

How to customize Safari start page on iPhone or iPad
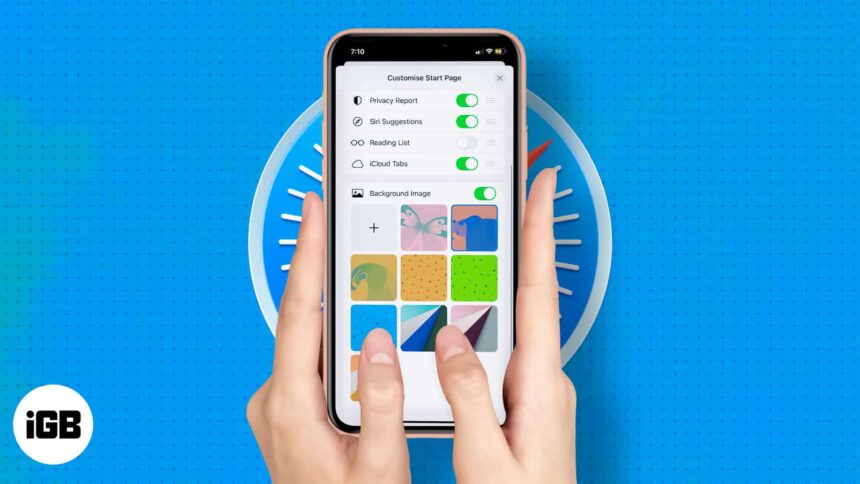
The redesigned Safari start page was first introduced in Mac OS Big Sur and then rolled out to iOS 15 and iPad OS 15. With that, Apple has given its legacy browser, Safari, a fresh new start (being honest, a much-needed reset).
One of the features included in the mix is customizing the Safari start page or home page to your preference. And with the introduction of iOS 16 , we can have different start page settings for different Tab Groups. How? Follow the step-by-step guide to customize the Safari start page on your iPhone and iPad.
How to edit Safari start page on iPhone
How to add a background image to safari start page.
In Safari, the start page is usually packed with bookmarked sites, frequently visited websites, privacy reports, items on the reading list, and so much more! However, you can personalize the Safari start page to only show sections you wish to see.
- Open Safari and stay on the start page or open a new tab .
- Scroll down and tap Edit .
- Toggle off the options you do not want on the Customize Start Page .
- You may also rearrange the order by touching the three lines icon and dragging it up or down.
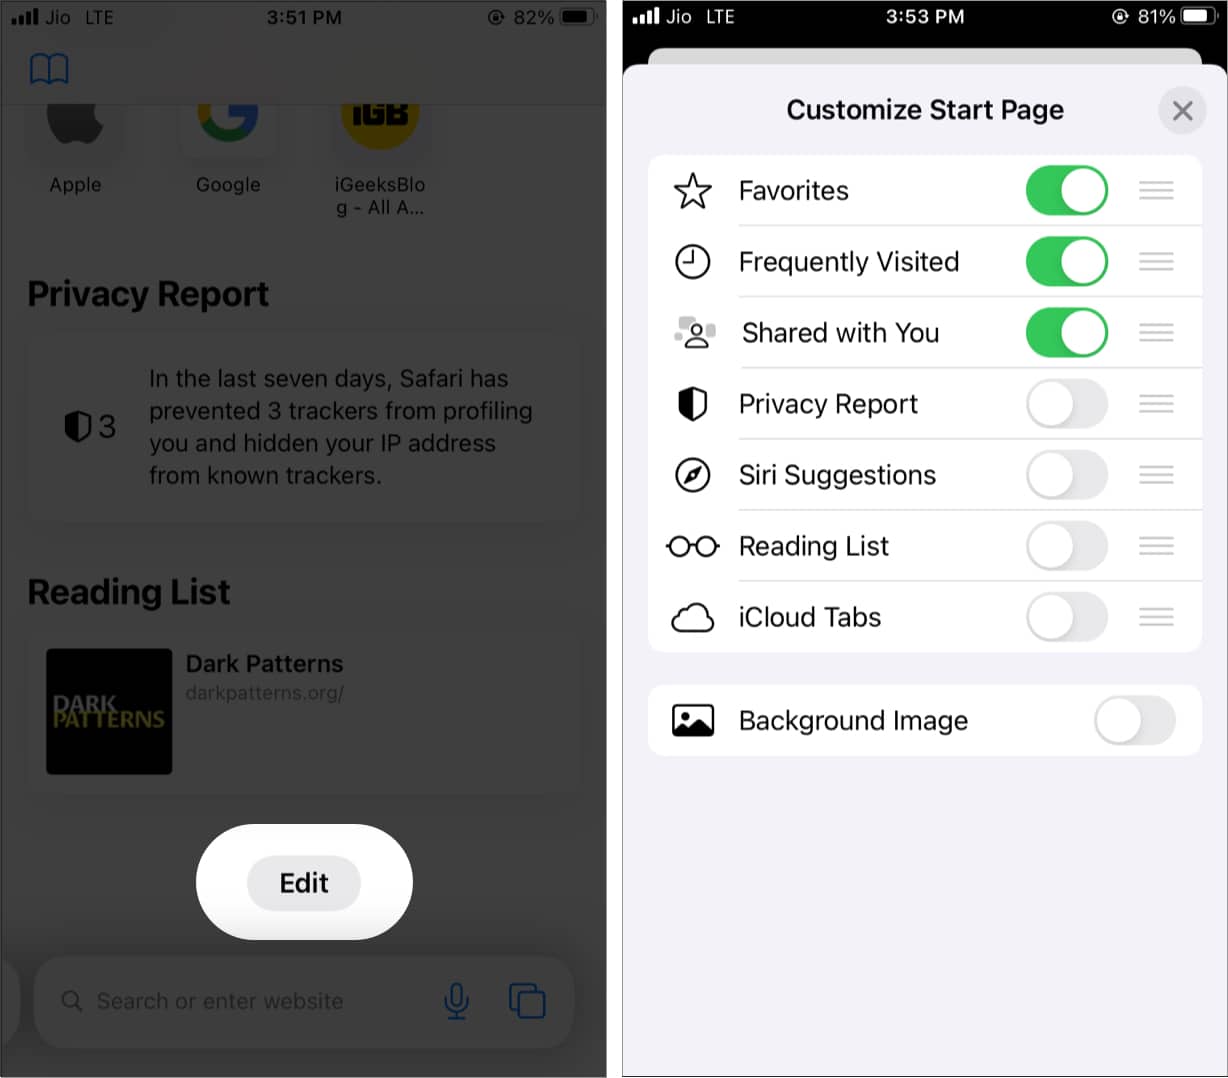
Anytime you change your mind, follow the same steps to remove or add more sections.
Traditionally, browsers have been that plain white backgrounds, but with this edit option, Apple has tried adding a pinch of glamor to it. What’s more, seeing elements you like keeps you fresh, motivated, and focused on the task.
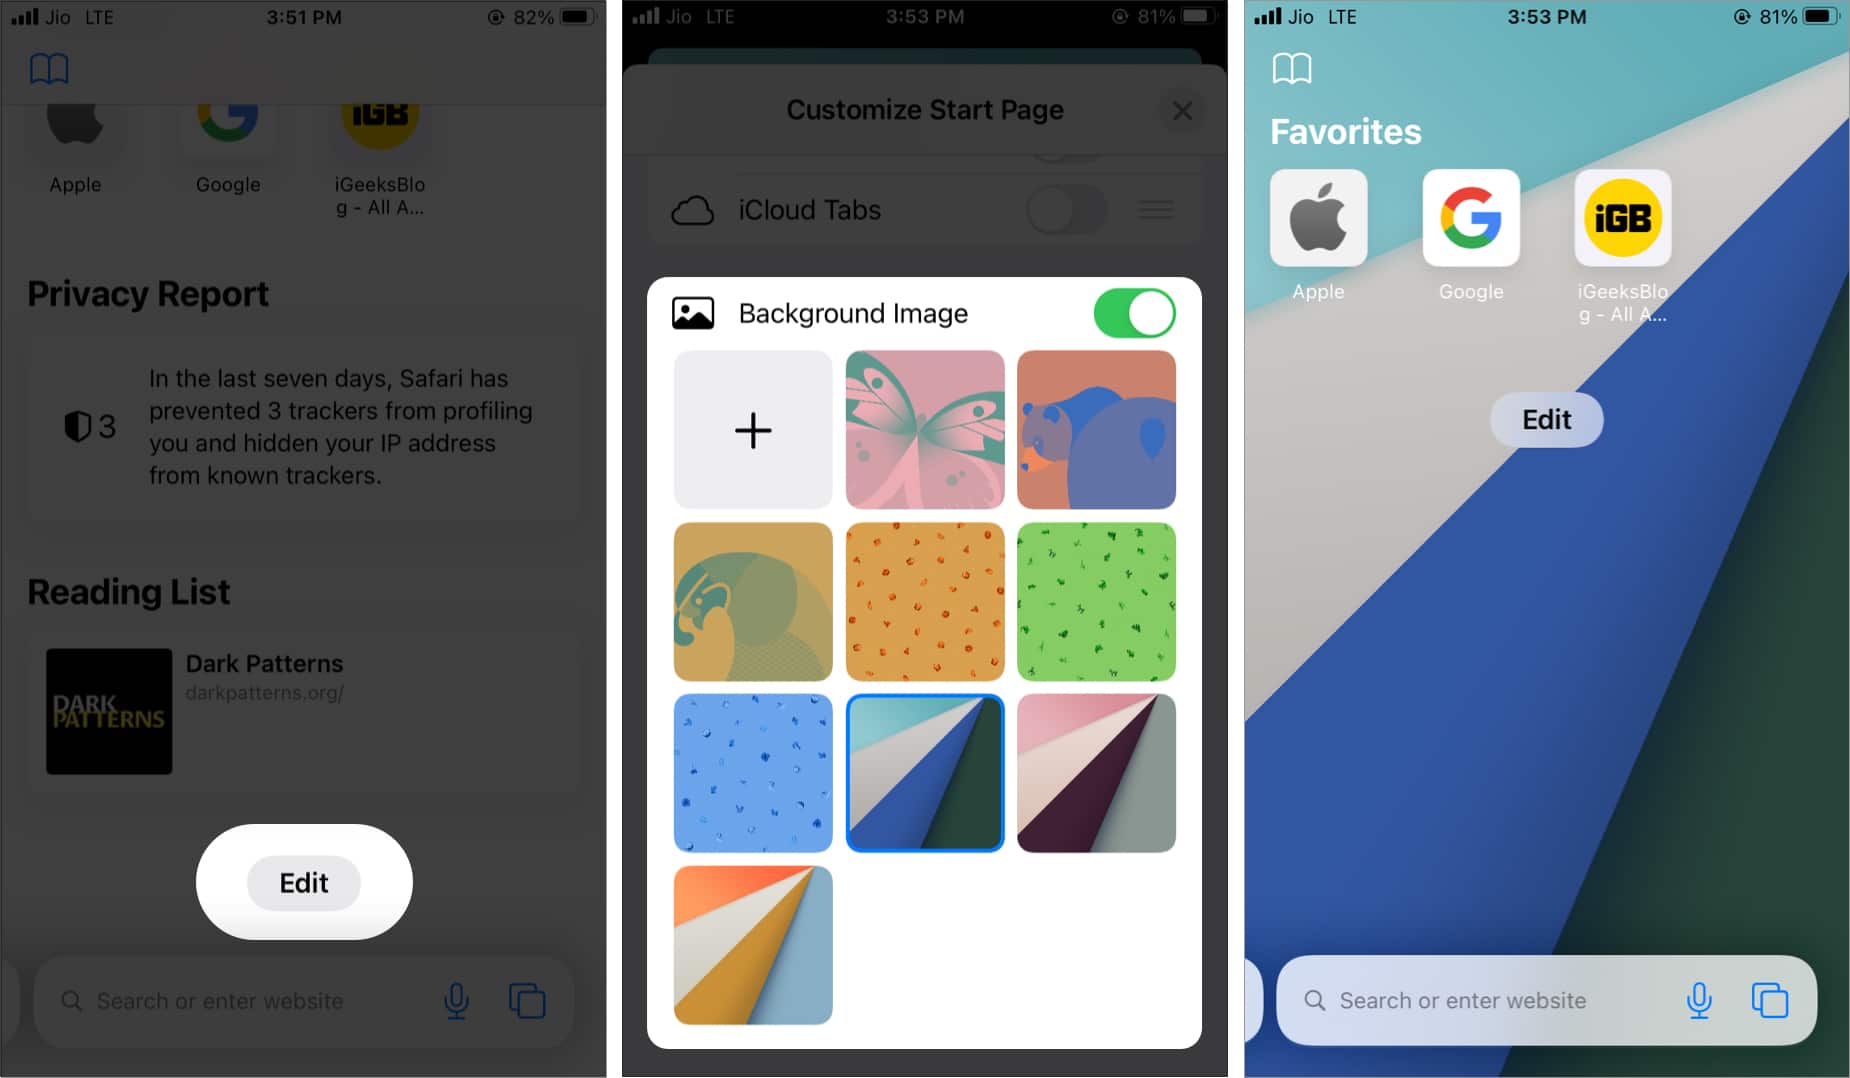
You can use one of the wallpapers by Apple or choose a custom image from your Photos app. Here’s how.
- Open Safari .
- Toggle on Background Image .
- Tap a wallpaper or the plus icon to choose an image from the iPhone Camera Roll.
- Tap X to close this screen. You will see the selected image as the background for Safari’s start page.
How to change background for Safari Tab Group in iOS 16
From iOS 16, the start page customization option will not be applied to all the Tab Groups. So, if you have multiple Tab Groups in action, you’ll have to change them individually.
- Go to desired Tab Group start page.
- Tap the edit button.
- Customize the page with the steps mentioned above.
And that’s it.
The start page is our door to everything we will be doing in the browser. When you launch the browser, it’s the first page you are introduced to.
Thankfully, we can easily edit or customize the iPhone Safari browser’s home page. Hope you enjoy customizing your Safari comment; if you liked it, share if you found it helpful.
You may also like:
- Safari tips and tricks for iPhone
- How to prevent websites from tracking you in Safari on iPhone
- How to use Safari Tab Groups on Mac
- Customize and share website settings in Safari on iPhone
🗣️ Our site is supported by our readers like you. When you purchase through our links, we earn a small commission. Read Disclaimer .
Leave a Reply Cancel reply
Your email address will not be published. Required fields are marked *
Save my name, email, and website in this browser for the next time I comment.
How-To Geek
How to disable safari's frequently visited start page on iphone, ipad, and mac.
The new Frequently Visited and Siri Suggestions sections in the start page on iOS, iPadOS, and macOS might annoy some users. Here's how to hide both.
Quick Links
How to disable the frequently visited section, how to disable siri suggestions.
iOS 13's, iPadOS 13's, and macOS Catalina's Safari updates are quite robust. But the redesigned start page leaves something to be desired. If you don't like the new Frequently Visited or Siri Suggestions sections, here's how to disable them.
As the name suggests, the new Frequently Visited section in Safari's start page lists websites that you visit frequently. If you already have those websites in the Favorites section, this new feature is redundant. You also might not want Safari to show these websites for privacy reasons .
You can either hide a website from this section or disable the whole Frequently Visited section altogether.
Disable the Frequently Visited Section on iPhone and iPad
On your iPhone or iPad, open the Safari app and go to the start page. Find the Frequently Visited section and then press and hold on a website icon.
From the popup, tap on "Delete."
To disable the entire Frequently Visited section, we'll need to go to the Settings app.
Open the Settings app and go to the "Safari" section.
Here, in the General section, tap on the toggle next to "Frequently Visited Sites."
The Frequently Visited section will instantly disappear from the Safari start page.
Disable the Frequently Visited Section on Mac
If you're using a Mac, you can customize the Frequently Visited section right from the start page in Safari.
To delete a particular website from the Frequently Visited section, right-click on the website icon and then click on "Delete."
If you want to remove the entire Frequently Visited section, right-click in the blank area on the start page and uncheck the "Show Frequently Visited" option.
Siri Suggestions have now made their way to the Safari app. Just like Siri Suggestions in iOS, iPadOS, and macOS, they aren't really helpful in Safari. Siri Suggestions will show you websites from your reading list, open tabs from other devices, and sites it thinks you might want to visit.
Disabling the Siri Suggestions section is straightforward on the Mac, but the option in iOS and iPadOS is hidden deep in the Settings app.
Disable Siri Suggestions on iPhone and iPad
Open the Settings app on your iPhone or iPad and then go to the "Siri & Search" section.
Here, find the "Safari" option.
On this page, tap on the toggle next to "Show Siri Suggestions In App" to disable Siri Suggestions section in the Safari start page.
Disable Siri Suggestions on Mac
To hide Siri Suggestions section in Safari on macOS Catalina, simply right-click in the empty area on the start page.
Here, click on the "Show Siri Suggestions" option.
The Siri Suggestions section will instantly disappear from the Safari start page.
Related: The Best New Features in iOS 13, Available Now
The latest iPadOS 15 beta features Safari's redesigned tab interface
What you need to know
- The fourth developer beta of iPadOS brings a macOS Monterey feature to the iPad.
- The latest beta brings the redesigned Safari tab experience to the iPad.
When Apple announced macOS Monterey at WWDC21, the company unveiled a redesigned Safari with a completely new tab experience.
With the latest developer beta of iPadOS 15 , which Apple released to developers earlier today, the company appears to be bringing that new experience to iPad users as well. The new experience breaks out tabs into a new look that turns them more into floating bubbles than tabs underneath the top view.
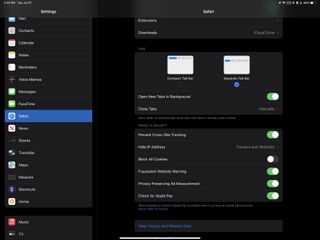
In addition to the redesigned Safari tabs coming to iPadOS 15, it appears that Apple has added the ability for users to tweak the experience. In the Safari section of the Settings app, users can choose whether to use the "Compact Tab Bar" or the "Separate Tab Bar."
The "Compact Tab Bar" simplifies the user interface by incorporating the search functionality into each tab that you have open. The "Separate Tab Bar" will, as the name indicates, separate the search bar from your open tabs, a user experience similar to the current version of Safari on macOS and iPadOS.
Apple has been hit with quite a lot of negative feedback for how it approached its redesign of Safari tabs in macOS Monterey. iMore's Oliver Haslam even went as far to call the redesign "user-hostile."
The problem isn't that the tabs are now on the same level as the address bar as such. Rather, it's that the tabs affect where the address bar lives. It moves around depending on which tab is active and if you have more than a couple of tabs open at once that address bar can move from far left to far right in one click. It's simultaneously everywhere and nowhere. And you're always chasing it.
Apple has already made one change with its tab redesign. The "Separate Tab Bar" originally wasn't an option, but Apple added it in a later version of the macOS Monterey beta and now the latest iPadOS 15 beta. We'll have to wait and see if the change satisfies users or if the company continues to backtrack with continued feedback.
Master your iPhone in minutes
iMore offers spot-on advice and guidance from our team of experts, with decades of Apple device experience to lean on. Learn more with iMore!

Joe Wituschek is a Contributor at iMore. With over ten years in the technology industry, one of them being at Apple, Joe now covers the company for the website. In addition to covering breaking news, Joe also writes editorials and reviews for a range of products. He fell in love with Apple products when he got an iPod nano for Christmas almost twenty years ago. Despite being considered a "heavy" user, he has always preferred the consumer-focused products like the MacBook Air, iPad mini, and iPhone 13 mini. He will fight to the death to keep a mini iPhone in the lineup. In his free time, Joe enjoys video games, movies, photography, running, and basically everything outdoors.
iPadOS 18: Rumored features, supported devices, and more
3 features iPadOS 18 needs to make up for another predictable year for iPad software
Emulators on iPhone: Everything you need to know
Most Popular
- 2 Refurbished Apple Watch Ultra 2 smartwatches have started their international Apple Store rollout with 15% savings
- 3 iPad Air 6 to get the iPad Pro's mini-LED display in shock late leak — OLED iPad Pro won't be the only display boost in May
- 4 How to play games on Delta Game Emulator for iPhone — get to grips with the app everyone's talking about
- 5 iPhone and iPad owners can now AirPlay content, music, and even games to TVs in these hotels
- Great Tech Gifts for Any Occasion
- The Best Gadgets for The Beach or Pool
How to Add Safari Website Shortcuts to iPad's Home Screen
For iPads running iOS 7 and above
:max_bytes(150000):strip_icc():format(webp)/ScottOrgera-f7aca23cc84a4ea9a3f9e2ebd93bd690.jpg)
What to Know
- Open Safari > go to web page you want to add as Home screen icon > Share icon > Add to Home Screen .
- Next, edit the shortcut name (optional) > select Add to save the shortcut.
This article explains how to add an iPad Home screen icon for a specific web page to serve as a shortcut to that page.Information applies to iPads with iOS 7 through iPadOS 16.
How to Add a Home Screen Icon for a Web Page
The iPad home screen displays icons for navigating through your applications and settings. Among these apps is Safari , Apple's web browser, which is included with all its operating systems. One especially useful feature is the ability to put shortcuts to your favorite web pages on the iPad Home screen.
Making a Home screen icon for a web page that you visit frequently saves time. Here's how to do it.
Select the Safari icon to open the main browser window.
Go to the web page that you want to add as a Home screen icon. Select the Share button at the top or bottom of the browser window. It's represented by a square with an up arrow.
In the window that opens, scroll across or down and select Add to Home Screen .
In the interface that opens, edit the name of the shortcut icon you are creating, if needed. This step is optional, but a short name is best. It represents the title that displays on the Home screen under the icon.
Select Add to save the shortcut.
Your iPad's Home screen now contains an icon that takes you directly to your chosen web page.
If you have multiple home screens, it may appear on a screen that isn't filled.
You can move the shortcut and organize it like any other app icon. When you no longer need it, delete it in the same way that you would delete apps from the iPad .
Get the Latest Tech News Delivered Every Day
- How to Add Safari Shortcuts to an iPhone Home Screen
- How to Download and Save Photos and Images to the iPad's Camera Roll
- How to Add Safari Bookmarks on iPad
- 4 Ways to Play Fortnite on iPhone
- How to Add and Save a Website to the Home Screen on Your iPad
- How to Change Your Homepage in Safari
- The Best Mac Shortcuts in 2024
- How to Bookmark on an iPad
- How to Add Safari Bookmarks on an iPhone or iPod Touch
- How to Add, Edit, and Delete Bookmarks in iPhone's Safari
- How to Get a Full Screen on iPad
- How to Customize an iPhone's Home Screen
- How to Add Widgets on iPad
- How to Make Chrome Shortcuts on Your Windows Desktop
- How to Use Tab Groups in Safari With iOS 15
- How to Use Safari's Split Screen
- a. Send us an email
- b. Anonymous form
- Buyer's Guide
- Upcoming Products
- Tips / Contact Us
- Podcast Instagram Facebook Twitter Mastodon YouTube Notifications RSS Newsletter
iOS 15: How to Customize Your Safari Start Page and Background
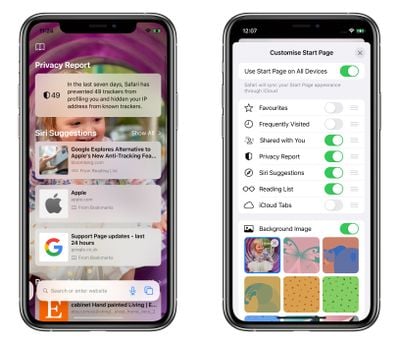
First seen in macOS Big Sur, Safari's redesigned Start Page in iOS 15 is a one-stop shop for all of your Bookmarks, Favorites, Frequently Visited sites, Siri Suggestions, iCloud Tabs, Reading List, and Privacy Report.
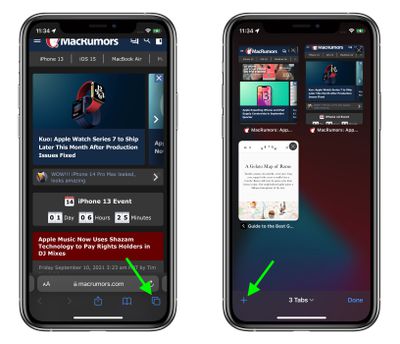
- Launch Safari on your iPhone or iPad .
- Tap the open tabs icon in the bottom right corner of the Safari interface.
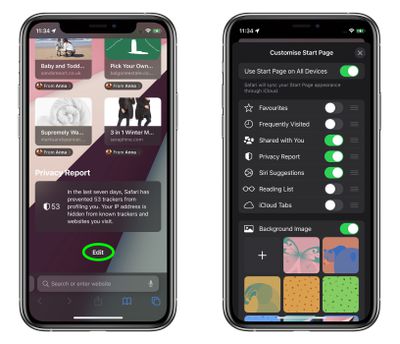
- Scroll down to the bottom of the Start Page and tap the Edit button.
- To sync your Start Page settings with other devices linked to the same Apple ID , turn on the switch next to Use Start Page on All Devices .
- Use the switches to control what you want to appear on your Start Page. Options include: Favorites , Frequently Visited , Shared with You , Privacy Report , Siri Suggestions , Reading List , and iCloud Tabs .
- You can also turn on the Background image option and choose one of the existing iOS wallpapers, or select your own from your photos by tapping the big + button.
In iOS 15, Tab Groups is another new feature in Safari that can improve your browsing experience. To learn more about Tab Groups, be sure to check out our dedicated how-to.
Get weekly top MacRumors stories in your inbox.
Popular Stories

PlayStation, GameCube, Wii, and SEGA Emulator for iPhone and Apple TV Coming to App Store

Delta Game Emulator Now Available From App Store on iPhone

12.9-Inch iPad Air Now Rumored to Feature Mini-LED Display

All iPhone 16 Models to Feature Action Button, But Usefulness Debated
Next article.

Our comprehensive guide highlighting every major new addition in iOS 17, plus how-tos that walk you through using the new features.

App Store changes for the EU, new emoji, Podcasts transcripts, and more.

Get the most out your iPhone 15 with our complete guide to all the new features.
A deep dive into new features in macOS Sonoma, big and small.

Revamped models with OLED displays, M3 chip, and redesigned Magic Keyboard accessory.
Updated 10.9-inch model and new 12.9-inch model, M2 chip expected.

Apple's annual Worldwide Developers Conference will kick off with a keynote on June 10.

Expected to see new AI-focused features and more. Preview coming at WWDC in June with public release in September.
Other Stories

20 hours ago by MacRumors Staff

1 day ago by MacRumors Staff
2 days ago by MacRumors Staff
3 days ago by MacRumors Staff

Screen Rant
How to customize safari's start page across apple devices.
Starting with macOS Big Sur, Mac users can customize their Safari start page to have custom backgrounds, access to frequently-visited sites and more.
Safari is the default web browser for macOS users, and although it faces fierce competition from Google Chrome, it has a lot of unique features tailored to Mac users — like a customizable start page designed to improve efficiency. Though Safari seemed like an afterthought in some macOS updates and remained the same for years, it gained a multitude of improvements following the debut of Apple Silicon. The introduction of Apple-designed processors made it easier for the company to integrate hardware and software, which had ripple effects throughout the operating system. Safari is one of the apps that gained functionality following the shift, and the browser's start page is one of the ways users can customize the app to their liking.
Improvements were made on multiple fronts, including tab management, privacy transparency, and sharing. For example, Safari has added features that let users see where they are being tracked on the internet and view the links shared with them through iMessage. It also created new ways to add, organize and share tabs across devices and other people. However, features are less influential if they are hard to use or enable daily. That's why Apple allows users to customize their start page on Safari, so their most-used features are accessible right when the app is launched.
Related: The Easiest Way To Switch Tabs In Safari For iPhone
The start page is the browser window that opens when Safari is first launched or when a new tab is created. In older versions of macOS, it might have been best to set another website as the start page — like a search engine. To ensure the start page is visible on Safari, navigate to the menu bar while the app is open and click on the 'Bookmarks' tab. Then, select 'show start page' to reveal the default Safari start page. In the bottom right corner of the default start page, there will be an 'Options' button with an icon that looks like setting sliders. After clicking the 'Options' button, a new window shows the list of available start page options. Check the boxes to show the options a user wants to see on their start page and drag them around to create the desired order in which they appear. Options include favorites, frequently visited, privacy reports, a reading list, iCloud tabs, and background tabs. There is also an option to share these preferences across devices, so the start page is available on iOS, iPadOS, and macOS.
All The Start Page Customization Options, Explained
There are a few options that stand out from the rest. The background image option allows users to upload a custom image as their start page background, similar to desktop wallpaper. The favorites option shows the websites added to the start page via the 'Bookmarks' tab. Shared with users, Siri suggestions and iCloud tabs show links sent from others, suggested, or open on other devices. Finally, the privacy report serves as an information source, displaying the number of trackers on each website a user has visited.
With these customization options on the Safari start page, Apple users can customize the browser to fit their needs and preferences. In addition, users can access much more information as soon as the app is launched or a new tab is created.
Next: Safari Not Working On iPhone? Try These Tips To Fix It
Source: Apple Support

The Tech Edvocate
- Advertisement
- Home Page Five (No Sidebar)
- Home Page Four
- Home Page Three
- Home Page Two
- Icons [No Sidebar]
- Left Sidbear Page
- Lynch Educational Consulting
- My Speaking Page
- Newsletter Sign Up Confirmation
- Newsletter Unsubscription
- Page Example
- Privacy Policy
- Protected Content
- Request a Product Review
- Shortcodes Examples
- Terms and Conditions
- The Edvocate
- The Tech Edvocate Product Guide
- Write For Us
- Dr. Lynch’s Personal Website
- The Edvocate Podcast
- Assistive Technology
- Child Development Tech
- Early Childhood & K-12 EdTech
- EdTech Futures
- EdTech News
- EdTech Policy & Reform
- EdTech Startups & Businesses
- Higher Education EdTech
- Online Learning & eLearning
- Parent & Family Tech
- Personalized Learning
- Product Reviews
- Tech Edvocate Awards
- School Ratings
Reading Groups: Everything You Need to Know
Product review of the ultenic p30 grooming kit, reading anxiety in children: everything you need to know, iep meetings and parent-teacher conferences: everything you need to know, college disability services and accommodations: everything you need to know, spam vs. phishing: how are these unwanted messages different, how to charge your iphone properly, encouraging your teenager to read: everything you need to know, 8 ways to service an air conditioner, 3 ways to stop a baby from vomiting, how to customize the safari start page on iphone and ipad.

Safari is the default web browser for iPhones and iPads, and it comes with a customizable Start Page that allows users to access their favorite websites, bookmarks, and reading lists easily. Customizing the Safari Start Page can enhance your browsing experience and save time by accessing the websites you visit frequently quickly. In this article, we will discuss how to customize the Safari Start Page on iPhone and iPad.
Step 1: Launch Safari
The first step is to launch the Safari browser on your iPhone or iPad. You can find the Safari icon on your home screen or application library.
Step 2: Open the Start Page
Once you have launched Safari, tap the Start Page button, also known as the Home button, located at the bottom center of your screen. The Start Page will display your frequently visited websites, bookmarks, and reading list.
Step 3: Edit the Start Page
To customize the Start Page, tap the Edit button located at the bottom right corner of the screen. You will notice the Start Page icons starting to wiggle, indicating that they are editable.
Step 4: Reorder and Remove Icons
To reorder the icons, press and hold the icon and drag it to the desired location. To remove an icon, tap the minus (–) icon in the top left corner of the icon and confirm the deletion by tapping Remove. To add an icon, tap the plus (+) icon in the bottom center of the screen, and select either Add Bookmark, Add Reading List, or Add Website.
Step 5: Change the Background Image
You can also customize the Start Page background image by tapping the Customize button on the bottom left of the screen. You can select one of the default images, select a photo from your camera roll, or take a new photo.
Step 6: Save Changes
After you have finished customizing the Start Page, tap the Done button in the top right corner of the screen to save your changes.
In conclusion, customizing the Safari Start Page on iPhone and iPad is a quick and easy way to enhance your browsing experience. By following the steps outlined above, you can personalize your Start Page to display the websites, bookmarks, and reading lists that matter most to you. Moreover, you can change the background image to add a personal touch to your browsing experience. With these tips, you will be able to create a Start Page that is uniquely fitted to your browsing needs.
How to Create an Email Group in ...
The science behind your child’s tech obsession.
Matthew Lynch
Related articles more from author.

What Is a Database Relationship?

Why Your Mac is So Slow and How to Speed It Up?

How to Run Linux Commands in the Background

Cross-Platform Mobile Multiplayer Games to Play With Friends

The Yamaha A-S1100 Analog Stereo Integrated Amplifier

What is Pulse Width Modulation (PWM)?
Looks like no one’s replied in a while. To start the conversation again, simply ask a new question.
iPad two safari pages at once
How do I get back to one safari page on my ipad
Posted on Apr 14, 2021 9:12 AM
Similar questions
- How to get safari back on my iphone How to get safari back on my iphone 357 2
- How do I get safari back on my iPhone How do I get safari back on my iPhone 384 2
- How do I get safari back How do I get safari back on my iPhone 336 3
Loading page content
Page content loaded
Apr 15, 2021 10:48 AM in response to stasys113
Hello stasys113,
Thanks for reaching out to us in Apple Support Communities about having two Safari websites open on your iPad, we're happy to help by looking into this more!
The following support article explains more about this feature and how you can have one website open at a time:
How to split screen in Safari on your iPad
Hope this helps.
Best Regards.
Apr 15, 2021 4:40 PM in response to stasys113
You can easily manage and manipulate Split and Slide Over views...
To change a Split view to full screen, place your finger one the centre of the central divider (you’ll see a little grey drag bar) and drag the divider to the edge of the screen - then release; your split-screen view will become full-screen.
You can manipulate other screen views in a similar way. To transform a Slide Over view, to Split Screen, use the grey drag-bar at the top of the Slide Over Window; drag downwards and to towards the side of the screen. As the view changes, lift your finger.
You can also change a Slide Over to a Full Screen view. This time, using the same drag-bar, drag to the top-centre of the screen, then release.
You may find these overview Apple video guides to be helpful:
After viewing, you’ll be ready for the additional Multitasking Guide:
Use Multitasking on your iPad - Apple Support
The iPad User Guide for iPadOS is also a rich source of information. Here are links to both the downloadable and online versions of the Guide:
iPad User Guide on Apple Books
iPad User Guide - Apple Support
I hope this explanation and additional information is helpful in resolving any difficulties you may be having with Multitasking features of your iPad.
- Nyhedsoversigt
- Net bloggen

Indstil startside på Iphone/iPad
Kvikstart app-ikon, vejledning til ios7 - opdateret guide på vej....
1. Åben KvikStart i Safari
2. Tilføj app ikon
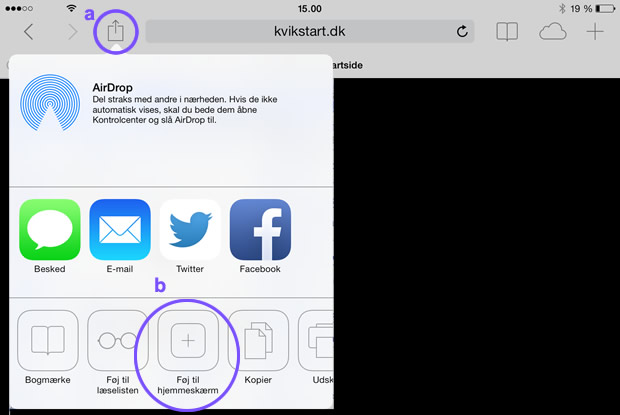
Tillykke, du har nu fået et ikon til KvikStart på din iPad/iPhone. Du kan flytte ikonet rundt og placere det der hvor det passer dig bedst, på samme måde som apps fra App store.
Hvis du ikke kan få indstillet din startside til kvikStart ud fra denne guide, så er du altid velkommen til at kontakte os for at få hjælp.

Hvordan skifter man startside i browseren
Hjem » Guider » Hvordan skifter man startside i browseren
Skift startside i browseren til den side du ønsker.
Startsiden er den side der vises, når du åbner din browser. Det kan være søgesider som Google eller Bing, men det kan også være en side du ofte besøger som f.eks. bt.dk, eller en anden side, efter dit eget valg.
Klik og se indholdsfortegnelsen:
Skift startside i din favorit browser
Her kan du se, hvordan du skifter startside i de fem mest anvendte browsere:
- Internet Explorer
- Microsoft Edge
- Google Chorme
Der findes en del forskellige Internet browsere, og hver browser du installerer, har sin egen prædefinerede startside.
Startsiden kan du ændre til hvilken som helst side du ønsker.
Du skal blot skrive adressen til startside, f.eks. Google – https://www.google.dk
I nogle browsere, f.eks. Google Chome, er der mulighed for at åbne flere faner samtidig , med de hjemmesider du ofte besøger.
Skift startside i Internet Explorer
- Klik på Funktioner , eller tryk Alt+X
- Internet indstillinger
- I feltet Startside skriver du adressen på den side du vil benytte
Skift startside i Microsoft Edge
- Klik på Mere i øverste højre hjørne -> Indstillinger
- Vælg Åbn Microsoft Edge med
- Skriv adressen på siden du ønsker
Skift startside i Google Chrome
- Klik på Tilpas -> Indstillinger
- Under punktet Udseende skal du klikke på linket Skift
- Vælg Åbn denne side og skriv adressen på den side du vil bruge som startside
Skift startside i Mozilla Firefox
- Klik på Åbn Menu -> Indstillinger
- Vælg fanen Generelt
- Skriv adressen til den ønskede startside i feltet Startside
Skift startside i Safari
- Klik på Indstillinger -> Indstillinger
Download browsere
Her har du links til at downloade de fem browsere, så kan du selv vælge hvilken du synes bedst om
- Google Chrome
- Mozilla Firefox
- Safari (for Windows)
Læs andre artikler med tips til browsere
Hvis du synes om denne artikel, så vil du måske også kunne lide disse artikler, der handler om browsere og hvordan du kan personliggøre din browser:
- Skift standardbrowser i Windows 10 – Sådan gør du
- Se og slet browserdata i Microsoft Edge
- Skift søgemaskine i browser
- Skift Google Chrome tema og gør browseren personlig
- Hvad er Google Chrome
Helpdesken.dk
Helpdesken.dk er ikke ansvarlig for fejl eller skader på udstyr, som måtte opstå på baggrund af de guider og vejledninger, du følger på siden.
- Privatlivspolitik
- Bliv skribent
- Om Helpdesken.dk
iPhone User Guide
- iPhone models compatible with iOS 17
- R ' class='toc-item' data-ss-analytics-link-url='https://support.apple.com/guide/iphone/iphone-xr-iph017302841/ios' data-ajax-endpoint='https://support.apple.com/guide/iphone/iphone-xr-iph017302841/ios' data-ss-analytics-event="acs.link_click" href='https://support.apple.com/guide/iphone/iphone-xr-iph017302841/ios' id='toc-item-IPH017302841' data-tocid='IPH017302841' > iPhone X R
- S ' class='toc-item' data-ss-analytics-link-url='https://support.apple.com/guide/iphone/iphone-xs-iphc00446242/ios' data-ajax-endpoint='https://support.apple.com/guide/iphone/iphone-xs-iphc00446242/ios' data-ss-analytics-event="acs.link_click" href='https://support.apple.com/guide/iphone/iphone-xs-iphc00446242/ios' id='toc-item-IPHC00446242' data-tocid='IPHC00446242' > iPhone X S
- S Max' class='toc-item' data-ss-analytics-link-url='https://support.apple.com/guide/iphone/iphone-xs-max-iphcd2066870/ios' data-ajax-endpoint='https://support.apple.com/guide/iphone/iphone-xs-max-iphcd2066870/ios' data-ss-analytics-event="acs.link_click" href='https://support.apple.com/guide/iphone/iphone-xs-max-iphcd2066870/ios' id='toc-item-IPHCD2066870' data-tocid='IPHCD2066870' > iPhone X S Max
- iPhone 11 Pro
- iPhone 11 Pro Max
- iPhone SE (2nd generation)
- iPhone 12 mini
- iPhone 12 Pro
- iPhone 12 Pro Max
- iPhone 13 mini
- iPhone 13 Pro
- iPhone 13 Pro Max
- iPhone SE (3rd generation)
- iPhone 14 Plus
- iPhone 14 Pro
- iPhone 14 Pro Max
- iPhone 15 Plus
- iPhone 15 Pro
- iPhone 15 Pro Max
- Setup basics
- Make your iPhone your own
- Take great photos and videos
- Keep in touch with friends and family
- Share features with your family
- Use iPhone for your daily routines
- Expert advice from Apple Support
- What’s new in iOS 17
- Turn on and set up iPhone
- Wake and unlock
- Set up cellular service
- Use Dual SIM
- Connect to the internet
- Sign in with Apple ID
- Subscribe to iCloud+
- Find settings
- Set up mail, contacts, and calendar accounts
- Learn the meaning of the status icons
- Charge the battery
- Charge with cleaner energy sources
- Show the battery percentage
- Check battery health and usage
- Use Low Power Mode
- Read and bookmark the user guide
- Learn basic gestures
- Learn gestures for iPhone models with Face ID
- Adjust the volume
- Find your apps in App Library
- Switch between open apps
- Quit and reopen an app
- Multitask with Picture in Picture
- Access features from the Lock Screen
- View Live Activities in the Dynamic Island
- Perform quick actions
- Search on iPhone
- Get information about your iPhone
- View or change cellular data settings
- Travel with iPhone
- Change sounds and vibrations
- Use the Action button on iPhone 15 Pro and iPhone 15 Pro Max
- Create a custom Lock Screen
- Change the wallpaper
- Adjust the screen brightness and color balance
- Keep the iPhone display on longer
- Use StandBy
- Customize the text size and zoom setting
- Change the name of your iPhone
- Change the date and time
- Change the language and region
- Organize your apps in folders
- Add, edit, and remove widgets
- Move apps and widgets on the Home Screen
- Remove apps
- Use and customize Control Center
- Change or lock the screen orientation
- View and respond to notifications
- Change notification settings
- Set up a Focus
- Allow or silence notifications for a Focus
- Turn a Focus on or off
- Stay focused while driving
- Customize sharing options
- Type with the onscreen keyboard
- Dictate text
- Select and edit text
- Use predictive text
- Use text replacements
- Add or change keyboards
- Add emoji and stickers
- Take a screenshot
- Take a screen recording
- Draw in documents
- Add text, shapes, signatures, and more
- Fill out forms and sign documents
- Use Live Text to interact with content in a photo or video
- Use Visual Look Up to identify objects in your photos and videos
- Lift a subject from the photo background
- Subscribe to Apple Arcade
- Play with friends in Game Center
- Connect a game controller
- Use App Clips
- Update apps
- View or cancel subscriptions
- Manage purchases, settings, and restrictions
- Install and manage fonts
- Buy books and audiobooks
- Annotate books
- Access books on other Apple devices
- Listen to audiobooks
- Set reading goals
- Organize books
- Create and edit events in Calendar
- Send invitations
- Reply to invitations
- Change how you view events
- Search for events
- Change calendar and event settings
- Schedule or display events in a different time zone
- Keep track of events
- Use multiple calendars
- Use the Holidays calendar
- Share iCloud calendars
- Camera basics
- Set up your shot
- Apply Photographic Styles
- Take Live Photos
- Take Burst mode shots
- Take a selfie
- Take panoramic photos
- Take macro photos and videos
- Take portraits
- Take Night mode photos
- Take Apple ProRAW photos
- Adjust the shutter volume
- Adjust HDR camera settings
- Record videos
- Record spatial videos for Apple Vision Pro
- Record ProRes videos
- Record videos in Cinematic mode
- Change video recording settings
- Save camera settings
- Customize the Main camera lens
- Change advanced camera settings
- View, share, and print photos
- Use Live Text
- Scan a QR code
- See the world clock
- Set an alarm
- Change the next wake up alarm
- Use the stopwatch
- Use multiple timers
- Add and use contact information
- Edit contacts
- Add your contact info
- Use NameDrop on iPhone to share your contact info
- Use other contact accounts
- Use Contacts from the Phone app
- Merge or hide duplicate contacts
- Export contacts
- Get started with FaceTime
- Make FaceTime calls
- Receive FaceTime calls
- Create a FaceTime link
- Take a Live Photo
- Turn on Live Captions in a FaceTime call
- Use other apps during a call
- Make a Group FaceTime call
- View participants in a grid
- Use SharePlay to watch, listen, and play together
- Share your screen in a FaceTime call
- Collaborate on a document in FaceTime
- Use video conferencing features
- Hand off a FaceTime call to another Apple device
- Change the FaceTime video settings
- Change the FaceTime audio settings
- Change your appearance
- Leave a call or switch to Messages
- Block unwanted callers
- Report a call as spam
- Connect external devices or servers
- Modify files, folders, and downloads
- Search for files and folders
- Organize files and folders
- Set up iCloud Drive
- Share files and folders in iCloud Drive
- Share your location
- Meet up with a friend
- Send your location via satellite
- Add or remove a friend
- Locate a friend
- Get notified when friends change their location
- Notify a friend when your location changes
- Add your iPhone
- Add your iPhone Wallet with MagSafe
- Get notified if you leave a device behind
- Locate a device
- Mark a device as lost
- Erase a device
- Remove a device
- Add an AirTag
- Share an AirTag or other item in Find My on iPhone
- Add a third-party item
- Get notified if you leave an item behind
- Locate an item
- Mark an item as lost
- Remove an item
- Adjust map settings
- Get started with Fitness
- Track daily activity and change your move goal
- See your activity summary
- Sync a third-party workout app
- Change fitness notifications
- Share your activity
- Subscribe to Apple Fitness+
- Find Apple Fitness+ workouts and meditations
- Start an Apple Fitness+ workout or meditation
- Create a Custom Plan in Apple Fitness+
- Work out together using SharePlay
- Change what’s on the screen during an Apple Fitness+ workout or meditation
- Download an Apple Fitness+ workout or meditation
- Get started with Freeform
- Create a Freeform board
- Draw or handwrite
- Apply consistent styles
- Position items on a board
- Search Freeform boards
- Share and collaborate
- Delete and recover boards
- Get started with Health
- Fill out your Health Details
- Intro to Health data
- View your health data
- Share your health data
- View health data shared by others
- Download health records
- View health records
- Monitor your walking steadiness
- Log menstrual cycle information
- View menstrual cycle predictions and history
- Track your medications
- Learn more about your medications
- Log your state of mind
- Take a mental health assessment
- Set up a schedule for a Sleep Focus
- Turn off alarms and delete sleep schedules
- Add or change sleep schedules
- Turn Sleep Focus on or off
- Change your wind down period, sleep goal, and more
- View your sleep history
- Check your headphone levels
- Use audiogram data
- Register as an organ donor
- Back up your Health data
- Intro to Home
- Upgrade to the new Home architecture
- Set up accessories
- Control accessories
- Control your home using Siri
- Use Grid Forecast to plan your energy usage
- Set up HomePod
- Control your home remotely
- Create and use scenes
- Use automations
- Set up security cameras
- Use Face Recognition
- Unlock your door with a home key
- Configure a router
- Invite others to control accessories
- Add more homes
- Get music, movies, and TV shows
- Get ringtones
- Manage purchases and settings
- Get started with Journal
- Write in your journal
- Review your past journal entries
- Change Journal settings
- Magnify nearby objects
- Change settings
- Detect people around you
- Detect doors around you
- Receive image descriptions of your surroundings
- Read aloud text and labels around you
- Set up shortcuts for Detection Mode
- Add and remove email accounts
- Set up a custom email domain
- Check your email
- Unsend email with Undo Send
- Reply to and forward emails
- Save an email draft
- Add email attachments
- Download email attachments
- Annotate email attachments
- Set email notifications
- Search for email
- Organize email in mailboxes
- Flag or block emails
- Filter emails
- Use Hide My Email
- Use Mail Privacy Protection
- Change email settings
- Delete and recover emails
- Add a Mail widget to your Home Screen
- Print emails
- Get travel directions
- Select other route options
- Find stops along your route
- View a route overview or a list of turns
- Change settings for spoken directions
- Get driving directions
- Get directions to your parked car
- Set up electric vehicle routing
- Report traffic incidents
- Get cycling directions
- Get walking directions
- Get transit directions
- Delete recent directions
- Get traffic and weather info
- Estimate travel time and ETA
- Download offline maps
- Search for places
- Find nearby attractions, restaurants, and services
- Get information about places
- Mark places
- Share places
- Rate places
- Save favorite places
- Explore new places with Guides
- Organize places in My Guides
- Delete significant locations
- Look around places
- Take Flyover tours
- Find your Maps settings
- Measure dimensions
- View and save measurements
- Measure a person’s height
- Use the level
- Set up Messages
- About iMessage
- Send and reply to messages
- Unsend and edit messages
- Keep track of messages
- Forward and share messages
- Group conversations
- Watch, listen, or play together using SharePlay
- Collaborate on projects
- Use iMessage apps
- Take and edit photos or videos
- Share photos, links, and more
- Send stickers
- Request, send, and receive payments
- Send and receive audio messages
- Animate messages
- Change notifications
- Block, filter, and report messages
- Delete messages and attachments
- Recover deleted messages
- View albums, playlists, and more
- Show song credits and lyrics
- Queue up your music
- Listen to broadcast radio
- Subscribe to Apple Music
- Play music together in the car with iPhone
- Listen to lossless music
- Listen to Dolby Atmos music
- Apple Music Sing
- Find new music
- Add music and listen offline
- Get personalized recommendations
- Listen to radio
- Search for music
- Create playlists
- See what your friends are listening to
- Use Siri to play music
- Change the way music sounds
- Get started with News
- Use News widgets
- See news stories chosen just for you
- Read stories
- Follow your favorite teams with My Sports
- Listen to Apple News Today
- Subscribe to Apple News+
- Browse and read Apple News+ stories and issues
- Download Apple News+ issues
- Listen to audio stories
- Solve crossword puzzles
- Search for news stories
- Save stories in News for later
- Subscribe to individual news channels
- Get started with Notes
- Add or remove accounts
- Create and format notes
- Draw or write
- Add photos, videos, and more
- Scan text and documents
- Work with PDFs
- Create Quick Notes
- Search notes
- Organize in folders
- Organize with tags
- Use Smart Folders
- Export or print notes
- Change Notes settings
- Make a call
- Answer or decline incoming calls
- While on a call
- Set up voicemail
- Check voicemail
- Change voicemail greeting and settings
- Select ringtones and vibrations
- Make calls using Wi-Fi
- Set up call forwarding and call waiting
- Avoid unwanted calls
- View photos and videos
- Play videos and slideshows
- Delete or hide photos and videos
- Edit photos and videos
- Trim video length and adjust slow motion
- Edit Cinematic mode videos
- Edit Live Photos
- Edit portraits
- Use photo albums
- Edit, share, and organize albums
- Filter and sort photos and videos in albums
- Make stickers from your photos
- Duplicate and copy photos and videos
- Merge duplicate photos and videos
- Search for photos
- Identify people and pets
- Browse photos by location
- Share photos and videos
- Share long videos
- View photos and videos shared with you
- Watch memories
- Personalize your memories
- Manage memories and featured photos
- Use iCloud Photos
- Create shared albums
- Add and remove people in a shared album
- Add and delete photos and videos in a shared album
- Set up or join an iCloud Shared Photo Library
- Add content to an iCloud Shared Photo Library
- Use iCloud Shared Photo Library
- Import and export photos and videos
- Print photos
- Find podcasts
- Listen to podcasts
- Follow your favorite podcasts
- Use the Podcasts widget
- Organize your podcast library
- Download, save, or share podcasts
- Subscribe to podcasts
- Listen to subscriber-only content
- Change download settings
- Make a grocery list
- Add items to a list
- Edit and manage a list
- Search and organize lists
- Work with templates
- Use Smart Lists
- Print reminders
- Use the Reminders widget
- Change Reminders settings
- Browse the web
- Search for websites
- Customize your Safari settings
- Change the layout
- Use Safari profiles
- Open and close tabs
- Organize your tabs
- View your Safari tabs from another Apple device
- Share Tab Groups
- Use Siri to listen to a webpage
- Bookmark favorite webpages
- Save pages to a Reading List
- Find links shared with you
- Annotate and save a webpage as a PDF
- Automatically fill in forms
- Get extensions
- Hide ads and distractions
- Clear your cache
- Browse the web privately
- Use passkeys in Safari
- Check stocks
- Manage multiple watchlists
- Read business news
- Add earnings reports to your calendar
- Use a Stocks widget
- Translate text, voice, and conversations
- Translate text in apps
- Translate with the camera view
- Subscribe to Apple TV+, MLS Season Pass, or an Apple TV channel
- Add your TV provider
- Get shows, movies, and more
- Watch sports
- Watch Major League Soccer with MLS Season Pass
- Control playback
- Manage your library
- Change the settings
- Make a recording
- Play it back
- Edit or delete a recording
- Keep recordings up to date
- Organize recordings
- Search for or rename a recording
- Share a recording
- Duplicate a recording
- Keep cards and passes in Wallet
- Set up Apple Pay
- Use Apple Pay for contactless payments
- Use Apple Pay in apps and on the web
- Track your orders
- Use Apple Cash
- Use Apple Card
- Use Savings
- Pay for transit
- Access your home, hotel room, and vehicle
- Add identity cards
- Use COVID-19 vaccination cards
- Check your Apple Account balance
- Use Express Mode
- Organize your Wallet
- Remove cards or passes
- Check the weather
- Check the weather in other locations
- View weather maps
- Manage weather notifications
- Use Weather widgets
- Learn the weather icons
- Find out what Siri can do
- Tell Siri about yourself
- Have Siri announce calls and notifications
- Add Siri Shortcuts
- About Siri Suggestions
- Use Siri in your car
- Change Siri settings
- Contact emergency services
- Use Emergency SOS via satellite
- Request Roadside Assistance via satellite
- Set up and view your Medical ID
- Use Check In
- Manage Crash Detection
- Reset privacy and security settings in an emergency
- Set up Family Sharing
- Add Family Sharing members
- Remove Family Sharing members
- Share subscriptions
- Share purchases
- Share locations with family and locate lost devices
- Set up Apple Cash Family and Apple Card Family
- Set up parental controls
- Set up a child’s device
- Get started with Screen Time
- Protect your vision health with Screen Distance
- Set up Screen Time
- Set communication and safety limits and block inappropriate content
- Charging cable
- Power adapters
- MagSafe chargers and battery packs
- MagSafe cases and sleeves
- Qi-certified wireless chargers
- Use AirPods
- Use EarPods
- Apple Watch
- Wirelessly stream videos and photos to Apple TV or a smart TV
- Connect to a display with a cable
- HomePod and other wireless speakers
- Pair Magic Keyboard
- Enter characters with diacritical marks
- Switch between keyboards
- Use shortcuts
- Choose an alternative keyboard layout
- Change typing assistance options
- External storage devices
- Bluetooth accessories
- Share your internet connection
- Allow phone calls on your iPad and Mac
- Use iPhone as a webcam
- Hand off tasks between devices
- Cut, copy, and paste between iPhone and other devices
- Stream video or mirror the screen of your iPhone
- Start SharePlay instantly
- Use AirDrop to send items
- Connect iPhone and your computer with a cable
- Transfer files between devices
- Transfer files with email, messages, or AirDrop
- Transfer files or sync content with the Finder or iTunes
- Automatically keep files up to date with iCloud
- Use an external storage device, a file server, or a cloud storage service
- Intro to CarPlay
- Connect to CarPlay
- Use your vehicle’s built-in controls
- Get turn-by-turn directions
- Change the map view
- Make phone calls
- View your calendar
- Send and receive text messages
- Announce incoming text messages
- Play podcasts
- Play audiobooks
- Listen to news stories
- Control your home
- Use other apps with CarPlay
- Rearrange icons on CarPlay Home
- Change settings in CarPlay
- Get started with accessibility features
- Turn on accessibility features for setup
- Change Siri accessibility settings
- Open features with Accessibility Shortcut
- Change color and brightness
- Make text easier to read
- Reduce onscreen motion
- Customize per-app visual settings
- Hear what’s on the screen or typed
- Hear audio descriptions
- Turn on and practice VoiceOver
- Change your VoiceOver settings
- Use VoiceOver gestures
- Operate iPhone when VoiceOver is on
- Control VoiceOver using the rotor
- Use the onscreen keyboard
- Write with your finger
- Use VoiceOver with an Apple external keyboard
- Use a braille display
- Type braille on the screen
- Customize gestures and keyboard shortcuts
- Use VoiceOver with a pointer device
- Use VoiceOver for images and videos
- Use VoiceOver in apps
- Use AssistiveTouch
- Adjust how iPhone responds to your touch
- Use Reachability
- Auto-answer calls
- Turn off vibration
- Change Face ID and attention settings
- Use Voice Control
- Adjust the side or Home button
- Use Apple TV Remote buttons
- Adjust pointer settings
- Adjust keyboard settings
- Adjust AirPods settings
- Turn on Apple Watch Mirroring
- Control a nearby Apple device
- Intro to Switch Control
- Set up and turn on Switch Control
- Select items, perform actions, and more
- Control several devices with one switch
- Use hearing devices
- Use Live Listen
- Use sound recognition
- Set up and use RTT and TTY
- Flash the LED for alerts
- Adjust audio settings
- Play background sounds
- Display subtitles and captions
- Show transcriptions for Intercom messages
- Get Live Captions (beta)
- Type to speak
- Record a Personal Voice
- Use Guided Access
- Use built-in privacy and security protections
- Set a passcode
- Set up Face ID
- Set up Touch ID
- Control access to information on the Lock Screen
- Keep your Apple ID secure
- Use passkeys to sign in to apps and websites
- Sign in with Apple
- Share passwords
- Automatically fill in strong passwords
- Change weak or compromised passwords
- View your passwords and related information
- Share passkeys and passwords securely with AirDrop
- Make your passkeys and passwords available on all your devices
- Automatically fill in verification codes
- Automatically fill in SMS passcodes
- Sign in with fewer CAPTCHA challenges
- Use two-factor authentication
- Use security keys
- Manage information sharing with Safety Check
- Control app tracking permissions
- Control the location information you share
- Control access to information in apps
- Control how Apple delivers advertising to you
- Control access to hardware features
- Create and manage Hide My Email addresses
- Protect your web browsing with iCloud Private Relay
- Use a private network address
- Use Advanced Data Protection
- Use Lockdown Mode
- Use Stolen Device Protection
- Receive warnings about sensitive content
- Use Contact Key Verification
- Turn iPhone on or off
- Force restart iPhone
- Back up iPhone
- Return iPhone settings to their defaults
- Restore all content from a backup
- Restore purchased and deleted items
- Sell, give away, or trade in your iPhone
- Erase iPhone
- Install or remove configuration profiles
- Important safety information
- Important handling information
- Find more resources for software and service
- FCC compliance statement
- ISED Canada compliance statement
- Ultra Wideband information
- Class 1 Laser information
- Apple and the environment
- Disposal and recycling information
- Unauthorized modification of iOS
View your Safari tabs from another Apple device on iPhone
Note: You must be signed in to iCloud with the same Apple ID on all your devices to manage Safari tabs across your devices.
View tabs that are open on your other Apple devices
To close a tab on another Apple device, touch and hold the link, then choose Close.
Note: To view tabs open on your other devices, you must have iCloud Tabs turned on for your start page. See Customize your start page .
Keep tabs and Tab Groups updated across your devices
Note: To also see tabs open on your Mac, you must have Safari turned on in iCloud settings on your Mac, be signed in with the same Apple ID , and use two-factor authentication .

IMAGES
VIDEO
COMMENTS
Change the display controls for a website on Safari. You can hide the search field, switch to Reader, and more. Open the Safari app on your iPad. Tap , then do any of the following: Hide the search field: Tap Hide Toolbar (tap the top of the screen to get it back). See a streamlined view of the webpage: Tap Show Reader (if available).
Add Safari back to your Home Screen. If you don't see Safari on your Home Screen, you can find it in App Library and add it back. On the Home Screen, swipe left until you see the App Library. Enter "Safari" in the search field. Press and hold , then tap Add to Home Screen. In Safari on iPad, view websites, preview website links, translate ...
Åbn appen Safari på din iPad. Du åbner en ny fane ved at trykke på i øverste højre hjørne af skærmen. Rul til bunden af siden, og tryk på Rediger. Vælg indstillinger til din startside. Favoritter: Vis genveje til de websteder, du har oprettet bogmærker til. Se Føj en webside til Favoritter.
Here's how. First, open Safari on your iPhone or iPad and open a new tab by tapping the tabs button (two overlapping rectangles), then tapping the plus ("+") button. You'll see Safari's "Start Page" by default. To edit what's on the Start Page, scroll down if necessary and tap the "Edit" button. When you tap "Edit," a "Customize Start Page ...
However, you can personalize the Safari start page to only show sections you wish to see. Open Safari and stay on the start page or open a new tab. Scroll down and tap Edit. Toggle off the options you do not want on the Customize Start Page. You may also rearrange the order by touching the three lines icon and dragging it up or down.
How to have Safari close tabs automatically in iPadOS 15. If you find your iPad soon becomes an unmanageable mess of open tabs, you can have Safari take the hassle out of cleaning that up for you with tabs that close automatically after going unviewed for a set period of time. Open your Settings app. In the sidebar, scroll down and tap Safari.
Here's how. First, open Settings by tapping the grey gear icon. In Settings, tap "Safari" in the sidebar. In Safari settings, navigate to the "Tabs" section, then select "Compact Tab Bar" until it has a check mark below it. Next, launch Safari and open several websites at once. Previously, with "Separate Tab Bar" selected, you'd see a dedicated ...
Here's how. Launch Safari on your iPhone or iPad. Make sure you're in a new tab so you can be on the start page. Choose sections to customize Safari on iPhone by showing: Launch Safari, open the tabbed view, open a new tab (Image credit: iMore) Scroll down to the bottom and tap Edit. Tap the toggle for Background Image to ON (green).
On your iPhone or iPad, open the Safari app and go to the start page. Find the Frequently Visited section and then press and hold on a website icon. From the popup, tap on "Delete." To disable the entire Frequently Visited section, we'll need to go to the Settings app. Open the Settings app and go to the "Safari" section.
When Apple announced macOS Monterey at WWDC21, the company unveiled a redesigned Safari with a completely new tab experience. With the latest developer beta of iPadOS 15, which Apple released to developers earlier today, the company appears to be bringing that new experience to iPad users as well. The new experience breaks out tabs into a new ...
How to Add a Home Screen Icon for a Web Page . The iPad home screen displays icons for navigating through your applications and settings. Among these apps is Safari, Apple's web browser, which is included with all its operating systems.One especially useful feature is the ability to put shortcuts to your favorite web pages on the iPad Home screen.
Launch Safari on your iPhone or iPad. Tap the open tabs icon in the bottom right corner of the Safari interface. In the Tabs view, tap the + icon in the bottom left corner to open a new tab ...
To ensure the start page is visible on Safari, navigate to the menu bar while the app is open and click on the 'Bookmarks' tab. Then, select 'show start page' to reveal the default Safari start page. In the bottom right corner of the default start page, there will be an 'Options' button with an icon that looks like setting sliders.
Step 2: Open the Start Page. Once you have launched Safari, tap the Start Page button, also known as the Home button, located at the bottom center of your screen. The Start Page will display your frequently visited websites, bookmarks, and reading list. Step 3: Edit the Start Page. To customize the Start Page, tap the Edit button located at the ...
Open Safari. Go to the web page you would like to make your home page. Tap the box and arrow icon at the bottom of the screen. Tap " Add to Home Screen ". Rename the icon if you wish, then tap " Add " in the top right corner of the screen. You can now use your new shortcut to open Safari to that web page from now on. Categories: iPhone.
Now, you can customize Safari Start Page in iOS 16 on iPhone and iPad. Let me show you how to personalize the Safari Start Page in iOS 16 or iPadOS 16 to you...
The review is out, but many of you want to know more about each little feature of the iPad. We take an in-depth look at the Safari web browser on the iPad. W...
To transform a Slide Over view, to Split Screen, use the grey drag-bar at the top of the Slide Over Window; drag downwards and to towards the side of the screen. As the view changes, lift your finger. You can also change a Slide Over to a Full Screen view. This time, using the same drag-bar, drag to the top-centre of the screen, then release.
Start Safari (din browser) og naviger til KvikStart's startside. Sørg for du står på startsiden og ikke den side du læser lige nu. 2. Tilføj app ikon. a) Tryk på delings-ikonet som på billedet nedenfor er markeret med bogstavet a. b) Tryk derefter på "Føj til hjemmeskærm" som nedenfor er markeret med bogstavet b.
Tap , then tap Bookmarks. Tap Edit, then do any of the following: Create a new folder: Tap New Folder at the bottom left, enter a name, then tap Done. Move a bookmark into a folder: Tap the bookmark, tap the Location, then tap a folder. Tap to return to your bookmarks. Delete bookmarks: Tap . Rename bookmarks: Tap the bookmark, enter a new name ...
Safari; Der findes en del forskellige Internet browsere, og hver browser du installerer, har sin egen prædefinerede startside. Startsiden kan du ændre til hvilken som helst side du ønsker. Du skal blot skrive adressen til startside, f.eks. Google - https://www.google.dk
Open and close tabs in Safari on iPad. In the Safari app , use tabs to help you navigate between multiple open webpages. Note: If you're using the Compact Tab Bar layout, the menus and other items may look different from what's described in this guide. See Change the layout of Safari.
How to record your screen. Go to Settings > Control Center, then tap the Add button next to Screen Recording. Open Control Center on your iPhone, or on your iPad. Tap the gray Record button, then wait for the three-second countdown. Exit Control Center to record your screen. To stop recording, tap the Screen Recording button at the top of your ...
Go to Settings > [ your name ] > iCloud > Show All, then make sure Safari is turned on. Note: To also see tabs open on your Mac, you must have Safari turned on in iCloud settings on your Mac, be signed in with the same Apple ID, and use two-factor authentication. In Safari on iPhone, view the tabs that are open on your other Apple devices and ...