Immigration help for your business
- News & Reports
- Guides: Individual immigration

How to Apply for a U.S. Tourist Visa From the Philippines
Learn how to apply for a b1 or b2 visa for u.s. travel when you’re from the philippines, in this guide.
- Completing the Travel Visa Application
- Visa Appointment at the U.S. Embassy in Manila
- Travel Visa Tips for Filipinos
- Frequently Asked Questions
- Related Information
Are you from the Philippines and planning a trip to the United States? Filipino nationals looking to travel to the U.S. for temporary tourism or business purposes must first obtain a B-1/B-2 travel visa in order to enter the country.
In this guide, we’ll cover how to apply for a U.S. tourist visa from the Philippines, what steps to take, and other helpful tips for Filipino applicants .
Want more information on travel visa costs, processing times, and requirements? We can help. Learn more about what Boundless can do to help.
Start planning your immigration journey today with Boundless.
Learn more today
Filing Form DS-160
The first step in the travel visa process for every Filipino applicant is filing Form DS-160 (Online Nonimmigrant Visa Application). Form DS-160, filed online, requests basic information about the applicant’s life in the Philippines, their intended trip to the U.S., and any past immigration history.
You can learn more about filing Form DS-160 in Boundless’ guide , including what questions to expect and how the online submission process works.
Travel Visa Costs
When filing the DS-160, all applicants are required to pay a $185 government filing fee. The fee must be paid upfront. Filipino applicants can pay by one of the following payment methods :
- Paying by cash at a bank: Print out a deposit slip, make the $185 payment in a Bank of Philippine Islands (BPI), and save the payment slip/receipt to bring to your visa appointment later in the process.
- Paying online: You can pay the $185 filing fee online if you are a client of Bank of Philippine Islands (BPI) or using the online platform PesoNet .
You can find more details about completing your travel visa application payment on the U.S. government’s website here .
Embassy Information
All nonimmigrant visa applications filed in the Philippines (including tourist visa applications) are processed at the U.S. Embassy in Manila :
U.S. Embassy in Manila
1201 Roxas Boulevard
Manila, Philippines 1000
(+63) 2 5301-2000
Scheduling Your Appointment
After you’ve filed your travel visa application, the next step is to schedule your visa appointment at the U.S. Embassy in Manila. In order to schedule your appointment, you’ll need your DS-160 confirmation page and fee payment receipt, to prove you have a pending tourist visa application.
Appointment availability at the U.S. Embassy in Manila fluctuates, depending on demand at the time you are applying and the current visa backlog. The embassy recommends that travel visa applicants start the application process well in advance of their intended travel dates to the U.S. to avoid long appointment wait times.
You can calculate your estimated appointment wait time on the State Department’s official appointment tracker . As of March 2023, the current wait time for a B visa appointment at the U.S. Embassy in Manila is 144 calendar days .
Preparing for the Travel Visa Interview
Once you’ve scheduled your visa appointment, it’s time to prepare for your travel visa interview!
The visa interview can feel like the most stressful part of the tourist visa process, but you don’t have to go through the process on your own. We’ve put together a helpful guide on how to prepare for your travel visa interview with confidence and compiled a list of common interview questions to practice from.
Tips for Tourist Visa Approval
Now that you’ve read up on the travel visa process, is there anything you can do to increase your chances of getting approved? Boundless put together some helpful tips on how to strengthen your B1/B2 application and navigate all of the tricky travel visa requirements. Check them out here !
Travel Insurance
Once your travel visa is approved and you’re starting to plan your trip, you may want to consider purchasing travel insurance for your time in the U.S. Healthcare in the U.S. is notoriously expensive, so temporary travel insurance plans can help reduce any emergency medical costs. Travel insurance can also alleviate the financial burden of travel mishaps, such as lost luggage, flight delays, and more.
Flying Into the U.S.
You’ve booked your flight and packed your bags — what’s next? Getting through the U.S. airport smoothly! If it’s your first time flying to the U.S., be sure to read up on what to expect for security protocols, U.S. customs, and required documents before boarding your flight.
Want more U.S. immigration help? Check out Boundless’ Philippines-specific visa guide for everything you need to know.
Yes, Filipino citizens who are issued a B-2 visa are subject to a reciprocity fee . The fee must be paid after the visa is approved but before it is issued. The exact amount can be found on the U.S. Department of State’s website .
Yes, you can apply for a U.S. visa from the Philippines, even if you have been refused in the past. However, it’s important that you understand the reasons for the refusal and address those in your new application.
You must apply at the U.S. Embassy in Manila where visa interviews are conducted. Applicants from any part of the Philippines can apply. However, they will need to travel to Manila for the interview.
If your other citizenship allows for visa-free travel or easier visa application process to the U.S., you might want to use that passport. Otherwise, you can apply with either, but make sure to use the same one throughout the entire process.
Holding a different U.S. visa in the past does not prevent you from applying for a tourist visa. During the application process, you will likely be asked about your previous stays in the U.S.
No time for research? We provide an easy, guided application experience, with 4 anti-rejection checks and a lawyer review. Get started for free .
Article Contents
Apply for your visa with boundless., unlimited live support. lawyer review. money-back guarantee., which service.
Looks like you were working on a application just now. Applicants typically only require one service at a time.
You unlocked a $50 discount!
Congrats! Because your friend referred you, your application with Boundless is discounted. Start the application with Boundless within the next 14 days, and you'll save $50.
We’re sorry, this site is currently experiencing technical difficulties. Please try again in a few moments. Exception: request blocked
How To Apply for a US Visa in the Philippines: An Ultimate Guide
With Uncle Sam tightening its immigration policy more than ever before, US visa application can be a nerve-racking experience, especially for first-timers.
It’s not unusual to hear about applicants who entered the US Embassy oozing with the confidence only to come out later with the bad news of rejection.
No less than President Rodrigo Duterte can share his own horror story of having his US visa application rejected .
US visa is, without a doubt, one of the most difficult to obtain among the foreign visas. But is there a way to increase your chances of getting approved?
In this definite guide, we’ll discuss in great detail every step involved in the US visa application, plus tips to boost your chances of getting approved.
Table of Contents
What is a us visa, a. immigrant visas, a. business/tourist visa, b. work visa, c. student visa, d. exchange visitor visa, e. transit/ship crew visa, f. religious worker visa, g. domestic employee visa, h. journalist and media visa, i. treaty investors and traders visa, 2. check if you’re qualified to apply for your chosen us visa, general requirements, supporting documents, other supporting documents (according to us visa type), 4. fill out the us visa online application form, option 1: over-the-counter payment, option 2: online payment, option 1: online, option 2: over the phone, 7. show up at the us embassy on the date and time of your interview, 8. wait for your passport to be released, tips and warnings, 1. do i need to have ‘show money’ when applying for a us visa what is the minimum amount of money that i need to show in my bank account, 2. my visa got denied. what happens next.
- 3. My visa application has been denied. What can I possibly do to reverse the decision?
4. I was found ineligible for a visa. Can I get my money back?
5. when can i re-apply for a us visa, 6. is there a time limit as to when i can re-apply, 7. what could make the consul change his mind and grant my visa on re-application, 8. how can i apply for a us visa for my yaya/caregiver/secretary, 9. how can i apply for a us visa for my baby/infant, 10. how long is the validity of the us visa, 11. i set an appointment with the embassy but made a mistake in my application. what should i do next, 12. i’m a fresh grad with less than php 30k on my bank account. will my visa application be denied, 13. is it possible to be granted a us visa to visit a significant other.
- 14. The validity of a US visa is 5-10 years. With that said, if I renew my passport, will I still have the remaining years of my visa or not?
15. Can anyone recommend a reliable US tourist visa agency to help me get a visa?
16. is it possible to submit a family or group application.
Anyone who wants to go to the US either temporarily (for work/pleasure) or permanently as an immigrant is required to obtain a US visa.
A visa isn’t like your Philippine passport with multiple pages. Rather, it’s an endorsement placed within your passport which proves you can enter, leave, or stay in a foreign country for a specified period of time.
A US visa looks something like this:
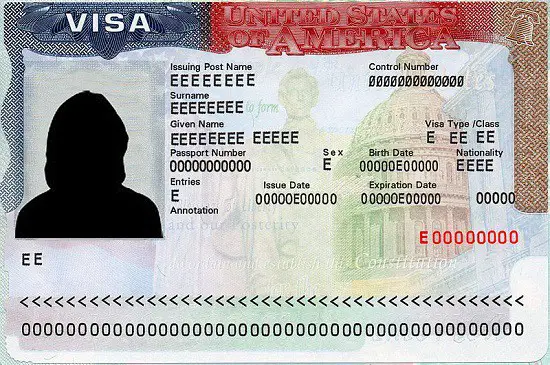
It should be noted that citizens from countries that participate in the Visa Waiver Program can travel to the US visa-free.
Unfortunately, the Philippines is not one of them. And for a good reason.
Filipinos with short-term visas have been notorious for overstaying and eventually seeking employment in the US illegally, so much so that we have a colloquial term for them– TNT which is short for “tago ng tago” or constantly hiding from immigration authorities.
US visa is a way for Americans to protect their country not just from illegal immigrants but also from threats of terrorism, human trafficking, and the likes.
If the US Embassy is extremely selective when screening applicants, it’s only because of a lot of Filipinos in the past who betrayed them.
Therefore, Filipinos with an ulterior motive when applying for a US visa must be warned: the US Embassy is always ready to deny your application at the slightest chance they get.
How To Apply for a US Visa in the Philippines in 8 Steps
1. identify the appropriate visa for the purpose of your trip.

There are different types of US visas.
For your application to become successful, ensure that you’re applying for a US visa that aligns with your purpose of traveling to the US.
There’s no point in applying for a tourist visa when the purpose of your trip is to study and possibly get a permanent employment in the US.
In general, US visa has two types: Immigrant visa and Nonimmigrant visa.
Immigrant visas are granted to those who intend to live permanently in the United States.
To apply for this visa, an employer or a family member who is already a US resident or citizen must first submit a petition to the US Embassy or the US Citizenship & Immigration Service (USCIS) on your behalf.
Once granted, you can use the visa to stay in the US as a Legal Permanent Resident and eventually acquire US citizenship.

b. Nonimmigrant visas
By contrast, nonimmigrant visas are issued to specialty workers, tourists, students, and business people who are planning to stay in the United States for a limited period of time.
The following is a list of common nonimmigrant visas:
B-1 and B-2 visas are granted to foreigners who are visiting the United States temporarily.
B-1 is for those who are going on a business trip (e.g., attending conventions/conferences, consulting with business associates, negotiating contracts, etc.). B-2, on the other hand, refers to the “tourist visa” given to those coming to the US for a vacation, family reunion, medical treatment, etc.
While B-1 and B-2 visas differ in terms of purpose, they’re combined and issued as one visa, also known as the B-1/B-2 visa.
A work visa is intended for those who have been petitioned by an employer or agent to work in the United States temporarily.
There are different work visas for different kinds of jobs:
- H-1B (specialty occupation)
- H-2A (seasonal agricultural workers)
- H-2B visa (skilled and unskilled workers)
- H-3 (trainee)
- H-4 (dependents)
- L-1 (intra-company transferees)
- L-2 (dependents)
- O (people with outstanding ability/achievements in sciences, arts, education, business, athletics, motion picture, and television production)
- P (artists and entertainers)
- Q (people who are participating in an international cultural exchange program).
As the name suggests, a student visa is issued to Filipinos who have been approved to study in a legitimate educational institution in the United States.
It comes in two varieties:
- F-1 visa, for those who are pursuing academic studies.
- M-1 visa, designed for those who wish to engage in a non-academic or vocational study/training.
Also known as a J visa, this type of US visa is given to those who have been accepted and approved to participate in exchange programs in the US. An exchange program is designed to promote the interchange of persons, knowledge, and skills in the fields of arts, sciences, and education.
Aside from the principal visa holder (J-1 visa), dependents who wish to accompany him/her for the duration of the trip may also apply for a J-2 visa.
The transit or C visa is used whenever you’re passing through the United States en route to another country. It’s like a tourist visa except that you’re only allowed to stay in the US for a relatively shorter period of time.
Crew or D visa, meanwhile, is designed for the crew members of a ship or an aircraft who will likewise transit or pass through the United States.
In most cases, the crew members use a combination of transit/crew visas (C-1/D). Should they wish to spend more time in the US for vacation or during time-off between flights/cruises, they have to apply for both transit/ship crew visas and the B-1/B-2 visa.
A religious worker who belongs to a recognized religious group or organization may apply for this visa (also known as R visa) to stay in the US temporarily. The visa will allow the religious worker to conduct religious worship and other activities within the limits of his/her occupation.
A domestic employee is defined as a personal or domestic servant who is accompanying or following an employer to the United States.
In this case, the Filipino worker may be eligible for a B-1 visa, regardless of whether the employer is an American citizen or not. If the employer is a government official or a foreign diplomat, the domestic employee may qualify for an A-3 or G-5 visa, depending on the employer’s visa status.
Domestic employees include, but not limited to, nannies, au pairs, valets, chauffeurs, cooks, butlers, housemaids, footmen, gardeners, paid companions, etc.
The media or I visa is for Filipino reporters or representatives of local media who want to travel to the US temporarily to cover news or engage in activities related to their profession.
Because the Philippines is one of the countries that maintain a treaty of commerce and navigation with the United States, Filipinos can travel to the US with an E-1 (Treaty Trader) or E-2 (Treaty Investor) visa.
This visa will allow you to come to the US to invest capital, develop and direct operations of an enterprise you’ve invested in, or carry on substantial trade (including trade in services or technology).
Before getting an appointment with the US Embassy, ensure you have valid reasons for applying for the type of visa you’re aiming for.
The embassy official who will conduct the interview will scrutinize your application and can reject it if you’re unable to prove you have the necessary qualifications.
From this point on, we’re going to focus on the more popular nonimmigrant US visas. If you want to know the qualifications and requirements for the immigrant visa, please refer to this guide .
a. For Business/Tourist Visa: You must prove to the consular officer that you intend to visit the US for a limited period of time by showing proof of funds to cover your travel expenses and solid ties to the Philippines like properties, business, or employment.
b. For Work Visa: To qualify for a work visa, your employer or agent must first file a Petition for Nonimmigrant Worker on your behalf. The petition or Form I-129 must be approved by the US Citizenship and Immigration Services (USCIS).
Upon approval, applicants must present their petition receipt number during the interview at the US Embassy. Take note, however, that having an approved petition doesn’t guarantee visa approval.
For a complete list of work visas and their respective qualification requirements, check out this link .
c. For Student Visa: F-1 and M-1 visa applicants must prove that they’ve been accepted and approved to study in an accredited educational institution in the United States.
Keep in mind, however, that Filipinos (and other foreigners) are prohibited by US law to study in a public elementary school (from kindergarten to 8th grade) or a public adult education program. For more information about US student visas, visit Education USA .
d. For Exchange Visitor Visa: To apply for this visa, Filipinos must first be accepted by an educational institution or a program sponsor in the US who will then provide the applicant with the necessary documents needed for the visa application.
Exchange visitor visa applicants can be one of the following: students, on-the-job trainees, teachers, professors, research scholars, professional trainees (medical and allied fields), etc.
e. For Transit/Ship Crew Visa: To get approved for this visa, you must prove to the consular officer your intention by showing the following: proof of funds to support your transit journey, permission to enter your destination country, and the ticket or other documents that will prove you’re en route to the said destination.
f. For Religious Worker Visa: Filipinos who are interested to apply for this visa must be a member of a tax-exempted nonprofit religious organization (or its affiliate) recognized by the US.
You must be a member of the denomination for at least 2 years prior to the visa application. If you’ve previously spent five years in this category, you must show to the consular officer that you reside or physically present in the Philippines for the immediate prior year.
g. For Domestic Employee Visa: As an applicant, you must prove to the consular officer that you have compelling ties to the Philippines and that you intend to go back to your home country once your contract expires.
You must also secure an employment contract signed by you and your employer. For a complete list of qualifications for a domestic employee accompanying a US citizen or a non-US citizen, please refer to this checklist .
h. For Journalist and Media Visa: To qualify for this visa, you must be a representative (e.g., reporter, editor, film crew, etc.) of a local media and the activity you’ll be doing in the US should be informational in nature like news gathering and reporting.
If you have a spouse or unmarried children less than 21 years old who wish to accompany you on the trip, they may apply for a derivative I visa.
Freelance journalists may also qualify for the media visa, provided that they are under a contract to a media organization, hold a credential issued by a professional journalistic organization, and the content they’re working on isn’t intended for commercial entertainment/advertising.
i. For Treaty Traders and Investors Visa: Click here for a complete list of qualification requirements for E-1 and E-2 visa.
3. Know the US Visa Application Requirements
The requirements listed here are applicable to nonimmigrant US visa applicants. If you’re applying for an immigrant visa, please go here instead.
The consular officer will treat every application as unique. Therefore, the number of requirements that will be requested from you depends on your personal circumstances and the type of US visa you’re applying for.
a. Duly accomplished DS-160 Form or Nonimmigrant Visa Electronic Application Form (more on this later).
b. A valid Philippine passport . The validity date should be at least 6 months beyond your intended period of stay in the US.
c. One 2″x2″ ID photograph which you are required to upload as part of the online application. You should also bring extra copies during the interview in case the consular officer requests for additional ID pictures.
The photo must meet the following criteria:
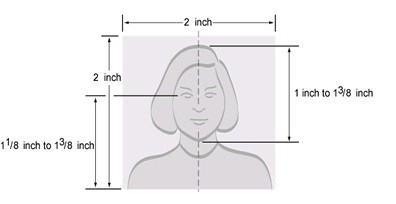
- Must be recent or taken within the last 6 months .
- Your eyes must be open and looking straight toward the camera. They should be anywhere between 1-1/8 inches and 1-3/8 inches (28 mm and 35 mm) or about 60% from the bottom of the photo.
- Must show your head from the top of your hair to the bottom of your chin . Hats, head coverings, and eyeglasses must be removed except if used for religious purposes (hats) or if the eyeglasses can’t be removed for medical reasons, in which case a medical certificate/statement must be provided.
- The entire head should be at the center of the frame . It should measure 1-1-3/8 inches (25 to 35mm), filling between 50% to 70% of the photo.
- The background must be either white or off-white . It must be uncluttered with no shadows either in the background itself or across the applicant’s face.
- Your face must show a relaxed and natural expression .
- The photo must be in color . Black and white photos aren’t accepted.
- You should wear normal clothing or something you wear on a daily basis . Uniforms and camouflage attire aren’t allowed except for religious attire that is worn every day.
d. Receipt showing payment of the USD 160 non-refundable nonimmigrant visa application fee (paid in Philippine pesos).
e. Interview appointment letter c onfirming that you’ve booked an appointment with the US Embassy online.
Update: Aside from the general requirements above, the US Embassy now also requires visa applicants to submit their social media information and all of their previous contact information as part of the visa application process. Applicants are required to submit information on social media accounts that they have used in the past 5 years. This will give the US government access to the applicants’ previously shared locations, photos, dates of births, dates of milestones and other information that can be found on social media profiles. Applicants will also be asked to provide all of their previously used telephone numbers and email addresses, as well as all of their previous and current international travel and deportation status. This requirement has been added for the purpose of checking if the applicant or any of his family members has been involved in terrorist activity.
For nonimmigrant US visa applications, supporting documents will provide strong evidence that the applicant intends to go back to the Philippines at the end of the trip.
Not all applicants will be required to present these documents. In most cases, all vital information that the consular officer needs are already provided in the application form and by the interview itself.
However, supporting documents may not be required only on a case-to-case basis. If your application raises some red flags, the consular officer may request some documents to strengthen your profile.
Hence, it’s better to come to the US Embassy fully prepared for the worst.
In general, supporting documents are classified into two categories:
Proof of funds, which will prove to the consular officer that you are financially capable of carrying out the trip; and Proof of strong ties to the country which provides evidence that you’ll go back to the Philippines after the trip and have no intention of overstaying in the US and live there illegally.
Proof of funds
a. For employed
Show that you can afford the trip and you have a job to go back to by providing the following:
- Certificate of Employment/COE (stating your position, salary, and tenure).
- Recent payslips (usually for the past 3 months).
- Income Tax Return (ITR) for the previous year.
b. For self-employed
The consular officer must see that you’re in good financial standing and that your business/freelance job is stable through the following:
- Business permit or a copy of the official business registration .
- Bank certificates/Bank statement/Book of the company and Financial Reports from the past 3 months.
- Tax statements and/or tax-paying certificate.
c. For students or minors
- Certification from the school or educational institution providing the grant (for US student visa), showing the specific details of the scholarship .
- Sponsorship letter from parents/legal guardians with attached proof of their solvency or financial capability to cover the expenses of the trip.
d. For retirees
- Business permits and other requirements for self-employed, if applicable.
- Evidence of pension (e.g., receipts).
- Financial assets and proof of investments.
- Retirement certification.
e. For unemployed
- Sponsorship letter with proof of the sponsor’s solvency.
- Copies of bank statements, bank certificates, and personal credit cards from the past 3 months.
f. Additional proof of funds
If you want to increase your chances of getting approved, you can also try the following suggestions:
- Especially if you’re a freelancer or self-employed, it doesn’t harm to add a sponsor even if you can afford the trip. This sponsor doesn’t necessarily need to cover your expenses. If anything, he/she can serve that role only on paper. The goal, after all, is to strengthen your application in any means possible.
- Provide proof of accommodation by making hotel reservations on websites like Agoda which offer free cancellation. You can also show your return tickets to prove you’re scheduled to go back to your home country after the US trip.
Proof of strong ties to the country
Proof of strong ties shows that you have enough and compelling reasons to return to the Philippines after your trip to the United States.
The US Embassy uses this to prevent the proliferation of illegal immigrants in the United States. Requirements under this category vary depending on the applicant’s financial resources, travel plans or history, and personal circumstances.
- Leave of absence.
- Certificate of Employment.
- A letter from you explaining the reasons why you won’t overstay.
- Business registration .
- Scheduled business meeting or company events that you’ll attend upon return, if applicable.
- Land title and other proof of properties/real estate you own.
- A letter from you detailing the reasons why you won’t overstay.
- School enrollment certificate.
- A letter from you and your parents/legal guardians explaining the reasons why you won’t overstay.
e. For the unemployed
- A contract/job offer from the company you’ll be working for in the Philippines, if applicable.
- A letter from you explaining the reasons why you won’t overstay. Valid reasons may include opening a business, enrolling in a school, etc. (with authentic documents to support them).
Ensure that all documents you’ll bring are authentic. Submitting fake documents will result in permanent ineligibility to apply for a US visa. If confidentiality is a concern, put all documents in a sealed envelope.
While you can’t predict which supporting documents will be asked from you, it’s better to bring as many of them as you can to show the consular officer that you didn’t come unprepared.
Depending on the type of US visa you’re applying for, you may be required to bring other documents apart from those already mentioned above.
For quick reference, here’s a list of different US visas and links to their specific requirements we might have missed:
- Business/Tourist Visa
- Student Visa
- Exchange Visitor Visa
- Transit/Ship Crew Visa
- Religious Worker Visa
- Domestic Employee Visa
- Journalist and Media Visa
All nonimmigrant US visa applicants regardless of age are required to accomplish and submit a Nonimmigrant Visa Electronic Application (DS-160) form.
There are two reasons why.
First, you can’t set up an appointment with the US Embassy without the alphanumeric barcode number which is only generated once you’ve completed the DS-160 form.
Lastly, you won’t be allowed to enter the US Embassy for the interview without the printed DS-160 confirmation page. Handwritten or typed applications will not be accepted.
I can’t mention enough the importance of the DS-160 form. As a matter of fact, some Filipinos get rejected by providing incomplete or inaccurate information on this form.
In case you need help in filling out the form, please consult a translator or an immigration lawyer. If you’re ready to complete the DS-160 form, please follow the procedure below.
Prepare the requirements/information that you will need for the completion of the DS-160 form.
- Soft copy of your ID picture (see step 3)
- Résumé or Curriculum Vitae (for information regarding your education and employment history)
- International travel history/dates of your last five trips to the United States, if applicable
- Travel itinerary, if you’ve already made travel arrangements
- Other information specific to the US visa you’re applying for. For students and exchange visitors, for example, you will be asked to provide the school address and your SEVIS ID, both of which can be obtained from your I-20 or DS-2019 form.
Access the DS-160 form online
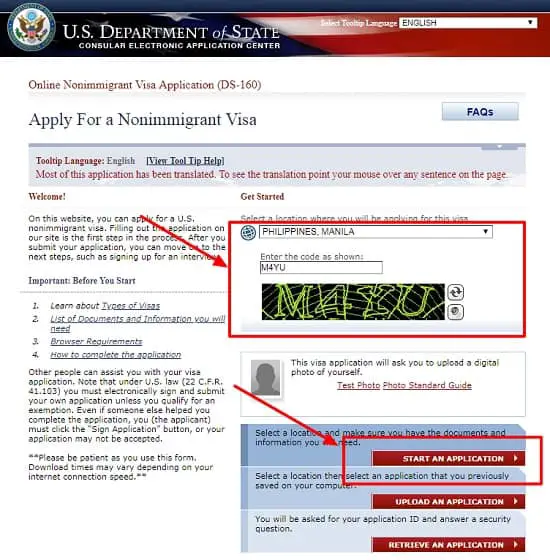
To get to the DS-160 form, go to the Consular Electronic Application Center website.
In case you’re having difficulty accessing the page, try switching your browser to either Firefox or Internet Explorer.
If the page is displaying correctly, go ahead and select your location (i.e., Philippines, Manila), enter the captcha code provided, and click “Start An Application.”
Complete the DS-160 form by providing all requested information
Ensure all your answers are complete, accurate, and written in English.
If you want a preview of the type of questions that will be asked in the application form, click here . Expect the DS-160 form to be comprehensive with questions falling under the following categories:
- Personal information (e.g., name, gender, marital status, address, contact information, passport information, etc.)
- Travel information (e.g., the purpose of your trip, travel companions, previous trips to the US, etc.)
- Family information (e.g., details about your parents, spouse, etc.)
- Work and education history
- Security and background (e.g., any mental/physical disorder or communicable disease you’re currently afflicted with, criminal background, etc.)
Upload your ID photo
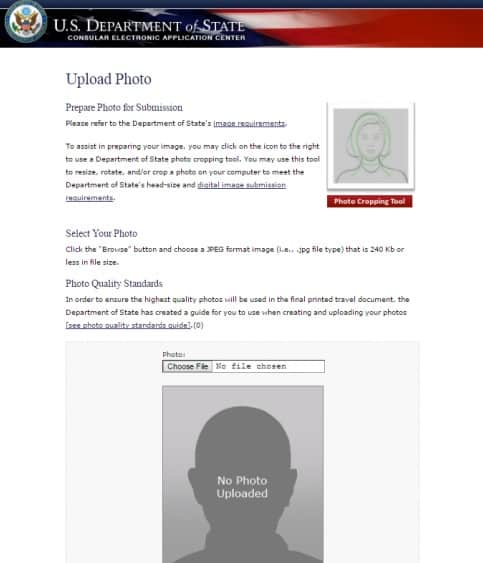
Ensure the photo has the right size and follows the specifications required by the US Embassy. For more information, see step 3 of this guide.
Review your application before submitting it.
The system will give you an opportunity to review all the information you’ve provided before submitting the form.
Make sure that they’re all complete and accurate as you won’t be able to change anything once the DS-160 form has been submitted.
If you’re confident about your application, enter your passport number and the captcha code provided. These will serve as your E-Signature.
Finally, click “Sign and Submit Application.”
Print your DS-160 confirmation page
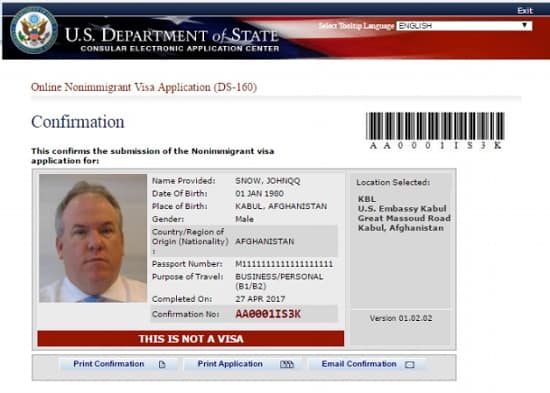
All applicants are required to bring the printed confirmation form to the US Embassy during their scheduled interview. The alphanumeric barcode number located on the upper right corner of the page will enable the consular officer to retrieve your DS-160.
Without this confirmation page, you will not be allowed entry to the US Embassy and your application will be automatically forfeited.
It is also recommended to keep a backup copy of your duly accomplished DS-160 form in case things go awry. To secure a copy, simply hit the “Back” button on your browser and then email yourself a copy of the form in PDF format.
Additional reminders related to the DS-160 form:
- Only use letters in the English alphabet. Hence, if your name contains “ñ” as in the case of “Niña,” you must spell it using the equivalent letter in the English alphabet (i.e., Nina).
- While filling out the DS-160 form, always click the “Save” button or download the unfinished form to your computer. Otherwise, you can potentially lose all the data you’ve provided as the page “times out” after 20 minutes of inactivity.
- Every time you complete a page in the application, it is automatically saved so you don’t have to worry about losing the data when the Internet connection is interrupted. You can also save a partially completed application in case you want to run some errands. To continue where you left off, simply return to the Consular Electronic Application Center website and click “Retrieve an Application.” You will then be asked to enter your application ID number and answer the security question.
- In case you want to take more time, you can also download your incomplete application to your personal computer. Return to the website within the next 30 days and then select “Upload an Application.” Follow the instructions to resume the application.
5. Pay the US Visa Application Fee
At this point, you’re only one step away from scheduling an appointment with the US Embassy for your interview.
To book an interview, you must first pay a non-refundable, non-transferable Machine Readable Visa application fee (or MRV fee).
All US visa applicants are required to pay this fee. This is because the online appointment will ask for the receipt number (proof of payment) before you can move forward.
The amount of MRV fee depends on the type of US visa you’re applying for and the current US dollar to the peso exchange rate. To view the list of US visa types and their corresponding application fees, please go to this page .
As of this writing, the most common types of US nonimmigrant visas like the tourist visa cost $160 whereas petition-based visas like religious and work visas require an application fee of $190 .
Meanwhile, the most expensive US visas are the K visa (Fiancé(e) or Spouse of US Citizen) and the E visa (Treaty Trader/Investor) with application fees amounting to $265 and $205, respectively.
To pay the US visa application fee, you can choose from two modes of payment: Over-the-counter or online transactions.
If you choose this method, you can pay the visa application fee in cash at any BPI (Bank of Philippine Islands) branch near you.
To make a payment, you need to present a printed copy of your US visa application deposit slip. You can find the deposit slip on this page .
Apparently, there’s a unique deposit slip for each application fee. Choose and print the deposit slip that corresponds to the cost of your US visa application fee.
The deposit slip is valid for a single transaction. It also has an expiration date so make sure you make the payment before it becomes invalid. In case it expires, you can generate another deposit slip by returning to the page I’ve mentioned and re-clicking the link to the deposit slip.
After making the payment, ensure you keep the receipt as you’ll be needing the receipt number to schedule an appointment.
For a faster and more convenient way of paying the MRV fee, you can use either the BPI or Bancnet online bill payment services.
If you have an account with either of the two, you can quickly pay the fee without going to the bank.
To make the payment, simply go to the BPI or Bancnet website. For this transaction, you will be asked to provide a reference number:
- 48160628 (for BPI customers)
- 35887923 (for Bancnet customers)
For complete instructions on how to pay the US visa application fee online, please refer to the following guides:
- How to Pay US Visa Application Fee Online with BPI
- How to Pay US Visa Application Fee Online with Bancnet
Avoid making lump-sum payments when paying for your family or a group of applicants. Instead, make the payments individually to generate a unique receipt number for each applicant which is needed to secure an appointment with the US Embassy.
Once the payment has been accepted, you’ll then receive an email confirmation which you need to print and bring to the US Embassy on the day of your appointment.
6. Schedule an Appointment With the US Embassy for Your Visa Interview

After paying the visa application fee, it’s important to know that you can’t schedule an appointment right away.
Depending on the mode of payment you used, it may take anywhere between four hours to a whole day before you can make an appointment.
For over-the-counter bank transactions, you can already book an appointment/interview after four hours from the time of payment.
Online payments, on the other hand, may take longer depending on the time of payment and whether you used BPI or Bancnet for the transaction.
The tables below summarize their processing times and exactly when you can schedule an appointment:
For online payments made with BPI

For online payments made with Bancnet

After the waiting period has passed, you can now schedule an appointment.
There are two ways to secure an appointment with the US Embassy: online via the US Department of State’s Bureau of Consular Affairs website or over the phone with the help of a customer service representative.
To schedule an appointment online, you must first ensure that you have the following information on hand:
- MRV fee payment receipt number
- Passport number
- The ten-digit barcode number in your DS-160 confirmation page
Once you’re ready, go to the US Department of State’s Bureau of Consular Affairs website and register/create an account.
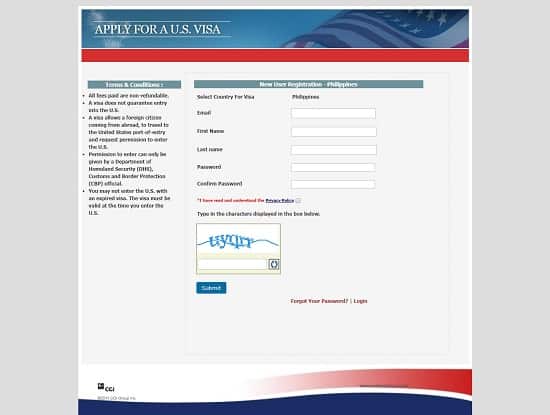
After creating an account, log into the system and click “Schedule Appointment” on the left-hand side menu.
On the succeeding pages, you will be asked to provide vital information like the visa type you’re applying for, personal data, DS-160 confirmation number, names of your family members (in case you’re traveling with them), how you prefer to receive the passport, visa payment confirmation, and the appointment schedule.
Take note that you can’t book an appointment unless you’ve already paid the visa application fee and completed the DS-160 form. This is also the reason why I’ve included them in the earlier steps.
Alternatively, you can ask for the assistance of a customer service representative to book an appointment.
The call center is available during weekdays, from 8 AM to 8 PM, except during the Philippine and US holidays. You can talk to the agent either in English or Tagalog, whatever is comfortable for you.
Here are three ways to talk to a customer service representative directly:
- Telephone: (02)5488223 or (02)7928988
- Web call: If you’re using Firefox, Google Chrome, Safari11 or Opera, you can call directly through your browser by clicking the green button on this page .
- Skype: Please add ustraveldocs-philippines to your list of Skype contacts.
Additional reminders regarding appointment scheduling:
- Choose the earliest schedule to avoid getting stuck in traffic and the long queues.
- Plan your visa application carefully as you’re only allowed to reschedule twice (excluding the initial appointment). If you cancel your second rescheduling attempt again, you’ll be barred from making a new appointment for the next 90 days.
We’ve finally arrived at the most critical part of your US visa application: the dreaded interview.
In this section, I’ll give you an idea what to expect on the day of your appointment.
For tips and strategies to pass the US visa interview, please refer to this guide where I’ve compiled all the insights from some Filipinos who survived the interview and got their visas approved.
Before heading to the US Embassy, make sure you bring all the requirements needed for your US visa application (see step 3 of this guide for the complete list).
Arrive at the US Embassy at least 30 minutes before your scheduled interview. If possible, bring a companion with you who will keep your phone, camera, laptop, and other electronic devices, all of which are prohibited inside the Embassy.
Upon arrival, you will be subjected to initial security checks. Applicants will fall in line to have their bags and requirements checked by the security personnel.
Afterward, you will be directed to another queue where you’ll wait for your turn to undergo the following procedures:
- Pre-Screening : In this step, a consular officer may ask you a few questions regarding your application such as the visa type you’re applying for, the purpose of the trip, and personal data like your name, birthday, and marital status. They may also request additional photos so make sure you have extra copies of your ID picture just in case.
- Fingerprinting : A consular officer assigned in this station may ask you to provide your passport and state your name and birthday. Then, you’ll be instructed to place your fingers on the fingerprint scanner one by one to get your biometrics.
- Interview : The last step is also the most important one. After waiting for your turn, you will be assigned to an interview window where a consular officer will assess your visa application using your answers to the DS-160 form and the interview questions. On average, the interview may last for a few minutes but it can be relatively quick if you have a strong application. For a list of commonly asked questions during the US visa interview, please go to this link.
After the interview, you’ll get an immediate feedback whether your US visa application has been approved or denied.
For successful applicants, expect your passport to be issued after 5 working days.
Passports of approved applicants are released at the chosen 2GO branch. You’ll receive a text message from 2GO once your passport is available for pick-up at the specified 2GO location.
In case you’ve changed your mind and want to pick up your passport at another 2GO branch, you only have until midnight on the day of your interview to update the Documentation Delivery Instructions (see step 6).
To claim your passport, you need to present a government-issued ID.
- All applicants, regardless of age, are required to show up at the US Embassy for the visa interview. Minors (17 years old and below, unmarried) must be accompanied by at least one parent or a legal guardian.
- Only bring original, authentic documents. In the case of government-issued IDs, make sure they’re valid and not expiring anytime soon. Submitting fake documents will not only get your visa application denied but may also permanently ban you from applying for any US visa in the future.
- When it comes to submitting documentary requirements, it’s better to overdeliver. While a lot of applicants who got approved can attest that the consular officer didn’t even bother to ask for supporting documents, remember that visa applications are approved on a case-by-case basis. The more requirements you can bring, the better prepared you will be in case the consular officer request additional evidence to strengthen your application.
- Filipinos who are well-traveled are more likely to get approved for nonimmigrant US visa compared to those who don’t have extensive travel history. By showing your passport stamps, travel tickets, or bookings, you’re making a positive impression to the consular officer that you always come back to the Philippines every time you travel overseas.
- Arrive at the US Embassy 15 to 30 minutes before your scheduled interview. Take note that this applies to all applicants, regardless if you picked an earlier schedule or not. It doesn’t make sense to go there at 6 AM when your schedule is still at 9 AM. Remember, they don’t accommodate applicants on a first-come, first-served basis. The US Embassy prioritizes applicants who have secured an early schedule, not those who arrived at the gate early.
- You have a better chance of getting your visa application approved if you’re applying with your family, especially if you already have previous travel experiences together . While there’s no concrete explanation for this, it is probably because a family of three or four are less inclined to overstay their welcome, especially if all of them have strong ties to the Philippines.
- Pregnant women who will be traveling to the US on tourist visas and with the intention of giving birth so their babies will be granted birthright citizenship will now be treated as foreigners coming to the US for medical treatment. This means that the applicants must prove that they are coming to the US for medical treatment and have the means to pay for it. The new visa restriction is designed to limit the popular practice known as “birth tourism”, which, although considered fundamentally legal, has led to the proliferation of birth tourism agencies, some of which have been arrested for visa fraud or tax evasion.
Frequently Asked Questions
3. my visa application has been denied. what can i possibly do to reverse the decision.
It varies depending on the consul that will be assigned to handle your application. It can be a Single-Entry or Multiple-Entry Visa. Therefore, the validity of the visa ranges from 3 months up to 10 years.
First, fill out a new application form and make sure that all the information you’ve provided is correct. Then, you should call the hotline of the US Embassy where you’ve set your appointment and explain your situation. Provide the application number of the new form that will then replace the old one with errors.
If you’re a minor, then you can use your parents’ credentials and bank statements when you apply for a visa. But if you’re no longer a minor, then your own credentials will be assessed.
Your application will most likely be denied but you can improve your chances by gathering evidence of ties to the Philippines for a couple of years. Once you have done that, then you can apply for a US visa. To increase your chances of getting an approved visa, do the following:
- Get a good job and stay long enough for it to be considered as a long-term job. This is to increase your salary and to prove that you have ties to your country.
- Travel as much as you can to other countries. If you have an impressive travel history, it will increase your chances of getting approved for a visa.
If you really want to apply for a visa now and you’ve been to the US before, as well as other countries, then you can give it a try. To improve your chances and prove that you will definitely come back to your home country, mention future plans like going to graduate school, starting a business, or anything like that.
If your parents will sponsor your trip, you can consult a lawyer and draft an Affidavit of Support that you can present to the consul. Make sure to bring all the necessary documents to support your application like you and your parents’ bank statements and titles.
Unfortunately, your chances are slim if ‘visiting a significant other’ will be your reason for going to the US. All the red flags are there if you are single and have a US citizen partner.
If you’re already engaged, then you can apply for a different visa category instead. On the other hand, if you have a child together, then you can try the Family Reunification approach.
You can increase your chances of getting an approved visa if you have a stable job in your country, have an impressive travel history, and a good amount of savings.
14. The validity of a US visa is 5-10 years. With that said, if I renew my passport , will I still have the remaining years of my visa or not?
Yes, your visa will still be valid even if you change your passport.
According to the US State Department website, you just have to bring your old passport with you when you travel to the US. You can even purchase a passport jacket that can hold both your old and new passports together so it’ll be more convenient to bring them with you during your travels.
You don’t need to look for a reliable agency to process your visa for you.
Getting the services of an agency will not improve your chances of getting approved . The agency’s only role is to apply on your behalf.
In order to increase your chances of getting your visa application approved, you only have to show that you have substantial ties to the Philippines like a stable and high-paying job, properties, investments, money in the bank, and family.
Yes, you can submit your applications together as a family or as a group.
On your ‘Confirmation’ page, click ‘Email Confirmation’. You’ll be redirected to a ‘Thank You’ page where you will see an option to create a family or group application.
Applicable information from your application will automatically be imported when you create a new application. It must be noted that even though it will be a family or group application, you’ll still need to create an individual application for each family member or individual.
Read our other travel visa guides:
How to Get Japan Visa in the Philippines: A Complete Guide for First-Time Tourists
How to Get Korean Visa in the Philippines: A Complete Guide for First-Time Visitors
How to Apply for Schengen Visa: An Ultimate Guide for Philippine Passport Holders
How to Apply for an Australian Tourist Visa: A Complete Guide for Filipino Tourists
Written by Luisito Batongbakal Jr.
in Juander How , Travel and Leisure
Last Updated September 21, 2023 10:15 AM
Luisito Batongbakal Jr.
Luisito E. Batongbakal Jr. is the founder, editor, and chief content strategist of FilipiKnow, a leading online portal for free educational, Filipino-centric content. His curiosity and passion for learning have helped millions of Filipinos around the world get access to free insightful and practical information at the touch of their fingertips. With him at the helm, FilipiKnow has won numerous awards including the Top 10 Emerging Influential Blogs 2013, the 2015 Globe Tatt Awards, and the 2015 Philippine Bloggys Awards.
Browse all articles written by Luisito Batongbakal Jr.
Copyright Notice
All materials contained on this site are protected by the Republic of the Philippines copyright law and may not be reproduced, distributed, transmitted, displayed, published, or broadcast without the prior written permission of filipiknow.net or in the case of third party materials, the owner of that content. You may not alter or remove any trademark, copyright, or other notice from copies of the content. Be warned that we have already reported and helped terminate several websites and YouTube channels for blatantly stealing our content. If you wish to use filipiknow.net content for commercial purposes, such as for content syndication, etc., please contact us at legal(at)filipiknow(dot)net
Baguhin ang Wika: Change to Tagalog
Apply for a U.S. Visa
In the philippines.
Important Notice! Insert Message Here
- Bank and Payment Options/Pay My Visa Fee
- DS-160 Information
- Appointment Wait Times
- Photos and Fingerprints
- Visa Waiver Program
- Security Regulations
- Apply for a Visa
- Ages below 14 and over 79
- Renew My Visa
- Complete My DS-160
- Schedule My Appointment
- Change Document Delivery Address
- Retrieve My Passport/Visa
- Apply for an Expedited Appointment
- Application Refused Under INA 221(g)
- Visa Information
- Check My Petition Status
- Visa Wait Times
- Select Document Delivery Address
- Travel Coordinator
- Priority Interview Program
- Crew and Manning Program
- Group Appointments
- Diplomatic and Government Officials
- Visas for Children
- U.S. Embassy, Manila
- Passport/Visa Collection Locations
- Document Drop-Off Locations
- Bank Locations
- Holidays and Closures
- Helpful Links
You are here: Home / DS-160 Information
On this page:
Guidelines for Completing the DS-160 Form
More information.
Each applicant - including children - must have their own Form DS-160 visa application. The Form DS-160 must be completed and submitted online prior to your interview at the Embassy or Consulate. The barcode number on the Form DS-160 confirmation page is required in order to book your interview. The Form DS-160 must be submitted online and the printed confirmation page must be brought to the interview. The Embassy or Consulate will not accept handwritten or typed applications and you will not be permitted to attend your interview without a Form DS-160 confirmation page.
When you sign your DS-160 electronically, you are certifying that all the information contained in it is true and correct. Misrepresenting any facts could render you ineligible to enter the United States. Please double-check that all your answers are accurate and that every question is answered completely.
Note: Any inquiries on completing the DS-160 will be addressed on the following website: https://travel.state.gov/content/travel/en/us-visas/visa-information-resources/forms/ds-160-online-nonimmigrant-visa-application/ds-160-faqs.html . We are unable to answer any questions or provide guidance on this process.
Complete and submit your DS-160 after reviewing the nonimmigrant visa application process . You must submit your DS-160 application online prior to making an appointment for an interview at the U.S. Embassy/Consulate.
- The interview post you select at the beginning of the DS-160 form must be the same post where you schedule your interview appointment.
- All questions must be answered in English using English-language characters only, except when you are asked to provide your full name in your native alphabet.
- The DS-160 "times out" after 20 minutes without user activity, and your data will be lost. To safeguard against data loss, click the "Save" button frequently and download the file to your local computer. Select a place on your computer to save the DS-160 file, browse to that location, and click the "Save" button in the "Save As" window.
- You are required to upload a photograph as a part of the DS-160 process. Detailed guidelines for taking and submitting a quality photograph are on the U.S. Department of State website here .
- The completed DS-160 application form will generate an alpha-numeric barcode confirmation page. The printed confirmation page is required for the interview at the Embassy/Consulate.
- Once you have printed the barcode confirmation page, hit the "Back" button on your web browser and then email yourself a backup copy of the DS-160. The emailed file will be in PDF format, which requires Adobe Acrobat to view or print.
- A new DS-160, Online Nonimmigrant Visa Application form and associated barcode must be submitted with each and every new visa application. A DS-160 and barcode from a prior visa interview or drop-off service will be rejected and result in a delay of your visa application.
Any inquiries on completing the DS-160 will be addressed on the following website: https://travel.state.gov/content/travel/en/us-visas/visa-information-resources/forms/ds-160-online-nonimmigrant-visa-application/ds-160-faqs.html . We are unable to answer any questions or provide guidance on this process.
The DS-160 form is online here .
© CGI Federal Inc.
- NIV Information
- Bank and Payment Options
- NIV Application
- Pay My Visa Fee
- Immigrant Visas
- Local Visa Programs
- General Information
Is this your first time applying for a visa and/or visiting our site?
Yes No
Baguhin ang Wika: Change to Tagalog
Apply for a U.S. Visa
In the philippines.
As of July 15, the United States Embassy in Manila has resumed certain nonimmigrant services, including: F, M, certain J categories (alien physician, government visitor, international visitor professor, research scholars, short-term research scholar, specialist, secondary school student and college/university student), C1/D, E, I, O, and P visas, and certain immigrant visas including IR1, CR2, and E3. The MRV fee is valid and may be used to schedule an interview appointment in the country where it was purchased. If you have an urgent matter and need to travel immediately on visa category not listed above, please follow the guidance provided at https://www.ustraveldocs.com/ph/ph-niv-expeditedappointment.asp to request an emergency appointment.
Applicants for H1B, H2B, L1, and certain J categories and their dependents covered by Presidential Proclamation 10052 should request an appointment only if you have reason to believe you may qualify for one of the exceptions listed in the Proclamation here .
The Presidential Proclamations suspending the entry of foreign nationals who were physically present within 14 days in certain countries prior to their entry or attempted entry into the United States (Presidential Proclamations 9984, 9992, 9993, 9996, and 10041), and the Presidential Proclamations suspending the entry of certain immigrants and nonimmigrants who present a risk to the U.S. labor market following the coronavirus outbreak (Presidential Proclamations 10014 and 10052) remain in effect. For details about these Presidential Proclamations click here .
The U.S. Mission to the Philippines understands that many visa applicants have paid the visa application processing fee and are still waiting to schedule a visa appointment. We are working diligently to restore all routine visa operations as quickly and safely as possible. In the meantime, rest assured that the U.S. Mission will extend the validity of your payment (known as the MRV fee) until December 31, 2021, to allow all applicants who were unable to schedule a visa appointment as a result of the suspension of routine consular operations an opportunity to schedule and/or attend a visa appointment with the already paid fee. Please continue to monitor this site for information on when we will return to routine visa operations.
For more information on how to pay your visa fee, please visit https://www.ustraveldocs.com/ph/ph-niv-paymentinfo.asp .
On Monday, June 22, President Trump signed a proclamation suspending entry into the United States of certain immigrants and nonimmigrants who present a risk to the U.S. labor market following the coronavirus outbreak. Effective immediately, the proclamation extends the suspension of entry for certain immigrants ( Presidential Proclamation 10014 ) through December 31, 2020. The new restrictions imposed by the proclamation are effective at 12:01 a.m. EDT on Wednesday, June 24 and expire on December 31, 2020, unless continued by the President. U.S. citizens, lawful permanent residents, and aliens who are or were inside the United States or those holding valid nonimmigrant or immigrant visas on the effective date are not subject to the proclamation.
The proclamation suspends entry of nonimmigrants in the following categories: H-1B, H-2B, J (for aliens participating in an intern, trainee, teacher, camp counselor, au pair, or summer work travel program) and L, along with their spouses and children. No valid visas will be revoked under the proclamation. Presidential Proclamation 10014 and this proclamation provide exceptions to their restrictions for certain categories of immigrants and nonimmigrants. The full text of the presidential proclamations are available on the White House website at: https://www.whitehouse.gov/presidential-actions/proclamation-suspending-entry-aliens-present-risk-u-s-labor-market-following-coronavirus-outbreak/
Entry of foreign nationals who were physically present within the following list of countries within 14 days prior their entry or attempted entry into the United States is suspended, per Presidential Proclamations 9984, 9992, 9993, 9996 and the subsequent proclamation issued May 24, 2020:
- The United Kingdom of Great Britain and Northern Ireland, excluding overseas territories outside of Europe;
- The Republic of Ireland;
- The 26 countries that comprise the Schengen Area (Austria, Belgium, Czech Republic, Denmark, Estonia, Finland, France, Germany, Greece, Hungary, Iceland, Italy, Latvia, Liechtenstein, Lithuania, Luxembourg, Malta, Netherlands, Norway, Poland, Portugal, Slovakia, Slovenia, Spain, Sweden, and Switzerland)
- The Islamic Republic of Iran;
- The People’s Republic of China, not including the Special Administrative Regions of Hong Kong and Macau
There are certain exceptions to the suspension of entry, including exceptions for U.S. lawful permanent residents and certain family members of U.S. citizens and lawful permanent residents, among other exceptions listed in the proclamations. If you reside in, have traveled recently to, or intend to transit or travel to the above listed countries prior to your planned trip to the United States, we recommend you postpone your visa interview appointment until 14 days subsequent to your departure from the subject country(ries). Additionally, if you are experiencing flu-like symptoms, or believe you may have been exposed to the novel coronavirus, you are required to postpone your appointment by at least 14 days. There is no fee to change an appointment and visa application fees are valid for one year in the country where the fee was paid. For questions about rescheduling a pending consular appointment, please contact us at [email protected] for specific guidance.

Welcome to the U.S. Visa Information Service for the Philippines. On this website you can find information about U.S. immigrant and nonimmigrant visas and the requirements to apply for each. You can also learn how to pay the required visa application fee, and book an interview appointment at the U.S. Embassy in Manila.
This is the official visa information website of the U.S. Embassy in the Philippines.
Nonimmigrant Visa Information
- Bank and Payment Options
- DS-160 Information
- Appointment Wait Times
- Photos and Fingerprints
- Visa Waiver Program
- Security Regulations
Nonimmigrant Visa Application
- Apply for a Visa
- Pay My Visa Fee
- Complete My DS-160
- Schedule My Appointment
- Change Document Delivery Address
- Retrieve My Passport/Visa
- Apply for an Expedited Appointment
- Renew My Visa
- Application Pending Further Action
Immigrant Visas
- Visa Information
- Check My Petition Status
- Visa Wait Times
- Select Document Delivery Address
Local Visa Programs
- Travel Coordinator
- Priority Interview Program
- Crew and Manning Program
- Group Appointments
- Diplomatic and Government Officials
- Visas for Children
- U.S. Embassy, Manila
- Passport/Visa Collection Locations
- Document Drop-Off Locations
- Bank Locations
General Information
- Holidays and Closures
- Helpful Links
© CGI Federal Inc.
Department of State
- usvisas.state.gov

IMAGES
VIDEO