
Top 16 Free Moon Quilt Patterns (+7 Bonus Patterns For Sale)
Categories Free Quilt Patterns
- Save To Pinterest 41

Moon quilt patterns are a popular choice among quilters due to their versatility and timeless appeal. The moon has always held a special place in our hearts and has been a subject of art and literature for centuries. From the mesmerizing full moon to the crescent moon and the waning gibbous, there are endless ways to incorporate this celestial body into quilt patterns. In this roundup, we will explore various free moon quilt patterns that range from simple and elegant designs to intricate and detailed masterpieces. Whether you are a beginner or an experienced quilter, you are sure to find a moon quilt pattern that will inspire you to create something magical. So, sit back, relax, and get ready to be amazed by the stunning designs and creativity of the quilting community in our Moon Quilt Patterns roundup.
Free Moon Quilt Patterns – Top Picks
1. free quilt pattern: moon and stars quilt.

Designer: Harriet Ellen Cox for McCall’s Quilting
The Moon & Stars Quilt is a free pattern inspired by a vintage hand-pieced original from 1896 in Basque County, Texas. Designed by Harriet Ellen Cox, this modern version features an intricate appliqué design of stars and celestial bodies. Measuring at 66 ½˝ x 88˝, the pattern comes with fabric requirements, cutting instructions, and assembly diagrams to guide quilters through the process. With its vintage charm and modern design elements, this pattern is a must-have for any quilter looking for a unique project.
2. Free Quilt Pattern: My Moon

Designer: Heather Ross for Windham Fabrics
The My Moon Quilt by Heather Ross is a free pattern featuring the Far Far Away II collection by the same designer. Measuring at 68″ x 84″, this charming quilt showcases stars and a cute moon with a face, perfect for those looking for a playful and whimsical design. Suitable for quilters of all skill levels, this free moon and stars quilt pattern is sure to become a favorite.
3. Free Quilt Pattern: Luna

Designer: American Quilter’s Society
The Luna pattern by the American Quilter’s Society is a celestial-themed quilt that showcases the phases of the moon in a wall hanging or table runner. This unique pattern measures 10 1/2″ x 26″ and can be enhanced with beads and embroidery. Ideal for anyone who loves astronomy or the night sky, this project highlights the different stages of the moon, from new moon to full moon. A perfect addition to any room, the Luna quilt pattern is sure to add a touch of celestial beauty to your home.
4. Free Quilt Pattern: Day Night

Designer: AGF Studio
The Day Night free quilt pattern showcases a stunning design with a unique contrast between a dark and vibrant side to represent the moon and sun. Designed by AGF Studio, this sun and moon quilt features the Aligned fabric collection, with a finished size of 64″ × 64″. With a mix of deep blues, blacks, yellows, pinks and oranges, this modern quilt pattern is perfect for showcasing your quilting skills and adding a vibrant touch to any room.
5. Free Quilt Pattern: Magical Moons Wall Art

The Magical Moons Wall Art is a free quilt pattern designed by AGF Studio, featuring the Crafting Magic collection by Maureen Cracknell. With stunning crescent applique moons, this project can be made in two finished sizes, making it a great option for a wall hanging or decorative pillow. The pattern also includes a video tutorial, making it accessible to quilters of all skill levels. Add a touch of magic to your home decor with this dreamy and ethereal quilt project.
6. Free Quilt Pattern: Phases

Designer: Wendy Sheppard for Anthology Fabrics
The Phases quilt pattern by Wendy Sheppard for Anthology Fabrics is a unique design inspired by The Deposition artwork. This free quilt pattern is perfect for beginners and features a calming color palette. Measuring 64” x 80”, it’s perfect for a cozy lap quilt. With clear instructions and stunning fabrics, this pattern is sure to become a cherished addition to your quilt collection.
7. Free Quilt Pattern: Full Moon

Designer: Felice Regina of I am Luna Sol
The Full Moon quilt pattern designed by Felice Regina is a stunning and unique design that features an improved pieced Dresden method. Using the Nocturne fabric collection by Janet Clare, the quilt showcases a beautiful contrast between cream and gray prints against a navy, blue, and white background. The centerpiece of the quilt is a beautiful 18″ full moon quilt block that can be appliqued to the quilt top. With a finished size of 60″ x 72″, this quilt is perfect for snuggling under on chilly nights and is sure to be a hit with both experienced quilters and beginners.
8. Free Quilt Pattern: Starry Night

Designer: Osie Lebowitz for Timeless Treasures
Set a soothing tone in your home with this gorgeous pattern from Osie Lebowitz. The Starry Night quilt pattern features charming applique stars that create a dreamy atmosphere with the large fabric panel from the To The Moon and Back collection by Timeless Treasures. Finished at 40″ x 60″, this pattern is perfect for any room in your home.
9. Free Quilt Pattern: Many Moons Mini Quilt

Designer: Monica Curry Quilt Design
The Many Moons mini quilt pattern by Monica Curry is a delightful and easy project that creates a charming wall hanging . Using batik fabrics, the quilt gives the illusion of a starry night sky with multiple moons. The finished size is 32″ x 24″, with each block measuring 4″ x 4″. The pattern is perfect for practicing piecing skills and experimenting with color and texture.
10. Free Quilt Pattern: Moon Rise Quilted Wall Hanging

Designer: Becca of Floss Candy
The Moon Rise Quilted Wall Hanging, a free quilt pattern by Becca of Floss Candy, combines English Paper Piecing, Applique, and Traditional Piecing techniques to create a beautiful work of art. With a series of hand-stitched moons in various phases appliqued onto a background fabric, this small wall hanging measures approximately 7.5 x 22.5 inches, making it a perfect addition to any home decor. Personalize it by choosing your own fabric shades.
11. Free Quilt Pattern: Summer Moon Quilt Along

Designer: Carrie Nelson for Fat Quarter Shop
The Summer Moon Quilt Along is a fun and creative way to make a beautiful sampler quilt. With tutorials on how to make different blocks, you can follow along and make a unique version of the quilt. Use up your fabric scraps and follow Carrie Nelson’s helpful tips in her videos to make the blocks. It’s perfect for all quilters and produces a stunning quilt you can be proud of.
12. Free Quilt Pattern: Midnight Moon Quilt Along

The Midnight Moon Quilt Along is a free quilt pattern that celebrates the fall and Halloween seasons with haunting designs. The quilt features 24 unique blocks with pumpkins and bats, measuring 70 ½” x 78 ¾”. It’s perfect for cozying up under on chilly autumn evenings or displaying as a festive decoration during Halloween . The dark and moody color palette evokes a sense of mystery and intrigue, making it a unique addition to your home decor. Enjoy a video tutorial for easy crafting!
13. Free Quilt Pattern: Dusk Dusk Dusk

The Dusk Dusk Dusk pillow cover quilt pattern is a free and beginner-friendly project that showcases the beauty of AGF Studio’s Pure Elements Collection. With a gradient color scheme that evokes the sunset, the pillow cover is easy to construct using basic piecing techniques. The finished 18″ × 18″ pillow cover is not only beautiful but also functional, adding a cozy and colorful accent to any room. Give it a try to practice your quilting skills and experiment with new color combinations!
14. Free Quilt Pattern: Hello Mr. Moon

Designer: Teri Henderson Tope for We All Sew
Meet the delightful Hello Mr. Moon Quilt, a quick, beginner-friendly project by Teri Henderson Tope for We All Sew. This small wall-hanging creation, completed in mere days using free-motion appliqué, illustrates a cat lounging on the moon. Simple and swift, it’s perfect for beginners eager for a quick accomplishment. With its finished size of 16 x 20 inches, this charming piece makes an excellent holiday or housewarming gift, especially for cat enthusiasts among us.
15. Free Quilt Pattern: Moon Gazing

Designer: Janet Houts for Andover Fabrics
The Moon Gazing Quilt Pattern by Janet Houts, a free PDF from Andover Fabrics, features the illustrious Moon and Stars fabric collection. Suitable for intermediate quilters, it results in a 56″ x 70″ quilt that artistically brings the night sky into your home. It’s a perfect project for those eager to showcase their skills and create a captivating quilt that provides both aesthetic pleasure and comfort. Crafting a distinctive item that showcases your passion for the wonders of the universe, this design is an excellent option.
16. Free Quilt Pattern: Moon Glow

Designer: Jinny Beyer Studio
Experience an artistic quilting journey with Jinny Beyer Studio’s Moon Glow Quilt pattern. A signature piece from Jinny, this intermediate-level pattern delicately merges compass blocks with gradient-shaded log cabin blocks, creating a luminous quilt with a mesmerizing visual effect. Once completed, the quilt spans an impressive 86 ¼” square, showcasing a sublime blend of expert crafting and complex design. Ideal for those looking to elevate their quilting aptitude, this pattern offers a striking yet intricate project to quilting enthusiasts.
BONUS Moon Quilt Patterns For Sale from Online Shops
1. eclipse sky quilt pattern (downloadable pattern for sale).

Designer: Joanne Kerton from Canuck Quilter Designs
Discover celestial magic with the Eclipse Sky Quilt Pattern by Joanne Kerton from Canuck Quilter Designs. This modern stitch masterpiece, measuring 55 ½ inches x 71 ½ inches upon completion, encapsulates the breath-taking spectacle of a solar eclipse, illuminating brighter stars and the sun’s corona flaring around the moon. Utilizing accessible techniques – simple piecing and fusible appliqué – this pattern brings the celestial phenomenon to life, culminating in a contemporary quilt that pays a striking tribute to the mesmerizing dance between the sun and moon played out on a quilted sky.
2. Lunar Phases Quilt Pattern (PDF Downloadable Pattern For Sale)

Designer: Hayley of Spring Daisy Stitchery
Craft an astronomic masterpiece with the Lunar Phases Quilt Pattern designed by Hayley of Spring Daisy Stitchery. Ideal for the easy beginner, this 60″ x 60″ quilt visibly portrays the changing phases of the moon using a raw edge applique technique. It eliminates the need for curve piecing. The fabric requirements are flexible, offering a variety of options to express your creativity on how scrappy you’d like it to be. Approach quilting from a universal perspective with this delightfully intriguing and accessible pattern.
3. Blue Moon Quilt Pattern (PDF Printable Pattern For Sale)

Designer: Saginaw Street Quilts
Embark on a fun crafting journey with the Blue Moon Quilt Pattern by Saginaw Street Quilts. This pattern allows you to make a large 60″ x 80″ quilt. It’s flexible – you can either follow the steps exactly, add more moons, or change the positions of the blocks. You can even use different colored fabrics from your collection to make the moons. No matter how you choose to make it, this quilt is sure to be an enjoyable project!
4. That’s No Moon Quilt Pattern (Downloadable Pattern For Sale)

Designer: Megan Collins Quilts
The That’s No Moon Quilt Pattern by Megan Collins Quilts transforms your strip scraps into a modern marvel. This intermediate pattern emphasizes gentle curves framed with sashing, allowing every curve to pop—perfect even if they aren’t quite perfect. The pattern caters to a full array of sizes from snug Baby to regal King, offering versatility for any project. Dive into a modern take on quilting with your scrap stash and watch your piecing skills take shape across this undeniably contemporary design.
5. Mini Moons Quilt Pattern (Digital Downloadable Pattern For Sale)

Designer: Jen Wagner of Snapdragon Quilting
Embark on a quilting journey to the stars with Mini Moons Quilt Pattern by Jen Wagner of Snapdragon Quilting. This pattern, ideal for confident beginners to advanced quilters, simplifies piecing small circles, making it an achievable task. Its charm pack friendly nature offers a fantastic opportunity to mix and match fabric designs, creating a unique quilt every time. It’s time to create a celestial masterpiece with this versatile, easy-to-follow pattern.
6. Moon Dance Revival Pattern (Physical Pattern For Sale)

Designer: Sew Kind of Wonderful
Moon Dance Revival is a 60″ x 60″ quilt pattern created by Sew Kind of Wonderful. Ideal for early-intermediate quilters, it integrates the use of the Mini Quick Curve Ruler to create a beautiful, flowing design. Impressively versatile, this pattern offers the perfect opportunity to showcase your growing skills, play with color patterns, and finish a project with an elegant and unique outcome. Its distinct curves capture the essence of a serene moonlit dance.
7. Partial Eclipse Quilt Pattern (Physical Pattern For Sale)

Designer: Robin Pickens
Ready for a charming quilting project? Consider the Partial Eclipse Quilt Pattern by Robin Pickens. This design is great for charm packs, layer cakes, and fat quarters. It features stunning curves from a central square. Decide between a compact 32.5″ wall hanging or a larger 64.5″ lap quilt. The pattern provides a paper template, but quilters will find the Creative Grids Circle Savvy Ruler useful for exact cut lines. Optional curved corners add a unique flair to this aesthetic quilt pattern—an enjoyable challenge for quilting enthusiasts.
Here Are More Moon Quilt Pattern Ideas For Inspiration

Photo Source: Eudaimonia Studio

Photo Source: Fran Gulick

Photo Source: Modern Handcraft

Photo Source: Sea Salt Studio

Photo Source: Modern Patchwork Quilts

Photo Source: Jaimie Orland

Photo Source: Truckee Meadows Quilters
Moon quilt patterns are a popular and timeless choice among quilters. The moon’s beauty and symbolism have inspired artists and writers for centuries, and it’s no surprise that quilters have also found inspiration in this celestial body. The Moon Quilt Patterns roundup is a great resource for quilters looking to create something magical with a moon theme. From simple and elegant designs to more intricate and detailed patterns, there is something for every quilter, regardless of their skill level.

Celestial Journey by Josephine Wall

3 Wishes Fabric Celestial Journey Tree Quilt

3 Wishes Fabric Celestial Journey Unicorn Quilt

Celestial Journey Collection 17130-MLT-CTN-D

Celestial Journey Collection 17131-NVY-CTN-D

Celestial Journey Collection 17132-BLK-CTN-D

Celestial Journey Collection 17133-MLT-CTN-D

Celestial Journey Collection 17134-BLU-CTN-D

Celestial Journey Collection 17135-MLT-CTN-D

Celestial Journey Collection 17136-GRN-CTN-D

Celestial Journey Collection 17137-PUR-CTN-D

Celestial Journey Collection 17138-MLT-CTN-D
Celestial Journey Collection CLJN-AST-DR
JavaScript seems to be disabled in your browser. For the best experience on our site, be sure to turn on Javascript in your browser.
- Create an Account
- Design Wall
- Collections: A - D
Celestial Journey
Celestial Journey -- by Josephine Wall for 3 Wishes Fabrics

- Unicorns 1 item
- 3 Wishes Fabric 1 item
- Celestial Journey 1 item
- Josephine Wall 1 item
- 100% Cotton 1 item
- 44/45" 1 item
- Remove This Item
- Add to Cart Add to Cart Remove This Item

Payment Method
- Privacy Policy

Quilting Wonders
Celestial Star Quilt Pattern
In the world of quilting, there exists a pattern that transcends the ordinary, drawing inspiration from the boundless beauty of the cosmos. The Celestial Star quilt pattern is a testament to the celestial wonders that have captivated humanity for centuries. With its intricate design and mesmerizing symmetry, this pattern offers quilters a unique opportunity to explore the vast expanse of the night sky from the comfort of their own homes.
Origins of the Celestial Star Pattern
The origins of the Celestial Star pattern are shrouded in mystery, much like the celestial bodies it seeks to emulate. Some historians trace its roots back to ancient civilizations that gazed upon the stars with awe and wonder. Others believe it emerged more recently, inspired by the advancements in astronomy and space exploration of the modern era.
Regardless of its exact origins, the Celestial Star pattern has become a beloved staple in the quilting community, cherished for its elegance and complexity. From its intricate star formations to its swirling galaxies, this pattern invites quilters to embark on a celestial journey unlike any other.

At first glance, the Celestial Star pattern may seem daunting with its myriad of intricate pieces and complex arrangements. However, with careful planning and attention to detail, quilters can unlock the secrets of this celestial masterpiece.
The key to successfully executing the Celestial Star pattern lies in understanding its core components. At its heart are the stars themselves, each comprised of individual pieces meticulously arranged to create stunning visual effects. These stars are then surrounded by swirling orbits and cosmic bursts, adding depth and dimension to the overall design.
While the Celestial Star pattern may require patience and precision, the end result is well worth the effort. Quilters who embark on this cosmic journey are rewarded with a breathtaking quilt that captures the timeless beauty of the night sky.
Interpreting the Cosmos
One of the most captivating aspects of the Celestial Star pattern is its ability to be interpreted in countless ways. From vibrant hues reminiscent of distant nebulae to subtle shades that evoke the tranquility of a moonlit night, the possibilities are as vast as the cosmos itself.
Some quilters choose to stay true to the traditional colors of the night sky, opting for deep blues and rich purples accented by pops of gold and silver. Others take a more whimsical approach, incorporating bold and unexpected color combinations that defy convention.
No matter the interpretation, each Celestial Star quilt is a unique expression of its creator’s imagination and vision. Whether hung on a wall as a work of art or draped over a bed as a cozy reminder of the universe’s majesty, these quilts serve as a testament to the enduring fascination with the celestial realm.
Constructing the Quilt Center
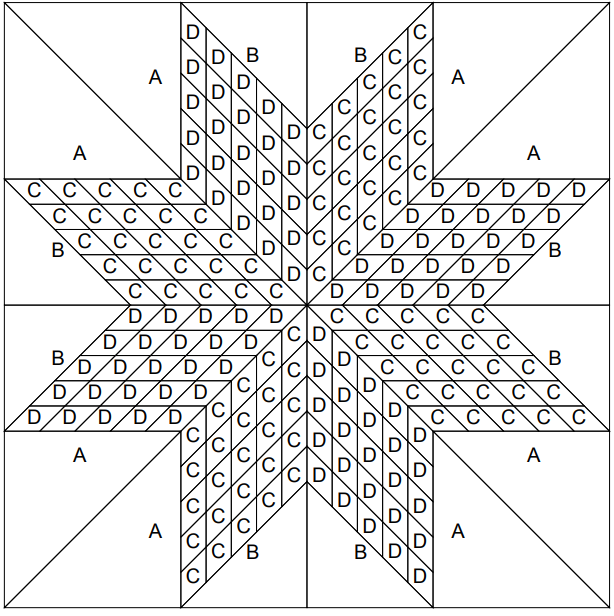
To embark on your journey to create a Celestial Star quilt, begin by constructing the quilt center. Finished at 48″ x 48″, this central piece sets the stage for the celestial wonders to come.
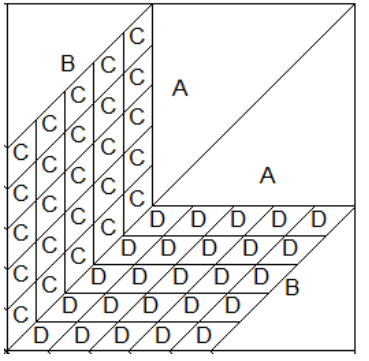
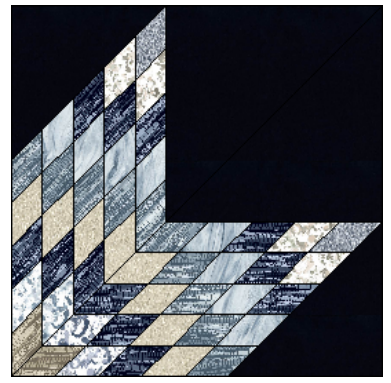
- Block Quadrants: Using the quilt image as a guide for fabric placement, arrange and sew together (25) “C” pieces to create a pieced diamond unit. Add (1) indigo “B” and (1) indigo “A” piece to two sides of the diamond unit to form a 1/8th block section. Repeat this process using (25) “D” pieces and (1) indigo “A” and (1) indigo “B” pieces to create the second 1/8th block section. Sew both 1/8th block sections together to form (1) block quadrant. Repeat this process to create a total of (4) block quadrants.
- Quilt Top Assembly: Once you have created all (4) block quadrants, sew them together to complete the quilt center.
Quilt Top Assembly
With the quilt center complete, it’s time to assemble the quilt top:
- Outer Border: Sew (2) 3″ x 48 1/2″ Dusk Landslide strips to the opposite sides of the quilt center. Follow this by sewing (2) 3″ x 53 1/2″ Dusk Landslide strips to the remaining opposite sides of the quilt center to complete the quilt top.

Quilting Instructions
With the quilt top assembled, it’s time to bring your Celestial Star quilt to life through quilting:
- Lay the backing fabric taut, then place the batting and quilt top to form the quilt sandwich, ensuring there’s enough space for quilting.
- Quilt as desired, whether it’s echoing the paths of distant stars or capturing the swirls of cosmic dust.
- Finally, bind the edges to finish your Celestial Star quilt, completing your journey through the cosmos in fabric form.
In the world of quilting, few patterns inspire as much awe and admiration as the Celestial Star. With its intricate design and timeless appeal, this pattern invites quilters to explore the mysteries of the cosmos in a whole new light. Whether you’re a seasoned quilter or just beginning your journey, the Celestial Star pattern offers a captivating adventure that is sure to leave a lasting impression. So pick up your needles, choose your fabrics, and prepare to embark on a celestial journey like no other.
Related Posts

Indigo Quilt Free Pattern
April 25, 2024

Pole Twist Table Runner Pattern
March 25, 2024

Starburst Pillow Pattern
March 5, 2024 March 25, 2024
About admin
Leave a reply cancel reply.
Your email address will not be published. Required fields are marked *
Save my name, email, and website in this browser for the next time I comment.
Simple Ornate Celestial Quilt Pattern
Introducing the Simple Ornate Celestial Quilt Pattern, a delightful quilting project that strikes the perfect balance between simplicity and elegance.
Are you ever in the mood for a project that’s both beautiful and blissfully simple? This is a project that allows you to create something stunning without the complexities and intricate designs.
Elegance Meets Effortlessness
Whether you’re a seasoned quilter with years of experience under your belt or just beginning your quilting journey, this pattern is designed to cater to your creative needs. The beauty of this quilt lies in its simplicity, making it a perfect choice for those moments when you want to sew something pretty without having to overthink the process.
The heart of this quilt is crafted using 6-inch quilt blocks, stitched together in two celestial themed printed fabrics. The result is a captivating center that effortlessly combines the charm of tradition with the allure of the modern aesthetic.
However, what truly sets the Simple Ornate Celestial Quilt Pattern apart from the rest are the magnificent and uncomplicated borders. These borders add a touch of ornate beauty to your creation while ensuring that the quilting process remains hassle-free and enjoyable.

Post contains affiliate links, and we earn commissions if you shop through the links on this page. For more information, please read the disclosure section under the About Us page .
Quilt Pattern Inspiration
Have you ever been standing in a fabric store with the goal of purchasing fabric and supplies for a different project when you see fabric that seems to speak to you? I had this happen a few times already with yarn, where I walked past yarn, stopped in my tracks, and stood there with the vision of the finished crochet project in my head.
Well, this happened to me for quilting now. I was in a fabric store to get fabric that was on sale, and only the sale fabric. That obviously didn’t happen.
As I was standing in line to check out, I saw this celestial themed fabric from Jason Yenter for In the Beginning Fabrics©. The longer I stood there, the more I couldn’t resist. I could see all the fabrics that I would use and even pictured the design in my head.
So, the fabric for this quilt wasn’t on sale, but I just love how it turned out. It was quick to make too. With just a few simple steps, you can create the center and add the borders for a celestial-inspired blanket.

Easy Quilt Block Layout for Beginners
Sometimes I’m just in the mood for a super simple squares quilt pattern. I don’t want to have to think too hard, I just want to sew something pretty. This quilt pattern is sure to give you exactly what you are looking for whether you’re a seasoned quilter or a person just starting out.
This pattern uses 6 inch quilt blocks joined together to make the center of this quilt in two printed fabrics. Just layout the fabric squares in an alternating pattern.
There are five borders that frame the center rectangle. Using complimentary dark and light fabrics along with a solid gold fabric, this quilt top transforms from plain squares being joined together to an eye-catching work of art.

Directions: Simple Ornate Celestial Quilt Pattern
Quilting skill level.
Easy – Confident Beginner
Finished Quilt Measurements
54 X 66 Inches
Materials and Equipment/Tools
The fabric requirements for the quilt tip, backing, binding, and the batting needed are noted below.

A = Bright Moon and Sun Fabric, 3/4 yard
B = Darker Moon and Sun Fabric, 3/4 yard
C = Cream with Gold Print Fabric, 7/8 yard
D = Gold Fabric, 3/4 yard
E = Black with Gold Stripe Fabric, ½ yard
F = Black with Gold Circles Fabric, ½ yard
G = Black with Gold Flecks Fabric, ½ yard
A piece 58 inches x 70 inches. 2 yards of 108 inch wide fabric or 4 yards sewn together of 42 or 44 inch fabric.
A piece 58 inches x 70 inches.
¾ yard cut into strips of fabric and joined. 2 1/2” X 258”. Jelly rolls work nicely joined for making your own binding too.
Equipment and Tools
- Rotary Cutter
- Quilting Ruler
- Cutting Mat
- Rotating Cutting Mat
- Ironing Board or Pressing Mat
- Sewing Machine
- My Favorite Quilting Supplies
General Cutting and Sewing
The directions for this quilt are for rotary cutting, machine piecing, machine quilting, and the binding is hand-stitched to the quilt back.
Accurate cutting and sewing helps ensure that seams line up for a beautiful quilt top. Pin your pieces together before sewing them to ensure proper seam alignment.
Pattern Notes
Choose any contrasting or complimenting colors of fabric.
All sewing in this tutorial uses ¼” seam allowance.
All fabric is sewn right sides together unless otherwise noted.
There are both colored photos and charts to help with the construction of the blanket.
Time Saving Tip: There are two borders 2 and 4 of the gold fabric. Rather than measure each side, top, and bottom separately and join the strips and cut to size ahead of time. I cut 2” strips the width of fabric. I made 10 of these. Then join each together as you would for making a long strip of binding. Next sew the strip of gold fabric to the sides and trim. Continue using the long strip as you sew to the top and bottom, trimming after each.
Fabric Cutting Directions
Center block fabric.
A = Cut 18, 6 ½” X 6 ½”. Bright Moon and Sun Fabric.
B = Cut 17, 6 ½” X 6 ½”. Darker Moon and Sun Fabric.
The center is made up of 35,6-inch finished size quilt block size in middle 5 blocks wide 7 blocks long. Alternatively, you could use 1 piece of fabric. 30 1/2” wide X 42 1/2” long.
Corner Squares Fabric for Borders 1, 3, 5
C = Cut 6, 3 ½” X 3 ½” squares. Cream with Gold Print Fabric.
E = Cut 6, 3 ½” X 3 ½” squares. Black with Gold Stripe Fabric.
Border 1 Fabric
Use the 2 pieces of C 3 ½” X 3 ½” squares for two corners.
Use the 2 pieces of E fabric 3 ½” X 3 ½” squares for two corners.
Cut 2 pieces of C Fabric 3 ½” X 32” Cream with Gold Print Fabric.
Cut 2 pieces of E fabric 3 ½” X 11” Black with Gold Stripe Fabric.
Top and Bottom
Cut 2 pieces of C Fabric 3 ½” X 20 1/2” Cream with Gold Print Fabric.
Cut 2 pieces of E Fabric 3 ½” X 10 1/2” Black with Gold Stripe Fabric.
Border 2 Fabric
Cut 2 pieces of D Fabric 2” X 48 ½”. Gold Fabric.
Cut 2 pieces of D Fabric 2” X 39 ½”. Gold Fabric.
Border 3 Fabric
Cut 2 pieces of C Fabric 3 ½” X 31 3/4” Cream with Gold Print Fabric.
Cut 2 pieces of F Fabric 3 1/2” X 19 ½” Black with Gold Circles Fabric.
Border 4 Fabric
Cut 2 pieces of D Fabric 2” X 57 ½”. Gold Fabric.
Border 5 Fabric
Cut 2 pieces of G Fabric 3 1/2” X 40 ½” Black with Gold Flecks Fabric.
Cut 2 pieces of C Fabric 3 ½” X 16 1/2” Cream with Gold Print Fabric.
Cut 2 pieces of G Fabric 3 1/2” X 32 ½” Black with Gold Flecks Fabric.

Center Section Sewing Directions
Begin with the 35, 6 ½” X 6 ½” squares of the A and B fabric.
There are a total of 7 rows with 5 squares in each row.
Begin sewing the first row of squares together alternating the squares A, B, A, B, A. See the diagram for fabric placement. Place squares right sides together and use ¼” seam.
Press seams to the right.
Layout the squares for row 2 according to the chart: B, A, B, A, B. Place squares right sides together and use ¼” seam.
Press seams to the left.
Continue alternating the squares for each row according to the chart for rows 3 through 7. Also, alternate which way you press the seams. This will help when you sew the rows together as it is easier to next the seams together.
Once all the rows are sewn, it is time to sew the rows together.
Once all the rows are sewn, join each row. Place row 2 on top of row 1 with the right sides together. Align and nest the seams securing with a pin.
Sew together using ¼” seam allowance removing the pins as you sew up to them.
Continue sewing the rows together making sure to align and nest the seams. Press the seams to one side or open.
Trim if needed to 30 1/2” wide X 42 1/2” long.

Begin Sewing on the Borders
Sewing directions for border 1.
Using the pieces previously cut out for the first border.
Sewing the Side Strips Together
With the right sides together using ¼” seam allowance, sew aC, Fabric 3 ½” X 32” Cream with Gold Print Fabric to the E, 3 ½” X 11” Black with Gold Stripe Fabric. Repeat the process for the other C and E fabric strips.
Press the seams to the darker fabric or open.
Using ¼” seam allowance and the right sides together. Sew the side strips onto the center quilt rectangle that is 30 1/2” wide X 42 1/2” long. Press the seams to the outside or open. (Use the diagrams to help with fabric placement. On the Right side, the black with gold stripe should be on the bottom and the cream with gold print should be on the top. On the left side, the black with gold strip should be on the top and the cream with gold print should be on the bottom).
Next Sew the Top and Bottom Strips Together with the Corner Squares
Begin by sewing one C, 3 ½” X 20 1/2” Cream with Gold Print Fabric strip to one E, 3 ½” X 10 1/2” Black with Gold Stripe Fabric strip. Just like you did for the side strips. Right sides together using ¼” seam allowance. Repeat the process for the other two strips.
Next Sew a 3 ½” X 3 ½” square onto each end of the strips. Align the lighter fabric squares, C with the darker fabric strips, E and the darker fabric squares, E with the lighter fabric strips, C. Refer to the diagrams for square placement. Press the seams to the inside, this will help nest seams when you sew the strip on.
Sew on the top strip with the right sides together using ¼” seam. Align any seams and pin in place to sew. The light cream square should be in the top left, then a dark strip, then light strip, and finishing with a dark square.
Press the seams to the outside or open.
Repeat the process for the bottom strip. The dark square should be on the bottom left, then a light strip, dark strip, and finishing with a light square.

Border 2 Sewing Directions
Using the pieces previously cut out for the second border.
Gold Fabric D. Cut 2 pieces 2” X 48 ½”. Cut 2 pieces 2” X 39 ½”.
While this is mentioned in the pattern notes, I think it is worth repeating and making sure you see this. You can cut the fabric strips for borders 2 and 4, the gold fabric to the measurements indicated. However, you can also make one long strip and sew on the strip trimming even as you go along.
With the right sides together using ¼” seam, sew on the side strips. Press seams to the outside or open.
Continue the process and sew on the top and bottom strips and press the seams to the outside or open.
Sewing Directions for Border 3
Using the pieces previously cut out for the third border.
With the right sides together using ¼” seam allowance, sew aC, Fabric 3 ½” X 31 3/4” Cream with Gold Print Fabric to the F, 3 1/2” X 19 ½” Black with Gold Circles Fabric. Repeat the process for the other C and F fabric strips.
Using ¼” seam allowance and the right sides together. Sew on the side strips. Press the seams to the outside or open. (Use the diagrams to help with fabric placement. On the Right side, the black with gold circles should be on the bottom and the cream with gold print should be on the top. On the left side, the black with circles strip should be on the top and the cream with gold print should be on the bottom).
Begin by sewing one C, 3 ½” X 20 1/2” Cream with Gold Print Fabric strip to one F, 3 1/2” X 19 ½” Black with Gold Circles Fabric strip. Right sides together using ¼” seam allowance. Repeat the process for the other two strips.
Next Sew a 3 ½” X 3 ½” square onto each end of the strips. Align the lighter fabric squares, C with the darker fabric strips, F and the darker fabric squares, F with the lighter fabric strips, C. Refer to the diagrams for square placement. Press the seams to the inside, this will help nest seams when you sew the strip on.

Border 4 Sewing Directions
Using the pieces previously cut out for the fourth border.
Gold Fabric D. Cut 2 pieces 2” X 57 ½”. Cut 2 pieces 2” X 48 ½”.
With the right sides together using ¼” seam, sew on the side strips. Press the seams to the outside or open.
Sewing Directions for Border 5
Using the pieces previously cut out for the fifth border.
With the right sides together using ¼” seam allowance, sew aC, Fabric 3 ½” X 20 1/2” Cream with Gold Print Fabric to the G, 3 1/2” X 40 ½” Black with Gold Flecks Fabric. Repeat the process for the other C and G fabric strips.
Using ¼” seam allowance and the right sides together. Sew on the side strips. Press the seams to the outside or open. (Use the diagrams to help with fabric placement. On the Right side, the black with gold flecks should be on the bottom and the cream with gold print should be on the top. On the left side, the black with gold flecks should be on the top and the cream with gold print should be on the bottom).
Begin by sewing one C, 3 ½” X 16 1/2” Cream with Gold Print Fabric strip to one G, 3 1/2” X 32 ½” Black with Gold Flecks Fabric strip. Right sides together using ¼” seam allowance. Repeat the process for the other two strips.
Next Sew a 3 ½” X 3 ½” square onto each end of the strips. Align the lighter fabric squares, C with the darker fabric strips, G and the darker fabric squares, G with the lighter fabric strips, C. Refer to the diagrams for square placement. Press the seams to the inside, this will help nest seams when you sew the strip on.

Finishing the Quilt
Now that the quilt top is complete, it is time to Layer the Quilt Top, Batting, and Backing Fabric
The backing fabric and the batting should be a few inches larger all the way around than the quilt top.
Backing and Batting should be approximately 58 inches x 70 inches.
This helps ensure that there is coverage all the way around the quilt top.
Make the quilt sandwich by placing the backing fabric right side down on a flat solid surface. Smooth out any wrinkles and use painters’ tape to secure the edges of the fabric down. This will help hold it in place and reduce the chance of a wrinkle developing as you place the next two layers.
Next, center the batting on top of the backing fabric smoothing out any wrinkles.
Finally, place the quilt top on the batting, centering it with the right side up . Smooth out any wrinkles.
Secure the Quilt Layers Together
All three layers can be secured using 1 ½” stainless steel pins. You can also spray with a basting spray if preferred.
If you use safety pins, put a pin in each corner and around the entire quilt about every 5-6 inches or so through all three layers.
This holds things in place, so they don’t move around while you are sewing the layers together using a quilting design of your choice.
Trimming the Batting and Backing Fabric
Once you have completed quilting the layers together. Trim the backing and batting. I like to use a large cutting mat, longer ruler, and a rotary cutter for this.
If I have a larger quilt than my work surface, I lay as much of the quilt as I can on a flat surface over my rotary cutting mat. Place the ruler along the edge of the quilt and use it as a guide to run your rotary cutter against to trim the quilt batting and backing to the size of the quilt top.
Continue moving the quilt as needed to get all four sides trimmed.
Sewing The Binding Strips
Sew together the long binding strips that will be used to cover the raw edge of the quilt.
Make a strip 2 1/2” X 258”.
Either use Jelly Roll Strips or cut 2 ½ inch width of fabric strips (WOF) and join them together to make the length needed for the quilt. I cut 7, 2 ½” WOF fabric strips and joined them together.
You can find a tutorial for making binding on the website.
Once the strips are sewn together, fold in half lengthwise with wrong sides together and press.
Pin the raw edge of the binding onto raw edge of the quilt top. I generally start in the middle of a side leaving approximately a 3-5” tail hanging. Fold over about 1-inch to the wrong side. This will be used to cover the ending tail.
Using a walking foot, sew the binding onto all four sides making sure to miter the corners and join the binding.
Join the end of the binding to the beginning of the binding strip. Trim the end so it will tuck into the folded beginning tail about 1-inch. Continue sewing the binding.
When you have finished sewing all four sides of the binding onto the quilt.
You can use your sewing machine to sew the binding on the back of the quilt. However, I hand-stitched the folded edge of the binding onto the back.
Other free quilt patterns you may enjoy making.
- Favorite Fast Four Patch Quilt Pattern for Beginners
- Charleston Beginner Pinwheel Quilt Pattern
- Free Simple Crochet Pillow Cover Pattern
- Elaine Simply Done Quilt Pattern
- Afternoon Tea Four Patch Table Runner
- Easy Four Patch Quilt Pattern Ombre Sunset
- Sweet Dreams Easy Quilt Pattern
- Simple Blocks Beginning Quilt Pattern

You can find Victoria crocheting, quilting, and creating recipes. She has cooked in restaurants for over 20 years, including many larger parties. She learned to crochet when she was just 11 years old and has been crocheting ever since; over 50 years now. Over 40 years ago, she loved her first class in sewing and continues to hone her skills in quilting. Many have enjoyed the handmade gifts over the years. In her professional career, she has worked in management in a wide variety of businesses including higher education as a dean of a division. All the while attending college part-time to achieve her doctorate in higher education with an emphasis in e-learning.
This site uses Akismet to reduce spam. Learn how your comment data is processed .
Carried Away Quilting
Journeys quilt pattern is ready!
Last October I shared my new Journeys quilt with you, along with the promise that the finished pattern would be ready sometime in 2022. The process to complete a quilt pattern can be slow and tedious . . . designing, writing, testing, sewing, editing, retesting, sewing some more, editing some more, photographing, proofing and editing. I won’t lie, by the end of the process, I really begin to dislike my boss (me). But in the end, when I have an original quilt to share with you, it’s all worth it. The Journeys quilt pattern is officially ready!

You can read all about the Journeys quilt and why it’s so special to me here .
The pattern is available as digital PDF on my Etsy Shop . It’s a great pattern for showcasing a beautiful collection of fat quarters!

Here are some quick facts:
- Finished Size: 69” x 77”
- Feature fabrics in my sample quilt: 18 fat quarters from Art Gallery Fabrics, designers included: Sharon Holland , Bonnie Christine , Maureen Cracknell and Amy Sinibaldi . (The backing fabric was from Bonnie Christine’s Open Road collection.)
- Background fabric: Moda’s Indigo Chambray
- Quilting: Woods Edge Quilting of Becker, MN
And here are the fabric requirements:
18 fat quarters ……… Top & scrappy binding*
Neutral …………………. 3 1/2 yards
Backing ………………… 4 3/4 yards
*Binding ……………….. 5/8 yard (If you do not wish to make a scrappy binding from the fat quarter fabric, then you will need 5/8 yard.)
I hate to be a tease, but I made a second sample of Journeys featuring Christmas fabric ! I used the Christmas Morning collection by Lella Boutique, which is gorgeous. Here’s a sneak peek photo from when I was just getting started. Once it has been quilted and bound, I’ll share a full reveal.
Have a great day!

Share this:
26 thoughts on “ journeys quilt pattern is ready ”.
Don’t be too hard on your “boss”! 🙂 She designed a beautiful quilt.
Hee hee! Thanks Kathy. I’ll go easy on her. She’s a pretty decent boss.
Tell your “boss” that she did a good job motivating you, and I’ve already bought my copy of the new pattern. It looks really fun to make, and when I saw the Christmas fat quarters, you had me!
Oh thank you so much! I hope you love the project! 🙂 Happy sewing to you!
I do love your Journey’s Quilt. Anxious to see the finish on your Christmas quilt.
Thanks so much Nancy!
Carried Away Quilting has been. Blessing to me! I marvel at your artistic ability to combine fabrics in such a beautiful way! And your math skills are crazy good!!! I love Journeys Quilt! Add it to my make list!
You are just too good to my, Sylvia! Thank you !
Thanks Deanna!!
Taunja, You amaze me with your talent and thanks for sharing this gift and thoughts that inspired this gorgeous quilt! I too, stray from blue, but it’s so beautiful, like the sky or the lake that we love. I couldn’t agree with you more on our precious time with our children, Luke is a great quilt holder!
Thanks so much, dear friend! I’m so lucky that you always “get” me and we have so much in common, including great children who mean the world to us!
Gorgeous as always! I keep saying I am NOT purchasing more patterns, but, YOU are making this effort VERY difficult! 🤣
Hee hee! I love being a bad influence! 😉
- Pingback: Quilt shop offers Journeys fabric kits – Carried Away Quilting
- Pingback: Journeys fat quarter quilt for Christmas – Carried Away Quilting
May I buy a hard copy of your pattern Journey Ruth
I’m sorry Ruth. Journeys is only available as a PDF pattern. Thank you for your inquiry!
I spotlighted this lovely quilt on my YouTube channel. I hope your sales skyrocket! I love this pattern. Thank you so much! Timestamp 11:14 https://youtu.be/FRN36Y4IusE
Thank you so much for sharing information about my pattern. That was very kind of you. I really enjoyed your lively Youtube video and subscribed. Isn’t it awesome when quilters find each other? 🙂
I ordered The Journeys Pattern via Etsy yesterday and it has been paid for from my Credit Union Account. There is not a download of the pattern in my Etsy Account and I can’t find it anywhere else. Please send me the pattern or let me know where/how I can download it.
Sincerely, Patricia Lee
Hello Patricia. I sent you a Convo Message via Etsy. I see your order out there. Please log into your Etsy account where you will find my Convo Message and I can help you out. Thank you!
Luv the quilt but I cannot find the free pattern. Can domeone assist me please?
Hello Vicky! Journeys isn’t a free pattern. It is a PDF pattern available for purchase on my Etsy Shop (there is a link in the blog post.) However, I do have several free tutorials on my blog. Maybe you were thinking of one of them? https://carriedawayquilting.com/free-tutorials/
Thank you! My mistake!! I get too excited sometimes. LOL
HAPPY HALOWEEN!
Beautiful! Can’t wait to see it made with Christmas Morning.
Leave a Reply Cancel reply
Discover more from carried away quilting.
Subscribe now to keep reading and get access to the full archive.
Type your email…
Continue reading
Free Quilt Patterns
- Change to 12
- Change to 24
- Change to 48
- Change to 100

Cardinal Noel I Free Quilt Pattern

Cardinal Noel II Free Quilt Pattern

Carnaby Street Free Quilt Pattern

Cast a Spell Free Quilt Pattern

Castle Spooky Free Quilt Pattern

Catalina Morning Sunlight Dark Free Quilt Pattern

Catalina Morning Sunlight Light Free Quilt Pattern

CAT® Junior Crew Free Quilt Pattern

Celestial Journey Free Quilt Pattern

Celestial Journey Unicorn Free Quilt Pattern

Celtic Dreams Free Runner Pattern

Century Black on White Atmosphere Free Quilt Pattern

Century Rainbow Color Vision Free Quilt Pattern

Century Solids Canyon Road Free Quilt Pattern

Century Solids Century Pinwheels Free Quilt Pattern

Century Solids Century Squares Free Quilt Pattern

Century Solids Flying South Free Quilt Pattern

Century Solids Rainbow Rundle Free Quilt Pattern

Ceylon Free Quilt Pattern

Ceylon Free Table Runner Pattern

Chai Over Latte Free Quilt Pattern

Chameleon Basics Free Quilt Pattern
IMAGES
VIDEO
COMMENTS
Item # celestial-journey-unicorn-free-quilt-pattern $0.00. Connect With Us. Facebook; Pinterest; Check out all our online Clubs and Programs! Long Arm Machine Quilting Service is available for local and online customers. Schedule today! (click above image for details) April Shop Hop Bunny browsing through Clubs/Programs!
To make this 54″ x 64″ quilt design, you will start with the incredibly detailed 36″ x 44″ digital-printed panel, then add coordinates from the collection to make the 'twisted ribbon' border. We hope you enjoy this fantastical adventure. …featuring the 'Celestial Journey' collection by Josephine Wall for 3 Wishes Fabric.
center to complete the 45 1/2" x 55 1/2" quilt center. Press seams toward the rows. 6. Sew the 55 1/2" white strips from step 2 to the long sides of the quilt center and the 47 1/2" strips to the top and bottom. Press seams toward the strips. 7. Stitch the 2 1/2" x WOF lavender strips short ends together to make a long strip. Press seams to one ...
Featuring the Celestial Journey Collection by Josephine Wall Shipping to stores Jan. 2021! page 1 Finished Size: 43" x 52" (109.22cm x 173.99cm) Fabric Needed 3 Wishes Fabric® Celestial Journey Collection • 1 Panel - Tree Panel (17130-MLT-CTN-D) • ¾ yd - Planets (17132-BLK-CTN-D) • ½ yd - Fiery Sky (17133-MLT-CTN-D) for Binding
Celestial Journey Unicorn Free Quilt Pattern. View Larger Image. Price: $0.00. 1 item(s) available. Item # celestial-journey-unicorn-free-quilt-pattern Tweet Pin It. Celestial Journey Unicorn Free Quilt Pattern courtesy of 3 Wishes Fabric.
Designer: Harriet Ellen Cox for McCall's Quilting. The Moon & Stars Quilt is a free pattern inspired by a vintage hand-pieced original from 1896 in Basque County, Texas. Designed by Harriet Ellen Cox, this modern version features an intricate appliqué design of stars and celestial bodies. Measuring at 66 ½˝ x 88˝, the pattern comes with ...
100% Premium Cotton. Showing 1 - 12 of results. 3 Wishes Fabric. Celestial Journey Tree Quilt. 3 Wishes Fabric. Celestial Journey Unicorn Quilt. Celestial Journey Collection. 17130-MLT-CTN-D. Celestial Journey Collection.
Notions & Patterns; Pre-cuts & Kits; Fun Gift Items; Gift Cards; Retreat Center; Retreat Gallery; Events & Map ... $12.20. PRODUCT. 3 Wishes Celestial Journey by Josephine Wall 17132 BLK Black Planets $12.20/yd . $12.20. PRODUCT. 3 Wishes Celestial Journey by Josephine Wall 17135 MLT Feathers $12.20/yd ... Fabri-Quilt; Free Spirit; Henry Glass ...
Celestial Journey Fabric By 3 Wishes Fabric. Beautiful 100% Cotton Fabric Great For Quilting, Blankets, & Various Sewing Crafts (455) $ 3.98. Add to Favorites ... Celestial Quilt Pattern, Moon Wall Art Pattern, Crescent Moon Face Wall Decor, Colorful Art Quilt Pdf Pattern (103) $ 8.00. Digital Download ...
Midnight Rendezvous Quilt Kit with Fabric and Pattern for Quilt Top and Binding, 66x72 Blank Quilting Moths Moons Celestial Witchy Astrology. (9.2k) $94.50. $105.00 (10% off) FREE shipping. Twinkle, Twinkle - Quilt pattern - Queen/King - Step by Step from mystery quilt to you! Any skill level - any color scheme! (78)
After your purchase you will receive an email with the digital file to download. Quilt sizes included in this pattern: Baby: 36" x 36". Square Throw: 54" x 54". Throw: 54" x 72". Twin: 72" x 90". Queen: 90" x 108". Add To Cart. All Alderwood Studio patterns can be used to make quilts for personal use, gifting, or selling in small batches.
Celestial Journey. Celestial Journey -- by Josephine Wall for 3 Wishes Fabrics. Show per page. Sort By. Celestial Journey: Landscape Unicorns Green - 3 Wishes 17136 green. $12.20 Per Yard. Add to Cart.
Ginkgo Garden Pattern 59.5" x 78.5". Drag fabric here. to add backing. add backing.
The Celestial Star quilt pattern is a testament to the celestial wonders that have captivated humanity for centuries. With its intricate design and mesmerizing symmetry, this pattern offers quilters a unique opportunity to explore the vast expanse of the night sky from the comfort of their own homes. ... To embark on your journey to create a ...
Featuring the Celestial Journey Collection by Josephine Wall Shipping to stores Jan. 2021! page 1 Finished Size: 37 ½" x 47 ½" (95.25cm x 120.65cm) ... • Quilting and sewing supplies • Even-feed foot (optional for quilting) • Square up ruler (optional) Unicorn Quilt. www.3wishesfabric.com page 2
Finishing Instructions. Step 1 - Lay out the Corner Sections, Middle Edge Sections, and Block K as shown in the diagram on page 35. Step 2 - Stitch the sections together into rows, press the seams open. Stitch the rows together to create the quilt center. Step 3 - Attach the 72½" Print 11 inner border strips.
Begin with the 35, 6 ½" X 6 ½" squares of the A and B fabric. There are a total of 7 rows with 5 squares in each row. Begin sewing the first row of squares together alternating the squares A, B, A, B, A. See the diagram for fabric placement. Place squares right sides together and use ¼" seam. Press seams to the right.
Three Wishes Celestial Journey Quilting Fabrics. 17138-MLT Unicorn 34 x 42 Panel Quilting Fabric. Designed by Josephine Wall for 3 Wishes Fabrics. 699919324712 ... Big Sky Quilts stocks all the fabrics, notions, kits, patterns, and batting materials you need to make beautiful quilts. Need a sewing machine? We have those too, along with an ...
Introducing the Simple Ornate Celestial Quilt Pattern, a delightful quilting project that strikes the perfect balance between simplicity and elegance. ... Effortlessness Whether you're a seasoned quilter with years of experience under your belt or just beginning your quilting journey, this pattern is designed to cater to your creative needs ...
Celestial Stripes Quilt Quilting Pattern From Zen Chic Patterns BRAND NEW, Please See Item Description and Pictures For More Information! (13.4k) $ 12.75. Add to Favorites Star Log Cabin Quilt Block Pattern, 16-inch, Baby, Lap, Twin Queen Bed Size (3.3k) $ 3.00 ...
The Journeys quilt pattern is officially ready! You can read all about the Journeys quilt and why it's so special to me here. The pattern is available as digital PDF on my Etsy Shop. It's a great pattern for showcasing a beautiful collection of fat quarters! Here are some quick facts: Finished Size: 69" x 77".
Celestial Stripes is an easy-to-do, beginner friendly quilt pattern. Even gathering the materials is easy, you just need one Jelly Roll of your choice and a matching, simple, calm background fabric. And you are all set to make a completed bed-sized quilt. By cutting the block units themselves efficiently, you can put the center of the quilt ...
Item # celestial-journey-free-quilt-pattern Celestial Journey Unicorn Free Quilt Pattern. $0.00. Item # celestial-journey-unicorn-free-quilt-pattern Celtic Dreams Free Runner Pattern. $0.00. Item # celtic-dreams-free-runner-pattern Century Black on White Atmosphere Free Quilt Pattern.