- PRO Courses Guides New Tech Help Pro Expert Videos About wikiHow Pro Upgrade Sign In
- EDIT Edit this Article
- EXPLORE Tech Help Pro About Us Random Article Quizzes Request a New Article Community Dashboard This Or That Game Happiness Hub Popular Categories Arts and Entertainment Artwork Books Movies Computers and Electronics Computers Phone Skills Technology Hacks Health Men's Health Mental Health Women's Health Relationships Dating Love Relationship Issues Hobbies and Crafts Crafts Drawing Games Education & Communication Communication Skills Personal Development Studying Personal Care and Style Fashion Hair Care Personal Hygiene Youth Personal Care School Stuff Dating All Categories Arts and Entertainment Finance and Business Home and Garden Relationship Quizzes Cars & Other Vehicles Food and Entertaining Personal Care and Style Sports and Fitness Computers and Electronics Health Pets and Animals Travel Education & Communication Hobbies and Crafts Philosophy and Religion Work World Family Life Holidays and Traditions Relationships Youth
- Browse Articles
- Learn Something New
- Quizzes Hot
- Happiness Hub
- This Or That Game
- Train Your Brain
- Explore More
- Support wikiHow
- About wikiHow
- Log in / Sign up

How to Make a Travel Itinerary with Google Maps
Last Updated: August 16, 2024 Fact Checked
This article was reviewed by Stan Kats and by wikiHow staff writer, Nihal Shetty . Stan Kats is a Professional Technologist and the COO and Chief Technologist for The STG IT Consulting Group in West Hollywood, California. Stan provides comprehensive technology solutions to businesses through managed IT services, and for individuals through his consumer service business, Stan's Tech Garage. Stan holds a BA in International Relations from The University of Southern California. He began his career working in the Fortune 500 IT world. Stan founded his companies to offer an enterprise-level of expertise for small businesses and individuals. There are 8 references cited in this article, which can be found at the bottom of the page. This article has been fact-checked, ensuring the accuracy of any cited facts and confirming the authority of its sources. This article has been viewed 106,969 times.
If you’re planning a trip, you might be wondering how to figure out where to go and in what order. Luckily, Google has a free tool that you can use in order to get a better sense of your travel plans. We’ll walk you through how to make a travel itinerary with Google Maps through its My Maps feature. In a few easy steps, you can master an excellent organizational tool that’ll help you plan the best trip possible.
Setting Up Your Map

- Unfortunately, as of October 2021, Google no longer supports the “My Maps” app on phones. If you’re on mobile, you’ll have to use your phone’s web browser to access the site while on the go. [2] X Research source
- If you don’t already have a Google account, setting one up is a quick process. A Google account gives you a number of benefits, including a new gmail address. Check out this link to start the set-up process: https://accounts.google.com/signup/v2/webcreateaccount?flowName=GlifWebSignIn&flowEntry=SignUp

- For instance, your might name your map something like “California Summer Trip 2022,” and you could enter a description like, “Places to see and eat during two-week California road trip.”

- For example, for a California road trip, you might enter “Golden Gate Bridge” into the search box. My Maps will automatically direct you to its location.

- For instance, if you’ve searched for “Golden Gate Bridge,” there will be a white box that offers some information on the location, and even a rating from other users. Click on the “Add to map” button to send it to your saved locations.

- For example, you might fill in the description to the “Golden Gate Bridge” box with something like, “Spend at least 1 hour here—must-see location.”

- You might consider changing the colors of your pins to match how important each location is to your trip. For example, must-see locations could be red pins, your housing spots could be green pins, and optional places to visit could remain as blue pins.
Creating an Itinerary and Planning Routes

- For example, you might have a layer titled “Places to see,” one titled “Places to eat,” and one titled “Places to sleep.” You can then put sightseeing destinations, restaurants, and hotels you want to stay at in their respective layers.

- You can add more than one location to a single route. For example, if you wanted to plot a route from Big Sur to the Golden Gate Bridge, and then to Palo Alto, you can add all three locations to your route layer and create a multi-stop path. [11] X Research source
- By clicking on the three dots next to the layer with your travel route, then selecting “Step-by-step directions,” My Maps will create a set of directions for your travel. Handy!

- For example, by using My Maps, you might notice that seeing the Golden Gate Bridge, walking around San Francisco, and eating at a restaurant in Berkeley are close enough to all be doable in one day, while visiting Big Sur might be better saved for another afternoon. My Maps can help you plan out the most efficient trip possible, so you can enjoy your travels even more.

- When sharing your map, you can also choose the option that allows others to edit the map as well. With this option selected, your friends can pick places that they’re interested in as well, so you can have them all on the same document. [13] X Research source

- Although My Maps can’t be viewed offline, you can download an offline map of any areas you’re interested in on your phone. Using the Google Maps app, type in a location into the search bar, tap the name of the location, then navigate to the option “Download offline map.” [15] X Research source
Expert Q&A
You Might Also Like

- ↑ https://support.google.com/mymaps/answer/3024925?visit_id=637744367666134651-2428484219&p=lite_addplaces&rd=1
- ↑ https://9to5google.com/2021/07/20/google-my-maps-android-shutdown/
- ↑ https://support.google.com/mymaps/answer/3024454?hl=en&ref_topic=3024924
- ↑ https://support.google.com/mymaps/answer/3024925?visit_id=637744500327517491-717751493&p=lite_addplaces&rd=1
- ↑ https://support.google.com/mymaps/answer/3024925?hl=en&co=GENIE.Platform%3DDesktop
- ↑ https://support.google.com/mymaps/answer/3502610?hl=en&ref_topic=3024924
- ↑ https://support.google.com/mymaps/answer/3109452?hl=en
- ↑ https://support.google.com/maps/answer/6291838?hl=en&co=GENIE.Platform%3DiOS
About This Article

- Send fan mail to authors
Did this article help you?

Featured Articles

Trending Articles

Watch Articles

- Terms of Use
- Privacy Policy
- Do Not Sell or Share My Info
- Not Selling Info
wikiHow Tech Help Pro:
Develop the tech skills you need for work and life
How To Plan A Trip With Google Maps: 7 Easy Steps
This page may contain affiliate links which earn us a commission at no extra cost to you to support the site. Thank you!
Wondering how to plan a trip with Google Maps? Below, we’ll show you how we plan all our trips on Google Maps – get ready for every Google Maps hack you’ll ever need!
There is a lot that goes into planning the perfect trip. What are you going to do? Where will you stay? How are you going to plan your days? How long do you even need to see everything? It’s overwhelming!
I love travel planning. As you can see on this website, I kind of made my career out of it. Because I want to make the most out of my trips (and write the best possible guides about the destinations I visit), I take travel planning pretty seriously.
There is so much research that goes into it, and I couldn’t do it without my favourite travel planning tool: Google Maps. In this guide, I’m sharing how I use Google Maps as a trip planner, along with some handy hacks to help you on your next adventure. Let’s take a look!
Add Directions
Embed your map on your site, 3. it is easy to plan your driving miles/time.

7 Steps to Plan a Trip With Google Maps
Here is how to use Google Maps trip planner:
1. Create a Map
To create a map on Google, you do need a Google account. Once signed up/logged in, go to this page .
Click on “ Saved” >> “My Maps “, which will take you to your maps. If you have created any maps in the past, you will also find them here. As you can see in the screenshots below, I’ve already created quite a few!
Alternatively, you can go to this page , where you see and access your maps in an instant.

To create a new map, click on “ Create Map ”. This will open a new tab with an empty map.

By clicking on “ Untitled Map ”, you can give your map a name and a description. And ta-da! You’re ready for some travel planning on Google Maps. Time to create the perfect itinerary .

2. Add Locations
Now it’s time to start brainstorming. What do you want to do and see on your trip? There are so many ways to find the best places to visit.
For starters, you can find things to do by reading travel guides, blog posts , and itineraries from other travel bloggers. It’s also a good idea to go through Instagram hashtags and location tags. And, of course, good old printed travel guides (by Lonely Planet and Rough Guides, for example) are always a good shout too.
You don’t have to worry about how to plan out your days in detail. For now, you simply want to get an idea of what you want to do on your trip.
Whenever you find something that seems interesting, you can add these to your map by typing the location into the search bar. This can be the name of the location or the address, or you can use the coordinates. Usually, you’ll see a drop-down menu with suggestions as you type.

By pressing enter or selecting one of the options, Google Maps will take you to the location. Here, you can add these locations to your maps. Simply click on “ Add to map ”. Afterwards, you’ll see it appear on the Untitled Layer .

Alternatively, you can use the “ Add Market ” tool (shown in the screenshot below) to add a marker on the map. You can use this when a location isn’t on the map but you don’t have the coordinates, for example.

Before adding all your locations, make sure to read step 3. We explain how to customize your pins on Google Maps, making it much easier to plan your daily itineraries later on.

Planning a road trip on Google Maps? Start by adding the places you want to see/visit. Later on (see step 5), you can add directions to help you find the fastest routes. You can create on Google Maps for the overall road trip, and make another map for daily itineraries of your road trip.
3. Customise Your Categories (Icons and Colours)
The customisation options are another reason why planning trips on Google Maps is one of the best travel planning tools out there. By using colours, icons, pictures and notes, your map will be even easier to navigate.
These options let you break down your locations into categories, such as things to do, photography spots, restaurants, cafes, hotels, shops, etc.
You can change the colour of your pin and add an icon under the “ Style ” option – it looks like a paint bucket. There are hundreds of different icons to choose from.
At this stage, it’s best to stick to changing the icons for now. I normally change the colours to divide the days on my itineraries. Obviously, you can completely style this the way you want.

You can also change the colour and icon of your pins in the side menu.

When clicking on the “ Edit ” icon, you can change the title and add a description for your location. This can be handy to help yourself remember any specifics about this place, such as good photography spots, opening times and whether you need to book a ticket in advance or not.

You can add an image or video to your pins, too. And lastly, you can delete the pin by clicking on the trash icon.

4. Create Layers
Now you’ve added all the things you want to do and given them some icons, it’s time to take a look at the layers. You can add a layer by clicking the “Add layer” option in the sidebar. This automatically creates a brand new untitled layer on your map.

You can rename and delete the layers by clicking on the three dots next to the name of the layer.

You can make layers invisible by unchecking the box next to the name of your layer.

To move points of interest from one layer to another, you can simply drag them over with your mouse.
Layers are an easy way to categorize and organise the locations on your map. There are multiple ways to do this, and you can choose a way that works best for your trip. For example, you can create one layer for restaurant options in Tokyo, one for sightseeing in Tokyo, one for hotels in Tokyo , etc.
When I’m planning a big trip, I like to use layers to break down my individual days or cities. This way, I can quickly see what I’m doing every day while I’m travelling. To make it even clearer, I change the colours of all my pins to match the different layers.
5. Plan Your Itinerary (with Directions)
After following these steps, we should have a good overview of all the things we want to do and see during our trip. This will make it much easier to break down the trip into days.
For the Tokyo itinerary I’ve been planning as part of this Google Maps tutorial, I’m going to spread it out over two days.
I created two layers to match my time in Tokyo in Google Maps.

Because I can see where all my hotspots are located, I can see which activities and sights I want to pair together. This way, I can efficiently plan what I want to see each day. You can even make squares to group things together with the “ Line Drawing ” tool.
For example, it makes sense to group these pins together per day – this will save me a ton of time travelling from one place to the other.

Always check whether these things actually work together, though. Sometimes, a ton of restaurants are located near each other, but there’s no point in planning to visit four restaurants on the same day.
Sometimes, there are museums that take way too long to visit alongside other sights or you can combine certain parts of the city in one day.
Take a look at your itinerary and plan it accordingly. As mentioned before, I like to use the colour tool to add the same colour per day to make it even easier to spot. My Google Map itinerary turned out like this:

If you’re planning a road trip on Google Maps or want directions for walking from one point to another, you can use the direction tools. Click on one of the locations and select “ Directions to here ”.

This will create a new layer on your map. From here, you can add different locations to create a route. You can select points of interest on your map to easily add them to your route. Click on “ Add Destination ” to add more stops.
You can also change whether you want directions by car, bike, or on foot by clicking on the car icon. This opens up a small window with a car, bike and pedestrian. Changing the mode of transport will automatically change the directions to find the best route for you.
This tool allows you to create road trip itineraries or city walks with just a few clicks. I find this especially handy to plan a road trip with Google Maps, as it allows me to estimate the driving time and the amount of money I’ll have to spend on petrol.

By clicking on the three dots next to the name of this direction layer, you can click on “ Step-by-step directions ”. This will give you detailed directions, distances, and an estimation of how long it’ll take for you to get there. Super handy!

6. Book Your Hotels
Now you know exactly what your daily plans are for our trip, it makes it much easier to pick the perfect location for your accommodation . Since you know what parts of the city you’ll be visiting, you can pick a spot that’s near these locations. This will save you so much time (and money), as you won’t have to travel too far to go to start your daily itinerary.
I usually book hotels on Booking.com . The website’s map feature makes it perfect for choosing the location. Because I have my itinerary ready on Google Maps, I know exactly what area of the city I prefer to stay in.
Once you’ve booked your accommodation, you can add the location to your map too.
7. Share Your Trip & Access it on Your Phone
Once you’ve finished your map, you can share it with your travel buddies and download it onto your phone. Here is how to do it.
Access Your Map on Your Phone
To view the map on your phone (with an internet connection), simply download the Google Maps app. Log into your account and click on the “ Saved ” button at the bottom.
Then scroll down and click on “ Maps ”. This will take you to all the maps you created. Click on the map you want to access, and all your saved spots will appear.

Share Your Map
To share your map with your travel company or friends, click on the “ Share ” button. Make sure to enable link sharing , which will allow you to copy the shareable link. You can share this link with friends, who can then access your map and download it themselves.

If you’ve read any of my itineraries or travel guides , you have probably noticed some Google Maps. As I always use these maps for my own trips, I try to include them in my articles for you to use. If you want to embed your map onto your site, click on the three dots >> “Embed on site” .

This will give you a code that you can include on any site for an interactive map to appear.
Why Use Google Maps for Trip Planning?
Google Maps is one the best travel tools because it’s so easy to use for both planning your trip and using it during your trip. We use it for planning city trip itineraries and road trip routes, plus it allows us to save our favourite locations and hotspots.
Whenever we come across a location on social media that we’d like to check out, we add it to a bigger map so we can organise it into smaller itineraries when we’re ready to visit.
Here are some of the main reasons to use Google Maps:
1. It Allows You to Access Your Maps Anywhere
You can access Google Maps anywhere you want. After creating a map on your desktop, you can open it on your phone or tablet. Plus, you can download it so you can access it without being connected to the internet. This is especially handy when you’re abroad and internet access isn’t a given.
2. It Makes it Easy to Find the Best Hotel Location
Using Google Maps to plan my city breaks gives me insight on the perfect location for my accommodation. Because I have a visual representation of all the things I plan to do during my holiday, I know exactly what the best hotel spot is. I compare the map from Booking.com and my own map, and ta-da!
When planning road trip routes on Google Maps, you can easily estimate the time it takes to drive from one place to the next. You can use this to properly budget your trip in terms of petrol cost, too. And when on the road, you can use the directions from your own map while driving.
Conclusion: Using Google Maps Trip Planner
That concludes my tutorial on how to plan a trip with Google Maps. I hope this has shown you all the amazing features this tool offers and how easy it is to use when planning a road trip or city break.
Ever since I started using it, I’ve never looked back. It has saved me so much time and always takes away a ton of travel planning stress. I hope it can do the same for you!
Nele (Nay-la) graduated from Manchester Metropolitan University with an English and Creative Writing Degree and has lived in the UK for nearly 10 years. She has had an interest in Japan and its culture for as long as she can remember. Since her first trip in 2018 surpassed all expectations, she has continued to return to Japan to explore more of all it has got to offer. You can read her full story here .
10 thoughts on “How To Plan A Trip With Google Maps: 7 Easy Steps”
WOW!! I had no idea this resource existed. Your detailed steps and screenshots make it easy for me to take the plunge and start using this tool. Thank you.
Thank you so much for the lovely comment, Anne! So glad the post was able to teach you a few things – it’s such a great tool to use for planning trips!
Hi, Thank you for sharing this interesting feature. I was looking for a hard copy of a plan for my travel in Malaysia.
Great guide, exactly what I was looking for, Great work, Thank you!
- Pingback: Blogs To Read This September - Bournemouth Girl
This was very helpful. Thank you 🙂
Amazing tutorial! I am so glad you came up in Google search just as I was looking for this kind of resource. And best of all its free and a tool that I am so used to. How did I not know this before about G Maps?!
So glad to hear the tutorial was helpful! It’s been such a useful tool in my travels, hopefully you can use it on your next trip too!
Very detailed explanation and very well explained too. Thanks for making this blog…
Great post! I recently planned a trip to a nearby city using Google Maps, and it was incredibly helpful in navigating unfamiliar roads and finding the best routes. I especially appreciated the feature that allowed me to save my route and share it with friends. Will definitely be using this method for future trips!
Leave a Comment Cancel reply
This site uses Akismet to reduce spam. Learn how your comment data is processed .
Must-Read Articles

50+ Best Things To Do In Japan

Is The Japan Rail Pass Worth it?

The Perfect Three Week Japan Itinerary
Japan Travel Tips Group

The Japan Travel Newsletter
Sign up to get inspired! Receive insider tips, special discounts and more to plan your perfect Japan trip.
You have successfully joined our subscriber list.
japan travel Blog
Tokyo Kyoto Osaka Hiroshima Hakone Kobe Nikko Nara Kyushu All Japan Content
Plan Your Trip
Best Things To Do Japan Rail Pass 2 Week Itinerary 3 Week Itinerary Accommodation Japanese Phrases
About The Navigatio Work With Us
- How to Use Points for Free Flights
- The Best Carry-On Luggage
- The Ultimate Guide to Traveling Like a Pro
- My Favorite Travel Credit Cards
- lake louise
- new orleans
- new york city
- palm springs
- packing lists
- product reviews
- How to Use Vitamin C Serum
- Easy Step-by-Step Skincare Routine
- Drunk Elephant: Best & Worst Products
- Fitness & Wellness
- How I Edit My Photos for Instagram
- Furniture My Interior Designer Loves
- Best Strapless Bras
- blogging & business
- Amazon Finds
- Hotel Lobby Candle
- Shop My Faves
- Promo Codes and Discounts
- Shop My Instagram
How To Use Google Maps Trip Planner

With so many different travel apps and websites available, it’s now easier than ever to keep yourself organized while planning a trip. One of my favorite tools to use, regardless of where I’m going, is Google Maps Trip Planner.
If you’re the type of person that gets easily overwhelmed when putting together an itinerary , you’ll want to follow this step-by-step guide which details exactly how I use it. Google Maps Trip Planner is not only a highly-visual way to get your bearings of an area, but it’s extremely useful for figuring out where you can realistically travel to during the duration of your trip.
It’s a fantastic way to use Google Maps for multiple stops in a single itinerary , and also comes in handy if you’ve received a TON of recommendations from friends, because you can add destination after destination, and then refer back to the map as you’re out and about exploring.
For example: if you’re visiting NYC and find yourself in Soho looking for a cute cocktail spot , rather than endlessly scrolling through Yelp or TripAdvisor, you’ll be able to pull out your trip planner to see if you’re near places that your friends have recommended! It’s also a particularly handy tool to use when creating a road trip itinerary.
Here’s the step-by-step outline that we’ll go over:
- Create a new Google map for your destination.
- Choose categories for your map.
- Start adding your locations and ideas.
- Customize and color-code your map.
- Decide which activities to group together.
- Plan your day-by-day itinerary.
- Download the Google Maps app on your phone.
- Share your map with friends.
This will all make more sense once I walk you through everything with screengrabs.
Whether you’re thinking about a girlfriends getaway or a honeymoon , Google Maps Trip Planner will be a game changer for you. Take my word for it! Here’s a step-by-step guide to using Google Maps to coordinate your next getaway — with a completely flawless travel plan.
How to Use Google Maps Trip Planner
1. make a new google map..
To get started, you’ll need to create a new Google Map by visiting this link .
It will take you to the main maps page, which you’ve likely seen before. (Make sure you’re logged into a Google account, and if you don’t already have one, you can sign up for free here .)
Once you’re signed in, simply click on the three bars icon in the top left corner and select “Your Places” from the menu.

Next, you’ll want to click on “Maps” in the far right corner of the menu.
You won’t see anything listed yet, unless you’ve created a map previously.
Click “Create Map” (which is at the bottom of the menu.)

After that, you’ll be directed to an untitled map that you’ll want to name and add a description to.
Do this by clicking on “Untitled Map” and a text box will appear and allow you to fill out this information. Remember to be as specific as possible so you stay organized throughout the entire planning process.

2. Categorize Your Map.
Create a list of all the things you want to spend your time doing on your trip. Here are the categories I typically use:
- Restaurants & Bars
- Cities & Towns (this is good if you’re road-tripping or visiting multiple destinations during a single trip)
- Hotels (I’d only use this category if you’re staying in more than one)
- Activities (beaches, hikes, Instagram spots, etc)
Now that you have your category ideas solidified, you’ll create a “layer” for each one by clicking on the “Add Layer” button on the left hand-side of your screen.
Be sure to name each individual layer by clicking on “Untitled Layer” text box, just like you did when you first named your map. I named my first layer “Hotels” as an example.

More: How I Use Points & Miles to Travel for Free
3. Add Your Ideas to the Google Map.
If you’re planning a trip to a destination you’ve been thinking about visiting for a while, it’s likely that you already have some things on your bucket list, whether it be from friends, bloggers, travel sites, or Instagram.
This is your chance to put those thoughts in one organized space and see which ones you’ll be able to make time for. (Shameless plug: I have guides for Tokyo , Maui , New York City , Thailand , Mykonos , Santorini , Positano , Miami , St Barths , and more. Feel free to use them for inspiration should you be heading to any of these locations!)
To add an idea you have for your trip, click on the layer (the category) that you want to add a location marker to.
For example, I added this hotel to my map by checking the box on my “Hotels” layer and then typing the hotel name into the search bar. When the place you’re searching for pops up on the menu, click “Add to Map” and you’ll see that a marker is placed on the map. You’ll also notice that the name of the location is added underneath the layer description on the left side of the screen.
- If you accidentally put a location into the wrong layer: not to worry. You can easily drag the location and drop it into the correct category.
- If the place you’re searching for doesn’t auto-populate: it’s probably because Google hasn’t made a location for it yet. But don’t fret! You can just as easily add that spot to your map by typing the address into the search bar and writing the location name manually.

Need some trip inspiration? Check out my travel guides, go-to airport looks, and carry-on essentials here.
4. Customize Your Map.
One of the best ways to keep things visually organized is by color-coding your markers by their category.
To do this, click on the paint bucket that’s located at the bottom of the location marker’s pop-up window.
You can also add additional notes about a location (i.e. “LindsaySilb’s favorite bar; order their signature Bloody Mary) or write down other ideas that you have for that place by clicking on the pencil icon directly next to the paint bucket.
To remove an idea from your trip, just click the trash can icon that’s on the same panel.

There are a number of ways to use color coding:
- For example, you could mark all the restaurants that were on your “Must Visit” list in red, the ones you’d like to go to in yellow, and the ones you would stop by if you have the time in green. This will help you make sure that you get everything checked off of your “must-see” and “must-do” list first.
- For example, pricier sit-down restaurants can be marked in blue, while casual “grab and go” places could be labeled in green.
- You might have just one layer named “Activities” but instead of color coding all those places green, for example, you could mark the museums in purple, mark parks in blue, and stores in gray.
Pro tip: Even if you don’t want to color code everything, I recommend changing the default color from blue to something brighter, like red or yellow. In my experience, the blue location markers can be a bit hard to find on the map.
When you’re done organizing your categories, hit the save button and you’ll notice that they all show up underneath their accompanying layer.
Each location should be saved along with its phone number, address, and website information. This is super helpful because if you decide you want to make a reservation at a restaurant or purchase tickets to a theater show, you have all the tools you need to get there in one space.
5. Decide Which Activities to Group Together.
At this stage, you’ll be able to see a zoomed-out version of the map, with all of your points of interest plotted.
This might help you make decisions about which neighborhood to stay in, which hotel to book (if you’ve been debating between a few), which restaurants you can walk to, or which activities should be grouped together.
It’s nice to see your entire itinerary on a map and use a process of elimination approach to determine which pitstops make the most sense on which days. Seeing things on a map also makes it easier to keep track of the amount of time you’ll need to dedicate to get from place to place.

6. Plan Your Day-by-Day Itinerary.
I like to create a Google Doc that has a little outline of each day of the trip. I also use the doc as the place to store hotel confirmation numbers, car rental info, and flight info.
If you’re planning on driving when you get to your destination, you can easily pull up directions to your first stop by clicking on the arrow icon on the bottom of the pop-up’s panel.
This will automatically create a new layer on the left side of your screen with the location’s name on it. You’ll need to type in your starting location, like the airport, in the text box above it that’s labeled “A” and then click on the icon with the three dots to get step-by-step driving directions.

7. Download Google Maps on Your Phone & Log In.
Finally, to make the map you created accessible on your phone while you’re traveling, you’ll need to have Google Maps downloaded if you don’t already.
Then, be sure to sign in with the same Google account that you used to first create the map. Once you’re signed in, go to “Your Places,” and scroll to the last tab on the right called “Maps.”
8. Share Your Map with Friends and Travel Buddies.
One of the best parts about using Google Maps Trip Planner is being able to share the map. If you’re traveling with a group, sharing the map ahead of time will ensure that everyone is on the same page about where things are located.
And better yet, after you’ve returned from your trip, you now have a full list of everything that you can share with friends who are headed to that location.
To share the map on desktop, simply open the map like you’ve done previously. You’ll notice the “share” button directly underneath the title of your map. Click it, and you’ll have the option to share via Twitter, Facebook, or email.
To share the map on mobile, open the Google Maps app, then click the three bars > your places > maps. Select your preferred map, then select “View Map Legend,” and finally click share. You’ll be able to share your map via text, airdrop, Facebook, Twitter, email etc.
If you’re feeling particularly generous, I recommend going back into the map and adding notes about places that you went, what to order there, places that were worth skipping, etc. Your friends will thank you for it!
The verdict? This tool is a travel game changer .
Rather than sifting through an endless number of routes on Google Maps each time you want to go somewhere, using this process will help you streamline all of your travels. You can put together so many trip itineraries by using Google Maps Trip Planner, and it honestly offers the perfect way to plan a road trip.
Are there other apps or hacks that you use to plan trips? I’d love to hear about them. Drop your suggestions in the comments below.
Pin this post for later:

You Also Might Like

70 Travel Hacks That Will Change Your Travel Game Forever

Maui Itinerary: A Guide to the Perfect 4-Day Trip

8 Travel Apps I Use to Jetset Like a Boss
10 comments.

I do that all the time Lindsay! Since 2009, believe it or not! I always add a google maps to my travel posts so that people can follow exactly what I did. It’s so helpful!

This is the best thing ever! I love Google maps for making places I want to go but they were always just on my”normal” map and it really bothered me that I couldn’t colour code. I won’t be doing any work today I’m the office, just rearranging my whole maps! Thank you for this amazing tip & detailed guide!

Lindsay Silberman
yay!! So happy you found it helpful!

I had no idea about this, wow!!!! Incredible. Thank you, Lindsay 🙂

I love this and the Visit a City app, which figures out the grouping for you!

This was a great write up explaining the how to… only thing missing is multiple people cannot edit the map.

Actually, multiple people can edit: Just share your map with editor rights

How can you share the map with editor rights? I’m trying to do this right now, and I can’t quite figure it out! Thank you!!

How do you view all maps at once ?

love this tutorial!! thank you
Leave a Reply Cancel Reply
Save my name, email, and website in this browser for the next time I comment.
How to Apply Fake Nails Like a Nail Artist (in 15 Minutes or Less)
Here's exactly how to pack jewelry for travel.
How To Use Google Maps Trip Planner (2024)

Travel planning a dream trip is fun — but it can also bring a lot of anxiety. To give yourself peace of mind you can follow travel guides, copy other people’s plans, or (my favorite) you can use Google Maps trip planner to design your own ideal vacation. You can use Google’s app or web interface to:
- Add destination points
- Color code locations that you pin
- Get directions to multiple destinations
- Plan the perfect trip
I’m going to give you a step-by-step guide and instructions on how I used Google My Maps to plan an itinerary for a 3-day trip to Florence. But first, let’s look at why Google Maps is such a great trip planning tool.
💡Looking for a way to plan the most efficient route? Check out How To Route With Multiple Stops On Google Maps .
Why Google Maps is a great trip planner
A survey found that 97% of respondents were happier when they had a trip planned. Mindset and mood change when you have something to look forward to — but without an itinerary in place, this excitement can turn to anxiety.
Here are my four top reasons why you can, and should, use Google Maps to plan a road trip or vacation:
1. Integration with other Google products
Your Google account connects you to a number of different products that work really well together to make life easier during your travels. You can:
- Create a custom map and then copy it to your Google Drive.
- Plan out each day’s agenda in Google Calendar, with exact locations and map links included.
- Use Google Sheets to budget for your vacation or road trip.
- Use location names in Google Photos so your pictures are easy to find and organize.
Google’s deep product integrations make it easier to plan recreational trips and learn more about the places you plan to visit.
2. Reviews and additional location data
The Google Maps app on your phone doesn’t have all the features of the desktop version. But if you plan out your trip on the app, you can move seamlessly between the two so that you can read:
- Reviews from other visitors
- Information about your places, including website URLs and opening and closing times
- Things to do nearby
A lot of reviews include useful travel tips. For example, when I was planning my trip to Florence I read the reviews for the Uffizi Gallery, a must-visit place for me. That’s how I found out that even though you can buy tickets on the same day, the queues are long, so it’s better to buy tickets in advance.
3. Easy access to trip itinerary
Some people keep their trip itineraries in a spreadsheet or document, but I love the combination of Google Calendar and the Google Maps trip planner. I can visualize exactly where I plan to go each day, and see instantly what’s around it. Google Maps routes are a breeze to create and make it easy for me to check travel times, no matter whether I’m walking, driving, using public transit or taking a taxi.
4. Personalized notes and labels
Worried you’ll forget something important? Just open Google Maps, go to your trip planner, and add notes to your places. For example, I’m likely to forget to preorder tickets! So I create an event in Google Calendar to remind me, link the location to the event and add all the notes I need in Maps.
How to use Google Maps to plan your trip
Now, here comes the fun part — planning your trip. Here’s how I do it:
1. Create a new custom map

To start planning your trip with Google Maps, visit https://www.google.com/mymaps . On your My Maps dashboard, click the “Create a New Map” button.
Maps will open up, and you’ll have lots of options here. Start by giving your map a name. Click “Untitled Map,” and a dialog box will open up where you can add the map’s name and a description.
For this example, I’m planning a 3-day trip to Florence, Italy. So let’s call this map “3 Days in Florence.”
Once you’ve given your map a name, you can start adding your locations.
2. Add and customize your locations

Now, here comes the fun part — adding all of the places you want to visit during your trip. I’m going to assume that you already have a list of places, but if not, take this time to research the city and make a list of sightseeing spots.
Having a list will make the planning process much quicker and easier.
In Google Maps, your locations are “pins.” To start adding pins, use the search bar to search for the place of interest.
Let’s start with one of the most famous sights in Florence: The Cathedral of Santa Maria del Fiore, also known as the Duomo.
Maps will zoom in on the place you search, and you’ll have the option to “Add to Map.” Click or tap this button, and the point of interest will be added to your map layer.
If you want to keep your pins more organized, you can change the color and icon for each point of interest.
You’ll see a paint can icon when you hover over the location. Click it to open up your customization options. Google Maps gives you a wide range of icons to choose from, including ones for monuments, museums, gardens, and more.
These icons make it a little easier to see what each destination is at a glance. And that can help make the next step easier, too.
3. Break your trip down into layers (categories)

Planning a trip is fun and exciting, but it can easily become chaotic and messy if you don’t organize things. Breaking your trip down into layers (or categories) will help you keep track of everything you want to do.
In this example, I’m planning a short trip to Florence. It makes sense to break my trip down into days, so I know which points of interest I want to visit each day. In this case, each day will be a new layer or category.
To organize things, I can click on “Add layer.” Each layer will be a new “category.”
Once you click “Add layer,” you’ll have the option to name it. Delete “untitled layer” and add your own name. In this example, I’m going to add three layers and name them “Day 1,” “Day 2,” and “Day 3.”
Once that’s set up, I can start organizing my points of interest for each day.
When planning your trip, you can add whatever categories (or layers) you want as long as they are relevant to your trip.
For example, if you’re planning a road trip intinerary, you may choose to break your trip down into cities and add points of interest within each city. Maybe you want to have categories for food or specific points of interest. The great thing about using Google Maps is that you can customize it to your own traveling style and tastes.
How many layers can you add to a map?
Layers can keep your map organized, but don’t get too overzealous with them. There is a limit to how many layers you can add: 10.
If you’re planning a big and complex trip, you may need to plan out your layers or categories carefully.
How many location pins can you add to each layer?
You can add up to 2,000 separate pins to each map you create in My Maps.
4. Plan your itinerary

With all of your categories created, it’s time to start planning your itinerary. You can easily move points of interest into different layers (or categories) to plan things out. Just click and drag the pin to wherever you want it to go.
In our example, I created three layers (one for each day), so to plan my itinerary, I dragged each point of interest into its respective layer.
But what if you’re not breaking your trip up into days? What if you’re categorizing your points of interest by city or type (museums, restaurants, etc.) No problem! You can create your layers in whatever way makes most sense to you. The point is that Google My Maps makes it easy to visualize your trip. At a glance, you can see which points of interest are close to each other. That makes it easy to create your itinerary on paper or in a digital planner.
5. Start booking
Now that you have your trip planned out, you can start:
- Booking your hotels
- Scheduling car rentals
- Reserving tickets for events or museums
Consider booking as far ahead as possible. If you wait too long, you may find that tickets and rooms are sold out.
6. Share your map
If you’re traveling with friends or family, you can share your map and itinerary with them.
Here’s how:
- Head back to the main Google My Maps dashboard
- Click the share button (the arrow icon) on the map you just created
You can share your map via Facebook, email, or Twitter. You can also embed your map on your website if you have one.
7. Access your map on your phone
You’ve created your map and shared it with your friends. But to use it on your phone, you’ll need to make sure that you have the Google Maps app installed.
Here’s how to access your maps on mobile devices:
- Open the Google Maps app
- At the bottom, tap Maps
- Choose your trip’s map from the list
Can you use your phone to create or edit Google maps?
Technically, you can create or edit maps on your phone. But you’ll need to use your browser to create and edit them — not the Google Maps app.
Road trip planning vs. city trip planning
Google Maps can be a great route planner, but you’ll need to take different approaches for planning road trips and city trips.
Road trips are a little more complicated, right? You’re driving from one place to the next, and at each stop, you may have a few places you want to visit. If you’re just visiting a single city, planning is much simpler. Just pick your points, add them to your map, and go.
Tips for road trip planning
- Create a layer for each stop you’re making on your trip
- Add pins to each layer, so you don’t miss any points of interest at each stop
- Include hotels that are on your route, so you can make an impromptu stop if you need
Tips for city trip planning
- If you’re staying multiple days, create a layer for each day, and add pins for each day (just like in my example)
- If you’re only staying one day, create a layer for each type of activity, and choose spots as you go through the day
How to use your Google Maps itinerary/wishlist on the go
You’ve created and shared your map, and you’ve downloaded the Google Maps app. Now what?
Here’s how to use your Map on the go:
- Start by opening up Google Maps and tapping your Map.
- To view all of your pinned locations, tap “View map legend.”
- You won’t be able to tap any of the locations. The only thing you can do is view your itinerary.
- If you want to add directions, navigate back out to the main Map. Tap one of your points of interest, then tap the “Directions” button at the bottom of the map.
- The route planning screen will pop-up. Type in your next location, and Maps will find the best route for you.
By default, you’ll see the driving directions for your next stop. But at the top of the screen, you can change your mode of transport to walking, biking, or public transport.
Maps will change your step-by-step directions automatically based on your mode of transport.
Now, the only thing left to do is enjoy your trip!
Try it for yourself
Want to give the Google Maps trip planner a try for yourself?
We’ve created a starter map with some of the best stops in Vancouver, which is where we’re based — see it here . You’re welcome to copy it, and use it to test out the steps above. Change icon colors, or add your own places.
Here are a few other fun maps to play with:
- A cycle route with beer stops
- Bike routes around Vancouver
Once you get the hang of using Google Maps, you can start planning your own trip. Add location pins of your must-see locations, and create a map of your bucket list of cafes, museums, stores, and restaurants to see how easy it is to plan your next trip.
Frequently Asked Questions
Does google have a trip planning app.

Yes, there is a Google trip planning app, and you may have heard of it: “Google Trips.” However, the app’s users were redirected to Google Travel when it was shut down in 2019. You can use the Travel web app to plan your trip ( click here to try it).
There isn’t a mobile app available on Android or iOS, but you can still use it on the official website.
Google Travel allows you to:
- View popular destinations
- View plane ticket costs and average hotel room costs
- Research top sites, hotels, rentals, flights, and more
Users can save destinations for their trip and add them to their travel plans. For example, I want to visit the Uffizi Gallery, and when I click on it, I see:
- Pin on the map
If you don’t want to miss one of the places on your bucket list during your next trip, you can add multiple destinations and points of interest right to your travel plan.
Can you see how much time it will take to reach a pinned destination?
You can use Google Maps to get directions for your road trip or for walking. Open up your trip map, and you’ll notice toward the bottom left of the screen, it will say “Directions from” and the name of your location pins.
Next to the directions layer, you’ll want to:
- Tap the three dots
- Click step-by-step directions
You’ll now see directions for each of the days that you have planned, the best route to take, and an easy way to judge if you can fit all of the places on your bucket list into each day.
Can you use the directions layers to navigate?
No, you cannot use the directions layers to navigate around the map. You will have to open the Google Maps app and navigate from there.
What’s the difference between Google My Maps and Google Maps Lists?
Google My Maps is more advanced and customizable than a simple Maps list. If you add places that you want to go on Lists, you’ll only have access to:
- Location name
- Location address
- Reviews of the location
- Operating hours
- Type of location
You can add notes to the places that you add to Lists.
If you add too many places to your list, it can be overwhelming to manage your trip. My Maps allows you to add categories, which makes visualizing your trip more intuitive.
Is there an app for Google My Maps?
You’ll need to use the Google Maps App ( Android and iPhone ) to access My Maps. You will need a Google account to:
- Create a new Google map
- View your custom map across platforms
You can access My Maps by opening the mobile app, tapping Saved, and continuing using the trip planner. Users can add points of interest to the map, access the directions layer and view their starting point for each day planned.
Can you use custom Google My Maps offline?
You can launch the Google Maps app offline and download maps for the location. However, you cannot access your own map with your points of interest or layers. Offline maps cannot be customized.
Related articles
Liked this article? See below for more recommended reading!

How To Route With Multiple Stops On Google Maps

How To Optimize Multi-Stop Routes With Google Maps (2024)
How to Plan A Trip With Google Maps in 4 Easy Steps

by Annie
Published: March 8, 2022

Google Maps is a powerful tool that can help you save time when you’re putting the pieces of your next adventure together. My personal maps are full of places I want to visit and I create custom maps for my clients when helping with their itineraries. Learning how to plan a trip with Google Maps is super easy and, when you're done, you’ll have everything you need right at your fingertips while you’re out exploring!
There are a number of ways to customize your Google Maps . You can add routes between destinations, color code your location pins, and create multiple layers so you can change what you see on the map. In this article, you’ll see how to do each of these with simple steps and screenshots so you can easily follow along. Below are the basic steps you’ll use to plan a trip with Google Maps.
How to Plan a Trip With Google Maps in 4 Steps
Create bookmarks regularly. Add them to your “Favorites”, “Want to Go”, “Travel Plans”, or “Starred Places” list or create a new list.
Create a custom map for your trip by going to Your Places > Maps > Create Map.
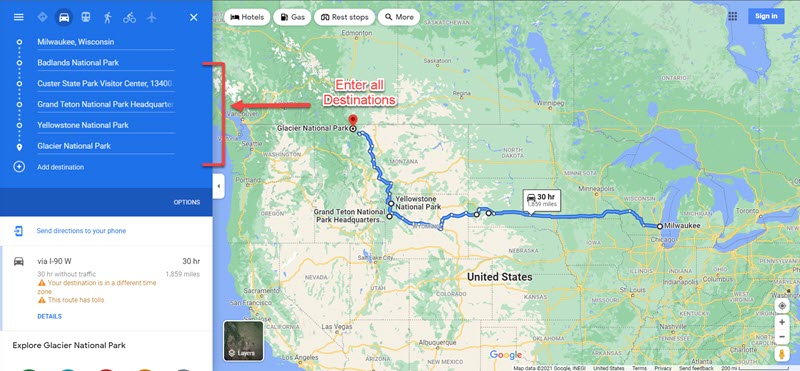
Add the starting point for your trip to the custom map. Then add your next destination and the driving route. Do this until all destinations are added to the map.
Create new layers for each destination and bookmark sights, accommodations, restaurants, etc. Customize each type with a color and icon so it’s easy to see.
Download your custom map in your Google Maps app and have a great time!
*** This post may contain affiliate links, which means if you make a purchase using the link, I receive a small commission at no additional charge to you. This helps me keep the lights on around here. 🙂 I ONLY recommend products and services I personally use and love. * **
Tips for Customizing Your Google Maps
If you’re anything like me, you’re constantly coming across new places you want to visit! Maybe it’s a pretty picture on Instagram, a destination you read about, or a place you saw in a movie. You want to make sure you don’t forget them so start bookmarking them in your Google Maps!
The images below will show you how to create bookmarks for the places you want to visit. You can put them all on the same list or make customized lists to organize them however you want. I put all of mine in the “Starred Places” list and then organize them when I’m making a custom map for a destination, which we'll cover in a bit.

This is what it looks like when you add bookmark places on your Google Maps.

When it’s time to plan a trip with Google Maps, you’ll already have a head start if you’ve been bookmarking spots! When you’re deciding where to go and how much time to spend, you’ll be able to see if there are places in the area that you’re already interested in visiting. It’s also helpful to add bookmarks as you’re researching your destinations so the highlights are already on your map when you arrive.
Planning an Itinerary With Google Maps
One of the hardest parts of putting together a trip is choosing a route and timeline. It’s one of the travel planning elements I help clients with most often. You can use Google Maps to show your different options in one place and get a picture of your trip! For the rest of this article, we’re going to say we have two weeks to spend on a trip and that will start in Berlin, Germany and end in Prague, Czechia.
Choose a starting point. There are few ways to choose where to start your trip -- find a cheap flight to a destination you’re excited about, use these questions to help you narrow down your bucket list, or choose based on what type of indie traveler you are and the experience you want to have.
Brainstorm routes. Look at the map and bookmark or make a list of places you’d like to visit along the way. You can make a loop if you want to start and end in the same place, or choose another destination to fly home from and choose stops along the way. You can also choose somewhere to base yourself and take day trips from there! I recommend planning at least 2-3 nights in each place, if you have multiple stops. Packing up and moving every single day gets old!
Step 1 to Plan a Trip with Google Maps: Create A Custom Map
Google Maps lets you create your own maps! Create a custom map (screenshots below) and then we'll start putting in the routes from your brainstorming session. You can change the name of your map and add a description if you’re going to be sharing it with others later.

Start by searching for your beginning destination and adding it to your map. Click on the “directions to here” icon to start building your first route.

Step 2 to Plan a Trip with Google Maps: Add Your Major Stops
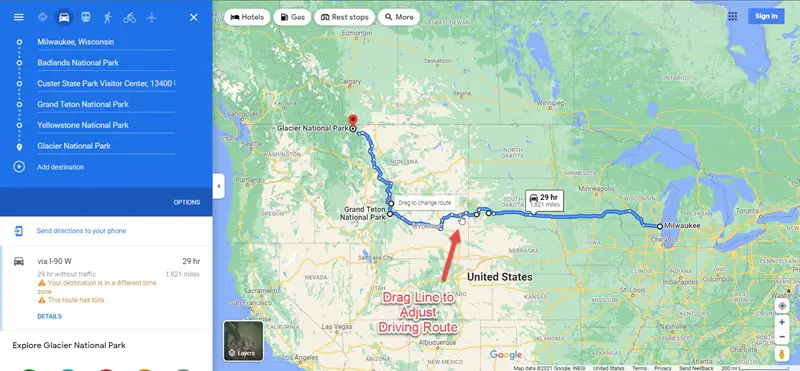
Now you’re ready to finish building your first route! Continue adding places along with the driving directions. As you continue to add places and directions, you can drag them up or down to put them in any order you’d like. Google Maps will adjust the routes to match the order of destinations. Unfortunately, you can only choose driving directions and not public transportation but this will give you an idea of distance and travel time between stops.

Once your first route is built, create your next route using the same steps. Click on your starting point again and when you add driving directions, it will begin a new layer for you to create another route.

Once you’ve created the additional routes, you’ll see them all on the map at once. You can choose to turn a route on or off by clicking the checkmark next to the name of that layer. Rename the layer by clicking on the three dots at the end of the name.

You can see the step-by-step driving directions, distance, and driving time between destinations for each route. Click on the three dots at the end of the name and choose “step-by-step directions”. At the top, you’ll see the total distance and drive time for your route. Next to each major stop, you’ll see the information between the current stop and the next.

Once you’ve chosen a route for your trip, it’s time to create a customized map for each stop along the way!
Step 3 to Plan a Trip with Google Maps: Add Destination Info
One of the other great features that helps you plan a trip with Google Maps is the ability to color code and customize sights, restaurants, etc. Your original starting point will still be on the map, making it easy to get started. Start by deleting the city marker because you’ve already built your routes.

Now we’re going to add in the places we want to visit in our destination. Start by renaming the layer to match the destination so it's easy to see which city you’re viewing. Search for each attraction, restaurant, etc. in the search bar and add it to the layer. Adding similar places together will make them easier to customize as a group. We’ll start with museums so you can see what that looks like.

To customize the color and icon, hover over the place and click on the paint bucket you see at the end.

Choose the color and icon (click on “more icons” to see additional options) you want. If you choose an item from “more icons” you’ll see it there when you customize the next one, making it quick and easy to use it on similar places.

You can do as much or as little of this as you like. You can drag items up and down to put them in any order you want. Once you’ve finished adding places to your map, you’re ready to share and download! To share your map with others, simply click on the share option next to “Add Layer” and choose the settings you want.
Download the map onto your phone by going to your Google Maps App. Click on “Saved” (the little bookmark) and choose “Maps” at the bottom. This will pull up customized maps you’ve created. Choose the one you want to see and you’ll see your map in addition to the usual Google Maps.
Step 4 to Plan a Trip with Google Maps: Outline Your Itinerary
Now that you have your route selected and a personalized map of your destinations, it’s time to nail down your itinerary. Start by deciding your “must see'' places. These are the spots you’re not willing to leave the destination without visiting. This is the hard part, my friend! You’re not going to see it all so make peace with that now. It’s okay. You’ll either go back or go somewhere new, but there’s no way to see every single thing unless you’re going to spend weeks or months in a place.
Your custom map will help you decide how many days to plan for each stop. I recommend no more than two major attractions in a day. Yes, you can see more, but you will want some unplanned time to wander aimlessly, get a coffee in the cute little cafe you find in the morning, or have a picnic in the park. I promise, many of your most memorable moments will come from the things you didn’t plan. Leave room for the magic to find you instead of running from one thing to the next.
When you plan a trip with Google Maps you’ll have everything right at your fingertips. Once you finish at one of your “must see” spots, check your map to see what else is nearby. Walking from place to place is a great way to see more of your destination too!
Now that you know how to plan a trip with Google Maps, have fun with it! On the weekends, I love to get a cup of coffee and see what kind of amazing itineraries I can dream up with this tool. Yes, I’m a travel nerd through and through! 🙂
If you’ve enjoyed this article, sign up for emails so you’ll know when I publish new ones! While it does take some time and effort to put your own international trips together, there are some additional tips and resources that can make it easier. Below are some of the most popular articles to help with travel planning!
- 7 Tips for Finding Cheap Flights to Anywhere You Want to Go
- 5 Different Types of Accommodations that Can Save You Money on Your Next Trip
- How to Plan a Travel Budget + Tips to Save Money on Indie Travel
- Planning A Europe Trip: A Complete Step-by-Step Guide to Creating a Trip You’ll Love
If you don’t have the time to plan every single bit of your trip or would like to get insight on your plans, check out these consulting services created specifically for indie travelers like you. I’d love to stay connected! You can find me on Instagram and Facebook too. If you’ve made it this far, thanks for sticking around!
Now get out there. The world is waiting for you!
Did you learn anything new about Google Maps in this article? What are some of your favorite tools for planning itineraries and mapping your travel routes?
Share in the comments!
Love it? Share it!
Pin it for later...

Get new posts, travel deals, and inspiration right to your inbox!
Share this:
Keep Reading...
5 Unique & Easy International Travel Destinations for Your Next Trip
How to make flexible travel plans: 5 tips to save time & money, how i found cheap flights to peru: see the research, routes, and prices.
About the author
Fun Lover. Food Eater. Bold Explorer. Big Dreamer. Annie is a fiercely independent traveler who loves to create unique and interesting experiences. She thrives on finding the magical moments and hidden gems waiting around every corner. Her passion for helping others make their travel dreams come true fuels her work as a travel planner, consultant, educator, and community builder.
Leave a Reply
Your email address will not be published. Required fields are marked
Save my name, email, and website in this browser for the next time I comment.
That was a super helpful post, Annie.
I’m so glad you enjoyed it!
I love Google Maps and it’s such a Godsend while traveling! That said, you’ve given me some new insight into other neat features – I had no idea you could customize the color of the icons!
I totally agree! Google Maps has made getting around new cities SO much easier. I’m glad you learned some new tricks too. 🙂
Wow, Annie, this is so helpful and detailed. I use Google Maps for all my trip planning and thought I knew a good bit but you just blew my basic knowledge out of the water and I love that! I had no idea every little detail could be customized. I will be coming back to go through this as I finish my next trip. I appreciate the step-by-step instructions, it will ensure what I learn sticks with me! Thanks for sharing!
Ah, I’m so glad it was helpful! I love to play with all the fun features in Google Maps. Have fun! 🙂
I never could figure out how to use Google Maps to make up my itineraries- thanks for the clear instructions.
You’re so welcome! I’m glad they were helpful. 🙂
So how do you add saved locations (from Favorites or Travel plans lists) to the map?
If you search for the place on Google Maps, you’ll see a little bookmark icon that says “Save”. If you click on that, you can add it to a pre-made list or create a custom one of your own! 🙂

Ready to see the world on your terms?
Get travel inspiration, resources and everything you need to, create your next adventure delivered right to your inbox..
Never Miss a Post Again
Be sure to get all travel planning tips, inspiration, and destination info delivered right to your inbox.
Google Maps
- Google Travel
How to get ready for a road trip using Google’s travel site and Maps
Due to the pandemic, travel has been slow this past year, and you might be a little rusty when it comes to picking up and traveling somewhere to visit friends and family or just planning a getaway. Whatever the case, Google has a few helpful tools in Google Maps and Google’s travel site to help you get started on making those plans and staying safe along the way.
Table of contents
Getting started with google’s travel website, using google map’s road trip feature, planning a trip around covid-19 restrictions.
Google’s travel website is meant to be a companion site that can help you plan all of the details of your trip. You can use it to book flights, make an itinerary, and even explore interesting places to visit at your destination. If you have a Gmail account , there’s a good chance that any flight reservation you make will automatically appear the next time you use Google’s travel site, making it that much easier to plan the trip’s details. If not, Google Travel may suggest locations based on your search history and interests. While that may be a little creepy, it can also be pretty helpful.
If no destination has been chosen yet, Google will suggest locations in the “Explore” tab. You can filter these locations based on flight and hotel cost, giving you a pretty good idea of where a nice place to go would be. After choosing a destination, Google gives you a few options as far as what you’d want to know. There’s a “Discover” section that will break down various points of interest. In bigger cities, you may find the number of things to do or see endless. Fortunately, you can filter out locations and activities based on your personal interest.
If there are a few places that pique your curiosity, or you already know you want to go there, Google allows you to save them to the trip and pin them to the trip’s detail page. This serves as a sort of to-do list when you get where you’re going.

If you don’t plan on flying and want to avoid certain COVID-19 hotspots, Google Maps is probably the way to go. Just this year, Google added a feature to the Maps website that allows you to add stops along the route when planning the trip. Previously this was possible on mobile, but it didn’t lend itself well to planning out a road trip to be shared with friends and family. Adding stops along the way with Google Maps on mobile was best for impromptu stops.
Once you’ve defined a starting point and destination, you can add stops along the way. You can add anything from a city to rest stops and gas stations. You can do this by either manually entering a stop you already know you would like to pause at, or by choosing one of the criteria towards the top of the screen. Google Maps lets you narrow down your search by these criteria:
When selecting from one of these criteria, Google will also suggest a few filters. For instance, choosing hotels will bring up a “Guest rating” filter, as well as an “Amenities” filter, so you make sure that you’re getting free wifi. Of course, if none of these fit the bill, you can always just search for what you want. The nice thing is that these suggestions can add a little flare to the trip by suggesting something you would have never thought about, making the road trip that much more exciting.
Once you find a point of interest, hit add stop , and Google Maps will automatically insert it in the right spot on the planned route. Unfortunately, there doesn’t seem to be a way to define how much time you plan on spending at that stop, so the trip time might have to be calculated manually. Besides that, Google Maps has become a handy road trip planner with enough tools to get you where you’re going and let you have some fun along the way.
The major caveat to traveling right now is the looming risk of COVID-19. Fortunately, the travel website by Google and Maps both supply some great tools for managing risk and assessing where you plan to go.
On the travel website, you can find up-to-date COVID-19 information for your destination pretty easily. You can access this information by searching for and clicking on the destination . Under the main card that lists the date of your trip, area name, and weather, there will be a COVID information section. This section has useful information like the CDC’s travel advisory website, COVID-19 stats for that specific area, and the number of local cases.
Clicking on the “Travel advisory” button brings you to the CDC’s COVID-19 map. This map is a risk assessment of most destinations in the world, color-coded depending on how risky it is to travel there. The second button will search Google for COVID-19 information on the location you’re traveling to, detailing data like news, statistics, and testing locations. The “Local cases” button will show even more detailed information about active cases, vaccines administered, and deaths in the area. All of this is fantastic information to have when traveling and comes in handy when planning your trip.
FTC: We use income earning auto affiliate links. More.

Check out 9to5Google on YouTube for more news:
Andrew Romero's favorite gear
Google Pixel 7 Pro
Pixel Watch

Manage push notifications

- Help Center
- Google Maps
- Privacy Policy
- Terms of Service
- Submit feedback
Plan your commute or trip
Find ways to get to relevant places.
- On your computer, open Google Maps . Make sure you’re signed in.
- Get directions to relevant places : Click a place in the list. You’ll get places based on your Gmail, Calendar, and recent travel history.
- Get directions to saved places: If you saved your work or home address in your Google Account, click Home or Work . You can edit your home or work addresses in your Google Account. Learn how to set your work and home addresses .
Learn more about your surroundings
- Find places of interest: Click an option, such as Restaurants, Hotels, or More.
Was this helpful?
Need more help, try these next steps:.
How to Plan a Road Trip with Google Maps: A Step-by-Step Tutorial
This post may include affiliate links. As an Amazon Associate, I (The Winding Road Tripper) earn from qualifying purchases. Read more .
This post was originally published on August 8, 2021, and updated on February 16, 2023.
Ready to start planning your road trip using the power of Google Maps?
Then you’ve come to the right place.
Google has two amazing tools to help you plan your road trip: Google Maps and Google My Maps.
Google Maps is a great tool for plotting out your route, while Google My Maps is an amazing tool for road trip planning and organization.
In this post, I’ll teach you how and when to use each of these powerful free tools.
Let’s start by looking at Google Maps since it’s the simpler of the two.
But if you are looking for how to use Google My Maps, then click here .
How to Use Google Maps to Plot Your Road Trip Route
Google Maps is a great tool if you want to plot out your road trip route.
We use it as a starting point for all of our road trip planning to get a sense of how long our trip will be or what we can accomplish in the time we have.
Step 1: Open Google Maps
Start by opening up Google Maps on your desktop or phone.
When trip planning, we like to use our desktop computers to make use of the bigger screen.

Step 2: Plot Your Road Trip Route
To start plotting your road trip route, click on directions.

Then enter your starting point and your first destination.

Continue to add stops to your road trip by clicking on the (+) to add destinations.

Stop when you have all your road trip stops added to your map. Google Maps allows you to add up to 10 points to your map. If you want to add more, then Google My Maps is the tool for you.
Step 3: Reorder Road Trips Stops
If you want to play around with your route and reorder your stops, Google Maps makes it easy to do so.
On the left, where your stops are listed, you can drag and drop the stops to reorder them.

Step 4: Move the Driving Route
Google Maps will choose the fastest route between your road trip stops. But sometimes, there may be a scenic route you want to take.
You can easily move your driving route as desired by dragging and dropping your route.
Step 5: Send the Driving Route to Your Phone
Once you plan your road trip, you can send the directions to your phone for easy access during your trip. Directions can be sent via text message or email.
Note: You will have to have a Google Account to send directions to your phone.

Google Maps is a great starting point for planning a road trip.
But if you want to harness the power of Google and use it to plan your road trip and as a resource throughout your trip, Google My Maps is the choice for you.
Google My Maps: The Best Road Trip Planning Tool
Planning a road trip can be a daunting task. It’s hard to know where to start, and all the research can feel overwhelming. But that is where the ultimate road trip planning tool, Google My Maps, comes to the rescue.
Google My Maps is a very similar tool to traditional Google Maps, but it’s much more powerful and customizable.
In this section, we’ll start with detailed information on the features of Google My Maps. And then, we’ll get into exactly how we use Google My Maps to plan each one of our road trips.
Using this tool will help you seamlessly organize and plan your road trip.
Once we tried it, we never looked back.
Let’s start by giving you a little introduction to Google My Maps.
What is Google My Maps?
Google My Maps utilizes all of the data in Google Maps to allow you to create your very own custom map for your road trip. It’s a way for you to create a map containing the places important to you .
Once you create your map, you can access all of the personalized information you’ve added, so you never miss a beat while on the road.
Why is Google My Maps the Ultimate Road Trip Planning Tool?
Google My Maps is our favorite tool for planning a road trip. Here is why:
- It Helps You Visualize Your Trip Plotting all of your points of interest on a map helps see how your road trip may take shape. At the start of road trip planning, we typically have no idea what route we may take until we see all of the things we want to do on a map. And this is where Google My Maps can help.
- It Helps Organize Your Research When planning a road trip, you are likely gathering information from many sources, including websites, tourist bureaus, and recommendations from friends and family. Google My Maps can help you organize all of your research so you can more easily plan your road trip itinerary.
- It Consolidates Your Entire Itinerary Using Google My Maps allows you to have all of your road trip information in one place. There will be no need for a separate spreadsheet with your day-to-day itinerary or to bring your travel books with you.
What Are the Limitations of Google My Maps?
- Google My Maps Can Not Be Used Offline You will need access to wifi or cellular data to use your map on your road trip. But don’t let that stop you from using it to plan your road trip. There are ways to download your map to other apps for offline use, which I’ll take you through in the tutorial.
- You Can Only Add 2,000 Locations to Your Map Likely, you will not need over 2,000 locations when planning your road trip. And if you do, you can make separate maps, possibly divided by days or weeks, to get around this limitation.
- You Can Only Add 10 Layers to Your Map Layers are ways to categorize your location points. When using Google My Maps, you can only have ten layers per map.
- Planned Routes Can Not Be Accessed for Driving Directions on Google Maps When planning your trip, you may add a direction layer on your map to display the route you plan to take. Unfortunately, you can not use those directions to give you turn-by-turn navigation on your road trip. You’ll have to use Google Maps or click on a destination point on your custom Google My Map to bring up directions. I go through this in detail here .
How to Use Google My Maps to Plan a Road Trip
Now that you know why Google My Maps is the best road trip planning tool, let’s dive into the nuts and bolts of Google My Maps.
We’ll start with an in-depth overview and then show you exactly how we use Google My Maps to plan our road trips. Use the screenshots I’ve provided to help guide you through all of the steps.
Overview of Google My Maps
If you want to know how we use Google My Maps to plan our road trips, then feel free to skip down to the step-by-step guide for planning a road trip here .
But if you want to learn the ins and out of Google My Maps, this is where to start.
You can start from the beginning or jump to the section you want to learn more about by clicking on the links below.
Here is what we will cover to familiarize you with how Google My Maps works so you can start road trip planning like a boss.
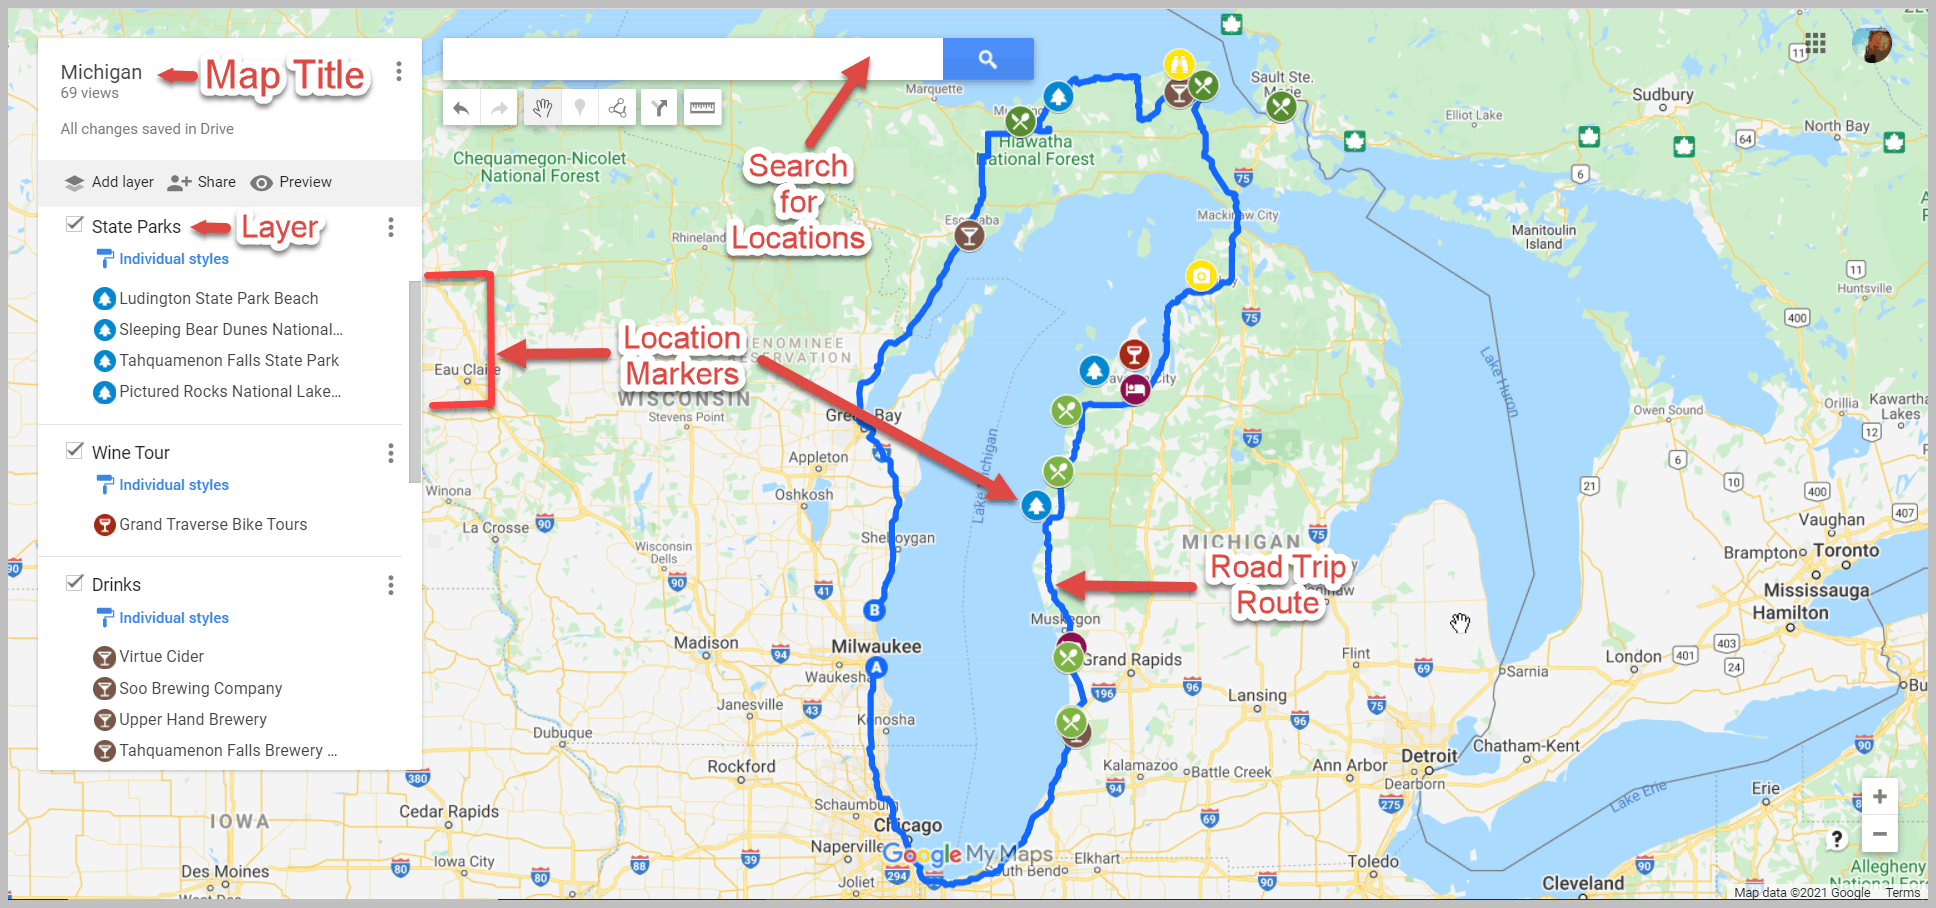
Google My Maps Layout
- Markers/Locations
Google My Maps allows you to add locations and driving directions to your map while allowing you to organize them as you wish.
To get started, let’s get familiar with the layout of Google My Maps.
I suggest creating your first Google My Map and playing around with the functions of the map to help you get familiar with them.
Note: You must either create a Google Account or sign in to your Google account to start using Google My Maps .
Location Markers
Location markers are points that you add to a map. They can be things like restaurants, hotels, sights-to-see, bathroom stops, etc.
Find things to do along your route with our Favorite Tools to Find Things to Do Along Your Road Trip Route .
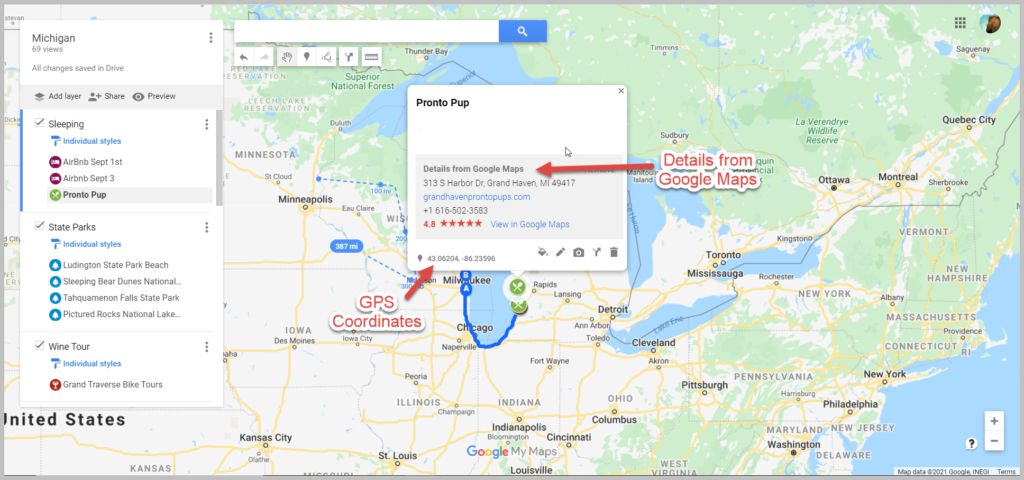
Each point you add to a map will include any information that Google already has for that point.
These include things like:
- GPS coordinates
- Website address
- Phone Number
Three Ways to Add Markers to Your Google My Map
You can add markers to your road trip map in three ways:
- Using the search function
- Selecting a Point already on Google Maps to add to your own map
- Add a point manually
Let’s look at how to do all three.
Search Function
You can find a marker by typing in the name, address, or GPS coordinates into the search bar.
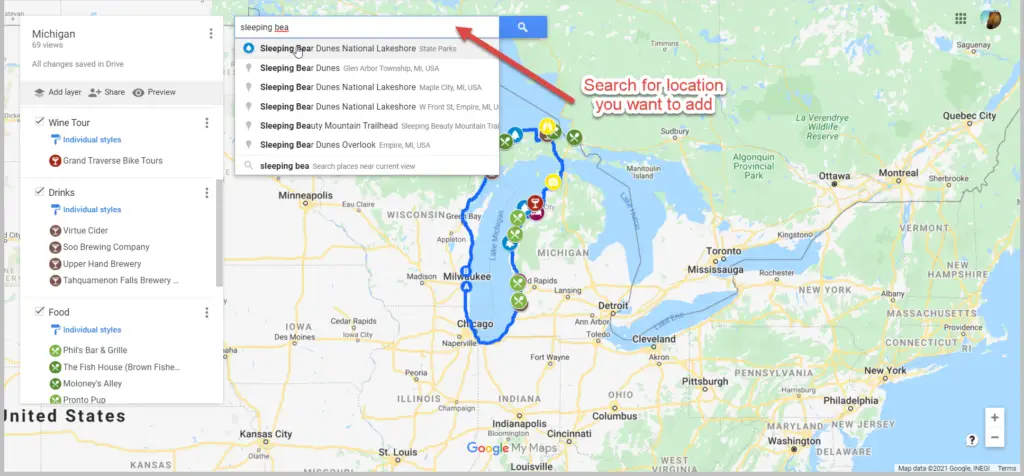
Adding a Marker That is Already on Google Maps
Google Maps already has many markers in its database. When you zoom into an area, many points of interest will start to show up. If any of these markers look appealing to you, you can add them to your own map by clicking on them.
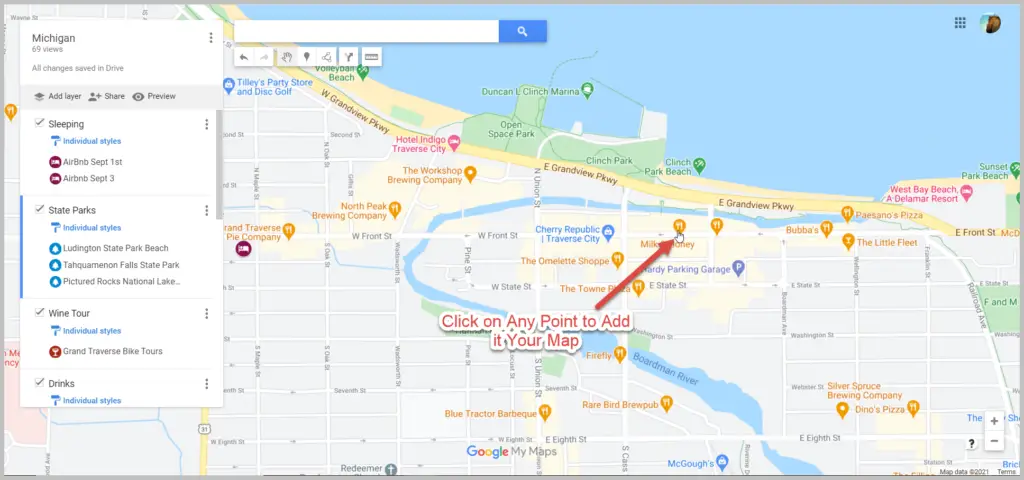
Adding a Marker Manually
You may need to add markers manually when you can not find them via the search function and don’t have the location’s GPS coordinates.
For example, sometimes, I struggle to find the exact location of a trailhead via the search bar. In these cases, I find the location of the trailhead via a different resource and plot it on the map myself.
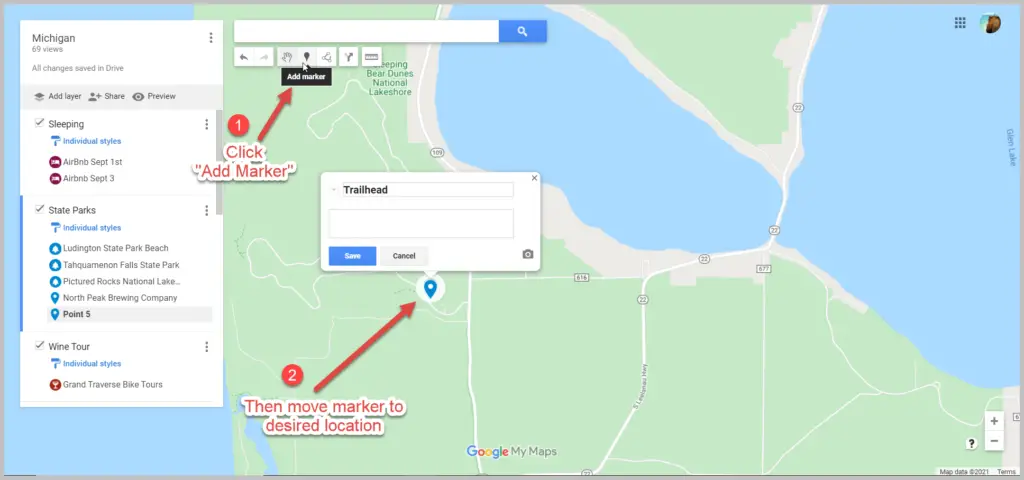
Color Code and Change the Icons of Your Markers
To keep your map organized, you’ll want to customize and color-code your icons to help you group locations together.
Luckily, Google lets you fully customize your markers.
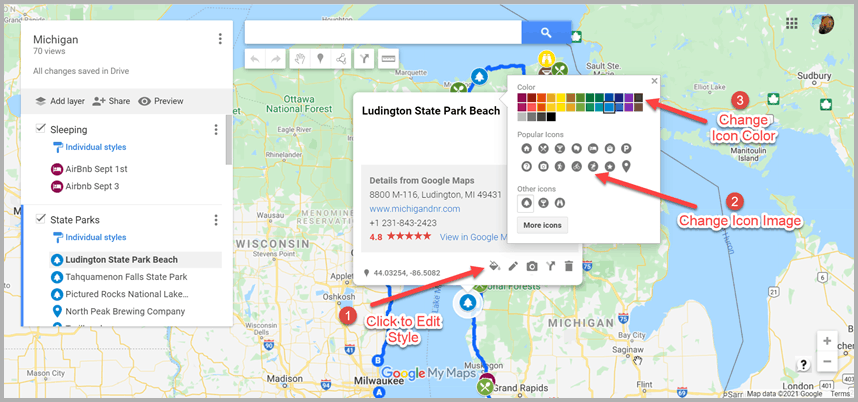
Map layers are a great way to organize your maps.
But before we dive into adding layers, let’s talk about map layers.
What are Map Layers?
A map layer is a set of markers that are layered on top of an existing map. You can see your different layers on the left-hand side of your map.
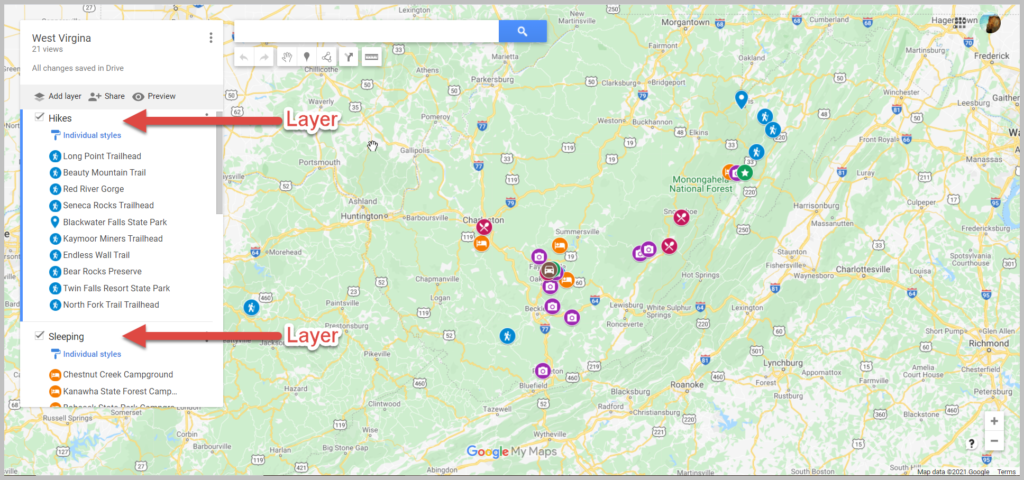
When you add a marker to a map, Google My Maps will add it to a layer. You can then use these layers to organize your map.
The added marker will appear on the selected layer. If you want to move a marker to a different layer, click and drag that marker to the desired layer.
For example, I made a map of Wisconsin Campgrounds to help me find campgrounds nearby during our road trips.
I have chosen to use separate layers for different types of campgrounds; National Forests, State Parks, and County Parks.
The benefit of using separate layers versus adding all of the campgrounds to a single layer is that I can check and uncheck specific layers depending on what information I want to see on my map.
If I don’t want to see the State Parks on my map, I can uncheck “Wisconsin State Parks,” and they will not be plotted on my map until I recheck the box.
How to Add Layers
Within Google My Maps, you can have up to 10 layers on a single map.
To add layers, click on “add layer” on the left-hand side of your map just below the map title and description.

Google My Maps then adds an “untitled layer” to your map.
To change the title, click on “Untitled layer,” and it will give you the option to rename the layer.
The current layer selected will have a solid vertical blue bar on the left side of the layer panel. Any new markers created will be added to the selected layer.

You can use Google My Maps to plot your driving route. Unfortunately, you can’t use these routes for navigation in Google Maps. This is one of the downfalls of Google My Maps.
But that is not to say that adding driving directions to your Google road trip map isn’t helpful. Adding driving directions helps you visualize your route so you can better understand where you are going while on your road trip. It also will help you figure out how long you can drive in one day .
Here’s how to add and use Directions on your Google Map:
Start by clicking on the direction icon located below the search bar.

You will then continue to add stops along your route to get a visual of your driving route.

Google Maps will default to the quickest route when creating your driving route. The quickest driving route will likely be the main highways and not always the most scenic. Therefore, there may be times you want to deviate from the quickest route and take a more scenic route.
Fortunately, you can adjust your route by dragging it to where you want it to go.
Start by clicking on the route, and a small circle will appear.

Then drag this route to where you want the route to go.
How to Plan a Road Trip with Google My Maps – A Step-by-Step Tutorial
Now that we know the ins and outs of Google My Maps let’s learn how to use it to create your very own customized road trip map.
- Create a New Google Map
- Add Layers for Different Types of Locations
- Add Locations to Your Map
- Plan Your Road Trip Route
Step 1: Create a New Google Map
You will need to sign in to your Google Account or create a new account to create your own Google My Map.
Once you’re logged into Google, follow this link to bring you to Google Maps .
Click on the hamburger ( 𝄘 ) in the top left-hand corner of Google Maps.
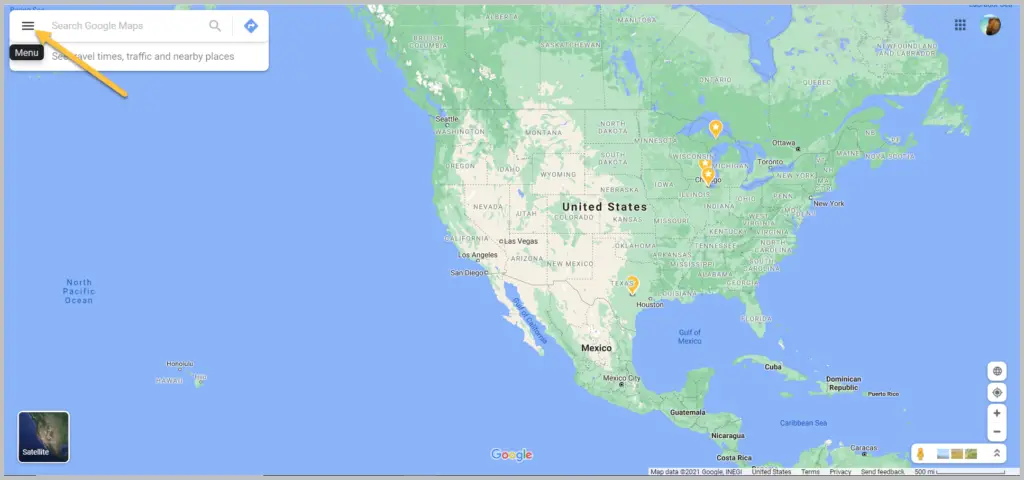
Click on “Your Places”.
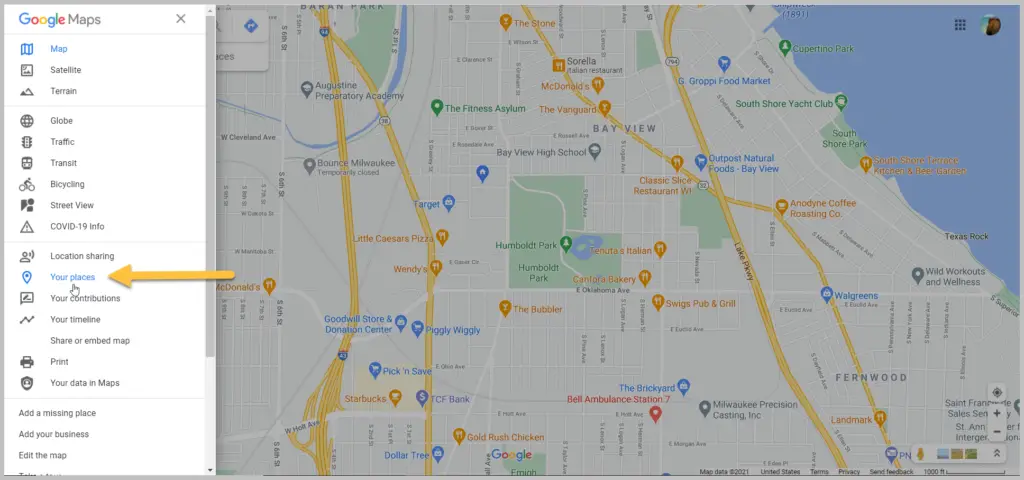
This brings up any saved information you’ve stored in Google maps, like your favorites
Now it’s time to bring up your very first map.
Click on Maps on the top left →, then click “create map” on the bottom left.
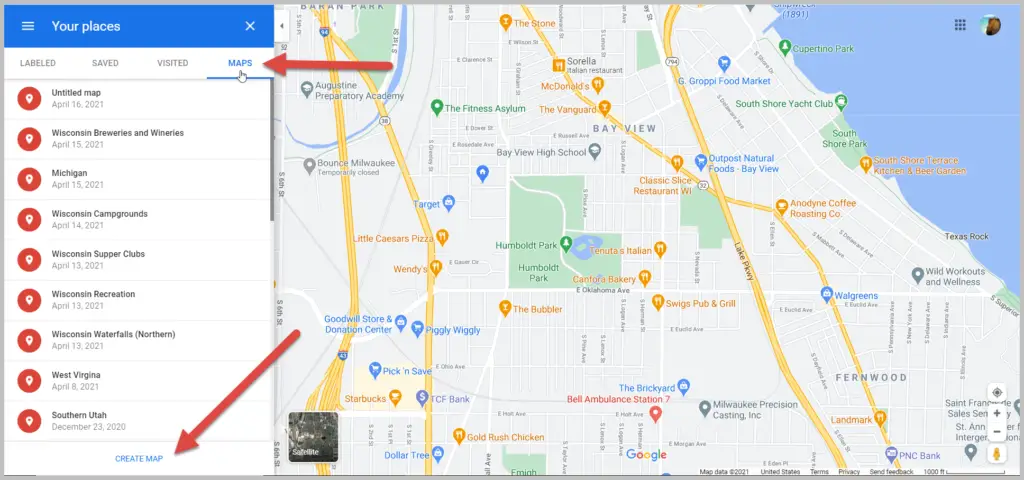
You now have your blank map!
Give your map a title, and get ready to create your first custom road trip map.
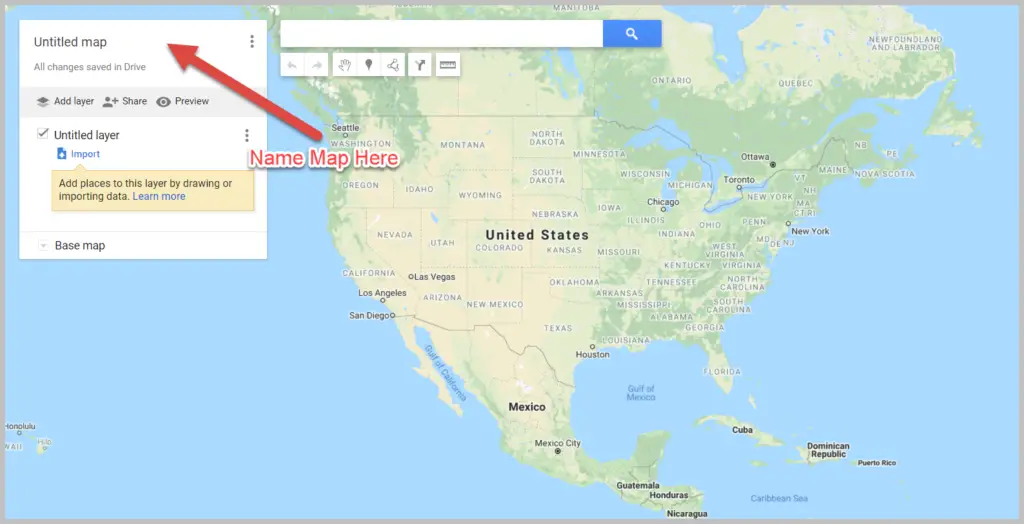
Step 2: Create Layers for Different Types of Markers
I like to start trip planning by creating different layers for the types of markers I plan to add to my map.
The layers I typically use are: – Places to Sleep – Places to Eat – Places to Drink – Things to Do
You can always add layers while you plan. But I find it easier to stay organized if I start with some layers on my map before adding locations.
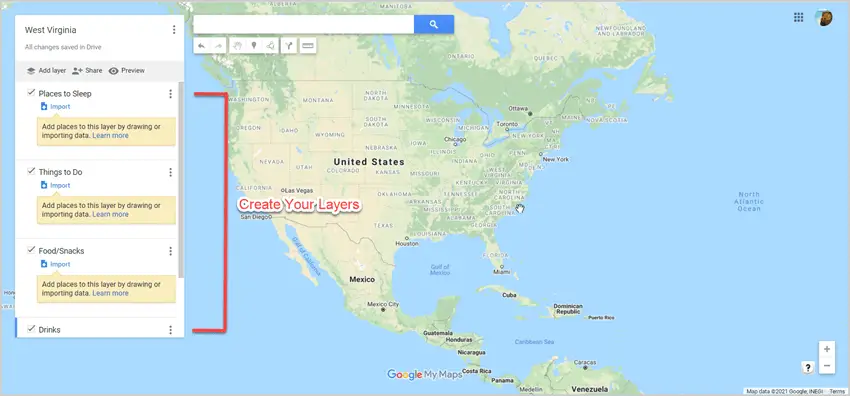
Step 3. Add Markers to Your Map
This is the best part of planning your road trip with Google My Maps.
Whether you are in your brainstorming stage of travel prep or you already know where you want to go, this step is where your trip starts to come together.
To start, you’ll research your destinations to find markers to add to your map.
I like to use the following resources for trip research:
- Google: Search for things to do, places to eat, places to stay, etc., in the areas you plan to visit or pass through
- Visitor Centers: Find tourism information online or request info from your destinations’ tourism bureaus to be mailed to you
- Travel books: We like to get ours from the library
- Facebook groups: Join a Facebook Group for the area you are traveling to. They are filled with tons of suggestions on the best things to do in the area.
When you find a location you want to make note of, add it to your map.
Do this by entering it into the search bar.
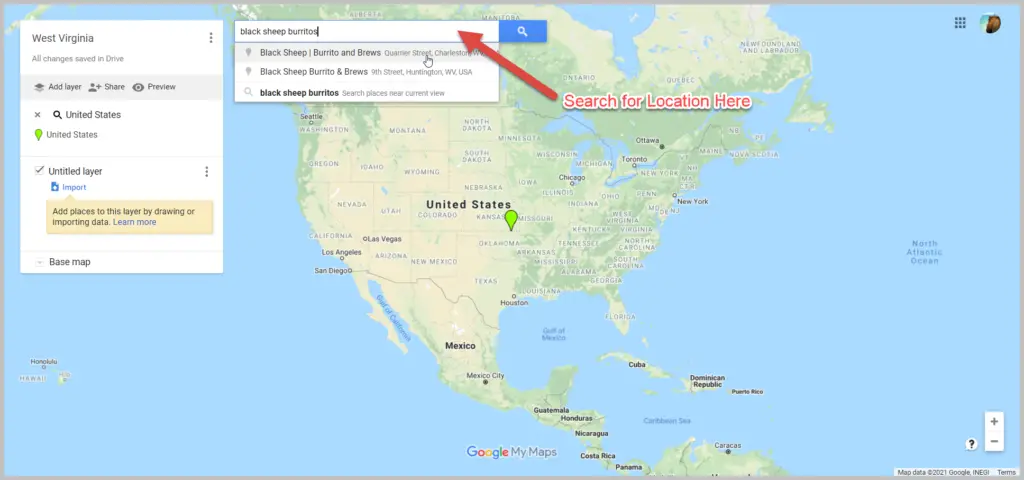
The great thing about Google Maps is that it pulls up all of the information on a location that Google has. If available, you can find the exact address, reviews, and website address.
If the location looks good, you can then add it as a marker to your map by clicking “add to map”.
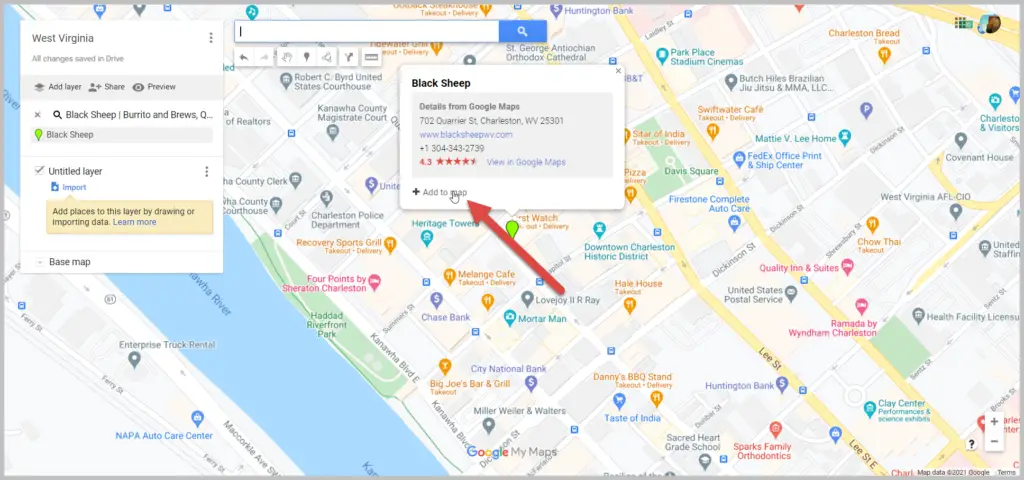
Once added to your map, you can customize your marker by changing your icon’s color and/or shape by clicking on the paint bucket icon labeled “style”.
I like picking a specific color and icon for each marker category. For example, my “restaurants” may all be blue with a fork and spoon icon, while my “sights to see” will be yellow with a binocular icon.

One of my favorite features of Google My Maps is that I can add my own info to the marker. Typically, this info comes from the research I’ve done on the location. If I found a blog post recommending a specific restaurant, I’ll add that to the marker, so I have that info at my fingertips when we are on the road.
Add any info you want to your marker and click save.

Your marker will now be added to your map.
You can see your marker in two places: one on the map and the other in the layer it was added to in the layers menu on the left-hand side of the screen.
Continue to add locations until your map starts to take shape.
Here is an example of a map we made for a West Virginia Road Trip .

Step 4: Determine Your Route / Itinerary
Now that you have location markers on your map, you can determine your route and day-to-day itinerary.
Take a look at where all your location markers are situated and start planning your route.
Start by creating a directions layer on your map.
Once you have your directions layer, rename it, and begin plotting your route.
First, you will need to enter your starting point. This can be done by either entering an address manually or clicking on a marker on your map.
Continue to add stops until your route is complete.
Here is an example of what our Lake Michigan Circle Tour Road Trip looked like.

Google Maps will default to the quickest route from two points. If you want to go a different route than the one suggested, you can drag the route to force it to go a different way than it was originally displayed.
You now have your own customizable Google Map for your road trip.
We use these maps for both planning our trip and for reference during our trip.
Now let’s look at how to use your awesome map during your trip.
How to View Your Google My Map on Your Phone
Now that you have your map customized, you’ll likely want to be able to view it on your phone.
You will first need to download the Google Maps app from your phone’s app store.
Once you have the Google Map app, here is how you access your map:
- Click on “Saved” on the lower toolbar on your phone
- Click on “Maps” on the lower right
- Select your customized map
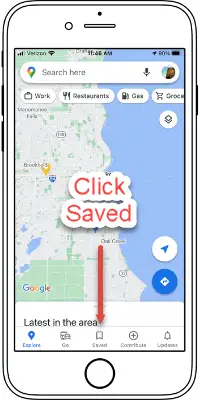
Now you can view your location markers and all the customized information you added to your map.
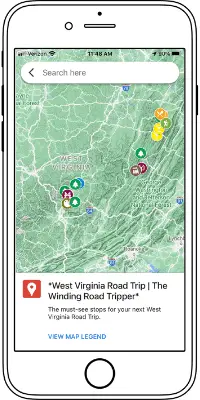
Click on your marker to bring up basic information. For the more detailed information you added, swipe up.
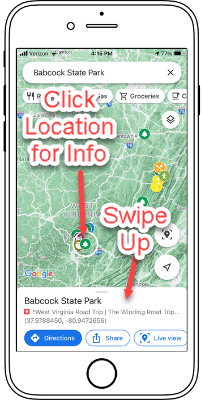
How to Use Your Google Map to Get Directions During Your Road Trip
Unfortunately, you can’t use the turn-by-turn directions you may have added to your map for actual driving instructions for your trip.
But not all is lost; you can still get directions to the next stop by using your customized map and Google Maps.
To do this, click on the location you want directions to and click on directions.
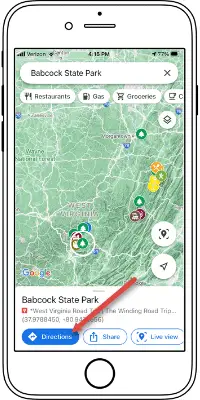
This will launch your Google Map app and allow you to get turn-by-turn directions to your next stop.
How to Export Your Map for Offline Access
Google My Maps works great when you have cell phone service on your trip. Unfortunately, you will not always have service, and you can’t download your Google My Map for offline use like you can in Google Maps.
Thankfully, there are ways to export your map for use offline.
To do this, we use Gaia GPS .
Let’s walk you through downloading your Google My Map for importing into Gaia GPS, an offline mapping app.
On your computer, click on the ( ⋮ ) in the top left corner by the map’s name. Then click on Export to KML/KMZ.
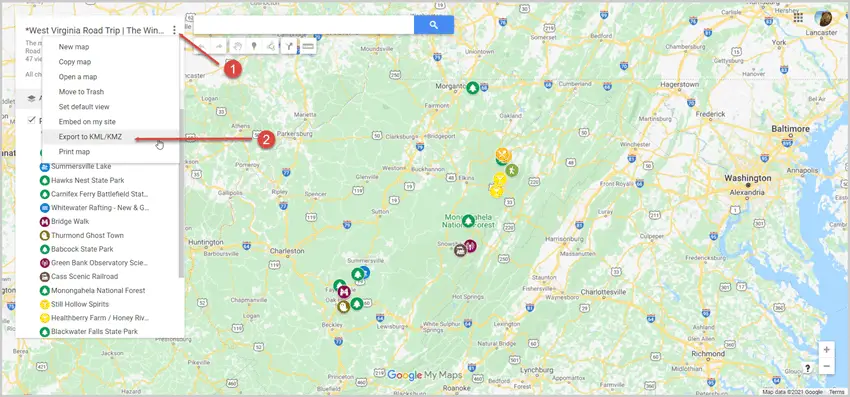
A pop-up will appear. Keep the default of “entire map” and click “download”.
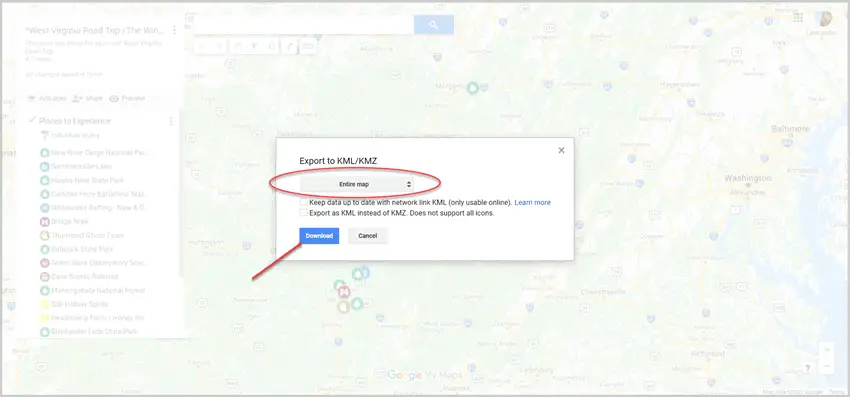
Now you can import this map into Gaia GPS.
Start by creating a Gaia GPS account .
Once logged in, click “Import Data” and select the .KMZ file you downloaded from Google My Maps.
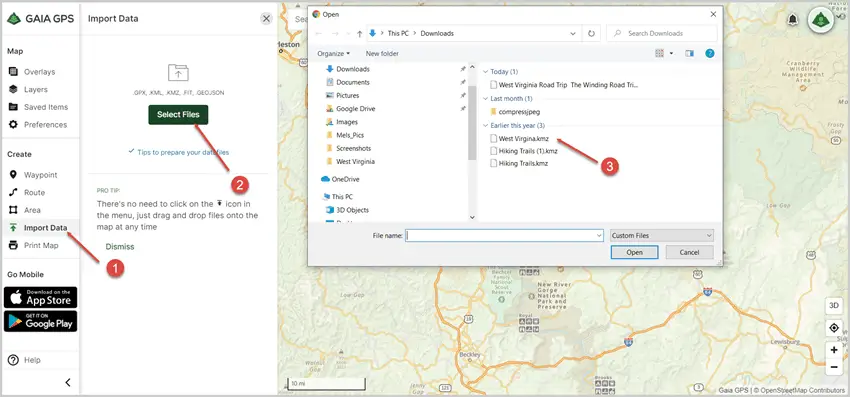
Your locations will now populate in your Gaia GPS map. Make sure to click “save” .
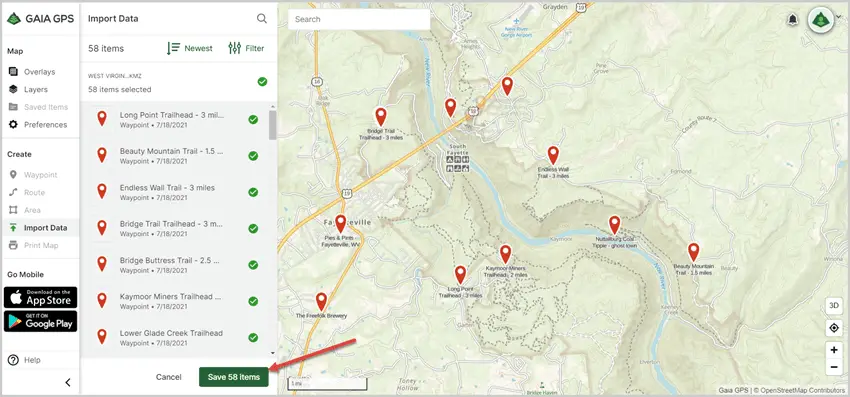
You can now access your map locations offline on your phone via Gaia GPS.
To do this, download the Gaia GPS App on your phone and log in.
Once logged in, you will see a notification that you have a saved location available.
Click on the Saved folder
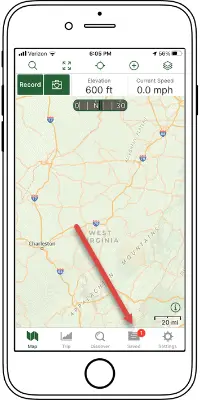
You can now see all your locations on your Google My Map. Including the details, you added.
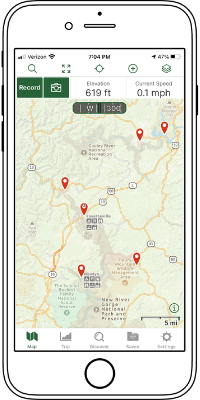
More Road Trip Tips: Road Trip Hacks for a Stress-free Trip Road Trip Activities for a Long Car Ride Road Trip Meal and Snack Ideas Money-Saving Tips for Your Next Road Trip How to Budget for a Road Trip
Easy Tips for How to Plan a Trip with Google Maps (Photos)
By: Author Kim Tate
Posted on Published: January 11, 2023

I’m sure many of us have used Google Maps to get directions to drive somewhere. But did you know that it’s a great way to plan your trips? You can plan a road trip with Google Maps, routing to points along the way and seeing traffic. But, you can also create a custom Google map to plan a trip around a city, marking all the sites you want to see as well as hotels and restaurants.
Another great thing is that Google Maps will give you directions for your route, and you can choose from several different modes of transportation including driving, biking, walking, or taking public transportation. The walking and public transportation directions are especially useful for navigating cities when you travel.
If you want to plan a trip with Google Maps, then these tips will help you become a savvy traveler and build the perfect travel itinerary.

How Can Google Maps Help You Plan a Trip?
Whether you’re planning a weekend getaway or a cross-country road trip, Google Maps can be a helpful tool for mapping out your planned route with a custom map.
Simply enter your starting point and destination, and the mobile app will generate a step-by-step plan for getting from one place to the other. You can also use the “traffic” layer to see real-time information about traffic conditions along your route.
This can be particularly helpful if you’re planning a trip during rush hour or other high-traffic periods. Additionally, the “Street View” feature can be useful for getting a sense of what your destination looks like before you arrive. With all of these features, Google Maps can help you plan a stress-free trip.
And beyond using Google Maps to plan a road trip or driving route, Google Maps can be a great way to plan a vacation itinerary and determine where to stay or eat when in a new city.
I’ve used Google Maps to create plenty of custom maps to help see where attractions are in a city and find hotels that are close to things I want to see and do. I’ll explain how to make a custom Google Map for itinerary planning further down below.
5 Reasons to Use Google Maps to Plan Your Trip
You may be wondering why you would use Google Maps to help with road trip planning. There are many reasons to use this technology to map out the easiest way to and from popular destinations for your next road trip. You can plan to take the scenic route or cut drive time with direct driving directions.
1. Google Maps is free – There’s no need to spend money on a complicated GPS system or a physical map when you can use Google Maps for free. All you need is an internet connection and you’re good to go.
2. Google Maps is easy to use – The interface is user-friendly and intuitive, so you’ll be able to figure out how to use it without any problem. Even if you’ve never used a GPS system before, you’ll be able to use Google Maps with ease. It provides turn-by-turn navigation and even gets you back on track if you take a wrong turn.
3. Google Maps is accurate (mostly) – You can typically trust that the information provided by Google Maps is accurate and up-to-date. This is especially important if you’re using it for directions, as you don’t want to end up getting lost! Getting to your exact location, safely, with easy steps that guide you through the best driving route makes Google Maps your new road trip best friend.
I say mostly because we have all probably read the stories that occasionally happen where drivers are routed somewhere popular via a bad road, but those situations are very rare when you consider how often Google Maps is used.
4. Google Maps has extra features – In addition to providing directions, Google Maps also offers traffic information, satellite views, and even Street View images. This can come in handy if you’re trying to find a specific landmark or considering taking a detour off the beaten path.
5. Google Maps is available on all devices – Whether you’re using a smartphone, tablet, or computer, you can access Google Maps trip planner without any problems. The navigation app is also available in multiple languages, so even if English isn’t your first language, you can still use it without any issues.

Step-by-Step Directions for Planning a Short Trip with Google Maps
1. open google maps.
Begin by opening the Google Maps app on your phone or by going to maps.google.com on a computer.
2. Add Location for Starting Point and Destination

Click on the search bar at the top of the map and enter your destination. When the destination details window opens, you can click the blue button for “Directions”. Add your starting destination.
You can also click and drag the location pins to adjust their placement if needed.
3. Choosing Your Transportation

Once you have your starting point and destination added, a set of directions will load with estimated times. There is a menu to choose your transportation method.
You can choose from several modes of transportation including driving, public transportation, walking, biking, or even ride-share. You can also see traffic conditions along your route – orange and red road colors mean heavier traffic, which might cause a delay.
4. Get Directions & Customization

Once you have your destinations routed and transportation chosen, there are further options to help you customize your trip. You can select a specific time you want to depart or arrive, and Google Maps will use its algorithm to tell you the approximate trip time based on traffic and other factors.
You can also choose different routes for your trip, like taking a different street route. You can also go into the route options to avoid highways, tolls, or ferries.
5. Add Mulitple Stops

You can add additional stops to your route, making it easy to plan a road trip with Google Maps. This can be convenient if you’re doing a simple one-day road trip or just running errands.
But if you want to get a broader view, check out the details below for how to plan a road trip with Google Maps using custom maps.
How to Plan a Road Trip Using Google Maps
Let’s say you already know about the simple Google Maps directions method above, but you’re looking for something bigger and better. Sitting down with a physical map and planning out your cross-country road trip can be time-consuming and difficult. I’m sure baby boomers and Gen X’ers will remember the days of AAA TripTiks.
Fortunately, it’s easy to plan a road trip with Google Maps with multiple stops. You just need to create your own Custom Google Map.
Keep in mind that the steps above will help you get driving directions to your destination(s), these directions below help you plan a road trip but won’t be available for live driving directions. The driving directions above using the Google Maps app can be convenient for short trips or trips with stops already planned.
Note: planning a road trip with custom Google Maps is best done on a desktop computer. As much as we love our phones, planning a large trip like this typically works better on a desktop (in my opinion, based on my experience).
1. Create a New Google Map

The first step is to open Google Maps , click on the “hamburger menu” (three lines in the top corner), then click on the “Your Places” tab. There are four tabs, Lists, Labeled, Visited, and Maps. Click on Maps. Your custom maps will be shown here, to create a new map, select “Create Map.” Another shortcut is to simply go to mymaps.google.com .

Name your map something easy that describes your trip. Google Maps does allow you to make these maps shared with the public, or with friends. So keep that in mind when you’re naming your map.
2. Click “Add Directions” Arrow

Begin your route by clicking the arrow “directions” button that is located below the search field. This will create a new driving directions layer. You’ll start with fields for locations A and B. This is the first start to planning your road trip with Google Maps. Add your next destination, and continue adding each destination. You’re limited to 10 destinations per layer.
You can click the “directions arrow” again to create multiple Driving Layers, so you may choose to make a different layer for each day of your road trip, or different sections.
Clicking on the “car” image next to “Driving” will let you choose biking or walking as your transportation method. This is great if you’re planning to go between stops via one of those methods.
3. Check Drive Times and Directions

Click the three dots next to the layer title name to view the “Step-by-Step Directions”. This will help you see the estimated mileage and drive times as well as the directions. You’ll be shown the overall time and mileage at the top, but each stop in smaller writing will show the time and distance from that starting point to the next point.
Note, this will not give you GPS driving directions for use when you’re actually driving. However, you can use this to pre-plan your route and stops, then use the traditional driving directions I noted above to navigate between each of your stops.
How to Plan a Trip Itinerary with Google Maps
Another way Google Maps can help you plan a trip is by adding location tags to a custom map. You can input all of the things you want to do on layers of the map to help you group together certain activities and restaurants as well as determine which hotel is best for your plans.
Follow the same directions from step 1 above to create and name a new Google Map.
2. Add Locations to Your Google Map

Next, you’ll add all of your desired destinations by searching and selecting the location in the search bar, then clicking on the (+) to add them to your map. Organize your destinations by creating layers, renaming them, and dragging and dropping pins into their respective layers.
3. Customize Location Pins

To customize the pins on your map, click on the “Paint Can” image on the location details or next to the location name on the layer (hidden unless you hover over the location). You can change the color of the pins and the icon used to represent each pin. There are many icons that are especially useful in charting the attractions, restaurants, hotels, and bars in a city.
4. How to Create Map Layers in Google Docs
To create map layers, click on the “Add Layer” button at the top left corner of your map. Name the layer and add destinations to it by searching and using the (+) to add the location to your map. If you assign a location to the wrong layer, you can simply click on the icon and drag the location to the preferred layer. You can also organize your layers by dragging and dropping them in a different order.
You can also add additional layers for walking or driving directions. You can see my 1 Day in Rome Itinerary post to see how I did that. Or just view the map here . This lets you create layers for planning as well as layers to map out walking or driving around to points of interest.
5. Plan Your Trip
Once you’ve added the places you want to see, stay, and eat, it will help you plan your itinerary with your Google Map. You’ll be able to see which restaurants are near which attractions. And you can see if a certain hotel is more centrally located for your desired activities.
What Are the Limitations to Google Maps?
It’s important to keep in mind that Google Maps is not always 100% accurate. Overall, it’s a very powerful vacation planning tool, and it’s free!
No Account for Schedule Changes
Google Maps does not always take into account any changes to public transportation schedules, road closures, or construction. It’s important to do your own research and stay updated on possible delays that may affect your route. This is especially true if you’re traveling on a holiday.
Recently I’ve noticed Google Maps is doing a pretty good job of recognizing road closures and helping you route around those.
GPS technology is not always completely accurate and can lead to errors in directions. It’s a good idea to have a backup plan in case Google Maps leads you astray. We still carry a road atlas (affiliate link) in our car, and if you’re touring a specific state you may want to pick up a state road map as well.
Delayed Updated Information
Google Maps can only give suggestions and recommendations based on the information it has. It’s up to the user to pay attention to their surroundings and make safe choices while traveling. Business also may have closed or changed and that info has not been noted.
Overall, Google Maps can be a helpful tool for trip planning, but it’s important to remember that it is not infallible. Always make sure to use common sense for a successful journey.
FAQs for Planning a Trip with Google Maps
Can i save my custom routes on google maps.
When using Google Maps for driving directions, you can’t save the route. However, you can save locations to “Your Places”. When you create a custom Google Map for your trip, it will be saved in your My Maps section automatically after creating it.
How do I view traffic conditions along my route?
The Google Maps app will automatically show traffic conditions on your route when you plan directions between locations. If you’re planning a trip using a custom Google Map, traffic conditions won’t be shown as they don’t provide live driving directions.
Can I view my saved places and custom routes on a computer?
Yes, you can access your saved places and custom routes by signing into your Google account on maps.google.com. You can see your custom maps at mymaps.google.com.
Can I plan a multi-destination trip with Google Maps?
Yes, you can add multiple destinations by clicking on the “+” sign in the search bar and entering additional locations. You can also click and drag pins to adjust their order if needed. Keep in mind that Google Maps will plan the most efficient route, so you may have to manually adjust your stops if you want to visit them in a specific order.
Can I plan a trip with multiple modes of transportation?
Yes, you can select different modes of transportation for each leg of your trip using different layers. For example, you could choose to drive to your first destination, take public transportation to your second destination, and then walk to your final destination. Google Maps will provide step-by-step directions for each mode of transportation.
Can I add stops along my route?
Yes, in the three dots menu, click on the “Add stop” option to add specific locations that you want to visit along your route. You can also drag and drop the stops to adjust their order if needed.
When using a custom Google Map, you can add up to 10 locations to each layer of your map. Simply search for the location and click the (+).
Can I view my trip itinerary and estimated time of arrival on Google Maps?
Yes, when using Google Maps for directions you’ll see an drive time and distance located in the lower section below the map for your trip. Using the three dots menu you can also select to set an arrival or departure time that will help you plan for traffic.
If you’re using the custom Google Map method, you’ll be able to see drive times and distances for your route, however live traffic will not be taken into account so the times are based on averages.
Can I share my custom route with others?
Yes, you can select to share your route, such as through email or a social media platform. Keep in mind that the recipient will also need to have a Google account in order to view the saved route. You can also embed the maps into a website.
Can I plan a trip with multiple people using Google Maps?
Yes, in the pin dropdown menu, click on the “Share or embed map” option and select the “Collaborate” tab to add other Google users who can view and edit your custom route. This can be a useful tool for planning group trips.
Can I use Google Maps offline?
Yes, you can download specific maps for offline use by searching for a location, clicking on the three pin dropdown menu, and selecting “Download offline map.” You’ll be able to zoom in and out to select a certain area/region of map to download.
This feature can be useful when you don’t have access to wifi or data while traveling. Keep in mind that this feature may not include real-time information such as traffic conditions or public transportation schedules. Also, you’ll need free storage space on your phone to save the maps data.
Can I view public transportation schedules on Google Maps?
Yes, when you’ve arranged directions you can click on the “Public transit” option to see schedules for buses and trains along your route. You can use the “set arrival or departure time” feature to help figure out public transportation times.
Keep in mind that this information may not be available for all areas, and could have adjustments not known by Google such as holiday schedules.
How to Calculate Gas Cost
When you are driving, it is important to calculate the cost of gas for your trip. Here are some steps to help you with this calculation:
- Determine the average miles per gallon (MPG) for your car. This can usually be found in the car’s manual or online.
- Estimate the total distance of your trip.
- Calculate the number of gallons needed for the trip by dividing the distance by your car’s MPG.
- Find the current price of gas per gallon at a nearby gas station.
- Multiply the number of gallons needed by the price of gas to get the estimated cost of gas for your trip.
Make sure to also account for any gas you may need for the return trip or for any detours during your travels. Knowing where the gas stations are will help relieve stress so you can focus on getting from point A to point B. You can use an app like Gas Buddy to help you find the best towns to fill up for lower prices. Check out my vacation cost calculator for more help planning your trip.

Different Ways to Access Google Maps
There are a few different ways that you can access Google Maps. People from all walks of life like to use different versions of Google Maps. Here’s how to use it in different ways.
Head to the Website
The first way is to go to maps.google.com.
Download the App
The second way is to go to the App Store on your mobile device and download the Google Maps app.
Use Your Phone’s Browser
Use the Google Maps website on your mobile device’s browser. This can be hard to do on some older phones, but many smartphones now have the capability to access websites just like a computer.
Use Your Car’s Navigation System
Some cars come with built-in navigation systems that use Google Maps. Check your car’s manual or touchscreen display to see if this option is available.
Use a Third-Party Map Program
There are also some third-party map programs, such as Waze or Apple Maps , that use Google Maps or other data as a source for their own navigation services. These can be downloaded as apps on your mobile device.
Whichever way you choose to access Google Maps, always make sure you have a safe way to view the map while driving. This could mean using a navigator or pulling over to a safe location before accessing the map on your phone.
The last way is to use the GoogleMaps API through a programming language such as Java, Python, or JavaScript.
There are many different ways that you can access Google Maps depending on your needs. If you just need directions, then any of the five methods will work for you.
However, if you need more specific information or want to use Google Maps’ advanced features, then you may need to use the Google Maps API through a programming language.
How to Utilize Google Maps
There are many benefits to using Google Maps. You can use it for directions, finding businesses in your area, or even checking out an aerial view of your neighborhood! Here are tips and tricks on how to get the most out of this useful tool.
Getting Directions
One of the most popular features of Google Maps is its ability to give you directions from one place to another. Whether you are driving, walking, or taking public transportation, Google Maps can help you plan your route. Simply enter your starting location and destination into the search bar and click on the “Get Directions” button.
Then, choose the type of transportation you will be using and click “OK.” Google Maps will then show you the best route to take, complete with estimated time and distance. You can even click on the “Steps” tab to see a detailed breakdown of each leg of your journey.
Finding Businesses in Your Area
Another great use for Google Maps is finding businesses in your area. For example, let’s say you are looking for a nearby restaurant. Enter “restaurants” into the search bar and then zoom into the area you would like to search.
Once you have done that, a bunch of different icons will appear on the map, each representing a different type of business. To see more information about a particular business, such as its address or hours of operation, simply click on its icon. You can also read customer reviews by clicking on the “Reviews” tab.
Checking Out an Aerial or Street View
Google Maps also offers an aerial view of any location. This can be handy if you want to get a bird’s eye view of your neighborhood or any other place you are interested in exploring. To access this feature, zoom all the way into the map until you see houses and other buildings.
Then, click on the “Satellite” button in the upper-right corner of the screen. This will bring up an aerial view of the area that you can scroll around and explore at your leisure.
You can also click for a street view to be able to see a recent image of the exact location from a drive-by imaging car. This is useful if you are considering a hotel or Airbnb and want to get a feel for the area.
These are just a few examples of how you can use Google Maps to plan your next trip. Whether you need directions to somewhere new or want to find a nearby business, Google Maps is a helpful tool that everyone should know how to use! With your road trip itinerary under control, you can focus on having the best time where ever you end up!
Have you planned a trip with the Google maps route planner? Let me know if the comments what your favorite road trip is!
Share and Save This Post:
How to Use Google My Maps to Plan a Trip (Ultimate Guide)

Note: Some of the links in this post may be affiliate links. This means if you click on the link and purchase the item, I will receive a commission at no additional cost to you. More details are here .
I love a good map. I’ve got maps hanging on my walls. I go to the bookstore to read maps. Whenever I navigate my way home using only a map, I feel like I must have some innate bushcraft skills. And if you’ve read my posts about traveling in Maine , you’re probably sick of me talking about the DeLorme Atlas by now.
But while reading paper maps will always inspire a sense of get-up-and-go adventure for me, I’m not totally opposed to using tech for planning my trips and navigating on the ground.
And one of my favorite techy solutions? A secret little trip planner called Google My Maps, buried inside of everyone’s favorite map tool.
Google My Maps lets you create shareable custom maps with multiple layers, plus location pins with icons and notes. It’s a great way to brainstorm travel plans or create a trip itinerary from a desktop. And since the map can be viewed in the Google Maps app, you can use it to navigate on the go.
To give you an example of what this post will show you how to do, here’s one of the custom Google Maps I’ve created for a trip.
Keep reading for an overview of how to use Google My Maps to plan a trip, plus a video tutorial of how to set it up—all updated in 2023. I’ll also share answers to commonly asked questions and some lesser known tips to help you get the most out of this tool.
A quick note: Creating a custom map in Google My Maps is distinct from Google Lists of saved places. Check out our Google My Maps vs Lists comparison to see all the differences and our full guide to using Google Maps Lists .
8 Top Google My Maps Features
(AKA Why It’s Awesome)
Google My Maps allows you to see your trip itinerary.
This is so helpful, especially if you’re a visual person or enjoy using maps. But even if you’re not, it’s still really useful to see where everything is in relation to each other as you plan your trip, vacation, or holiday because it helps you be realistic about your plans.
It connects with other Google apps.
Setting aside my (ahem, very rational) fear that they may take over the world soon, I love all things Google. My Maps stores a copy of the map in whatever Google Drive account you’re using. (Am I the only one who has six of these?) So if you like to create Google Docs or folders to store trip planning information, documents, photos, or itineraries, it’s nice to have your map easily accessible in the same folder.
You get additional location information since it’s part of Google Maps.
If a location is on Google, you can see their website, phone number, address, reviews, and website when you add it to your custom map. (Note that you can’t see this information when clicking on your saved pin from the Google Maps app, but you can from desktop.)
You can add your own extra notes and photos.
Customize your map even more by adding notes, photos, or videos. Use the notes during planning to add website, hours, or tips. If I hear about the location from a particular website, I usually add that link and what was noted in the article about the location (e.g., it’s a great sunset spot, which dish on the menu is recommended) so I can reference it later.
You can view your route by creating a layer with directions.
When I traveled to Burlington, Vermont, I wanted to see the length of the bike trail on the map, so I used the directions feature to show the whole route. (Check out the Burlington travel guide for an example of the travel map I created that includes the bike path route.) And while I haven’t done this yet, you could also use Google My Maps to plan a road trip itinerary for a longer adventure.
Caveat: As I’ll discuss later, you can’t use directions layers to get turn-by-turn directions (but I mention an alternative below). For this reason, I only use these layers to visualize my route.
It’s highly customizable.
Don’t mind me while I swoon over the color coding and organization options over here. Use custom icons, layers, and colors so it’s easy to see what things are at a glance. For example, you can give different locations individual styles: a coffee cup icon for cafes, a bed icon for hotels, and a swimming icon for beaches. You can also use layers in many different ways, such as one layer for each day of your trip or one layer for each category (like dining, lodging, and things to do).
In-depth planning on your computer. Easy, on-the-go access from your phone.
While you can’t edit the maps from the Google Maps app on iPhone or Android, you (and anyone you’ve shared them with) can view them. You can click on icons and see your notes, as well as navigate to those locations.
Note that there used to be a dedicated My Maps app on Android, but this has been deprecated.
It’s easy to share it with a friend or with the world.
If you’re planning a trip with other people, it’s easy to share the map with others . And if it’s something you want to make available to everyone (like I do on my travel guide posts), just change the privacy setting and share the link or embed it on a website.
3 Ways to Use Google My Maps
Brainstorm and store ideas for future “maybe” trips.
I often come across a really interesting hotel, restaurant, or fun thing to do in destinations I want to travel to in the future, and I want to make sure I don’t forget about them. I have so many bookmarks in so many places (Pinterest, Facebook, Instagram), but Google My Maps is the place I’ve started storing ideas for future trips.
Plan your trip itinerary.
Want to use Google Maps for route planning? When you’re ready to plan an upcoming trip, plot it out visually by using Google My Maps to create your itinerary. If you like structured itineraries, you can easily create a detailed day-to-day plan.
Or, you can use a looser itinerary structure like we usually do by adding all the places you might like to go.
For example, on a day trip to NYC, we added tons of places to eat on the map (thank you, Tiktok). As we were walking around doing other activities and started to get hungry, we were able to easily see which saved restaurants were closest to us.
Navigate on the go.
Whether you’re using your map loosely for ideas or for a structured itinerary, you can pull it up on your phone anytime and get directions to your next location.
Not sure what you want to do today, or want to see what the closest restaurant from your list is for dinner? Pop into your custom map to jog your memory from the notes you made or to get directions to your next location.
Recommended: Need an organized backpack to take on the road? Check out my favorite luggage for camping, road trips, and flying: the Cotopaxi Nazca 24L and Allpa 35L !
How to Use Google My Maps to Plan a Trip
How to create a new custom map.
Go to Google My Maps from your desktop browser . Check the Google icon in the top right corner to make sure you’re using the Google account you want to. Click “Create A New Map” and a window will open with a blank map. To give your map a name and description , click the map name (“Untitled Map”).

You can also change the color and style of the base map if desired. At the bottom of the layer panel on the left, click the arrow next to “Base Map.” You’ll get a window with nine options, including terrain, light political (a very light version of the standard Google Maps), satellite, and some different colored versions. Note that changing the base map style on desktop won’t change anything when viewing on mobile in Google Maps.
How to Add and Edit Layers
When you create a new map, the first layer will already be created, so you’ll probably want to rename it. To give your first layer a title , click directly on the title name like you did with the map name, or click the 3 dots next to “Untitled Layer” and then click “Rename Layer.” Clicking these 3 dots next to a layer title is also how you can delete a layer if you add one accidentally or change your mind. In this example, I’m changing my first layer to “dining” and will add all restaurants to this layer.
You can use layers any way you want to, or simply stick to one layer if you don’t need multiple. To add new layers , simply click “Add Layer” in the gray section below the map title and description.
To move a pin between layers , click the pin on the layer and hold down the mouse, and then drag it to the desired layer.

How to Add Location Pins
There are various ways to add location pins to a layer. First, make sure the correct layer is chosen by clicking anywhere in the white area on the layer. You’ll see which layer is selected by looking for the blue bar on the left of the layer.
- In the map search bar, type either a place name or an address. Click “Add to Map” to add a pin for this location . This is how I add most pins.
- If you don’t need an exact location or don’t have an address , you can click the pin marker button below the map search bar (“Add Marker”). It will turn your mouse into a T and you can click anywhere on the map to add a blank pin. You’ll immediately be prompted to add the pin title and description.
- If you’re dealing with very remote locations (or you just like geeky map stuff), you can also use latitude and longitude coordinates in the search bar.
To delete a pin , simply click on it and click the trash icon.

A few tips and best practices for adding pins:
- If the place you’re searching for does not have a listing on Google, you’ll have to use an address. One thing to note is that sometimes Google Maps listings aren’t correct or don’t take you to the right place, so you may want to double check the location if you’re not using a street address to add the pin (especially if it’s a small business without a website).
- I have also found that hiking trail heads are frequently on Google Maps, but they’re not always correct in terms of navigating there by car. I usually add them to my map to get a basic idea of where they are while planning, but I use a paper map or atlas to find them while traveling.
How to Customize Location Pins
To change the title and add notes to your listing, click on the pin on the map, and then click the pencil icon (“Edit”).
To change the color and icon of the pin , click the paint bucket icon (from the pin itself or directly in the layer). Click “More Icons” to view all the icon options. You can color code by type of activity, by layer, or any way that makes sense to you.
To add photos or videos to a pin , click on the pin on the map, and then click the camera icon (“Add Image or Video”). This is another way to make your map interactive, especially after you’ve visited a location and want to share it with others.

How to Add A Directions Layer
I find that directions layers are helpful for showing the route of a walking tour, bike path, or road trip you want to take, but I don’t find them useful for directions while traveling since I can simply use the maps app to navigate.
I use directions layers whenever I want to show an entire route on a map , rather than a specific location. Think of this as the 2024 version of mapping out a trip with AAA paper maps and a highlighter (if you’re old enough to remember).
Click the arrow icon underneath the search bar, which will create a new directions layer. On the legend, click “Driving” if you want to change this to walking or biking directions. Add a location name or address to Points A and B in the legend. If you find that the pins are not exactly where they should be, you can drag the points on the map.
Continue adding points by clicking “Add Destination” on the map. You can either type the information into the legend or hover your mouse to a spot on the map and double click it. (This is especially useful if you’re tracing a route on something like a bike path or hiking trail that won’t have an address.)
Rearrange the order by dragging the items around in the legend. Just like altering directions on Google Maps navigation, you can click on part of the route and drag it to a different road if you want to change part of the route after it is complete.
If you need to access the directions so you can see the distance of your route or the time it will take, click the three dots on the layer and click “Step-by-Step Directions.” Note that you can’t actually use this to get turn-by-turn directions in Google Maps.

How to Share A Google My Map
There are several options for sharing your Google Maps trip plan.
Open up your map, then click the share button in the gray bar above your layers. To allow others to view your map (which includes embedding on your website), click “change” under the section “Who has access.” For embedding, you will need to make this setting public.
Otherwise, if you want to allow others to edit your map, add their email address in the “invite people” section.

How to View Your Custom Map in Google Maps (iPhone or Android)
Open Google Maps and go to the Saved icon at the bottom. Scroll to the bottom of this screen and click “Maps.” Choose the My Map you want to view. The layers with your custom icons will now be visible on your Google Map. You can click on any pin to view your details (such as description or photos), as well as to navigate there.
To close a map, click on a pin and then click “View Map Legend.” There, you can click the Close icon.
From the Map Legend, you can also toggle layers on and off, and then backing out to the main map (don’t click Close—just the back arrow or back button).
How to Navigate with a Custom My Map (iPhone or Android)
To navigate to one of your pins, open your map, find the pin for where you want to go, click it, and then click “directions.” When you do this, you won’t see your custom map anymore but will be looking at the regular navigation of Google Maps.
You can’t use a My Maps “directions layer” for navigation. If you’re looking for that functionality, I recommend just creating a route in Google Maps and sending it to your phone (or sharing with others). See here for more details.
How to Import Locations from Google Sheets, CSV, or Excel
Importing locations to a My Maps layer can be helpful in a few scenarios:
- You have a significant amount of locations to add to your layer
- Your data is already in the form of a spreadsheet
- You want additional fields included besides the default Name and Description
- You want to create groupings of pins (for example, a list of 50 restaurants could have a column for “Cuisine,” which will give you the option to group and style the pins by cuisine)
The process is simple, and you can import a variety of file types, including CSV, Excel (XLSX), or directly from Google Sheets. There are also special file formats that import map data from other programs, but this section is focused on spreadsheet-type files that you create and format.
Create a spreadsheet with the desired column headers. At a minimum, you need place names and either addresses or latitude-longitude information .
If you want to group your pins by some type of categorization, you should include that as a column. Other columns you could include: website, phone number, description, or notes. While Google Sheets allows you to include photos in a cell, Google My Maps will not import photos in this way (it will include the column as a field, but will be blank).
Once your spreadsheet file is ready, click “Import” on a blank layer (if your map already has layers, you will need to add a new layer to see this option). If uploading a CSV or XLSX, do this from the Upload tab. If using a Google Sheet, click the Google Drive tab and choose your file.
Choose which column has location data (address or latitude-longitude) and click “Continue.” Choose the location name column next and click “Finish.”
To change the icons individually, click “Uniform Style” next to the paintbrush on your layer. Under “Group Places By,” choose “Individual Styles.”
To change styles by a category column (such as Cuisine), click the link next to the paintbrush and choose to group places by the desired column. You can then give each category its own color or icon.
You can manually add new pins to this layer, and they will include all the fields you imported from the spreadsheet columns.
You can also add more items to your spreadsheet, and import this new data. Click the three dots on your layer. Under “Reimport and Merge,” click “Add More Items” and choose your file. It will add the new rows to your layer.
How to Import a Route from Google Maps Timeline History (KML) or GPS Data From a Fitness App (GPX)
Google My Maps can import routes and locations you’ve already traveled to via special file types that are very easy to download from certain apps. This could be useful if you want to share a walking, biking, or driving route that you’ve taken without having to recreate it on a directions layer.
Note that this only works as well as the GPS satellites were able to track your location while you were traveling.
If there are a lot of clouds, dense forest, buildings, or anything else blocking the GPS signal, your tracked route will be much less precise. I’ve noticed that Google Maps sometimes has my route showing somewhere I couldn’t have walked or driven.
If you have your location history turned on in Google Maps, you can download a KML file from a trip, which will include the route traveled and location pins for any stops. Sometimes it misses a location name or adds a pin in the wrong place, but overall it’s pretty good.
Go to your Google Maps Timeline and locate the day you want to export. Click on it, and you should now see your route highlighted along with any stops you made. Now click the gear icon on the bottom of your map, and click “Export this day to KML.” Go to your My Map and on a new layer, click “Import.” Choose the KML file you just downloaded. You can now edit each portion as needed—changing the color and thickness of the route line, changing the location icons, as well as adjusting the route where desired.
If you have other apps that track your location, such as fitness apps, you may be able to download a GPX file that shows the route you took. The instructions for doing this will vary from app to app, but I was able to easily find it in Samsung Health by looking at the detail of a particular workout/walk and clicking the three dots to download a GPX. The import process to Google My Maps is the same as above.
With both methods, you can make adjustments to points/stops along the way or even add more pins. With the Google Maps KML file, you can also adjust your route by moving the small white dots.
Google My Maps Tutorial
Here’s a walk through video to show you how to use Google Maps to plan a trip, along with several of my own Google My Maps itinerary examples. Coming soon: a 2024 update!
Google My Maps Examples
Here are a few more examples of My Maps I’ve created for sharing recommendations, trip ideas, and actual vacation planning.

Google My Maps FAQs and Tips
As great as Google My Maps is for planning a trip, there are some limitations to using it. Lots of questions have also come up about more specific uses and ways to use its features. Thanks to all the readers who have asked or shared tips in the comments as I’m always looking to make this a more robust guide. I’ve organized the questions and tips here since it makes it easier than scrolling through the comments.
How many layers can you add to a map?
Google My Maps limits you to 10 layers. If you are planning a longer road trip and want to create a layer for each day, this limitation may prove frustrating.
Here are a couple of workaround ideas: You can create 2 maps, and have the entire master route as 1 layer on each (showing the very basic route for all 12 days—say from city to city) as a reference. Then build individual layers for each day. As a second option, you could add multiple days to 1 layer and change the titles to start with the day they correspond to (so it would be “1 – Name of Place” instead of just “Name of Place.”) However, this option may not be ideal since you can’t see the titles until you click when you’re on the phone.
How many location pins can you add to each layer?
You can add up to 2,000 pins per layer, and the entire map cannot exceed 10,000 lines, shapes, or places total. I haven’t tested the limits, and it’s possible adding this amount of items could slow things down. My guess is that most travelers wouldn’t need anything so large, but it is possible according to Google .
Are custom Google My Maps available offline?
No, but keep reading for a workaround and alternative.
One of the biggest complaints about Google My Maps is that you can’t download your custom map and pins to use offline, unlike the rest of Google Maps.
However, I have been able to use it in areas with spotty reception. I pulled the map up when I did have reception, and I left it running in the background. It would stay loaded in the app and I was able to pull it up to look at it later when I was out of reception. I’m not sure I would rely on this as a surefire workaround, but it can work in a pinch.
Another alternative, especially if you’ll be traveling in another country where you’ll be completely offline, is to use Google Maps Lists, which can be edited from desktop or your phone but don’t offer the option for separate layers, unique icons, or adding photos.
Is there an app for Google My Maps?
There is no separate Google My Maps app, but you can view your maps within Google Maps. Just make sure you’re signed into the same account, and all your maps will sync.
(There used to be a dedicated My Maps app on Android, but this was deprecated in 2021.)
Can you create or edit maps from your phone?
No, the maps cannot be edited from the Google Maps app. Google My Maps can only be created or edited from the desktop version of the site. This is another huge advantage Google Lists has over Google My Maps because Lists allow you to add new places or entire lists from any device—iPhone, Android, tablet, laptop, or desktop.
Is there a bridge height filter?
No. For RVers and others who need to plan ahead for height limitations, there is no bridge height filter available in Google Maps. Since I haven’t had to use this feature myself, I am not confident in an alternative to recommend. However, from a bit of digging around, there are some apps and GPS units for truckers that may be a good place to start looking if you have an oversize vehicle.
What is the difference between Google Maps Lists and Google My Maps?
They both allow you to create custom maps with pins, but there are some key differences, such as offline access, layer capabilities, customizable pins, and creating/editing within the app. Check out the details on how Google My Maps compares to Lists (including a features comparison table).
How many stops can you add on a directions layer?
You can only add 10 stops per directions layer. This is also the maximum number of stops you can add for navigation in Google Maps. As some readers have pointed out, this can be limiting when you want to use this feature for a long road trip.
Can you use the directions layers on your phone for navigation purposes?
No, you cannot create a directions layer and then access those turn-by-turn directions for navigation in the Google Maps app.
So…are directions layers totally useless? What’s the point of having a Driving Directions layer in My Maps?
Personally, I still like to use these layers, but only to show a route for my very visual brain, rather than to actually create custom directions.
Can you send a custom created route (layer) to someone else so that the other person will take that specific driving route on google maps?
No, you can’t do this from My Maps, but there’s a workaround I can suggest.
Forget My Maps, and use Google Maps from desktop or mobile to plot a route. You can add up to 10 stops, and then you will be able to share your custom directions.
From desktop, there’s an extra step in first sending the directions to your phone. If you’ve created the directions in the mobile app or once you have them pulled up there, you can share them with anyone by clicking the 3 dots next to your list of locations (sharing must be done before clicking “Start”—if you’re already in the navigation, you need to back out of it to share). When you share, it will list all the steps as well as send a link for the other person to open the directions in Google Maps directly.
An important caveat to sharing custom routes: Google Maps will reroute the directions as it normally does according to current traffic at the time of driving, so this method cannot be relied upon if you’ve mapped a specific route for bridge clearances. As a workaround, you can add “stops” on the desired interstate (zoom in and add this literally on the road itself so navigation doesn’t try to take you off an exit), which will force Google Maps to take the driver that way. This is what I do when driving south from Connecticut to PA because Google Maps always wants me to take its beloved George Washington Bridge and I always don’t want to. I add a stop to force my route across the Tappan Zee Bridge. However, I’m not sure I would rely on this workaround as a sole method for RVs or truckers.
Can you see how much time the directions will take?
Yes, on desktop you can view the details if you want to know the distance or how long a route will take. To view distance and time for a directions layer, click the 3 dots on the laye, then click Step-by-Step Directions.
Of course, this doesn’t really help when you want to get this information on your phone or use the directions for navigation. As mentioned elsewhere, the “directions” layer functions best as a way to visualize a route. If you need turn-by-turn directions, see the steps mentioned above to save and send directions in Google Maps.
This post was originally published on July 27, 2017 and has been updated in May 2023.

Travel Photographer | FAA Certified Drone Pilot
Naomi is the coffee-loving, crazy-about-Latin-America writer and photographer behind everything here. She's guided by curiosity and a belief that every place has a story to tell–whether it’s through the intricate details of nature, history that has shaped a culture, or the people who call a place home. Learn More
HOW TO USE GOOGLE MAPS TRIP PLANNER IN 7 STEPS

Google Maps Trip Planner allows you to create detailed travel plans while simplifying those confusing things related to travel planning.
Planning a trip often seems like trying to put together a million-piece puzzle. It is understandable that a trip to a place that we’ve only ever seen through a laptop screen can be confusing.
But it won’t be that way when you start planning a trip on google maps.
Most of the confusion related to travel planning is because we have no sense of orientation for that place or destination that we’re about to visit. All we have is a bunch of ideas – places we want to go and see, hotels we like, activities, but we have no idea where those things are located.
Creating a trip plan on google maps puts everything into perspective because it gives you a visualization of those things on a map.
When you have those ideas clearly pointed out on an organized google maps travel plan, it will be easier to choose the area you want to stay (and eliminate the surprise of booking a hotel in the middle of nowhere) , group together certain activities in a practical way and you can also plan a route in google maps for your daily itinerary.
Basically, planning a trip on google maps will make travel planning a whole lot easier. And best of all, it’s free and pretty simple to use.
Before we start, you may want to save the URL link to this post in case you need it for future reference.
Ok then let’s get right to it.
If you want to know something specific about creating a travel plan in google maps you can skip straight to what you want in the table of contents below.

1. CREATE A NEW GOOGLE MAP
2. add all your ideas to google maps, 3. changing the pins colors and icons, 4. categories a google maps travel plan, 5. access you google maps travel plan on mobile, 6. use maps offline, 7. share map with friends.
Do this if you’re soon going on vacation or planning a trip.
Before you go on vacation make sure to purchase travel insurance. I know, most times it seems like a waste of money. But the thing is, you don’t know you need it until you do so it’s good to minimize those risks that you could face while traveling. Keep in mind, that medical bills or hospitalization can cost 1000’s of $$. And
CLICK HERE FOR A FULL RUNDOWN ON TRAVEL INSURANCE STARTING AT JUST $1.50
In this guide, we are laying out a step-by-step guide to create a travel plan using google maps on desktop (laptop). Although it is possible to create a map on your smartphone, the options are limited. But don’t worry, the map created on your desktop will be synced to all your devices, even mobile phones and tablets.
If you already have a Google account (Gmail), go onto your search engine (Google, or whatever you usually use) and type in google maps. Or you can click here to get started.
You will need a google account so that your maps will be saved and also so the maps that you create can be accessed from all your devices like mobile phones and tablets.
If you don’t have a Google account click on this link to create one. Don’t worry it’s free and only takes about 5 minutes. Once you’ve created an account you follow the same steps from above.
Make sure that you’re logged in before you start creating a new google maps trip plan. If you’re logged in there should be a round icon with your initials on it in the top right corner of the screen. If there isn’t you’ll see a sign-in button.
After signing in, first go to the hamburger icon near the search bar on the map. It’s in the top left corner. And then click on your places, the first option in the drop-down menu.

In the menu click on MAPS , the last option on the right. This is where all the maps that you create are saved. So, if this is the first time that you’re creating a google map, this section should be empty.
At the bottom of the current menu, click on CREATE MAP .
Ok then, great the map has now been created.
All you need to do now is to give your new google maps a title and a description. If you only have one map, you barely need a title let alone a description. But as you create more maps, those titles and descriptions will help you easily find the map you’re looking for rather than searching through a bunch of unorganized maps.
In the menu in the top left corner of the screen, Click on Untitled Map . And in the text box that pops up, give your map a title. Think of giving specific names to your maps. For instance, if you’re making a map of New York, instead of just writing a title “New York”, write “New York Trip – October 2021”. And write a description, like places I have to visit, or the best hotels, restaurants, activities, for example.

Not everyone follows the same steps to create their personal travel plan on google maps. For example, our favorite way is to start off by putting all our ideas on the map.
We start off by making a list of places that we want to go, activities that we want to do, hotels and restaurants we like, and anything else that comes to mind that we could possibly consider while in that destination.
Because you can visualize Adding all our ideas onto a map offers a visualization of that destination and puts everything into perspective. For instance, if certain activities are too far away we can determine
For instance, we can easily understand if an activity is too far away or maybe choose a hotel that is centrally located in the middle of the things that we want to do.
Seeing all those places on a map will help you understand what you can realistically do within your trip duration. For instance, you will be able to determine if certain activities are too far away. Or if a hotel you like is in the middle of nowhere.
Adding all those ideas to the map is straightforward.
Step. 1. Go to the search box in the middle of the screen and type in the name of the place. You can search for anything you want, like hotels, restaurants, beaches, waterfalls, parks. Basically, on google maps you’ll find almost every place you look for. If that place doesn’t come up in the search, you’ll need to type in the street address.
Step. 2. Once you’ve found the place you want, a green will come on the map in the location of that place. And a small description box will be next to it.
Step. 3. To save that place to the map, click +add to map in the description box.
Repeat these 3 steps for all those places that you want to add on you new Google Map travel plan.

TIP: if only the green pin comes on the map, click on the green pin. When you click on the pin the description box will come up and you can add that place to the map.
Too many ideas but not much time? When we plan short trips, sometimes we book tours or at least we book a tour if they’re any good. Tours save us time because they combine the must visit spots in the destination we visit. And surprisingly, some tours have cost us less than if we did everything by ourselves.
Whenever we are considering a tour in a popular destination, we always make sure to book with a reputable company and also to book in advance. Because you know, the good things easily run out. Below are links of 2 companies that we personally use.
PRE BOOK & GET THE LATEST DEALS WITH VIATOR HERE
OR PREBOOK WITH KLOOK FOR THE BEST DEALS ON TOURS & TICKETS IN ASIA
At this point, we have a good idea of where all those places – like activities, tourist spots, hotels, restaurants – are located. And by default, all the pins will be in blue color.
But having a load of identical pins isn’t a great way to visualize a google maps travel itinerary.
So now, what we need to do is to give meaning to each pin by color coding and/or changing the pins into icons.
Color coding the pins or changing them into different icons will make your google map a lot more visually understandable.
For example, what we do is color code each place into different categories. For example, if we have beaches we make yellow pins, for hikes we use brown pins, for restaurants red pins, and so on.
And we also customize the icons. Don’t worry, both color and icons are pretty straightforward.
How to color code pins in google maps
Step 1. Click on the pin that you want to change the color. A description box will open up.
Step 2. Next click on the style, the icon resembling a tipping paint bucket. The first icon at the bottom of the description box.

Step 3. A small window with color samples will open. Choose a color that will help you easily identify that specific place.
How to change pins to specific icons
Changing those identical pins into icons that actually mean something will further help you visualize what those places are on your google maps trip planner.
For instance, if you have a beach add a palm tree or an umbrella. If you have a restaurant, add a knife and fork icon.
Color coding and icons work simultaneously. So don’t worry, you don’t need to choose either the icon OR the color.
To change icons follow steps 1 and 2 from above. When the window with color samples opens, there will also be a number of icons to choose from. However, you can further expand that icon window by clicking on more icons.
TIP: alternatively you can change color or icons of pins when you’re adding your ideas to the map. After you click +add to map
Adding layers in google maps trip planner is a key feature because it allows you to categories your trip itinerary into different sections.
Creating different layers is a way of grouping together certain things on the map. Because although you may have defined all the pins with specific colors, the map still doesn’t have much organization. It’s like having a bunch of pins with not much value.
The way in which you group together the pins will depend entirely on your choice and also on what is the purpose of the google maps that you’re creating. We’ll give a few ideas on how you could categories all those pins.
We group together our pins in 3 ways, depending on what makes the most sense for that specific travel plan.
If we want an easy to follow travel itinerary, we group together pins in days. So if a number of things can be done in a day, we group those together and call that a day plan.
Or, when we go to countries made up of loads islands like Indonesia or the Philippines, we categories all the pins by islands.
Or, we create a different layer for each different type of place that we want to visit. For instance, we make categories for hotels, restaurants, malls, historical places, activities, etc.
How to add layers on a google maps travel plan
Step 1. In the menu, in the top left corner, click on add layer. You can add up to 10 different layers.

Step 2. Categorize each layer with a title. Click on Untitled layer . A text box will open up and here you can write the title for that layer. If you don’t see the text box, click again until it comes on the screen.

Step 3. All the places that you had previously added to the map will be in the first layer. Once you’ve created different layers, all you need to do is to click on the place you want to move and drag it into the layer/category that you want.
Make sure the box next to each layer is ticked. If next to the layer title there is no tick, it means that layer is closed and you won’t be able to see the things in that layer when use the map on your mobile phone.
Now that you’ve created your Google Maps travel plan you will need to be able to access that plan easily with your mobile phone.
To access your plan on mobile phone go to google maps (make sure you go to google maps and not maps go) and click on saved at the bottom of your screen.
In the next window scroll all the way down and click on maps on the bottom right side of the screen. This is where the maps you create are saved.
Now choose the map you and click on it.
Now you can access your google maps travel plan when offline. And also use google maps to get directions even if you don’t have a connection.
So from now on it won’t really matter if you’re connected to the internet or not. You can easily find google maps travel plans and get directions even in remote places with unreliable wifi service.
You’ll need to plan these things ahead because the only way to access your maps or get directions is to download what you need in advance.
I will explain exactly how to download google maps for directions and how to download your google maps trip planner.
Accessing Google Maps travel plan offline
- Download Google Earth App on your mobile phone.
- Go to your google maps travel plan on desktop and click on the 3 dots next to the title.
- In the pop up box click export to KML/KMZ. In the next pop up leave the boxes unchecked and click download.
- Send a downloaded copy to yourself by email.
- Now, on your phone go to that email, click on the file and open it with Google earth.

And follow these steps to use Google directional maps offline
- On your mobile phone, open the google maps app. Be sure the app is Google Maps and not “Google Maps Go”.If you haven’t got the app on your mobile phone you can download it here.
- In the top right corner of your mobile screen you will see a round icon. Click on the icon to access your account and go to offline maps.
- On the next page click “select your map”. This will open the page where you download your map. By default, the area of the map will be of your location. However, you can scroll to find whichever part of the world you want to download.
Keep in mind that for google to work offline you need to download the map over a connection. By default, maps will only download over wifi connections. If you want to include mobile data for downloads head to the settings wheel on the “select your own map” page and go to download preferences.
Whether you are planning a trip with google maps or not you should always share your travel plan with someone you trust.
Especially if you’re traveling solo, someone should always know what your plans are. At least, if something happens in those places you’re going to visit someone will know where you are.
Besides safety reasons, you can also share your google maps and let friends or your travel buddies contribute and give their own input on things they want to do.
Follow the steps below to share your google maps travel plan:
- To share from desktop go to the map you want to share and under the main title click on the share button. In the pop up window click the button next to “anyone with this link can view”. Copy the link and share it either by email or message.
- To share on mobile open google maps mobile app, click saved at the bottom of the screen. In the next window scroll all the way down and click on maps. Open the map you want to share and click on “view map legend”. Click the share option and choose how and to who you want to share that google maps travel plan.
Sharing your map will give your loved ones some peace of mind. At least, if they don’t hear from you they will know where you were at that time.
Using google maps to create detailed travel plans takes out a lot of the unnecessary stress of travel planning. It also makes a travel plan organized and easy to understand because of the visual aspect of planning a trip on a map.
So I hope this article gives you a better understanding of how to plan a trip with google maps. But if you have any other ideas or alternate ideas on certain things we mentioned please let us know in the comments below. There is no better way to improve than to get ideas from other travelers.
Our love for travel started off in South East Asia and continues to attract us each year. If you want you can read a bunch of interesting articles about beaches, waterfalls, food, itineraries by clicking the link below.
CLICK HERE TO READ A BUNCH OF INTERESTING ARTICLES!!
Do you want to know useful travel tips without even searching?
Subscribe to our email list to receive tips and detailed itineraries for amazing places around the world that will spark your travel inspiration.
Your Name (required)
Your Email (required)
Follow Us On Pinterest .
2 thoughts on “HOW TO USE GOOGLE MAPS TRIP PLANNER IN 7 STEPS”
The articles you write help me a lot and I like the topic
I like this. I posted this on my LinkedIn and my followers enjoyed it! Keep up the good work. 🙂
Leave a Comment Cancel reply
Save my name, email, and website in this browser for the next time I comment.
——— ABOUT US ———

We're Jackie and James, now in our late 30's, we've been traveling on and off for 5 years now. After living our entire lives on a tiny island named Malta, we set off to explore Asia on a budget while writing detailed guides about awesome destinations. We hope our travels help you realize that traveling doesn't have to cost a fortune.
——— SEARCH THE BLOG ———
Recommended

Travel Packing Methods – X6 Packing Organization Tips
Read More->

HOW TO PLAN A TRIP – 10 STEP TRAVEL PLANNER GUIDE

TRAVEL SAFETY – 27 TIPS TO STAY SAFE WHEN TRAVELING

CHOOSING THE BEST LONG TERM TRAVEL INSURANCE POLICY IN 2021

CHOOSING A HOLIDAY DESTINATION – 7 STEPS TO FIND THE BEST VACATION SPOT
How to use Google Maps as a trip planner and make a full itinerary
- You can use Google Maps as a trip planner through the "Places" and "My Maps" features.
- Both the Google Maps website and app let you save locations to lists, which you can then get immediate directions to.
- When getting directions, you can look up reviews and add multiple stops to your route.
Google Maps has become an essential part of any road trip. After all, it's a GPS, business directory, and reviews platform all-in-one.
But if you spend some time with it, you can integrate Google Maps even more seamlessly into your next vacation. Google Maps has a variety of features you can use to plan your trip and save any interesting spots you find on the way.
Here's how to make Google Maps your trip planner, using the Places feature, My Maps, and more.
How to use Google Maps as a trip planner
Use the 'places' feature to save points of interest.
Let's say you're traveling, and happen to stumble upon the cutest coffee shop you've ever seen. You want to visit, but don't have time right now — what's the best way to remember it?
Google Maps' Places feature can help you out. Both the Google Maps website and app let you save any location on the map to a list, which you can then easily find later.
1. Open Google Maps and click, tap, or search for the location that you want to save.
2. Find the Save icon , which has the icon of a bookmark. You'll find it right under the location's name, but you might need to swipe to find it in the mobile app.
3. Pick where you want to save the location to. You've got three lists to start with — Favorites , Starred places , and Want to go — but you can make a new one by tapping New list .
4. Once you've saved the location, you can find it again by opening the list. In the mobile app, tap Saved at the bottom of the screen; on the website, click the three stacked lines in the top-left and then Your places .
Tap on a location in your list to have the map jump straight to it.
Look at Google Reviews to find the best shops
Nearly every point of interest on Google Maps has a section for user reviews. Similar to sites like Yelp, these reviews can be a great way to see which stops are must-sees and which you can pass.
To check out reviews:
1. Open Google Maps and find the location that you're interested in.
2. At the top of its information page should be a star rating and a number, showing how many people have left reviews.
3. Scroll down until you hit the Reviews section, and you'll find reviews from other users who've visited the location. They'll include a star rating, a date, and occasionally a picture.
If you're interested in leaving a review of your own, check out our article on how to write Google reviews .
Make a custom My Maps page to share your road trip plan
Only available on a computer as of this month , Google's My Maps program lets you make a custom map or plot out a route with as many waypoints as you like, and then save and share it with others.
1. Head to the My Maps homepage and click Create a New Map .
2. You'll be given a world map. In the menu in the top-left, click the Untitled map name to give your map a name.
3. Use the search bar at the top of the page to find any location, then click Add to map to save it. You can add as many points of interest as you like.
4. You can also save multiple separate lists of locations to the same map; just click Add layer in the top-left menu.
5. To save directions between multiple locations, click the Add directions icon that looks like a curved arrow. It'll add a new layer that you can use to plot a path.
6. When you're done, click Share or Preview in the top-left window.
Add multiple stops to one trip
Driving from one city to another is simple. But if you want to make stops along the way — lunch, the beach, a mall — things get complicated.
Luckily, you don't need to start a new Google Maps route for every stop. You can create one navigation route that includes every stop from the start, giving you a clear way to see how long it'll all take.
1. Open the Google Maps app and start navigating to another location.
2. On the screen that lets you pick your starting and ending location, tap the three dot icon .
3. Select Add stop .
4. A third waypoint — labeled "B" — will appear. Tap it to choose your second destination, or drag it to reorder the waypoints.
On a computer
1. On the Google Maps app website, find a location and start getting directions to it.
2. Underneath the menu that lets you pick your starting and ending location, click Add destination .
3. A new field will appear. Enter your third waypoint.
4. Once you pick a new waypoint, you'll be able to click Add destination again and pick another one, as well as reorder them.
You can add up to nine destinations on both the website and mobile app.
- Main content
How to Plan a Road Trip with Google Maps | A Step-by-Step Illustrated Guide

By Jason Barnette | Travel writer and photographer with 15+ years of road tripping experience
- Last Updated on June 3, 2024
- Published on March 25, 2022
This post may contain affiliate links. Read my Affiliate Disclosure here .
My road trip planning always begins with Google Maps. In less than half an hour, I can create a new map, add a driving route, and fill layers with markers. Once completed, I sit back with a fully visualized road trip in front of me.
All of this is made possible with Google My Maps – a component of Google Maps that allows users to create customized maps. After years of road tripping, I have built an archive of over a hundred custom maps. It’s great for planning a road trip – and remembering my favorite moments years later.
Follow this step-by-step illustrated guide to learn how you can create custom maps, load them in Google Maps, and create the perfect road trip itinerary.
Google Maps vs Google My Maps
Google Maps has become one of the most popular navigation apps available on mobile devices and online. Users can get turn-by-turn voice navigation, search for points of interest, and save them to lists. However, that’s where the usability ends. It’s not the ideal way for planning a road trip.
Google My Maps is a tool for creating a custom map with layers, stylized markers, and routes.
READ MORE: 10 Ways to Save Money on Gas on Your Next Road Trip
This helps visualize a road trip, place destinations in the correct order, and make sense of the grand scale of the road trip. After creating a customized map, users can open it in Google Maps on any mobile device, plug into a compatible vehicle, and let the road trip adventure begin.
Here are three primary differences between Google Maps and Google My Maps:
- Google Maps cannot be shared with friends and family, but Google My Maps can be shared
- Google Maps cannot stylize the markers, but Google My Maps can style colors and icons
- Google Maps has an app for mobile devices, but Google My Maps can only be used in a web browser
Google Maps lists is a great way to build your road trip wish list, and Google My Maps is a great way to build your road trip itinerary. Used together, these are powerful tools for planning every moment of your road trip adventure.
Google My Map Example
“Wish, however, that you had added a road map that I could use on my GPS,” Karen commented on Road Trip: Exploring the Tennessee Mountains From Knoxville to Chattanooga . She wasn’t the first person to request a map to download to mobile devices and take on the road with them.
I listened.
One of the benefits of using Google My Maps is the ability to share the map with friends, family, and fellow road trippers. But after posting a story about a road trip, I would delete the Google My Map. Eek! I wish I hadn’t done that.
I am in the process of recreating all the road trip itineraries I’ve posted in Google My Maps. In the future, when you see a road trip itinerary, “things to do” post about a destination, or roundup of coffee shops, breweries, and restaurants, you will see a link to a custom Google My Map. You can download the map to your Google account and take it with you!
For now, here is an example to help you with this tutorial: Road Trip to the Southern Sixers at Google My Maps .

Step No. 01
Create a custom map.
To begin creating a custom map, visit the Google My Maps website. You’ll need a Google account if you don’t already have one – there are lots of travel benefits to having an account.
Google My Maps requires a web browser – Google recommends Safari, Firefox, or Chrome. It’s possible to create these custom maps a browser on a tablet, but the ideal situation would be desktop or laptop computer.
1. Create a New Map
Click the “Create a New Map” button.
2. Give the Map a Name
Initially, the map will be named “Untitled map.” Not exactly memorable or descriptive. Click on the map’s name to change it and make is something you can easily identify later.

Step No. 02
Edit the first layer.
By default, an “Untitled Layer” is already present in any new map. This is the starting point for creating a custom map.
1. Rename the Layer
Click the title of the layer and change it to “Destinations.” This will always be the first layer when creating a road trip map. In this instance, destinations are cities, towns, or parks used for creating the route of your road trip. You will create additional layers later for attractions, restaurants, and hotels.

2. Add Markers to the Layer
The next step is to lay out the road trip route. You may not yet know the exact route you want to drive, but you’ll likely know the destinations you want to visit.
Always begin by adding your home address as the first marker. You will need this when creating the driving route.
Using the search bar, search for the name of the destination. It can be a city or town, state or national park, or any type of business listed in Google Maps. Add each destination to the layer, and then drag the markers into the order you wish to visit them.
Layers can have an unlimited number of markers. But keep this first layer to strictly the destinations you want to visit.

Step No. 03
Create a route between destinations.
The hardest part of planning a road trip is determining the route to drive. Sometimes, it’s easy if there is only one way to get from one destination to another. Fortunately, creating a route with a Google Map presents options.
1. Create a Driving Route
In the Map Tools area, click on the icon to “Add Directions.” Clicking this tool will create a new, untitled layer. The default directions are for driving, however it’s possible to change the transportation mode to bicycling or hiking.
2. Enter the Start and End Points
Two empty boxes appear in the driving route. In Box A, begin typing the name of the first marker saved in the Destinations layer – most likely your home address, unless you’re on a multi-stop road trip. It will appear in a dropdown menu. Select the name of the destination to add it to Box A. Do the same with Box B, choosing the end point of your road trip.
An initial route will appear on the map. Like planning a route in Google Maps, this is Google’s default route based on traffic conditions, road closures, and speed limits. It’s just a suggestion. It’s possible to change this route depending on your personal preferences.
If you want to create a loop, simply enter the start point again as the end point. Google Maps will automatically create a loop connecting all the destinations.

3. Add Additional Stops
If you want to add additional stops to the driving route, click “Add Destination” at the bottom of the layer. Another empty box will appear. Begin typing the name of a destination and select it from the dropdown list.
Driving layers can have a maximum of 10 stops. If you’re road trip is longer than ten stops, consider dividing the route into multiple layers. One option would be to create a driving layer for each day of the road trip. Another option is to divide the road trip into segments.

4. Customize the Route
Click on any point along the route. With the route highlighted – a faint white line surrounding the bright blue line – you can now edit the route. Click on any point along the route and drag it in a different direction. Let go, and the route automatically adjusts to your preference.
Customizing the route must be the last step in the process of creating a driving layer. If you add another stop to the layer, it will reset the custom route and you’ll have to start over again.
Customizing the route gives you the option to avoid interstate highways, take the scenic route along national scenic byways, or to select country roads for a long summer drive.
5. Rename the Driving Layer
When a route is created, Google My Maps automatically generates a name for the layer. However, you may want to rename this layer something easier to remember. “Route” is always a good option.

6. Route Information
One of the neatest features of Google My Maps is the step-by-step directions with driving, biking, or hiking routes. Click the three dots beside the layer name and select “Step-by-Step Directions” in the dropdown menu. At the very top of the directions, you’ll find the total miles and suggested drive time for the route. This can be valuable information for budgeting gas and planning how long to drive each day of your road trip.

Step No. 04
Add additional layers and markers.
With the route finished, now comes the fun part. Adding the markers! Layers and markers are a good way to visualize your road trip adventure, adding places you don’t want to miss and roadside attractions you need to visit.
1. Create a New Layer
Click “Add Layer” to add a new layer to the custom map. Custom maps can have a maximum of 10 layers, including driving layers. Make use of this limit to organize your road trip information.
What kind of information would you want to save into layers?
Hotels, campgrounds, bed and breakfasts, and Airbnb rooms. It can help to save the place where you’ll spend each night of your road trip into a “Lodging” layer.
Restaurants, coffee shops, and dessert cafes. Everybody needs to eat. Creating a “Restaurants” layer can help you remember all those places your friends told you to visit.
Points of interest. Friends inevitably bombard you with tips on places you shouldn’t miss. The best way to keep up with that information is to drop a marker onto the map in a “POI” layer.
Layers can be organized by theme, date, location, or any way you could possibly think to organize the content. The purpose of layers is to organize the markers to make them easier to show or hide on the map while traveling.

2. Add Markers
There are three ways to add markers to any layer. The first is visually as you scroll through the map. Like Google Maps, Google My Maps allows users to click on business names to see more information.
The popup box includes a wealth of information. Typically, each marker will include “Details from Google Maps” like the street address, website, and phone number. Clicking the website will open it in a new tab or window in your browser.
At the bottom of the popup box, click “Add to Map” to add the marker to the current layer.
A second way to add markers is with the search box. After entering a search, lime green markers appear on the map and a list appears at the top of the layers. Clicking on the markers or names in the list will display the popup box and the option to add it to the current layer.

The final way to add a marker to the map is to create a custom marker. In the Map Tools menu, click “Add Marker.” The cursor changes to a crosshair. Wherever you click on the map, a new marker will be created.
A popup appears asking for information about the new marker. Enter a name for the marker in the top box. You can add a description in the second box, if needed. Click “Save” to add the marker to the layer.

Step No. 05
Stylize the markers.
After adding a route and dozens – perhaps hundreds – of markers, the data can be overwhelming to view on a single map. This is where Google My Maps differs the most from Google Maps: the ability to stylize the markers.
There are three ways to stylize markers in a custom map: Individual Styles, Uniform Styles, and Sequence of Numbers.
1. Individual Styles
By default, Individual Styles is selected. With this option, you can change the color and icon for each marker individually. This is helpful if you want to color code markers or create groups of icons within a single layer.
2. Uniform Style
The second option is to create a Uniform Style. This collapses the list of markers and allows you to choose a custom color and icon for all the markers in that layer at once. The markers are still viewable if you want to see them, but not editable. Uniform Style is a great way of grouping all the markers in a layer by subject like restaurants, hotels, or museums.
3. Sequence of Numbers
The third option is to create a Sequence of Numbers. This is a great option for creating an itinerary for the markers in the layer. The markers are still visible in the list and draggable to reorder them, automatically updating the number sequence. Changing the color of any of the markers will automatically pass that color to all the markers in the sequence.

4. Style Options
After clicking the edit button for any marker, a popup menu shows a color palette and popular icons. Unfortunately, Google My Maps does not support custom colors. But with 30 colors to choose from, you’re certain to find something that will work for your road trip.

Clicking “More Icons” at the bottom of the popup menu opens the full list of 432 available icons. A search bar makes it easy to find what you need for the markers on your road trip map. Here are some common icons you may want to use:
- Shopping Cart
- Information

Step No. 06
Open the custom map in google maps.
Every change made to a custom map in Google My Maps is automatically saved. Once you have finished customizing the map, it’s time to open it on your mobile device. If you created a new Google account, you will need to use that same login information with the mobile app.

1. Load a Custom Map on a Phone
Open the Google Maps app. Tap “Saved” on the bottom menu bar. Tap “Maps” underneath your lists. Here, you will see the custom map you created earlier. Tap on the map you want to open.
To begin using the map, tap “Go” in the bottom menu bar. You can now scroll through the custom map, zoom in and out, and tap on any of the markers you added earlier.

2. Load a Custom Map on a Tablet
Open the Google Maps app. On tablets, tap the three-line “hamburger” menu icon in the search bar and then tap “Your Places.” Tap “Maps” in the new menu along the top of the lists. You will now see the same list of custom maps you see in the phone menu. Tap on the map you want to open.
Once this map opens in Google Maps on a tablet, it is ready to use.

Step No. 07
Navigation with a custom map.
Although you can create driving directions with a custom map, you cannot use that route for turn-by-turn voice navigation.
So, what’s the point in doing all this work?
Long before Facebook was invented, in the era of Napster and Road Rules on MTV, pioneering road trippers used maps printed on paper. Using a custom map created in Google My Maps, loaded into Google Maps, would be a similar experience but in a digital format.
With the custom map loaded, users can zoom in and out to get more details of the route ahead. Like using Google Maps, your location is pinpointed with a blue circle – if you have location services enabled on your mobile device. Although it won’t be voice navigation, you will still be able to see where you need to make turns to follow the route you created earlier.
Quasi-Voice Navigation
It is possible to get turn-by-turn voice navigation, but it comes with a caveat. Tap on the next marker along the driving route, and then tap on the blue circle to get directions. Tap “Start” and turn-by-turn voice navigation starts.
However, you will notice the driving route may no longer match your customized route. That’s because this method creates a new “initial” route.
If you customized the driving route to use national scenic byways or avoid interstates, you lose that customization using this method. But, depending on how you customized your route, it may not matter anyway.

5 Responses
If you’re using your custom map without turn by turn navigation, it is a small headache to keep the phone from auto-locking. The best I was able to find was that you’d have to make a change in developer mode and even then it would only stay open if the phone was charging, not all the time.
Very helpful in creating the map and the layer with destintaions. Was able to see the map on the phone. When opening the map on the phone however there was no option to “go” so the map was useless.
That’s strange. I just tested it again on my iPhone 14 with Google Maps. I loaded the custom map I had created for places to eat brunch in Columbia, South Carolina, I tapped one of the pins I dropped on the map to a restaurant, and I was given the option to tap “Start” and it began voice navigation. You didn’t see that option on your phone?
MyMaps unfortunately is limited to ten stops on a trip route. So it’s rather useless for long road trips…
This is true. But that’s why this is only for PLANNING a road trip, not executing it. Google My Maps helps you visualize the stops and choose the best route. After that, I think you should use a Garmin automotive GPS for navigation.
Leave a Reply Cancel reply
Your email address will not be published. Required fields are marked *
- share this article
Privacy Policy
Copyright © 2023 Jason Barnette | All rights reserved | Seriously, don’t steal my stuff

Share this Article
Did you enjoy reading this article? If so, then share it with your friends. Sharing is caring, after all.
How-To Geek
How to plan a road trip with multiple destinations in google maps.

Your changes have been saved
Email is sent
Email has already been sent
Please verify your email address.
You’ve reached your account maximum for followed topics.
Quick Links
Add multiple stops using the website, add multiple stops using the mobile app.
Whether you're planning a day out on the town, or want to orchestrate the perfect road trip across the country, Google Maps allows you to add up to nine stops, excluding your starting point, when you make directions from both the website and the Maps app. Here's how you do it.
First, open up your browser and head on over to Google Maps. Click the "Directions" button to the right of the search bar.
By default, Maps will use your device's location for the starting point. If you want this to be a different location, enter it now.
Next, enter the location of your first destination into the field provided, and then hit Enter. Alternatively, you can click any location on the map to get the same results.
Make sure you have either the driving or walking option selected, as Maps only lets you make multiple destinations with these two travel modes.
To add another destination, all you have to do is click either the "+" or the space below your first destination, and then start typing a new location. You can repeat this to add up to nine total stops. If you have more stops than is allowed, you may need to make another map from where you left off.
If at any point you decide you want to change up the order of your destinations, just drag any location up or down on the list using the circles on the left.
And once you've created your map in your web browser, you can click the "Send directions to your phone" link to send it to your mobile device by email or text message. Assuming you've got the Google Maps app installed, you can open it right up.
If you want to optimize your travel, you can also turn a multi-stop Google Maps trip into a round-trip .
Related: How to Find Public Restrooms Near You with Google Maps
You can use the Google Apps mobile app (free for iPhone , iPad , and Android ) to create a map with multiple destinations in much the same way.
Related: How to Download Google Maps Data for Offline Navigation on Android or iPhone
Fire up the Google Maps app on your mobile device, and then tap the blue "Go" button on the bottom right of your screen.
By default, Maps uses your device's location for the starting point. If you want this to be a different location, enter it now.
Start typing in your first destination or tap a location on the map below to start your journey.
Next, open the menu (the three dots at the top right), and then tap the "Add Stop" command.
Enter the location of your next stop, or tap anywhere on the map to add the next destination.
To change the order of your destinations, just drag any of the locations up or down the list using the "Hamburger" (three stacked lines) on the left.
When you've added all the stops to your trip, go ahead and tap "Done" so you can start your journey.
Related: How to View and Delete Your Google Maps History on Android and iPhone
- Google Maps
How to Use Google Maps to Plan Your Next Road Trip (Step-By-Step Tutorial With Examples)
Post summary: A comprehensive guide on how to use Google Maps to plan a road trip itinerary and why Google Maps is the best tool/app for planning a trip. Includes a road trip planning tutorial!
Author’s Note: This post was originally published in 2020 and was updated in April 2023 for accuracy and comprehensiveness.
So, you want to plan a road trip. But, where do you start? Better yet: How do you start?
I’m often asked about my trip planning process. Where to go, what to do, and how exactly to fit everything into a cohesive itinerary that, well, makes sense .
Planning a road trip can be hard. But, with the right tools and resources, it doesn’t have to be. I’ve already put together a list of my most trusted travel booking resources , and the best apps for road trips , but now I want to talk about one of my favorite road trip planning tools: Google Maps.
Google Maps is like a trip planning goldmine, and it’s always my very first step in organizing my itinerary whenever I take a trip.
Google Maps is one of the best tools for planning a cohesive and successful road trip, because it allows you to create a highly customizable, visual representation of your trip (shoutout to all my fellow visual learners out there). And its FREE!
Basically, if you’re planning a road trip, knowing how to customize Google Maps is going to make your life so much easier.
So if you’re wondering how to get started, then you’ve come to the right place. I’m breaking the entire process down into an easy to follow step-by-step tutorial on exactly how to use Google MyMaps to plan your next road trip. So, lets get started!
GOOGLE MAPS TRAVEL PLANNING OVERVIEW
Here’s exactly what we cover in this guide:
- Create a new Google Map for your trip.
- Add location pins to your map
- Customize and color code your location pins.
- Create Google Map layers to plan your day-to-day itinerary.
- Add driving directions to your map.
- Download your custom Google Map to your phone.
- Share your map with friends.
- Calculate gas milage for your road trip.
Scroll down for a super detailed step-by-step guide to planning your own travel itinerary for free using Google Maps or skip ahead with the table of contents.
Table of Contents
Need some road trip inspiration? Visit my most popular travel guides:
Las Vegas to Sedona Road Trip (3 Jam-Packed Itineraries to See it All in Less Time)
5-Day British Columbia Road Trip Itinerary
1-Day Yoho National Park Road Trip Itinerary
The Perfect 2-week Costa Rica Itinerary
. Don’t forget to grab my FREE Travel Expense Planner Download below to help you plan your next trip . Use it to easily and automatically calculate how much money you’ll spend on gas, flights, accommodation, food + more
WHY GOOGLE MAPS IS THE BEST TRAVEL PLANNING TOOL FOR YOUR NEXT TRIP
Google Maps is the best tool for planning your next trip , whether you’re just using it for adventure inspiration, to share ideas with your friends, or creating a detailed step-by-step road trip itinerary. Here’s why!
IT CREATES A VISUAL REPRESENTATION OF YOUR ROAD TRIP
If you’re a visual learner, Google Maps is going to be your best friend. But even if you’re not a visual learning, using Google Maps to plan your trip is still going to be incredibly helpful.
Planning your trip with Google Maps is the fastest way to familiarize yourself with the layout of an area. It allows you to wrap your head around how large an area is and where everything is in relation to each other, which, in my opinion, is the best way to start planning any trip.
Here’s an example of the Google Map I created for our 4-day road trip in Iceland.
Click here to access the interactive map.

GOOGLE MY MAPS HELPS YOU FIGURE OUT WHERE TO SPEND YOUR TIME
Have you ever had a list of places you wanted to see, only to find out that they’re super far away from each other?
Pinning your locations to your custom Google Map will show you where your stops are. This will help you figure out where to spend your time and plan accordingly.
Are your pins clustered in one place? If so, then you might want to allocate more time to that area. Or maybe your pins are spread out all over the map? If this is the case, then it might be best to prepare yourself for a lot of driving or focus on a smaller area instead.
YOUR GOOGLE MAP IS HIGHLY CUSTOMIZABLE
Whether you’re touring NYC, road tripping cross country, or backpacking to Beaver Falls in the Grand Canyon , you can create a highly customizable Google Map to help plan your adventure.
Handy features like customizable locations, adding multiple stops, pinning by GPS coordinates, organizing by categories, and overlaying direction layers, all make it incredibly easy to customize your Google Map to plan your travel itinerary.
Need to remember entrance fees, operating hours, or best places to see? You can even add notes to your location pins so you don’t forget important details!
IT HELPS YOU NAVIGATE AND PLAN YOUR ROUTE
Quickly learn how to navigate between stops by adding directions between multiple locations to your map.
This is an incredibly useful tool for figuring out the best routes to take, roads to avoid, and to plan for drive time. You can even choose between walking, biking, or public transportation directions. This is especially helpful for choosing the best entrance to Yellowstone National Park , taking the scenic route on an Ecuador road trip , or mapping out the best Hudson Valley wineries .
IT’S EASY TO COLLABORATE AND SHARE YOUR TRIP
Traveling with friends? Google Maps makes it super easy to collaborate by allowing you to share your map with your travel partners. You can even give them editing access so that everyone can add their must-do’s to the map.
YOUR MAP IS EASY TO SHARE BETWEEN DEVICES
You’ll have to create your Google Map on desktop. But, luckily, you can seamlessly share your custom map straight to your iPhone or Android using the Google Maps App!
Sharing your custom map to your phone makes it super convenient to access your itinerary on the go. You can even set up your map for offline use if you’re traveling without cell phone service.
HOW TO CREATE A CUSTOM MAP IN GOOGLE MAPS: A STEP-BY-STEP GUIDE
1. create a new google map, login to google drive on your desktop.
Before you start planning your road trip using Google Maps, make sure you’re signed into your Google Drive.
- Visit www.google.com/maps from your desktop and log in .
- If you don’t have a Google Drive account, create one now.
CREATE A NEW GOOGLE MAP
To create a new map, select “Saved” in the sidebar on the left > “Maps”. You can also click on the menu (the three lines) in the upper left corner > “Saved” > “Maps”.
For now, your list is probably empty. But as you create more maps, this is where they’ll be stored.
Begin creating your first custom map by selecting “CREATE MAP”

This opens a new blank map. Start by giving your map a title and a description.
Once you’ve named your map, you’re ready to start pinning stops! Keep reading to learn about adding and customizing location pins.
2. ADD LOCATIONS TO YOUR GOOGLE MAP
This is where you start adding the places you want to go!
HOW TO ADD LOCATION PINS
Add multiple stops to your Google map by pinning their locations. There are a few different ways to add location pins to your Google Map :

- Add a pin using coordinates if you can’t find the exact location in the search bar drop down list. You may have to use this method for extremely specific or remote locations, such as a backcountry campsite or an unmarked trailhead. Simply type the location’s latitude and longitude coordinates into the search bar. .
- To pin a general area, click on the “Add Marker” button below the map search bar . You’ll be able to drop a blank pin by clicking anywhere on the map. A box will appear asking you to add a title and description
NOTE: You’re allowed to pin 10 location pins per layer. Continue reading to learn how to use layers to add more than 10 location pins to your map.
3. CUSTOMIZING LOCATION PINS
Once you save your pins to the map, they’ll be blue by default. However, you can customize a pin by changing the color, icon style, description, and title . You can even add pictures or videos if you’re feeling extra fancy.
To change the color and style , begin by clicking on your location pin (either in the list to the left or directly on the map) > “Style” (the little paint can) in the lower right hand corner of the text box. Click “More Icons” to view more options.

To change the location title , click”Edit” (the pencil icon) in the text box. You can also add notes in the “Notes” box. Use the notes box to add more details about finding trail heads, hiking logistics, packing reminders etc. I also like to use it to keep track of specific places to see within a general location, such as a National Park.
To add media (i.e. photos or videos) , click “Add Image or Video” (the camera icon) in the text box. I found this especially helpful on my first Iceland road trip to remember which waterfall was which, since they all sound the same (if you’ve been there, you know what I mean!). You can also add your own photos and videos if you want to create a map to share with others.
To delete a pin , click on it and then click on the trash can icon. .

. 4. CREATING MAP LAYERS TO PLAN YOUR TRIP IN GOOGLE MAPS
What are google map layers.
Google Map layers are a really useful tool for organizing your road trip itinerary. But, what exactly is a layer? A layer in Google Maps is, by definition, a way to contain arbitrary geospatial data.
Okay, English please ?
In other words, each layer can be used to display different types of information on your map. You can dedicate different layers to different types of places like restaurants, cafe’s, hotels, hiking trails, etc. Or you can dedicate layers to different days of your trip. Or you can stick to one layer. Its up to you.
Here’s an example of how I broke up my Iceland itinerary, using a different layer for each day of our road trip:

HOW TO ADD LAYERS
When you create your map, you’re automatically using one layer (“Untitled Layer”). This is the layer that your location pins are added to by default, unless you add additional layers. You can add up to 10 location pins per layer, and 10 layers per map.
To add a new layer to your Google Map , simply click “Add Layer”. This creates a new “Untitled Layer”, which you can rename accordingly. To rename layers, click on the title name or click the 3 dots next to the title > “Rename Layer”.
To move a pin between layers , click on the location pin in the list, then drag and drop it into the desired layer.
Choose which layers to display by turning individual layers “on” and “off”. You can do this by checking/unchecking the box next to the layer’s name.
To delete a layer , click the 3 dots next to the layer’s title > “Delete this layer” > “Delete”.

. TIPS FOR USING LAYERS TO PLAN YOUR ITINERARY IN GOOGLE MAPS
When planning my road trip itineraries, I usually give each day its own layer (unless the trip is longer than 10 days, in which case then I’ll combine days or make another map). Then I color code all of my pins by day.
For example, all of my stops (i.e. location pins) on day 1 (layer 1) would be orange, all of my stops on day 2 (layer 2) would be red, and all of my stops on day 3 (layer 3) would be blue. Organizing pins and layers this way makes it a lot easier to visualize your day-to-day itinerary on the map.
That’s just what works for me, so obviously you don’t have to do it that way. You can organize your pins and layers in any way that makes sense to you.
WHEN TO MAKE SEPARATE MAPS
Personally, I prefer to make a single map for my road trip itineraries whenever possible. But that won’t work for everything or for everyone.
Sometimes maps can get confusing if you have a lot of stops to make. Other times you’ll find that you need more than 10 layers or directions between more locations than Google Maps allows.
To solve these problems, you may opt to create several maps. Perhaps you’ll find it easier to create a separate map for each day of your road trip, or create one map dedicated just to a certain type of location or activity.
For example, we created two separate maps for our road trip through New Zealand. One map for the North Island and one map for the South Island.
5. ADDING DIRECTIONS TO YOUR GOOGLE MAP
. What good would a Google Maps itinerary be if you couldn’t get driving directions?
To add driving directions to your Google Map , click on “Add Directions” (the arrow icon) under the search bar. A new layer will appear (you cannot add directions without it adding a new layer).

Click on “Add Directions” simply by clicking on a pinned location on the map. It will populate in point “A” . Click on a second location on the map, which will populate in point “B” . The route will show up as a blue line on the map.
The original directions will only give you the option to add points “A” and “B”. To add more destinations, click on “Add destinations”. You can add up to 10 destinations.
NOTE: This may seem obvious, but I’ll say it anyway: When you connect locations, make sure to do it in the order that makes sense. Don’t just add directions between two random locations. Make sure to do it in order!

To choose between driving, walking, or bicycle directions , click on the Directions button in the layer (the blue car icon). Then click on the appropriate mode of transportation.
VIEW STEP-BY-STEP DIRECTIONS
To view step-by-step directions, click the three dots to the right of the little of the directions layer > click “Step-by-step directions”.

ADJUSTING YOUR ROUTE
Google maps will automatically calculate the shortest route between locations. But you can easily change the route if you prefer to take a different one (i.e. to take the more scenic route, avoid tolls/highways, etc.).
To adjust the route between two points , hover your cursor anywhere along the blue line. Your cursor will change from a hand to an arrow over a white dot. A dialogue box will say “Drag to change route”. Click and drag the white dot to the desired road or highway on the map.

. 6. HOW TO ACCESS CUSTOM GOOGLE MAPS ON YOUR PHONE
. There are two ways to access your custom Google Maps on your phone. You can (1) reference your map through the Google Maps app or (2) export the entire map for offline access using Maps.me . Which method you use depends on your personal preference.
Steps are the same for iPhone and Android.
1. To view your maps in the Google Maps app:
- You will need to download Google Maps, if you haven’t done it already
- Sign into the same Google Drive account you used to create the map
- Click on the search bar > “…More” > scroll to the right and click “Maps”
- Select your custom map

How to view your custom Google Map on your phone using the Google Maps app .
Essential tips for using the Google Maps app:
- Accessing step-by-step directions: When you open your map in the Google Maps app, your directions layer will be visible, but you won’t be able to click on it and get the step-by-step directions. . Instead, navigate to the individual location pins on the map. Click the pin and the directions instruction will populate in the search bar. Click on the search bar and then hit “Search”. This will exit your custom map and open up the regular Google Maps navigation screen. .
- Accessing your map offline: You can’t. There is currently no way to access your custom map offline in the Google Maps app. Which is obviously not ideal if you’re traveling without cell phone service or wifi. . You can download an area for use offline by clicking on your photo (the circle in the upper right corner) > “Offline maps” > “select your own map”. However, when you do this, the map will be blank and you’ll have to repin/save all of your pins. You can repin/save locations by searching for the location > “save” > and then either add to an existing list or create a new list.
2. To export your custom map to Maps.me:
This method is quite a workaround, but (unlike the Google Maps app) it allows you to access your custom map offline without having to repin anything.
On your desktop:
- Open your map on desktop
- Click the 3 dots next to the map title > select “Export to KML” > check the box next to “Export to .KML file instead of .KMZ”.
- Make this file accessible through your phone by uploading it to Dropbox, Google Drive, email, or any other file sharing app.
On your phone:
- Download the Maps.me app
- Search for the city, state, or country your map is based in and then download
- Go to your photo sharing app and open your .KML file with Maps.me
- You’ll be directed to your custom map in Maps.me
Tips for using Maps.me
If you download your map in Maps.me, you’ll be able to use it offline. However, the major drawback is that you will only be able to access step-by-step directions from your current location. So, even though your directions layers will populate on your map, you’ll only be able to view the drive times and not the actual directions, unless one of those points is your current location.
That being said, I am not a Maps.me expert. So, if you have an update or workaround for this issue, please reach out and let me know :)
7. CREATE A SHARED GOOGLE MAP
You might want to share your map if you’re planning a trip with someone else, collaborating on an itinerary, or sharing your map on a website.
To share your Google Map , open the map > click “share” in the gray bar above the layers. Make sure the slider for “Anyone with this link can view” is set to blue. Then copy the link and send it to friends!
To embed your map on a website , check that your sharing sliders are set to “Anyone with this link can view” and “Let others search for and find this map on the internet”. Next, click the menu (the three dots) next to the map title > then click “Embed on my site”. Copy the HTML and paste it in the source code for your page.
8. BONUS: CALCULATE GAS MILEAGE
. Download my customizable Travel Expense Planner below for free . Use it to easily and automatically calculate how much money you’ll spend on gas, using your custom Google Map!
And there you have it! All the tips, tricks, and general instructions on how to use Google Maps as a road trip planning tool . As always, if you have any questions or have anything to add, leave a comment below. I love to hear from you!
Happy adventuring!
Did you find this Google Maps road trip planning tutorial helpful? Don’t forget to pin it for later!

Hi, I’m Jackie! I’m a travel photographer and content creator based near the Adirondack Mountains of Upstate New York. I’m also a millennial who works full-time, yet I still find ways to travel frequently without breaking the bank, because traveling is what makes me feel most alive. Now I help fellow travelers who also work 9-5 and are looking for ways to travel more with limited PTO.
Related Posts

15 Useful Apps to Download Before Your Next Road Trip (for Free!)

All You Need to Know About Renting a Car in Belize | Cost, Tips, FAQs – Updated Guide 2023

19 Important Things to Know About Ecuador Before You Go
28 comments.
[…] Krawiecki, J. (n.d.). How To Plan Your Road Trip With Google Maps. The Adventure Atlas. Retrieved from How To Plan Your Road Trip With Google Maps (Tutorial With Examples) | The Adventures Atlas […]
[…] that an SUV or an RV is better suited for the whole family. Once you’ve secured your vehicle, map out your route, research the stops that you want to make, and make a list of the things that you’ll need to […]
[…] You won’t have service once you get there though, so I suggest downloading offline Google Maps of the area before you go. To learn how to download offline Google Maps, visit my blog post on How To Plan Your Road Trip Using Google Maps […]
[…] How to Plan Your Road Trip Using Google Maps […]
[…] How to Plan Your Trip Using Google Maps […]

All I needed when I googled “how to plan a trip in google maps” was to be pointed in the right direction of where to look for the feature. This went WAY beyond what I could have ever asked for and helped SO MUCH! Thank you, thank you, thank you!

Hi Nicole – I’m SO glad to hear you found this post helpful!
[…] How to plan a road trip using Google Maps […]

Hello Jackie, and thanks for the very informative article! It was well written and I used Google Maps on my last trip to the Baja in Mexico. One other tool I used was the free trip planner from Geovea https://geovea.com/trip_plan/new_trip to create and share my trip, and estimate my trip budget. You can also take your itinerary with you on your phone for navigation. I really appreciate all of the great travel guides and already planning my next trip :-)

Thank you for sharing all of this valuable information! I see how to view the turn-by-turn directions, but is there a way to start the route so you can follow it while driving? Thanks!!
[…] How to Plan Your Road Trip using Google Maps […]

This literally just changed my life! Thank you for sharing how to use google maps to plan a road trip. I will use this all the time now!
Hey there – so happy to hear you found this post useful!
[…] Planning a Costa Rica road trip? Read: How To Plan Your Road Trip With Google Maps (Tutorial With Examples) […]
[…] a large geographical area you need to give your trip a bit of structure. You can start by using Google Maps to plot and plan your journey so you can make a note of all the destinations you are interested in. You can then agree on a few […]
[…] Read next: How To Plan Your Road Trip With Google Maps (Tutorial With Examples) […]

said no driving directions from point a to point b, so i couldn’t get started. E.G. Badland SD to Mt Rushmore to Custer Nat. Park, I need a little more direction, i’m not to good with comp. thanks
Hey Billy – Sometimes Google Maps won’t recognize directions to very general areas because it wants you to use something more specific. This most often happens with National Parks and wilderness areas. In those cases, Google Maps will generally present you with a list of specific locations you can choose from, such as the park’s ranger stations, visitors centers, etc. However, in your situation, I was able to pull up directions using “Badlands National Park”, “Mount Rushmore National Memorial”, and “Custer National Forest”. Hope that helps!
[…] necessary than you suppose to sleep, bathe and plan for slower days. A very good rule of thumb is to plan in rest time each three days. That method, you possibly can push your self however forestall exhaustion in your […]
[…] essential than you assume to sleep, bathe and plan for slower days. An excellent rule of thumb is to plan in rest time each three days. That means, you possibly can push your self however stop exhaustion in your […]

I’ve been a user of paper maps, since before the Internet, or color TV for that matter. For an up coming trip, basically Texas to FL, and back, I decided to make better use of Google Maps. A google search brought me to this page. Super helpful, and the pins per layer note answered a long standing confusion of mine. Thank you. I do have one question. Is there a way to to add waypoints based on distance or travel time? For example, this is going to be a two day trip. I want to find the halfway point (easily)? Or in the case of a longer trip, I want to drive X miles or Y hours? I know I can trial and error it, but what if I want the half-way point? What’s the easiest way to find it? Or where will I be in 8 hours of driving? Thank so much! Cheers, Eric
Hey Eric – thanks so much for your comment! Unfortunately, I don’t know of an easy way to calculate your half way point or location after x amount of hours. I typically eyeball it, which might be the only way to find your answer

Thanks very much, it is really helpful

This was most helpful for creating a personal map. I tried it and created a practice map on my laptop; named it and accessed it exactly like your instructions indicate. The part that has me puzzled is the accessing it from your phone. I have used Google maps on my phone for a long time and believe I am signed in using the same account. The Google Maps app on the phone identifies me (the right end if the search bar has my initial and shows the account when tapped.) When I tap the search bar I get to the … More but that is it. All I then see is the opportunity to set my Home and Work Locations but no listing of My Maps.
On the laptop going to the Menu (bars at left side of Search) allows access to Lists, Labeled, Visited, and Maps. (Maps is the one, as you indicate, to get to your personal Maps.) On my phone the only thing that seems to be available is the Labeled option. What am I missing to get to the Maps? I feel like there must be a switch somewhere to have the Maps come through … but I can’t seem to find it! Hoping you or someone can point me in the right direction. Thank you.

Without creating a custom map, is there a way to display a route in Google Maps and show attractions at the same time?

You’ve written a terrific guide and I’m learning a lot more about Google maps. Is there some way to print this guide or download a printable copy? Thanks.

Hey so this is the most amazing thing ive ever seen, however i wasnt able to access the travel expense planner or gas mileage calculator things, i was wondering if there was another way to access those:)
Leave A Comment Cancel reply
Save my name, email, and website in this browser for the next time I comment.
WANT TO SAVE MONEY TRAVELING?
Check out the travel resources →
Check out my list of reliable budget-friendly travel resources that are guaranteed to save you the most money, without compromising your experience.
This error message is only visible to WordPress admins Error: There is no connected account for the user 17841400792270379.
Get in touch
Contact Portfolio Let’s work together
Explore the blog
Destinations Guides and itineraries Travel planning tips
Let’s connect
Never miss an adventure, privacy policy | terms of service | disclaimer | by zazen designs.
Back to top

- Destinations
- Hotels, Resorts & Villas
- News, Features, Tips & Advice
- Private Jets
- LLM Readers’ Travel Awards 2024
The Latest Travel Features

Food & Drink
- Healthy Eating & Drinking
- Recipes, Cooking Tips & Tools
- Restaurants, Bars & Clubs
- Sweet Treats & Savoury Bites
- Wines, Beers, Cocktails & Spirits
The Latest Food & Drink Features

Style, Beauty & Health
- Men's Style & Grooming
- Women's Fashion
The Latest Style, Beauty & Health Features

- Drive, Sail & Fly
- Homes & Gardens
- Money & Business
- Sport & Entertainment
- Tech, Gadgets & Gaming
- The Luxury Lifestyle List
- The Best of the Rest
- Work with us: Luxury SEO Content
- Advertising Terms & Conditions
Top 7 travel platforms to simplify your luxury trip planning
We explore the top travel platforms that are redefining the way you plan your next journey, ensuring stress-free, immersive, and unforgettable experiences..

Planning a trip can often feel overwhelming with endless options, especially when you’re aiming for a unique, personalised adventure. Thankfully, today’s travel platforms have evolved to simplify the process, offering curated experiences, expert advice, and user-friendly tools to make planning a breeze. From trekking through the serene landscapes of the Himalayas to exploring Africa’s vibrant wildlife, these platforms cater to a variety of travel styles. Here, we explore the top travel platforms that are redefining the way you plan your next journey, ensuring stress-free, immersive, and unforgettable experiences.
Everything New Zealand

Website: everythingnewzealand.com
Everything New Zealand has been dedicated to providing top-notch travel experiences since its establishment in 2004, as New Zealand’s first online travel agency. The company is a team of locally based travel experts who personally experience and review every activity they offer. With more than 1,000 handpicked experiences across the country, Everything New Zealand ensures that only the best activities are available to travellers. The company’s user-friendly website is designed to help visitors easily navigate through various options, read reviews, book activities, and enjoy a well-organised and stress-free holiday. Everything New Zealand prides itself on offering reliable advice and a seamless booking process.
Why choose Everything New Zealand
Everything New Zealand offers a complimentary service for booking activities and tours, ensuring a hassle-free experience.
The company guarantees the lowest prices online, with no hidden fees or additional charges.
Booking in advance with Everything New Zealand allows travellers to avoid long queues and fully enjoy their holiday without worries.
Experienced customer service representatives carefully review all bookings to ensure they meet the specific needs of each traveller.
As an independently owned company, Everything New Zealand provides honest and impartial advice about the best activities and tours.
The website is designed to be easy to navigate, packed with useful information to help travellers make informed decisions.
Everything New Zealand is ideal for those who crave adrenaline-pumping activities like bungy jumping, skydiving, or canyoning.
The company offers a wide range of options for travellers looking to explore New Zealand’s breath-taking landscapes and cultural sites through guided tours and attractions.
Everything New Zealand provides numerous family-friendly activities that cater to all age groups, ensuring an enjoyable experience for everyone.
Perfect for individuals who appreciate food and wine tours, offering opportunities to indulge in local flavours while enjoying stunning views.
Everything New Zealand is the go-to for those who wish to immerse themselves in the natural beauty of the region, including wildlife tours, hiking, and exploring national parks.

Website: go2africa.com
Go2Africa is a premier safari travel company based in Cape Town, South Africa, specialising in customised African travel experiences since 1998. Their team of experts, all born and raised in Africa, offer unparalleled first-hand knowledge of the continent’s best safari destinations. They focus on creating memorable journeys, ranging from Big Five safaris to beach getaways. Among their highly recommended experiences is the Botswana safari , which offers travellers the chance to explore pristine wilderness and witness breath-taking wildlife encounters.
Why choose Go2africa
Over 25 years of experience in safari planning.
3,000+ safari partners across Africa.
24/7 local assistance and expertise.
First-hand knowledge of lodges, camps, and activities.
Commitment to sustainable travel, benefitting both people and nature.
First-time safari-goers looking for expertly guided tours and insider tips.
Wildlife enthusiasts are seeking authentic encounters with Africa’s Big Five or gorilla trekking experiences.
Luxury travellers who want handpicked lodges, fine dining, and personalised services.
Honeymooners or couples wanting romantic, secluded getaways in pristine African landscapes.
Families seeking adventure and educational trips that are both safe and thrilling.
Adventure seekers who wish to explore Africa’s diverse landscapes, from savannas to beaches.
Go2Africa has curated over 200,000 personalised safari trips, offering travellers unforgettable wildlife encounters and breath-taking landscapes. They visit and review more than 365 lodges and camps yearly to provide unbiased, expert recommendations. Their commitment to excellence has earned them numerous industry awards and over five-star reviews on Feefo, cementing their status as Africa’s top safari specialists.
Intriq Journey.com

Website: intriqjourney.com
Intriq Journey is a luxury travel agency headquartered in Singapore, Hong Kong, and Beijing, specialising in tailor-made travel experiences across the globe. With over 60 years of combined experience, they offer personalised, elite holidays to destinations that were once considered inaccessible. Intriq Journey prides itself on curating unique, authentic experiences that allow travellers to fully immerse themselves in the culture and customs of their chosen destinations.
Why choose Intriq Journey.com
Based in Singapore, Hong Kong, and Beijing.
Specialises in unique, off-the-beaten-path destinations.
Over 60 years of combined travel experience.
Fully personalised itineraries are designed to suit each traveller.
Focus on sustainable travel that benefits local communities.
Luxury travellers are seeking highly personalised and exclusive experiences.
Cultural explorers desiring immersive, authentic journeys in Asia and beyond.
Adventure seekers looking to discover hidden destinations and new experiences.
Eco-conscious travellers who want to support sustainable tourism and responsible practices.
Families or multi-generational travellers seeking hassle-free, curated experiences across the globe.
Intriq Journey ensures every trip is designed with care, offering peace of mind and enriching travel experiences. Their partnerships with prestigious networks like Virtuoso guarantee added value and exclusive services to clients.
Follow The Camino

Website: followthecamino.com
Follow The Camino is a leading tour operator specialising in organising customised trips along the Camino de Santiago, also known as the Way of Saint James. Founded in 2006 by Umberto di Venosa, the company was the first to offer organised tours along this historic pilgrimage route. Their team of experts has decades of experience and offers carefully curated accommodations and routes to make every journey as seamless and enjoyable as possible. Whether you prefer walking or cycling, Follow The Camino ensures a stress-free experience, so you can focus on your adventure.
Why choose Follow The Camino
Established in 2006, the first Camino de Santiago tour operator.
Customised itineraries tailored to each traveller’s needs and fitness levels.
High-quality accommodation and transport partnerships for nearly 20 years.
Offers guided tours, self-guided tours, and group tours.
Pilgrims looking for spiritual and meaningful journeys along the Camino de Santiago.
Walking enthusiasts want a well-supported adventure with customisable routes.
Cultural explorers seeking an authentic experience of local food, wine, and history.
First-time travellers who want expert guidance and seamless planning.
Active holiday seekers desiring a balance of fitness and exploration.
Follow The Camino ensures every traveller has a fulfilling experience by offering comprehensive support and expert advice throughout the planning and journey process.
Nkuringo Safaris

Website: nkuringosafaris.com
Nkuringo Safaris is a leading East African tour operator specialising in sustainable and authentic wildlife experiences in Uganda and Rwanda. Founded in 2007, they offer customised gorilla trekking, cultural tours, and private adventures, tailored to meet each traveller’s preferences. Their trips immerse guests in East Africa’s untamed beauty, from dense rainforests to remote cultural encounters, all while maintaining a deep commitment to responsible travel and community support. Nkuringo Safaris ensures a seamless experience, guiding travellers through off-the-beaten-path adventures that leave a lasting impact.
Why choose Nkuringo Safaris
Established in 2007, specialises in Uganda and Rwanda safaris.
Customised gorilla trekking and wildlife adventures.
Award-winning Nkuringo Bwindi Gorilla Lodge at the gorilla trekking base.
Strong focus on sustainable tourism and community involvement.
Gorilla trekking enthusiasts seeking an intimate and authentic wildlife experience.
Eco-conscious travellers who prioritise responsible travel and community support.
Adventure seekers looking to explore off-the-beaten-path destinations.
Cultural explorers are eager to engage with local communities and traditions.
Nature lovers desire a transformative safari experience amidst stunning East African landscapes.
Nkuringo Safaris’ personalised approach and responsible travel ethos ensure unforgettable, life-enriching experiences for all their guests.
Heaven Himalaya

Website: heavenhimalaya.com
Heaven Himalaya is a Kathmandu-based travel company founded by Ramhari Adhikari and Sanjib Adhikari. The company specialises in trekking and peak climbing tours in Nepal, with the Everest Base Camp trek being one of their most popular offerings. As one of the most iconic and sought-after adventure tours in the world, the Everest Base Camp trek attracts travellers from all over who seek to experience the ultimate challenge of trekking in the Himalayas. Along with this, the company also offers a range of other activities, including cultural tours, wildlife safaris, and adventure sports like bungee jumping and mountain biking.
With over a decade of experience, the team at Heaven Himalaya prioritises safety, personalised experiences, and sustainable tourism. They also offer tours in Tibet, Bhutan, and India, ensuring that travellers experience the beauty of the Himalayas and beyond.
Why choose Heaven Himalaya
Specialises in trekking, peak climbing, and cultural tours in Nepal, including the Everest Base Camp trek.
Offers adventure sports like whitewater rafting and mountain biking.
Committed to sustainable and responsible tourism.
Comprehensive packages, including travel services like accommodation, transportation, and guides.
Adventure seekers looking for trekking, peak climbing, and other adrenaline-filled activities.
Cultural enthusiasts want immersive experiences in Nepal’s local traditions and history.
Eco-conscious travellers who value sustainable tourism and reducing environmental footprints.
First-time visitors seeking a well-organised, hassle-free adventure in the Himalayas.
Heaven Himalaya provides unforgettable, tailor-made travel experiences while promoting eco-friendly practices.
Young Pioneer Tours

Website: youngpioneertours.com
Young Pioneer Tours (YPT) is a travel company established in 2008 by Gareth Johnson and a group of expats passionate about travel. Specialising in unique, off-the-beaten-path destinations, YPT offers adventurous tours to over 100 destinations worldwide, including North Korea. Their tours cater to travellers eager to experience different cultures, build connections, and push the boundaries of conventional travel. YPT’s guides are known for their fun, engaging personalities while ensuring the smooth running of tours. With over a decade of experience, the company has developed a reputation for delivering memorable, affordable travel experiences.
Why choose Young Pioneer Tours
Specialises in North Korea and other unique destinations.
Tours include experienced multi-lingual guides.
Highly rated on TripAdvisor with over 1,000 reviews.
Focuses on affordable, comfortable travel experiences.
Tours cover transportation, accommodation, local guides, and meals.
Young Pioneer Tours is best suited for adventurous travellers who seek unique experiences in lesser-visited destinations. Whether you’re a backpacker or prefer more comfort, YPT is ideal for those who enjoy cultural immersion, making new friends, and pushing travel boundaries. With a range of affordable tours to North Korea, Africa, Central Asia, and beyond, it’s perfect for anyone with a thirst for adventure and an interest in unconventional destinations.
Final thoughts
These travel platforms offer a wide range of services to make planning your next trip easy and enjoyable. Whether you’re looking for a meaningful journey along historic routes in Europe, a wildlife adventure in Africa, or the thrill of exploring the Himalayas, these platforms are there to guide you every step of the way. Their personalised services, expert advice, and convenience make organising your trip a breeze. Simply choose the one that fits your travel goals, and get ready for an unforgettable adventure.

Plan your next getaway with these 8 Google Maps tips
Apr 05, 2022
[[read-time]] min read

The longer days in the U.S. have us chasing that windows-down-music-up-breeze-blowing kind of road trip feeling. Whether you’re planning a getaway to the coast to get a dose of Vitamin D or a weekend reunion to see friends and family, here are 8 Google Maps tips for your next road trip — which include some brand new features — so you can save money, coordinate with friends and family and plan your trip like a pro.
Save $ on the go
- Get the best gas deal near you: With gas prices skyrocketing, even the smallest difference per gallon helps! When you need to make a pit stop, use Google Maps to search for nearby gas stations and see their prices to get the best deal.
- Increase your fuel efficiency : Google Maps can help you keep your tank full a little longer by recommending the most fuel-efficient route. To turn on fuel efficient routes, tap the three dots on the directions screen, then tap ‘Route options’ and turn ‘Prefer fuel-efficient routes’ on.
- Avoid tolls: Avoid high-priced toll roads and highways when navigating to your destination. To steer clear of tolls completely, simply tap on the three dots at the top right corner of your directions in Google Maps to see your route options and select ‘Avoid tolls.’ And soon, we’ll start showing you the estimated toll price before you start navigating to help you compare and select the best route for you.
Use your vacation time wisely
- Figure out the best time to leave: Traffic to popular destinations, like the beach on a perfect summer day, can be unpredictable. To make sure you don’t get stuck in traffic for most of your drive, set the time you’d like to depart or arrive by to see how long it’ll take you to get to your destination.
- Find helpful information and save precious time : Once you arrive at your vacation destination, use the Popular Times and Live Busyness information to see when restaurants are most crowded so you can know which places are likely to seat you immediately. You can also use the popular dishes feature to quickly find out what the must-try items and local favorites on the menu are.
- Get directions quicker with new widgets: Our new pinned trip widget lets you access frequent trips that are pinned in your Go Tab directly from your iOS home screen — so you can see your estimated arrival time at the destination, next departures for transit trips, and a suggested route for driving trips. To add a widget, first make sure you have the latest Google Maps app. Then, touch and hold a widget or an empty area on your home screen until your apps jiggle, then tap ‘Add button’ in the upper-left corner. Once you find the Google Maps app, tap it, swipe to select a widget, then tap ‘Add widget.’
Plan like a pro
- Plan activities as a group : With group lists in Google Maps, planning with friends or family is simple and efficient, giving you the ability to create a vacation activity itinerary together by adding places to go and things to do as a group. Bonus tip: You can also share your real-time location with your group to make it easier to meet up or find one another if you get separated.
- Access directions offline : No service? No problem. You can still find your way even if you have spotty reception or an expensive data plan. Download a map of an area in advance so you can still access directions and turn-by-turn navigation even if you can’t get online. To do this, tap on your profile picture in Maps, tap Offline maps, then Select your own map. From here, adjust the map to cover the area you'd like to download and that will be available for you to reference on your adventures.
Related stories

5 AI tools to explore and enjoy your vacation

7 ways to keep up with the Paralympic Games Paris 2024 on Google and YouTube

Stay informed on the go with new updates from Maps and Waze

Explore new augmented reality features in Google Maps

8 ways to keep up with the Olympic Games Paris 2024 on Google

4 ways Google will show up in NBCUniversal’s Olympic Games Paris 2024 coverage
Let’s stay in touch. Get the latest news from Google in your inbox.

4 Questions To Ask Yourself Before You Book Your Next Trip
By: Author Kevin Monroe
Posted on Last updated: September 4, 2024
Traveling is a luxury many people don’t experience often, so be thoughtful when planning your next trip. Booking a trip is a significant expense that can affect other areas of your life. If you’re eager to plan your next adventure , now might be the perfect time to ask yourself some straightforward trip-planning questions.
This doesn’t mean your trip won’t happen; it just ensures you make the best choice for yourself in the long run. With that in mind, here are four questions to consider before you hit ‘book now’ on your upcoming trip.

1. Have I Done My Research?
Spending a little time researching before you book a trip is always a good idea, especially if you want to check out what a specific place offers regarding hotels, attractions, sightseeing, and more. Doing your research via a reliable source such as Footsteps Travel Blog will give you the confidence to create a schedule for your trip. Whether looking for the best places to stay in a particular area or hoping to uncover secret restaurants, there is so much to learn by doing some online research.
2. Have I Considered Travel Routes?
Knowing how to get to your chosen destination is essential; considering various travel routes will also give you an idea of the cost and how long it will take to get from A to B.
3. Have I Created a Realistic Budget?
Getting your budget right from the outset is important when planning a trip. It's not just about setting a budget but a realistic one you can stick to. As costs can quickly add up as you start adding more and more things onto your itinerary, having a clear budget for travel, accommodation, activities, and spending money while you’re there will help you stay in control and enjoy your trip without worrying about overspending.
4. Have I Finalized the Trip Dates?
When taking a vacation, there is no right or wrong time of year to book your trip. However, you will find that certain times of year are much busier than others, making the price much higher. Finalizing your trip dates may depend on whether you can get time off work or get the right people together simultaneously. Either way, you need to know what dates you’re aiming for before making your trip happen.
These questions are designed to help you make thoughtful travel decisions. By carefully considering your options, you’ll create an incredible trip you’ll be excited about. Remember, a great vacation isn’t just about the destination but also the journey to get there, including the planning and booking. So, embrace every step of the process and enjoy the fun along the way!
This story is published in partnership with Footsteps Travel Blog.
Planning a trip? Go Backpacking recommends:
- G Adventures for small group tours.
- Hostelworld for booking hostels.
Notify me of follow-up comments by email.
Notify me of new posts by email.
- Logout Login
- Adventure Holidays
- Weekend Getaways
- Driving Holidays
- Travel News
Top Searches
Heavy Rainfall Agra
Tumbbad Village
Romantic International Destina
Uttarakhand Landslides High Al
London Pod Taxis Mumbai
Snowfall Destinations India
5 unique things that exist only in Japan
Priya Srivastava Priya Srivastava / TIMESOFINDIA.COM / Created : Sep 15, 2024, 08:00 IST
You're Reading
Japan is known for its unique cultural phenomena, including cuddle cafes, vending machines for almost everything, the hikikomori lifestyle, robot restaurants, and Pikachu-themed items. These aspects highlight different facets of J … Read more
Japan is known for its unique cultural phenomena, including cuddle cafes, vending machines for almost everything, the hikikomori lifestyle, robot restaurants, and Pikachu-themed items. These aspects highlight different facets of Japanese society and offer a glimpse into the country's innovative and quirky side. Read less

More from Travel News

10 most affordable Asian countries with estimated daily budgets

Comments (0)

Refrain from posting comments that are obscene, defamatory or inflammatory, and do not indulge in personal attacks, name calling or inciting hatred against any community. Help us delete comments that do not follow these guidelines by marking them offensive . Let's work together to keep the conversation civil.
Comments ( ) Sort: Newest UpVoted Oldest Discussed Down Voted closecomments

SIGN IN WITH
Or post without registration.

Visual Stories

Popular Galleries

Indians can travel to these 10 gorgeous countries visa-free! TRAVEL TRENDS , WORLD

5 best destinations to experience snowfall in India this October TRAVEL TRENDS , INDIA

10 pretty countries that you can visit with this single visa TRAVEL TRENDS , WORLD
Trending stories, indians can travel to these 10 gorgeous countries visa-free.

Predjama Castle: World’s largest cave fortress and its secret canals

Planning your first international trip? Top tips and destinations for Indian travellers

- Uttarakhand on high alert: Landslides at prime routes leading to Badrinath

5 Bollywood-inspired romantic international destinations to visit in 2024
- 1 5 unique things that exist only in Japan
- 2 Predjama Castle: World’s largest cave fortress and its secret canals
- 3 5 Bollywood-inspired romantic international destinations to visit in 2024
- 4 How to reach Jim Corbett National Park from Delhi: A complete guide
- 5 International students face higher financial requirements for UK visas in 2025

THE DEFINITIVE GUIDE TO DESTINATIONS, ITINERARIES, THINGS TO DO, RESTAURANTS, NIGHTLIFE and LOTS MORE!
FOLLOW US ON
Places to visit.
- Places to visit in Bangalore
- Places to visit in Mumbai
- Places to visit in Delhi
- Places to visit in Goa
- Hotels in Goa
- Hotels in Jaipur
- Hotels in Shimla
- Hotels in Mumbai
Things To do
- Things to do in Goa
- Things to do in Mumbai
- Things to do in Bangalore
- Things to do in Delhi
Travel Inspiration
- Visa on arrival for Indians
- Honeymoon Places in india
- Hill Stations in India
- Weekend getaways in Mumbai
- Weather in Delhi
- Weather in Chennai
- Weather in Bangalore
- Weather in Mumbai
Best Beaches
- Goa Beaches
- Mumbai Beaches
- Pondicherry Beaches
- Kerala Beaches
- Restaurants in Bangalore
- Restaurants in Chennai
- Restaurants in Pune
- Restaurants in Jaipur
- Hill Station near Delhi
- Winter trip to Ladakh
- Places to visit in Kerala
- Winter Honeymoon Destinations
- UK visa guide for Indians
- Winter Trip to Manali
- Vaishno Devi Yatra
- Special Train Ticket Booking
- HP inter-state Bus
- Honeymoon Destinations India
Latest News
Congratulations.
You have been successfully added to the mailing list of Times of India Travel. To complete the subscription process, kindly open your inbox and click on the confirmation link which has been emailed to you.
Share with friends
Thank You for sharing! Your friend will receive the article link on email mentioned.
- (For more than one recipient, type addresses separated by commas)

Japan is known for its unique cultural phenomena, including cuddle cafes, vending machines for almost everything, the hikikomori lifestyle, robot restaurants, and Pikachu-themed items. These aspects h...

IMAGES
VIDEO
COMMENTS
We're also adding a few new features to make planning and organizing your trips easier. One place for all of your trip details. Last year, we started adding your trip reservations for things like hotels and flights to a trip timeline for your upcoming trips, when you're signed into your Google account and you've received a confirmation in ...
Create a new map through the home screen. At the top left of the "My Maps" home screen, you'll see a red box with the text "+Create a New Map.". Click on it to be redirected to a map screen. [3] 3. Give your map a descriptive name. To keep yourself organized, give your map a name to remind you what it contains.
Here is how to use Google Maps trip planner: 1. Create a Map. To create a map on Google, you do need a Google account. Once signed up/logged in, go to this page. Click on " Saved" >> "My Maps ", which will take you to your maps. If you have created any maps in the past, you will also find them here.
Plan your day-by-day itinerary. Download the Google Maps app on your phone. Share your map with friends. This will all make more sense once I walk you through everything with screengrabs. Whether you're thinking about a girlfriends getaway or a honeymoon, Google Maps Trip Planner will be a game changer for you. Take my word for it!
You can use Google Maps to get directions for your road trip or for walking. Open up your trip map, and you'll notice toward the bottom left of the screen, it will say "Directions from" and the name of your location pins. Next to the directions layer, you'll want to: Tap the three dots. Click step-by-step directions.
Step 1 to Plan a Trip with Google Maps: Create A Custom Map. Step 2 to Plan a Trip with Google Maps: Add Your Major Stops. Step 3 to Plan a Trip with Google Maps: Add Destination Info. Step 4 to Plan a Trip with Google Maps: Outline Your Itinerary. Conclusion. Your Turn.
Fortunately, the travel website by Google and Maps both supply some great tools for managing risk and assessing where you plan to go. On the travel website, you can find up-to-date COVID-19 ...
Choose your own adventure. For the top 200 cities in the world, Google Trips shows you a variety of day plans featuring the most popular daily itineraries. We've automatically assembled the most popular sights, attractions, and local gems into a full day's tour — all based on historic visits by other travelers. Say you're visiting ...
Plan for your next trip using your iPhone or iPad to make sure you arrive on time. On your iPhone or iPad, open the Google Maps app . At the top, type a destination. In the bottom left, tap Directions. It'll show a car, bus, bike, a person waving, or a person walking. Choose your transportation mode.
On your Android phone or tablet, open the Google Maps app . Search for a destination or tap a place on the map. At the bottom, tap Directions. At the top, tap Driving . At the bottom, tap the white bar to display: The current traffic on your route. Typical traffic by the hour and any slowdowns on the way.
3. Take organization to another level with Google Sheets. Using Google Sheets to organize various parts of a trip is admittedly very obvious compared to my first two tips, but here's how I like to set things up: I have three pages in a Sheet file — one that functions as a list of things to do in each location, one that lists all of our reservation information and a last tab to collect ...
On your computer, open Google Maps. Make sure you're signed in. On the left, choose an option: Get directions to relevant places: Click a place in the list. You'll get places based on your Gmail, Calendar, and recent travel history. Get directions to saved places: If you saved your work or home address in your Google Account, click Home or ...
Step 1: Create a New Google Map. You will need to sign in to your Google Account or create a new account to create your own Google My Map. Once you're logged into Google, follow this link to bring you to Google Maps. Click on the hamburger ( 𝄘 ) in the top left-hand corner of Google Maps. Click on "Your Places".
Step-by-Step Directions for Planning a Short Trip with Google Maps. 1. Open Google Maps. Begin by opening the Google Maps app on your phone or by going to maps.google.com on a computer. 2. Add Location for Starting Point and Destination. Click on the search bar at the top of the map and enter your destination.
Go to Google My Maps from your desktop browser. Check the Google icon in the top right corner to make sure you're using the Google account you want to. Click "Create A New Map" and a window will open with a blank map. To give your map a name and description, click the map name ("Untitled Map").
Accessing Google Maps travel plan offline. Download Google Earth App on your mobile phone. Go to your google maps travel plan on desktop and click on the 3 dots next to the title. In the pop up box click export to KML/KMZ. In the next pop up leave the boxes unchecked and click download.
Step 1: Make a New Google Map. The first step to create a trip in Google Maps is to visit the Google Maps home page. Click on the hamburger menu icon in the top left-hand corner. Select "Your Places" from the dropdown menu. Select "Maps" in the far right-hand corner menu.
1. Open Google Maps and click, tap, or search for the location that you want to save. 2. Find the Save icon, which has the icon of a bookmark. You'll find it right under the location's name, but ...
READ MORE: 10 Ways to Save Money on Gas on Your Next Road Trip This helps visualize a road trip, place destinations in the correct order, and make sense of the grand scale of the road trip. After creating a customized map, users can open it in Google Maps on any mobile device, plug into a compatible vehicle, and let the road trip adventure begin.
First, open up your browser and head on over to Google Maps. Click the "Directions" button to the right of the search bar. By default, Maps will use your device's location for the starting point. If you want this to be a different location, enter it now. Next, enter the location of your first destination into the field provided, and then hit Enter.
Post summary: A comprehensive guide on how to use Google Maps to plan a road trip itinerary and why Google Maps is the best tool/app for planning a trip.Includes a road trip planning tutorial! Author's Note: This post was originally published in 2020 and was updated in April 2023 for accuracy and comprehensiveness.
Provide up to 26 locations and Route Planner will optimize, based on your preferences, to save you time and gas money. Find the shortest routes between multiple stops and get times and distances for your work or a road trip. Easily enter stops on a map or by uploading a file. Save gas and time on your next trip.
Planning a trip can often feel overwhelming with endless options, especially when you're aiming for a unique, personalised adventure. Thankfully, today's travel platforms have evolved to simplify the process, offering curated experiences, expert advice, and user-friendly tools to make planning a breeze.
The longer days in the U.S. have us chasing that windows-down-music-up-breeze-blowing kind of road trip feeling. Whether you're planning a getaway to the coast to get a dose of Vitamin D or a weekend reunion to see friends and family, here are 8 Google Maps tips for your next road trip — which include some brand new features — so you can save money, coordinate with friends and family and ...
Booking a trip is a significant expense that can affect other areas of your life. If you're eager to plan your next adventure, now might be the perfect time to ask yourself some straightforward trip-planning questions. This doesn't mean your trip won't happen; it just ensures you make the best choice for yourself in the long run.
5 unique things that exist only in Japan, Japan is known for its unique cultural phenomena, including cuddle cafes, vending machines for almost everything, the hikikomori lifestyle, robot ...