
- All Companies
- Driver Training
- All Freight Types
- Lease/Purchase
- Message Board
- Truck Driver Salary
- How to Become A Truck Driver
- Will I Be Successful?
- Truck Driving Schools
- CDL Practice Tests
- Get Your CDL
- Get Your First Truck Driving Job
- Your First 100,000 Miles
- Advanced Tips
- Sign Up Here

Select Location x
Please tell us your location.
Location not set
The Complete Pre-Trip Inspection Checklist
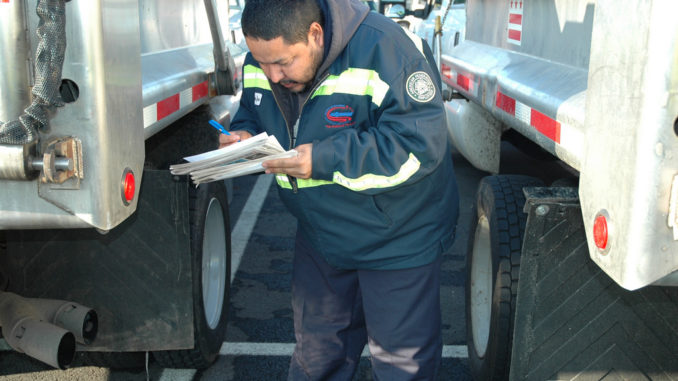
Due to heavy memorization, the pre-trip inspection is one of the hardest aspects of the CDL test. Also called the “Vehicle Inspection Test,” the pre-trip is one of the tests that trucking students fail the most.
With this pre-trip inspection checklist, we tell you everything you need to know and what you need to check for.
Engine Compartment – What to Check For:
When checking the engine compartment, you always want to make sure the following components are properly mounted and secured. You should also make sure they are not cracked, bent, or broken. The items you need to check for include:
Belt-Driven Alternator
All of the wires are connected. The belt is not cracked or frayed, and the free play on the belt is between ½ to ¾ of an inch.
Belt-Driven Water Pump
The free play on the belt is between ½ to ¾ of an inch, and all the hoses running to and from the water pump are tightly clamped. Ensure nothing is leaking.
Brake Chamber
The brake chamber is not leaking air.
The brake drum is properly mounted and secure.
The brake hose is rubber; it is not cracked and is not leaking air.
Brake Lining
Check for oil or debris on the lining. There should be at least ¼ of an inch of friction material.
Caste Nuts and Cotter Pins
All three caste nuts and cotter pins are present.
Coolant Reservoir
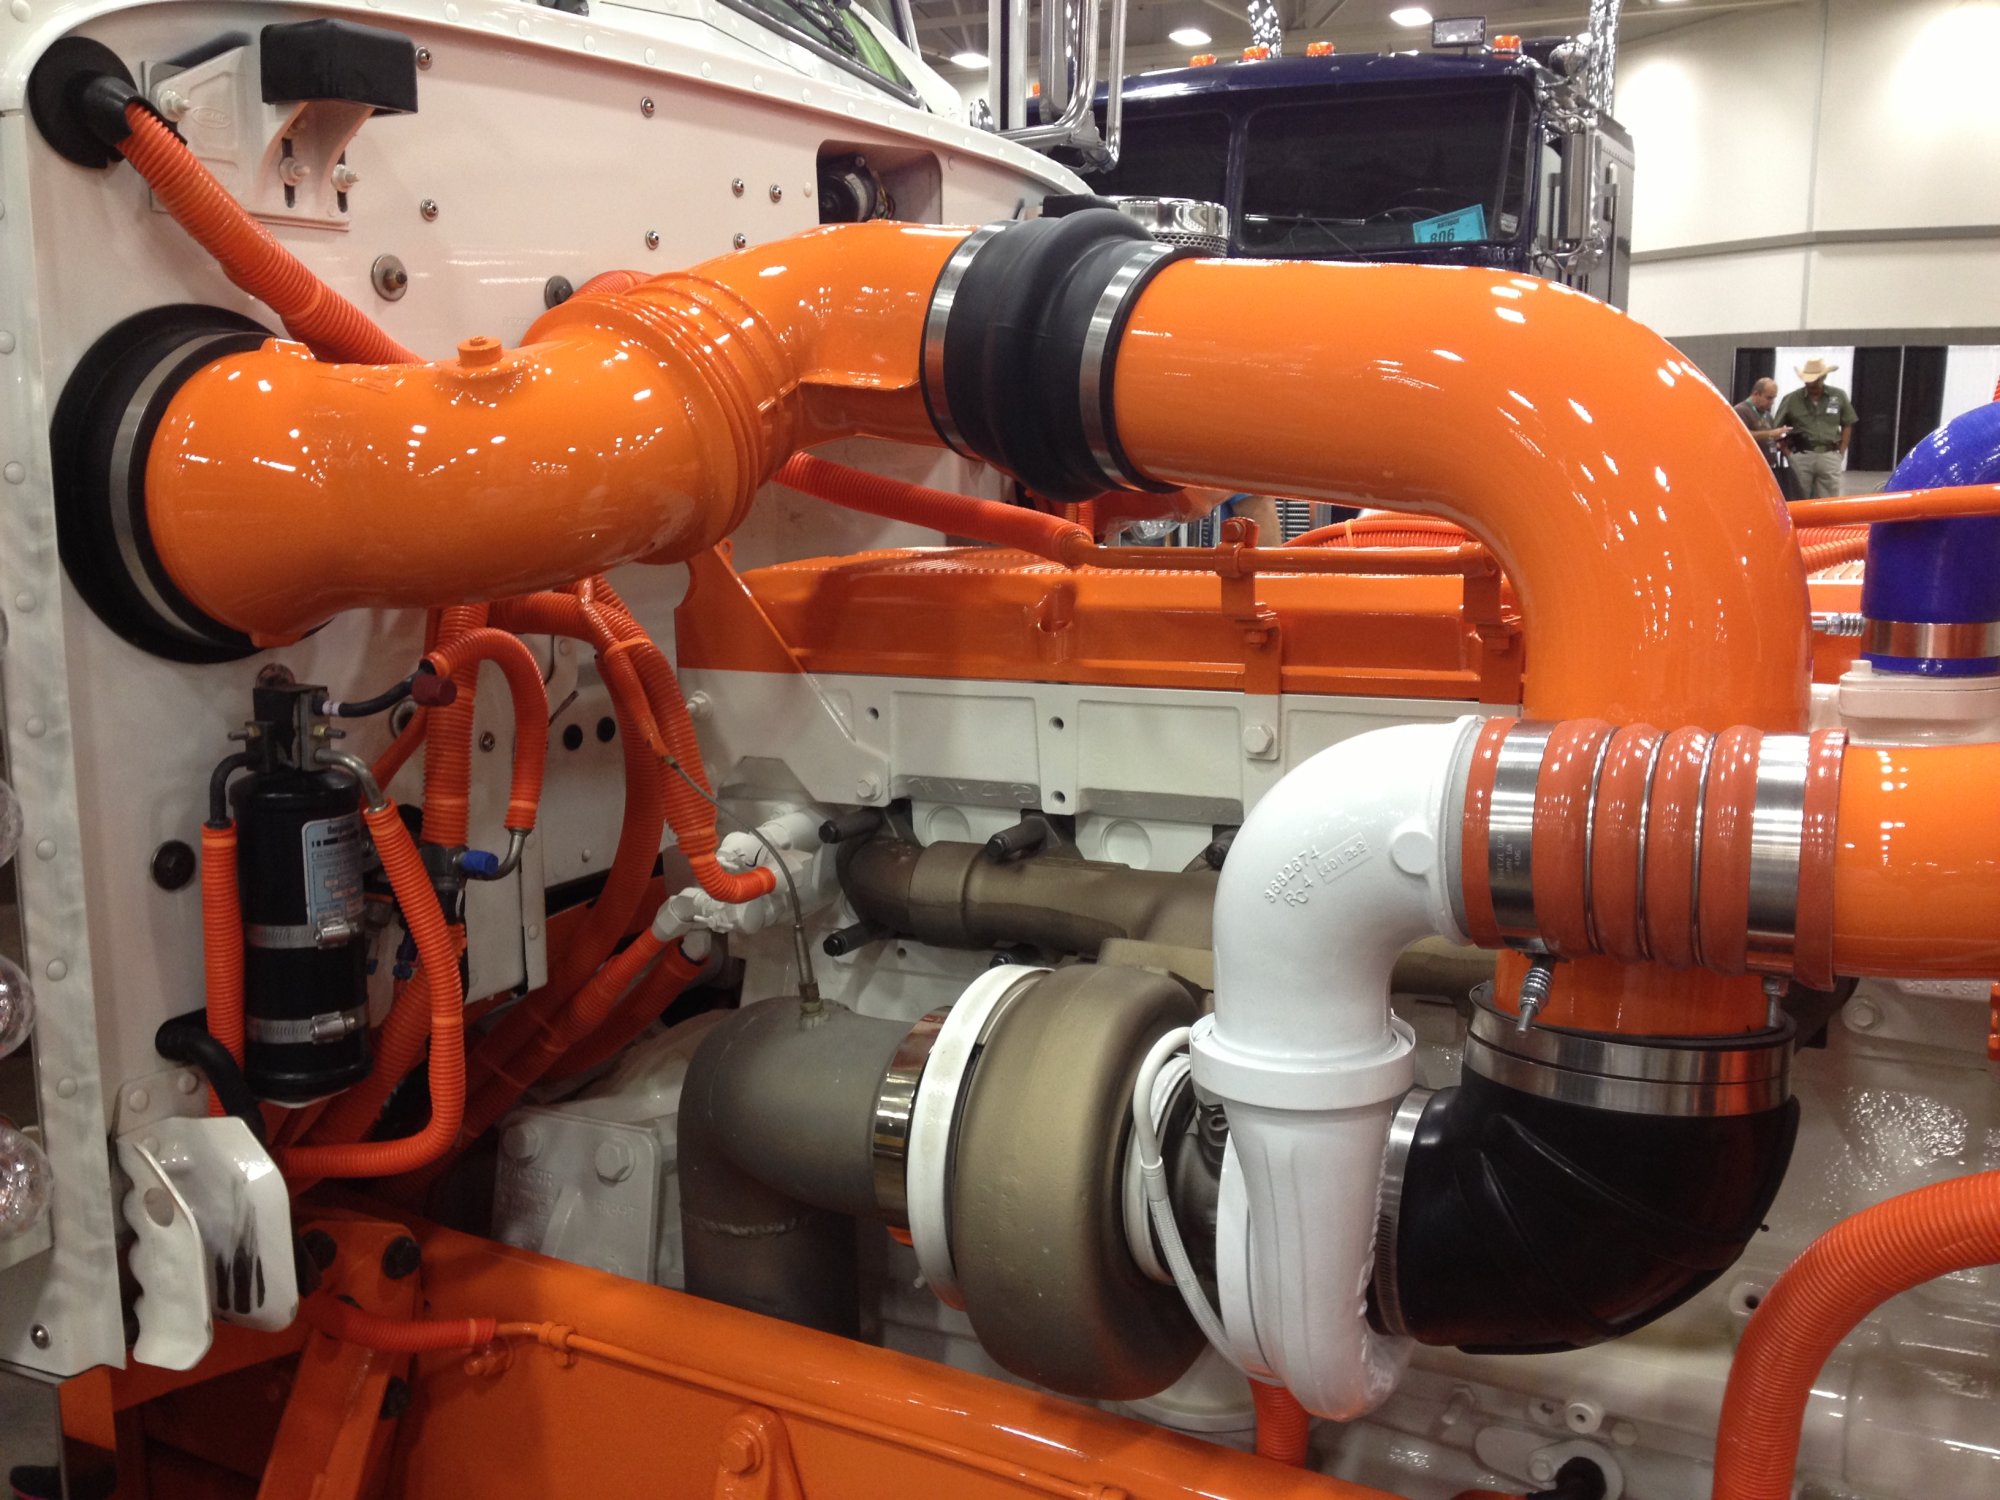
The reservoir is not leaking and is filled to the manufacturer’s specifications.
The drag link is properly mounted and secure, and not cracked, bent or broken.
Gear Box and Hoses
The gear box and hoses have no abrasions, bulges or cuts, and are not leaking.
Gear-Driven Air Compressor
The air compressor is properly mounted and does not leak.
Gear-Driven Power Steering Pump
The steering pump is properly mounted and not leaking.
General Hoses (Passenger and Driver’s Side)
The hoses are secure at both ends and are not leaking. There are no abrasions, bulges, or cuts.
The hub seal (or axle seal) is leaking and is filled to the manufacturer’s specifications.
Leaf Springs
None of the leaf springs have shifted or are bent or broken.
There are no signs of leaks under the truck.
There are no lug nuts missing. There are no rust trails, powder residue, or cracks around the bolt holes.
The oil level is filled to the manufacturer’s specifications.
The pitman arm is properly mounted and secure. It is not cracked, bent, or broken.
Power Steering Fluid Reservoir
The power steering reservoir is not leaking and is filled to the manufacturer’s specifications.
The rim does not have any unauthorized welds.
Shock Absorber
The shock absorber is not leaking. If it is leaking, the leak will be at the point where the top and bottom portion of the shock meet.
Slack Adjuster and Push Rod
With the brakes released and pulled by hand, the push rod does not move more than one inch.
Spring Hanger
The spring hanger is properly mounted and secure.
Steering Column
The steering column is properly mounted and secure. It is not cracked, bent, or broken.
There are no abrasions, bulges, or cuts on the tread or sidewalls. Tread depth should have a depth no less than 4/32 of an inch. Tires are properly filled to the manufacturer’s specifications. This can be checked with an air gauge.
The tie rod is properly mounted and secure, not cracked, bent, or broken.
Make sure all are accounted for.
Driver Door Fuel Area-What to Check For:
Remember – during the pre-trip inspection, you want to make sure these items are properly mounted and secure. Look for cracks, bends, and breaks.
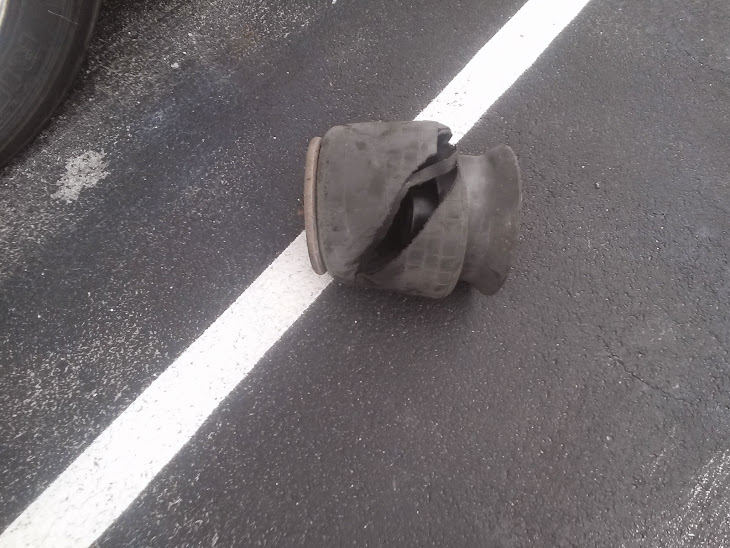
The actual airbag has no abrasions, bulges, cuts, or leaks. The airbag is not missing mounting bolts.
The axle seal is not leaking and is filled to the manufacturer’s specifications.
The brake drum is secured properly and has no cracks, bends or breaks.
Check the brake hose at both ends to make sure it is not leaking air.
There is no oil or debris on the brake lining. There is at least ¼ of an inch of friction material.
Catwalk and Steps
The cat walk and steps are clear of any loose objects.
Door and Hinges
The doors open, close, and latch properly. Door seals should not be worn, torn, or rotten.
Drive Shaft
The drive shaft is not twisted, and the u-joints are free of any debris.
The tread and sidewalls have no abrasions, bulges, or cuts. The tread depth is no less than 2/32 of an inch. Tires are properly filled to the manufacturer’s specifications. This can be checked with an air gauge.
Exhaust System
The exhaust system shows no signs of leaks.
Frame and Cross Members
There are no unauthorized holes or welds. Bundle up the cross members to ensure none are missing.
Fuel is not leaking from the tank, and the cap is on tight.
There are no rust trails, loose bolts, powder residue, or cracks around the bolts.
Mirrors are clean, with no cracks or chips.
The mud flap is secured properly, with no cracks, bends and breaks.
There are no unauthorized welds.
The shock absorber is secure at both ends and not leaking. If it does leak, it is preferable to leak in the middle.
There is proper spacing between the tires and there is nothing stuck.
The spring arm is secure at both ends.
Spring Mount
The spring mount is secure at both ends.
The torque arm is secured properly, with no cracks, bends or breaks.
No u-bolts are missing.
Coupling Area-What to Check For:
Air lines should be secure at both ends with no abrasions, bulges, or cuts. They should not be leaking, dragging, or tangled.
Make sure the apron is properly mounted and secure. Look for cracks, bends, and breaks.
Make sure there is enough space between the tractor mud flap and the trailer landing gear, so that they don’t hit each other when making a turn.
Electric Line
The electric lines are secure at both ends. There are no abrasions, bulges, cuts, or exposed wires.
There is no space between the apron and the skid plate.
The seals are in good condition with no cracks, signs of rotting, or leaking air.
The king pin is properly mounted and secure, without cracks, bends and breaks.
Locking Jaws
Physically check that the locking jaws are fully locked around the king pin.
Mounting Bolts
No mounting bolts are missing.
The platform is properly mounted and secure, without cracks, bends and breaks.
Release Arm
The release arm is in the fully locked position.
The skid plate is properly lubed.
Sliding Fifth Wheel Locking Pin
The pin is in the fully locked position.
Trailer- What to Check For :
The airbag has no abrasions, bulges, cuts or leaks, not missing any mounting bolts.
The brake chamber is properly mounted and does not leak air.
The brake hose is secure at both ends with no abrasions, bulges, cuts, or leaks.
No oil or debris on the brake lining and at least ¼ of an inch of friction material.
No missing cross members.
Header Board
The header board does not have any holes or missing rivets.
Landing Gear
The landing gear is fully raised and the cradle handle secure.
No rust trails, powder residue, or cracks around the bolt holes.
The rims do not have any unauthorized welds.
Rear Door and Hinges
The rear door opens, closes, and latches properly. Door seals are not worn, torn, or dry rotten.
The shock absorber is secure at both ends with no leaks.
When the brakes are released and pulled by hand, the push rod does not move more than one inch.
Tandem Frame and Release
Release handle and locking pins are in the fully locked position.
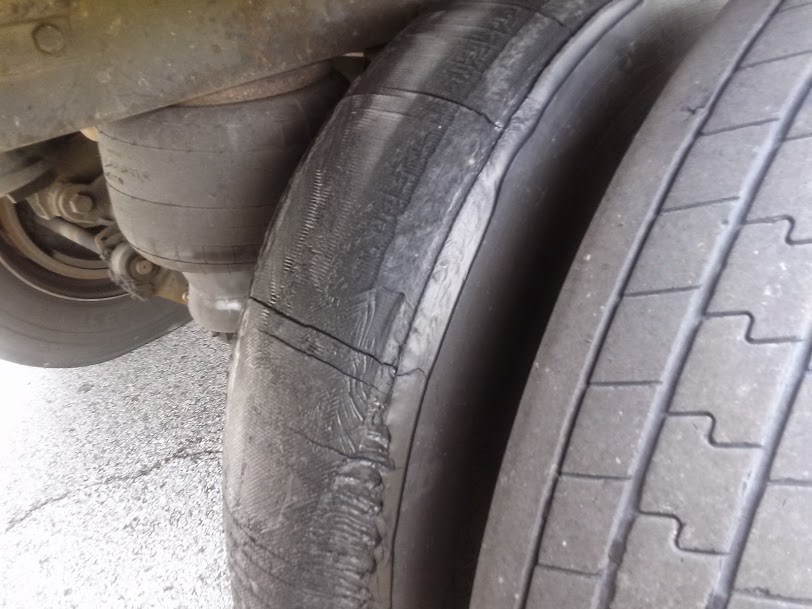
Trailer Tire
There are no abrasions, bulges, or cuts to the tread or sidewalls. Tread depth is no less than 2/32 of an inch. The tire is properly filled to manufacturer’s specifications and checked with an air gauge.
Light Check
There are five locations where you must check your lights. These include:
- Front of the truck
- Both sides of the truck
- Rear of the truck
- Both sides of the trailer
- Rear of the trailer
The five functions are:
- Left turn signal
- Right turn signal
- Four way flashers
- High/low beams
- Brake lights
Inspection and Brake Tests-What to Check For: In-Cab
The last section is In-Cab Inspection and Brake Tests. For the In-Cab Inspection you once again want to make sure all of the following components are properly mounted and secure. As well as the following:
Air Brake Test
There are three stages to an air brake test:
- Applied Pressure Test – When doing the Applied Pressure Test, you want to build the air pressure to governor cut out. Put the truck in the lowest gear, turn the engine off and immediately turn it back on. Push in the tractor and trailer valves which then release the parking brakes. Push and hold the brake pedal, allowing the gauges to stabilize. When the gauges have stabilized, announce the Primary and Secondary PSI. Listen for air leaks while doing this.
- Warning Light and Buzzer – Pump down on the brake pedal until the warning light and buzzer comes on. This is typically at or before 60 PSI.
- Tractor/Trailer Protection Valve Pop Out – Pump down on the brake pedal until the tractor and trailer protection valves pop out, this will be between 20 and 40 PSI.
Air Pressure Gauges
The air pressure gauges build to governor cut out.
Emergency Equipment
Truck has a fire extinguisher, three red reflective triangles, and spare electrical fuses.
Heater and Defroster
Demonstrate both the heater and defroster are working properly.
Horns (Air Horn and City Horn)
Blow both horns to make sure they are working.
Lighting Indicators
Check the left turn, right turn, four way flashers and high beams; also point these out on the dashboard.
With the transmission in neutral, fully depress the clutch. Turn the key on, check the ABS light, announce when it comes on and off, and start the engine.
The seat belt is not ripped or frayed and adjusts and latches properly.
Oil Pressure Gauge
The engine oil pressure gauge should rise to normal operating range.
Parking Brake
- Trailer Parking Brakes – Set the trailer brake, release the tractor brake, and tug lightly on the trailer.
- Tractor Parking Brakes – Set the tractor brake, release the trailer brake, and tug lightly on the trailer.
Service Brake Check
Release both the tractor and trailer brakes. Drive at idle speed. Apply the service brake to make sure you come to a complete stop and that it doesn’t pull to the left or right when applying the brakes.
The voltmeter is charging between 13 and 14 volts.
Water Temperature Gauge
The water temperature gauge rises to normal operating range.
Windshield and Mirrors
The windshield and mirrors are clean, with no obstructions and in proper adjustment.
Windshield Wipers and Washers
Demonstrate the wipers and washers are working properly by spraying the windshield.
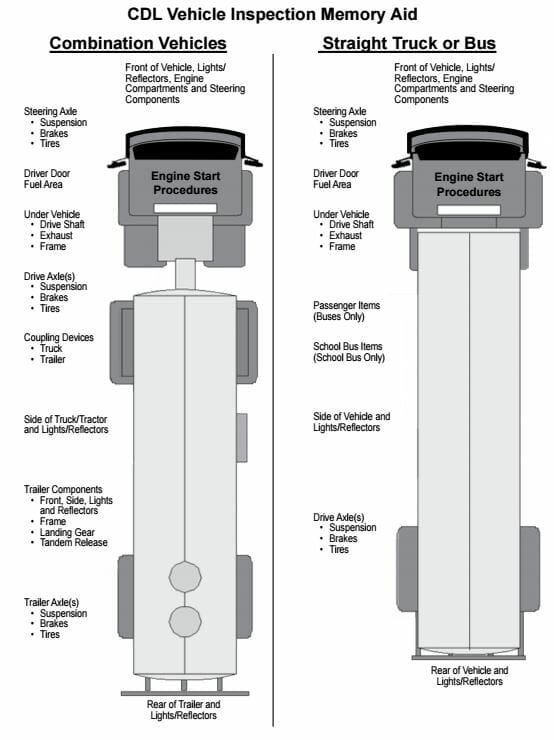
This is a really nice complete list, very useful.
Comments are closed.
Contact ClassADrivers.com
Please use the form below to contact our customer service or sales team.
You can also reach us at (888) 830-2326. Our normal business hours are Monday-Friday 8 a.m. to 5 p.m. (Pacific Time).
Our business address is: Attn: Class A Drivers MH Sub I, LLC dba Internet Brands 909 N Pacific Coast Highway, 11th Floor El Segundo, CA 90245
By clicking the ["Send"] button, you agree to our Terms of Use and Privacy Policy , and to the use of cookies described therein, and you also consent to the collection, storage, and processing of your data in the United States where the level of data protection may be different from that in your country.
Complete pre-trip inspection checklist for truck drivers
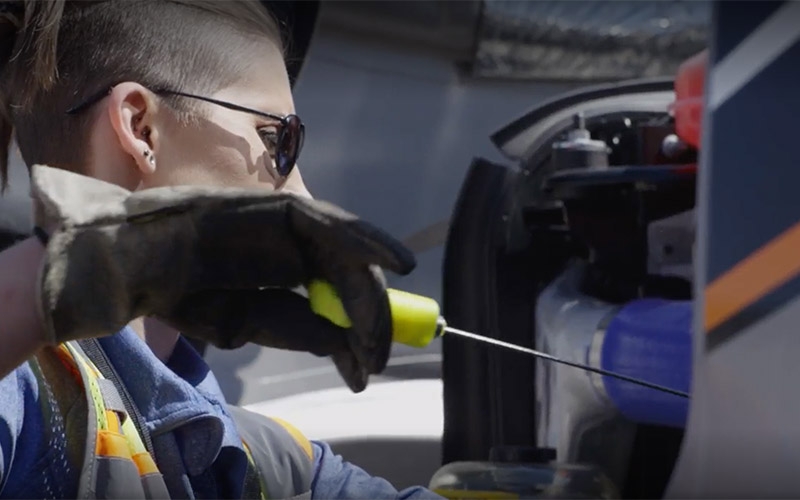
By The Schneider Guy
Estimated reading time: 4 minutes
As a truck driver, performing a CDL pre-trip inspection is one of the most common and repeated tasks you will complete. Pre-trip inspections help truck drivers ensure their tractor and trailer are safe to operat e before hitting the road.
Keep reading to learn what a p re -trip inspection is and what should be on a p re -trip inspection checklist .
What is a pre-trip inspection?
A pre-trip inspection includes checking over the tractor and trailer a truck driver will be operating . A pre-trip should be completed before the operation of a vehicle :
- At the beginning of a driver’s shift.
- Any time a new trailer is picked up.
- After a 10-hour break.
A thorough inspection usually takes anywhere from 30 minutes to one hour and should be logged as on-duty, not driving (line 4) .
How to complete a CDL pre-trip inspection
CDL pre-trip inspection checklist
1. passenger-side engine: .
- Air filter housing: Secure mounting, cover in place.
- Windshield washer fluid reservoir: No leaks, proper fluid level.
- Turbocharger: No oil or exhaust leaks.
- Engine air ductwork: No cuts, clamps secured.
- Alternator: Mounting secured, no broken or loose wire.
- Accessory drive belt: Not cracked or frayed.
- Air conditioner compressor: Secure m ounting .
2. Front brakes (covers all five brake components):
- Brake drum: No cracks.
- Brake lining: No cracks or damage.
- Slack adjuster: Proper angle to the brake chamber, clevis and cotter pin intact.
- Brake air line: No bulges or cuts, fitting tight .
- Brake chamber: Mounting bolts secured, band clamp secured.
3. Front wheel:
- Tire: ABCs (abrasions, bulges, cuts), pressure = 120 PSI, tread depth = 4/32 min ( DOT ) .
- Wheel: Not cracked or bent.
- Hub oil: Not leaking, at proper level – if it’s a sealed unit, can’t check level.
- Oil seal (outer): Not leaking.
- Valve cap: Not missing.
- Lug nuts: None missing, no streaks or shiny areas, none loose.
4. Driver side of engine:
- Radiator brace: No cracks or missing bolts.
- Radiator: Not leaking, secure mounting.
- Water pump: No cracks, not loose or leaking.
- Fuel water separator/filter: Not leaking, secure mounting.
- Pitman arm/drag link: Not cracked, castle nut secured with cotter pin.
- Steering gear box: Secure to frame, not leaking.
- Power steering reservoir: Secure mounting , no leaks, proper level.
- Dipstick: Right level, secured after check.
- Steering shaft: Secure, not loose or damaged.
- Fuel pump: No cracks, not loose or damaged.
- Oil filler cap: Secure, no cracks.
- Engine coolant reservoir: No leaks, proper fluid level.
5. Steer axle suspension:
- U-bolts: No cracks, no loose or missing nuts.
- Leak spring: No cracks, not loose or shifting.
- Tie rod: Secured with castle nuts and cotter pins.
- Shock absorber: Secure mounting, not leaking oil.
- Axle: Not cracked.
6. Rear suspension:
- Spring mount: No cracks, secure mounting.
- Tire: ABCs (abrasions, bulges, cuts), pressure = 110 PSI, tread depth = 2/32 min ( DOT ) .
- Airbag (bellows): Fully inflated, secure mounting, not ruptured.
7. Side of cab:
- Mirrors: Secure m ounting , no broken glass.
- Doors: No damage, glass not broken, hinges secured, opens and closes well.
- Lights and turn signals: Working, not cracked.
- Steps: Mounted, secured to skirting.
- Battery box: Secure m ounting , cover latched.
- DEF cap: Cap secured.
- Fuel cap/tank: Gasket in place, vent in place, chain secures the cap to the tank.
- Side skirting: No damage, panels secure.
- Side box: Secured, safety triangles present.
- Side of sleeper berth: No body damage.
- Sleeper berth window: No cracks.
8. Rear of cab:
- Electrical cord: No bare wire, no corrosion, check the plug at the end of the cord.
- Air line: Not tangled or worn, rubber grommets not worn, fittings tight.
- Cab shock absorber: Secure mounting, not leaking oil.
- Cab airbag (bellows): Not ruptured, securely mounted.
9. Driveshaft/rear frame:
- Driveshaft: Not cracked.
- Universal joint: Not cracked, not missing bolts, no shiny areas.
- Differential: Not leaking oil.
- Frame: Straight, no non-factory welds.
10. Fifth wheel area:
- Pivot pin: Keeper pin and cotter key intact.
- Slider lock pins: Fully engaged.
- Release arm: Not bent.
- Slider rail: No broken welds or missing bolts.
- Slider stop blocks: Welds not broken, not missing bolts.
- 5th wheel platform: Well-greased, tilted down.
11. Front of trailer:
- Top rail: No cracks or collision damage.
- Clearance lights: Not broken, working properly.
- Registration: Not missing, readable.
- Document box: Not missing or loose.
- Air line /glad hands: No bulges or cuts in air lines, rubber grommets not damaged on glad hands.
- Electric hook up: No broken pins, cover intact.
- PM sticker: Current, legible.
- Height sticker: Legible, legal for route.
- Placard holder: Not broken or missing rivets.
- Tracking device: No cracks or collision damage.
12. Side of trailer:
- Top rail: Not cracked, no collision damage.
- Clearance light: Not broken, operational.
- Bottom light: Not cracked, no collision damage, no missing bolts.
- Landing gear: Legs straight, no broken welds in bracing, sand pads secured and clean handle in cradle.
- Reflector tape: Clean.
- Side panels: No holes or cuts, no missing rivets.
13. Rear of trailer:
- Latches: Secured, not damaged.
- Lights: Not broken or missing, operational.
- Splash guard: Brackets and guard secured.
- License plate: Secure and clean, light is working.
- Bumper: Not damaged, no broken welds.
- Door hooks: Not loose, no missing bolts.
- Hinges: Not cracked, no missing bolts on both sides.
- Door seals: No separation, no rubber tubing sticking out.
14. Trailer suspension:
- Air line: No bulges or cuts, fittings are tight and not rubbing.
- Axle: Not bent or broken.
- Clevis pin/cotter key: Not missing.
- Slack adjuster: Proper angle, clevis pin and cotter pin intact.
- Brake linings: Minimum of ¼ inch thick, not cracked.
- Brake drum: Not cracked.
- Tire: (ABCs), tread depth = 2/32 , air pressure = 110 PSI.
- Spring: Not broken, not shifted.
- Spring mount: No broken welds.
- U bolts: Not loose, not cracked.
- Torque rod: Secure mounting, bushings intact.
- Spring brake chamber: Secure m ounting , band clamp secure.
15. Gauges/inside the truck:
- Fuel: Matches visual when looking in the tank.
- Def level: Maintain a minimum of one light bar.
- Oil pressure: 25-50 PSI.
- Speedometer: 0-60 MPH.
- Air pressure: 90-120 PSI.
Please note that the list above is just an example. It is important to remember the type of driver you are, the company you work for and the type of truck you drive can impact your CDL pre-trip inspection . Be sure to consult your company guidelines or speak with your leader for more information on your post-trip inspection requirements.
Get more great driving tips and guides.

Schneider Guy loves the "Big Orange." He's passionate about the trucking industry and connecting people to rewarding careers within it. He's been the eyes and ears of our company since our founding in 1935, and he's excited to interact with prospective and current Schneider associates through "A Slice of Orange."
Related posts
8 CDL Road Test tips to help you pass

How hard is it to get a CDL?

How to get your CDL – 7 simple steps for new truck drivers

Eliminate blind spots with 360° visibility around every vehicle.

By industry
Cascade improves safety by 50%, reclaims ~10K hours per year.
With the Motive platform, Cascade has a consolidated view of fleet and spend management across its fleet of more than 3,000 vehicles.
Technical resources

G2 Fleet Management Leader.
Motive ranks #1 in G2 Fleet Management for enterprises; 20% higher than nearest competitor.
Get to know Motive

Missed the Motive Innovation Summit?
Explore the future of logistics and transportation, alongside groundbreaking AI models revealed at our inaugural Summit – Vision 24’.
Talk to Sales or Support 24/7
+1 855-511-3529 Visit Help Center
- Blog »
- Tips for drivers
CDL pre-trip inspection checklist.

A commercial driver’s license (CDL) can put you behind the wheel of a tractor-trailer, a flatbed, or a tanker, among other non-passenger vehicles. Before you hit the road though, you’ll need to complete a CDL pre-trip inspection checklist. By inspecting the commercial vehicle beforehand, you can head out on your route knowing you’ve confirmed major systems and parts are road ready. Recognizing road safety is always a fleet priority . This article provides a comprehensive guide to the CDL pre-trip inspection checklist.
What is a CDL pre-trip inspection checklist?
A CDL pre-trip inspection checklist systemizes the driver’s vehicle inspection to ensure care and consistency. While a pre-trip inspection would be a best practice no matter what, the Federal Motor Carrier Safety Administration (FMCSA) requires these checks for commercial vehicles. Part 396.3 (a) calls on every motor carrier to “systematically inspect, repair, and maintain, or cause to be systematically inspected, repaired, and maintained, all motor vehicles subject to its control.”
The fleet also has to keep formal records of their vehicle checks. So, drivers typically follow a CDL pre-trip checklist and record their findings in the driver vehicle inspection report, or DVIR , confirming the commercial motor vehicle (CMV) inspection is complete.
A CDL A pre-trip inspection checklist requires drivers to inspect many different parts and system including:
- Vehicle lights
- Tires, wheels, and rims
- Windshield wipers
- Emergency equipment
Different motor carriers may add their own expectations to the CDL pre-trip checklist. But they would be adding particular items to check, not doing away with the pre-trip inspection. After all, non-compliance with the federal pre-trip inspection requirements can earn hefty fines and lead to the loss of certifications and licenses.
The Class A CDL pre-trip inspection checklist is important enough that drivers testing for their license are expected to do the pre-trip inspection as part of their examination. Inspection requirements can vary by state. There’s also a Class B CDL pre-trip inspection list.
Why is the CDL pre-trip inspection checklist important?
Compliance isn’t the only reason following the CDL pre-trip inspection checklist is important. The federal requirement is in place, after all, to ensure commercial vehicles on the road are safe to drive.
With continued investment into critical infrastructure over the last 20 years, the percentage of roads in good condition has climbed since 2000. Yet the United States still has hazardous roads. In fact, “from 2000 to 2020, the share of major roadways in poor condition has remained fairly steady, rising from 11.8% to 13.8% over the course of 20 years.”
This makes keeping commercial vehicles in top shape all the more important to safety and efficiency. A CDL pre-trip checklist helps improve fleet safety by avoiding drivers going out on the road in vehicles that are not fit for duty. Taking a truck out on the road with an unsecured load, damaged brakes, disconnected wiring, or another issue could lead to drivers hurting themselves or somebody else.
Fleet vehicle inspections can also help keep drivers on the road. Identifying issues in advance can help avoid major problems that mean downtime and costly repairs. Plus, if the Department of Transportation (DOT) inspects the vehicle and finds something that the driver missed, they can put that vehicle out of service for longer. DOT violations can also lead to fines and hurt your CSA scores . A decrease in your CSA scores can lose your fleet business and cause your insurance premiums to go up too.
How to perform a CDL pre-trip inspection
Although there is no specific time limit, a thorough CDL pre-trip inspection usually takes 15 to 30 minutes. This pre-trip starts at the front of the truck, but you can take the steps in this CDL pre-trip checklist and make them your own.
Front of the truck
Verify lights are clean, securely mounted, the right color, and working. Make sure the truck isn’t leaning. Confirm there are no leaks under the engine compartment.
Engine compartment
Check critical fluid levels. This includes power steering, coolant, windshield washer fluid, and engine oil. Inspect reservoirs, tanks, and hoses for any leaks, splits, or cuts. Ensure the hoses for the water pump, coolant, oil, and power steering are all properly connected and securely mounted. Check the air compressor is well secured. Inspect to make sure the belts on the alternator, pumps, and compressor are secure as well. They should have no more than 1/2″ to 3/4″ of play with no cuts or splits.
Front of the truck/tractor
Inspect the steering shaft and gear box to see they’re properly mounted to the frame and that there are no cracks or breaks. Check gear box hoses for leaks. Look for excessive play in the steering belt, secure connections. Check connections and look for leaks on pitman arm, drag link, and upper/lower control arms and tie rod. Move on to the spring mounts, leaf springs, and U-bolts to confirm they are not cracked or broken and are securely mounted. Do the same with shock absorber but also look for visible leaks and ensure the rubber bushings don’t have dry rot. Check the rubber of the airbag.
Check the hose, chamber, drum, pads and slack adjuster to confirm secure mountings and no leaks. Look out also for any breaks, splits, or cuts. Verify slack adjuster push rod has no more than 1″ of play and is at a 90° angle to the brake chamber. Check the brake drum has no bluing from excessive heat. Ensure brake pads have a minimum thickness of 1/4”.
Wheels/tires
Check tires for cuts, bulges, and abrasions on your tires. Confirm tire tread depth and inflation levels. Check All lug nuts are accounted for and in good condition. Ensure valve stem is properly secured and capped. Look out for unauthorized or illegal welds on wheel rims. Check tires are properly spaced if your tractor/trailer has duals. Confirm the hub seal/axle seal is not loose and has no visible leaks.
Rear of truck
Look at the frame to ensure nothing is broken. Check for unauthorized welds. Confirm the catwalk and steps are properly mounted and kept clear. Ensure the drive shaft is free of debris with unbroken and untwisted U-joints. Verify the exhaust system is secure and look for exterior soot, which could indicate a leak. Make sure mudflaps are also secured at the right height.
Coupling area
Check that the fifth wheel platform, apron, and kingpin are secure, not cracked, bent, or broken. Look for any unauthorized or illegal welds. Confirm skid plate is properly greased. Verify release arm, locking jaw, and slide locking pin are fully locked. See that mounting bolts are tight and none are missing. Ensure glad hands have seals in good condition with no signs of rot or leaks. Secure electric lines with safety latches in place. Check air connector is secure on both ends without cuts or abrasions.
Verify that there are no holes in the trailer’s front, sides, or floor and that all rivets are present. See that DOT tape is properly secured and not dirty. Check that all hardware is present on an untwisted, unbroken frame and that cross members are securely mounted with none missing. Ensure lights are clean, working, and not loose. Confirm landing gear is raised, securely mounted, with an operational handle. Check air lines are securely mounted, above ground, with no audible leaks. Verify tandem slide and release arm are properly mounted and locked.
Truck exterior
Make sure that the truck steps are mounted and secure. Ensure the fuel cap is tight and the tank is not leaking. Demonstrate that the doors latch properly with hinges intact. Ensure mirrors are unbroken and securely attached. Check all the lights and reflectors are working too. This means inspecting the running lights, high beams/low beams, turn signals, hazards, brake lights, license plate lights, and reflector tapes. If driving a hazardous load , ensure you have the proper hazmat placards securely affixed.
Check to ensure your seat belt adjusts and latches properly and that there are no rips or frays. Confirm the shifting distance, room for the clutch, and that parking brake is on. Verify the steering wheel is secure and that the foot pedals are clear of obstruction. When the vehicle is on, look for the ABS light to come on and off. Make sure the windshield wipers, heat and defrost, gauges, and horns are working. Pump the brake pedal several times then apply pressure to the pedal and hold for five seconds to ensure the pedal does not move. For air brakes, confirm applied pressure, warning lights and buzzers, and valve pop-out are all working. Look for three reflective triangles , spare fuses or circuit breakers, and a properly charged and rated fire extinguisher with its pin in place.
Common issues found during pre-trip inspections
While completing a CDL pre-trip list, drivers may encounter any of these common problems. This section identifies common issues, how to address them, and how to prevent future problems too.
Truck is leaning
Using the 3L’s you might see the truck leaning to one side. This could be a suspension problem or indicate low tire pressure.
Fix it by first checking the tire pressure and inflating tires. If that doesn’t address the problem, check the suspension. Driving a vehicle when there is a problem with the suspension, springs, shocks, or struts can cause severe damage to the vehicle.
Broken lights/warning lights
If you detect an exterior light is cracked or broken, fix it before going out on the road. If a light from the on-board diagnostic system comes on during inspection, e.g., “check engine” or “service engine soon,” address that warning as you’ll fail a roadside inspection if that light comes on.
Gas cap missing
Damaged or missing gas caps are a common reason for failed inspections on the road. Don’t set out on your route without replacing the gas cap.
Worn tire tread
Unacceptable or worn tire treads or knots or bulges in tires can also lead to failed roadside inspections. Don’t risk going on your route with substandard tires.
How to prevent future CDL pre-trip list problems
An eDVIR or electronic driver vehicle inspection report allows you to record, compile, and store pre-trip and post-trip information on electronic devices such as computers, smartphones, and tablets. This helps motor carriers and fleets to have a centralized record of inspection history, allowing authorized users to monitor progress, pull reports quickly, and promptly address driver, vehicle, or equipment issues.
Using an eDVIR , you can get out on the road faster with the convenience and accuracy of using a smartphone or tablet to record your data while ensuring your vehicle is safe for operations. Drivers can even take and upload photos to record details and communicate with fleet supervisors for quick troubleshooting.
Making pre-trip inspection checklists easier
CDL pre-trip inspection checklists help systemize the driver’s check of their vehicle before going out on the road. This enhances driver safety and can help reduce accidents. Consistently inspecting fleet vehicles also helps simplify fleet maintenance and avoids failed DOT inspections and reduced CSA scores.
Pre-trip checks are part of the day to day for drivers. Motive’s customizable eDVIR technology simplifies the reporting. Drivers can assess vehicle parts against a built-in checklist in the Motive Driver app, indicate the severity of the issue, and upload photos. Fleet managers get pre-trip inspection reports in real time. Plus, the technology provides advanced reports to help managers analyze health and maintenance trends for all fleet vehicles.
Ensure smooth fleet operations with Motive’s fleet safety software. Learn more today. Contact us to request a free demo.
Want to know more about commercial vehicle driving safety? Check out these tips .

What is paid CDL training? What truckers need to know.

How to save gas while driving commercial vehicles.

How to get your commercial driver’s license in California.
How to spec your fleet vehicles to maximize fuel mileage., fitness tips for truck drivers: how to stay in shape., stay updated.
Subscribe to get the latest news, industry trends, blog posts, and updates.
Please enter a valid email address
Thank you for subscribing!
You will be the first one to receive the latest updates and announcements..
Pre-Trip Inspection Checklist for Truckers
July 28, 2023.

Table of Contents
The most important element of a truck driver’s daily routine is the pre-trip inspection. Pairing a comprehensive pre-trip inspection with a regular preventative truck maintenance schedule is key to ensuring your safety and the safety of others on the road . To give you an idea of how essential the pre-trip inspection is, consider that drivers are required by law to record at least one inspection per day.
Finding and fixing mechanical defects early is essential to functioning as a safe operator.
What is a Pre-trip Inspection?
The pre-trip inspection is the process of thoroughly examining the truck before starting a new journey. It ensures the safety of the driver and the others sharing the road with them by identifying and addressing mechanical issues early on, so truckers can prevent unexpected breakdowns, delays, and potential accidents.
Drivers must record at least one pre-trip inspection per day. Learning the process is crucial for obtaining a commercial driver's license (CDL) and continuing a successful career in the industry.
Benefits of a Truck Pre-Trip Inspection
Aside from being a requirement, here are some benefits of conducting a thorough pre-trip inspection:
- Safety is prioritized by the early identification of potential mechanical issues, ensuring a secure journey for truck drivers and others on the road.
- Early detection and resolution of mechanical problems during this essential routine lead to reduced delays and costly repairs.
- Regulatory compliance is showcased as pre-trip inspections are a legal requirement, reflecting professionalism and commitment to safety.
- Smooth schedules are maintained as pre-trip inspections help prevent unexpected breakdowns and disruptions.
- Early issue identification and timely repairs achieve cost savings and prolonged vehicle lifespan.
- Improved fuel efficiency results from ensuring components like tires and engines are in top condition.
- Trust and professionalism are earned by conducting regular inspections, leaving a positive impression on clients, employers, and regulators.
- Reduced on-road accidents are promoted by verifying lights and brakes are in optimal condition.
- Boosted driver confidence is achieved by confirming the truck's peak condition, enabling worry-free journeys.
This powerful routine keeps us safe, compliant, and efficient on our trucking journey.
15-minute Pre-trip Inspection Checklist

A properly conducted pre-trip inspection is a core proficiency evaluated during the CDL exam. The most efficient way to prepare for the pre-trip inspection exam is to use a checklist. Practice using the checklist several times a day until you have the process memorized and have mastered this important truck driver skill . It will serve you well in helping you obtain your CDL and will continue to benefit you throughout your career.
It may seem overwhelming and difficult at first , but with practice, the pre-trip inspection will become a habit. To help you, we’ve prepared this pre-trip inspection guide.
A good starting point is the FMCSA and its regulations concerning the pre-trip inspection. Different companies have produced their pre-trip inspection checklists, so it’s a good idea to consult your company’s guidance and compare it with the FMCSA regulations to ensure you are conducting a compliant inspection.
Some common elements you will encounter on most checklists include:
1. Tire Inspection
Every 10 ° F change in air temperature can make vehicle, truck, and light truck tires lose one psi pressure. A tire with low pressure has a negative effect on the distance needed to stop and miles per gallon of gas.
Ensure no foreign objects are between the wheels and no space between tires and rims. Evaluate the tires for sufficient tread depth and look for cuts, bubbles, or gouges.
Insufficient treads increase the likelihood of losing control from hydroplaning or sliding on standing water, snow, or ice. This is an especially important detail when preparing to drive your truck in winter weather conditions.
2. Lights and Reflectors Check
Verify the proper functioning of exterior lights, turn signals, warning lights, and clean lenses for maximum visibility. Ensure reflectors are free of dirt or debris and intact without cracks or missing pieces.
3. Brake Examination
Assess the brake system both inside the cab and externally. Verify proper brake adjustment with the slack adjuster, inspect brake linings for the appropriate thickness, and ensure air lines are free from damage, leaks, and properly sealed. This includes checking air brakes, parking brakes, and hydraulic braking systems.
4. Engine Inspection
Check the engine compartment for various components, such as the radiator, air compressor, steering gearbox, water pump, belts, hoses, and wiring.
5. Fuel Tank and Battery Check
Visually examine the fuel tank and battery area to ensure no cracks or leaks. Verify the battery levels for sufficient power and proper charging.
6. Fluid Inspection
Inspect fluids under the truck for signs of leaks, including fuel, oil, coolant, power steering fluid, brake fluid, and windshield washer fluid. Check fluid levels and assess the condition of hoses, belts, and wires for safe operation. Pay special attention to the oil pressure gauge for proper functionality.

7. Windshield
Chipped, cracked, or deteriorated glass weakens the final barrier that prevents the driver from being thrown during an accident and can inhibit clear road visibility. Also worn-out wipers will reduce visibility when driving in the rain or snow.
8. Emergency Kit
Road flares, triangles, and a fire extinguisher are the emergency equipment necessary to safeguard the vehicle and the driver should an accident or breakdown occur and must not be missing or broken. The fire extinguisher must be easily accessible, with a current inspection, and maintain the appropriate PSI.
9. Mirrors with Swivel Mounts
Frozen or loose mirrors prevent the driver from properly adjusting them to cover blind spots. It can create a greater risk of hitting the side or colliding when turning.
10. Coupling System Assessment
Examine the coupling system, paying close attention to the kingpin and sliding fifth wheel locking pin. Check the condition of air lines, apron, electrical connections, gap, glad hands, locking jaws, mounting bolt, platform, release arm, and a skid plate that connects the trailer to the cab.
11. Cabin InspectionTemperature
Inside the cabin, check the seat belts for wear or fray and ensure a snug fit. Assess the operation and functionality of inside and outside mirrors, seat position, steering wheel, pedals, windshield, wipers, horns, lights, and gauges. Make sure all alerting systems, including ABS lights, are working correctly.
Verify the temperature, controls that are not working properly can produce physical stress, fatigue, and distraction while driving.
12. Trailer Examination
Conduct a thorough inspection of the trailer for mechanical defects that might hinder secure mounting to the tractor. Look for holes, cracks, breaks, bends, or missing rivets in the headboard, frame, release pins, cross members, release handles, locking pins, doors, and hinges.
13. Back of the Truck Inspection
Before hooking up to a trailer, check the back of the truck for properly inflated tires with decent tread, undamaged brake chambers, intact shocks and airbags, a clean driveshaft without debris in the u-joints, a sturdy and unbroken frame, well-greased fifth wheel, and leak-free fuel tanks. Also, inspect stairs and catwalks for cleanliness and integrity.
A thorough pre-trip inspection should take approximately 15 to 30 minutes to complete.
How to Properly Report a Pre-trip Inspection?

According to current guidelines by the FMCSA , at least one inspection must be logged in your hours of service each day. Previously, drivers were also required to fill out a pre-trip inspection report each day. However, recent changes in the guidelines now only require you to fill out an inspection report for the purpose of recording a defect found during your inspection. If you have uncovered no defects, you are no longer required to fill out the inspection report.
Companies such as JJ Keller produce market inspection reports that you can keep on board your truck in the event you need to fill one out. Additionally, you can, in a pinch, use these reports as a checklist if you are still unfamiliar with the pre-trip inspection process.
Regardless of how long you’ve been working as a truck driver or how many other trucker safety tips you follow, the pre-trip inspection will serve you well to keep you safe as you go about your day. Discovering critical defects early can be the difference between making it to your next stop and ending up broken down on the side of the road , or even worse, involved in a preventable accident.
Download Your Free Pre-Trip Inspection Checklist for Trucks

Frequently Asked Questions
How often should i perform a pre-trip inspection.
It should be conducted before every journey, ensuring the vehicle's safety and readiness for the road.
How long does a pre-trip inspection typically take to complete?
It usually takes 15 to 30 minutes to complete, depending on the complexity of the vehicle and the driver's familiarity with the checklist.
Can I skip a pre-trip inspection if I'm in a rush?
Never skip a pre-trip inspection. Not only is the inspection a legal requirement, but also it is essential for your safety and the safety of others on the road.
Can I keep a pre-filled inspection report for daily use?
While it might seem convenient, it is not recommended. The pre-trip inspection report is meant to reflect the vehicle's actual condition. Using a pre-filled report without physical inspection may lead to inaccuracies and compromise safety.
Can I delegate the pre-trip inspection?
The pre-trip inspection is the driver's responsibility to operate the vehicle. While others can assist, the driver remains accountable for ensuring it is conducted correctly.

Preparing and Planning Loads Has Never Been Easier
Better Paying Loads Without Calling a Broker. Instant Payments After Delivery. Competitive Rates so you keep 82% of your load.
Related Articles

13 Safety Tips for Truck Drivers

12 Essential Tips for Truck Driving in Winter Weather

Essential Truck Driver Skills to Master
Start driving with cloudtrucks.
Have questions? Give us a call at (469) 250-1214
Prime’s Guide to Pre-Trip Inspections
Tractor-trailers can weigh up to 80,000 lb . if you count the semi, trailer and cargo. Operating a heavy tractor-trailer can be dangerous, so drivers undergo extensive training to earn their CDLs and start their careers.
Whether studying for your CDL test or heading to your next customer, pre-trip inspections help you catch problems with your vehicle or trailer. Unchecked issues can lead to accidents or extensive repairs.
Do you know how to perform a pre-trip inspection? Need a quick refresher? Follow our guide to pre-trip inspections to learn the basics. Reach out to our Safety Department for more in-depth information.
Use these quick links to jump to sections of the article:
- The Engine Inspection
- Driver Door Area & Tires
- Trailer Pre-Trip Inspection
Lights & Reflectors
In-cab pre-trip inspection , large truck crash statistics .
Knowing how to operate a semi-truck safely in various conditions is imperative for drivers. In 2019, there were 510,000 large truck crashes, according to FMCSA’s 2021 Pocket Guide to Large Truck and Bus Statistics .
Of these crashes, 4,479 were fatal, and 114,000 were injury crashes involving large trucks. Most fatal large truck crashes involved those weighing more than 33,000 lb.
Accidents happen. Drivers can mitigate their risk of an accident by being responsible behind the wheel , following federal regulations and performing pre- and post-trip inspections.
Your Pre-Trip Inspection Checklist
Drivers must provide a vehicle inspection report at the end of each day. Vehicle inspection reports list any issues that could affect the vehicle’s operation and safety. Inspecting vehicles before and after each trip helps catch problems and keep drivers safe.
At a minimum, each report covers the following parts of a vehicle :
- Coupling devices
- Emergency equipment
- Lights and reflectors
- Parking brakes
- Service brakes
- Steering mechanism
- Tires and rims
- Windshield wipers
Pre-trip inspections take around 15 to 20 minutes. You’ll examine your truck and trailer to ensure it’s ready for the trip.
Before every haul, you should check that you have your license, registration, medical card, updated inspection sticker and FMCSA Safety Regulation manual. If you’re picking up a trailer, always make sure the trailer number matches the number listed on your assignment.
Follow these steps to inspect your tractor-trailer, and watch our video on Prime’s pre-trip inspections . Chock your tires before you begin, so the vehicle doesn’t roll or slip.
Under the Hood: Examining the Engine
Start your pre-trip inspection by looking at the engine. Lower the gear guard so you can open the hood. Remove pins and unlatch the hood to do so. Once the hood is open, step back and look underneath the truck to see if there are any leaks.
Passenger Side
On the passenger side, make sure that your general hoses and alternator are free of cuts, abrasions or cracks. Hoses should be sufficiently secured, exhibiting no signs of leaks.
Driver’s Side
Walk around to the driver’s side and conduct a similar examination. Look at the parts listed below for signs of wear, abrasions and leaks. Your coolant and oil levels should be filled to the manufacturer’s specifications. Keep an eye out for fraying belts, improperly secured parts, and missing castle nuts and bolts.
- Air compressor
- Belt-driven water pump
- Coolant reservoir
- Gearbox and hoses
- General hoses
- Power steering fluid
- Power steering pump
- Shock absorber
- Spring hangers and arm
- Steering linkage
Check Your Brake System
Drivers must check the brake hose, brake chamber and slack adjuster. When pulled by hand, the push rod should not move more than 1” with the brakes released.
Your brake line should be free of debris and oil, and the hose material shouldn’t be worn too thin.
Outside Driver Door Area & Tires
If the engine looks good, inspect the outside of the truck.
- Check your mirror on the driver’s side to ensure it is clean and firmly mounted to the vehicle.
- Open the driver’s door, and examine the door’s seals and hinges for cracks or dry rot.
- The fuel cap should be on tight, and the fuel seal should not leak.
- Ensure that the catwalk and steps at the back are clear of any objects or debris.
In addition to the steps above, drivers should look at the following parts for damage, wear or debris buildup:
- Brake hose, chamber, lining and drum
- Drive shaft
- Frame and cross members
- U-joints and bolts
Check Your Tires (All of Them!)
The tires on your tractor-trailer should have a tread depth of no less than 0.125” and be aired according to the manufacturer’s standards. You can check the air pressure with a gauge and adjust it based on your load and the temperature .
The rims shouldn’t be bent or broken, and there shouldn’t be cracks around the bolt holes. Behind the tire, the mud flap should not be tattered or loosely attached to the vehicle. There should be space between the mud flap and the tire.
Trailer Pre-Trip Inspection
Is the truck good to go? Check! Now it’s time to inspect the trailer. Walk around the trailer and examine it for cracks, abrasions or broken parts.
- Brake hose, lining and chamber
- Frame and cross members
- Shock absorbers
You’ll also want to check that:
- The landing gear is fully-raised with the crank handle secure in its cradle. The landing gear and mud flap should be a proper distance apart.
- The tandem relief’s handle and locking pins are in the fully-locked position.
- The slack adjuster and push rod don’t move more than 1” when pulled by hand.
The back doors of the trailer should latch properly. The trailer’s lock rods and hinges must be intact and not bent. Your trailer should also have door chains for safety when loading and unloading.
Coupling: Back of Tractor, Front of Trailer
A driver’s next step is to examine where the tractor and trailer connect.
- Electric line — Ensure there are no exposed wires. The line should be secure.
- Air line — Your air line should be secured at both ends and not leaking.
- Gladhands — Check for worn or rotted seals on gladhand couplings. Make sure there are no leaks in the gladhands connected to the trailer’s air brakes.
- Trailer apron — No gap should exist between the apron and the skid plate. The skid plate should be lubed.
You should also check the kingpins, mounting bolts, and the sliding fifth wheel and locking pin.
Refrigerated Trailer Inspections
When you inspect one of Prime’s refrigerated trailers , you start by selecting the “pre-trip” option on the trailer’s display. It will take the reefer 10 to 15 minutes to complete a self-inspection and notify you of anything in need of adjustment or repair.
While the reefer’s self-test runs, you should look for any signs of damage on the bottom rail, top rail and sides of the trailer. Reefers are insulated. Drivers need to examine the trailer for cracks and exposed insulation.
You don’t want to drive off without working lights. The lights on your truck and trailer should be securely in place, not cracked and amber in color.
- Clearance lights
- Marker lights
- Headlights
- Tail lights
- Reflective tape on trailer and mud flaps
Once you’ve checked that the lights and reflectors are intact, you should test your lights and turn signals. Climb into your cab and turn the following lights and signals on:
- Left turn signal
- Right turn signal
- Four-way flashers
- Brake lights
Inside your cab, you’ll check that your seat belt latches and is not too worn. Next, check that you have a fire extinguisher that’s charged. Ensure your cab has three reflective triangles under the bunk area and electrical fuses in the glove box.
Once you’ve reviewed your safety gear, adjust your mirrors, start the engine and check the dashboard’s instrument panel:
- Oil pressure — It should be rising as the engine runs.
- Voltmeter — It should show the alternator charging between 13 and 14 volts.
- Air pressure — It should be around 120 to 125 psi.
While you’re here, test the heat and air conditioning, city horn and air horn.
Air Brake Test
With your tires chocked, you can perform an air brakes test. To do so, release both brakes and turn the truck off. When you turn the truck back on, you will apply pressure.
- Apply hard pressure to the brake.
- Watch for the gauges to stabilize.
- Hold a hard brake for one minute. You don’t want to lose more than four psi during this minute.
- Pump down on the brakes until the gauges read at or before 60 psi. Your warning light and buzzer should come on.
- Pump down on the brakes until the tractor and trailer valves pop up between 40 to 20 psi.
Parking Brake Test
After testing your air brakes, you can test your parking brake. Allow the truck to rebuild its air pressure before testing the parking brakes.
- Remove wheel chock.
- Release the tractor brakes and apply the trailer brakes.
- Put the truck in “drive.”
- Give your trailer brakes a light tug, ensuring they hold.
- Switch. Release the trailer brakes and apply the tractor brakes.
- Give your tractor brakes a light tug, ensuring they hold.
- Release both brakes.
- Pull forward to 5 mph, then use the brake pedal. The truck shouldn’t pull left or right. It should come to a smooth stop.
What to Do if There’s an Issue During Pre-Trip Inspection
Contact your fleet manager or road assistance immediately if you find an issue with your tractor or trailer. Prime will take corrective action and advise you on what to do next. Repairs must be made before the tractor-trailer can be dispatched again.
Inspection violations affect both the driver’s and carrier’s records. Violations can decrease a carrier’s CSA score . FMCSA keeps records of driver and vehicle violations. These records are updated monthly.
CDL Pre-Trip Inspection Test
Truck drivers must begin each work day with a pre-trip inspection. The Class A CDL test requires new drivers to know how to do a pre-trip inspection. Student drivers must be able to identify truck and trailer parts and understand how they operate.
You’ll walk an examiner through a pre-trip inspection for that portion of the CDL test. The best way to remember what’s on a pre-trip inspection checklist is to perform inspections the same way each time. The more you practice, the more it will become second nature.
Are you ready to become a driver?
Do you need CDL training? Our Driver Training Program prepares you for your CDL exam and offers experience hauling real loads.
Apply online to start our CDL training program, or contact our Recruiting Department at 866-290-1568 for details.
Recent Posts

7 Easy Stretches for Lower Back Pain Relief

10 Semi-truck Organization Ideas: Easy Cab Storage

10 Construction Zone Safety Tips for Truck Drivers
Transportation solutions, carrier solutions, drive for prime, work in house, success leasing.
Created by: Campaignium
Privacy Overview
- Company Culture
- Company Programs
- Leadership Team
- Fleet Maintenance
- Refrigerated Division
- Flatbed Division
- Tanker Division
- Intermodal Division
- Load Tracing
- Documentation
- Qualifications & Expectations
- Pay & Benefits
- Driver Training Program
- CDL Holders
- Driver Awards
- Salt Lake City
- Pittston, PA
- Springfield, MO
- Jobs At Prime
- View Available Loads
- Prime Power Fleet
- Lease & Lease Purchase
- Benefits of Leasing
- How to Get Started
- Pedigree Benefits
- Financing Information
- Equipment Inventory
- Omnitracs Logs
- Company Store
- Submit Pics from the Road
- Driver Verification
What is a Pre-Trip Inspection Checklist for Class A CDL
October 22, 2021
Get Started With Samsara
Key Takeaways
Drivers who have a class A commercial driver’s license (CDL) usually have to complete a pre-trip inspection on their non-passenger commercial vehicles. Having a pre-trip inspection checklist handy helps driver’s know what to expect when they pass their CDL examination and what parts of their vehicle the will need to inspect before heading out on the road.
What is a CDL pre-trip inspection checklist?
A pre-trip inspection checklist helps truck drivers remember all the major systems and parts to inspect before heading out on a route. Knowing how to complete a pre-trip vehicle inspection is an important part of trucking.
Pre-trip inspections for class A licensees
The class A commercial driver’s license (CDL) typically covers non-passenger commercial vehicles . These might include tractor-trailers, tankers, livestock carriers, flatbeds, and more.
The Department of Transportation (DOT) requires drivers to perform a pre-trip inspection before driving a commercial vehicle. Similar to Class B CDL holders, the actual daily pre-trip inspection takes about 15 minutes or less. Typically, the inspection includes the following, with some employers making their own variations.
Brakes and air system
Steering mechanism
Lights and reflectors
Tires, wheels, and rims
Windshield wipers
Rearview mirrors
Emergency equipment
Drivers complete a driver vehicle inspection report (DVIR) recording the completed inspection.
Class A CDL pre-trip inspection checklist
When getting a CDL, drivers need to pass a pre-trip inspection test. It’s more intensive than the inspection drivers perform daily. This pre-trip inspection checklist for a Class A CDL gives drivers an overview of performing an inspection. Check your state’s CDL manual for a complete list of inspection requirements.
Click here for a Class B pre-trip inspection list.
Engine compartment
Fluids - coolant, oil, and power steering : Reservoirs and tanks should not leak. Check hoses for splits or cuts and that they are securely mounted on both ends. Verify proper fluid levels with a dipstick.
Belts - alternator, pumps, compressor : All belts should be securely mounted without cracks or frays. Belt should have no more than 1/2" to 3/4" of play.
Hoses (passenger and driver’s sides) : All hoses, including power steering and coolant hose, should be secured on both ends. They should not have splits, cuts, or leaks.
Air compressor: May be difficult to see. Ensure it’s securely mounted, not broken, cracked or leaking.
Alternator : All wires are properly connected.
Water pump : All hoses are properly connected and not leaking.
Front of tractor/truck
Steering gearbox and hoses : No damage or leaks. Hose should be secured on both ends. They should not have splits, cuts, or leaks.
Steering shaft/steering column : Not bent or broken.
Pitman arm : All caste nuts and cotter pins are present and tight.
Drag link : Rubber is not split and properly greased.
Upper and lower control arms and tie rod : Tie rod should be secure, not cracked or bent.
Front suspension
Spring mounts/spring hanger : Not cracked or broken.
Leaf springs : None are cracked, broken, or shifted.
U-bolts : All accounted for.
Shock absorber : No visible leaks. Leaks will show at the point where the top and bottom of the shock meet. Rubber is not split or shows signs of dry rot.
Airbag : Check rubber for abrasions, cuts or audible leaks plus any missing mounting bolts.
Driver door and fuel area
Mirrors and bracket: Hardware attached properly. Mirror should be clean and not broken.
Door and hinges : Demonstrate door operations, latching properly, hinges intact. Door seals should not be torn or rotten.
Steps : Mounted properly and can hold weight.
Fuel tank: Not leaking; cap is tight with seal intact.
Rear of tractor/truck
Drive shaft : Not twisted, U-joints not broken and free of debris.
Exhaust system: Not loose, no sign of leaks (exterior soot).
Frame : Nothing broken or unauthorized welds.
Catwalk and steps : Properly mounted and clear of loose objects.
Mudflap : Secured, not missing or broken. At the right height.
Coupling area
Air connector: Secure on both ends, no abrasions, cuts, or audible leaks. Connectors should not drag or tangle.
Electric lines : Secure on both ends, no abrasions or cuts. Safety latches in place. Lines should not drag on the catwalk or tangle.
Glad hands : Seals should be in good condition with no cracks, signs of rotting, or leaking air.
Fifth wheel platform : Secure to frame, not cracked, bent or broken. No unauthorized or illegal welds.
Mounting bolts : No missing bolts and mounted tight.
Skid plate: Properly greased.
Release arm : Secure in fully locked position.
King pin : Mounted and secure. No cracks, bends, and breaks.
Locking jaw : Fully locked around the king pin.
Apron : Mounted and secure. No cracks, bends, and breaks.
Sliding 5th wheel locking pins : Pin must be in the fully locked position.
Brake system (both tractor and trailer)
Brake hose : Securely mounted on both ends. No splits, cuts, and not audibly leaking air.
Brake chamber : Not audibly leaking air.
Slack adjuster and push rod : When brakes are released and pulled by hand, the push rod should have no more than 1” of play. It should stay at a 90° angle to the brake chamber.
Brake drum : No bluing from excessive heat.
Brake pads/brake lining : Check for oil and debris on the lining. Minimum brake pad thickness is ¼.”
Wheel system (both tractor and trailer)
Wheel rims : No unauthorized or illegal welds.
Steer tires : Look for cuts, bulges, and abrasions on the tread and sidewalls. Tread depth should be a minimum of 4/32”. Tread should be evenly worn. Check inflation levels on tires with an air gauge, filled to manufacturer’s specifications.
Drive tires : Look for cuts, bulges, and abrasions on the tread and sidewalls. Tread depth should be a minimum of 2/32”. Tread should be evenly worn. Check inflation levels on tires with an air gauge, filled to manufacturer’s specifications.
Valve stem . Properly secured, metal cap in place. Not audibly leaking air.
Lug nuts : All accounted for. Check for rust or cracks.
Hub seal/axle seal : Should not be loose. No visible leaks.
Spacing : If equipped with duals, there must be proper spacing between the tires.
Frame and cross members : Secure, not cracked, bent or broken and none missing.
Header board : Secure and not excessively damaged. No holes or missing rivets.
Landing gear : Must be fully raised and the cradle handle secured. Not cracked, bent or broken.
Doors and hinges: Secured and should open, close and latch properly. Door seals have no separation, no rubber tubing sticking out.
Tandem release : Release handle and locking pins should be fully locked.
Trailers airbag : Check rubber for abrasions, cuts or audible leaks, plus any missing mounting bolts.
Trailer spring mounts/spring hanger : Not cracked or broken
Trailer leaf springs : None are cracked, broken, or shifted.
Trailer u-bolts : All accounted for.
Trailer shock absorber : No visible leaks. Leaks will show at the point where the top and bottom of the shock meet. Rubber is not split or shows signs of dry rot.
Torque arm/radius rod : Secure mounting, bushings intact.
Check all lights on the front, both sides of tractor, truck rear, both sides of trailer, and trailer rear. Turn on to ensure lights and reflectors are working.
Running lights : Walk around the truck and trailer to examine all.
High beams/low beams: Walk around the truck and trailer to examine all.
Turn signals : Signal both right turn and left turn. Walk around the truck and trailer to examine all.
Hazards/4-way flashers : Walk around the truck and trailer to examine all.
Brake lights : Ask the examiner to watch brake lights. Confirm they worked using the side mirror.
License plate lights : Walk around the truck and trailer to examine all.
Reflector tapes : Clean and not worn. Walk around the truck and trailer to examine all.
In-cab inspection and air brake test
Seat belt: No rips or frays and should adjust and latch properly.
Lighting indicators : See lights and reflectors section
Oil pressure indicator : Demonstrate normal operating range.
Water temperature gauge : Demonstrate normal operating range.
Air pressure gauges : Build to governor cut out.
Ammeter/voltmeter : Charging between 13 and 14 volts.
Mirrors : Secure, not cracked or broken. No obstructions and properly adjusted.
Windshield : No more than a 1” crack is permitted. Clean and free of debris.
Windshield wipers and washers: Turn on to show they are working properly.
Horns (city and air) : Show they are working properly.
Heater/defroster : Turn on to show they are working properly.
Safety/emergency equipment : Must have a fire extinguisher, three red reflective triangles and spare electrical fuses. Extinguisher must be fully charged and secured.
Steering wheel : Secured to steering column.
Foot pedals : Free of grease and debris. No obstructions.
Hydraulic brake check : Pump the brake pedal several times. Apply pressure to the pedal and hold for five seconds. The pedal should not move.
Air brake check : Air brake devices vary. Drivers must test three components of the air brake check correctly: applied pressure, warning lights and buzzers, and valve pop-outs.
Parking brake:
Trailer parking brake : Set the trailer brake, release the tractor brake. Put truck in low gear and tug.
Tractor parking brake : Set the tractor brake, release the trailer brake. Put truck in low gear and tug.
Service brake : Release both the tractor and trailer brakes. Drive 3 – 5 mph. Apply the service brake and come to a complete stop. Ensure steering does not pull to the left or right when applying the brakes.
Watch the video below to see how All Aboard America uses the Samsara Driver App to become nearly 100% paperless and save 30 minutes per trip, totaling 500 hours saved weekly.

Watch Video
Pre Trip Inspection Checklist
A Pre-Trip Inspection Checklist is a comprehensive tool used by drivers, especially those operating commercial vehicles, to perform a detailed safety check of their vehicles . This checklist includes various items to inspect, such as brakes, tires, lights, mirrors, and emergency equipment, to ensure everything is in good working order. Additionally, it covers the inspection of fluid levels, horns, wipers, and cargo securement. This systematic approach helps identify mechanical issues or safety concerns that could pose a risk during the trip.
A Pre-Trip Inspection Checklist is particularly important in the logistics and transportation industry, where the condition of the vehicle directly impacts operational safety and efficiency. The checklist helps maintain safety standards required by regulatory bodies and extends the vehicle’s life by ensuring regular inspections and maintenance.
Other PDF Forms
You will discover more editable PDF forms accessible here. Below, we selected some of the more popular PDFs available in this category. Moreover, do not forget that you may upload, fill out, and edit any PDF document at FormsPal.
- Online Graph Paper
- Prescription Label Template
- Form 3575 USPS
- Temporary Guardianship Agreement Form
How to Fill Out the Checklist Template
Actually, as with any checklist, you do not have to write anything: you have to just mark the boxes that explain the state of your vehicle’s various parts. You must check everything attentively because it is your responsibility to drive safely and not to get stuck in the middle of nowhere, discovering that your vehicle cannot move anymore.
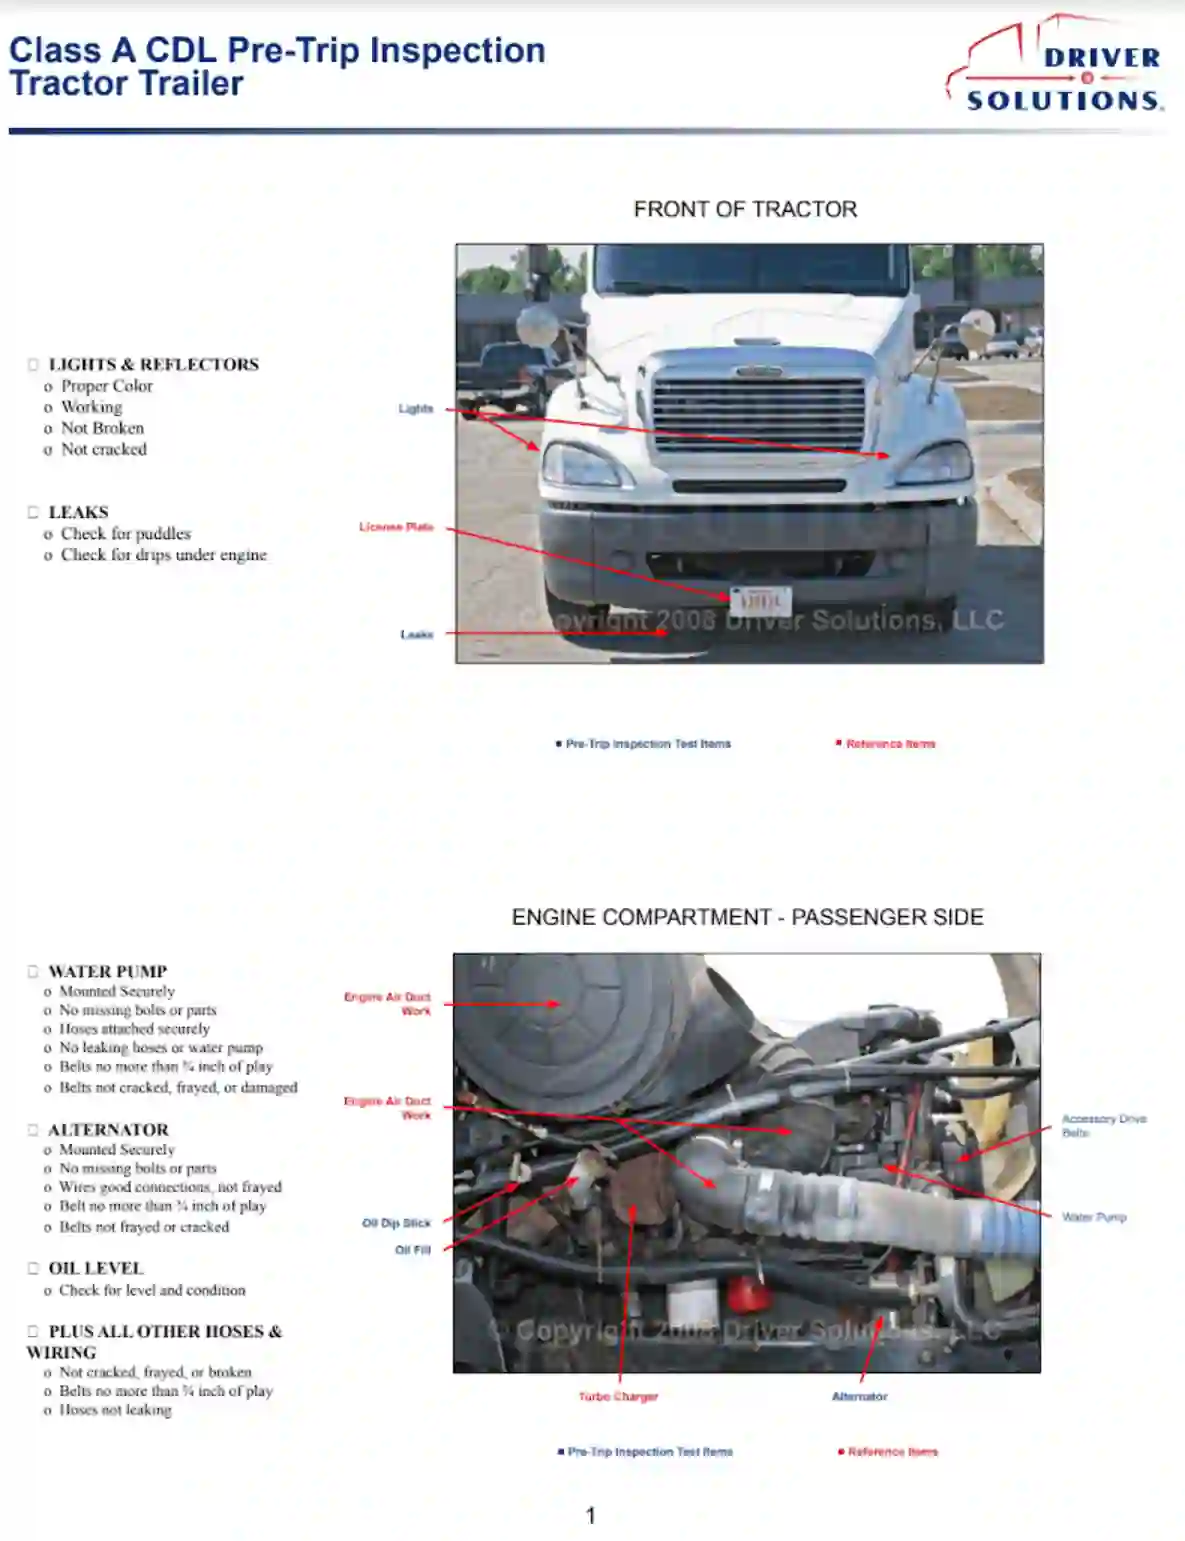
We offer to download a convenient pre-trip inspection checklist template using our form-building software. It is pretty straightforward because you have not only names of different vehicle parts but also pictures that will help you orientate if you have doubts. After you have gotten the template, proceed to our instructions below.
- Start with the Front of Your Vehicle
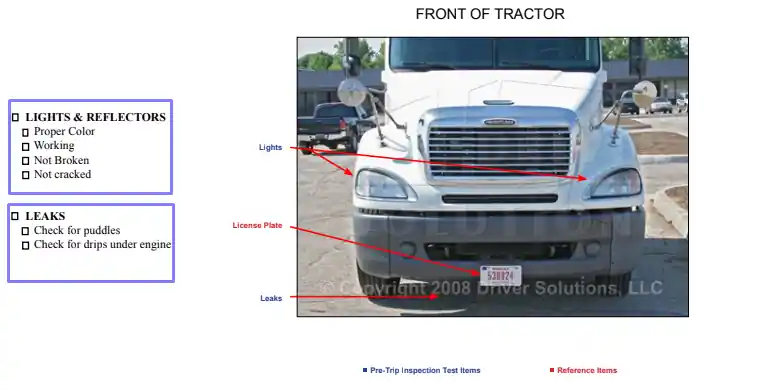
The inspection starts with observing your vehicle’s front: this is how you make your vehicle visible on the road for other drivers and police. Additionally, you can check if there are any leaks coming from the engine: for that, you have to look under the front.
Check if your license plate is readable, lights are working properly, and there are no leaks—Mark all the points in the checklist.
- Open the Hood
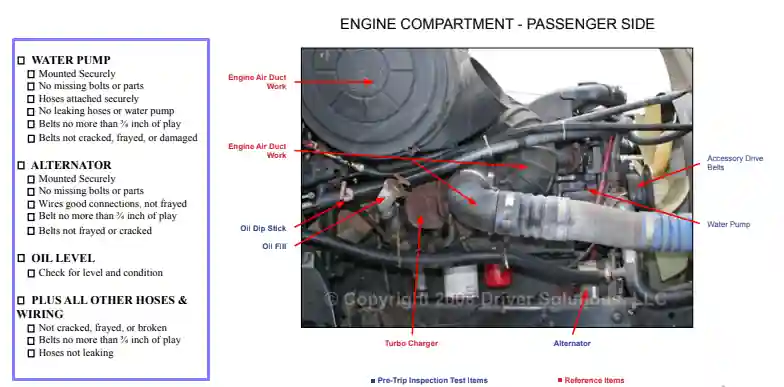
Then, the engine check must begin. Open the vehicle’s hood and start with the passenger’s side. Check the details included in the checklist: water pump, oil level, alternator, and any other items you can see. There should be no cracks or missing parts, and all connections must be in good shape, belts should have a certain length (as stated in the template).
- Move to the Driver’s Side
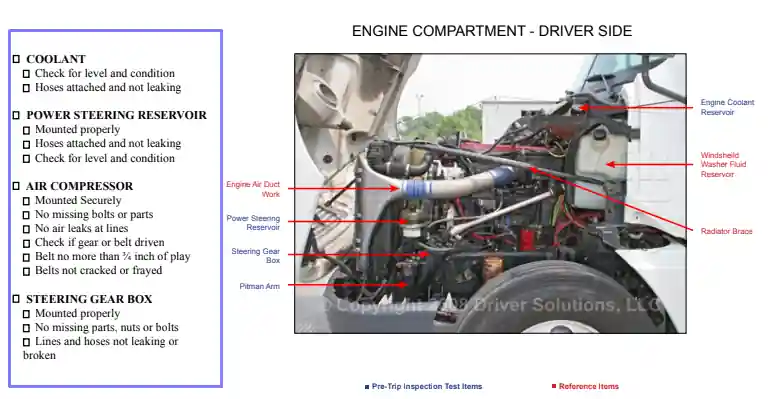
Here, you have a bit more things to check. Pictures you see in the checklist contain hints about every single detail that you should examine. Among them are coolant, steering gearbox, air compressor, power steering reservoir, steering linkage.
Follow the checklist’s instructions to examine everything as advised. Mark all the boxes with ticks if everything works properly. The main concept is still not to have any leaks, damages, missing details, or cracks, and anything that can lead to the vehicle’s malfunctioning.
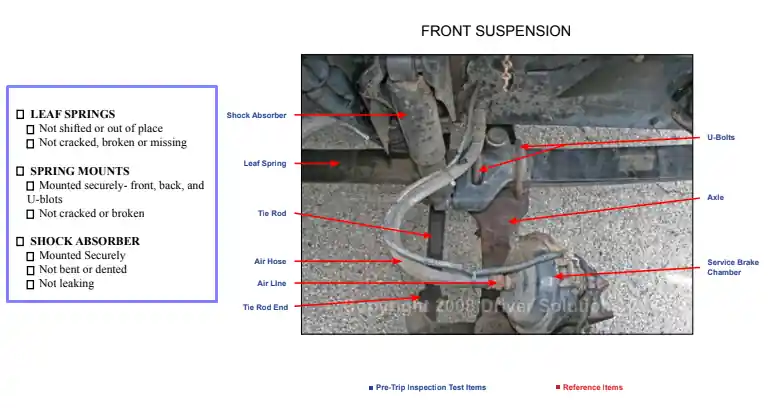
- Check the Front Suspension
After you are done with a thorough engine check, proceed to the front suspension of your vehicle. It consists of a wide range of details that must be mounted and linked securely. Keep following the checklist and its guidelines: go through spring mounts, leaf springs, and the shock absorber.
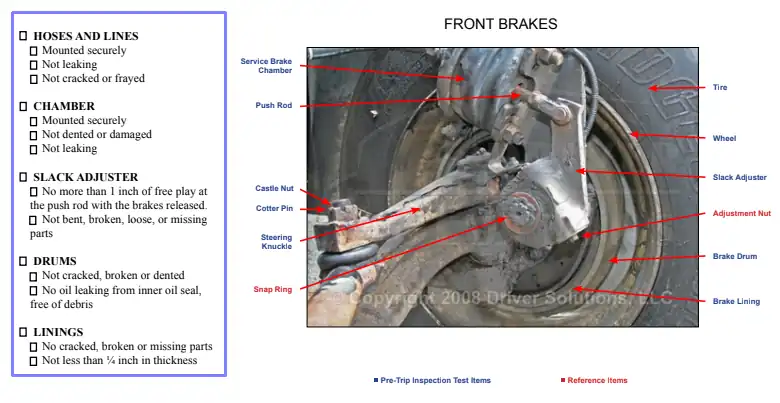
- Proceed to Front Brakes
Breaks are one of the most essential parts of any vehicle. If they crash and you cannot stop your vehicle, the consequences might be catastrophic. So, now you have to check them properly. See hoses and lines, drums, linings, a chamber, and a slack adjuster. If it seems complicated, the pictures will still help you understand what is what.
Check every detail in accordance with the checklist. Again, there should be no leaks or absent details, and all connections should be secured. Include the information in the template.
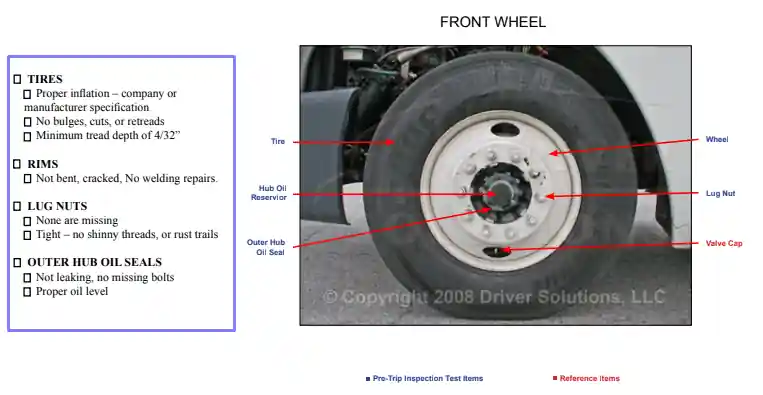
- Examine Front Wheels and the Driver Fuel Area
Check the tires and rims of your vehicle’s wheels, then see if no nuts are missing and the oil level is fine. Examine the door and mirrors on your side. Inspect the fuel tank under the door. Then, mark the points in the checklist.
- Go Behind the Cab
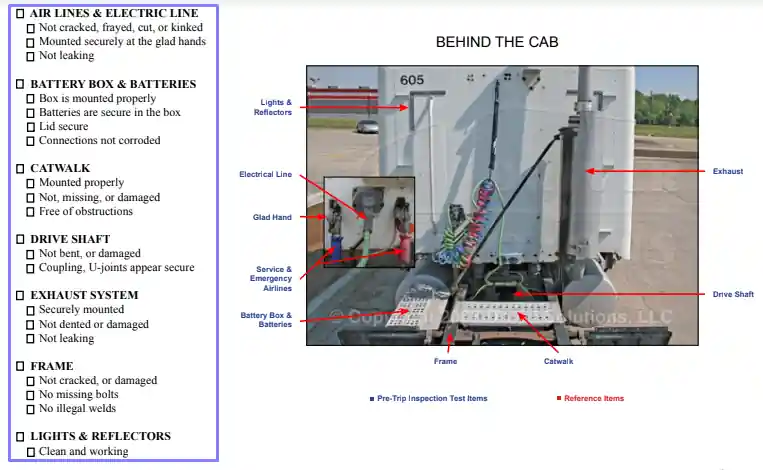
You have completed the front check; now, move behind the cab and start an inspection there. Go through the frame, lights, catwalk, driveshaft, electric and airlines, batteries, and exhaust system.
Next, check the front of the trailer connected to the truck. Its body should not have any holes, and the lights must work properly. Reflect the check results in the form.
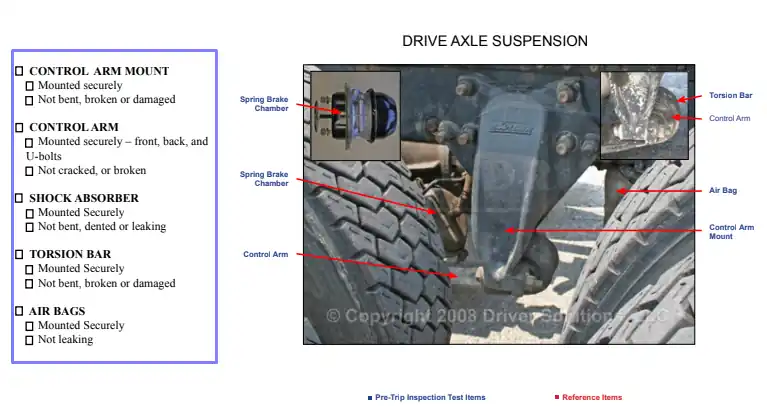
- Check Driver Axle Suspension and Fifth Wheel
Examine all the listed details, including a control arm, torsion bar, airbags, and other important items. If everything is in order and you see no leaks or malfunctions, state it in the checklist by marking all options and proceed to the next part of your inspection.
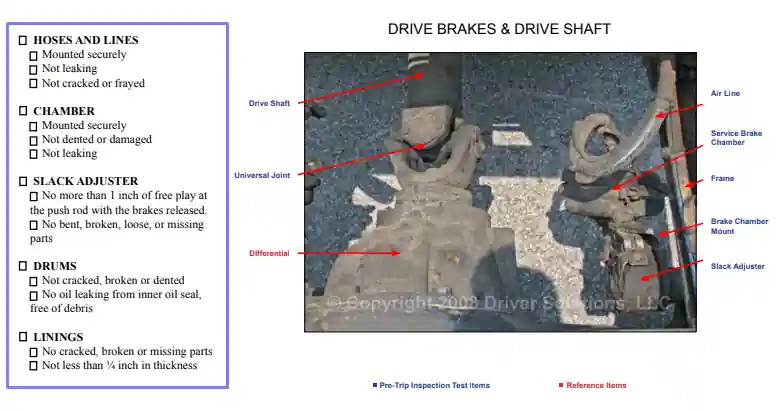
- Go through Drive Shaft, Breaks, and Wheels
Verify that everything is fine with those elements: you have already checked other wheels and breaks, so you know what exactly you should test. Use the checklist’s guidance to identify all the details you need to check here. After ensuring everything is great, move to the next step.
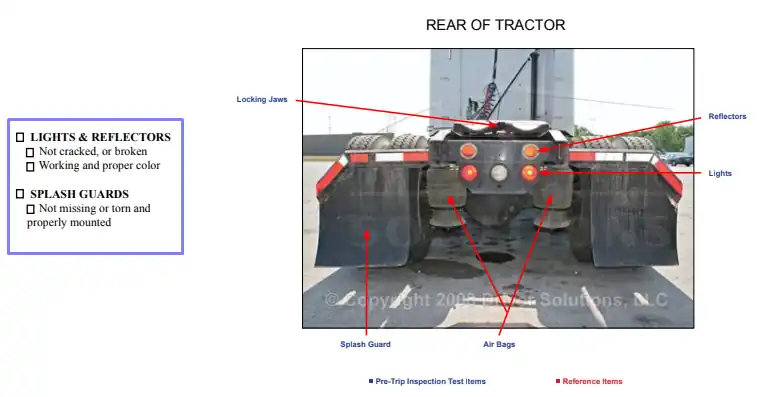
- Inspect the Tractor’s Rear and Coupling System
Check lights and splash guards of the rear and test multiple items of the coupling system as recorded in your checklist. Insert the results in the template.
- Check the Trailer
Start with the trailer’s sides and ensure that lights are working and the sides themselves do not have any damages (as well as sides’ connections and details). Then, inspect the suspension the way the checklist advises you. Proceed to the brakes and wheels.
This should be easier now because you have done all of those before with your tractor. However, if something is uncertain, consult the checklist’s pictures. If everything looks good, tick all the relevant boxes.
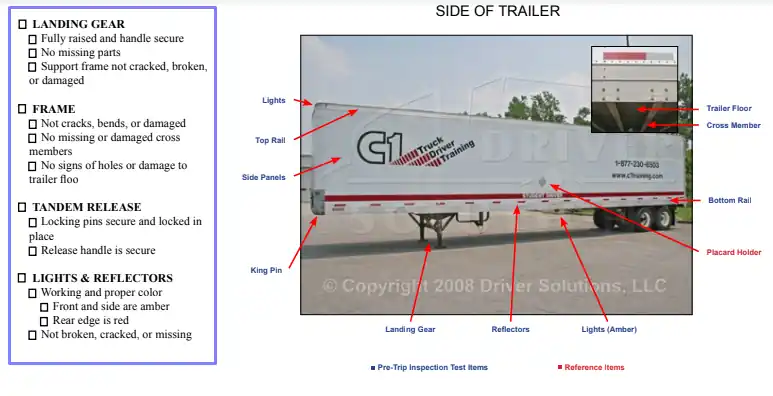
- Conduct the Cab Check
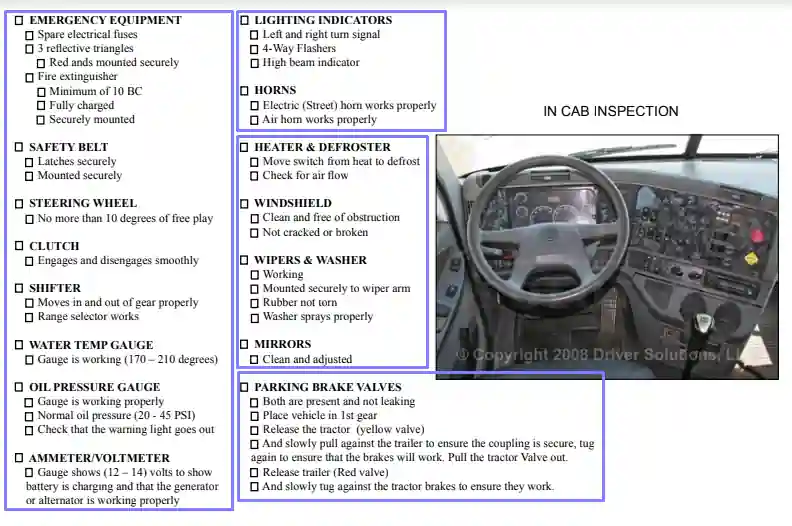
Finally, you have to see what is happening in the cab where you will sit and drive. Here, the list of items to inspect is long.
Check if you have all emergency equipment in place. Move to the steering wheel, horns, safety belt, clutch, and shifter. See if they work properly. Then, verify that your windshield is clean and has no cracks, and test the washer and wipers.
Turn on the heater and try switching its modes. All of them must work and provide you with an appropriate temperature. Look at the dashboard and ensure that all indicators from the checklist are roadworthy.
After ensuring that your vehicle’s cab is in good condition, add your last ticks to the checklist. Now, you are all set and ready to go.
Pre-Trip Inspection Checklist for Truckers

How can you keep your drivers safe on the road, reduce overhead costs for truck maintenance, and protect your business in the event of complaints or incidents? One of the most effective solutions to these problems is a pre-trip truck safety inspection, a mandatory procedure preceding each new trip.
Below, we will discuss this procedure in more detail, analyze the generally accepted levels of inspection, and also provide our truck inspection checklist that your company can use on a daily basis.
What Is a Pre-Trip Truck Inspection?
Pre-trip truck inspection involves a thorough check of structural elements, fuel, and other fluids, which together ensure the proper functioning of the trucks. Sometimes, it also requires the assessment of the driver’s condition and the legality of his or her work duties. The drivers have to carry out such checks daily before the start of their trips – i.e., before the vehicle begins to be used.
Even though transport companies often implement their own checklists to complete this procedure, there is a certain set of standards and rules that each must consider (for example, they can follow the Motor Carrier Safety Planner provided by FMCSA).
How Long Should a Pre-Trip Inspection Take?
Although there is no uniform standard regarding the length of inspections, this procedure should take 15-30 minutes on average. However, if any malfunctions and inconsistencies are discovered, the upper threshold for these time frames may increase.
What Are the Levels of a Truck Inspection?
The Commercial Vehicle Safety Alliance, a US non-profit organization, has introduced eight levels of vehicle inspection. After passing at least some of them (their list is selected based on the technical characteristics and type of use of a particular vehicle), drivers receive stickers that are valid for three months. The inspections themselves are carried out only by certified DOT employees. So, let's look briefly at these levels.
- NAS – it is a comprehensive level-one inspection of the driver and truck. Inspecting a truck involves a visual assessment of the serviceability of its internal systems and a check of documentation confirming the legal operation of a particular truck by a particular driver (this may include a driver's license, CDL permit, medical certificates, HOS, etc.). The driver's physical condition (the DOT officer checks whether the driver is under the influence of prohibited substances) and the legality and safety of securing the load are also assessed.
- Walk-Around Driver and Vehicle Inspection – it is similar to the level-one inspection but does not require a DOT officer to be present under the vehicle.
- Driver-Only Inspection – this type includes all the mandatory procedures of NAS but without the participation of the truck (that is, they are aimed at the driver only).
- A Special Check – it is an in-depth type of inspection addressed to a specific feature of a vehicle and is usually aimed at obtaining statistical data.
- Vehicle-Only Inspection – this type of inspection includes all the same procedures as the NAS but without the driver's participation.
- Enhanced NAS inspection – it is a standard inspection for trucks carrying radiological materials and equipment. It is performed under the supervision of representatives from the Department of Energy. After successfully passing it, the truck receives a special sticker with a radiation sign.
- Jurisdictional mandated inspection – it is a standard inspection for commercial vehicles such as school buses, taxis, limousines, and other vehicles used for the commercial transportation of people.
- NAS electronic inspection – it is an analog of offline inspection, which is performed by connecting inspectors via a wireless network to trucks that are on the road. During it, the driver transfers his or her personal data, current GPS coordinates, driving license, and other documents that are used during the offline NAS.
Why Truckers Should Always Perform a Pre-Trip Inspection
Since truck driving is one of the most dangerous jobs, providing truck driver safety to perform their daily tasks is essential. Actually, this is the main task of pre-trip inspections. At the same time, their regularity helps transport companies achieve some other advantages:
- Reduced maintenance costs. Regular inspections help drivers identify problems with their trucks early and fix them before they become serious and costly for your company;
- Ensuring the legality of your business. A procedure conducted by DOT officers determines the legality of a particular company's transportation operations. Specifically, representatives of the Ministry of Transport regularly check the reports of such inspections to ensure that if malfunctions and inconsistencies were discovered, they were also fixed in time;
- Correct determining the degree of the driver’s guilt for possible accidents. Yes, of course, this is not the most positive advantage, but given that accidents involving truck drivers still happen, it should not be discounted either. For example, if your driver was involved in an accident, having a report on the successful completion of a pre-trip inspection will help you prove that there is no your fault due to your truck’s malfunction.
According to federal laws, any commercial vehicles are required to undergo regular pre-trip inspections. In addition, having documents confirming a successful inspection helps transport companies process claims with less damage to them. So, let's look at the key aspects of our commercial pre trip inspection checklist.
Drive Safe with Haulk
As we can see, truck inspection is a comprehensive process that requires special care and scrupulousness on the part of inspectors. To simplify it, you can use our TMS, which has functions for truck accounting, templates for documents about their condition, and a secure database of drivers. You can also download a PDF file with our CDL pre trip inspection checklist to implement it into your company’s work processes.

You may also like
This site uses cookies to make your experience more comfortable. By continuing to browse the site you are agreeing to the use of cookies.
Mineralnye Vody Tourism
- Things To Do in Mineralnye Vody
- Mineralnye Vody Itineraries
- Mineralnye Vody Hotels
Mineralnye Vody Trip Planner
Plan your customized day by day trip plan for Mineralnye Vody. Choose from various experinces categories as adventure, romantic and family and kids friendly for your trip using using Mineralnye Vody trip planner.
- THINGS TO DO
- HOW TO REACH
- TOP RESTAURANTS

IMAGES
COMMENTS
Complete CDL pre-trip inspection checklist with online reference and study guide plus a free PDF pre trip inspection checklist to print. Find A School; CDL Training Resources. ... Tractor/Trailer Protection Valve Pop Out - Pump down on the brake pedal until the tractor and trailer protection valves pop out, this will be between 20 and 40 PSI. ...
Tractor/Trailer Protection Valve Pop Out Test: Pump down on the brake pedal until both the tractor and trailer protection valves pop out. ... Our pre-trip inspection checklist covers every part of the truck from front to back, both inside and outside of the truck. It covers the air brakes, suspension parts, steering components, wheels and rims ...
Pre-Trip Inspection. My pre-trip begins as I approach the vehicle. I am looking for leaks, leaning one way or the other (which may indicate a low tire or bad suspension). Hint: Start at the bottom and work your way up. License plate - Secure, clean and up to date. Bumper - Secure, not cracked, bent or broken.
CHECK TRAILER: (TRAILER COMPONENTS) 1. Trailer: 2. Clearance lights, clean, not broken and working properly, have proper color. 3. Trailer no damage 4. Landing Gear Fully raised, securely mounted, no cracked no bent, 5. Support frame securely mounted, no cracked, no bent, no damage 6. Crank handle: secure 7. DOT stickers properly place 8.
Class A Pre-Trip Inspection Point to, or touch, every item that you are inspecting. Tell the tester how you know that the part you are inspecting is in good, safe working condition. Identify all defects or you may not receive credit. 1 Engine Compartment + 1 Axle 3 L's. Leaks, Leans, and Lights.
4 Pre-Trip Inspection Checklist: Coupling Area o Air Lines - Air lines should be secure at both ends with no abrasions, bulges or cuts. They should not be leaking, dragging or tangled. o Apron - Make sure the apron is properly mounted and secure. Look for cracks, bends and breaks. o Clearance - Make sure there is enough space between the tractor mudflap and the trailer landing
PRE-TRIP INSPECTION CHECIST TT 9 Secure to frame, not cracked, bent or broken. Secure, straight, no more than 25% cracked or broken, none missing. Secured to axle, not cracked, bent or broken. ☐ Spring hangers ☐ Springs ☐ U-bolts and saddle Suspension - Drive Tires: Secure to tractor and trailer with 7 pins, 7 receivers with safety latch ...
The pre-trip inspection test requires heavy memorization and is one of the hardest trials to get your CDL. Use this helpful checklist to pass that test! ... With this pre-trip inspection checklist, ... Tractor/Trailer Protection Valve Pop Out - Pump down on the brake pedal until the tractor and trailer protection valves pop out, this will be ...
Class A CDL Pre-Trip Inspection Tractor Trailer. The purpose of this inspection is to make sure the vehicle is safe to operate, and to see if you have the knowledge and skills to inspect your vehicle. You may have to walk around the vehicle and point to or touch each item and explain to the examiner what you are checking and why.
What is a pre-trip inspection? A pre-trip inspection includes checking over the tractor and trailer a truck driver will be operating. A pre-trip should be completed before the operation of a vehicle: At the beginning of a driver's shift. Any time a new trailer is picked up. After a 10-hour break. A thorough inspection usually takes anywhere ...
A CDL pre-trip inspection checklist systemizes the driver's vehicle inspection to ensure care and consistency. While a pre-trip inspection would be a best practice no matter what, the Federal Motor Carrier Safety Administration (FMCSA) requires these checks for commercial vehicles. Part 396.3 (a) calls on every motor carrier to ...
A pre-trip truck inspection is a thorough check of the truck and its major systems to maintain safety on the road. Inspections need to occur before the start of a driver's shift and at least once every 24 hours while on the road. Truck pre-trip inspection needs to be performed by the driver while on duty, but before driving starts.
Class A CDL Pre-Trip Inspection Tractor Trailer ® LANDING GEAR o Fully raised and handle secure o No missing parts o Support frame not cracked, broken, or damaged FRAME o Not cracks, bends, or damaged o No missing or damaged cross members o No signs of holes or damage to trailer floo . Pre-Trip Inspection Test Items Reference Items
Check the condition of air lines, apron, electrical connections, gap, glad hands, locking jaws, mounting bolt, platform, release arm, and a skid plate that connects the trailer to the cab. 11. Cabin InspectionTemperature. Inside the cabin, check the seat belts for wear or fray and ensure a snug fit.
Tractor-trailers can weigh up to 80,000 lb. if you count the semi, trailer and cargo. Operating a heavy tractor-trailer can be dangerous, ... The best way to remember what's on a pre-trip inspection checklist is to perform inspections the same way each time. The more you practice, the more it will become second nature.
A pre-trip inspection checklist helps truck drivers remember all the major systems and parts to inspect before heading out on a route. Knowing how to complete a pre-trip vehicle inspection is an important part of trucking. ... Brake system (both tractor and trailer) Brake hose: Securely mounted on both ends. No splits, cuts, and not audibly ...
A Pre-Trip Inspection Checklist is particularly important in the logistics and transportation industry, where the condition of the vehicle directly impacts operational safety and efficiency. The checklist helps maintain safety standards required by regulatory bodies and extends the vehicle's life by ensuring regular inspections and maintenance.
One of the most effective solutions to these problems is a pre-trip truck safety inspection, a mandatory procedure preceding each new trip. Below, we will discuss this procedure in more detail, analyze the generally accepted levels of inspection, and also provide our truck inspection checklist that your company can use on a daily basis.
Best Clothing stores in Mineralnye Vody, Stavropol Krai. Sportmaster, Magazin Odezhdy I Obuvi, Zenden, Zolla, kari ГИПЕР, Sluzhivyy, Elitsport, Tervolina, Daniel ...
Mineralnye Vody (Russian: Минеральные Воды; IPA: [mʲɪnʲɪˈralʲnɨjə ˈvodɨ]; lit. mineral waters) is a town in Stavropol Krai, Russia, located along the Kuma River and the main rail line between Rostov-on-Don in Russia and Baku in Azerbaijan.
Kayak Adventure Downtown Dallas Night Sightseeing 2 Hour E-Bike tour Pre-Cruise Tour of Rome from Fiumicino Airport to Civitavecchia Port Meliá Caribe Beach - Round Trip Shuttle - Punta Cana Airport Tour of The Real Hidden Venice Amsterdam Evening Canal Cruise With Pizza and Drinks MY SUN ...
9. Ogon Vechnoi Slavy. 10. Church of the Annunciation of the Blessed Virgin. 11. Monument to the Border Guards. 12. Church of Elijah the Prophet. 13.