- PRO Courses Guides New Tech Help Pro Expert Videos About wikiHow Pro Upgrade Sign In
- EDIT Edit this Article
- EXPLORE Tech Help Pro About Us Random Article Quizzes Request a New Article Community Dashboard This Or That Game Popular Categories Arts and Entertainment Artwork Books Movies Computers and Electronics Computers Phone Skills Technology Hacks Health Men's Health Mental Health Women's Health Relationships Dating Love Relationship Issues Hobbies and Crafts Crafts Drawing Games Education & Communication Communication Skills Personal Development Studying Personal Care and Style Fashion Hair Care Personal Hygiene Youth Personal Care School Stuff Dating All Categories Arts and Entertainment Finance and Business Home and Garden Relationship Quizzes Cars & Other Vehicles Food and Entertaining Personal Care and Style Sports and Fitness Computers and Electronics Health Pets and Animals Travel Education & Communication Hobbies and Crafts Philosophy and Religion Work World Family Life Holidays and Traditions Relationships Youth
- Browse Articles
- Learn Something New
- Quizzes Hot
- This Or That Game
- Train Your Brain
- Explore More
- Support wikiHow
- About wikiHow
- Log in / Sign up
- Computers and Electronics
- Smartphones

How to Remove Autofill Info on an iPhone
Last Updated: February 27, 2024
This article was co-authored by wikiHow staff writer, Nicole Levine, MFA . Nicole Levine is a Technology Writer and Editor for wikiHow. She has more than 20 years of experience creating technical documentation and leading support teams at major web hosting and software companies. Nicole also holds an MFA in Creative Writing from Portland State University and teaches composition, fiction-writing, and zine-making at various institutions. This article has been viewed 72,045 times. Learn more...
This wikiHow teaches you how to delete your name, credit cards, passwords, and contact information from Safari on your iPhone.
Clearing Your Name and Contact Information

- When Safari automatically enters your name and contact details into a form field, the information comes from your Contacts card. This method helps you prevent Safari from pulling information from Contacts so you don’t have to delete your own Contact card. [1] X Research source

Clearing Account Passwords

- If you aren’t asked to enter a passcode, you don’t have any AutoFill data stored.

- To prevent Safari from saving passwords in the future, hit the back button, tap AutoFill , then move the “Names and Passwords” switch to the Off (gray) position.
Clearing Credit Cards

- To prevent Safari from saving cards for AutoFill in the future, tap the back button, then slide the “Credit Cards” switch to the Off position (gray). [2] X Research source
Common Questions: iPhone AutoFill Settings
How do I reset my iOS AutoFill?
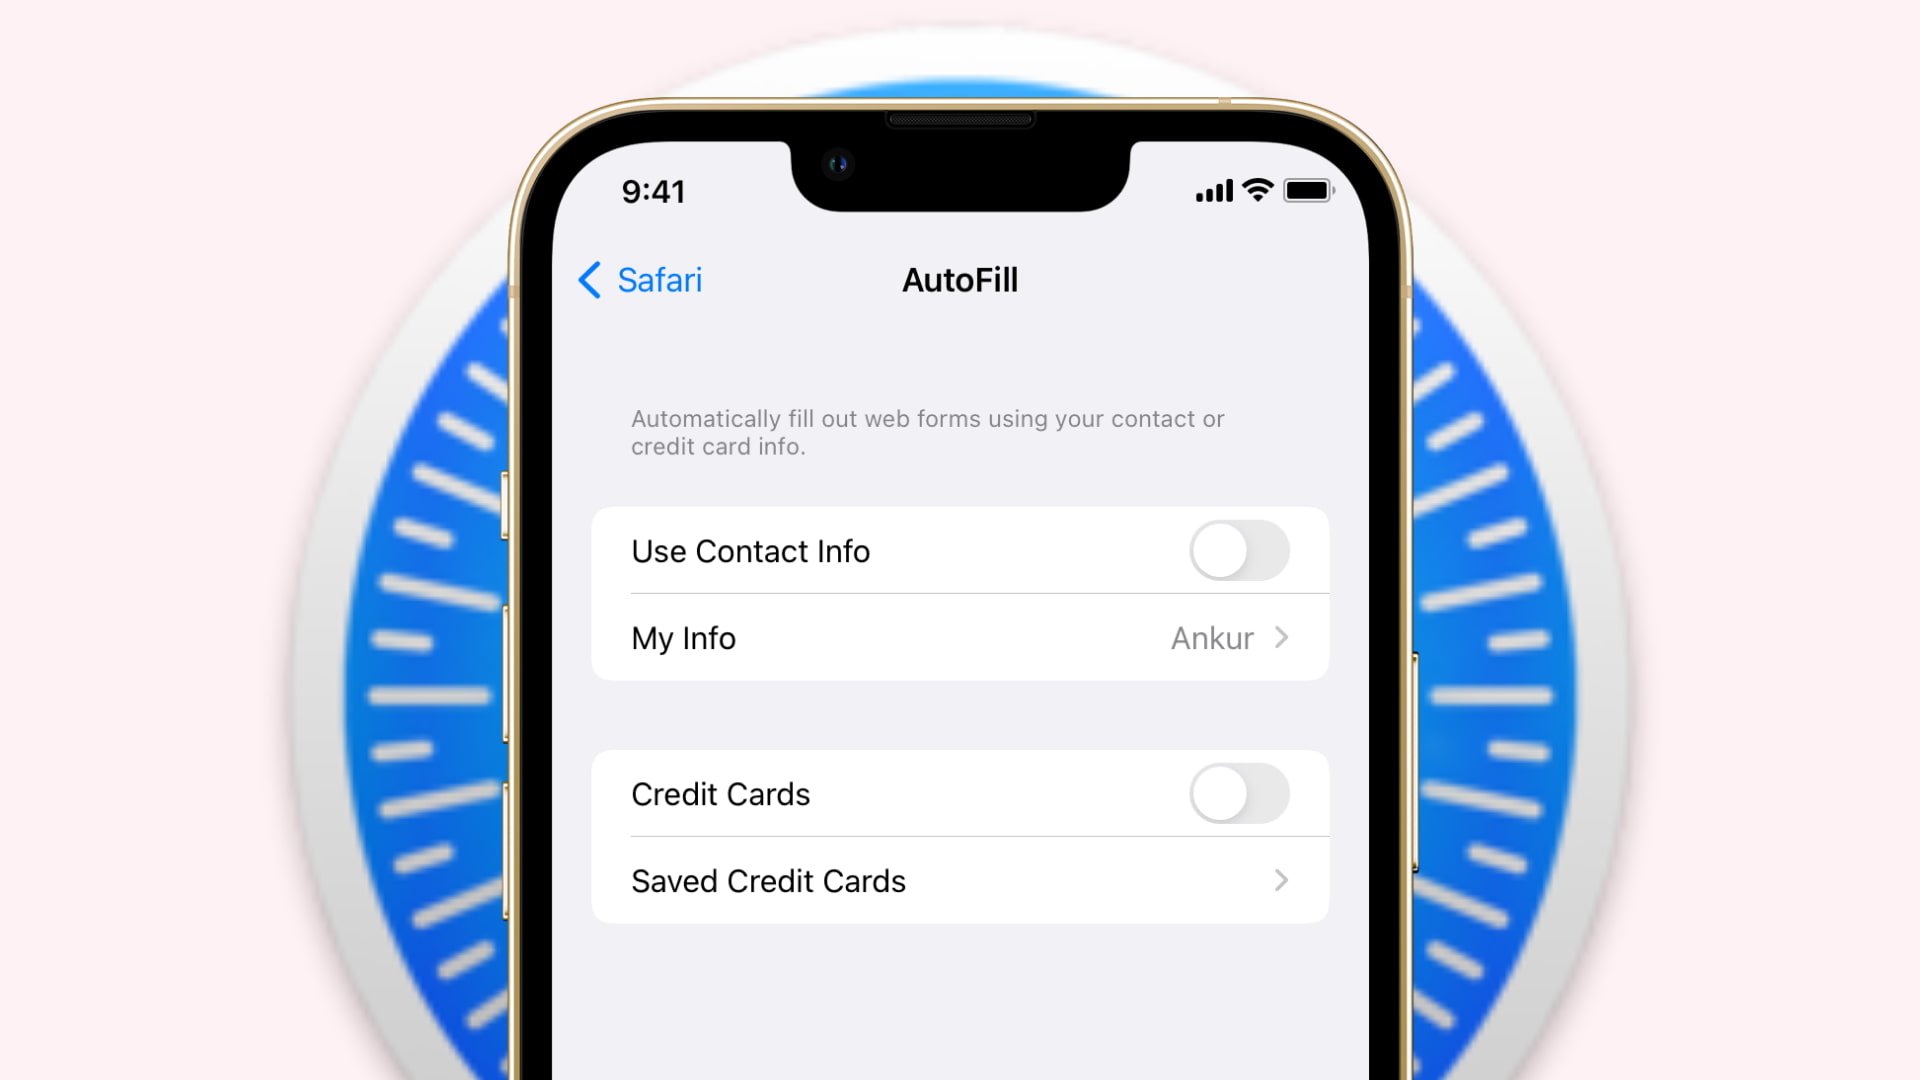
Head to your Settings app and tap the "Safari" option, followed by "AutoFill." While there isn't an official "reset" button on this page, you can change/update your AutoFill contact and credit card information (or toggle it off altogether). [3] X Research source
How do I delete my AutoFill contact information?
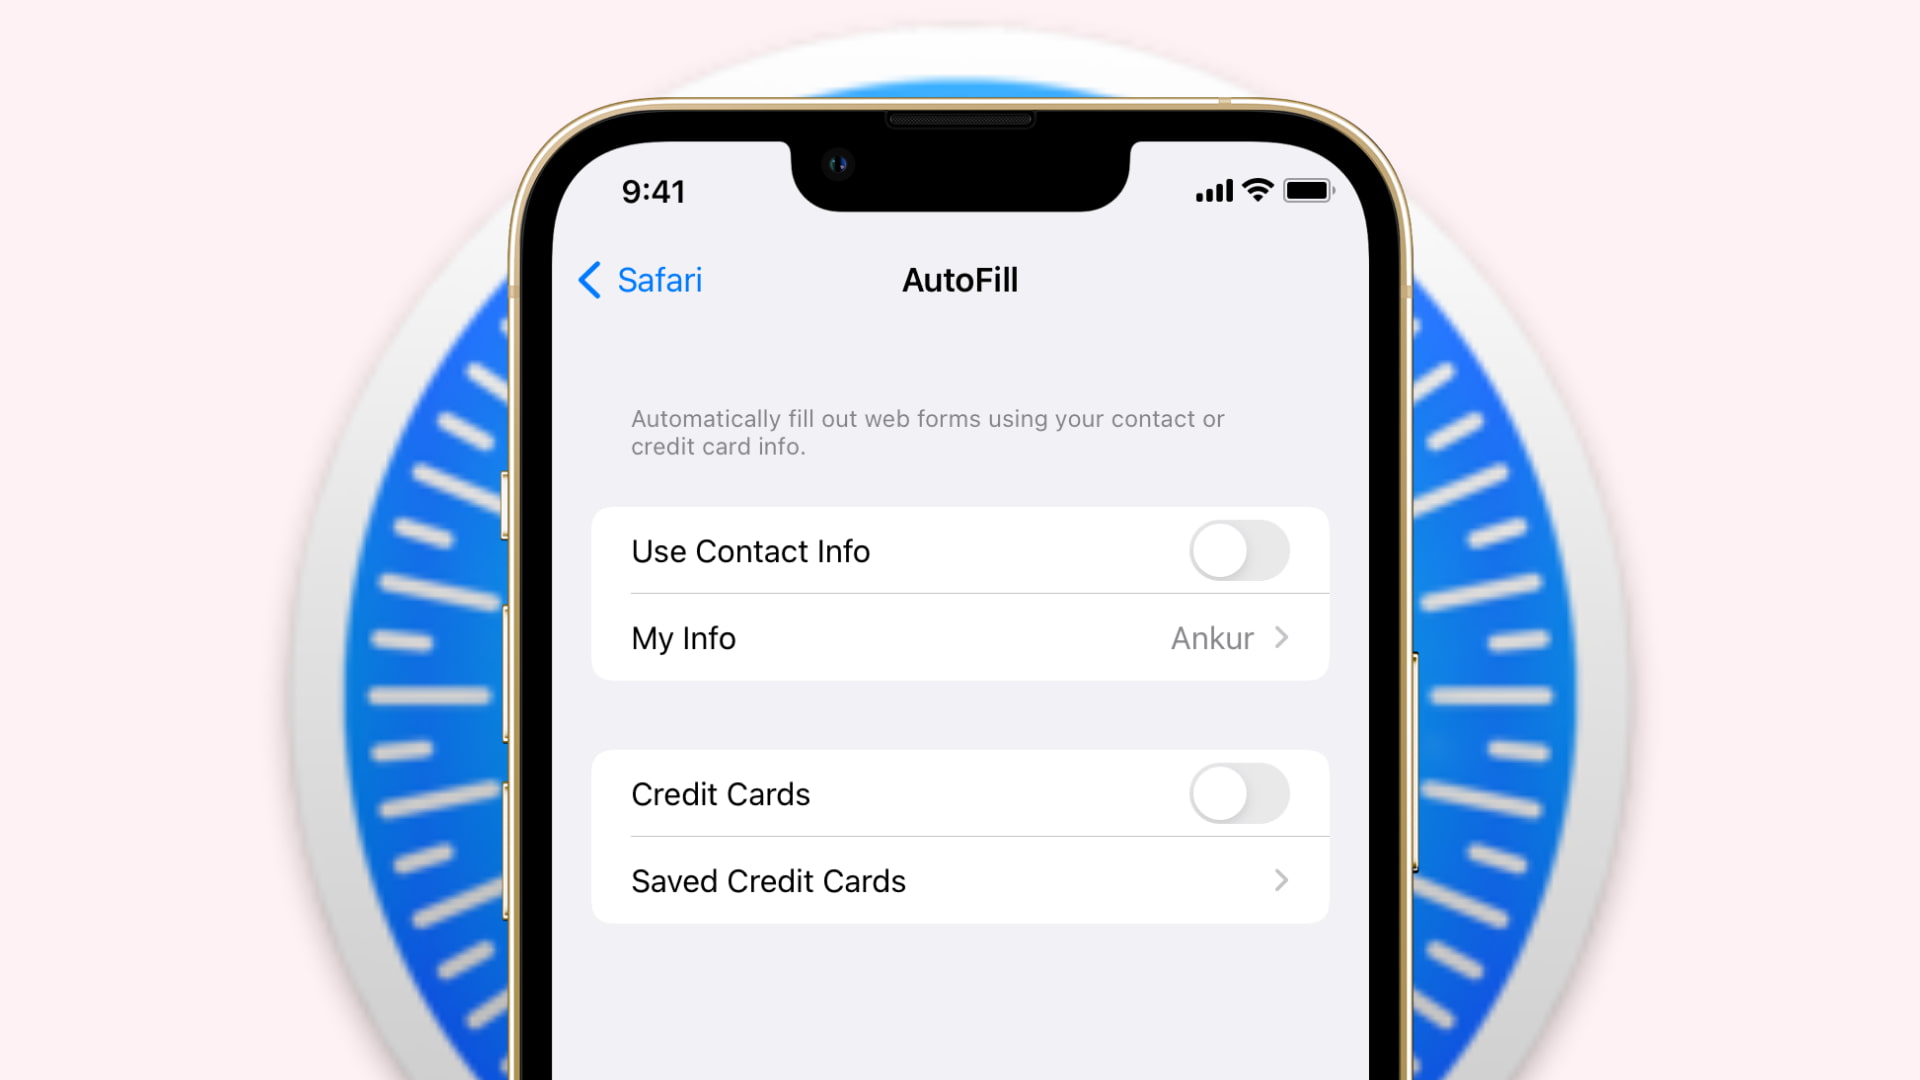
Go to your Settings app and tap "Safari" and "AutoFill." Select the "My Info" option to update the contact associated with your AutoFill settings. Alternatively, toggle off "Use Contact Info."
Where is AutoFill information stored?
The information used for AutoFill can be accessed and toggled on/off in your phone's Settings. Just select the "Safari" option, followed by the "AutoFill" selection.
You Might Also Like

- ↑ https://support.apple.com/kb/PH21470?locale=en_US
- ↑ https://support.apple.com/guide/iphone/automatically-fill-in-forms-iphccfb450b7/ios
About This Article

- Send fan mail to authors
Is this article up to date?

Featured Articles

Trending Articles

Watch Articles

- Terms of Use
- Privacy Policy
- Do Not Sell or Share My Info
- Not Selling Info
Keep up with tech in just 5 minutes a week!
How To Clear Autofill In Safari

- Software & Applications
- Browsers & Extensions
Introduction
Autofill is a nifty feature that saves time and effort by automatically filling in forms and login credentials on websites. It's like having a personal assistant who remembers your details and completes the tedious task of entering them for you. In Safari, Apple's web browser, Autofill is a built-in feature that can be incredibly convenient. However, there are times when you may want to clear or manage your Autofill data, whether for privacy reasons, to update outdated information, or simply to declutter your digital footprint.
In this article, we'll delve into the world of Autofill in Safari, exploring how it works, how to clear Autofill data, and how to manage Autofill settings. Whether you're a seasoned Safari user or a newcomer to the browser , understanding how to navigate and optimize this feature can greatly enhance your browsing experience. So, let's embark on this journey to uncover the ins and outs of Safari's Autofill and empower you to take control of your browsing data.
Understanding Autofill in Safari
Autofill in Safari is a time-saving feature designed to streamline the process of entering information on websites. It functions as a digital assistant, automatically populating fields with details such as names, addresses, phone numbers, email addresses, and even credit card information. This feature is particularly handy for frequent online shoppers, form fillers, and anyone who values efficiency in their browsing experience.
Safari's Autofill operates by storing the information you enter into web forms, allowing the browser to recognize and suggest the same or similar details when you encounter similar fields in the future. This can be especially convenient when filling out shipping addresses, billing information, or login credentials on various websites.
Additionally, Safari's Autofill feature extends beyond basic form data. It can also remember and suggest passwords for websites, making it easier to log in to your favorite online platforms without the hassle of typing out lengthy and complex passwords each time.
Furthermore, Safari's Autofill is integrated with iCloud Keychain, Apple's password management system. This means that the information stored in Safari's Autofill is securely synced across your Apple devices, ensuring a seamless browsing experience across your iPhone, iPad, and Mac.
Understanding how Autofill works in Safari is essential for maximizing its benefits while being mindful of potential privacy and security considerations. While Autofill can undoubtedly enhance convenience, it's crucial to be aware of the data being stored and take necessary steps to manage and clear it when needed.
By grasping the inner workings of Autofill in Safari, users can harness its capabilities to streamline their online activities while maintaining control over their personal information. This knowledge empowers users to make informed decisions about when and how to leverage this feature to suit their browsing preferences and security needs.
Clearing Autofill Data in Safari
Clearing Autofill data in Safari is a straightforward process that allows users to declutter and manage their stored information. Whether you want to remove outdated details, enhance privacy, or simply start afresh, Safari provides the tools to accomplish this task with ease.
To clear Autofill data in Safari on a Mac, follow these simple steps:
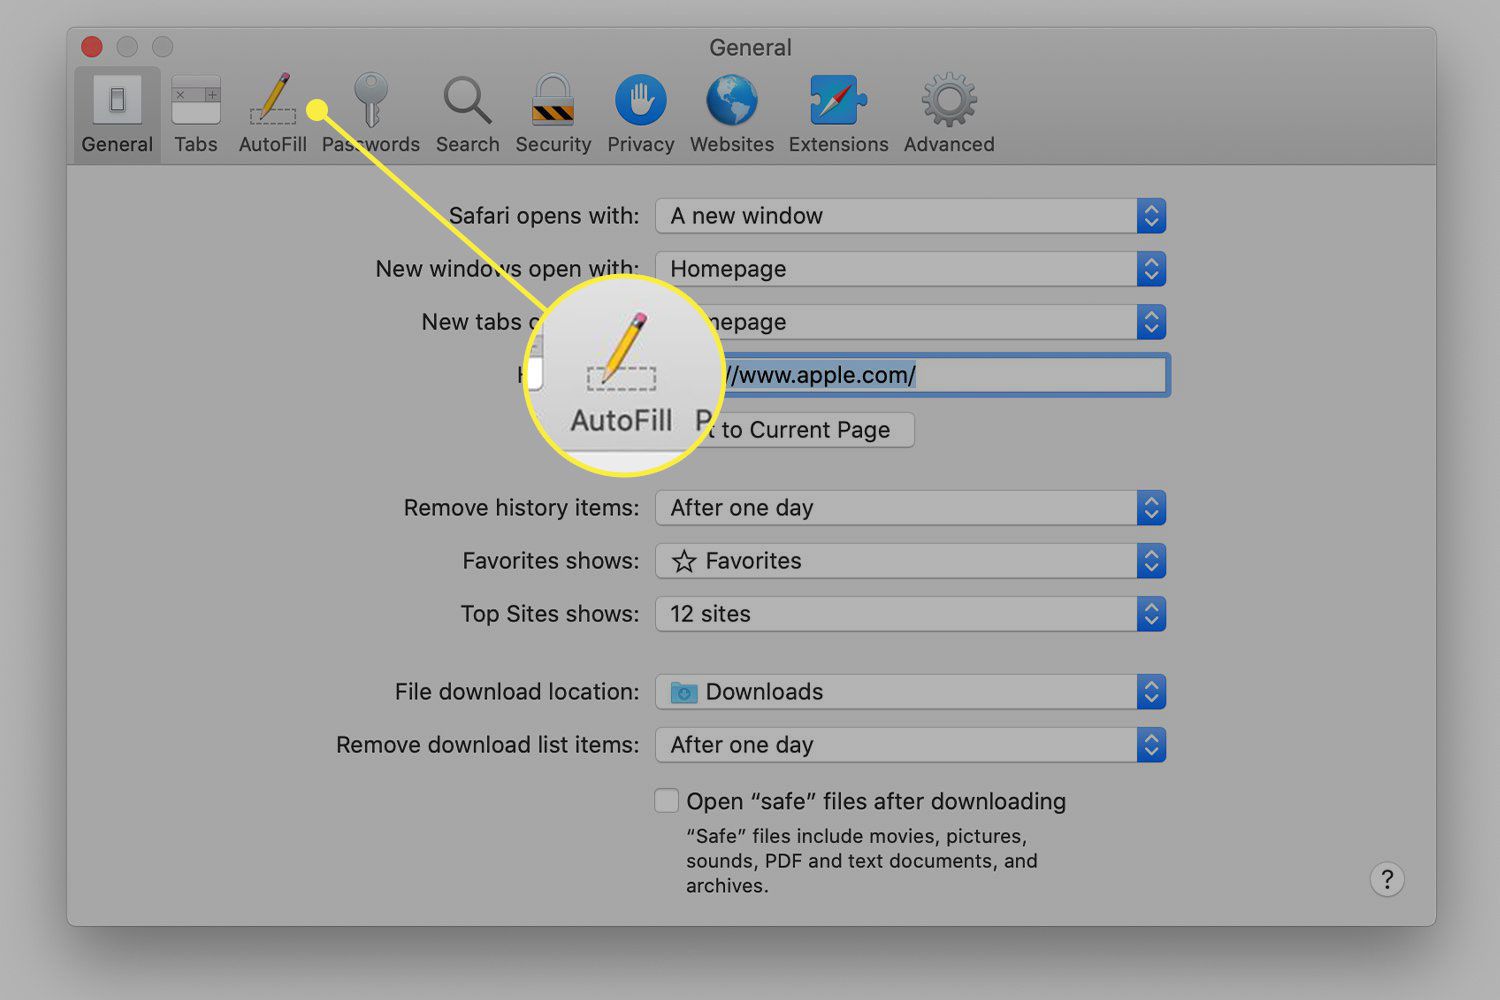
Open Safari Preferences : Launch Safari and click on "Safari" in the top menu bar. From the drop-down menu, select "Preferences."
Access Autofill Settings : In the Preferences window, navigate to the "Autofill" tab. Here, you'll find various options for managing Autofill data, including forms, user names and passwords, and credit cards.
Clear Specific Autofill Entries : To remove specific Autofill entries, click on the "Edit" button next to the respective category, such as "User names and passwords" or "Other forms." This allows you to view and selectively delete individual entries.
Clear All Autofill Data : If you prefer to clear all Autofill data at once, simply click on the "Edit" button next to the respective category and choose "Remove All" to wipe the slate clean.
Confirm the Deletion : Safari will prompt you to confirm the deletion of Autofill data. Once confirmed, the selected entries or all Autofill data will be permanently removed from Safari.
On an iOS device, such as an iPhone or iPad, the process of clearing Autofill data in Safari is equally straightforward:
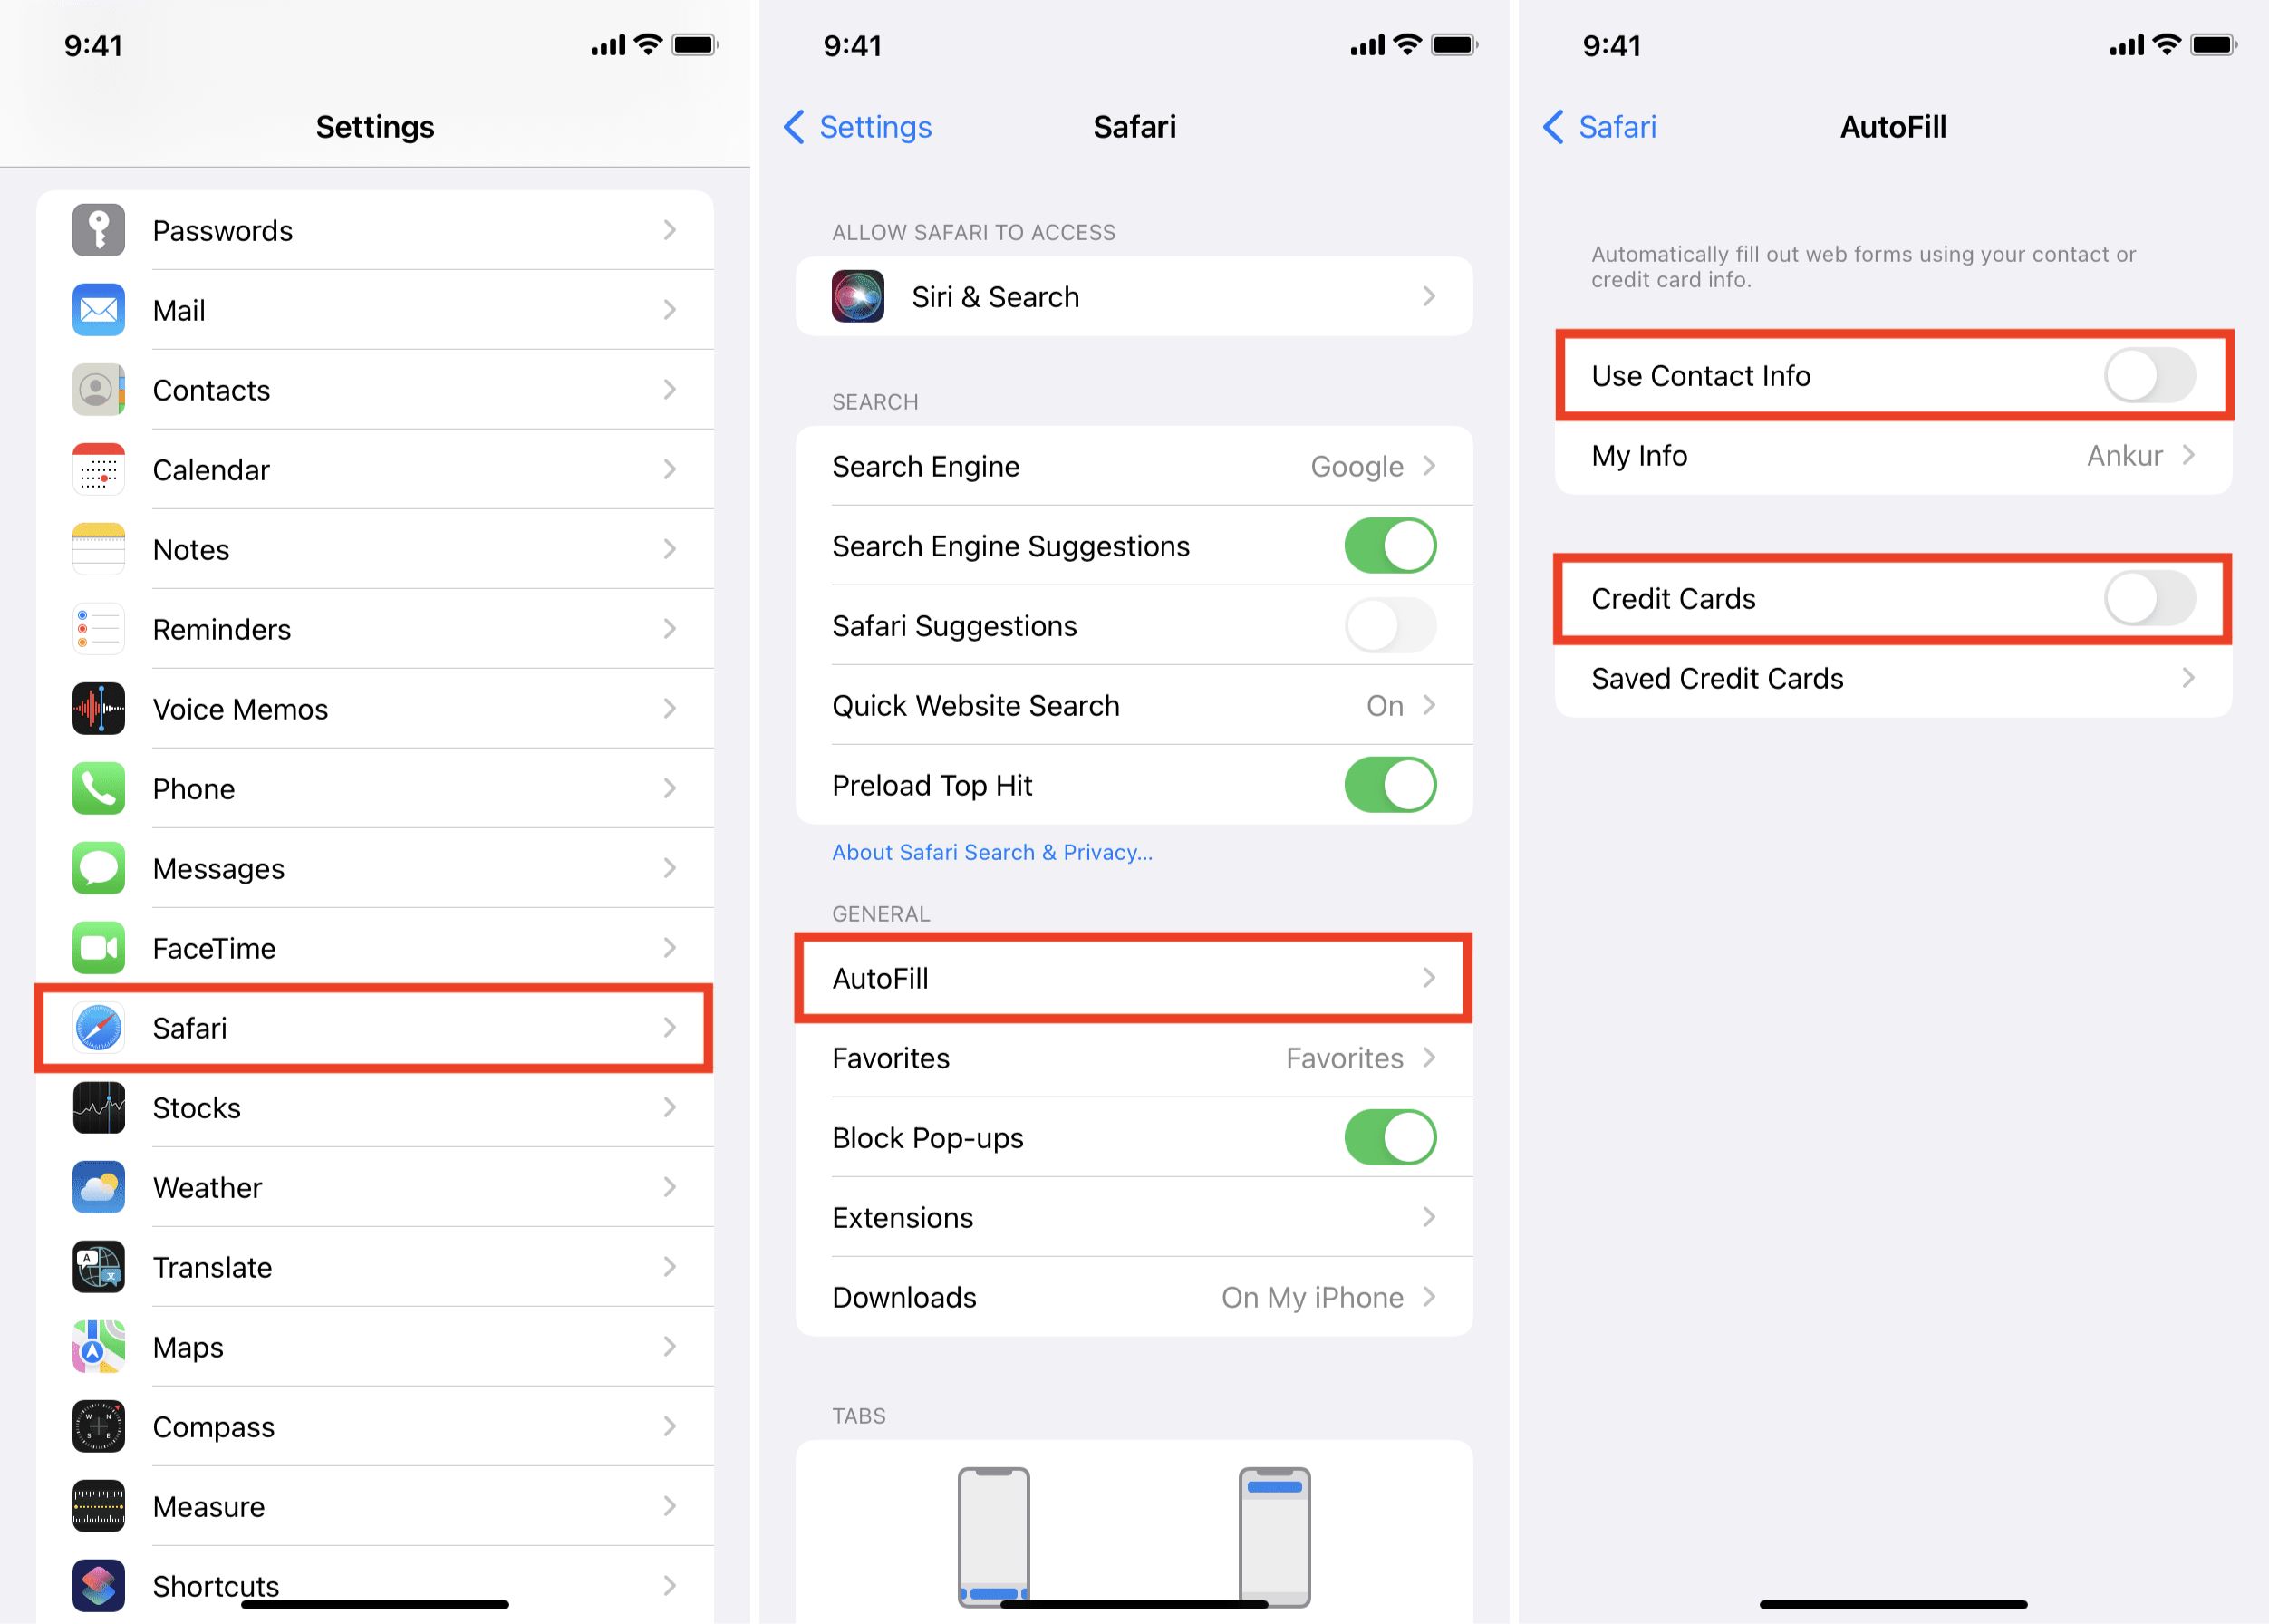
Access Settings : Open the "Settings" app on your iOS device and scroll down to find "Safari."
Manage Autofill Data : Within the Safari settings, tap on "Autofill" to access the options for managing Autofill data.
Clear Specific Entries or All Data : Similar to the Mac version, you can choose to delete specific Autofill entries or clear all Autofill data entirely.
By regularly clearing Autofill data in Safari, users can maintain a tidy and up-to-date repository of stored information. This not only helps in safeguarding privacy but also ensures that Autofill suggestions remain relevant and accurate, enhancing the overall browsing experience.
Taking control of Autofill data empowers users to curate their digital footprint, aligning with their evolving needs and preferences. Whether it's tidying up outdated addresses, refreshing saved passwords, or simply decluttering form suggestions, the ability to clear Autofill data in Safari puts users in the driver's seat of their browsing environment.
Managing Autofill Settings in Safari
Managing Autofill settings in Safari provides users with the flexibility to customize their browsing experience and fine-tune the way Autofill operates. By delving into the settings, users can tailor Autofill to align with their preferences, enhance privacy, and ensure the accuracy of stored information.
In Safari, accessing the Autofill settings allows users to exert control over various aspects of this feature. Here's a detailed look at the key elements of managing Autofill settings in Safari:
Customizing Form Autofill
Safari enables users to customize the Autofill feature for web forms, such as those requiring personal information like names, addresses, and contact details. By navigating to Safari Preferences and selecting the Autofill tab, users can fine-tune the information Safari automatically populates in web forms. This customization empowers users to decide which details Safari should suggest, providing a personalized and efficient form-filling experience.
Managing User Names and Passwords
The management of user names and passwords is a crucial aspect of Autofill settings. Safari allows users to view and edit the stored login credentials for various websites. By accessing the Passwords tab within Safari Preferences, users can review, update, and remove saved passwords. This level of control ensures that users can maintain the security and accuracy of their stored login information, promoting a secure and seamless browsing experience.
Configuring Credit Card Autofill
For online shoppers, Safari's ability to Autofill credit card information can be a time-saving convenience. By navigating to the Autofill tab in Safari Preferences, users can manage and update their saved credit card details. This includes adding new cards, editing existing information, and removing outdated entries. This level of control over credit card Autofill ensures that users can keep their payment details up to date and accurate, enhancing the efficiency and security of online transactions.
Utilizing iCloud Keychain Integration
Safari's Autofill settings are seamlessly integrated with iCloud Keychain, Apple's password management system. This integration ensures that the Autofill data stored in Safari is securely synced across all Apple devices linked to the user's iCloud account. By managing Autofill settings, users can leverage the power of iCloud Keychain to maintain a consistent browsing experience across their Apple ecosystem, with synchronized Autofill data ensuring a seamless transition between devices.
By actively managing Autofill settings in Safari, users can harness the full potential of this feature while maintaining control over their browsing data. This level of customization empowers users to tailor their browsing experience to suit their individual needs, ensuring that Autofill operates in a manner that aligns with their privacy, security, and convenience preferences.
In conclusion, Safari's Autofill feature is a valuable tool that streamlines the process of entering information on websites, offering convenience and efficiency to users. By automatically populating forms, login credentials, and even credit card details, Autofill simplifies the browsing experience, saving time and effort.
Understanding how Autofill works in Safari is essential for users to make the most of this feature while being mindful of privacy and security considerations. The ability to clear Autofill data in Safari provides users with the means to manage and declutter their stored information, ensuring that Autofill suggestions remain relevant and accurate.
Furthermore, actively managing Autofill settings in Safari empowers users to customize their browsing experience, aligning with their individual preferences and security needs. By fine-tuning the information suggested by Autofill, managing login credentials, and updating credit card details, users can maintain control over their browsing data while enjoying the convenience of this feature.
Ultimately, Safari's Autofill feature, when utilized effectively and managed proactively, enhances the browsing experience, offering a seamless and personalized interaction with web forms and login processes. By staying informed about how to navigate and optimize Autofill in Safari, users can harness its capabilities while safeguarding their privacy and security.
In the ever-evolving digital landscape, where convenience and security are paramount, Safari's Autofill feature stands as a valuable asset, providing users with the tools to streamline their online activities while maintaining control over their personal information. With the knowledge and understanding gained from this exploration of Safari's Autofill, users are empowered to navigate the digital realm with confidence and efficiency.
Leave a Reply Cancel reply
Your email address will not be published. Required fields are marked *
Save my name, email, and website in this browser for the next time I comment.
- Crowdfunding
- Cryptocurrency
- Digital Banking
- Digital Payments
- Investments
- Console Gaming
- Mobile Gaming
- VR/AR Gaming
- Gadget Usage
- Gaming Tips
- Online Safety
- Software Tutorials
- Tech Setup & Troubleshooting
- Buyer’s Guides
- Comparative Analysis
- Gadget Reviews
- Service Reviews
- Software Reviews
- Mobile Devices
- PCs & Laptops
- Smart Home Gadgets
- Content Creation Tools
- Digital Photography
- Video & Music Streaming
- Online Security
- Online Services
- Web Hosting
- WiFi & Ethernet
- Browsers & Extensions
- Communication Platforms
- Operating Systems
- Productivity Tools
- AI & Machine Learning
- Cybersecurity
- Emerging Tech
- IoT & Smart Devices
- Virtual & Augmented Reality
- Latest News
- AI Developments
- Fintech Updates
- Gaming News
- New Product Launches
Learn To Convert Scanned Documents Into Editable Text With OCR
Top mini split air conditioner for summer, related post, comfortable and luxurious family life | zero gravity massage chair, when are the halo awards 2024, what is the best halo hair extension, 5 best elegoo mars 3d printer for 2024, 11 amazing flashforge 3d printer creator pro for 2024, 5 amazing formlabs form 2 3d printer for 2024, related posts.
How To Make Safari Remember Passwords
How Do I Clear Safari
How To Stop Autofill In Safari
How To Make Safari Smaller
How To Delete Safari Autofill
How To Turn Off Safari Autofill
How To Save Passwords In Safari
How To View Stored Credit Cards In Safari
Recent stories.

Fintechs and Traditional Banks: Navigating the Future of Financial Services

AI Writing: How It’s Changing the Way We Create Content

How to Find the Best Midjourney Alternative in 2024: A Guide to AI Anime Generators

How to Know When it’s the Right Time to Buy Bitcoin

Unleashing Young Geniuses: How Lingokids Makes Learning a Blast!

- Privacy Overview
- Strictly Necessary Cookies
This website uses cookies so that we can provide you with the best user experience possible. Cookie information is stored in your browser and performs functions such as recognising you when you return to our website and helping our team to understand which sections of the website you find most interesting and useful.
Strictly Necessary Cookie should be enabled at all times so that we can save your preferences for cookie settings.
If you disable this cookie, we will not be able to save your preferences. This means that every time you visit this website you will need to enable or disable cookies again.
How to Delete & Clear Autofill Suggestions in Your Browser
Mistype Something? Get Rid of Unwanted Autofill Suggestions
- Tips and Tricks
- Dream Vacations
- Win Electronics
- Home and Garden
- Win Vehicles
- Jewelry and Clothing
- Types of Contests
- Creative Contests
- Frugal Living
- Fine Arts & Crafts
- Card Games & Gambling
- Cars & Motorcycles
- Playing Music
:max_bytes(150000):strip_icc():format(webp)/LAbio-SandraG-71d952ecca9342619f0f66c0f4eff19c.jpeg)
- University of Maryland
Autofill — also known as autocomplete — is a feature of modern internet browsers that makes filling out forms easier by saving information that you've used in the past. For example, autofill can keep track of the name you use, then fill that name in for you so you don't have to type it out when you fill out the next form.
But what do you do when the information your browser suggests is out of date, misspelled, or just plain wrong? Here's how to clear and delete autofill suggestions.
Why Should You Clear Autofill Suggestions?
If you enter sweepstakes or otherwise fill out forms on websites, autofill can save you time by reducing the amount of typing you need to do. It can replace the need for a form-filling program like Roboform .
Autofill suggestions usually appear as a drop-down list of options when you double-click on an empty field in an entry form. The suggestions might also be prefilled when you open a form.
The problem is that unwanted autofill suggestions can build up over time. For example, if you make a typo when you enter your name, move and have a new address, or fill out a form for a friend or relative, your browser never lets you forget and keeps that suggestion in your autocomplete list.
Those useless autofill suggestions will keep appearing when you fill out new forms. Even worse, the list gets longer over time, making it harder for you to find the right suggestion to use and easier to pick the wrong suggestion by mistake. You could miss out on a win if you misclick and send your prize to the wrong address.
Luckily, it's simple to remove unwanted autofill suggestions. Follow these tips to clear your autofill and prevent unneeded suggestions from appearing when you fill out forms:
* Clearing your autofill suggestions is quick and easy. Doing it saves you time when filling out forms and prevents costly mistakes if you pick the wrong suggestion.
* Deleting unwanted autofill entries is one of a number of maintenance tasks you should do regularly when you enter sweepstakes. There are more tips about maintenance tasks at the end of the article.
How to Delete Autofill Suggestions in Chrome
To get rid of unwanted autofill suggestions in Chrome, highlight the suggestion you want to clear by hovering your mouse over it, then press the "shift" and "delete" keys at the same time.
You can also see the information you've saved and delete any entries that are no longer needed by taking the following steps:
- Click the hamburger button , which looks like three dots stacked on top of each other, at the top right-hand side of your screen.
- Click the "Settings" option.
- Under the "Autofill" section, click "Addresses and more".
- Click the hamburger button next to any entry you want to delete, then select "Remove".

Clearing Autofill Entries in Internet Explorer
To delete individual autofill suggestions in Internet Explorer:
- Double-click the text field so the drop-down box containing the autofill suggestions appears.
- Hold your mouse over the option that you want to remove from autofill to highlight it. Don't click on it.
- Press the "delete" key on your keyboard.
This will clear the unwanted suggestion from your autofill results.
If you'd like to remove all your autofill suggestions, click the "Tools" icon at the top right-hand side of your screen, then select "Internet Options" and pick the "Content" tab.
Look for the AutoComplete section and click on "Settings." At the bottom of that section, there's an option to "Delete AutoComplete History."
You can choose whether you want to delete forms, passwords, or both.
Removing Autofill Options in Microsoft Edge
To clear individual autocomplete suggestions in Microsoft Edge:
- Click "Settings" at the upper right-hand corner of the screen.
- Choose "Passwords & autofill".
- Under the "Autofill" section, select "Manage forms."
- Click the "X" button next to any entry you want to delete.
If you want to remove all your autofill suggestions from Microsoft Edge:
- Open "Settings" by clicking on the three dots icon and selecting it from the menu.
- Select the "Privacy & Security" tab on the left side of the page.
- Scroll down to "Clear Browsing Data" and select "Choose What to Clear."
- Select "Autofill data (includes forms and cards)" and click the "Clear" button.
- If you don't want your browser to store your autofill data at all, you can also select the option on the same page to clear autocomplete data every time you close your browser.
Deleting Autofill Entries in Firefox
As with Chrome, delete individual autofill suggestions in Firefox by highlighting the suggestion you don't want to receive any more and pressing the "shift" and "delete" keys at the same time.
If you want to delete all of your autocomplete information in Firefox:
- Click the hamburger button.
- Select "History" and then "Clear Recent History."
- Make sure that the option for "Form & Search History" has been selected and that the time range is set to "Everything."
- Confirm to clear the data.
Clearing Autofill Suggestions in Opera
Opera has an easy way to remove either individual or bulk autofill suggestions. To access it:
- Open the Settings gear icon at the left of the screen.
- Click "Advanced".
- Look for the "Autofill" section and select "Addresses and more".
- From there, you can choose to edit individual entries or disable the autocomplete option altogether.
Don't Stop After Clearing Your Auto-Fill Suggestions!
If you enter sweepstakes, there are a few bits of maintenance that you should do to keep things from getting overwhelming. Keeping your autofill suggestions up-to-date and accurate is one of them.
Another thing that you should do regularly is removing likes from Facebook contests that you don't need anymore. While you're at it, you can also remove unneeded Facebook sweepstakes apps .
And you can also keep your sweepstake email under control by unsubscribing from unwanted sweepstakes newsletters . Also, be sure to delete emails right away to make it easier to find
These things take only a few minutes to do, but they make entering sweepstakes more efficient and more enjoyable.
- The Best Form-Filling Programs for Entering Sweepstakes
- How to Mute Sound in Your Internet Browser
- What to Look For in a Good Privacy Policy
- Request a Free Delia's Catalog
- Internet Browsers: A Simple Guide to How Browsers Work
- What Are Automatic Sweepstakes Entries?
- Roboform: Enter Sweepstakes with the Click of a Button
- Faster Sweepstakes Entry: Enter Sweepstakes in Half the Time
- Liked Too Many Facebook Pages? How to Remove Them, Quickly and Easily
- Too Many Facebook Apps? Why You Should Remove Them — and How to Do It
- The Mac-Centric Tools More and More eBay Sellers Use
- How to Find the Link for a Specific Tweet on Twitter
- Visual Guide to Selling Using eBay's iPhone App
- A Simple Guide to Understanding and Using URLs
- The Ultimate Guide to Entering and Winning Mail-In Sweepstakes
- Problems Printing Online Coupons?

PowerUninstall
Weekly Sale
How to Delete Autofill on Mac Browsers

Written By Jordan Baldo
Last updated: March 13, 2024
Almighty writing expert who is proficient in analyzing Mac issues and providing efficient solutions.
I have a MacBook Pro and I use it for my work---video editing. It is really handy when it comes to work since it’s a powerful device. But there’s another thing I use it for, browsing the Internet. I use multiple browsers and I don’t have a preference. However, I noticed that all of my browsers know my personal information. I see it on autofill/ autocomplete. How to delete autofill on Mac ?
~MacBook Pro User
Contents: Part 1. What Autofill Means? Part 2. How to Delete Autofill on Mac Browsers Manually Part 3. How Do I Clear Autofill on Mac Browsers with One Click Part 4. Conclusion
People Also Read: Top 2 Ways to Remove Mac Purgeable Space
Part 1. What Autofill Means?
Every browser out there has its own autofill (or autocomplete) feature. This is to make the browsing experience faster and smoother. The autofill feature puts your information or suggested data in the search box or field box automatically so that you don't have to type everything out yourself.
This is a useful feature especially if you're always rushing around through time. However, for some people, it can cause privacy issues. The thought of browsers knowing your personal data and filling it in forms for you automatically is creepy.

It just knows too much. And sometimes, people just want their information to be kept safe. So they might want to clear cookies and browsing history on the browsers.
One way to keep your personal information safe is to delete the autofill or autocomplete history on all browsers of your Mac. This can be time-consuming as you have multiple browsers on your device. It can be tiring because you have to put in the effort. The good thing about it is you can also fix the problem of how to delete autofill on Mac with a tool.
Let’s delve into the manual stuff first.
Part 2. How to Delete Autofill on Mac Browsers Manually
There are a variety of browsers out there. But we’ll teach you how to delete autofill from 3 popular browsers . Let’s start with Safari.
Clear Autofill History on Safari
Below are the steps to delete autofill on Mac from Safari :
- Launch Safari on your Mac
- Click Safari from the menu and then click Reset Safari
- Click Remove Other AutoFill Form Text and then click Reset This erases the Autofill information on Safari you entered before.
- Go back to the menu and click Safari and then select Preferences .
- Select AutoFill
- Go to Users names and passwords . Click Edit to remove the saved names and passwords.
- Navigate to Using info from my Contacts card , select Edit to delete the info in Safari.
- Go to Credit cards and click Edit to clear the credit card information.
- Click Edit for Other forms to remove all autofill entries.

And that’s how to delete autofill on Mac with Safari. Simple, right? Although there’s a simpler way that we’ll teach you at the near end of this guide.
Remove Autofill from Mac Chrome
How to delete autofill on Mac within your Chrome browser? It is actually very easy. Just follow the steps below:
- Open Your Google Chrome.
- Click on the three dots located at the upper right-hand corner of your screen. Click History and then choose Show Full History .
- Click Clear browsing data .
- Click Advanced
- Choose Autofill form data and click Clear data .
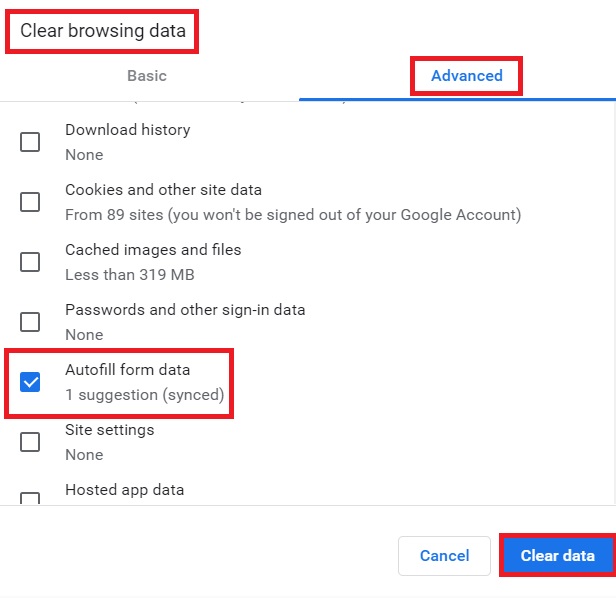
Now you have fixed the problem "how to delete autofill on Mac" from Google. If you want to delete some specific autofill entries on your Google Chrome, you can follow the below steps:
- Open your Google Chrome on Mac.
- Click on the three dots located at the upper right-hand corner of your screen and select Settings .
- Click Autofill and then click Password Manager .
- Now you can see all the passwords that you have saved for all of the websites you have visited before.
- Click on the three-dot icon and click Remove to delete the autofill information on your Google.
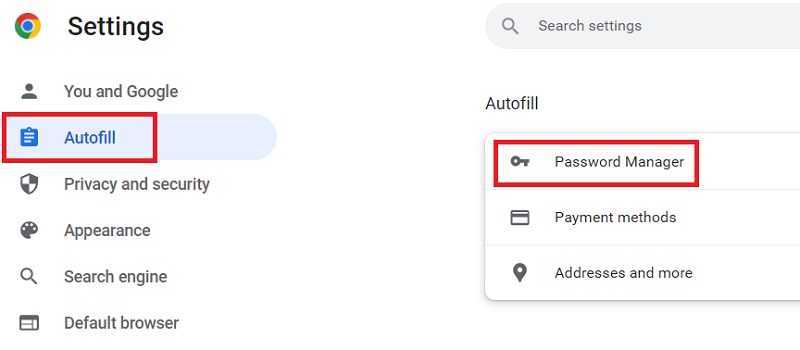
So, how to delete autofill on Mac in Chrome? That’s it. Very easy. Now, let’s move on to the next browser.
Clean Autofill History on Mac FireFox
Easy as 1-2-3. That’s how we would describe cleaning up autofill history on Firefox. Just follow the steps below:
- Open Firefox on Your Mac
- Press the three-line icon located in the top-right corner
- Click History and then click Show All History
- Change the time range to Everything
- Click Form & Search History and then click Clear Now
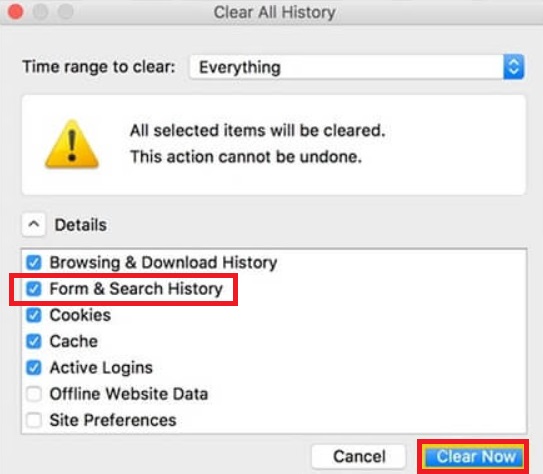
And that’s how to delete autofill on Mac in every browser. But how do you do it automatically. See our guide below.
Part 3. How Do I Clear Autofill on Mac Browsers with One Click
To solve your problem of how to delete autofill from Mac , the tool we would recommend is iMyMac PowerMyMac . This amazing program can help optimize your Mac. It can uninstall unneeded apps, clean junk files, remove app extensions, clear caches from mac and so on.
Get A Free Trial Now!
The Privacy module of PowerMyMac can easily clear your browsers. Follow the steps below and you will never be troubled by the question how to delete autofill on Mac again.
- Download PowerMyMac from the official website and launch it.
- On the left-hand side of the screen, select Privacy .
- Click the SCAN button to scan all browser data on your computer.
- Once the scanning process is complete, all browsers and the data within them will be displayed. Choose the browser you would want to delete data from.
- Select the type of data you want to clean in this browser. In this case, we will select autofill History. However, if you want to delete more data, you can select more options.
- Click the CLEAN button for the data to be cleaned up.
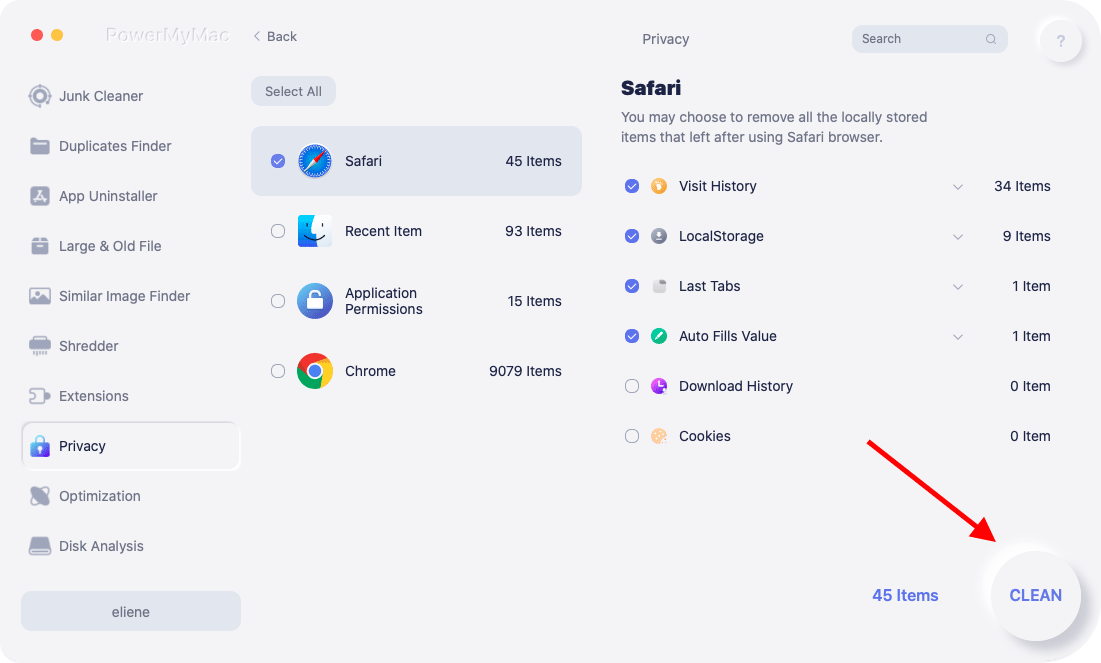
Now you have successfully figured out the answer to the question "how to delete autofill on Mac". You can also make use of PowerMyMac to speep up your Mac. And below are some advantages and features of PowerMyMac:
- Easy to use. Even if you are a beginner and not familiar with a computer, you can use this tool to clean up your browser. It is easy to operate and you can also do tasks with just a few simple clicks.
- Fast. It scans your entire computer for data quickly. Clearing up browser data is also quickly done with the Privacy Tool. This is possible with only a few clicks.
- Free trial. You are given a free trial for the first 500MB. You don’t have to purchase the tool just to try it out. You can simply get the free trial so you can experience the benefits of Privacy.
Part 4. Conclusion
Autofill or autocomplete data can contain sensitive personal information that you don’t want your browser to keep. That’s why it’s best to know how to delete autofill on Mac . You can do it manually or with a tool called PowerMyMac’s Privacy . Whatever method you choose, you must make sure you delete all autofill/autocomplete data to make yourself more secure online.
Rating: 4.5 / 5 (based on 88 ratings)

Clean up and speed up your Mac with ease
People Also Read:
Comment( 10 )
Copyright © 2024 iMyMac. All rights reserved.

You're almost done.
Subscribe to our best deals and news about iMyMac apps.
Warm Prompt
This software can only be This software can only be downloaded and used on Mac. You can enter your email address to get the download link and coupon code. If you want to buy the software, please click store .
This software can be used on Mac and Windows. You can enter your email address to get the download link and coupon code. If you want to buy the software, please click store .
Please enter a valid email address.
Thanks for your subscription!
The download link and coupon code has been sent to your email [email protected] . You can also click the button to purchase the software directly.
Free Domestic Shipping on Orders Over $200
- Collections
- Faraday FAQ
- SLNT Glossary
JUST RELEASED - ESSENTIALS COLLECTION
Your Cart is Empty
Customer Also Bought
- $0.00 USD Subtotal
Taxes and shipping calculated at checkout
- Credit Cards
- Large Devices
- Accessories
- Full Faraday
- Submersible
- RFID Blocking
- EMF Protection
- EMP and Solar Flare
- All Collections
USA Made Faraday
Incognito Collection
SLNT® X RELV®
Clear Your Browsing History on Apple Devices: Quick Steps to Remove Autofill Suggestions
February 21, 2023 3 min read
We’ve all been in those tricky situations when our search history decides to make an appearance. Whether it's due to a surprise birthday present or that mysterious rash, we have sought out information privately - but do you know how and where your searches are stored? To keep things running smoothly (and maintaining privacy), consider adjusting your settings with these quick and easy steps.
First thing you need to do before you get started is update your browsers., most browsers update automatically but before you get started make sure you are running on the latest version. here are the steps to get you started., open your browser menu , find your browser about page , click update button if available or it will be clearly visible if it is set yo automatically update and the last update date will populate. , close your browser and relaunch a new session, chrome browsers, steps for mac, how to delete autofill in google chrome browser on your mac., open chrome, top right-hand corner of your screen click the 3 dots, click settings, in the left-side, select autofill, a list of items that use autofill will appear. click on each one that you don’t want autofill used and toggle to turn off. if you want to remove individual items you can select the 3 dots within the autofill category and click remove., how to clear out existing autofill data in chrome for mac, select history, and select history again (shortcut command y), on the left-side select clear browsing data, click the advanced tab, in time range menu - select "all time" , select autofill form data and make sure it is checked off. check off any other options you want to be cleared, select clear data, steps for iphone, how to delete autofill in google chrome browser for iphone, open the chrome app, click the 3 dots on the bottom-right corner of the screen and select settings, select payment methods, password manager or addresses and more , toggle off and select done. if you would like to remove individual entries select edit, check the item to remove and then select delete. , how to clear out existing autofill data in chrome for iphone, tap the 3 dots on the bottom-right of your screen, scroll down a bit and select clear browsing data, adjust the time range at the top of the screen to say all time, make sure autofill data is checked off, select clear browsing data, then clear browsing data again to confirm, safari browsers, how to delete autofill in safari for mac, open safari, at the very top of your screen next to the apple icon, click safari, select autofill, uncheck usernames and passwords, as well as any options that you don’t want safari saving autofill information for, how to clear out existing autofill data in safari for mac, select clear history, in the clear menu, select all history, for an iphone, how to delete autofill in safari for iphone, open settings, select safari, under the general tab, select autofill, toggle off the options for use contact info and credit cards, how to clear out existing autofill data in safari for iphone, click the icon in the bottom right that looks like an open book, in the bottom right-hand corner, select clear, select all time and press done, for an ipad, how to delete autofill in safari for ipad, click the settings app icon on the home screen to launch the settings app., click safari.”, scroll down and click clear history and website data., click clear to confirm the action., safari puts convenience and control in your hands with the ability to easily clear individual searches. just give a tap, hold that suggestion, then select "remove" when prompted – voila your search history is cleared quickly and efficiently..
How-To Geek
How to wipe your browsing history automatically in safari on mac.
Safari records all your web activity, so it's best to occasionally clear it with Safari's self-destruct tool. Here's how it works.
Your browser records all your web activity. Therefore, for added privacy, it's best to regularly clear your browsing history. Safari on your Mac can take care of this for you and automatically wipe your history every once in a while. Here's how to set it up.
Launch Safari on your Mac from the Launchpad or by looking it up on Spotlight .
Next, click "Safari" from the left corner of the menu bar and select "Preferences." Alternatively, you can press Cmd+comma on your keyboard to head directly into this menu.
Under the "General" tab, locate the "Remove History Items" option.
From the dropdown beside it, you can select how often Safari should delete your browsing history. You can have it cleared as frequently as every day or every year.
When you enable this setting, Safari automatically wipes logs of the websites you visit, your web searches, and more.
If you prefer reviewing your browsing history before clearing it, you can choose "Manually" from the dropdown and periodically erase your web activity from Safari yourself.
At the bottom of the "General" section, you'll also find a separate setting called "Remove download list items." With this option, you can configure Safari to automatically remove the list of files you downloaded (but not the files themselves).
You can have them wiped after a day, as soon as you quit Safari, or when the download is unsuccessful.
Enabling these won't affect your Safari browsing data on other Apple devices such as an iPhone or an iPad. As of yet, the options to automatically wipe your browsing history and the download list are not available on Safari's iOS and iPadOS apps.
There's a lot more you can do for a more secure experience on Safari, including browsing in incognito mode by default and optimizing it for maximum privacy .
- PC & Mobile
How To Automatically Delete Browsing History in Safari
Evan Gower With over a decade of experience in digital publishing. Evan leads our team with a keen eye for emerging tech trends. Read more May 28, 2019
Browsing history in Safari is there to help you quickly navigate to a specific page. In addition, Safari can remember the pages you frequently visit and display them in the main window as top sites. However, there is one downside to the browsing history.
The more pages you visit, the more data gets cached in the browser. This might slow down the overall browser performance and affect your user experience. On the other hand, browsing history is easily accessible to anyone using your Mac. So you might want to set the browser to automatically delete the history after some time.
Whatever the reason, it’s pretty straightforward to do, even if you are not tech-savvy. Check out the methods below.
Deleting the Browsing History
Launch Safari and press Cmd + Comma to access “Preferences”. You can also do it by selecting Safari, then Preferences in the menu bar.

Click or tap on the “General” button and select the pop-up menu next to “Remove history items”. By default, the history automatically gets deleted after a year. You can change the settings to after a day, week, two weeks, or a month. Of course, there is also an option to do it manually.
How to Manually Remove Safari History

Select “History” from the menu bar and click on “Clear history” at the bottom of the drop-down window. A pop-up window appears in Safari, and again, you get to choose the time frame – last hour, today, today and yesterday, or all history. Once you make the selection hit “Clear History” to confirm.
Safari Preferences Tips and Tricks
Aside from automatic history removal, you can customize the new window’s behavior and change the homepage. To change the homepage, click on the bar and insert a link http://www.techjunkie.com/ , for example. Then confirm by tapping/clicking on “Set to Current Page”.
By default, the files you download go to the Downloads folder, but you can change it to any destination of your liking. The downloaded files are automatically removed after day, but you can also change it to “manually”, “after quitting”, or “upon successful download”.
The “Tabs” button reveals a menu with a few options to tweak Safari tab performance. There are also a few useful shortcuts that can make your browsing experience faster. If you want to block all cookies, click or tap the “Privacy” button and check the box next to Cookies and website data.
Can You Do It on Your iPhone?
Sure you can, and the same method applies for your iPad and iPod Touch. That said, iOS on mobile devices doesn’t feature automatic scheduling and there is no option to select the time frame. In other words, you need to do it manually and the action deletes all the history and website data.
Tap on the Settings app, swipe up and select Safari. Once inside the Safari menu, navigate to “Clear History and Website data” and tap on it.

Tap “Clear History and Data” in the pop-up window to confirm and you’re good to go.
Note: Deleting Safari history via a mobile device affects all other devices signed into the same iCloud account. On the other hand, this action doesn’t affect the AutoFill data, so you’ll be able to easily log into websites you frequently use.
Can You Automatically Delete History in Chrome?
Unfortunately, there is still no way to automatically remove browsing history and cache in Chrome. However, you can delete cookies automatically. Take the following path to access the option:
Chrome > Settings > Advanced > Content settings (under Privacy and Security) > Cookies
Toggle on the button next to “Keep local data only until you quit your browser”. If you are really annoyed by cookies, you can also toggle the button next to “Block third-party cookies”.

How to Delete History in Chrome
To access your browsing history, press “Cmd + Y” on your keyboard and select the “Clear browsing data” option. The pop-up window allows you to select the time frame and type of data. It’s advisable to keep Passwords, Autofill, Hosted apps, and Media licenses unchecked.

Once you are done with the selection, click/ tap the “Clear Browsing Data” button to confirm This process is very similar on your iPhone.
Launch Chrome and tap the three dots to access the “More” menu. Select “History” and tap “Clear Browsing Data” at the bottom of the window. You can choose the type of data to delete – tapping on “Edit” allows you to pick the websites you want to delete or keep.
Unleash the Cookie Monster
By now, you know how easy it is to set automatic history removal in Safari on your Mac or PC. The automatic removal is not possible on your iPhone/iPad. However, it shouldn’t take you more than 10 seconds to reach the “Clear History and Website Data” section.
Whichever method you prefer, it’s advisable to get rid of the browsing history at least once a week to make sure your browser run smoothly.
Related Posts

Disclaimer: Some pages on this site may include an affiliate link. This does not effect our editorial in any way.

Parth Shah February 29, 2024

Lee Stanton February 23, 2024

Lee Stanton February 19, 2024
Send To Someone
Missing device.
Please enable JavaScript to submit this form.
Safari User Guide
- Get started
- Go to a website
- Bookmark webpages to revisit
- See your favorite websites
- Use tabs for webpages
- Import bookmarks and passwords
- Pay with Apple Pay
- Autofill credit card info
- View links from friends
- Keep a Reading List
- Hide ads when reading
- Translate a webpage
- Download items from the web
- Add passes to Wallet
- Save part or all of a webpage
- Print or create a PDF of a webpage
- Interact with text in a picture
- Change your homepage
- Customize a start page
- Create a profile
- Block pop-ups
- Make Safari your default web browser
- Hide your email address
- Manage cookies
- Clear your browsing history
- Browse privately
- Prevent cross-site tracking
- See who tried to track you
- Change Safari settings
- Keyboard and other shortcuts
Clear your browsing history in Safari on Mac
You can remove all records that Safari keeps of where you’ve browsed during a period of time you choose. If your Mac and your other Apple devices have iCloud set up for Safari , your browsing history is removed from all of them. Clearing your browsing history in Safari doesn’t clear any browsing histories kept independently by websites you visited.
Open Safari for me
Choose how far back you want your browsing history cleared.
When you clear your history, Safari removes data it saves as a result of your browsing, including:
History of webpages you visited
The back and forward list for open webpages
Frequently visited site list
Recent searches
Icons for webpages
Snapshots saved for open webpages
List of items you downloaded (downloaded files aren’t removed)
Websites added for Quick Website Search
Websites that asked to use your location
Websites that asked to send you notifications
Apple Event: May 7th at 7 am PT
> Learn more
> Add to your calendar
Disable "clear history" from safari?
I want to disable the "clear history" feature from my iPhone. How can I do this?
I have an iPhone SE. Thanks
iPhone SE (3rd generation)
Posted on Aug 29, 2023 5:06 AM
Posted on Aug 29, 2023 9:42 AM
The short answer is it can't be done, but it might help if you were to explain your need to do that. For example, perhaps Private Browsing will meet your requirements: Browse privately in Safari on iPhone - Apple Support
When you use Private Browsing, "Safari won't remember the pages you visit, your search history, or your AutoFill information." — Turn Private Browsing on or off on your iPhone - Apple Support
Similar questions
- Clear history Why i cannot clear my safari history ?because my history at iphone still connect at my ipad even I already clear many time .how to remove 233 2
- How to clear the Safari history on my iPhone? I have a iphone 7 and I would like to clear all the history from it. Is there an easy way to do this? [Re-titled by Moderator] 69 3
- Safari How do I clear my history on safari on ios13? 197 1
Loading page content
Page content loaded
Aug 29, 2023 9:42 AM in response to auldsport
Aug 29, 2023 12:16 PM in response to John Galt
I have one device, and it is shared among three. Two of the three are minors and they keep deleting history to hide whatever they are up to and it is screwing up my saved settings on my phone. Here is a silly example - it clears my history from Wordle and I can't see how many 3s I have accumulated :) - I am glad for wordle because that is how it came to my attention. I do not wish to deprive them of any device use, but my entreaties to stop deleting history have gone unheeded. I have limit adult content set up on my phone already, so either it doesn't work or they are hiding something that doesn't count as adult content. Luckily they don't know about private browsing.
Aug 29, 2023 1:28 PM in response to auldsport
auldsport wrote:
I have one device, and it is shared among three.
You are asking for trouble by doing that. Do not share your Apple ID. One person = one Apple ID:
Make sure that each family member has a unique Apple ID - Apple Support
Keep Apple IDs separate from one another. From https://appleid.apple.com/faq:
Can I share an Apple ID with someone else?
Your Apple ID should not be shared with anyone else.
There is no need to deprive anyone of anything. Use Family Sharing: Set up Family Sharing - Apple Support
Aug 29, 2023 3:53 PM in response to John Galt
Oh well, two more devices are not in the cards so they have to share mine for now.
Aug 29, 2023 5:32 PM in response to auldsport
There's alway another birthday coming up.

How to delete autocomplete history
Autocomplete is a default feature of many web browsers that attempts to anticipate what you are typing and suggests how to complete it. If you press Enter , the application automatically completes your typing with the remainder of the suggested text.
For example, if you type goog in your browser's address bar , the browser may suggest google.com by displaying the letters you haven't typed yet. If you press Enter , the browser goes to that website.
To delete your autocomplete history items, select your browser from the list below, and follow the instructions.
Google Chrome
Mozilla firefox, microsoft edge, internet explorer.

Google Chrome's autocomplete feature suggests sites and words/phrases based on web pages you've previously visited and past search queries. To delete autocomplete entries for individual web pages or search queries that you've typed in previously, follow the steps below.
To clear all suggestions for web addresses, see: How to clear the address bar history.
While similar, autocomplete and autofill are not the same thing. Autocomplete is for web address history and search queries that were typed into a search or address bar. Autofill is a browser tool that populates forms automatically with data, such as saved credit card information or a shipping address. To clear your autofill data, see: How to add, change, or clear autofill data.
Deleting unwanted entries one at a time
- Open Google Chrome .
- Locate the field where the unwanted item is being autocompleted. This field can be any search box or the address bar .
- Start typing the unwanted phrase or web address, or press the down arrow key until it is highlighted.
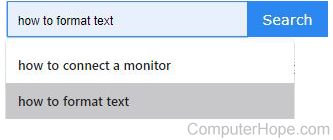
- Press Delete . If the entry is not removed, press Shift + Del .

Firefox's autocomplete feature suggests sites and words/phrases based on the web pages you've previously visited and past search queries. The following sections show you how to delete specific search entries or suggested websites one at a time, or clear all the autocomplete data at once.
- Open Mozilla Firefox .
How to delete all autocomplete history
The steps in this section clear your autocomplete history for all web addresses and search entries.
- In the drop-down menu , select Settings .
- In the window, click the Privacy & Security option in the left navigation pane .
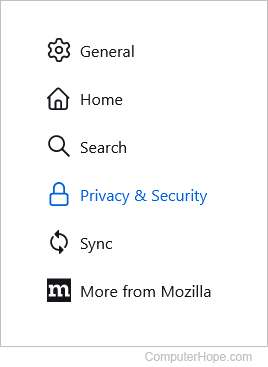
- Scroll down to the History section and click the Clear History... button.
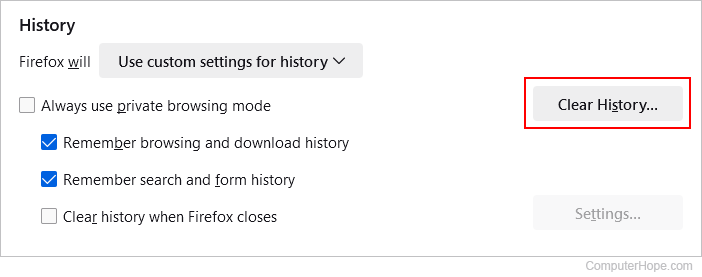
- In the prompt , choose a time range to clear ( A ), check the boxes next to Browsing & Download History and Form & Search History ( B ), and click OK ( C ).
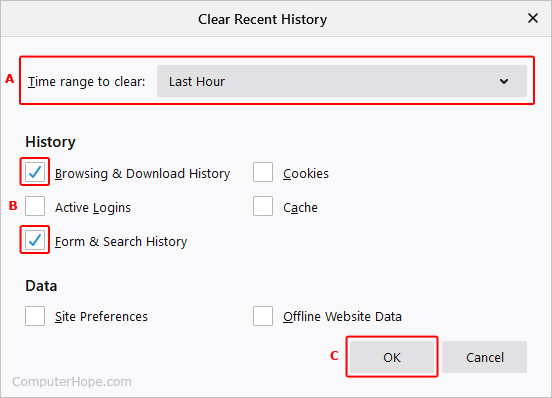
- Your autocomplete data is now erased for the selected time range.
You can press Ctrl + Shift + Del to directly access the Clear All History window.

Microsoft Edge's AutoComplete feature suggests sites and words/phrases based on web pages you've previously visited and past search queries. The following sections show you how to delete specific search entries or suggested websites one at a time, or clear all of the autocomplete data at once.
While similar, autocomplete and autofill are not the same thing. Autocomplete is for web address history and search queries that were typed into a search or address bar. Autofill is a browser tool that populates forms automatically with data such as saved credit card information or a shipping address. To clear your autofill data, see this page: How to add, change, or clear autofill data.
- Open Microsoft Edge .
To clear all your autocomplete data at the same time, delete your browsing history. To learn how, see: How to clear Edge history.
Some web page suggestions still show after clearing your browser history because, in Edge, they are also tied to your bookmarks . To clear these site suggestions, remove bookmarks. See: How to delete and organize Internet favorites and bookmarks.

While similar, autocomplete and autofill are not the same thing. AutoComplete is for web address history and search queries that were typed into a search or address bar. Autofill is a browser tool that populates forms automatically with data, such as saved credit card information or a shipping address. To clear your autofill data, see: How to add, change, or clear autofill data.
- Open Internet Explorer .
- In the menu, click Internet Options .
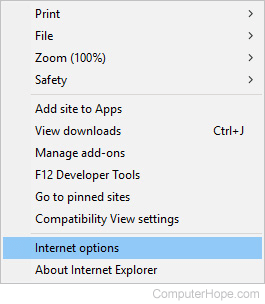
- Under the Content tab, in the AutoComplete section, click the Settings button.
- In the AutoComplete Settings window, using the checkboxes , select the fields where you want to store autocomplete data.
- Once you've made your selections, click the Delete AutoComplete history button.
- Check the boxes for areas whose history you'd like to clear, then click Delete .
- Click OK twice to exit the two windows.
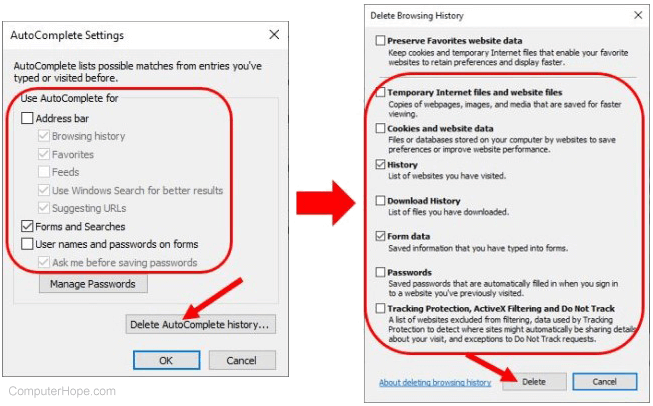
Safari's autocomplete feature suggests sites and words/phrases based on the web pages you've previously visited and past search queries. The following sections show you how to delete specific search entries or suggested websites one at a time, or clear all the autocomplete data at once.
Deleting individual history entries
- Open Safari .
- In the menu bar at the top of the screen, click History and choose Show All History from the drop-down menu . Or, press the keyboard shortcut Command + Y .

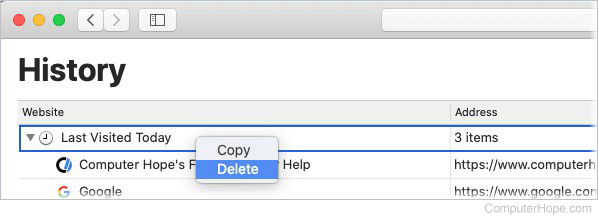
- In the History window, websites you've visited are listed chronologically by day. Press and hold the control key, and click an entry. In the context menu, select Delete .
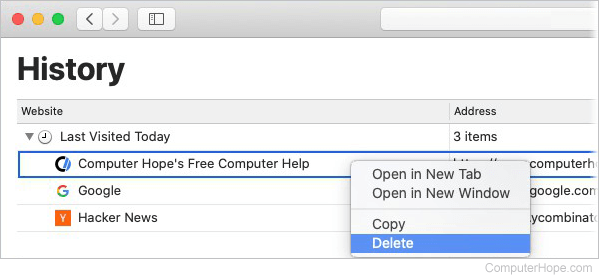
- To delete an entire day's history, press and hold the Ctrl key, click the day, and select Delete .
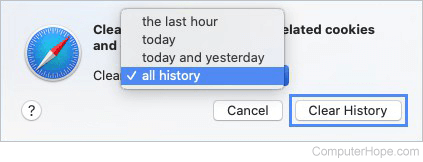
- In the menu , select All History , then click the Clear History button.
Some web page suggestions still show after clearing your browser history because, in Safari, they are also tied to your bookmarks . To clear these site suggestions, remove the corresponding bookmarks/favorites. See: How to delete and organize Internet favorites and bookmarks.

Opera's autocomplete feature suggests sites and words/phrases based on web pages you've previously visited and past search queries. The following sections show you how to delete specific search entries or suggested websites one at a time, or clear all the autocomplete data at once.
Deleting unwanted search field entries one at a time
- Open Opera .
- Locate the search field where the unwanted item is being autocompleted.
Deleting unwanted address bar entries one at a time
- Select History from the drop-down menu .
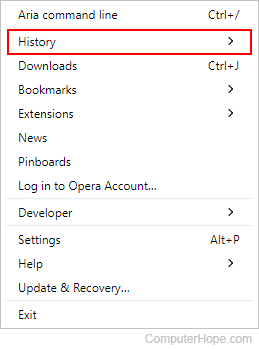
- In the expanded menu, click History .

- Move your mouse over the entry you'd like to delete and click the X that appears on the right side.

Clear all autocomplete entries at once
To clear all your autocomplete data at the same time, delete your browsing history. To learn how, see: How to clear Opera history.
Some web page suggestions still show after clearing your browser history because, in Opera, they are also tied to your bookmarks . To clear these site suggestions, remove the corresponding bookmarks. See: How to delete and organize Internet favorites and bookmarks.
Related information
- How to enable or disable autocomplete in a web browser.
- Individually remove page, search, or text in the search bar.
- How to clear the address bar history.
- How to view, save, and remove browser passwords.
- See the autocomplete definition for further information and related links.
- Internet browser help and support.

IMAGES
VIDEO
COMMENTS
type the following to open safari: ⌘-space, safari, enter; once safari is open/active, type this to enable searching of history: ⌘-y, ⌘-f; start typing whatever url you wish to delete from your autocomplete, it will start filtering the displayed list. select entries to be removed: (shift + scroll); or just use the mouse. press the delete key
Clear cookies and cache, but keep your history. Delete a website from your history. Block cookies. Use content blockers. Delete history, cache, and cookies. Go to Settings > Safari. Tap Clear History and Website Data. Clearing your history, cookies, and browsing data from Safari won't change your AutoFill information. When there's no history or ...
Open the Chrome app. Tap the 3 dots on the bottom-right of your screen. Scroll down a bit and select Clear browsing data. Adjust the Time Range at the top of the screen to say All Time. Make sure Autofill Data is checked off. Select Clear Browsing Data, then Clear Browsing Data again to confirm.
3. Click Sidebar button in the Safari Toolbar. Click Reading List. Search and delete the item from Reading List. 4. Safari > iCloud tabs. Click the iCloud tabs button in the Safari Toolbar and remove item from iCloud Tabs. Auto-complete. Choose Safari > Preferences, click Search, then deselect "Include search engine suggestions.".
To turn off any or all AutoFill forms in Safari on macOS, first open Safari's preferences from the Safari menu or press Command+, on your keyboard. In Safari's preferences, click the AutoFill tab You'll see a list of the things Safari can autofill. Uncheck any items you don't want Safari autofilling, or click "Edit" next to any of the four ...
Scroll down and tap Safari. It's about halfway down the list of settings. 3. Tap AutoFill. It's in the "General" section. 4. Slide the "Use Contact Info" switch to the Off position. The switch will turn gray, and Safari will no longer pull your name, phone number, or address from your information in Contacts. Method 2.
To change these settings, choose Safari > Settings, then click AutoFill. Complete forms with information from any contact card in Contacts. To view or edit information, click Edit. Save user names and passwords you enter on websites, then easily fill in the saved information when you revisit the same websites.
There's no way to delete many history entries at the same time. You can delete an entry at a time from history by swiping leftwards on it, exposing a Delete button on the right of the entry. Or holding down on the item in history until it previews and a "Delete" button is shown in the context menu. If you're doing some kind of iCloud sync with ...
Then, click on the "Delete" option in the upper-right corner. Firefox. You'll use the same trick in Firefox as you did in Chrome. To delete an autofill entry, just press the Delete key on ...
To clear Autofill data in Safari on a Mac, follow these simple steps: Open Safari Preferences: Launch Safari and click on "Safari" in the top menu bar. From the drop-down menu, select "Preferences." Access Autofill Settings: In the Preferences window, navigate to the "Autofill" tab. Here, you'll find various options for managing Autofill data ...
safari address bar re-opens after search When I search from the address bar in Safari, the address bar opens with a list of autocomplete suggestions generated from my search engine, bookmarks, history, etc. This is very helpful. If I ignore those suggestions and simply hit "enter", Safari loads my search engine of choice to search for that term (which is great and exactly what I want).
Delete history, cache, and cookies. 1. Go to Settings > Safari. 2. Tap Clear History and Website Data. Clearing your history, cookies, and browsing data from Safari won't change your AutoFill information. When there's no history or website data to clear, the button to clear it turns gray.
Press the "delete" key on your keyboard. This will clear the unwanted suggestion from your autofill results. If you'd like to remove all your autofill suggestions, click the "Tools" icon at the top right-hand side of your screen, then select "Internet Options" and pick the "Content" tab. Look for the AutoComplete section and click on "Settings."
Let's start with Safari. Clear Autofill History on Safari. Below are the steps to delete autofill on Mac from Safari: Launch Safari on your Mac; Click Safari from the menu and then click Reset Safari; Click Remove Other AutoFill Form Text and then click Reset This erases the Autofill information on Safari you entered before.
Clear your cookies and the cache, but keep your history. Delete a website from your history. Block cookies. Use content blockers. Delete history, cache and cookies. Go to Settings > Safari. Tap Clear History and Website Data. Clearing your history, cookies and browsing data from Safari won't change your AutoFill information. When there's no ...
How to clear out existing autofill data in Safari for Mac. Open Safari; At the very top of your screen next to the Apple icon, click Safari; Select Clear History; In the Clear menu, select all history; Select Clear History For an iPhone How to delete autofill in Safari for iPhone. Open Settings; Select Safari; Under the General tab, select ...
Open Safari for me. In the Safari app on your Mac, choose History > Clear History, then click the pop-up menu. Choose how far back you want your browsing history cleared. When you clear your history, Safari removes data it saves as a result of your browsing, including: History of webpages you visited. The back and forward list for open webpages ...
Launch Safari on your Mac from the Launchpad or by looking it up on Spotlight . Next, click "Safari" from the left corner of the menu bar and select "Preferences." Alternatively, you can press Cmd+comma on your keyboard to head directly into this menu. Under the "General" tab, locate the "Remove History Items" option.
Deleting the Browsing History. Launch Safari and press Cmd + Comma to access "Preferences". You can also do it by selecting Safari, then Preferences in the menu bar. Click or tap on the ...
When you clear your history, Safari removes data it saves as a result of your browsing, including: History of webpages you visited. The back and forward list for open webpages. Frequently visited site list. Recent searches. Icons for webpages. Snapshots saved for open webpages. List of items you downloaded (downloaded files aren't removed)
The short answer is it can't be done, but it might help if you were to explain your need to do that. For example, perhaps Private Browsing will meet your requirements: Browse privately in Safari on iPhone - Apple Support When you use Private Browsing, "Safari won't remember the pages you visit, your search history, or your AutoFill information."— Turn Private Browsing on or off on your ...
In the AutoComplete Settings window, using the checkboxes, select the fields where you want to store autocomplete data. Once you've made your selections, click the Delete AutoComplete history button. Check the boxes for areas whose history you'd like to clear, then click Delete. Click OK twice to exit the two windows.