- PRO Courses Guides New Tech Help Pro Expert Videos About wikiHow Pro Upgrade Sign In
- EDIT Edit this Article
- EXPLORE Tech Help Pro About Us Random Article Quizzes Request a New Article Community Dashboard This Or That Game Popular Categories Arts and Entertainment Artwork Books Movies Computers and Electronics Computers Phone Skills Technology Hacks Health Men's Health Mental Health Women's Health Relationships Dating Love Relationship Issues Hobbies and Crafts Crafts Drawing Games Education & Communication Communication Skills Personal Development Studying Personal Care and Style Fashion Hair Care Personal Hygiene Youth Personal Care School Stuff Dating All Categories Arts and Entertainment Finance and Business Home and Garden Relationship Quizzes Cars & Other Vehicles Food and Entertaining Personal Care and Style Sports and Fitness Computers and Electronics Health Pets and Animals Travel Education & Communication Hobbies and Crafts Philosophy and Religion Work World Family Life Holidays and Traditions Relationships Youth
- Browse Articles
- Learn Something New
- Quizzes Hot
- This Or That Game New
- Train Your Brain
- Explore More
- Support wikiHow
- About wikiHow
- Log in / Sign up
- Computers and Electronics
- Internet Browsers
- Safari Browser

How to Change Safari Settings on iPhone or iPad
Last Updated: November 4, 2019 Tested
This article was co-authored by wikiHow staff writer, Nicole Levine, MFA . Nicole Levine is a Technology Writer and Editor for wikiHow. She has more than 20 years of experience creating technical documentation and leading support teams at major web hosting and software companies. Nicole also holds an MFA in Creative Writing from Portland State University and teaches composition, fiction-writing, and zine-making at various institutions. The wikiHow Tech Team also followed the article's instructions and verified that they work. This article has been viewed 35,799 times. Learn more...
This wikiHow teaches you how to customize the behavior of the Safari web browser on your iPhone or iPad. If you're using iOS 13 or later, you now have the option to choose display options for individual websites in addition to making global changes.
Changing Web Preferences by Website

- Changes you make with this method will only affect the currently-open website. If you want your preferences to affect all websites rather than just for those you customize, see the Changing Web Preferences for All Websites section instead.

- Select Ask on a feature if you'd like to be asked each time the site tries to access the feature (default).
- Select Deny if you never want the site to access the feature.
- Select Allow to always allow the site to access the feature.

Changing Web Preferences for All Websites

- It is also possible to customize these settings on a per-website basis. See this method to learn how.
- Changing your web preferences using this method will not affect sites you've customized individually.

- Select Ask on a feature if you'd like to be asked each time any site tries to access the feature (default).
- Select Deny if you never want websites to access the feature.
- Select Allow to always allow websites to access the feature.
Changing General Safari Settings

- Use the sliders in the "IN SAFARI" section at the top to choose whether Siri has access to Safari.
- Use the sliders in the "IN SEARCH" section to customize whether Safari options show when searching your iPhone/iPad or using the Shortcuts app.
- Tap the back button when you're finished.

- Tap AutoFill to adjust which information appears automatically in form fields, such as your name, address, phone number, email, and credit card info.
- Pop-up ads are blocked in Safari by default. If you'd like to see pop-up ads on websites, slide the "Block Pop-ups" switch to the Off (gray) position.
- Tap Downloads to choose where to save files and media you download from websites. You'll have the option to choose a cloud storage service or your iPhone/iPad.

- To allow sites and services to track your browsing anywhere on the web, slide the "Prevent Cross-Site Tracking" switch to the Off (gray) position. To retain your privacy, you can leave this switch in the On (green) position.
- Cookies are used by websites to keep track of your visits, preferences, and login information (for sites that require username/password access). [2] X Research source The "Block All Cookies" switch is Off (gray) by default, but you can enable it by toggling it to the On (green) position.
- Safari will display a warning message if a website you visit is deemed fraudulent in some way. If you don't want to see these messages, you can toggle the "Fraudulent Website Warning" switch to the Off (gray) position.
- Adjust the "Check for Apple Pay" switch to reflect your desired Apple Pay behavior on all websites.

Expert Q&A
You might also like.

- ↑ https://www.cultofmac.com/636450/how-to-use-safaris-amazing-new-settings-in-ios-13/
- ↑ https://us.norton.com/internetsecurity-privacy-what-are-cookies.html
About This Article

1. Go to a website in Safari. 2. Tap the Aa button. 3. Tap Website Settings . 4. Make your changes. 5. Tap Done . Did this summary help you? Yes No
- Send fan mail to authors
Is this article up to date?

Featured Articles

Trending Articles

Watch Articles

- Terms of Use
- Privacy Policy
- Do Not Sell or Share My Info
- Not Selling Info
wikiHow Tech Help Pro:
Level up your tech skills and stay ahead of the curve
- Apple Watch
- Accessories
- Digital Magazine – Subscribe
- Digital Magazine – Log In
- Smart Answers
- New iPad Air
- iPad mini 7
- Next Mac Pro
- Best Mac antivirus
- Best Mac VPN
When you purchase through links in our articles, we may earn a small commission. This doesn't affect our editorial independence .
How to use Safari on a Mac

Safari is the web browser app bundled with all Macs as part of macOS. You don’t have to use it – if you prefer to use Chrome or Firefox, for example, you can install those apps for your web surfing needs. But in our experience, Safari is a good option – and as you can see from our round-up of best web browser apps for the Mac , it’s pretty much the best you can get.
If you are new to Safari this article will help you find your way around the app. And if you are a seasoned Safari user we will reveal a few Safari tips and tricks that you might not know, including some of the fab new features in Safari 11, the latest version of Safari for Mac.
If you’d like to read about using Safari on the iPad or iPhone, read this .
How to get the latest version of Safari for Mac
First things first. You will want to make sure you have the latest version of Safari. At the time of writing the most up-to-date version is Safari 11.1.
Here’s how to find out which version of Safari you are running:
- Open Safari.
- Click on Safari > About Safari in the menu.
- The resulting window will reveal the version number.
As long as your copy of MacOS – the Mac operating system – is up to date your copy of Safari should be because Safari is bundled as part of an operating system update.
However, you don’t have to be using the latest version of macOS to have the latest version of Safari. Apple is bundling Safari 11 with High Sierra, Sierra and El Capitan versions of the Mac OS. If you need to update your version of MacOS read this: how to update your Mac operating system software .
Now that you have the latest version of Safari you can start enjoying some of the new features that we will discuss below.
Safari basics
If you are a surfing novice you might want to familiarise yourself with these tips.
We’ll start off with the basics, such as how to get into Safari, how to search, and other useful pointers. You can skip this bit if you aren’t a Safari beginner, there are plenty of tips below that you might find useful.
You can find Safari in the Dock at the bottom of your Mac’s screen. Its icon looks like a compass.
How to use Safari
The big bar at the top of the Safari window is where you can enter a website URL or a search term to either take you directly to a website, or to a list of pages that match your query.
It will automatically search in Google (but you can change it so it defaults to another search engine).
You rarely have to enter a complete URL for a website. Once you have visited a site once you only need to type a few letters of its name and it will autofill the rest of the URL.
For example, type: ‘Face’ and it will autofill the rest of the URL and when you press enter it will take you straight to Facebook.
How to make it easy to find your favourite sites in Safari
There are lots of ways of making it easy to get to websites you frequently visit.
When you open a new tab (see below for details of how to do that) you will see your Favourites view including Frequently Visited Sites. You could also choose to see a Top Sites view, set a Homepage, just see an empty page, or have the Same Page show up. These are all options you can access in Safari > Preferences > General. Just click on the menu beside New tabs open with.
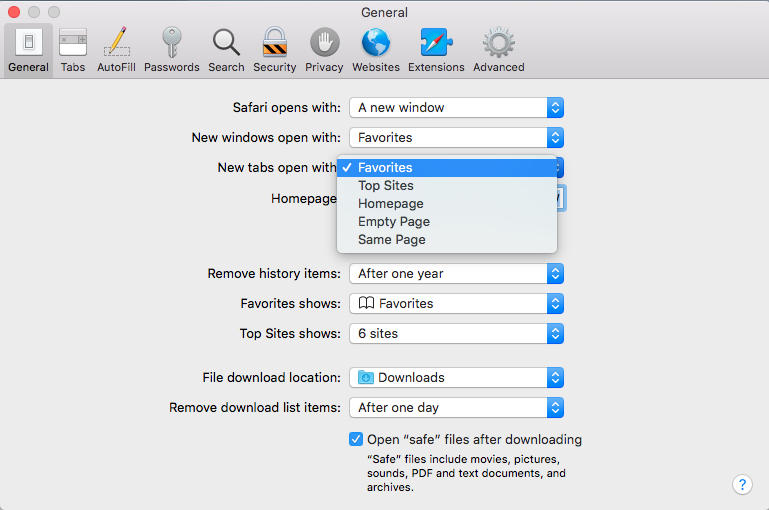
If you choose the Top Sites view you can adjust it to show 6, 12 or 24 sites. To add and remove Top Sites hover over the preview until you see an x and a pin icon. Pin those sites you wish to keep and click x on those you don’t image you will want to find again. The sites that appear in Top Sites tend to be those you visit most frequently.
You can choose one of these views for every time you open a new Safari window.
How to Pin a site in Safari
In Safari you can also ‘Pin’ favourite sites to the menu bar – a simple way of adding a shortcut to Facebook, YouTube or any site you visit frequently.
When you Pin a site you will see a small icon representing that site on the left of your tabs.
To Pin a particular web page right- or control-click on the tab and choose Pin Tab. Then it’s very easy to go straight to that site.

Using tabs in Safari
Back to tabs. You can open multiple tabs in a Safari window, this means that rather than having a different Safari window open for every website you are on, you can just have one Safari window open and multiple pages accessible through that.
To open a new tab press Command + T.
There are two ways that you can see a preview of the different tabs you have open:
- You can see a short summary of the name of the web page on the tabs themselves. This might be sufficient if you only have one or two tabs open, but once you have more than eight you’ll probably find the summary is too short to be useful.
- Or, you can click on the icon that looks like two boxes on the right of the search/URL box. This will show a thumbnail view of all the web pages you have open.
While we’re on the subject of Tabs, you can close a single tab just by hovering over the tab and clicking on the x that shows up in the corner of that tab.
It’s also possible to close all but one tab. Just hold down the Option/Alt key when you click on the x to get rid of all the other tabs that are open, except for the page on that tab.
How to tell which Safari tabs are playing audio
Not everyone wants to surf the web in silence though. There is lots of very worthy audio and video content available on the web and no doubt many surfers wouldn’t want to miss out on that.
The problem is when you have multiple web pages open and more than one of them is blaring out audio.
Luckily there is another Safari tip to fix that.
You can identify which of your open tabs is playing audio by the speaker symbol that appears in the far right of the Safari tab associated with that web page.
It’s possible to mute the audio with a single click on the speaker symbol without even opening the tab.

And if more than one Safari webpage is playing audio you can choose to mute them all at once. Just click on the speaker symbol in the URL bar and choose Mute all Tabs.
Alternatively, you can Option/Alt-click on the speaker icon of the tab you do wish to listen to and mute the audio on all the other tabs.
How to reopen all windows from the last session
Here’s another useful tip. You can easily reopen all the tabs you had open last time you were using Safari.
Click History > Reopen All Windows from Last Session to quickly recover all the windows you were recently looking at. You might also find this helpful: How to export bookmarks from Chrome to Safari
How to show the full URL in Safari
Another handy Safari tip. In Yosemite Safari stopped showing the whole URL – a feature designed to help avoid users being taken in by phishing scams, wherein the URL is obfuscated. In other words, if you’re visiting https://macworld.co.uk/this/page/that/page then all you’ll see in the address bar is macworld.co.uk.
If this isn’t what you want, perhaps you want to see the full URL of the article you are reading, you can change things so that the whole URL is shown.
Open Safari’s preferences dialog box (Cmd+,) then click the Advanced icon and put a check alongside Show Full Website Address.
How to change how you view websites in Safari
One of our favourite features in Safari 11 is the extra control we have over the web. You can tweak the settings of specific websites so that they suit you for example.
How to change the font size on a website
You can tweak your settings so that when you visit a specific site the images and text are bigger – perfect if you are frustrated to find that the text on a favourite website is a bit too small for your eyes.
Here’s how to enlarge (or reduce) the font size on a particular website so that it stays that size whether you visit:
- Go to Safari > Preferences.
- Click on the Websites tab.
- Click on Page Zoom.
- Find the site you want to customise (any site you have open or have recently visited will be listed here).
- Choose a number bigger or smaller than 100% depending on how large you want the text and images to be.
You can do this on a per website basis, or if you frequently find that the text on websites is too small for you, you can choose to default to the percentage that suits you wherever you go on the web. Note that not all websites are created the same so some will naturally have larger type than others.

To choose the zoom percentage for all websites, click in the drop down box beside “When visiting other websites”.
Another benefit of having access to these controls that allow you to change the way you view the web is that it enables you to stop seeing ads and auto-playing videos. We’ll look at that below.
How to stop ads and auto-playing videos in Safari
Another enticing feature of Safari is the way you can choose to adjust the settings so that you never see another ad or auto-playing video again. We’ll look at how to do that next.
How to stop autoplay audio and video in Safari
Perhaps you are frustrated by auto-playing video blaring out every time you visit a website.
With Safari 11 you can disable autoplay video, so you will never again have to hear voices while you are browsing the web. Here’s what to do:
- Open the offending website.
- Click on Safari > Settings for This Website (or right-click the URL box and select Settings for This Website).
- Allow All Auto-Play
- Stop Media with Sound
- Never Auto-Play
Stop Media with Sounds is the default option, and it will essentially stop any video from starting if the sound is set to be on. If the video is set to play silently it will still run but you won’t hear it, unless you choose to.
If you would rather not let auto-playing video play, you can choose Never Auto-Play.
Remember that if you adjust the settings this way it will only apply to autoplay videos on that website. If you’d like to never see an autoplaying video again follow these steps:
- Go to Safari > Preferences and click on Websites.
And there is an option below to choose the same settings “When visiting other websites”.
We have a complete tutorial that explains how to use this feature here: How to stop autoplay video in Safari & Chrome on Mac .
We also cover how to stop Safari asking to use your location data here .
How to stop seeing ads on websites in Safari
While ads pay a part of our wage, we realise that some ads can really reduce the enjoyment of web browsing. Usually these are ads that have something wrong with the way they have been coded and aren’t behaving as intended, or even worse they are spam ads that have crept onto the ad networks. We are honestly as frustrated as you are!
One of the big changes Apple bought to Safari 11 was the ability to really manage the ads that you see – this was part of Apple’s effort to make the web work better. Effectively, if Apple can remove ads that aren’t behaving as intended and are jamming up page loading times and the like, then Safari will perform quicker, which means that the surfer has a better time surfing.
There are a few ways you can take advantage of these anti-ad related features in Safari 11.
One way is to choose to surf the web – or certain pages – in Reader mode.
Reader mode is a way of viewing webpages that Apple introduced back in 2010 in Safari 5. Reader displays just the text and images from a webpage, without any of the other page furniture. We think it is a bit like reading a Word document or a PDF. The feature hasn’t changed much over the years, but in Safari 11 it’s became possible to choose for a site to always be viewed in Reader Mode.
First, here’s how to view a site in Reader mode:
- Click on the stack of lines to the left of the URL bar.
- This will automatically change the webpage to Reader view.
- Click on the stack of lines to turn Reader view off.
It’s worth checking how a site appears in this mode before switching over to it because not all sites implement it particularly well (sometimes you will find that an article stops abruptly because only one page has been carried into Reader view). Some sites don’t have a Reader view at all (such as Apple, for example).
And here is how to customise your settings so that whenever you visit that site the pages are viewed in Reader mode:
- Click on Reader.
- Find the site you want to customise (any site you have open, or have recently visited will be listed here).
- Toggle the drop-down menu beside that site to On.
A quicker way to do this is to right-click or control-click on the stack of lines beside the URL and choose Use Reader Automatically.
Or, as long as you are on the website you wish to change the setting for, you can click on Safari > Settings for this Website, and choose Use Reader When Available.
How to surf in private using Safari
Another useful feature in Safari is the option to use a private browsing window. This doesn’t just keep your browsing habits private from someone else who has access to your Mac, it also means that you are incognito – in other words even the websites you are visiting don’t have any information about you.
Go to Safari > File > New Private Window (or shift-cmd-n). You can tell if a window is private because the search bar will be grey. Any new tabs you open in this window will be private.
Alternatively, to open a Private Browsing window you can click shift, command and N.
You can tell it’s a private window because the URL field will be greyed out.
Hold down Option/Alt while picking Private Browsing to quickly switch it on and bypass the ‘Do you want to switch on Private Browsing?’ alert window if you happen to see it frequently. We have a complete guide to private browsing on Safari here .
For even more privacy, you can choose to always search with privacy-obsessed DuckDuckGo as your default search engine. Go to Safari > Preferences > Search, and click on the Search Engine. Then select Duck Duck Go from the Search Engine dropdown list. You can choose from Google, Bing, Yahoo or DuckDuckGo.
How to delete your histroy in Safari
If you didn’t search using a private browsing window you can still delete your history and evidence of what you were up to.
- Click on History.
- Scroll down and click on Clear History.
- You can choose to clear history for Today, the last hour, today and yesterday, or all history.
- You’ll see a warning that Clearing history will remove related cookies and other website data. Basically this is warning you that if you go ahead and Clear History you may find that you have to log onto websites, or shopping cart information may disappear.
- If you are happy with that then click on Clear history.
We have a complete tutorial all about how to delete your browser history on a Mac here .
How to delete cookies in Safari
Another new feature that came in Safari 11 was the introduction of privacy protection, a feature that’ll stop those annoying Amazon adverts showing you products after you’ve bought them.
Safari actively tries to block the cross-site tracking data that powers targeted adverts. While it won’t completely stop it, it should have a noticeable effect when using the browser.
According to Apple this isn’t an attempt to block ads, but rather to protect your privacy.
This means that you should no longer need to delete cookies if you want to stop seeing targeted ads (cookies have also been known to affect the price for goods if you have previously shown an interest in a product so deleting cookies could avoid such practices).
If you want to go a step further regarding cookies in Safari 11 there are some preferences changes you can make.
- Beside Website tracking click on Ask websites not to track me.
- Beside Cookies and website data click on Block all cookies.
If you aren’t using Safari 11 you can still delete cookies.
- Click on the Privacy tab.
- Click on Remove All Website Data…
Here’s how to add your own background image to Safari.
Author: Karen Haslam , Editor

Macworld editor since 2008, Karen has worked on both sides of the Apple divide, clocking up a number of years at Apple's PR agency prior to joining Macworld two decades ago.
Karen's career highlights include interviewing Apple's Steve Wozniak and discussing Steve Jobs’ legacy on the BBC. Her focus is Mac, but she lives and breathes Apple.
Recent stories by Karen Haslam:
- How to scan documents on iPhone
- How to back up a MacBook or Mac
- Apple Events 2024: Apple’s event plans
- How to Use Copilot In Word
- Traveling? Get These Gadgets!
How to Control iPhone Safari Settings and Security
Control your settings and security in the iPhone browser
:max_bytes(150000):strip_icc():format(webp)/SamCostello-d7fcf106ec2048ccb06d1e2190b3396d.jpg "open preferences in safari")
- Ithaca College
In This Article
Jump to a Section
How to Change the Default iPhone Browser Search Engine
How to use safari autofill to fill out forms faster, how to view saved passwords in safari, control how links open in iphone safari, how to cover your online tracks using private browsing, how to clear your iphone browser history and cookies, prevent advertisers from tracking you on your iphone, how to get warnings about potentially malicious websites, how to block websites, ads, cookies, and pop-ups using safari, how to use apple pay for online purchases.
- Take Control of Your iPhone Security and Privacy Settings
What to Know
- To change search engine, go to Settings > Safari > Search Engine . To control links, go to Safari > Open Links .
- To use AutoFill, go to Settings > Safari > AutoFill > turn on Use Contact Info .
- To view saved passwords, go to Settings > Passwords & Accounts > Website & App Passwords .
This article explains how to adjust Safari settings and security on your iPhone or iPad.
Searching for content in Safari is simple; tap the menu bar at the top of the browser and enter your search terms. By default, all iOS devices use Google for web searches, but you can select a different search engine by following these steps:
Open the Settings app.
Select Safari > Search Engine .
Select the search engine you would like to use as the default. Options include Google , Yahoo , Bing , and DuckDuckGo . The setting is automatically saved, so you can search using the new default search engine right away.
Similar to a desktop browser , Safari automatically fills in forms by grabbing information from your address book. This saves time because you don't need to fill out the same forms over and over again. To use this feature, follow these steps:
Select Safari > AutoFill .
Toggle the Use Contact Info switch to on/green.
Your information appears in the My Info field. If it does not, select the field and browse your address book to find your contact information.
Older versions of iOS allowed you to change your username and password info here. If you want to save, edit, or delete usernames and passwords in iOS 13 or later, go to the Passwords & Accounts settings page (select Settings > Passwords & Accounts ).
To save frequently used credit cards to make online purchases quicker, move the Credit Cards switch to on/green. If you don't have a credit card saved on your iPhone, select Saved Credit Cards , and add a card.
Saving usernames and passwords in Safari means you're not forced to memorize login credentials to access a website. As this data is sensitive, iOS takes measures to protect it. If you need to look up a username or password, you can do so by following these steps:
Select Passwords & Accounts > Website & App Passwords .
You are asked to authorize access to this information using Touch ID , Face ID , or your passcode.
A list details all the websites for which iOS has saved login data. Select a site to view the corresponding username and password.
You can choose where new links open by default—in a new window that appears either in front of or behind the page you are currently viewing. Follow these steps to adjust this setting:
Select Safari > Open Links .
Select In New Tab to open links in a new window in Safari and to have that window appear in front of the current tab. Select In Background to open links in a new window that appears behind the page you are currently viewing.
Browsing the web leaves digital footprints. Between browsing history, cookies, and other usage data, you may prefer to cover some of those tracks. The Safari Private Browsing feature prevents Safari from saving information about your behavior—including browsing history, cookies, and other files—while it is turned on.
When you want to delete your browsing history or cookies manually, follow these steps:
Select Safari > Clear History and Website Data .
A menu appears asking if you would like to clear the browsing data. Select Clear History and Data .
Cookies allow advertisers to track you across the web. This lets them build a profile of your behavior and interests to target you with ads better. Here's how to opt-out of some of that tracking data:
Select Safari .
Move the Prevent Cross-Site Tracking switch to on/green.
Older versions of iOS included a Do Not Track feature that asked websites not to track your browsing data. Apple removed this feature, as the request was never mandatory and did not do much to limit the tracking of user data.
Setting up fake websites that look like ones you normally use is a common method of stealing data from users. Safari has a feature to help avoid these sites. Here's how to enable it:
Move the Fraudulent Website Warning switch to on/green.
You can speed up your browsing, maintain privacy, and avoid certain ads and websites by blocking cookies. Here's how:
Move the Block All Cookies switch to on/green, then select Block All to confirm the action.
If you set up Apple Pay , you can use it at any participating retailer to complete purchases. To make sure you can use it at those stores, enable Apple Pay for the web. Here's how:
Move the Check for Apple Pay switch to on/green.
Take Control of Your iPhone Security and Privacy Settings
While this article focuses on privacy and security settings for the Safari web browser, the iPhone has other security and privacy settings. These settings can be used with other apps and features to protect private info stored on your iPhone .
Get the Latest Tech News Delivered Every Day
- How to Clear Search History on iPhone
- 3 Ways to Clear Cache on an iPad
- How to Manage Browsing History on Safari for iPad
- 4 Ways to Play Fortnite on iPhone
- How to Find a Wi-Fi Password on an iPhone
- The Top 10 Internet Browsers for 2024
- How to Manage History and Browsing Data on iPhone
- How to Change the Default Search Engine in Safari for iOS
- How to Enable or Change AutoFill Information on an iPhone
- How to Disable JavaScript in Safari for iPhone
- How to Solve Safari Crashes on the iPhone
- How to Clear Cookies on iPad
- Firefox Focus: What It Is and How to Use It
- How to Add, Edit, and Delete Bookmarks in iPhone's Safari
- How to Manage Your Browsing History in Safari
- Managing History and Other Private Data in Safari for macOS
The Ultimate Guide to Customizing Safari on Mac
Make Safari an even better browser for your Mac by customizing it. Here's how to tweak it to your liking.
Safari can be a pleasure to use if you take the time to customize it and get rid of any potential annoyances. You don't need to spend a lot of time on this task.
As you'll see below, even a few simple tweaks can go a long way in polishing up Apple's native browser.
1. Tweak Tab and Window Behavior
Start by setting up Safari to restore windows from the previous session every time you open the app. To do this, under Safari > Preferences > General , select All windows from last session from the Safari opens with dropdown menu.
This tweak makes the homepage seem redundant, because it changes what you see when you first open Safari. Despite that, it's a good idea to set the homepage to your most-loved web page to keep it accessible with a click of the Home button on the toolbar.
From the same settings section, you can also choose what shows up in every new window and tab by default. A blank page, your homepage, and your most frequently opened pages are a few of your options here.
2. Clean Up the Toolbar
While Safari's toolbar is minimal to begin with, it gets cluttered up fast when you install extensions. That's because each extension automatically enables its own toolbar button.
Also, you'll find that you have no need for certain toolbar buttons. For example, if you know the shortcut for displaying the sidebar ( Cmd + Shift + L ), you don't need the corresponding button.
In any case, if you don't want to get distracted by the sight of unnecesary toolbar buttons, it's important to clean up the toolbar once in a while. To do that, first right-click on a blank space in the toolbar and then click on the Customize Toolbar option that appears.
From the toolbar button choices that show up in a box, drag the ones you need to the toolbar and the ones you don't off the toolbar. You can also rearrange buttons by dragging and dropping them into place. Click on the Done button once you're satisfied with the results.
(Pay attention to the default set of buttons at the bottom of the toolbar box. You can restore this set any time if you ever make a giant mess of your toolbar setup.)
If you simply want to rearrange or get rid of toolbar buttons, you can do that even without opening the Customize Toolbar box. Hold down the Cmd key and move the buttons around or drag them off the toolbar as needed.
3. Set Up Bookmarks and the Reading List
Your Safari customization is incomplete without easy access to your favorite web pages. If you want to import your bookmarks from Chrome, Firefox, or an HTML file, you can do so via File > Import From . You can also create bookmarks from active tabs with the Bookmarks > Add Bookmark menu option or with the shortcut Cmd + D .
Read our guide to bookmarks and favorites in Safari to learn everything you need to know about managing your bookmarks.
Apart from bookmarks, Safari has another useful read-it-later feature called Reading List. It's ideal for temporary bookmarks, reading articles offline, and sharing them between your Apple devices.
To add a page to your Reading List, click on the tiny plus button that appears next to the URL in the address bar when you hover over it. Clicking on Bookmarks > Add to Reading List when you have the page open also works.
Your Reading List content shows up in the second tab in Safari's sidebar. You can access the list directly by clicking on View > Show Reading List Sidebar .
Want Safari to save your Reading List articles for offline use automatically? To make this happen, visit Safari > Preferences > Advanced and select the checkbox next to Reading List .
4. Customize Websites
Safari lets you configure a few settings on a per-website basis. These include camera and microphone access, push notifications, and auto-play settings. To tweak these, visit Safari > Preferences > Websites .
In the sidebar, you'll see the list of settings you can configure for individual websites. For each setting, notice the default behavior listed below the right-hand pane. You can leave that setting alone or pick a different option from the dropdown menu provided.
Above this setting, you'll see a list of currently open websites and can configure a specific setting for each of them. For example, in the Auto-Play pane, notice that the default Safari behavior is to stop auto-playing media.
Now, let's say you have YouTube open in the background. You can then program Safari to auto-play all content on YouTube in future. To do this, select the Allow All Auto-Play option from the dropdown menu next to YouTube in the list of active websites.
Related: Safari Can't Open the Page? Here's What to Do
5. Create Custom Keyboard Shortcuts for Bookmarks
Did you know that you can set up shortcuts for your Safari bookmarks? It's one of those tiny but useful macOS features you'll definitely want to know about.
To create shortcuts for a bookmark, first visit System Preferences > Keyboard > Shortcuts > App Shortcuts . Now, click on the plus button below the right-hand pane to reveal the shortcut creation popup. Here, select Safari from the Application dropdown menu.
Next, switch to Safari and note the name of the bookmark you want to create the shortcut for, exactly as it appears under Bookmarks > Favorites . Type that name in the Menu Title field back in the macOS settings app you switched from.
(You can also copy the bookmark name from the Bookmarks Editor and paste it into the Menu Title field.)
Now, highlight the field next to Keyboard Shortcut and hit the key combination you want to use for the bookmark in question. Click on the Add button to wrap up.
The shortcut you set up should start working immediately in Safari, as long as the address bar isn't selected. Test it out and then set up shortcuts for the rest of your most-important websites.
Be sure to also check out our Safari shortcuts cheat sheet .
6. Add More Features With Extensions
Safari's extension gallery hasn't ever been as vast as that of Chrome and Firefox. It's a pity that now it has shrunk further thanks to Apple's decision to kill support for non-App Store extensions.
Despite that, you still have quite a few useful extensions to choose from. Here are a few of those we consider must-haves:
- AutoPagerize : This auto-loads paginated webpages.
- Shut Up : Will auto-hide comments on webpages.
- Awesome Screenshot : Capture and annotate screenshots.
7. Enable Special Features With the Develop Menu
You'll notice that you can't inspect web pages in Safari to debug and tweak page content. That's because this advanced feature is available only via a hidden menu.
To reveal this---the Develop menu---first visit Safari > Preferences > Advanced . There, at the bottom of the pane, select the checkbox for Show Develop menu in the menu bar .
You'll then see the menu show up between the Bookmarks and Window menus. It lets you empty caches, tweak webpages on the fly, disable images, and so on.
With the Develop menu enabled, an Inspect Element option shows up in the right-click menu. Click on this item to reveal Safari's Web Inspector for the active page.
Make Safari Your Most Favorite Browser Yet
Safari is one of the best default Mac apps you don't need to replace . We consider it the optimal browser for Mac (and iOS) users . And we guarantee that with changes like the ones we discussed above, Safari will be a delight to use every day.
New to Mac? How to customize Safari settings

One of the things you want to do when get a new device or computer is customize it. And if you use Safari as your preferred web browser on Mac, it’s no different. You can set an image as your home page or customize the Safari toolbar . These sorts of personalization adjustments can make your experience more pleasant.
If you’re new to Mac and want to know which Safari options you can change to make it just the way you like it, we’re here to help. Here’s how to customize Safari on Mac.
Customizing Safari on Mac
Changing the window settings, working with websites, managing safari extensions, miscellaneous settings.
The simplest way to start with customizing Safari is with the general settings for what you see when you open Safari windows and tabs.
Open Safari and click Safari > Preferences from the menu bar. In the pop-up window, choose the General tab. You can then adjust each of these settings.

- Safari opens with : When you open Safari, you can choose to open a new window or a private window. You can also open it with all windows from your last session or just non-private windows from your last session.
- New windows open with : If you only open a new window in Safari, you can pick what displays from Favorites to your homepage to a specific folder.
- New tabs open with : You can also choose what to see when you open a new tab from things like top sites to your homepage to an empty page.
- Homepage : Pop in a URL or click the Set to Current Page button to determine your homepage.
- Favorite shows : Choose which folder you want to see for your Favorites.
- Top Sites shows : Pick how many top sites to show.
The other few settings on the General tab let you choose how often to remove history and download list items in addition to where you want to save your downloads and if you want to open them automatically.
Safari offers several features for how you want to work with the websites you visit regularly. To check out these options, open Safari , click Safari > Preferences from the menu bar, and choose the Websites tab.
On the left side, you’ll see your various options like Reader, Auto-Play, Notifications, and more. When you pick an option, you can then make your adjustments to the sites that display on the right. These settings let you decide how you want to handle specific items for different websites.
You can do things like:
- Reader : Automatically open websites using Reader.
- Auto-Play : Stop websites from automatically playing media.
- Location : Allow or deny websites from accessing your location.
- Downloads : Allow or deny downloads from sites.
- Notifications : Show alerts from sites in your Notification Center.
To delete a website from the list, select it and click the Remove button.

After making your changes for those particular sites, you can select an overall setting for each option to apply to other websites that aren’t on the list. Just click the When visiting other websites drop-down box at the bottom and make your choice.
Extensions for Safari are just like add-ons for Firefox or Chrome. They’re third-party tools that you can install for extra features and functions. Those for Safari may not seem as plentiful as other browsers, but you can still find some useful ones.
Open Safari , click Safari > Preferences from the menu bar, and choose the Extensions tab. If you already have some installed, this is where you’ll manage them. You can enable, disable, or uninstall extensions.

To shop for others, click the More Extensions button at the bottom. This will take you directly to that section on the Mac App Store where you can browse the Safari extensions.
Here are settings that you’ll find on the other tabs in Safari Preferences that relate to customization.
Tabs tab : Show site icons on tabs and choose to open pages in tabs or windows when you click a link.
AutoFill tab : AutoFill forms and credit cards.
Passwords tab : View saved usernames and passwords and enable AutoFill for them.
Search tab : Pick your default search engine and Smart Search Field options.
Security tab : Identify fraudulent websites and enable JavaScript.
Privacy tab : Prevent cross-site tracking, block cookies, and enable Apple Pay and Apple Card.
Advanced tab : Show the full website address, enable the Reading List, and select a style sheet.
Wrapping it up
After you finish getting the basics of your Mac set up, you might want to spend a little time customizing the way that Safari looks and works. And since the settings are all in one spot, you can move through each tab and set everything the way you want it.
Are you going to customize Safari on your Mac? Or are there only certain settings that you want to change? Let us know!
How to manage privacy and security settings in Safari on Mac

Apple continues to add new features to Safari on a regular basis to try to make our web browsing experience faster, easier, and—above all—more secure.
You can open up a private browser window anytime you want in Safari's file menu and Safari won't save your browsing history and will ask websites you visit not to track you. But there are a few more steps you might want to consider taking.
The place to go for most of these things is in Safari's preferences window, accessed from the Safari menu.
How to guard against unsafe files
How to identify fraudulent websites, how to disable javascript, how to prevent cross-site tracking, how to block all cookies in safari, how to remove website data, how to clear your browsing history, how to check for apple pay on websites, how to allow or deny camera, microphone, and location access, how to block pop-up windows.
As with all things related to security, there's a balancing act between convenience and safety. Safari will automatically open certain types of "safe" files you download from the web as a matter of convenience. But because a malicious file could be disguised as a "safe" file, it's a good idea to guard against unsafe files—and it's as easy as checking a box.
- Launch Safari . If it's not in the Dock, you can find it in the Applications folder.
- From the Safari menu, choose Preferences... .

- Click the General button.
- Uncheck the box to Open "safe" files after downloading .

Downloads will occur as they usually do, and to the location you have chosen, but the files won't automatically open.
Safari already identifies websites that use encryption (indicated by a padlock icon in the address bar) and an EV certificate which indicates a more extensive identity verification of the website operator (indicated in green). Safari also uses Google Safe Browsing technology--which is simply a list of websites that may contain malware, unwanted software, or phishing scams.
If it's not already on, here's how to do so:
Master your iPhone in minutes
iMore offers spot-on advice and guidance from our team of experts, with decades of Apple device experience to lean on. Learn more with iMore!
- Click the Security button.
- Check the box to Warn when visiting a fraudulent website .

If you happen to run across one of these sites, Safari will put up a full-screen warning about the site before you can proceed.
Many—if not all—webpages contain JavaScript, which enables certain functionality for web pages, such as displaying the time and date or displaying an image from a set of options.
You can disable JavaScript if you like, but it may impact the functioning of the web page.
- Uncheck the box to disable JavaScript .

If you've been using Safari and suddenly seen a plethora of lawnmower ads not long after doing some web research about lawnmowers, then congratulations: you've discovered crop-site tracking. It's a way of keeping track of your behavior on one part of the internet to show you ads while using a different part of the internet. If you prefer, you can turn it off.
- Click the Privacy button.
- Check the box to Prevent cross-site tracking and check the box to Ask websites not to track me .

Keep in mind that while you can ask websites not to track you, it's up to the website creator to honor your request.
Cookies are small text files a website may store on your Mac to help identify you or your Mac when you visit the website in the future. Examples of content stored in a cookie are your name, site browsing history, and preferences. If you don't want Safari to use cookies, you can shut it off.
- Uncheck the box to Block all cookies .

If you ever decide to remove website data from your Mac, you can do it selectively for certain websites or remove all the data.

- Click the Manage Website Data... button.
- Select a website and click the Remove button to remove the site's cache, cookies, or local storage or click the Remove All button to delete data for all websites.

Rather than root around through a set of checkboxes and pop-up menus, you can clear your browsing history, cookies, and website data with a menu command.
- From the Safari menu, choose Clear History... .
- From the Clear pop-up menu, choose how far back you want to go.
- Click Clear History .

In addition to the history of the website pages you've visited, you'll also give the heave-ho to recent searches, a list of items you have downloaded, the frequently visited site list, and other information.
If your Mac and other devices have Safari turned on in iCloud preferences, the clear history command will remove the browsing history from Safari on those other devices.
You can enable Safari on your Mac to show you websites that can accept payments via Apple Pay. You can then make the payments from your Apple Watch or iPhone, or using Touch ID if it's built into your Mac.
- Check the box to Allow websites to check if Apple Pay is set up .

Safari includes the ability to determine whether or not websites ask can use your Mac's camera and microphone. Here's how to set it up.
- Click the Websites button.

- From the General section of the sidebar, click Camera .
- Click the pop-up menu for "When visiting other websites" and choose Ask, Deny, or Allow , depending on your preference.

The settings work in exactly the same way for your Mac's microphone and your location. Simply click Microphone or Location in the sidebar. Similarly, you can change the setting for currently open websites to suit your preference.
Some web pages that you visit will automatically display a pop-up window that will block content—often with an ad—that you're trying to view. While this can be annoying, there are some sites that require pop-up windows to work properly. Fortunately, Safari provides fine-grained control of these pop-up windows.
- From the General section of the sidebar, click Pop-up Windows .
- Click the pop-up menu for "When visiting other websites" and choose Block and Notify, Block, or Allow , depending on your preference.

Similarly, you can change the setting for currently open websites to suit your preference.
If you choose Block and Notify, a small icon will appear on the right side of the Smart Search field. Click it to display the pop-up windows for the web page.
Great Mac accessories

Apple AirPods 2 (From $159 at Apple)
The best Apple accessory has gotten betting with AirPods 2. Now offering a wireless charger case, the popular earbuds feature the new Apple H1 headphone chip that delivers a faster wireless connection to your devices, as well as support for "Hey Siri."

Samsung T5 SSD (From $88 at Amazon)
This solid-state drive from Samsung is speedy, tiny, and portable. It also connects using USB-C, making it a perfect companion for your new Mac.
Let us know in the comments below.
Updated August 2019: Updated through macOS Mojave and the macOS Catalina beta.

Mike Matthews is a writer at iMore.com. He has used Apple products all the way back to the Apple II+. He appreciates no longer having to launch apps by loading them from a cassette tape recorder.
Apple's on-device AI plans might have been confirmed as the tech giant acquires another AI startup
All-screen iPhone SE 4 tipped for a 2025 launch, but those hoping for a low-budget powerhouse are set to be disappointed
Apple's iPhone 16 could finally get the capacitive buttons that the iPhone 15 missed out on with a supplier now lined up
Most Popular
- 2 All-screen iPhone SE 4 tipped for a 2025 launch, but those hoping for a low-budget powerhouse are set to be disappointed
- 3 Apple's iPhone 16 could finally get the capacitive buttons that the iPhone 15 missed out on with a supplier now lined up
- 4 An Apple Vision Pro headset helped this Brazilian surgeon repair an injured shoulder like never before
- 5 Apple's being forced to add Google Pay to iPhones in the EU — but no one should downgrade their mobile wallet, believe me I've tried
Looks like no one’s replied in a while. To start the conversation again, simply ask a new question.
Unable to open Preferences in Safari.
MacBook Air (11-inch Late 2010), OS X Yosemite (10.10.4)
Posted on Jul 4, 2015 11:16 AM
Loading page content
Page content loaded

Jul 4, 2015 11:49 AM in response to emmy1333
The keyboard shortcut show the keys you need to use (Command and comma keys) or you can also click on the Preferences... menu option.
Jul 4, 2015 12:29 PM in response to QuickTimeKirk
That is the problem, nothing happens when I select it or use the shortcut key.
Jul 4, 2015 12:56 PM in response to emmy1333
Safari preferences may be corrupted after upgrading to Yosemite. It can happen.
Quit Safari if it's open.
Now open a Finder window. From the Finder menu bar click Go > Go to Folder
Type or copy paste the following
~/Library/Preferences/com.apple.Safari.plist
Click Go then move the com.apple.Safari.plist file to the Trash.
Relaunch Safari to test.
Jul 4, 2015 1:09 PM in response to Carolyn Samit
Thanks. I just tried that and emptied the trash, it didn't work.
Jul 4, 2015 1:32 PM in response to emmy1333
Make sure your Mac is running Yosemite becasue your Safari > Preferences drop down menu is from Mavericks, not Yosemite.
Click your Apple menu top left in your screen.
From the drop down menu click: About This Mac
Which version do you see?
Jul 4, 2015 1:46 PM in response to Carolyn Samit
version 10.10.3
Jul 4, 2015 1:47 PM in response to emmy1333
Safari 8.0.5
Jul 4, 2015 1:52 PM in response to emmy1333
Ok... v10.10.3... that's Yosemite but it needs upgrading to v10.10. 4 and Safari to 8.0.6
Open your App Store then select Updates from the menu top of the App Stor e window.
Install the available updates then restart your Mac then try Safari > Preferences.
Jul 4, 2015 2:12 PM in response to Carolyn Samit
That didn't help either. I now have Safari 8.0.7. Also, when I first open Safari, i don't get a window to open. I have to select Open New Tab for a window to open at all.
Jul 4, 2015 2:19 PM in response to emmy1333
Delete the cache.
Open a Finder window. From the Finder menu bar click Go > Go to Folder
~/Library/Caches/com.apple.Safari/Cache.db
Click Go then move the Cache.db file to the Trash.
Quit and relaunch Safari to test.
Jul 4, 2015 2:23 PM in response to Carolyn Samit
That didn't work either.
Jul 4, 2015 2:48 PM in response to emmy1333
Now that you have updated Safari, try the .plist file one more time.

Jul 4, 2015 2:59 PM in response to emmy1333
Please read this whole message before doing anything.
This procedure is a test , not a solution. Don’t be disappointed when you find that nothing has changed after you complete it.
The purpose of this step is to determine whether the problem is localized to your user account.
Enable guest logins * and log in as Guest. Don't use the Safari-only “Guest User” login created by “Find My Mac.”
While logged in as Guest, you won’t have access to any of your documents or settings . Applications will behave as if you were running them for the first time. Don’t be alarmed by this behavior; it’s normal. If you need any passwords or other personal data in order to complete the test, memorize, print, or write them down before you begin.
Test while logged in as Guest. Same problem?
After testing, log out of the guest account and, in your own account, disable it if you wish. Any files you created in the guest account will be deleted automatically when you log out of it.
*Note: If you’ve activated “Find My Mac” or FileVault, then you can’t enable the Guest account. The “Guest User” login created by “Find My Mac” is not the same. Create a new account in which to test, and delete it, including its home folder, after testing.
The purpose of this step is to determine whether the problem is caused by third-party system modifications that load automatically at startup or login, by a peripheral device, by a font conflict, or by corruption of the file system or of certain system caches.
Please take this step regardless of the results of Step 1.
Disconnect all wired peripherals except those needed for the test, and remove all aftermarket expansion cards, if applicable. Start up in safe mode and log in to the account with the problem.
Note: If FileVault is enabled in OS X 10.9 or earlier, or if a firmware password is set, or if the startup volume is a software RAID, you can’t do this. Ask for further instructions.
Safe mode is much slower to start up and run than normal, with limited graphics performance , and some things won’t work at all, including sound output and Wi-Fi on certain models. The next normal startup may also be somewhat slow.
The login screen appears even if you usually log in automatically. You must know your login password in order to log in. If you’ve forgotten the password, you will need to reset it before you begin.
Test while in safe mode. Same problem?
After testing, restart as usual (not in safe mode) and verify that you still have the problem. Post the results of Steps 1 and 2.
Jul 4, 2015 3:43 PM in response to Linc Davis
Thanks. Can I just delete Safari and reinstall it? This only happened when I upgraded to Yosemite just the other day. I have not connected anything to the laptop or added any software. I just opened Safari and had these issues.
Jul 4, 2015 3:55 PM in response to emmy1333
Can I just delete Safari and reinstall it?
No. You can reinstall OS X, but that's usually not the solution to any problem.
How-To Geek
How to allow pop-ups in safari on mac.
Sometimes you want browser pop-ups!
By default, Safari on Mac blocks pop-up windows from appearing. If you need to allow pop-ups for certain websites, it's easy to make the change in Safari Preferences. Here's how.
First, open Safari on your Mac and browse to the website that includes the pop-ups that you want to allow. In the menu bar, click "Safari," and select "Preferences" from the menu that appears.
In the preferences window of Safari 14 and up, click the "Websites" tab, and then scroll down to the bottom of the sidebar and select "Pop-up Windows."
In older versions of Safari, open Preferences and click the "Security" tab. Uncheck "Block pop-up windows" here. If you're still using an older version, we recommend updating Safari as soon as possible to keep your Mac safe .
With "Pop-Up Windows" selected, you'll see a box on the right titled "Allow pop-up windows on the websites below." Locate the name of the website that you want to allow pop-ups on in the list. (Remember that the site must currently be open in a Safari browser window.)
Click the drop-down box beside the website name and select "Allow."
Repeat this step with any other sites in the list that you want to allow pop-ups for.
If you want to allow pop-ups on all websites by default (although we strongly advise against it), click the drop-down menu beside "When visiting other websites" and select "Allow."
After that, close Safari Preferences, and your settings will be changed. The next time you visit the site that you allowed pop-ups for, the pop-ups will appear as expected. Happy browsing!
Related: Why You Should Update All Your Software

6 Tips to Improve Your Safari Experience on iPhone
A ccessing the internet on an iPhone is made simple by Safari, Apple's native web browser; it does a great job of getting you started, but there are several other features that you can leverage to enhance your user experience.
Below, we'll list some valuable tips you can use to get the most out of Safari on your iPhone. So, let's get started.
1. Modify the Start Page
The start page is the first element you usually run into when launching Safari—it's the default screen if you've not used the browser before or didn't leave any tabs open after your last session. And the first step you can take in improving your Safari experience is to customize it.
Customizing the start page involves changing the background image and choosing the sections (listed below) you want the app to show. We've added descriptions to help you understand a little more about each section.
- Favorites : This section will show all your favorite websites and bookmarks which have been added to the Favorites section on your iPhone.
- Frequently Visited : This is a collection of searches and websites you've frequented in recent months. The information is said to be a mix from all your Apple devices if you've enabled iCloud.
- Shared with You : It works by finding links, images, music, and more, sent within the Messages app, and brings them up in relevant applications. For example, if someone texted you a link via iMessage, you'll find it in this section of the start page.
- Privacy Report : This section surfaces information on the trackers used by websites you've visited in the last 30 days and showcases when your iPhone—and other Apple devices—prevented them from profiling you.
- Siri Suggestions : You can find website suggestions based on your recent browsing history, bookmarks, and open tabs within this section if you choose to use them.
- Reading List : You can find the three latest additions to your Reading List in this section, with a Show All button available in case you want to view the other articles you've added to your read later list.
- iCloud Tabs : This feature showcases up to four most recent tabs open on each Apple device you own with iCloud enabled for Safari.
To begin customizing your Safari's start page, follow the steps listed below:
- Scroll down to the bottom of the Safari start page and tap Edit.
- Now, enable the desired sections using the toggles or reorder them by pressing (and dragging) the three horizontal lines.
If you want to experience Apple's Continuity feature , toggle on Use Start Page on All Devices at the top of the edit menu. This will ensure your start page is in sync across all devices connected to your iCloud account.
2. Create Tab Groups in Safari
The next step in improving Safari on iPhone is to create and use Tab Groups . The feature lets you bring order and control to tabs by allowing you to group similar ones—or those you often use together—into folders. Ideally, you can use the feature to separate search results and websites related to work from those you open during casual browsing.
To create a Tab Group, follow the steps listed below:
- View all your tabs by tapping the Tab button in the bottom-right corner.
- Now, tap the text box at the bottom of the screen—it mentions the number of tabs open.
- In the menu that appears, tap New Empty Tab Group or the second option, New Tab Group with X Tabs .
- Name the Tab Group according to your liking and hit Save .
The X in the second option will vary based on the number of tabs open when creating a Tab Group.
3. Use Safari Extensions
Like Chrome, you can install Safari extensions to improve your browsing experience. For those unaware, these are applications built for web browsers that bring additional functionality and make your life easier.
For example, you can install applications that scour the web for coupon codes and bring them up when you're making a purchase or add ones that help edit written content to ensure you aren't making silly errors.
Adding extensions to Safari on an iPhone is a bit different compared to installing and removing extensions in Safari on a Mac . To do this, follow the steps listed below:
- Go to Settings > Safari on your iOS device.
- On the next screen, find Extensions under the General subsection and tap on it.
- You'll now see a list of extensions available. In case you see no options, tap More Extensions to visit the Safari Extensions store.
You may sometimes see options without having installed an extension before; these are present due to an application—that offers Safari extensions—installed on your iPhone from before.
Once you've installed an extension, activate it in Settings using the same steps above and then do the following:
- Open Safari and tap the AA button in the address bar.
- Now, tap Manage Extensions and select the extension you want to activate.
4. Choose Websites to Automatically Use Reader
Reader in Safari is a nifty add-on that lets you read content from a website with minimal distractions and no ads. It makes the experience quite simple and offers options like changing the page color, font, and font size.
Activating Reader is quite simple; tap the AA button in the address bar when you're on a supported webpage and choose Show Reader . However, if you frequently visit a specific website, you can configure Safari to load all its webpages in Reader. Here's what you need to do:
- Open the desired website and tap the AA button.
- In the context menu that appears, tap Website Settings .
- Now, toggle on Use Reader Automatically . Each supported webpage will now open in Reader, making it easier to read the content.
5. Set Tabs to Open in Background
Despite it being easy to access AI tools like ChatGPT on mobile for learning about things, if you prefer getting deep into the weeds when doing research, you may want to view many of the following webpages in new tabs.
By default, opening a new tab via a hyperlink will leave the old tab behind and move you to the new tab. While this behavior is fine, it can feel like a chore if you'd like to open multiple results from a search page.
Fortunately, you can change this behavior. Here's what you need to do:
- Open the Settings app, and scroll down to the Safari option.
- On this page, under the Tabs subsection, tap on Open Links .
- Now, choose In Background .
6. Configure Safari to Automatically Close Tabs
Lastly, while the ability to open many tabs in Safari is a boon, knowing ways to organize your browser and keeping it clutter-free can help you focus better and increase productivity. And keeping only a few tabs open can be a part of this regime.
Safari on iPhone also helps with this, with the ability to automatically close tabs after a set period of time; we've detailed the steps to activate the feature below:
- On this page, under the Tabs subsection, tap on Close Tabs .
- Now, choose from the available options: After One Day , After One Week , or After One Month .
Become a Safari Power User With These Changes
Each customization method listed above will help improve your Safari experience, be it with a new background image that makes the app feel more personal or a setting that keeps it clutter-free.
Overall, Safari is an excellent browser that can be made even better for power users with a few changes. And some of Apple's exclusive features make a strong case for the app, especially if you're a Mac user.

iPad User Guide
- iPad models compatible with iPadOS 17
- iPad mini (5th generation)
- iPad mini (6th generation)
- iPad (6th generation)
- iPad (7th generation)
- iPad (8th generation)
- iPad (9th generation)
- iPad (10th generation)
- iPad Air (3rd generation)
- iPad Air (4th generation)
- iPad Air (5th generation)
- iPad Pro 10.5-inch
- iPad Pro 11-inch (1st generation)
- iPad Pro 11-inch (2nd generation)
- iPad Pro 11-inch (3rd generation)
- iPad Pro 11-inch (4th generation)
- iPad Pro 12.9-inch (2nd generation)
- iPad Pro 12.9-inch (3rd generation)
- iPad Pro 12.9-inch (4th generation)
- iPad Pro 12.9-inch (5th generation)
- iPad Pro 12.9-inch (6th generation)
- Setup basics
- Make your iPad your own
- Keep in touch with friends and family
- Customize your workspace
- Do more with Apple Pencil
- Customize iPad for your child
- What’s new in iPadOS 17
- Turn on and set up iPad
- Wake and unlock
- Set up cellular service
- Connect to the internet
- Sign in with Apple ID
- Subscribe to iCloud+
- Find settings
- Set up mail, contacts, and calendar accounts
- Learn the meaning of the status icons
- Charge the battery
- Show the battery percentage
- Check battery usage
- Use Low Power Mode to save battery life
- Read and bookmark the user guide
- Learn basic gestures
- Learn advanced gestures
- Adjust the volume
- Find your apps in App Library
- Switch between apps
- Zoom an app to fill the screen
- Quit and reopen an app
- Drag and drop
- Open two items in Split View
- Switch an app window to Slide Over
- View an app’s windows and workspaces
- Multitask with Picture in Picture
- Move, resize, and organize windows
- Access features from the Lock Screen
- Perform quick actions
- Search on iPad
- Get information about your iPad
- View or change cellular data settings
- Travel with iPad
- Change or turn off sounds
- Create a custom Lock Screen
- Change the wallpaper
- Adjust the screen brightness and color balance
- Customize the text size and zoom setting
- Change the name of your iPad
- Change the date and time
- Change the language and region
- Organize your apps in folders
- Add, edit, and remove widgets
- Move apps and widgets on the Home Screen
- Remove apps
- Use and customize Control Center
- Change or lock the screen orientation
- View and respond to notifications
- Change notification settings
- Set up a focus
- Allow or silence notifications for a Focus
- Turn a Focus on or off
- Customize sharing options
- Type with the onscreen keyboard
- Dictate text
- Move the onscreen keyboard
- Select and edit text
- Use predictive text
- Use text replacements
- Add or change keyboards
- Add emoji and stickers
- Take a screenshot
- Take a screen recording
- Write and draw in documents
- Add text, shapes, signatures, and more
- Fill out forms and sign documents
- Use Live Text to interact with content in a photo or video
- Use Visual Look Up to identify objects in your photos and videos
- Lift a subject from the photo background
- Subscribe to Apple Arcade
- Play with friends in Game Center
- Connect a game controller
- Use App Clips
- Update apps
- View or cancel subscriptions
- Manage purchases, settings, and restrictions
- Install and manage fonts
- Buy books and audiobooks
- Annotate books
- Access books on other Apple devices
- Listen to audiobooks
- Set reading goals
- Organize books
- Create and edit events in Calendar
- Send invitations
- Reply to invitations
- Change how you view events
- Search for events
- Change calendar and event settings
- Schedule or display events in a different time zone
- Keep track of events
- Use multiple calendars
- Use the Holidays calendar
- Share iCloud calendars
- Take photos
- Take a selfie
- Take a Portrait mode selfie
- Take videos
- Change advanced camera settings
- Adjust HDR camera settings
- View, share, and print photos
- Use Live Text
- Scan a QR code
- See the world clock
- Set an alarm
- Use the stopwatch
- Use multiple timers
- Add and use contact information
- Edit contacts
- Add your contact info
- Send Contacts on iPad
- Use other contact accounts
- Hide duplicate contacts
- Export contacts
- Get started with FaceTime
- Make FaceTime calls
- Receive FaceTime calls
- Create a FaceTime link
- Take a Live Photo
- Turn on Live Captions
- Use other apps during a call
- Make a Group FaceTime call
- View participants in a grid
- Use SharePlay to watch, listen, and play together
- Share your screen in a FaceTime call
- Collaborate on a document in a FaceTime call
- Use video conferencing features
- Hand off a FaceTime call to another Apple device
- Change the FaceTime video settings
- Change the FaceTime audio settings
- Change your appearance
- Leave a call or switch to Messages
- Block unwanted callers
- Report a call as spam
- Connect external devices or servers
- Modify files, folders, and downloads
- Search for files and folders
- Organize files and folders
- Set up iCloud Drive
- Share files and folders in iCloud Drive
- Share your location
- Add or remove a friend
- Locate a friend
- Get notified when friends change their location
- Notify a friend when your location changes
- Add your iPad
- Get notified if you leave a device behind
- Locate a device
- Mark a device as lost
- Erase a device
- Remove a device
- Add an AirTag
- Share an AirTag or other item in Find My on iPad
- Add a third-party item
- Get notified if you leave an item behind
- Locate an item
- Mark an item as lost
- Remove an item
- Adjust map settings
- Get started with Freeform
- Create a Freeform board
- Draw or handwrite
- Apply consistent styles
- Position items on a board
- Search Freeform boards
- Share and collaborate
- Delete and recover boards
- Get started with Health
- Fill out your Health Details
- Intro to Health data
- View your health data
- Share your health data
- View health data shared by others
- Download health records
- View health records
- Log menstrual cycle information
- View menstrual cycle predictions and history
- Track your medications
- Learn more about your medications
- Log your state of mind
- Take a mental health assessment
- Customize your Sleep Focus
- Turn Sleep Focus on or off
- View your sleep history
- Check your headphone audio levels
- Use audiogram data
- Back up your Health data
- Intro to Home
- Upgrade to the new Home architecture
- Set up accessories
- Control accessories
- Control your home using Siri
- Use Grid Forecast to plan your energy usage
- Set up HomePod
- Control your home remotely
- Create and use scenes
- Use automations
- Set up security cameras
- Use Face Recognition
- Configure a router
- Invite others to control accessories
- Add more homes
- Get music, movies, and TV shows
- Get ringtones
- Manage purchases and settings
- Magnify nearby objects
- Change settings
- Detect people around you
- Detect doors around you
- Receive image descriptions of your surroundings
- Read aloud text and labels around you
- Set up shortcuts for Detection Mode
- Add and remove email accounts
- Set up a custom email domain
- Check your email
- Unsend email with Undo send
- Reply to and forward emails
- Save an email draft
- Add email attachments
- Download email attachments
- Annotate email attachments
- Set email notifications
- Search for email
- Organize your email in mailboxes
- Flag or block emails
- Filter emails
- Use Hide My Email
- Use Mail Privacy Protection
- Change email settings
- Delete and recover emails
- Add a Mail widget to your Home Screen
- Print emails
Use keyboard shortcuts
- Get travel directions
- Select other route options
- Find stops along your route
- View a route overview or a list of turns
- Change settings for spoken directions
- Get driving directions
- Report traffic incidents
- Get cycling directions
- Get walking directions
- Get transit directions
- Delete recent directions
- Get traffic and weather info
- Predict travel time and ETA
- Download offline maps
- Search for places
- Find nearby attractions, restaurants, and services
- Get information about places
- Mark places
- Share places
- Rate places
- Save favorite places
- Explore new places with Guides
- Organize places in My Guides
- Delete significant locations
- Look around places
- Take Flyover tours
- Find your Maps settings
- Measure dimensions
- View and save measurements
- Measure a person’s height
- Set up Messages
- About iMessage
- Send and reply to messages
- Unsend and edit messages
- Keep track of messages
- Forward and share messages
- Group conversations
- Watch, listen, or play together using SharePlay
- Collaborate on projects
- Use iMessage apps
- Take and edit photos or videos
- Share photos, links, and more
- Send stickers
- Request, send, and receive payments
- Send and receive audio messages
- Animate messages
- Change notifications
- Block, filter, and report messages
- Delete messages and attachments
- Recover deleted messages
- View albums, playlists, and more
- Show song credits and lyrics
- Queue up your music
- Listen to broadcast radio
- Subscribe to Apple Music
- Listen to lossless music
- Listen to Dolby Atmos music
- Apple Music Sing
- Find new music
- Add music and listen offline
- Get personalized recommendations
- Listen to radio
- Search for music
- Create playlists
- See what your friends are listening to
- Use Siri to play music
- Change the way music sounds
- Get started with News
- Use News widgets
- See news stories chosen just for you
- Read stories
- Follow your favorite teams with My Sports
- Subscribe to Apple News+
- Browse and read Apple News+ stories and issues
- Download Apple News+ issues
- Solve crossword puzzles
- Search for news stories
- Save stories in News for later
- Subscribe to individual news channels
- Get started with Notes
- Add or remove accounts
- Create and format notes
- Draw or write
- Add photos, videos, and more
- Scan text and documents
- Work with PDFs
- Create Quick Notes
- Search notes
- Organize in folders
- Organize with tags
- Use Smart Folders
- Export or print notes
- Change Notes settings
- Delete, share, or copy a photo
- View and edit Photo Booth photos in the Photos app
- View photos and videos
- Play videos and slideshows
- Delete or hide photos and videos
- Edit photos and videos
- Trim video length and adjust slow motion
- Edit Live Photos
- Edit Cinematic videos
- Edit portraits
- Use photo albums
- Edit, share, and organize albums
- Filter and sort photos and videos in albums
- Make stickers from your photos
- Duplicate and copy photos and videos
- Merge duplicate photos
- Search for photos
- Identify people and pets
- Browse photos by location
- Share photos and videos
- Share long videos
- View photos and videos shared with you
- Watch memories
- Personalize your memories
- Manage memories and featured photos
- Use iCloud Photos
- Create shared albums
- Add and remove people in a shared album
- Add and delete photos and videos in a shared album
- Set up or join an iCloud Shared Photo Library
- Add content to an iCloud Shared Photo Library
- Use iCloud Shared Photo Library
- Import and export photos and videos
- Print photos
- Find podcasts
- Listen to podcasts
- Follow your favorite podcasts
- Use the Podcasts widget
- Organize your podcast library
- Download, save, and share podcasts
- Subscribe to podcasts
- Listen to subscriber-only content
- Change download settings
- Make a grocery list
- Add items to a list
- Edit and manage a list
- Search and organize lists
- Work with templates
- Use Smart Lists
- Print reminders
- Use the Reminders widget
- Change Reminders settings
- Browse the web
- Search for websites
- Customize your Safari settings
- Change the layout
- Use Safari profiles
- Open and close tabs
- Organize your tabs with Tab Groups
- View your tabs from another device
- Share Tab Groups
- Use Siri to listen to a webpage
- Bookmark a website
- Bookmark a website as a favorite
- Save pages to a Reading List
- Find links shared with you
- Annotate and save a webpage as a PDF
- Automatically fill in forms
- Get extensions
- Hide ads and distractions
- Clear your cache
- Browse the web privately
- Use passkeys in Safari
- Check stocks
- Manage multiple watchlists
- Read business news
- Add earnings reports to your calendar
- Use a Stocks widget
- Translate text, voice, and conversations
- Translate text in apps
- Translate with the camera view
- Subscribe to Apple TV+, MLS Season Pass, or an Apple TV channel
- Add your TV provider
- Get shows, movies, and more
- Watch sports
- Watch Major League Soccer with MLS Season Pass
- Watch multiple live sports streams
- Control playback
- Manage your library
- Change the settings
- Make a recording
- Play it back
- Edit or delete a recording
- Keep recordings up to date
- Organize recordings
- Search for or rename a recording
- Share a recording
- Duplicate a recording
- Check the weather
- Check the weather in other locations
- View weather maps
- Manage weather notifications
- Use Weather widgets
- Learn the weather icons
- Find out what Siri can do
- Tell Siri about yourself
- Have Siri announce calls and notifications
- Add Siri Shortcuts
- About Siri Suggestions
- Change Siri settings
- Set up Family Sharing
- Add Family Sharing members
- Remove Family Sharing members
- Share subscriptions
- Share purchases
- Share locations with family and locate lost devices
- Set up Apple Cash Family and Apple Card Family
- Set up parental controls
- Set up a child’s device
- Get started with Screen Time
- Protect your vision health with Screen Distance
- Set up Screen Time for yourself
- Set communication and safety limits and block inappropriate content
- Set up Screen Time for a family member
- Set up Apple Pay
- Use Apple Pay in apps and on the web
- Track your orders
- Use Apple Cash
- Use Apple Card
- Use Savings
- Manage payment cards and activity
- Power adapter and charge cable
- Use AirPods
- Use EarPods
- Use headphone audio-level features
- Apple Pencil compatibility
- Pair and charge Apple Pencil (1st generation)
- Pair and charge Apple Pencil (2nd generation)
- Pair and charge Apple Pencil (USB-C)
- Enter text with Scribble
- Draw with Apple Pencil
- Take and mark up a screenshot with Apple Pencil
- Quickly write notes
- Preview tools and controls with Apple Pencil hover
- Wirelessly stream videos and photos to Apple TV or a smart TV
- Connect to a display with a cable
- HomePod and other wireless speakers
- iPad keyboards
- Switch between keyboards
- Enter characters with diacritical marks
- Use shortcuts
- Choose an alternative keyboard layout
- Change typing assistance options
- Connect Magic Trackpad
- Trackpad gestures
- Change trackpad settings
- Connect a mouse
- Mouse actions and gestures
- Change mouse settings
- External storage devices
- Bluetooth accessories
- Apple Watch with Fitness+
- Share your internet connection
- Make and receive phone calls
- Use iPad as a second display for Mac
- Use iPad as a webcam
- Use a keyboard and mouse or trackpad across your Mac and iPad
- Hand off tasks between devices
- Cut, copy, and paste between iPad and other devices
- Stream video or mirror the screen of your iPad
- Use AirDrop to send items
- Connect iPad and your computer with a cable
- Transfer files between devices
- Transfer files with email, messages, or AirDrop
- Transfer files or sync content with the Finder or iTunes
- Automatically keep files up to date with iCloud
- Use an external storage device, a file server, or a cloud storage service
- Get started with accessibility features
- Turn on accessibility features for setup
- Change Siri accessibility settings
- Open features with Accessibility Shortcut
- Enlarge text by hovering
- Change color and brightness
- Make text easier to read
- Reduce onscreen motion
- Customize per-app visual settings
- Hear what’s on the screen or typed
- Hear audio descriptions
- Turn on and practice VoiceOver
- Change your VoiceOver settings
- Use VoiceOver gestures
- Operate iPad when VoiceOver is on
- Control VoiceOver using the rotor
- Use the onscreen keyboard
- Write with your finger
- Use VoiceOver with an Apple external keyboard
- Use a braille display
- Type braille on the screen
- Customize gestures and keyboard shortcuts
- Use VoiceOver with a pointer device
- Use VoiceOver for images and videos
- Use VoiceOver in apps
- Use AssistiveTouch
- Use an eye-tracking device
- Adjust how iPad responds to your touch
- Auto-answer calls
- Change Face ID and attention settings
- Use Voice Control
- Adjust the top or Home button
- Use Apple TV Remote buttons
- Adjust pointer settings
- Adjust keyboard settings
- Adjust AirPods settings
- Adjust Apple Pencil settings
- Control a nearby Apple device
- Intro to Switch Control
- Set up and turn on Switch Control
- Select items, perform actions, and more
- Control several devices with one switch
- Use hearing devices
- Use Live Listen
- Use sound recognition
- Set up and use RTT
- Flash the LED for alerts
- Adjust audio settings
- Play background sounds
- Display subtitles and captions
- Show transcriptions for Intercom messages
- Get Live Captions (beta)
- Type to speak
- Record a Personal Voice
- Use Guided Access
- Use built-in privacy and security protections
- Set a passcode
- Set up Face ID
- Set up Touch ID
- Control access to information on the Lock Screen
- Keep your Apple ID secure
- Use passkeys to sign in to apps and websites
- Sign in with Apple
- Share passwords
- Automatically fill in strong passwords
- Change weak or compromised passwords
- View your passwords and related information
- Share passkeys and passwords securely with AirDrop
- Make your passkeys and passwords available on all your devices
- Automatically fill in verification codes
- Sign in with fewer CAPTCHA challenges
- Two-factor authentication
- Use security keys
- Control app tracking permissions
- Control the location information you share
- Control access to information in apps
- Control how Apple delivers advertising to you
- Control access to hardware features
- Create and manage Hide My Email addresses
- Protect your web browsing with iCloud Private Relay
- Use a private network address
- Use Advanced Data Protection
- Use Lockdown Mode
- Receive warnings about sensitive content
- Use Contact Key Verification
- Turn iPad on or off
- Force restart iPad
- Update iPadOS
- Back up iPad
- Return iPad settings to their defaults
- Restore all content from a backup
- Restore purchased and deleted items
- Sell, give away, or trade in your iPad
- Install or remove configuration profiles
- Important safety information
- Important handling information
- Find more resources for software and service
- FCC compliance statement
- ISED Canada compliance statement
- Apple and the environment
- Class 1 Laser information
- Disposal and recycling information
- Unauthorized modification of iPadOS
- ENERGY STAR compliance statement
Customize your Safari settings on iPad
Customize your start page
Every time you open a new tab, you begin on your start page. You can customize your start page with new background images and options.

Scroll to the bottom of the page, then tap Edit.
Choose options for your start page.
Favorites: Display shortcuts to your favorite bookmarked websites. See Add a website to Favorites .
Frequently Visited: Go straight to the websites you visit most.
Shared with You: See links shared with you in Messages. See Find links shared with you .
Privacy Report: Stay updated on how many trackers and websites Safari blocked from tracking you. See View the Privacy Report .
Siri Suggestions: As you search, allow websites shared in Calendar and other apps to appear.
Reading List: Show webpages currently in your Reading List. See Add the current webpage to your Reading List .
Recently Closed Tabs: Go back to tabs you previously closed.
iCloud Tabs: Show open tabs from other Apple devices where you’re signed in with the same Apple ID and Safari is turned on in iCloud settings or preferences. See Organize your tabs with Tab Groups .
Note: Your custom start page settings are updated on all your Apple devices where you have Use Start Page on All Devices turned on, and you’re signed in with the same Apple ID using two-factor authentication .
Change the text size for a website on Safari
Tap the large A to increase the font size or the small A to decrease it.

Change the display controls for a website on Safari
You can hide the search field, switch to Reader, and more.
Hide the search field: Tap Hide Toolbar (tap the top of the screen to get it back).
See a streamlined view of the webpage: Tap Show Reader (if available).
To return to the normal view, tap Hide Reader.
See what the webpage looks like on a desktop computer: Tap Request Desktop Website (if available).
You can also adjust Safari settings in Accessibility settings. Go to Settings > Accessibility > Per-App Settings. Tap Add App, choose Safari, then tap Safari to adjust the settings.
Choose where to save downloads
When you download a file in Safari, you can choose whether to save it to iCloud or on your iPad.
iCloud Drive: Select this option to save downloads to the Downloads folder in iCloud Drive. This allows you to access the downloaded file on any iPhone, iPad, or Mac where you’re signed in with the same Apple ID .
On My iPad: Select this option to save downloads to the Downloads folder on your iPad.
Share website passwords with a group
You can create a group of trusted contacts and share a set of passwords. Passwords stay up to date for everyone in the group, and you can remove someone at any time.
See Create shared password groups .
Adjust privacy settings for Safari
You can choose what privacy settings you want across Safari, and create individual exceptions for websites. See Browse privately .
You can navigate in Safari using keyboard shortcuts if you have an Apple external keyboard connected to your iPad.
To view available keyboard shortcuts, connect your keyboard, then press and hold the Command key.
IMAGES
VIDEO
COMMENTS
On an iPhone or iPad, go to your device's Settings app to change the general preferences of Safari. On Mac, change your general preferences in "Safari > Settings > General." Changing things like your search engine and preventing trackers will provide you with more privacy and increase your security. Method 1.
In the Safari app on your Mac, choose Safari > Preferences, then click a preference pane: General: Change your homepage, and choose what to see when you open a window or tab, how long to keep your browsing history, which bookmarks to show in Favorites view, and choose where to save downloads and how long to keep them. Tabs: Choose when to open ...
To change these preferences, choose Safari > Preferences, then click Websites. The settings you can customize (such as Reader and Content Blockers) are listed on the left. To apply a setting to a website on the right, first select the setting, then choose the option you want from the pop-menu next to the website. Open Safari for me
Customize your start page. When you open a new tab, you begin on your start page. You can customize your start page with new background images and options. Open the Safari app on your iPhone. Tap , then tap . Scroll to the bottom of the page, then tap Edit. Favorites: Display shortcuts to your favorite bookmarked websites.
1. Open any website in Safari. Beginning with iOS 13, Safari now allows you to choose custom settings for individual websites. Start by visiting a website (e.g., https://www.wikihow.com ). Changes you make with this method will only affect the currently-open website.
Open the offending website. Click on Safari > Settings for This Website (or right-click the URL box and select Settings for This Website). You will see a pop-up window with the option Auto-Play ...
Get to know Safari in iOS 15. Learn how to switch between tabs, add a bookmark, use Private Browsing, and more.To learn more about this topic, visit the foll...
What to Know. To change search engine, go to Settings > Safari > Search Engine. To control links, go to Safari > Open Links. To use AutoFill, go to Settings > Safari > AutoFill > turn on Use Contact Info. To view saved passwords, go to Settings > Passwords & Accounts > Website & App Passwords. This article explains how to adjust Safari settings ...
1. Tweak Tab and Window Behavior. Start by setting up Safari to restore windows from the previous session every time you open the app. To do this, under Safari > Preferences > General, select All windows from last session from the Safari opens with dropdown menu. This tweak makes the homepage seem redundant, because it changes what you see when ...
Open Safari and click Safari > Preferences from the menu bar. In the pop-up window, choose the General tab. You can then adjust each of these settings. Safari opens with: When you open Safari, you can choose to open a new window or a private window. You can also open it with all windows from your last session or just non-private windows from ...
From the Safari menu, choose Preferences.... Click the Websites button. ... Similarly, you can change the setting for currently open websites to suit your preference. If you choose Block and Notify, a small icon will appear on the right side of the Smart Search field. Click it to display the pop-up windows for the web page. Great Mac accessories.
You can go to the menu bar in Safari and select Bookmarks > Show Start Page. This will open the Start page in Safari. Click the settings button in the bottom-right corner to start personalization ...
Now, here are 30 tricks to help you have a better experience when using Safari. 1. Navigate Tab Bar. (Credit: Lance Whitney / Apple) The jump to iOS 15 moved Safari's address bar to the bottom of ...
Unable to open Preferences in Safari. I downloaded Yosemite and now I am not able to open Preferences in Safari. The Reset option is also grayed out. Show more Less. MacBook Air (11-inch Late 2010), OS X Yosemite (10.10.4) Posted on Jul 4, 2015 11:16 AM Me too (38) Me ...
Here's how. First, open Safari on your Mac and browse to the website that includes the pop-ups that you want to allow. In the menu bar, click "Safari," and select "Preferences" from the menu that appears. In the preferences window of Safari 14 and up, click the "Websites" tab, and then scroll down to the bottom of the sidebar and select "Pop-up ...
Change Advanced preferences in Safari on Mac. In the Safari app on your Mac, use Advanced preferences to increase accessibility, specify a style sheet, change the default encoding, and turn on the Develop menu. To change these preferences, choose Safari > Preferences, then click Advanced. Open Safari for me
For this, open Safari Preferences [command + ,], and go to the Search section. And from here, tap the dropdown button next to Search engine and choose your search engine from the list. 8.
In the Safari app on your Mac, use Tabs preferences to choose how pages, links, and tabs work in Safari windows. To change these preferences, choose Safari > Preferences, then click Tabs. Keep tabs in a separate tab bar, or move them into the toolbar. Separate: Tabs remain in the tab bar, under the toolbar. Compact: Tabs move up to the toolbar.
In the Safari app on your Mac, choose Safari > Preferences, then click a preference pane: General: Change your homepage, and choose what to see when you open a window or tab, how long to keep your browsing history, which bookmarks to show in Favourites view, and choose where to save downloads and how long to keep them. Tabs: Choose when to open ...
Open the Settings app, and scroll down to the Safari option. On this page, under the Tabs subsection, tap on Close Tabs. Now, choose from the available options: After One Day, After One Week, or ...
Change the display controls for a website on Safari. You can hide the search field, switch to Reader, and more. Open the Safari app on your iPad. Tap , then do any of the following: Hide the search field: Tap Hide Toolbar (tap the top of the screen to get it back). See a streamlined view of the webpage: Tap Show Reader (if available).