
15 Outstanding Overlooks for Sunrises and Sunsets on the Blue Ridge Parkway
- Blue Ridge Parkway

By Jason Barnette | Travel writer and photographer with 15+ years of road tripping experience
- Last Updated on May 10, 2024
- Published on February 4, 2018
This post may contain affiliate links. Read my Affiliate Disclosure here .
Explore the Blue Ridge Parkway Series
This article is part of the Blue Ridge Parkway series. Click the button to read more articles, itineraries, and travel guides in the series.
There are two types of scenic overlooks on the Blue Ridge Parkway: those with a great view of sunset, and those that never see the sunset. The last thing you want to be doing fifteen minutes before sunset is pulling over at every overlook to check if you can see it. More than likely, you’d watch the colors dance across the sky while buzzing down the parkway in your car.
That’s why this travel guide is so handy.
When I drive the Blue Ridge Parkway, I always begin looking for a place to watch the sunset an hour early. I have apps and tools for finding the best places. And I have years of experience from driving the Parkway end-to-end twice.
Keep reading to see a list of the fifteen best scenic overlooks to watch the sunset on the Blue Ridge Parkway. Download the map for offline use so you’ll be able to find your way. And then, leave me a comment and let me know how the sunset looked.

How to use this map: Click the icon in the top-left corner to open the Map Legend, then click on any of the legend items to display more information. If you have a Google account, click the star beside the map’s name to save this map to your account, then access the map from your smartphone during your trip.

The official National Park Service app is an all-in-one tool for planning a national park adventure and finding your way around the park. The app has information about every national park site across the country, essentially putting all the online information at your fingertips.
The free app features interactive maps, self-guided tours, amenities like restrooms, and lists of things to do. The powerful app has an offline mode – with a single tap, you can save the park for offline use to access all the information later. You’ll also have access to important information like alerts, contacts, fees, and operating hours.
Download the free app on iOS and Android .

Mileposts on the Blue Ridge Parkway are concrete posts etched with numbers marking the distance from Waynesboro, Virginia, at Milepost 0. The last marker is Milepost 469 at the Oconaluftee Visitor Center in Cherokee, North Carolina.
Like exit numbers on interstate highways, Mileposts are easy ways to determine the distance between attractions on the Blue Ridge Parkway.

Standing at the Ravens Roost Overlook can make you feel like you’re walking in the clouds. It’s a sweeping view across the western horizon with a glimpse at the Shenandoah Valley. One of the reasons this is such a great place to watch the sunset is because there is plenty of room. Stay near your car at the rustic stone wall, or walk a few minutes to a rocky outcropping and favorite place for people to hang hammocks.
Best Time of Year: June – July

A small parking area just off the Parkway provides access to an equally short trail to an overlook on the edge of the mountain. Just below the overlook is the Appalachian Trail. From here visitors can admire the beauty of the Allegheny Mountains across the horizon, Purgatory Mountain to the left, and House Mountain on the right.
This overlook has a large parking area perfect for RV’s and campers and features a great sunset view in the early summer months. In the later months you may not be able to see the sunset directly because of trees and foliage, but you can still see the color splash across the sky over The Great Valley.
Best Time of Year: March – October

A rocky outcropping at the edge of the parking area offers a good place to lounge while watching the sunset at this overlook. The overlook faces a slightly northwest direction, but with a sweeping panorama vista you’ll be able to see the sunset’s colors.
Best Time of Year: March-September
Pro Travel Tip
The Thunder Hill Overlook at Milepost 290.4 offers one of the best sunrise views on the Blue Ridge Parkway.

The 47-acre Julian Price Lake is a great place for kayaking and spectacular place to watch sunset on the Blue Ridge Parkway. From the parking lot, walk across the bridge to the corner of the lake where you can watch the sunset behind Grandfather Mountain.
Best Time of Year: October – March
Grandfather Mountain
Grandfather Mountain is one of the best attractions along the Blue Ridge Parkway. Home to the infamous Mile High Swinging Bridge, the views in all directions are spectacular. However, Grandfather Mountain is a private attraction and never stays open past sunset.
The parking lot just off the Parkway offers a pretty nice view of Grandfather Mountain, but you’ll need to do a little hiking for a great sunset view. The trail is short but ascends 1,400′ making it rather strenuous. Atop Beacon Heights there is an exposed rocky outcropping facing east and another facing west, making this a great spot to catch sunrises and sunsets.
Best Time of Year: January-May, August-October
The pull-off on the side of the Blue Ridge Parkway at this scenic overlook offers a chance to watch a spectacular sunset from the comfort of your car. It will be an early sunset, though. The Black Mountains loom over the horizon near the overlook which means the sun will disappear about half an hour before the typical sunset time.
Best Time of Year: February – June

Mount Mitchell at Milepost 355.4
At 6,684′, Mount Mitchell is the highest point east of the Mississippi River. The state park is uniquely situated where visitors can only enter the park via the Blue Ridge Parkway. After a long drive on the winding road to the top of the park, you’ll have to walk another 15-20 minutes on a steep concrete path to an observation deck on the mountain’s summit. Endless views in all directions offer a chance to see sunset, albeit seasonally – the park is only open past sunset May through October.
Best Time of Year: May – October

There are three stunning places to watch the sunset at Craggy Gardens. The first is to park at Craggy Pinnacle at Milepost 364.1 and hike the short, moderately difficult trail to a pair of overlooks above the Parkway. The second place to watch a sunset is from the comfort of your car at the Craggy Gardens Visitor Center along the Parkway. The view here looks more into the valley but still offers a gorgeous sunset view. The third option is to hike the short and easy trail to Craggy Dome. Once the trail reaches a covered shelter turn left to find the bald spot on top of the gently sloping mountain for an amazing sunset view.
Best Time of Year: Year Round

The parking lot of the Mount Pisgah Trail is a surprising, and hidden, destination for sunset views. The first parking area on the left looks over the Parkway to the west and provides a stunning view of the setting sun. The second parking lot just around the corner is on top of the tunnel and provides a decent place to watch the sunset, but not as good as the first.
Best Time of Year: March-May
Fryingpan Mountain Lookout Tower at Milepost 409.1
The sunset view from the top of the 70′ fire tower is unmatched, but you’ll have to work for it to enjoy this view. From the informal parking lot, it’s a 1.5-mile hike with a 350-foot ascent to the former fire tower. But the effort is worth it with a panorama view from inside the glass-walled observation tower.

Devil’s Courthouse Overlook at Milepost 422.4
If you pull into the parking lot at Devil’s Courthouse and think you’ll have a great sunset view, think again. This one is gonna require some strenuous hiking. Look for the trail alongside the Parkway, beginning your hike on a paved path. The steep path eventually ends and a primitive path covered with large rocks and roots continues to the top of Devil’s Courthouse. Once at the top a breathtaking overlook built atop a rocky outcropping provides one of the best sunset views on the entire Parkway.

This has long been my favorite sunset spot on the entire Parkway and offers one of, if not the, best view for the sunset . The large parking area has plenty of room for lots of cars, although it’s rarely crowded during sunset. There are no trees or foliage to block the view so the overlook provides a stunning 270-degree panorama of the local mountains, with the Great Smoky Mountains on the horizon.
At 6,053′ the Richland Balsam Overlook is the highest point on the entire Blue Ridge Parkway. The view is average, but partially blocked by trees and foliage. Although I wish some overlooks could be cleared again I hope this overlook actually remains just as it is. The southwestern corner of the overlook is mostly free and clear for watching sunsets early and late in the year.
Best Time of Year: January-March, October-December

One of the most popular and most visited sunset locations on the Blue Ridge Parkway is Waterrock Knob. A small visitor center and restrooms are part of what makes this a popular overlook, but really it’s the view. Located on top of a ridge the overlook features views looking toward sunrise and sunset. In the distance during sunset visitors can see the Great Smoky Mountains on the horizon just before the sun disappears of the day. There is a short and moderately strenuous trail that leads to the summit of Waterrock Knob with a couple of overlooks and some nice views, but the view from the parking lot is really the best here.

8 Responses
Thank you for this article! I’ve been looking around trying to find a place to go watch the sunset for mine and my hubby’s 21st anniversary! I’m hoping one of the two locations I’ve picked will be just what I’m looking for!!!
You’re very welcome! But do keep one important thing in mind: the sun sets at different locations throughout the year. I did my best to describe that in this article. Just be sure it’s a good spot for this time of year.
Really enjoyed your enjoyed selections. I am a frequent visitor to the North Carolina section of the Parkway and every time I come, finding an overlook for sunset is a challenge. You have made my next visit much easier. And for what it’s worth, Cowee Mountain is my favorite so far. Thanks
Haha you’re welcome! I wish I’d had myself as a resource when I first started exploring the Parkway. I think I still have new overlooks to discover, though. I hope you enjoy your next road trip on the Blue Ridge Parkway!
This is amazing! I wish we would have had this list while we visited the Great Smoky Mountains, but that just means we will have to go back! Beautiful photos!
The more you know! I’ll keep writing about the Southeast if you keep visiting. One day I’ll come to Arkansas and we’ll switch roles!
Great article Jason! Amazing photos as always…
Thank you Elisa!
Leave a Reply Cancel reply
Your email address will not be published. Required fields are marked *
- share this article
Privacy Policy
Copyright © 2023 Jason Barnette | All rights reserved | Seriously, don’t steal my stuff

Share this Article
Did you enjoy reading this article? If so, then share it with your friends. Sharing is caring, after all.
- Getting Started in Photography
- General Photography
- Photography Business
- Experimenting
- Selling Your Photography
- Gear Guides
- Gear Reviews
- Portfolio Reviews
- Tips, Tricks, and DIY
- Tips & Ideas
- Photo Licensing Tips
The essential sunset photography guide
Published by Feature Shoot • 3 years ago
For some photographers, a mere fifteen minutes of sunset is worth a lifetime of traveling. Take, for example, Paul Reiffer , a UK-based photographer who spent years journeying across the globe to capture sunsets over Bonsai Rock, the Empire State Building, the Moeraki Boulders, Pulpit Rock, the Tokyo Tower, and beyond.
In Torres del Paine, Patagonia, he sat for hours on a tiny lakefront outcrop, as the winds blew and the colors shifted before his eyes. On another occasion, he visited a pristine Yosemite on the off-season, watching the sky illuminate overhead. He’s hiked in the mountains of Iceland beneath the midnight sun and caught a reverse sunset at Lake Tahoe’s Emerald Bay.
Sunsets are unpredictable and fleeting, but for a few adventurous souls, that’s where the magic lies. As we enter the mid and late-winter weeks—also known as peak sunset season—we put together this quick guide to shooting vivid skies. Read on for ten simple tips for getting started.

The sunset itself is fleeting, so do some work behind-the-scenes to boost your chances of success. First, scout your location during the daytime to find a vantage point and composition that suits your vision. Create some test shots to kickstart the process. Get everything ready in advance, and track the sun using an app like PhotoPills or The Photographer’s Ephemeris to make sure the time of your shoot will coincide with the best lighting conditions possible.
You’ll also need to check the weather report, as cloudy skies tend to make for more dynamic sunsets. Humid evenings also tend to create less saturated colors than drier ones.
A simple but easily overlooked tip: clean your lens and filters before your shoot. When you shoot into the sun, any dust spots will become more noticeable.

Beat the crowds
If you’re shooting at a popular location, arrive early to avoid crowds and set up your tripod in the perfect spot. Give yourself more time than you think you need, and bundle up in layers for added warmth once it gets dark. When you’re done, stick around, even after everyone else has left. Sunset photography includes the golden hour, but many forget to linger and enjoy the blue hour and twilight as well.
It can help to choose an area or landscape close to home, so you can return as often as possible. Not only will you be able to visit during the “off-season” and get images others have missed, but you’ll also be able to observe how the sunset changes throughout the year. After all, the same location will look significantly different during winter and summer sunsets.

Carry a flashlight
You’ll arrive in the light, but don’t forget you have to make the trip back to your car or bike. If you’re shooting sunsets, you’ll travel in the dark, so bring a flashlight or headlamp to illuminate your path. It’s also a good idea to know the terrain as well as possible and study it before your trip. As a bonus, you can also use your flashlight to set your focus, as your camera might struggle in low light.

Play with color
Think of the golden hue of sunset as an invitation to experiment with color. Perhaps you pair the oranges of the sun with the blues of the sea for a complementary color palette, or you go for a harmonious look by pairing the sky’s fiery reds with the warmer tones found in sand. Each color choice will convey a different mood, transforming your scene from energetic to serene and back again.
Sunsets are often saturated, so you could add drama by combining them with an equally saturated foreground—or bring out those colors even more by incorporating a desaturated, grayish foreground. When choosing your subject, and editing in post, look for compelling color schemes; you can refer to our article on color theory for ideas.

Shoot in manual mode
One potential pitfall that comes with shooting sunsets is having a well-exposed sky and underexposed foreground subject; alternatively, you could end up with a well-exposed subject and a blown-out sky. For full control over your exposure, consider switching to manual mode, and keep your eye on your settings as the sun moves throughout the sky.
Check your exposure frequently via your LCD—and keep an eye on that histogram. You can also try exposure bracketing for more options. Finally, consider a custom white balance to finesse the color temperature of your photo. One more tip for avoiding overexposed skies would be to bring a graduated neutral density filter to reduce the exposure above the horizon, while keeping the light the same below. Finally, shoot RAW so you can recover more details in post.

Turn around
A simple if often overlooked technique is to do a spin and survey your surroundings. It’s easy to focus on the sun itself, but don’t forget to look around to see how the light illuminates your surroundings. Look in all directions for interesting clouds, buildings, or shadows. If you’re in a popular spot, you might find that all the other photographers are facing in one direction, while missing out on another remarkable moment unfolding just behind them.

Incorporate reflections
Photographers have been capturing sunsets for generations, so the more creative you can get, the better. Even a small pond can transform an otherwise ordinary sunset into an ethereal moment. Look for naturally occurring reflections in lakes and streams, or use mirrored buildings for a similar effect. If you want to take it a step further, you can bring a mirror from home or frame the sunset in the reflection of a car mirror.

Move your horizon line
Many photographers instinctively place the horizon line either along a thirds line or in the center of the frame. These compositions often work, but they can also feel limiting, especially when you’re shooting sunsets. For example, if the sky is vibrant and saturated, feel free to move your horizon line down past the third’s line to emphasize its colors and textures. If the sunlight is illuminating the landscape, you can push your horizon upward to include more of the scenery. Give yourself the freedom to change things around depending on your environment.

Bring a few lenses
The same sunset will take on an entirely different character when photographed with a wide-angle or telephoto lens. While the first will offer a wide angle of view, bringing the surrounding landscape to life, the second will home in on a specific part of the landscape and magnify the sun’s orb. Remember to avoid looking directly at the sun (with your eyes and through your viewfinder), as it can damage your vision.

Get in the frame
Tomas Havel is well-known for his self-portraits, but they aren’t the kinds of self-portraits you’d expect. Instead, he’s photographed himself in the wild summits and coasts of Northern Norway and beyond, seen as a tiny figure amid a vast expanse of land.
By jumping into the frame with his sunsets, he provides a sense of scale as well as a reminder of the majesty of nature and our responsibility to protect it for generations to come.
Not on 500px yet? Sign up here to explore more impactful photography.
How incorrect keywords may be damaging your commercial Licensing potential
Licensing contributor antoine martin on capturing authentic experiences in commercial photography, leave a reply, previous post.

Related Posts

Your Guide To Photographing A Meteor Shower

Landscape Photography | 23 Actionable Tips To Stir Emotions

9 Mistakes In Landscape Photography And How To Avoid Them
The Photographers Ultimate Road Trip Guide

So you want to go on a photography road trip, you pick your favorite spots from Instagram to hit up. You’re all set right? Well, not exactly. There are some major factors you should be considering before planning out the trip.
As a landscape photographer I spend a huge portion of my photography traveling and because of that I want to capitalize on every moment possible while on the road. With so many places to go and so little time we want to be mindful and effective in our travels. Like most of you, I see something amazing place online or on social media and think I want to see that in person. That’s how I came across the Scripps Pier sun alignment. I thought that is my next trip, but before I started to book everything I had to know more information, a lot more.
So here is my list of the most important things to consider when planning a photography based road trip.
Research, Research, Research
If you don’t plan, then you plan to fail! A classic quote that holds true even today. When I first found out about the sun alignment at Scripps Pier, I had to do two important things first. Find out where it was and when it happened. When I research a spot, my go to site is Google Maps . You can create your own maps that can be referred to even on you mobile device. You don’t want to find yourself looking for your iconic spot only to learn you are actually miles away. In order to get the most accurate information start with city and government websites.

Now that we know where to go we now need to know when to be there. For example, the sun alignment event only happens two times per year and within those two times of the year the sun only aligns directly down the middle of the pier for only two days. To help determine what time I need to be on location, I use an app called Photos Pills to find out when sunset and sunrise occurs, and where the sun will set in correlation to my composition. This app is crucial for planning out any landscape photography.
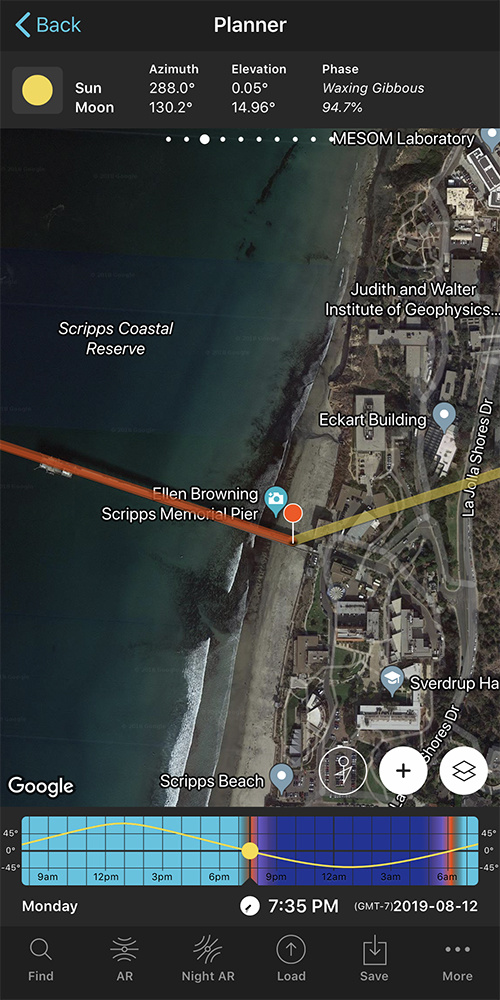
Notable mentions for research. Check tide tables if you are going to be shooting along the coast. It is important to know if the beach you want to shoot at will be under high tide or open for low tide. Consistently checking weather apps and websites to get an accurate idea of the weather is also crucial.
Plan Your Trip
The next step is to lay out the drive. Trust me when I say this is important. The worse thing you can do is to not plan out your next stop and miss out on the best light. I’ve been that guy in his car freaking out as I watch the sunset explode and I'm stuck on a highway.

Start with the locations you want to photograph, now that you know when the light is best for each plan your route for the maximum efficiency. Even if you have a day that is completely travel try to find a location near where you are stopping to take in the views at sunset.
When looking for places to spend the night, camp grounds make for great stops. If you are thinking about #vanlife, truck stops are great for overnight stays. Please be sure to check with local laws, signage, and retailers to make sure you are following the rules.
Now that we have our route mapped we need to look at where to stop for food, fuel, traffic and rest. Often overlooked when planning, these factors can add loads of time in your travels. For days that you are not traveling use this time to explore and scout locations.
Before you Embark
Now that you have everything planned out there are still a few things left to do. Some of these could save you heaps of trouble on the road.
- Let friends and family in on your itinerary and route.
- See your Doctor for a quick health check.
- Take you vehicle in for service and mechanical check.
- Make sure all your documents are in order, from passport to insurance.
Have a Back Up Plan
As much as I like to be prepared for everything and make sure I am on schedule, it is important to your experience and your craft to leave room to be creative or inspired. You will find there are times you will get a gut feeling about a location or the weather and it might take you away from photographing your plan A.

Gear will always come down to personal style and your goals, but there will always be the core things to pack with you.
1. Always take a spare body, even if it stays in the car for the entire trip, you will thank me later if something catastrophic happens to your main camera.
2. Take more glass. I almost always shoot very wide with landscapes, but there are those times that the location does not work ultra wide. Taking a long lens can save you from missing the composition you want. I generally have a range from 14mm to 600mm.

3. Get yourself a quality pack. If you plan on hiking this will be the best way to keep your back from getting destroyed and to keep your gear safe. Camera packs come in all shapes and sizes, find the one that fits the gear you want and fits your body well.

4. Three legs are better than two. You can do so much handheld, yes I agree. That being said you can do even more with a sturdy tripod. Even if you only use it a few times, it will be worth it. If you are looking to any astrophotography or long exposure photography you are going to need a tripod.

5. Bring a laptop. But more importantly, bring back up drives. I take a minimum of two external hard drives on any trip. Back up your shots daily!

Some non camera gear choices:
6. Headlamps are a life saver, not just for the hike but while shooting in the dark.
7. Rubber boots or waders come in handy. There is always that one shot that would look better from in the water.
8. Quality hiking shoes are a must. Trust me, your feet will thank you.
9. Get a local SIM card. This may be obvious to some, but you will need it to stay current with weather and if there is an emergency you will want that voice plan as well.

Final Thoughts
Now that you are prepped the only thing left to do is close your eyes and point to a spot on the map. I hope you took some tips away that will land you shooting the best photos on your next adventure! Remember it's not about the destination it's about the journey.
Did I miss anything? Comment below with what you think should be added to the list!

I am an all around creative, I focus primarily on Landscape photography, but there isn't a genre I haven't tried. I balance my time between teaching photography and fine art print sales. I travel the world in search of beautiful scenes and epic adventures! I want to connect people and our planet through emotion to create change.

https://fstoppers.com/originals/one-best-tools-use-when-planning-your-ne...
This might change your life! Well your photography trip life
Gotta love google maps. It’s so helpful!
This is exactly what I do for each trip and it's been so helpful. Especially when you can download those maps and bring them up when you are in an area with limited service!
Thanks for the tips. Now to start planning. :)
Thank you. Get out there!!

"If you don’t plan, then you plan to fail! A classic quote..."
Actually goes a little something like this:
"If you fail to plan, then you plan to fail"
"5. Bring a laptop."
This is the only point I have a slight bit of issue with and it's mostly from the temptation to want to edit photos right away. Most cell phones have the ability to check weather station forecasts, Photopills, PTE and other very useful apps to make your trip run smoother, so unless during your trip it is 100% imperative that you blog everyday from the road, or you need to relay images in a quick turn time to someone else, I just think it's added weight that will slow you down from really enjoying that time on the road.
Sure there is going to be downtime inevitably. I went on a solo 2-week road trip to Oregon last summer and when the weather was awful, my day was shot. I _DID_ bring my laptop, but by the end of the road trip I couldn't wait to be free of it. Bring a book and a portable hard drive to backup your memory cards instead, and enjoy your time on the road free of disctractions. You never know when you will have that chance, in those areas again.
*End useless rant*
Thanks for the article! I usually like to make a Google Map first with all the pins set up on a map I can pull up from my Google Drive.
Fair point. It can be a distraction. That being said so can the camera. I think with anything there is always the need to balance each side of the coin.
I suggest a laptop for two main reasons if you traveling for work, then it will be crucial to get images prepped and secondly to back up. On my last trip to Iceland I took over 1tb of images and footage, I used the back ups to make sure I didn’t loose anything. Another reason I did not mention in the article is the camera lcd can trick you some times, things may look tack sharp on there but because it’s so small it can trick you. I use a laptop to confirm everything looks proper with my shots. That way I don’t leave a location with nothing to use. That has happened to me in the early years.
But like I said you do have a point about keeping a balance.
That definitely makes sense. And recently when there was a sale going on with B&H I picked up a 12 inch iPad Pro to review photos on the road.
I think a good majority of people that do go on these road trips aren't working against deadlines with companies, but more so against their own deadlines to get content up on their social media feeds. I am/was guilty of this too and it ultimately led to my own social media overload that by the time I was done with my road trip I realized the people I met along my journey, the stories I was able to be fully apart of and engaged with, left the most impactful and life changing memories that a computer would have probably distracted me from. But yes, I agree, being able to see my work in the field before I decide to move on to the next place, ensuring that everything is exactly how it should be would have saved a couple of shots for me.
Again, excellent article and one people should definitely take note of. I can''t tell you how many times I have left with a friend of mine that is totally unprepared for life on the road.

I use google earth to help visualise the terrain and what I might be up against. To help with this in the settings change the 'elevation exaggeration' to 1.5 or higher. It literally exaggerates the terrain so you can see hills and valleys etc. Also terrain view in google maps is very useful.
So many tools at our disposal, what a time to be alive :) Thanks for the article :)
Google earth is a fantastic way to find hidden gems. Thank you for the comment!
Be sure to take water and snack food. You won’t take many photos if you have to leave early for McDonalds ..
This post may contain affiliate links, which means I'll receive a commission if you purchase through my link, at no extra cost to you. Please read the full disclosure here.
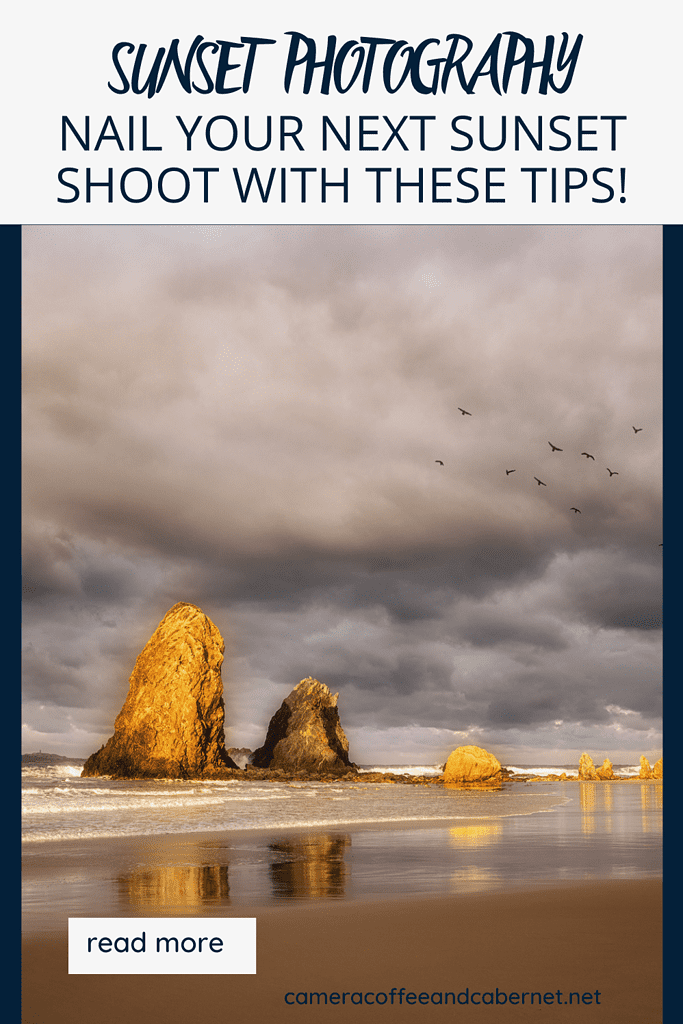
Sunset Photography for Beginners: Tips and Best Camera Settings
This article is all about sunset photography. If you’re looking to improve your sunset photography skills, this guide has you covered. Discover the best camera settings, tips on exposure, filters, composition and more to capture stunning sunset images.
If you’re interested in sunset photography, learning how to create beautiful sunset images is a must for all landscape photographers.
There’s just something about those warm, vibrant skies that make for truly stunning shots.
Sunset photography is a fantastic way to capture the beauty of nature and create stunning images.
However, it can be challenging to take the perfect shot, especially if you’re a beginner.
But don’t worry, you don’t necessarily need the fanciest equipment to take captivating photos of a sunset. What you do need is to know the best camera settings and a few smart techniques to enhance the beauty of the scene before you.
If you’re feeling a bit lost on how to start and feeling a little overwhelmed, don’t worry.
We’ve got you covered with some essential tips on how to get better results. From adjusting your camera settings to finding the right composition, we’ll help you take your sunset photos to the next level.
So let’s get started and discover the magic of sunset photography!

1 – Preparing for Sunset Photography
While spontaneous sunset shots can be stunning, the best ones are often the result of careful planning and preparation.
So, it’s always a good idea to scout out your location beforehand whenever possible. Look for spots where you can capture the sun as it dips below the horizon line and also consider incorporating an interesting foreground subject and even create a starburst effect in your shots.
Keep in mind that the window of opportunity for sunset photography is often brief. Therefore, it’s best to plan ahead and make sure you arrive at least an hour before the sun is due to set. That way, you’ll have plenty of time to set up your equipment, plan your composition and experiment with different shots before the golden hour begins.
Don’t forget to check the weather forecast as well. Different weather conditions can create unique patterns and colours in the sky during sunsets. While clear days can still offer stunning colours, some clouds in the sky often make for more dramatic and captivating shots. Dust and smoke in the air can also result in incredible sunset photos?
The above apps are all essential when planning photography shoots .
To make sure you’re ready to capture the perfect shot , don’t forget to bring the right equipment. A tripod is essential for tack sharp shots , and lenses with a range of focal lengths can help you create a variety of different compositions. And, of course, it’s always a good idea to bring along extra batteries to ensure you don’t miss the shot of the day.
Long Exposure Sunset Photography for which a tripod is essential
2 – Camera Settings to Improve Your Sunset Photos
In sunset photography, your technique and camera settings matter more than having the most expensive gear.
The good news is that beginners and budget-minded photographers can still get great results.
When it comes to camera settings for sunsets, it’s all about maximising depth of field and adjusting for the bright light of the sun shining into the camera.
If you’re new to sunset photography, try using your camera’s aperture priority mode. Look for the “A” or “Av” on your camera’s settings dial. Aperture priority mode allows you to set the aperture, and your camera will automatically adjust the shutter speed for you.
If you want to have more control over your camera settings and get more creative with your sunset photos, don’t be afraid to try out manual mode.
While it can seem daunting at first, manual mode allows you to fine-tune your settings and capture stunning sunsets with the perfect exposure.
Let’s get to the best settings to start capturing beautiful sunset images:
FREE Photography Resources Bundle : Includes 9 handy reference sheets and checklists including Exposure Basics, Planning Shoots, Photography Workflow and much more. Simply download to your phone for reference no matter where you are!

Aperture:
Set your aperture to a high number (between f/11 and f/16) to get the largest possible depth of field and to keep as much of the scene in focus as possible.
A higher f-stop (between f/16 and f/22) can also create a stunning starburst effect in your sunset photos. If you’re interested in learning more about how to create beautiful starbursts in your sunset photos, check out my article on the topic: Creating Beautiful Starbursts in Your Photos . You’ll find in-depth tips and techniques to help you achieve this stunning effect in your own photography.
Keep your ISO as low as possible to avoid graininess.
As the sun sets and the scene gets darker, consider lowering your shutter speed to allow more light in, instead of increasing your ISO. Since you will likely be using a tripod for sunset photography, camera shake won’t be an issue. Remember to adjust your shutter speed as needed to ensure correct exposure .
Shutter Speed:
The ideal shutter speed for sunset photography will depend on the specific conditions you are shooting in, such as the brightness of the sun and the movement of any foreground elements.
As a general rule, start with a shutter speed of around 1/125th of a second and adjust accordingly. A slower shutter speed can create a dreamy effect in your photos, but be sure to use a tripod to avoid blur from camera shake.
Remember, these settings will just give you a good starting point. Experiment with different combinations to find what works best for the specific scene you are photographing.
Using a longer shutter speed here to help smooth the water – and of course a tripod is essential!
3 – Best Camera For Your Sunset Shoot
If you’re new to photography and wondering if the camera you currently have is capable of capturing beautiful sunset photos, then I have some good news for you!
Any camera that offers manual control over settings can do a pretty good job of capturing sunset pictures.
That being said, there are certain camera features that make some models better for landscape photography, including sunset shots. One of the most important features to keep in mind when photographing sunsets is dynamic range, which refers to the range of light and dark areas a camera can capture within a single frame.
A wide dynamic range is essential for ensuring that your sunset photos don’t turn out blown out with little detail in darker areas, or underexposed with little detail in the bright areas.
With this in mind, choosing a camera with excellent dynamic range is a great way to ensure your sunset photos turn out stunning.
4 – Choosing the Right Lens for Gorgeous Sunset Pictures
When it comes to sunset photography, you don’t necessarily need a specialised lens to capture stunning images. Many landscape photographers have achieved great results with just a basic kit lens.
However, using different types of lenses can bring a new perspective and creative options to your sunset photography.
Wide-angle lenses , typically around 16-35mm, are a must-have in any landscape photographer’s collection and are incredibly popular with sunset photographers. These lenses allow you to capture a wider view of the surrounding area in your sunset photo, making them ideal for showcasing the full beauty of the sunset. Additionally, they can shrink the sun relative to the rest of the frame, which helps to balance the contrast in your shot and produce more even exposures.
On the other hand, a telephoto lens , typically around 100-400mm, can be used to great effect in sunset photography by making the sun look larger and isolating a smaller portion of the landscape.
This type of lens is perfect for highlighting a specific element in your sunset scene, such as a particular cloud formation or the silhouette of a tree. However, it’s important to remember that the telephoto lens acts as a magnifying glass, so it’s essential to avoid looking directly into the sun while shooting.
Mid-range lenses , such as the 24-70mm and 70-200mm, can also be used to create stunning sunset photos by filling the frame and highlighting specific subjects within your scene. While some may consider the 70-200mm lens to be a telephoto lens, let’s not get too caught up in semantics.
The most important thing is to choose a lens that works best for your specific sunset photography goals and vision.
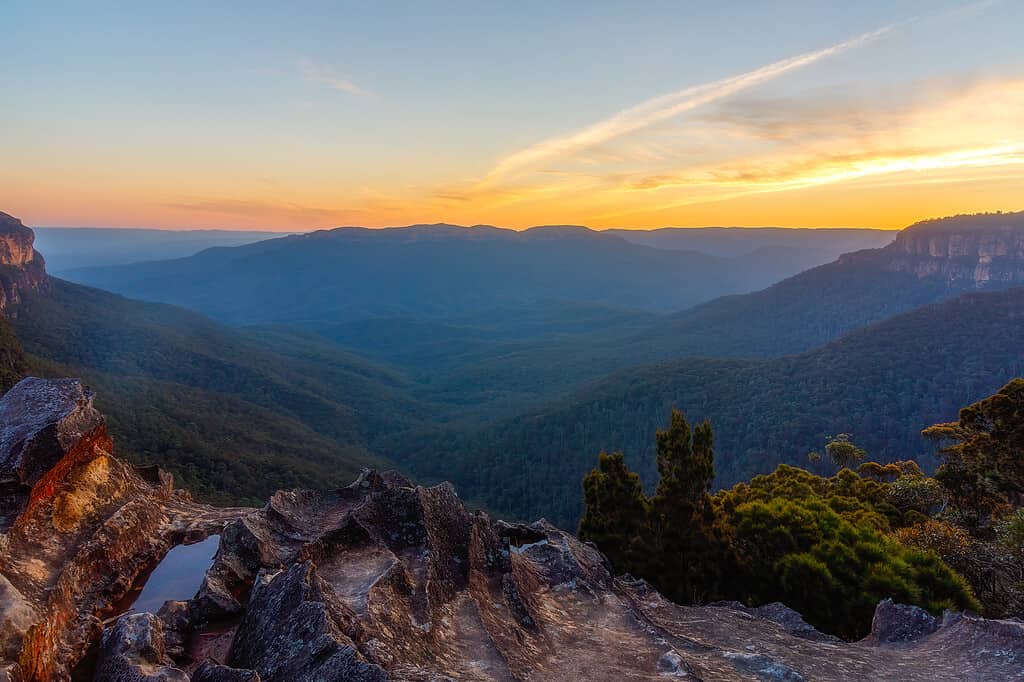
A wide-angle lens was definitely needed here to capture this scene – Blue Mountains, NSW, Australia
5 – The Importance of a Tripod for Sharp Sunset Images
As a landscape photographer, a tripod is already an essential piece of equipment, and when it comes to sunset photography, it becomes even more invaluable.
While shooting a sunset, you’ll likely want to focus on capturing the details in the scene, rather than fast-moving action. This makes it the perfect time to use a tripod, which provides stability and prevents camera shake. A tripod also allows you to experiment with long exposures, which can create a beautiful ethereal look in sunset beach photos.
When shopping for a tripod, it’s important to strike a balance between lightness for easy portability and heaviness for stability. As beaches and sunset photography are often synonymous, you may also want to consider a tripod that is resistant to corrosion from water and sand. Carbon-fibre tripods are a great option for this.
Remember, once you have a few shots you’re happy with at one tripod position, move it around and try out different angles and vantage points to get the best possible shots. Don’t get caught in the trap of not moving just because you’re using a tripod.
If you’re shooting at longer shutter speeds of 1/60s and beyond, then using a tripod is crucial. It will keep your camera stable and your images sharp .
While you don’t necessarily need a tripod for the beginning of your sunset shoot, as there will be plenty of light, as the sun sinks on the horizon, a tripod will become more and more necessary. By the time the sun has set, it will be absolutely essential.
If you forget your tripod or don’t have one, you can stabilise your camera against an object like the hood of a car or set it on the ground. Just ensure it’s as still as possible to minimise any camera shake.
Overall, tripods are essential for sunset photography, giving you the stability and flexibility needed to capture stunning sunset shots.
6 – Try Different Exposure Settings for Creative Sunset Shots
Once you’ve taken your shots with proper exposure, don’t stop there.
Experiment with different exposures to create unique and creative shots.
Start with the recommended aperture and shutter speed settings in aperture priority or manual mode, and then try underexposing by raising the shutter speed or narrowing the aperture. Alternatively, try overexposing by doing the opposite.
The key is to experiment with different settings until you find the right exposure that captures the mood and atmosphere you’re aiming for.
Sunsets offer endless possibilities for creative expression, and there is no single “right” exposure. For example, underexposing can create moody and dramatic shots, while overexposing can bring out the vibrant colours and tones of a sunset.
Personally, I tend to begin by using a faster shutter speed and wider aperture, and then progressively decrease the shutter speed as the sun dips below the horizon.
7 – Use Exposure Bracketing to Capture the High Dynamic Range
When taking photos of the sunset, the range of light in the scene can be difficult to capture in a single shot. Exposure bracketing is a technique that can help you capture the wide dynamic range of the sunset scene by taking multiple shots at different exposures.
To bracket exposures, take three shots of the same scene: one correctly exposed, one overexposed, and one underexposed. The underexposed shot captures the details in the highlights, while the overexposed shot captures the details in the shadows. The correctly exposed shot serves as a reference point for the other shots.
Once you have taken the shots, you can use post-processing software like Adobe Lightroom or Photoshop to combine the images into a single high dynamic range (HDR) image. The software will align the images and blend the different exposures to create an image with details in both the highlights and shadows.
If you’re new to blending exposures, don’t worry – it’s not as complicated as it might sound. This is a simple tutorial if you’d like to learn more about blending photos in Lightroom.
By using exposure bracketing and HDR, you can capture the full range of colours and tones in the sunset scene. This technique is particularly useful when you have a high contrast scene with deep shadows and bright highlights.
8 – Ditch the Auto White Balance Setting for Beautiful Sunsets
When you take pictures of sunsets, the colours can be breathtaking – warm, golden hues that make everything feel magical. But capturing these colours can be tricky, especially if you’re relying on your camera’s auto white balance setting.
Your camera’s white balance setting adjusts the temperature of the colours in your scene, which can have a big impact on the look of your photos.
When the white balance is set to Auto, your camera will try to figure out the colour temperature on its own. While this can work in some situations, it often doesn’t do justice to the warm, golden tones of a sunset.
That’s why I recommend ditching the auto white balance setting and using the Cloudy or Shade presets instead. These presets will warm up your photos and bring out the best in the colours of your sunset. If you want a cooler, more moody shot, you can experiment with other white balance settings.
Now, some photographers might argue that shooting in RAW and adjusting the white balance during post-processing is the way to go.
And it’s true that shooting in RAW gives you more flexibility when it comes to tweaking the white balance later on. But I think it’s worth taking the time to get the white balance right in-camera, so that you can get the best possible results straight out of the camera.
After all, who wants to spend hours tweaking white balance settings in front of a computer?
9 – Why Shooting in RAW is Key for Stunning Sunset Photos
When it comes to sunset photography, shooting in RAW is key to getting stunning results. While many photographers, especially beginners, tend to shoot in JPEG format due to its convenience and shareability, it comes at a cost. When your camera creates a JPEG, it compresses the image data and performs some basic editing. This results in less information in the file and less flexibility in post-processing.
On the other hand, RAW files contain all the image data from the moment of capture and offer several major advantages. They have more colour and tonal information, making it easier to push colours in different directions and recover detail in the shadows and highlights. This is especially important in sunset photography where you’re dealing with a wide dynamic range and vibrant colours.
While RAW files may not look as stunning as JPEGs straight out of the camera, with a little bit of editing knowledge, you can turn them into incredible images. So, don’t let the camera do the editing for you. Shoot in RAW and take control of your sunset photos.

10 – Improving Image Sharpness with Remote Release or Timer
When capturing sunset photos, it’s important to keep the camera steady to achieve maximum sharpness. Even the slightest camera shake can cause blur, which is especially noticeable in the details of the image.
One simple solution to this issue is to use a remote release or timer. By using a remote release, you can trigger the camera’s shutter without physically touching it, which eliminates the risk of camera shake. Similarly, by setting the camera’s timer, you can delay the shutter release for a few seconds, allowing you to step away from the camera and avoid any unintentional movements.
This is especially important in sunset photography, where the light can change quickly and you may need to adjust settings on the fly. With a remote release or timer, you can easily make changes to your settings without risking camera shake and losing the sharpness of your image .
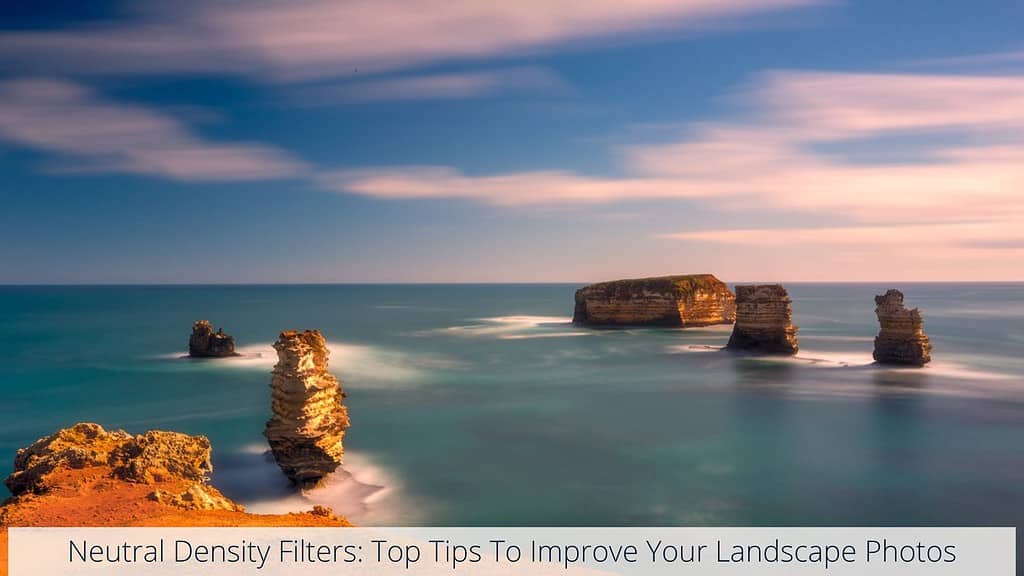
11 – Enhance Your Sunset Images with the Right Filters
If you want to take your sunset photography to the next level, consider using filters. The two types of filters that are particularly useful for sunset photography are neutral density (ND) filters and graduated neutral density (GND) filters.
An ND filter reduces the amount of light entering your camera, allowing you to use slower shutter speeds without overexposing your image. This is particularly useful during sunset when the light levels can change quickly. On the other hand, a GND filter helps to balance the exposure between the sky and the ground. This is useful when the sky is much brighter than the foreground.
Think of filters like sunglasses for your camera lens. Just as sunglasses help to reduce glare and improve contrast when you’re outside on a bright day, filters can help to reduce harsh light and balance exposure during sunset photography.
For more information on filters and how to use them in your photography, check out our comprehensive guide to filters .
12 – Composition Tips to Create Stunning Sunset Photos
When it comes to sunset photography, the composition of your shot can make all the difference in creating a stunning image.
One of the fundamental principles of composition is the “ rule of thirds ,” which involves dividing your frame into a 3×3 grid and placing the horizon or the main subject along one of the gridlines or intersections.
This creates a more visually interesting and balanced composition.

However, the rule of thirds is just the beginning. Leading lines , framing , keeping it simple, and other techniques can also greatly improve your sunset photos. Leading lines can guide the viewer’s eye to the main subject, while depth can add a sense of dimension and scale to your shot. Keeping it simple by minimising distractions in the background can also help draw attention to the main subject.
For more detailed information on composition techniques, check out my article on composition tips for beginners. Remember, rules are meant to be broken, and experimentation is key to finding your own unique style.
13 – Explore New Perspectives: Playing with Different Angles
When it comes to sunset photography, it’s easy to fall into the habit of shooting from the same eye-level perspective. However, to create truly stunning images, it’s important to play around with different angles and perspectives.
While shooting from the standard vantage point can still produce great shots, varying your angles can help you capture unique and eye-catching images. Try lowering your tripod or shooting from a higher angle to add depth and interest to your photos.
Experimenting with different angles can also help you highlight specific elements in your sunset scene, such as interesting foreground objects or dramatic cloud formations. So don’t be afraid to mix things up and try out new perspectives.
Of course, there’s no need to abandon the more conventional approach entirely – simply experiment with different angles and see what works best for you!
Of course, don’t give up the more conventional approach completely, but do try these other perspectives and see what you think!
14 – Look Beyond The Horizon Line
One of the many amazing things about sunsets is the beautiful golden light they cast.
As the sun sets, the light transforms the landscape and creates new photographic opportunities.
So don’t just focus on the horizon line. Look around and see how the light is illuminating other elements in the scene.
Experiment with capturing the golden light on mountains, trees, and other features of the landscape. You might be surprised by the stunning results you get!
The sun was setting to the right of this image but casting beautiful golden light on the mountains
15 – Don’t Leave Too Soon: Keep Shooting after Sunset
As a sunset progresses, the colours in the sky change and create different opportunities for photos.
Don’t just take a few shots and call it a day. Stay a little longer and keep shooting as the sun goes down.
This is known as the golden hour, where the sun casts a warm, golden light on the landscape. Even after the sun has set, don’t pack up your gear just yet.
The blue hour, the period after sunset, can offer beautiful colours and light, too. Keep finding compositions and shooting until the colours have completely disappeared below the horizon line.
Remember, every minute can be an opportunity for a different shot.
This shot was taken long after the sun had dipped below the horizon line
Well, there you have it! Sunset photography is one of the most beautiful and rewarding genres of landscape photography, but it does come with its own set of challenges.
I hope you found these sunset photography tips and techniques useful and informative.
Remember, the most important thing is to have fun and experiment with different techniques. Don’t be afraid to get creative and try new things, whether it’s playing with exposure, using filters, or changing your composition. And always bring your tripod for the sharpest results.
And don’t forget to shoot in RAW whenever possible – RAW files give you more control over your images and allows you to make adjustments later on.
Finally, don’t pack up too early and miss out on the blue hour – it can be just as beautiful as the sunset itself!
So grab your camera, head outside, and start capturing those breathtaking sunsets. And if you have any questions or tips of your own, please share them in the comment below – I’d love to hear from you!
That’s it for now – Keep clicking and stay caffeinated
Like this post? PIN it so you can save it for later
Sam is the creator of cameracoffeeandcabernet.net, a website dedicated to photography and solo travel. Based in Australia, Sam combines her passion for photography and travel to bring you tips, insights and experiences to help you plan, pack, and make the most of your photography while on the road.
Similar Posts
Tasmania Photo Road Trip: 10 Days In Tasmania
Tasmania photography at its best! Photograph amazing Tasmania in this 10 day itinerary full of beautiful landscapes and exciting photo locations.

Timing Your Landscape Photography: 7 Tips For Getting Great Shots
Timing your landscape photography is so important for great photos! Learn how to plan and consider your timing: time of day, season, weather and more.

Tasmania Photo Locations: 25 Must-Go Spots For Great Photos
Tasmania photo locations: top 25 spots for photographers. Hobart, Tasman Peninsula, Freycinet National Park, The Tarkine, Cradle Mountain and more.

The Best Landscape Photography Podcasts Worth Listening To
Explore these picks for the best landscape photography podcasts. Here you’ll find entertainment, helpful tips, gear reviews and a wealth of inspiration.
Essential Landscape Photography Gear
Everything you need for landscape and travel photography. All the gear to take awesome landscape photos.

Why and how to use a Circular Polarising Filter
A complete guide to when and how to use a circular polarising filter to give your photos some extra pop and colour
Leave a Reply Cancel reply
Your email address will not be published. Required fields are marked *
Save my name, email, and website in this browser for the next time I comment.
Home » Adventure Travel » Amazing 5 Day Southwest Road Trip For Lovers of Photography

Amazing 5 Day Southwest Road Trip For Lovers of Photography

The beauty of the natural landscape poses the ultimate challenge to travel photographers on a Southwest road trip in the United States. How to capture the majesty of the region when the bar was set so high by the greatest landscape photographer of them all–Ansel Adams?
“It is all very beautiful and magical here—a quality which cannot be described. You have to live it and breathe it, let the sun bake it into you. The skies and land are so enormous, and the detail so precise and exquisite that wherever you are you are isolated in a glowing world between the macro and the micro, where everything is sidewise under you and over you, and the clocks stopped long ago.” Ansel Adams
The right equipment and technical know-how are important, but so is experience. As they say, you don’t know what you don’t know. That’s where a reputable photography workshop is worth its weight in gold. Scroll down to learn about the workshop, as well as our 5-day Southwest road trip itinerary.
And for even more American Southwest adventures, check out our epic Havasu Falls trip , Arizona mountain towns , this long list of West Coast National Parks , and an even longer 11-Day Southwest National Parks Road Trip itinerary that includes visiting Bandelier National Monument , among others.

Table of Contents
Southwest Photography Workshop
Not too long ago, my traveling companion and I had the opportunity to join a Southwest Photography Travel Workshop run by two instructors, Jeff Sink, and David LaNeve, with the California Center for Digital Arts . Drawing on their familiarity with the region, they knew which Southwest destinations to choose, and how to schedule landscape shoots to place us in the right place at the right time.
Before leaving, we were advised on which lenses ( all of them! ) and accessories (tripods and graduated neutral density filters) to pack. While there, they coached us on settings and techniques such as the use of HDR and bracketing. And by the end of the road trip, we had plenty of material for an editing workshop.
Since participants brought their knowledge to the photo tour, we learned from them too. So, on the evening when Jeff Sink showed us his next-level editing workflow, we drew on group expertise to select our best images. And even during photo shoots, we gained insight and tips from everyone–not just the group leaders.
“Sometimes I arrive just when God’s ready to have someone click the shutter.” Ansel Adams

5-Day Southwest Road Trip In November
Photographing the Southwest landscape is breathtaking at any time, but in November you’re less likely to find the influx of visitors seen in the summer months. And it’s still before temperatures nosedive and winter conditions bring other challenges. Generally, we drove and/or visited visitor centers during harsh midday hours, keeping early morning and late afternoon hours free for photography.
Here is our travel photography itinerary.
Southwest Road Trip Day 1: Grand Canyon National Park
Our photography tour was set to begin with a sunset shoot on the Grand Canyon’s South Rim. But we wanted to be settled into our hotel room before joining our tour group.
The Grand Canyon’s South Rim is about an eight-hour drive from our departure point in Southern California. With an early start, we could’ve made it there in time to meet up for the sunset photo shoot. ( Note- if flying in, consider flying to Salt Lake City or Las Vegas, and renting a car. )
But since we couldn’t leave until late afternoon, we broke up the scenic drive with an overnight stay in Kingman, Arizona. Because of this, we reached our hotel early and had time to explore the accommodations.

Grand Canyon Lodging
Yavapai Lodge is conveniently located within Grand Canyon National Park, about a mile from the South Rim. Check-in is at the main building, where the gift shop and dining options are located, but rooms are found a short distance away in the newer 2-story Yavapai Lodge East or motel-style Yavapai Lodge West.
Our room for the night was in the Mid-Century Modern Yavapai West. These older accommodations don’t have air conditioners; hardly a drawback in the cooling temperatures of late Autumn.

The decor was more utilitarian than plush, but it offered all we needed for a comfortable night’s rest. Plus, the single-story layout made it easy to go back and forth from the truck with our gear.
Sunset at South Rim Photo Spot
Our meeting point on the South Rim Trail was by the Yavapai Museum of Geology. There’s a convenient parking lot and restrooms, with easy access to Yavapai Point Overlook. It was still a little early, but we needed plenty of time to set up. ( See the National Park Service’s Sunrise/Sunset Times and Moon Phases for current times. )
Landscape Photography Tips
Before splitting up, Jeff advised us on general camera settings. He then introduced an advanced method of bracketing shots that produces an ideal range of lighting for merging shots into an HDR (high dynamic range) photo:
- Start with a wide-angle lens and tripod.
- Use Manual camera setting with the lowest ISO (100 or less) and sweet spot aperture, F11 (or whatever is right for the specific lens.)
- Use the histogram in Live View mode to determine shutter speeds. Begin with what the camera considers the best shutter speed, then choose shutter speeds that capture high lights and low lights.
- Be sure to use an open and closed fist in front of the camera to remember the beginning and end of the sequence.
And then came the challenge of picking the best spot to set up a tripod. Jeff and David advised us to search out a focal point even within the vastness of the Grand Canyon while considering all the usual compositional tools–rule of thirds, leading lines, etc.
The only problem was that there were many great vantage points along the rim; fortunately, we would have another chance to photograph this landscape at sunrise.

Dining at Yavapai Lodge
Given the captive audience, it’s a welcome surprise that dining options at Yavapai Lodge are as good as they are. A coffee shop offers baked goods and sandwiches for quick, on-the-go meals. A fast-moving cafeteria line ensures prompt service and decent meals.
And, at the end of the day, Yavapai Tavern is a welcome retreat serving Arizona craft beers and Elk Burgers, plant-based items, and the usual pub fare.

Southwest Road Trip Day 2: Grand Canyon to Horseshoe Bend
There’s no doubt that shooting the sunrise at the Grand Canyon South Rim is one of the most awe-inspiring bucket list experiences. In November, it’s also one of the coolest–as in freezing cold temperatures. It pays to dress accordingly in layers, with a hat and gloves.
We returned to Yavapai Lodge for the cafeteria breakfast and to check out before starting the road trip to Page, Arizona, where Horseshoe Bend Canyon is located. It’s a little over two hours to drive from Horseshoe Bend, so we had plenty of time to get there before sunset. But we wanted to stop along the way.

Moran Point – Grand Canyon National Park
Heading east, our first stop was at Moran Point for sweeping views of the Colorado River snaking its way along the canyon floor. A quick stop to set up tripods at the vantage point, and then it was back to the car for the next stop along Deseret View Drive.

Deseret View Watchtower
You can’t miss the 70-foot-tall Deseret View Watchtower. Designed by Mary Elizabeth Jane Colter, better known as the architect of the Southwest, it was inspired by the ancient homes of the Pueblo people.
Inside, a massive Kiva anchors the room, and as you climb steps to the upper floors, walls and ceiling paintings preserve the stories of indigenous tribes.

Navajo Outpost
One last stop just outside the national park at a Navajo souvenir stand–we were hoping to find fry bread but left with buffalo jerky instead–and we were on our way.

Horseshoe Bend
From that souvenir stand, we drove straight to Page, Arizona, to have time to check in at the hotel before going to Horseshoe Bend for sunset photos.
It wasn’t my first time in Page, AZ as it’s a convenient stop on cross-country road trips. Until recently, parking was free, though limited. Now there is ample parking, but it comes with an entrance fee ($10 for a passenger vehicle.)

And as many times as I’ve made the short but steep hike to Horseshoe Bend, I never fail to be awed by the sight that awaits. The only difference is that this time, despite another overcast sky, and thanks entirely to onsite instruction, I could capture a landscape photograph that does the place justice.

Southwest Road Trip Day 3: Slot Canyons In Page AZ
Another reason to go to Horseshoe Bend is to see the slot canyons, especially the famous Upper Antelope Canyon. Sadly, one month after our visit, the photography tours were canceled. However, sightseeing tours are now open, and there’s a new staircase adding a one-way exit.

The way the Adventurous Antelope Canyon photography tour worked, you would accompany a Navajo guide in a truck that would take you to four canyons: Antelope, Rattlesnake, Owl, and Mountain Sheep.
Because Antelope was so popular–the most expensive fine art photo in the world was shot there–the photography group had to hustle through. It was stressful and difficult to get a good shot.
Meanwhile, the other slot canyons were just as interesting, but trying to see them all on one tour was challenging.

You can still see the slot canyons on one of the regular sightseeing tours, but professional photography is limited because you can’t take a tripod.

And in case you’re wondering, no, you can’t explore any of these slot canyons without a Navajo guide. According to tour guide Presley Ashley, this rule was instituted after a flash flood killed eleven visitors in 1997.
Hotels in Page AZ
Reflecting increased interest in Horseshoe Bend and the slot canyons, in addition to proximity to popular tourism destination Lake Powell, and all the epic things to do in Page AZ , new franchise hotels have opened up. We spent two nights at the Hampton Inn & Suites.
It’s nothing fancy but clean and comfortable, with a spacious workspace, a good breakfast, an indoor pool, and free parking.

Restaurants in Page AZ
There are several restaurants in Page, Arizona. We enjoyed the Navajo Tacos at Steer 89 and the steak dinner at State 48 Tavern . However, the most festive restaurant we frequented was Fiesta Mexicana . The spicy shrimp Aguachile and Molcajete, served in a traditional volcanic rock bowl, are particular favorites.

Southwest Road Trip Day 4: Page AZ to Bryce Canyon National Park
It’s less than a three-hour drive from Page, AZ, to Bryce Canyon National Park along US 89, but there are plenty of reasons to linger a little longer.

Glen Canyon National Recreation Area
Lake Powell and Lower Cataract Canyon are part of Glen Canyon National Recreation Area, which covers over a million acres across Arizona and Utah. Beautiful canyon vistas are everywhere, but just as you leave Page, you see the Glen Canyon Dam Overlook that carves out the Lake Powell reservoir from the Colorado River.
And soon after that, there are hiking trails and lake access at Wahweap Recreation Area.

Grand Staircase-Escalante National Monument
As for hiking, there are more trails en route at the Toadstools Trailhead in the Grand Staircase-Escalante National Monument. The hike to the mushroom-like rock formations is 1.6 miles roundtrip, but be sure to pack in plenty of water and be aware that there is limited cell reception.

Best Friends Animal Sanctuary
When we dropped in it happened to be on dog adoption day at the Best Friends Animal Sanctuary . Cute puppies caught and held our attention, but there’s also a cafe, shop, and hiking trails. With advance planning, visitors can also volunteer.

The Rock Stop
About an hour from Bryce Canyon along US 89, you can’t miss the rock-shaped roadside building housing the Rock Stop . Inside, and out, there’s a wide array of rocks, fossils, and collectibles. But it’s also a good spot to pick up a snack, coffee, or soft ice cream.
Southwest Road Trip Day 5: Bryce Canyon back to Southern California
One day, including an overnight stay, in Bryce Canyon National Park gave us plenty of time to capture images at several iconic stops. There’s both a Sunrise Point and a Sunset Point, as well as Bryce Point and Inspiration Point. And they’re all within a few minute’s drive from each other, located within a short distance from the parking lot.

Sunset Point
Our first stop after meeting at our hotel was to check out Sunset Point. This was to get the lay of the land so that we could be well prepared for the dark and chilly start the next morning.

Sunrise Point
My only regret was that we only had one sunrise at Bryce. The hoodoos at Sunrise Point glowed under the incredible morning light, and I would’ve liked to see how that light would impact other rock formations in the park.

Bryce Point
Fortunately, the beautiful morning light lasted long enough to see it cast upon Bryce Point.

Inspiration Point
By the time we reached Inspiration Point, sunrise lighting didn’t seem to matter anymore. Here, soft shadows were kind to the contrasts between the white and red rock.
Hotel At Bryce Canyon

The closest lodging to Bryce Canyon National Park is the one located within park boundaries, the Lodge at Bryce Canyon. But for a usually lower rate and more amenities, you can’t beat the Best Western Plus Ruby’s Inn . And it’s only a mile from Sunrise Point.
Ruby’s Inn offers a wide variety of activities from horseback riding, mountain bike rentals, and even a summerlong rodeo.
As for dining, we ate at the hotel’s Cowboy’s Buffet & Steak Room and picked up lunch snacks onsite at Ruby’s General Store. It was convenient and satisfying.
More Southwest Road Trip Destinations
Canyonlands national park.
Canyonlands National Park in Utah is divided into four districts, it offers unique opportunities for capturing stunning images. In the Island in the Sky district, Mesa Arch frames the La Sal Mountains beautifully. The Needles district showcases colorful spires and canyons, perfect for exploring intricate formations. The Maze district’s remote terrain provides a unique and isolated perspective. Lastly, the rivers in the Green and Colorado Rivers districts offer serene reflections and dramatic canyons, making Canyonlands a captivating destination for photographers.
Arches National Park
Arches National Park in Utah is known for its iconic natural arches like the Delicate Arch and the stunning Windows Section. Sunrise at Mesa Arch and the unique formations of the Fiery Furnace are also photography highlights. The park’s ever-changing light and dramatic landscapes offer endless opportunities for capturing the beauty of the desert.
Zion National Park
Zion National Park in Utah is a photographer’s paradise with its stunning landscapes. The Narrows, a narrow slot canyon, offers captivating light and shadow play. Zion Canyon’s towering monoliths like Angels Landing and the Great White Throne provide breathtaking vistas. Emerald Pools and Weeping Rock offer lush contrasts against red rocks, perfect for close-ups. The Zion-Mount Carmel Highway offers numerous scenic viewpoints.
Valley of Fire State Park
Valley of Fire State Park, located in Nevada, is a captivating destination for landscape photographers. This surreal desert landscape is adorned with fiery red sandstone formations that come alive with vibrant colors during sunrise and sunset. Key photography highlights include the iconic Fire Wave, where swirling patterns in the rock create a mesmerizing foreground for dramatic desert landscapes, and the brilliant red arches of Arch Rock, which frame the surrounding landscape with striking elegance.
Monument Valley
Monument Valley, situated on the Arizona-Utah border, is an iconic landscape that has captivated photographers for generations. Its towering sandstone buttes and mesas, set against the backdrop of endless desert vistas, create a striking and timeless scene. Photographers flock here to capture the interplay of light and shadow on the unique geological formations, particularly during sunrise and sunset, when the landscape is bathed in warm, golden hues.
Dead Horse Point State Park
Dead Horse Point State Park, perched high above the Colorado River in Utah, offers photographers breathtaking vistas of the canyonlands below. The park’s namesake overlook provides a stunning panoramic view of the meandering river as it carves through deep canyons, especially enchanting during sunrise and sunset when the golden light bathes the landscape. Photographers also find the East and West Rim viewpoints ideal for capturing the dramatic red rock formations and the meandering river below, creating striking compositions and memorable shots.
More Romantic Road Trips
- Great Fall Weekend Road Trips; Northeast US: Get Outta Town
- Drive Cross Country on US Route 6

Sandra Foyt is a storyteller, road trip junkie, and award-winning travel photographer. A veteran of many cross-country road trips, she drove Route 66, the Lincoln Highway, the Fossil Freeway, the Extraterrestrial Highway, and even “The Loneliest Road in America.” Sandra is based in Upstate New York, with family homes in California and the Caribbean. Her work is influenced by tropical colors and warm relationships. And she believes that the best travel photography connects us across time, place, and culture.
View all posts
15 Photography tips on your road trip
by Noel | | Photo Tips , Photo tour , Travel Photography | 13 comments

Capture Memorable Moments: Photography Tips for Your Road Trip Adventure
Everyone loves taking road trips but many travelers spend more time planning the trip experience first and the photography as a secondary function to chronicle the adventure. It’s always disappointing to come back home from the trip and bring back photos that are lackluster and just don’t show the magnificence of a location. This can be very disappointing, but with some pre-planning, you can return home from the trip and bring back some amazing pictures to share about your experience.
It just takes a little more time to plan the photography part, try some basic photography techniques and being at your destination in the right time and place, so you will have better opportunities to photograph your subject. I’ve done a lot of road trips around the world and have learned so much from doing these adventures and how to maximize your timeframe while traveling to showcase your journey from your photography.

We share our favorite ways to capture images along a road trip adventure below. Remember, photography is a creative expression, so don’t be afraid to experiment, try new techniques, and capture the moments that make your road trip memorable. Enjoy the journey and have fun with your photography!
1. Plan your photo trip requirements – just like planning your road trip, it is also crucial to plan your photography approach for this trip. This could be anything you can do in thinking about the destination and checking out websites, blogs and magazines for inspiration of where certain images were taken and how to even get to those locations. Planning the logistics for getting to a certain spot including the important golden hours in the morning and sunset are important considerations to coming up with stunning imagery from your trip
2. Keep flexible with your plans – when it’s a road trip inspiration comes at anytime especially when you are passing through some interesting areas that you may just want to spend more time in to explore and cut things out from your regular agenda. Being flexible in your timeframe, places of interests and what looks attractive that you may want to explore in more detail.
3. Consider your photography equipment – road trips allow you to bring as much or as little equipment with you as you are comfortable with. If you are willing to slepp all your electronic gear with you and keep it handy in your trunk, then go ahead. But for those that are more comfortable traveling light know what you are capable of doing with the equipment you have and how much you are willing to walk to get yourself in a better range to the subject, either in a close up or panorama. Make sure you also bring your handy tripod or monopod for those shots you want to get perfect.
4. Always be ready to shoot – It seems like when you are driving or just happen into something unusual, the moment comes and goes quickly. This is when it makes sense to always have your camera ready to shoot. In fact get those preset camera settings already in place for your shutter speed, priority setting or manual mode so all you have to consider is shooting. Or if you have not time for trying out the perfect setting, just put it on program or automatic and at least you will get the shot that normally you would have missed because the camera setting was not in place.

5. Tell the whole story – Getting a sense of place in a location better known as an environmental shot, really gives a perspective to the place you are visiting. Try to include some of the local scene, graphic elements and signage, architecture, people, food and anything else that gives us a sense of place that is truly unique and tells us a complete story without any words or captures to describe your photograph.
6. Have fun on your trip and show that in your imagery – Be curious and really be in the moment while you travel, this is part of the joy of doing road trips and finding something new to experience. Now the challenging part is to photograph that experience to convey what you are actually doing or seeing at that moment.
7. Golden hour – It’s important to plan and be somewhere specific in order to capture those wonderful sunrise or sunset moments (the golden hour which includes the timeframe before and after sunrise or sunset). These are the best timeframes when you want to be at the site shooting those gorgeous landscapes and landmarks. It does take a little effort to plan on a road trips to be at a location for the golden hour timeframe. But, you will be rewarded for your efforts at the destination when lighting conditions are ideal and you get to photograph your subject at the golden hour.

Senso Ji temple in Tokyo looking to the sky
8. Take those obligatory famous landmark photos, then show us something different about this place . This can be done by infusing some local people or fashion, a different angle to present this landmark or framed in an unusual format. This is a great time to experiment and try something out of the box to see what you can do that’s different now that you have taken the standard tourist shot of that venue.
9. Shoot fast – along with keeping your camera ready, if you are on a drive and doing the drive by shootings, have your camera set on burst mode so at least you can have a variety of shots to choose from instead of the one blurry image you took of that place or an experience that happened only during that moment.

Route 66 at Seligman, Arizona
10. Take the scenic route – get off the main highway and go on those slower but more scenic routes. These roads really do live up to their reputation to show you the more genuine and almost forgotten towns, quirky venues, fun locals and those wonderful landscapes that you will see from taking the time to drive through these scenic routes

Streets around Marrakesh in Morocco
11. Don’t just show us the scenery – road trips are filled with those wonderful small details: the fascinating people and traditions, delicious local foods and roadside stands, architecture and anything else that stands out beyond the traditional photo shots in front of a landmark or beautiful landscape. It’s also great to use people within a landscape to show a sense of scale, doing something active or being place in a strategic spot to create an interesting composition.
12. Balance between taking that photo and savoring the moment – Yes it is amazing to capture that scenery or landmark, but it is also important to be present and admire that visual for just what it is and how special it is. This definitely is a balance of being present and enjoying that immediate scene and taking the time to portray just the way that you are experiencing it for the moment.
13. Using a tripod – Not every situation deserves using a tripod on your road trip especially when you are always on the go. But for those really spectacular scenic shots or even difficult imagery with challenging lighting conditions, using a tripod is mandatory. You can also look for alternatives like some a solid stand/surface or even a makeshift prop you can put your camera or even a monopod if you don’t have space to travel with a tripod.

14. Looking from above – when you are at a vista point or location where you can climb up to get a nice view, make sure you do it! Having a different perspective of a landscape, city or landmark is more interesting when you can see it from above, and you will be able to capture a sense of place looking down from a high vantage point.

15. Time to experiment – Road trips are the perfect excuse to take risks and show us something new or creative. This is really the best time to be curious and explore anything that fascinates or peaks your interest. Try different camera settings, different camera angles, shooting from above or below and using your remote timer to include your subjects or yourself into the scenery.
More inside tips for your road trip and photography focus
Here are some additional inside tips to make your road trip and photography-focused adventure even more rewarding:
- Research Scenic Routes: Plan your road trip along scenic routes known for their natural beauty or cultural landmarks. This will provide abundant photography opportunities along the way.
- Allow for Flexibility: Embrace spontaneity and be open to detours and unexpected discoveries. Some of the best photo opportunities can arise when you least expect them.
- Take Breaks: Schedule regular breaks to stretch your legs, explore new areas, and capture unique shots. Roadside attractions, small towns, and hidden gems can offer interesting subjects for your photographs.
- Capture Local Flavors: Use your camera to document the local cuisine, markets, and regional specialties. Food photography can add a delicious dimension to your road trip memories.
- Scout Locations in Advance: If there are specific landmarks or photography hotspots you want to visit, research them in advance. Look for the best angles, lighting conditions, and times of day to capture them.
- Use Apps for Planning: Utilize navigation and travel apps to find the best photo spots, scout accommodations, and track weather conditions along your route.
- Stay Patient and Observant: Be patient and wait for the perfect moment to capture a shot. Keep an eye out for unique compositions, interesting patterns, and fleeting moments that make your photographs stand out.
- Experiment with Different Genres: Explore various genres of photography during your road trip. Try landscape, portrait, street, and even astrophotography if the conditions are favorable.
- Seek Local Advice: Interact with locals and fellow travelers to get insider tips on lesser-known but picturesque spots. They may suggest hidden gems that are off the beaten path.
- Backup Your Photos: Carry extra memory cards or a portable hard drive to back up your photos during the trip. This ensures that your precious memories are safe, even if something happens to your camera.
- Take Care of Your Gear: Keep your camera and lenses clean and protected during the journey. Carry a cleaning kit and use protective cases or bags to prevent damage.
- Document the Journey: Capture not only the destinations but also the moments in between. Photograph the open road, fellow travelers, and the overall experience of the road trip itself.
If you enjoyed these camera tips, please check out some of my other photo tips below
Black and white photo tips for beginners
Capturing street images – some photo tips and techniques
15 Instagram tips for better photos and compositions
10 Photography tips for grey sky or rainy days
Flower and nature photography – tips on making your images pop
Photographing people – some tips and techniques
Photography tips for travel Photography
Travel photography – what to pack
Photo tip – backlighting your image
Photo tip – fill the frame
Food photography – making your images pop
Try keeping your camera clean and safe on a road trip
Keeping your camera clean and safe during a road trip is essential to ensure optimal performance and protect your valuable equipment. Here are some tips to help you keep your camera clean and secure throughout your journey:
- Use a Camera Bag or Case: Invest in a reliable camera bag or case that provides padding and protection against bumps, shocks, and moisture. Make sure it has compartments to organize your camera body, lenses, and accessories.
- Pack Silica Gel Packs: Include silica gel packs in your camera bag to absorb moisture and prevent condensation buildup, especially in humid environments. This helps protect your gear from potential damage caused by moisture.
- Carry Lens Cleaning Tools: Pack a microfiber cloth, lens cleaning solution, and a lens brush to keep your lenses clean and free from dust, fingerprints, and smudges. Regularly wipe the lens surfaces and use the brush to remove any debris.
- Handle with Care: Be mindful of how you handle your camera and lenses. Avoid touching the glass surfaces and use lens caps or hoods when not in use to provide extra protection.
- Protect from Extreme Temperatures: Avoid exposing your camera gear to extreme temperatures. Keep it shielded from direct sunlight or excessive heat, which can damage the internal components. In cold conditions, allow your camera to gradually adjust to room temperature before use to prevent condensation.
- Secure Your Camera: Use a neck strap or wrist strap to keep your camera secure while shooting. This minimizes the risk of accidental drops and damage.
- Clean Your Camera Body: Regularly wipe down your camera body with a soft, dry cloth to remove dirt, dust, and debris. Pay attention to the buttons, dials, and LCD screen.
- Be Mindful of Changing Lenses: If you need to change lenses during your road trip, do so in a clean and sheltered environment to minimize the risk of dust or debris entering the camera body.
- Backup Your Photos: Create regular backups of your images to prevent losing precious memories. Consider carrying an external hard drive or utilizing cloud storage options to store your photos securely.
- Check for Damage: Routinely inspect your camera and lenses for any signs of damage or wear. If you notice any issues, address them promptly or seek professional assistance if needed.

Crossing the Virgin River at Zion National park
Conclusion on 15 Photography tips on your road trip
Embarking on a road trip with a photography focus opens up a world of possibilities to capture stunning images and create lasting memories. By combining the freedom of the open road with your passion for photography, you have the opportunity to explore new destinations, immerse yourself in diverse landscapes, and document the beauty you encounter along the way.
Through careful planning, flexibility, and an open mind, you can discover hidden gems, unique perspectives, and extraordinary moments that make your road trip truly special. Whether it’s capturing the grandeur of nature, the vibrant energy of city streets, or the intimate details of local cultures, your camera becomes a powerful tool to translate your experiences into visual stories.
Thanks for visiting today, if you enjoyed reading this post on 15 Photography tips on your road trip , please do share it with any of the social media links below, thank you.
If you like what you see, come and check out my other social media channels for more updates, including Instagram , Pinterest and Twitter .
Sharing is caring!
13 Comments

“If you like what you see, come and check out my other social media channels for more updates, including Instagram, Pinterest and Twitter.” None of these links seem to work, Noel.

Great tips. It is always good to have a refresher course in photography. On my recent trip to Trinidad, I rediscovered that golden hour in the morning after sunrise. Got some great shops and have jet lag to thank for it.

Some great tips here. I like the one about pre-planning and researching your photos in the same way you do everything else in your trip.

Great advice, thanks. We try to follow most of this but will keep working on it.

Love road trips and these are great tips! Really need to remember to capture more than just the scenery as it adds so much more to the destination as a whole, as well as the story. 🙂

Thanks for the tips (and more great photos)

Great photo tips Noel. I’ll put them into use right away. I’m off to read your tips on food photography.

This is tremendous advice! I was already thinking I should have a plan for the photos on my next trip. Your tips have clinched it. What a great article, thanks!

Great tips. I have to pay more attention to the Golden Hour. I also like the tip about telling a whole story with the photo. Looking for that perspective should make for some interesting photos.

Talk about timely! Your tips are a great reminder to me as I head off to Bhutan in 2 weeks. I liked #8 and #11 because I tend to do a lot of landscape shots and getting other details and close ups can really help tell a story. So glad you wrote this post….and once again, I LOVE your photos!

thanks so much for the comments, check out some of the other tips that I have also included in the post Janice, they would be perfect for your trip!

Thanks for these wonderful tips that encourage the slower, off-the-highway road trip style we love. Can’t always build our stops around the golden hour, but it’s really nice when we do. When possible, I love to include a person in large landscape shots to give some perspective (pretty tired of the “person jumping in front of the scenery shot” though). Love your Route 66 picture!

Love these tips. The Golden Hour is a great one. I will have to remember that.
Submit a Comment Cancel reply
Your email address will not be published. Required fields are marked *
This site uses Akismet to reduce spam. Learn how your comment data is processed .
Hi, I'm Noel, a writer and photographer based in San Francisco and Hawaii. I write about delicious food and wine indulgences, thoughtful luxury, and adventure travel. I share camera tips and techniques while exploring new and unusual places around the world. My site explores culture and history, art and architecture, world heritage sites, exotic locals, along with nature tours and natural landscapes worldwide. Quite a mixed bag of curiosities and quirky interests, just like myself.
Posts by category

- Travel Photography and Videography
Sunset Photography: Expert Tips for Capturing Evening Sunset Shots
- 10 minute read
- August 9, 2023

Embarking on a journey to capture the breathtaking allure of sunsets through the lens of your camera is an endeavor that marries technical precision with creative intuition. As the sun gracefully dips below the horizon, it paints the sky with a palette of warm, captivating colors that dance against the fading light. Welcome to the world of sunset photography, where the interplay of vibrant hues and serene landscapes beckons both seasoned photographers and budding enthusiasts alike.

In this immersive guide, we’ll delve deep into the art of mastering sunset photography, equipping you with expert insights and practical techniques to ensure your images are imbued with the essence of this magical hour. From understanding the fundamental concepts that underpin successful sunset captures to uncovering the secrets behind evocative storytelling, this journey promises to elevate your photography skills to new heights.
Our exploration will encompass a plethora of vital aspects, ranging from selecting the ideal equipment and planning meticulously for the optimal lighting conditions to mastering the intricate nuances of composition and camera settings. We’ll reveal the art of harnessing the power of golden hour illumination and offer you invaluable post-processing tips to make your sunset images truly shine.
Understanding Sunset Photography Basics
Sunset photography is a captivating genre that requires a solid grasp of the fundamentals to create stunning and evocative images. As the sun sets, the changing light and colors provide a unique canvas for photographers to capture moments of tranquility and beauty. Here’s a comprehensive breakdown of the key basics to consider:
- Golden Hour and Lighting: The golden hour, the period shortly before sunset or after sunrise, is characterized by soft and warm lighting. This lighting casts a magical glow, creating a serene and enchanting atmosphere that lends itself perfectly to sunset photography. The warm hues of this light bring out rich and vibrant colors, adding depth and emotion to your images.
- Dynamic Range: Sunsets often present a challenging dynamic range, with the bright sun and dark foreground elements. Understanding how to manage this dynamic range is crucial to ensure both the sky and the landscape are properly exposed. Techniques like bracketing or using graduated filters can help achieve balanced exposures.
- Color Palette and Mood: Sunsets offer a diverse range of colors and moods as the sun moves lower in the sky. From fiery oranges and reds to soft pinks and purples, each sunset is a unique spectacle. Pay attention to how these colors interact with the landscape and contribute to the mood and emotional impact of your photographs.
- Composition and Elements: While technical aspects are important, composition plays a significant role in creating compelling sunset shots. Elements such as leading lines, symmetry, and framing can guide the viewer’s eye and enhance the overall aesthetics of your images.
- Patience and Timing: Beyond the technical settings, mastering sunset photography requires patience and timing. Arriving early at your chosen location allows you to observe changing light conditions and anticipate the optimal moment to capture the perfect shot.
Sunset photography basics encompass a blend of technical knowledge and creative intuition. By understanding the unique characteristics of sunset light and its impact on colors, mood, and composition, you’ll be well-equipped to create captivating sunset images that evoke emotion and resonate with viewers.
What is the secret to photographing the sunset?
Photographing the sunset can be a captivating and rewarding experience. While there’s no one-size-fits-all secret, there are several tips and techniques that can help you capture stunning sunset photos:
Timing is Key: The “golden hour,” which occurs shortly after sunrise and before sunset, offers soft, warm lighting that enhances the beauty of the scene. Arrive early to set up your equipment and choose your composition.
Scout Locations: Choose a location with an interesting foreground that can add depth and context to your sunset photo. This could include elements like trees, buildings, rocks, or bodies of water.
Use a Tripod: As the light diminishes during sunset, your camera will need longer exposure times. A tripod helps keep your camera steady, preventing blurry photos.
Choose the Right Settings:
- Aperture (f-stop): A wide aperture (low f-stop number) like f/2.8 or f/4 will create a shallow depth of field and allow for a more pronounced background blur.
- Shutter Speed: Use a slower shutter speed for longer exposures that capture the vibrant colors and movement of the sky. A tripod is essential for this to avoid camera shake.
- ISO: Keep the ISO as low as possible to reduce noise. Start with ISO 100 or 200 and adjust if needed.
Manual Mode: Shooting in manual mode gives you full control over your camera settings. Experiment with different combinations of aperture, shutter speed, and ISO to achieve your desired look.
Composition Rules: Apply basic composition principles like the rule of thirds, leading lines, and framing to create visually pleasing sunset photos.
Bracketing: Sunset scenes can have a wide range of bright and dark areas. Bracketing involves taking multiple shots at different exposures to capture the full dynamic range, which can then be blended in post-processing.
Filters: Graduated neutral density filters can help balance the exposure between the bright sky and darker foreground. A polarizing filter can also enhance the colors and reduce reflections.
Focus Carefully: Ensure your foreground and background are in focus. You can use manual focus, autofocus, or focus stacking for complex scenes.
Shoot in RAW: RAW format retains more image information and provides greater flexibility during post-processing, especially for adjusting exposure and colors.
Experiment with Silhouettes: Use the strong backlight during sunset to create striking silhouettes of subjects against the colorful sky.
Post-Processing: Use photo editing software to enhance your sunset photos. Adjust exposure, contrast, saturation, and color balance to bring out the best in your image.
Patience and Observation: Sometimes the most stunning sunset moments occur after the sun has already dipped below the horizon. Stay patient and observant to capture these fleeting moments.
Remember that every sunset is unique, and experimenting with different techniques and settings will help you find your personal style for capturing the beauty of this natural phenomenon.
Essential Equipment for Sunset Photography
To embark on your journey into sunset photography, having the right equipment is essential. The gear you choose can greatly influence the quality of your images and your overall experience. Here’s a breakdown of the essential equipment you should consider:
Camera: While any camera can capture sunsets, using a camera with manual controls allows you to have greater creative control over your shots. This includes DSLRs, mirrorless cameras, and even smartphones with manual modes.
Lenses: The choice of lenses plays a significant role in your sunset photography. Consider these options:
- Wide-Angle Lenses: Ideal for capturing expansive landscapes and dramatic skies during sunset. They allow you to include the colorful sky and interesting foreground elements in your frame.
- Telephoto Lenses: These lenses are great for zooming in on specific details, such as the sun itself or a distant subject against the sunset backdrop.
- Prime Lenses: Primes offer exceptional image quality and wider apertures, allowing for creative exploration and beautiful bokeh.
Tripod: A sturdy tripod is invaluable for sunset photography; especially as light levels decrease. It ensures stability and eliminates camera shake, allowing for longer exposures without blur.
Filters: Filters can enhance your sunset shots:
- Polarizing Filters: Reduce reflections and increase color saturation, making the colors in the sky and landscape more vibrant.
- Neutral Density (ND) Filters: These filters reduce the amount of light entering the camera, allowing for longer exposures even in bright conditions. This can create dreamy effects in the sky and water.
Remote Shutter Release: A remote shutter release or cable release prevents camera shake when taking long-exposure shots, ensuring crisp and sharp images.
Having the right equipment gives you the tools to fully explore the creative possibilities of sunset photography. Whether you’re using a smartphone or a professional camera setup, understanding how each piece of equipment contributes to your shots will help you make the most of every sunset opportunity.
Planning Your Sunset Photography Session
Planning is key to capturing stunning sunset shots that convey the beauty and emotions of the moment. By preparing ahead of time, you can maximize your chances of capturing the perfect shot. Here’s how to plan your sunset photography session effectively:
- Scouting Locations: Research and scout potential locations before the actual shoot. Look for spots with interesting foreground elements, such as mountains, water bodies, or cityscapes, that can complement the sunset sky.
- Checking Weather Conditions: Weather plays a crucial role in sunset photography. Clouds and atmospheric conditions can greatly impact the quality of light and the colors in the sky. Use weather apps to track cloud cover and atmospheric conditions for the day.
- Golden Hour Timing: Determine the timing of the golden hour—the period just before sunset—when the light is soft and warm. Arriving early allows you to set up your gear, compose your shots, and observe the changing light conditions.
- Foreground Elements: Incorporate foreground elements to add depth and context to your images. Rocks, trees, or even people can serve as compelling foreground subjects that lead the viewer’s eye into the photograph.
- Backup Plans: While you may have a specific location in mind, be prepared with backup locations in case conditions aren’t ideal. Flexibility is key in landscape photography, and having alternatives ensures you can still capture stunning shots.
By meticulously planning your sunset photography session, you set yourself up for success. A well-chosen location, attention to weather conditions, and a deep understanding of the timing of the golden hour can significantly enhance your chances of capturing breathtaking sunset moments.
Mastering Composition Techniques
Composition is a powerful tool that can transform a good sunset photo into a breathtaking masterpiece. By understanding and applying composition techniques, you can create visually appealing and emotionally engaging images:
- Rule of Thirds: Divide your frame into a grid of nine equal sections using two horizontal and two vertical lines. Position key elements along these lines or at their intersections to create a balanced and visually pleasing composition.
- Leading Lines: Utilize lines in your composition, such as roads, shorelines, or trees, to guide the viewer’s eye toward the focal point or the sunset itself.
- Foreground Elements: Incorporate interesting foreground elements to add depth and context to your images. A well-placed rock, flower, or person in the foreground can create a sense of scale and draw the viewer into the scene.
- Framing: Use natural elements in your scene, such as trees or archways, to frame the sunset. Framing adds a sense of depth and focus to your image.
- Symmetry and Patterns: Seek out symmetrical scenes or patterns in nature to create a sense of balance and order in your composition.
Best Camera Settings for Sunset Photography
Understanding camera settings is essential to capturing the true beauty of sunsets:
- Adjusting Aperture: Choose a moderate aperture (between f/8 and f/16) to ensure both foreground and background elements are in focus. This allows you to capture the full depth of the scene.
- Managing Shutter Speed: Use a slower shutter speed to allow for proper exposure as light diminishes during sunset. However, be cautious not to go too slow without a tripod to prevent camera shake.
- Optimizing ISO: Begin with a low ISO setting to maintain image quality and reduce noise. Gradually increase it if needed as light decreases, but be mindful of noise levels.
- Using Exposure Compensation: Adjust exposure compensation to account for the bright sunset. Experiment with -1 to -2 stops to avoid overexposing the sky.
Playing with Exposure and Settings
Experimenting with exposure settings can lead to creative results:
- Adjusting Shutter Speed: Varying the shutter speed can create different effects. A slower shutter speed (long exposure) can create a dreamy, soft appearance in water or clouds, while a faster shutter speed can capture sharp details.
- Balancing Aperture and ISO: Depending on the effect you want, balancing a wider aperture with a higher ISO can allow for faster shutter speeds in low light conditions.
Capturing the Sun and Silhouettes
Creating striking images of the sun and captivating silhouettes requires a thoughtful approach:
- Capturing the Sun: Safely capturing the sun itself involves using a smaller aperture to prevent excessive brightness and lens flares. Position the sun near the edge of the frame for a more balanced composition.
- Creating Silhouettes: Use the vibrant colors of the sunset sky as a backdrop to create silhouettes. Position subjects against the colorful sky to create a dramatic contrast.
Post-Processing and Enhancements
Post-processing is the final step in bringing out the full potential of your sunset shots:
- Color Enhancement: Adjust the saturation and vibrancy of colors to bring out the warmth and beauty of sunset hues without oversaturating.
- Dynamic Range Balancing: Use editing tools to balance the contrast and dynamic range of your image. This ensures that both bright and shadowed areas maintain detail.
- Lens Flare and Glare Correction: Address lens flares and glare that may occur due to shooting directly into the sun. Use editing tools to reduce or remove them for a cleaner image.
Showcasing Your Sunset Photography
Sharing your work allows you to connect with others who appreciate the beauty of sunsets:
- Online Portfolios: Create a dedicated online portfolio to showcase your best sunset shots. Organize them by themes, locations, or styles to create a visually appealing presentation.
- Social Media Platforms: Utilize platforms like Instagram, Facebook, and photography communities to share your work with a wider audience. Engage with fellow photographers and enthusiasts by using relevant hashtags and descriptions.
- Feedback and Interaction: Encourage engagement with your audience by inviting comments, likes, and shares. Constructive feedback from the photography community can offer valuable insights to refine your skills.
In the realm of photography, capturing the enchanting beauty of sunsets goes beyond technical settings. It’s an art that combines technical knowledge with creative vision. As you’ve discovered in this article, the magic of sunset photography lies in the interplay of light, emotion, and storytelling. Whether you’re a seasoned photographer or a passionate beginner, the allure of sunsets provides endless opportunities for exploration and self-expression.
Throughout this journey, you’ve gained insights into understanding the basics of sunset photography, unlocking the secrets to capturing the essence of the moment, and honing your skills with the right equipment and composition techniques. You’ve learned how to master camera settings and utilize exposure to your advantage. You’ve discovered the art of creating silhouettes and capturing the sun itself, all while enhancing your images through post-processing.
How much did you like Our detailed Mastering Cinematic Travel Videography: 15 Tips to Create Stunning Travel Videos ? Review Also, please share these Blogs with your friends on social media.
Related Article –
- Road Trip With Kids
- Cinematic Travel Videography
Sunset Photography FAQ’s
Can i use a smartphone for sunset photography.
A smartphone with manual controls can yield impressive results. Experiment with settings and utilize editing apps to enhance your images.
What is the “golden hour,” and why is it important?
The golden hour refers to the period shortly before sunset or after sunrise when the light is soft, warm, and diffused. It enhances colors and textures, making it ideal for capturing captivating shots.
How do I avoid overexposing the sun itself?
Use a small aperture (high f-number) to reduce the amount of light entering the camera. Additionally, consider using filters to control the intensity of the sunlight.
What’s the best way to capture reflections in water during sunset?
Position yourself so that the water body reflects the colorful sky. Calm water surfaces work best for clear reflections.
Is post-processing necessary for sunset photography?
While post-processing isn’t mandatory, it can enhance the visual impact of your images. Adjustments to color balance, contrast, and exposure can bring out the best in your sunset shots.

Meet David Hoper, a passionate travel Blog writer with 7+ years of experience in travel content. Through his exemplary storytelling and engaging narratives, he shares his experiences and brings destinations to life. With a keen eye for detail and a love for exploration, he has cultivated a diverse portfolio of travel blogs that inspire and inform readers worldwide.
In this article:
Post written by: David Hoper
Leave a reply.
Your email address will not be published. Required fields are marked *
Save my name, email, and website in this browser for the next time I comment.

- August 8, 2023
Travel Photography and Videography Mastering Cinematic Travel Videography: 15 Tips to Create Stunning Travel Videos

Travel Photography and Videography Mastering Sunrise Photography: Proven Techniques for Stunning Morning Sunrise Shots
You may also like.
Mastering Cinematic Travel Videography: 15 Tips to Create Stunning Travel Videos

The Impact of Drones on Travel Photography and Videography
- 8 minute read

Exploring the World from Above Aerial Adventures with Drones
Mastering Sunrise Photography: Proven Techniques for Stunning Morning Sunrise Shots
- 7 minute read

Vintage Travel Photography: The Charm of Capturing Vintage Travel Photography
- 9 minute read

Mastering Twilight Photography: Tips and Techniques for Stunning Day-to-Night Shots
- 15 minute read
Our Latest Instagram Posts
@amazingworld.travel8.
5 Tips to Transform Your Road Trip Photography
A Post By: Simon Ringsmuth

Embarking on a road trip may not initially sound like the most thrilling adventure. Endless stretches of mundane scenery, hours of gazing out the window as the world whizzes by at 70 miles per hour – it’s a recipe for monotony, right?
Well, let me tell you a little secret: Even the dullest car ride can transform into a treasure trove of incredible photo opportunities. With a pinch of planning and a dash of creativity, those seemingly uninspiring countryside views can be the backdrop for photos that’ll make your friends green with envy.
So buckle up, because I’m about to spill the beans on how you can turn those seemingly boring roads into a photographer’s paradise. Get ready to unleash your inner artist and uncover the hidden gems that await along the way. Trust me, your next road trip is going to be one for the photo album!
1. Take the road less traveled
I live about 400 miles away from my parents and siblings, so I find myself hitting the road back to my old stomping grounds a few times a year. The quickest route involves a turnpike and miles of monotonous interstate driving. Sure, it lets me bypass small towns without slowing down every 20 minutes, but it also robs me of some incredible photo opportunities.
You see, interstates and the like may get you to your destination in record time, but when it comes to snapping stunning photos, they fall short. What’s the solution? Instead of taking the quick and easy path, embrace your inner Yoda and seek out alternative routes to your destination. These roads may not be as swift, but trust me, they’re brimming with photographic charm.

Grab your favorite mapping app or dust off a good old-fashioned physical map. Look for quaint, two-lane roads that wind through captivating landscapes. As you traverse these scenic routes, you’ll encounter breathtaking sights that the interstate can never deliver!

Even better, if you take back roads, you have the freedom to pull over at your leisure without causing a traffic nightmare.
So slow down, explore, and let the road less traveled become your gateway to unforgettable photo opportunities.
2. Plan your photos in advance
When you embark on a road trip, it’s essential to have a game plan for capturing amazing photos. Don’t just rely on chance encounters along the way; instead, be proactive and set your sights on specific picture-perfect moments.
Let me introduce you to the Baader-Meinhof phenomenon – a quirky mind trick that works in your favor. Once you’ve got a particular idea in mind, like photographing tractors, your brain starts playing a game. Suddenly, you’ll spot tractors popping up everywhere, as if they’re waiting for you to notice them.
Now, let me share my experience. During a recent road trip, I decided to focus on windmills. I did my homework and chose slower but more intriguing routes on the map. I was determined to capture the beauty of these majestic structures. To be honest, I couldn’t recall ever seeing windmills before, but I had a feeling the Midwestern United States would surprise me. And boy, was I right!

As the hours rolled by on my drive, windmills seemed to appear one after another, like a magical photo opportunity conveyor belt. I couldn’t help but snap some incredible shots that exceeded my expectations.

You can apply this trick to your own road trips. It’s simple, really. Before you hit the road, pick a particular subject or type of photo you want to capture. Then keep an eye out for those hidden gems along the way. Dilapidated barns, weathered billboards, old bridges, towering cacti, breathtaking mountain vistas, or even dusty dirt roads – these are all exciting subjects just waiting for your lens.
So do a bit of planning. Think about what you want to photograph. Plant the ideas in your mind, and you’ll be amazed at how they flourish into fascinating and breathtaking photos!
3. Time of day is paramount
When it comes to capturing amazing road trip photos, the time of day is absolutely crucial. Let’s face it, sunlight can make or break any type of photo, and the same holds true for those epic shots you want to take on your journey.
Picture this: You’re cruising down the open road, and you have some beautiful landscape photos in mind. If you set out in the morning or evening, your results will often be spectacular – but if you set out at high noon, you can kiss those breathtaking sunrise or sunset pictures goodbye! It may sound like common sense, but understanding how sunlight affects your photos will have a massive impact on your departure time and overall planning.

If you’re not quite sure what kind of pictures you want to snap on your road trip, plan to hit the road at least 30 minutes before sunrise. Why? Because magic happens during those early hours, and you might stumble upon something truly captivating.
On the other hand, if you already have a specific photo location in mind along your route, make sure you time your trip accordingly. This way, you’ll increase your chances of capturing that spot in the most awe-inspiring light possible.
Remember, time is of the essence when it comes to photography, and being mindful of the sunlight’s influence will elevate your road trip pictures to a whole new level of brilliance. Don’t overlook the power of timing – embrace it and watch your photos come alive!

4. Allow more time than you need
One of the worst things that can happen to a road-trip photographer is stumbling upon a jaw-dropping sight or a famous landmark, only to realize you’re running out of time and can’t stop to snap a picture. Trust me: It’s a heart-wrenching experience. That’s why you should add an extra hour or two to your drive schedule, just to be safe. Don’t let time limit your creative adventures.
If I take the boring interstate to head back home and plan on stopping only once, I can make the trip in about six and a half hours. But that’s not my style when it comes to driving. I prefer taking those less-traveled roads, making pit stops at least half a dozen times for potential photo opportunities. Sure, it adds an extra hour or two to my journey, but boy, is it worth it!

Having that extra time is not just about capturing amazing shots; it’s also a fantastic excuse to stretch your legs and soak in the breathtaking scenery, even if you’re not sure about the photographic possibilities. On one of my recent drives to visit my folks, I accidentally drove past a massive field filled with gorgeous sunflowers. The lighting wasn’t ideal, but I stopped anyway and took some pictures. I made a mental note to revisit the spot on my way back. With no idea how long it would take, I made sure to allocate plenty of extra time for my drive, and guess what? It paid off! Hours later, I pulled over and captured a cool shot of an oil pump and a majestic wind turbine:

5. Don’t worry about your gear
As you prepare for your next exhilarating road trip, you might find yourself wondering if your current gear is up to the task. But here’s the exciting part: Capturing amazing road trip photos doesn’t require fancy equipment. In fact, you probably already have everything you need right at your fingertips. Even a smartphone camera can transform ordinary moments into breathtaking vistas and picturesque landscapes.
Don’t let the worry of not having the latest gear hold you back from unleashing your creativity on those long hours spent behind the wheel. Whether you wield a DSLR or rely on your trusty smartphone, rest assured that fantastic shots are within your grasp. And if you happen to have a trusty tripod , it’s worth bringing along, as you never know when it might prove useful.

As you hone your skills, you may discover a preference for a specific lens or camera that complements your photographic style. But remember, the true magic lies in mastering lighting techniques, strategic planning, and venturing off the beaten path rather than fixating on acquiring the latest camera gadgetry. So embrace the gear you have, and let your passion for exploration lead to captivating images that will stand the test of time.

Road trip photography: final words
And there you have it, folks! We’ve reached the end of our wild ride through the world of road trip photography. Who knew that those endless stretches of highway could hold so much potential for breathtaking snapshots?
So grab your gear, buckle up, and embark on your own epic photo adventure. Capture those picturesque landscapes and unexpected surprises along the way. Remember that the road is your canvas, and your camera is your brush. Now go out there and create photographic masterpieces that will leave everyone in awe. Happy shooting!
Now over to you:
Do you have any favorite tips or tricks for getting good pictures while out driving? Share your thoughts in the comments below!

Read more from our Tips & Tutorials category

is an educational technology specialist at Oklahoma State University and enjoys sharing his enthusiasm for photography on his website and podcast at Weekly Fifty. He and his brother host a monthly podcast called Camera Dads where they discuss photography and fatherhood, and Simon also posts regularly to Instagram where you can follow him as @sringsmuth.
- Guaranteed for 2 full months
- Pay by PayPal or Credit Card
- Instant Digital Download

- All our best articles for the week
- Fun photographic challenges
- Special offers and discounts
Finding the Universe
Travel tales, photography and a dash of humor

Sunrise and Sunset at the Grand Canyon: Best Photography Locations
Last updated: July 31, 2021 . Written by Laurence Norah - 39 Comments
Remember how I went to Yosemite to take pictures and share them with you, as part of my series of photography location guides around the world ?
Admittedly, Yosemite was a tough act to follow. Maybe I should have aimed a bit lower for my first post in the series. I think, however, I may have found a worthy successor. On a recent road trip through the USA, we stopped off at the Grand Canyon .
Which is rather a pretty place, quite nice for photography. I have no idea how I’m going to follow these two locations up, to be honest it’s probably going to be downhill from here.

Back to the Grand Canyon. We had allocated two full days to take it in, and I spent a good deal of time researching the best places to shoot the sunrise and the sunset at the Grand Canyon, both online and through questioning the park rangers when we arrived. Note that this is all for the south rim – time was tight, so we didn’t have a chance to get to the other side.
I appreciate that a couple of days isn’t very much, but to be honest, I think that most visitors come for around about this length of time, and you will have enough time to see as much as you want. I took in the Grand Canyon sunset from two different locations, and sunrise from one, and was very happy with the results. Here are my tips for where to go for shooting the Grand Canyon at sunset and sunrise, as well as some general advice on visiting.

Sunrise and Sunset at the Grand Canyon: The Best Photography Locations
Sunset at the grand canyon: hopi point and yavapai point.
A little pre-visit research, followed by a chat with the rangers on arrival confirmed that Hopi Point was a good option for sunset at the Grand Canyon – the location thrusts out a way into the Canyon, so you have a clear view in both directions.
The key thing to remember when shooting sunset at the Grand Canyon is that you really want to be shooting in the opposite direction to the sun, slightly counter-intuitively. This is because the contrast is super high as the sun sinks low, and shooting into the sun won’t reveal the glory of what is below you very well.
Point your camera away from the sun though, and you’ll see the light on the rocks below, which is just spectacular.

One thing to note at this point, about this location, and about many of the locations in the Grand Canyon. It’s going to be busy. Sunset is a very popular time for folks to come out, and locations such as Hopi Point get very crowded. It’s not all bad news though! Just step a little away from the crowds and fences (take care, the drops are quite incredible!), and you will be able to find your own quiet photography paradise to get the shots you want.

In the case of Hopi Point, I went a little way east of the main viewing area, and was very happy with the results. The advantage of Hopi Point was that as it’s so popular, there are a great many buses ready and waiting to get everyone home after the sunset is over. More on getting around and the bus system at the end of the post.
The other location I went for sunset was Yavapai Point. This is a little walk from the visitor centre, although there is a shuttle bus option. I found myself a route down to the edge which appeared to have excellent views up and down the canyon, and waited to see what would happen.

As you can see, what happened was quite pretty! Admittedly, the mile deep drop was fairly terrifying, but the views of the Canyon and the light (again, shooting away from the sun until it set), were magnificent!

Sunrise at the Grand Canyon: Mather’s Point
I will freely admit that I have a major flaw as a photographer – I hate early mornings. Given that the best light of the day is at sunrise and sunset, this means that I’m missing around fifty percent of my shooting opportunities just because I’m lazy.
Well, I think I’m going to have to change that, and start trying to get up earlier.
I’m going to issue a spoiler – the sunrise at the Grand Canyon was easily the best I’ve ever seen, and entirely worth the 4am start for.
I took a bit of time to find a great location for sunrise, walking up and down the rim path near Mather’s Point, which is by the visitor centre. Mather’s Point is a popular location for sunrise, as this photo shows:

and I didn’t want to be battling crowds to get the shot. So again, I headed east along the rim, in this case around 300 metres, and found myself a handy spot away from both people and railings. I grabbed a selfie (tripods have so many good uses!) to give you an idea of where I was.

As you can see, not a bad spot for sunrise. And these were the photos I got:

Which, as you can imagine, I was quite happy with.
Other Grand Canyon Photography Locations
Ok, so it’s not all sunset and sunrise. If you’ve got more time at the Grand Canyon, then you’ll find yourself wanting to shoot during the day. In this case – pray for some clouds. The canyon is vast, and getting a sense scale can be a bit challenging.
We drove up and down the Canyon Rim a little, and found countless opportunities to stop off and take photos. One favourite was Duck Rock (first photo below), a rock which is said to look like a duck. I admit I wasn’t totally convinced, but it made for a nice piece of foreground!

Finally, in the main cluster of hotels and bars near the train station there are ample opportunities along the rim for photos, including some excellent spots to get that all important selfie. Which, I promise you, will look a lot better with a tripod.

Practicalities for visiting the Grand Canyon
First, you need to remember that the Grand Canyon is a hugely popular destination, for overseas visitors and Americans alike. If you plan on going, book your accommodation well in advance! Camping, which was what we did, is a good option, but in the busiest summer months sites can book up months in advance. Lodging options and links for reservations can be found here .
Next, all those people mean that getting around the Grand Canyon is a process that is carefully managed. Whilst you can drive your own car, the canyon road network is labyrinth like, and I’d suggest that instead of driving you take the free shuttle bus . Large parts of the park can only be accessed by this shuttle bus network for much of the year, and they’ll get you where you want to go. At popular times of day (sunset!), be aware that there can be queues for the buses, so arrive well in advance (at least an hour) so as not to miss a moment.

What else? Well, in the summer of course it’s going to be seriously hot here, so be aware of the signs of dehydration and keep yourself well topped off with water. Food is available in a variety of locations, and there’s an excellent grocery store, as well as a bank and post office, so you don’t need to worry about that.
Further Reading and other Resources for Photographing the Grand Canyon
If you want more information, both on photography at the Grand Canyon, and on visiting in general, then I can highly recommend the following resources:
- The Photographers Guide to the Grand Canyon is a good book option if you want something printed to bring with you
- For more general advice on visiting the Grand Canyon, including visiting both the north and south rims, this excellent post on spending four days at the Grand Canyon has you covered.
- If you’re looking for a fun road trip which includes the Grand Canyon, see our two week USA road trip itinerary
- We have a guide to hiking Havasu Falls if you’re looking for an epic hike with amazing photography opportunities. This is also within the Grand Canyon, but on an Indian Reservation.
- The Grand Canyon is not too far from Las Vegas. See our guide to things to do in Las Vegas for some ideas on spending time in the party city. We also have a guide to the best day trips from Las Vegas .
- If you are looking for a tripod (and if you’re serious about your photography, you absolutely should have one!), then Vanguard have an excellent range. The VEO system I was using for this shoot is specifically designed for travel, meaning it’s super-light and easy to use, plus they won’t break the bank.
- If you’re in the market for a new camera, check out my definitive guide to the best travel camera , with something for every budget
- My other photography location guides , to get you the best shot in destinations around the world
- Finally, if you’re looking to learn more about photography, I run an online travel photography course which covers everything I know about photography, plus you get one on one feedback directly from me as you go! Check it out and let me know if you have any questions.
If you’ve visited the Grand Canyon for sunrise or sunset, do share your experiences and thoughts in the comments below – particularly if you found a great spot for sunset or sunrise!

Enjoyed this post? Why not share it!
There are 39 comments on this post
Please scroll to the end to leave a comment
Kody M says
3rd March 2021 at 4:55 am
Tank you so much for all the info! I’m taking my wife and kids in a couple weeks. I plan on making the drive from CO to the south rim over night (13ish hours). If all goes well, we will catch the sunrise at the spot you were! Thanks for posting the GPS cords! OMG! I’m so excited! This has been on my bucket list since I knew what one was! Safe travels to you and yours! P.S. I don’t have any sort of fancy camera, just an iPhone. But I still can’t wait!!
Laurence Norah says
3rd March 2021 at 10:39 am
My pleasure Kody! I hope you have a great trip and I’m sure you’ll get some great photos regardless of your camera 😀
Rhonda Johnson says
30th August 2020 at 11:15 pm
Awesome site👍. We live in lake havasu city, been to GC many times but you offered great photo tips. Ty for sharing.
31st August 2020 at 11:52 am
Thanks very much Rhonda! It’s always lovely to hear from locals that I’m getting it right 🙂 Stay well!
Johanna says
12th June 2020 at 8:23 am
Stunning pictures and a lot of very helpful and detailed tips! Thanks a lot for this, the article is really helpful 🙂
12th June 2020 at 10:16 am
My pleasure Johanna, I’m pleased you liked it 🙂
Jacob Forsythe says
31st March 2019 at 4:16 pm
I’m curious how far off the trail you had to go for your sunrise location? I was trying to find your spot! Love the overlook!
31st March 2019 at 4:52 pm
It wasn’t far off the trail, the exact co-ordinates I took the sunrise photos from was here: 36°3’38.886″ N 112°6’24.539″ W
which you can see on Google Maps here: https://goo.gl/maps/nTUhrfU8yNN2
I would very much advise caution of course, wherever you choose to go, and especially if you leave the marked trail. There are very large drops in the Grand canyon and many unfenced sections. So please do take care 🙂
Have a great trip!
yasmin says
21st March 2019 at 1:41 pm
hey! great guide! do you recommend using an ND? i was considering purchasing one but have read that graduated filters can be better for the canyon. i don’t have the budget to get a fixed and a graduated filter. i would mostly if not exclusively be using it for sunrise/sunset shots. did you use one? what do you recommend?
21st March 2019 at 2:21 pm
So I didn’t use an ND filter. The only reason to use it would be if you wanted to do longer exposure of the cloud movements. I would say though that a graduated filter would definitely be useful. The difference between the brightness in the sky and the darkness of the canyon makes for challenging photography, and a graduated filter can help with this. I didn’t have one, so I used exposure blending to achieve this in post, but a graduated filter would definitely have made this easier 🙂
Have an awesome trip! Would love to see your photos when you are done, we have a facebook group you are welcome to join here: https://www.facebook.com/groups/travelloversandphotography/
21st March 2019 at 2:35 pm
thanks for the quick response! do you have any guides on exposure blending in lightroom? i have lightroom but am definitely less than proficient in it.
21st March 2019 at 3:53 pm
My pleasure! So I don’t have a guide for Lightroom for exposure blending, but to be honest there’s not a lot to it. The key is to get the exposures in the first place, for which you’ll obviously need a tripod and a camera that supports exposure bracketing (although you can do it manually). In Lightroom, you then select the images you want to blend and press “HDR merge”, and it’ll do it for you.
Photoshop is actually better for this as it gives you control over the layers and the blending, but I find the HDR merge tool in Lightroom works pretty well, and despite the name, the results are not too HDR’y 🙂
Nicole Nieto says
18th March 2019 at 1:45 am
Thank you so much for all this great information. It was incredibly helpful! I’ll be in the area this coming Wednesday/Thursday. I’m getting my itinerary together and just have a few ?s Wednesday Sunset – Yavapai/Hopi Point? do getting to these require walks/hikes or more of an actual lookout point near the road? Thursday Sunrise/hike – Mather’s Point. I checked that it should be around 6:30am. Same question, is it close to the road or there’s a hike to where you want to be? what time do you suggest we get there? Also, I have approx 3-4 hours for a hike after that so any suggestions on which direction to head or trail? Your suggestions are so appreciated!
18th March 2019 at 12:28 pm
So neither of the locations require a hike as there are shuttle buses that run to both of them. The only reason you might hike is if the shuttle bus is full. For sunset, Hopi point for example is a popular spot, so you will want to arrive at the shuttle bus in plenty of time. My advice is to walk a bit away from the main lookout point for both options as they will be more crowded – even just a five minute walk will get you to more peaceful spots where you can enjoy the view with less of the crowds 🙂
In terms of a hike, personally I liked just walking along the rim – either direction is good! The trails run right along the edge and the views are spectacular. You could also try descending into the canyon if you prefer – just be aware it will take you longer to come up then to go down 🙂
Have a great trip, and do drop in to our facebook group to share your photos and feedback, we’d love to see them! You can find that here: https://www.facebook.com/groups/travelloversandphotography/
18th March 2019 at 2:29 pm
Thanks so much and I definitely will follow up with my shots!! We would like to actually hike and get a little bit of a workout in, I see South Kaibab Trail is popular, but if you have a rec for any other trail to hike down, thinking down for 1-1.5 hours and back.
Again, I really appreciate all the information I’ve gotten here and your suggestions as well!
Thanks for getting back to me so quick, A panicing/last minute east coaster 🙂
18th March 2019 at 2:54 pm
My pleasure Nicole 🙂 So I haven’t actually done the trails into the canyons, but friends of mine have done both the South Kaibab Trail and the Bright Angel trail. The latter is a little easier with more shade, whilst the former is a bit steeper. Both are very popular trails though, and I’m sure you’ll enjoy either 🙂
Jannette Bradley says
17th March 2019 at 3:01 am
Greetings! First off, your photos are AMAZING! You and your wife have quite an eye for the camera. Thank you for the advice,tips, and photos on this blog. I’m wondering if you can answer a few questions for me: I plan to visit the South Rim in June. I googled the time of the sunrise (it’s around 5:12am) and we are staying in Flagstaff. I’m thinking we should leave FS around 3:45 to get to the Canyon on time? Do you recommend parking at the visitor center and walking to Mather Point? How “early” before actual sunrise should we arrive? Also, since it will be dark, is the road to the visitor center well marked to direct us to the appropriate area to park and get to Mather Point? Any advice on taking the perfect sunrise picture? Thank you in advance for the help and thanks again for this very informative blog. Peace and light to you both, Jannette
18th March 2019 at 12:41 pm
Hi Jannette,
Thanks very much!
I would definitely say you will need to park at the visitor centre and walk to Mather point. It’s the closest (and pretty much only!) parking available. I would say you will want to be there at least 30 – 40 minutes before actual sunrise as the pre-sunrise light can also be magical, plus the canyon photographs really well when the sun isn’t up as the canyons are less contrasts. The visitor centre is well marked as I recall, but I have to admit that I drove there in daylight. But there aren’t a lot of roads so I think you will be fine. I would suggest having a GPS or downloading an offline Google Map of the area for reference.
In terms of photographing the event, my advice is to use a tripod if you possibly can, especially before the sun comes up, as it will be quite dark. We also have loads of tips on photography across the site, I’d suggest starting here and reading up on composition etc 🙂
https://www.findingtheuniverse.com/category/photography/photography-tips/
Have an awesome trip!
Karyn Curtis says
18th February 2019 at 2:10 am
We will be visiting the Grand Canyon in July. We are not camping; will be at a hotel in Flagstaff. I want to capture the sunrise. I know we’ll have to head out very early. Once we are there do we get on a shuttle to take us to these specific spots you recommended? Thanks
18th February 2019 at 11:02 am
For parking for Mather Point, which is one of my recommended sunrise locations, you will be able to park at the visitor center. It should not be too busy if you arrive that early! You can see a map of parking locations here: https://www.nps.gov/grca/planyourvisit/parking_sr.htm
If you aim for P2, you should be just a short walk from the rim 🙂
18th February 2019 at 2:49 pm
Thanks! Because we are going that early we shouldn’t need the shuttle then, correct? Also since it will be dark I’m nervous about the hike down to Mather Point with kids. What do you think? Thanks again!
18th February 2019 at 4:37 pm
That should be correct! The hike down to Mather Point is on a well marked and level path, and there are fences at Mather Point itself, so I don’t think you’ll have any trouble as long as your kids stay to the path 🙂
18th February 2019 at 7:55 pm
Thank you for all your help!
10th February 2019 at 8:26 pm
Hi Lawrence, Jessica,
“Wow” photos!!! I will take your advice, may struggle to get up at 4am! I would be most grateful for any recommendation about taking beautiful photos in Cuba, including diving photos?
Thanks, Chris
10th February 2019 at 9:44 pm
Thanks very much 🙂 Unfortunately I’ve not been to Cuba, so I wouldn’t be able to help 🙁 Have a great trip though!
Henry AT fotoeins says
1st October 2018 at 4:44 am
Hi, Laurence. I found your post in a search as I’m accumulating best practices and wisdom online for viewing sunrises and sunsets at the Grand Canyon. I’m looking forward to witnessing at least one with the naked eye; the rest will be left to a choice of camera!
1st October 2018 at 2:44 pm
Thanks Henry! Let me know if you have any specific questions I can help with, and have a great trip! It’s an incredible sight to see for sure 😀
Ras Jarborg says
29th July 2018 at 11:34 pm
Thanks so much for this post! We just arrived at Grand Canyon and managed to drive into the park by 07.30am to bear the crowds. I was looking for tips on sunset and sunrise photography posts when Google led me straight to your post. I’m now signed up for your newsletter. Thanks again!
30th July 2018 at 9:12 am
Awesome – have a wonderful time! It’s a stunning place 🙂 Thanks for signing up, we look forward to having you be part of our adventure!
10th June 2018 at 12:25 pm
Hey Laurence and Jessica, love this post! What stunning photos!! Amazing!
I am off to LA and also the Grand Canyon next week, I’m really excited and looking forward to using plenty of your great tips’ thank you so much!
Also not looking forward to the 4am start but I know it will be worth it!
Will we be able to drive and park nearby the sunrise spots?
Thank you!! Becky
11th June 2018 at 11:30 pm
Hi Becky! My pleasure. For the sunrise spots, the best option is to take the shuttle *assuming you are camping*, as this runs from very early in the morning and will take you to where you need to go. There is very limited parking around the park 🙂
6th March 2018 at 4:03 pm
Hi Laurence, really helpful post and the photos are AMAZING! Soo excited to go for the first time! My husband’s a photographer and I’m a festival fashion designer so when we travel we usually do photoshoots for my clothing line . I’m planning to drive to the Grand Canyon after a festival in Cali and wanted to do sunrise/sunset photoshoots with possibly studio lights set up and drone footage. Is there any place you would recommend that’s not fenced off? I notice that a lot of the viewpoints have fences but ideally wanted to shoot somewhere more natural where we could just climb on a rock or have the models actually interact with the scenery without a big crowd coming to look.
6th March 2018 at 9:33 pm
Thanks very much! So, I have good news and bad news. The bad news – you can’t use drones in the Grand Canyon (or any US national park). You can see the rules here: https://www.nps.gov/grca/learn/management/lawsandpolicies.htm
The good news is that it is very easy to find unfenced areas, in fact, most of the grand canyon is unfenced – it’s just the very popular spots that have fences, and these aren’t very long. I specifically asked a ranger about where I was allowed to go, and she said I was fine to go anywhere. So you won’t have a problem. I did a lot of photography and had no problems, you should be able to easily find a spot with no crowds (sunrise is better than sunset for this) and shoot unhindered.
Katie BH says
14th January 2018 at 3:27 pm
Hey Lawrence! Firstly photos are amazing! I was in the canyon November 2017 and managed to get sunrise and sunset photos. My favourite one ( https://www.facebook.com/photo.php?fbid=10159654560950494&set=a.10159551659225494.1073741869.644015493&type=3&theater ) of the sunrise was taken from Moran Point just off desert view drive – i was aiming to get to desert view point but didnt make it out of bed in time to get there – still pretty awesome photo ops from there 🙂 feel free to flick through the rest on my facebook page and I’m heading back there in May this year so will check out Yavapai point for the sunrise 🙂 Katie
14th January 2018 at 3:33 pm
Thanks for sharing. For some reason I can’t see the image (possibly it’s not set to a public audience on facebook?), but I’m delighted you had a good time anyway. I’d love to take a look at your facebook page and see what you got from your adventure though! Good luck in May!
Chris Víllanueva says
18th March 2017 at 10:46 pm
hey Laurence! i just stumbled on your page and i think your photos are amazing! i just have a quick question as to one of the photos, the “selfie” that you took with your tripod after walking down 300m from mathers point east…how did you get on that rock? did you have you climb over the safety railing in order to get that photo? or do the railings stop after awhile? and your just free to go onto the edge of the rocks? i am curious because i want to go on a trip at the end of this year, and one of my main goals is to recreate a photo like that one of you standing on the rock overlooking the grand canyon!
Laurence says
19th March 2017 at 10:49 pm
When I was there there are points where there are fences, and then huge stretches without fences. I made the point of checking with a park range their policy on this, and she told me I was fine to go wherever I wanted, even the other side of the fences, and it was on me if I fell off. So yes, you’re free to go on the edge of rocks, but please exercise caution and be careful – some of those rocks are on the edge of mile high drops 😉
Duke Mantee says
13th August 2016 at 1:55 am
Enjoyed your article and photos. I saw Grand Canyon for the 1st time this summer and am determined to go back next year.
Ford Quarterman says
19th September 2015 at 2:10 pm
I recently just returned from my first jaunt to the Grandaddy Canyon, & couldn’t put down the camera! You’ll have to try out the north rim next time – much less people, higher in elevation & more “foresty.” Even the iPhone shutterbugs can get stunners there, but thanks for these brilliant pro shots of one of our planet’s gems!
Leave a Reply Cancel reply
Your email address will not be published. Required fields are marked *
Let me know when there's a reply to my comment (just replies to your comment, no other e-mails, we promise!)
Subscribe to our monthly Newsletter where we share our latest travel news and tips. This also makes you eligible to enter our monthly giveaways!
We only ask for your e-mail so we can verify you are human and if requested notify you of a reply. To do this, we store your data as outlined in our privacy policy . Your e-mail will not be published or used for any other reason other than those outlined above.

Photography Highlights of Route 66

Let me start out by saying that I kind of under-estimated this Route 66 road trip. I love a good road trip. But, most of the time I based my road trips around certain photo destinations. And while there’s lots to photograph on “the mother road”, it’s not really a “photography destination”.
Early in the trip, I was struggling to find things to photograph that didn’t feel cliché or simple. I found myself fighting a rut.
But, as the road trip wore on, I started to understand it. I started to feel the vibe, and the energy of the mother road. I started to learn a lot about my own photography as I moved along. I learned something really important: though they might not be classic photo locations, the most rewarding images are ones that you’ve made and that are unique. And I think that along this Route 66 road trip, I made more unique images than I did in Patagonia – even if they might not have seemed epic.
I felt like a photographer on this trip. In Patagonia, I almost felt like a technician. I really thankful to this trip for bringing me back on the art side of things.

Also, it needs mentioning that this was a sponsored trip. We partnered up with Marriott International for the project. We stayed at Marriott brands the entire trip. In fact, we took it as a bit of a challenge to stay at a different Marriott brand each night – staying everywhere from Ritz Carlton to Courtyard. So, a big thanks to them for helping make this trip happen.
Anyways, let’s get into the images.
Route 66 in Illinois
The Route 66 section that goes through Illinois is fantastically done. There are lots of signs directing you on your journey, and there’s lots to see visually. However, it’s probably not the most photogenic of the sections. That said, there are things and places to shoot.
Officially, the road starts in Chicago. If you’re driving the road from start to finish like we did it’s obvious that from a photography standpoint we start there too. I only had one sunrise to get a photo of Chicago. But, obviously, there are hundreds of locations for photos in the city. So, plan to spend more time here than we did.

After Chicago, the route cruises quickly into rural Illinois. We drove through some interesting places, but as our journey wasn’t exactly photo-based, we just didn’t have enough time to make the pictures I would have liked to. We did, however, spend a night in Springfield ( which is the capital of the state ). I’m a bit Capitol building obsessed, so I headed down to photograph it.
Photography in Missouri
The next section of Route 66 took us into Missouri. We landed in St. Louis, and I immediately headed out to photograph “The Gateway to The West” arch. It’s such a great place to shoot. I found this location and was really happy with what came of it.

Beyond St. Louis, I found the Missouri section of Route 66 to be the most fascinating. It really was entertaining, and so different all other parts of the trip. It felt more rural, it felt more “middle-America”, and it had its strange side for sure.
From a photography standpoint, however, there wasn’t much beyond the typical memorabilia and nostalgia shots. However, we did stop at the old Gay Parita Sinclair station which was phenomenal. George, was kind enough to pose for a photo for me.

Then, just before arriving to the Kansas section of Route 66 – between Rescue and Plew – I found this beautiful scene of a tree out in the prairie fields. It’s a shot I was really hoping to get on this trip, and I’m very happy with how it came out.

Though Route 66 only travels through Kansas for a very short time, it was interesting. There was a bit of a shrine to the movie Cars in one town, a beautiful old bridge, and more forest than I expected from Kansas.

From a photography standpoint, this little section of road adjacent to Route 66 was beautiful. The exact location is just after the old bridge just after Riverton. Note that this isn’t actually Route 66, the photo was taken from the intersection of the route and SE Beasley Road; so the photo itself is of SE Beasley Road.
Let me start by saying that the people of Oklahoma are extremely proud of their section of route 66. In fact, I got absolutely roasted by a Facebook group for saying “there wasn’t much to see on the Oklahoma section” in one of my vlogs.
Of course, those words can’t really explain what I meant, and I feel were taken a bit out of context.
What I meant was that there’s a lot of open space in Oklahoma. So, aside from Route 66 attractions like the whale, and the museums, there’s a lot of empty space and open road in Oklahoma. That’s not a bad thing, it’s beautiful, and the drive is stunning. It’s just a lot of open roads.
That said, the absolute best Route 66 museum on the whole of the road was in Clinton, Oklahoma. We kind of whipped in and out of most of the museums, but the one in Clinton is so good. We spent a couple hours there. It was a great meld of information and entertainment. Extremely well done.
From a photography standpoint, there are lots of photo locations across the prairies. However, as we were short on time for this sections, we really had to push to Oklahoma City.
Oklahoma City surprised me. It’s really photogenic. And – what was a bit of a theme on this road trip – we found ourselves short on time and I really had to pick just one photo locations. So, I went to the capitol building. There’s a great composition in front of the flags of the native nation flags, and I’m really happy with the shot I got there.

Mark OKC on my list of cities I have to go back to. And, while I’m at it, Tulsa looked cool. It’s a shame we had to whip through it to keep our schedule.
Texas in Photos
Like Oklahoma, the Texas section was a lot of open roads and long distances between attractions. Again, we found ourselves covering way too much ground in one day to get to Amarillo.

On the way, there are some beautiful images of the windmills and the open skies. In fact, when we were going past there was a massive grass fire before Groom which made for some dramatic imagery. After spending a night in Amarillo, I actually headed back to near Groom to photograph a tree out in a wheat field. I didn’t get the light I’d hoped for, but this is a cool locations if the conditions are better. From there, we left Texas for New Mexico.
We only had 12 days to drive Route 66, and I know that’s too little. I think that if I was to do it again, I’d probably try to spend a bit more time crossing Oklahoma and Texas, as we were a bit too rushed to find great photo locations.
New Mexico is where the “southwest” feel really starts. In fact, New Mexico often feels like a world of its own. A stop in Tucumcari was fantastic. And, the BBQ we hit up for lunch – called Watson’s – was amazing.
We took the “Santa Fe loop,” because Santa Fe is way too cool to skip. The adobe city has so many things to photograph. But, I kind of found myself still struggling to make photos I was happy with. I actually went around shooting in Santa Fe for over an hour and only took 1 picture.

Now, I know Taos isn’t on Route 66. However, if you give yourself a couple days in Santa Fe, be sure to do a side trip out that way. It really is a cool town and there’s lots to see. In fact, from a photography standpoint I think it’s much more photogenic than Santa Fe is. Though we were there in the day, I got a bunch of photos I liked. They’re in the video from my photography channel below.
From Santa Fe, we headed to Albuquerque. I didn’t expect much from Albuquerque, but I actually think the city has a lot of potential from a photography standpoint. And, the mountains outside of the city are incredible.

I headed up to the top of Sandia Crest at sunset, and I think this was the moment I got my photography mojo back. The light was killer, the views were amazing, and everything kind of just came together.
Route 66 in Arizona
I think most non-Americans associate a Route 66 road trip with Arizona . These are the classic locations on the route. And, they are also the most visited. It was actually quite strange having locations all to ourselves for over a week and then arrive in places like Seligman to tour buses full of French tourists.
It was hard not to be a little bit snobby; but, I did my best.
The truth is, the Arizona section of Route 66 isn’t that much more entertaining than it was in any of the previous states. I think it’s just much more accessible and gets far more press. Its proximity to The Grand Canyon, Sedona , and Las Vegas certainly help with that.
That said, it was a really fun section of the route.

I really enjoyed the Painted Desert in Petrified Forest National Park ( the only national park directly on Route 66 ). And places like Seligman, and Kingman are great.
From a photography standpoint, I found a really cool location for star photography next to Two Gun ghost town. It was a little bit creepy to shoot, as you’ll see from the video below. But it was a fantastic place to shoot.
We also did a massive day trip out of Flagstaff so I could show Matt from Landlopers.com the Grand Canyon and Sedona – places I’ve seen and shot a number of times.
Route 66 in California is really two tales. On one hand, it’s beautiful. There are stretches that just feel so desolate and world’s away from anything else. It can feel a bit desolate, but in such a beautiful way. Then, on the other hand, the California stretch is painful when you hit the suburbs of LA. We stuck as closely to the original route the entire way, and that included through LA. It took us almost 5 hours from San Bernadino to Santa Monica Pier.
Halfway through California we veered off of Route 66 to head down Joshua Tree National Park. Which was totally fine by me. Joshua Tree is one of my favourite places in California for photography. We headed in for a quick sunset.

And, that same night I went back into the park to shoot some star photography. The skies were clear and the milky way was out in full force. So, it was incredible. I could not have asked for better conditions to shoot. Is there a better place in America for dark skies?
And, finally, we made it to the end of Route 66 at Santa Monica Pier. After 90s music on repeat for over 2000 miles, lots of laughs, and lots of great moments, it was over.
For me, it was a much more intense road trip than I expected. I think I became a bit of an “epic travel” snob. I mean, I have driven a scooter all the way down Africa . And, I once drove from NYC to LA in 80 hours while also doing 10 photo shoots and meet ups. So, it was easy for me to dismiss this trip as easy. But, it wasn’t.
We didn’t use google maps at all. We navigated the whole way using guidebooks and paper maps. And, it was a lot of driving, a lot of shooting, and then on top of it all at the end of every day there was photo and video editing. Obviously, this wasn’t your ordinary Route 66 road trip.

What’s Next?
Now that Route 66 is over, I’m headed back to Europe. I’ve got personal trips planned in Portugal and Ireland. Then, I have a photography workshop in The Faroe Islands. So, more fun and lots of photography locations coming up.
Wow, what a great collection of photos. I love that you didn’t hit up any of the traditional roadside attraction. It makes me want to take the same route 66 trip. How long did it take you to do the whole thing?
We did it in 12 days.
Would love to see some of the lens/fstop etc. info on these shots. I am so in a learning mode and your photography is gorgeous!
love this post because of my fav spot images is there. me too a travel photographer and love to take photos on different way. This post quite impressive and learning full.. thanks for sharing..
I thinkmyou missed out on thenfull Rt66 adventure. To me a great part are tye restored tourist shots and most of all the people you encounter along the way. As this had been on my bucket list forever, when I retired, i bought a Corvette, drove to Chicago and began my journey. I allowed the trip to dictate the time rather then the time dictating the trip. As a result I took almost a month. Stopped at every museum I encountered and every junket shop along the way but most importantly talk with anyone and everyone I encountered. With my non-schedule, if I felt like staying and exploring a particular area I did. My photos are of everything I saw along the way, as that is the essence of the journey.
How do you get a job like this? I love traveling. I like taking lots of pictures. They are full of memories.
Leave a Reply Cancel reply
Your email address will not be published. Required fields are marked *
Notify me of follow-up comments by email.
Notify me of new posts by email.
This site uses Akismet to reduce spam. Learn how your comment data is processed .
Bryce Canyon Photography: Sunrise, Sunset, Hikes + Viewpoints
by Mark and Kristen Morgan
Published: January 26, 2021

Bryce Canyon photography begins with a bang as a beautiful flaming red sunrise fills an amphitheater made of needle-like sandstone hoodoo’s, before a day of hiking, a calming sunset and a crystal clear night sky transform the atmosphere into a relaxing arena for photographers.
If you’re visiting Bryce Canyon based entirely around photography, you can get all the images you need in one full day from sunrise to stars. Based on our own experiences, we will talk through some Bryce Canyon photography tips in this article to help you plan your visit.
If you’re just here to look at the best of Bryce Canyon through imagery, ignore the tips, scroll through and enjoy the photos!
Bryce is a relatively small and compact National Park along the popular Utah Mighty 5 National Park road trip circuit. But size isn’t everything. Bryce Canyon packs a hefty punch in staggering beauty, a unique landscape and most importantly – fantastic photography opportunities.
Bryce Canyon Sunrise Photography
Serious hobbyists and professional photographers visit Bryce Canyon to capture an extraordinarily staggering sunrise as Bryce amphitheater glows as though molten lava is seeping through its pores.
There is no lava, or volcanoes for that matter. But an unimaginably bright red glow illuminates camera lenses, sensors and eyes behind each viewfinder.
A line of two legged photographers entangled with three legged tripods stand firm at Sunrise Point before first light each morning. A Sea of legs waiting impatiently for an Ocean of burning reds and oranges.
Last minute settings checks, filters being changed, compositions being adjusted, test shots snapping. The brilliant blue of civil twilight turns yellow and the Rim of Bryce Canyon amphitheater absorbs the first rays of Sun to mark a new day.
Relentless shutters clicking for 5 minutes as the amphitheater burns before it all ends and deep dark shadows cast across the canyon signaling the end of another sunrise extravaganza at Bryce Canyon National Park.
Sunrise photography at Bryce Canyon is unquestionably among the best things to do on a visit to Utah .

Vibrant blues and purples in the sky at Civil Twilight in Bryce Canyon – Sunrise Point.

Bryce amphitheater illuminating under intense sunlight – Sunrise Point.
Photography Tips For Capturing A Bryce Canyon Sunrise
- Sunrise Point is the best and only place to set up your tripod for sunrise at Bryce Canyon. The ‘viewing platform’ is only 20-30 feet long and that means first come first served.
- If you visit in Summer and want to get a prime spot, you must arrive before civil twilight (check sunrise times here). We visited in October and the line was filled before sunrise. There are always a few disgruntled photographers who didn’t plan in advance and skulk around behind those who did plan effectively!
- Bryce Canyon is located at around 8,000 ft, which means it is very cold before sunrise in Fall, Spring and Winter. It was sub-zero the morning we visited in October and we were wrapped up in full ski suits.
- Take a wide angle lens (anywhere between 16-24 is perfect) to capture as much of the amphitheater as possible, including the famous tree with its roots exposed.
- If you arrive first, stand just a few feet to the right of the information board for the best spot. It goes without saying but you will need your tripod for Bryce Canyon sunrise!

Wider canyon shot to show deep shadows and vibrant yellow glow of the sun – Sunrise Point.

A few minutes later shadows begin to lighten and rocks turn from red to orange – Sunrise Point.
Photography Inside Bryce Canyon Amphitheater
Photography inside Bryce Canyon amphitheater is unique, even for the varied and mind-boggling landscapes in Utah. Vibrant orange sandstone ‘hoodoo’s’ – tall thin spires of rock – appear in all manner of shapes and sizes.
The best place to start is by hiking the Queen’s Garden and Navajo Loop trail between Sunrise and Sunset points. This loop is one of the best hikes in Utah and it is uniquely photogenic.
You will follow a dusty and sandy trail through a maze of impressive rocks cutting interesting shapes against a clear blue sky.
A series of fun switchbacks were formed in order to access the canyon floor more directly from Sunset Point and this area is the most photographed part of the trail.
Look out for the three favored formations of Thor’s Hammer, Twin Bridges and Wall Street on the Navajo Loop.

Mark and Kristen about to hike Queen’s Garden Trail with Northern Bryce Canyon in the background – Rim Trail, Sunrise Point.

Wonderful sandstone shapes like melting candle wax contrasting against deep blue sky – Queen’s Garden Trail.

Bryce Canyon floor flattening and smoothing out – Queen’s Garden Trail.

Rugged sandstone landscape – Queen’s Garden Trail.

Needle-like towering spires reaching for the sky – Queen’s Garden Trail.

Three spires with balancing rocks showcasing Bryce Canyon’s impressive hoodoo’s – Queen’s Garden Trail.

Welcome change of color as green trees dwell on the canyon floor – Queen’s Garden Trail.
Tips Inside the Amphitheater
- Shoot from underneath looking back up at sandstone formations to contrast against the blue sky.
- The canyon is quite open and exposed on Queen’s Garden as far as Navajo Loop, so you’ll need plenty of water and sunscreen!
- Shadows are inevitable inside Bryce Canyon’s amphitheater but you can use them to add drama in your images.
- A good 24-70 or 24-105 lens works well in the canyon because you can switch from wide angle landscape to telephoto of a specific formation easily.
- Head into the canyon early if you want to avoid people in your images but expect it to be busy any time after 9am, especially in Summer.
- The best thing you can do here is explore every nook and cranny of the landscape, find short dead end spur trails and see if you can create a new perspective.

Mark and Kristen warming up as mid morning approaches the canyon – Queen’s Garden Trail.

Venetian mask with deep blue eyes and Thor’s Hammer perched atop a spire – Navajo Loop Trail.

Mother Nature, how is that one solitary spire still standing? – Navajo Loop Trail.

Odin deciding if Mark is worthy of Thor’s Hammer – Navajo Loop Trail.

Awesome lung bursting switchbacks descending into Bryce Canyon – Navajo Loop Trail.
Bryce Canyon Scenic Drive Viewpoints Photography
If you have enough time, take 63 Bryce Canyon scenic drive route to the end.
You will pass numerous overlooks offering different perspectives of Bryce Canyon, including more varied landscapes outside of the hoodoo dense amphitheater.
Natural bridge is definitely worth a stop if you won’t be visiting Arches National Park when in Utah. Once almost back, take the right turn to Bryce Point and Inspiration Point for yet more diverse takes on the intriguing topography.
Admittedly, we didn’t have much time left as we needed to make tracks for Zion. However, we we did make all the stops along Bryce’s scenic drive and it’s well worth the extra effort.

Wide open landscapes and huge blue sky surrounding Bryce Canyon – Rainbow Point.

Natural Bridge in the dark shadow of late afternoon – Natural Bridge.

Impressive U shaped canyon surrounded on three sides by sandstone cliffs – Black Birch Canyon.

More sandstone needles and deep canyons below – Ponderosa Canyon.
Tips for the Scenic Overlooks
- Go early to avoid crowds or go at midday to avoid the deepest shadows.
- This road is far less busy in general than the Rim and best hikes into the canyon floor.
- Drive the full length of the road and stop only on the way back to Bryce Canyon Rim because all the pull offs are on the amphitheater side of the road.
- Wide angle lens works better to capture the wide open landscape surrounding Bryce Canyon.

Kristen on the Bryce Point observation platform, the only viewpoint with a metal barrier – Bryce Point.

Not too busy by National Park standards! But this was October – Bryce Point.

The alternate view they’re all here to see – Bryce Point.

Slightly different perspective of the same canyon – Inspiration Point.
Bryce Canyon Sunset Photography
Sunset at Bryce Canyon is not like sunrise. The sun sets behind you as you look at the amphitheater, which means the hoodoo’s are out of the picture. You won’t have to worry about crazy battles for position or limited spaces as you have the entire Rim to enjoy.
Sunset Point is (unsurprisingly!) the best place to be around sunset. Not because there is a magical sunset image from here but because you can walk down slightly into the canyon as though you are going to descend the switchbacks into Wall Street.
As the sun gets lower in the Western sky, it strongly illuminates the sunset facing wall of Navajo Loop trail. Extremely dark shadows and abyss-like black holes make the canyon appear incredibly eerie.
The best action you’ll get at sunset in Bryce Canyon is watching as distant hills are illuminated a golden yellow. A nice contrast between cooling orange rocks in foreground darkness create a cool image but you need luck with clouds.
If you can only do one – pick sunrise.

Dark shadows forming atop the switchbacks just before sunset – Navajo Loop (Wall Street side).

Using Kristen’s head to create a starburst as we wait for the sun to set – Sunset Point.
Tips for Sunset
- Stand anywhere along the Rim close to Sunset point for best view of distant hills.
- Be sure to go inside the canyon to see the walls glowing brightly an hour before sunset.
- After sunset stay for astrophotography, the stars and night sky are very clear at Bryce Canyon.
- Don’t forget a high quality head torch if you do stay for a Milky Way display.
- Wide angle lens again is the better choice to give perspective of valley size.

Bryce Canyon amphitheater thrust into darkness as distant hills soak up the final rays of day – Sunset Point.

Stunning colors forming around the clouds in the final moments of sunset across Bryce Canyon – Sunset Point.
Two Bonus Extras

On the way back to our campground after sunrise we saw two deer play fighting at dawn so we pulled over and watched them quietly from afar for 5 minutes.

Visiting Utah in Fall means the Milky Way is prominent as early as 8pm. We walked down into the canyon right above the Navajo Loop switchbacks to capture the Milky Way as it appeared over the Rim trail.
Read More About Bryce Canyon National Park …
- Zion and Bryce Canyon: Epic 3 Day National Parks Road Trip Itinerary
- Best Hike at Bryce Canyon: Queen’s Garden and Navajo Loop Trails
- The 12 best hotels near Bryce Canyon National Park
Are you planning a trip to Utah? Our Ultimate Utah Road Trip Planner covers all of Utah’s Mighty 5 National Parks, plus crosses into Northern Arizona to complete the most amazing loop route.
More Photography Inspiration …
- Canyonlands Sunrise: Complete Guide to the Unforgettable Sunrise at Mesa Arch
- Arches Sunset: Hiking and Photography Tips for the Amazing Delicate Arch Sunset
- Yosemite: Best Locations, Iconic Landmarks and Epic Vistas Photography Guide
- Grand Canyon: Most Amazing Sunrise and Sunset Photography Locations
We hope this helped you plan your Bryce Canyon photography from sunrise to sunset!
Have you been to Utah? Which is your favorite National Park?
Please let us know if you have any questions or need any help planning your visit.
Happy Snapping ,
Mark and Kristen
Was This Post Helpful? Pin It For Your Visit!

Note : This article contains affiliate links. When you make a purchase using one of these affiliate links, we may earn a small commission at no extra cost to you.
All Rights Reserved © Where Are Those Morgans, LLC. Republishing this article and/or any of its contents (text, photography, maps, graphics, etc.) in whole or in part is strictly prohibited.
Mark and Kristen Morgan are travel, hiking and photography experts. Over the last 6 years traveling full time, they have explored more than 40 countries and 30 US states.
Where Are Those Morgans has been featured in USA Today, Gestalten, Get Your Guide, CityPASS and Condé Nast Traveler along with various other publications. Read more about us .
Leave a Comment Cancel reply
Subscribe to our newsletter
Get the latest in travel straight to your inbox
Click here to subscribe
Monument Valley Photo Tips and Road Trip

Monument Valley is one of those places that makes you go ”Woah” even if you hate that particular declaration of modern slang. It’s one of the most imposing landscapes I’ve ever seen or photographed.
It’s barren, desolate plains are interrupted by these giant sandstone monoliths (known as Buttes) that slice into the sky and seem strategically placed to make beautiful compositions for photographers and painters.
Even though you’ve probably seen the classic shot of the West and East mittens from the main hotel viewing area I defy you to resist taking that shot. I wrestled with my inner snob for a whole 5 minutes before giving in and trying to take my own interpretation of the cliche valley overlook. Even though I hated myself for doing it I’m still pretty happy with the results. Here are my Monument Valley Photo Tips.

Getting There
It’s a very easy drive down from Moab, just follow the 191 South and then take the 163 Scenic Route. When you get to the main intersection in Monument Valley simply turn left up Monument Valley Road. You’ll have to pay around $5 per person per day at the toll booth to get access to the valley. The drive from Moab takes about 3 hrs.
Drive East on the 98 to Kayenta. When you hit the 160 take a left and go North-East to Kayenta and then join the 163 to Monument Valley which is left again. This drive takes about 2 hrs.
The Trail and Loop Road
There is only one walking trail that is accessible without a Navajo guide and you can access it from the car park at the visitor centre / View hotel. It’s called the ‘Wild Cat Trail’ and takes you all the way around the West Mitten Butte. If you hire a Navajo guide you can get access to much of the valley.
The Loop road that snakes through the valley is 17 miles long and unpaved. It ranges from smooth sand to brutal potholes to slick rock and will seriously test the suspension of your vehicle. We were in a large 4X4 SUV with plenty of clearance so we had no problems. I watched one guy in a nice new Mustang creep his way out of the valley – that must have been one slooooow drive.
Private residents live in the valley itself and you’ll pass their homes on the loop road so be careful not to accidentally trespass on private property. For an excellent map of the loop road and valley go here .

Recommended Equipment
- Rain Cover – We were there mid May and it rained a lot.
- Heavy Tripod – The winds get pretty aggressive so if your tripod is super light you’ll need some weights.
- Polarizer – For control of reflections, glare and colour saturation.
- Wide Angle Lens – Goes without saying really.
- Warm Clothes – it was freezing on the second morning during mid May.

For sunrise, skip the obvious overlook at the start of the valley and drive right to end of the loop road to ‘Artists Point’ . The sun will light up the Buttes from the East while you face West and you’ll get an immense valley view during the best light. I got there about an hour too late because I’d opted for the classic backlit buttes shot – lesson learned.
If thunderstorms are forecast you’ll get some spectacular weather conditions but don’t expect them to be during typical golden hour. Any time of day can yield fleeting moments of amazing light so just fill up a thermos, strap on your rain cover and be ready.

Accommodation
You have three choices if you are staying close to the valley itself. There is ‘The View’ hotel which sits at the very lip of the valley and is where you’ll start the Valley loop drive. The other option are Gouldings Lodge or camping. We stayed at the Gouldings campground near the Gouldings Lodge and it was not bad.
There are other places to camp in the area but they seem pretty ramshackle. Apparently you can even camp right in the valley itself near the Buttes so if you fancy that I would ask at the visitor centre as I never actually saw anyone camping down there.
If you prefer more choice of accommodation there are a few chain hotels in Kayenta, which is about 20 miles South of Monument Valley.
I have to say that the dining options in Monument Valley are pretty grim. The only two restaurants are situated in the only two hotels and both offer similar food. I did however get a taste for the Navajo taco – that fry bread is pretty good.
I live in BC which has abundant wildlife so I was pretty shocked out how little life there is out here but it is the desert after all. I saw no snakes or lizards, few birds. I did however see lots of feral dogs, one poor fella was limping along on a maimed foot that he’d obviously gotten used to. I couldn’t get him to come close.
Oh and I did see a rotting horse carcass beside the road right near the toll booth. The cycle of life continues.
While You’re There
This area has so many world class destinations for photography that you’ll be spoiled for choice. It depends on which road you take to get here but if you’re coming from Moab be sure to check out the ‘ Natural Bridges National Monument’ . If you’re coming from Page be sure to visit ‘ Navajo National Monument ‘ which has 3 preserved cave dwellings.

Published by Gavin Hardcastle
Gavin is a professional landscape photographer from Nanaimo, Vancouver Island, BC. He teaches photography workshops all over the world and writes extensively about his experiences on location. You can read his photo guides and tutorials here at Fototripper.com.
22 Comments

I’ve foud your homepage while I was surfing around looking for some interesting spots in Utah. Your tips look very inteesting. Next year September, I will be back in Utah for a photo trip and I hope that your page will give me some good hints.
Regards Dirk

Glad you like it Dirk, we’ve got many more guides for Utah coming out in the next few weeks. Should we add you to the mailing list?

[…] Also check out Lower Antelope Canyon and if you’re up for a drive, take a trip to Monument Valley. […]

Please put ME on the mailing list! I’m taking a photo excursion with a friend next month and your guides have been very helpful. Thank You!!!!
Thank you! Your guides fantastic for someone like myself who has never been to this area.
The iconic location in your first beautiful shot… is that easy to access or does it tucked back behind the pot holes and rough road you described?
“Even though you’ve probably seen the classic shot of the West and East mittens from the main hotel viewing area I defy you to resist taking that shot. I wrestled with my inner snob for a whole 5 minutes before giving in and trying to take my own interpretation of the cliche valley overlook. Even though I hated myself for doing it I’m still pretty happy with the results.”

Hi Gavin, I’ll be visiting Monument Valley on my honeymoon in November, (I’m from Australia) and I was wondering what your tips would be for the best sunrise and sunset experiences/photography locations, given we will be only staying one night, (getting there in the afternoon and departing mid morning) We are just hiring a standard car to drive across the US, not sure if it’s suitable to drive through the park or not. Would like to do one of the guided tours as well, could you advise what to do and when? Best to do a tour at sunrise or sunset? Will most likely stay at the view hotel. Any help would be greatly appreciated, as this will be the highlight of my trip. Dean

Hi Dean, congrats on the wedding. It’s an awesome place to visit on your honeymoon but be prepared to rough it a little. The View is pretty much your only option for close access. As for where you want to be for sunrise/sunset, it depends on what type of shot you like. If you prefer the sun being in the shot as it rises between the Buttes you’ll want to be fairly close to t he hotel but everyone gets that shot. Instead I would advise going to the far end of the valley drive to this spot as mentioned in the article ”For sunrise, skip the obvious overlook at the start of the valley and drive right to end of the loop road to ‘Artists Point’. The sun will light up the Buttes from the East while you face West and you’ll get an immense valley view during the best light. I got there about an hour too late because I’d opted for the classic backlit buttes shot ‘ lesson learned.”
You can easily do the drive in a rental, just go slow.
Thanks for the tips Gavin, I think thats what ill do. Sunset from the hotel / lookout area, sunrise from the back. Will the sunrise tours leave early enough to get to the location you mentioned before the sun actually rises? Or will we have to get out there on our rental early morning?

After many years of dreaming about it, I get to visit and photograph Monument Valley two weeks from now. Ive already made a preemptive upgrade to FX for the opportunity and am now contemplating just how wide I need to go… Currently my widest lens is a 24 mm – will I regret not having something wider?
Actually Glenn, 24mm is plenty wide enough to fit in most of the delights of the valley. Hope you get some great shots now that you’re full frame.

Gavin, Thanks for the guide, it is very helpful. I will be staying at Goulding’s campground for a night and would like to take some sunrise picture of the valley. My trip is quite packed so I don’t think I have time to drive the wild cat trail you mentioned. I want to know if it is possible to take pictures at the view hotel even if I don’t stay there?
Yes you can take pictures from the hotel as a none guest but you actually don’t need to be in the hotel to get good shots of the valley. If you want the classic shot you’ll be better off at the car park of the hotel right where the wall looks down into the valley. I would STRONGLY advise you take the time to drive the trail to see the lesser known compositions available to you.

Very helpful tips you have on here. This will be my first visit in Page, Arizona… I have one concern as I have no DSLR camera. I am using Nikon coolpix p900. What do you think about this camera to use for my upcoming visit to Antelope (upper) Canyon and possibly monument valley and horseshoe bend.
Australia here!
Thank you in advance Anna
I think you should upgrade 😉

Even now in 2023, your information you provided us in 2013 is still very very valuable. Thank you!!
One question, because we are learning that a guide is needed for most areas. When looking at the map you provided via link, Valley Drive; is this part of the Wild Cat Trail (17 miles long) or are we needing to find a guide to travel the Valley Drive? Thank you kindly for all your help. We are coming from Germany, first big vacation since the US finally opened the doors for international travel. We look forward to hearing from you.
When I did it you didn’t need a guide for the drive. Nowadays who knows.
Leave a Reply Cancel reply
Your email address will not be published. Required fields are marked *
Vintage Car Coastal Roadtrip

Gritsan Photography-51

Monterey Touring Vehicles

Rally Smiles

IMG_0288 (1)
Nothing says California Dream like a road trip down the central coast in a classic convertible. Driving a vintage car completely transforms your experience, whether you’re cruising on Highway 1 along the majestic Big Sur coastline, enjoying the peaceful 17-mile Drive in Pebble Beach or winding through the scenic vineyards of wine country, the road is calling your name. In our eclectic, woman-owned fleet of over 30 vintage cars Monterey Touring Vehicles boasts easy-to-drive automatics and sporty manuals in every size and shape so you can find the perfect ride to put a smile on your face.
Starts at $220
2888 Del Monte Avenue Monterey, CA 93940
Get a Heads-Up for 2024
We’ll let you know when the 2024 Sunset Travel Awards open for entry!
Other Entries

Stan Stephens Glacier & Wildlife Cruises
The journey to Valdez, Alaska, may take a little extra time, but is worth it because you have a chance to explore Prince William Sound with the local experts at Stan Stephens Glacier & Wildlife Cruises. For the past 52 years the Stephens family and crew have operated tours in concert with the environment in […]
Highlighted

‘Alohilani Resort Waikiki Beach

1 Hotel San Francisco

5th Street Public Market

A Vacation Different

Absinthe Brasserie & Bar
Make Trip Happen
The Best Sunrise Photography Spots in Grand Teton National Park
Grand Teton National Park has not just one, but many iconic sunrise photography spots. If you’re looking for unforgettable mountain landscapes, look no further. These are the best sunrise photography spots in Grand Teton National Park to visit on your next trip.
Schwabacher Landing
We start the list with Schwabacher Landing, one of the most picturesque locations in Grand Teton for sunrise photography. The Snake River provides a stunning reflective surface and natural leading lines for the cliffs of the Grand Teton Range. There is a walking trail down along the riverbed, with two primary spots for taking sunrise pictures. The first is right near the parking area near the bend in the river. The second is up the trail approximately 0.25 miles to Beaver Dam Sunrise. Be sure to get there early to claim your spot, and be respectful of other photographers!
Similar to Schwabacher Landing, Oxbow Bend also sits right along the Snake River in Grand Teton National Park. The river provides stunning reflections of the Grand Teton range for sunrise photography. This spot is towards the north end of the park a few miles from the Moran Entrance station. There is a parking area just off highway 191. This is also a popular spot for birds to swim through which can add in a peaceful wildlife flair.
Many people have likely seen pictures from Mormon Row without realizing it. The John Moulton barn at Mormon Row is one of the most iconic sunrise spots in Grand Teton National Park, and as soon as you experience it, you’ll understand why. In the 1890’s, Mormon settlers from Salt Lake established a settlement in the plains on the eastern side of the Grand Teton Range. Their historic homestead poses a picturesque foreground with the stunning backdrop of the Grand Tetons. This spot is no secret so we suggest getting there early. Enjoy the beauty as the mountains and the barn transition from darkness to that unforgettable morning glow.
Jenny Lake sits at the heart of Grand Teton National Park, and is a focal point for many of the activities you can do there. Just across from the Campground and Visitor Center near the Jenny Lake Trailhead, there is a wonderful outcropping that poses unspoiled views of Inspiration point, as well as a chance to see foxes, beavers, and other wildlife.
String Lake
While not as popular as the other sunrise spots in this list, String Lake is a beautiful in its own right, and you’re likely to have this spot to yourself. Located within Grand Teton National Park, String Lake is only a short walk from the parking lot.
__________________________
The map below shows the locations of each of these Grand Teton photography spots:
That wraps up our list of the best sunrise photography spots in Grand Teton National Park. Plan to wake up early on several days of your trip to capture all of these gorgeous locations, it’s worth it!
To learn more about what camera gear we used to capture these Grand Teton sunrise photos and our camera gear recommendations, check out our post on camera accessories for travel photography .
The Ultimate 3 Day Guadalupe Mountains & Carlsbad Caverns National Park Itinerary
The 5 best hikes in texas, how to spend one day in black canyon of the gunnison national park, the best hikes in guadalupe mountains national park, texas.
Taking a road trip? These Western NC places voted among top 10 in US to stay. What to know.

Several Western North Carolina locations have been voted as top choices in the country for road trip lodging this summer, according to USA TODAY's 10Best Readers' Choice . From vintage trailers by the river to midcentury roadside motels, the choices in WNC alone have a little something for everyone.
It isn't the first time WNC has topped a 10Best list . Methodology provides locations chosen by an expert panel to voters in the community, who choose their favorite options to add to the lists.
Here's what to know about the WNC options chosen by readers for the 2024 10Best road trip roundup.
More: Asheville, WNC communities earn multiple 10Best Readers' Choice Awards for beer, breweries
Best glamping 2024
Coming in at first place on this list is Sky Ridge Yurts. Located at 200 Sky Ridge Drive in Bryson City, Sky Ridge Yurts has eight structures available for booking. 10Best praised the three-person Santeelah and six-person Fontana, and mentioned the cooking areas, full baths, heating and air conditioning available in each that make the yurts a true glamping experience.
10Best glamping spots
- Sky Ridge Yurts (Bryson City, North Carolina)
- Beaver Island Retreat (Beaver Island, Michigan)
- Piney River Ranch (Vail, Colorado)
- Treebones Resort (Big Sur, California)
- Westgate River Ranch Resort & Rodeo (River Ranch, Florida)
- Nomad Ridge at The Wilds (Cumberland, Ohio)
- Little Arrow Outdoor Resort (Townsend, Tennessee)
- The Destination (Dadeville, Alabama)
- The Resort at Paws Up (Greenough, Montana)
- Borealis Basecamp (Fairbanks, Alaska)
More: WNC city voted among 10 Best Small Towns in the South: Here's why
Best roadside motel 2024
Two WNC options made the 2024 10Best list of best roadside motels. First was the Sunset Motel at third place. Located at 523 S Broad St. in Brevard, the motel has a wide range of rooms including a separate cottage on the property available to reserve. Rooms feature midcentury modern themes.
Rhodes Motor Lodge was the other WNC choice on the list, coming in at seventh place. The lodge at 1377 Blowing Rock Road in Boone features two stories of rooms all facing the Blue Ridge Mountains. In fact, the views were among the specific features praised by 10Best. Their house bar and restaurant, Canteen, serves homestyle meals and a rotating selection of local craft beer and ciders, plus wine and cocktails.
10Best roadside motels
- The Groovy Nomad (Trenton, Georgia)
- Sugarloaf Mountain Motel (Virginia City, Nevada)
- The Sunset Motel (Brevard, North Carolina)
- Roadrunner Lodge Motel (Tucumcari, New Mexico)
- Bear Cove Inn (St Ignace, Michigan)
- The Local - St. Augustine (St. Augustine, Florida)
- Rhode's Motor Lodge (Boone, North Carolina)
- The Starlite Motel (Kerhonkson, New York)
- Americana Motor Hotel (Flagstaff, Arizona)
- The Ozarker Lodge (Branson, Missouri)
More: West Asheville eatery is No. 2 on national Best New Restaurants list: What's on the menu
Best national park lodge 2024
Pisgah Inn, located at 408 Blue Ridge Parkway near Canton, was sixth on the list. The inn, located on the Blue Ridge Parkway in Pisgah National Forest, has a rich history beginning in 1919, when it first opened, and is one of only two remaining park lodges on the 469 miles of the parkway.
At an elevation of 5,000 feet, Pisgah Inn features views of the forested mountains and plenty of nearby hiking trails. 10Best also mentioned the quality of the meals served at the inn's dining room.
10Best national park lodges
- Jackson Lake Lodge (Grand Teton National Park)
- Paradise Inn (Mount Rainier National Park)
- Old Faithful Inn (Yellowstone National Park)
- Skyland (Shenandoah National Park)
- El Tovar Hotel (Grand Canyon National Park)
- Pisgah Inn (Blue Ridge Parkway)
- The Ahwahnee (Yosemite National Park)
- Many Glacier Hotel (Glacier National Park)
- The Inn at Death Valley (Death Valley National Park)
- Glacier Park Lodge (Glacier National Park)
More: This NC amusement park ranked in the top 10 countrywide; Coaster, entertainment praised
Best vintage trailer hotel 2024
Asheville River Cabins was fourth on the list of best vintage trailer hotels of 2024. At 318 Wanderlust Ridge in Arden, Asheville River Cabins offers reservations for private cabins and vintage Airstream trailers. Its website suggests hiking the property's river trail or tubing down the river.
Currently, riverfront Airstream rentals start at $159 per night. Airstreams are equipped with full kitchens and private fire pits.
10Best vintage trailer hotels
- The Vintages Trailer Resort (Dayton, Oregon)
- Flying Flags RV Resort & Campground (Buellton, California)
- SkyStream Resort at SkyPark Camp + RV Resort (Skyforest, California)
- Asheville River Cabins (Arden, North Carolina)
- Sou'wester Historic Lodge & Vintage Trailer Resort (Seaview, Washington)
- Hart's Camp (Pacific City, Oregon)
- AutoCamp Yosemite (Midpines, California)
- AutoCamp Cape Cod (Falmouth, Massachusetts)
- Lake Bastrop North Shore Park (Bastrop, Texas)
- Camp LeConte Luxury Outdoor Resort (Gatlinburg, Tennessee)
Iris Seaton is the trending news reporter for the Asheville Citizen Times, part of the USA TODAY Network. Reach her at [email protected].
IMAGES
VIDEO
COMMENTS
Sunset photography is wildly popular, and for good reason. ... It was rainy during almost the entire trip, and a lot of my planned sunset photoshoots turned into impromptu "blue hour" photoshoots because the sunset itself was so dreary. NIKON Z 7 + NIKKOR Z 14-30mm f/4 S @ 14mm, ISO 64, 105 seconds, f/13.0 ...
Use your camera to explore many perspectives, like overhead, straight on, close up, and far away. Also, if you're shooting inside, try finding a sun patch, dark corner, or spot by the window, and see what light shows your subject best and creates the feeling you want to convey in your image." For feed-worthy road trip photos you'll want to ...
Jason Barnette started a career in travel photography in 2009. He created a travel blog in 2015 to showcase his photos, but the blog quickly expanded to include details of his adventures. In 2019, he rebranded as Road Trips & Coffee. He shares his expertise as a perpetual road tripper who's traveled thousands of miles across the U.S.
The sunset itself is fleeting, so do some work behind-the-scenes to boost your chances of success. First, scout your location during the daytime to find a vantage point and composition that suits your vision. Create some test shots to kickstart the process. Get everything ready in advance, and track the sun using an app like PhotoPills or The ...
1. Always take a spare body, even if it stays in the car for the entire trip, you will thank me later if something catastrophic happens to your main camera. 2. Take more glass. I almost always ...
Improve your sunset photography skills with the best camera settings, tips on exposure, filters, composition and more to capture stunning sunsets ... Snowy Mountains Photography Road Trip: Best Itinerary. By Sam Wilson 4 April 2024. Outside the snow season there are so many photo opportunities in the NSW Snowy Mountains - snow gums, rock ...
Download and use 100,000+ Road Trip Sunset stock photos for free. Thousands of new images every day Completely Free to Use High-quality videos and images from Pexels
Sunset & Moonrise Arches Landscape PhotographyAmerican Southwest Landscape Photography Road TripWelcome to episode 12 from my 7 week road trip photographing ...
If you're interested in flower photography, be sure to bring a macro lens; if you expect to see birds or other wildlife, take a long lens; if you'll mostly be taking landscapes, bring zoom lenses in the 24-200mm range. Plan a shot list. If you're really ambitious, you might put together a shot list. This is a good exercise to help you ...
Southwest Road Trip Day 5: Bryce Canyon back to Southern California. One day, including an overnight stay, in Bryce Canyon National Park gave us plenty of time to capture images at several iconic stops. There's both a Sunrise Point and a Sunset Point, as well as Bryce Point and Inspiration Point.
6. Have fun on your trip and show that in your imagery - Be curious and really be in the moment while you travel, this is part of the joy of doing road trips and finding something new to experience. Now the challenging part is to photograph that experience to convey what you are actually doing or seeing at that moment. 7.
Understanding Sunset Photography Basics. Sunset photography is a captivating genre that requires a solid grasp of the fundamentals to create stunning and evocative images. As the sun sets, the changing light and colors provide a unique canvas for photographers to capture moments of tranquility and beauty.
This is the first video of my photography road trip across the U.S. In this episode I visited Badlands national park and photographed sunset and the milky wa...
So slow down, explore, and let the road less traveled become your gateway to unforgettable photo opportunities. 2. Plan your photos in advance. When you embark on a road trip, it's essential to have a game plan for capturing amazing photos. Don't just rely on chance encounters along the way; instead, be proactive and set your sights on ...
Sunset at the Grand Canyon: Hopi Point and Yavapai Point. A little pre-visit research, followed by a chat with the rangers on arrival confirmed that Hopi Point was a good option for sunset at the Grand Canyon - the location thrusts out a way into the Canyon, so you have a clear view in both directions. The key thing to remember when shooting ...
I headed up to the top of Sandia Crest at sunset, and I think this was the moment I got my photography mojo back. The light was killer, the views were amazing, and everything kind of just came together. Route 66 in Arizona. I think most non-Americans associate a Route 66 road trip with Arizona. These are the classic locations on the route.
Our Ultimate Utah Road Trip Planner covers all of Utah's Mighty 5 National Parks, plus crosses into Northern Arizona to complete the most amazing loop route. More Photography Inspiration … Canyonlands Sunrise: Complete Guide to the Unforgettable Sunrise at Mesa Arch; Arches Sunset: Hiking and Photography Tips for the Amazing Delicate Arch ...
From Moab. It's a very easy drive down from Moab, just follow the 191 South and then take the 163 Scenic Route. When you get to the main intersection in Monument Valley simply turn left up Monument Valley Road. You'll have to pay around $5 per person per day at the toll booth to get access to the valley. The drive from Moab takes about 3 hrs.
The best time for Palouse Photography is during the "magic hour" - an hour or two before sunset, and at sunset too. If you're lucky, there will by paragliders which will give you a photo opportunity. A fantastic end to a great Palouse Road Trip. Watch for deer as you descend the mountain.
Cape Royal. Cape Royal is the best viewpoint for sunset photography on the North Rim, but is great for sunrise photography as well. Most landscape photographers would agree that Cape Royal is the best viewpoint in all of Grand Canyon National Park! Cape Royal is the only location that provides sweeping views to the east, south, and west.
Nothing says California Dream like a road trip down the central coast in a classic convertible. Driving a vintage car completely transforms your experience, whether you're cruising on Highway 1 along the majestic Big Sur coastline, enjoying the peaceful 17-mile Drive in Pebble Beach or winding through the scenic vineyards of wine country, the road […]
Schwabacher Landing. We start the list with Schwabacher Landing, one of the most picturesque locations in Grand Teton for sunrise photography. The Snake River provides a stunning reflective surface and natural leading lines for the cliffs of the Grand Teton Range. There is a walking trail down along the riverbed, with two primary spots for ...
scott_vuilleumier on May 22, 2024: "Surprise on the road w/ @nils_kuenzli_photography — #sun #sunset #sunrise #atmospheric #nature #world #earth #naturelovers #earthfocu...". Scott Vuilleumier | Surprise on the road w/ @nils_kuenzli_photography — #sun #sunset #sunrise #atmospheric #nature #world #earth #naturelovers #earthfocu... | Instagram
Be prepared with the most accurate 10-day forecast for Noginsk, Moscow Oblast, Russia with highs, lows, chance of precipitation from The Weather Channel and Weather.com
The Prescott OffStreet Festival is May 25-26 at its new home, Pine Ridge Marketplace, formerly the Gateway Mall. There will be fine art, photography, handmade crafts and food. The fun starts at 9 ...
Best Time To Visit Rozhdestveno. The best time to visit Rozhdestveno is during the summer months of June, July, and August.During this time, the weather is mild and pleasant, with average temperatures ranging from 15°C to 25°C.The days are longer, allowing for more time to explore the beautiful countryside and enjoy outdoor activities.Additionally, the summer months are when the annual ...
Here's what to know about the WNC options chosen by readers for the 2024 10Best road trip roundup. More: Asheville, WNC communities earn multiple 10Best Readers' Choice Awards for beer, breweries ...