
How to Reset Safari to Default Settings on Mac and iPhone
Scratching your head to reset Safari to default settings? Don't know where to begin? Well don't worry, we have got your back!

Safari is an exceptional browser and there are no two ways about it. With Apple leading the charge against ad trackers on the internet with its anti-tracking policy, Safari has been a safe haven for users who want to protect their privacy.
That being said, while Safari might win the race when it comes to protecting its users but more often than not is not able to match up to its competitors in the game of extensible features.
However, many of us are extensively using safari on a daily basis. Some want to hold on to that last ounce of privacy on the net, and others do not want to install a 3rd party browser on their Macs or iPhones.
Whatever may be your case for using Safari. One thing is for sure, with years of use, Safari accumulates tons and tons of website data which might slow down your browser or in worst cases, your devices as well.
Reset Safari to Default Settings on Mac
To everybody’s shock, there’s no ‘Reset Safari’ button on any of the apple devices. As a result, we are bound to perform a list of steps not every user might be comfortable with. Anyways, resetting Safari consists of resetting 3 components :
- Website Data
We are going to reset the components on a first-come-first-serve basis. So let’s get started.
Reset History
First, Launch Safari from the Launchpad or from dock of your Mac.

Next, click on the ‘History’ tab from the menu bar. Next, click on the ‘Clear History…’ option from the list.

After that, choose ‘all history’ option from the drop-down. Then, click on ‘Clear History’ button.

Reset Website Data
First, Launch Safari from the Launchpad or from the dock of you Mac.

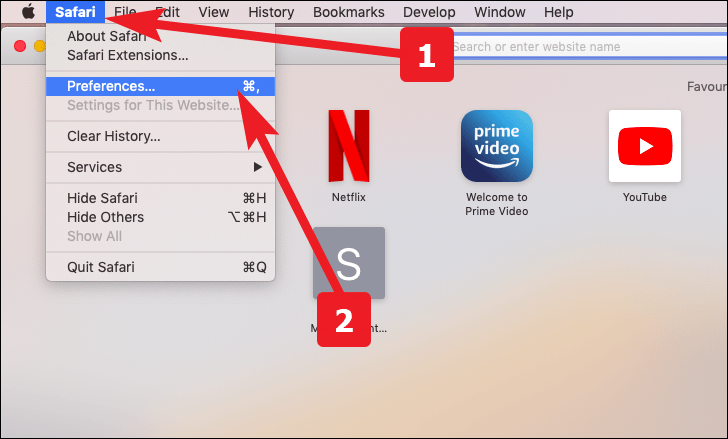
Next, click on the ‘Safari’ tab present on the menu bar. Now, click on the ‘Preferences’ option from the list.

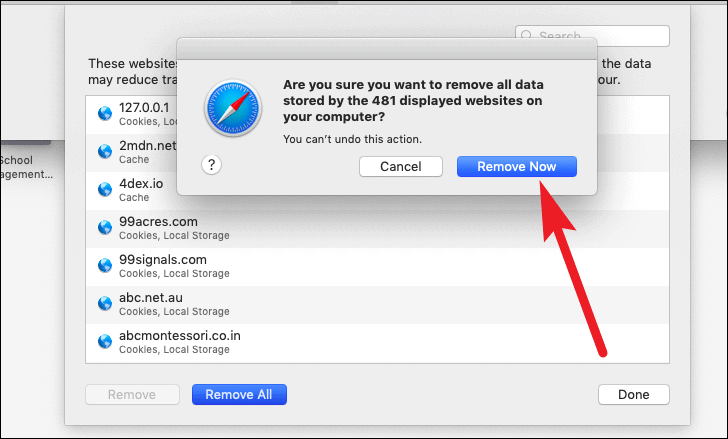
After that, go to the ‘Privacy’ pane and click on ‘Manage Website Data’ button.

Now, click on ‘Remove All’ button from the bottom left corner of the pane.

Next, click on ‘Remove Now’ button to confirm.
Reset Cache

Next, click on the ‘Safari’ tab from the menu bar. Then, click on the ‘Preferences’ option from the list.
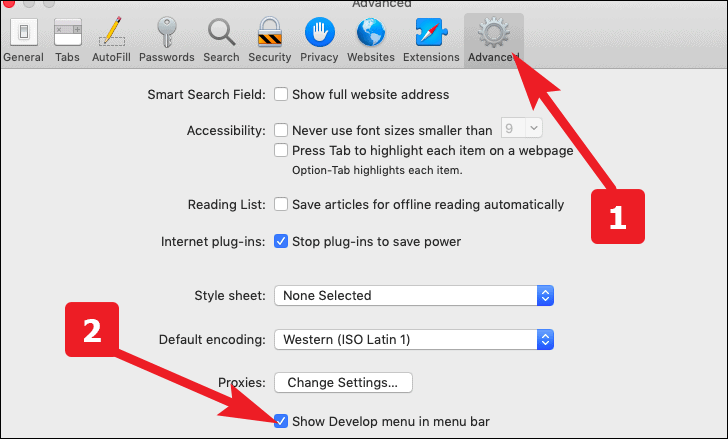
After that, go to the ‘Advanced’ pane. Now, check the ‘Show Develop menu in the menu bar’ option.
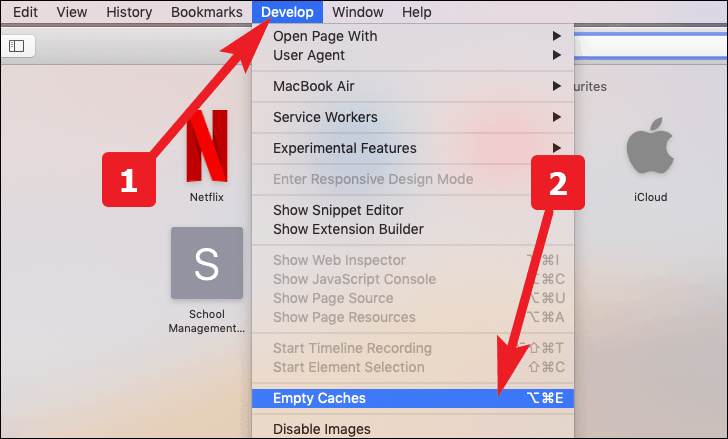
As a result, the ‘Develop’ tab would now be visible in the menu bar. Click on it, and then choose the ‘Empty Caches’ option from the list.
Reset Safari to Default Settings on iPhone
Resetting safari is pretty straight forward on iPhone and requires just couple of steps.
Launch the ‘Settings’ app on your iPhone from the home screen.
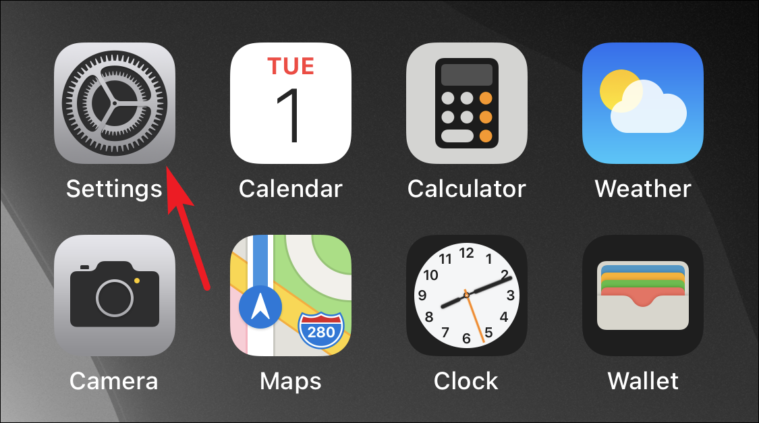
Next, scroll down and locate ‘Safari’ from the list and tap on it.

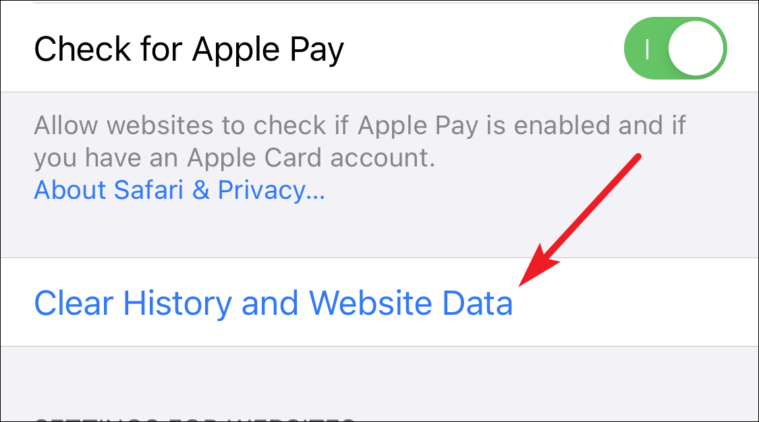
After that, scroll down till you find the ‘Clear History and Website Data’ option on the screen and then tap on it, once located.
Now, tap ‘Clear History and Data’ from the pop-up alert menu to confirm.

11 Ways GPT-4o is a Game Changer

How to Use Gemini Code Assist in VS Code

How to Code Using AI
Get all the latest posts delivered straight to your inbox., member discussion.

What Does Time Sensitive Snapchat Notification Mean and How to Turn It Off

How to Enable Advanced Tracking and Fingerprinting Protection in Safari on iPhone

How to Add or Remove Photos and Videos from a Memory on iPhone

How to Solve iOS 17 Battery Drain Issue on Your iPhone

How to Play Retro Games with Delta on iPhone
How to Reset Safari on iPhone: A Step-by-Step Guide
Safari, the default web browser on iPhone, plays a crucial role in our daily online activities. However, as time goes by, Safari may start to accumulate cached data, cookies, and browsing history, leading to potential performance issues. If you've been experiencing slow browsing speeds or encountering glitches while using Safari on your iPhone, it might be time to reset the browser and start afresh.
In this article, we will provide you with a comprehensive step-by-step guide on how to reset Safari on your iPhone. By following these instructions, you can optimize Safari's performance and enjoy a smoother browsing experience. So, let's dive right in!
Reasons to Reset Safari on iPhone
Before we delve into the process of resetting Safari, let's explore why it is necessary to do so. There are a few key reasons why resetting Safari can prove beneficial:
Clear Accumulated Data : Over time, Safari collects a significant amount of cached data, cookies, and browsing history. By resetting Safari, you can wipe out this accumulated data, freeing up storage space and potentially improving performance.
Troubleshooting Safari Issues : If you've been experiencing frequent crashes, freezes, or other glitches while using Safari, resetting the browser can help resolve these issues. It essentially gives Safari a fresh start, eliminating any underlying problems that may have caused the instability.
Enhancing Performance and Speed : Safari's performance can be affected by factors such as excessive cached data and cookies. By resetting Safari, you can optimize its performance, resulting in faster loading times and smoother browsing.
Step-by-Step Guide: How to Reset Safari on iPhone
Now that we understand the importance of resetting Safari, let's walk through the step-by-step process of doing so on your iPhone:
Open the Settings app on your iPhone : Locate the Settings app on your home screen and tap on it to open the settings menu.
Find Safari settings : Scroll down the settings menu and look for the “Safari” option. Tap on it to access Safari's settings.
Reset Safari : Within the Safari settings, scroll down until you find the “Clear History and Website Data” option. Tap on it to proceed with the reset process.
Confirm the reset action : A pop-up window will appear, asking you to confirm the reset action. Read the warning message carefully, as resetting Safari will delete your browsing history, cookies, and other website data. If you are certain about proceeding, tap on “Clear History and Data” to confirm.
Congratulations! You have successfully reset Safari on your iPhone. Now, let's discuss a few precautions you should take before resetting Safar
Precautions before Resetting Safari on iPhone
While resetting Safari can be beneficial, it is essential to take a few precautions to ensure a smooth transition and avoid any potential loss of data. Consider the following steps before proceeding with the reset:
Backup important data and bookmarks : Before resetting Safari, it is wise to create a backup of any important data, bookmarks, or saved passwords. You can use iCloud or other backup methods to safeguard your data.
Understand the consequences : Resetting Safari will delete your browsing history, cookies, and other website data. Make sure you are aware of the consequences and are prepared to lose this information.
Save login credentials : Take note of any login credentials for websites you frequently visit. After resetting Safari, you will need to re-enter your login information for each site.
By following these precautions, you can ensure a seamless transition while resetting Safari on your iPhone.
Additional Tips for Optimizing Safari on iPhone
Resetting Safari is not the only step you can take to enhance your browsing experience. Here are a few additional tips to optimize Safari on your iPhone:
Regularly clear cache and browsing history : To prevent the accumulation of excessive data, make it a habit to clear the cache and browsing history regularly. This can be done within the Safari settings menu.
Manage website data and cookies : Safari allows you to manage website data and cookies on an individual basis. Review and delete unnecessary data to enhance performance and protect your privacy.
Enable content blockers : Content blockers can significantly improve the speed and smoothness of your browsing experience. Enable them in Safari settings to block unwanted ads and trackers.
By implementing these tips, you can further optimize Safari's performance and enjoy a hassle-free browsing experience on your iPhone.
In conclusion, resetting Safari on your iPhone is a simple yet effective way to optimize its performance and enjoy a smoother browsing experience. By following our step-by-step guide, you can reset Safari with ease and take additional measures to enhance its performance. Remember to back up your important data before resetting and be aware of the consequences. With these precautions in mind, you can confidently reset Safari and enjoy a fresh start with improved browsing speeds and stability.
Restore Safari Tabs on iPhone from iCloud | Reinstall Safari on iPhone
Tabletmonkeys is a tablet computer media company focusing solely on tablet computers. iPad & tablet news, tablet leaks, November tablet deals, tablet sales, tablet prices, tablet launches, tablet apps, tablet comparison, 2-in-1 tablets, and tablet accessories, is otherwise the focus of Tabletmonkeys.com.

- INSIDER REVIEWS
- TECH BUYING GUIDES
How to reset the Safari browser on your iPhone in 2 different ways
Emma witman .

- You can reset Safari on your iPhone by clearing cookies and erasing your browsing history.
- There are two ways to reset your Safari data: through the Safari app itself, and through the Settings app.
- Both methods will let your clear both your browsing history and cookies.
- Visit Business Insider's homepage for more stories.
It's nice to get a clean start on Safari , but simply removing your Frequently Visited sites isn't going to address privacy concerns if you have cookies stored, for instance.
Fortunately, it's easy to reset all your browsing and history and settings.
Here's two ways, one directly through Safari , and the other through your iPhone's Settings.
Check out the products mentioned in this article:
Iphone 11 (from $699.99 at best buy), how to reset safari on your iphone through the browser.
1. At the bottom of the Safari page, tap the icon that looks like an open book.
Emma Witman/Business Insider
You'll need to open your Safari's history to wipe it.
2. At the top of the menu that opens, tap the icon that looks like a clock.
3. Tap "Clear" at the bottom of the page. You'll see options to clear your history, cookies, and other data for various time periods. Select "All time," at the bottom.

If you want a less extensive data wipe, you can always select a shorter time period than "All time."
How to reset Safari on your iPhone through the Settings app
1. Open the Settings app for iPhone .
2. Search for or scroll down to "Safari" and open it.
3. Tap "Clear History and Website Data" in blue near the bottom of the page.
4. A notification will pop up. Tap "Clear History and Data," and wait a few moments while the iPhone processes your request. Once it does, all your data will have been cleared.

You can't undo it once you've cleared the data, so you do want to be sure before proceeding.
The button to clear your data will be gray while data is being cleared, then go back to blue when complete.
Related coverage from How To Do Everything: Tech :
Ios 13 lets you automatically close tabs in the safari browser on an iphone after a set period of time - here's how to do it, how to stop pop-ups from appearing on your iphone's safari browser, how to add bookmarks and favorites on an iphone's safari browser for quick access to your preferred webpages, how to delete or edit the saved bookmarks on your iphone's safari browser.

NOW WATCH: Why plane tires don't explode during landing
Read more articles on.
Advertisement
- PRO Courses Guides New Tech Help Pro Expert Videos About wikiHow Pro Upgrade Sign In
- EDIT Edit this Article
- EXPLORE Tech Help Pro About Us Random Article Quizzes Request a New Article Community Dashboard This Or That Game Popular Categories Arts and Entertainment Artwork Books Movies Computers and Electronics Computers Phone Skills Technology Hacks Health Men's Health Mental Health Women's Health Relationships Dating Love Relationship Issues Hobbies and Crafts Crafts Drawing Games Education & Communication Communication Skills Personal Development Studying Personal Care and Style Fashion Hair Care Personal Hygiene Youth Personal Care School Stuff Dating All Categories Arts and Entertainment Finance and Business Home and Garden Relationship Quizzes Cars & Other Vehicles Food and Entertaining Personal Care and Style Sports and Fitness Computers and Electronics Health Pets and Animals Travel Education & Communication Hobbies and Crafts Philosophy and Religion Work World Family Life Holidays and Traditions Relationships Youth
- Browse Articles
- Learn Something New
- Quizzes Hot
- This Or That Game
- Train Your Brain
- Explore More
- Support wikiHow
- About wikiHow
- Log in / Sign up
- Computers and Electronics
- Internet Browsers
- Safari Browser
How to Change Safari Settings on iPhone or iPad
Last Updated: November 4, 2019 Tested
This article was co-authored by wikiHow staff writer, Nicole Levine, MFA . Nicole Levine is a Technology Writer and Editor for wikiHow. She has more than 20 years of experience creating technical documentation and leading support teams at major web hosting and software companies. Nicole also holds an MFA in Creative Writing from Portland State University and teaches composition, fiction-writing, and zine-making at various institutions. The wikiHow Tech Team also followed the article's instructions and verified that they work. This article has been viewed 36,672 times. Learn more...
This wikiHow teaches you how to customize the behavior of the Safari web browser on your iPhone or iPad. If you're using iOS 13 or later, you now have the option to choose display options for individual websites in addition to making global changes.
Changing Web Preferences by Website

- Changes you make with this method will only affect the currently-open website. If you want your preferences to affect all websites rather than just for those you customize, see the Changing Web Preferences for All Websites section instead.

- Select Ask on a feature if you'd like to be asked each time the site tries to access the feature (default).
- Select Deny if you never want the site to access the feature.
- Select Allow to always allow the site to access the feature.

Changing Web Preferences for All Websites

- It is also possible to customize these settings on a per-website basis. See this method to learn how.
- Changing your web preferences using this method will not affect sites you've customized individually.

- Select Ask on a feature if you'd like to be asked each time any site tries to access the feature (default).
- Select Deny if you never want websites to access the feature.
- Select Allow to always allow websites to access the feature.
Changing General Safari Settings

- Use the sliders in the "IN SAFARI" section at the top to choose whether Siri has access to Safari.
- Use the sliders in the "IN SEARCH" section to customize whether Safari options show when searching your iPhone/iPad or using the Shortcuts app.
- Tap the back button when you're finished.

- Tap AutoFill to adjust which information appears automatically in form fields, such as your name, address, phone number, email, and credit card info.
- Pop-up ads are blocked in Safari by default. If you'd like to see pop-up ads on websites, slide the "Block Pop-ups" switch to the Off (gray) position.
- Tap Downloads to choose where to save files and media you download from websites. You'll have the option to choose a cloud storage service or your iPhone/iPad.

- To allow sites and services to track your browsing anywhere on the web, slide the "Prevent Cross-Site Tracking" switch to the Off (gray) position. To retain your privacy, you can leave this switch in the On (green) position.
- Cookies are used by websites to keep track of your visits, preferences, and login information (for sites that require username/password access). [2] X Research source The "Block All Cookies" switch is Off (gray) by default, but you can enable it by toggling it to the On (green) position.
- Safari will display a warning message if a website you visit is deemed fraudulent in some way. If you don't want to see these messages, you can toggle the "Fraudulent Website Warning" switch to the Off (gray) position.
- Adjust the "Check for Apple Pay" switch to reflect your desired Apple Pay behavior on all websites.

Expert Q&A
You might also like.

- ↑ https://www.cultofmac.com/636450/how-to-use-safaris-amazing-new-settings-in-ios-13/
- ↑ https://us.norton.com/internetsecurity-privacy-what-are-cookies.html
About This Article

1. Go to a website in Safari. 2. Tap the Aa button. 3. Tap Website Settings . 4. Make your changes. 5. Tap Done . Did this summary help you? Yes No
- Send fan mail to authors
Is this article up to date?

Featured Articles

Trending Articles

Watch Articles

- Terms of Use
- Privacy Policy
- Do Not Sell or Share My Info
- Not Selling Info
Keep up with tech in just 5 minutes a week!
- The Lowdown on Meta AI
- What's the Difference? PS5 Slim vs. PS5
How to Control iPhone Safari Settings and Security
Control your settings and security in the iPhone browser
:max_bytes(150000):strip_icc():format(webp)/SamCostello-d7fcf106ec2048ccb06d1e2190b3396d.jpg "how to reset iphone safari settings")
- Ithaca College
In This Article
Jump to a Section
How to Change the Default iPhone Browser Search Engine
How to use safari autofill to fill out forms faster, how to view saved passwords in safari, control how links open in iphone safari, how to cover your online tracks using private browsing, how to clear your iphone browser history and cookies, prevent advertisers from tracking you on your iphone, how to get warnings about potentially malicious websites, how to block websites, ads, cookies, and pop-ups using safari, how to use apple pay for online purchases.
- Take Control of Your iPhone Security and Privacy Settings
What to Know
- To change search engine, go to Settings > Safari > Search Engine . To control links, go to Safari > Open Links .
- To use AutoFill, go to Settings > Safari > AutoFill > turn on Use Contact Info .
- To view saved passwords, go to Settings > Passwords & Accounts > Website & App Passwords .
This article explains how to adjust Safari settings and security on your iPhone or iPad.
Searching for content in Safari is simple; tap the menu bar at the top of the browser and enter your search terms. By default, all iOS devices use Google for web searches, but you can select a different search engine by following these steps:
Open the Settings app.
Select Safari > Search Engine .
Select the search engine you would like to use as the default. Options include Google , Yahoo , Bing , and DuckDuckGo . The setting is automatically saved, so you can search using the new default search engine right away.
Similar to a desktop browser , Safari automatically fills in forms by grabbing information from your address book. This saves time because you don't need to fill out the same forms over and over again. To use this feature, follow these steps:
Select Safari > AutoFill .
Toggle the Use Contact Info switch to on/green.
Your information appears in the My Info field. If it does not, select the field and browse your address book to find your contact information.
Older versions of iOS allowed you to change your username and password info here. If you want to save, edit, or delete usernames and passwords in iOS 13 or later, go to the Passwords & Accounts settings page (select Settings > Passwords & Accounts ).
To save frequently used credit cards to make online purchases quicker, move the Credit Cards switch to on/green. If you don't have a credit card saved on your iPhone, select Saved Credit Cards , and add a card.
Saving usernames and passwords in Safari means you're not forced to memorize login credentials to access a website. As this data is sensitive, iOS takes measures to protect it. If you need to look up a username or password, you can do so by following these steps:
Select Passwords & Accounts > Website & App Passwords .
You are asked to authorize access to this information using Touch ID , Face ID , or your passcode.
A list details all the websites for which iOS has saved login data. Select a site to view the corresponding username and password.
You can choose where new links open by default—in a new window that appears either in front of or behind the page you are currently viewing. Follow these steps to adjust this setting:
Select Safari > Open Links .
Select In New Tab to open links in a new window in Safari and to have that window appear in front of the current tab. Select In Background to open links in a new window that appears behind the page you are currently viewing.
Browsing the web leaves digital footprints. Between browsing history, cookies, and other usage data, you may prefer to cover some of those tracks. The Safari Private Browsing feature prevents Safari from saving information about your behavior—including browsing history, cookies, and other files—while it is turned on.
When you want to delete your browsing history or cookies manually, follow these steps:
Select Safari > Clear History and Website Data .
A menu appears asking if you would like to clear the browsing data. Select Clear History and Data .
Cookies allow advertisers to track you across the web. This lets them build a profile of your behavior and interests to target you with ads better. Here's how to opt-out of some of that tracking data:
Select Safari .
Move the Prevent Cross-Site Tracking switch to on/green.
Older versions of iOS included a Do Not Track feature that asked websites not to track your browsing data. Apple removed this feature, as the request was never mandatory and did not do much to limit the tracking of user data.
Setting up fake websites that look like ones you normally use is a common method of stealing data from users. Safari has a feature to help avoid these sites. Here's how to enable it:
Move the Fraudulent Website Warning switch to on/green.
You can speed up your browsing, maintain privacy, and avoid certain ads and websites by blocking cookies. Here's how:
Move the Block All Cookies switch to on/green, then select Block All to confirm the action.
If you set up Apple Pay , you can use it at any participating retailer to complete purchases. To make sure you can use it at those stores, enable Apple Pay for the web. Here's how:
Move the Check for Apple Pay switch to on/green.
Take Control of Your iPhone Security and Privacy Settings
While this article focuses on privacy and security settings for the Safari web browser, the iPhone has other security and privacy settings. These settings can be used with other apps and features to protect private info stored on your iPhone .
Get the Latest Tech News Delivered Every Day
- How to Change Settings in iOS Dolphin
- How to Find a Wi-Fi Password on an iPhone
- How to Clear Search History on iPhone
- 3 Ways to Clear Cache on an iPad
- How to Manage Browsing History on Safari for iPad
- What Is DuckDuckGo?
- How to Manage History and Browsing Data on iPhone
- How to Change the Default Search Engine in Safari for iOS
- 4 Ways to Play Fortnite on iPhone
- Firefox Focus: What It Is and How to Use It
- How to Enable or Change AutoFill Information on an iPhone
- How to Manage Your Browsing History in Safari
- How to Solve Safari Crashes on the iPhone
- How to Disable JavaScript in Safari for iPhone
- The Top 10 Internet Browsers for 2024
- How to Clear Cookies on iPad
How to Get Safari Back on iPhone 13
The iPhone has long included a number of default apps that let you use the basic functionality of the device. This includes things like a Settings app, Phone app, Camera app, Messages, Mail, and Safari, the Apple default Web browser.
For a while, you weren’t able to hide or delete these default apps at all, but Apple has gotten a little more flexible with this in recent versions of iOS.
Some of the default apps can be uninstalled, such as GarageBand, while others can simply be moved to different locations. This is one of the more effective ways to save space on an iPhone or iPad, as some of these apps can be quite large.
The Safari browser is one of the apps that can’t be uninstalled, but it is possible to remove it from the Home screen. This still lets you access it from the App Library by tapping a link or searching for it, but you may wish to restore it to the Home screen.
Our tutorial below will show you how to get Safari back on the iPhone Home screen so that you can more easily access it to browse Web pages on the Internet.
How to Add Safari to the Home Screen from the iPhone App Library
- Swipe to the left until you reach the App Library.
- Tap and hold on the Safari icon.
- Select the Add to Home Screen option.
Our guide continues below with additional information on getting Safari back on the iPhone, including pictures of these steps.
If you would like to start using the stored history on your iPhone to improve your browsing experience, then our Safari history iPhone article can show you how.
How to Restore Safari to the iPhone Home Screen (Guide with Pictures)
The steps in this article were performed on an iPhone 13 in iOS 15. This guide assumes that you have removed the Safari app from the Home screen and would like to restore it to its previous location. We will be navigating to the App Library which is where you can find all the apps on the edevice.
Note that your Safari browser data will remain on the device even if you have removed the Safari iPhone icon from the Home screen.
Step 1: Navigate to the App Library . It’s the rightmost Home screen.
You can get to the App Library by repeatedly swiping to the left on the Home screen.

Step 2: Tap and hold on the Safari icon.
If you haven’t rearranged the apps in the App Library then it will likely be in a folder labeled “Utilities.”

Step 3: Select the Add to Home Screen option.

If this does not restore the Safari app to your iPhone’s Home screen, then there may be something else affecting the app. Our guide continues below with some potential solutions to this problem, including working with Screen Time and searching for the app in the App Store.
How to Move the Address Bar Back to the Top in the Safari Browser on an iPhone
In versions of iOS before iOS 15, the address bar was at the top of the screen in the Safari app.
However, iOS 15 moved it to the bottom. This has the added benefit of giving you the option to swipe between your tabs, but you may not like this change.
Fortunately, you can restore the address bar to the top of the screen like in previous versions of Safari.
- Open Settings .
- Choose Safari .
- Select Single Tab under Tabs .
Now when you go back to Safari, you should be able to enter search terms and Web addresses at the top of the screen instead of the bottom, like you used to be able to do in iOS 14 and earlier.
How to Delete the Safari App from an iPhone Home Screen
While we have focused on getting the Safari app back on the Home screen in this article, you may be wondering how it got deleted in the first place. You can delete Safari from the Home screen on your iPhone by tapping and holding on the Safari app, then choosing the Remove App option. For Safari and other default apps, you will then see a pop up where you need to tap Remove from Home Screen .
This is the same method that you can use to delete other apps on your iPhone. However, for apps that actually can be deleted, there is going to be a Delete App option on the pop-up where you could only remove the Safari app from the Home screen.
How to Change Screen Time Settings on iPhone
It’s possible to hide Safari on an iPhone by disabling it via the Screen Time menu on the device. If this has happened, then you will need to know the Screen Time passcode to restore.
- Choose Screen Time .
- Select Content & Privacy Restrictions .
- Tap Allowed Apps .
- Enter the Screen Time passcode.
- Turn on Safari .
Conversely, if you are trying to hide or block the Safari app on the device, then you can go to this menu and turn off the Safari option to hide it.
Note that anyone with the Screen Time passcode for this device will be able to hide or Safari at will. Therefore the passcode should be different than the one that is used to sign in to the device.
How to Reset Home Screen Layout on iPhone 13
One other way that you can get the Safari app icon back on the iPhone’s Home screen is to reset the home screen layout on the device. You can do this with the following steps.
- Choose General .
- Select Transfer or Reset iPhone .
- Touch Rese t.
- Tap Reset Home Screen Layout .
- Choose Reset Home Screen .
This will restore all of the default apps to their original locations and will add all of your third-party apps after them in alphabetical order.
If you have other problems with the device and simply wish to complete the Restore iPhone procedure, then it’s possible to get it back to factory default settings. To do this, you will choose to Erase All Content and Settings from that menu instead, but that is going to essentially restore your iPhone to its factory settings, so it’s best not to complete that action unless you have tried everything else and are willing to go through the process of setting your iPhone up again.
You can perform a factory reset on your iPhone by following the directions in the following section if you’ve been trying to fix issues with it but would rather start from scratch.
How to Reset an iPhone to Factory Settings
The vast majority of iPhone models and iOS operating system updates are compatible with the guidelines in this section.
In this tutorial , you can get more details on how to factory reset an iPhone 11.
Your iPhone 11 will be reset to its factory settings after you erase all of its data and settings. You may need to reset your iPhone 11 for a number of reasons, such as selling or gifting it or if you are experiencing software problems that can’t be resolved any other way. We’ll walk you through the quick process of factory resetting an iPhone 11 in this article.
Back up your data before doing a factory reset. This crucial step involves performing a factory reset, which deletes all data, including apps, pictures, contacts, and personal settings. You may backup your iPhone 11 using either iCloud or iTunes , depending on your preferences.
To reset your iPhone 11 to factory settings, adhere to the following steps:
Step 1: Launch the “Settings” software first.
Step 2: The next action is to choose “General.”
Step 3: Click the “Transfer or Reset iPhone” button at the bottom of the page.
Step 4: From the menu, choose “Erase All Content and Settings”.
Step 5: Enter your passcode.
Following your selection of “Erase All Content and Settings,” you will be prompted to enter your passcode. This method makes sure that only people in positions of power can do a factory reset.
Step 6: You must confirm your choice in this step.
A pop-up box will appear after you input your passcode and ask you if you are certain you want to wipe all data and settings. Decide what to do by clicking “Erase Now.”
Step 7: Watch for the procedure to be completed.
The quantity of data on your iPhone 11 affects how long it takes to conduct a factory reset. Your iPhone 11 will restart during this time and show the Apple logo.
Step 8: Reset your iPhone 11 or restore from a backup.
Your iPhone 11 will restart after you’ve finished the factory reset and ask you if you want to set it up from scratch or restore it from a backup. You can utilize a data backup to restore your iPhone 11 if you have one.
Related: How to Change the Default Safari Search Engine in iOS on an iPhone
More Information on How to Get Safari Back on iPhone 13
One useful action that you can take when something weird or unexpected occurs on your iPhone is to reboot it. You can do this by holding the volume up and the Power button at the same time, then swiping the Slide to Power Off slider to the right. It will take a few seconds for the device to power down, then you can hold down the Power button to turn it back on.
If, somehow, you did manage to uninstall the Safari app, then you can simply reinstall Safari from the App Store like you would with any other app. You can do this if you open App Store > Search > type “safari” into the search bar and select it, then tap the download icon. This method to reinstall Safari app is slightly different than installing a new app because you’ve already “purchased” the Safari app.
If the Safari app is still installed on the device, then there will be an “Open” button next to it when you search for it in the App Store.
You can also search for the Safari app on your iPhone or iOS device by swiping down on your Home screen, which will open Spotlight Search. You can then type “safari” into the search box and select Safari from the list of search results.
When you tap and hold on the Safari icon, there is an Edit Home Screen option on the pop-up menu. If you choose that, there will be a small minus icon at the top-left of the Safari icon, which also lets you remove the Safari app from the Home screen.
If you have changed the default Web browser on your iPhone to something other than Safari and would like to make it Safari again, then follow these steps.
- Select Default Browser App .
- Tap Safari .
Now any link that you tap should open in Safari instead of whatever was previously set as the default.
The number of dots at the bottom of the Home screen indicates the number of Home screens on your device. This is the number of times that you will need to swipe left to reach the App Library.
Another way to restore the device is to connect iPhone to your computer, which will launch iTunes. There you can make selections for the iPhone from the left sidebar menu, including restoring it to factory defaults or restoring backup files saved through iTunes.
Continue Reading
- How to Change the iPhone Search Engine to Google in Safari
- Where is the Utilities Folder on the iPhone?
- How to Open Settings on an iPhone If You Cannot Find the Icon

Matthew Burleigh has been writing tech tutorials since 2008. His writing has appeared on dozens of different websites and been read over 50 million times.
After receiving his Bachelor’s and Master’s degrees in Computer Science he spent several years working in IT management for small businesses. However, he now works full time writing content online and creating websites.
His main writing topics include iPhones, Microsoft Office, Google Apps, Android, and Photoshop, but he has also written about many other tech topics as well.
Read his full bio here.
Share this:
Join our free newsletter.
Featured guides and deals
You may opt out at any time. Read our Privacy Policy
Related posts:
- How to Hard Reset iPhone 11 (2024 Guide)
- How to Hard Reset iPhone 14 – A Complete Guide for 2023
- 15 Ways to Fix Safari Not Working on iPhone in 2023
- Safari History iPhone: How to See It [2023 Guide]
- Where is the Factory Reset Option on an iPhone 11?
- How to Find Installed Apps on iPhone
- How to Factory Reset iPhone 15
- 15 iPhone Settings You Might Want to Change
- How to Remove Outlook Account from iPhone 13
- How to Rotate Screen on iPhone 7
- How to Delete Apps on iPhone 8
- How to Delete Apps on iPad 6th Generation
- iOS 17: How to Reset Home Screen on iPhone – A Step-by-Step Guide
- How to Delete Apps on Firestick (6 Quick Steps)
- iOS 17 – How to Change Default Safari Search Engine
- How to Reset Your Location and Privacy Settings on an iPhone 5
- How to Make Google Your Homepage in Safari on a Mac
- What are the iPhone Reset Options?
How to Reset Safari on iPhone, iPad and Mac

Safari no longer has a reset button. This means that if you want Safari to return to its default settings, you would have to find a workaround.
This workaround will require that you take multiple steps to remove the history, clear the cache and disable extensions and plugins, and other aspects of the browser.
In this guide, we share with you how to take all these steps and effectively reset Safari to its default settings.
1. Reset Safari on iPhone and iPad
To reset Safari settings on your iPhone or iPad, follow these simple steps:
Step 1: Open the Settings from the Home screen.
Step 2: Scroll down and tap “Safari”.
Step 3: Then tap “Clear History and Website Data”.
Step 4: Tap “Clear History and Data” again to confirm.

2. Reset Safari on Mac
2.1. remove browser history.
While your browser history can help you auto-complete URLS and other items while browsing, it is often a good idea to clear your browser history for privacy reasons. Deleting your browser history resets the browser by deleting the following:
- All webpage history
- The sites that aren’t marked as permanent
- All cookies and website data
- A list of all the downloads
- Recent searches
- Any sites added to Quick Website Search
To remove the browser history, follow these simple steps:
Step 1: Open Safari and then select “History > Clear History and Website Data”. Then click “Clear history” in the popup that appears. You can also click on Safari > Clear History to do it.
Step 2: If you would like to clear the history for a particular period of time, then you must select a value in the “Clear” dropdown menu.
Step 3: If you want to clear a particular website, go to History > Show History and then select the website before clicking “Delete”.
2.2. Clear Your Safari Cache
You can also clear your Safari cache. When you do this, Safari will forget any websites stored and reloads each page you visit. Here’s how to do it:
Step 1: Go to Safari > Preferences > Advanced and then click on “Show Develop menu in menu bar”.
Step 2: Go back to the browser window and then click “Develop > Empty Caches.
2.3. Turn Off Plugins within Safari
To turn off the plugins within Safari, follow these simple steps:
Step 1: Open the Preferences window in Safari and then click on the “Websites” tab.
Step 2: Uncheck the box next to each plugin to turn them off.
2.4. Delete Extensions
Finally, you may want to disable or delete the extension. Disabling them is much easier than deleting them since all you have to do is go to Safari > Preferences > Website and deselect the plugins you no longer want to use.
But if you want to delete them completely, follow these simple steps:
Step 1: Close Safari.
Step 2: Go to this path: “/Library/Internet Plug-Ins/” or “~/Library/Internet Plug-Ins/”.
Step 3: Use Cmd-A to select all plugins and then press “Delete” to remove them.
- Can’t Get Face ID to Work? 9 Ways to Fix ‘Move iPhone Lower’
- Soundmap Not Loading? How to Fix Loading Issues (NEW)
- What to Do Next If iPhone Face ID Not Working After Water Damage
- How to Find Lost/Stolen iPhone without Apple ID Signed In
- What Is Realme UI Recovery? How to Solve Realme UI Recovery Problems?
Leave a Comment Cancel reply
Your email address will not be published. Required fields are marked *
Save my name, email, and website in this browser for the next time I comment.
- Full Guide for Xiaomi Recovery Mode
- [FAQ] How To Turn Off Samsung Without Password?
- How to Send Fake Location on WhatsApp for iOS and Android
- Solved! iPhone & iPad Says Incorrect WiFi Password but It Correct!
- How to Make Certain Contacts Ring on Silent Android 2024

How to Reset Safari to Default Settings on Your Mac
If Safari runs slow or fails to open a page on your Mac, we will show you how to reset the browser to its default state to fix those issues.
Safari helps you feel at home while browsing the web on a Mac. The latest iterations of Safari always bring improvements, but no browser is perfect. Over time, Safari tends to slow down, become sluggish, and feel unresponsive.
While Chrome and Firefox pack a reset button, this feature is missing from Safari. We will show you how you can reset Safari to default settings on your Mac.
First, Back Up Your Bookmarks
After you've used Safari for a while, you probably have a lot of sites saved in your Bookmarks and Favorites. It's a good idea to make a copy of your Bookmarks before you proceed. Since you'll remove every bit data related to Safari, you probably don't want to erase all your bookmarks.
To do this, launch Safari, select the File tab in the top menu bar, and click Export Bookmarks . You can either set a new name or let it use the default one if you don't mind it. Click Save to save a copy of those bookmarks.
You may also want to edit, organize, and manage those bookmarks that you've collected over years.
After you've reset Safari by following the methods below, you can import the HTML copy of your Bookmarks by going to File > Import From and selecting Bookmarks HTML File . Make sure to save the file somewhere safe in the meantime.
Clear the Browsing History in Safari
To start, you should run Safari's built-in history cleaner. This will remove cookies and other browsing data from everywhere you've visited. Thankfully, the process to remove your browsing history manually from Safari is quite straightforward.
Related: How to Clear Your Safari Browsing History and Data
After opening Safari, click on the Safari item in the top menu bar and select Clear History . A window will pop up; select All History from the dropdown list. Then click on the Clear History button to erase all that data from Safari.
Remove the Temporary Files and Cache
To improve your browsing efficiency, Safari stores the data for sites that you visit regularly as cache on your Mac and uses that to load elements faster than downloading them again. That cache takes up disk space and often contributes to Safari's performance woes.
It's thus a good idea to get rid of that old data when you're resetting Safari to its defaults. Here's how to clear Safari's temporary files and cache:
- While you have Safari running, open Safari > Preferences from the menu bar.
- A window will pop open. Head to the Advanced tab and select the check box for Show Develop menu in menu bar .
- The Develop menu will appear next to Bookmarks on the menu bar. Select Develop > Empty Caches or use Option + Cmd + E to quickly clear the web cache.
Delete All Cookies
Like other browsers, Safari stores site cookies whenever you visit websites. These cookies contain details about your interactions with the site, such as registration and form data, your cart contents, and similar. It's a good idea to remove those cookies when starting fresh.
Here's how you can clear all cookies from Safari:
- Launch Safari and in the menu bar at the top of the screen, go to Safari > Preferences .
- In the window that pops up, go to the Privacy tab and click the Manage Website Data button. That'll pop open a window showing the list of cookies in Safari.
- You can hold down Cmd to select cookies to remove individually, or click Remove All to delete the entire list.
Turn Off Website Access/Delete Safari Plugins
While Apple builds Safari for efficiency, some outside plugins and website access rules can cause Safari to slow down. It's best to ensure that those plugins ask you before Safari runs them. You can also confirm which sites can access your Mac's camera, microphone, and other settings.
With Safari open, go to Safari > Preferences in the menu bar on the top of the screen. Go to the Websites tab and check each item in the sidebar for website access. We recommend disabling Auto-Play , Camera , Microphone , Location , and Pop-Ups , unless you have some reason not to do so.
If you're using an older version of Safari that doesn't have these options, you can head to Safari > Preferences and click on Security > Plug-In Settings . Then set all the plugins to Ask before Safari runs them, and disable the ones you don't need.
Disable or Uninstall Safari Extensions
Unlike Chrome and Firefox, Apple allows only a handful of extensions to work with Safari. Even with this filtering, some of them might impact your browsing performance and slow everything down. Whether you use extensions for saving articles to Pocket or applying dark mode on every website, they could affect Safari.
You can disable these extensions by going to Safari > Preferences and clicking the Extensions tab. Uncheck each extension listed to disable it. To remove all of them, you'll need to select each extension and click on the Uninstall button in the adjacent pane.
You can always find and install new Safari extensions later after resetting the browser. Try to only install high-quality ones you absolutely need.
Reset Safari Using Terminal
Even after removing cookies, cache, browsing history, and extensions, Safari still has some underlying metadata. To wipe everything in a true sense, you can use the Terminal app.
Using the Terminal to reset Safari to its default state means you'll have to use a series of commands. Refer to our beginner's guide to the Mac Terminal for using it effectively.
To reset Safari using Terminal:
- Open the Terminal app (you can find it easily using Spotlight with Cmd + Space ).
- Next, open the Apple menu at the top-left corner of your screen. Click Force Quit and select Safari to completely close it.
- Enter the below commands commands, one line at a time. After you run each command, the Terminal will prompt for confirmation to delete said files. Type y to confirm, then hit Enter .
Reset Safari for a Fresh and Fast Browser Experience
Now you know how to effectively reset Safari to factory settings. It should feel faster after this—though all the sites you visit at first will take a couple of seconds to load completely, since they'll create new cookies and cache.
To get even more out of Safari, make sure you're applying the best Safari tweaks for a better experience.
How to reset all of your Safari browser's settings on a Mac, including clearing your cache and removing plugins
- Knowing how to reset your Safari browser on a Mac can help speed up the browser and fix issues.
- However, resetting Safari will also cause you to lose browser-saved data, including login credentials and browser extensions.
- Here's what you need to know to reset the Safari browser on your Mac computer.
- Visit Business Insider's homepage for more stories .
Resetting your Safari browser on a Mac computer can help speed it up and get rid of any issues you may have encountered.
But before you start, be aware that it will delete your installed extensions, as well as any auto-fill data, including saved usernames and passwords.
So you may want to take note of those before getting started, so that you can get your browser back to the way that you're accustomed to using it.
Once that's done, here's how to reset the Safari browser on your Mac .
Check out the products mentioned in this article:
Macbook pro (from $1,299 at apple), how to reset safari on a mac.
Resetting your Safari browser consists of several steps (like clearing your cache and history), rather than a simple button. So it will take a while to accomplish. Here's what you need to do:
Clear your Safari history
Keep in mind that the process is different for Safari on an iPhone or iPad , in case you want to do a reset across all of your devices.
1. Launch Safari
2. In the top toolbar, select "Safari" and then "Clear History."
3. Select "All History" in the dropdown and then click "Clear History."
Clear your Safari cache
1. With Safari open, go up to the top toolbar.
2. Select "Safari" and then "Preferences."
3. Toggle over to the "Advanced" tab and tick the box next to "Show Develop menu in menu bar" — you should see "Develop" appear in the top toolbar.
4. Click "Develop" and then select "Empty Caches."
Get rid of your Safari extensions
1. Go back into your Safari Preferences (located in that top toolbar)
2. Toggle over to the "Extensions" tab
3. Go through all of your extensions and select "Uninstall"
Turn off plugins within Safari
1. With the Safari Preferences window still open, toggle over to the "Websites" tab
2. Untick the box next to each plugin (listed at the bottom of the left sidebar)
Delete those plugins
These are stored in two separate areas, so your work will feel a bit redundant, but it's necessary to get the job done.
1. Tap your Finder to open it (it's the half-toned face icon in your bottom toolbar).
2. Under the "Go" menu of the top toolbar, select "Go to folder."
3. In the pop-up search menu, type "~/Library" and hit "Go."
4. Locate and go through the "Internet Plug-ins" folder and delete your plug-ins (you may want to keep your Safari Preferences open to "websites" so you can view your installed plugins) by dragging them over to the Trash.
5. Go up to the "Go" tab in your top toolbar and select "Go to folder".
6. Enter "/Library" in the search bar and hit "Go."
7. Locate and open the "Internet Plug-ins" folder again.
8. Select and delete or drag your undesired plugins into the Trash.
Related coverage from How To Do Everything: Tech :
How to set your browser's homepage on a mac, with instructions for safari, chrome, and firefox, how to block pop-ups on a mac computer's safari browser, and avoid fraudulent websites, how to add websites to your favorites list on a mac's safari browser, making them easily accessible at any moment, how to save and delete webpages on the reading list in your mac computer's safari browser.
Watch: Apple just launched a $6,000 Mac Pro, available this fall
- Main content
Looks like no one’s replied in a while. To start the conversation again, simply ask a new question.
Factory reset without loosing esim
Hi. I need to factory reset my iphone to factory defaults but i dont want to loose the esim. I am on ios15 on iphone 12 pro max.
iPhone 12 Pro Max, iOS 15
Posted on Sep 23, 2021 8:08 PM

Posted on Sep 23, 2021 8:35 PM
The eSIM will survive a complete factory reset. At time of easing the device and resetting it, you will be given an option to either save the eSIM plan or delete it. You can choose to save it.
You can follow these steps to complete a factory reset on your eSIM-compatiable iPhone. Go to 'Settings' > 'General' > 'Reset' > 'Erase All Content and Settings' > 'Erase iPhone' >'Erase All and Keep Mobile Plans'.
Similar questions
- i want to do factory reset of my iphone 5s i want to do factory reset of my iphone 5s 391 1
- I want to reset my iPhone i want to reset my iphone but i want to keep my esim. There is no menu to keep my esim. Only erase iphone. Anybody can help? [Re-Titled by Moderator] 2085 1
- How do I do a factory reset on my IPhone 11 ? I need to do a factory reset on my IPhone 1, but I can’t find it in settings. Can someone tell me where to find it in settings?Please! 531 1
Loading page content
Page content loaded
Sep 23, 2021 8:35 PM in response to fahdaj
Oct 28, 2021 7:17 PM in response to Iphoneuser0006
It also worked for me, here is the next screen shot!
Sep 23, 2021 9:17 PM in response to Axel Foley
Thanks for your reply. I thought that was the case prior to iOS15 but the messaging has changed and it says that the esim will be safely removed.
Oct 3, 2021 12:56 AM in response to fahdaj
I am in the same boat - needing to erase and reset but the prompt on iOS has changed with the upgrade to 15. Did you ever get a resolution?
Oct 10, 2021 9:50 PM in response to fahdaj
Hey fahdaj. In iOS 15 resetting your iPhone your eSim will survive. In above screenshot you shared it says it will erase your eSim.
But at the very last screen before resetting your phone it will ask you do you want to keep mobile data plan or erase it. You have to chose keep mobile data plan. It worked for me. Try it
Oct 5, 2021 3:25 AM in response to fahdaj
Hi I have the same problem its says eSim will be removed if I reset my iPhone.
Oct 6, 2021 11:57 PM in response to abhinav125
You get option to retain esim in next screen after you select continue in the above screen..
Oct 6, 2021 10:35 PM in response to fahdaj
same with me
How to factory reset your iPhone, iPad, or iPod touch
Learn how to securely erase information from your iPhone, iPad, or iPod touch and restore your device to factory settings.
If you also need to securely erase your Apple Watch, you can use these steps to unpair your devices .
Back up your device
Make sure to back up your device so that you can restore your data later.
Tap Settings > General > Transfer or Reset [Device]
Tap Erase All Content and Settings.

If asked, enter your passcode or Apple ID password
Forgot your passcode or Apple ID password ?
Confirm that you want to erase your device
If you have an eSIM, you can choose to erase your eSIM or keep it. If you erase your eSIM, you need to contact your carrier to reactivate your cellular plan.

Wait for your device to erase
It might take a few minutes to completely erase your data.
If you can't erase your iPhone, iPad, or iPod touch
Learn what to do if you don't remember your passcode for your iPhone, iPad, or iPod touch, or your device is disabled .
If you forget your Screen Time passcode, you can reset it . Restoring your device using a backup won't remove the Screen Time passcode.
If you still need help, contact Apple Support .
Explore Apple Support Community
Find what’s been asked and answered by Apple customers.
Contact Apple Support
Need more help? Save time by starting your support request online and we'll connect you to an expert.
- Helldivers 2
- Dragon’s Dogma 2
- Wuthering Waves
- Genshin Impact
- Counter Strike 2
- Honkai Star Rail
- Lego Fortnite
- Stardew Valley
- NYT Strands
- NYT Connections
- Apple Watch
- Crunchyroll
- Prime Video
- Jujutsu Kaisen
- Demon Slayer
- Chainsaw Man
- Solo Leveling
- Beebom Gadgets
Why Can’t I Receive Pictures on My iPhone and How to Fix It
- Incorrect MMS settings, corrupted network settings, poor internet connection, and Apple ID glitches are among the common reasons why you can't receive pictures on your iPhone.
- You can check your internet connection, MMS settings, and AirDrop settings to fix iPhone not downloading pictures in messages.
- If this doesn't help, you can sign out and back into your Apple account or reset the network settings on your iPhone.
Method 1: Check Internet Connection
Method 2: verify mms settings.
- Open the Settings app and navigate to the Messages section.
- Now, scroll down to see if MMS Messaging is enabled. If not, turn it ON.
- If you’re using dual SIM, tap on MMS Messaging and enable MMS on the line you prefer. You can also turn on MMS Messaging on both of your phone numbers.

Method 3: Check AirDrop Settings
If you can’t receive pictures on an iPhone when someone shares them via AirDrop, you must check your AirDrop settings. Just a refresher, AirDrop offers three levels to control the visibility of your device:
- Receiving Off: Your iPhone won’t receive files from anyone.
- Contacts Only: Only your contacts can discover you and share files with you.
- Everyone for 10 Minutes: You can receive files from all nearby Apple devices.

Method 4: Sign out from Messages and Sign Back In
- Open the Settings app and tap on Messages.
- Here, tap on Send & Receive .
- Tap on your Apple ID and then hit the Sign Out button.

- Once you’ve signed out, tap on Use your Apple ID for iMessage.
- Tap on Sign In and enter your Apple ID credentials.
Method 5: Reset Network Settings
Incorrect or corrupted network settings are another reason why pictures aren’t appearing in text messages on your iPhone. Fortunately, you can reset the network settings to wipe off any network-related glitches on your iOS device.

Kanika Gogia
Kanika has been a loyal iPhone user since 2014 and loves everything Apple. With a Master’s in Computer Applications, passion for technology, and over five years of experience in writing, she landed at Beebom as an Apple Ecosystem Writer. She specializes in writing How To’s, troubleshooting guides, App features, and roundups for Apple users to help them make the best use of their gadgets. When not writing, she loves to try out new recipes and enjoy some family time.
Add new comment

[Solved] Stop System Data From Taking All Your iPhone Storage

On iPhone, System Data is a storage category that houses the caches and temporary files that iOS processes use. It speeds up loading times by making it easier to retrieve frequently accessed data. Caching should barely be noticeable. System Data only takes up around 5 to 10 GB, and if storage usage is too large (e.g., 15 GB), it could indicate underlying performance issues.
You’ll see slower processes at first. As things worsen, however, your iPhone will start saying it’s low on storage. The best approach is to fix the issue fast to prevent performance degradation. Follow these troubleshooting steps.
If you’re trying to save a generous amount of storage space, you should search for a trusted cleaning app. For instance, Intego Washing Machine will delete all unnecessary files from your system, including temporary files and caches, while optimizing your iPhone’s health for a long time.
➡️ Try Intego Washing Machine for free
How To Reduce System Data Storage Usage on iPhone
1. offload unused apps.
Time needed: 3 minutes
When you offload an app, you delete it from your iPhone while preserving its documents and data. It’s an effective way to free up storage space without permanently deleting content. Since some apps store large caches in System Data, offloading can potentially reduce its storage space. Here’s how:

You can also offload apps manually.
- Scroll down to the list of apps—select unused apps with a large file size.

- Repeat as many times as needed.
2. Clear Safari Cache
Safari caches a lot of website data (e.g., images, scripts, and cookies) to load pages faster on subsequent visits. This data accumulates over time and increases your System Data size. If you rarely clear your browser history, now’s the best time to do so.
- Go to Settings and scroll down to Safari .

3. Manage Message History
Messages with file, video, and photo attachments take up significant storage space, and they’re typically cached in System Data. I suggest deleting old SMS and iMessage conversations automatically.
- Open Settings and scroll down to Messages .
- Select Keep Messages under Message History .

4. Invest in iCloud+
An iCloud+ subscription won’t directly reduce System Data size on your iPhone, but it can help you manage your files better. Upload your largest files (e.g., videos, HD photos, and documents) on the cloud.
- Go to Settings > [your Apple ID name] .

5. Factory Reset iPhone
As a last resort, factory reset your iPhone. You might resolve the hidden glitch that’s spiking System Data’s storage space after you wipe all your files. Just make sure to set up iCloud Backup beforehand. Otherwise, consider your data gone.
- Open Settings > General > Transfer or Reset iPhone .

- Select Continue to confirm the action.
Recheck iPhone Storage before you sync iCloud Backup. If System Data is still taking up too much space, the underlying issue isn’t with your system files or settings preferences. Unfortunately, there’s likely a more complex underlying issue.
The best approach is to contact Apple Support and have their certified technicians check for other software and hardware problems. Since iCloud Backup syncs across Apple devices, check System Data’s storage usage on your Mac , too.
Leave a Reply Cancel reply
You must be logged in to post a comment.
This site uses Akismet to reduce spam. Learn how your comment data is processed .
- Jose Luansing Jr.

How to access router settings
D o you want to take control of your home or office network? Accessing your router settings opens up a world of possibilities, allowing you to customize and manage various aspects of your network experience.
By navigating through your router's configurations, you can fine-tune wireless settings, strengthen security, troubleshoot issues, and create a network tailored to your needs. In this guide, we'll walk you through the steps to access your router settings, including how to find your IP address. Are you ready to optimize your network for peak performance? Let's dive in!
Tools and requirements
- A router
- A device connected to the router via Ethernet or Wi-Fi
- Your IP address
You can find your IP address by looking at the router itself or checking your computer or mobile phone. We'll cover seven of the most common options: Router, Windows, Linux, Chromebook, Mac, Android, and iPhone.
Step-by-step guide for how to access router settings
1. find password.
Next, you'll need your username and password. If you haven't changed these, the default credentials are usually found in the router's manual or on a sticker on the router itself.
Some routers also use a WPS (Wi-Fi Protected Setup) PIN as a security feature to facilitate connecting devices to a Wi-Fi network. If your router has this, make a note of this as well.
If you can't find your username, password, or PIN, there are a few other options you can try.
You can visit the official website of the router manufacturer. Many manufacturers provide default login information for their routers on their websites. If you can't find the information online, contact the manufacturer's customer support, who may be able to provide you with the default login credentials.
If all else fails, you can perform a factory reset on your router. Keep in mind that this will erase all custom configurations, and you'll need to set up your router again. To reset the router, locate the reset button on your router. It is usually a small button that may require a paperclip or a similar tool to press. Press and hold the reset button for about 10-15 seconds until the router lights flash. Release the reset button, and the router will reboot to its factory settings.
3. Open your router settings page
Open a web browser like Chrome, Firefox, or Safari, and type the router's IP address into the address bar of your web browser.
You should now see the login page for your router. The example in the screenshot shows the Virgin Media Super Hub. You will see the router access page for your provider.
Enter your password and username or PIN.
4. Access router settings and make changes
Once logged in, you will have access to the router's settings. The layout and options may vary, but common settings include wireless settings, security options, and network configurations.
You can configure various settings, such as Wi-Fi passwords, security protocols, port forwarding, and more. Be cautious while making changes, as incorrect settings can affect your network's functionality.
After making any changes, remember to log out of the router's interface for security reasons.
How to find your IP address
Check on your router itself to see if it displays the router IP address we need to access the settings page. You should also make a note of the password and PIN, as we're going to need that later on.
You can find your router IP address on a Windows device in the command prompt window.
To open the Windows Command Prompt, click the Start button (Windows icon) in the bottom-left corner of your screen. Type Command Prompt or cmd into the search bar. Select Command Prompt from the search results.
Type ipconfig /all and press enter. Under the heading Wireless LAN or similar, you'll see an IP address next to Default Gateway. This is your router IP address.
To find out your Router IP address, you'll need to open the terminal.
Methods for opening the terminal vary slightly depending on which Linux distro you're using, but you should be able to access it from your applications or by entering Ctrl + Alt + T.
Once inside the terminal, type ip r and hit return. The first IP address returned will be your Router IP address.
4. Chromebook
To get your router's IP address on a ChromeOS device, click the clock at the bottom right of your screen and select the gear icon. Click Network, then Wi-Fi. Select your Wi-Fi router. You'll find the router's IP address next to Gateway.
If you're using a MacOS device, go to System Settings and Network: Wi-Fi. Click Details on your connection, and you'll find the address next to Router.
Open the Settings app on your Android device and select the Wi-Fi or Network and Internet option. Find the connected Wi-Fi network and tap on it, then look for an option like Network details. The exact wording may vary depending on your device. Your router IP address will be displayed here. It may be called the Gateway or Router IP.
Open the Settings app on your iPhone and navigate to Wi-Fi Settings. Find the connected Wi-Fi network and tap the (i) icon next to its name. This icon is typically located on the right side of the network name. In the network details, look for the Router or Gateway field. This field contains the IP address of your router.
Final thoughts
Now that you've successfully accessed your router settings, you can take a closer look at your network settings and modify them to suit your preferences and requirements.
You can strengthen your network's security by updating Wi-Fi passwords, changing security protocols, and enabling features like MAC address filtering. You can also keep an eye on the list of connected devices to your network. This enables you to detect unauthorized devices and troubleshoot any connectivity issues.
You can also set up port forwarding, check firmware, and prioritize network traffic using Quality of Service (QoS) settings.
However, you should remember that making changes to your router settings should be approached with caution. Incorrect configurations can impact your network's functionality. Always refer to your router's documentation for guidance, and if in doubt, consult your router manufacturer's support. After making adjustments, ensure you log out of the router's interface to uphold security measures.
You might also like...
- What is an IP address?
- The best Wi-Fi routers
- How to build a VPN router

Android Police
How to factory reset an iphone.
Give your beloved iPhone a fresh start
Factory resetting your iPhone is a good idea whether you're selling it, giving it away, or switching to a foldable phone . A factory reset restores your iPhone to its original factory settings, erasing all personal data and downloaded apps. It can also resolve software bugs that weren't fixed through a software update.
There are several ways to factory reset an iPhone. You can use the Settings app on your iPhone, or connect it to a computer with a USB cable and use iTunes. The Settings method is the easiest. We show you how to perform a factory reset on your iPhone. We also walk you through the steps to remotely reset your iPhone.
Before you get started
Before you get started, prepare your iPhone for a factory reset. It's also important that you know what happens when you factory reset your device.
- A factory reset returns your phone to the state it was in when you took it out of the box. It erases all your data, including contacts, photos, videos, music, passwords, files, accounts, and messages.
- To save your content and settings, back up your iPhone before erasing it or when you're given the option during the erase process. A backup helps you restore your data on a new iPhone or iPad. Save your files over a secure Wi-Fi connection so that you don't use up a lot of mobile data during the transfer.
- Before resetting your iPhone, have your iPhone passcode ready. You'll enter your passcode to complete the factory reset. If you forgot the passcode on your iPhone, reset using the iTunes app on your PC.
- Make sure you know your Apple ID login information. That includes your Apple ID and password. This grants you access to your iCloud data across all your devices. You'll find your Apple ID in your device's Settings.
- If you received your iPhone from someone else, and it's still associated with their Apple ID, you'll need access to the login information, or you can't erase it.
- Resetting your iPhone to factory settings turns off Find My. If you lose your iPhone before signing back in with your Apple ID, you can't track it down.
How to factory reset an iPhone from Settings
The easiest way to factory reset your iPhone is to start with the Settings app. Follow these steps to learn how.
This method works on most iPhones, whether you have an iPhone 15, iPhone 7, or the older iPhone 6s.
- Open the Settings app on your iPhone.
- Select General .
- Tap Erase all content and settings .
- Tap Continue and enter your passcode.
- Your phone backs up to the cloud. When that's done, you can continue. If not, tap Erase anyway .
How to identify the iPhone or iPad model you own
How to factory reset an iphone with itunes.
You can use iTunes to factory reset your iPhone. This method is useful if you don't remember your passcode. However, it requires that you have synced your iPhone to iTunes before. Here's how to do this.
- Connect your iPhone to your PC with a USB cable.
- Open the iTunes app on your PC
- Click the Device button near the upper-left corner of the iTunes window.
- iTunes asks you to confirm the factory reset. Click Restore to factory reset your iPhone.
- Wait for the reset to finish, then sign in again.
How to factory reset iPhone with iCloud
iCloud lets you factory reset your iPhone remotely, even if you forget your passcode. However, you'll need your Apple ID and password to pull it off. This method is handy as long as Find My iPhone is turned on.
- Go to iCloud.com/find . Sign in using your Apple ID and password.
- An All Devices drop-down menu displays a list of all your Apple devices that can be located. Select your iPhone.
- Click Erase iPhone from the menu that appears.
- Click Erase .
- Enter your Apple ID and Password.
- Verify your identity by entering a two-factor authentication code.
- If you want to be contacted when someone finds your iPhone, enter your phone number and click Next .
- Enter a Lost Phone Message . This message shows up on the screen if your iPhone is lost. You can skip this step, but adding a message might help someone who finds it return it to you.
- Tap Done when you're finished.
How to make Google Maps the default navigation app on your iPhone
Reset your iphone with ease.
Follow the methods mentioned in this article to factory reset your iPhone. You can easily erase all the data from your iPhone if you remember your passcode and Apple ID login information. When you're done, learn how to activate haptic feedback on your iPhone and use its hidden trackpad for a better experience.
IMAGES
VIDEO
COMMENTS
1. Open the Settings app on your iPhone. 2. Search for or scroll down to Safari and open it. 3. Tap Clear History and Website Data in blue about halfway down the page. 4. A prompt menu will pop up ...
Customize your start page. When you open a new tab, you begin on your start page. You can customize your start page with new background images and options. Open the Safari app on your iPhone. Tap , then tap . Scroll to the bottom of the page, then tap Edit. Favorites: Display shortcuts to your favorite bookmarked websites.
Settings > Safari > Advanced > Experimental Features >. Scroll all the way to the bottom of Experimental WebKit Features where you will find Reset All to Defaults. View in context. 1 reply.
Reset Safari and restore the default settings by clearing history, clearing the cache, and deleting or disabling plugins and extensions. G A S REGULAR. Skip to content. Menu. ... To clear Safari's settings on an iPhone or iPad: Open the iOS device's Settings app. Scroll down and select Safari.
Reset Cache. First, Launch Safari from the Launchpad or from the dock of you Mac. Next, click on the 'Safari' tab from the menu bar. Then, click on the 'Preferences' option from the list. After that, go to the 'Advanced' pane. Now, check the 'Show Develop menu in the menu bar' option. As a result, the 'Develop' tab would now ...
Find Safari settings: Scroll down the settings menu and look for the "Safari" option. Tap on it to access Safari's settings. Reset Safari: Within the Safari settings, scroll down until you find the "Clear History and Website Data" option. Tap on it to proceed with the reset process. Confirm the reset action: A pop-up window will appear ...
Content blockers are third-party apps and extensions that let Safari block cookies, images, resources, pop-ups, and other content. To get a content blocker: Download a content blocking app from the App Store. Tap Settings > Safari > Extensions. Tap to turn on a listed content blocker. You can use more than one content blocker.
Go to Settings > General > Transfer or Reset iPhone > Reset. WARNING: If you choose the Erase All Content and Settings option, all of your content is removed. See Erase iPhone. Choose an option: Reset All Settings: All settings—including network settings, the keyboard dictionary, location settings, privacy settings, and Apple Pay cards—are ...
1. Open the Settings app for iPhone. 2. Search for or scroll down to "Safari" and open it. 3. Tap "Clear History and Website Data" in blue near the bottom of the page. 4. A notification will pop ...
Let's reset Safari on your iPhone so you can clear all the cache, website history and data, saved passwords, bookmarks, etc.Thanks for your time today. Cheers.
3. Adjust the font size. The default zoom amount (100%) appears at the top of the menu. Tap the smaller A on the left to decrease the default font size, or the larger A on the right to increase it. Continue taping until you're satisfied with the new size, then tap anywhere on the page to close the window. [1] 4.
To control links, go to Safari > Open Links. To use AutoFill, go to Settings > Safari > AutoFill > turn on Use Contact Info. To view saved passwords, go to Settings > Passwords & Accounts > Website & App Passwords. This article explains how to adjust Safari settings and security on your iPhone or iPad.
This Tutorial will guide you through the best method to reset Safari to default settings on Mac/iPhone. For More Information, Visit Our Article - https://wha...
You'll learn how to reset safari to default settings on iphone. Basically, how to go to safari settings on iphone. Enjoy!
Reset Safari for Mac via Terminal. Open the Terminal app (you can find it easily using Spotlight with Cmd + Space ). Next, open the Apple menu at the top-left corner of your screen. Click Force Quit and select Safari to completely close it. Enter the below commands, one line at a time.
Method 4: Check your App Library. We now recommend you try searching for Safari on your device. It could be hidden from your home screen or in a folder. Let's start by checking the App Library. Unlock your device and swipe left on your last home screen page to access the App Library . Now tap the Search bar at the top.
To reset your iPhone 11 to factory settings, adhere to the following steps: Step 1: Launch the "Settings" software first. Step 2: The next action is to choose "General.". Step 3: Click the "Transfer or Reset iPhone" button at the bottom of the page. Step 4: From the menu, choose "Erase All Content and Settings".
1. Reset Safari on iPhone and iPad. To reset Safari settings on your iPhone or iPad, follow these simple steps: Step 1: Open the Settings from the Home screen. Step 2: Scroll down and tap "Safari". Step 3: Then tap "Clear History and Website Data". Step 4: Tap "Clear History and Data" again to confirm. 2.
Refer to our beginner's guide to the Mac Terminal for using it effectively. To reset Safari using Terminal: Open the Terminal app (you can find it easily using Spotlight with Cmd + Space ). Next, open the Apple menu at the top-left corner of your screen. Click Force Quit and select Safari to completely close it.
Clear your Safari cache. 1. With Safari open, go up to the top toolbar. 2. Select "Safari" and then "Preferences." 3. Toggle over to the "Advanced" tab and tick the box next to "Show Develop menu ...
You can choose to save it. You can follow these steps to complete a factory reset on your eSIM-compatiable iPhone. Go to 'Settings' > 'General' > 'Reset' > 'Erase All Content and Settings' > 'Erase iPhone' >'Erase All and Keep Mobile Plans'. Axel F. The eSIM will survive a complete factory reset.
If you can't erase your iPhone, iPad, or iPod touch. Learn what to do if you don't remember your passcode for your iPhone, iPad, or iPod touch, or your device is disabled.. If you forget your Screen Time passcode, you can reset it.Restoring your device using a backup won't remove the Screen Time passcode.
Method 1: Check Internet Connection. A poor internet connection is one of the most common reasons why your iPhone isn't receiving picture messages or they aren't downloading. To verify, try opening a website in Safari. If the site doesn't load or you see a message saying "Your iPhone isn't connected to the internet", there's ...
To reset your network settings on your iPhone: Open the Settings app. Tap on General. Scroll down and tap on Transfer or Reset iPhone. Tap Reset. You'll see a list of reset options.
Open Settings > General > Transfer or Reset iPhone. Tap Erase All Content and Settings. Select Continue to confirm the action. Recheck iPhone Storage before you sync iCloud Backup. If System Data ...
Head to System Preferences on your Macbook and then click Network. Next, inside the Wi-Fi tab, click the 'Advanced' button and head to DNS settings. Add Google's Public DNS - '8.8.8.8' and select the OK button to make changes. Refresh the site to see if it loads now. Conclusion: Final Thoughts.
#Safari #iPhone #Reset Learn how to reset Safari browser on iPhone/iPad. You need to reset 2 things from settings. You need to delete cookies and history and...
Open a web browser like Chrome, Firefox, or Safari, and type the router's IP address into the address bar of your web browser. You should now see the login page for your router. The example in the ...
Here's how to do this. Connect your iPhone to your PC with a USB cable. Open the iTunes app on your PC. Click the Device button near the upper-left corner of the iTunes window. Select Summary ...
Select Settings on the homescreen. 2. Go to General. 3. Choose either 'Info' or 'About'. 4. Scroll to Version below. How to set up a Safari profile. Follow the instructions to solve Settings related issues on your Apple iPhone 14 Pro.