How-To Geek
How to configure a proxy server on an iphone or ipad.
When you configure a proxy server for a Wi-Fi network, your iPhone or iPad will use it when accessing that network.
When you configure a proxy server for a Wi-Fi network, your iPhone or iPad will use it when accessing that network. This is sometimes required to access the Internet on a business or school network, for example. Your network traffic will be sent through the proxy you configure.
Related: What's the Difference Between a VPN and a Proxy?
Generally, you'll use a proxy if your school or work provides it to you. You could also use a proxy to hide your IP address or access geoblocked websites that aren't available in your country, but we recommend a VPN for that instead . If you need to set up a proxy for school or work, get the necessary credentials from them and read on.
Head to Settings > Wi-Fi to access proxy settings on an iPhone or iPad. Tap the name of the Wi-Fi network you're connected to. Scroll down and you'll see the "HTTP Proxy" option at the bottom of the screen.
By default, the HTTP Proxy option is set to "Off". This means your iPhone won't use a proxy at all when connected to the network.
To enable automatic proxy detection, select "Auto". Your iPhone will use the Web Proxy Auto-Discovery Protocol, or WPAD, to see whether a proxy is necessary on the Wi-Fi network and automatically configure your proxy settings if one is required. This feature is often used on business and school networks. If your current network doesn't provide proxy details using the WPAD protocol, your iPhone or iPad won't use a proxy, even if you select "Auto" here.
To use an automatic proxy configuration script, sometimes called a .PAC file, select "Auto" and enter the address of the proxy auto-configuration script into the "URL" box. iOS will instead use the proxy auto-configuration script instead of WPAD to enable your proxy.
If your network administrator or proxy service provider wants you to use a proxy auto-configuration script, it will provide you with the address of the file.
To manually specify a proxy server's address and port, select "Manual". Enter the address of the proxy server in the "Server" box and the port it requires in the "Port" box. Your organization or proxy service provider will provide you with these details.
If the proxy server requires a username and password---your proxy provider will let you know if it does---enable the "Authentication" option here. Enter the username and password the proxy server requires in the "Username" and "Password" boxes.
If your iPhone or iPad can't connect to the proxy server---for example, if the proxy server goes down or if you enter its details incorrectly---you won't be able to access websites and other network addresses.
For example, in Safari you'll see a "Safari cannot open the page because the server cannot be found" message, and in the App Store you'll see a "Cannot Connect to App Store" message. Other applications will display their own network error messages.
You'll need to fix your proxy settings before you can continue accessing the Internet on that Wi-Fi network.
The proxy settings you configure are unique to each Wi-Fi network. In other words, if you want to use the same proxy on three different Wi-Fi networks, you'll have to enable it separately for each Wi-Fi network, entering the server details three times. That's because you may need to use a proxy while connected to the Wi-Fi network at your workplace, but not at home or on other Wi-Fi networks.
If you'd like to set up a global HTTP proxy that's used when connected to all Wi-Fi networks, you'll have to "supervise" your iPhone or iPad and create a configuration profile that enables a proxy on all connections. Apple considers this a feature for businesses, schools, and other organizations, so it requires enterprise-grade configuration tools.
Related: How to Create an iOS Configuration Profile and Alter Hidden Settings

How to Configure a Proxy on an iPhone: The Complete Guide
Proxies can be useful tools for accessing blocked content, securing your web traffic, and maintaining your privacy online. While proxies are commonly set up on computers, you can also configure them on iPhone and iPad devices.
This complete guide will teach you everything you need to know about setting up and using proxy servers on your iOS devices.
What is a Proxy Server?
A proxy server acts as an intermediary between your device and the wider internet. When you connect through a proxy, all your web traffic is first routed through that server before reaching the final destination.
Proxies provide a few key benefits:
- Access Blocked Websites and Apps: Proxies can bypass geographic restrictions and censorship to unblock sites and services blocked in your country.
- Enhanced Privacy and Security: By hiding your real IP address, proxies make it harder for sites to track your activity and identity online.
- Faster Browsing: Proxy servers often cache commonly accessed content, allowing webpages to load faster.
Proxy servers come in a few main varieties:
- HTTP/HTTPS Proxies: The most common type, these proxies route web (HTTP/HTTPS) traffic only.
- SOCKS Proxies: Route all internet traffic, including web, email, messaging, and more.
- Residential Proxies: Assigned to real residential IP addresses to appear as normal consumer traffic.
- Datacenter Proxies: Hosted in data centers, less likely to be blocked, fast throughput.
The proxy server you use can be self-hosted or provided by a commercial proxy service. Paid proxy plans give you access to large proxy networks with numerous IP addresses to rotate through.
Why Set Up a Proxy on iPhone?
There are a few reasons you may want to configure a proxy server on your iPhone or iPad:
- Bypass Geographic Restrictions: Proxies let you access country-specific content, view blacked out sports games in your area, use sites blocked by your school/work.
- Stay Anonymous Online: Hide your iOS device’s real IP address and location to browse the web more privately.
- Enhanced Security: Adding a proxy creates an extra layer between your device and websites, helping keep malware and hackers at bay.
- Faster Speeds: Connecting via proxy often provides faster page load times, especially if using a dedicated paid proxy service.
How to Manually Configure an iOS Proxy
Manually setting up a proxy server on iPhone or iPad takes just a few quick steps:
- Open the Settings app then tap on Wi-Fi
- Next to the Wi-Fi network you’re connected to, tap the i button
- Scroll down and tap Configure Proxy
- Choose Manual
- Enter your proxy server Address and Port number
- If required, enable Authentication and enter your proxy username and password
- Tap Save in the top right corner
And that’s it! Your iOS device is now routing web traffic through the configured proxy server.
A Note About Automatic Configuration
If your network administrator or proxy provider has supplied an automatic proxy configuration file, you can choose the Automatic option instead.
However, most proxy users will need to enter the manual proxy details.
Testing Your iPhone Proxy Connection
After setting up the proxy server, it’s important to test that everything is working correctly:
- Open a browser like Safari and navigate to websites, check if your location/IP address has changed
- Visit IP testing sites like ShowMyIP to confirm your new proxy IP
- Access blocked sites/apps specific to other countries, see if restrictions are now bypassed
- Check connection speeds to confirm proxies are providing expected performance
If you run into any issues while testing, reconfirm your proxy settings or contact your network admin/proxy provider for troubleshooting help.
Using a Proxy for All iOS Traffic (SOCKS Proxies)
The manual proxy configuration method outlined above routes only web traffic through the proxy server.
If you want all internet traffic from your iPhone or iPad to connect via proxy, including emails, messaging apps, etc, you need to set up a SOCKS proxy.
Unfortunately, iOS does not natively support SOCKS proxy configuration. However, there are third-party SOCKS apps you can install to enable device-wide proxy connections:
- Shadowsocks: A popular free and open source SOCKS proxy client for iOS.
- Psiphon: Freemium SOCKS proxy app focusing on bypassing internet censorship.
- SurfEasy: Paid VPN and proxy service providing iOS SOCKS configuration.
These apps make the SOCKS proxy setup process quick and easy without any manual configuration required.
Using Proxies on Cellular Data
The manual proxy configuration method above applies only when connecting via Wi-Fi on your iPhone or iPad.
If you instead want to use a proxy when browsing on your iOS cellular data connection there are a couple of options:
Download a VPN app that includes proxy support like Surfshark, NordVPN, ExpressVPN, etc. Connecting via the VPN app will route all cell data through their proxy servers.
Use a SOCKS proxy app like Shadowsocks to proxy your cellular data in addition to Wi-Fi traffic.
Configure proxies at the router level if you want all devices on your home network to use proxies, including when on cellular data.
How to Disable an iPhone Proxy Server
If you no longer wish to use a proxy on your iPhone, disabling it is simple:
- Go back into your iPhone Settings , choose Wi-Fi and tap the i next to the connected network.
- Scroll down and tap on Configure Proxy .
- This time select Off instead of Manual.
- Tap Save to remove the iOS proxy configuration.
Your iPhone will now use your normal IP address instead of routing through a proxy server.
Why You May Want to Keep Using Proxies
While simple to disable, there are many benefits to keeping your proxies configured on iPhone and iPad such as:
- Maintain access to blocked apps, websites and streaming services from anywhere
- Keep your mobile browsing more secure and private
- Further hide your identity with regularly rotating IP addresses
- Never worry about internet censorship restrictions again
- Continue benefiting from faster page load speeds
Regularly changing your digital identity with proxies reduces traceability while unlocking restricted online content. Many proxy users keep servers running on all their devices for these ongoing advantages.
FAQs About iPhone Proxy Settings
Here are answers to some commonly asked questions about configuring proxy servers on iPhones:
What’s the difference between an iPhone VPN and proxy?
A VPN encrypts and tunnels all device traffic through remote servers for security and anonymity. A proxy routes only web traffic to hide your IP address and location.
Will a proxy drain my iPhone battery faster?
Proxies require slightly more processing power which can impact battery life. However, modern iPhones are very efficient and any battery drain from using reputable proxies is marginal.
Can I be tracked if using an iPhone proxy?
It‘s much harder to track proxy users as all traffic looks to be coming from the proxy server’s IP address instead of the actual device. However, individual proxies can still potentially log traffic, so check your provider‘s privacy policy.
Is it illegal to use an iPhone proxy?
Proxy usage is generally legal in most regions. However, some ways proxies are utilized may breach terms of service or local laws, like accessing unauthorized copyrighted streams. Examine your country’s cyber laws before deciding if proxies align with regulations.
Final Thoughts on iPhone Proxy Configuration
Learning how to set up proxy servers on your iPhone opens up many possibilities that are unavailable when browsing from your normal identifiable IP address and location.
While the iOS manual proxy configuration method covered here only routes web traffic through your server of choice, third party SOCKS apps allow for device-wide proxy connections.
Be sure to thoroughly test your newly configured iPhone proxy server and tweak settings if necessary. Proxies that go unmonitored can unexpectedly stop working over time.
With your web traffic now tunneling through an intermediary server before reaching intended destinations, you can enjoy enhanced privacy, bypass geographic blocks, and much more.
How useful was this post?
Click on a star to rate it!
Average rating 5 / 5. Vote count: 1
No votes so far! Be the first to rate this post.
You May Like to Read,
- Proxy Crawl Review
- The Complete Guide to BrightData Alternatives
- My Ultimate Guide to Free Proxy Lists in 2024
- The Best Proxies For Ad Verification In 2023
- The 10 Best Sneaker Proxies to Cop Your Grail in 2024
- The Top 10 Web Scraping Tools for 2024
- Balkobot Review 2023: My Ultimate Guide for Sneaker Coppers
- Operating a Business Ethically on eBay

- Accessories
- Meet the team
- Advertise with us
- Privacy Policy

More often, a workspace or school network requires you to use a proxy. This redirects your network requests to a proxy server. However, it can also be helpful if you want to hide your IP address or access geo-blocked websites. The good news is that configuring a proxy server on iPhone and iPad is pretty simple.
All you need is the credentials of the proxy server and this iGeeksBlog’s guide. But before we move on to the hows, let’s first understand the whats and whys.
What is a proxy server on iPhone?
It’s all in the name; the setting builds a proxy for your IP address. Simply put, it acts as a gateway/barricade between the internet and your device. As discussed above, a proxy server can have many use cases, from securing your IP against malicious parties to unlocking geo-blocked content.
Benefits of using a proxy server
- Enhanced security – It masks your IP address keeping hackers at bay. Plus, you can use different proxies to avoid IP-specific data and private browsing.
- Circumvent geo-blocks – While VPNs (such as Surfshark ) do a better job, proxy servers can also help. When you set up a proxy server associated with another country, you can somewhat fool the host and access content available in that country.
- Put up web-filters – Schools, colleges, and offices can use a proxy server to block inappropriate or distracting sites. This also helps them avoid potential security breaches and data leaks.
- Balance traffic – Proxy servers can help organizations improve overall network performance, reducing the chances of server crashes in case of heavy traffic or activity.
And that’s why individuals and institutions rely on a proxy server. However, you can’t randomly deploy proxy settings on an iOS device and need valid credentials such as the server address, port, and password, if applicable.
So, connect with your proxy service providers, school, or college to get hold of that information. And hop on to the next section to enable a proxy server.
How to use proxy server for a Wi-Fi network on iPhone
- Go to Settings and select Wi-Fi .
- Tap the i icon next to the Wi-Fi network you want to enable the proxy server for.
- Scroll to HTTP Proxy and tap Configure Proxy .
- Select Auto for automatic proxy detection and enter the proxy auto-configuration script address into the URL field.
- Tap Server and enter the proxy server address.
- Toggle on Authentication ; if the server requires a username and password, enter the necessary details.
- Tap Save to enable the setting.
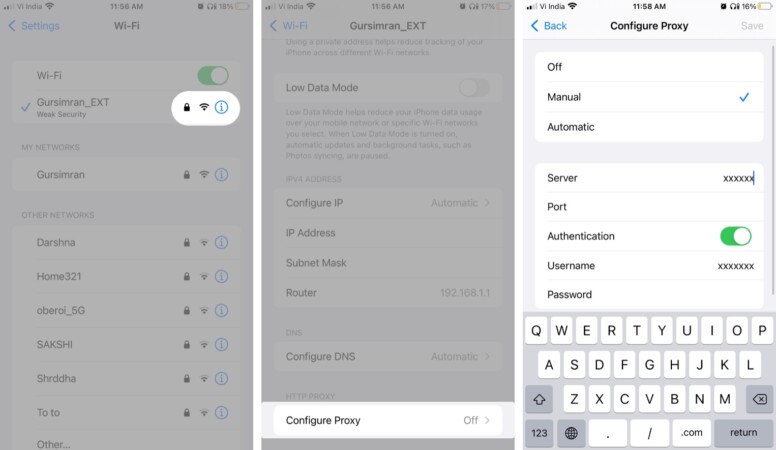
Once everything is set up, your iPhone and iPad will forward all network requests to the configured proxy server. You can easily change or turn it off. Simply, repeat the steps and select a suitable option.
In addition, the proxy is enabled for one Wi-Fi network at a time. And if you want the same or different proxy for all available Wi-Fi networks, repeat the steps for each network.
Note : If you can’t access the internet after setting up, the credentials might be incorrect, or the server is unavailable. Contact the service provider to troubleshoot the issue.
Happy surfing!
Hopefully, our guide has helped you configure a proxy server on your iPhone and iPad. If you have any further queries or questions, use the comment section below to connect with us.
Want to tinker more with your device? Check out these posts
- How to use WhatsApp proxy on iPhone
- 9 Ways to boost Wi-Fi signal on iPhone and iPad
- Best Wi-Fi analyzer: 10 Apps for iPhone and iPad
- How to find your Wi-Fi password on iPhone (3 Ways)
A self-professed Geek who loves to explore all things Apple. I thoroughly enjoy discovering new hacks, troubleshooting issues, and finding and reviewing the best products and apps currently available. My expertise also includes curating opinionated and honest editorials. If not this, you might find me surfing the web or listening to audiobooks.
View all posts
🗣️ Our site is supported by our readers like you. When you purchase through our links, we earn a small commission. Read Disclaimer .
LEAVE A REPLY Cancel reply
Save my name, email, and website in this browser for the next time I comment.
Related Articles
Why is my iphone touch screen not working and how to fix it, how to pin a post on x (twitter) on iphone, ipad, or desktop, how to check if iphone is original or not: a detailed guide, how to turn off flashlight on iphone (2024 guide).
- -> Published on: 29-01-2024
Beginner’s Guide: How to Configure a Proxy on iPhone?
Updated · Jan 29, 2024
Raj Vardhman is a tech expert and the Chief Tech Strategist at TechJury.net, where he leads the rese... | See full bio
- Top 10 Secure Browsers That Protect Your Privacy in 2024
- How to Configure Docker to Use a Proxy?
- 4 Ways to Install Python on MacOS [A Complete Guide]
Florence is a dedicated wordsmith on a mission to make technology-related topics easy-to-understand.... | See full bio
- How Does Honeygain Work?
- Encrypted Messaging: Protect Your Messages From Hackers
This page may contain links to our partners’ products and services, which allows us to keep our website sustainable. Тechjury.net may receive a compensation when you sign up and / or purchase a product or a service using our links. As an Amazon Associate we earn commissions from qualified purchases. This comes at no extra cost to you. On the contrary, these partnerships often allow us to give you discounts and lower prices. However, all opinions expressed on our site are solely ours, and this content is in no way provided or influenced by any of our partners.
Table of Contents
Configure Proxy on iPhone Manually
Using a pac file on iphones, setting up a hostname in iphone’s proxy settings, how to configure a proxy on or off, ios proxy server: why is it important.
iPhones are widely acknowledged for their superior security compared to other devices. That’s why it is not surprising that there are over 1 billion active iPhone users globally. However, iPhones are not 100% safe from malware, hackers, or digital threats.
One way to boost an iPhone’s security is by using proxies . Through iOS proxy settings , you can add another security layer to protect your device—even without any prior technical knowledge.
Discover how to configure a proxy on an iPhone and the benefits of doing so in this article. Read on.
Setting up a Proxy on iPhone
Setting up a proxy on your iPhone boosts security and privacy. The process can be executed manually , allowing you to control the settings precisely. You can also configure proxy on iPhone using a Proxy Auto-Configuration (PAC) file or via hostname for an easier setup.
Explore how to configure a proxy on iPhone using the step-by-step guides below.
iPhones do not allow proxy setup on a cellular data connection. Proxies can only be set up using a Wi-Fi connection, and you can do it manually.
Here are the steps to set up a proxy on an iPhone:
- Go to your phone’s Settings
- Select Wi-Fi. The WiFi network that you are connected to has a blue checkmark.

- Scroll down at the bottom and find HTTP PROXY. Tap on Configure Proxy under it.
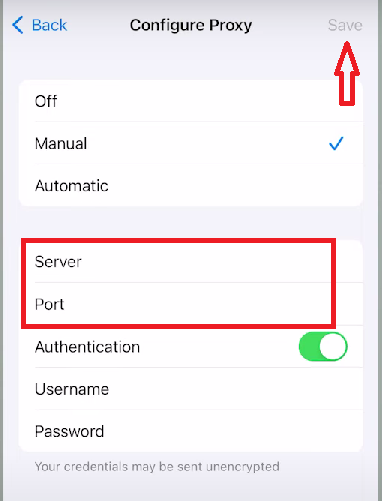
- Enter the proxy address or IP in the Server box and the port number in the Port box.
- If the proxy server requires authentication, turn on Authentication.
- Enter the username and password. Typically, the proxy service provider provides the credentials.
- Tap on Save.
Automatic proxy detection on iOS is also possible. All you need to do is select the “Automatic” option and save.
If automatic proxy detection is activated, your device will automatically adapt the proxy config set by the network administrator. This is common in workplaces and schools.
While uncommon, some proxy providers give their customers an address for a PAC file. This file contains a configuration script that can be used to set up proxies on an iPhone device.
To set up a proxy using a PAC file, follow the steps below:

- Enter the PAC URL in the required field.
If a PAC address is set, this will be prioritized over automatic proxy detection within a WiFi network.
Instead of a proxy IP address or PAC file, your proxy provider will sometimes give you a hostname. This type of setup is usually for automatic proxy rotation of shared residential, data center, and mobile proxy addresses.
Here’s how you can set it up:
- Select Configure Proxy under HTTP PROXY. Click Manual.

Proxies can result in increased data usage or slower internet speeds. When not in use, it is best to turn off your proxy. You can disable proxy on iPhones by following the same steps.
To do that, you must:
- Tap on Configure Proxy under HTTP PROXY.
- Select Off to turn the proxy off. Select Manual or Automatic to activate the saved settings.
- Hit Save to apply changes.
As an operating system, iOS is already packed with safety features. That security is enhanced with proxies. You may want to consider getting a proxy for your iPhone for the following reasons:
1. Anonymous Browsing
No matter how secure your iPhone is, it means nothing if you are browsing the web unprotected. Online criminals can still access and steal your data if your IP is exposed .
People use proxies to browse the Internet anonymously. When you hide your IP, you can go online without worrying about leaving any digital footprint or sensitive information that cybercriminals may access.
2. Accessing Geo-Restricted Apps and Services
Online services such as Netflix have geo-restricted content libraries. To access those, you can use a VPN or set up a proxy on your iPhone.
Some mobile applications, like Telegram, also enforce geo-blocking . If it is banned in your country, you can set up a Telegram proxy for iPhone .
3. Added Layer of Encryption
Proxy protocols provide an additional layer of encryption for your web traffic. Sensitive transactions done through phones benefit from this added security layer. Secure proxies can also block malicious content before it enters your device.
Setting up a proxy on your iPhone is like adding an extra shield for your online safety. You can do it manually or automatically. Use a proxy to stay private, access content or apps that might be blocked in your area, and make your online transactions more secure.
Do not use free proxy services. Instead, look out for excellent and affordable options. Keep your iPhone safe by getting proxies from reliable service providers.
FAQs in Configuring a Proxy on iPhone .
What is the proxy server address on an iphone.
You can find it by going to iOS proxy settings ( Configure Proxy >Manual). Then, check the server address and corresponding port number.
Can you manually configure a proxy in Safari?
No. Safari uses the proxy configuration of the device’s system. If you go to Safari’s advanced settings to set up a proxy, it will redirect you to the system's proxy settings.
How do you know if your IP is a VPN or proxy?
If you are using a proxy, you will see it in your device’s proxy settings. VPNs usually use an app to deliver their services, making it easier to identify them. If you are still unsure, try visiting whatismyproxy.com.
Your email address will not be published.

Updated · Feb 11, 2024
Updated · Feb 08, 2024
Updated · Feb 05, 2024
We use affiliate links. They let us sustain ourselves at no cost to you.
How to Configure Proxy on iPhone
Learn how to configure proxies on your iPhone or iPad and access content without restrictions.
A proxy server sends all your connection requests to websites and apps through itself. You can use proxies to hide your IP address, change your perceived location to unblock and access content, and more. It’s also possible for someone to enable proxies without your knowledge for malicious purposes.
This article will show you how to configure your iPhone or iPad proxy settings to set up or disable an iOS proxy server.
How to Set Up an iOS Proxy Server
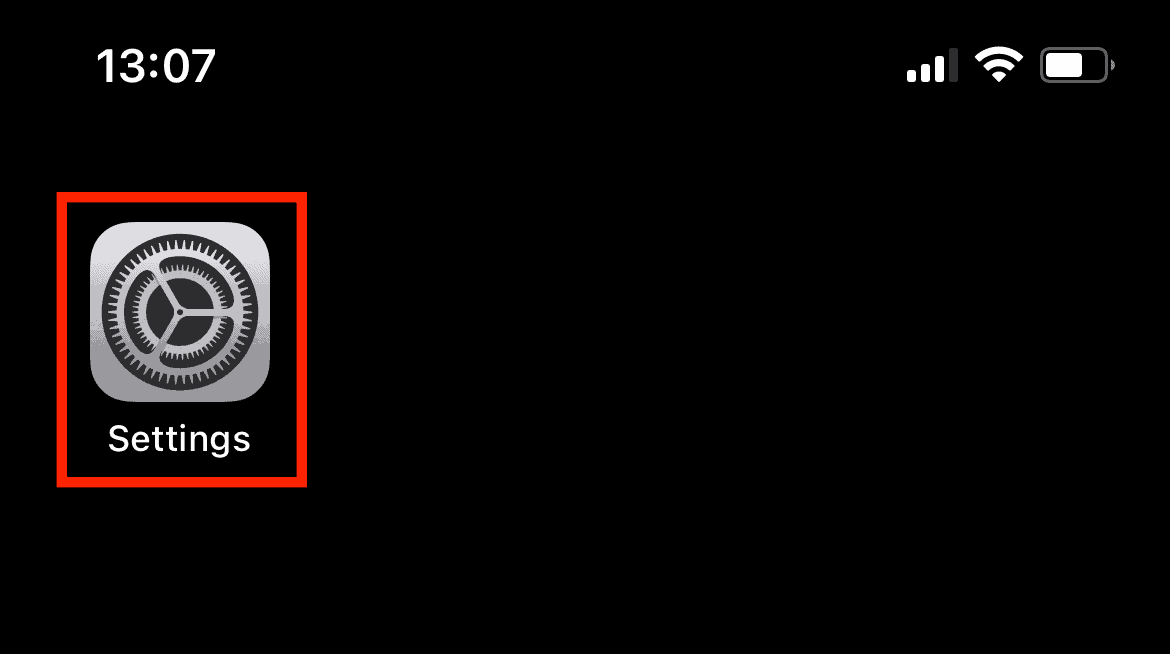
Step 1. Open your iPhone Settings .
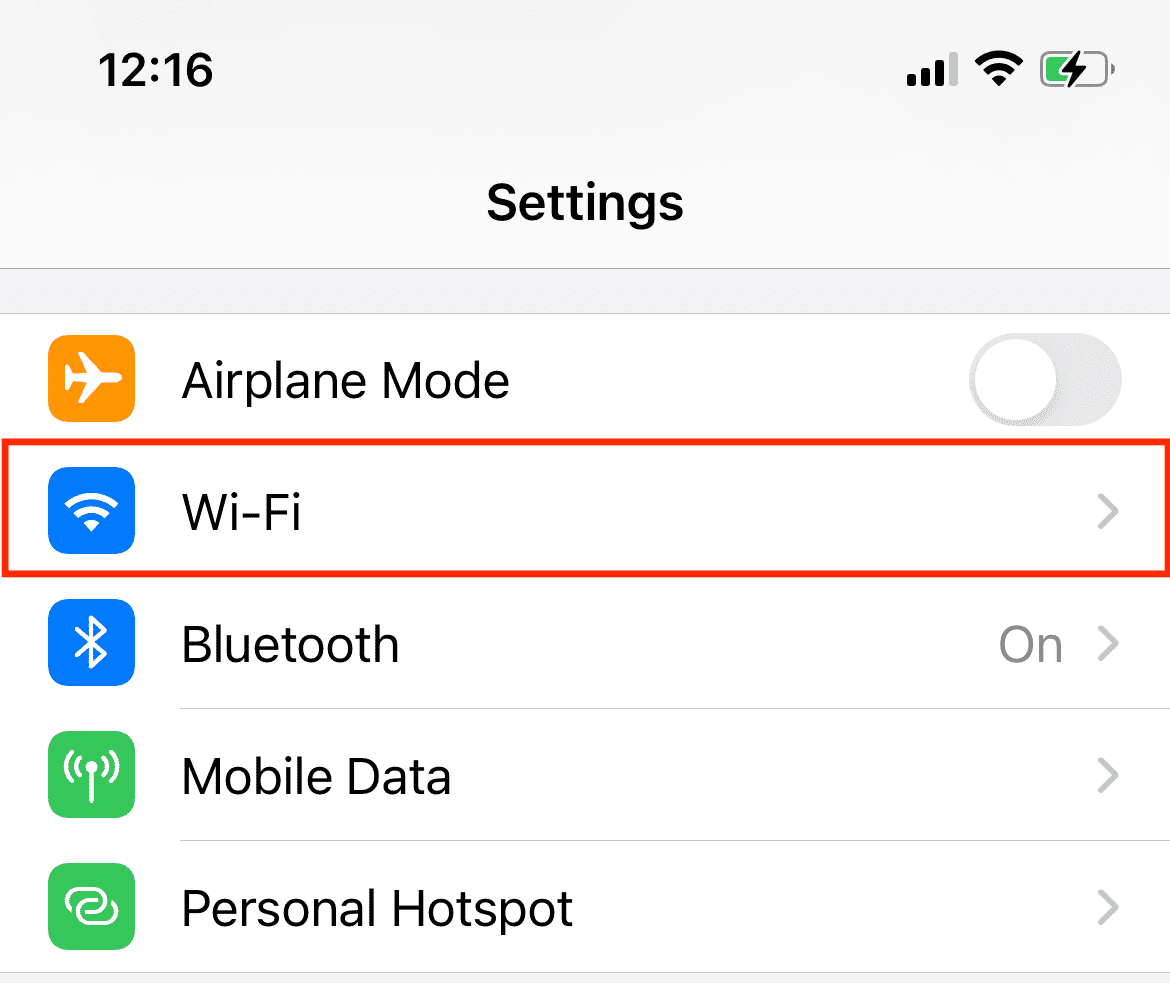
Step 2. Select Wi-Fi .
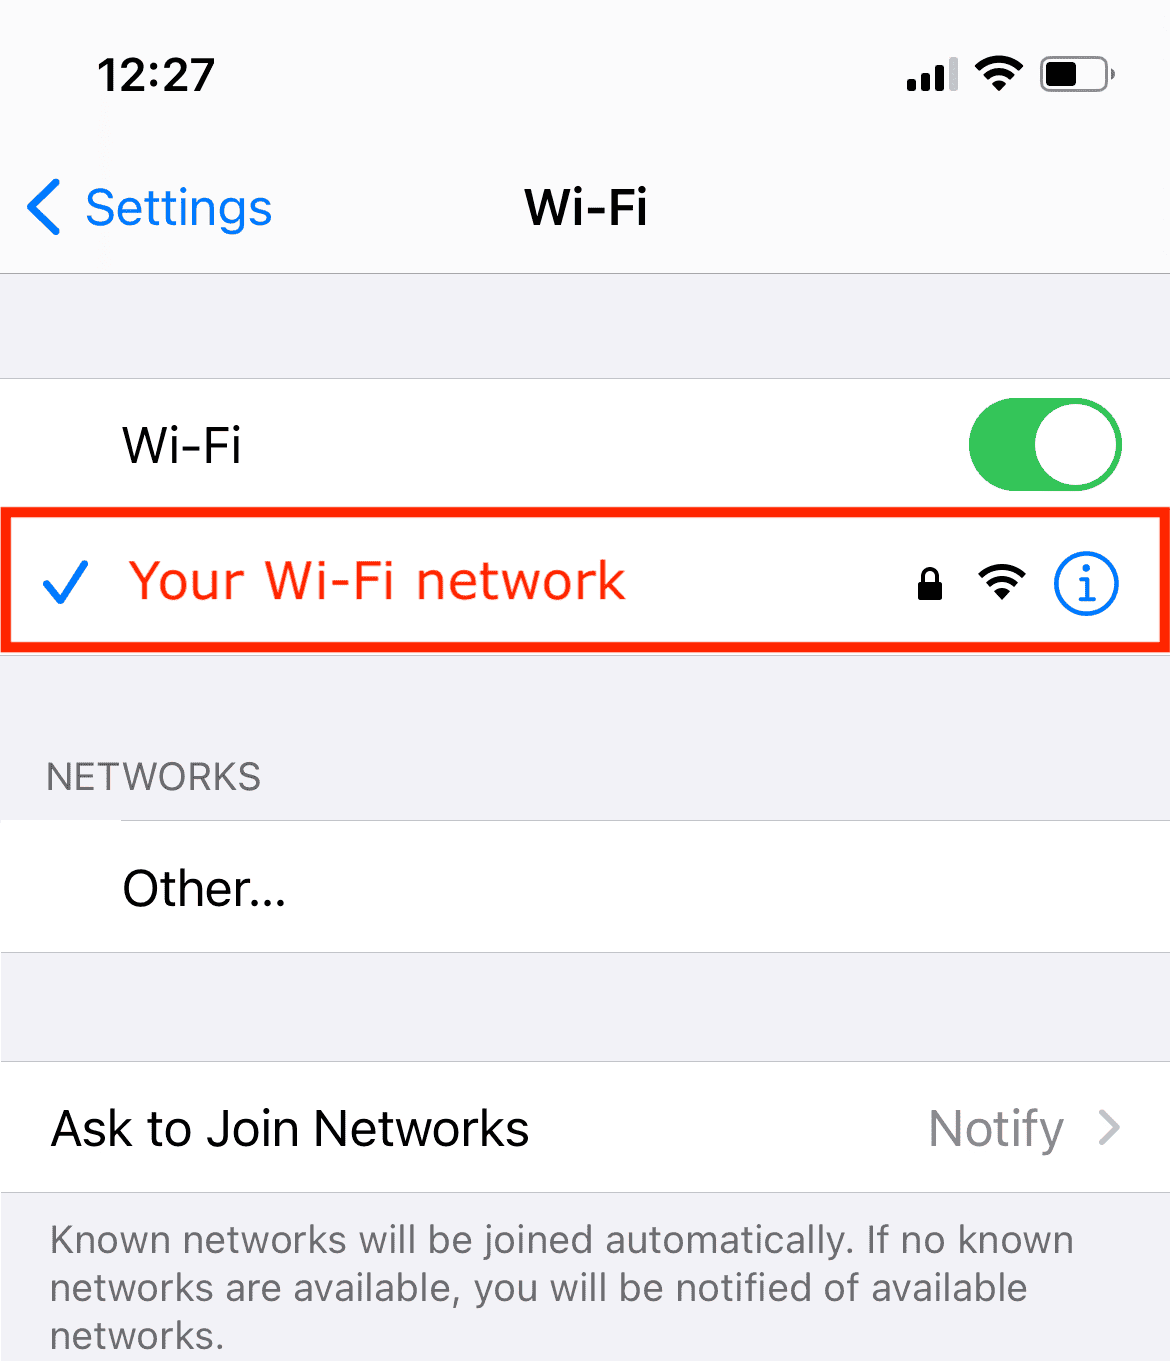
Step 3. Select the Wi-Fi network you’re connected to. It will have a blue checkmark on the left.
Step 4. At the bottom of the page, under HTTP Proxy , select Configure Proxy .
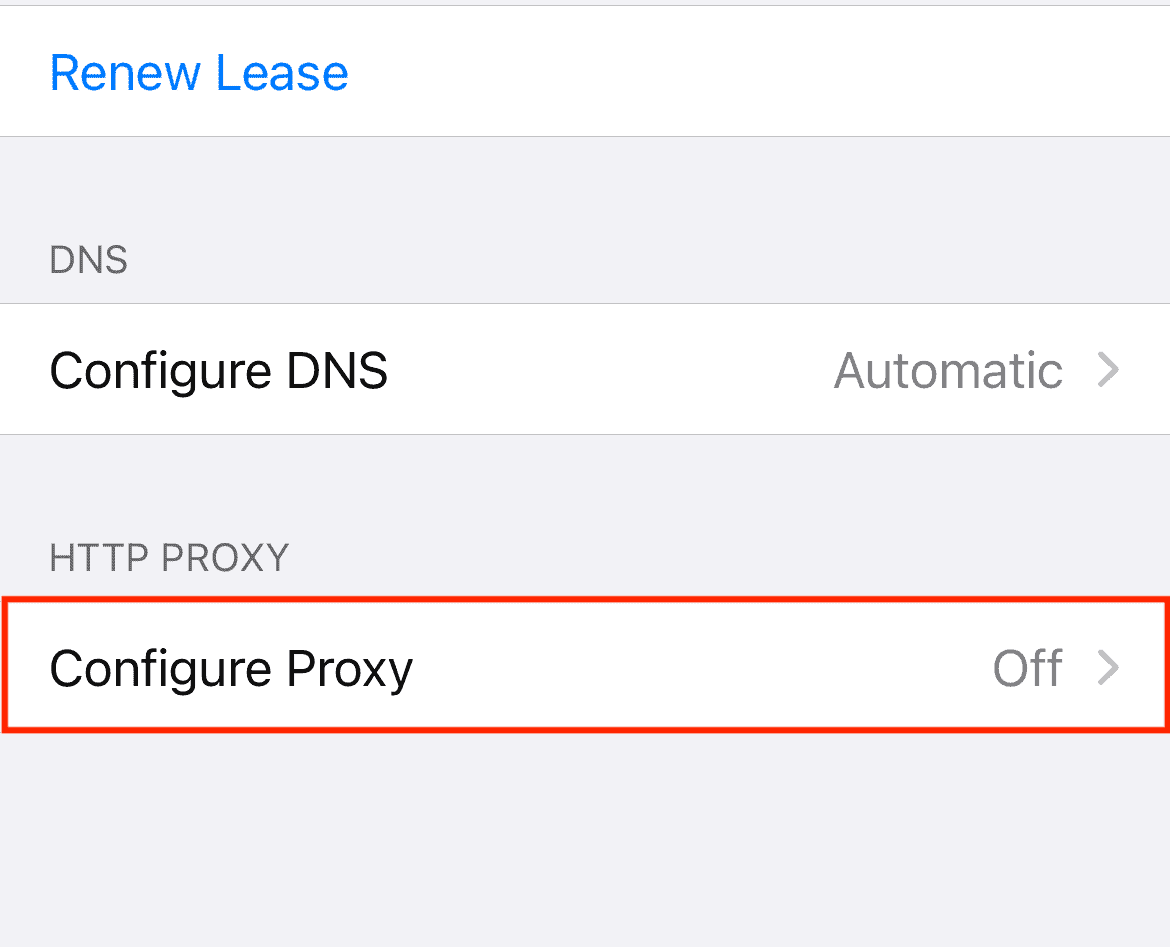
Step 5. Select Manual Configuration .
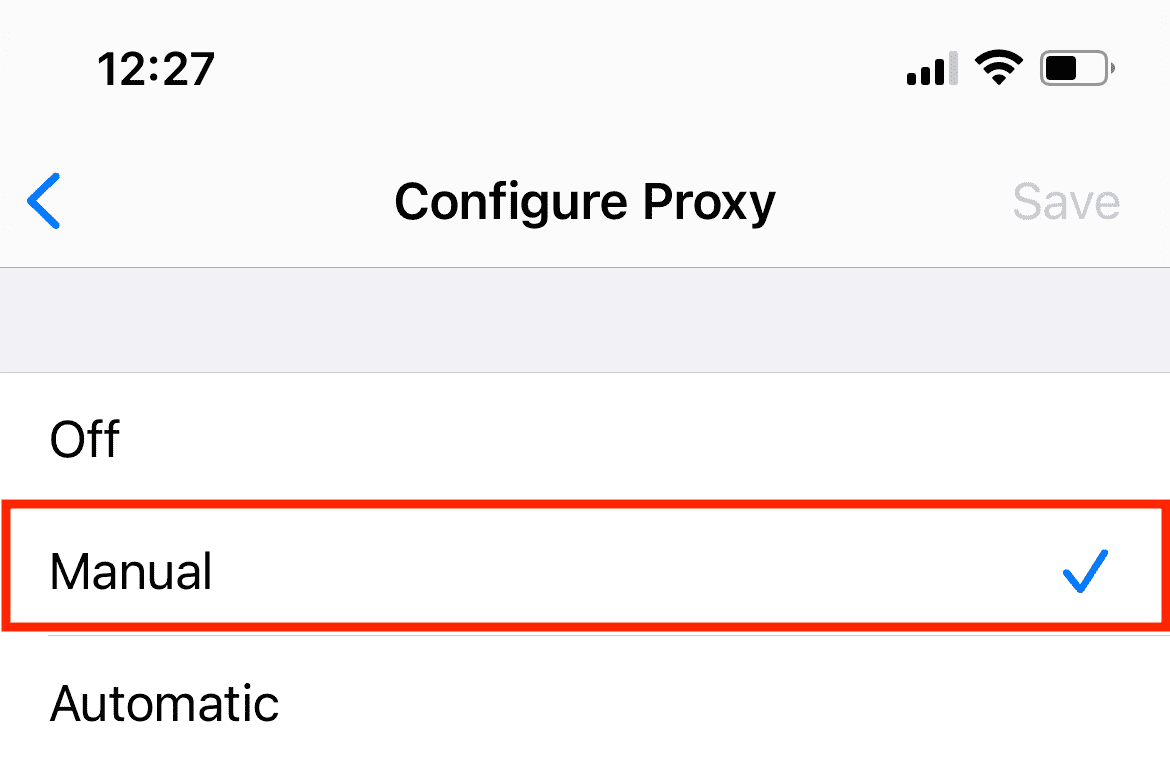
If your proxy provider has given you a link to the proxy configuration file, you can select Automatic Configuration instead. Most commercial proxy providers won’t give you one.
Step 6. Enter your proxy server’s settings.
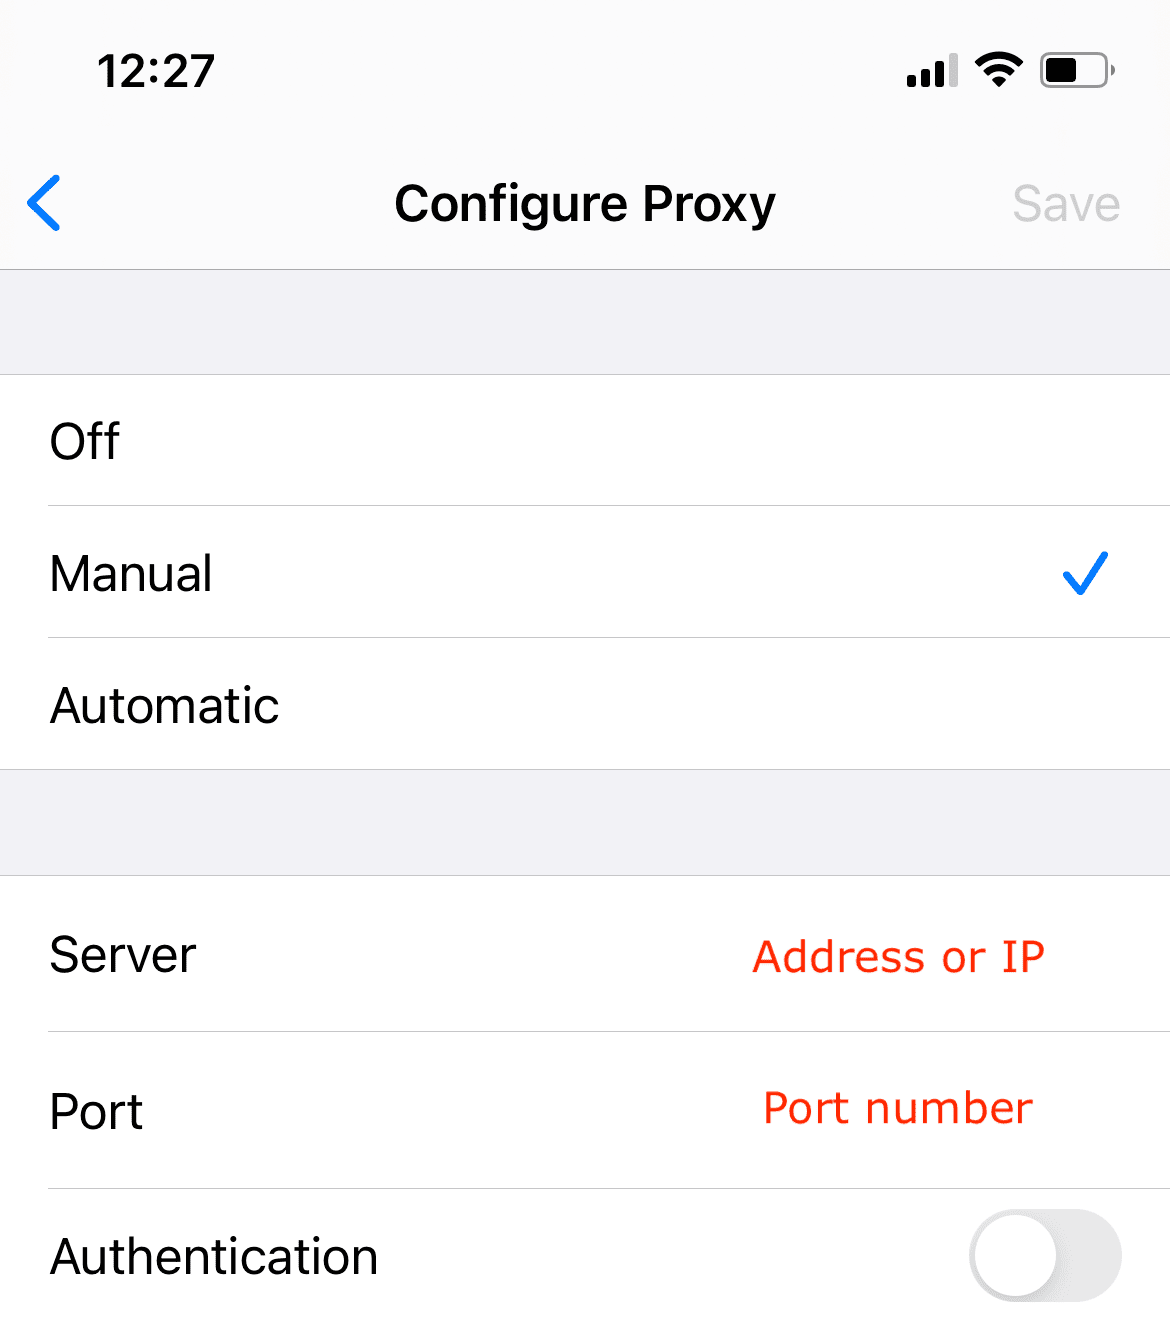
In the Server field, you’ll have to enter the IP address you’ve received from your proxy providers. If you’re using backconnect proxies (so, residential or mobile IPs), you’ll have to enter a hostname instead.
- Example of an IP: 127.168.0.1
- Example of a hostname: en.proxyprovider.net
In the Port field, enter the numbers that come after the IP or hostname. They will be separated by a colon.
- Example of a port: en.proxyprovider.net: 10000
You’ll also have to authenticate your proxy server. If you’re using the whitelisted IP method, there’s no need to do anything else. If you’re authenticating with a username and password, tick Authentication . It will expand and let you enter those credentials.
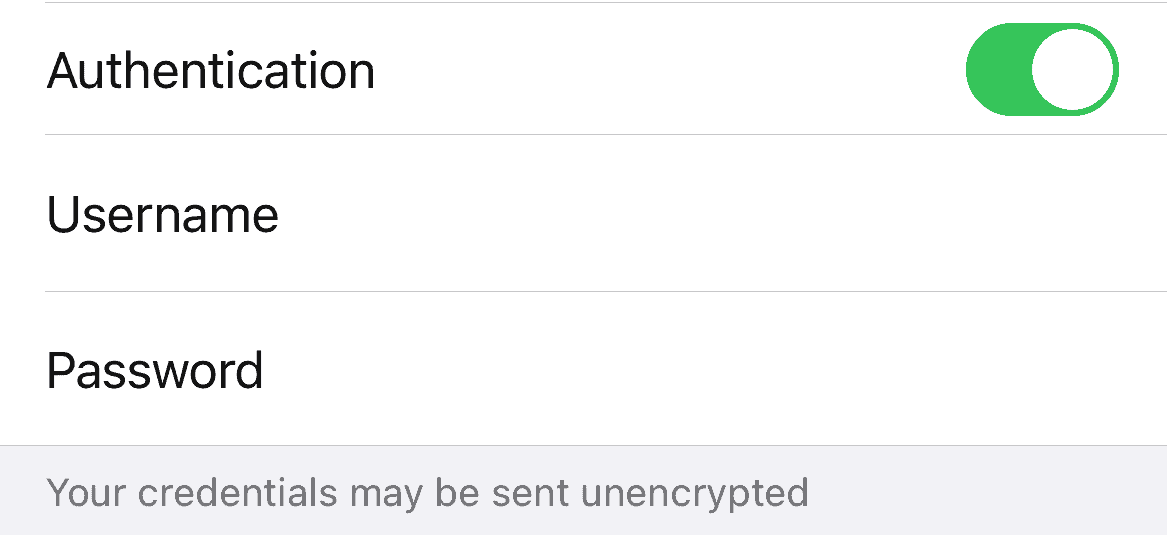
Note that iOS won’t let you set up a SOCKS5 proxy server through the settings. This works only for HTTP(S) proxies.
Step 7. Test your proxy server.
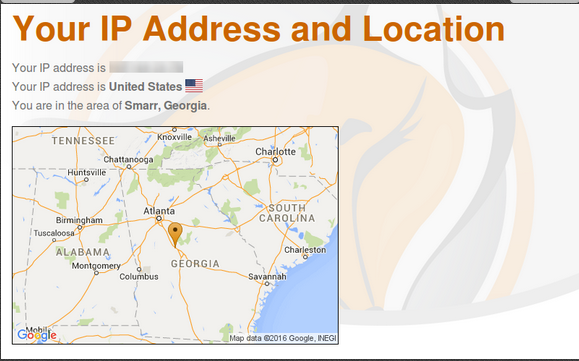
Go to Show My IP to see if your IP address and location have changed.
If you want to test the proxies in more detail, we have an article on how to test proxies .
That’s it! You’ve successfully set up a proxy server on your iOS device!
How to Use an iPad or iPhone Proxy
Once you’ve configured the iPad or iPhone proxy server on your iOS device, it will try to route all your connection requests through a proxy. It might not work with some applications if they’ve been programmed to ignore proxy settings.
Note that this only applies to the Wi-Fi connection where you have set up the proxies . Once you disconnect from it, or connect to a different Wi-Fi, you’ll stop using the proxy server.
How to Turn Off a Proxy Server on iPhone or iPad
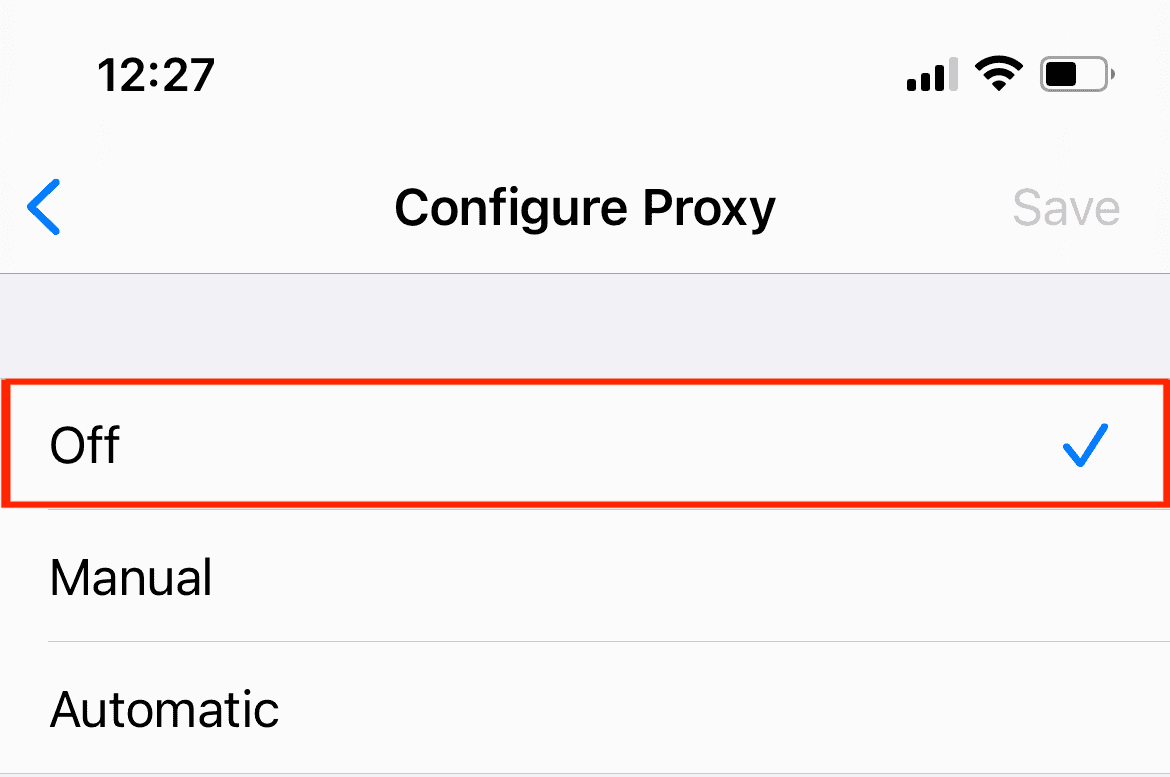
Follow Steps 1-5. Then, simply select Off . A blue checkmark should appear on the right side.
Frequently Asked Questions About iPhone Proxy Settings
A proxy server is an intermediary device that sends your connection requests through itself. So, instead of connecting to a website directly, you first go through a proxy server.
It means that you can set up your Wi-Fi to use a proxy server. Proxies help you hide your IP, change location, and do other things. Sometimes, they can be used by malware.
If you’re not on a work or school Wi-Fi, by default they should be disabled.
- October 9, 2023
Easy proxy server setup on iPhone or iPad
Setting up a proxy server on your iPhone or iPad can provide several benefits, including masking your IP address and changing your location on the Internet. This allows access to restricted content and increases your security by preventing direct requests from malware.
Here's how to set up a proxy server on your iPhone or iPad:
To configure proxy settings on a Wi-Fi network, follow these steps. Please note that the screenshots below were taken using iOS 16.1.
NOTE: iOS only supports HTTP proxies, so SOCKS5 proxies cannot be configured.
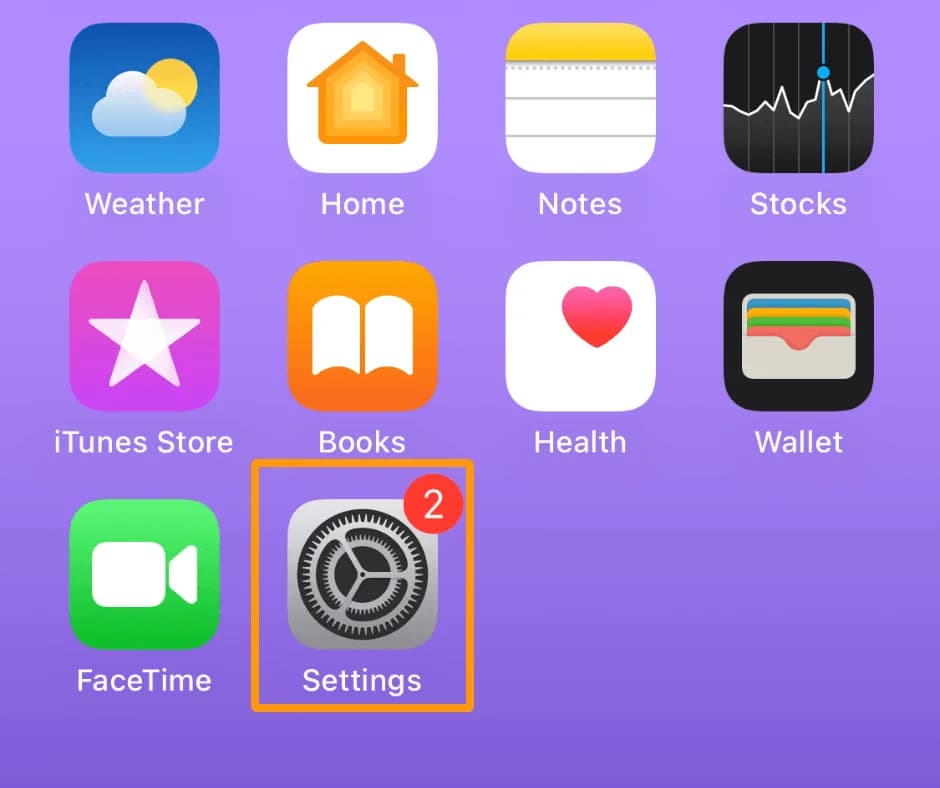
- Your proxy settings are now configured! To check if the connection was successful, visit the IP-Api and check if your IP address has been replaced with a proxy address. If you are not sure about your own IP address, check it before connecting to a proxy server and then compare them.
To turn off the proxy server on your iPhone or iPad:
If you have configured a proxy server on your iOS device, it will try to route all your connection requests through that proxy server. However, some programs have automatic proxy detection and may not allow the connection. In such cases, you will need to disable the proxy server.
To disable the proxy server connection, follow these steps:
- Open the Settings app on your device.
- Click on Wi-Fi.
- Select the network you are currently connected to.
- Scroll down and select "Proxy Settings".
- Click "Disable" to disable the proxy server.
By following these steps, you can easily disable the proxy connection on your iPhone or iPad.
StableProxy
© StableProxy – 2021 - 2024 – Ukraine

- How to Use Your Proxy Services With Safari
Turning it on
Turning it off
- Repeat steps 1-3 above
- Select the proxies tab. Uncheck the Web Proxy (HTTP) and Secure Web Proxy (HTTPS) checkboxes in the list of protocols. Click OK then Apply .
Related Articles
- Firefox: Import your servers to a new device
- How To Setup a Socks5 Proxy In uTorrent
- Guaranteed Google Accuracy
- How to use the GeoShift Extension
- Sophos UTM: Redirect single domains through FoxyProxy Proxy Servers
- How to Use Proxy Services with iPhone/iPad/iOS
- Residential Dashboard
- Data Center & ISP Dashboard
Residential Proxies
Ethical residential proxies for all of your data needs.
Data Center IPs
Unlimited bandwidth and unlimited connections.
Mobile Proxies
Get the best rotating mobile proxies for web scraping!
ISP Proxies
The authority of residential meets the speed of data center.
Scraping Robot
Scrape websites into JSON with ease!
Rotating ISP Proxies
Learn more about our newest beta product.
All Products
Click here to compare our products on price, speed, and authority for all use cases.
Residential Pricing
Isp proxies pricing, data center pricing, mobile pricing.
Get the best rotating mobile proxies for web scraping.
Get A Custom Package
Connect with our sales team to find a price that works for you!
See All Pricing
Use our pricing calculator to identify the right mix of products for your use case.
How we build proxies fit for the Fortune 500.

Why we've rebranded from Blazing SEO to Rayobyte.
A leading source of proxy and scraping information.
Learn how to get started with proxies for any use case.
Knowledge Base
Learn the ins and outs of Rayobyte proxies.
Make money at home through the Rayobyte affiliate program.
API Documentation
Our easy-to-use world-class API puts the power in developers' hands.
Why we do what we do.
Law Enforcement Inquiries
Are you a member of Law Enforcement seeking records for investigations related to a Rayobyte user?

Support Ukraine
Ukraine Support Campaign 2024
Going On Safari (Exploring How To Use Apple Safari Proxies)
You’re alone, deep in the African savanna, bushwhacking across the sun-baked plains of golden grasses and thorny acacia trees—the arid heat naught but a subtle annoyance to your enthusiasm, the winds of adventure firmly at your back. It is here, in the heart of this sun-scorched wilderness that you are searching for the epitome of nature at odds with itself. The cunning predator versus its ever-elusive prey. The raw illustration of life and death poignantly locked in a struggle for supremacy. Read more about safari proxy
A dangerous journey? Sure. But you’ve always preferred living on the wild side. Survival of the fittest, right? Unfortunately, you stick out like a giraffe without a tree to hide behind and before long, those same wild predators you expected to see ambushing some poor animal from behind your camera lens have you surrounded. Game over. You’ve been eaten.
Table of Contents
- 1. What Is a Safari Proxy?
- 2. Types of Proxy for Safari
- 3. Nothing But the Best Apple Safari Proxies
- 4. How to Set Safari Proxy Settings
- 5. How to Use a Safari Proxy for Best Results
What does this have to do with Safari proxies? Well, just as you would’ve remained hidden on the African grasslands and avoided death by lions if you’d just set out some remote trail cameras, when searching online, a Safari proxy will likewise keep you hidden from preying eyes of the internet. If you’ve been wondering about what a Safari proxy is, what Safari proxy settings should be, and how to use a Safari proxy to get the most out of it, then this is the blog for you. Like any great Safari guide referencing their trusted field book, you can use our handy table of contents to brush up on whatever topic you want. Otherwise, gear up and let’s get this adventure started.

What Is a Safari Proxy?

With any outing into the wild, it’s vital that you know exactly what you need to bring along. That might include a water canteen, sunblock, compass and map, satellite phone, bug spray–you know, the bare essentials necessary to have a great experience. When browsing online, understanding your web proxies is just as important.
A proxy, in its most general function, is a network device which creates a barrier between you and the online worlds you explore. These devices act as intermediary “computers” which, by substituting your computer’s IP address for its own, can therefore make web requests on your behalf without the servers you’re requesting resources from identifying you directly. This added layer of request processing not only keeps your identity a secret, but also protects you from the prying eyes of hackers and spammers that would gladly steal your valuable personal information. In some cases, using a proxy also allows you to access content that is restricted based upon your location by creating the appearance that your requests are coming from an unrestricted network or country.
Safari proxies, similar to Chrome proxies and Firefox proxies , are simply proxies specially designed to operate in conjunction with their namesake web browser. The beauty of a dedicated web browser proxy is that you retain all the performance benefits while being able to effortlessly enjoy your favorite web browser wherever you want. Whether sitting at your desktop computer or surfing the web on your mobile device, you can browse like never before.
Types of Proxy for Safari

Let’s talk about options. Believe it or not, you have a few for when picking out which proxy you want to install on Safari. After all, you want the best one suited for your specific needs. When deciding on which Safari proxy to get, there are three main types from which to choose: semi-dedicated, dedicated, and rotating.
First up, semi-dedicated proxies. Semi-dedicated proxies are neither fully dedicated, nor are they completely open. This is to say, unlike dedicated proxies—where you alone control all the resources—and public proxies—which anyone can access—semi-dedicated proxies have you share your proxy with at least two other people. Although cheaper than dedicated options, semi-dedicated proxies are more vulnerable to poor performance and IP bans since you can’t control the activities of the other users.
Dedicated proxies, on the other hand, don’t have this problem. You’re the King of the Beasts here. You control every bit of the speed and bandwidth and have sole ownership of the proxy IP. That means you alone control your destiny online and can utilize every resource when and as you need.
Finally, rotating proxies. Like their name suggests, rotating proxies rotate IP addresses each time you make an online connection by accessing a website. By constantly switching IPs, this type of proxy provides an even tougher challenge for websites, online criminals, and anyone else wanting to identify you from actually doing so. This added layer of anonymous browsing capability is great for when you want to scrape data off competitor web pages, cop some new sneakers, or simply avoid those annoying targeted ads.
An important thing to remember—never use public proxies. If you thought the African savanna was scary, these free proxies are even more dangerous. Not only are public proxies typically slow and rife with technical issues, they are also ideal hunting grounds for hackers, identity thieves, scam artists, and other criminally minded predators. Though the temptation to save a few dollars is strong, it isn’t worth the inherent risks. Instead, stick to purchasing your proxies from a trusted provider.
Nothing But the Best Apple Safari Proxies

Now that you understand a bit about the ins and outs of Apple Safari proxies, we have no doubt you cannot wait to get your online excursion under way.
So, here’s the sales pitch. We at Rayobyte truly believe that we offer the best proxies for Safari (or any other web browser) out there. Our high-quality proxy packages feature 1 Gbps speeds on fully dedicated lines with unlimited threads and bandwidth allowances. Not to mention they are extremely affordable.
And because nothing is worse than having the unexpected happen at the most inopportune time, we won’t leave you lost without an idea of what to do. We have a tireless team of experts dedicated to resolving any issues you might encounter no matter the hour of the day or night they might arise. Safari proxies will open a whole new world to you. We’re here to ensure you can discover it as only you know how with the best dedicated proxies as part of your explorer’s pack.
How to Set Safari Proxy Settings

When it comes to the setup of your Apple Safari proxies on your browser, installing a Safari proxy is super simple. Trust us, we aren’t lion.
Since Safari is an exclusive web browser for Apple devices, you’ll want to first check that you are using such a device. To try and do so on another operating platform or piece of tech just won’t happen. If you are wondering how to set up browser proxies for different browsers , check out our dedicated blog on the subject! Below we’ve outlined the step-by-step process of adding a proxy in Safari.
How to set up a proxy for Safari macOS
Configuring a proxy for Safari on Mac devices takes only a few quick, easy steps. To begin setup, launch the Safari browser and open the “Safari” menu. Click “Preferences” and then the “Advanced” tab at the top of the window. Click the “Change Settings” button next to the “Proxies” entry. You’ll then select the type of proxy server you wish to configure in the left pane and enter proxy details. If for example you want to set up a Safari HTTP proxy connection, you would select “Web Proxy (HTTP).”
If your proxy requires you to log in, check the “Proxy server requires password” option and enter the login information in the provided boxes. Repeat for each proxy server you wish to configure. Finally, click “Apply Now” button in the lower right corner of the window to save settings.
How to set up a proxy for Safari iPhone (iPad/iPod)
To config your proxy in Safari on a mobile device , first open your “Settings” app on your iPhone , iPad, or iPod. Go to “Wi-Fi” and, if not already, connect to your desired Wi-Fi network. Once connected, click on the “info” icon ( (i) ). Scroll to and tap on “Configure Proxy,” followed by selecting “Manual.” Toggle “Authentication” on and enter your proxy username and password. Hit save and you’re all set to browse with a mobile Safari proxy.
Following these steps will guarantee your Safari proxy is correctly configured each and every time. However, just in case you do encounter some unexpected issue during install, Apple support should provide you the answers you need.
Now, just because you successfully set up one proxy doesn’t mean you’ll never need to make any changes. You may find that one Safari proxy isn’t enough to satisfy your thirst for unbridled—yet incredible safe—online adventuring and decide to rotate between a handful of dedicated proxies. If that’s the case and you’re wondering how to change Safari proxy settings, the good news is you already have the answer here before you. Simply revisit these setup tutorials and enter your new proxy info appropriately and you’ll stay browsing wild and free. You won’t even need a tour guide.
How to Use a Safari Proxy for Best Results

One of the best features about web browser proxies is that, once installed, you can sort of forget they’re even there—which his kind of the point if you’re all about unobtrusive computer add-ons. This is true for Safari proxies as well. Operating quietly in the background of your Safari browser, your proxies will handle all the nitty gritty work like strengthening your security, promoting anonymous browsing, and getting access to the sites ordinarily off limits to you. This way you can rest easy and continue exploring the internet like you always have.
Not that you want to adopt an entirely hands-off attitude toward your proxies; actively managing your proxy settings is the only way to get the most out of your proxies and the best chance for you to enjoy a truly great online experience. Having the tools and know-how to mobilize your Safari proxies at a moment’s notice simply means these changes and alterations are much easier to implement effectively no matter the occasion.
You may want to take your browsing capabilities even further by adding a Safari proxy extension. These browser extensions give you even greater, specialized power to capitalize on online activities. Some of the most popular are SEO tools for improving your content’s Google search rankings and data scrapers for cataloging and analyzing elephants’ worth of invaluable data from the sites you use. However, there are countless extensions for just about anything you want to do online.
Go wild and explore what’s out there. You may discover something you never thought you needed becomes something you can never live without again. Just be sure your proxy is up to the challenge of handling what you intend. Bogging down your awesome Safari proxy with too many extensions or failing to properly configure it to optimize its performance settings is a surefire recipe for finding yourself too far off in the weeds.
Finishing the Safari Proxy Tour
As we’ve shown, you don’t need to fly have way across the world to experience extraordinary sights. Instead, you can have the freedom and security to explore the entire web without fear of falling victim to unsuspecting online predators who’d gladly take advantage of knowing exactly who you are, where you are, and what you are doing. Though a Safari proxy doesn’t mean you won’t have to take some responsibility for your online activity, it does make enjoying your favorite sites that much simpler. And who knows, following these guidelines may just wind up convincing you that using proxies for Safari is just as exotic and exciting as a real African Safari—or at the very least, a heck of a lot safer.
The information contained within this article, including information posted by official staff, guest-submitted material, message board postings, or other third-party material is presented solely for the purposes of education and furtherance of the knowledge of the reader.
All trademarks used in this publication are hereby acknowledged as the property of their respective owners.
Sign Up for our Mailing List
To get exclusive deals and more information about proxies.
Start a risk-free, money-back guarantee trial today and see the Rayobyte difference for yourself!
Related Posts
Residential proxies quick start guide, isp proxies quick start guide, a quick start guide for dedicated data center proxies, how to set up a proxy in c#.
Troubleshooting
How to disable proxy settings in Safari
Last updated: October 18, 2022
If you can’t connect to the internet while the VPN is on, it is possible that you are using a proxy server. This guide will show you how to disable proxy settings in Safari .
A proxy server is an intermediary between your computer and the internet. It is often used to hide your real location and helps you access websites that would otherwise be blocked. However, proxies do not offer the same privacy protections as a VPN. If you are using ExpressVPN, there is no need to run a proxy on top of the VPN connection.
If you are using Chrome, please follow this guide .
What is a Proxy? Disable proxy settings in Safari on Mac Disable proxy settings on iOS
What is a Proxy?
Disable proxy settings in safari on mac.
- Click OK > Apply .
Need help? Contact the ExpressVPN Support Team for immediate assistance .
Back to top
Disable proxy settings on your iOS
When your iOS device is connected to a Wi-Fi network, you are using its network’s proxy server to access the internet. Follow these steps to disable the proxy settings on your device.
Further Issues?
If you have other issues, including not being able to access certain websites and services, contact the ExpressVPN Support Team for immediate assistance .
Was this article helpful?
We're sorry to hear that. Let us know how we can improve.
Which web browser do you need help with?
Examples: Chrome, Firefox, Edge
A member of our Support Team will follow up on your issue.
Choose language
Want to highlight a helpful answer? Upvote!
Did someone help you, or did an answer or User Tip resolve your issue? Upvote by selecting the upvote arrow. Your feedback helps others! Learn more about when to upvote >
Looks like no one’s replied in a while. To start the conversation again, simply ask a new question.
Proxy exceptions on safari / iPhone-iPad config utility
iPad / iPhone, iOS 4, *
Posted on Jan 13, 2011 2:12 PM
Loading page content
Page content loaded
Jan 14, 2011 2:59 AM in response to smiggs69
Jan 14, 2011 11:38 AM in response to smiggs69
Jan 14, 2011 12:47 PM in response to Bonesaw1962
Feb 11, 2011 3:23 AM in response to smiggs69
Feb 11, 2011 3:24 AM in response to smiggs69
Mar 7, 2011 12:50 PM in response to smiggs69
Apr 7, 2011 10:32 AM in response to smiggs69
May 9, 2011 2:39 PM in response to Jonson Tsai
The setting is not in the configuration utility, it is manually setup in your wifi-networks settings.
At the bottom section of your network setup
Settings -> Wi-Fi -><select your SSID> Set the HTTP Proxy to Auto and select the path to your PAC file.
May 9, 2011 2:42 PM in response to Rascally
This works for iphones as well, any browser that can see the PAC file can use the rules you add.
manually setup in your wifi-networks settings.
Set proxy_no for your local mail server as per the code snippet above.
Jun 7, 2011 11:34 AM in response to smiggs69
This PAC file is still being ignored by some Apps used at the office for local URLs.
Is there any way around this??
Jun 8, 2011 8:05 AM in response to jagdmc
Can you advise on which apps are not working? I.E. native apps such as app store, facebook etc or your internal apps such as web mail, intranet apps?
Jun 8, 2011 8:35 AM in response to smiggs69
I'm specifically talking about SAP's BusinessObjects Explorer.
It can only be used if I don't use Porxy Exceptions list... I don't know a work-around to this problem
Jul 29, 2011 7:49 AM in response to smiggs69
Due to the absence of proxy exception , I spent hours trying to use proxy.pac . I set up an IIS server, set up a proxy pac. For Safari and iTunes worked fine, however for mail and other applications ( SoundHound operates etc ... ) did not work.
My environment has an aggravating factor , because the proxy requires authentication and the proxy does not support it. Every time I open Safari , it requires re-authentication to navigate.
I hope apple in iOS 5 increase support services for corporate and implement NTLM , Kerberos TGT for single sign on.
If you guys got some information regarding, please let me know.
Sep 8, 2011 12:30 PM in response to Joao Campos
Joao Campos wrote: I hope apple in iOS 5 increase support services for corporate and implement NTLM , Kerberos TGT for single sign on. If you guys got some information regarding, please let me know.
Here, here. Kerberos TGT is a must.
Feb 16, 2012 7:14 AM in response to smiggs69
I know this is an old post but I hope you guys are still listening.
I have made my own proxy.pac but am struggling where to put it so the iPad has it to access.
How to Configure iOS to Use Socks Proxy over SSH with a Linux/Unix Host
The socks proxy I created following Proxy Using SSH Tunnel works very well on both Linux and Windows . However, when I try to configure my iPhone and iPad with iOS, I find iOS does not support socks proxy in its settings interface. I don’t know why it is not added while socks proxy is indeed supported by the iOS operating system. This post introduces how to configure iOS to use the socks proxy created by the SSH tunnel.
Here, we assume that you have already set up one proxy (hence, you need one Linux or Unix host or others that you can set up SSH proxies listening on public IPs) that listens on an IP address which can be connected by the iOS device. One typical configuration may be that both the Linux host and the iOS device are connected to the same WiFi network which you iOS device is connected to. Here, assume the address and the port of the socks proxy over SSH tunnel is proxy_host:proxy_port . In summary, what you need are
- iOS device connected to WiFi.
- A Linux/Unix host connect to the same WiFi for setting up a socks proxy over SSH .
- A Web host to host your own PAC file. One in your local network is also fine.
You need additional hosts and configurations. The benefit is that the proxy provided by the Linux/Unix host is very solid and stable.
Prepare an PAC file on a host
You need a Proxy Auto-Config (PAC) file to configure iOS to use the socks proxy. The PAC file is a text file that contains the content like this:
Here, you need to replace the proxy_host:proxy_port with your proxy setting.
You will need a Web server to host the PAC file. One in your local network or one connected to the Internet are both fine. There are many options to do this. You may set up your own web server , use Dropbox , choose a shared hosting server or use github .
Here, in this tutorial , we assume this PAC file is named proxy.pac and is stored at address http://www.my-server.com/proxy.pac .
Configure the iOS device to use the socks proxy
Now, we can configure the iOS to use the socks proxy by pointing it to the PAC file.
In the iOS, go to Settings -> Wi-Fi and click the blue right arrow on the right of your wireless network, choose Auto in the HTTP Proxy section, and fill the URL of the PAC file ( http://www.my-server.com/proxy.pac in our example).
By now, you have configured your iOS device to use the socks proxy over SSH tunnel. Check Who am I and you should already have been behind the proxy.
- How to Set Up Socks Proxy Using SSH Tunnel
- Which ssh client on iOS works the best for socks?
- Git through SSH Tunnel as Proxy
- How to Play Movie from Remote Host using MPlayer over SSH
- How to convert between dos and unix file coding in Emacs?
- Proxy using SSH Tunnel on Windows
- Fixing “Remote Host Identification Has Changed” Error When SSH to a Server
- How to choose the key used by SSH for a specific host?
Eric is a systems guy. Eric is interested in building high-performance and scalable distributed systems and related technologies. The views or opinions expressed here are solely Eric's own and do not necessarily represent those of any third parties.
27 comments:
I hosted my file here:
http://copy.com/yTqsQZqHAsl2F0nE/sunshine.pac
And used this same url on my iphone, but for some reason it doesn’t work. It doesn’t send traffic through the proxy. I was wondering if i did something wrong. The IP address and ports on the .pac file work because I use them on other pc’s in the local network and they successfully connect to the proxy.
The “SOCKS” is missing in your .pac file.
Thanks for this information. But this only sets the proxy for a single WIFI connection. Is there a way to set the proxy system-wide? For instance, so that I use the proxy over the 3G data link as well?
Yes there are ways to set the system-wide proxy (but I never tested them yet): https://developer.apple.com/library/ios/featuredarticles/iPhoneConfigurationProfileRef/Introduction/Introduction.html
Note that: you need to turn the device to the supervised mode (you will need a Mac and the Apple Configurator app; a tutorial ).
If you are using a VPN, it will be easier: there is an option to set the proxy that you will connect through to the VPN server.
Thanks a lot!. Works perfectly.
Simple and works great.
Hi, can I place my PAC file inside my ssh server? I am using free ddns service for my dns address.
So far as I have tested, the method to get the PAC file is from HTTP. You may need a Web service.
Hello, where i need to put the pac file? Stored where? In my iphone or on my ssh server?
“Assume this PAC file is named proxy.pac and is stored at address http://www.my-server.com/proxy.pac .”
I have debian ssh vps, iphone connected thorugh http proxy also
could you help me?
You will need a Web server to host the PAC file. Update the post with more details. Please check.
Thank you for you reply! I am in Office with:
-PC Office with http proxy for surfing (proxy:8080) -iPhone on same lan -vps for tunneling
I would like to surf free and under SSH with my iPhone.
-I set iphone in same lan with proxy auto with ( file:///private/var/root/proxy.pac)
-proxy.pac filed with: “function FindProxyForURL(url, host) { return “SOCKS localhost:1084″; }”
– ssh_config file with this line added: “Proxycommand connect -H IPofOfficePC:4040 %h %p”
-SSH connection with mterminal “ssh -D 1084 -C -p Proxyport -N root@IPofVPS”
– in my Office PC port 4040->8080
The problem is that only Safari is under Socks proxy (has same IP of my VPS) but other apps not! I cannot open whatsapp.. Facebook msg… :-(
Your settings look good.
But be aware that iOS does not force the apps to use the system proxy. Instead, apps poll the system proxy settings to receive proxy configuration. Hence, apps can bypass the proxy settings and make the connections out directly.
Apps like whatsapp and facebook message may choose to bypass the proxy settings (but I am not 100% sure about this).
How can I do it? I would like every app through tunnel.
I use sshuttle https://github.com/apenwarr/sshuttle on Linux. It works as a VPN over SSH. It seems you have jail broken you iPhone. I am not sure how hard it is to run it on iOS.
Hi! I should use it on server pc (work office windows pc) or on a client (iphone jailbroken)? Can you explain me how please! Read also other my comments below: I report to you here: “*I can open an SSH tunnel with kitty in work windows pc with port forwarding dynamic. But still i can surf under socks only with Safari in my iphone client :-( Please help me!”
Thanks again ^^
sshuttle runs on the client (your iOS).
As noted, I did not ever tried it on iOS. Neither do I know whether it works and how hard to make it work.
Please check the shuttle manuals online and see whether you can make it work for you. We would be happy to know the results.
Update: I can open an SSH tunnel with kitty over work proxy with port forwarding dynamic.
In the proxy.pac i set workPCip:PORTforwarded
But still i can surf under socks only with Safari :-(
Please help me!
*I can open an SSH tunnel with kitty over work pc with port forwarding dynamic.
Hi! How can I run sshuttle on Iphone? I think impossible.. on manuals nothing written, no istructions to follow for iphone :(
which ssh client on ios work the best for sock? thx
You may try vSSH: https://www.systutorials.com/which-ssh-client-on-ios-works-the-best-for-socks/
hi, I rent a vps, and use socks5 proxy over ssh.Now i can use my laptop to connect the vps and can use proxy. However, i use your method and this is my pac file address ,but this dosent’t work on my iphone
this script makes it easier : https://github.com/wooowooo/proxyMyPhone
it uses python as pac server. every linux distro have python. it generates the pac file in 1 command.
Hello, how do i upload pac file on dropbox new website
Hey! Very handy tutorial, many thanks! One point tho $ ssh -D 8080 username@sshd_server wouldn’t allow other users to use the tunnel $ ssh -g -D 8080 username@sshd_server would solve this problem!
Thanks _very_ much for this. Managed to unblock Bluey for my 4 year old (wonderful Australian series!). You have absolutely made her (and my!) day.
Your email address will not be published. Required fields are marked *
Save my name, email, and website in this browser for the next time I comment.
Proxy locations
North America
South America
See all locations
English (EN)
integrations
Guide to Setting a Proxy in Safari on macOS
Proxy servers are great if you want to hide your real IP address, enhance your web browsing security, and access geo-restricted sites.
Depending on your Mac OS version, the visual process to configure proxies might differ, but the main steps are interchangeable.
In this guide, we’ll show you how to access proxy settings and disable a proxy server, and we’ll share a couple of common reasons your Safari browser might have trouble connecting to a proxy server.
Launching the proxy settings
1. Open Safari and go to Safari > Preferences .
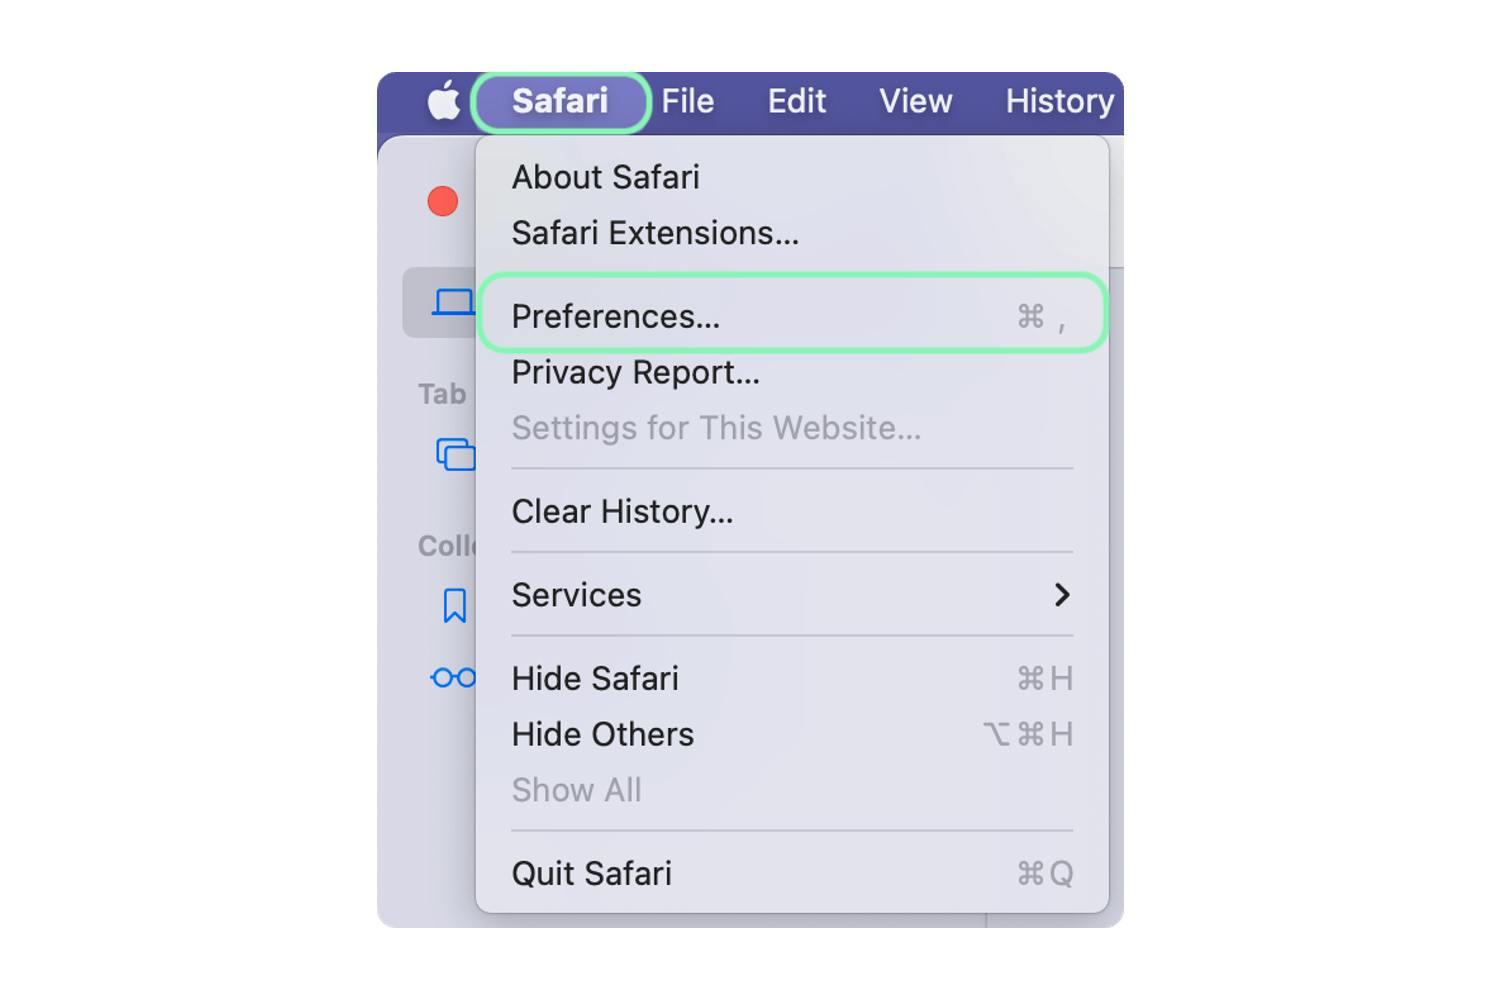
Selecting preferences
2. Select the Advanced tab, and within the Proxies section, click Change Settings .
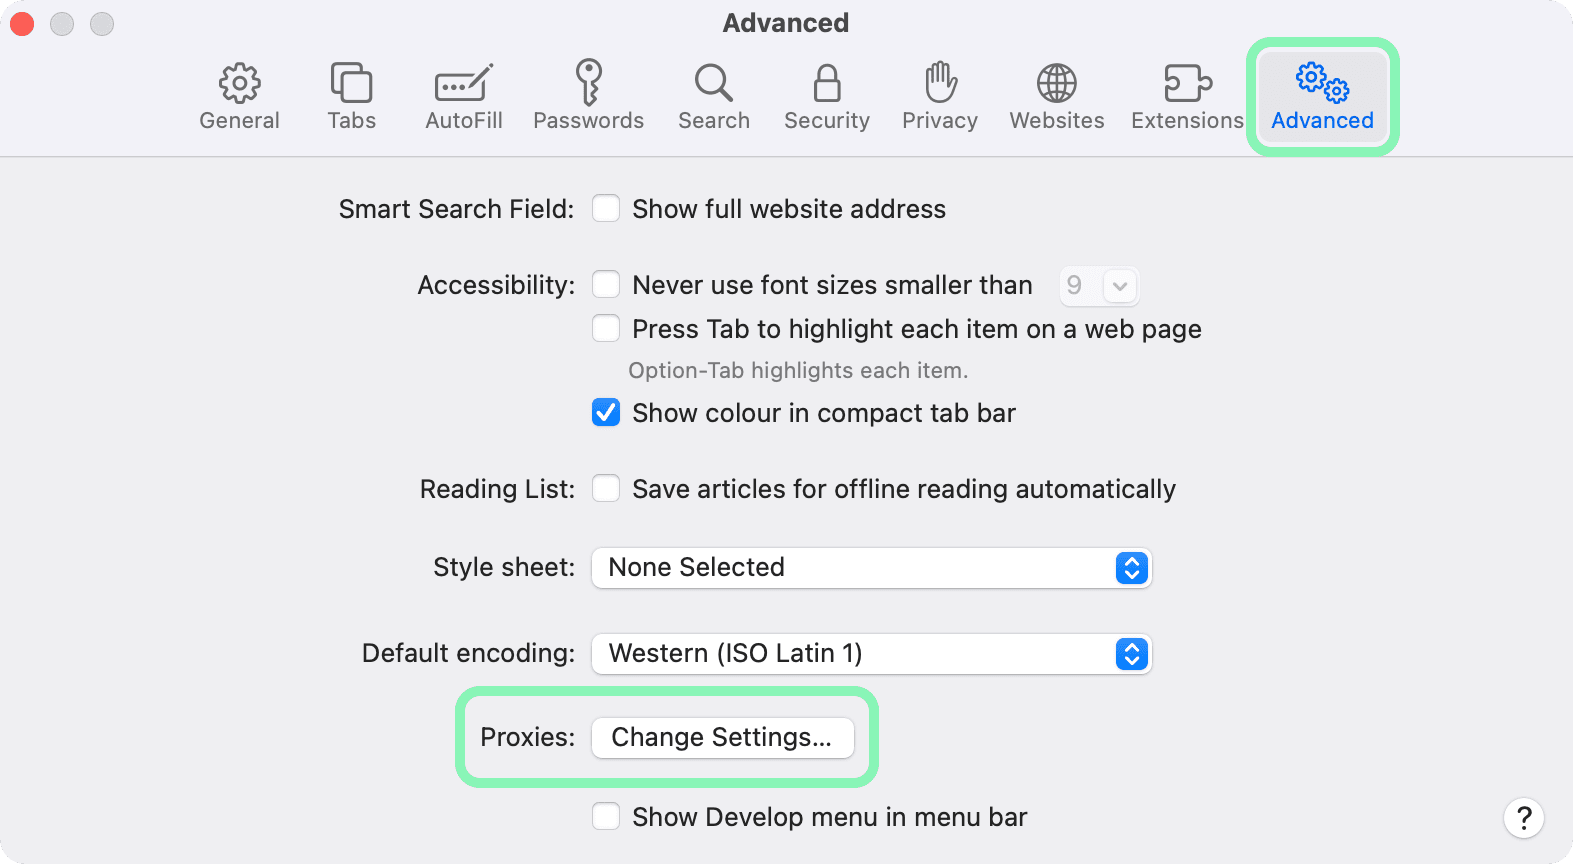
Changing proxy settings
In the newly opened window, you can configure proxies. However, the setup will be system-wide, which means that any other browser and application you use will be connected to the internet through the proxy server. Please refer to our macOS proxy integration guide for further steps.
How to turn off a proxy in Safari
1. Navigate to the proxy configuration window to change the settings, as shown in the above guide.
2. Open the Proxies tab and uncheck any checkbox. Then click OK in the lower right corner.
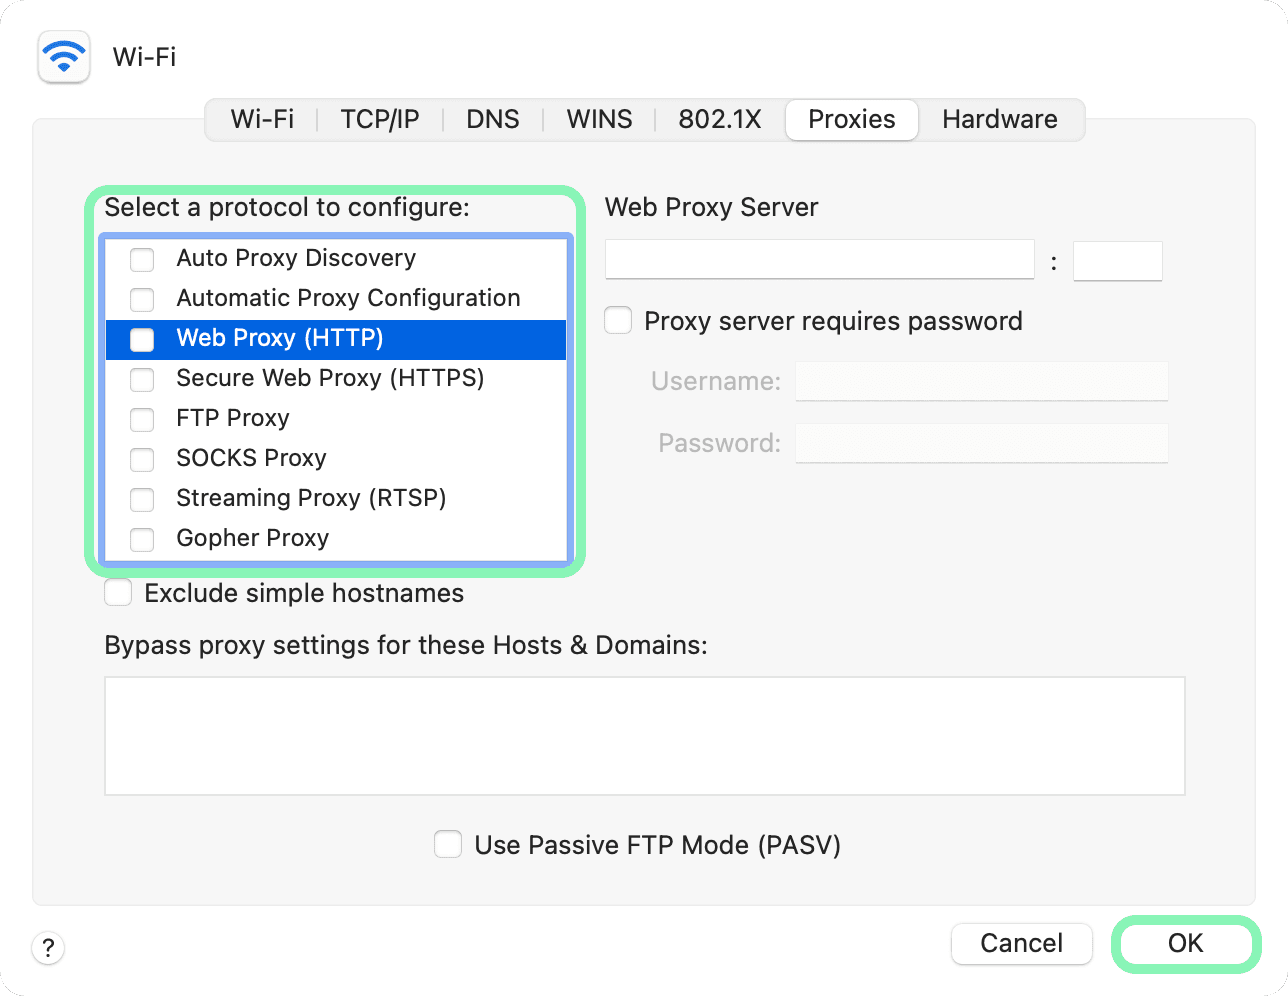
Unchecking the checkboxes
3. In the Network window, click Apply , and then you can close the settings entirely.
Why Safari can't connect to a proxy server
Most commonly, the reason is that the proxy server settings were set up incorrectly. Follow our macOS proxy integration guide to configure Oxylabs proxies properly.
Another reason could be that, coincidentally, you have lost the internet connection. Disable the proxy to eliminate it as a cause, and check your Wi-Fi or Ethernet connection.
If you still can’t connect your proxy, don’t hesitate to contact us via live chat or send us an email .
Wrapping up
As mentioned previously, the Safari browser doesn’t support proxies. You have to configure the proxy on your Mac operating system to be able to use it with Safari. Although this is less than ideal, other solutions are available to enjoy the benefits of proxy servers, specifically on your chosen application. Check out our integrations page to find out more.
If you have any questions or need immediate assistance, please feel free to get in touch with us.
Please be aware that this is a third-party tool not owned or controlled by Oxylabs. Each third-party provider is responsible for its own software and services. Consequently, Oxylabs will have no liability or responsibility to you regarding those services. Please carefully review the third party's policies and practices and/or conduct due diligence before accessing or using third-party services.
Useful resources
How to Bypass an IP Ban: Techniques & Tips
Got your IP banned from a website? This blog post will walk you through the best solutions on how to prevent IP bans from ever happening again.
Most Common HTTP Headers
HTTP headers enable to transfer further details within the request or response headers. Find out 5 key HTTP headers that are crucial to use and optimize in web scraping.
How to Use cURL With Proxy?
In this step-by-step guide, you will go through the basics of how to use cURL with proxy. Also, you will get bonus tips on smooth and easy proxy usage.
Get the latest news from data gathering world
Get Safari proxies for $8/GB
GET IN TOUCH
Certified data centers and upstream providers
Connect with us
- Affiliate program
- Service partners
- Residential Proxies sourcing
- Our products
- Project 4beta
- Sustainability
- Trust & Safety
- Datacenter Proxies
- Shared Datacenter Proxies
- Dedicated Datacenter Proxies
- Residential Proxies
- Static Residential Proxies
- SOCKS5 Proxies
- Mobile Proxies
- Rotating ISP Proxies
- Proxy Servers
Advanced proxy solutions
- Web Unblocker
Top locations
- United States
- United Kingdom
- All locations
- Developers Hub
- Documentation
Scraper APIs
- SERP Scraper API
- E-Commerce Scraper API
- Web Scraper API
Innovation hub
- Adaptive Parser
- Intellectual Property
oxylabs.io © 2024 All Rights Reserved
Burp Scanner
Burp Suite's web vulnerability scanner

Product comparison
What's the difference between Pro and Enterprise Edition?

Download the latest version of Burp Suite.

- Support Center
- Documentation
- Desktop editions
- Mobile testing
Configuring an iOS device to work with Burp Suite Professional
Professional Community Edition
Last updated: April 29, 2024
Read time: 2 Minutes
You can test web applications and mobile apps using an iOS device. To do this, you need to do the following:
- Configure your Burp Proxy listener to accept connections on all network interfaces.
- Connect both your device and your computer to the same wireless network.
- To interact with HTTPS traffic, you need to install a CA certificate on your iOS device.
Step 1: Configure the Burp Proxy listener
To configure the proxy settings for Burp Suite Professional :
- Open Burp Suite Professional click Settings to open the Settings dialog.
- Go to Tools > Proxy .
- In Proxy listeners , click Add .
- In the Binding tab, set Bind to port to 8082 (or another port that is not in use).
Select All interfaces and click OK .
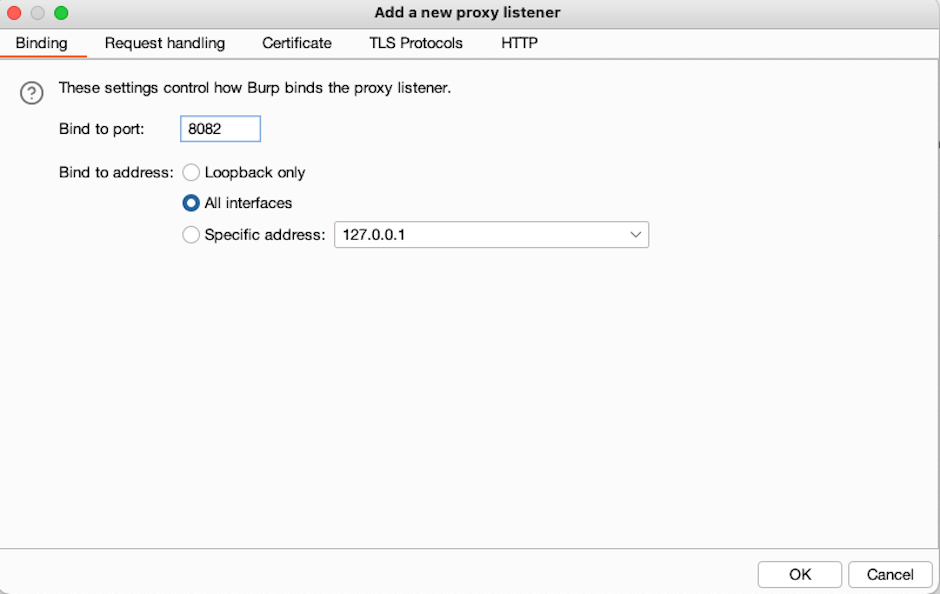
- At the prompt, click Yes .
Step 2: Configure your device to use the proxy
To configure the proxy settings for your iOS device:
- In your iOS device, go to Settings > Wi-Fi .
- Make sure that the Wi-Fi button is on and connect to your Wi-Fi network.
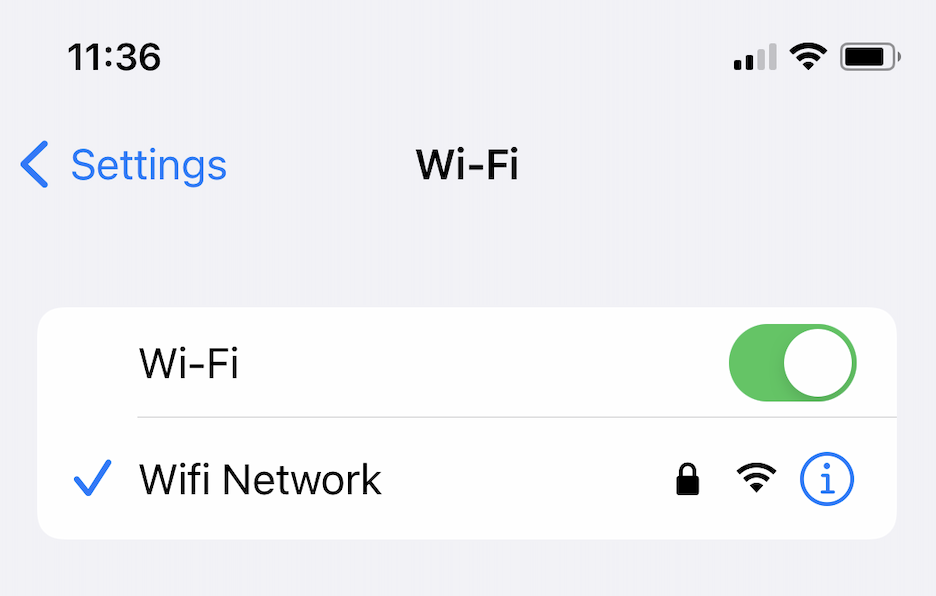
Select the information icon ( i ) next to your Wi-Fi network.
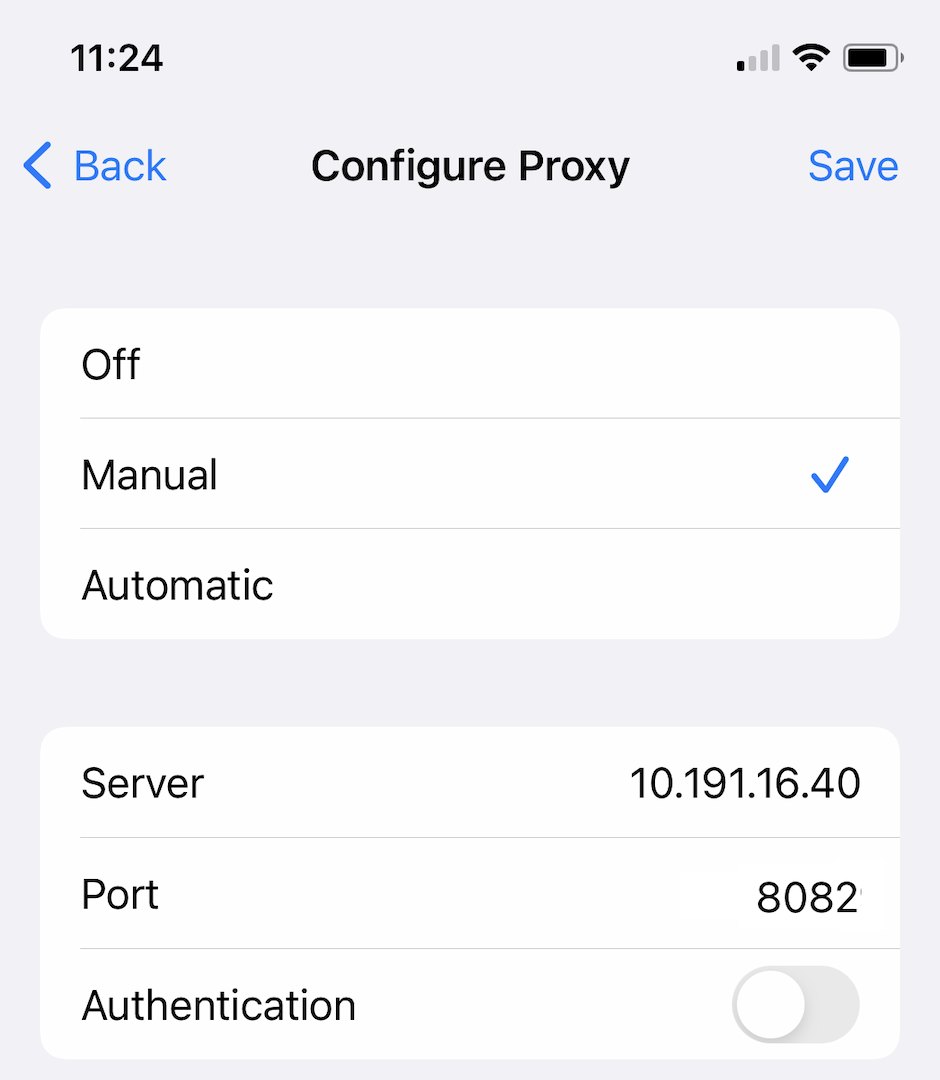
- Set Configure Proxy to Manual .
- Set Server to the IP address of the computer that is running Burp Suite Professional.
- Set Port to the port value that you configured for the Burp Proxy listener, in this example 8082 .
Step 3: Install a CA certificate on your iOS device
In order to interact with HTTPS traffic, you need to install a CA certificate from your Burp Suite Professional installation on your iOS device.
To install the CA certificate to your iOS device:
- Make sure that Burp Suite Professional is running on your computer.
- Use the browser on your iOS device to go to http://burpsuite and select CA Certificate .
- When the CA certificate downloads, select Profile downloaded in the Settings menu.
On the Install Profile screen, select Install .
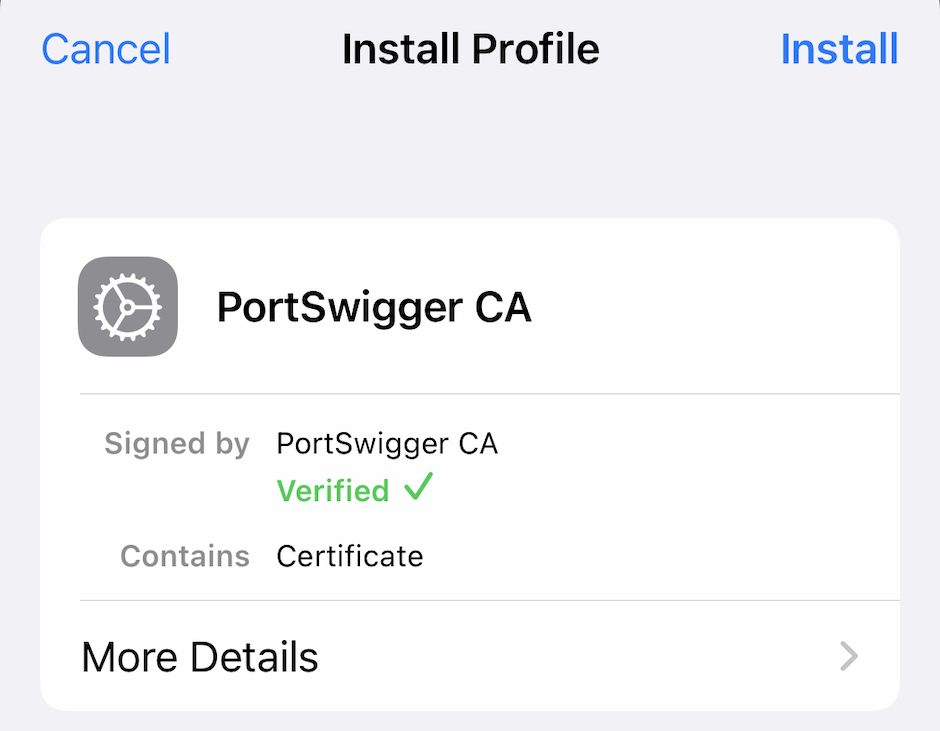
- On the Installing Profile screen, select Install .
- When the profile is installed, select Done .
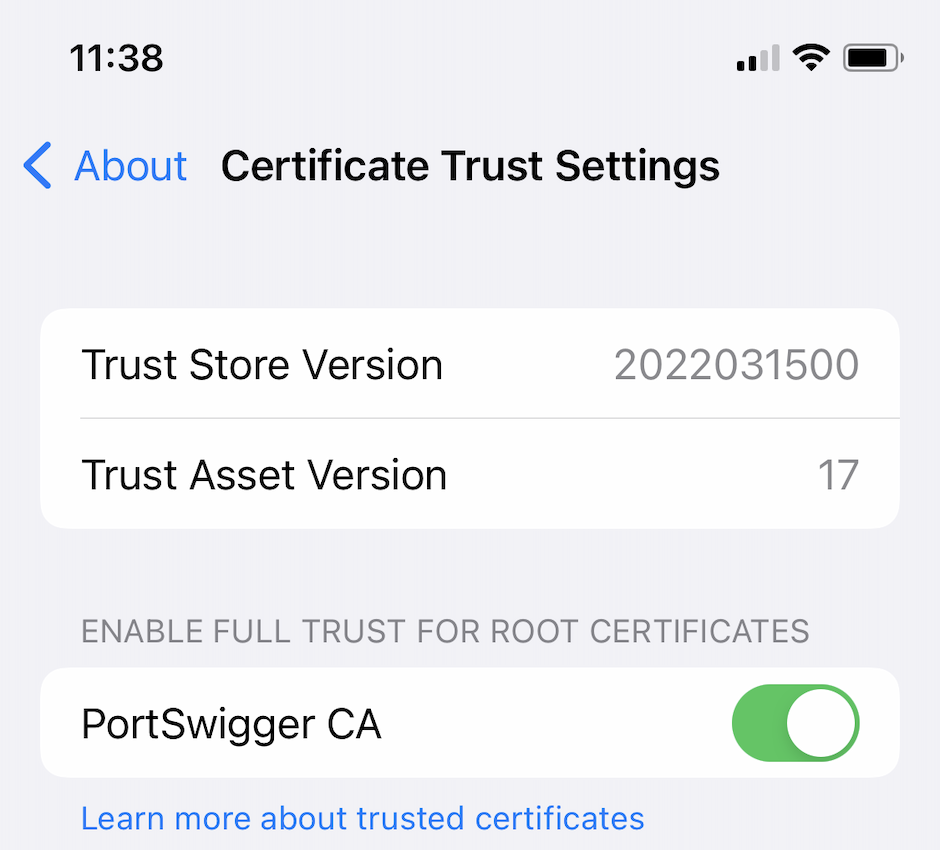
- Go to Settings > General > About > Certificate Trust Settings .
Activate the toggle switch for Portswigger CA .
Step 4: Test the configuration
To test the configuration:
- Open Burp Suite Professional.
- Go to Proxy > Intercept and click Intercept is off to switch intercept on.
- Open the browser on your iOS device and go to an HTTPS web page.
The page should load without any security warnings. You should see the corresponding requests within Burp Suite Professional.
Was this article helpful?
An error occurred, please try again.
More From Forbes
Ios 17.5—apple issues update now warning to all iphone users.
- Share to Facebook
- Share to Twitter
- Share to Linkedin
Apple has issued iOS 17.5 along with a warning to update your iPhone as soon as possible. That’s because iOS 17.5 fixes 15 security vulnerabilities, some of which are serious.
Apple remains tight-lipped about exactly what is fixed in iOS 17.5, to ensure as many people as possible are able to upgrade their iPhones before attackers can get hold of the details.
Among the important flaws patched in iOS 17.5 are an issue in the Kernel at the heart of the iPhone operating system tracked as CVE-2024-27818, which could allow an attacker to execute code. Another issue fixed in iOS 17.5, in AppleAVD, could see an adversary able to execute arbitrary code with Kernel privileges if a user downloads an app, Apple said on its support page .
Apple has issued iOS 17.5 along with a warning to update your iPhone as soon as possible.
05/14 update below. This article was first published on 05/13.
Another significant bug squashed in iOS 17.5 is a vulnerability in Voice Control that could allow an attacker to elevate privileges. Meanwhile, CVE-2024-27834 is a flaw in WebKit, the engine that underpins the Safari browser, which could allow an attacker to bypass Pointer Authentication.
An issue in MarketplaceKit tracked as CVE-2024-27852 and reported by researchers at security outfit Mysk could see a maliciously crafted webpage able to distribute a script that tracks users on other webpages.
‘Ghost Of Tsushima’ Is Already Flooded With Negative Reviews On Steam
Wwe smackdown results winners and grades with stratton vs belair, biden trump debates what to know as trump pushes for 2 more faceoffs.
Sean Wright, head of application security at Featurespace, calls the fixes issued in iOS 17.5 “a mixed bag.”
The worst is the kernel flaw, he says. “This could be chained with some of the other vulnerabilities to allow an attacker to gain full access to the device.”
POC for iOS 17.5 Kernel Flaw Will Soon Be Ready
One day after iOS 17.5 was issued, more is being unveiled about the security fixes. Notably, a security researcher Meysam who claims to have reported the kernel vulnerability has described in a post on X, formally Twitter, how he reported the flaw in iOS 17.4.1—the previous version of iOS 17. He plans to publish a proof of concept to demonstrate how it works “soon.”
While he is keen to point out that this is not an exploit—ie a direct method of exploiting the issue—it does make updating to iOS 17.5 especially crucial. The more attackers know about the flaw, the more likely it is they can use it in attacks.
Apple Issues iOS 16.7.8 To Fix Already-Exploited Issue
Alongside iOS 17.5, Apple has issued iOS 16.7.8, fixing two issues, one of which is already being used in real-life attacks. Tracked as CVE-2024-23296, the flaw in RTKit could enable an attacker with arbitrary kernel read and write capability to bypass kernel memory protections. “Apple is aware of a report that this issue may have been exploited,” Apple wrote on its support page .
The iOS 16.7.8 is available for iPhone 8, iPhone 8 Plus, iPhone X, iPad 5th generation, iPad Pro 9.7-inch, and iPad Pro 12.9-inch 1st generation.
Why You Should Update Now To iOS 17.5 Or iOS 16.7.8
It’s been a while since Apple’s last security update, iOS 17.4.1 —released in March—which fixed multiple serious security flaws. The update before that, iOS 17.4, was an emergency patch for issues being used in real life attacks.
The iOS 16.7.8 update is similar as it also patches already-exploited security issues. If you have an older device, updating to iOS 16.7.8 is a no-brainer, given that the flaw is being used in attacks.
While iOS 17.5 doesn’t cover any already-exploited flaws—at least that we know about—some of the issues are serious making it important you update your iPhone as soon as you can.
At the same time, the iOS 17.5 update contains cool new features, including unwanted tracker protection, as well as bug fixes.
The iOS 17.5 update is available for the iPhone XS and later, iPad Pro 12.9-inch 2nd generation and later, iPad Pro 10.5-inch, iPad Pro 11-inch 1st generation and later, iPad Air 3rd generation and later, iPad 6th generation and later and iPad mini 5th generation and later.
Two days after iOS 17.5 was released, some users are complaining about a Photos bug that is seeing deleted photos from years ago reappearing on people’s iPhones. This bug is certainly concerning, but it’s likely it will be fixed soon by Apple. I haven’t had any issues since updating to iOS 17.5.
If you care about your security, you will need to apply iOS 17.5 or iOS 16.7.8 manually, because Apple’s automatic updates can take a while to reach iPhones. It’s during this time that your device remains open to attack.
Wright says there is no need to panic, but ensure that you update “as soon as you can.”
So what are you waiting for? Go to your iPhone’s Settings > General > Software Update and download and install iOS 17.5 or iOS 16.7.8 now.
05/14 update: As well as important security fixes, the iOS 17.5 update contains a feature that helps stop unwanted tracking across platforms. Building on Apple’s iPhone feature to detect AirTags that might have been slipped into a bag or placed in a vehicle, the unwanted tracking tool in iOS 17.5 is a result of a partnership between Apple and its rival Google.
After releasing iOS 17.5, Apple has issued a press release to confirm the anti-tracking features are live. It describes how Apple and Google worked together to create an industry specification—Detecting Unwanted Location Trackers—for Bluetooth tracking devices. “This will help mitigate the misuse of devices designed to help keep track of belongings,” the statement reads, adding that Apple is implementing this capability in iOS 17.5, and Google in its Android 6.0+ devices.
The iOS 17.5 feature means users will get an “[Item] Found Moving With You” alert if an unknown Bluetooth tracking device is detected.
It works across platforms, with Bluetooth tag manufacturers including Chipolo, eufy, Jio, Motorola and Pebblebee saying future tags will be compatible.
Among the benefits, it offers instructions and best practices for manufacturers, “should they choose to build unwanted tracking alert capabilities into their products,” according to Apple and Google.
The standard is ongoing: Apple and Google are working with the Internet Engineering Task Force via the Detecting Unwanted Location Trackers working group to develop the official standard.
Update 05/15: Article updated to include details about iOS 17.5 photos bug.

- Editorial Standards
- Reprints & Permissions
Join The Conversation
One Community. Many Voices. Create a free account to share your thoughts.
Forbes Community Guidelines
Our community is about connecting people through open and thoughtful conversations. We want our readers to share their views and exchange ideas and facts in a safe space.
In order to do so, please follow the posting rules in our site's Terms of Service. We've summarized some of those key rules below. Simply put, keep it civil.
Your post will be rejected if we notice that it seems to contain:
- False or intentionally out-of-context or misleading information
- Insults, profanity, incoherent, obscene or inflammatory language or threats of any kind
- Attacks on the identity of other commenters or the article's author
- Content that otherwise violates our site's terms.
User accounts will be blocked if we notice or believe that users are engaged in:
- Continuous attempts to re-post comments that have been previously moderated/rejected
- Racist, sexist, homophobic or other discriminatory comments
- Attempts or tactics that put the site security at risk
- Actions that otherwise violate our site's terms.
So, how can you be a power user?
- Stay on topic and share your insights
- Feel free to be clear and thoughtful to get your point across
- ‘Like’ or ‘Dislike’ to show your point of view.
- Protect your community.
- Use the report tool to alert us when someone breaks the rules.
Thanks for reading our community guidelines. Please read the full list of posting rules found in our site's Terms of Service.

Six Ways to Speed Up Your iPhone
I t’s hard to be patient with a slow iPhone , especially when using it for everything, from the calculator to getting directions on Maps. No one likes dealing with lag, buffering, or app freezing. Fortunately, there are a few ways you could speed up your iPhone.
Restart your iPhone
Let’s start with the classic “Did you try turning it off and on again?” It’s a classic for a reason, not just another tech myth. On a technical level, it helps refresh your iPhone’s RAM or working memory, which optimizes its overall performance. Since it’s probably the most straightforward hack, I’d recommend starting with this one.
There are slightly different ways to restart an iPhone based on its model. If you can’t get yours to restart, you might want to do a quick “how to restart [your iPhone model]” search. In case you’re unsure about your iPhone’s model, we have a guide for that , too.
Clear Safari Data
I’m sure we have encountered an ‘Accept Cookies’ popup. Even if you have no idea what that does, you’ve probably accepted tons of cookies by now. Refer to this helpful guide for a detailed and easy lesson on internet cookies. For the scope of this piece, all you need to know is that every time you click on ‘Accept Cookies’ on your browser, you’re putting a bunch of files on your device. These files pile up over time and end up slowing your phone.
If you frequently use Safari on your iPhone, you probably have a lot of passwords, cookies, tabs, and other login info in your Safari cache. It’s a good habit to clear that from time to time. Note that this will require re-entering login credentials or other personal info on some sites since clearing your cache will make your Safari brand new again.
To clear all Safari data, go to Settings on your iPhone and look up ‘Safari.’ Once in the Safari menu, scroll down until you see ‘Clear History and Website Data.’ It will ask you to pick a timeframe. Select ‘All history’ and then hit the red button at the bottom that says ‘Clear History.’
Free Up Space
Full storage is one of the leading causes of a sluggish iPhone. Go to Settings , scroll to General , and click on iPhone Storage from the menu. Doing so will present you with a stacked bar chart and an ordered list of your iPhone’s storage situation, clearly labeling how much space is occupied by which app.
It will also provide you with recommendations on how to free up space. Under Recommendations , click on Review Large Attachments to see the photos, videos, and attachments that are taking up the most space. When you see something you want to delete, swipe left and hit Delete .
There are other ways to free up space on your iPhone, but it ultimately depends on your priorities and your phone use. If you don’t always need all your photos and videos on your phone, you can back them up on iCloud and delete them from your iPhone. However, this would mean you would no longer be able to access them without the internet.
Similarly, if you don’t need all your iMessages, you can mass-delete them. I’ll review all the ways to clear storage on your iPhone in a separate, dedicated guide.
iOS updates often bring bug fixes that help improve your iPhone’s efficiency, so it’s a good idea to always be on the latest software update. You can do that by turning automatic updates on. Go to Settings > General > Software Update > Automatic Updates and turn on the toggle switch for all three options on the page. This will automatically download and install iOS software updates when your phone is connected to Wi-Fi, charging, and locked.
You can also manually update your iOS. A ‘Software Update Available’ notice on your Settings app under your Apple ID will tell you there’s a newer version you haven’t yet updated to. If you see that, scroll down to General > Software Update and click Download and Install to begin the update. If you don’t see that notice, you’re on the latest version.
Replace Battery
Another possible reason for a slow phone is a battery overused to the point of dysfunction. If your iPhone is old, its battery’s health may not be ideal. To see if that’s the case, go to Settings, look up Battery Health, and click on Battery Health & Charging from the open menu. Anything 80% and above is good, but Apple recommends replacing your battery when its health falls below that mark.
Turn Off Automatic Downloads and Background App Refresh
Apps on your iPhone tend to auto-update. While this is helpful, it could become overwhelming for your phone, especially if you have many apps on it. Multiple background app refreshes also take place without you knowing. Again, this is a helpful feature, but it could lead to a considerable drop in your phone’s efficiency if you have many apps that constantly refresh and update.
Go to Settings > App Store and turn off all three toggle switches under ‘Automatic Downloads.’ These are App Downloads, App Updates, and In-App Content. Then, go to General > Background App Refresh > Background App Refresh (again) and choose Off . Doing both will ensure no power-hungry apps are running in the background. If you’d like an app updated, you can constantly manually update it in the App Store.
No, closing your background apps won’t help.
I know; I felt as deceived as you did when Gizmodo Maxwell Zeff told us that closing background apps doesn’t do anything and that I have been making my poor little thumb do all that labor for years for nothing. It’s just a tech myth that originated years ago on Apple’s community forum and Stack Overflow and has been perpetuated ever since (because it sounds like it should work!). But yeah, doing that won’t affect either performance or battery.
Are some of your apps still running slow?
Are you sure it’s your phone and not your network? People often mistake a slow connection for a slow phone. Especially if you’re experiencing lag on apps that require an internet connection, it might just be your internet that needs fixing.
To quickly check this, look up ‘speed test’ on your browser. You’ll see an ‘Internet speed test’ pop-up. Hit the blue button that says ‘run speed test.’ In around 30 seconds, you’ll get precise stats on your download and upload speeds and a comment on your internet performance.
I just ran mine, and it said, “Your Internet connection is very fast. It should be able to handle multiple devices streaming HD videos, video conferencing, and gaming at the same time.” So, if my iPhone starts acting up, I’d know it’s not my internet.
For the latest news, Facebook , Twitter and Instagram .
iPhone User Guide
- iPhone models compatible with iOS 17
- R ' class='toc-item' data-ss-analytics-link-url='https://support.apple.com/guide/iphone/iphone-xr-iph017302841/ios' data-ajax-endpoint='https://support.apple.com/guide/iphone/iphone-xr-iph017302841/ios' data-ss-analytics-event="acs.link_click" href='https://support.apple.com/guide/iphone/iphone-xr-iph017302841/ios' id='toc-item-IPH017302841' data-tocid='IPH017302841' > iPhone X R
- S ' class='toc-item' data-ss-analytics-link-url='https://support.apple.com/guide/iphone/iphone-xs-iphc00446242/ios' data-ajax-endpoint='https://support.apple.com/guide/iphone/iphone-xs-iphc00446242/ios' data-ss-analytics-event="acs.link_click" href='https://support.apple.com/guide/iphone/iphone-xs-iphc00446242/ios' id='toc-item-IPHC00446242' data-tocid='IPHC00446242' > iPhone X S
- S Max' class='toc-item' data-ss-analytics-link-url='https://support.apple.com/guide/iphone/iphone-xs-max-iphcd2066870/ios' data-ajax-endpoint='https://support.apple.com/guide/iphone/iphone-xs-max-iphcd2066870/ios' data-ss-analytics-event="acs.link_click" href='https://support.apple.com/guide/iphone/iphone-xs-max-iphcd2066870/ios' id='toc-item-IPHCD2066870' data-tocid='IPHCD2066870' > iPhone X S Max
- iPhone 11 Pro
- iPhone 11 Pro Max
- iPhone SE (2nd generation)
- iPhone 12 mini
- iPhone 12 Pro
- iPhone 12 Pro Max
- iPhone 13 mini
- iPhone 13 Pro
- iPhone 13 Pro Max
- iPhone SE (3rd generation)
- iPhone 14 Plus
- iPhone 14 Pro
- iPhone 14 Pro Max
- iPhone 15 Plus
- iPhone 15 Pro
- iPhone 15 Pro Max
- Setup basics
- Make your iPhone your own
- Take great photos and videos
- Keep in touch with friends and family
- Share features with your family
- Use iPhone for your daily routines
- Expert advice from Apple Support
- What’s new in iOS 17
- Turn on and set up iPhone
- Wake, unlock, and lock
- Set up cellular service
- Use Dual SIM
- Connect to the internet
- Sign in with Apple ID
- Subscribe to iCloud+
- Find settings
- Set up mail, contacts, and calendar accounts
- Learn the meaning of the status icons
- Charge the battery
- Charge with cleaner energy sources
- Show the battery percentage
- Check battery health and usage
- Use Low Power Mode
- Read and bookmark the user guide
- Learn basic gestures
- Learn gestures for iPhone models with Face ID
- Adjust the volume
- Silence iPhone
- Find your apps in App Library
- Switch between open apps
- Quit and reopen an app
- Multitask with Picture in Picture
- Access features from the Lock Screen
- Use the Dynamic Island
- Perform quick actions
- Search on iPhone
- Get information about your iPhone
- View or change cellular data settings
- Travel with iPhone
- Change sounds and vibrations
- Use the Action button on iPhone 15 Pro and iPhone 15 Pro Max
- Create a custom Lock Screen
- Change the wallpaper
- Adjust the screen brightness and color balance
- Keep the iPhone display on longer
- Use StandBy
- Customize the text size and zoom setting
- Change the name of your iPhone
- Change the date and time
- Change the language and region
- Organize your apps in folders
- Add, edit, and remove widgets
- Move apps and widgets on the Home Screen
- Remove or delete apps
- Use and customize Control Center
- Change or lock the screen orientation
- View and respond to notifications
- Change notification settings
- Set up a Focus
- Allow or silence notifications for a Focus
- Turn a Focus on or off
- Stay focused while driving
- Customize sharing options
- Type with the onscreen keyboard
- Dictate text
- Select and edit text
- Use predictive text
- Use text replacements
- Add or change keyboards
- Add emoji and stickers
- Take a screenshot
- Take a screen recording
- Draw in documents
- Add text, shapes, signatures, and more
- Fill out forms and sign documents
- Use Live Text to interact with content in a photo or video
- Use Visual Look Up to identify objects in your photos and videos
- Lift a subject from the photo background
- Subscribe to Apple Arcade
- Play with friends in Game Center
- Connect a game controller
- Use App Clips
- Update apps
- View or cancel subscriptions
- Manage purchases, settings, and restrictions
- Install and manage fonts
- Buy books and audiobooks
- Annotate books
- Access books on other Apple devices
- Listen to audiobooks
- Set reading goals
- Organize books
- Create and edit events in Calendar
- Send invitations
- Reply to invitations
- Change how you view events
- Search for events
- Change calendar and event settings
- Schedule or display events in a different time zone
- Keep track of events
- Use multiple calendars
- Use the Holidays calendar
- Share iCloud calendars
- Camera basics
- Set up your shot
- Apply Photographic Styles
- Take Live Photos
- Take Burst mode shots
- Take a selfie
- Take panoramic photos
- Take macro photos and videos
- Take portraits
- Take Night mode photos
- Take Apple ProRAW photos
- Adjust the shutter volume
- Adjust HDR camera settings
- Record videos
- Record spatial videos for Apple Vision Pro
- Record ProRes videos
- Record videos in Cinematic mode
- Change video recording settings
- Save camera settings
- Customize the Main camera lens
- Change advanced camera settings
- View, share, and print photos
- Use Live Text
- Scan a QR code
- See the world clock
- Set an alarm
- Change the next wake up alarm
- Use the stopwatch
- Use multiple timers
- Add and use contact information
- Edit contacts
- Add your contact info
- Use NameDrop on iPhone to share your contact info
- Use other contact accounts
- Use Contacts from the Phone app
- Merge or hide duplicate contacts
- Export contacts
- Get started with FaceTime
- Make FaceTime calls
- Receive FaceTime calls
- Create a FaceTime link
- Take a Live Photo
- Turn on Live Captions in a FaceTime call
- Use other apps during a call
- Make a Group FaceTime call
- View participants in a grid
- Use SharePlay to watch, listen, and play together
- Share your screen in a FaceTime call
- Collaborate on a document in FaceTime
- Use video conferencing features
- Hand off a FaceTime call to another Apple device
- Change the FaceTime video settings
- Change the FaceTime audio settings
- Change your appearance
- Leave a call or switch to Messages
- Block unwanted callers
- Report a call as spam
- Connect external devices or servers
- Modify files, folders, and downloads
- Search for files and folders
- Organize files and folders
- Set up iCloud Drive
- Share files and folders in iCloud Drive
- Use an external storage device, a file server, or a cloud storage service
- Share your location
- Meet up with a friend
- Send your location via satellite
- Add or remove a friend
- Locate a friend
- Get notified when friends change their location
- Notify a friend when your location changes
- Turn off Find My
- Add your iPhone
- Add your iPhone Wallet with MagSafe
- Get notified if you leave a device behind
- Locate a device
- Mark a device as lost
- Erase a device
- Remove a device
- Add an AirTag
- Share an AirTag or other item in Find My on iPhone
- Add a third-party item
- Get notified if you leave an item behind
- Locate an item
- Mark an item as lost
- Remove an item
- Adjust map settings
- Get started with Fitness
- Track daily activity and change your move goal
- See your activity summary
- Sync a third-party workout app
- Change fitness notifications
- Share your activity
- Subscribe to Apple Fitness+
- Find Apple Fitness+ workouts and meditations
- Start an Apple Fitness+ workout or meditation
- Create a Custom Plan in Apple Fitness+
- Work out together using SharePlay
- Change what’s on the screen during an Apple Fitness+ workout or meditation
- Download an Apple Fitness+ workout or meditation
- Get started with Freeform
- Create a Freeform board
- Draw or handwrite
- Apply consistent styles
- Position items on a board
- Search Freeform boards
- Share and collaborate
- Delete and recover boards
- Get started with Health
- Fill out your Health Details
- Intro to Health data
- View your health data
- Share your health data
- View health data shared by others
- Download health records
- View health records
- Monitor your walking steadiness
- Log menstrual cycle information
- View menstrual cycle predictions and history
- Track your medications
- Learn more about your medications
- Log your state of mind
- Take a mental health assessment
- Set up a schedule for a Sleep Focus
- Turn off alarms and delete sleep schedules
- Add or change sleep schedules
- Turn Sleep Focus on or off
- Change your wind down period, sleep goal, and more
- View your sleep history
- Check your headphone levels
- Use audiogram data
- Register as an organ donor
- Back up your Health data
- Intro to Home
- Upgrade to the new Home architecture
- Set up accessories
- Control accessories
- Control your home using Siri
- Use Grid Forecast to plan your energy usage
- Set up HomePod
- Control your home remotely
- Create and use scenes
- Use automations
- Set up security cameras
- Use Face Recognition
- Unlock your door with a home key
- Configure a router
- Invite others to control accessories
- Add more homes
- Get music, movies, and TV shows
- Get ringtones
- Manage purchases and settings
- Get started with Journal
- Write in your journal
- Review your past journal entries
- Change Journal settings
- Magnify nearby objects
- Change settings
- Detect people around you
- Detect doors around you
- Receive image descriptions of your surroundings
- Read aloud text and labels around you
- Set up shortcuts for Detection Mode
- Add and remove email accounts
- Set up a custom email domain
- Check your email
- Unsend email with Undo Send
- Reply to and forward emails
- Save an email draft
- Add email attachments
- Download email attachments
- Annotate email attachments
- Set email notifications
- Search for email
- Organize email in mailboxes
- Flag or block emails
- Filter emails
- Use Hide My Email
- Use Mail Privacy Protection
- Change email settings
- Delete and recover emails
- Add a Mail widget to your Home Screen
- Print emails
- Get travel directions
- Select other route options
- Find stops along your route
- View a route overview or a list of turns
- Change settings for spoken directions
- Get driving directions
- Get directions to your parked car
- Set up electric vehicle routing
- Report traffic incidents
- Get cycling directions
- Get walking directions
- Get transit directions
- Delete recent directions
- Get traffic and weather info
- Estimate travel time and ETA
- Download offline maps
- Search for places
- Find nearby attractions, restaurants, and services
- Get information about places
- Mark places
- Share places
- Rate places
- Save favorite places
- Explore new places with Guides
- Organize places in My Guides
- Clear location history
- Look around places
- Take Flyover tours
- Find your Maps settings
- Measure dimensions
- View and save measurements
- Measure a person’s height
- Use the level
- Set up Messages
- About iMessage
- Send and reply to messages
- Unsend and edit messages
- Keep track of messages
- Forward and share messages
- Group conversations
- Watch, listen, or play together using SharePlay
- Collaborate on projects
- Use iMessage apps
- Take and edit photos or videos
- Share photos, links, and more
- Send stickers
- Request, send, and receive payments
- Send and receive audio messages
- Animate messages
- Send and save GIFs
- Turn read receipts on or off
- Change notifications
- Block, filter, and report messages
- Delete messages and attachments
- Recover deleted messages
- View albums, playlists, and more
- Show song credits and lyrics
- Queue up your music
- Listen to broadcast radio
- Subscribe to Apple Music
- Play music together in the car with iPhone
- Listen to lossless music
- Listen to Dolby Atmos music
- Apple Music Sing
- Find new music
- Add music and listen offline
- Get personalized recommendations
- Listen to radio
- Search for music
- Create playlists
- See what your friends are listening to
- Use Siri to play music
- Change the way music sounds
- Get started with News
- Use News widgets
- See news stories chosen just for you
- Read stories
- Follow your favorite teams with My Sports
- Listen to Apple News Today
- Subscribe to Apple News+
- Browse and read Apple News+ stories and issues
- Use Offline Mode to read downloaded News content
- Manually download Apple News+ issues
- Listen to audio stories
- Solve puzzles in Apple News
- Solve crossword and crossword mini puzzles
- Solve Quartiles puzzles
- Search for news stories
- Save stories in News for later
- Subscribe to individual news channels
- Get started with Notes
- Add or remove accounts
- Create and format notes
- Draw or write
- Add photos, videos, and more
- Scan text and documents
- Work with PDFs
- Create Quick Notes
- Search notes
- Organize in folders
- Organize with tags
- Use Smart Folders
- Export or print notes
- Change Notes settings
- Make a call
- View and delete the call history
- Answer or decline incoming calls
- While on a call
- Have a conference or three-way call on iPhone
- Set up voicemail
- Check voicemail
- Change voicemail greeting and settings
- Select ringtones and vibrations
- Make calls using Wi-Fi
- Set up call forwarding
- Set up call waiting
- Block or avoid unwanted calls
- View photos and videos
- Play videos and slideshows
- Delete or hide photos and videos
- Edit photos and videos
- Trim video length and adjust slow motion
- Edit Cinematic mode videos
- Edit Live Photos
- Edit portraits
- Use photo albums
- Edit, share, and organize albums
- Filter and sort photos and videos in albums
- Make stickers from your photos
- Duplicate and copy photos and videos
- Merge duplicate photos and videos
- Search for photos
- Identify people and pets
- Browse photos by location
- Share photos and videos
- Share long videos
- View photos and videos shared with you
- Watch memories
- Personalize your memories
- Manage memories and featured photos
- Use iCloud Photos
- Create shared albums
- Add and remove people in a shared album
- Add and delete photos and videos in a shared album
- Set up or join an iCloud Shared Photo Library
- Add content to an iCloud Shared Photo Library
- Use iCloud Shared Photo Library
- Import and export photos and videos
- Print photos
- Find podcasts
- Listen to podcasts
- Follow your favorite podcasts
- Use the Podcasts widget
- Organize your podcast library
- Download, save, or share podcasts
- Subscribe to podcasts
- Listen to subscriber-only content
- Change download settings
- Make a grocery list
- Add items to a list
- Edit and manage a list
- Search and organize lists
- Work with templates
- Use Smart Lists
- Print reminders
- Use the Reminders widget
- Change Reminders settings
- Browse the web
- Search for websites
- Customize your Safari settings
- Change the layout
- Use Safari profiles
- Open and close tabs
- Organize your tabs
- View your Safari tabs from another Apple device
- Share Tab Groups
- Use Siri to listen to a webpage
- Bookmark favorite webpages
- Save pages to a Reading List
- Find links shared with you
- Annotate and save a webpage as a PDF
- Automatically fill in forms
- Get extensions
- Hide ads and distractions
- Clear your cache and cookies
- Browse the web privately
- Use passkeys in Safari
- Check stocks
- Manage multiple watchlists
- Read business news
- Add earnings reports to your calendar
- Use a Stocks widget
- Translate text, voice, and conversations
- Translate text in apps
- Translate with the camera view
- Subscribe to Apple TV+, MLS Season Pass, or an Apple TV channel
- Add your TV provider
- Get shows, movies, and more
- Watch sports
- Watch Major League Soccer with MLS Season Pass
- Control playback
- Manage your library
- Change the settings
- Make a recording
- Play it back
- Edit or delete a recording
- Keep recordings up to date
- Organize recordings
- Search for or rename a recording
- Share a recording
- Duplicate a recording
- Keep cards and passes in Wallet
- Set up Apple Pay
- Use Apple Pay for contactless payments
- Use Apple Pay in apps and on the web
- Track your orders
- Use Apple Cash
- Use Apple Card
- Use Savings
- Pay for transit
- Access your home, hotel room, and vehicle
- Add identity cards
- Use COVID-19 vaccination cards
- Check your Apple Account balance
- Use Express Mode
- Organize your Wallet
- Remove cards or passes
- Check the weather
- Check the weather in other locations
- View weather maps
- Manage weather notifications
- Use Weather widgets
- Learn the weather icons
- Find out what Siri can do
- Tell Siri about yourself
- Have Siri announce calls and notifications
- Add Siri Shortcuts
- About Siri Suggestions
- Use Siri in your car
- Change Siri settings
- Contact emergency services
- Use Emergency SOS via satellite
- Request Roadside Assistance via satellite
- Set up and view your Medical ID
- Use Check In
- Manage Crash Detection
- Reset privacy and security settings in an emergency
- Set up Family Sharing
- Add Family Sharing members
- Remove Family Sharing members
- Share subscriptions
- Share purchases
- Share locations with family and locate lost devices
- Set up Apple Cash Family and Apple Card Family
- Set up parental controls
- Set up a child’s device
- Get started with Screen Time
- Protect your vision health with Screen Distance
- Set up Screen Time
- Set communication and safety limits and block inappropriate content
- Set up Screen Time for a family member
- Charging cable
- Power adapters
- MagSafe chargers and battery packs
- MagSafe cases and sleeves
- Qi-certified wireless chargers
- Use AirPods
- Use EarPods
- Apple Watch
- Wirelessly stream videos and photos to Apple TV or a smart TV
- Connect to a display with a cable
- HomePod and other wireless speakers
- Pair Magic Keyboard
- Enter characters with diacritical marks
- Switch between keyboards
- Use shortcuts
- Choose an alternative keyboard layout
- Change typing assistance options
- External storage devices
- Bluetooth accessories
- Share your internet connection
- Allow phone calls on your iPad and Mac
- Use iPhone as a webcam
- Hand off tasks between devices
- Cut, copy, and paste between iPhone and other devices
- Stream video or mirror the screen of your iPhone
- Start SharePlay instantly
- Use AirDrop to send items
- Connect iPhone and your computer with a cable
- Transfer files between devices
- Transfer files with email, messages, or AirDrop
- Transfer files or sync content with the Finder or iTunes
- Automatically keep files up to date with iCloud
- Intro to CarPlay
- Connect to CarPlay
- Use your vehicle’s built-in controls
- Get turn-by-turn directions
- Change the map view
- Make phone calls
- View your calendar
- Send and receive text messages
- Announce incoming text messages
- Play podcasts
- Play audiobooks
- Listen to news stories
- Control your home
- Use other apps with CarPlay
- Rearrange icons on CarPlay Home
- Change settings in CarPlay
- Get started with accessibility features
- Turn on accessibility features for setup
- Change Siri accessibility settings
- Open features with Accessibility Shortcut
- Change color and brightness
- Make text easier to read
- Reduce onscreen motion
- Customize per-app visual settings
- Hear what’s on the screen or typed
- Hear audio descriptions
- Turn on and practice VoiceOver
- Change your VoiceOver settings
- Use VoiceOver gestures
- Operate iPhone when VoiceOver is on
- Control VoiceOver using the rotor
- Use the onscreen keyboard
- Write with your finger
- Keep the screen off
- Use VoiceOver with an Apple external keyboard
- Use a braille display
- Type braille on the screen
- Customize gestures and keyboard shortcuts
- Use VoiceOver with a pointer device
- Use VoiceOver for images and videos
- Use VoiceOver in apps
- Use AssistiveTouch
- Adjust how iPhone responds to your touch
- Use Reachability
- Auto-answer calls
- Turn off vibration
- Change Face ID and attention settings
- Use Voice Control
- Adjust the side or Home button
- Use Apple TV Remote buttons
- Adjust pointer settings
- Adjust keyboard settings
- Control iPhone with an external keyboard
- Adjust AirPods settings
- Turn on Apple Watch Mirroring
- Control a nearby Apple device
- Intro to Switch Control
- Set up and turn on Switch Control
- Select items, perform actions, and more
- Control several devices with one switch
- Use hearing devices
- Use Live Listen
- Use sound recognition
- Set up and use RTT and TTY
- Flash the indicator light for notifications
- Adjust audio settings
- Play background sounds
- Display subtitles and captions
- Show transcriptions for Intercom messages
- Get live captions of spoken audio
- Type to speak
- Record a Personal Voice
- Lock iPhone to one app with Guided Access
- Use built-in privacy and security protections
- Set a passcode
- Set up Face ID
- Set up Touch ID
- Control access to information on the Lock Screen
- Keep your Apple ID secure
- Use passkeys to sign in to apps and websites
- Sign in with Apple
- Share passwords
- Automatically fill in strong passwords
- Change weak or compromised passwords
- View your passwords and related information
- Share passkeys and passwords securely with AirDrop
- Make your passkeys and passwords available on all your devices
- Automatically fill in verification codes
- Automatically fill in SMS passcodes
- Sign in with fewer CAPTCHA challenges
- Use two-factor authentication
- Use security keys
- Manage information sharing with Safety Check
- Control app tracking permissions
- Control the location information you share
- Control access to information in apps
- Control how Apple delivers advertising to you
- Control access to hardware features
- Create and manage Hide My Email addresses
- Protect your web browsing with iCloud Private Relay
- Use a private network address
- Use Advanced Data Protection
- Use Lockdown Mode
- Use Stolen Device Protection
- Receive warnings about sensitive content
- Use Contact Key Verification
- Turn iPhone on or off
- Force restart iPhone
- Back up iPhone
- Reset iPhone settings
- Restore all content from a backup
- Restore purchased and deleted items
- Sell, give away, or trade in your iPhone
- Erase iPhone
- Install or remove configuration profiles
- Important safety information
- Important handling information
- Find more resources for software and service
- FCC compliance statement
- ISED Canada compliance statement
- Ultra Wideband information
- Class 1 Laser information
- Apple and the environment
- Disposal and recycling information
- Unauthorized modification of iOS
Clear your cache and cookies on iPhone
Note: Clearing your browsing history in Safari doesn’t clear any browsing histories kept independently by websites you visited, or your browsing history in other apps.

Below Clear Timeframe, choose how much of your browsing history to clear.
Note: If you have Safari profiles set up, select a profile to clear only the history of that profile, or select All Profiles.
Tap Clear History.
VPN : Secure & Fast Proxy 4+
Super unlimited proxy, unlimited vpn service, designed for iphone.
- 3.7 • 3 Ratings
- Offers In-App Purchases
iPhone Screenshots
Description.
Experience lightning-fast browsing with Fast VPN. Protect your online privacy and access any content securely from anywhere in the world. Try it now! Unlock a world of secure and private internet experiences with Fast VPN. Our VPN proxy app provides you with a lightning-fast and ultra-secure connection, ensuring that your online activities remain shielded from prying eyes. At the same time, you explore your favorite apps and websites. Looking for a fast, secure, and privacy-respecting VPN? Download Fast VPN on your iPhone or iPad today for anonymous web surfing. Looking for a VPN service that's easy to use and elegantly designed? Look no further than Fast VPN. Our user-friendly app is simple to master. All you need to do is open it up, select your preferred server location, and click "connect." With FastVPN, you'll enjoy secure, private browsing in no time. Are you wondering whether you should install a VPN proxy app on your device? Here are some reasons why you might want to consider Fast VPN: - It offers lightning-fast and secure connections. - You get unlimited bandwidth without any speed limitations. - It has a wide range of VPN servers in different countries. -Fast VPN is highly reliable and dependable. - It works with Wi-Fi, LTE, 5G, and all mobile data carriers. - The app has a sleek and intuitive design that is easy to use. If you're looking for secure and private web browsing, then FastVPN is the ideal solution for you. Whether you're at a café, enjoying a drink, or anywhere else, and connected to a public Wi-Fi network, you may be concerned about the security of your data. But with secure servers, you can surf the web with complete privacy and without any fear of tracking or spying. So, don't wait any longer! Download Fast VPN on your device today and initiate a secure connection to our private VPN proxy servers. By doing so, you'll be able to enjoy your favorite social networks and streaming platforms anytime, anywhere, without having to worry about anyone spying on you. These locations are available as follows: - VPN USA - VPN United Kingdom - VPN Netherlands - VPN Germany - VPN Singapore - VPN Spain - VPN France - VPN India - VPN Canada - VPN Japan - VPN Italy - VPN Austria - VPN Australia - VPN Switzerland - VPN Belgium - VPN HongKong - VPN UAE Privacy Policy: https://hawkpass.com/privacy/ Terms of Service: https://hawkpass.com/terms/
Version 2.0.2
1.Fix known bugs 2.Support Steam Store
Ratings and Reviews
App privacy.
The developer, Unlimited VPN Service , indicated that the app’s privacy practices may include handling of data as described below. For more information, see the developer’s privacy policy .
Data Used to Track You
The following data may be used to track you across apps and websites owned by other companies:
- Identifiers
Data Linked to You
The following data may be collected and linked to your identity:
Data Not Linked to You
The following data may be collected but it is not linked to your identity:
- Diagnostics
Privacy practices may vary, for example, based on the features you use or your age. Learn More
Information
English, French, German, Spanish
- Pro Plan $8.99
- Upgrade to Premium $69.99
- Upgrade to Premium $11.99
- Developer Website
- App Support
- Privacy Policy
You Might Also Like
UpperVPN - Best VPN
Zen7 VPN | Fast & Secure
VPN - Unlimited Proxy & Secure
SharkVPN - Secure & Affordable
VPN - Daily Unlimited Proxy
Turbo Fast Secure - Splash VPN

IMAGES
VIDEO
COMMENTS
Head to Settings > Wi-Fi to access proxy settings on an iPhone or iPad. Tap the name of the Wi-Fi network you're connected to. Scroll down and you'll see the "HTTP Proxy" option at the bottom of the screen. By default, the HTTP Proxy option is set to "Off". This means your iPhone won't use a proxy at all when connected to the network.
Configure an iPhone proxy manually. If you know the connection details to the proxy server, tap the Manual option. This reveals additional options to manually enter the Server, Port, and Authentication details for the proxy server on the iPhone. Type the proxy server's IP address in the Server field. Then, enter the Port used for the proxy ...
Manually setting up a proxy server on iPhone or iPad takes just a few quick steps: Open the Settings app then tap on Wi-Fi. Next to the Wi-Fi network you're connected to, tap the i button. Scroll down and tap Configure Proxy. Choose Manual. Enter your proxy server Address and Port number.
JetEngr. From the Home Screen, select Settings, then Wi-Fi. Select the blue right arrow button on your network. Scroll down to the bottom of the page and turn on the HTTP Proxy. Mine requires that I use the Manual option and enter in the server and the port. You may be able to use Auto. where to set safari proxy settings on iphone?
How to use proxy server for a Wi-Fi network on iPhone. Go to Settings and select Wi-Fi. Tap the i icon next to the Wi-Fi network you want to enable the proxy server for. Scroll to HTTP Proxy and tap Configure Proxy. Select Auto for automatic proxy detection and enter the proxy auto-configuration script address into the URL field. Select Manual,
A proxy server acts as a security barrier between your network and the Internet by forwarding requests between a web browser and the requested website. It is a very simple process to configure iOS devices (iPad / iPhone or iPod Touch) to use a proxy server to connect to the Internet. This article describes how to use a proxy server:
Here are the steps to set up a proxy on an iPhone: Go to your phone's Settings. Select Wi-Fi. The WiFi network that you are connected to has a blue checkmark. Tap the round "i" symbol on the right side. Scroll down at the bottom and find HTTP PROXY. Tap on Configure Proxy under it. Choose Manual.
To set up a proxy server for Safari simply configure your iPhone's proxy settings. It would then automatically apply to all the web browsers you will use. This is also applicable for iPad! Here's a more thorough guide for changing Safari proxy settings on iPhone. Table of contents.
Select Wi-Fi . Step 3. Select the Wi-Fi network you're connected to. It will have a blue checkmark on the left. Step 4. At the bottom of the page, under HTTP Proxy, select Configure Proxy . Step 5. Select Manual Configuration . If your proxy provider has given you a link to the proxy configuration file, you can select Automatic Configuration ...
Configuring built-in content filters. Apple devices can restrict Safari and third-party apps to specific websites. Organizations with simple or limited content-filtering needs can use this feature. Organizations with complex or legally mandated content-filtering requirements should use global HTTP proxy or advanced content-filtering options ...
Easy proxy server setup on iPhone or iPad. Setting up a proxy server on your iPhone or iPad can provide several benefits, including masking your IP address and changing your location on the Internet. This allows access to restricted content and increases your security by preventing direct requests from malware.
This article is a bit confused on the details of how Safe Browsing works, but in the new iOS beta, Safari does indeed proxy the service via Apple servers to limit the risk of information leak ...
An iPhone proxy server helps you access a Wi-Fi network for dedicated use. Learn how to configure and use this network to access the internet. ... For instance, if you launch Safari, you will likely get a "Safari cannot open the page because the server cannot be found ...
In the Safari app on your Mac, choose Safari > Preferences, then click Advanced. Click Change Settings (next to Proxies) to open the Network pane of System Preferences. Change the proxy settings using the information your network administrator provided. Click OK. In Safari on your Mac, if you connect to the internet through a firewall, you may ...
Select the internet connection on the left (typically "Wi-Fi"), then click the advanced button. Select the proxies tab. Select both the "Web Proxy" and "Secure Web Proxy" checkboxes. For each checkbox, enter the host/IP address and port number that was displayed at checkout and in your welcome email. Do not check Proxy server ...
How proxy works on iPhone. iPhone Proxy Client: The iPhone that is configured to use a proxy. When your iPhone needs to access internet resources like websites or services, it sends out a request. Proxy Server: An intermediary between your iPhone and the internet. When it receives a request from your iPhone, the proxy server intercepts this ...
How to set up a proxy for Safari iPhone (iPad/iPod) To config your proxy in Safari on a mobile device , first open your "Settings" app on your iPhone, iPad, or iPod. Go to "Wi-Fi" and, if not already, connect to your desired Wi-Fi network. Once connected, click on the "info" icon ( (i) ). Scroll to and tap on "Configure Proxy ...
Disable proxy settings in Safari on Mac. In the Safari browser, click Safari > Preferences…. Click the Advanced tab. Next to Proxies, click Change Settings…. In the Proxies tab, uncheck any checked boxes. Click OK > Apply. Need help?
This works for iphones as well, any browser that can see the PAC file can use the rules you add. manually setup in your wifi-networks settings. At the bottom section of your network setup. Settings -> Wi-Fi -><select your SSID>. Set the HTTP Proxy to Auto and select the path to your PAC file.
The ssh -D is not a global proxy on iOS system (such as iPhone and iPad). The HTTP proxy is also not a global proxy. They cannot both be used on most games and IM (instant message). It just for some web surfing (Safari is all right) but mostly only this. The best and most easy way on iPhone and iPad is using VPN.
Prepare an PAC file on a host. You need a Proxy Auto-Config (PAC) file to configure iOS to use the socks proxy. The PAC file is a text file that contains the content like this: return "SOCKS proxy_host:proxy_port"; Here, you need to replace the proxy_host:proxy_port with your proxy setting. You will need a Web server to host the PAC file.
In the Safari app on your Mac, choose Safari > Settings, then click Advanced. Click Change Settings (next to Proxies) to open Network settings. Change the proxy settings using the information your network administrator provided. Click OK. In Safari on your Mac, if you connect to the internet through a firewall, you may need to specify a proxy ...
1. Open Safari and go to Safari > Preferences. 2. Select the Advanced tab, and within the Proxies section, click Change Settings. In the newly opened window, you can configure proxies. However, the setup will be system-wide, which means that any other browser and application you use will be connected to the internet through the proxy server.
Step 2: Configure your device to use the proxy. To configure the proxy settings for your iOS device: In your iOS device, go to Settings > Wi-Fi . Make sure that the Wi-Fi button is on and connect to your Wi-Fi network. Select the information icon ( i) next to your Wi-Fi network. Set Configure Proxy to Manual .
Go to your iPhone's Settings > General > Software Update and download and install iOS 17.5 or iOS 16.7.8 now. Forbes Apple Sends Spyware Attack Alerts To iPhone Users In 92 Countries By Kate O ...
Launch the Safari app. On the bottom navigation bar, long-press on the Tabs switcher icon to pull up the menu. Select "Close All [X] Tabs." Finalize the action by hitting "Close All [X] Tabs ...
Open Safari on your iPhone and tap the 'Bookmarks' button at the bottom (beside the tab switcher button). On iPad, tap the 'Show Sidebar' button at the top left corner. 2.
To clear all Safari data, go to Settings on your iPhone and look up 'Safari.' Once in the Safari menu, scroll down until you see 'Clear History and Website Data.' It will ask you to pick a ...
Open the Safari app on your iPhone. Tap , tap , then tap Clear. Below Clear Timeframe, choose how much of your browsing history to clear. Note: If you have Safari profiles set up, select a profile to clear only the history of that profile, or select All Profiles. Tap Clear History.
Download VPN : Secure & Fast Proxy and enjoy it on your iPhone, iPad, and iPod touch. Unlock a world of secure and private internet experiences with Fast VPN. Our VPN proxy app provides you with a lightning-fast and ultra-secure connection, ensuring that your online activities remain shielded from prying eyes. At the same time, you ...