- Skip to main content
- Skip to primary sidebar
- Start a Craft Blog
- Cake Decorating
- Craft Ideas
- Holiday Crafts
- Crafting Equipment
- Sewing Crafts

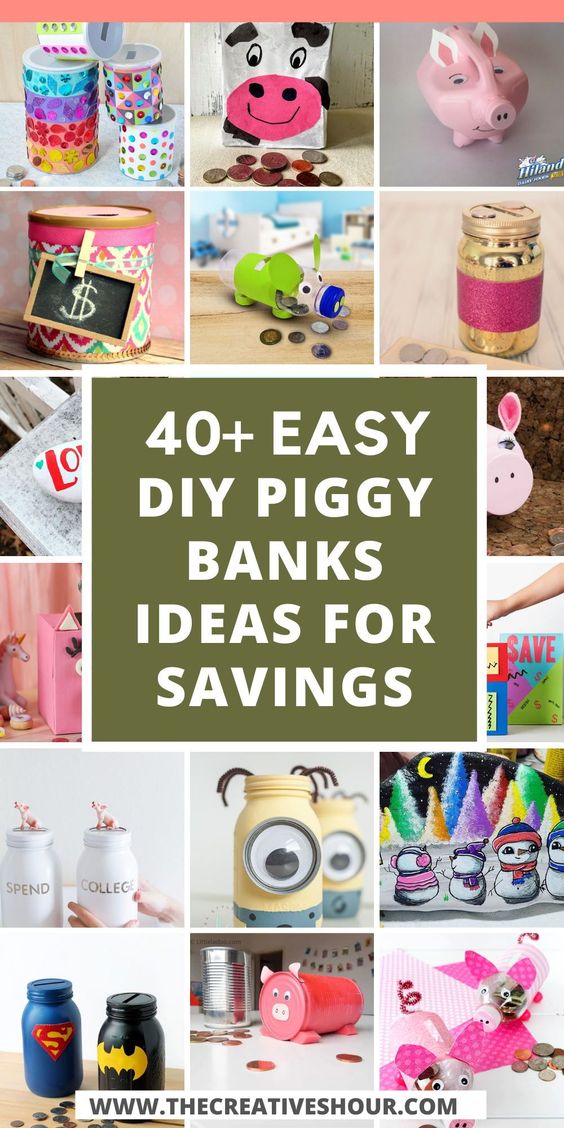
40 Cool DIY Piggy Banks For Kids & Adults
By Melanie 3 Comments
*We hope you enjoy all the crafty posts! Just so you know some links on this page may be affiliate links. For more information refer to our Privacy Policy .

Saving money can be difficult at the best of times, but what if you had an awesome coin bank to motivate you to do so each and every day?
Making your own money-saving device isn’t only good for your back pocket – it’s also a fun and simple project to tackle on a rainy afternoon. That’s why we’ve rounded-up 40 of the most incredible DIY piggy banks that are both adult and kid-friendly!
From coin banks made using cardboard and wallpaper, to glass jars, tins, plastic bottles and more – trust us, you’re sure to find a few projects here that tickle your creative bone. So, let’s get started!

How cute is this DIY cardboard coin bank by ABC Creative Learning ? Your kids will love making this little guy!

What makes a basic mason jar more awesome? Mustaches and faces of course! About Family Crafts is the genius behind this tutorial.

Who knew it was so cheap and easy to create a piggy bank from a plastic bottle? This DIY tutorial from All You is upcycling at its best!

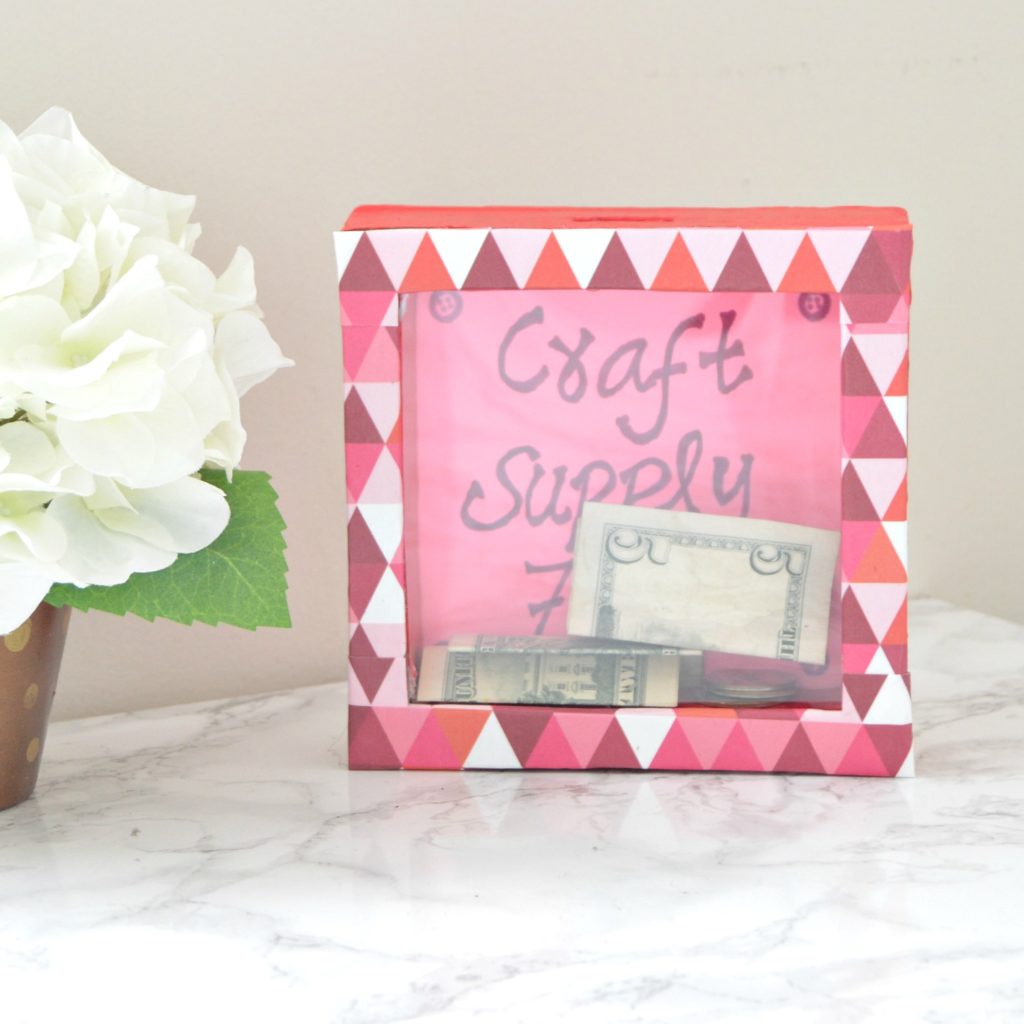
Saving up for a special trip (like a Honeymoon)? A Mom’s Take has this awesome DIY shadow box coin bank project that you’re sure to love!

Here’s another cool tutorial using an upcycled bottle to create a DIY coin bank, this time from Bright Nest . What an awesome airplane!

Cut Out and Keep has created this stylish yet understated coin bank using affordable materials. Find out how she did it by reading her full tutorial!

How creative is this DIY pencil coin bank from Damask Love ? It’s the most fun way to teach children how to save!

Disney Family will show you how to create this fun little DIY piggy bank. This would be a great mother-child project to complete this weekend!

Here’s another DIY piggy bank, this time featuring a miniature felt version from Dream a Little Bigger . Adorable!

You can’t miss this bright orange coin bank from Dukes and Duchesses ! Get crafty and creative with your own slogan.

You can also turn some trendy water bottles into an awesome trio of coin banks to help you save, spend, or share. What a great idea from eHow !

Do you have a little superhero in your life? Fireflies and Mudpies will teach you everything you need to know to make these cool DIY coin banks.

Have a boring old piggy bank at home already? Why not ‘glitterfy’ it, just as Greta’s Day has done? Now it’s glamorous and glitzy!

Here’s another trio of coin banks which encourages people to spend, save, and give. Thanks Homemade Ginger for this amazing tutorial!

Fancy owning a self-sorting coin bank? Now you can make your own, because Instructables has this cool DIY tutorial for you!

If you like to get crafty with old tin cans, then this DIY coin bank from It Happens in a Blink is certainly for you!

Who would’ve thought that a Pringles tube could serve as the perfect DIY coin bank? Thankfully, Jennifer P Williams did!

Want a DIY coin bank with a more masculine touch? Johanna Rundel has created this cool car-inspired coin bank for the special man in your life!

Karina Garcia is the talented YouTuber behind this video tutorial which will teach you how to make a Starbucks coin bank. How clever!

Who doesn’t love the Minions? KA Styles is here to show you how to recreate your own coin banks inspired by the popular characters!

Saving up for a big Disney trip? Kimberley Marriott created these DIY Minnie and Mickey coin jars to encourage her family to save their dollars. Genius!

Here’s another fantastic upcycling inspired tutorial. Kix Cereal turned some old cereal boxes into these adorable DIY coin banks!

It’s incredibly easy to make these DIY turtle coin banks – just ask Krokotak ! This is also a kid-friendly tutorial which they’re sure to love.

Wow, these wall-mounted coin banks from Lovely Greens has a gorgeous vintage aesthetic. What a great incentive to save!

Mermag also has the most wonderful kid-friendly DIY projects! This one is no exception either – it features a cool coin bank to help children save, spend appropriately, and give to worthy causes.

Here’s another Disney inspired DIY, this time from Mommity . It features a cute Mickey Mouse silhouette to motivate your next Disneyland trip!

For another plastic bottle makeover, check out this tutorial via Musely ! You too can make this adorable piggy bank.

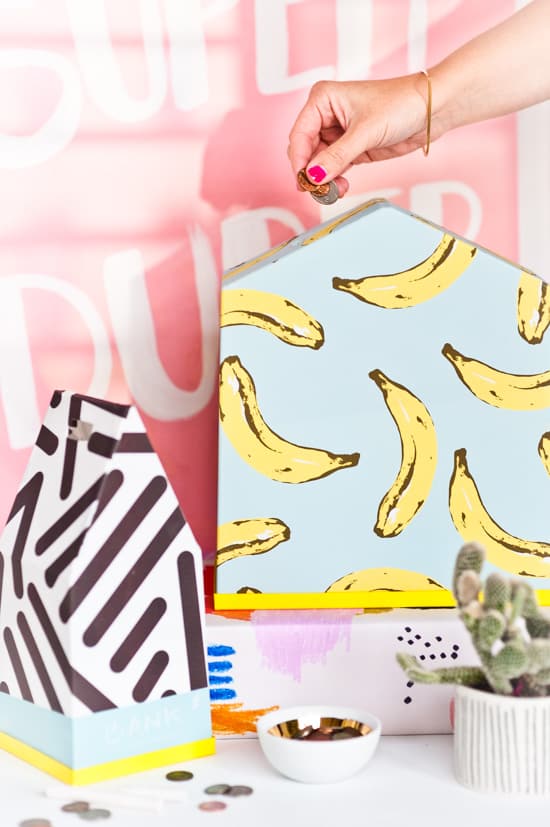
You can always rely on Paper & Stitch for a DIY with a difference! She has created this fun coin bank using wallpaper in vibrant and stylish patterns.

Here’s a DIY piggy bank that won’t bust the budget! Parents.com created this one from a cardboard box. Your kids are sure to love this project!

Got some old cans or formula tins lying around at home? Why not turn them into these fun DIY coin banks to help kids save, save, save? Thanks Parents.com for this clever craft idea!

Wow, this DIY coin bank from Pink Heels Pink Truck has got some serious style! The gold makes it look especially glamorous.

Teach your children to create their own little pot of gold at the end of the rainbow! Playground Park Bench has this fascinating DIY tutorial for you.

You can even make your own paper mache dinosaur coin bank – does it get any better than that? Red Ted Art will show you how it’s done!

Need a college fund? Make a DIY coin jar version! Say Yes created this amazing trio for her little ones.

Did you know that a baby wipes tub could also double as a coin bank? What a great way to recycle and save! Check out the full tutorial via Sunny Day Family for more.

This DIY save jar from Time with Thea sure is fancy! We love the gold color scheme.

How’s this for a wedding wishing well that also doubles as a coin bank? Inspired by Anthropologie, Un beau Jour has created this stunning DIY painted globe.

Got some ‘Mickey Money’ that needs to be saved? Create this DIY coin jar from Undercover Tourist to house it in!

For those who are minimalists, this DIY cardboard coin bank from Instructables is sure to please you! What a clever contraption.

We all need an ice cream fund from time to time, especially during the warmer months when the treat is basically an essential! Yesterday on Tuesday created this DIY coin bank which is pastel perfection.
There you have it – 40 amazing DIY coin banks to help you save those dollars! Which projects will you be making? We’d love to hear from you in the comments section below!
Reader Interactions
March 7, 2017 at 10:31 am
I enjoyed this article, some super ideas, i like the globe, perfect for saving up the holiday cash, thanks for sharing
July 11, 2019 at 4:54 am
I love DIYs and piggy banks. It’s the best way to save at all costs.
September 21, 2019 at 11:46 am
OMG they all look soooooooooooo cute that I just want to do them all!!! lol
Leave a Reply Cancel reply
Your email address will not be published. Required fields are marked *
- PRO Courses Guides New Tech Help Pro Expert Videos About wikiHow Pro Upgrade Sign In
- EDIT Edit this Article
- EXPLORE Tech Help Pro About Us Random Article Quizzes Request a New Article Community Dashboard This Or That Game Popular Categories Arts and Entertainment Artwork Books Movies Computers and Electronics Computers Phone Skills Technology Hacks Health Men's Health Mental Health Women's Health Relationships Dating Love Relationship Issues Hobbies and Crafts Crafts Drawing Games Education & Communication Communication Skills Personal Development Studying Personal Care and Style Fashion Hair Care Personal Hygiene Youth Personal Care School Stuff Dating All Categories Arts and Entertainment Finance and Business Home and Garden Relationship Quizzes Cars & Other Vehicles Food and Entertaining Personal Care and Style Sports and Fitness Computers and Electronics Health Pets and Animals Travel Education & Communication Hobbies and Crafts Philosophy and Religion Work World Family Life Holidays and Traditions Relationships Youth
- Browse Articles
- Learn Something New
- Quizzes Hot
- This Or That Game
- Train Your Brain
- Explore More
- Support wikiHow
- About wikiHow
- Log in / Sign up
- Hobbies and Crafts
- Making Toys
How to Make a Piggy Bank
Last Updated: November 5, 2022 Tested
This article was co-authored by wikiHow Staff . Our trained team of editors and researchers validate articles for accuracy and comprehensiveness. wikiHow's Content Management Team carefully monitors the work from our editorial staff to ensure that each article is backed by trusted research and meets our high quality standards. The wikiHow Video Team also followed the article's instructions and verified that they work. This article has been viewed 219,374 times. Learn more...
It’s never too early to start saving money! A piggy bank can be a fun way of making sure your money is all in one safe place. While it’s easy to go purchase a piggy bank, there's nothing to stop you from making one of your own. There are a few different ways to create a homemade piggy bank, and they can be constructed from materials you already have in your home.
Using a Plastic Bottle

- Keep the bottle cap on the bottle. It will serve as the pig’s snout.
- The coin slot will need to be at least 1 inch (2.5 cm) long to fit a standard US quarter.

- When the pig is standing on its new legs, the coin slot should be facing up.

- You can give the pig eyes by hot gluing googly eyes onto its face, or by drawing, cutting out, and gluing on eyes yourself.
Warning : Adding many of these touches will require a hot glue gun, so make sure you have an adult around to help you with this part.
Making a Mason Jar Piggy Bank

- Use a spaghetti sauce jar if you don’t have a mason jar handy. Make sure to wash out the jar thoroughly before you convert it into a piggy bank. You can just run it through the dishwasher.

- Let the jar sit for 15-20 minutes so it can dry. Once the jar is dry, you can start using it as a piggy bank!
- If you don’t feel comfortable using a box cutter, you can actually go out and buy a lid with a pre-cut slot. These lids are available at your local crafts store.
- You want your jar to be safe, but be sure to keep it in a part of your home that’s easy to access.
Tip : Tape the lid shut to discourage people from opening the jar before it’s full

- You can buy washi tape, stickers, and puffy paint at your local crafts store or get order some online.
- Add the tape and stickers onto the jar before the puffy paint. Then, once you’ve painted, let the jar sit for 6 hours so it can dry completely.
Working with Papier-Mâché
- You can purchase mixable papier-mâché paste at arts and crafts supply stores, but it’s easy to make your own at home. You’ll also save some money in the process!
- You can also use butcher paper, which you can order online.

- It doesn’t matter what color the balloon is, as it’s just providing a structure to papier-mâché on top of and won’t actually be visible.
- Once you add the layers, let the balloon sit for 2 days in a well-lit, well-ventilated area of your home so it can dry fully.
Tip : Your piggy bank will be stronger if you allow each layer to dry before adding another. This is why you should wait about 15 minutes in between adding layers.
- You can also use this hole to pull the balloon out from the inside of the piggy bank. Feel free to throw the balloon away when you’re done with it.
- Place the piggy bank on its legs so the glue can set and let it sit for 30 minutes before you begin decorating.
- Other decoration ideas include drawing nostrils onto the pig’s snout with a black marker and cutting 2 triangles out of pink paper or felt to glue them on as ears.
- If you do not want to use paint, you can color the body of the piggy bank with markers.
Community Q&A
Tips from our Readers
- Try using a 1.5 L bottle so that you can put even more money inside.
- Try cutting a hole big enough so even a bill fits.
- You may have to cut out a piece of the piggy bank if it comes time to take coins out. If you put in a coin slot without a way to get the money back out, you'll have to damage part of your piggy bank to withdraw anything. Thanks Helpful 7 Not Helpful 4
Things You’ll Need
- Empty plastic bottle
- Low-heat hot glue gun
- Paper egg carton
- Pipe cleaner
- Acrylic paint
- Googly eyes
- Construction paper
- Mason or spaghetti sauce jar
- Pen or pencil
- Puffy paint
Utilizing Papier-Mâché
- Bag of balloons
- Pot for paste mixing
- Brown paper bags or butcher paper
- Spray or acrylic paint
You Might Also Like

- ↑ https://sassytownhouseliving.com/plastic-bottle-piggy-bank/
- ↑ https://brightnest.com/posts/for-kids-make-a-unique-piggy-bank-out-of-a-plastic-bottle
- ↑ https://www.moneycrashers.com/how-to-make-a-large-personalized-piggy-bank/
- ↑ https://www.ultimatepapermache.com/paper-mache-piggy-bank
- ↑ https://www.brisbanekids.com.au/papier-mache-piggy-bank/
- ↑ https://www.kidspot.com.au/parenting/things-to-do/build-a-paper-mache-piggy-bank/news-story/bbb63a60b09b638f10a914f5ea4217f2
About This Article

To make a piggy bank, start by gluing a piece of paper around a toilet roll. Fold the excess paper into the ends of the roll. Then, cut 2 circles, 2 triangle shapes for ears, and an oval and small rectangle for the nose out of cardstock. Attach the circles to each end of the roll with glue. When both ends are securely in place, assemble and attach the nose to one of the circles. Draw a pig's face above the nose using any color you like and glue the ears to the sides. Finally, use a box cutter to cut a hole in the top of your piggy bank that's just large enough for coins to fit through. Did this summary help you? Yes No
- Send fan mail to authors
Reader Success Stories
Feb 6, 2022
Did this article help you?
Featured Articles

Trending Articles

Watch Articles

- Terms of Use
- Privacy Policy
- Do Not Sell or Share My Info
- Not Selling Info
wikiHow Tech Help Pro:
Level up your tech skills and stay ahead of the curve

40+ Cool DIY Piggy Banks For Kids and Adults

Saving money can be difficult at times, but what if you have an amazing DIY piggy bank to do the deed? These DIY piggy bank ideas will motivate you every day to save some more money.
Making your DIY coin bank is a good way to save money and a fun summer project. And here we have some fantabulous DIY piggy bank ideas for you to try out.
Also read –
40 Dollar Tree Crafts To Make On A Budget & Sell For Profit
30+ Effortless Mason Jars Crafts Ideas For Your Home
20+ Fall Crafts for Kids – Easy Fall Project Ideas for Kids 2022
1. Tin Can DIY Piggy Bank

Image & Tutorial by littleladoo
DIY piggy bank for adults can be fun too. For instance, look at this cute DIY savings bank. It is unbreakable, sturdy, and budget-friendly. All you will need for this cute DIY project are an old tin can, pink sponge, google eyes, pink metallic paint, pink cardstock paper, a piece of cardboard, and a hot glue gun.
2. Tissue Box DIY Piggy Bank

Image and Tutorial by crayola
I love a repurposed DIY project like this one. This is a great option if you are looking for a DIY piggy bank for kids. It is made out of simple waste materials like an empty tissue box, disposable plate, acrylic paint, brushes, scissors, and pencils. This DIY money bank is a ‘pig’ deal!
3. Mason Jar Piggy Bank

Image and Tutorial by firefliesandmudpies
How about a superhero DIY piggy bank mason jar ? If your kids have started receiving daily allowances, then this kind of DIY piggy bank jar is perfect for them. I love how simple and easy these DIY piggy banks look. All you will need are a mason jar, spray paint, mason jar coin slot lid, and duct tapes.
4. DIY Water Bottle Piggy Bank

Image and Tutorial by ourkidthings
Yet another cute DIY project for your kids. With these kinds of cute piggy bank ideas, you will not have to waste money on expensive piggy banks. All you will need for this coin bank are empty water bottles, pink paper, googly eyes, pink pipe cleaners, pink wooden beads, hot glue, and scissors.
5. Mini Mason Jar Coin Banks

Image and Tutorial by kastyles
Mason jar coin bank ideas are so much fun and super cool. Look at these cute minion mason jar coin banks! I love how fun and cute these look. These are perfect coin banks for kids; they will make saving money fun for kids. All you need for these are mason jars, acrylic paints, googly eyes, and mini pipe cleaners .
6. DIY Pink Pig-gy Bank

Image and Tutorial by doterra
How adorable is this pink piggy bank?! I just love this one, you can place it anywhere to add some extra fun to your indoor decor. You will need some basic supplies. There is also an easy tutorial that will accomplish this beautiful task at hand. This is the perfect way to find space for your spare changes and simultaneously save money.
7. Sparkle and Shine Coin Bank

Image and Tutorial by taylorbradford
If you search the internet, you will find several interesting DIY coin bank ideas, but this one is truly unique. I love the bling! It is super cool and trendy. This one is perfect for young adults and adults.
8. Cereal Box Piggy Bank

Image and Tutorial by kixcereal
Can you imagine a piggy bank made out of an empty cereal box?! How amazing is that? It is super easy and cool to make. Get your kids involved in this craft project. You can teach them the importance of saving money with this kind of engaging project.
9. Formula Can Piggy Bank

Image and Tutorial by ithappensinablink
If you ask me, this has to be one of my favorites on this list. I love how crafty and boho it looks. This is a repurposed piggy bank that is recyclable. You can explore your creativity with this DIY piggy bank. All you will need for this one here are an empty formula can with a lid, a fat quarter, ribbon, sequin string, mini chalkboard, clothespins, hot glue, scissors, mod podge, and coordinating cardstock.
10. DIY Piggy Bank Mason Jar

Image and Tutorial by sayyes
Another mason jar piggy bank idea for you! This one is all the more simple to make. You can make a few of these to save money according to allowances. So if you have some mason jars at home and some basic supplies, get ready to make a few of these and encourage saving money.
11. Sequin Piggy Bank

Image and Tutorial by handmadecharlotte
Saving money has never been more fun with these sequin colorful piggy banks. It is easy and fun to decorate these DIY piggy banks. Your kids will have fun spreading out the sequins and organizing them by color.
12. DIY Wooden Piggy Bank

Image and Tutorial by thecreatedhome
You will love these DIY wooden piggy bank ideas. These are perfect crafts for kids. You can make a few of these animal wooden piggy banks for your kids and encourage them to save money. I love the penguin piggy bank. Which one is your favorite? Let us know in the comment section.
13. Bottle Piggy Bank

Source : iswitchenergy
If you are looking for a perfect opportunity to teach your kids the value of money, then this is a good way to start. This one is a simple and easy DIY coin bank idea for kids. It is super cool and I just love the touch of green color.
14. Llama Piggy Banks

Image by delineateyourdwelling
Who doesn’t love a fun DIY project? If you are looking for something like that, then these are perfect for you. These colorful llama DIY piggy banks are just too cute to ignore.
15. How to Make Your Own Piggy Bank?

Image and Tutorial by diynetwork
If you looking for some mind-blowing ideas for homemade piggy banks for adults, then look no further. We all love fun and funds. But sometimes it can get difficult to manage enough funds, and having a piggy bank for that makes things easier. I love how aesthetically pleasing this one looks. Just love it!
16. DIY Milk Jug Piggy Bank

Image and Tutorial by thehilaandhome
Do you like this cute piggy bank? It is super easy to make it! All you need for this one is a gallon milk jug, cardboard egg carton, scissors, pink spray paint, construction paper, black permanent marker, googly eyes, pipe cleaner, craft knife, glue gun, and glue stick.
Read – 25 Recycled Egg Carton Crafts for Kids & Toddlers
17. Rolling Coin Bank

Image and Tutorial by lovelyindeed
This one is a very special coin bank. It is a perfect addition to your home decor. This has a fun tutorial. It is fun to see the coins rolling down the ramps when you insert the coin.
18. Moo- point

Image and Tutorial by platein28
If keeping things simple and easy is your thing, then this one is for you. All you need is an empty tissue box, and you can turn it into this cute cow piggy bank.
19. DIY Book Piggy Box

Image and Tutorial by karenkavett
Where are the book lovers?! This one is a book lover’s paradise! You can get a book box from a craft store for this DIY piggy bank. This cardboard box looks like a book but you can open it to store things in it.
20. Piggy Bank Gift Box

I love this! They look so crafty, fun, and adorable. These DIY piggy banks look super cool. There is a descriptive tutorial for you to follow and make a few of these coin banks.
21. DIY Mason Jar Piggy Bank

Source and Tutorial by mamalaladiy
Mason jar crafts are versatile. You can experiment a lot with mason jars. This mason jar coin bank is super easy to make. All you will need is a slotted lid to replace the normal lids of the mason jar. Check out some more mason jar craft ideas for your home- 30+ Effortless Mason Jars Crafts Ideas For Your Home .
22. Rainbow Mason Jar Piggy Bank

Image and Tutorial by livingwellmom
I love rainbows; I can’t get enough of the colors in this DIY piggy bank. You can make this one with acrylic paint, paintbrushes, cardstock paper, laminator, scissors, and mod podge.
23. Leather Piggy Bank

This is a perfect DIY project for adults. You can make this leather piggy bank for your kids to encourage them to save money for the future. It is a great way to teach your kids some ways to handle allowances. I love this sophisticated leather piggy bank.
24. Crochet Piggy Bank

Image and Tutorial by nickishomemadecrafts
This DIY piggy bank is so fast and fun to create. Instead of throwing away your empty tissue box reuse it to make this adorable DIY coin bank. You also have an easy tutorial here to make things simpler.
25. Easy DIY Piggy Bank

Image and Tutorial by homemadeginger
If you are planning to teach your kids healthy money habits, then you should certainly get a piggy bank for them. This is a set of three mason jar piggy banks that will help your kids to segregate the allowances.
26. Cardboard Box Piggy Bank

Image and Tutorial by instructables
Here is an easy DIY piggy bank idea for you made out of cardboard, cord, and elastic tape. This is a great way to repurpose an old cardboard box. The best part about this one is that you can choose and change the shape of the piggy bank.
27. DIY Coin Bank

Image and Tutorial by cutoutandkeep
If you are having a problem dealing with spare changes, it is time to make yourself a fancy DIY piggy bank. This piggy bank will compliment your decor. She has beautifully transformed an unattractive coffee can into something fancy and beautiful. This one is an easy and fun project; go ahead and give it a try!
28. Totem Pole Bank

Image and Tutorial by mermagblog
Totem pole coin banks are so innovative and unique. I love these. It looks fun and is super cool. You will need three cans, duct tape, a knife, and glue for this one.
29. Lunch Box Piggy Bank

Image and Tutorial by studiodiy
I love this pink coin bank. This one is a super easy DIY coin bank. All you will have to do is paint the lunchbox pink and follow the tutorial.
30. Little Piggy Bank

Image and Tutorial by thelittleredhouse
As a kid, I had a similar piggy bank. So I wanted to make something similar for my little niece. And she was ecstatic at the sight of this little piggy. This is a fantastic tissue papercraft that is super fun and cool. Here are some more tissue paper craft ideas that you can check out 15+ Amazing Tissue Paper Crafts For Your Fun Time .
31. Upcycled Piggy Bank Craft

Image and Tutorial by penelopesoasis
This DIY piggy bank is unique and has repurposed an empty mouthwash bottle. Your kids can make take this as a summer project. They will certainly enjoy making this adorable piggy bank. This is a great way to be creative and have a fun time.
32. Taxi Cab Piggy Bank

Image and Tutorial by doubledutymommy
Kids are often obsessed with cars; if your kid has the same obsession then this might be perfect for you. Look how amazing the bright yellow cab coin bank turned out! This DIY project takes only 30 minutes and is a fun project.
33. Felt Piggy Bank Tutorial

Image and Tutorial by dreamlittlebigger
If you are looking for something handier than a DIY ceramic piggy bank, then this one might be your thing. I love how easy and creative this coin bank looks.
34. Shadow Box Coin Bank

Image and Tutorial by vikalpah
If you are confused about what to gift your friend this year, how about this DIY shadow box coin bank? I love how simple and easy it is to make this one. You can explore your creativity with this one. Help your friend save some funds for the fun with this DIY coin bank.
35. DIY Charlie Brown Coin Bank

Image and Tutorial by onionringsandthings
It is never easy to teach your kids the importance of saving money. But this piggy bank is a fun way to start it. This is not only a fun project for kids but also a great way to repurpose a Tootsie roll can.
36. Budgeting Jars

Image and Tutorial by willworkfordecor
Making a DIY piggy bank can’t get any simpler than these coin banks. All you need for these are some basic craft supplies. So go ahead, and encourage your kids to save money.
38. Broken Piggy Bank

Image and Tutorial by fouroakscrafts
This is a DIY wooden piggy bank with a good twist. I love how artistic this mauve coin bank looks. This one has to be one of my favorite ones on the list.
38. Minnie & Mickey Piggy Banks

Image and Tutorial by kimberleymarriott
I am in love with these adorable piggy bank jars. There is a detailed tutorial that will help you to recreate a few of these coin banks. Trust me, it is a super fun project.
39. Robot Emoji DIY Piggy Bank

Image and Tutorial by sawsonskates
This DIY piggy bank is shaped like a robot and the color pattern is just too good. It is an easy project to do yourself and made with basic supplies like scrap wood and craft paints.
40. Mason Jar DIY Coin Bank

Image and Tutorial by factorydirectcraft
This is a perfect gift for your little girl. Let her start saving up for the little joys. I like the Bohemian vibe in this one; especially the cute felt piggy. Here are some more mason jar craft ideas for you- 20+ Cute Mason Jar Crafts For Kids That Are Too Cool .
41. Pink Piggy Bank
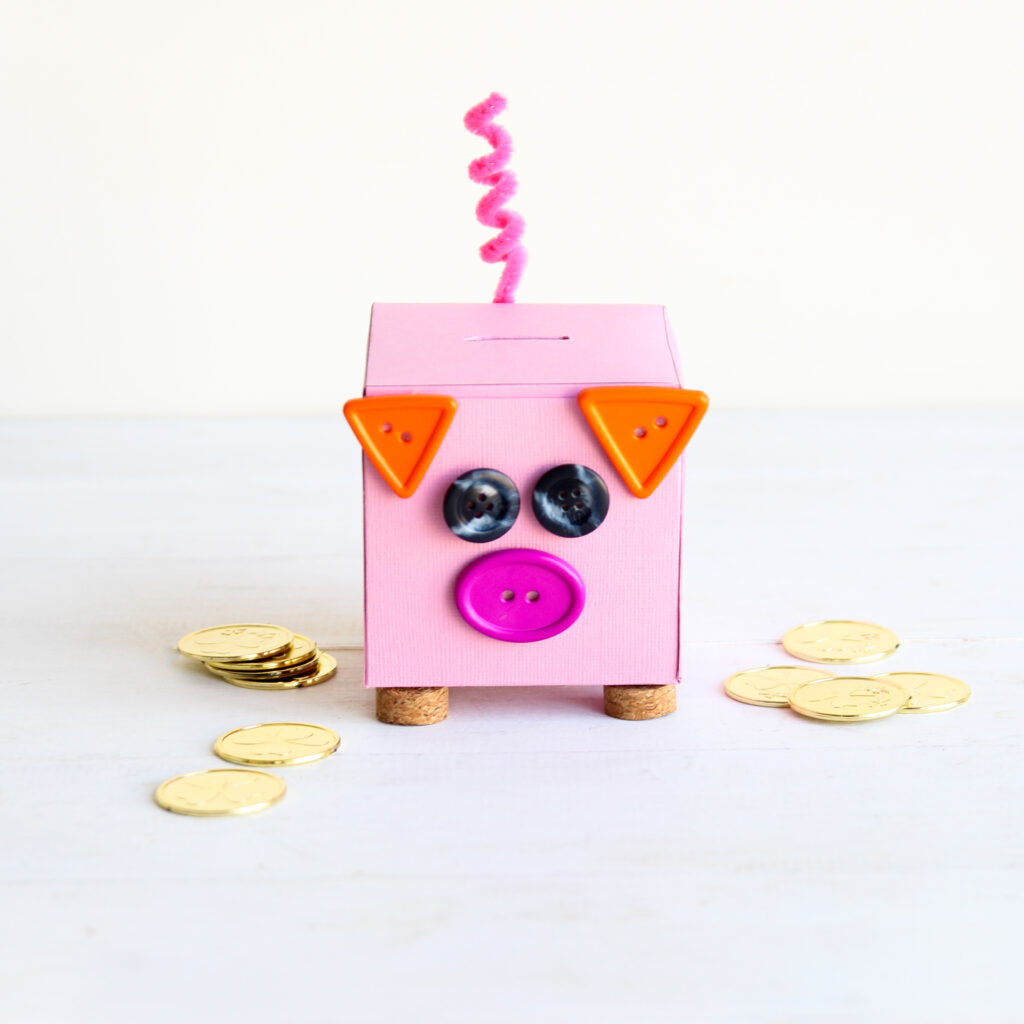
Image and Tutorial by misrachelhollis
If pink is your jam, then pick this one. It is easy, simple, and adorable. All you need for this one are pink card stock, corks, drinking straw, buttons, pipe cleaners, glue, scissors, and a knife.
42. Homemade Piggy Bank

Image and Tutorial by theclassychapter
If you are looking for a homemade piggy bank for adults, then look no further. If you have some empty food containers and some basic supplies then, that’s all you will need for these piggy banks.
43. DIY Shadow Coin Bank

Image and Tutorial by amomstake
DIY shadow piggy banks are my kind of thing. They look class no matter where you put them. And the best part is you don’t always have to empty it to count the notes you have saved. Try your hands at this one!
44. Pot o’ Gold DIY Piggy Bank
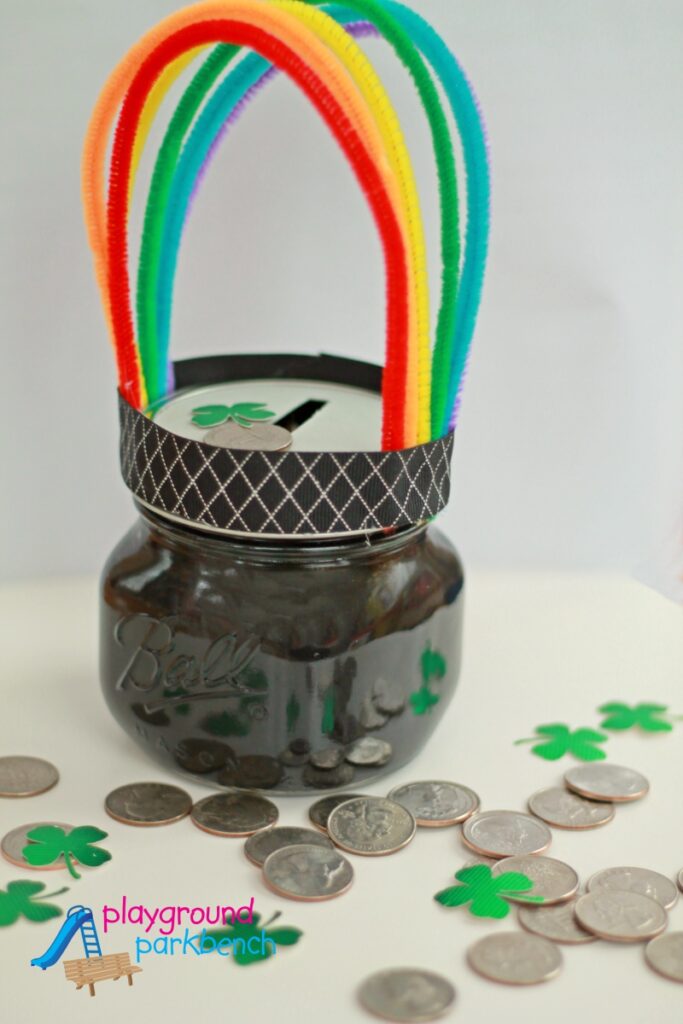
Image and Tutorial by Playgroundbarkbench
If you’re looking for a cool idea to make a piggy bank from mason jar, then you’ll love making this craft. All you need to make this Pot of Gold is a mason jar, colourful pipe cleaners for rainbow, black acrylic paints, hot glue and a decorative ribbon. Even kids will enjoy painting and decorating the jar.
45. Giant Pencil Piggy Bank
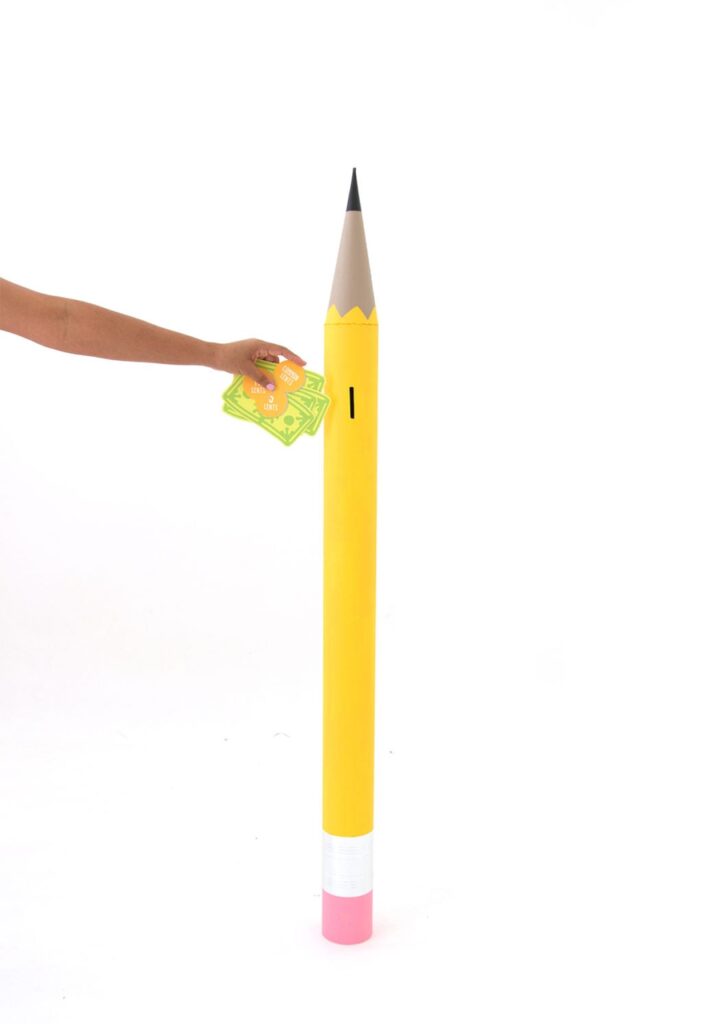
Image and Tutorial by Damasklove
Have a spare mail tube lying at your home? Here’s a crafty DIY for you to turn it into a piggy bank that looks like a pencil. Just add a paper mache cone at the top with hot glue, and make a slit to slide in your pennies. You will enjoy painting the tube to turn into a pencil in your choice of colour.
46. DIY Car Coin Bank
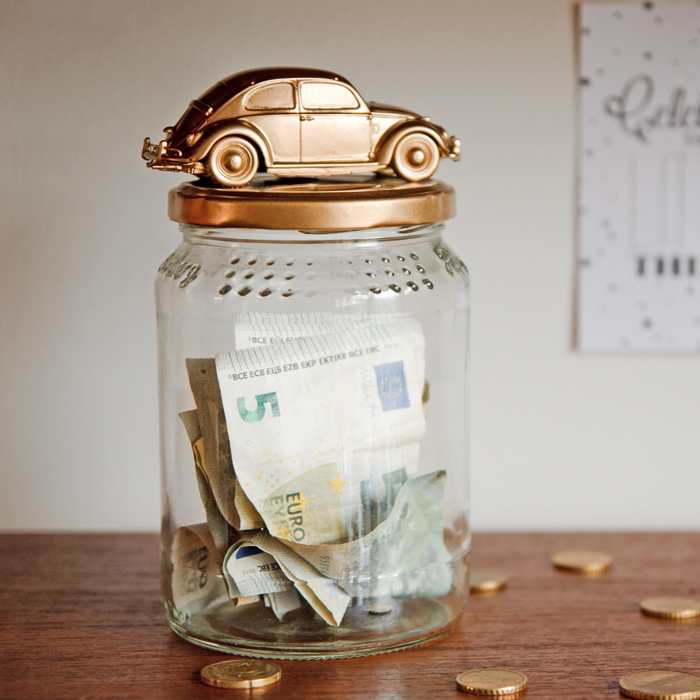
Image and Idea by johannarundel
Looking for a creative DIY idea with Mason jar? You will love making this aesthetic piggy bank with a vintage car on the lid. You can use any toy car and spray paint it a beautiful gold colour to make it stand out.
47. Ice Cream Fund Mason Jar Piggy Bank

Image and tutorial by yesterdayontuesday
If your kids love ice cream, their idea of a piggy bank would actually be ice cream fund. Here’s a cool mason jar craft idea. The use of chalkboard paint makes the jar look super cute and your kids can use a chalk to label it.
There you go, people. You have got here a long list of crazy DIY piggy bank ideas. These ideas are unique and refreshing. Let us know your favorite one in the comment section below. Happy crafting, people.
If you loved these ideas, you can use the Pin image below and save this article on your ‘Crafts for kids’ Pinterest board.
Leave a Comment Cancel reply
Save my name, email, and website in this browser for the next time I comment.
- Skip to primary navigation
- Skip to main content
- Skip to primary sidebar

Diy Craft Projects » 25 DIY Piggy Bank Projects - How To Make A Piggy Bank
25 DIY Piggy Bank Projects - How To Make A Piggy Bank
Published: Dec 16, 2020 · Modified: Aug 1, 2021 by Luke Allison · This post may contain affiliate links · This blog generates income via ads
Getting a piggy bank is a good way to save money. Making one is the perfect way to save your money. There are a couple of ideas you can come up with for a DIY piggy bank.
In this article, we have put together 25 DIY piggy bank projects you can make with ease. You’ll just need to get a few materials and then follow the steps for the project you want to DIY. Feel free to make adjustments and be creative.

Table of Contents
1. How To Make A Piggy Bank At Home Easy
Using a piggy bank will help you learn to save. This is made of a carton in a cube shape and you can retrieve the money at any time. Cut the measurements of the carton and assemble it.
The making process is pretty much easy to follow.
2. DIY Piggy Bank Plastic Bottle

You can convert an old bottle into a useful savings container for yourself. You just need to tweak it a little so people don’t mistake it for something else. Cut out a piece of colored paper and wrap around the bottle halfway. Cut out pig ears and place where the wrap ends then fix eyes. Fit 4 buttons on the bottom to serve as legs and pipe cleaner as the tail.
Click for more details
3. DIY Wooden Animal Coin Bank

Here’s a fun project that you and the kids can make in your spare time. There are different animal shapes that you can use to make a savings bank. This is made of wood and with different attractive colors. This will encourage your kids to save.
4. DIY Wooden Piggy Bank

My favorite part about this project is the staining. That seems to be the easiest part of the making process. This piggy bank is made of wood, the process of putting this together requires a lot of wood and woodworking tools. You’ll have to follow 18 steps to make this wooden piggy bank.
5. DIY Piggy Bank

Here’s another fun project you can DIY. This is created from a plastic grommet and you can also use cork. Carve out the piece you want with the sides glued on a hollowed-out center. Make a hole in the creation and paint the piggy.
6. Children DIY Piggy Bank
Are your kids in need of a piggy bank? Here’s a project for them. This uses a clear bottle that will be decorated. Make the inscriptions on the bottle and use a tissue roll to cut out the legs. Paint as desired.
7. Wooden Piggy Bank For Kids
To make this cube piggy bank, you will need to know how to work with wood materials. Create a pattern and cut it out. Sand and carve then make a hole to insert the money. You can also paint it.
8. DIY Electronic Piggy Bank

This is a wooden piggy bank that counts all the money using a flex sensor and reset button displayed with an LCD screen. The first step is to make the LCD operating system then make a wooden box and assemble it. The making process of this project might be harder for some people.
9. DIY Coconut Piggy Bank

This is a really unique piggy bank made of coconut shell. Remove the flesh from the coconut after breaking it evenly. Make holes it ain't for the eyes. Use a jute thread for the tail. Seal the coconut shell and add a tail made of resin.
10. How to Make a Piggy Bank From a Shadow Box Frame

With this piggy bank, you can always see your money through the glass frame. Use decorative paper for the background then insert the description you like then cut out the money slot. Assemble again.
11. DIY Wooden Piggy Bank
Woodwork has never been so perfect. This piggy bank is somewhat flat and you can slide in your money to keep it safe. Place the pattern on the wood and carve out the pattern with a machine.
12. How To Make A Wooden Piggy Bank
This is simple to do. Just cut out the pieces you will need. Set the parts out for the compartments and shape the wood to taste. Drill holes for the coins to slide in comfortably. Sand and polish.
13. DIY Ice Cream Piggy Bank
Making a plastic DIY piggy bank is not stressful. First thing is to clean the container then cut a slit at the lid to slide in money. This is a quick project that you can make with your kid. The steps are easy, the materials used can easily be gotten.
14. DIY Cement Piggy Bank
Here will require some good work to be done. Get an old piggy bank, cement, paint, and paintbrush. Cut the old piggy bank into two. Mix the cement and plaster within. When it is dry, take the plastic off and paint.
15. DIY Piggy Bank With Bottle

It is easier to break a bottle and remove your money when there is a need for it. to make it unique, get an image for the background, and attach it with a mod podge. As soon as it gets dried fix the cap and create a hole for slotting in money. You can paint it with acrylic.
16. DIY Piggy Bank

You can use a supplement container for this. Make a slot using a knife where your money will fit into. Paint the bottle and use bottle caps for the legs. Attach the eyes and nostrils. You can use felt for the ears. A length of pipe cleaner can serve as the tail.
17. How To Make A Piggy Bank In 3 Ways

This presents 3 unique ways to go about making your piggy bank. The first step is to use a plastic bottle and cut out the side to fit money then decorate. The second is to use a mason jar and create a hole in the lid then decorate. The last is to work with a paper Mache and a balloon. Inflate, paste, deflate, and paint.
18. DIY Piggy Bank For Children

Art and craft can come in an amazing way. Take off the original wrapper from the jar and cut a slit in the lid. Washi tape is easy to work with and it comes in various designs and colors. Use it around the jar.
19. DIY Angry Birds Piggy Bank

The materials used to make this piggy bank are wood and a plastic jar. Strange combo but you would love the outcome. Cut out the piggy head and the rear. Paint them the way you want and then assemble them with the jar. Don’t forget to insert the hole.
20. DIY Piggy Bank

No need to recycle, this is a perfect old jug to use. Before you paint the jug, use sandpaper to scratch it a little, it will make the paint stick better. Use felt for the ears, eyes, and tail. Make a slit for the money to go through if you don’t want to use the lid.
21. How To Make A Piggy Bank From Cardboard
This piggy bank is made of cardboard and it has a lid where you can open up and take out your money. Measure out the parts on the cardboard and cut. Assemble them together with an open window at the side.
22. DIY Minions Piggy Bank
This takes the form of the character minions and it is made from a plastic jar and some colored papers. Use the papers to decorate the jar and form the minions by forming pieces and gluing.
23. DIY Airplane Piggy Bank For Kids
This airplane piggy bank is made from a plastic coke bottle. Wrap the bottle with paper leaving out the two ends for the wings. Cut out scraps of cardboard to use for the decorations after making a slit for the coins to pass through.
24. DIY Sequins Piggy Bank

There is fun making this with your kids because they will not just know how to be creative, they will learn to save. Different collections of sequins are used for this project. You will need sequins, print paper, a tube with a lid, and a knife. Cover the container with paper and begin to decorate. Make a hole in the lid for the money.
25. DIY Piggy Banks

You can start to teach your kids the value of money. Make piggy banks with different labels and help them have a saving culture. Get transparent jars and paint them after making inscriptions. Make a space in the lid.
Making a piggy bank is a fun project that you can do with your kids. It's a great way to increase the parent-child bond and also teach your kids how to save money from a tender age. All the projects listed in this article are very easy to make.
Before choosing a DIY project you want to make, be sure you can easily get the materials and tools used. Thanks for stopping by.
Reader Interactions

Ask Me Anything Cancel reply
Your email address will not be published.
Save my name, email, and website in this browser for the next time I comment.
- DIY & Crafts
DIY Piggy Banks: 15 Fun Ways to Save Your Money!
by Luna Lupus
Putting some money aside for emergencies and big future plans is a smart idea. You have to be patient and consistent in order to achieve your savings goal, but it totally pays off! To assure you won’t spend the money you’ve saved up before you reach the goal, it’s best to keep it in a secure piggy bank that will motivate and excite you every time you look at it! You can find some great ideas among these chic DIY piggy banks!

1. White Mason Jar Piggy Bank

Mason jars are easily accessible and just the right size to hold a respectable amount of savings! Paint them to your favorite color, one that matches your interior and label them according to their purpose. We love the minimalist white piggy banks by Say Yes !
2. Shadow Box Bank
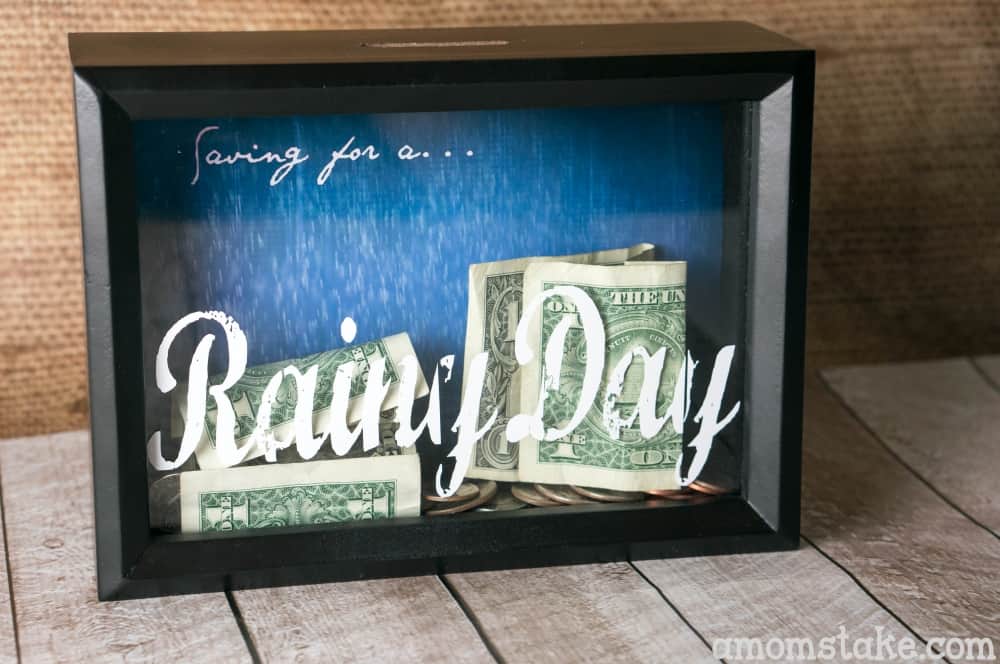
If you always want to be aware of how much you’ve already saved up, a shadow box is the option of you! It can be your little window into the future, a glimpse into your dreams coming true very soon! Stay patient, stay dedicated and don’t forget to thank A Mom’s Take for this idea!
3. Sparkling Mason Jar Piggy Bank
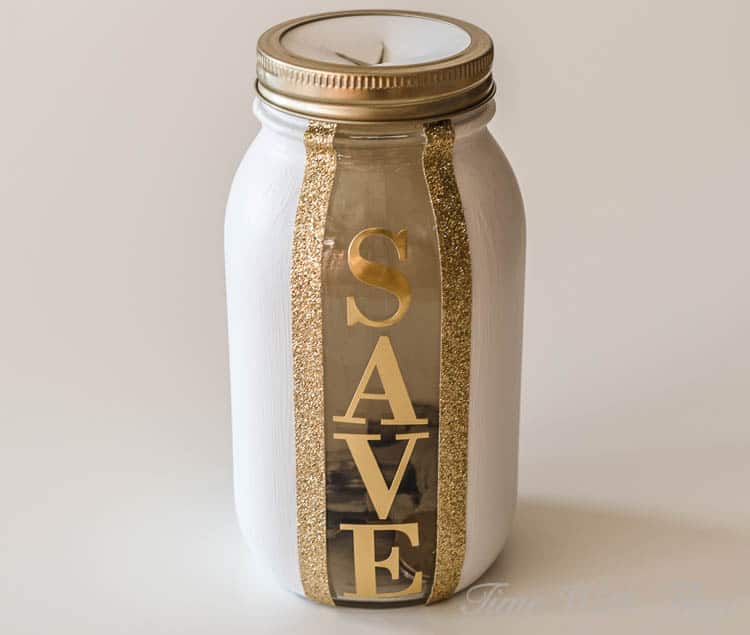
Time with Thea offers another perspective on a mason jar piggy bank, this one sparkling with glitter, already embodying the lush life your savings will buy you! It’s also a beautiful piece to be featured in your home, given it’s modern metallic look.
4. Starbucks Piggy Bank
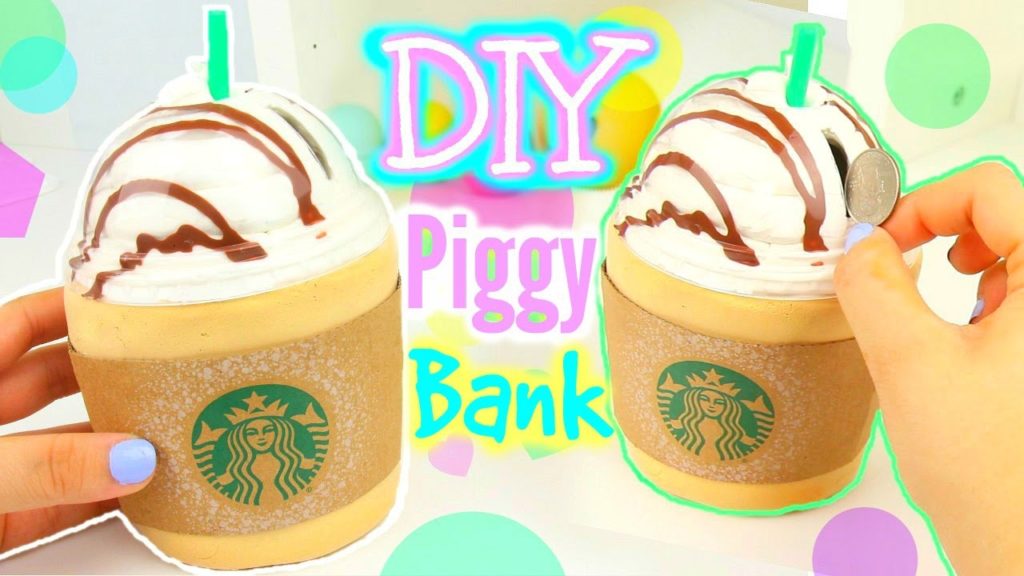
Starbucks lovers, Karina Garcia has a piggy bank for you! You may be spending a lot of money on your coffee, but that doesn’t mean you can’t also be mindful about finances. Make sure to skip coffee every now and again to save the money inside of your fancy Starbucks piggy bank!
5. Cardboard Shadow Box Bank
If you love the idea of a shadow box but don’t want to commit yourself to an expensive and time-consuming DIY project, Vikalpah can teach you how to make a proper shadow box from cardboard! It’s cheap, it’s fast, it’s loads of fun!
6. Superhero Piggy Bank
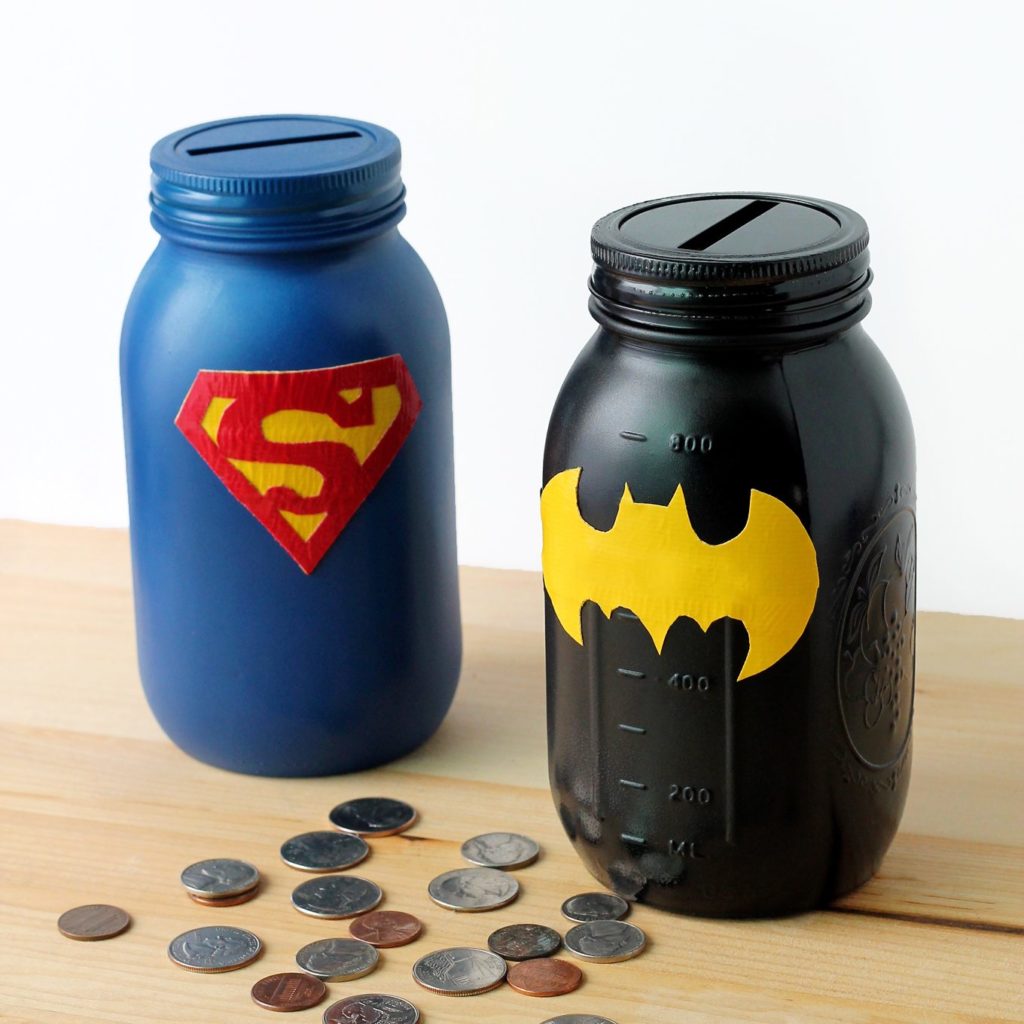
It’s hard to teach children how to save money when they’re so eager to spend it all on sweets! Maybe it they knew their favorite superheroes are saving money too, the task would be a bit easier on them? We found some epic piggy banks at Fireflies + Mud Pies that might help with that!
7. Airplane Piggy Bank

If you’re saving money for traveling the world, you’ll want to make a piggy bank that represents that dream. An airplane seems like a fitting choice, as it’s the vehicle that will take you all around the world, once the piggy bank is filled to the brim! Find the tutorial at Bright Nest .
8. Tin Can Piggy Bank
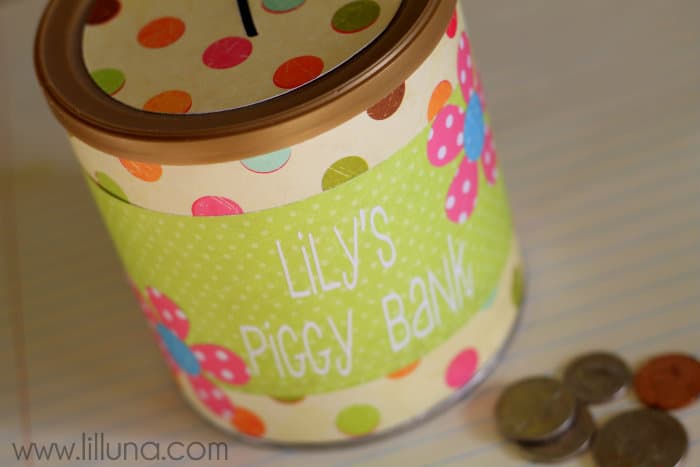
If you have a simple tin can at hand, you can quickly create a beautiful piggy bank that will make a lovely personal gift for someone you love or simply be there to motivate you to dream big and work hard! Find out more about this choice of a piggy bank at Lil’ Luna !
9. Pencil Piggy Bank
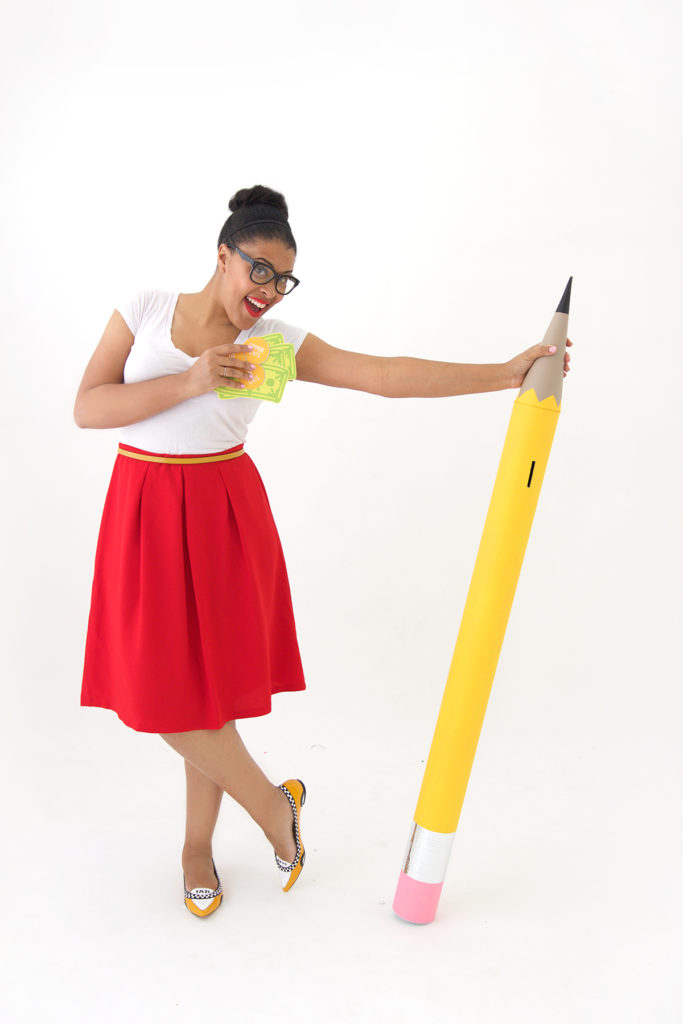
You know we can’t resist an edgy and unique DIY project. The more it’s out-of-the-box, the more we love it! Damask Love made a giant piggy bank in the shape of a pencil! It’s the perfect piggy bank if you’re saving up for education as it has a lot of space and will always be in your sight.
10. Felt Piggy Bank
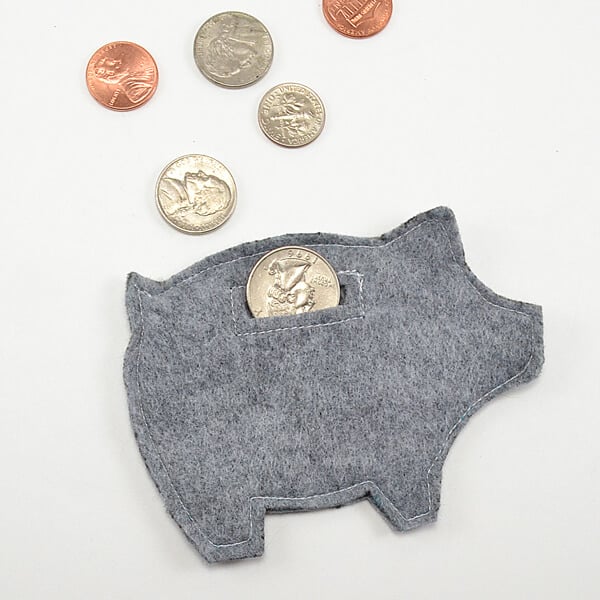
A piggy bank doesn’t have to have a large volume. The most important thing is that it serves your needs, so if you are fine with a smaller piggy bank because you are conquering smaller projects, Dream a Little Bigger has a felt piggy bank that you would definitely find useful.
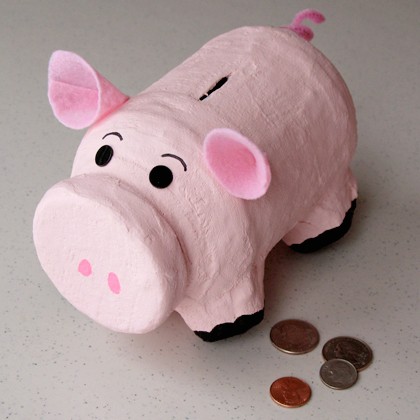
11. Hamm Piggy Bank
What’s a piggy bank roundup without an actual pig to keep your money safe? You can make it in the image of a beloved pig Hamm, following the tutorial at Disney Family . You’ll soon be able to brag with a classic, traditional piggy bank!
12. Sorted Piggy Bank
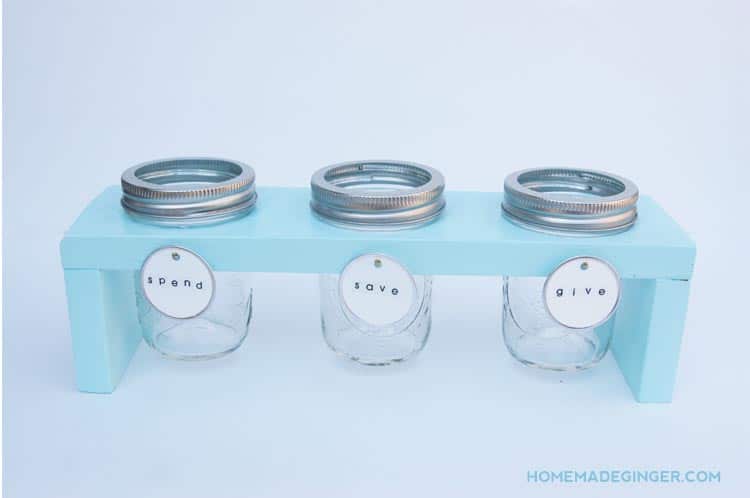
Sometimes you want to save up for more things than just one. This doesn’t mean you have to give up a piggy bank altogether, it only means you need to build it differently. Take Homemade Ginger ‘s as an example of a beautiful and functional sorted piggy bank!
13. Car Piggy Bank

Saving up for a car? Let it be known! Pick out a big jar to serve as your bank, then visit Johanna Rundel to see how you can turn the lid of the jar into a beautiful car carrying platform! The copper paint gives the whole piggy bank a charming, timeless look!
14. Minion Piggy Banks
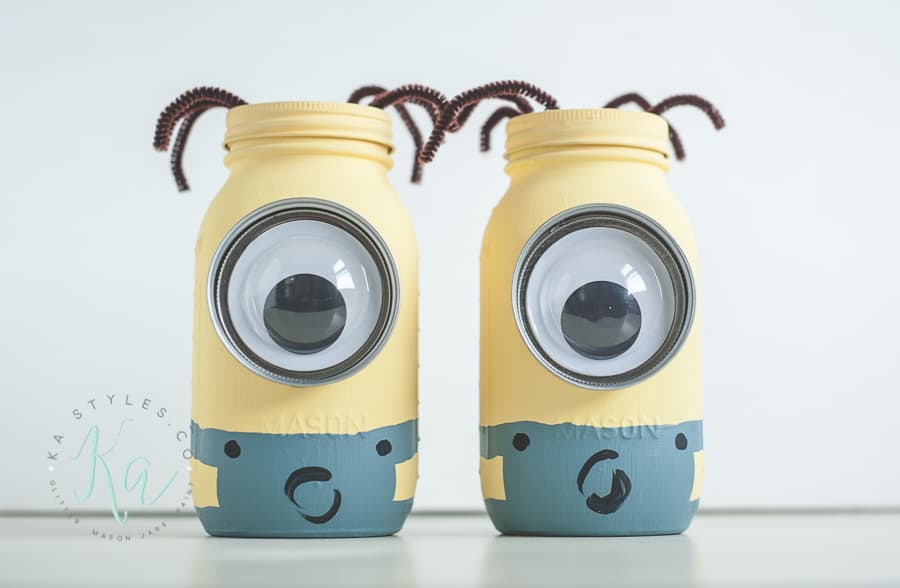
Honor the adorable minions by making a piggy bank that looks just like them! Saving up the money needed to achieve your dreams can be stressful, but if you add a little bit of humor to it, it doesn’t have to be! Check in with Ka Styles to see how these cheeky minion piggy banks were made!
15. Retro Piggy Bank
This roundup features many modern piggy banks, but don’t think we’ve forgotten our devoted retro enthusiasts! Paper & Stitch has the tutorial for most unique piggy banks with a significant retro look that will add a valuable piece to your interior.

- Privacy Policy
MORE INSPIRATION

WONDERFUL DIY
wonderfuldiy.com is an up-and-coming community of people specialized in high-quality and on-trend cool projects and tutorials in home design, fashion, and crafts. Recognizing the value of the do-it-yourself movement of the last several years, wonderfuldiy.com is inspired by unique yet replicable ideas. Because everyone’s style is individual, customized pieces with a high-end look are what we're always after.
- PRIVACY POLICY
LET’S CONNECT
Don’t miss these.

26 Easy DIY Piggy Bank Ideas in 2024
If you’re trying to find cute or clever ways to help yourself save up souvenir money for the next big trip you’re taking or trying to teach your kids how to have a good relationship with money, piggy banks can come in handy.
A lot of times, though, coin savers are just not that attractive. So, if you’re wondering how to make a piggy bank you’d actually enjoy looking at, these DIY money-saving jar ideas are a fantastic way to while away the minutes as you daydream of places far off.
Glittery Dollar Store Pig

For fans of the traditional piggy bank that’s shaped, well, like a pig, this is a fun way to add some pop and sparkle to an otherwise boring little ceramic or plastic piggy you found at the dollar store. This is a super easy piggy bank crafts project perfect for doing with the kids, too.
You really just need a couple of basic supplies, including the piggy bank, some ultra-fine glitter in your color(s) of choice, spray adhesive or Mod Podge , and a spray sealer.
Via Greta’s Day
Easy Wood and Jar Coin Bank

This little coin bank collective is the perfect way to work on money habits – for you or the kids – with a simple, fun way to separate out how much should go to what. While the tutorial has the jars labeled “spend,” “save,” and “give,” you can, of course, always choose any labels you wish for the three-jar setup.
You will need a few simple woodworking skills for this one, though, since you’ll be making the wooden frame for the jars.
Via Homemade Ginger
2D Felt Coin Savers

These adorable coin savers are perfect for anybody on the go a lot, especially if you wind up collecting random coins throughout your day. They work as either a coin keeper or a coin purse for the pockets – whichever is most conducive to your situation.
They’re also really great for placing in a few different spots around the house where you’re likely to stash coins for no reason (i.e. by the door when you get home, by the washing machine, on the bedside table, etc.).
Via Dream a Little Bigger
Giant Mail Tube Pencil Coin Bank

For the educationally minded, this giant mail tube pencil coin bank is a super fun project. Whether you want to make one for the classroom for the kids to give to a fund for less fortunate students around the world, homeschool the kids yourself, or otherwise just enjoy giant, fun projects, it’s a perfect choice.
You’ll need a mail tube, silver scrapbook paper, pink and yellow craft paper, and a craft knife. If you do the cutting, you’re all set for the perfect project with the kids that will also help them learn how to save money.
Via Damask Love
Upcycled Glass Water Bottle Bank

Here’s another coin bank that’s perfect for helping teach the kids how to view money . It’s also designed with three things in mind – saving, spending, and sharing. Though, of course, you can label the jars with anything you wish.
To make this fabulously fun coin jar, you just need some of those used clear water bottles (glass are best), some letter stickers, and some colorful yarn to craft this fun bank up.
Via It Still Works
Recycled Formula Can Coin Jar

If you love recycling materials that get used every day then you’ll love this recycled formula can (or any similar can) coin jar. It’s a simple, easy project that won’t cost you much, and looks pretty cute when you’re done.
You’ll need an old can with a lid, some fat quarters , ribbon, sequin string, a mini chalkboard, mini clothespin, and coordinating cardstock. You’ll use a hot glue and scissors and Mod Podge to put it all together.
Via It Happens In A Blink
Minion Mason Coin Jars

For fans of Despicable Me and the Minions movies, you’ll love these adorable Mason jar coin banks that look like those crazy little yellow guys who want to serve their most evil of masters. It uses seal lids cleverly to create the eye of the little monster buddies, along with some fun color mixing of acrylic paints.
You’ll need a quart Mason jar, some acrylic paints, a giant googly eye, and brown pipe cleaners to make these fun banks.
Via Kastyles
Silly Moustache Mason Jar Banks

These super silly Mason jar banks are a fun way to spend a half-hour (or less) with the kids while providing them with something they’ll use to collect and save money in. They’re easy and inexpensive, so they’re great for party projects, too.
You’ll need Mason jars, some paint, black felt for the moustaches, googly eyes, hot glue sticks and gun, and scissors to craft these silly, fun little coin banks.
Via About Family Crafts
Super Simple Disney Trip Saver Jar

If you’re planning a family (or solo) trip to Disney sometime in the near future, a great way to keep the saving goals in sight is through a Disney themed coin saver jar. This cute little bank is super easy to make, kinda classy looking, and helps to keep that trip very visual for anyone working towards the goal.
You’ll only need a few simple supplies to make it, too, which is great. You’ll need some spray paint, a clean, empty jar and lid, some air-dry or bake-dry clay, a toothpick, E6000 glue, and stickers of vinyl lettering.
Via Undercover Tourist
Glittered Mason Jar Coin Bank

This beautiful Mason jar coin bank is a super fun, super shiny way to save up some coin for whatever you’ve got planned in the future that needs a little extra cash. It’s pretty, it’s easy, and it’s super fun for keeping coins in.
You’ll need a gold mirrored Mason jar, a standard mouth slot lid and band, some pink (or whatever color you prefer) glitter tape, and some gold spray paint. A few simple steps, and you’ll have this one ready to collect those coins.
Via Taylor Bradford
Papier Mache Dino Banks

Papier Mache has always been a super fun – though often messy – way to create unique shapes and creatures. And these dinosaur-shaped piggy banks are no exception to that rule. Plus, they’re great for rainy, or cold wintery days when you need a project to keep the kids occupied and learning.
The tutorial offers some easy guides on how to make Papier Mache with flour and tips on the best way to do everything, etc.
Via Red Ted Art
Cereal Box Piggy Banks

These homemade piggy bank ideas are so much fun – taking old “trash” and turning it into treasures. And using cereal boxes and turning them into easy, fun, recycled projects is a great way to teach your kids how to save money and the environment.
For these fun piggies, you’ll need empty cereal boxes, construction paper, scissors, glue, and a couple of pipe cleaners. For less than about $2, you’ll have a fun, new piggy around catching coins.
Via Kix Cereal
Pot ‘O Gold Mason Jar Bank

What’s luckier than a rainbow? A pot of gold at the end of it! So, this fun, clever upcycle of an old Mason jar is one of the luckiest things you’ll have around. Plus, they’re super cute and fun to make.
To make these easy pot o’ gold Mason jar banks, you’ll need some basic supplies you probably already have on hand. Mason jars, of course, are where you start. From there, you’ll need black acrylic paint, Mod podge, a sponge brush, colored pipe cleaners, hot glue and glue gun, heavy card stock, and black ribbon.
Via Playground Park Bench
Recycled Pringle Can Banks

Here’s another one for the fans of recycling: using an old Pringles can and turning it into a piggy bank. It’s a super easy, very fun little project to do with the kids. And since you’re using a recycled Pringles can, you won’t spend much money on it (if any).
To make these, you’ll need the Pringles can, some kind of adhesive (Mod podge, white glue, spray glue – take your pick), a measuring tape, scissors, foam paintbrush, and colorful paper, stickers, and other things to decorate with.
Via Jennifer P Williams
Tin Can Totem Pole Bank

This DIY coin bank is a super fun way to nod to other cultures while recycling old cans and having a little fun with the kids. This is an especially great project if you’re visiting any Native American visitor sites on a family trip or taking some time to appreciate the cultures of our country.
To make this coin bank, you’ll need three cans that can be stacked. You’ll also need duct tape, a utility knife, and some low temp hot glue and hot glue fun, along with paper, feathers, etc. for décor.
Via Mermag Blog
Gravity-Run Coin Sorting Machine

If you’re not one to manually sort coins, this little gravity-run coin sorting machine that you can make from simple household items is a great way to go. Plus, it can help teach your kids a bit about the laws of gravity, how it works, etc., as well as the values of different coins.
To make it, you’ll need some basic woodworking skills and supplies, including MDF material or your choice of wood, some bendy straws, screws, foam board, super glue, a drill and bit, jigsaw (hacksaw), right angle ruler, a sander, and protection gear.
Via Instructables
Recycled Baby Wipes Container Piggy Bank

This is another great project for recycling baby and toddler product packaging in a fun and useful way. This time, you’ll be using a baby wipes container to create a super fun piggy bank the kids can play with or you can use to keep the cash safely tucked away in.
You’ll need a baby wipes container, card stock in your favorite colors, googly eyes, scissors, Mod podge or other glue, milk bottle caps (if you want to make toy coins), and a permanent marker.
Via Sunny Day Family
Vintage Style Wall-Mounted Coin Vault

These classy DIY money boxes are more for the grown-ups in the crowd. They’re absolutely beautiful, stylish, and a unique and fun project for anyone who’d like to work with salvaged materials such as plexiglass and wood.
Find some pallet wood, clear plastic acrylic plexiglass, metallic spray paint, and some design decals for the front. Whatever you want to use the money vault for – savings for a trip, a new couch, whatever – can lead to that inspiration.
Via Lovely Greens
DIY Starbucks Cup Coin Bank

And here’s another DIY piggy bank for adults, or at least for Starbucks fans: A Starbucks’ cup coin bank! The tutorial is a fun, easy to follow Youtube video from Karina Garcia who loves her some Starbucks.
You’ll need some basic crafting supplies, a little bit of time, and some imagination to craft this cute piggy bank. And because it’s so darn cute, you’ll enjoy having it at work, at home, or wherever you tend to collect coins.
Via Youtube
Superhero Mason Jar Banks

If you or the kids love Superheroes, here’s the bank for you. It’s a super easy project that you and the kids can make in an afternoon and customize specially for each kids’ preference of superhero. So, whether they love Superman, Batman, Captain Marvel, or Black Widow, you’ve got options.
To make these super easy coin banks, you’ll need Mason jars, regular Mason jar coin slot lids, a self-healing cutting mat, an X-acto knife, colored duct tape, spray paint, and a little imagination. (You may also want to check online for printable silhouettes for the Superhero symbols.)
Via Fireflies And Mudpies
Recycled Water Bottle Airplane Bank

If flying’s all the rage in your house, but your kid is more into airplanes than dudes with capes, you will want to check this one out. It’s a super fun, super cute airplane bank that recycles a plastic water bottle.
You’ll need that empty water bottle (clear is specified, but any color would do), card stock in your kid’s favorite colors, two-sided tape, scissors, and a pencil. You may also want an X-acto knife to cut a smooth-edged coin slot in the bottle.
Via Angie’s List
Simple Cardboard Coin Box

This is another fun option for folks looking to make a coin box out of materials you’ve already got on hand. Specifically, you’ll be working with cardboard. So, don’t throw out that box just yet. You’ll also need some elastic tape, colored cord, and markers, stickers, or whatever else you want to decorate the box with.
All you do to make this is draw the form for the box on the cardboard, cut it out, make holes for the cord, and assemble it, according to the instructions. Easy, fast, and fun.
Simple Mason Jar Coin Bank

This is about as simple as any coin bank could be. It’s very cute and attractive, though, and works for either kids or adults. Plus, it’s super cheap, and you just need a couple of simple supplies that you may already even have on hand.
You’ll need a Mason jar with a lid that’s slotted, some spray paint in your favorite color, and letter stickers for whatever you’d like the coin jar to say.
Via Dukes and Duchesses
Mickey And Minnie Coin Jars

Here’s another fun one for anyone with Disney themed room anywhere, be it the kid’s room, playroom, or a section of the living room where Donald, Daisy, and Goofy make the foreground.
You’ll need some basic supplies, including 2 Mason jars with slotted lids, red spray paint, black spray paint, clear glass spray paint, painter’s tape, paper towels, multi-purpose craft paint, super glue, foam sheets in red, white, and black, and basic tools like scissors and pencils.
Via Kimberley Marriott
Pink Felt Jar Piggy Bank

All right, so when you look at the photos of this one, you might also think it’s Papier Mache and wonder how the heck you get the bank so perfectly round. But it’s actually pink felt over a round plastic jar that gives it this shape. Sounding easier, right?
It’s actually a very easy, fun project that you can do with the kids on a rainy day. You’ll just need some basic supplies, including a plastic jar and lid, plaster cloth, a craft knife, warm water, a cardboard egg carton, craft paint, and pink felt, plus standard supplies and tools.
Via Disney Family
Upcycled Globe Bank

This final is a favorite for grown-ups who love to travel or those encouraging their kids to learn more about the world while saving for their own spending money for a big trip coming up. It’s a globe turned into a coin and cash bank.
To make this fantastically great bank, you’ll need a metal ruler, X-acto knife, a roll of clear tape, and a cardboard or paper globe. This is not designed for glass or metal globes.
Via Rad Megan
The Right Piggy Bank For You And Yours
We all have random coins lying around the house and office. Anyone who carries a purse sometimes has to dump it out to drop the weight of those scattered coins collected over the weeks – or months. But then, where do we put them?
We all know: A piggy bank! But many of the options you can buy are just boring, or too expensive, or impractical. So, this collection of uniquely crafted DIY piggy banks is a great way to find the right fit for you and your family.
Just be sure to read through the tutorials for the ones you like best, check the supply list, and plan accordingly before you get started. And don’t be afraid to use your imagination to change some of them up to better fit your needs.
Wooden Piggy Bank

Introduction: Wooden Piggy Bank

I have wanted to get into wood carving for a long time, with both hand tools and power tools.
This wooden piggy bank is my first attempt at a power carving project, and was made for one of my kids as a Christmas present.
It is made from layers of scrap pine boards which were cut, glued up, carved down, and finished into the little pig you see here. It is approximately 11" long, 6" tall and 6" wide, with a cavernous belly to hold all the monies.
This was a fun project, and I learned a lot along the way.
Hopefully you can learn something from what I've shared here, and perhaps even be inspired to carve your own wooden piggy bank. Thanks for taking a look!
Step 1: 360-degree Look

Here's a look all around the finished wooden piggy bank.
Step 2: Pattern and Pieces

I began by drawing up a pattern, which is linked below as a PDF should you want to give this a shot. The general look and shape was inspired by a small pig toy that my kids have.
I could have carved this from a solid piece of wood, sawed it in half, bored out the middle, and then glued the two halves back together. But I have piles and piles of scrap pine boards, so I figured I'd try something a little different.
The pattern was used to create three different shapes, two of which are used twice each, and one of which is used four times, for a total of eight layers. Please see the pattern itself and photo notes above for details on the layout.
I laid out the pieces so the grain runs in alternating directions in corresponding boards, both because I thought it might look cool, but also to provide some added strength to the finished pig. For the narrow legs to be strong, I ensured that the boards that would be making up the bulk of the carved legs had the grain running vertically (these are the outer "B" boards.)
With these considerations (and a keen eye to avoid any knots), I laid out the pattern pieces and everything was cut out with a band saw using a narrow, fine-toothed blade.
Attachments

Step 3: Outline Top Profile

The layers were stacked together, and the top profile was drawn on.
Step 4: Mark for Open Space Cut-outs

The two "A" boards in the middle and the two inner "B" boards will have their middle areas removed. These were marked accordingly.
About an inch was left all around the outside to provide plenty of material for carving and shaping.
Step 5: Cut Out Open Spaces

The open spaces were cut out with a band saw, with the entry cut made at the bottom of the pieces.
These entry cuts are in the same location where the bottom hole for the plug will be made later on, so they won't actually exist on the finished piggy bank.
Step 6: Glue Up Layers

The layers were glued up and clamped two at a time, as it would be next to impossible to glue all the layers together in one shot.
So for each half the order of gluing was thus:
- A plus inner B, and outer B plus C
- Once dry, AB plus BC
Then the two completed and dry ABBC halves were glued together.
Step 7: Cut Out Top Profile

The top profile was then cut out on the band saw.
It's terribly difficult to pick your nose with your knuckles, so please mind your fingers.
Step 8: Carving Burs

I basically used the burs in order from left to right, as I got down to finer and finer details. The larger red burs are quite aggressive and worked great for roughing and rounding out the basic shape.
The blue bits were great for slightly finer details, while the small double-cut bur was excellent for the finer details like the eyes and tail.
As I said, I'm a complete newby when it comes to power carving, so I did a lot of experimenting and fiddling around with different bits and burs to see what I liked.
Step 9: Mark Waste Areas, and Dig In

I marked on the pig the areas where I wanted to remove material, and started rounding off the sharp angles.
Making guide marks like this makes a huge difference, and helps to keep you from removing too much material.
I would not recommend using a sharpie marker for this however. It bleeds into the soft pine and there were a couple of places where I needed to remove extra material just to remove the pen marks. Pencil is much better!
Step 10: Refine Shape

I kept moving the pig around and viewing it from different angles, and removing material a little here and a little there.
The idea is to remove enough material that it stops looking angular and boxy, and appears to be a general pig-shape.
Step 11: Eyes, Part One

For the eyes, I left round bulbous protuberances in the eye areas.
Then I drew on an eye-like shape with pencil for each eye.
Step 12: Eyes, Part Two

Using a small bit, I carved out the top of the eyeball, leaving the upper bulbous area intact to be the upper eye lid. Then I cut out the bottom in the same manner.
Then a bit of careful shaping was done to refine the eye further. I then repeated this for the other eye.
The tail was carved out with the same small bit.
Step 13: Unfinished

Here's a look at the carving work once I was satisfied with it.
It was still fairly rough, but I was perfectly happy to leave it that way.
Step 14: Coin Slot

The coin slot was made by drilling a couple of holes and then using a jig saw to connect them. I then gently nibbled the roundness of the holes away with the jig saw into a square-ish shape for the corners.
Step 15: Bottom Hole

The bottom hole was drilled out with a 2" hole saw. The rubber plug whose large side was 2 3/16" across was purchased at a hardware store for a few bucks.
Step 16: Staining

The finishing I did on this piggy bank was a multi-step process.
I began by applying a light color of oil-based stain.
Once the stain was dry, the pig was brushed with a coat of shellac to seal the first coat of stain.
When the shellac was dry, I gave the entire pig a light sanding with 220 sandpaper.
I then rubbed on a darker stain, which penetrated the slightly roughed-up shellac just enough to add some depth and character to the wood.
Step 17: Subtle Painting

Layers of light washes of acrylic paint were added to age the pig a little, and to emphasize the grooves and cracks around the eyes, nose, mouth, legs and tail.
To create this faux grime, I primarily used a dark umber color mixed with a bit of black.
This subtle painting and aging really helped define the features of the pig. Prior to this step, the features just didn't stand out and the entire pig looked kind of 2-dimensional.
Step 18: Clear Coat and Wax

A protective layer was created by spraying on several coats of semi-gloss lacquer, with a rub down of superfine steel wool in between coats, and after the last. This method results in an ultra smooth finish.
The final step is to rub on and buff off a layer of wax. This completes the finish and makes all the colors really pop.
Step 19: The END!

If you make one, please leave a photo. I'd love to see how yours turns out!

Participated in the Wood Contest
Recommendations

Engineering in the Kitchen - Autodesk Design & Make - Student Contest

Remake It - Autodesk Design & Make - Student Contest

Made with AI - Autodesk Design & Make - Student Contest


How To Make An Easy DIY Piggy Bank
If you are trying to teach kids about healthy money habits, then you probably need a piggy bank. We will show you how to make an easy DIY piggy bank that your kids will love using!
This DIY piggy bank is easy to make even if you don’t have much DIY experience. We will show you how to create a wooden stand for 3 mason jars. You will end up with a piggy bank for kids that has a way for them to divide their money up into “spend”, “save” and “give” categories!
We have been trying to teach our girls about money habits and practicing generosity lately. They get a very small weekly allowance for doing chores, but it was difficult to keep the money organized when teaching about saving, spending and giving. After a little brainstorming, my husband came up with a DIY piggy bank that solves the problem! I think these little wooden stands that small mason jars slip into are just the perfect solution to visually see how to divide kids’ money up into the 3 categories.

How To Make An Easy Piggy Bank
The girls love their new piggy banks and thinking about how much to save and give with each allowance. I love that they now have a little stash of coins that they can take to church that is only theirs to give!

Materials Needed For A DIY Piggy Bank
- 3.5 inch X 20 inch X 3/4 inch board (approximately)
- 2.5 inch Hole Saw
- Small Nails
- Spray Paint
- Sanding Dremel Bit
Instructions For Making A DIY Piggy Bank
Step One: Cut the board to about 12.5 inches for the top piece. The legs need to be at least 2 3/4 inches each.
Step Two: Measure to the center of the top board to cut the first hole. Use the hole saw to cut the first hole in the center. Measure 2 1/4 inches from each edge to mark the center of the outside holes and cut.

Step Four: Nail legs to the top board piece. You could also glue and clamp the pieces together.

Step Five: Sand all surfaces with a fine grit sand paper.
Step Five: Spray paint with the color of your choice.

Step Six: For the labels, use alphabet stickers on small round tags. Use small, short picture hanging nails for the labels to hang on.
Step Seven : Insert the mason jars and start saving!

Enjoy your little DIY piggy bank! I kind of want one for myself.
If you want some more kid friendly tutorials, check out these posts!
- Kid’s Drawing Furniture Update
- Watercolor Plant Markers
- Dollar Store DIY Night Light
- Toothpick Cacti
- Q-Tip Flowers

Recent Content
12 Tips For How To Sell Furniture Fast On Facebook Marketplace
Although I may not consider myself to be a "minimalist", I'm trying to be better at getting rid of items that I no longer need or use. This includes furniture. I have sold quite a few furniture...
17 Things To Know Before Deciding If It's Safe To Buy Furniture From The Thrift Store
We have been doing a lot of room makeovers lately. With our kids switching rooms and setting up areas to do virtual learning at home, we have had to purchase quite a few furniture pieces for our...

Type to search
- Crafts For Kids
18 Fun DIY Piggy Banks For Kids and Adults

Sharing is caring!
- pin now, make later ❤️️

Handmade Piggy Banks: A DIY Project For the Whole Family
These 18 Fun DIY Piggy Banks For Kids and Adults are unique and practical crafts you can make at home with just a few materials.
Making your own piggy bank allows you to customize it to your liking and adds a personal touch to saving money.
For kids, creating their own piggy bank can teach them the importance of saving and the value of money.
It also provides a fun and creative outlet for them to express themselves.
Adults can also benefit from making their own piggy bank to save money and stay organized.
Plus, creating a personalized piggy bank can be a fun and satisfying DIY project.
There are many different materials that can be used to make piggy banks, such as jars, boxes, and even plastic bottles.
You can also decorate it in any way you like, such as painting it, adding stickers, or covering it with bright, cheerful pieces of paper.
The possibilities are endless when it comes to designing and decorating your own piggy bank.
Not only is making a piggy bank a fun and engaging activity, but it can also help teach valuable lessons about money management.
Please note, that this post may contain affiliate links. I earn a small percentage if you purchase any item through the links on this site, but it will be at no cost to you. You can see the full disclosure policy here. Thank you for supporting my work and this blog.

See More Easy And Unique DIY Piggy Banks Below
If you are looking for creative and fun ways to save money, look no further than these DIY Piggy Banks!
Whether you want to make one for a kid or an adult, there’s a great selection of crafts here for all ages!
Making your own piggy bank is a great way to express your creativity and save some cash.
From using mail tubes and cardboard to plastic bottles and cans, there are countless ways to make a piggy bank that’s both functional and stylish.
So, don’t wait any longer to save those coins and bills. Browse through the full list and carefully look at each piggy bank design to find the best one for your preference and needs.
Check out the DIY piggy bank ideas below and get inspired to create your unique savings vessel!
Homemade Piggy Bank Ideas for Kids
Recycle empty food containers and create these easy, colorful piggy banks! It’s a fun project you can do with the kids to teach them how to save and budget their money.
Designer: Kristi of The Classy Chapter Materials Used :
- 3 Empty food containers of various sizes with lids
- 3 Sheets craft paper with designs
- 3 Sheets colored cardstock paper
- Letter Stickers
- Hot Glue Gun/Glue
Completion Time: 10 to 15 minutes Size: Unspecified Format: Written

Rainbow Mason Jar Piggy Bank
Do you or your kids love rainbows? If yes, then add this bright, cheerful rainbow mason jar piggy bank to your to-be-made crafts. It is delightful to create and looks great when displayed in the room.
Designer: Brenda P of Living Well Mom Materials Used :
- Acrylic paint (white and all the colors of the rainbow)
- Paintbrushes
- Cardstock paper
- Laminator and laminating pockets (optional but recommended)
- Regular mouth mason jars
Completion Time: 1 to 2 days (drying time included) Size: Unspecified Format: Written

Felt Piggy Banks
Unlike typical piggy banks, this one doesn’t require breaking! It’s sewn, so you only need to cut the embroidery floss to get the bank. This craft is a great option if you want to introduce sewing to your older kids or refine your own sewing skills.
Designer: Allison Murray of Dream a Little Bigger Materials Used :
- Cricut Maker
- StrongGrip Cutting Mat (Purple)
- Cricut Felt Sampler
- Embroidery Floss & Needle
Completion Time: 30 minutes Size: Unspecified Format: Written

Water Bottle Piggy Banks
Learning a valuable life lesson like saving should be exciting. These adorable water bottle piggy banks can help your kids realize the importance of money while having fun.
Designer: Crystal of Our Kid Things Materials Used :
- 2 Empty Water Bottles, shorter ones
- 3-4 Sheets Paper, pink patterns
- 4 Small Self-Stick Googly Eyes
- 1 Pink Pipe Cleaner
- 8 Small Pink Wooden Beads
Completion Time: 20 to 30 minutes Size: Unspecified Format: Written

Robot Emoji DIY Piggy Bank
While you must do most of the steps to create this cool robot piggy bank, kids are welcome to help! They can assist you, especially with gluing the parts and painting the robot’s details.
Designer: Scott of Saws on Skates Materials Used :
- 1-¼” Finish Nails or Brad Nails
- 1-¼” Wood Screws
- Ready Patch
- Craft Paints
- Artist Brushes
- Sharpie Marker
- Minwax Polycrylic (Matte-Finish)
- Tape Measure
- Kreg Multi-Mark
- Miter Saw or Miter Box
- Hammer or Brad Nailer
- ¼” Drill Bit
Completion Time: 30 minutes to 1 hour Size: Unspecified Format: Written

Minnie & Mickey Mouse Mason Jar Money Banks
Anyone who loves Disney, especially Minnie and Mickey Mouse, will thoroughly enjoy these magical money banks!
Designer: Kimberley of Kimberley Marriott Materials Used :
- 2-1 Gallon Ball mason Jar
- 1 Can Of Red Spray Paint
- 1 Can Of Black Spray Paint
- 1 Can Of Clear Glass Spray Paint
- Painters Tape
- Paper Towels (or something similar)
- 1 Small Bottle of White Multi-Purpose Craft Paint
- 1 Round Sponge (about 1 – 1 1/2 inches in diameter)
- 1 White Foam Sheet
- 1 Red Foam Sheet
- 2 Black Foam Sheets
- 1 Small Cookie Cutter/Shot Glass
- 1 Large Cookie Cutter/Other round item
Completion Time: Unspecified Size: Unspecified Format: Written

Piggy Bank ATM Machine
With its brilliant design and features, this DIY ATM piggy bank will be a hit among kids and adults alike. It requires some time to complete, but the result is rewarding!
Designer: Shreyans Jain of MechTech Inc Materials Used :
- Marker / Pen
- Glue gun + melt sticks
- Toilet paper roll
- Construction Paper
Completion Time: 1 to 2 hours Size: Unspecified Format: Video

Diy Lunchbox Piggy Bank
This pink and fabulous lunchbox piggy bank offers generous storage for your savings and doubles as a stunning home décor piece.
Designer: Kelly Mindell of Studio DIY Materials Used :
- Lunchbox Bank
- Light Pink + Hot Pink Paint
- Paint Brush
- Printable “Broke” Phrase (available inside the tutorial)
- Computer Paper + Printer
Completion Time: 1 hour Size: Unspecified Format: Written

DIY Piggy Bank & Money Counting Activity for Preschoolers
This fun craft is a great opportunity to introduce the concept of saving to young children. It’s fun and only requires supplies you already have at home.
Designer: Laura of Sunny Day Family Materials Used :
- Baby wipes container
- Card stock or construction paper (Pink and Black)
- Googly eyes
- Glue (Mod Podge)
- Milk Bottle Caps
- Permanent marker
Completion Time: 15 to 20 minutes Size: Unspecified Format: Written

Tin Can Piggy Bank
Similar to a traditional piggy bank, this tin can coin bank features a bright pink color and a cute pig expression. The only difference is it’s unbreakable, keeping your kids’ savings safe and sound.
Designer: Madhumitha of Little Ladoo Materials Used :
- Old tin can
- Pink sponge (a dishwasher sponge will work)
- Pink metallic paint
- Pink cardstock paper
- A piece of cardboard
- Hot glue gun
Completion Time: 30 minutes to 1 hour (drying time included) Size: Unspecified Format: Written + Video

DIY Llama Piggy Bank
This cute and whimsical llama piggy bank is a versatile bank you can also use as a decorative item or a toy because of its design and detailing. It’s easy on the eye and a festive craft to do with your kids.
Designer: Amy Weir of Delineate Your Dwelling through Fun365 Materials Used :
- Llama Template Printable (available inside the tutorial)
- Bright foam sheets
- Chenille Stem
- Acrylic Paint
- Wood Block Bank
- Paper Grass
- Tiny pom-poms
Completion Time: 60 to 70 minutes Size: Unspecified Format: Written

DIY Cereal Box Piggy Banks
You’ll be obsessed with how customizable these cereal cox piggy banks are. You can do animals for toddlers, robots for older kids, and modern ones for teens—the designs you can make are endless!
Designer: Allison Waken of All For The Boys through Kix Materials Used :
- Empty recycled cereal box
- Construction paper
- Few googly eyes
- Pipe cleaner/s

Diy Piggy Bank Made From A Book (2 Ways)
Aside from being a great craft to make with your kids, this book piggy bank is a perfect DIY gift for book lovers and loved ones who want a special secret place to keep their money or trinkets.
Designer: Karen Kavett of Karen Kavett Materials Used :
- Book box from the craft store / Old hardcover book
- Craft Knife
- Painter’s tape
- Paint, leather stickers, label makers (anything you like to decorate the bank)
- Packing tape
Completion Time: Unspecified Size: Unspecified Format: Written + Video

Diy Piggy Bank Gift Boxes
Not only are these DIY piggy banks simple and quick to do, but they also feature unique and charming characters your kids will love!
Designer: Rachel Faucett of Handmade Charlotte Materials Used :
- Bright construction paper
- Double-sided tape
- Mailing tubes
- Hole punch (patterned)
- Pascal, Parrot, and Panda printable template (available inside the tutorial)

Diy Leather Piggy Bank
Do you need a durable piggy bank to keep your little ones’ savings? This minimalistic DIY leather piggy bank is a fantastic option to do so! It’s made of reliable material and looks classy when displayed at home.
Designer: Chelsea of Lovely Indeed Materials Used :
- Piggy printable template (available inside the tutorial)
- About 1 1/2 square feet of 9-10 oz vegetable tanned leather
- About 1 square foot of 2-4 oz vegetable tanned leather
- Button stud screwback
- Sharp craft knife
- Spray bottle with water
- Leather hole punch
Completion Time: 2 hours Size: Unspecified Format: Written

Giant Mail Tube Piggy Bank
This 4-foot-tall piggy bank is the ultimate craft if you and your kids plan to do some big, serious savings. It’s large and will totally fit lots of pennies and dollars.
Designer: Amber Kemp-Gerstel of Damask Love Materials Used :
- A 4″x 48″ Scotch Mail Tube
- Silver scrapbook paper
- Pink and yellow craft paint
- Craft knife
- Yellow, black, tan colored paint
- 4″ paper mache cone
Completion Time: Unspecified Size: 4 Feet (length) Format: Written

DIY Piggy Bank
This fun and practical DIY piggy bank is great for encouraging young kids to save up. It’s an excellent activity to develop their creative skills, too!
Designer: Rachel Hollis of Rachel Hollis Materials Used :
- Pink cardstock
- Piggy Bank Template
- Drinking straw
- Assorted buttons
- Pink pipe cleaner
- X-acto knife

Baby Yoda Piggy Bank Craft
Are your kids Stars Wars fans? If yes, I highly recommend you try this adorable Baby Yoda piggy bank craft! It’s easier than it looks, and you’ll likely be obsessed with the final output.
Designer: Heather Painchaud of Homemade Heather Materials Used :
- 500 ml wide mouth mason jar
- Black acrylic paint
- Green acrylic paint
- White puffy paint
- Paint brush
- Green felt material
- Brown felt material
- Hot glue sticks
- Mod Podge (optional)
Completion Time: 1 to 2 hours Size: Unspecified Format: Written

If you found this post helpful, please like and share. Follow me on Pinterest for more crochet inspiration. Follow us on Instagram and Facebook @ArtyCraftyCrew .

Looking For Similar Projects?


20 Fun DIY Piggy Banks that Encourage Saving

DIY Piggy Banks make Saving for Kids fun!
Piggy banks allow kids to see how just adding a few coins each day will really add up to saving. Once the piggy bank is filled, we head to the bank to add the money to their savings account which is always an exciting day.
Related: Creative ways to give money as a gift
Who doesn’t remember having a piggy bank. I went through so many as a kid from actual piggy banks, crayon banks, truck banks, and more. But I never made my own. My kids loved making their own banks and making a piggy bank is a fun craft to do as a family. So, to spread the fun we put together a bunch of super cool ways to make piggy banks for kids.
Piggy Banks Kids Can Make
1. batman piggy bank.
This is so fun for superhero fans! They can make their own Mason Jar Superhero Banks. You can make a Batman or Superman piggy bank. via Fireflies and Mud Pies
2. DIY Piggy Bank Ideas
If you have an empty formula can, you can make this Formula Can Piggy Bank . via It Happens in a Blink
3. Ice Cream Piggy Bank
This is my kind of piggy bank! This is an Ice Cream Piggy Bank , perfect for saving up for an icy treats. via Yesterday on Tuesday
4. Large Piggy Bank
This huge bank looks like a pencil and can hold a ton of change! Can you fill up this Giant Mail Tube Piggy Bank? via Damask Love
5. Duct Tape Piggy Bank
I love that this has three sections: to spend, to save, and to give. Plus, this Totem Pole Banks from Cans and Duct Tape is super cute. via Mer Mag Blog
6. DIY Money Box
Add a photo of what you are saving for in this shadow box. This DIY Shadow Box Bank is perfect if you are saving for something big. via A Mom’s Take
7. Homemade Piggy Bank
How cute is this Piggy Bank from a Wipes Container. It is one of the easiest ways to make a bank. Plus, it is perfect for smaller children who don’t have the best fine motor skills yet. via Sunny Day Family
8. Pink Glitter Piggy Bank
I love this Pink Glitter Piggy Bank Spice up a boring piggy bank easily! You can use for favorite color sparkles and even mix and match the colors! via Greta’s Day
9. Dinosaur Piggy Bank
Who doesn’t love Dinosaurs? If your child is a Dino fan then they will love this Paper Mache Piggy Bank Dinos. Use paper mache to make a pink pig bank way cooler. via Red Ted Art
10. Mason Jar Piggy Bank
Cha-Ching Mason Jar Piggy Bank – This bright and fun jar turned piggy bank is so cute. via Dukes and Duchesses
More Creative Bank Crafts for Kids
11. Money Bank Box
Going green is the best! Here are three fun ways to recycle a cereal box into a DIY Cereal Box Piggy Bank . via Kix Cereal
12. Piggy Bank Craft
Make your own piggy bank with a Mayo jar. The best part is this Mayo Jar Hamm Piggy Bank is not only another great recycle project, but the same piggy bank as the one from Toy Story ! via Thrifty Fun
13. Piggy bank Made Of Plastic Bottle
Recycle plastic bottles by making this Soda Bottle Piggy Bank. This adorable piggy bank is fun to make and looks so cute. via DIY Projects
14. Turtle Piggy Bank
Use plastic bottles and foam to make this Turtle Piggy Bank. These tiny banks that look like turtles and actually float! via Krokotak
15. Piggy Bank Jar
Wanting an easy DIY piggy bank craft? This Mason Jar Piggy Bank is simple to make and you can decorate it anyway you want or leave it as is.
16. Minion Piggy Bank

Everyone loves Minions! You can make your own Minion Piggy Bank from Water Cooler Bottle. Here’s a fun way to make your own piggy bank. via Pinterest
17. Piggy Bank Craft Ideas
Don’t throw out your Pringles can! Use it to make this Pringles Can Piggy Bank. Personalize it and make it your own.
18. Saving Jar
This Disney saving jar is the perfect way to save money for Disneyworld! If you are saving up for a Disney trip, these are perfect! via Poofy Cheeks
19. Plastic Piggy Banks
Get crafting with this DIY Airplane Piggy Bank. This is so cool, you would never know it was made from a plastic bottle. via BrightNest
20. Spend, Save, Give, Bank
These Spend Share Save Piggy Banks are my favorite. This is a really great bank that reminds kids to spend some, save a little, and give. via eHow
This article contains affiliate links.
Some Of Our Favorite Piggy Banks
Don’t want to make your own DIY Piggy banks? These are some of our favorite piggy banks.
More Fun Money Activities for Kids

- We have 5 ways to make financial literacy activities for elementary students fun. Understanding and teaching fiscal responsibility doesn’t have to be hard and boring.
- It is important that as parents we take time to find ways of helping kids understand money. Not only will this teach them to manage their own money that they are given, but it will help them in future endeavors as well.
- What better way to learn about money than playing with it! This free printable money is a great way to teach how much the value of dollar and cents and even promotes pretend play!
- Learning budgeting tips as a family is a great way to save money in general or for something special!
- Saving money to make life easier? Then try out these other life hacks that can make things just a little bit simpler.
Leave a comment : What DIY piggy bank from this list does your kids plan to make?
Originally Posted Here
Encourage Your Teenager's Self-Esteem
Study reveals parental concerns over rise of zero-alcohol drinks among adolescents, related articles.

Explore some easy-to-make DIY Piggy Bank Ideas and teach your kids the importance of financing and money-saving. Read on to know more!
These DIY Piggy Bank Ideas will let you transform everyday objects into delightful penny banks for your little ones.
Check out the best penny projects here
DIY Piggy Bank Ideas
1. ice cream fund mason jar.

A dedicated mason jar for ice cream funds is a fun and effective method to instill the habit of saving in kids. Read the details here .
2. Cardboard Coin Bank

This coin bank is made from an old cardboard box, cord, and elastic tape. You can customize its size and appearance as well. Check out the DIY here .
3. DIY Spend, Save & Share Piggy Banks

Make your kiddo learn the importance of saving, spending, and donating money with these three labeled piggy banks. Read this article for more info.
4. DIY Plastic Bottle Airplane Piggy Bank

Here’s another one of the funkiest piggy bank craft ideas, made from a plastic bottle, scissors, colored paper, and glue. Go through this article for the tutorial.
5. Totem Pole Banks from Cans and Duct Tape

Teach your kids the virtues of saving money with this fun, colorful totem pole bank. Hop to this tutorial for more info.
6. Mason Jar Superhero Banks

This superhero-themed piggy bank is a fun project to do with your kids. Follow the step-by-step instructions here .
7. Disney Savings Jar Bank

With this piggy bank, children can see their savings grow, fueling their anticipation for a magical Disney vacation. Get the tutorial here .
8. Stunning DIY Painted Globe Bank

Learn how to turn an old globe into an eye-catching piggy bank in this tutorial. Get the instructions here .
9. Baby Wipes Container Piggy Bank

Encourage your kiddos to save their money in this wipes container piggy bank. It’s super affordable and easy to make in a few minutes. The DIY is here .
10. Pringles Can Piggy Bank

This DIY idea uses everything kids love, from Pringle cans to stickers and Mod Podge. Check out the steps in this tutorial .
11. Turtle Piggy Bank

Make this turtle cash box using the bottom of a plastic bottle and some other supplies. Read the details here .
12. Silly ‘Stache Jars Bank

Glass jars, googly eyes, and stickers are all you need to create these decorative saving banks that let you display coin collections as well. Get the details here .
13. Soda Bottle Piggy Bank

Upcycle a soda bottle to make this cute piggy bank. It’s ideal for gifting purposes as well. See the instructions here .
14. Paper Mache Dino Bank

For a playful spin on the traditional piggy bank idea, consider crafting this paper mache dino bank. The details are here .
15. Pot o’ Gold Piggy Bank

Inspired by an old Leprechaun legend, this rainbow-themed coin bank is a fun craft to do with kids. It’s one of the most amazing DIY piggy bank ideas. Find the tutorial in this article .
16. Sparkle & Shine Piggy Bank

If you’re looking for a glamorous piggy bank idea, consider trying this DIY that uses lots of glitters and metallic spray paint.
17. Handy Hamm Piggy Bank

Grab a plastic jar, newspaper, plaster cloth, egg carton, paint, and a few supplies to craft this adorable piggy bank. Follow the instructions here .
18. Self-Sorting Coin Bank

This wooden coin bank uses gravity to sort coins automatically. Plus, it doubles up as a penny-saving box. Get the DIY here .
19. Rainbow Mason Jar Piggy Bank

Make this colorful rainbow-themed piggy bank using a mason jar, acrylic paint, card stock, and this tutorial .
20. Piggy Bank From a Tissue Box

This piggy bank is a clever way to reuse an empty tissue box while encouraging healthy financial habits in kids. Here is the complete tutorial.
21. Banana-Patterned House-Shaped Coin Bank

Using a milk carton as the base, you can fashion a chic house-shaped coin bank that makes a nice gift for the holidays, too. Check out the DIY here .
22. Robot Emoji DIY Piggy Bank

Shaped like a cute robot emoji, this DIY piggy bank is made with simple supplies like scrap wood and craft paints. Get the details here .
23. Cha-Ching Mason Jar Piggy Bank

You only need a plain old mason jar to create a piggy bank. Learn more about this project in this DIY .
24. Papier Mache DIY Piggy Banks

Encourage kids to start saving with their own personalized piggy banks. These paper mâché piggies are fun and easy to make from everyday items. Get the instructions here .
25. Minion Mason Jar Coin Banks

Is your kiddo a Minion fan? If yes, then these coin banks are the perfect weekend project for you. Go to this DIY for the details.
26. Minnie & Micky Mouse Mason Jar Money Banks

If Minions don’t quite appeal to you, these twinning Micky & Minnie jars will seal the deal. They’re equally easy to make and add a brighter pop of color to the rack. Get the instructions here .
27. Wooden Piggy Bank

Carved from layers of scrap pine boards, this wooden piggy bank is a stylish money-saving tool. Make your own with this DIY .
28. DIY Car Coin Bank

This is not a typical piggy bank. It’s beautified with a gold-painted toy car. Read more about this project here .
29. Dollar Store Piggy Bank Makeover

Rather than purchasing a new piggy bank, jazz up your kiddo’s old one with lots of glitters. Get the DIY here .
30. DIY Shadow Box Piggy Bank

To recreate this custom shadow box piggy bank for yourself, check out this step-by-step tutorial .
31. Homemade Piggy Banks

DIYing this puff bottle-upcycled piggy bank is easy and lets your kids have fun customizing it. Here’s the tutorial .
32. DIY Spend, Save, and Give Jars

Learn how to transform ordinary jelly jars into coin banks and encourage your kiddos to spend, save, and donate. Follow the instructions here .
33. Formula Can Piggy Bank

Embellish an old Formula can with decorative fabric, ribbons, and a dollar tag to create a chic coin bank. Get the DIY here .
34. DIY Giant Mail Tube Pencil Piggy Bank

Shaped like a giant pencil, it’s a one-of-a-kind storage container for pennies and dollar bills. The details are here .
35. Paper Plate Frog Coin Bank

This is the perfect craft to create with your kiddos this summer! It’s one of the best kid-friendly DIY piggy bank ideas. Follow the tutorial here .
36. Drink Container Bank

Made with a plastic bottle and pink foam stickers, this piggy bank looks like a festive prop. Make one with this DIY .
37. Crochet Piggy Bank

Instead of discarding the empty tissue box, convert it into an adorable piggy bank with crochet. The instructions are here .
38. Coffee Can Piggy Bank

Transforming a drab coffee can into a purposeful and decorative item is fun and fulfilling. Give this DIY a try.
39. Piggy Bank Freebie Pouch

Follow this article to make a peculiar piggy bank out of fabric and basic sewing skills.
40. Painted Polka Dot Piggy Bank

This cute polka-dotted piggy bank is an artsy offering to a contemporary-style dressing table and keeps your change handy when you’re in a hurry. Get the DIY here .
41. DIY Leather Piggy Bank

Adorable and space-friendly, this trendy leather piggy bank has a secret opening for emptying the coins, so you won’t have to rip apart the entire thing. Follow the DIY here .
42. DIY Piggy Bank Gift Boxes

These piggy banks disguised as whimsical gift boxes excite your child’s imagination, making it a fun challenge for them to save as many coins as they can. Make them with this tutorial .
43. Mouthwash Bottle Piggy Bank

With recycled materials and cute cutouts, this zero-waste DIY piggy bank project makes a nice addition to your child’s room. Get the instructions here .
44. DIY Cardboard Coin Bank

Create a super affordable piggy bank for your little one using cardboard. Follow these detailed instructions .
45. DIY Charlie Brown Coin Bank

Salvaged from an empty roll can, this coin bank is super easy to make. See the instructions here .
46. DIY Yarn Fund Piggy Bank

How would you like a glass block that not only adds to your decor but also lets you showcase your saved coins? This DIY is all about that!
47. Gold Piggy Bank

Looking for a special baby shower gift that won’t break the bank? How about this trendy rose gold piggy bank? Check out the DIY here .
48. DIY Cow Piggy Bank

Transform an empty tissue box into a cow-themed piggy bank using this tutorial . It’s a beginner and kid-friendly project.
49. Bus Piggy Bank Toy

Watch this video to create a bus-shaped piggy bank that also doubles up as a fully functional toy.
50. Sequin Piggy Bank

Adorned with rainbow-hued sequins, these glammy piggy banks are super easy to customize. If your kids are saving up for something special, these coin banks are just what they need!
Here are the creative beads craft ideas
27 DIY Corner TV Stand Ideas | DIY TV Shelf
Is avocado oil comedogenic | does avocado oil clog pores, leave a reply cancel reply.
Your email address will not be published.
Can Farts Cause Pink Eye | Does Farting on a Pillow Cause Pink Eye

How to Get Rid of Rats With Black Pepper

Does Ammonia Repel Snakes | Does Ammonia Keep Snakes Away

Does Glycerin Clog Pores | Glycerin Benefits for Skin
- 10 Cowboy Hat Storage Ideas
- 7 Baseball Bat Display Ideas
- 10 Clever Hair Tie Storage Ideas
- 7 Best Hand Saw Storage Ideas
- 8 DIY Wood Slice Wreath Ideas
38 Fun and Simple DIY Piggy Banks to Make
As an Amazon Associate we earn from qualifying purchases.
DIY piggy banks are a great way to jump start your savings without having to spend money. Most of these DIY coin banks below are made from items that you may have around the house or can purchase for the fraction of the price a normal piggy bank costs in stores.

1. Clorox Bottle Pig
2. monster banks, 3. fabric piggy bank, 4. soda bottle bank, 5. paper mache dinosaurs, 6. cereal box, 7. airplane bottle, 8. unicorn bank, 9. starbucks cup, 10. crochet piggy bank, 11. glittery piggy bank, 12. self sorting piggy bank, 13. leather piggy bank, 14. shadow box, 15. deco coffee can, 16. pallet bank, 17. globe bank, 18. indestructible money box, 19. quote jar, 20. superhero mason jars, 21. golden car, 22. minions, 23. mickey and minnie, 24. glitter mason jars, 25. pot o’ gold, 26. map jar, 27. glass water bottles, 28. empty multi-sized containers, 29. mason jar trio, 30. totem pole, 31. hidden shoebox, 32. wood and acrylic animals, 33. scrap wood, 34. painted animals, 35. carved wood piggy bank, 36. wooden train, 37. rolling coin bank, 38. mechanical snail, easy kid piggy banks.
For kids, these DIY piggy banks are really easy to create and allows them to get some hands on experience with crafting while they are also learning how to save money. All of these craft below can be made with kids, no matter the age, just make sure that adult supervision is present for painting and cutting the coin slots.
For this DIY kids craft you will need a Clorox bottle , some paint and any other items that you have on hand to decorate it. Make sure that before you begin you rinse out the Clorox bottle really well so that the bleach smell is gone.

You can also make this for boys too, swap out the pink paint for blue or green.
Take a look at this craft here: www.bernysinspredmuse.com
These monster banks are really easy to make with kids and only require a few crafty items. Pringles cans, baby formula cans and even coffee cans are perfect for the base of these fun monster themed piggy banks.
Next you will need some glue, scrapbook paper, scissors and googly eyes to bring it all together.
See this and other crafts here: www.parents.com
This picture tutorial shows you the step by step instructions on how to create a cute little fabric coin bank. You will need a trimmed down section of PVC pipe or a sturdy cardboard tube for the body.

Next you will want to cut out the fabric into the shapes shown and then adhere them with glue to the round tube. Finally add in details for eyes, ears, a tail and even a cute ribbon around its neck.
See the picture tutorial here: www.howtoinstructions.org

Cute and customizable, this piggy bank is made from an empty (and rinsed out) soda bottle and some construction paper. To make this with your little ones, help them decorate and cut out the eyes, nose and ears for the pig.
You will glue or tape them to the bottle, as well as you will need to make a slit in the large piece of construction paper that wraps around its body.
On the other hand, if a can of soda is what you have, you can also use that to make a DIY keychain .
Look here for the final instructions: www.marthastewart.com
Sometimes a simple piggy bank just isn’t what’s cool anymore. For those who want a different animal, then you can create something different with a paper mache project.

These creative dinosaurs can be made with a little shaping and design. You will also need to have a balloon handy to create the inner hollow shape.
Take a look at the tutorial here: www.redtedart.com

I love the idea of using an old cereal box to create a quick piggy bank for your family.
You will need construction paper or paint to cover the original artwork on the box to make it your own.
Finally you will need to cut a hole in the top of the box so that you can add your money.
Check out the details here: www.kixcereal.com
For the little pilot in your life, this DIY airplane coin bank is perfect to help them learn how to save.

For this project, you will need an empty soda bottle, some construction paper (in their choice of color), some tape and a pencil to outline the shapes.
See the finished project here: www.brightnest.com
This adorable project utilizes a pre-made wooden bank block, I suggest using an empty small box or even a round tin to create the main body.

You can paint on or use felt paper to create the colorful stripes .
Get your inspiration here: www.fun365.orientaltrading.com
Teen Piggy Banks
This may be the cutest bank I have on the list. To create this DIY Starbucks coffee coin bank you will need some modeling clay, paint and an empty plastic Starbucks frappe cup. To get the most out of this craft, I highly suggest that you treat yourself to a frozen treat before making this.

To go with your Starbucks Cup Bank, you might want to check out my ideas on DIY coffee tables from pallet wood .
Watch the instructional video here: www.youtube.com
This is a great DIY coin bank project for teens and older kids, since they can crochet the cover themselves. For this project they will need an empty tissue box, yarn and a crochet hook. The crochet pattern is fairly easy to make for beginner and intermediate crocheters.

Take a look at the free pattern here: www.nickishomemadecrafts.com

While the base of this piggy bank is a store bought one, I consider this a DIY upgrade to an old piggy bank, or you could try the glitter upgrade on another project I have listed here.
To make this sparkly coin bank you will need your choice of glitter, spray adhesive, sealer and some sand paper.
Check out this fun project here: www.gretasday.com
This is a really cool piggy bank that your older kids can make along with an adult in the garage. Due to the use of power tools I do recommend some supervision for younger kids who want to help out. This coin bank will sort your quarters, nickels and dimes into their own chamber.

You’ve got to see this one: www.instructables.com

Elevate your standard way to save coins with this DIY leather piggy bank.
The entire body of this coin bank is made from vegetable tanned leather.
It will take a little longer to create this project due to needing to be careful cutting the leather with scissors or an Exacto knife.
You will also need some E6000 adhesive, a leather hole punch and some water to spray the leather as you are molding it into the pig’s shape.
See the full tutorial here: www.lovelyindeed.com
Adult Piggy Banks
Fun crafts to help you save money isn’t just for kids, adults can get in on this action to create fun ways to save for life events, travelling or a much needed day out on the town.

This is a great way to see your small savings grow.
For this DIY piggy bank you will need a shadow box, a dremel tool , an inspiring background and an optional vinyl decal for the glass.
The best part about a shadow box is that until the coin bank is full, you will be able to see through to the background.
To help yourself save, put in a picture of what you are saving for to help motivate you to get there.
Check out the instructions here: www.amomstake.com

Upcycle your old coffee can with this great DIY craft.
All you need is an empty can, some construction paper or paint, adhesive and an Exacto knife to slit a hole in the lid.
You can opt to create a simple pattern, keep it one color or add an inspiration quote to make it your own.
See the inspiration here: www.cutoutandkeep.net
This is a gorgeous way to pick your piggy bank up off of the table and create a chic way to hold loose change. Created from a pallet, the base of this coin bank is wood with a Plexiglas front and a painted back. You can create just one or make one for copper, silver and gold coins to keep them separate.

Take a look at the design here: www.lovelygreens.com
This money or card bank is exquisite and fairly easy to make. While the instructions are in french for this project, there are plenty of pictures to show you the steps to achieve this DIY globe bank. You will need a globe, some white spray paint, acrylic paint, gold paint, sandpaper, carbon paper and a craft knife.

See the picture instructions here: www.unbeaujour.fr
This is the piggy bank you need if you cannot save money. Once coins go in, you are going to have to put forth some real effort to get them out. For a coin bank as indestructible as this one you are going to need some power tools as well as steel for the body.

You’ve got to see this one: www.instructables. com
Mason Jar Coin Banks
Creating a piggy bank out of a mason jar is a trendy way to save right now. Not only are mason jars inexpensive, but they also give you a blank canvas base that you can decorate a multitude of ways to make your coin savings bank personalized to you. You will need a coin slot lid for your mason jar banks. You might also need to drill a hole in a mason jar for some of the projects.

Create this fun jar that has something to say. You will need a mason jar, some paint and a cutout of however you want to personalize it.
Adhere the letters to the mason jar and paint over the outside .
Before the paint is fully dry, you will need to peel up the letters, if you wait until the paint has dried then you may accidentally peel up some of the paint as well.
Take a look here: www.dukeandduchesses.com

Help the superhero in your life learn to save with these fun DIY coin banks. For this easy project you will need a mason jar, paint, an Exacto knife and duct tape in the color of your preferred superhero.
Paint the jars, and then cut out the emblem to adhere on the front once the mason jar is completely dried.
Some people also use this same technique to create Superhero themed mason jar lights for decor.
Get the directions here: www.firefliesandmudpies.com

This is a perfect coin bank for teens who are saving for their first car.
At first glance the source website is in german however, further down the how to article has been translated into english so that you can follow along.
This DIY mason jar coin bank is really easy to make, all you need to do is adhere a car to the top of the lid either with a screw or glue. Then paint the entire metal top gold to make it look chic.
Take a look here for more: www.johannarundel.de
Create your own little minion to take charge of your money with these minion mason jar banks. You will need some paint, a few pipe cleaners for the hair, a giant googly eye and a second screw top lid.

Just make sure that the paint is fully dry before you begin with a second coat, this will limit any chipping.
See the finished product here: www.kastyles.co

These jars are perfect as DIY his and hers coin banks especially for Disney enthusiasts. The Mickey and Minnie pair are really easy to make and are made from the same colors, so no extra items needed to make two.
Minnie’s dots are made from a sponge paint brush making circles around the jar, while Mickey’s two buttons are a 3D foam element.
This matching mason jar piggy bank would also be a perfect gift for your girlfriend .
Take a look here for more instructions: www.kimberleymarriott.com
For this glittery and gold DIY mason jar, the creator uses an already painted gold jar from a craft store. You can easily use a standard mason jar to create the same effect, all you need to do is spray paint it a metallic gold and allow it to dry before you move onto the next steps.

Check out the rest of the directions here: www.taylorbradford.com

I love how the creator of this craft wants to teach her little ones how to make their own luck and now you can too with this pot of gold DIY mason jar bank.
The rainbow is created with pipe cleaners and for added fun you can even glue a mini leprechaun on the top to guard it.
See this great DIY idea here: www.playgroundparkbench.com

Surprisingly these DIY map coin banks are made with napkins modge podged onto a painted mason jar.
This allows the picture to adhere nicely and dry with a really authentic look.
I also love how the creator cuts the map into strips before adhering it to the jar, this allows you to make sure that there are no bubbles or wrinkles in the finished product.
You’ve got to see this one: www.pillarboxblue.com
Spend, Save and Share Banks
Having a DIY piggy bank is a great way to help your kids start saving their loose change. These 3 in one coin savings systems go a step beyond, teaching the recipient to not only save, but to also have an okay-ed spending allotment and one that they can use to treat someone else.
You can easily reuse glass or plastic water bottles for this great way to start learning more about saving. Pull off any bottle decals and then add vinyl letters that spell out each money bank goal. To keep them all together tie some colorful yarn around each bottle.

You can also opt to cut your bottles with a tile saw for the slot.
Check out this great DIY here: www.itstillworks.com
When you are making DIY coin banks, you can use almost anything that you have around the house to create the base. For this multiple bank project, you are encouraged to use different sizes and shapes that you have laying around. Depending on what you want them to add the most to, then that will be the one that takes the largest container.

Get your inspiration for this project here: www.theclassychapter.com
This is a really simple project that looks nice on display anywhere in the home as a decor or a home improvement project. All you need is to build a simple base to hold mason jars and then add little tags to notate what each jar is for. If you don’t like the tags you can borrow an idea from above and paint or decal each jar to show what it is for.
Take a look here for more: www.homemadeginger.com
This is a great gift for kids or anyone that enjoys decor with a purpose. Once stacked, no one would guess that these three jars hold loose change. Pringles mini cans are a great base since they already come with a plastic lid that you can use as the top, plus they stack well. To keep which one is which you can discreetly write “Spend, Save and Share” on the back of each.

See the finished product here: www.mermagblog.com
Shoeboxes are great for so many different crafts, and this is one that kids will love since they can stash it under their pallet beds for added protection. Using glass small mason jars or baby food jars gives this mostly cardboard project a little more stability, plus who doesn’t love the clink that jars make when change is dropped in.

Check out this DIY craft here: www.icanteachmychild.com
Wooden Piggy Banks
Crafting things out of wood is a great way to make something that is a little more authentic that will last as well as give the creators time to bond in the garage while putting it all together. I also love the heavier and more durable look of DIY wooden piggy banks.

These wooden bubble bank animals are a great gift for any age and can be customized to fit the person it’s being made for.
The source link provides easy to cut out templates that you can trace onto the wood and then cut out with a scroll saw .
You will need enough acrylic to cover the front and back of the animal’s opening.
See all of the steps here: www.realitydaydream.com
Similar to the shadow box bank above, this is the same basic concept but you will make the entire shadow box yourself with scrap wood pieces trimmed to size and Plexiglas inserted between the wood. Make sure that you fully clean the Plexiglas on both sides before you finish installing it, because the inside will be sealed shut.

Take a look here for more: www.100things2do.ca
These DIY piggy banks are much larger than they seem and are a really great large wooden bank that you can make. There are a good amount of steps that you will have to follow as well as you will need some power tools to make the cuts and hollowing out easier.

The finished product is definitely worth all of the effort especially after the bright colored paint dries to create a large 3D cartoon animal.
Check out this DIY here: www.thecreatedhome.com
Warning in advance, this gorgeous DIY wooden piggy bank is not for the average DIYer. To create this project you will need to have a few skills, some power tools and the want to whittle away at wood.

This is because all of the details are carved into the wood, as well as the shape and contours of the pig’s body. If you are committed to trying then this DIY pig bank will be a gorgeous addition to your home, or as an additional decor project your backyard .
You need to see this one: www.instructables.com
This wooden train coin bank is all wood, even the stopper is a wooden slot cover that is connected to the main body with a screw. For an easy wood coin bank DIY this is a great place to start since it is all done is simple steps.

You will cut out the opening, cut out the main train shape around it and then create a slot and emptying hole.
Take a look here for more: www.instructables.com

If you like your money saving to come with a little show, then this is a great DIY craft to make.
The wooden slants in the body of the coin bank allow your coins to roll nicely to the bottom.
The real entertainment is to see how far the coins will roll as the bank begins to fill up.
See the instructions here: www.lovelyindeed.com
If you enjoy tinkering and seeing how gears work then you need to try out this mechanical wooden snail DIY piggy bank. The inner wooden gears work to push the snail’s head out of the shell to grab a coin and then pull it back in.

Don’t skip this one: www.thekidsshouldseethis.com

No matter what type of DIY piggy bank you choose, having a place to build up a savings is no small feat. Create your coin bank and then start creating your goals for the money. This is great to teach your kids about saving or to help you realize how quick a small homemade money savings bank can add up.

Allen Michael
Allen runs a popular home website, and understands what it takes to educate audiences through online content. Through his focus at home, Allen developed an insatiable appetite for home improvement projects that he could do for cheap on weekends. Over the years, he has gained valuable experience, which he shares in detail in articles like How to Build A DIY Dining Room Table. His ability to clearly share these DIY ideas is a huge asset, and he is a valuable resource to the home improvement community.
What a Whimsical Life
If you're not willing to risk it all, then you don't want it bad enough.

Welcome to What a Whimsical Life
If you're not willing to risk it all, then you don't want it bad enough.
Fun Ideas for Homemade Piggy Banks
Posted on February 14, 2019 February 3, 2019 Author Tracy Marie Leave a comment
We may earn money or products from the companies mentioned in this post.

Nowadays, money is usually accessed by way of your bank account and use of a plastic card. But piggy banks are an awesome tool in helping to teach your child about the value and management of money. Instead of going out and buying a generic piggy bank, try making your own. It’s a fun craft that you and your child can take part in together. Listed below are different homemade piggy bank ideas for you to try.
1. Spend, Save, Give Piggy Bank
For this DIY piggy bank, all you’ll need is three Mason jars, some wood, a saw to cut three circles in the wood, and some tags to write on.
First, cut the three holes into the wood. You’ll want the holes to be the same size as the opening of the Mason jar. Ensure that you (the parent) is the one to cut the holes. You can paint the wood to your child’s desired color if preferred.
Then, once the holes are cut, you and your child can slip the three Mason jar openings into the hole.
The third step is to label the three Mason jars with the words Spend, Save, and Give.
This type of a piggy bank will help keep your child organized and aware of how to manage their money.
2. Eco-Friendly Piggy Bank
For this DIY, you’ll need an empty plastic bottle, a knife to cut a slit in the top, and things to decorate the bank with.
First, take the empty plastic bottle and cut a slit on the side big enough to fit all coins and dollar bills through. Be sure that you (the parent) is the one to do this.
Then, let your child decorate it the way they want with the arts and crafts material. They can make the bottle into a pig, or simply do as they please with it.
This super-easy piggy bank is meant for your child to see their money grow with each new “deposit” and learn how valuable money is. The piggy bank also teaches your child how to be eco-friendly and to reuse any materials available.
3. “Feed Daily” Piggy Bank
For this DIY, you’ll need an old piggy bank you may have laying around and some paint.
Take the old piggy bank that you have and paint over it to give it a new appearance. Then, in a different color paint, write on the piggy bank (once dry), “Feed Daily”. This will encourage your child to “feed” the bank and get them to understand the importance of saving as much money as they can.
Piggy banks are a great place for little ones to keep all their money. It provides them with a place to keep their money organized and well managed. Making your very own piggy bank also provides your child with a sense of creativity and eco-friendliness. It’s important to teach children these key lessons. When making your own piggy bank, it’s like you’re killing two birds with one stone.
Don’t Buy What You Can Borrow
Indoor Cheap and Fun Entertainment
Share this:
Leave a reply cancel reply.

DIY Piggy Bank – Do it yourself in 2024
- Last Update: November 22, 2023
Saving money is sometimes hard to do. It needs patience and consistency. Hence, you have to deal with that by creating a DIY piggy bank. It doesn’t only motivate you to fill up the piggy bank, yet it challenges your creativity.
On the other side, it is also a smart idea to train your kiddos to save money in a fun and amazing way.
Here are some DIY piggy bank ideas for your inspiration:
DIY Gold Piggy Bank
Diy cardboard coin bank, diy painted globe bank, diy turtle piggy bank, diy self-sorting coin bank, glass block coin bank, ice cream fund mason jar, sorting coin bank, diy upcycled wipes container piggy bank, pringles can coin bank, bottle piggy bank, mason jar super hero bank, diy crochet piggy bank, diy airplane bank, diy cute piggy bank, disney coin bank, diy galaxy nightlight jar bank, diy cereal box piggy bank, mickey and minnie mouse mason jar banks, air balloon coin bank, handy piggy bank, diy milk carton coin bank, diy leather piggy bank, diy budgeting jar, minion coin bank, mason jar piggy bank, diy charlie brown coin bank, cardboard piggy bank, totem poles bank, diy sparkling coin bank, tissue box piggy bank, diy fancy coin bank, glittered piggy bank, diy can piggy bank, giant pencil coin bank, simple budgeting jar, shadow box piggy bank, mini felt piggy bank, diy classy piggy bank, upcycle your cardboard, tin can piggy bank.

The golden piggy bank is the best idea if you want to infuse a classy ambiance in your space. It can also be a good decision if you want to give it as a gift.
And if it is hard to find the golden one, you can find the piggy bank and paint it by yourself and follow the steps below:
- Wash the bank with soapy water and let it dry.
- Wipe down the bank down with rubbing alcohol and ensure it dry completely.

Creating a DIY piggy bank doesn’t need any certain materials. As long as it can protect the money inside, then it is fine. It also works for the cardboard. You can make a coin bank from the cardboard with the cord and the rubber band or elastic tape.
You can start by drawing the form on the cardboard, cut, and make the holes. After that, assemble the box with the cord. Last, glue it on with the rubber band or elastic tape as well.
More DIY ideas you might need: DIY Mouse Pad

If you want to save money to wander around the world, this globe piggy bank can be the best option to motivate you on saving. Aesthetically, it also works as a decorative object which beautifies your desk.
If you want to make this kind of bank, you have to prepare the following materials:
- A globe made out of cardboard
- White spray paint
- Acrylic paint
- Carbon paper
You can decor it with the colorful pen you have as you wish.

Train your kiddos to save money is always a good decision. It can help them to spend money wisely. And if the standard coin bank is boring, you can make a DIY piggy bank and let them help you.
You can upcycle the unused 1.5-liter plastic bottle and the household cloth. Outline a slightly larger circle and add the head, limbs, and tail. Sew the plastic bottle and the household cloth.
After all, you can paint the head of the turtle and make a filling slot.

However, sorting coins you have been collected manually is tiring. Besides, it takes your time. The best alternative if you want to sort the coin, you can make the sorting self-coin by yourself.
The materials you will need:
- MDF material
- Bendy straws
- 3.5mm screws
For further steps and information, see the steps on the link above.

If you don’t know what to do with the old glass block, you can modify them and make a coin bank for you. This kind of coin bank is the best option if you want to make a DIY piggy bank effortlessly.
You only need to ensure that it is clean both inside and outside. You can put some decorative vinyl as you wish so that the piggy bank won’t look too blank and boring.

If you want to teach your children to spend money wisely, you can train them to start saving money. You can make an attractive DIY piggy bank so that it can motivate your children to fill up the piggy bank. One of the best options to make an attractive piggy bank is an ice cream coin bank.
The supplies you will need:
- White primer
- Chalky Finish Paint in Refreshing
- Chalkboard paint
- Metal piggy bank insert
- American Decou-Page
- Painter’s tape
- Gold glitter

If you want to create good money habits and budgeting to your children, you can start since they are young. If you want to ensure they can make a wise decision before spending money, you can teach them to separate spend, save, and share money.
You can make them excited to fill up the piggy bank by modifying them. You can place the vinyl on banks and bind them with the colorful yarns.

Do you still keep the baby wipes container? If so, upcycling a baby wipes container can be a good decision to challenge your creativity. You can make a piggy bank from that container and decor it as cute as possible to make saving time more enjoyable.
You will need the following supplies:
- Baby wipes container
- Pink and black card stock or construction paper
- Googly eyes
- Milk Bottle Caps
- Permanent Marker
You can also make this kind of piggy bank as the inexpensive, easy, and educative stuff.

You will never run out of ideas to make a saving time more enjoyable and fun when you can upcycle the materials surrounding. You can even make a coin bank from the Pringles can.
With the following materials, you can make your own can bank:
- Pringles can
- An adhesive (spray glue, Mod Podge, or hot glue)
- Something to measure with
- Foam paintbrush
- Paper and decorations to cover the can
Tips: Add the name label so that they know their belonging and motivate them.

If you feel guilty when you are tossing the plastic bottle away, which causes the environmental issue, you can recycle it anyway. You can make a DIY piggy bank from that plastic bottle.
Besides the plastic bottle itself, you will need the additional supplies:
- Double-sided tape
- Hot-glue gun
- Pipe cleaner
Note: You have to ensure that you have rinsed the plastic bottle.
After that, you can put the ears, eyes, legs, a nose, and make a hole in the back to insert the coin.

It is important to teach your children about saving money. It is one of the best ways to make them spend their money wisely and responsibly. But somehow, it is pretty hard to make this kind of good habit long last.
You can make the vibe more fun and attractive by using the decorative coin bank. The superhero piggy bank made out of the jar can be a good idea to make saving time more fun so that it takes your children’s interest.

This kind of piggy bank is made out of a tissue box with the crocheting method. It will make your piggy bank looks more adorable with the pink color of a crocheted piggy bank.
If you want to make this kind of piggy bank, you will need:
- Impeccable Yarn from Loops & Threads in Arbor Rose (1 skein)
- Tapestry needle
- 2x12mm and 2x10mm plastic eyes with closures
- Tissue box that has these dimensions: 5 x 4.5 x4.5 inches

If you want to give your children an educational toy, this DIY airplane bank can be a good option. You can even make it with your children because it is so easy to make. On the other side, the material is also easy to find.
You can use the plastic bottle, card stock paper, two-sided tape, scissors, and pencil. But first, before you wrap the plastic bottle with the card stock paper, you have to make a coin slot. After that, you can make and place the wings, the propeller, and any other details to make it looks cool.

When crafting is one of your passions, this DIY piggy bank idea must be a good option if you want to improve your skill. Besides, it can be one of the best alternatives to motivate you on saving.
On the other side, you can also give it to your nephew or cousin and teach them to save their money. You can create the characters within 20 minutes and put it on the tube.

If you want to save money to go to Disneyland, you have to start from the little step. You can start to save the change you have in a jar. And you want to put your effort into it you can create your own piggy bank made out of a jar.
You can accentuate the Disney character on it by creating a clay Mickey head and put it on the lid and spray the golden paint. After all, you can place the stickers to spell Mickey Money. Voila! Saving time won’t be boring anymore.

There are so many ways to motivate those who want to save their money. If you want to motivate your boy to start saving, you can create a DIY piggy bank that brings out the series character or movie character they love.
First of all, you have to supply the following materials:
- Glass mason jar
- Stained glass spray paint (we used blue and purple)
- Glitter blast spray paint (we used purple)
- Battery-operated LED light string
- Hot glue gun and glue sticks
- 3Below Character Printable

If you want to have quality time with your kiddos, you can ask them to make a DIY cereal box piggy bank. There are so many characters you can apply to the box. Other than that, you can teach them the importance of saving money and spend money responsibly.
You will need some cereal boxes and decorative papers. The pig and robot character can be a good decision. Besides cute, they are easy to make and are familiar with children.

We all know that Mickey and Minnie Mouse are the timeless characters of Disney. No wonder, even the adults love those characters. If you want to bring back your childhood memories by collecting the Disney characters, you should take the piggy bank Mickey and Minnie Mouse too.
You can create it by yourself anyway with the supplies:
- 3 – 1 gallon Ball Mason Jars
- 2 can red spray paint
- 2 can black spray paint
- 2 can clear gloss spray paint
- Painters tape
- Paper towels
- 2 small bottles of white multi-purpose craft paint
- 2 round sponge brush
- 2 white foam sheet
- 2 red foam sheet
- 1 black foam sheets

However, collecting your old jar is not a good idea. But sometimes, you must be feeling guilty to throw it away. Hence, upcycling the old jar can be the best alternatives.
There are so many things you can do with the old jar. One of the simplest ideas is you can make a piggy bank from the old jar. You can make it like an air balloon.
You only need to paint the jar and make a coin slot on the lid. After all, you can decor it with the assorted, colored pipe cleaners and glue them on the side of the lid.

No. You never run out of materials for crafting. You can use every single thing you have and make something useful. Just like this piggy bank, it made out of a plastic jar where you can make a coin slot on its back easier.
On the other side, you can make the pig’s feet by using the egg carton, trim the tops evenly. After that, you have to make the ears and glue them. You have to ensure that the paint is completely dry when you are about to glue the ears, eyes, and tail.

If you want to accentuate the fun and cheerful vibe on your house which also functional, you can make this kind of coin bank.
This coin bank is made out of a milk box covered by removable wallpaper. Other than that, you will need Easy Stripe, shape blade, and plastic house terrariums. Once you finished it, it can be an adorable focal point of your area.

If you want to accentuate a classy vibe on your desk, you can place the stuff made out of leather materials.
Besides finding the beautiful stuff, it is a smart decision if your stuff is also functional. And the leather piggy bank is all that you need. If this idea takes your interest, you can see how to make it and get your own.

We have to admit that budgeting is pretty hard to start. But we also have to admit that it is important to spend money responsibly. You can start from the simple thing starts from the coin or the change you have.
You will need:
- 3 jars and lids
- Floral scrapbook paper
- Sharpie (fine tip)
- Baker’s twine
You can make and label the save jar, give jar, and spend jar. They can be simple yet functional guidance for you to start budgeting.

If you are wondering what is the best give for your cousins when you are on a budget, you can use your creativity and make the minion piggy bank. You will need the unused jars, paint, big eyeball, and some brown pipe cleaner for hair.
It doesn’t need any certain skill to make it. As long as you have time, materials, and willing to make it, the minion coin bank will be a beautiful creature.

If you are tired of the scattered change on your desk, you can collect and put them in one place. It doesn’t only make your desk looks tidier, yet it also can help you to save money. If you want to save money and upcycle the available materials you have, then upcycling the jar can be the best option.
You will need a clean mason jar, the rim of the lid, and make a coin slot on the lid. If you want to paint it, you can use spray paint. And if you want to make it cuter, you can make a simple phrase or word like cha-ching from vinyl and place it before you spray the mason jar.

Creating your own saving device can be the best decision if you need the motivation to save money. You can make a DIY piggy bank from any other materials you have.
You can upcycle the Tootsie roll container and combine it with the yellow and black scrapbook papers. You have to cover the Tootsie roll container with the yellow paper. After that put the zigzag black paper in the middle of the container. It can be a smart way to motivate your saving habit.

If you want to encourage your children to save money, you can make a DIY piggy bank for your children. It doesn’t need any skill requirement, but basic skill so that you can ask your children to make it together. If you want to make a simple DIY piggy bank, you will need:
- Cardboard box
- Some extra cardboard
- Craft knife (optional)
- Red, black, white, and yellow acrylic paint
The attractive saving device will take your children’s interest so that they will love saving.

If you want to teach them to spend money wisely, you can ask them to do budgeting. You only need to start from the simplest thing, make three different spots for money and divide into spend, save, and share or give. The materials you will need to make a saving device are:
- Utility knife for cutting
- Low temp hot glue and gun
The duct tape is the main material after the can because the tapes can change the ugly can into an attractive totem pole.

You can accentuate the glamorous vibe to your desk only by placing sparkling stuff. Besides placing decorative stuff, you can also place functional stuff at the same time, a DIY piggy bank.
In this DIY project, a mason jar is one of the most wanted materials after cardboard. You will need a gold mirrored mason jar with the slotted lid and band, gold spray paint, and pink glitter tape.

Who doesn’t love the cute pinky piggy bank? The iconic character for saving money which can be the smart ways to make your children love saving money. No worries, when you are on a budget, you don’t need to buy the piggy bank because you can make it by yourself.
And you also don’t need to worry about the materials because they are easy to find:
- Pink craft paper
- Chenille Stems
- Fast-setting glue
- Pink and black pom-poms
- 1.25-ounce clear plastic cups
- 2-inch wide round or oval box or jar lid
After the materials are being collected, you can see the steps to start crafting.

However, there is nothing more amazing than having stuff that works best as decorative stuff and functional at the same time. If you want to improve your crafting skill, you can make a DIY piggy bank.
You can make it as beautiful as you can so that you can proudly place it in your favorite space in your house. You will need a wooden pallet to make the hexagonal shapes.
The adorable appearance also comes from the 2mm clear plastic acrylic plexiglass, silver, golden, and copper paint. You can divide them according to your needs.

If you are bored with your old piggy bank which makes your saving habit getting worse, you have to make a move. You can upcycle or retouch your old piggy bank.
It doesn’t need a huge move to make it better because the simple yet right move will turn the old one into the amazing DIY piggy bank. The supplies you are going to use are:
- Fine or Ultra Fine Glitter
- Spray adhesive or mod podge
- Spray sealer
You have to make sure that the piggy bank is clean and dry before you spray with adhesive and sprinkle with glitters.

You might be tired of the can in your house. And if tossing away can make you feel guilty you can recycle it. You can make something more useful from the can such likes the DIY piggy bank.
And if you don’t want it looks too plain, you can decor the can with the fat quarter, sequin string, ribbon, mini chalkboard, mini clothespin, and coordinating cardstock.
After you are done with the decorative things, you can put the coin slotted lid with the cardstock to cover it.

If you want to make a different type of piggy bank, this DIY piggy bank project is worth trying. You can make a huge coin bank pencil made out of a Scotch Mail Tube, silver scrapbook paper, pink and yellow craft paint, and a craft knife.
You can paint the mail tube with yellow paint. On the bottom side, you can paint it pink which works like an eraser. After that, you have to cover the tube with pink and yellow paint.
For the top of the pencil, you need to make a paper mache cone and paint it black int the peak of the cone and yellow zigzag on the bottom side. After all, glue the cone thing and the body part.

It is never too early to teach your children how to spend money wisely. You only need to show them about money habits by making the spend, save, and give coin banks. And the most important thing is you can make it effortlessly because you only need to find the following supplies:
- 3.5 inch X 20 inch X 3/4 inch board (approximately)
- 2.5 inch Hole Saw
- Small Nails
- Spray Paint
- Sanding Dremel Bit
Tips : Hang the spend, save and give labels.

Upgrade the way you save your money that will inspire you to save more money instead of spending it.
Try saving your money in a shadow box. The glass screen allows you to see the progress of your saving so that you can control yourself as well.
Supplies you will need:
- Shadow box picture frame
- Printable art
- Dremel tool
Choose the vinyl to avoid the plain glass, which complements the beauty of the backdrop behind. Ensure you paint the frame that blends with the background of the shadow box.

The mini piggy bank made out of felt should be on your list if you are planning to challenge your creativity. It could collect the coins in one place, which is easier to find and avoid the coins are scattered on the entire house.
The felt has so many colors so that you can pick the best color as you wish. One thing that you need to remember that this project doesn’t even need a sewing skill. Also, you can give some different touch or even using different patterns.

Upcycle the old mason jare made out of glass and turn it into a DIY classy piggy bank. The crucial hint that makes this DIY project looks classy is the golden accents.
Paint white the glass, then let a little space unpainted to expose the clear glass where you can stick the vinyl.
Add the golden and sparkling touch on the edge of the white part on the mason jar. The SAVE letter on the clear part of the jar makes it looks way better and fancier.

If you are wondering how to stop throwing away the cardboard and make it more functional, then consider making a piggy bank.
You can make it likes a softer version of a shadow box since it is made out of cardboard.
The supply materials that will help you to make it works:
- Tissue paper
- Scrapbook paper
- Utility knife or Craft knife
- Writing utensil & Ruler
- Paint (Optional)
- Acetate sheet
Tips: Choose the good quality of cardboard and ensure it sturdy enough.

If you are wondering what kind of materials are worth making to save your money stylishly, try using the tin can. Since the bare can is too boring and too plain, then you can decorate it and make it looks admirable.
While creating a DIY piggy bank is a great way to motivate saving and express creativity, keeping track of your savings is equally important. For an easy way to manage your finances, consider using Zintego ‘s receipt template, which helps in organizing and tracking your expenses efficiently
Cover the can with the polka dots decorative paper. Then, add the floral touch that blends seamlessly.
You will also need to cover the lid of the tin can. The golden touch on the edge of the lid looks great together with the decorative paper.
These are the DIY piggy bank ideas for you to consider. Get ready to challenge your creativity during your leisure time.
Happy crafting!

Rachel Tate
Passionate about interior design and helping readers find design inspiration. Head of content in Define Bottle Since and love writing about interior design ideas.
Gardening in Small Spaces: Using Sustainable Resources
Sustainability in Every Load: Your Partner in Responsible Clean-Ups

Elevating Your Bathroom with High-End Fixtures
10 Essential Features to Include in Your Homebuyers
Privacy Policy
Join the community
And get interior design ideas.


40 Facts About Elektrostal
Written by Lanette Mayes
Modified & Updated: 02 Mar 2024
Reviewed by Jessica Corbett

Elektrostal is a vibrant city located in the Moscow Oblast region of Russia. With a rich history, stunning architecture, and a thriving community, Elektrostal is a city that has much to offer. Whether you are a history buff, nature enthusiast, or simply curious about different cultures, Elektrostal is sure to captivate you.
This article will provide you with 40 fascinating facts about Elektrostal, giving you a better understanding of why this city is worth exploring. From its origins as an industrial hub to its modern-day charm, we will delve into the various aspects that make Elektrostal a unique and must-visit destination.
So, join us as we uncover the hidden treasures of Elektrostal and discover what makes this city a true gem in the heart of Russia.
Key Takeaways:
- Elektrostal, known as the “Motor City of Russia,” is a vibrant and growing city with a rich industrial history, offering diverse cultural experiences and a strong commitment to environmental sustainability.
- With its convenient location near Moscow, Elektrostal provides a picturesque landscape, vibrant nightlife, and a range of recreational activities, making it an ideal destination for residents and visitors alike.
Known as the “Motor City of Russia.”
Elektrostal, a city located in the Moscow Oblast region of Russia, earned the nickname “Motor City” due to its significant involvement in the automotive industry.
Home to the Elektrostal Metallurgical Plant.
Elektrostal is renowned for its metallurgical plant, which has been producing high-quality steel and alloys since its establishment in 1916.
Boasts a rich industrial heritage.
Elektrostal has a long history of industrial development, contributing to the growth and progress of the region.
Founded in 1916.
The city of Elektrostal was founded in 1916 as a result of the construction of the Elektrostal Metallurgical Plant.
Located approximately 50 kilometers east of Moscow.
Elektrostal is situated in close proximity to the Russian capital, making it easily accessible for both residents and visitors.
Known for its vibrant cultural scene.
Elektrostal is home to several cultural institutions, including museums, theaters, and art galleries that showcase the city’s rich artistic heritage.
A popular destination for nature lovers.
Surrounded by picturesque landscapes and forests, Elektrostal offers ample opportunities for outdoor activities such as hiking, camping, and birdwatching.
Hosts the annual Elektrostal City Day celebrations.
Every year, Elektrostal organizes festive events and activities to celebrate its founding, bringing together residents and visitors in a spirit of unity and joy.
Has a population of approximately 160,000 people.
Elektrostal is home to a diverse and vibrant community of around 160,000 residents, contributing to its dynamic atmosphere.
Boasts excellent education facilities.
The city is known for its well-established educational institutions, providing quality education to students of all ages.
A center for scientific research and innovation.
Elektrostal serves as an important hub for scientific research, particularly in the fields of metallurgy, materials science, and engineering.
Surrounded by picturesque lakes.
The city is blessed with numerous beautiful lakes, offering scenic views and recreational opportunities for locals and visitors alike.
Well-connected transportation system.
Elektrostal benefits from an efficient transportation network, including highways, railways, and public transportation options, ensuring convenient travel within and beyond the city.
Famous for its traditional Russian cuisine.
Food enthusiasts can indulge in authentic Russian dishes at numerous restaurants and cafes scattered throughout Elektrostal.
Home to notable architectural landmarks.
Elektrostal boasts impressive architecture, including the Church of the Transfiguration of the Lord and the Elektrostal Palace of Culture.
Offers a wide range of recreational facilities.
Residents and visitors can enjoy various recreational activities, such as sports complexes, swimming pools, and fitness centers, enhancing the overall quality of life.
Provides a high standard of healthcare.
Elektrostal is equipped with modern medical facilities, ensuring residents have access to quality healthcare services.
Home to the Elektrostal History Museum.
The Elektrostal History Museum showcases the city’s fascinating past through exhibitions and displays.
A hub for sports enthusiasts.
Elektrostal is passionate about sports, with numerous stadiums, arenas, and sports clubs offering opportunities for athletes and spectators.
Celebrates diverse cultural festivals.
Throughout the year, Elektrostal hosts a variety of cultural festivals, celebrating different ethnicities, traditions, and art forms.
Electric power played a significant role in its early development.
Elektrostal owes its name and initial growth to the establishment of electric power stations and the utilization of electricity in the industrial sector.
Boasts a thriving economy.
The city’s strong industrial base, coupled with its strategic location near Moscow, has contributed to Elektrostal’s prosperous economic status.
Houses the Elektrostal Drama Theater.
The Elektrostal Drama Theater is a cultural centerpiece, attracting theater enthusiasts from far and wide.
Popular destination for winter sports.
Elektrostal’s proximity to ski resorts and winter sport facilities makes it a favorite destination for skiing, snowboarding, and other winter activities.
Promotes environmental sustainability.
Elektrostal prioritizes environmental protection and sustainability, implementing initiatives to reduce pollution and preserve natural resources.
Home to renowned educational institutions.
Elektrostal is known for its prestigious schools and universities, offering a wide range of academic programs to students.
Committed to cultural preservation.
The city values its cultural heritage and takes active steps to preserve and promote traditional customs, crafts, and arts.
Hosts an annual International Film Festival.
The Elektrostal International Film Festival attracts filmmakers and cinema enthusiasts from around the world, showcasing a diverse range of films.
Encourages entrepreneurship and innovation.
Elektrostal supports aspiring entrepreneurs and fosters a culture of innovation, providing opportunities for startups and business development.
Offers a range of housing options.
Elektrostal provides diverse housing options, including apartments, houses, and residential complexes, catering to different lifestyles and budgets.
Home to notable sports teams.
Elektrostal is proud of its sports legacy, with several successful sports teams competing at regional and national levels.
Boasts a vibrant nightlife scene.
Residents and visitors can enjoy a lively nightlife in Elektrostal, with numerous bars, clubs, and entertainment venues.
Promotes cultural exchange and international relations.
Elektrostal actively engages in international partnerships, cultural exchanges, and diplomatic collaborations to foster global connections.
Surrounded by beautiful nature reserves.
Nearby nature reserves, such as the Barybino Forest and Luchinskoye Lake, offer opportunities for nature enthusiasts to explore and appreciate the region’s biodiversity.
Commemorates historical events.
The city pays tribute to significant historical events through memorials, monuments, and exhibitions, ensuring the preservation of collective memory.
Promotes sports and youth development.
Elektrostal invests in sports infrastructure and programs to encourage youth participation, health, and physical fitness.
Hosts annual cultural and artistic festivals.
Throughout the year, Elektrostal celebrates its cultural diversity through festivals dedicated to music, dance, art, and theater.
Provides a picturesque landscape for photography enthusiasts.
The city’s scenic beauty, architectural landmarks, and natural surroundings make it a paradise for photographers.
Connects to Moscow via a direct train line.
The convenient train connection between Elektrostal and Moscow makes commuting between the two cities effortless.
A city with a bright future.
Elektrostal continues to grow and develop, aiming to become a model city in terms of infrastructure, sustainability, and quality of life for its residents.
In conclusion, Elektrostal is a fascinating city with a rich history and a vibrant present. From its origins as a center of steel production to its modern-day status as a hub for education and industry, Elektrostal has plenty to offer both residents and visitors. With its beautiful parks, cultural attractions, and proximity to Moscow, there is no shortage of things to see and do in this dynamic city. Whether you’re interested in exploring its historical landmarks, enjoying outdoor activities, or immersing yourself in the local culture, Elektrostal has something for everyone. So, next time you find yourself in the Moscow region, don’t miss the opportunity to discover the hidden gems of Elektrostal.
Q: What is the population of Elektrostal?
A: As of the latest data, the population of Elektrostal is approximately XXXX.
Q: How far is Elektrostal from Moscow?
A: Elektrostal is located approximately XX kilometers away from Moscow.
Q: Are there any famous landmarks in Elektrostal?
A: Yes, Elektrostal is home to several notable landmarks, including XXXX and XXXX.
Q: What industries are prominent in Elektrostal?
A: Elektrostal is known for its steel production industry and is also a center for engineering and manufacturing.
Q: Are there any universities or educational institutions in Elektrostal?
A: Yes, Elektrostal is home to XXXX University and several other educational institutions.
Q: What are some popular outdoor activities in Elektrostal?
A: Elektrostal offers several outdoor activities, such as hiking, cycling, and picnicking in its beautiful parks.
Q: Is Elektrostal well-connected in terms of transportation?
A: Yes, Elektrostal has good transportation links, including trains and buses, making it easily accessible from nearby cities.
Q: Are there any annual events or festivals in Elektrostal?
A: Yes, Elektrostal hosts various events and festivals throughout the year, including XXXX and XXXX.
Was this page helpful?
Our commitment to delivering trustworthy and engaging content is at the heart of what we do. Each fact on our site is contributed by real users like you, bringing a wealth of diverse insights and information. To ensure the highest standards of accuracy and reliability, our dedicated editors meticulously review each submission. This process guarantees that the facts we share are not only fascinating but also credible. Trust in our commitment to quality and authenticity as you explore and learn with us.
Share this Fact:
- History of cooperation
- Areas of cooperation
- Procurement policy
- Useful links
- Becoming a supplier
- Procurement
- Rosatom newsletter
© 2008–2024Valtiollinen Rosatom-ydinvoimakonserni
- Rosatom Global presence
- Rosatom in region
- For suppliers
- Preventing corruption
- Press centre
Rosatom Starts Life Tests of Third-Generation VVER-440 Nuclear Fuel
- 16 June, 2020 / 13:00
This site uses cookies. By continuing your navigation, you accept the use of cookies. For more information, or to manage or to change the cookies parameters on your computer, read our Cookies Policy. Learn more
IMAGES
VIDEO
COMMENTS
Making your own money-saving device isn't only good for your back pocket - it's also a fun and simple project to tackle on a rainy afternoon. That's why we've rounded-up 40 of the most incredible DIY piggy banks that are both adult and kid-friendly! From coin banks made using cardboard and wallpaper, to glass jars, tins, plastic ...
4. Water bottle airplane piggy bank. If you're making the piggy bank for your kids and not yourself, something like a vacation might not be the best motivating thing. We happen to think our kids would probably do better with a bank shaped like something they really like instead! That's why this cute airplane piggy bank caught our eye!
Keep the bottle cap on the bottle. It will serve as the pig's snout. 2. Cut out a 1 inch (2.5 cm)-long coin slot with a box cutter. Have an adult slice a coin slot into the middle of 1 of the long sides of the bottle. Make the coin slot a little bigger than the biggest coin you plan on putting in the piggy bank. [1]
This is a great option if you are looking for a DIY piggy bank for kids. It is made out of simple waste materials like an empty tissue box, disposable plate, acrylic paint, brushes, scissors, and pencils. This DIY money bank is a 'pig' deal! 3. Mason Jar Piggy Bank.
Create a "travel fund" piggy bank and a "city break fund" piggy bank that takes about an hour to make. It's such a wonderful gift! Related DIY Post: Easy Mothers Day Gifts. Hot Air Balloon Mason Jar ... Paper Mache Piggy Bank. Source: Fiesta No Siesta. This homemade piggy bank project would be great if your kids are wanting to try ...
1. How To Make A Piggy Bank At Home Easy. Using a piggy bank will help you learn to save. This is made of a carton in a cube shape and you can retrieve the money at any time. Cut the measurements of the carton and assemble it. The making process is pretty much easy to follow. 2. DIY Piggy Bank Plastic Bottle.
1. White Mason Jar Piggy Bank. Mason jars are easily accessible and just the right size to hold a respectable amount of savings! Paint them to your favorite color, one that matches your interior and label them according to their purpose. We love the minimalist white piggy banks by Say Yes! 2. Shadow Box Bank.
These homemade piggy bank ideas are so much fun - taking old "trash" and turning it into treasures. And using cereal boxes and turning them into easy, fun, recycled projects is a great way to teach your kids how to save money and the environment. ... television, pet care, faith and religion, travel, podcasting, writing, budget, DIY, and ...
Step 16: Staining. The finishing I did on this piggy bank was a multi-step process. I began by applying a light color of oil-based stain. Once the stain was dry, the pig was brushed with a coat of shellac to seal the first coat of stain. When the shellac was dry, I gave the entire pig a light sanding with 220 sandpaper.
Instructions For Making A DIY Piggy Bank. Step One: Cut the board to about 12.5 inches for the top piece. The legs need to be at least 2 3/4 inches each. Step Two: Measure to the center of the top board to cut the first hole. Use the hole saw to cut the first hole in the center. Measure 2 1/4 inches from each edge to mark the center of the ...
Homemade Piggy Bank Ideas for Kids. Recycle empty food containers and create these easy, colorful piggy banks! It's a fun project you can do with the kids to teach them how to save and budget their money. Designer: Kristi of The Classy Chapter. Materials Used: 3 Empty food containers of various sizes with lids. 3 Sheets craft paper with designs.
Homemade Piggy Bank. Your Piggy Bank Can Look Like a Pig. How cute is this Piggy Bank from a Wipes Container. It is one of the easiest ways to make a bank. Plus, it is perfect for smaller children who don't have the best fine motor skills yet. via Sunny Day Family. 8. Pink Glitter Piggy Bank
DIY Piggy Bank Ideas. 1. Ice Cream Fund Mason Jar. A dedicated mason jar for ice cream funds is a fun and effective method to instill the habit of saving in kids. Read the details here. 2. Cardboard Coin Bank. This coin bank is made from an old cardboard box, cord, and elastic tape.
Cottage Creek Adventure Fund Piggy Bank, Vacation Savings Bank, Travel Candy Jar. (709) $34.99. FREE shipping. Shadow Box Savings Bank. Adventure Fund. Wooden Piggy Bank. Money Box. Vacation Fund.
13. Leather Piggy Bank. Elevate your standard way to save coins with this DIY leather piggy bank. The entire body of this coin bank is made from vegetable tanned leather. It will take a little longer to create this project due to needing to be careful cutting the leather with scissors or an Exacto knife.
How to Make Piggy Bank at Home | DIY Easy Piggy Bank | Amazing Piggy Bank Craft Idea. ...
Listed below are different homemade piggy bank ideas for you to try. 1. Spend, Save, Give Piggy Bank. For this DIY piggy bank, all you'll need is three Mason jars, some wood, a saw to cut three circles in the wood, and some tags to write on. First, cut the three holes into the wood. You'll want the holes to be the same size as the opening ...
22. Modern Travel Piggy Bank. If you are looking for a travel-specific money-saving jar with a simpler look, this adult piggy bank will do the job. Watching your savings grow in the chic wooden frame while planning your dream vacation will motivate you to save more. 23.
This kind of piggy bank is made out of a tissue box with the crocheting method. It will make your piggy bank looks more adorable with the pink color of a crocheted piggy bank. If you want to make this kind of piggy bank, you will need: Impeccable Yarn from Loops & Threads in Arbor Rose (1 skein) 5.0mm hook; Scissors; Tapestry needle
Elektrostal is a city in Moscow Oblast, Russia, located 58 kilometers east of Moscow. Elektrostal has about 158,000 residents. Mapcarta, the open map.
Welcome to the 628DirtRooster website where you can find video links to Randy McCaffrey's (AKA DirtRooster) YouTube videos, community support and other resources for the Hobby Beekeepers and the official 628DirtRooster online store where you can find 628DirtRooster hats and shirts, local Mississippi honey and whole lot more!
40 Facts About Elektrostal. Elektrostal is a vibrant city located in the Moscow Oblast region of Russia. With a rich history, stunning architecture, and a thriving community, Elektrostal is a city that has much to offer. Whether you are a history buff, nature enthusiast, or simply curious about different cultures, Elektrostal is sure to ...
The life tests started after successful completion of hydraulic tests (hydraulic filling) of the mock-up with the aim to determine RK3+ hydraulic resistance. Life tests are carried out on a full-scale research hot run-in test bench V-440 and will last for full 1500 hours. The aim of tests is to study mechanical stability of RK3+ components ...