- 8 Dependencies
- 70 Dependents
- 66 Versions
Tourist Guide into your React Components
From v1.9.1 styled-components it isn't bundled into the package and is required styled-components@^4 and react@^16.3 due to the use of createRef , so:

Sponsored by
Gold sponsors 🥇.

Reactour is proud to be sponsored by Frigade , a developer tool for building better product onboarding: guided tours, getting started checklists, announcements, and more.
Silver sponsors 🥈

Dopt gives developers UI components and SDKs to build seamless onboarding and education experiences in minutes.
Add the Tour Component in your Application, passing the steps with the elements to highlight during the Tour .
accentColor
Change --reactour-accent (defaults to accentColor on IE) css custom prop to apply color in Helper , number, dots, etc
Type: string
Default: #007aff
badgeContent
Customize Badge content using current and total steps values
Content to be rendered inside the Helper
Type: node | elem
Custom class name to add to the Helper
closeButtonAriaLabel
aria-label attribute for the close button (for accessibility)
Default: 'Close'
closeWithMask
Close the Tour by clicking the Mask
Default: true
disableDotsNavigation
Disable interactivity with Dots navigation in Helper
disableInteraction
Disable the ability to click or intercat in any way with the Highlighted element
disableKeyboardNavigation
Disable all keyboard navigation (next and prev step) when true, disable only selected keys when array
Type: bool | array(['esc', 'right', 'left'])
getCurrentStep
Function triggered each time current step change
Programmatically change current step after the first render, when the value changes
Type: number
highlightedMaskClassName
Custom class name to add to the element which is the overlay for the target element when disableInteraction
inViewThreshold
Tolerance in pixels to add when calculating if an element is outside viewport to scroll into view
Required: true
lastStepNextButton
Change Next button in last step into a custom button to close the Tour
maskClassName
Custom class name to add to the Mask
Extra Space between in pixels between Highlighted element and Mask
Default: 10
Renders as next button navigation
Overrides default nextStep internal function
onAfterOpen
Do something after Tour is opened
onBeforeClose
Do something before Tour is closed
onRequestClose
Function to close the Tour
Renders as prev button navigation
Overrides default prevStep internal function
Beautify Helper and Mask with border-radius (in px)
scrollDuration
Smooth scroll duration when positioning the target element (in ms)
scrollOffset
Offset when positioning the target element after scroll to it
Default: a calculation to the center of the viewport
showButtons
Show/Hide Helper Navigation buttons
showCloseButton
Show/Hide Helper Close button
showNavigation
Show/Hide Helper Navigation Dots
showNavigationNumber
Show/Hide number when hovers on each Navigation Dot
Show/Hide Helper Number Badge
Starting step when Tour is open the first time
Array of elements to highligt with special info and props
Type: shape
Steps shape
Steps example.
Value to listen if a forced update is needed
updateDelay
Delay time when forcing update. Useful when there are known animation/transitions
disableFocusLock
Disable FocusLock component.
Default: false
To guarantee a cross browser behaviour we use body-scroll-lock .
Import the library
Create the event handlers
Then assign them into the Tour props
- introduction
- step-by-step
- walkthrough
- tourist-guide
- product-intro
- presentation
Package Sidebar
npm i reactour
Git github.com/elrumordelaluz/reactour/tree/v1
github.com/elrumordelaluz/reactour/tree/v1
Downloads Weekly Downloads
Unpacked size, total files, last publish.
a month ago
Collaborators
- Blessing Krofegha
- Aug 6, 2020
A Practical Guide To Product Tours In React Apps
- 13 min read
- UI , Apps , React
- Share on Twitter , LinkedIn
About The Author
Blessing Krofegha is a Software Engineer Based in Lagos Nigeria, with a burning desire to contribute to making the web awesome for all, by writing and building … More about Blessing ↬
Email Newsletter
Weekly tips on front-end & UX . Trusted by 200,000+ folks.
As stated on Appcues :
“Product tours — sometimes called product walkthroughs — introduce users to a new product and help them find their bearings.”
Usually, when it needs to showcase a new feature or complex UI functionality in a web app, the customer-success team would send a campaign email to all of its users. While this is a great way to create such awareness, some users might not have the opportunity to see the added feature; hence, the purpose of the email would be defeated.
A better way to increase user awareness of a particular feature in a web app is by integrating concise, self-explanatory UI tips, called product tours.
Product tours guide users to “a-ha” moments , or showcase high-value features that are being underused. Product tours can be powerful tools to introduce users to a new product and to help them find their bearings. They can draw attention to product launches, promo offers, and product sales.
But when done wrong, product tours can end up feeling like a backseat driver. And no one likes a backseat driver, do they?
In this tutorial, you’ll learn about what a product tour is and the types of product-tour packages in the React ecosystem, along with their pros and cons.
If you’re building customer-facing products using React, then you might be keen to implement this in your React application. By the end, we’ll have built a product tour for a simple shopping-cart UI using React Joyride .
We won’t go through React and JavaScript’s syntax basics, but you don’t have to be an expert in either of these languages to follow along.
Product Tour Guidelines
Product tours are a tricky aspect of web apps, requiring some user-experience expertise to drive results. I’d recommend going through Appcues’ tips for product tours. The following are a few guidelines to consider.
Never Lecture
Putting a lot of tours on a web page is tempting. But users are usually not keen on long introductory tutorials. They become anxious when they have to ingest a lot of information before being able to use a feature in the app.
Break It Down
Don’t teach everything. Focus on a single feature, and create a tour of two to three steps to showcase that feature. Show many small tours, rather than a single long tour. Prioritize their sequence.
Do you enjoy taking your own tour? How about your teammates? Present the tour in such a way that users will understand. Showcase value, rather than stories.
Now that we know the value of product tours and seen some guidelines for building them, let’s cover some React libraries for product tours and learn how to use them.
There are only a few React-based libraries for implementing tours. Two of the most popular are React Tour and React Joyride .
React Tour has around 1,600 stars on GitHub and is being actively developed. The best use case for React Tour is a simple product tour in which little customization is required. A demo is available.
How It Works
With React Tour, you pass the className selector and content for each step to the component. The library will render the tour’s user interface based on a button click, or after you’ve mounted the component. It’s simple for static pages and UIs:
- React Tour is best for tours that need little customization.
- It works well for static content and for dynamic content whose selector labels always exist in the UI.
- Fans of styled-components might find it interesting because it has a hard dependency on styled-components.
- If your project has no dependency on styled-components, then you might not find it easy to implement.
- Your creativity will be limited because it doesn’t support customization.
React Joyride
The other main product-tour library is React Joyride , which has about 3,100 stars on GitHub and is also actively maintained.
We pass the className as a target and the content. The state stores the tour. The Joyride component uses steps as props.
- Integrating React Joyride in a web app is less rigid than with React Tour, and it has no hard dependency on other libraries.
- Events and actions are made available, which fosters customization.
- It’s frequently improved.
- The UI isn’t as elegant as React Tour’s.
Why React Joyride?
Product tours, especially for really big web apps, require customization , and that sets React Joyride apart from React Tour. The example project we’ll make demands some creativity and customization — hence, we’ll go with React Joyride.
Building A Simple Product Tour
First, we’ll build a simple React tour using the props available to us in React Joyride. Next, we’ll use the useReducer hook to automate the tour’s processes.
Clone the “ standard-tour ” branch in the GitHub repository, or use the web page of your choice, as long as you’re able to follow along.
Install the packages by running npm install .
To start the app, run npm run start .
We’ll be covering the following steps:
- define the tour’s steps;
- enable a skip option in each step;
- change text labels on buttons and links;
- customize styles like button colors and text alignment.
Then, we’ll add some custom features:
- autostart the tour;
- start the tour manually (i.e. with a link or button click);
- hide the blinking beacon.
The props in React Joyride enable us to perform some basic functionality.
For this tutorial, we’ll build a product tour of the UI shown below:
Define The Tour’s Steps
To begin with, ensure that you’re targeting the particular classNames that will hold the content of the tour on the page — that is, according to whether you’ll be using your UI instead of the shopping-cart UI.
In the component folder, create a Tour.js file, and paste the following code into it. Also, ensure that the target classNames exist in your style sheet. Throughout this article, we’ll tweak the Tour.js component to suit the task at hand.
What we’ve done is simply define our tour’s steps by targeting the classNames that will form the bedrock of our content (the text). The content property is where we define the text that we want to see when the tour starts.
Enable Skip Option in Each Step
A skip option is important in cases where a user isn’t interested in a particular tour. We can add this feature by setting the showSkipButton prop to true , which will skip the remaining steps. Also, the continuous prop comes in handy when we need to show the Next button in each step.
Change Text Labels On Buttons And Links
To change the text labels on either buttons or links, we’ll use the locale prop. The locale prop has two objects, last and skip . We specified our last tour as the End tour , while skip is the Close tour .
Customize Styles, Like Button Colors And Text Alignment
The default color of buttons is red, and text alignment is always set right. Let’s apply some custom styles to change button colors and align text properly.
We see in our code that the styles prop is an object. It has other objects with unique values, including:
- tooltipContainer Its key is textAlign , and its value is left .
- buttonNext Its key is backgroundColor , and its value is green .
- buttonBack Its key is marginRight , and its value is 10px .
- locale Its keys are last and skip , and its values are End Tour and Close Tour , respectively.
The library exposes some props to use on our elements in place of the default elements, some of which are:
- beaconComponent
- tooltipComponent
We’ve seen how to create a product tour and how to customize it using the various props of Joyride.
The problem with props, however, is that, as your web app scales and you need more tours, you don’t just want to add steps and pass props to them. You want to be able to automate the process by ensuring that the process of managing tours is controlled by functions, and not merely props . Therefore, we’ll use useReducer to revamp the process of building tours.
In this segment, we are going to take control of the tour by using actions and events , made available by the library through a callback function.
To make this process feel less daunting, we’ll break this down into steps, enabling us to build the tour in chunks.
The complete source code is available, but I’d advise you to follow this guide, to understand how it works. All of our steps will be done in the Tour.js file in the components folder.
Define the Steps
In this first step, we define our steps by targeting the appropriate classNames and setting our content (text).
Define the Initial State
In this step, we define some important states , including:
- Set the run field to false , to ensure that the tour doesn’t start automatically.
- Set the continuous prop to true , because we want to show the button.
- stepIndex is the index number, which is set to 0 .
- The steps field is set to the TOUR_STEPS that we declared in step 1.
- The key field makes the tour re-render when the tour is restarted.
Manage The State With Reducer
In this step, using a switch statement when case is START , we return the state and set the run field to true . Also, when case is RESET , we return the state and set stepIndex to 0 . Next, when case is STOP , we set the run field to false , which will stop the tour. Lastly, when case is RESET , we restart the tour and create a new tour.
According to the events ( start , stop , and reset ), we’ve dispatched the proper state to manage the tour.
Listen to the Callback Changes and Dispatch State Changes
Using the exposed EVENTS , ACTIONS , and STATUS labels offered by React Joyride, we listen to the click events and then perform some conditional operations.
In this step, when the close or skip button is clicked, we close the tour. Otherwise, if the next or back button is clicked, we check whether the target element is active on the page. If the target element is active, then we go to that step. Otherwise, we find the next-step target and iterate.
Autostart the Tour With useEffect
In this step, the tour is auto-started when the page loads or when the component is mounted, using the useEffect hook.
Trigger The Start Button
The function in this last step starts the tour when the start button is clicked, just in case the user wishes to view the tour again. Right now, our app is set up so that the tour will be shown every time the user refreshes the page.
Here’s the final code for the tour functionality in Tour.js :
We’ve seen how to build a product tour in a web UI with React. We’ve also covered some guidelines for making product tours effective.
Now, you can experiment with the React Joyride library and come up with something awesome in your next web app. I would love to hear your views in the comments section below.
- Documentation , React Joyride
- “ Seven Exceptional Product Tours, and the Best Practices They Teach Us ”, Morgan Brown, Telepathy
- “ The Ultimate Guide to Product Tours and Walkthroughs ”, Margaret Kelsey, Appcues
Smashing Newsletter
Tips on front-end & UX, delivered weekly in your inbox. Just the things you can actually use.
Front-End & UX Workshops, Online
With practical takeaways, live sessions, video recordings and a friendly Q&A.
TypeScript in 50 Lessons
Everything TypeScript, with code walkthroughs and examples. And other printed books.
Existing customer? Sign in
TUTORIAL: How to create product tours in ReactJS with React Tour
June 18, 2021

Psst! 4,000+ Companies can't be wrong. You can teach your users anything with Nickelled.
As onboarding specialists, we’re often asked about ‘roll your own’ javascript guided tours. We used to recommend a bunch of JS libraries based on jQuery to achieve this, but with most applications nowadays being built as single page apps using frameworks such as ReactJS, we figured it’s time to update our guidance – so this week, we’ll take a look at how to create product tours in ReactJS using React Tour.
For the uninitiated, React Tour (or, to use their spelling, Reactour) is the most popular guided tour component out there for React JS. You can find the Github repo here or the project webpage here . There are other libraries you could use (see our section below), but we’d recommend the Reactour library for most use cases. Also, it looks great:

Why are product tours helpful?
As a reminder, product tours are used to help users to get familiar with the product. They’re often used to introduce new features, or to welcome new users to an app with a quick overview of the user interface.
In this tutorial you’ll learn how to create product tours in ReactJS using the Reactour plugin.
How to create a product tour with ReactJS
Let’s create a React tour and see how it’s done.
First, we need to install the React Tour plugin (find it on Github here ).
In order to use the React Tour we need to import it in our application.
We also need to impact useState, so that we can use a state variable in our functional component.
Above before we render, we’ll set up the constant which contains our steps, and links them to elements (this example is from the Github repo).
You’ll see that steps is an array, containing each step with a selector and content.
Finally, let’s render the tour on the page by creating the component on the page:
We’ve created a heading, two paragraphs and an image, and below them all, we’ve added our Tour component.
Let’s update our steps constant so that we’ve got two steps, one for the heading and one for the picture.
You’ll see that the Tour component is using three properties – the steps (which we’ve defined as a constant), isOpen and onRequestClose , which is executing a function that changes the state of our isTourOpen constant.
With all of this, our tour will now display on the page when it loads (since we’ve set useState to true).
However, we probably want the tour to load when the user clicks a button, rather than just on page load.
To do that, lets add a button component to our page:
<button onClick={setIsTourOpen(true)} title={'Tour'}>
When the user clicks this button, the tour will open up. And our existing code will close it when the user wants to do so.
And there you have it – a simple two-step tour, implemented inside a ReactJS app in five minutes.
Other tour software packages to consider
React joyride.

This highly-recommended alternative comes courtesy of the original Joyride JS library. It’s well-documented and comes with tons of sandbox examples to try.
React Shepherd

React Shepherd is based on the popular Shepherd .js javascript framework for creating tours. It’s a port best suited for websites or applications that are already using a javascript framework like React, and there’s an Ember version available too. It’s not as popular as React Tour, but it’s a good alternative.
Intro.js-React
This is a simple port of Intro.js, which is another well-known javascript library. It’s lightweight, and a good choice if you’re very familiar with intro.js and don’t fancy making a change.
Should I just buy an off-the-shelf solution?
The short answer: It depends on what your goals are.
If you’re looking for a more “plug and play” experience, then it may be best to purchase a solution that is already built. Pre-built solutions (such as Nickelled ) contain tons of extra functionality which using something like Reactour won’t give you.
For example, consider whether you need
- Custom audience triggering
- Maintainability by non-coders
- Team collaboration on content
If you don’t need any of this and want to get hands-on and learn the process of creating a product tour, then it’s perfectly fine to build one from scratch using one of the libraries above.
Need to Teach Your Users?
Our tutorials and other content are like having someone sitting next to you while you learn. Take a free trial and see how we make life better for your users.
Recent Posts
Great SaaS Onboarding Software Solutions for Every Need
Employee Onboarding Software – FAQs We Get
SaaS Onboarding Checklist Best Practices & Examples
SaaS Onboarding Tooltips Best Practices (w/ Examples)
The Best Client Onboarding Software Solutions for Every Use
Millions of users have learned with Nickelled. Why aren't yours among them?
Existing customer? Sign in
Best React Product Tour Libraries for Creating User Onboarding
Looking for an open source library to build user onboarding for your React application? Here are eight best ones.
Do you have a web or a mobile app built with React, and do you want to onboard your users with ease and offer a seamless experience? The best way to do it is by creating effective product tours.
There are two paths for this. One is building on your own, and the other is buying a tool that can layer over your existing product and help you deploy tours quickly and easily without coding.
Here, we'll first run you through a build vs. buy overview. Then once you’ve decided that you want to build your own, we’ll show you the eight best React libraries you can use. Plus, we’ll present you with an alternative solution if building in-house is not an option for you right now.
To build in-house or find a SaaS solution? #
To summarize briefly, here is a comparison of building versus buying.
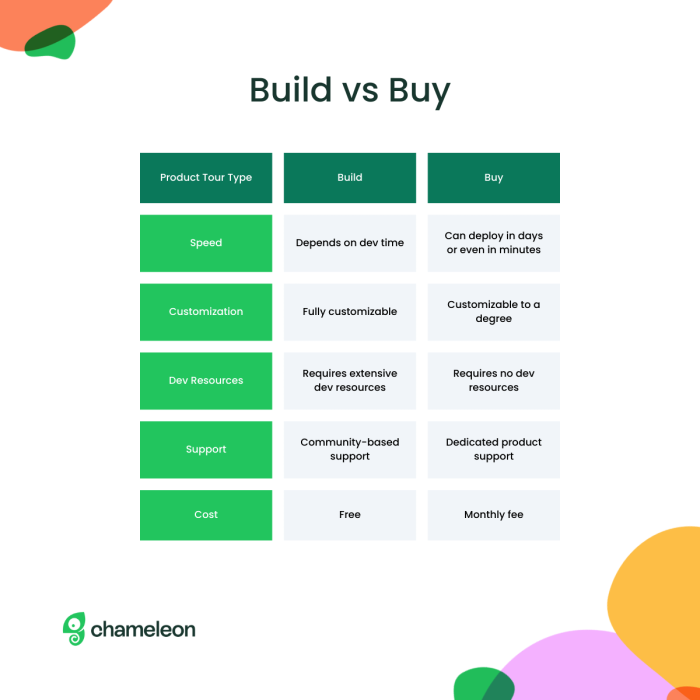
As you can see, building depends on whether you have dev resources available that can be committed to your product tours, since not only do they have to be built and deployed, but also maintained.
If your dev resources are restricted, getting a SaaS tool might be a better solution for you. With a dedicated product adoption software, you can deploy quickly and customize your experiences with a simple no-code builder. Plus, if you have an existing tech stack that you need to integrate with, such as your analytics and your CRM tools, then a product adoption software may make more sense rather than trying to do everything yourself.
If you do have developers who can quickly get to work, then the first starting point is finding an open-source library that already provides a good foundation. Here are eight React onboarding libraries that we would recommend to build your product tours with.
For React JS web applications #
1. intro.js #.
Intro.js is one of the most popular libraries for building JavaScript onboarding tours . It also comes with a React wrapper that allows you to deploy tours for your React application.
Intro.js is free for non-commercial projects, and for commercial use, it requires a one-time fee that starts at $9.99. So you can try it out for free and then decide if it’s what you want.

Why choose Intro.js?
Intro.js is the premier JavaScript library for DIY onboarding tours. This means they have unparalleled community support as well as active maintenance and update of its library. There’s a reason why even big companies like Amazon and SAP are using Intro.js.
Check out their GitHub or take a look at the demo to see it in action.
2. Shepherd.js #
Shepherd.js is another popular JavaScript library for building product tours. Like Intro.js, you can use the React wrapper to create onboarding flows for your React application.
For its modals, it uses Popper,js which is another open-source library used for rendering tooltips. This is how Shepherd.js enables you to create steps for your tour.
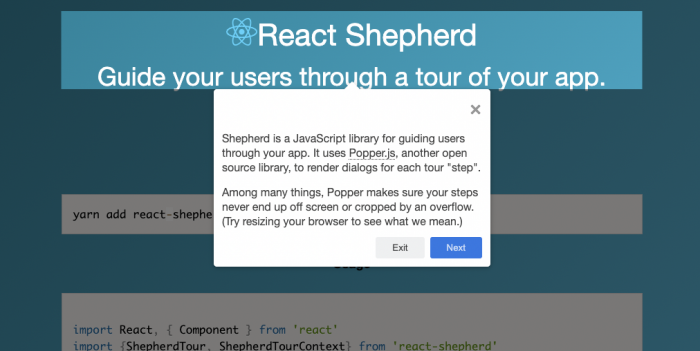
Why choose Shepherd.js?
Shepherd.js is a super robust tool thanks to Popper.js, a popular tool with 23.8k stars on GitHub. This makes Shepherd.js a better tour tool than many others. For instance, thanks to Popper, Shepherd.js tours never have steps that end up off-screen or cropped due to an overflow.
Get all the info on GitHub and view the demo to see what it looks like.
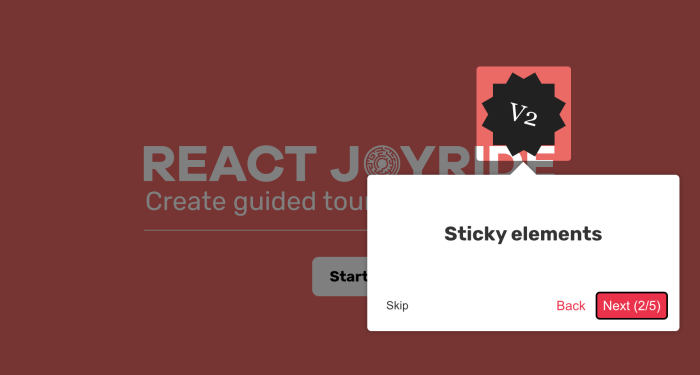
3. React Joyride #
With 5.1k stars on GitHub, React Joyride is one of the most popular libraries for creating product tours on React apps.
The way it works is fairly simple. It enables you to prompt tooltips on selected DOM elements to explain what they are. For positioning and styling of the tooltips, it uses React Floater .
Why choose React Joyride?
Thanks to React Floater, it has a great base design template that is highly customizable. So if you have some styling requirements, React Joyride might be the better choice.
Plus, the library is actively maintained and continuously updated. The community, including the creator, is also very active in providing assistance to those who encounter issues.
Get more info on GitHub and view the Demo on their website.
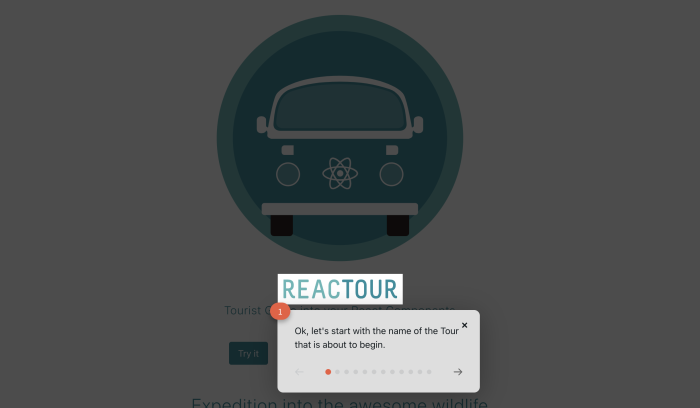
4. Reactour #
With 3.3k stars on GitHub, Reactour is another popular guided product tour library. Their latest release uses npm scoped package at Reactour.
For product tours, the most relevant packages from Reactour are:
@reactour/tour : The main package for creating a series of steps that highlight parts of your product.
@reactour/mask : A customizable component that allows you to highlight DOM elements or areas.
@reactour/popover : A customizable component that lets you place dialogs.
Why choose Reactour?
One great thing about Reactour is that you can make good-looking tours. But one caveat here is that there is limited styling customization compared to other libraries. So if you want to deploy something that looks fairly good quickly without much consideration into looking on-brand, then Reactour could be a great choice for you.
Learn more on their GitHub and see a demo of how it works on their website.
5. Walktour #
A relatively unknown library compared to other alternatives for React apps, Walktour still offers much potential in terms of creating onboarding flows and product tours.
Its features include:
Keyboard navigation
Full CSS selector support
Interaction with highlighted elements
Custom HTML content
Smart positioning
However, you may find it a little more difficult to get support when stuck on issues due to the relative obscurity of the library as well as the small size of its community.
Why choose Walktour?
Walktour seems to excel when it comes to advanced customization of your tour steps. So if you’re looking to tinker away and confident about being able to figure things out on your own, Walktour can be a decent option.
Read more on their GitHub and check out the demo.
For React Native mobile apps #
6. react native walkthrough tooltip #.
React Native is a framework for designing mobile applications that is based on React JS. So if you’re looking for a product tour library for your React Native mobile app, then React Native Walkthrough Tooltip could be a good option.
This library is an inline wrapper that calls out React Native components with tooltips. What this means is that when the tooltip shows, rather than the actual wrapped element, it renders a copy of that element that is positioned absolutely on the screen. You can then touch the element in the dialog that appears above the screen.
Why choose React Native Walkthrough Tooltip?
If you would like a simple solution to add onboarding tours and walkthroughs to your React Native mobile app, this could be a good option. It has a decently sized community as well, with tens of thousands of downloads each week .
You can learn more about it on their GitHub .
7. Highlight overlay #
This is another one for React native mobile apps. As the name suggests, Highlight overlay is an overlay that highlights DOM elements and tints the rest. Aside from simply being able to highlight elements, you can create a flow in which the highlights switch from one element to another, which is useful for creating walkthroughs that guide users through different parts of the user interface.
Why choose Highlight overlay?
This is a super simple product tour solution for your React native mobile app. If you want something minimal, this could be a good option for you.
Check out their GitHub to see if this is the right solution for you.
8. Spotlight tour #
This is a React native tour library that is highly customizable with a spotlight effect that is the signature of this tool. It essentially puts a spotlight on each element you’d like to highlight and enables you to render a tooltip that explains the element.
Why choose Spotlight tour?
This onboarding tour library for React native mobile apps is very customizable. The spotlight animation is also super smooth. Try Spotlight tour if you’re looking to wow your users with an engaging product tour.
See their GitHub for more info.
Build React tours quickly and easily with Chameleon #
At the end of the day, you still have to commit considerable dev resources when you use an open-source onboarding library, and despite the lack of fees paid, going DIY might end up costing you much more, especially if you have other pressing product issues that demand your dev resources.
How about a no-code tool that can quickly deploy 😉? Chameleon provides an intuitive product tour builder for your React JS app. With it, you can create complex and targeted onboarding flows – and so much more.
👉 Check out this interactive demo on building a Welcome Tour with Chameleon.
Chameleon also offers many more features such as:
Fully customizable styling
Deep integrations with other tools
Native A/B testing of product tours
If you don’t have any dev resources to commit, a dedicated product adoption platform like Chameleon is truly the way to go since you’ll have a versatile toolset. With Tours, Tooltips, Launchers, and Microsurveys, you’ll be able to boost product/feature adoption, reduce churn, increase retention, and drive more conversions in addition to many other benefits for your product’s growth.
You can try for free now!
Deploy React Tours in Minutes
Save dev resources and easily build product tours for your React app
You might also be interested in...
User Onboarding Metrics, KPIs, and Benchmarks: A Comprehensive Guide
User onboarding still isn't good enough, but here's how it's changing, mobile user onboarding: the ultimate guide for 2023, boost product adoption and reduce churn.
Get started free in our sandbox or book a personalized call with our product experts
Guide your users through a tour of your app.
Accessibility.
Shepherd has full keyboard navigation support, focus trapping, and a11y compliance via aria attributes.
Highly Customizable
Shepherd's styles are kept minimal, allowing you to easily customize the look and feel, but still give you enough to drop in and be ready to go quickly.
Framework Ready
Shepherd is ready to drop into your application using React, Ember, Angular, Vue.js, ES Modules, or plain Javascript!
01. How to Include
02. example, brands that use shepherd.
Create guided tours in the React app
by Clue Mediator · February 13, 2021
Today we’ll show you how to create guided tours in the React app.
Sometimes you may need to add a complete guide to your product developed in React . So we will give you the step by step implementation.
Here, we will use the npm package to create tours for sample react application.
Demo Application
Steps to create guided tours in the react app.
- Create a react app using multiple components
- Add npm dependency
- Create guided tours for react app
File Structure
- node_modules
- package-lock.json
- package.json
1. Create a react app using multiple components
First of all, we will create a react web application using multiple components. We will recommend you to check the following article for more information.
Create React Application using Multiple Components
Look at the following file code for your react app.
2. Add npm dependency
Now, we will have a react application and it’s time to add the guided tours in the app. So let’s add the reactour npm dependency in the react app by running the following command.
This package is also required the styled-components and react@^16.3 to use the createRef . Run the following command to install styled-components .
3. Create guided tours for react app
To create guided tours, we have to list out the steps and add the styles for the UI. Here, we will create a separate component called WebTour.js and import it in the root file.
We have also added a few more attributes to design the tour. Refer to this link for more information.
Let’s add the WetTour.js in the App.js component.
Run the application and check the output in the browser.
I hope you find this article is helpful. Thank you for reading. Happy Coding..!! 🙂
Demo & Source Code
Tags: React Advanced React Example React Package
You may also like...

Draw a line between two points on google maps in React
March 5, 2023
by Clue Mediator · Published March 5, 2023

How to read data from the Streams API in React
June 19, 2023
by Clue Mediator · Published June 19, 2023

Add space between carousel items in react-slick
May 31, 2020
by Clue Mediator · Published May 31, 2020 · Last modified November 5, 2020

Multiple parameters with React Router v6
September 12, 2022
by Clue Mediator · Published September 12, 2022

Routing in React JS
August 25, 2019
by Clue Mediator · Published August 25, 2019 · Last modified November 5, 2020

How to set up a proxy for multiple APIs in React
July 14, 2021
by Clue Mediator · Published July 14, 2021
Leave a Reply Cancel reply
Your email address will not be published. Required fields are marked *
Yes! Add me to your newsletter!
Search your query
JOIN OUR NEWSLETTER
Subscribe to our free, once-weekly email filled with coding news & articles.
Thank you for subscribing to us!
Recent Posts
- Design Product Page for Shopping Cart React Application – Part 9 March 14, 2024
- Design Home Page for Shopping Cart React Application – Part 8 March 1, 2024
- Design Footer Component for Shopping Cart React Application – Part 7 February 29, 2024
- Designing a Header Component for a Shopping Cart React Application – Part 6 February 26, 2024
- Add Bootstrap Icons in React Application – Part 5 February 24, 2024
Privacy Overview
Advisory boards aren’t only for executives. Join the LogRocket Content Advisory Board today →
- Product Management
- Solve User-Reported Issues
- Find Issues Faster
- Optimize Conversion and Adoption
- Start Monitoring for Free
Using React Shepherd to build a site tour

The fastest way to onboard first-time users on your website is by guiding them through some of the features your site has to offer. This phenomenon, also known as a site tour, ultimately shows users how to properly navigate through the site without facing any issues.

In this tutorial, I will show you how to use React Shepherd to easily implement a site tour on your website. React Shepherd is a lightweight wrapper library for Shepherd.js that allows us to create a walkthrough of a website — either parts of the site or the whole application — by using dialogs that represent steps that you create.
At the end of this article, we will have a functioning site tour as shown in the video below:
You can also check out the project code on GitHub . Let’s get started!
What is React Shepherd?
React Shepherd is an open source library that wraps around another open source library known as Shepherd.js . Its purpose is to make creating site tours easy, efficient, and aesthetic.
Essentially, React Shepherd provides two convenient ways to access methods and set objects for the tour without complexities: React Hooks and React Context. However, we will be focusing more on how to use React Context and the associated Provider component, which is the more convenient option.
Advantages of React Shepherd
The React Shepherd library comes with a number of advantages that make it a great tool to use for implementing a very powerful site tour in a React project:
- It’s highly customizable
- It has global state management built with Context
- It’s lightweight
- It’s highly accessible, providing actions with the user’s keyboard
We’ll see these advantages in action as we go through the step-by-step tutorial below.
How to use React Shepherd
The React Shepherd library basically accepts two props — steps and tourOptions . Although only steps is required, we should pass both props for the library work properly.
Generally, the steps prop expects an array of objects with the ShepherdOptionsWithType interface (or structure or type). Meanwhile, the tourOptions prop expects an object with the TourOptions interface.
The library expects that we pass these props to the provided ShepherdTour provider or to the useShepherdTour Hook, as shown in the sample below:
To start the tour, we can use the tour.start() method. We also have other methods available in the Tour class to perform other actions, such as stopping the tour.
The ShepherdOptionsWithType , TourOptions , and Tour interfaces
Let’s explore React Shepherd’s interfaces. As mentioned previously, the required steps prop expects an array of objects with the ShepherdOptionsWithType interface, so let’s begin there.
ShepherdOptionsWithType
The ShepherdOptionsWithType interface typically helps us to create an object that contains the following 15 keys:
- beforeShowPromise
- canClickTarget
- highlightClass
- scrollToHandler
We can combine these keys into array of objects and pass them to the steps prop. Let’s explore each one in more detail.
The attachTo key is used to bind a dialog (or step) to an element. When it’s not provided, the dialog remains at the center of the screen. It expects an object with element and on keys, and can be used like this:
The on key can accept a lot more options, like:
The arrow key accepts a boolean value and is used to show a tooltip on the dialog or to hide it. By default, the tooltip will be shown.
The beforeShowPromise key accepts a promise and is used to run a particular piece of code before other parts of the step will be shown. It can be used as like this:
The buttons key is used to add buttons to the modal. It accepts an array of objects with the following keys:
- action is a function that exposes this , which allows us to call methods available in the tour
- classes allow us to style the button with CSS
- text allows us to pass the visible text of the button
- type allows us to define how we expect the button to behave. type can be any of the following: 'back' | 'cancel' | 'next'
A buttons array can be defined as thus:
You can even omit the type and define an action like this:
The canClickTarget key is a boolean value. When set to false , it ensures that the targeted element where the dialog will be shown will not have a pointer event, meaning that it cannot be clicked at the time of the tour.
This key is most useful when certain components or elements contain links or sensitive parts of the app and you do not want users to mistakenly click on them during the tour.

Over 200k developers use LogRocket to create better digital experiences
The classes key accepts a string of classes separated by an empty space. It is used to style any part of the dialog.
The highlightClass key can be used to style the element we have attached the dialog (or step) to.
The id key is used internally to keep track of steps. Hence, it should be unique for all the steps.
The scrollTo key is used to make the dialog scroll to the attached element or not.
The text key accepts an array of strings and can used to pass paragraphs to the dialog. You would write the array of strings like so:
The title key, as the name suggests, is used to set the heading for the dialog.
The when key is a handy option that can be used to run functions when a dialog is shown or hidden. It basically accepts two keys: show and hide . You can use it like so:
The scrollToHandler key accepts a function with a parameter that represents the element attached to the step. It can be used to define a custom scroll or other DOM method.
The showOn key accepts a function that can be used to run a piece of code that generally should return a boolean value. When it return a false value, then the step is not shown. It can be used like this:
And finally, the cancelIcon key accepts an object comprised of enabled and label , which expect a string and a boolean value, respectively. This key is used to show or hide the icon.
More great articles from LogRocket:
- Don't miss a moment with The Replay , a curated newsletter from LogRocket
- Learn how LogRocket's Galileo cuts through the noise to proactively resolve issues in your app
- Use React's useEffect to optimize your application's performance
- Switch between multiple versions of Node
- Discover how to use the React children prop with TypeScript
- Explore creating a custom mouse cursor with CSS
- Advisory boards aren’t just for executives. Join LogRocket’s Content Advisory Board. You’ll help inform the type of content we create and get access to exclusive meetups, social accreditation, and swag.
We can combine these keys to form steps for our tour like this:
The simple demo above would result in two tour steps, internally labeled with id keys of tenth and eleventh . See if you can determine how each step would appear and behave based on the configurations above. Then, let’s move on to discussing the next interface.
tourOptions
The tourOptions interface allows us to add more functionality to the whole tour. For instance, we can use confirmCancel to add a window.confirm modal when closing the modal by clicking the x icon which we can equally show or hide using the defaultStepOptions option.
Some of the options for this interface are as follows:
- confirmCancel : Accepts a boolean value and can be used to attach a confirmation before closing the whole tour
- confirmCancelMessage : Accepts a string and it is used to define the message that will be shown in the window.confirm modal
- defaultStepOptions : Accepts all the default options that we can pass to a step; note that enabling this will apply all the default options to all the steps
- exitOnEsc : Accepts a boolean value and is used to determine whether the esc key should close the tour or not. By default, the value is set to true
- keyboardNavigation : Accepts a boolean value and is used to determine whether the user is allowed to navigate through the tour using the left and right arrow keyboard keys. By default, the value is set to true
- tourName : Used to attach a name to the tour. It is generally used to generate a id for the tour.
- useModalOverlay : Accepts a boolean value. When it is set to true , the whole page will have a dark overlay
These properties can be used like so:
The Tour class has bunch of methods we can use to perform specific actions, such as starting and canceling the tour. Some of the methods that exist in this class are:
- addStep() : Accepts an object created with the ShepherdOptionsWithType interface and can be used to add a new step to the tour
- addSteps() : Similar to addStep() ; however, it allows us to to add an array of multiple objects created with the ShepherdOptionsWithType interface
- back() : Used go back to a previous tour step
- next() : Used to go to the next tour step
- start() : Used to begin the entire tour
Other important methods to know include removeStep , which accepts a name as a parameter, and isActive() , which is used to indicate that a particular step is the active one. The complete list of methods can be found in the Shepherd.js documentation .
Project setup for our React Shepherd site tour
The next step in this tutorial is to implement the tour. To properly follow along, I have provided a modified version of a React project based on this free dashboard template . Download or clone this starter project containing the essential code needed to follow along.
Basically, by cloning or downloading this starter code, your folder structure should look similar to the one I have provided below:
Once you have the code, you can cd into the root folder of the project and run npm install or yarn install to install dependencies. After the dependencies have been added, you can start the project by running npm run dev or yarn dev , since this was actually set up using Next.js.
Adding steps to the React Shepherd site tour
In this section, we will set up each step of the site tour. First, let’s install the React Shepherd library using either of the commands below:
Next, we will add tour.tsx file in the components folder alongside components like blog.tsx . In the components/tour.tsx file, we will import necessary dependencies, including the styles required to make the dialogs look pretty:
Next, we will create the tourOption object like so:
After that, we will create a TourInstance component with the following code below the tourOptions object like so:
In the code above, we extract the tour instance from the ShepherdTourContext . Then, in the useEffect Hook, we check if the window is defined before using the value of demo-done in the localStorage . This will prevent the tour from restarting when we’re done with the tour’s steps.
After that, we run the tour.start function. We also return the passed children into the DOM.
Next, we will create another component where we will pass the steps and the tourOptions to the ShepherdTour consumer. Our code will look similar to this:
The next process is to define the steps. In total, we will have eleven steps, which will have different configurations:
The first step defined above only has six configurations attached. It has been set up this way so that we can place it at the center of the page, since we don’t want it to be attached to any item. The properties scrollTo and arrowTo were set to false , and we added only two buttons — Exit and Next .
Here’s the second step:
The second dialog was attached to an element with an id of #navigation , which can be found in components/header.tsx . Notice how the on key has a value of bottom because we want the dialog to be positioned at the right of the element.
Also, the scrollTo property has now been set to true because we expect the dialog to be moved to the #navigation element. There are also three buttons now, adding a Back button to the Exit and Next buttons we already set up in the previous step.
Notice how the class provided by Shepherd.js was attached to the buttons. This will ensure we have very neat default styles when we finally use the code.
Let’s take a look at the third and fourth tour steps:
The third and fourth steps are similar to the second step, except that they have been attached to different elements. These steps have an id of #nav-dashboard and #nav-about , respectively, which can still be found in the components/header.tsx file.
Next, we’ll look at the fifth and sixth steps:
The fifth and sixth steps are similar to our previous steps. However, we attached them to different elements using their id keys — #nav-menu and #nav-profile , respectively.
We have also added two extra properties to the steps — canClickTarget and when . This is so we automatically click on the items being discussed when we are on their respective steps.
We’ll look at the code for the seventh, eighth, ninth, and tenth steps all together:
Steps 7–10 are also similar to the ones above, except for the elements they are attached to:
- #sales-chart , which can be found in the components/sales-chart.tsx file
- #feeds , which can be found in the components/feeds.tsx file
- #projects-listing , which can be found in the components/projects-listing.tsx file
- #blogs , which can be found in the components/blogs.tsx file
The eleventh step is the most interesting of all:
What makes this step so interesting is that we have to route to a different page on the website without actually stopping the tour. We also have to restart the tour right from the other page. Initially, we start off in the /dashboard page before finally navigating to the /about page.
This can be handled using a series of steps. First, we use the show method inside the when property to click on the #sidemenu-about on the sidebar. Then, we set the demo-done value to true inside the localStorage .
Next, we implemented the beforeShowPromise function, which we use to ensure that we navigate to the /about page before we even show the dialog. We added a custom Restart button to the step, which implements an action that we use to cancel the existing tour, navigate back to the dashboard page, and start a new tour.
Implementing our custom React Shepherd tour
Now that we have defined our steps, we can use our tour in our project. We start by first wrapping the entry to our app — pages/_app.tsx — with the the Tour component we have created.
One thing to notice is the dynamic import we have done for the Tour , which was done to fix any issues that might arise while using our project with Next.js. Our pages/_app.tsx should now look like this:
By now, our app should have a demo that functions as shown in the YouTube video above . Our site tour now works with the React Provider–React Context method, but we can augment it further — for example, by adding a Start button that allows a user restart the tour at any given time.
Let’s see how to add this button now. We have to open components/sidebar.tsx file, add the handleStartTour function, and add the Start tour button to the DOM like so:
As I mentioned earlier, React Shepherd provides both React Hooks and React Context with its Provider component for accessing methods and setting objects for the tour. We focused on using the Context method in this tutorial.
However, let’s still take a look at using the Hook provided by the React Shepherd library. This is totally optional, but may be of help to you as you work with React Shepherd.
This implementation is quite simple — we just have to open the components/tour.tsx file and add the following code to it:
React Shepherd is a really great tool for site creating site tours in a React app. In this tutorial, we have used it to create a site of a dashboard site created with React.
There are many other libraries available for creating site tours, including React Tour and React Joyride , vue-tour for Vue projects , the Driver.js library , and more. Among these, React Shepherd stands out due to the elegant UI it provides along with its out-of-the-box, easy-to-use React Context implementation.
The React Tour package makes it easy to actually make any part of the app “tour-able,” meaning that we can add tour steps to any part of the app from a single point of truth. This often requires extra steps in other packages.
To review and play around with the code we implemented above, check out this GitHub repository . If you have any questions, you’re welcome to comment below.
Share this:
- Click to share on Twitter (Opens in new window)
- Click to share on Reddit (Opens in new window)
- Click to share on LinkedIn (Opens in new window)
- Click to share on Facebook (Opens in new window)

Stop guessing about your digital experience with LogRocket
Recent posts:.

ReScript vs. TypeScript: Overview and comparison
Many modern web developers are embracing emerging technologies that improve the speed of development as well as the quality of […]

Using Pavex for Rust web development
The Pavex Rust web framework is an exciting project that provides high performance, great usability, and speed.

Using the ResizeObserver API in React for responsive designs
With ResizeObserver, you can build aesthetic React apps with responsive components that look and behave as you intend on any device.

Creating JavaScript tables using Tabulator
Explore React Tabulator to create interactive JavaScript tables, easily integrating pagination, search functionality, and bulk data submission.

Leave a Reply Cancel reply
Navigation Menu
Search code, repositories, users, issues, pull requests..., provide feedback.
We read every piece of feedback, and take your input very seriously.
Saved searches
Use saved searches to filter your results more quickly.
To see all available qualifiers, see our documentation .
- Notifications
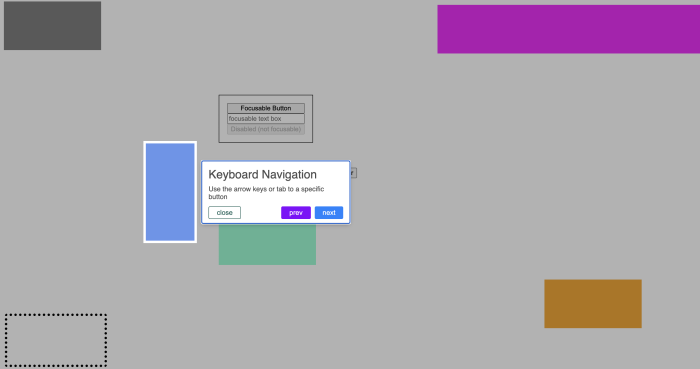
Guided tour/walkthrough component for React
alfrdmalr/walktour
Folders and files, repository files navigation.
Guided tour/walkthrough component for react projects.
npm | GitHub
Try the demo!
Options via Storybook
Installation
- npm i walktour
or, if you prefer yarn:
- yarn add walktour
Import the Walktour component:
import { Walktour } from 'walktour'
And then include it somewhere in your render function:
Each step of the tour is defined by a Step object.
These options can be provided at a tour level or applied to a single step along the tour.
Step-level options will take precedence over global options, so take care when using both in the same tour.
WalktourLogic
The WalktourLogic object aims to provide custom renderers with as much functionality as possible by exposing basic functions and data that the tour uses to operate. All custom renderers are responsible for implementing the various WalktourOptions to their desired degree. For instance, a customFooterRenderer might choose to ignore the disableClose option, or to always display "back" instead of the specified prevLabel .
*If any customFunc is specified, that custom function will replace the respective function in the WalktourLogic object, with the default logic passed as arguments to the custom functions. This means that a customNextFunc could look like this:
It's especially important to call close() if providing customCloseFunc , since there are cleanup events which are handled by the default close() call.
**All options available for a Step object will be provided in the WalktourLogic object, even if those options haven't been specified for a particular step. For instance, if the maskPadding option is passed to Walktour itself, but not to any individual step, each step's WalktourObject will still have the most relevant value for maskPadding as part of its stepContent .
Orientation And Alignment
The tooltip can be positioned at various locations around the targeted element. There are five simple positions:
and 8 more specific positions, which are just combinations of the simple ones:
The general format is [ Position ][ Alignment ], so a WestNorth-positioned tooltip is located on the left side of the target element, with their top edges aligned.
Each of these positions exists in the CardinalOrientation enum, and can be specified with the optional orientationPreferences like so:
Tour Level:
Step Level:
{... title: "Manual Positioning", orientationPreferences: [CardinalOrientation.EAST], ...}
An orientation can also be specified at either level with its corresponding string, like this:
{... orientationPreferences: ["south-east", "east-south", "south", "east"] ...}
* CENTER centers the tooltip relative to the target. Because it's placed on top of the target element (and thus obscures content, particularly with large tooltips and/or small targets), this position is usually ignored when choosing where to place the tooltip. If this behavior is desired, specify an orientationPreferences that only includes CardinalOrientation.CENTER and no other values, or implement a custom getPositionFromCandidates function.
If a content agnostic, centered tooltip is desired instead, specifiy that Step 's selector property value to null or undefined , or simply omit the property altogether.
Development / Demo
Clone the repo with:
git clone https://github.com/alfrdmalr/walktour.git
Navigate to the new directory and install the necessary development dependencies:
cd walktour && yarn install
Launch the development server:
Once the server is running, it will specify a URL (typically http://localhost:1234 ). Navigate there in your browser to see your changes and interact with the demo app!
npm pack will generate a tarball without actually publishing; this can then be installed via npm install [path-to-tarball] for testing that the package works as intended.
Bump Version
Releases 13, contributors 4.
- TypeScript 98.5%
- JavaScript 1.5%
ReactScript
Lightweight guided tour component for react – r-onboarding, description:.
R-onboarding is a lightweight yet customizable onboarding & guided tour component for React.
It’s an introduction view with a walkthrough that guides your users to set up a new account, sign up, install your app, introduce new features, or start playing a game.
How to use it:
1. Installation.
2. Import the r-onboarding component.
3. Add the component to your app and define your own steps as follows:
4. Possible options.
5. Render props.
- step: Current step object
- next(): Moves to the next step
- previous(): Moves to the previous step
- exit(): Exits from onboarding
- isFirst: Get if current step is the first step
- isLast: Get if current step is the last step
- index: Current step index (starts from 0)

More Like This

Interactive Walkthrough Component For React Native

React Native Modal Walk Through

Flexible Guided Tour For React Native App – rn-tourguide

React User Tour Component

Minimal Stepper Component For React Native

Multi-step Wizard Component For React – stepzilla
Add comment cancel reply.
User Onboarding Tours made simple with React-Joyride

Sep 12, 2022 · 5 min read

Have you ever tried to do a task on a website only to spend a lot of time attempting to identify different features or even not knowing about some functionality?
User onboarding tours, also known as Product walkthroughs, are self-explanatory ways to introduce new users to your app or describe how new features function. They are multi-step, in-app process guides that acquaint users with specific functionalities.
An application’s complexity might make it challenging to explain new features or functionalities to users, especially if you want them to access a lot of crucial data.
User onboarding tours are not just limited to instructing new users but also can be used in other different ways such as:
- When a new feature is released, for all users.
- In situations where users have not yet mastered more complicated features.
- For current users who have been away from the app for a while.
This article will show you how to use a Next.js application to onboard users into a new website and introduce them to essential UI components using the React Joyride Library.
Benefits of a user onboarding tour?
We now know why user onboarding tours are necessary. Let’s examine why you should use one in your Next.js projects.
- Lower the cost of customer support : The customer support crew at companies is frequently entrusted with responding to the same user questions, which can be overwhelming. Quality and seamless onboarding will lessen the need for constant support.
- Improvements in user engagement : Users are more likely to remain around and utilize your product if the user onboarding route is simple to follow.
- Improve/promote the adoption of features : Users are typically notified of the arrival of a new feature to a program via emails. Even though it functions, it is still not very successful because some users may not open their emails to view it or even end up in spam.
- Require users to perform specific actions : You can require users to perform specific activities to aid in their familiarization with various functionalities.
- Improve user retention : Users frequently lose track of specific features’ locations and how to use particular functions, but getting a tour each time might help them refresh their memory. Additionally, customers will probably not have the patience to search for additional tutorials regarding your app outside of it compared to other alternatives to the user onboarding tour, such as video tutorials and FAQs.
An onboarding tour can provide “aha” moments, but there is a fine line between this and merely upsetting customers’ experiences.
Therefore, it should possess the following qualities:
Be succinct and to the point : Because visitors to your website want to start using your app rapidly, you should respect their time and avoid giving them a lengthy tour that can irritate them throughout the onboarding process. It ought to be brief and to the point.
Order by sequence : Every successful user onboarding experience should adhere to a structure with obvious next steps that advance the user.
Design consistency : To keep consumers attention, employ a consistent design throughout.
Finally, the abundance of available solutions and libraries is one of the main benefits of developing applications in the react ecosystem. There are some existing libraries that can be used to set up user onboarding tours in Next.js application with ease, including React Joyride , React Shepherd , Intro.js React , React Joystick , Walktour , Reactour and also commercial products, such as Whatfix , Walkme , Appcues , etc.
We will stick with the React Joyride Library for this article.
Open Source Session Replay
OpenReplay is an open-source, session replay suite that lets you see what users do on your web app, helping you troubleshoot issues faster. OpenReplay is self-hosted for full control over your data.

Start enjoying your debugging experience - start using OpenReplay for free .
What is React Joyride?
React Joyride is a popular library for creating guided tours for your React applications. It allows developers to select DOM elements and prompt a tooltip, pointing and explaining what that element is.
React Joyride was created by Gilbarbara and had its first version released in 2016. So far has amassed over 4.7k stars on Github.
Its primary objective is to introduce new users to your program or explain how new features work.
The library is continually updated, and assistance is available if you encounter any problems.

How does React Joyride work?
To carry out certain functionalities, the React Joyride library uses a variety of props that can be supplied into the joyride component.
Under the hood, it handles positioning and styling using react-floater .
Large web applications can benefit from its flexibility and customizability to meet their unique requirements.
The React Joyride library offers prebuilt UI components for easy setup, but you also have the option to utilize a custom UI component that best suits your requirements.
Here is an example of an onboarding tour below:

Adding User Onboarding Tour to Next.js App using React Joyride
We will build a simple onboarding tour with the props provided by the library and then will see how to take complete control of the tour using functions and not just props.
To keep the focus of this article entirely on React Joyride, I have set up a starter Next.js application.
Alternatively, you can choose any other Next.js application of your choice and follow along with it.
Let’s clone the starter branch .
Run the following code:
The website ought to be accessible at localhost:3000 .
Building the tour component
Let’s start by adding the new library. In your Node.js environment, run the following command:
First, we create the Tour.js file in the directory components .
Add the following code:
As previously mentioned, the props are the foundation of the React Joyride library. The steps props are the first and most significant props that we will employ. The steps prop is the only required one, which consists of an array of steps.
This array comprises two essential properties target and content .
- target : Here, we target the appropriate classNames of the elements we want to highlight in the tour.
- content : The content is the information (text) displayed for the users.
After defining the array steps, we must pass it to the steps props in the Joyride component.
Dynamic Tour Component Import
Now go ahead and load the tour component, and we can do that anywhere on the page.
Quick Note: To avoid issues in more recent versions of Next.js, we will need to use dynamic imports.
I will be importing it into the index.js page.
Go to index.js and modify with the code below:
At this point, we have our simple tour up and running.
Click on the beacon (an animated dot) blinking to begin the tour.
Now you will notice that to continue to the next element, we must close the tour.
This is a really awful experience.
To solve this, we will use another prop called continuous .
Pass it into the Joyride component and set it to true .
This will add a next button, and when the user reaches the end of the tour, it changes to last , which stops the tour.
Enabling the skip option at each step
Skip options are very important in your tour because some users might already be familiar with your application and would like to continue without it.
This is very simple to achieve with React Joyride.
We will make use of the showSkipButton prop. This prop will take in a boolean value true .

Show tour progress
Now when a user is taking this tour, we need to show the user how many tour items/features they should expect. It will be in the format (e.g., 1/5).
We can include this by adding the showProgress prop to the Joyride Component. This prop is a boolean, which we will set to true .
note: This should be used together with the showSkipButton prop.

Adding custom styles
You might need to modify the default style of the tour card.
You can do this by simply adding the styles prop with your preferred customization to the Joyride component.
In our code, we can see that the styles prop is an object. It also has other objects with unique keys and values.
tooltipContainer : The key is textAlign , and its value is left.
buttonNext : Its key is backgroundColor , and its value is green.
buttonBack : Its value is 10px, and it has a key called marginRight .
Auto start tour
You can choose to start the tour immediately after the page loads without clicking on the beacon.
Pass a prop called disableBeacon: true to the first step of the step array.
In this article, we looked at the React Joyride Library and how we can use it to add user onboarding tours in Next.js Applications. You can take this a step further and make the tour controlled by button clicks using EVENTS and ACTIONS provided by the library through a callback function.
Here is the link to the complete source code .
React Joyride Documentation
https://react-joyride.com/
More articles from OpenReplay Blog

Jan 5, 2024, 7 min read
Website Personalization: An Overview
{post.frontmatter.excerpt}

May 15, 2023, 5 min read
Website usability testing
Advertisement
The price of loyalty: pga tour pros from jordan spieth to adam scott to chesson hadley react to the pga tour's equity ownership plan, share this article.
McKINNEY, Texas – On April 24, PGA Tour pros competing in the pro-am at the Zurich Classic of New Orleans couldn’t stop checking their phones. The reason? To tap refresh on their email and see if their notification of how much they had been allocated of $930 million in player equity shares that were divvied up to nearly 200 Tour members, or as one player put it, “Christmas in April,” had arrived.
Commissioner Jay Monahan originally detailed the Tour’s first-of-its-kind equity ownership program in a Feb. 7 memo to players. And it was why players experienced an uncontrollable urge to check their phones during play; it was so egregious that the Tour sent pros a memo reminding them of its phone usage policy.
Everyone wanted to know how much their loyalty was worth. The Telegraph reported Tiger Woods was to receive $100 million in equity and Rory McIlroy $50 million from a tier in which 36 players reportedly split $750 million. When McIlroy was asked at the Zurich Classic how much would make players feel validated for their decision to stay with the PGA Tour, he said, “I think the one thing we’ve learned in golf over the last two years is there’s never enough.”
We talked to a wide array of pros at the CJ Byron Nelson last week to find out how the rollout went and how they feel about being shareholders in the Tour’s new for-profit entity.
Chesson Hadley: 'The basement pays pretty good'

Chesson Hadley hits his tee shot on the first hole during the third round of the Farmers Insurance Open golf tournament at Torrey Pines Municipal Golf Course – South Course. Mandatory Credit: Ray Acevedo-USA TODAY Sports
One of those players who had his phone out and received a memo with good news was Chesson Hadley. Last June, he was the first-round leader at the RBC Canadian Open after Tour Commissioner Jay Monahan stunned the world by announcing the framework agreement with Saudi Arabia’s PIF. Hadley, 36, remarked at the time that he would like to be compensated for his loyalty and the one-time Tour winner, ranked No. 297 and with earnings north of $12 million, was crucified for it.
“I chose the wrong pronoun. I said ‘I’ and people thought I was trying to be like I’m some world hero, golf hero that deserves it. I’m very aware of my career compared to the big fish who have stayed, I’m very aware of that,” he said last week ahead of the CJ Cup Byron Nelson.
“The basement pays pretty good. I have a good view from the basement.”
Hadley was pleased to receive his shares, something he said all players who finished in the top 125 in the FedEx Cup point standings received and noted that he was “blessed to be in the right place at the right time.”
“Some people deserve more, some people didn’t get any that probably should have but it’s not a perfect system,” he added. “It will be curious what the Tour looks like in 10 years. There’s never been a major sports association that hasn’t gone up in value, right? They keep growing. Teams like the Dallas Cowboys are worth $6 billion now and 10 years ago they were worth $3 billion. Hopefully, that’s the trajectory of the PGA Tour and everybody’s equity grows.”
Asked if being a shareholder in the Tour changes his view about LIV players returning, he said, “It makes me want some of them back more. My piece goes up immediately if Jon Rahm comes back. The Tour is instantly more valuable if he comes back. I would think my equity goes up if PIF becomes an investor but I don’t know.”
Adam Scott: 'I don't think anything the PGA Tour is doing right now is about spending time looking in the mirror'

Adam Scott putts on the fourth hole during the third round of the AT&T Pebble Beach Pro-Am golf tournament at Pebble Beach Golf Links. Mandatory Credit: Michael Madrid-USA TODAY Sports
As a player-director on the Tour’s policy board, Scott, 43, has had an intimate view of how the sausage has been made in forming the for-profit entity and dishing out shares in the new venture.
“Honestly, I’ve really only heard of a couple of disappointments from some people who didn’t receive any. Of course, you’d be disappointed if you thought you were going to get some equity or a grant and you didn’t,” he said, noting that no one had directly approached him but that’s what he had heard through the grapevine. “I don’t think there are any holes in the system that was devised. I was asked should Jack Nicklaus get the most? I don’t think anything the PGA Tour is doing right now is about spending time looking in the mirror. It’s about building a Tour for the future.
“Grants to the legends category was correct and I just don’t know how far you can go in giving grants to players of 20 years ago, for example, when it is more about now and looking forward.”
Scott said he wasn’t sure how big a carrot the shares would be for players but called it a “gift,” a “perk,” and a “bonus.”
“It’s not exactly the same as the retirement plan but I think it is an additional perk of being a Tour member and having a stake in the business,” he said. “In the years going forward, hopefully the business goes well and this equity is a real bonus.”
Does he expect player equity to discourage more players from jumping to LIV Golf for lucrative guaranteed contracts?
“I don’t think it was designed as a retention tool if you want to call it that,” said Scott, fifth on the career earnings list with more than $64 million in earnings. “I think the guys who have stayed so far will have a longer-term view of things and will appreciate what the equity is and not just throw that away and leave.”
Jordan Spieth: 'I think it's very confusing'

Jordan Spieth watches his shot from the second tee during the second round of the 2024 CJ Cup Byron Nelson. (Photo: Jim Cowsert-USA TODAY Sports)
Spieth, age 30 and seventh on the all-time career money list with $62 million, is a fellow player- director on the Tour policy board. He was asked about the player equity program during his pre-tournament press conference.
“I had a couple players call me and say, wow, I didn’t know — they were excited about what their grants — I don’t know what their grants were. They were excited it was more than they thought it was,” he said. “I had conversations all the way back to even maybe just into the new year with some guys who missed out on it that would’ve made it other years. So I heard both sides.
“As far as the roll-out, I believe that it was made very clear to everybody that if anyone was confused in what it meant, how was it coming, and the roll-out specifically, there was PGA Tour officials every week that could sit down and explain any time anybody wanted to. I thought that was a good idea. I think it’s very confusing. It still is confusing for us players on when it’s vested, what’s the best idea for taxes, you know, stuff that we don’t — we all have people for that. That’s not what any of us do and it’s fairly complicated.”
Matt Kuchar: 'It feels like you're a shareholder now'

Matt Kuchar waits his turn on the 16th green during the first round of the Zurich Classic of New Orleans golf tournament. Mandatory Credit: Stephen Lew-USA TODAY Sports
Kuchar, 45, is 10 th on the all-time money list with earnings nearing $60 million. He said he’s kept a low-key, head-down approach to the player equity plan.
“It feels like you’re a shareholder now. It’s kind of cool to be an investor in the original new entity, whatever that is,” Kuchar said, but added, “I don’t get real excited until the deal is done, until the money is in your account. I reserve some of the excitement until the deal is done. It’s a nice bonus.”
Kuchar has always been a good soldier for the Tour, willing to do a media interview, shake hands with sponsors, stop by a tent after the round. Asked if being a shareholder will make him more willing to do more, he said, “I feel like I have a good rapport with fans and they like that I smile and I look like I’m enjoying myself out there. I feel like that has gone as far for me financially as good golf has. That’s a way I’m an asset to the Tour. I’m fortunate that fans want to holler my name. Am I going to start a social media presence? I probably have such a tainted view of social media that it would be tough for me to actually be the one that does it, maybe if someone else does it on my behalf, maybe if that helps the PGA Tour and the stock, maybe. It’s a neat incentive to think about it as a shareholder if you can do something to help the Tour, you can also help yourself. It’s an incentive, for sure.”
Kuchar said his stake was what he expected. He didn’t have any problems with how it was handled but did express some disappointment with the signature event sponsor invites, particularly with the RBC Heritage, where he was a past champion. “I had high hopes on that one. That’s the one I thought I stood my best chance. I was bummed out. I thought I did the things you were supposed to do. A couple of days of being disappointed went away and I realized best to earn them,” he said.
[Kuchar learned on Sunday that he had received an exemption into the Wells Fargo Championship.]
Mackenzie Hughes: 'I wasn't waiting for a handout'

Mackenzie Hughes of Canada plays a shot from a bunker on the 16th hole during the final round of the Valspar Championship at Copperhead Course at Innisbrook Resort and Golf Club on March 24, 2024 in Palm Harbor, Florida. (Photo by Julio Aguilar/Getty Images)
Hughes, 33, has been a refreshing voice speaking out on the greed in the game during these turbulent times. He’s earned more than $15 million during his career and the player equity program wasn’t something he was spending too much time thinking about given the number of years before a player can vest.
“I think they could have done a better job. Some people have to vest for eight years and some guys don’t. You have to play 15 events but there are other guys like Tiger who isn’t going to play 15 events; he’s going to vest in other ways. That option isn’t going to be available for others. To me there are so many questions and loopholes,” Hughes said. “It’s not money that I expected. I wasn’t waiting for a handout, let’s put it that way. If it turns out to be something nice, great, but I haven’t put much thought into it.”
Austin Smotherman: 'I better check my spam'

Austin Smotherman of the United States walks the eighth green during the first round of the Butterfield Bermuda Championship at Port Royal Golf Course on November 09, 2023 in Southampton, Bermuda. (Photo by Marianna Massey/Getty Images)
Smotherman, 29, is playing this season out of the Nos. 126-150 category and splitting time between the PGA Tour (five starts) and Korn Ferry Tour (three starts) this season. He’s earned nearly $2 million on Tour during his three seasons. More than a week after the majority of players had received word about their equity ownership, Smotherman still was in limbo.
“I haven’t seen anything yet,” he said. “I was a full-status guy at one point, do I get any? Even if it is half of a half of a percent.”
He smiled. “I guess I’ve got to check my spam.”
But even Smotherman took solace in knowing that the program has an additional $600 million in equity grants that will be awarded in amounts of $100 million annually starting in 2025.
“Play better and there’s more equity to be had,” he said.
Check out the best equipment you can buy: Best drivers for 2024 | Best irons for 2024 | Best putters for 2024 | Best golf balls for 2024
Most Popular
2024 wells fargo championship prize money payouts for each pga tour player, meredith and scottie scheffler welcome their first child to the world, 2024 cognizant founders cup prize money payouts for all the lpga golfers at upper montclair country club, meet the 16 liv golf players in the field for the 2024 pga championship at valhalla, early look at the top 10 betting favorites for the pga championship 2024, 2024 myrtle beach classic prize money payouts for each pga tour player, photos: pga championship 2024 monday practice round at valhalla golf club.
Install and use the Tour
This documentation is for the latest releases, which uses npm scoped package (opens in a new tab) @reactour . The original reactour package is now on branch v1 and its documentation can be found here (opens in a new tab) .
Install @reactour/tour (opens in a new tab)
1. add the tourprovider.
This should be at the root of your Application, passing the steps of the elements to highlight during the Tour.
2. Control the Tour
Then somewhere down the Application tree, control the Tour using useTour hook.

See Travis Kelce React to Taylor Swift Performing Songs Rumored to Be About Him During Eras Tour
Travis Kelce appeared to be feeling the love during Taylor Swift 's Eras Tour performance on Sunday, with all eyes locked on him as the songstress performed two songs rumored to be about their relationship.
The Kansas City Chiefs tight end was spotted inside Paris La Défense Arena alongside Gigi Hadid and her rumored beau Bradley Cooper , enjoying the final Eras Paris show where Andrea Swift and Lenny Kravitz were also in attendance. It was the first time Kelce has been in the audience since Swift largely revamped her live show , adding several songs from her newly-released album -- The Tortured Poets Department -- to the set list.
Among the songs added to Swift's TTPD set is "So High School," which Swifties have speculated may have been written about her relationship with Kelce.
On Sunday, eagle eyed fans caught Kelce's sweet reaction to seeing Swift perform it live.
As the singer transitioned from her performance of "But Daddy I Love Him" into "So High School," Kelce's energy appeared to pick up while Hadid -- who was standing next to him -- appeared to offer him a knowing nudge. With Kelce's eyes fixed on stage, he danced along and pointed from his eyes to Swift's as she sang the line, "Every time I look at you."
Fans were also quick to note that Swift appeared to blow a kiss in Kelce's direction before she began the song.
To Kelce's left during the show was his longtime friend Ross Travis , who appeared to jokingly mime playing a video game as Swift sang, "Touch me while your bros play Grand Theft Auto."
During the highly anticipated "Surprise Songs" portion of Swift's show, she sang another new one rumored to be about the couple's relationship. As Swift performed "The Alchemy," Kelce was seen emulating Swift's famous "heart hands" gesture in response.
In what is becoming a tradition on her tour , Swift once again closed out her show by changing the lyric in "Karma" to reference "the guy on the Chiefs." The 34-year-old pop star is now known to swap the lyric only when Kelce is in the crowd.
Kelce was seen making his way toward the stage to greet her, dancing along and shaking hands with fans as he went. As Swift delivered the line, he was seen moving his hips with his arms in the air.
While walking through the venue, the three-time Super Bowl champ stopped at one point for a fun exchange with one of his own fans. Kelce gleefully offered a big smile and a few words as he shook hands with one male audience member who was clad in his No. 87 Kansas City Chiefs jersey.
Swift also appeared to pay tribute to her beau's Chiefs colors with a yellow and red two-toned costume during the 1989 portion of her set. (For his part, Kelce has previously said that 1989 is his favorite album of Swift's.)
Adding to the significance of the evening, fans have pointed out that Sunday also marked Swift's 87th Eras Tour performance. The singer has proudly embraced Kelce's number, wearing a friendship bracelet with "87" on it in addition to custom-made jackets to his games.
"Travis couldn’t wait to attend Taylor’s European leg of her Eras tour," a source tells ET. "He was very excited to see Taylor in action yet again, and enjoys watching her perform and singing along."
The source added, "He’s a very supportive partner, as is she. The two are making it a point to celebrate each other’s achievements, and show up when it matters most."
Kelce has been busy with a full slate of his own projects during the NFL offseason, including signing a record-breaking contract extension with the Chiefs , hosing Are You Smarter Than a Celebrity? and testing his acting chops in Ryan Murphy's Grotesquerie .
But in a recent interview with ET , he promised that he had every intention of joining Swift abroad as her tour continues.
"There won't be a bad show, I promise you that," he said. "You know I gotta go support."
Kelce is also set to host his second annual Kelce Jam on May 18 in Kansas City.
RELATED CONTENT:
Travis Kelce Attends Taylor Swift's Final Eras Tour Show in Paris
See Taylor Swift's New Eras Tour Costume Easter Eggs
How Travis Kelce Showed Support for Taylor Swift's 'Eras' Paris Debut
Emma Stone Says She Loves Taylor Swift's Ex Joe Alwyn
How Taylor Swift's 'Tortured Poets' Department' Changed Her Eras Tour

Screen Rant
"pathetic": fans react in anger to new fallout 4 update.

Your changes have been saved
Email Is sent
Please verify your email address.
You’ve reached your account maximum for followed topics.
One Fallout Character Who Appears In Every Game Is A Clear Exclusion From The TV Show
10 harsh realities of playing fallout 4, 8 best weapons in fallout 4 (& how to get them).
- Fallout 4 's latest update has frustrated players, breaking the game further despite attempts to fix issues.
- Bethesda has received backlash on X for the "pathetic" update, with players calling for no future updates.
- Console users are happy with new features, while PC players may need to wait for modders to fix issues.
Despite its rekindled popularity, Fallout 4 just can't seem to catch a break as Bethesda's latest update manages to break the game even more , angering veterans and newcomers alike. Following the success of Prime Video's streaming series , Fallout 4 has seen a massive resurgence in players as the most recent dedicated single-player RPG in the franchise and while that's been a boon for the community, the recent "next-gen" patches have only hampered the experience. The latest release, which was meant to fix many of the game's most recently introduced problems, has only managed to make things worse.
Over on X (formerly Twitter), Fallout 4 players have lashed out at Bethesda for releasing what many are deeming a " pathetic " attempt at improving the game.
User PC_Nation_ complained that the latest patch managed to break the community's most popular mods just a few days after many of the add-ons were reworked to be compatible with the "next-gen" update. Players have even taken to requesting that Bethesda just leave the game alone, demanding that no future updates be released, and are instead turning to the aforementioned modders to fix any of the lingering issues.
There's a lot to love about Fallout 4, but there are also plenty of problems that have persisted over the years, especially compared to alternatives.
Fallout 4 Still Needs Some Work
The commonwealth needs love too.
While the latest update may have proven ineffective in addressing many of the problems introduced in previous patches, Bethesda's intentions were sound as the studio delivered some long-requested features for console users. It's worth noting that while PC players have expressed anger toward the studio, those on PlayStation 5 and Xbox Series X|S are generally happy with the improvement , especially the inclusion of a new option that allows graphic fidelity and performance to be adjusted. The addition of a Frame Rate Target feature on consoles has also been hailed as a success.
PC players may be eager to return to the Commonwealth and pick up their Fallout 4 journey but it might be worth waiting for a few days before booting up the game. It's possible that Bethesda will release another patch to correct some of the issues introduced in the latest update. Failing that, the modding community is undoubtedly already working hard on mending some of the broken features to ensure that the experience is as smooth as possible for old and new Sole Survivors alike.
As for whether Fallout 4 will receive any new content updates, it remains unknown whether Bethesda has any plans in that regard. The success of the Prime Video series resulted in an update that introduced new items and an entirely original questline , so should the game maintain its popularity, it's not impossible that more will be added in the coming months. If not, fans can always turn to Fallout 76 , the survival MMO that has managed to turn itself around from its disastrous launch in 2018.
Source: PC_Nation_/X , samurai49er/X
- Manage Account
Taylor Swift Wears Kansas City Chiefs Colors at Paris Eras Show With Travis Kelce in the Audience
Plus, the tight end held up a hand heart during the pop star's performance of "The Alchemy."
By Hannah Dailey
Hannah Dailey
- Share this article on Facebook
- Share this article on Twitter
- Share this article on Flipboard
- Share this article on Pinit
- + additional share options added
- Share this article on Reddit
- Share this article on Linkedin
- Share this article on Whatsapp
- Share this article on Email
- Print this article
- Share this article on Comment
- Share this article on Tumblr

Taylor Swift had the perfect outfit for her final Eras Tour show in Paris, considering who was in the audience. The pop star appeared in Kansas City Chiefs colors for the 1989 set of her performance Sunday (May 12), and tight end Travis Kelce adorably jammed out to his superstar girlfriend’s show from the crowd at La Defense Arena.
Taylor Swift’s Eras Tour Kicks Off Its European Leg in Paris: Photos From the…
Trending on billboard.
Following the 1989 set, Swift performed a series of songs from The Tortured Poets Department for just the fourth time so far. Fan videos captured Kelce smiling and dancing along to “So High School,” which many think the singer wrote about the athlete. During the number, she and her dancers swag surf as part of the choreography, a sweet tribute to Chiefs Kingdom.
Later, Swift sang another Tortured Poets track believed to be about Kelce as a surprise song — “The Alchemy” — which she mashed up with Red ‘s “Treacherous.” While she strummed on the guitar, the Ohio native swayed and held up a cute hand heart at the 14-time Grammy winner.
All the Surprise Songs Taylor Swift Has Performed on The Eras Tour (So Far)
See a photo of Swift’s Chiefs-themed outfit, plus videos of Kelce enjoying the show, below.
Bradley Cooper, Gigi Hadid, and Travis Kelce at #TheErasTourParis #ErasTourParis pic.twitter.com/WiXyITG8zV — trey (@treyfenwick) May 12, 2024
Travis Kelce hearing So High School at @taylorswift13 #TheErasTour #TheErasTourParis pic.twitter.com/9RQIP9Ay77 — trey (@treyfenwick) May 12, 2024
🏟️| Travis was really feeling "The Alchemy" 🥰 pic.twitter.com/DNQI1bnhaN — Taylor Swift Updates 🩶 (@swifferupdates) May 12, 2024
‼️| Travis Kelce reacting to "Karma is the guy on the Chiefs" atthe last show in France #ParisTSTheErasTour pic.twitter.com/wB785GrOeL — The Swift Society (@TheSwiftSociety) May 12, 2024
Get weekly rundowns straight to your inbox
Want to know what everyone in the music business is talking about?
Get in the know on.
Billboard is a part of Penske Media Corporation. © 2024 Billboard Media, LLC. All Rights Reserved.
optional screen reader
Charts expand charts menu.
- Billboard Hot 100™
- Billboard 200™
- Hits Of The World™
- TikTok Billboard Top 50
- Song Breaker
- Year-End Charts
- Decade-End Charts
Music Expand music menu
- R&B/Hip-Hop
Videos Expand videos menu
Culture expand culture menu, media expand media menu, business expand business menu.
- Business News
- Record Labels
- View All Pro
Pro Tools Expand pro-tools menu
- Songwriters & Producers
- Artist Index
- Royalty Calculator
- Market Watch
- Industry Events Calendar
Billboard Español Expand billboard-espanol menu
- Cultura y Entretenimiento
Get Up Anthems by Tres Expand get-up-anthems-by-tres menu
Honda music expand honda-music menu.
- skip navigation KendoReact Product Bundles DevCraft All Telerik .NET tools and Kendo UI JavaScript components in one package. Now enhanced with: NEW : Design Kits for Figma
Top 5 VS Code Extensions for React Developers
VS Code extensions let you add tools to your VS Code installation to support your development workflow. This article covers the top five VS Code extensions to speed up your React app development process.
VS Code extensions let you add debuggers and tools to your VS Code installation to support your development workflow. This extensibility model is one of the reasons many React developers choose VS Code. There are many extensions that help improve our development workflows as web developers. This article will cover the top five VS Code extensions to speed up your React app development process.

ESLint is a pluggable linting utility for JavaScript and JSX. It statically analyzes your code to quickly find and fix problems, avoid bugs and make your code more consistent and readable.
The VS Code ESLint extension integrates ESLint into VS Code. Search for ESLint in the extensions tab in VS Code and install it, or use this link to install it .
It uses the ESLint library installed in the opened workspace folder. If the folder doesn’t provide one, the extension looks for a globally installed version. Refer to the ESLint documentation for a guide on setting up ESLint for your project.
2. Prettier

Prettier is an opinionated code formatter that enforces a consistent style in your code. The Prettier extension makes it easy to configure the editor to format your code when you save it. Install the extension through VS Code extensions by searching for Prettier - Code formatter or using the web link .
If you’d like to toggle the formatter on and off, install vscode-status-bar-format-toggle .
3. npm Intellisense

npm Intellisense is a plugin that provides autocomplete for npm modules in import statements. All the imports for npm modules get automatically handled with this extension, thereby reducing your keystrokes.
You can install npm Intellisense by going to VS Code marketplace and searching for npm Intellisense , or by searching for it in the extensions window in VS Code.
4. Import Cost

Import Cost is used to display inline in the editor the size of the imported package. It uses webpack to detect the imported size and helps you become aware of the size of the modules you’re using.
You can install Import Cost using VS Code marketplace by searching for the Import Cost extension and clicking the install button.
Here’s an example that shows the difference in size when you import the uniqueId lodash function.

5. Simple React Snippets

Simple React Snippet is a collection of React Snippets and commands. It enables you to tab out shortcodes into code snippets.
You can install it using this link or search for Simple React Snippets in the extensions window in VS Code.
Bonus: Tailwind CSS IntelliSense

I know I promised you five, but this last snippet is one many React developers who love and use Tailwind CSS will appreciate.
Tailwind CSS IntelliSense is a tool that enhances the Tailwind development experience by providing VS Code users with advanced features such as autocomplete, syntax highlighting and linting. You can get it using this link or by searching for Tailwind CSS IntelliSense in the VS Code extensions marketplace.
VS Code has a large extension marketplace where you can find many extensions suitable for React developers. This article covered the top five VS Code extensions I’d recommend for speeding up your React app development process.
I hope this article helps make your development journey more enjoyable.

Peter Mbanugo
Peter is a software consultant, technical trainer and OSS contributor/maintainer with excellent interpersonal and motivational abilities to develop collaborative relationships among high-functioning teams. He focuses on cloud-native architectures, serverless, continuous deployment/delivery, and developer experience. You can follow him on Twitter .
Related Posts
React 19 beta released, 7 common mistakes when using react hooks, react basics: getting started with react and graphql, all articles.
- ASP.NET Core
- ASP.NET MVC
- ASP.NET AJAX
- Blazor Desktop/.NET MAUI
- Design Systems
- Document Processing
- Accessibility

Latest Stories in Your Inbox
Subscribe to be the first to get our expert-written articles and tutorials for developers!
All fields are required
Progress collects the Personal Information set out in our Privacy Policy and the Supplemental Privacy notice for residents of California and other US States and uses it for the purposes stated in that policy.
You can also ask us not to share your Personal Information to third parties here: Do Not Sell or Share My Info
By submitting this form, I understand and acknowledge my data will be processed in accordance with Progress' Privacy Policy .
I agree to receive email communications from Progress Software or its Partners , containing information about Progress Software’s products. I understand I may opt out from marketing communication at any time here or through the opt out option placed in the e-mail communication received.
By submitting this form, you understand and agree that your personal data will be processed by Progress Software or its Partners as described in our Privacy Policy . You may opt out from marketing communication at any time here or through the opt out option placed in the e-mail communication sent by us or our Partners.
We see that you have already chosen to receive marketing materials from us. If you wish to change this at any time you may do so by clicking here .
Thank you for your continued interest in Progress. Based on either your previous activity on our websites or our ongoing relationship, we will keep you updated on our products, solutions, services, company news and events. If you decide that you want to be removed from our mailing lists at any time, you can change your contact preferences by clicking here .
We earn a commission for products purchased through some links in this article.
Rylan responds to unexpected reaction to his new BBC show
He travels across Italy with Rob Rinder.
The pair joined forces for Rob and Rylan’s Grand Tour , a three-part series where they travel across Italy, using Lord Byron’s poems to guide them along the way as they stop off in Venice, Florence and Rome.
Following the release of the show on BBC iPlayer, Rylan took to social media to thank fans for their positive messages, writing on X/Twitter : “Wow, we never expected this reaction to the show. Thank you so much for the love. It’s so welcome x”

Related: Rylan Clark reveals he's dating again after divorce
The post itself received several comments from fans, with one happy viewer responding : “I loved it. It's interesting and educational. Funny and sad. You two are the nicest of people. Your honesty when you both share your experiences and feelings is so emotional. Can't wait for the next episode.”
“What an absolute joy it’s just been to watch your new show with Rob Rinder… I’ve always thought you were a joy inside and out but seeing a new side to you.. a deeper side has been a true pleasure! Can’t wait to watch the rest!! Love ya Rylan x” added another fan .
“It was fun, poignant and refreshing. (In fact, it was just like an Aperol). I can already tell that 3 episodes is nowhere near enough” wrote another viewer , with another one adding : “Best thing I’ve watched in ages! You pair are the friendship we didn’t know we needed! Laughed and cried all through that. Can’t wait to see more!”
Related: Rylan Clark compares his brand-new show to Big Brother
Ahead of the show’s launch, Rylan expressed his excitement at the prospect of working – and travelling – alongside Rinder , saying: “When I found out that Rob and I actually get to go travelling around Italy for the Grand Tour, I couldn't have packed my suitcase quicker.
“We're not going to be your typical Brits abroad though, as we properly immerse ourselves in all of Italy's cultural offerings. Rob will be teaching me all about Italian history and art as we follow in the footsteps of the cultural greats, while I show Rob how to dance on bars.”
Rob and Rylan’s Grand Tour streams on BBC iPlayer and airs on BBC Two on Sundays at 9pm.
May 2024 gift ideas and deals

Buy Zendaya's 'I Told Ya' Challengers t-shirt

Amazon Music Unlimited – 30-day free trial

Digital Spy Holidays - trips with TV experts

Audible, 50% off for 4 months

Watch the Fallout TV show for free

Buy Alison Hammond's outfits

Apple TV+ 7-day free trial

Sign up for Disney+

PS5 Slim Consoles

Buy Cat Deeley's This Morning outfits

Crunchyroll 14-day free trial
Shop Sky TV, broadband and mobile
Reporter, Digital Spy George is a freelance writer who specialises in Movies and TV. After graduating with a degree in Film Studies and Journalism from De Montfort University, in which he analysed the early works of Richard Linklater for his dissertation, he wrote for several websites for GRV Media. His film tastes vary from blockbusters like Mission: Impossible and John Wick to international directors such as Paolo Sorrentino and Hirokazu Kore-eda, and has attended both the London and Berlin film festivals.

.css-15yqwdi:before{top:0;width:100%;height:0.25rem;content:'';position:absolute;background-image:linear-gradient(to right,#51B3E0,#51B3E0 2.5rem,#E5ADAE 2.5rem,#E5ADAE 5rem,#E5E54F 5rem,#E5E54F 7.5rem,black 7.5rem,black);} Strictly Come Dancing

Strictly's Gorka Márquez reveals accent criticism

Bobby Brazier unveils short hair transformation

Strictly's Oti marks touching motherhood milestone

Strictly was "too late" on same-sex pairings

Strictly's Graziano shares sweet throwback photo

Strictly's Layton Williams lands new stage role

Strictly judge calls dancer his 'archenemy'

Strictly's Katya on "never-ending" single topic

Zoe Ball posts tribute to late boyfriend

Strictly star reveals her rule for couple's show

Strictly's Faye Tozer lands iconic stage role
By clicking Sign In, you agree to our Terms and Conditions and that you have read our Privacy Policy .
Sign In Up with your social account
We won't post to any of your accounts
Your password must include:
- Min 8 characters
- Min 1 lowercase character
- Min 1 uppercase character
- Min 1 number
Taylor Swift Fans Go Crazy Watching Travis Kelce Reacting to the ‘Vigilante S—t’ Choreography

Travis Kelce is (still) living his best life at girlfriend Taylor Swift ’s Eras Tour — and the fans can’t stop recording his reactions.
A video taken during the Paris Eras Tour on Sunday, May 12, at France’s Paris La Défense Arena showed Kelce, 34, dancing along while Swift, 34, performed her sultry dance number to “Vigilante S–t.” At one point, he could be seen cupping his hands around his mouth and cheering for the singer.
It appeared Kelce was having the time of his life as he stood next to Swift’s BFF Gigi Hadid , who was genuinely rocking out to the tune. While Kelce had a more subdued reaction to the performance, he definitely liked what he saw.
Since Swift kicked off her Eras Tour in March 2023, fans have become obsessed with the choreography to “Vigilante S–t” — perhaps her sexiest moves yet . The dance features Swift dancing on a chair, and the moves have definitely become sexier as the tour continues.
WE FINALLY HAVE HIS REACTION TO VIGILANTE SHIT pic.twitter.com/WKD71WpzkM — z-Tiffani 🤍 (@TayvisHeaven) May 13, 2024
“She has told me she really loves ‘Vigilante [S–t],’ like, she really loves that one!” Mandy Moore , who choreographed the Eras Tour , told Page Six in November 2023.
That same month, Swifties lost their mind after video of both Kelce and Swift’s father, Scott Swift , reacting to the “Vigilante S–t” dance during an Argentina Eras Tour show. The men were standing next to each other as Swift performed the song. As Kelce sang along, Scott, 71, leaned over and whispered something in the NFL star’s ear.
Kelce’s reaction to the song comes after eagle-eyed fans noticed that this particular the “old” Midnights bodysuit had returned in Paris with some apparent alterations. Some social media users have claimed that this particular outfit has been “altered in the back” and Swift is now showing more of her tight-clad backside.

Related: Celebrities Who Attended Taylor Swift’s ‘Eras Tour’
Swift has worn a dark blue fringe outfit while performing tunes from her Midnights era throughout the duration of the Eras Tour , but there are four different variations. The outfit that made its return in Paris had been “missing for 17 shows,” according to one Swift fan account.
You have successfully subscribed.
Subscribe to newsletters
By signing up, I agree to the Terms and Privacy Policy and to receive emails from Us Weekly

Deal of the Day
Check our latest news in Google News
Check our latest news in Apple News

Kelce has made headlines for his relationship with Swift after they went public in September 2023. At the time, the singer attended one of Kelce’s Kansas City Chiefs football games, proving that she had no qualms about publicly supporting her man.
While the NFL is in the offseason, Kelce has returned the favor, jetting off to various cities to watch the Eras Tour .
“When you say a relationship is public, that means I’m going to see him do what he loves, we’re showing up for each other, other people are there and we don’t care,” Swift told TIME in December 2023, discussing her relationship . “The opposite of that is you have to go to an extreme amount of effort to make sure no one knows that you’re seeing someone. And we’re just proud of each other.”
In this article

Taylor Swift

Travis Kelce
More stories.
IMAGES
VIDEO
COMMENTS
Reactour is proud to be sponsored by Frigade, a developer tool for building better product onboarding: guided tours, getting started checklists, announcements, and more. Silver sponsors 🥈 Dopt gives developers UI components and SDKs to build seamless onboarding and education experiences in minutes.
Introduction. Before onboarding products became widespread, I found myself with the need to create a "tour" for new users of different projects, with a nice look and above all with the possibility to interact with existing elements of the page. Thus was born this project in 2017, trying to simplify the logic of intro.js with React ...
Tourist Guide into your React Components. Mask click. Example to show the customizable behavior of the Mask click event.Try clicking the Mask and the Tour will proceed to the next step.
3- Intro.js React. Intro.js is the biggest JavaScript library for web onboarding content (21K stars and 2.6K forks), and its React wrapper, Intro.js React, is out there for the interested. With Intro.js, you can both create simple product tours and in-app hints/ Angular tooltips easily, which is a great advantage over other libraries on the list.
React Tour library. React Tour has around 1.4k stars on Github and is moderately active. It has very nice UI if you need a simple product tour without much customization. If this is the case, React Tour UI will be good enough. You can view the demo for React Tour here. How it works. With React Tour, you pass the classname selector and content ...
React Tour. React Tour has around 1,600 stars on GitHub and is being actively developed. The best use case for React Tour is a simple product tour in which little customization is required. A demo is available.. How It Works. With React Tour, you pass the className selector and content for each step to the component. The library will render the tour's user interface based on a button click ...
TypeScript 65.9%. MDX 16.8%. JavaScript 14.4%. CSS 2.9%. Tourist Guide into your React Components. Contribute to elrumordelaluz/reactour development by creating an account on GitHub.
Let's create a React tour and see how it's done. First, we need to install the React Tour plugin (find it on Github here ). npm install --save reactour. In order to use the React Tour we need to import it in our application. We also need to impact useState, so that we can use a state variable in our functional component.
Control the Tour Then somewhere down the Application tree, control the Tour using useTour hook. import { useTour } from '@reactour/tour' function App () { const { setIsOpen } = useTour () return ( <> < p className = "first-step" > Lorem ipsum dolor sit amet, consectetur adipiscing elit.
Here are five of the best React onboarding libraries for engineering teams creating custom, native user onboarding experiences: 1. Intro.js. Intro.js is a lightweight, user-friendly library that lets you embed step-by-step customer onboarding tours on your website.
For React JS web applications. 1. Intro.js. Intro.js is one of the most popular libraries for building JavaScript onboarding tours. It also comes with a React wrapper that allows you to deploy tours for your React application. Intro.js is free for non-commercial projects, and for commercial use, it requires a one-time fee that starts at $9.99.
Product tours, especially for really big web apps, require customization, and that sets React Joyride apart from other libraries. Building A Simple Product Tour We'll be covering the following ...
The Reactour component lets you create an interactive guided tour for your web app. Installation: # Yarn $ yarn add reactour # NPM $ npm install reactour --save Usage: Import the component. import Tour from 'reactour' Add the component (with your own tours) to your web app.
Guide your users through a tour of your app. GitHub Docs Blog Pro Pricing Contact Guide your users through a tour of your app. ... Shepherd is ready to drop into your application using React, Ember, Angular, Vue.js, ES Modules, or plain Javascript! 01. How to Include
1. npmistyled - components@ ^ 4.0.0. 3. Create guided tours for react app. To create guided tours, we have to list out the steps and add the styles for the UI. Here, we will create a separate component called WebTour.js and import it in the root file. WebTour.js. 1. 2.
React Joyride Demo is a webpage that shows how to use react-joyride, a library that creates guided tours for React apps. You can learn how to customize the steps, components and props of your tours.
React Shepherd is a really great tool for site creating site tours in a React app. In this tutorial, we have used it to create a site of a dashboard site created with React. There are many other libraries available for creating site tours, including React Tour and React Joyride, vue-tour for Vue projects, the Driver.js library, and more. Among ...
Create awesome tours for your app! Showcase your app to new users or explain the functionality of new features. It uses react-floater for positioning and styling. You can also use your own components. Open the demo Open GitHub repo. Setup. Copy npm i react-joyride. Getting Started. Copy
Tells the tour to jump to the specified step index. next* => void: Advances the tour by a single step. prev* => void: Returns the tour to the previous step. close* (reset: boolean) => void: Closes the tour. The optional reset argument controls whether or not the tour should be set back to its initial state, or remain on the current step ...
R-onboarding is a lightweight yet customizable onboarding & guided tour component for React. It's an introduction view with a walkthrough that guides your users to set up a new account, sign up, install your app, introduce new features, or start playing a game. How to use it: 1. Installation. # Yarn $ yarn add r-onboarding # NPM $ npm i r ...
React Joyride is a popular library for creating guided tours for your React applications. It allows developers to select DOM elements and prompt a tooltip, pointing and explaining what that element is. React Joyride was created by Gilbarbara and had its first version released in 2016. So far has amassed over 4.7k stars on Github.
Jordan Spieth watches his shot from the second tee during the second round of the 2024 CJ Cup Byron Nelson. (Photo: Jim Cowsert-USA TODAY Sports) Spieth, age 30 and seventh on the all-time career money list with $62 million, is a fellow player- director on the Tour policy board. He was asked about the player equity program during his pre ...
Tourist Guide into your React Components. This documentation is for the latest releases, which uses npm scoped package (opens in a new tab) @reactour.The original reactour package is now on branch v1 and its documentation can be found here (opens in a new tab).
The Kansas City Chiefs star lent his support during Taylor Swift's final Eras Tour stop in Paris on Sunday. ETOnline. See Travis Kelce React to Taylor Swift Performing Songs Rumored to Be About ...
Summary. Fallout 4 's latest update has frustrated players, breaking the game further despite attempts to fix issues. Bethesda has received backlash on X for the "pathetic" update, with players calling for no future updates. Console users are happy with new features, while PC players may need to wait for modders to fix issues.
Taylor Swift had the perfect outfit for her final Eras Tour show in Paris, considering who was in the audience. The pop star appeared in Kansas City Chiefs colors for the 1989 set of her ...
This article will cover the top five VS Code extensions to speed up your React app development process. 1. ESLint. ESLint is a pluggable linting utility for JavaScript and JSX. It statically analyzes your code to quickly find and fix problems, avoid bugs and make your code more consistent and readable. The VS Code ESLint extension integrates ...
Rylan Clark has thanked his fans following the reaction to his new travel show with Rob Rinder. The pair joined forces for Rob and Rylan's Grand Tour, a three-part series where they travel ...
Travis Kelce is (still) living his best life at girlfriend Taylor Swift's Eras Tour — and the fans can't stop recording his reactions. A video taken during the Paris Eras Tour on Sunday, May ...