- Press Releases
- Industry News
- Product Spotlight
- Fresh from Apple
- Video Production
- Installation Videos
- Explainer Videos
- Testing Lab
- Networking & Security
- Special OWC Deals
- The Other World
- Powered by OWC
- Space & Beyond
- Random Thoughts & Topics
- OWC Unplugged
- Article Archives
- Make a Suggestion

Send us a Topic or Tip
Have a suggestion for the blog? Perhaps a topic you'd like us to write about? If so, we'd love to hear from you! Fancy yourself a writer and have a tech tip, handy computer trick, or "how to" to share? Let us know what you'd like to contribute!
How to Take a Screenshot of an Entire Webpage in Safari on a Mac

Taking screenshots of a webpage is a normal operation for many. Perhaps it’s to capture an image for a meme, graphs for a presentation, or to send that annoying error message to a disbelieving customer service rep. Whatever the reason, some of the standard Mac screenshot options may not do the trick.
Most of us are familiar with Shift-Command-3 to capture the entire screen, or Shift-Command-4 to capture a selected portion of a screen. You may even be familiar with Shift-Command-5 to capture a single window. But what if you want to take a scrolling screen capture of an entire webpage? The aforementioned tools can’t do that – they can only capture visible areas of your screen. So, is it even possible to take a screenshot that includes a portion of a webpage you would normally need to scroll to see?
Yes, there is! But it does take a few extra steps than just executing a single keystroke combination.
Screenshot a Webpage
- Open Safari and go to “ Safari > Preferences… “
- Click the Advanced tab and toggle on “ Show Develop menu in menu bar .”

- Navigate to the webpage you want to capture and from the Develop menu, choose “ Show Web Inspector .” Alternatively, you can hit alt-command-I (⌥⌘I).

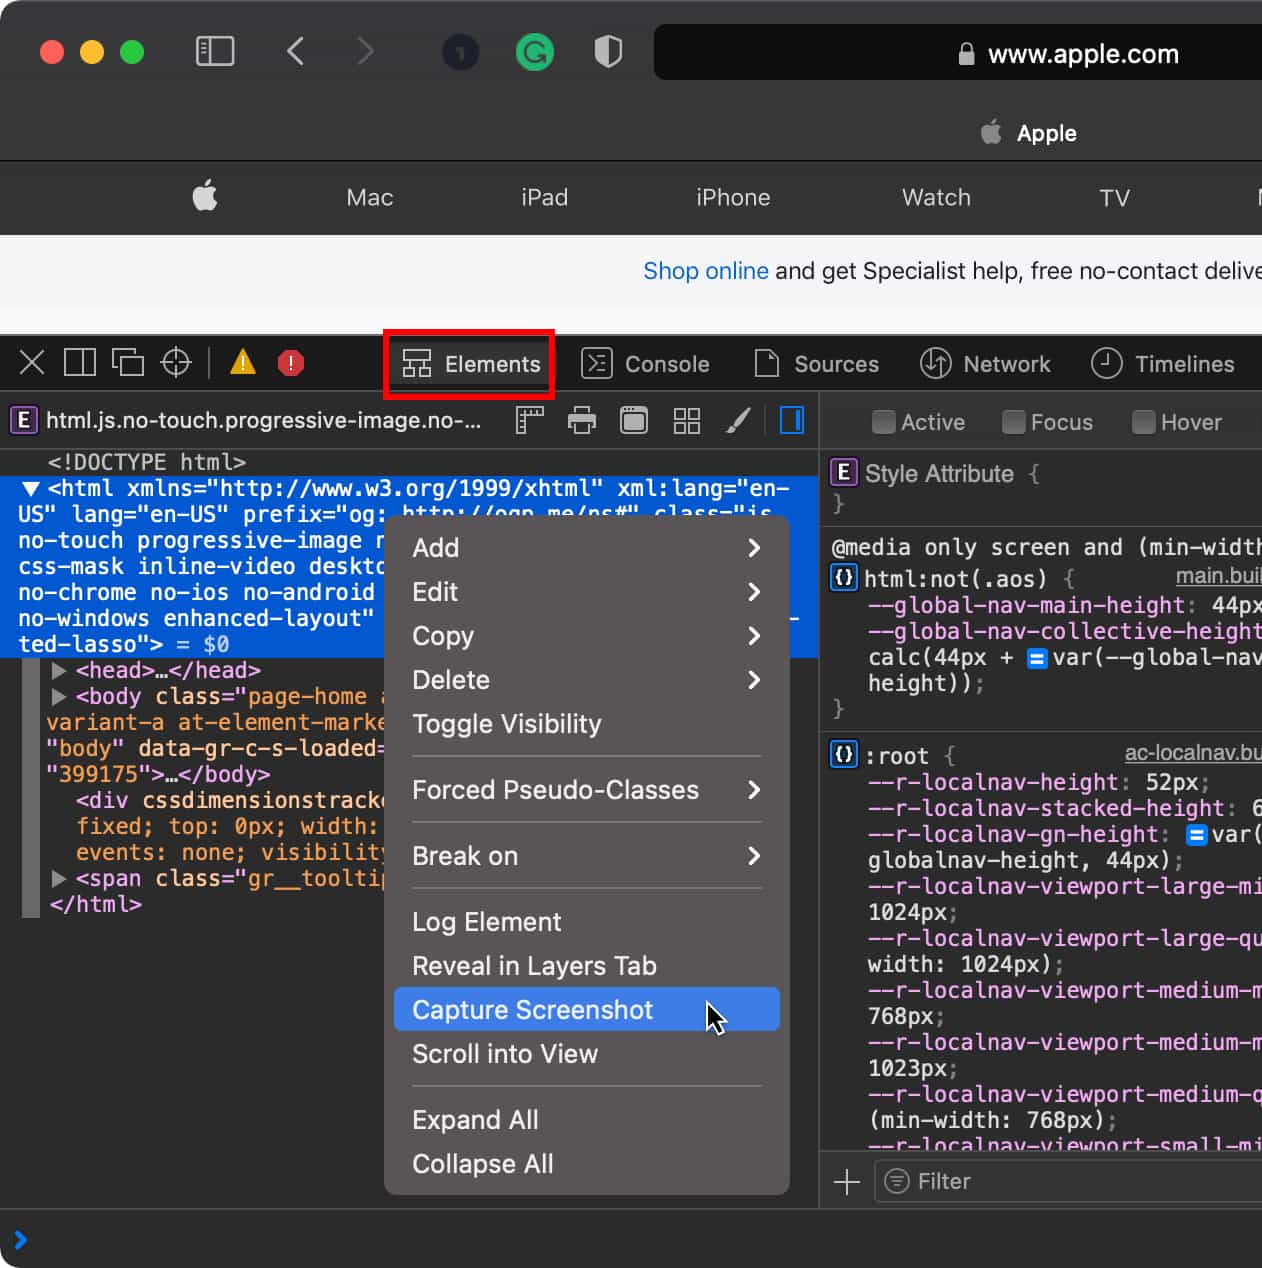
- Select the Elements tab and right-click on the line that begins with “<html…”
- Choose Capture Screenshot
- Give it a moment to do it’s magic, and then select a name and location to save the file.

All done! Well, almost…
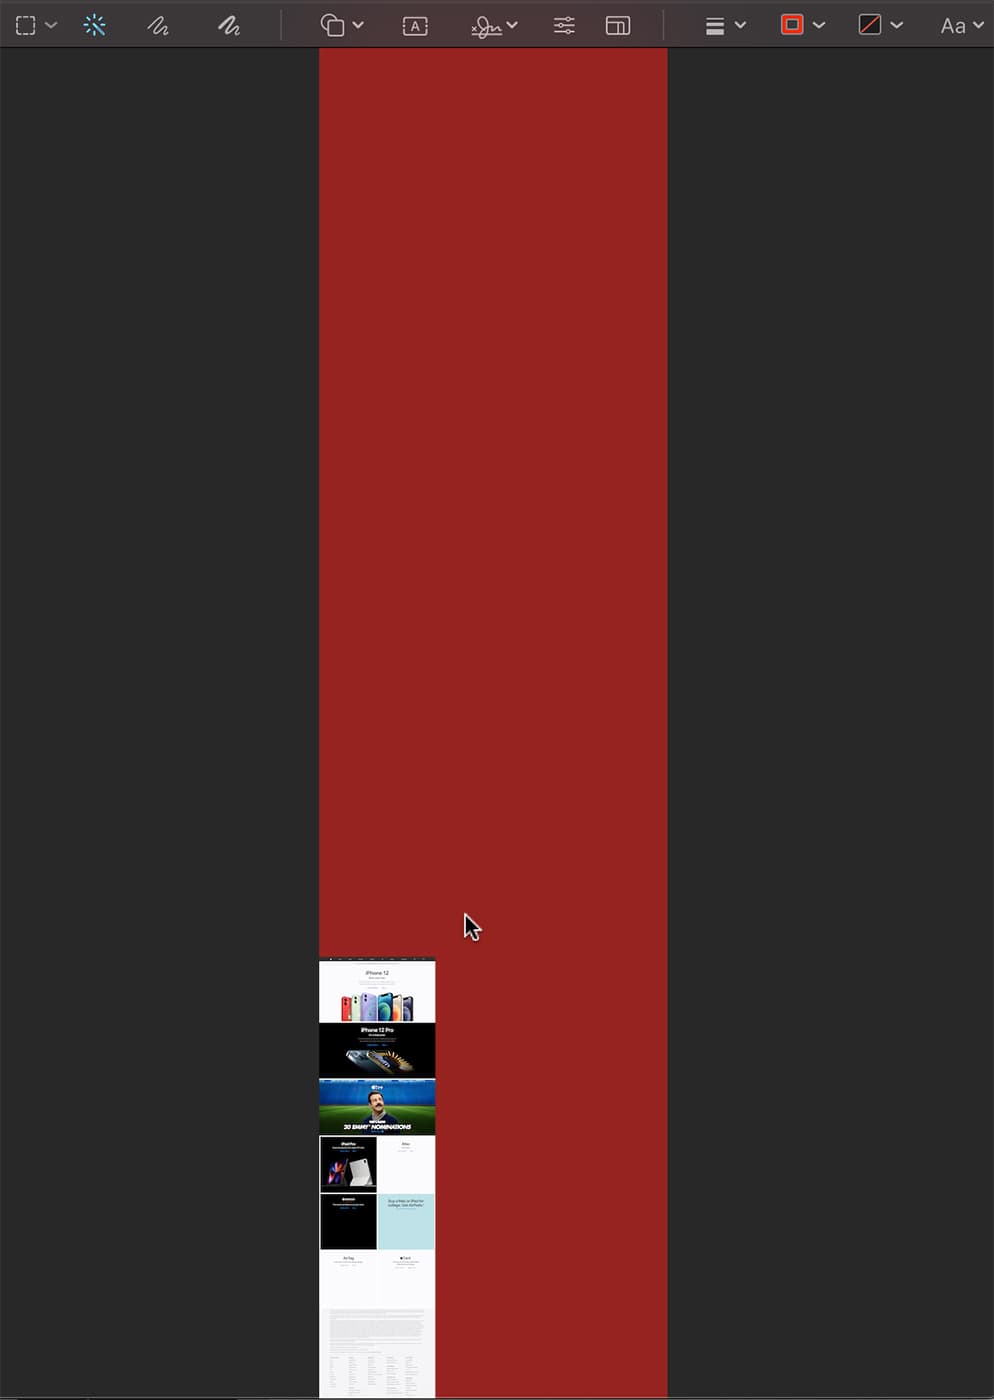
This could just be an issue I run into, but when capturing entire pages in this manner, there is a lot of empty container buffer around the image in the PNG file. You can see this in the Quick Preview of the file:

Let’s fix that.
- Open the file in Preview . If Preview is already your default application to open PNG files, you can simply double-click its icon.

- Drag the crosshairs in the empty area around the image. You’ll see the empty space selected and highlighted in red. Drag too far, and you’ll pick up the image itself. Don’t do that, we only want to select the empty area.
- When you let go of the mouse button, the highlighted color will disappear and be replaced with a dotted line indicating the selected area.

- Hit Shift-Command-I (⇧⌘I) to invert the selection.

- Hit Control-K (⌘K) to crop the image to the selection.
- Now you can hit Save (⌘S) and you truly are done. One cleaned up screenshot of an entire webpage.

Related Links
- macOS 101: What’s in the Utility Folder, Part 2
- Friday Five: Apple Webpages You Should Bookmark Right Now
- Using Activity Monitor Part 1: CPU and Memory
- Your Mac Doesn’t Want to Empty the Trash? Make It!
- How to Print a Webpage Without Ads and Backgrounds on a Mac
Other Topics You Might Like:

Leave a Reply Cancel reply
Save my name, email, and website in this browser for the next time I comment.
Notify me of follow-up comments by email.
Notify me of new posts by email.
13 Comments
OH man, Thank you so much for this post. it really helped me and saved a lot of my time.
Thanks for the helpful screen capture. I cannot get the clean up to work. The Shift+Command+I doesn’t work and I cannot get the Control+K to work. Can select the red area but that’s it.
Hoping you can help.
You show us how to capture OTHER web pages but NOT your own? That’s not cool dudes! If its not NOT for you, its not OK for anyone, right?
on Catalina, the part involving Preview to crop the image was a bit different, but I figured it out. Click on the show Markup Toolbar icon, then click on Rectangular Selection, then draw a box around the bit of interest, then click on “crop” in the toolbar. Repeat if needed. Zoom as needed.
Thanks for the insight!
Tried it on the article and when I try to pen saved .png I get message that either file is corrupted or can’t open the file format.
I ran into this also, then I quickly realized the file does not have the .png extension. Recaptured the screen and ensured when renaming the file, I added .png. Opened as a webpage though not as a preview. Still to figure out how to set preview as the default file opener for png files.
I’ve often wanted to do this. However, on this very page, while the initial steps seem to work, the resulting .png is un-openable by Preview or Pixelmator Pro or Quicklook. (“It may be damaged or use a file format that Preview doesn’t recognize.”)
File->Print->Save as PDF, and File->Export as PDF work as expected in Safari (full HTML-rendered page) with the added features of selectable text and extractable images in the PDFs (for those memes y’all). ~Tim~ macOS Big Sur, 11.4 Safari 14.1.1
Awesome tip! These are the articles that make it worthwhile to keep visiting Rocket Yard of OWC. Thanks. BTW an application to do it is Paparazzi! (but it does not work in all cases) https://derailer.org/paparazzi
I just tried that same Apple webpage with Safari 14.1.1 in OS 11.4. Went to File > Export as PDF… and bingo! Got a nice high-res 8.2MB PDF on my desktop instantly. Image is clean, no unexpected margins.
That works! Thank you!
Huh. I just tried that in Mojave with the latest Safari (14.1.2), using this webpage for the test.
I end up with a 20.6mb file ending in .PNG format, but which will not open. It’s either “damaged” or in a format that Preview can’t open.
In most other applications, this function would be easily performed using the Print button, and then Save as PDF. It is truly unfortunate that web developers have blocked the normal Print functionality on the web.
You Might Also Like

Apple Intelligence: System-Wide AI with Personal Contextual Awareness. Here Are the New AI Features Coming to iPhone, iPad, and Mac

macOS Sequoia’s Awesome New iPhone Mirroring Lets You Use Your iPhone Even if Your iPhone is in Another Room

Apple Unveils iOS 18, iPadOS 18, watchOS 11. Here Are All the New Features

Quick Review: OWC Atlas Pro CFExpress Type A Stuns With Speed in Sony A7R V
Email Address
- Brand Assets
8 Galaxy Way Woodstock, IL 60098 1-800-275-4576 +1-815-338-8685 (Int)
All Rights Reserved, Copyright 2020, OWC – Since 1988 | Terms of Use | Privacy Policy
We use cookies to provide you with a full shopping experience, including personalized content, and to help us improve your experience. To learn more, click here .
By continuing to use our site, you accept our use of Cookies, Privacy Policy and Terms of Use .
- a. Send us an email
- b. Anonymous form
- Buyer's Guide
- Upcoming Products
- Tips / Contact Us
- Podcast Instagram Facebook Twitter Mastodon YouTube Notifications RSS Newsletter
How to Screenshot An Entire Webpage on Mac
In iOS, Apple's Safari browser includes a built-in screenshot feature that lets you capture entire webpages on your iPhone or iPad for sharing elsewhere.

Note that in step 4, you can drag or click on the page to select a region and then save just that region by clicking Download , or you can save just the visible area of the page by clicking Save visible in the top-right corner.
Tip: You can also customize the Firefox toolbar to add a Screenshot button. Click the Menu button (three lines) in the top-right corner of the browser window. A special tab will open, where you can drag and drop items in or out of the overflow menu and the toolbar. Simply drag the Screenshot item (the cutting scissors icon) to the toolbar, then click Done .
Get weekly top MacRumors stories in your inbox.
Popular Stories

Alleged First Look at Apple Watch X / Series 10 With 2-Inch Display

Apple Releases New Firmware for AirPods, AirPods Pro, AirPods Max and More

iOS 18 to Bring These 5 New Features to AirPods Pro

Everything New in iOS 18 Beta 2

International Roaming Outage Affecting Verizon, AT&T, T-Mobile Customers [Updated]
Next article.

Our comprehensive guide highlighting every major new addition in iOS 17, plus how-tos that walk you through using the new features.

Apple News+ improvements, cross-platform tracker alerts, website app downloads for the EU, and more.

Get the most out your iPhone 15 with our complete guide to all the new features.
A deep dive into new features in macOS Sonoma, big and small.

Updates to Mail, Photos, Messages, and more, with Apple Intelligence features throughout.

iPhone Mirroring, Safari improvements, new Passwords app, and Apple Intelligence features throughout.

Apple Intelligence features, Smart Script handwriting refinement, Calculator app, and more.

New hand gestures, rearrange apps in Home View, larger Mac Virtual Display, and more.
Other Stories

1 day ago by Tim Hardwick

3 days ago by Tim Hardwick

1 week ago by Tim Hardwick
How To Take A Screenshot On Safari

- Software & Applications
- Browsers & Extensions

Introduction
Taking a screenshot is a handy skill that allows you to capture and save a snapshot of what's displayed on your screen. Whether you want to preserve a memorable moment, share information with others, or keep a record of important details, knowing how to take a screenshot on Safari can be incredibly useful. Safari, the default web browser for Apple devices, offers several methods for capturing screenshots, each with its own unique advantages. In this article, we'll explore three simple and effective ways to take a screenshot on Safari, empowering you to effortlessly capture and save images of web pages, online articles, or any other content you encounter while browsing the internet.
By mastering these screenshot techniques, you'll be equipped to capture and share visual information with ease. Whether you're a student needing to save excerpts from online research, a professional seeking to document web content for presentations, or simply someone who wants to preserve memorable online moments, the ability to take screenshots on Safari will prove to be a valuable skill. So, let's dive into the methods and learn how to capture and save screenshots using Safari on your Apple device.
Method 1: Using Keyboard Shortcuts
Capturing a screenshot on Safari using keyboard shortcuts is a quick and convenient method that allows you to capture the entire screen, a specific window, or a selected portion with ease. These keyboard shortcuts are intuitive and can be executed seamlessly, making them a popular choice for many users.
Full Screen Screenshot
To capture the entire screen, simply press the Command + Shift + 3 keys simultaneously. Upon doing so, Safari will instantly capture a screenshot of the entire screen, including the browser window and any open tabs or applications in the background. The captured image will be automatically saved to your desktop, ready for you to access and utilize as needed.
Screenshot of a Specific Window
If you wish to capture a screenshot of a specific Safari window, such as a single browser tab, you can do so by pressing Command + Shift + 4 followed by the Spacebar . This combination will transform your cursor into a camera icon, allowing you to click on the desired Safari window to capture a screenshot of it exclusively. Once captured, the image will be saved to your desktop, providing you with a focused snapshot of the selected Safari window.
Custom Selection Screenshot
For scenarios where you only need to capture a specific portion of the Safari window, the keyboard shortcut Command + Shift + 4 enables you to create a custom selection screenshot. Upon pressing this combination, your cursor will transform into a crosshair, empowering you to select the exact area of the Safari window that you want to capture. Once the selection is made, releasing the mouse or trackpad will trigger the screenshot to be saved to your desktop, offering you a tailored image of the chosen portion.
By leveraging these keyboard shortcuts, you can efficiently capture screenshots while browsing on Safari, empowering you to preserve and share valuable visual information effortlessly. Whether you need to capture the entire screen, a specific window, or a custom selection, the keyboard shortcuts in Safari provide a seamless and efficient way to capture and save screenshots, enhancing your browsing experience and productivity.
Method 2: Using the Screenshot Toolbar
Another convenient method for capturing screenshots on Safari is by utilizing the built-in Screenshot Toolbar. This feature, introduced in macOS Mojave and later versions, offers a user-friendly interface that simplifies the process of taking screenshots while browsing. The Screenshot Toolbar provides various options for capturing specific portions of the screen, adding annotations, and even recording video clips, making it a versatile tool for visual documentation.
To access the Screenshot Toolbar while using Safari, simply follow these steps:
Open Safari : Launch the Safari browser and navigate to the web page or content you wish to capture.
Activate the Screenshot Toolbar : Once on the desired page, press the Shift + Command + 5 keys simultaneously. This keyboard shortcut triggers the Screenshot Toolbar to appear at the bottom of the screen, presenting a range of screenshot and recording options.
Select Screenshot Type : Within the Screenshot Toolbar, you can choose from various screenshot options, including capturing the entire screen, a specific window, or a custom selection. By selecting the appropriate screenshot mode, you can tailor the capture to suit your specific needs.
Customize Screenshot Settings : The Screenshot Toolbar also allows you to customize additional settings, such as setting a timer for delayed captures, choosing the save location for screenshots, and enabling options for showing the mouse pointer in the screenshot.
Capture and Save : Once the desired settings are configured, simply click on the "Capture" button within the Screenshot Toolbar to initiate the screenshot. The captured image will be saved to the designated location, ready for you to access and utilize as needed.
The Screenshot Toolbar not only streamlines the process of capturing screenshots on Safari but also offers additional features for annotating and editing the captured images. After taking a screenshot, the Screenshot Toolbar provides options for adding text, shapes, and other annotations to the image, empowering you to highlight specific details or provide context to the captured content.
Furthermore, the Screenshot Toolbar enables users to record video clips of their screen, making it a comprehensive tool for visual documentation and communication. Whether you need to capture a static image of a web page or record a dynamic demonstration within Safari, the Screenshot Toolbar equips you with the necessary features to accomplish these tasks seamlessly.
By leveraging the Screenshot Toolbar in Safari, users can enhance their screenshot capabilities, benefiting from a user-friendly interface and versatile options for capturing, annotating, and recording visual content while browsing the web. This method provides a modern and intuitive approach to taking screenshots on Safari, catering to a diverse range of visual documentation needs.
Method 3: Using the Preview App
In addition to the keyboard shortcuts and the Screenshot Toolbar, Safari users can also utilize the Preview app, a versatile and feature-rich tool that offers advanced capabilities for capturing and editing screenshots. The Preview app, which comes pre-installed on macOS devices, serves as a powerful image viewing and editing application, and it includes seamless integration with Safari for capturing and annotating screenshots.
To utilize the Preview app for capturing screenshots while browsing on Safari, follow these simple steps:
Access the Preview App : Once on the desired page, navigate to the Applications folder or use Spotlight Search to locate and open the Preview app.
Capture the Screenshot : Within the Preview app, click on the "File" menu and select "Take Screenshot." This action will present options for capturing the entire screen, a specific window, or a custom selection.
Customize Screenshot Settings : After selecting the desired screenshot mode, the Preview app allows users to customize additional settings, such as setting a timer for delayed captures, choosing the save location for screenshots, and enabling options for showing the mouse pointer in the screenshot.
Annotate and Edit : Once the screenshot is captured, the Preview app provides a comprehensive set of tools for annotating and editing the image. Users can add text, shapes, arrows, and other annotations to highlight specific details or provide context to the captured content. Additionally, the app offers features for cropping, resizing, and adjusting the image, empowering users to refine the screenshot according to their preferences.
Save and Share : After annotating and editing the screenshot, users can save the image in their preferred format and share it with others as needed. The Preview app supports various image file formats, ensuring compatibility and flexibility in sharing the captured screenshots.
By leveraging the Preview app, Safari users can elevate their screenshot capabilities, benefiting from advanced annotation and editing features that enhance the visual documentation process. Whether you need to capture, annotate, or edit screenshots of web pages, online articles, or any other content within Safari, the Preview app provides a comprehensive solution for these tasks, empowering users to capture and customize visual content with precision and efficiency.
Incorporating the Preview app into your screenshot workflow expands your capabilities, allowing you to capture and refine screenshots seamlessly while browsing on Safari. This method offers a robust and versatile approach to capturing and editing screenshots, catering to a diverse range of visual documentation and communication needs.
In conclusion, mastering the art of taking screenshots on Safari opens up a world of possibilities for capturing and preserving visual content while browsing the web. By exploring the three methods outlined in this article, users can equip themselves with versatile and efficient techniques for capturing screenshots on Safari, each offering unique advantages and capabilities.
The keyboard shortcuts method provides a quick and intuitive way to capture screenshots, allowing users to effortlessly capture the entire screen, specific windows, or custom selections with ease. This method is ideal for those seeking a streamlined approach to capturing screenshots without the need for additional interfaces or tools.
The Screenshot Toolbar, introduced in macOS Mojave and later versions, offers a modern and user-friendly interface for capturing and annotating screenshots. With its versatile options for capturing specific portions of the screen, adding annotations, and even recording video clips, the Screenshot Toolbar caters to a diverse range of visual documentation needs, enhancing the screenshot experience on Safari.
Furthermore, the integration of the Preview app with Safari provides advanced capabilities for capturing, annotating, and editing screenshots. By leveraging the comprehensive set of annotation and editing tools offered by the Preview app, users can refine and customize their screenshots with precision, adding context and visual enhancements to the captured content.
By incorporating these methods into their workflow, Safari users can elevate their screenshot capabilities, benefiting from a range of options for capturing, annotating, and refining visual content with precision and efficiency. Whether it's capturing web pages, online articles, or dynamic content within Safari, the ability to take screenshots empowers users to preserve and share valuable visual information seamlessly.
In essence, the knowledge and proficiency in taking screenshots on Safari not only enhance individual productivity and documentation needs but also contribute to effective communication and collaboration. Whether you're a student, professional, or casual user, the ability to capture and share visual content with ease enriches the browsing experience and facilitates seamless information sharing.
By embracing these screenshot techniques, users can harness the power of visual documentation, preserving valuable moments, information, and insights encountered while browsing on Safari. With these methods at their disposal, users can confidently navigate the digital landscape, equipped with the tools to capture, annotate, and share visual content effortlessly.
Leave a Reply Cancel reply
Your email address will not be published. Required fields are marked *
Save my name, email, and website in this browser for the next time I comment.
- Crowdfunding
- Cryptocurrency
- Digital Banking
- Digital Payments
- Investments
- Console Gaming
- Mobile Gaming
- VR/AR Gaming
- Gadget Usage
- Gaming Tips
- Online Safety
- Software Tutorials
- Tech Setup & Troubleshooting
- Buyer’s Guides
- Comparative Analysis
- Gadget Reviews
- Service Reviews
- Software Reviews
- Mobile Devices
- PCs & Laptops
- Smart Home Gadgets
- Content Creation Tools
- Digital Photography
- Video & Music Streaming
- Online Security
- Online Services
- Web Hosting
- WiFi & Ethernet
- Browsers & Extensions
- Communication Platforms
- Operating Systems
- Productivity Tools
- AI & Machine Learning
- Cybersecurity
- Emerging Tech
- IoT & Smart Devices
- Virtual & Augmented Reality
- Latest News
- AI Developments
- Fintech Updates
- Gaming News
- New Product Launches
5 Ways to Improve IT Automation
- What is Building Information Modelling
Related Post
Sla network: benefits, advantages, satisfaction of both parties to the contract, what is minecraft coded in, how much hp does a diablo tuner add, what is halo-fi, what is halo lock iphone, related posts.

How To Download Apps From Safari

10 Best Browsers for Privacy That Aren’t Google Chrome

How To View Page Source On Tablet

How To Download The Latest Version Of Safari

MovieBox Pro: How to Install It on Your Phone

How To Get Adblock For Safari

What Is Cross-Browser Testing

How To Download Vshare On IPad
Recent stories.

What is Building Information Modelling?

How to Use Email Blasts Marketing To Take Control of Your Market

Learn To Convert Scanned Documents Into Editable Text With OCR

Top Mini Split Air Conditioner For Summer

Comfortable and Luxurious Family Life | Zero Gravity Massage Chair

Fintechs and Traditional Banks: Navigating the Future of Financial Services

AI Writing: How It’s Changing the Way We Create Content
- Privacy Overview
- Strictly Necessary Cookies
This website uses cookies so that we can provide you with the best user experience possible. Cookie information is stored in your browser and performs functions such as recognising you when you return to our website and helping our team to understand which sections of the website you find most interesting and useful.
Strictly Necessary Cookie should be enabled at all times so that we can save your preferences for cookie settings.
If you disable this cookie, we will not be able to save your preferences. This means that every time you visit this website you will need to enable or disable cookies again.
How to capture full page screenshots in Safari, Firefox, and Chrome on Mac
In this tutorial, we will show you how to take a screenshot of a full web page in Safari, Chrome, and Firefox on your Mac using built-in and third-party methods.

Important: Most websites use the lazy-loading feature, which loads the image only after you scroll to that point on the page. So, before following the steps below, load the web page completely and scroll to its bottom to ensure all images are also visible. After that, take a full-page screenshot (also known as a scrolling screenshot ).
Also see: How to take a full-page screenshot in any iPhone app
Screenshot an entire web page using built-in browser tools
To accomplish this in Safari, you’ll need to display the Develop tab in the menu bar. If you already have it, you’re a step ahead. If you don’t, follow these steps first.
- Open Safari and click Safari > Settings or Preferences from the menu bar.
- Go to the Advanced tab.
- Check the box for Show features for web developers or Show Develop menu in menu bar .

Now, head to the web page you want to capture and follow these steps.
1) Click Develop > Show Web Inspector from the menu bar. The Inspector will open with the webpage on either the right or the bottom, depending on the default position. This displays the HTML code for the page.
2) Go to the top of the code in the Elements tab and right-click the first line beginning with “html.”
3) Select Capture Screenshot from the shortcut menu. It can take several seconds before you see the screen in the next step, so be patient.

4) Choose a location to save the image and optionally rename it.
5) Hit Save .
You can then open the saved image in Preview or your Mac photo editor to see it in full.
To close the Web Inspector in Safari after you capture the shot, just click the X on the top left corner of the panel.
Firefox users will be happy to know that this browser provides the easiest option for capturing a scrolling screenshot.
1) Head to the page you want to capture. Now, right-click on the page and choose Take a Screenshot .
2) Click Save full page on the top right.

3) Hit Download to save the image or Copy to place it on your clipboard to paste where needed.

And that’s all there is to it! After you choose to Download or Copy the image, the webpage will go back to its original view.
Google Chrome
1) Visit the webpage you want to capture and click the Customize and Control button (three dots) on the top right.
2) Move down to More Tools and pick Developer Tools in the pop-out menu.

3) When the panel opens on the right of the webpage, click the Toggle Device Toolbar button at the top.
4) With your webpage on the left, you can choose to view it as a different device at the top or just leave as Responsive.
5) Click the three dots on the top right of the left-hand panel and select Capture full size screenshot in the menu.

The image will be downloaded for you to grab and open in whichever app you like. You can close the Developer Tools by clicking the X on the top right of that panel.
Use the Awesome Screenshot extension
You can use the excellent Awesome Screenshot extension to capture full-page screenshots inside any popular browser.
Start by getting the extension for Safari , Chrome , or Firefox . After that, click the extension icon and choose Capture Full Page > Done > Download .

Note: For Safari, you will have to first:
- Allow screen recording permission: Once the app is downloaded, open it and click Go to Screen Recording Setting . It will take you to System Settings > Privacy & Security > Screen & System Audio Recording. From here, enable the switch for Awesome Screenshot & Recorder and confirm. After that, click Quit & Reopen .
- Enable the extension: Go to Safari Settings > Extensions and check the box for Awesome Screenshot before its icon appears in the top left of the address bar.
On a related note:
- 3 ways to quickly find all screenshots on your Mac
- How to capture a screenshot of a whole text thread on iPhone
How To Take Full Page Screenshots In Safari For Mac
Safari comes as the default browser on Mac computers. It is a perfectly capable browser and if you prefer using native software instead of downloading third-party browsers, we get it. However, unlike Edge, there is no straightforward built-in tool for capturing full page screenshots in Safari.
We’re not sure if Apple ever plans to introduce the feature in an easier manner, but don’t worry, if capturing full page screenshots is something you’re interested in, there are ways around this problem which we will cover in the guide below, so read on to find out.
Saving Websites As PDFs
What’s interesting about this method is that if you try to take a scrolling screenshot on an iPhone , it actually saves as a PDF, so this method is pretty similar.
- Open Safari
- Go to the website you want to capture
- Click on Show Reader View
- From the menu, select File > Export as PDF
- Choose the location and name and click Save
Note that because you’re saving it as a PDF file, it is actually not an image file. The upside to this method is that if you have a PDF editor, you can actually make some edits to the file like adding notes. The downside is that it is equally easy for someone else to make the same edits if they have the file, versus images which might be slightly trickier to manipulate seamlessly.
Using Safari’s Developer Tools
Similar to how Google approaches full page screenshots with Chrome, it appears that Apple has also hidden its full page screenshot tool for Safari behind its developer tools.
- Click on Develop > Show Web Inspector
- In the newly opened window, right click the very first line that reads “html”
- Select Capture Screenshot
- Save the file
The upside to this method is that if you don’t need to capture the entire page, you can just highlight portions of the code that you want to capture, but that’s assuming you know what you’re looking at. Also, Apple already built-in screen capture tools into macOS that will work in Safari (except it doesn’t do full page captures), so that would be an easier method than this.
Using Awesome Screenshot Extension For Safari
If neither of the options above sound appealing to you, then you might be interested to learn that you can use a browser extension for Safari called Awesome Screenshot that makes the entire process a lot simpler.
- Download and install the Awesome Screenshot extension
- Once the extension is installed, go to the website you want to capture
- Click the extension’s icon and select Capture entire page
- You can now make edits to the screenshot if you want
- When you’re ready to save it, click the download icon and it’ll save it to your computer
Using TechSmith’s Snagit Desktop Tool
If you don’t mind paying for software, then perhaps TechSmith’s Snagit could be the end-all to all your screenshot needs. This is because Snagit won’t just work with Safari, but it will work across your Mac so in addition to capturing websites, you can use the Snagit tool to capture other screenshots like from applications, games, and so on.
- Download and install Snagit
- Launch Snagit and click the “All-In-One” tab to the left
- Click the Capture button
- Select the area of the website you want to capture and click the “Launch a Panoramic Capture” button
- Click start and start scrolling down the website and click Stop when you’re done
Keep in mind that Snagit is not free. There is a free trial that you can check out to see if this is what you want, but once the trial is up, you’ll have to pay $50 for a single-user license. It is expensive, but if you think you can get your money’s worth, why not?
Filed in Apple > Computers . Read more about macOS and Safari .
How-To Geek
4 ways to take a scrolling screenshot on a mac.

Your changes have been saved
Email Is sent
Please verify your email address.
You’ve reached your account maximum for followed topics.
Quick Links
Take full-page screenshots in safari with the develop menu, take a scrolling screenshot with the fireshot safari extension, take screenshots in an online tool, take scrolling screenshots in any app with shottr.
macOS has a built-in tool for taking screenshots, but it can only capture what's actually visible on the screen at any time. What if you need to take a screenshot of an entire web page or lengthy document? Here are the best ways to take scrolling screenshots on a Mac.
Safari has a hidden screen capture tool that you might not know about. It's a bit technical, but is accessible to everyone, and if you only need it for occasional use, this is the simplest option to try.
To access the feature, you first need to enable the Developer Settings in Safari. Go to Safari > Settings > Advanced and click "Show Features for Web Developers".
Exit the settings, and you should see that a "Develop" option has appeared in the Safari menu bar. Now load up the web page you want to screenshot and go to Develop > Show Web Inspector. A panel will open at the bottom of the screen. It looks pretty complicated if you aren't used to it, but don't be put off—you don't need to know what any of it means.
To take your screenshot, make sure the Elements tab is selected at the top of the panel. In the code in the left-hand pane, scroll to the top and right-click on the line that begins "html"—it'll normally be the second line. From the dialog box that opens, click "Capture Screenshot."
You'll now be prompted to choose where to save your image. Click "Save" and you're done.
If you take screenshots of websites regularly, then you'll be better off using an app to handle it. For Safari, you can install an extension to capture scrolling screenshots. The one we like is FireShot, which is free and is also available as an extension for Chrome and other third-party browsers.
Head to FireShot on the Mac App Store and download it by clicking "Get" followed by "Install."
Now open Safari and go to Safari > Settings > Extensions and locate FireShot in the Installed pane. Check the box alongside the name to activate the extension. In the right-hand pane, you can click "Always Allow on Every Website" if you plan to use it a lot. For security reasons, it's better not to do this. You can simply grant permission for the extension to work as and when you need it instead.
Now load up the page you want to screenshot in Safari. You'll see that a FireShot icon has been added to the toolbar alongside the address bar. It'll be grayed out at first, so click the icon and select "Allow for One Day" to give it permission to run.
Click the icon again, followed by "Capture Entire Page." The screenshot will open in a new tab, and you can choose to save it as an image (in the PNG format) or PDF, email it, copy it to your clipboard, or print it.
The other good option for taking full-page screenshots of websites is by using an online tool. This is less convenient in some cases, but it comes with the benefit of being able to share your screenshots between your Mac and another device more easily.
There are many web services that can capture full-screen screenshots of websites. FullPageScreenCapture.com is as good as any. It's free to use and fast, and it assigns a unique URL to every screenshot it saves, so you can access it through any browser on any device.
Simply head to fullpagescreencapture.com and type or paste the URL of the web page you want to save into the box, then click "Capture Now."
It takes a few seconds to process. Once it's done, you'll see the image displayed on the site. Click it to open the image in a new browser tab, then right-click on the image and select either "Save to Desktop" or "Save As."
You can also click in the address bar in Safari and hit Command+C to copy the unique URL for the image and share it with other devices.
Finally, if you need to take a full-page or scrolling screenshot from within any app, not just of a website, you can do this with the third-party app Shottr. You can use it to capture screenshots of PDF files, spreadsheets, documents, large photos, or anything else.
You can use the app for free for as long as you like. After 30 days, it will occasionally ask you if you want to pay for it. You're not obligated to do so, but it only costs $8 and is great value if you use it a lot.
The app isn't available through the Mac App Store. Instead, download it from the official Shottr website and install it to get started .
Launch Shottr, and its icon will appear in your menu bar at the top of the screen where it's always easily accessible. Open the app and content you want to screenshot, then click the Shottr icon and select "Scrolling Capture."
Your mouse pointer will turn into a crosshair. Click in the top-left corner of the area you want to screenshot, then drag to the bottom-right. When you let go of the mouse button, the screen will begin to scroll up. Everything within the width of the rectangle you drew will be captured, right down to the bottom of the page.
Your screenshot will open in a preview window. You can annotate or crop it, or click the Save icon to save it. If you close the preview accidentally, click the Shottr icon and select "Reopen Shottr."
It's easy to take scrolling screenshots on a Mac. Whether you just need a quick tool or a more professional solution, choose the method that's best for you, and you can grab full-page screenshots in any app.
How To Take A Scrolling Screenshot On Mac

This site contains affiliate links. As an Amazon Associate, We earn a commission from qualifying purchases at no extra cost to you.
Want to capture entire web pages or documents in a single scrolling screenshot on your Mac? This article covers native and third-party methods to take long screenshots without fragmentation.
Key Takeaways:
- Use QuickTime Player, Safari, Chrome, or Preview to capture scrolling screenshots on a Mac.
- Third-party apps like Snagit, Lightshot, and Skitch provide extra functionality like editing tools.
- On an iPhone with iOS 13+, take scrolling shots by pressing side/volume buttons and selecting Full Page.
- Copy text from screenshots on macOS Monterey using Live Text in Preview or Safari.
- Take full page screenshot on Firefox/Chrome using built-in features or extensions.
Top Native Ways To Take Scrolling Screenshots
You probably know about the trusty old Shift + Command + 3 and 4 keyboard shortcut that lets you capture your screen or a part of it. But what if you must capture something beyond your screen’s limits?
Fear not, my friend! There are several ways of taking scrolling screenshots on Mac, so let’s walk through them.
1. QuickTime Player
QuickTime Player is a multimedia player and screen recording software application developed by Apple Inc. It also includes basic editing features, such as trimming and merging video files, and the ability to record entire screen button of your Mac.
Here are the steps to take a scrolling screenshot using QuickTime Player:
- Open QuickTime Player from the Applications folder or search for it in Spotlight.
- Click File in the menu bar and select New Screen Recording.

- Click the drop-down arrow next to the record button and select None under the microphone option.
- Click on the red record button and select the area of the screen you want to capture.
- Once you have selected the area, click the Start Recording button to start screen recording.
- Scroll through the page or document you want to capture.

- Once you have reached the end of the page, click on the stop button in the menu bar.
- The recording will automatically be saved as a .mov file. To save it as an image file, open it in Preview and select File , followed by Export . Choose the desired image format and save it.
Safari is not just a web browser but also allows you to take scrolling screenshots. This method is especially useful for capturing entire web pages beyond the visible area.
- Open Safari and navigate to the web page you want to capture.
- Press the keyboard shortcut Command + Shift + 5 to open the Screenshot tool.
- In the Screenshot tool, click the Options button and select Capture Entire Page from the drop-down menu.
- Click the Capture button to start the scrolling screenshot capture process.
- Safari will automatically screen scroll through the web page and capture the entire page length of the browser window.
- Once the capture process is complete, the screenshot will appear in the bottom right corner of your screen.
- Click the screenshot preview to open it, then use the editing tools to make any necessary adjustments or annotations.
- Save the scrolling screenshot to your desired location by clicking on the Save button in the top right corner of the screenshot preview window.
This method is easy and useful if you need to take a scrolling screenshot of a web page in Chrome. However, it requires you to install a third-party extension, Full Page Screen Capture , which may be better for some users. If you don’t have any issues with it, Here are the steps:
- Open Google Chrome on your Mac and go to the Chrome Web Store.
- Search fo r Full Page Screen Capture and click Add to Chrome to install the extension.

- Navigate to the web page you want to take a scrolling screenshot of.
- Click on the Full Page Screen Capture icon in the toolbar.
- The extension will automatically start capturing the entire webpage, and you will see a scrolling screenshot preview.

- Once the capture is complete, you can save the screenshot to your computer or share it directly.
Preview is a built-in app on Mac that allows you to view and edit images and PDFs . It also can capture screenshots. Here are the steps to take a scrolling screenshot using Preview:
- Open Preview from the Applications folder or Spotlight search.
- Go to File > Take Screenshot> From Entire Page .

- Preview will then automatically take the screenshot and display it for you to edit or save.
You can then edit or annotate the screenshot and save it in your desired format.
Top 3 Third-Party Apps For Scrolling Screenshots
There are several apps available that allow you to take scrolling screenshots. But the three we recommend below are the best and safest ones for Macs. On top of that, they offer some extra features too.
1. Snagit

Snagit is a powerful third-party app that captures scrolling screenshots, videos, and audio. It is a paid app with a one-time purchase price of $49.99 for the individual license and discounts available for volume purchases. The app also offers a free trial period. It provides an intuitive user interface and customizable capture settings that enable you to capture any screen part.
To take a scrolling screenshot using Snagit, follow these steps:
- Open the app.
- Select the Capture button.
- Choose the All-in-One option.
- Select Scrolling Window.
After that, Snagit will capture the entire length of the page or window and save it as an image file.
2. Lightshot

Lightshot is a simple yet effective third-party app that allows you to capture screenshots of web pages or applications. It’s free and can be used on both Mac and Windows platforms. I have used it and personally found it a little slow.
To take a scrolling screenshot using Lightshot, you need to take these steps:
- Open the web page or application you want to capture.
- Click the Lightshot icon on your toolbar.
- Select the Capture Scrolling Window option.
- Scroll through the page.
Lightshot will capture the entire length of the page and provide you with editing options before saving the image.
3. Skitch

Skitch is a third-party app developed by Evernote that allows you to capture and annotate screenshots. It’s available for free and provides an easy-to-use interface with a variety of annotation tools.
Here’s how to take a scrolling screenshot using Skitch:
- Select the Screen Capture button.
- Choose the Capture Scrolling Window option.
- Scroll through the page. Skitch will capture the entire page length and allow you to annotate it before saving it as an image file.
If you don’t want the complexity of native solutions or the hassle of downloading apps, you can use two online screen capture tools: Screenshot Guru and Visualping .
Frequently Asked Questions
Here are some common questions to add to your knowledge.
How do you take scrolling screenshots on an iPhone?
To take a scrolling screenshot on your iPhone, it needs to have iOS 13 or above. Take a screenshot (press the side and volume up buttons together), tap on the thumbnail in the bottom-left corner, and choose Full Page. You can scroll through it using the bar on the right side and do some quick editing. Note that this file is saved in PDF format rather than PNG. Note : this scrolling screenshot feature only works on native Apple apps.
Can you copy text from a scrolling screenshot?
If you’re using macOS Monterey , you can access Live Text in Preview and Safari . It means you can copy and use the text in an image. Just position the pointer over the text you want to copy and then drag it to select it. There are also OCR (Optical Character Recognition) apps like Prizmo and TextSniper , which you can check out.
How to take full webpage screenshots with Firefox and Chrome on macOS?
You can still take full-webpage screenshots if you don’t use Safari as your primary browser. Firefox has an in-built feature to do it. For Chrome users, you can get the GoFullPage extension. It’s free and takes full webpage screenshots.
Taking a scrolling screenshot on your Mac is a real-time-saver, trust me. You can either stick with macOS’s built in screenshot tool or try some fancy third-party apps. Personally, I’m all about native solutions, but you do you! Find the best tool for you and start capturing epic scrolling screenshots.
And remember to share your preferred method in the comments below.

Leave a Reply Cancel Reply
Your email address will not be published. Required fields are marked *

Tips and guides for MacBook Pro users. As an Amazon Associate, I earn from qualifying purchases.
Featured Pages
- Best Mac Cleaner Software
- Clear System Data Storage
- Stop Spinning Wheel Mac
Sign up for our daily newsletter
- Privacy Policy
- Advertise with Us
How to Take a Scrolling Screenshot on Mac

Is the full screen screenshot on Mac not enough for your web page image capturing needs? Use these built-in tools, third-party apps, and browser extensions to take a scrolling screenshot on Mac . These tools and apps only work for web pages and files you can view in browsers.
How to Take a Scrolling Screenshot on Mac Using Safari
Third-party apps for taking scrolling screenshots, how to use browser extensions to take scrolling screenshots on mac, frequently asked questions.
Tip : you can also take scrolling screenshots in Windows using web browsers and third-party apps like Microsoft Edge and ShareX.
You can take a scrolling screenshot on Mac without downloading or using third-party apps. You only need Safari, which comes with Mac computers as the default web browser. Follow these steps to use it to take a scrolling screenshot:
- Go to the web page you want to screenshot.
- Scroll down to the bottom of the web page.

- From the menu bar, click on “Safari,” then select “Settings … “

- In the Safari settings window, go to the “Advanced” tab, tick the “Show Develop menu in menu bar,” then close the settings window.

- From the menu bar, click on “Develop,” then select “Connect Web Inspector” or “Show Web Inspector.”

- A window will appear containing elements and other web page assets.

- Select the first HTML element under the “Elements” tab in the web inspector.

- Right-click on the element, then select “Capture Screenshot.”

- Rename the screenshot, select a save destination, and click on “Save.”

- You can find the image in the save location you selected when you saved it to your Mac. In this example, we are saving the screenshot to the “Desktop” folder as shown above.
If you find Mac’s native scrolling screenshot method complicated, you can download and use third-party apps instead. Two such apps that you can use are listed below:
How to Take a Scrolling Screenshot on Firefox
The Firefox web browser has a built-in tool that makes taking screenshots of entire web pages a breeze. Follow these easy steps:
- Launch Firefox and visit the web page you want to capture.
- Right click on a blank space within the web page and select “Take Screenshot.”

- Click on “Save full page” to take a screenshot of the whole web page.

- In the pop-up window with the screenshot preview, click on the “Download” button.

- You can find the downloaded image in Firefox’s default downloads folder or a different location that you have previously selected.
How to Take a Scrolling Screenshot on Microsoft Edge
Windows’s native browser, Microsoft Edge, has a built-in screenshot tool that lets you capture a scrolling screenshot on Mac. The steps below show how to take a screenshot of a full web page using Microsoft Edge for Mac:
- Right click on a blank space within the web page, then select “Web Capture.” You can also press Shift + Command + S .

- When a small pop-up appears, click on “Capture Full Page” to capture the whole web page.

- In the web capture preview window, click on the floppy disk icon to save the image.

- You’ll find the image you downloaded in Microsoft Edge’s default downloads folder or different location that you have previously selected.
How to Use Full Page Screen Capture to Take a Scrolling Screenshot on Mac
Full Page Screen Capture is a free web app you can use to download a screenshot of a web page by pasting the page link on the app’s website. Use this tool with any web browser on your Mac. These step-by-step details show how to get a scrolling screenshot on your Mac using this third-party web app:
- Launch your web browser and go to Full Page Screen Capture’s website.
- Paste or type the URL of the web page you want to take a screenshot of, then click “Capture Now.”

- Wait for the app to process the web page’s screenshot.
- When the screenshot is ready, you’ll see a preview below the URL field. Click on the “Click to Download” button over the web page’s image. You’ll be directed to a new tab to view and save the full screenshot of the website.

- In the new tab, right-click on the image, then click on “Save Image As … “

- Add a filename, choose the image’s save destination, then click “Save.”

- You can find the image in the save location you selected when you saved it to your Mac. In the example above, we are saving the screenshot to the “Desktop” folder.
Aside from using Mac’s native tool and third-party tools, you can add dedicated web browser extensions, then use them to take scrolling screenshots on Mac. Listed below are two free browser extensions that can be used for this:
How to Use GoFullPage to Take a Scrolling Screenshot
GoFullPage is a browser extension that takes full web page screenshots . You need to add GoFullPage as a browser extension to use it. Follow these steps to take a scrolling screenshot on Mac:
- Launch Google Chrome and add the GoFullPage Chrome extension to your browser by clicking on the “Add to Chrome” button.

- A pop-up will appear asking if you want to add the GoFullPage browser extension. Click on the “Add extension” button to continue.

- After adding the GoFullPage extension to your browser, you’ll be taken to a web page showing you how to use it.

- Pin the GoFullPage icon to Chrome for quick access. To do this, click on the puzzle piece icon at the top right of Google Chrome’s window, then click on the pin icon to the right of GoFullPage.

- Go to the web page you want to take a scrolling screenshot of.
- Click on the GoFullPage icon at the top right of the Google Chrome window to process a screenshot of the web page. You will be directed to a new tab where you can view and download the screenshot.
- In the new tab, you can download the screenshot as a .pdf or an image (.png). Click on your preferred file type to start downloading the image.

- You can find the image in your Mac’s downloads folder or different location that you have previously selected.
How to Use Movavi Screenshot Chrome Extension
The Movavi Screenshot Chrome Extension is a screenshot tool from Movavi’s multimedia suite that will take scrolling screenshots on Mac. Like GoFullPage, you only need to add Movavi Screenshot Chrome Extension to your browser to use it. Follow this step-by-step guide to use it:
- Launch Google Chrome and go to the Movavi Screenshot Chrome Extension page on the Chrome Web Store.
- Click “Add to Chrome” to add this as a Google Chrome browser extension.

- A pop-up will ask you if you want to add Movavi Screenshot Chrome Extension. Click on the “Add extension” button to continue.

- Open the extensions tab by clicking on the puzzle piece icon at the top right of Google Chrome’s window. Click on the pin icon to the right of “Movavi Screenshot Chrome Extension” to pin it for easy access.

- Visit the web page you want to take a scrolling screenshot of.
- At the top right of your browser window, click on the Movavi Screenshot Chrome Extension camera icon.
- Select “Capture entire page” to take a screenshot of the whole web page.

- Let the extension process the image. When it’s done, you’ll be directed to a new tab where you can view and download the screenshot.
- In the new tab, click on the “Save JPG” button to download the image.

- When the extension asks for your permission to manage your downloads, click on the “Allow” button.

- Rename your screenshot, select a save destination, then click on “Save.”

- You can find the image in the save location you selected when you saved it to your Mac. In the above example, we are saving the screenshot to the “Desktop” folder.
Can I use the inspect tool to take a scrolling screenshot on a non-Safari browser?
Firefox also has a screenshot feature within its inspect tool. Just like on Mac, you can right-click on the first element and select “Screenshot Node” to save an image of a whole web page. Google Chrome doesn’t offer this feature.
Do GoFullPage and Movavi Screenshot Chrome Extension work with other browsers?
GoFullPage works on Google Chrome and Microsoft Edge. Movavi Screenshot Chrome Extension works on Google Chrome and Firefox.
How can I remove extensions on Google Chrome?
Click on the puzzle piece icon at the top right of Google Chrome’s window. Find the extension you want to remove, click on the three horizontal dots to its right, then select “Remove from Chrome.”
Image credit: Unsplash . All screenshots by Natalie dela Vega.
Our latest tutorials delivered straight to your inbox

Natalie is a writer specializing in tech how-tos and gaming. When she's not writing, she plays PC games and travels. Here at MakeTechEasier, you will see her write about guides, tips, and solutions for Windows and iOS.


How To Take A Scrolling Screenshot On Mac (5 Ways)
It’s easy to use a Mac, but not all the features are readily available and apparent. That is especially true if you’re a new user and simply want to capture what’s on the screen. Whether you’re a new or seasoned user, you may struggle with how to take a scrolling screenshot on a Mac.
You can take a scrolling screenshot on a Mac if you open Safari, press Command, Shift, and 5 then click “Capture Entire Page” in the pop-up menu. Apps like Chrome Screen Capture and Preview let you take a scrolling screenshot on Mac with the same method. Macs come with the Preview app which you can also use to take scrolling screenshots.
Other third-party apps you can use to take scrolling screenshots include Movavi Screen Recorder, Capto, and Lightshot. Follow along as we explore how to take a scrolling screenshot on a Mac.
Table of Contents
How to Take a Scrolling Screenshot of the Full Webpage on Mac
Safari screenshot tool.
The easiest way to take a scrolling screenshot on Mac is with Safari. To take a scrolling screenshot on Safari, press Command, then Shift, and 5 to pull up the screenshot menu . Click “Options” and “Capture Entire Page” to take a scrolling screenshot.
You don’t need to manually scroll through the page with this method. Make sure to save the screenshot when it pops up on your home screen after you edit it.
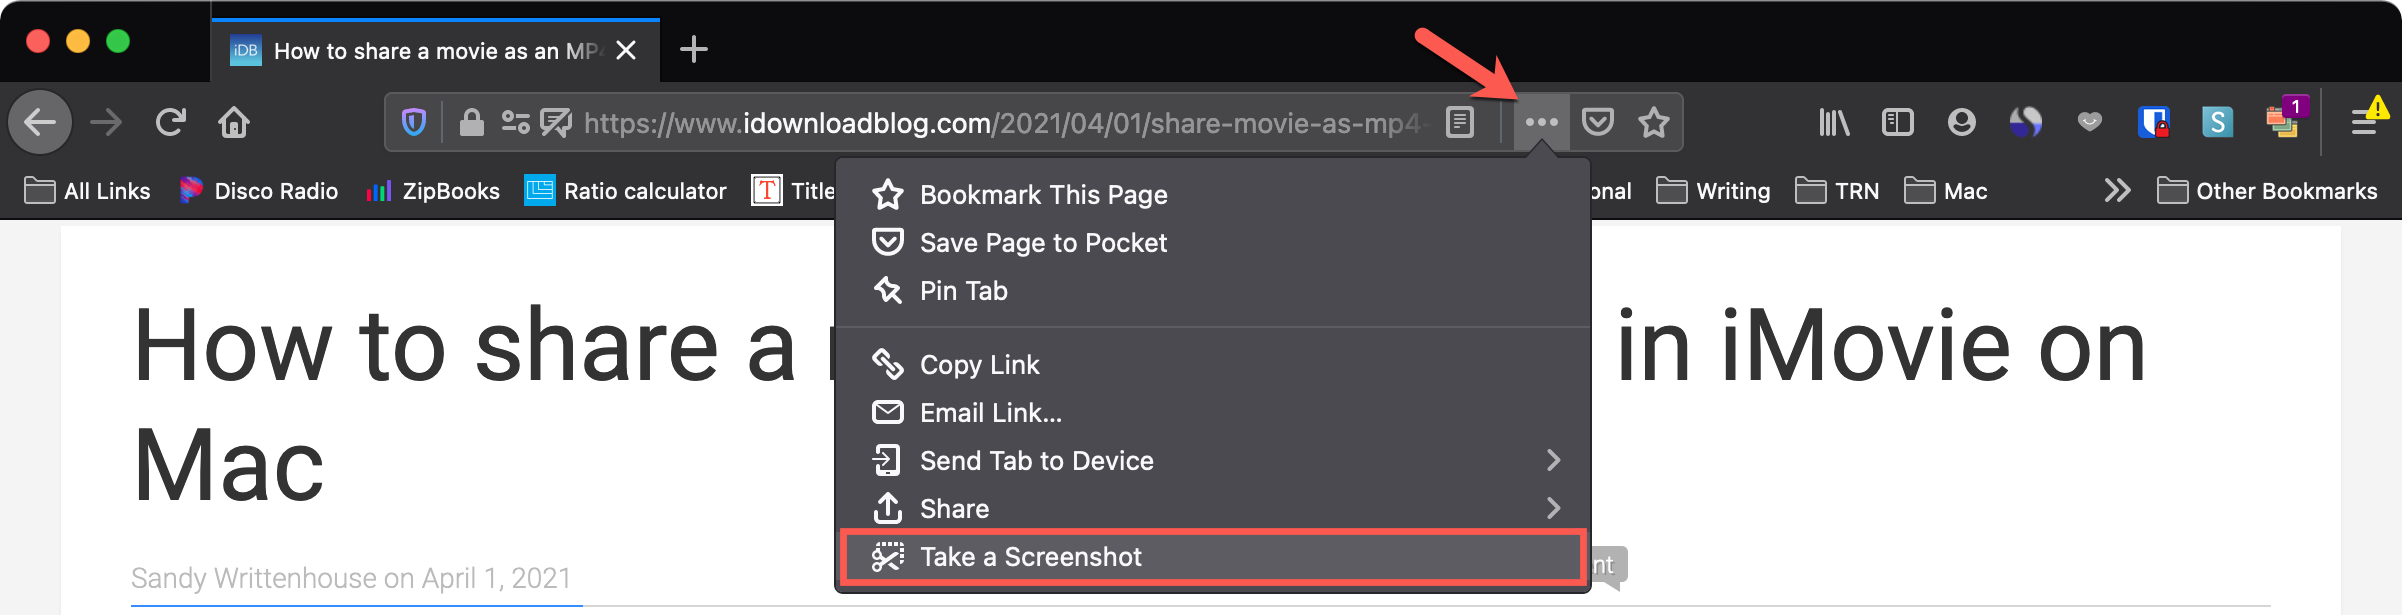
Image credit: idownloadblog.com
Use the Preview App
Each Mac comes with the Preview app, and it makes it easy to take a scrolling screenshot. Simply open the applications menu, scroll down, and select Preview. Next, click “File” at the top of the screen and scroll down to “Take a Screenshot”.
This will open a small pop-up menu. Click on “From Entire Screen” to take a scrolling screenshot . Once you take the screenshot, you can edit it or save it as is.
Chrome Screen Capture
Google Chrome is one of the most reliable web browsers, and it also features a great screen capture extension . You can take scrolling screenshots and record your screen activity with Chrome’s Full Page Screen Capture extension. While you can take scrolling screenshots with this extension, it’s not necessary.
As the name suggests, Chrome Full Page Screen Capture lets you screenshot the whole page at once without scrolling. The app is easy to use and free to download.
Capto is a screen capture app available for Mac users that lets you take scrolling screenshots and record your screen. There is essentially no limit to how you can take screenshots with Capto, and you can capture the full page or just a small portion of it . It is a paid app, but there is no fee to continue using Capto once you’ve bought it.
Movavi Screen Recorder
Movavi Screen Recorder is another paid screen recording program that lets you take scrolling screenshots on Mac. While it is paid, they do offer a 7-day free trial, so you can test it out if you need a scrolling screenshot quickly just once . You can easily record your screen activity or take a scrolling screenshot and edit it with Movavi Screen Recorder.
Lightshot is a free screen-capturing app for Mac and Windows users that lets you capture, edit, and share scrolling screenshots. First, you must put the Lightshot app on your Mac’s toolbar so you can easily access it. Next, simply open the webpage you want to capture, click the Lightshot icon, and select “Capture Scrolling Window” .
Scroll down on the page at a steady pace so Lightshot can take a scrolling screenshot. When you’re done, the screenshot will pop up and you can save it to your Mac.
How Do You Take a Picture of the Whole Page on Mac Without Scrolling?
If your Mac is up to date on the latest software, you can easily take a picture of the whole page on Mac. This is especially useful if not everything on the browser page appears on the screen. First, you must set the browser to full-screen so you can get the best screenshot .
Next, hold “Command” and tap (-) to bring the full webpage into view. Hold the Command key again and press Shift and 4. Highlight the full page with the cursor and let go to take a screenshot of the whole page.
So, How Do You Take a Scrolling Screenshot on Mac?
You can take a scrolling screenshot on Mac if you press Command, then Shift, and 5 on Safari then click Capture Entire Page.
The Preview app also lets you take a screenshot on Mac if you click File, Take a Screenshot, and From Entire Screen. Apps like Chrome Screen Capture, Capto, and Movavi Screen Recorder also make it easy to take a scrolling screenshot on Mac.
David Miller is a seasoned tech aficionado with a profound expertise in NGINX and Ubuntu. With a career spanning over a decade, David has honed his skills in optimizing web servers and enhancing server performance to perfection. His deep-rooted passion for open-source technologies has led him to become a go-to resource in the field. Whether it’s crafting intricate NGINX configurations or troubleshooting complex Ubuntu server issues, David’s problem-solving prowess shines through.
8 Ways to Take a Scrolling Screenshot on Mac
Need a screenshot of that super long webpage? Your Mac can do it in one go! This guide shows you how. The best part? It’s two clicks away using Zight.
Article Last Updated: June 04, 2024

Why Would You Need to Take a Scrolling Screenshot on Mac
Ways to capture scrolling screenshots on mac, conclusion on scrolling screenshot on mac.
Using a Mac is generally straightforward, but some features can be a bit hidden, especially for new users. Capturing what’s on your screen is one of those tasks that might seem tricky, whether you’re a newbie or a seasoned Mac user. Taking a scrolling screenshot, in particular, can be a bit of a challenge.
When you hear about taking a scrolling screenshot on a Mac, it usually means capturing a “full-page” or “long” screenshot. This lets you capture an entire webpage, document, or any screen content that goes beyond what you can see at once. It’s a great way to share more information while keeping the original layout intact, without needing multiple screenshots to get the full picture.
There are plenty of tools available for taking scrolling screenshots, including Mac’s built-in screenshot tools, browser extensions, online tools, and third-party apps. Read on to find the best method for capturing scrolling screenshots on your Mac.
Instead of capturing multiple screenshots and piecing them together, you can capture everything in one shot. This can be beneficial in some scenarios especially when you need to share or save information comprehensively and contextually. Some of the scenarios where scrolling screenshots can come in handy:
a). Long Web Pages
One of the scenarios a scrolling screenshot on Mac would be beneficial is when you need to save or share an article or a detailed forum thread. Capturing a scrolling screenshot on a long web page is not only more convenient but will also keep your information intact and in context, making it look more professional and organized.
b). Social Media Feeds
When you need to capture a social media conversation for a presentation or report, a scrolling screenshot ensures you don’t miss any part of the dialogue. This is particularly important if you’re documenting customer complaints , online harassment, or cyberbullying, where capturing the entire conversation in one continuous image provides clear and comprehensive evidence.
c). Work Documentation
In professional settings, taking scrolling screenshots can be incredibly useful. For instance, if you’re tracking progress on project management tools like Trello or Asana , capturing a full scroll of the board can provide a comprehensive overview. Similarly, when reviewing long code snippets that extend beyond the visible screen, a continuous screenshot ensures no part is overlooked, making peer reviews more efficient and thorough.
There are several ways to capture scrolling screenshots on Mac and we have listed all the possible ways with their step-by-step guides. Let’s look at each method below.
1. Best Third-Party Tool- Zight

Taking screenshots of extra-long web pages can be tricky. Sure, you could stitch together multiple screenshots in an image editor like Adobe Photoshop, but that’s a hassle. For Mac users, there’s a better way: Zight .
Here’s how to take a scrolling screenshot on a Mac using Zight:
Step 1: Download and Install Zight
Start by downloading and installing the Zight application on your Mac. You can find it on the Mac App Store or through the Zight website.
Step2: Launch the Zight App
Once Zight is installed, launch the application by double-clicking its icon in the Applications folder or by searching for it in Spotlight.
Step 3: Enable Full-Screen Capture
In the Zight interface, ensure that the option for full-screen capture is enabled. This usually involves clicking on the “Full Screen” within the Zight interface.
Step 4: Set Preferences (Optional)
Optionally, you can customize the preferences in Zight according to your preferences. This might include selecting the file format for the screenshot, setting a destination folder for saved screenshots, or adjusting other capture settings.
Step 5: Navigate to the Content to Capture:
Open the webpage, document, or any other content that you want to capture in a scrolling screenshot.
Step 6 : Activate Zight Screenshot Capture
Once you’re ready to capture the scrolling screenshot, activate Zight. This may involve clicking on the Zight icon in the menu bar or using a keyboard shortcut, depending on your Zight settings. Once you click capture, it automatically captures the entire screen.
Step 7 : Saving the Chrome Full-Page Screenshot
After capturing a screenshot, it will automatically upload to Zight’s secure cloud and add a Zight link to your clipboard. This means you can now paste the link or the content into your chosen platform by simply dragging the link on your clipboard.
If necessary, review the captured screenshot and make any edits or annotations using Zight’s built-in editing tools. This may take a few moments, depending on the length of the content.
Step 8: Share your Screenshot
Share your full-page screenshot by clicking the “Share” button, copying the autogenerated link to send it to anyone, dragging and dropping screen recordings into emails and chat apps, or sharing your video directly to platforms like Trello , Asana , and Slack , or embedding it in an email .
Alternatively, you can take a scrolling screenshot by recording content using Zight’s screen recording option. Here’s how to do it:
- Open Zight and Select GIF : Launch your Zight app and click on the GIF option. This feature lets you scroll through all the content on your screen and record it in a looping video that can be uploaded anywhere.
- Set Up Recording : Choose Full Screen and Screen Only, then click Start Recording. After the three-second countdown, begin scrolling through your page to capture all the content.
- Annotate as Needed : You can pause the recording at any time to add annotations. Zight offers various annotation tools, including a line, highlighter, ellipse, rectangle, and arrow.
- Finish and Upload : Once you’re finished, click the finish button. Your GIF will automatically upload to the cloud. You can then share it as a video link, avoiding the hassle of downloading and re-uploading files and making communication quick and efficient.
Here’s why Zight should be your go-to tool for capturing full-page screenshots:
While Zight will be the best screen capture tool for a full page, it also offers some other features that make it the best screen capture and communication tool :
- Screenshot : Capture specific areas, windows, or even delayed screenshots for perfect timing. Edit and annotate your screenshots directly within Zight.
- Crystal-Clear Screen Recordings : Record your entire screen or a selected area with audio. Zight lets you pause and resume recordings, add a webcam overlay, and choose between video or GIF formats. Perfect for creating tutorials or product demos .
- Webcam Recordings : Record videos with just your webcam or add a webcam overlay to your screen recordings. Add a personal touch and stand out in your communication.
- GIF Maker : Explain complex concepts or give clear instructions with loopable GIFs. Zight lets you record your screen as a GIF , eliminating the need for lengthy explanations in emails.
- Effortless Sharing : Zight creates easy-to-share links for any content you capture. You can also upload existing files like PDFs, JPGs, and GIFs and turn them into sharable links with optional password protection and expiration dates.
- Annotations : Add clarity to your screenshots and recordings with annotations . Use arrows, lines, emojis, shapes, and even blur sensitive information. Ensure your message is clear and nothing gets overlooked.
- Actionable Insights : See how many people have viewed your content and who they are with Zight’s analytics . Track your productivity with weekly reports that show items viewed and time saved.
- Flexible Editing : Don’t worry about getting it perfect the first time. Zight lets you edit your content after creation . Trim or clip recordings, crop screenshots, and make adjustments for optimal impact.
- Effortless Embedding : Share your content anywhere with Zight’s embed codes . Simply copy and paste the code wherever you want your screenshot, recording, or GIF to appear.
- Organized Collections : Create folders to keep your Zight creations organized . Find items faster and share them with team members more easily.
- Security First : Zight prioritizes your data security . With SOC2 Type II compliance certification , you can rest assured your information is protected.
- Customizable Workflow : Tailor Zight to your preferences. Set up custom shortcuts for a streamlined workflow and add a call-to-action button to your videos for increased engagement.
- Brand Consistency : Enhance brand recognition by adding your logo, custom redirect URLs , and custom domains to your Zight content.
Zight takes the hassle out of capturing and annotating full web pages. It’s the all-in-one solution for Mac users who want a quick, powerful way to grab and explain anything they see online. So ditch the frustration and give Zight a try – your screen will thank you !
- Capture or record your screen
- Annotate your screenshots or screen recordings with text, arrows, lines, and blur
- Instantly share with a link
2. Using Preview
Did you know your Mac’s built-in Preview app (it’s already there!) can capture entire web pages or documents in a single shot? Although this is not the most efficient method, it can work easily. Also, it’s not suitable for capturing long content and it’s more suitable for shorter scrolling captures.
Here’s the secret:
Step 1 : Open what you want to capture: Find the webpage or document you need a screenshot of.
Step 2: Take a regular screenshot (almost): Press the familiar shortcut Command + Shift + 4 . This normally lets you capture a specific area, but we’ll trick it a bit.
Step 3 : Hold on, don’t click yet! Instead of selecting an area, keep your finger hovering. You’ll see a small thumbnail appear in the corner.
Step 4 : Preview! Look closely at that corner thumbnail. You’ll see a tiny “Preview” option. Click that!
Step 5 : Preview takes over: Voila! Preview opens with your entire capture, ready for editing or saving.
Now you can grab those long web pages or documents without needing any extra software.
3. QuickTime Player
Your Mac’s built-in QuickTime Player isn’t just for watching videos anymore. It also doubles as a handy screenshot tool, and the best part? No extra downloads are required.
This hidden feature lets you capture entire web pages or documents, even the parts that scroll off the screen. Here’s how to use it:
Step 1 : Locate the page or document you want to screenshot.
Step 2 : Open QuickTime Player from your Applications folder or search for it in the Spotlight.
Step 4 : Select File , then choose New Screen Recording , and click Record Entire Screen.
Step 5 : Click the drop-down arrow next to the record button and select None under the microphone option. Navigate to the page you want to capture and click on it.
Step 6 : Click on the red record button and select the area of the screen you want to capture. Scroll through the entire page or document to the bottom.
Step 6 : Once you have selected the area, click the Start Recording button to start screen recording.
Step 7 : Once you reach the end of the page, click on the stop button in the menu bar.
Step 8 : The recording will automatically be saved as a .mov file. To save it as an image file, open it in Preview and select File, followed by Export. Choose the desired image format and save it.
Forget downloading extra apps! Mac lets you capture screenshots on the fly using handy keyboard shortcuts (hotkeys). These built-in shortcuts let you grab your entire screen, a specific window, or just a custom area you choose – all without opening another program.
Step 1 : Find what you want to capture: Open the webpage or document you need a screenshot of.
Step 2 : Shortcut Time: Press Command + Shift + 5 on your keyboard simultaneously. This activates the screenshot tool.
Step 3: Turn it into a Camera: Hit the Spacebar key. This transforms the cursor into a little crosshair, ready to capture a specific area.
Step 4 : Press the Record the entire screen button and then click anywhere on your screen. Scroll down to the bottom of the document or page
Step 5 : Capture! Glide your mouse over the window or area you want to grab. For scrolling screenshots, hold down the Option key while clicking.
Step 6 : Snap! Release the mouse button to save your screenshot. By default, it saves to your desktop, but you can change this in your System Preferences.
5. Browser Extensions for Chrome
If you don’t want to install an app and are looking for an easy way to go about it, the Zight Chrome extension is it. A quick and straightforward solution.
Step 1: Install the Zight Chrome Extension

Add the Zight extension to your Chrome web browser for quick and easy access.
- To get started, search for Zight on the Chrome web store on your Mac
- Click ‘Add to Chrome’
- Once you see the popup, click ‘Add Extension’
- The extension will then download and appear in your toolbar
- You can also choose to ‘pin’ the Zight extension to get even quicker access
Step 2: Open Your Webpage
Open the webpage that you want to capture. Whether it’s a lengthy article, an entire webpage, or a long chat thread, Zight will do it for you.
Step 3: Choose Your Frame – Full Screen or Region
After activating the screenshot function, decide on the frame of your capture. Since we want to capture a full-page screenshot, select Full Screen to capture everything displayed on your device.
Step 4: Saving the Chrome Full-Page Screenshot
Once you’ve captured the screenshot, it will automatically upload to Zight’s secure cloud and add a Zight link to your clipboard. You can then paste the link or the content into your chosen platform.
Step 5: Share your Screenshot
To share your full-page screenshot, click the “Share” button. You can copy the autogenerated link to send it to anyone, drag and drop screen recordings into emails and chat apps, share directly to platforms like Trello , Asana , and Slack , or embed it in an email .
6. Developer Tools
Alternatively, Chrome users can also use developer tools to capture scrolling screenshots. Although it is a hidden menu bar, it can help to capture screenshots too. However, this is not the easiest method to take a scrolling screenshot, so it can be confusing for beginners. Luckily, we’ll break it down for you.
Step 1 : Open the Google Chrome browser on your Mac. Alternatively, you can use the Alt + Command + I keyboard shortcut.
Step 2 : Click on the three dots in the top right corner and click to open the Developer Tools.

Step 3 : There is a menu bar within the Developer Tools screen. You’ll notice three vertical dots. Click on them, then select Run Command.

Step 4 : Choose the desired size of your screenshot by clicking with your mouse pointer in the Run Command box that appears when you type “screenshot” to bring up related options. You will be looking for the Capture full-size screenshot result.
Step 5 : Capture the screenshot by clicking on the three dots by the size settings. Choose Capture full-size screenshot to screenshot the entire page. Choose the folder and save the image to your computer. Then, select the Screenshot button, which will capture a screenshot of the current webpage (without displaying the underlying code).

Step 6 : Save the Screenshot: Your screenshot will be saved within your default downloads folder, but remember to save it if prompted.
7. Safari Screenshot Tool
If you want to capture a full-page screenshot on your Mac using Safari, there’s a workaround you can try. However, it’s tricky and might not deliver the best results. For a smoother experience, we recommend using Firefox or Chrome to take your scrolling screenshots.
Nonetheless, if you prefer Safari, here’s how to go about it:
Step 1 : Launch Safari and navigate to the webpage you want to capture.
Step 2 : Click on the Develop menu in the menu bar and select Show Web Inspector. If the Develop menu is not visible, go to Menu → Safari → Settings → Advanced tab and check ‘Show Develop menu in menu bar’.
Step 3 : In the Web Inspector window, select the Elements tab.
Step 4 : Right-click on the <html> tag and choose Capture Screenshot from the menu.
The scrolling screenshot will be saved as an image file on your desktop. However, the resulting PNG might be less effective than a PDF, even after cropping.
8. Save as PDF

This method of capturing scrolling screenshots on your Mac is suitable for capturing text-heavy content because it preserves the original format of the content. This might seem a bit like a cheat. You act as if you’re going to print the webpage, but instead of printing, you save it as a PDF file on your computer! It’s faster than using extensions or online recorders.
However, it will limit you when it comes to selecting a specific region, and also the interactive elements might not be captured correctly. Also, you can’t choose the file format. If you need a PNG or JPG, you’ll have to convert the PDF later.
Here’s how to go about it:
Step 1 : Navigate to the webpage you want to capture. Click the “File” button on the top or press Command + P
Step 2 : Click the “Print” button from the list of the dropdown menu
Step 3 : Select the “ Save as PDF ” button from the bottom PDF list
Step 4 : Click the “ Save ” button to take a scrolling screenshot of your notes, webpage, or document as PDF on Mac.
Since there are many ways you can take a scrolling screenshot on Mac, the choice is yours as it might depend on what you are looking for, whether in image, video, or PDF format. However, as per us, using a dedicated screenshot tool like Zight is the best as there are countless reasons why not to use native screenshot tools . After all, it comes with bonus features ensuring you maximize your productivity without downloading other tools.
Are you now going to get a Mac scrolling screenshot using the best tool? Get Zight today !
Create & share screenshots, screen recordings, and GIFs with Zight
Get Zight for iOS.
Take a screenshot on your Mac
To take a picture of the whole screen, press Shift-Command-3. To capture just part of the screen, press Shift-Command-4.
How to clear the cache on my iMac?
clear Caches on Mac
[Re-Titled by Moderator]
iMac 21.5″, macOS 12.6
Posted on Apr 10, 2023 3:07 PM
Posted on Jan 5, 2024 8:23 AM
Following your direction into Library/Caches I can see hundreds of Folders, each with dozens of folders within folders in hierarchy, with files of various suffixes and names beginning with "Cache." Are all these candidates to Delete in one broad stroke? Or, must I search each folder for ONLY those files that are names starting in 'Cache?"
A little more detail is requested to help the uninformed not make a major mistake that may screw up my machine's performance. MacBook Pro 2021 running Sonoma.
Similar questions
- clear cache on my macbook how do I clear cache on my MacBook? 3490 1
- how to clear cache on macbook air how to clear cache on MacBook air 7062 4
- clean out cache wondering how to clean out cache on imac 551 2
Loading page content
Page content loaded
Jan 5, 2024 8:23 AM in response to dsburn99
Apr 12, 2023 1:10 PM in response to Yer_Man
My Mac is loading VERY slow from start and slow to load programs and I was advised to clear all caches and that was what I am trying to do, is there another way to solve my slowness problem?
Apr 13, 2023 9:48 PM in response to dsburn99
To clear the cache on your iMac, follow these steps:
1. Open the Finder app on your iMac.
2. Click on the "Go" menu at the top of the screen.
3. Hold down the "Option" key on your keyboard and click on the "Library" option that appears.
4. In the Library folder, open the "Caches" folder.
5. Select the folder(s) of the app(s) whose cache you want to clear.
6.Press the "Command" and "Delete" keys on your keyboard to move the selected folder(s) to the Trash.
7. Empty the Trash by right-clicking on the Trash icon in the Dock and selecting "Empty Trash."
It's important to note that clearing the cache may cause some apps to take longer to load the first time you use them after the cache has been cleared, but it can help free up space on your iMac and potentially improve its performance.

Apr 17, 2023 4:34 AM in response to John Galt
John Galt wrote:
Would you care to explain how clearing a cache improves a Mac's performance?
Sure! When you use your Mac, your computer stores data in the cache memory to make it easier and faster to access that data again in the future. This can include things like web pages you've visited, app data, and system files.
Over time, however, the cache memory can become cluttered with outdated or unnecessary data, which can slow down your Mac's performance. Clearing the cache memory can help to free up space and improve your Mac's performance by removing this unnecessary data.
There are a few different types of cache memory that you may want to clear:
- Browser cache: If you use a web browser like Safari, Chrome, or Firefox, these browsers store website data in their cache memory. Clearing this cache can help to free up space and improve your browser's performance.
- App cache: Some apps also store data in the cache memory. Clearing this cache can help to free up space and improve the performance of those apps.
- System cache: Your Mac also has a system cache that stores system files and data. Clearing this cache can help to free up space and improve your Mac's overall performance.
Overall, clearing the cache memory can be a helpful way to improve your Mac's performance, especially if you've been using your computer for a long time and haven't cleared the cache in a while. However, it's important to note that clearing the cache won't necessarily solve all performance issues, and you may need to take other steps to optimize your Mac's performance.

Jan 5, 2024 10:10 AM in response to Al_Chance
Onyx will make it easy to clear the right caches...
htt https://www.northernsoftworks.com https://www.northernsoftworks.com/sonomacachecleaner.html
Northern Cache Cleaner..
https://www.northernsoftworks.com/sonomacachecleaner.html
Apr 12, 2023 1:40 PM in response to dsburn99
Caches speed up the system.
It would be better to describe what kind of system you have in as much detail as possible. Then describe the problem you are having in as much detail as possible.
No. Be more specific than that.
Apr 12, 2023 1:53 PM in response to etresoft
I am running Monterey 12.6.3. When starting from cold it takes over 2 minutes (sometimes much longer) for the white line to move across then another couple of minutes for Safari to load and similar with all other applications. Safari is the only application in the startup menu. Once an application has loaded it is still very slow. There is still lots of space available on the hard drive.
Apr 12, 2023 4:03 PM in response to dsburn99
The amount of free space is irrelevant. What kind of iMac is this? My guess is that you have an older iMac that has only a mechanical hard drive. If my guess is correct, this is as good as it gets. Those old iMacs (up to 2019) are just horribly slow.
If you have a newer one from 2017 or later, you can get an external Thunderbolt 3 SSD and use that as a boot drive. Just make sure it is a true Thunderbolt SSD. It is 2023, so in many cases, claims about being "Thunderbolt" are simply lies.

Apr 13, 2023 10:56 PM in response to sunny_mike
sunny_mike wrote:
Apr 17, 2023 4:36 AM in response to John Galt
Would you care to explain how the bot is able to avoid the auto-numbering that the editor tool adds? I keep trying to add spaces between the items in my numeric list like the bot does, but the editor always wins.

Apr 10, 2023 3:48 PM in response to dsburn99
Why? Unless you have a corrupted cache all you're doing is slowing your Mac down.
IN any event you can do this by restarting in Safe Mode
Start up your Mac in safe mode – Apple Support (UK)
Apr 12, 2023 1:29 PM in response to dsburn99
You might want to check for items that login when your computer starts and remove anything not needed.
https://support.apple.com/guide/mac-help/open-items-automatically-when-you-log-in-mh15189/mac
Apr 10, 2023 4:10 PM in response to dsburn99
Safari > Settings, click Advanced, then select “Show Develop menu in menu bar.” This gives you an option to empty caches.
Apr 11, 2023 12:09 AM in response to dsburn99
That refers only to Safari cache. It does nothing for the many other caches on your Mac.
Apr 12, 2023 1:46 PM in response to JNoel54
Thanks but that didn't do it.
XCUITest Screenshots not saving
I have some (very old ObjC) XCUITests, in Xcode 15.2. I recently noticed programmatic screenshots are not saving. The screenshots generated automatically by XCUITest are saving fine. This is code that used to work as expected; I do not know when it broke as I haven't had need to run this in a while.
During testing I added the UIImageWriteToSavedPhotosAlbum call, to verify the code is running and the image is available - and it does. But I really don't want these images cluttering up my library.
The results are the same whether I run my tests from within Xcode, or via the command line.
I need these screenshots so I have a set in PNG format, with standardized naming, for archiving, searching, and comparisons. The automatic screenshots are in Xcode's format - useful when reviewing a single test, which isn't my use case here.
- WWDC 2024 /
Apple WWDC 2024: the 13 biggest announcements
Apple’s wwdc keynote had a lot to do with ai..
By Emma Roth , a news writer who covers the streaming wars, consumer tech, crypto, social media, and much more. Previously, she was a writer and editor at MUO.
Share this story
Apple’s Worldwide Developers Conference keynote has come to a close — and the company had a whole lot to share. We got our first look at the AI features coming to Apple’s devices and some major updates across the company’s operating systems.
If you missed out on watching the keynote live, we’ve gathered all the biggest announcements that you can check out below.
Apple’s first AI system is coming to the iPhone, iPad, and Mac
:format(webp)/cdn.vox-cdn.com/uploads/chorus_asset/file/25485532/apple_intelligence.png)
With almost all of big tech getting in on the AI boom, it’s no surprise that Apple is launching an AI system of its own. Apple Intelligence is the company’s new personal intelligence system “that puts powerful generative models right at the core of your iPhone, iPad, and Mac.” That enables a ton of new capabilities across Apple’s native apps, such as the ability to generate images or summarize text.
Apple Intelligence comes with a big emphasis on security, as the system will automatically decide whether it needs to use on-device processing or contact Apple’s private cloud computing server to fulfill your request. The system will be available for free and on the iPhone 15 Pro as well as on iPads and Macs with an M1 chip and later.
Siri gets a big AI boost
:format(webp)/cdn.vox-cdn.com/uploads/chorus_asset/file/25485546/siri_ai_boost.png)
Apple’s big push into AI also includes Siri. The upgraded voice assistant will now be integrated more deeply into the iPhone, appearing as a pulsating light on the edge of your device. It will give you more control over your apps, allowing you to ask the voice assistant to find information inside a particular email or even surface a photo of one of your friends. Apple is relying on LLMs to help Siri better understand what you say and keep track of follow-up requests and questions.
Apple is building ChatGPT into Siri
:format(webp)/cdn.vox-cdn.com/uploads/chorus_asset/file/25485572/chatgpt_openai_siri.jpeg)
Siri’s big AI upgrade also includes an integration with OpenAI’s ChatGPT chatbot. With the new integration, Siri will automatically determine whether a query would be better suited for ChatGPT. It will then ask for your permission before sending its request to ChatGPT. You’ll be able to use ChatGPT through Siri for free and without an account.
New AI features in Mail, Messages, Photos, and more
:format(webp)/cdn.vox-cdn.com/uploads/chorus_asset/file/25485553/apple_emoji_creation.png)
Apple is rolling out a bunch of new AI features across its apps in iOS 18, including a way to summarize emails and generate responses. The company showed off its new Genmoji feature , letting you create custom emoji based on a text prompt, along with a new AI image generator called Image Playground.
Apple is bringing AI to the Photos app, too, giving you the ability to search for photos using natural language. You can also clean up objects in the background of your pictures, similar to Google’s Magic Eraser . Additionally, Apple is adding AI-powered transcriptions and summaries to Notes and the Phone apps.
The iPhone gets more customizable in iOS 18
:format(webp)/cdn.vox-cdn.com/uploads/chorus_asset/file/25485416/iphone_customization_ios18.jpg)
Aside from all the AI, Apple is introducing a new and more customizable Control Center in iOS 18. It’s also launching a way to freely place app icons on your homescreen. The company will also let you lock certain apps with the coming update, preventing other people from using them when you hand them your phone.
Other major changes include a Photos app redesign and a new Game Mode for iPhone that minimizes background activity to optimize gameplay.
The iPhone is finally getting RCS support
:format(webp)/cdn.vox-cdn.com/uploads/chorus_asset/file/25485431/Screenshot_2024_06_10_at_1.23.44_PM.png "screenshot on mac safari")
After announcing support for RCS last year , Apple confirmed that it’s arriving with iOS 18. It didn’t expand on any other details beyond that, though.
iMessage is getting some other upgrades, too, including the ability to schedule texts and support for SMS messaging via satellite . Apple is also rolling out colorful Tapback options and will let you bold, underline, and italicize text.
Apple TV Plus adds “inSights” to tell you which actor is onscreen
:format(webp)/cdn.vox-cdn.com/uploads/chorus_asset/file/25485442/image__9_.png)
Apple TV Plus is getting a new feature that will let you swipe down on your remote to show the actors and their characters in the movie or TV show that you’re watching. You can also find out the current song that’s playing and add it to your Apple Music playlist. Apple TV Plus will automatically show subtitles when you mute a show and will support 21:9 projectors.
A Passwords app to keep track of your logins
:format(webp)/cdn.vox-cdn.com/uploads/chorus_asset/file/25485504/passwords_app_apple.jpeg)
As rumored last week , Apple has revealed a new Passwords app that will let you keep track of your login details across different devices. The app will let you generate and store passwords similar to other password managers like LastPass and 1Password. Passwords will be available on iOS, iPadOS, macOS, visionOS, and even Windows.
iPadOS 18 adds a Calculator app with Apple Pencil support
:format(webp)/cdn.vox-cdn.com/uploads/chorus_asset/file/25485474/apple_math_notes.jpg)
The iPad is finally getting a Calculator app more than a decade after its release. It comes with a new feature called Math Notes, which lets you use the Apple Pencil to write equations on your iPad and have the app solve it for you.
Apple is launching a Smart Script feature as well, which uses machine learning to improve the appearance of your handwriting and spell-check your notes.
macOS 15 will let you mirror your iPhone
:format(webp)/cdn.vox-cdn.com/uploads/chorus_asset/file/25485482/apple_macos_15_mirror.png)
Apple’s next macOS update will let you mirror your iPhone on your Mac. You’ll be able to interact with your iPhone directly from your Mac, letting you view notifications and hear the audio playing from your mobile device.
There’s also a new Highlights feature coming to Safari, which uses machine learning to pick out interesting parts of a page.
Apple will automatically surface widgets in watchOS 11
:format(webp)/cdn.vox-cdn.com/uploads/chorus_asset/file/25485462/watch_os_11.jpg)
There are a ton of new features coming to watchOS 11, too, including a new capability that automatically adds widgets based on when you need them. Apple is launching a new Vitals app that will let you “explore your most important health metrics with just a glance” as well as new cycle tracking features, Live Activities, and support for Check In, allowing your loved ones to track you during your workout.
visionOS 2 adds spatial photos and an ultrawide Mac display
:format(webp)/cdn.vox-cdn.com/uploads/chorus_asset/file/25485379/apple_ultrawide_mac.jpg "screenshot on mac safari")
Apple has announced visionOS 2, its first major update for the operating system. One of the new features coming to the Vision Pro uses machine learning to bring depth to an existing photo. The update will also introduce support for an ultrawide virtual Mac display, more intuitive gestures, and support for travel mode on trains.
Apple is also planning to bring the Vision Pro to more countries, including China, Singapore, Australia, Canada, France, and the UK.
The next AirPods Pro update will let you quietly respond to Siri
Apple is launching Siri Interactions in its next AirPods Pro software update, letting you shake your head yes or no to respond to Siri’s announcements. The AirPods Pro are also getting Voice Isolation to enhance voice quality and reduce background noise.
Uber will pay you $1,000 to ditch your car for five weeks
More youtube premium plans are coming, youtube is stopping dr disrespect’s channel from making money, valve reveals the most-played steam deck games, what scotus just did to broadband, the right to repair, the environment, and more.
More from this stream WWDC 2024: Apple Intelligence, iOS 18, macOS 15, and more
Apple’s new custom emoji come with climate costs, apple ids are becoming apple accounts, apple skipped over the best visionos 2 updates, tim cook is ‘not 100 percent’ sure apple can stop ai hallucinations.
Serengeti Park 4+
Serengeti-park hodenhagen, designed for ipad, screenshots, description.
Die neue App vom Serengeti-Park begleitet Dich auf Deiner Safari. Lerne die Tiere des Parks kennen, finde den kürzesten Weg zu Deinem Lieblingskarussell und planen Deinen Tag mit Events, Shows und Fütterungen. Der Audio-Guide liefert Dir auf Deiner Fahrt durch die Serengeti-Safari viele spannende Infos zu den verschiedenen Tieren, die Dir begegnen. Das besondere Highlight: Mit der App kannst Du die Interactives im Tierpark steuern und Tiere verwöhnen oder sie über Webcams beobachten. Tiere kennenlernen Alle Tierarten von A-Z mit wichtigen Infos und vielen Bildern. Audio-Guide für die eigenen Fahrt durch den Park. Nach Tieren filtern und sie auf dem Parkplan finden. Freizeitpark erkunden Filterfunktionen für Fahrgeschäfte. Finde für Dein Alter, Deine Größe und Vorlieben alle passenden Rides in einer Übersicht oder lasse sie Dir auf der digitalen Karte anzeigen. Digitaler Parkplan mit Filtern für Service-Angebote Finde schnell den direkten Weg zu Toiletten, Wickelstationen, Parkplätzen, Infopoint, Sanitäter und vielem mehr. Burger, Pasta, Pizza, Eis, drinnen oder draußen? Mit der detaillierten Filterfunktion für das gastronomische Angebot findest Du das für Deinen Geschmack passende Angebot Plane Deinen Tag Kalender mit allen Shows, Fütterungen, Events und Aktionstagen. Mit der Serengeti-Park App bist Du immer up to date über Deinen Lieblingspark!
Version 1.0.1
- Fehlerbehebungen und Verbesserungen
App Privacy
The developer, Serengeti-Park Hodenhagen , indicated that the app’s privacy practices may include handling of data as described below. For more information, see the developer’s privacy policy .
Data Used to Track You
The following data may be used to track you across apps and websites owned by other companies:
- Identifiers
Data Not Linked to You
The following data may be collected but it is not linked to your identity:
- Diagnostics
Privacy practices may vary, for example, based on the features you use or your age. Learn More
Information
- Developer Website
- App Support
- Privacy Policy
You Might Also Like
bsk Mobility
Zeitreise Nürtingen
Steinhuder Meer-App
EE-Mobil 2.0
Feierreisen Mobile
IMAGES
VIDEO
COMMENTS
Take a screenshot on your Mac. You can capture the entire screen, a window, or just a portion of the screen. How to take a screenshot on your Mac . To take a screenshot, press and hold these three keys together: Shift, Command, and 3. If you see a thumbnail in the corner of your screen, click it to edit the screenshot.
Screenshot a Webpage. Open Safari and go to " Safari > Preferences…. Click the Advanced tab and toggle on " Show Develop menu in menu bar .". Navigate to the webpage you want to capture and from the Develop menu, choose " Show Web Inspector .". Alternatively, you can hit alt-command-I (⌥⌘I).
On your Mac, choose Apple menu > System Settings, click Keyboard in the sidebar, click Keyboard Shortcuts on the right, then click Screenshots. (You may need to scroll down.) Screenshots are saved as .png files and screen recordings are saved as .mov files. Filenames begin with "Screenshot" or "Screen Recording" and include the date and ...
Now right-click (Ctrl-click) anywhere on the webpage and select Take Screenshot from the contextual menu. To capture the entire webpage, click Save full page in the top-right corner of the browser ...
Shift+Command+4 then Space: Capture a window or menu. Shift+Command+5: Open the Screenshot app interface. Shift+Command+6: Take a screenshot of the Touch Bar on a Macbook Pro. To capture a screenshot directly to the clipboard instead of an image file, add Ctrl to any of the shortcuts listed above.
Open Safari: Launch the Safari browser and navigate to the web page or content you wish to capture. Activate the Screenshot Toolbar: Once on the desired page, press the Shift + Command + 5 keys simultaneously. This keyboard shortcut triggers the Screenshot Toolbar to appear at the bottom of the screen, presenting a range of screenshot and ...
From here, enable the switch for Awesome Screenshot & Recorder and confirm. After that, click Quit & Reopen. Enable the extension: Go to Safari Settings > Extensions and check the box for Awesome Screenshot before its icon appears in the top left of the address bar. On a related note: 3 ways to quickly find all screenshots on your Mac
To take a screenshot of a specific window or menu, press Shift-Command-5 and select the Capture Selected Window option in the toolbar. The pointer will change into a camera icon. Move the camera ...
Download and install Snagit. Launch Snagit and click the "All-In-One" tab to the left. Click the Capture button. Select the area of the website you want to capture and click the "Launch a Panoramic Capture" button. Click start and start scrolling down the website and click Stop when you're done.
Screenshot a window, menu, the Dock: shift + command + 4 + space bar. With these screenshots, you'll see a camera icon appear. Hover over different windows, the menu bar, menu items, or Dock, a ...
Awesome Screenshot is a browser plugin that can capture. the full site; the visible part or; a selection of the site. It also allows for basic annotation of the screenshot as well as downloading it or saving it on the web for access by URL. Available as extension to Safari, Firefox and Chrome.
Safari now has a ScreenCapture feature built-in, as explained in the article Full Page Screenshots in Browsers: In Safari DevTools, select a node, right-click, and you'll see Capture Screenshot in the context menu. There isn't a keyboard shortcut AFAIK, but it is available without additional third-party software.
Here are the best ways to take scrolling screenshots on a Mac. Take Full-Page Screenshots in Safari With the Develop Menu ... Take Screenshots in an Online Tool The other good option for taking full-page screenshots of websites is by using an online tool. This is less convenient in some cases, but it comes with the benefit of being able to ...
Click the Edit button at the top right of the window. From there, click the Crop tool at the top left. Click and drag the corners of the marquee that appears to crop comfortably to the edges of your screenshot, then click Done at the top right. You've now captured the full length of a web page without any additional software or tools.
Open Safari and navigate to the web page you want to capture. Press the keyboard shortcut Command + Shift + 5 to open the Screenshot tool. In the Screenshot tool, click the Options button and select Capture Entire Page from the drop-down menu. Click the Capture button to start the scrolling screenshot capture process.
Launch your web browser and go to Full Page Screen Capture's website. Paste or type the URL of the web page you want to take a screenshot of, then click "Capture Now.". Wait for the app to process the web page's screenshot. When the screenshot is ready, you'll see a preview below the URL field.
Take a screenshot on your Mac. You can capture the entire screen, a window, or just a portion of the screen. How to take a screenshot on your Mac . To take a screenshot, press and hold these three keys together: Shift, Command, and 3. If you see a thumbnail in the corner of your screen, click it to edit the screenshot.
Safari Screenshot Tool. The easiest way to take a scrolling screenshot on Mac is with Safari. To take a scrolling screenshot on Safari, press Command, then Shift, and 5 to pull up the screenshot menu. Click "Options" and "Capture Entire Page" to take a scrolling screenshot. You don't need to manually scroll through the page with this ...
Command-Shift-5 is your friend, in any case. You choose what area of the screen to capture, you can capture video (with sound if you want to) or still images. And you can set a delay of 5 or 10 seconds before the shot is taken or recording starts, so you can capture exactly what you need. how to take a scrolling screenshot on mac.
3. Type Awesome Screenshot in the search box. 4. Click the GET button, and then click the INSTALL button. 5. Navigate to Settings of Safari. 6. Click Extensions to find the installed extension (s). From the left sidebar, select the checkbox next to the desired extension to pin/show it on your Safari toolbar.
7. Safari Screenshot Tool. If you want to capture a full-page screenshot on your Mac using Safari, there's a workaround you can try. However, it's tricky and might not deliver the best results. For a smoother experience, we recommend using Firefox or Chrome to take your scrolling screenshots.
To take a picture of the whole screen, press Shift-Command-3. To capture just part of the screen, press Shift-Command-4.
The Quick Settings menu provides another convenient way to take screenshots, particularly useful if you prefer a graphical interface over keyboard shortcuts. Click the time in the bottom right corner to open Quick Settings. Click the Screen Capture icon. Choose either full-screen, window, or partial screenshot from the toolbar.
I always use Safari in fullscreen mode. I always have the "Always show toolbar in Full screen" option unticked, to maximize screen real estate, it's in menu View, top line. Whenever I try to take a screenshot with " Capture selected window ", or Command+Shift+4+space, I would expect to have the entire screen captured without the toolbar as I ...
To clear the cache on your iMac, follow these steps: 1. Open the Finder app on your iMac. 2. Click on the "Go" menu at the top of the screen.
Apple disclaims any and all liability for the acts, omissions and conduct of any third parties in connection with or related to your use of the site. All postings and use of the content on this site are subject to the Apple Developer Forums Participation Agreement and Apple provided code is subject to the Apple Sample Code License.
Note: Safari is exclusive to Mac. Sites were visited at the same time on each browser. Machine for Windows: Surface Laptop 3 with Intel Core i5-1035G7 CPU @ 1.20GHz, 8 GBs of RAM ... It was hell not going to lie, had to screenshot multiple times and go through each one and find out the average and the highest reported ram size, this ended up ...
Screenshot: Apple. Apple's next macOS update will let you mirror your iPhone on your Mac. You'll be able to interact with your iPhone directly from your Mac, letting you view notifications and ...
Die neue App vom Serengeti-Park begleitet Dich auf Deiner Safari. Lerne die Tiere des Parks kennen, finde den kürzesten Weg zu Deinem Lieblingskarussell und planen Deinen Tag mit Events, Shows und Fütterungen. Der Audio-Guide liefert Dir auf Deiner Fahrt durch die Serengeti-Safari viele spannende In…
OpenAI stated that the app's purpose was to make it easier for its users to gain access to ChatGPT and for them to ask questions on the Mac about content, screenshots, and email. When the macOS ChatGPT is installed, users can press Option and Space on their keyboard to open the chat interface of the app.