2019 Dodge Journey Owners Manual - Key
Your vehicle uses a keyless ignition system. The ignition system consists of a key fob with Remote Keyless Entry (RKE) and a START/STOP push button ignition system. The Remote Keyless Entry system consists of a key fob and Keyless Enter-N-Go feature if equipped.
The key fob may not be found if it is located next to a mobile phone, laptop or other electronic device; these devices may block the key fob’s wireless signal.
The Remote Keyless Entry key fob also contains an emergency key, which stores in the rear of the key fob.
The emergency key allows for entry into the vehicle should the battery in the vehicle or the key fob become depleted. The emergency key is also for locking the glove compartment. You can keep the emergency key with you when valet parking.
To remove the emergency key, slide the mechanical latch on the back of the key fob sideways with your thumb and then pull the key out with your other hand.

Emergency Key Removal
You can insert the double-sided emergency key into the lock cylinders with either side up.
The Remote Keyless Entry system allows you to lock or unlock the doors, open the liftgate, or activate the Panic Alarm from distances up to approximately 66 ft (20 m). The key fob does not need to be pointed at the vehicle to activate the system.
Driving at speeds 2 mph (4 km/h) and above disables the system from responding to all key fob buttons for all key fobs.

Backup Starting Method
In case the ignition switch does not change with the push of a button, the key fob may have a low or fully depleted battery.
In a situation of a low or fully depleted battery, a backup method can be used to operate the ignition switch. Put the nose side of the key fob (side opposite of the emergency key) against the START/STOP ignition button and push to operate the ignition switch.

TO UNLOCK THE DOORS AND LIFTGATE
Push and release the unlock button on the key fob once to unlock the driver's door or twice within five seconds to unlock all doors and the liftgate.
All doors can be programmed to unlock on the first push of the unlock button. Refer to “Uconnect Settings” in “Multimedia” for further information.
If the vehicle is unlocked by a key fob, and no door is opened within 60 seconds, the vehicle will re-lock and if equipped, the security alarm will arm.
The turn signal lights will flash twice to acknowledge the unlock signal. The illuminated entry system will be activated.
1st Push Of Key Fob Unlock Button
This feature lets you program the system to unlock either the driver's door or all doors on the first push of the unlock button on the key fob. To change the current setting, refer to “Uconnect Settings” in “Multimedia” for further information.
If the vehicle is equipped with Passive Entry, refer to “Keyless Enter-N-Go — Passive Entry” in “Doors” in this chapter for further information.
HEADLIGHT ILLUMINATION ON APPROACH
This feature activates the headlights for up to 90 seconds when the doors are unlocked with the key fob. The time for this feature is programmable, on vehicles equipped, through Uconnect Settings. To change the current setting, refer to “Uconnect Settings” in “Multimedia” for further information.
TO LOCK THE DOORS AND LIFTGATE
Push and release the lock button on the key fob to lock all doors and liftgate.
The turn signal lights will flash and the horn will chirp to acknowledge the signal. Refer to “Uconnect Settings” in “Multimedia” for further programmable information.
Vehicles Equipped With Keyless Enter-N-Go — Passive Entry
If one or more doors are open, or the liftgate is open, the doors will lock. The doors will unlock again automatically if the key is left inside the passenger compartment, otherwise the doors will stay locked.
SOUND HORN WITH LOCK
This feature will cause the horn to chirp when the doors are locked with the key fob. This feature can be turned on or turned off. To change the current setting, refer to “Uconnect Settings” in “Multimedia” for further information.
USING THE PANIC ALARM
To turn the Panic Alarm feature on or off, push the Panic button on the key fob. When the Panic Alarm is activated, the turn signals will flash, the horn will pulse on and off, and the interior lights will turn on.
The Panic Alarm will stay on for three minutes unless you turn it off by either pushing the Panic button a second time or drive the vehicle at a speed of 15 mph (24 km/h) or greater.
The interior lights will turn off if you place the ignition in the ACC or ON/RUN position while the Panic Alarm is activated. However, the exterior lights and horn will remain on.
You may need to be less than 35 ft (11 m) from the vehicle when using the key fob to turn off the Panic Alarm due to the radio frequency noises emitted by the system.
KEY FOB BATTERY REPLACEMENT
The recommended replacement battery is one CR2032 battery.
Perchlorate Material – special handling may apply. See www.dtsc.ca.gov/hazardouswaste/perchlorate .
Do not touch the battery terminals that are on the back housing or the printed circuit board.
Remove the emergency key by sliding the mechanical latch on the back of the key fob sideways with your thumb and then pull the key out with your other hand.
Insert the tip of the emergency key or a #2 flat blade screwdriver into the slot and gently pry the two halves of the key fob apart. Make sure not to damage the seal during removal.

Separating Key Fob Case
Remove the battery by turning the back cover over (battery facing downward) and tapping it lightly on a solid surface such as a table or similar, then replace the battery. When replacing the battery, match the (+) sign on the battery to the (+) sign on the inside of the battery clip, located on the back cover. Avoid touching the new battery with your fingers. Skin oils may cause battery deterioration. If you touch a battery, clean it with rubbing alcohol.
To assemble the key fob case, snap the two halves together.
PROGRAMMING ADDITIONAL KEY FOBS
Programming the key fob may be performed by an authorized dealer.
Once a key fob is programmed to a vehicle, it cannot be repurposed and reprogrammed to another vehicle.
GENERAL INFORMATION
The following regulatory statement applies to all Radio Frequency (RF) devices equipped in this vehicle:
This device complies with Part 15 of the FCC Rules and with Innovation, Science and Economic Development Canada license-exempt RSS standard(s). Operation is subject to the following two conditions:
This device may not cause harmful interference, and
This device must accept any interference received, including interference that may cause undesired operation.
Le présent appareil est conforme aux CNR d`Innovation, Science and Economic Development applicables aux appareils radio exempts de licence. L'exploitation est autorisée aux deux conditions suivantes:
l'appareil ne doit pas produire de brouillage, et
l'utilisateur de l'appareil doit accepter tout brouillage radioélectrique subi, même si le brouillage est susceptible d'en compromettre le fonctionnement.
La operación de este equipo está sujeta a las siguientes dos condiciones:
es posible que este equipo o dispositivo no cause interferencia perjudicial y
este equipo o dispositivo debe aceptar cualquier interferencia, incluyendo la que pueda causar su operación no deseada.
Changes or modifications not expressly approved by the party responsible for compliance could void the user’s authority to operate the equipment.
Dodge Journey Key Fob Battery Remote Replacement (2009 – 2021)
How to replace the dodge journey “rounded” key fob battery (2011-2021).
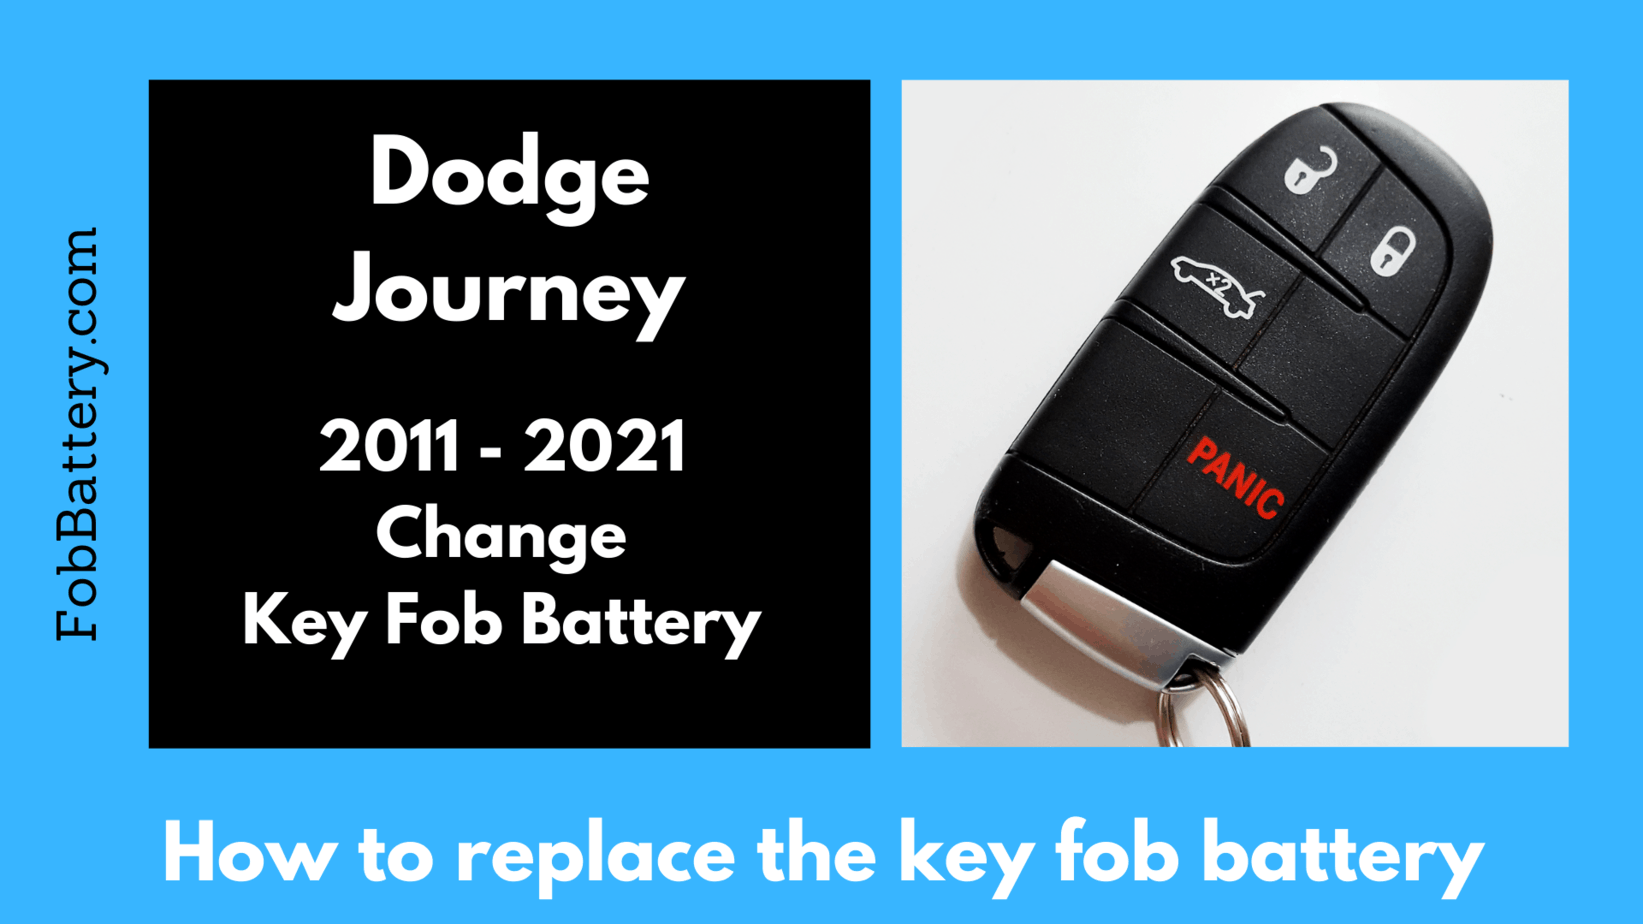
- 1x CR2032 battery
- A flat-head screwdriver

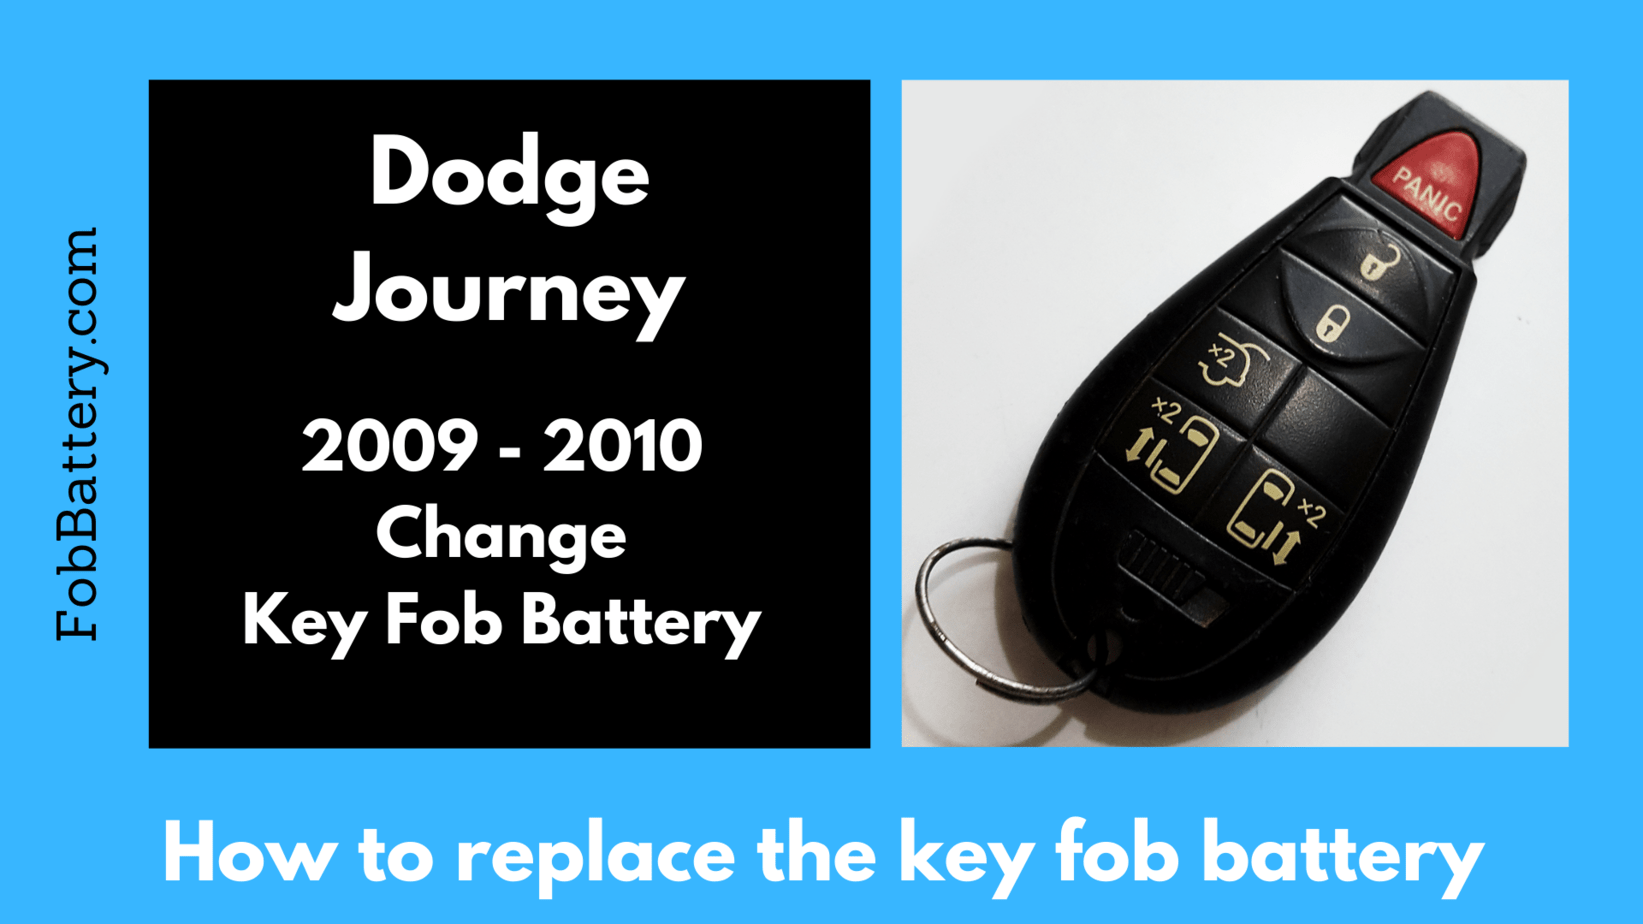
How to Replace the Dodge Journey “Teardrop” key Fob Battery (2009, 2010)
Frequently Asked Questions
Do i need to reprogram my key after changing the key fob battery, is it difficult to change a key fob battery yourself, how much does it cost to change a dodge journey keyless entry key fob battery, how often should keyless entry remote batteries be replaced, h ow do i know if my keyless entry remote dodge key fobs need a new battery.

- Dodge Manuals
- JOURNEY 2019
- User manual
Dodge JOURNEY 2019 User Manual
- Quick reference manual (17 pages)
- page of 212 Go / 212
Table of Contents
- How to Find Your Owner'smanual Online
- How to Use this Manual
- Essential Information
- Warnings and Cautions
- Graphical Table of Contents
- Instrument Panel
- Ignition Switch
- Keyless Push Button Ignition
- Remote Start - if Equipped
- How to Use Remote Start
- To Enter Remote Start Mode
- General Information
- Vehicle Security Alarm - if Equipped
- To Arm the System
- To Disarm the System
- Keyless Enter-N-Go - Passive Entry (if Equipped)
- Child-Protection Door Lock System
- Manual Adjustment (Rear Seats)
- Front Heated Seats
- Head Restraints
- Supplemental Active Head Restraints (AHR) - Front Seats
- Rear Head Restraint Adjustment
- Rear Head Restraint Removal
- Steering Wheel
- Tilt/Telescoping Steering Column
- Heated Steering Wheel - if Equipped
- Exterior Lights
- Multifunction Lever
- Daytime Running Lights (DRL)
- High/Low Beam Switch
- Flash-To-Pass
- Automatic Headlights
- Headlights on with Wipers (Available with Automatic Headlights Only)
- Headlight Time Delay
- Fog Lights - if Equipped
- Turn Signals
- Wipers and Washers
- Windshield Wiper Operation
- Rear Window Wiper/Washer
- Climate Controls
- Automatic Climate Controls Overview
- Climate Control Functions
- Automatic Temperature Control (ATC) - if Equipped
- Operating Tips
- Power Windows
- Wind Buffeting
- Power Sunroof - if Equipped
- Opening Sunroof
- Closing Sunroof
- Sunshade Operation
- Anti Pinch Protect Feature
- Sunroof Maintenance
- Ignition off Operation
- Universal Garage Door Opener (Homelink)
- Before You Begin Programming Homelink
- Erasing All the Homelink Channels
- Identifying Whether You Have a Rolling Code or Non-Rolling Code Device
- Programming Homelink to a Garage Door Opener
- Programming Homelink to a Miscellaneous Device
- Reprogramming a Single Homelink Button
- Internal Equipment
- Power Outlets
- Power Inverter - if Equipped
- Roof Luggage Rack - if Equipped
- Instrument Cluster Display
- Instrument Cluster Display Location and Controls
- Oil Change Due
- Instrument Cluster Display Selectable Menu Items
- Battery Saver On/Battery Saver Mode Message - Electrical Load Reduction Actions - if Equipped
- Warning Lights and Messages
- Red Warning Lights
- Yellow Warning Lights
- Green Indicator Lights
- White Indicator Lights
- Blue Indicator Lights
- Onboard Diagnostic System - Obd II
- Onboard Diagnostic System (OBD II) Cybersecurity
- Auxiliary Driving Systems
- Tire Pressure Monitoring System (TPMS)
- Occupant Restraint Systems
- Occupant Restraint Systems Features
- Important Safety Precautions
- Seat Belt Systems
- Supplemental Restraint Systems (SRS)
- Child Restraints
- Transporting Pets
- Safety Tips
- Transporting Passengers
- Exhaust Gas
- Safety Checks You Should Make Inside the Vehicle
- Periodic Safety Checks You Should Make Outside the Vehicle
- Engine Break-In Recommendations - Gasoline Engine
- Speed Control - if Equipped
- To Activate
- To Set a Desired Speed
- To Vary the Speed Setting
- To Accelerate for Passing
- To Resume Speed
- To Deactivate
- PARKSENSE REAR PARK ASSIST - if EQUIPPED Parksense Sensors
- Parksense Warning Display
- Enabling and Disabling Parksense
- Parksense System Usage Precautions
- Parkview Rear Back up Camera
- Refueling the Vehicle
- Loose Fuel Filler Cap Message
- Materials Added to Fuel
- Trailer Towing
- Trailer Towing Weights (Maximum Trailer Weight Ratings)
- Recreational Towing (Behind Motorhome, Etc.)
- Towing this Vehicle Behind Another Vehicle
- Bulb Replacement
- Replacement Bulbs
- Interior Fuses
- Underhood Fuses (Power Distribution Center)
- Jacking and Tire Changing
- Jack Location
- Spare Tire Location and Removal
- Preparations for Jacking
- Jacking Instructions
- Road Tire Installation
- Spare Tire Stowage
- Jump Starting
- Preparations for Jump Start
- Jump Starting Procedure
- If Your Engine Overheats
- 2.4L Engine - if Equipped
- Gear Selector Override
- Freeing a Stuck Vehicle
- Towing a Disabled Vehicle
- All-Wheel Drive (AWD) Models
- Front-Wheel Drive (FWD) Models
- Enhanced Accident Response System (Ears)
- Event Data Recorder (Edr)
- Scheduled Servicing
- Maintenance Plan
- Engine Compartment
- 2.4L Engine
- Raising the Vehicle
- Tire Safety Information
- Tires - General Information
- Spare Tires - if Equipped
- Wheel and Wheel Trim Care
- Department of Transportation Uniform Tire Quality Grades
- Traction Grades
- Temperature Grades
- Wheel and Tire Torque Specifications
- Torque Specifications
- Flexible Fuel (3.6L Engine Only)
- E-85 General Information
- Fluid Capacities
- Fluids and Lubricants
- Mopar Accessories
- Authentic Accessories by Mopar
- Cybersecurity
- Radio 4.3 & 4.3S
- Radio 4.3 & 4.3S at a Glance
- Uconnect 3/3 Nav with 8.4-Inch Display
- Uconnect 3/3 NAV at a Glance
- Uconnect Settings
- Steering Wheel Audio Controls
- Left Switch
- Right Switch
- Playing Ipod/Usb/Mp3 Devices
- Audio Jack (AUX)
- SD Card (3/3 NAV Only)
- Bluetooth Streaming Audio
- Video Entertainment System (Ves)
- System Operation
- Operation of the Remote
- Auxiliary Audio/Video Input Jacks
- Navigation Overview
- Main Navigation Menu
- Following Your Route
- Siriusxm Travel Link (3 NAV Only)
- Uconnect Phone
- Uconnect Phone (Bluetooth Hands Free Calling)
- Pairing a Phone
- Making a Phone Call
- Receiving a Call - Accept (and End)
- Common Phone Commands (Examples)
- Mute (or Unmute) Microphone During Call
- Transfer Ongoing Call between Handset and Vehicle
- Voice Command Tips (3/3 NAV Only)
- Changing the Volume
- Voice Text Reply
- Uconnect Voice Command (3/3 Nav Only)
- Common Voice Commands (Examples)
- Common Navigation Voice Commands
- If You Need Assistance
- FCA US LLC Customer Center
- FCA Canada Inc. Customer Center
- In Mexico Contact
- Puerto Rico and U.S. Virgin Islands
- Customer Assistance for the Hearing or Speech Impaired (TDD/TTY)
- Service Contract
- Reporting Safety Defects
- In the 50 United States and Washington
- Publication Order Forms
Advertisement
Quick Links
Related manuals for dodge journey 2019.

Summary of Contents for Dodge JOURNEY 2019
- Page 1 2019 JOURNEY USER GUIDE...
- Page 2 I M P O R T A N T Get warranty and othe r informati on online – you ca n revi ew an d prin t or d o wn lo a d a c op y o f t h e Ow n er ’s M a n u a l, Na viga ti on/U connect manuals and the limited warra n ti es p rovi d ed b y FCA US L LC f or y ou r ve h ic le b y vi si tin g w ww.mopar.com (U.S.) or www.owners.mopar.ca (Ca n ad a ).
Page 3: How To Find Your Owner'smanual Online
Page 4: how to use this manual, page 5: graphical table of contents, page 6: table of contents.
- Page 7 To Accelerate For Passing ... . . 114 Jump Starting Procedure ... . . 135 WARNING LIGHTS AND MESSAGES ..60 Red Warning Lights .
- Page 8 E-85 General Information ... . . 164 USB Port ..... 181 Voice Text Reply .
Page 9: Instrument Panel
Page 10: interior, page 11: keys.
- Page 12 The Panic Alarm will stay on for three minutes To Lock The Doors And Liftgate Backup Starting Method unless you turn it off by either pushing the Panic In case the ignition switch does not change with Push and release the lock button on the key fob button a second time or drive the vehicle at a the push of a button, the key fob may have a low to lock all doors and liftgate.
Page 13: Ignition Switch
Page 14: remote start - if equipped, page 15: general information, page 16: to disarm the system.
- Page 17 • If the vehicle is unlocked by Passive Entry and To Unlock From The Passenger Side: no door is opened within 60 seconds, the With a valid Passive Entry key fob within 5 ft vehicle will re-lock and if equipped will arm (1.5 m) of the passenger door handle, grab the the security alarm.
- Page 18 If one of the vehicle doors is open and the vehicle is locked with a door panel switch, key fob button or door handle button, once all open doors have been closed the vehicle checks the inside and outside of the vehicle for any valid Passive Entry key fobs.
Page 19: Child-Protection Door Lock System
Page 20: seats, page 21: manual adjustment (rear seats).
- Page 22 2. Place one hand on the seatback and apply a Manual Folding Second Row Seat WARNING! gentle pressure. To Fold The Seat Do not drive the vehicle with the seat in this 3. Lift the control lever with the other hand, position, as it is only intended for entering and allow the seatback to move forward slightly, exiting the third row seats.
- Page 23 The seatback can also be locked in the reclined To Unfold The Seat To Fold The Seatback position. To do so, pull the latch release-loop Raise the seatback and lock it in place. Pull the latch release-loop located at the top of located at the top of the seatback upward, allow the seatback upward, push the seatback for- the seatback to recline, and release the...
Page 24: Front Heated Seats
Page 25: supplemental active head restraints (ahr) - front seats, page 26: rear head restraint adjustment, page 27: rear head restraint removal, page 28: exterior lights, page 29: daytime running lights (drl), page 30: headlights on with wipers (available with automatic headlights only), page 31: wipers and washers, page 32: rear window wiper/washer, page 33: climate controls.
- Page 34 Automatic Climate Controls Descriptions Icon Description MAX A/C Button Press the button on the touchscreen to change the current setting, the indicator illuminates when MAX A/C is on. Pressing it again turns the MAX A/C operation to switch into manual mode and the MAX A/C indicator turns off. NOTE: The MAX A/C button is only available on the touchscreen.
- Page 35 Icon Description Rear Defrost Button The Rear Defrost Control button turns on the rear window defroster and the heated outside mirrors (if equipped). An indicator will illuminate when the rear window defroster is on. The rear window defroster automatically turns off after ten minutes. Rear Climate Control Button Press and release this button to access the rear climate controls.
- Page 36 Icon Description Faceplate Knob Blower Control Blower Control is used to regulate the amount of air forced through the climate system. There are seven blower speeds avail- able. The speeds can be selected using either the blower control knob on the faceplate or the buttons on the touchscreen. •...
- Page 37 Icon Description Floor Mode Floor Mode Air comes from the floor outlets. A slight amount of air is directed through the defrost and side window demister outlets. Mix Mode Mix Mode Air is directed through the floor, defrost, and side window demister outlets. This setting works best in cold or snowy conditions that require extra heat to the windshield.
- Page 38 Icon Description Rear Auto Button Automatically controls the rear interior cabin temperature by adjusting airflow distribution and amount. Performing this func- tion will cause the system to switch between manual mode and automatic modes. Refer to "Automatic Operation" within this section for more information.
- Page 39 Icon Description Blower Control Blower Control is used to regulate the amount of air forced through the climate system. There are seven blower speeds avail- able. Adjusting the blower will cause automatic mode to switch to manual operation. The speeds can be selected using the buttons on the touchscreen.
- Page 40 1. Adjust the Rear Blower, Rear Temperature Rear Automatic Temperature Control (ATC) NOTE: and the Rear Modes to suit your comfort • It is not necessary to move the temperature needs. settings. The system automatically adjusts the temperature, mode and fan speed to pro- 2.
- Page 41 Icon Description Bi-Level Mode Bi-Level Mode Air comes from both the headliner outlets and the floor outlets. NOTE: In many temperature positions, the Bi-Level mode is designed to provide cooler air out of the headliner outlets and warmer air from the floor outlets. Floor Mode Floor Mode Air comes from the floor outlets.
Page 42: Climate Control Functions
Page 43: automatic temperature control (atc) - if equipped, page 44: windows.
- Page 45 To close the window part way, pull the window Auto-Down Feature Window Lockout Switch switch up to the first detent and release it when The driver's power window switch has an Auto- The window lockout switch on the driver's door you want the window to stop.
Page 46: Wind Buffeting
Page 47: opening sunroof, page 48: hood, page 49: universal garage door opener (homelink), page 50: before you begin programming homelink, page 51: programming homelink to a garage door opener, page 52: programming homelink to a miscellaneous device, page 53: internal equipment.
- Page 54 CAUTION! • Do not exceed the maximum power of 160 Watts (13 Amps) at 12 Volts. If the 160 Watt (13 Amp) power rating is ex- ceeded the fuse protecting the system will need to be replaced. • The power outlet on the bottom of the center console shares the fuse with the power outlet on the back of the console.
- Page 55 Power Outlet Fuses 1 — F103 20 Amp Yellow — Power Outlet Console Bin And Power Outlet Console Rear 2 — F102 20 Amp Yellow — Cigar Lighter Instrument Panel And Power Outlet Left Rear Cargo Area...
Page 56: Power Inverter - If Equipped
Page 57: roof luggage rack - if equipped.
- Page 58 2. Relocate the crossbars, aligning the crossbar The tie down holes on the crossbar ends CAUTION! stanchions (end pieces) with one of the ver- should always be used to tie down the load. • Crossbars should remain equally spaced or tical marks on the outboard surface of the Check the straps frequently to be sure that the parallel at any roof rack position for proper...
Page 59: Instrument Cluster Display
Page 60: oil change due.
- Page 61 Load reduction is only active when the engine is The electrical loads that may be switched off (if • Unusual driving cycles (short trips separated running. It will display a message if there is a equipped), and vehicle functions which can be by long parking periods).
Page 62: Warning Lights And Messages
- Page 63 Warning Light, which will turn on when the Operation of the Brake Warning Light can be — Engine Coolant Temperature Warn- brake fluid level in the master cylinder has checked by turning the ignition switch from the ing Light dropped below a specified level. OFF position to the ON/RUN position.
- Page 64 transmission in PARK or NEUTRAL, until the This indicates a possible problem with the elec- turn off. If the light remains on with the vehicle light turns off. Once the light turns off, you may trical system or a related component. running, your vehicle will usually be drivable;...
Page 65: Yellow Warning Lights
- Page 66 — Electronic Stability Control (ESC) — Electronic Stability Control (ESC) Off CAUTION! Active Warning Light — If Equipped Warning Light — If Equipped steering. If a tire puncture occurs, repair This warning light will indicate when the Elec- This warning light indicates the Electronic Sta- immediately using the dedicated tire repair tronic Stability Control system is Active.
- Page 67 tire failure. Under-inflation also reduces fuel vehicle that prevent the TPMS from functioning — Anti-Lock Brake (ABS) Warning efficiency and tire tread life, and may affect the properly. Always check the TPMS malfunction Light vehicle’s handling and stopping ability. telltale after replacing one or more tires or This warning light monitors the Anti-Lock Brake wheels on your vehicle to ensure that the re- Please note that the TPMS is not a substitute for...
Page 68: Green Indicator Lights
Page 69: onboard diagnostic system (obd ii) cybersecurity, page 70: auxiliary driving systems.
- Page 71 Warning Light. Driving the vehicle may cause • The TPMS is not a substitute for proper tire CAUTION! maintenance, and it is the driver’s responsibil- the tire pressure to rise to approximately 28 psi • Using aftermarket tire sealants may cause ity to maintain correct tire pressure using an (193 kPa), but the Tire Pressure Monitoring the Tire Pressure Monitoring System...
- Page 72 The TPMS consists of the following compo- NOTE: nents: When filling warm tires, the tire pressure may need to be increased up to an additional 4 psi • Receiver module (28 kPa) above the recommended cold placard • Four tire pressure monitoring sensors pressure in order to turn the Tire Pressure Moni- toring System Warning Light off.
- Page 73 TEM" message will no longer display, and a chime will sound. In addition, the graphic in display a new pressure value instead of dashes the instrument cluster will still display a pres- (- -), as long as no tire pressure is below the pressure value will display in place of the sure value in a different color and an "Inflate low-pressure warning limit in any of the four...
Page 74: Occupant Restraint Systems
Page 75: seat belt systems.
- Page 76 The outboard front passenger seat BeltAlert is Enhanced Seat Belt Use Reminder System BeltAlert Warning Sequence not active when the outboard front passenger (BeltAlert) The BeltAlert warning sequence is activated seat is unoccupied. BeltAlert may be triggered when the vehicle is moving above a specified Driver and Passenger BeltAlert (if equipped) when an animal or other items are placed on the vehicle speed range and the driver or outboard...
- Page 77 Lap/Shoulder Belts WARNING! WARNING! All seating positions in your vehicle are • It is dangerous to ride in a cargo area, lap/shoulder belt or a lap belt for more than equipped with lap/shoulder belts. inside or outside of a vehicle. In a collision, one person, no matter what their size.
- Page 78 1. Enter the vehicle and close the door. Sit WARNING! WARNING! back and adjust the seat. • A seat belt that is too loose will not protect modify the seat belt system. Seat belt 2. The seat belt latch plate is above the back of you properly.
- Page 79 6. To release the seat belt, push the red button belt away from your neck. Push or squeeze the NOTE: anchorage button to release the anchorage, and The adjustable upper shoulder belt anchorage is on the buckle. The seat belt will automati- move it up or down to the position that serves equipped with an Easy Up feature.
- Page 80 Position the lap belt snug and low below the Seat Belt Extender WARNING! abdomen and across the strong bones of the If a seat belt is not long enough to fit properly, long enough and only use in the recom- hips.
- Page 81 essary to comfortably wrap around the occu- Energy Management Feature — If Equipped pant’s mid-section. Slide the latch plate into the The front outboard seat belt system is equipped buckle until you hear a "click." and the second row outboard seat belt system In Automatic Locking Mode, the shoulder belt is may be equipped with an Energy Management automatically pre-locked.
- Page 82 How To Engage The Automatic Locking Mode How The Active Head Restraints (AHR) Work WARNING! 1. Buckle the combination lap and shoulder The Occupant Restraint Controller (ORC) deter- • Failure to replace the seat belt assembly belt. mines whether the severity or type of rear im- could increase the risk of injury in colli- pact will require the Active Head Restraints sions.
- Page 83 Active Head Restraint (AHR) Components: NOTE: WARNING! For more information on properly adjusting and positioning the head restraint, refer to “Head • All occupants, including the driver, should Restraints” in “Getting To Know Your Vehicle.” not operate a vehicle or sit in a vehicle’s seat until the head restraints are placed in Resetting Active Head Restraints (AHR) their proper positions in order to minimize...
Page 84: Supplemental Restraint Systems (Srs)
- Page 85 • The Air Bag Warning Light remains on after Front Air Bags the four to eight-second interval. This vehicle has front air bags and lap/shoulder • The Air Bag Warning Light comes on intermit- belts for both the driver and front passenger. tently or remains on while driving.
- Page 86 Driver And Passenger Front Air Bag WARNING! WARNING! Features • Being too close to the steering wheel or • No objects should be placed over or near The Advanced Front Air Bag system has multi- instrument panel during front air bag de- the air bag on the instrument panel or stage driver and front passenger air bags.
- Page 87 When the ORC detects a collision requiring the Front Air Bag Operation Supplemental Driver Knee Air Bag front air bags, it signals the inflator units. A Front Air Bags are designed to provide addi- This vehicle is equipped with a Supplemental large quantity of non-toxic gas is generated to tional protection by supplementing the seat Driver Knee Air Bag mounted in the instrument...
- Page 88 The SABs may help to reduce the risk of occu- the door. The SAB moves at a very high speed pant injury during certain side impacts, in ad- and with such a high force that it could injure dition to the injury reduction potential provided occupants if they are not seated properly, or if by the seat belts and body structure.
- Page 89 The SABIC deploys downward, covering the side The Side Air Bags will not deploy in all side WARNING! windows. An inflating SABIC pushes the out- collisions, including some collisions at certain vehicle. Do not add roof racks that require side edge of the headliner out of the way and angles, or some side collisions that do not im- permanent attachments (bolts or screws) covers the window.
- Page 90 Air Bag System Components Rollover Events WARNING! Side Air Bags are designed to activate in certain NOTE: seat belts properly and sit upright with rollover events. The ORC determines whether The Occupant Restraint Controller (ORC) moni- their backs against the seats. Children the deployment of the Side Air Bags in a par- tors the internal circuits and interconnecting must be properly restrained in a child re-...
- Page 91 irritation, rinse the area with cool water. For If A Deployment Occurs Enhanced Accident Response System nose or throat irritation, move to fresh air. If The front air bags are designed to deflate imme- In the event of an impact, if the communication the irritation continues, see your doctor.
- Page 92 • Cut off battery power to the: Enhanced Accident Response System Reset WARNING! – Engine Procedure • It is dangerous to try to repair any part of – Electric Motor (if equipped) In order to reset the Enhanced Accident Re- the air bag system yourself.
Page 93: Child Restraints
- Page 94 Before buying any restraint system, make sure • Canadian residents should refer to Transport NOTE: that it has a label certifying that it meets all Canada’s website for additional information: • For additional information, refer to http:// applicable Safety Standards. You should also http://www.tc.gc.ca/eng/motorvehiclesafety/ www.nhtsa.gov/parents-and-caregivers or call: make sure that you can install it in the vehicle...
- Page 95 Infant And Child Restraints WARNING! WARNING! Safety experts recommend that children ride Do not install a rear-facing car seat using a • Never place a rear-facing child restraint in rear-facing in the vehicle until they are two years rear support leg in this vehicle. The floor of front of an air bag.
- Page 96 Older Children And Child Restraints Integrated Child Booster Seat — If WARNING! Equipped Children who are two years old or who have • Improper installation can lead to failure of The Integrated Child Booster Seat is located in outgrown their rear-facing convertible child seat an infant or child restraint.
- Page 97 To position a child into the Integrated Child 3. Lift the seat cushion up and push back to 6. Slide the latch plate up the webbing as far as lock it in the booster seat position. Booster Seat follow these steps: necessary to allow the seat belt to go around the child’s lap.
- Page 98 If the answer to any of these questions was Children Too Large For Booster Seats WARNING! “no,” then the child still needs to use a booster Children who are large enough to wear the seat in this vehicle. If the child is using the In a severe collision, the booster seat may be shoulder belt comfortably, and whose legs are lap/shoulder belt, check seat belt fit periodically...
- Page 99 Recommendations For Attaching Child Restraints Restraint Type Combined Weight of the Use Any Attachment Method Shown With An “X” Below Child + Child Restraint LATCH – Lower Anchors Seat Belt Only LATCH – Lower Anchors Seat Belt + Top Tether Only + Top Tether Anchor Anchor...
- Page 100 Your vehicle is equipped with the child restraint Lower Anchors And Tethers For CHildren LATCH Positions For Installing Child anchorage system called LATCH, which stands Restraints In This Vehicle (LATCH) Restraint System for Lower Anchors and Tethers for CHildren. The LATCH system has three vehicle anchor points for installing LATCH-equipped child seats.
- Page 101 Frequently Asked Questions About Installing Child Restraints With LATCH Use the LATCH anchorage system until the combined weight of the child What is the weight limit (child’s weight + weight and the child restraint is 65 lbs (29.5 kg). Use the seat belt and tether an- of the child restraint) for using the LATCH anchor- 65 lbs (29.5 kg) chor instead of the LATCH system once the combined weight is more than...
- Page 102 facing child restraints will also be equipped Locating The LATCH Anchorages Locating The Upper Tether Anchorages with a tether strap. The tether strap will have a hook at the end to attach to the top tether The lower anchorages are round bars that are There are tether strap anchorages behind each anchorage and a way to tighten the strap after it found at the rear of the seat cushion where it...
- Page 103 2. Left outboard and center seating positions WARNING! (3 and 2): Install the first child seat in the • If you are installing three child restraints left outboard seating position using lower next to each other, you must use the seat anchorages D and E.
- Page 104 1. Loosen the adjusters on the lower straps and 5. Tighten all of the straps as you push the child straint installation, instead of buckling it behind on the tether strap of the child seat so that restraint rearward and downward into the seat. the child restraint, route the seat belt through you can more easily attach the hooks or Remove slack in the straps according to the...
- Page 105 are designed to keep the lap portion of the seat Installing Child Restraints Using The Ve- Lap/Shoulder Belt Systems For Installing belt tight around the child restraint so that it is hicle Seat Belt Child Restraints In This Vehicle not necessary to use a locking clip. The ALR Child restraint systems are designed to be se- retractor can be “switched”...
- Page 106 Frequently Asked Questions About Installing Child Restraints With Seat Belts What is the weight limit (child’s weight + weight Always use the tether anchor when using the seat belt to install a forward of the child restraint) for using the Tether Anchor Weight limit of the facing child restraint, up to the recommended weight limit of the child re- with the seat belt to attach a forward facing child...
- Page 107 2. Pull enough of the seat belt webbing from 7. Finally, pull up on any excess webbing to Installing A Child Restraint With A Cinching the retractor to pass it through the belt path tighten the lap portion around the child re- Latch Plate (CINCH) —...
- Page 108 2. Next, pull enough of the seat belt webbing Any seat belt system will loosen with time, so Installing Child Restraints Using The Top from the retractor to pass it through the belt check the belt occasionally, and pull it tight if Tether Anchorage path of the child restraint.
- Page 109 1. Look behind the seating position where you 2. Route the tether strap to provide the most plan to install the child restraint to find the direct path for the strap between the anchor tether anchorage. You may need to move the and the child seat.
Page 110: Transporting Pets
Page 111: safety checks you should make inside the vehicle, page 112: periodic safety checks you should make outside the vehicle.
- Page 113 Door Latches Check for proper closing, latching, and locking. Fluid Leaks Check area under the vehicle after overnight parking for fuel, coolant, oil, or other fluid leaks. Also, if gasoline fumes are detected or if fuel, or brake fluid leaks are suspected. The cause should be located and corrected immediately.
Page 114: Engine Break-In Recommendations - Gasoline Engine
Page 115: to activate, page 116: to accelerate for passing, page 117: parksense rear park assist - if equipped parksense sensors.
- Page 118 • Jackhammers, large trucks, and other vibra- can result in the system misinterpreting a WARNING! close object as a sensor problem, causing the tions could affect the performance of mount and hitch ball assembly, depending “SERVICE PARK ASSIST SYSTEM” message ParkSense.
Page 119: Parkview Rear Back Up Camera
Page 120: refueling the vehicle, page 121: loose fuel filler cap message, page 122: trailer towing, page 123: recreational towing (behind motorhome, etc.), page 124: bulb replacement, page 125: fuses, page 126: interior fuses, page 127: underhood fuses (power distribution center).
- Page 128 Cavity Cartridge Fuse Mini-Fuse Description F139 40 Amp Green – Climate Control System Blower F140 30 Amp Pink – Power Locks F141 40 Amp Green – Anti-Lock Brake System F142 40 Amp Green – Glow Plugs – If Equipped F143 40 Amp Green –...
- Page 129 Cavity Cartridge Fuse Mini-Fuse Description F163 50 Amp Red – Cabin Heater #2 – If Equipped F164 – 25 Amp Clear Powertrain Auto Shutdown F165 – 20 Amp Yellow Powertrain Shutdown F166 – 20 Amp Yellow Spare F167 – 30 Amp Green Powertrain Shutdown F168 –...
Page 130: Jacking And Tire Changing
Page 131: preparations for jacking.
- Page 132 WARNING! • Turn on the Hazard Warning flasher. • Block the wheel diagonally opposite the wheel to be raised. • Apply the parking brake firmly and set the transmission in PARK. • Never start or run the engine with the vehicle on a jack.
- Page 133 3. Place the jack in the notches underneath the WARNING! lift area that is closest to the flat tire. Center the jack saddle between the drain flute for- Raising the vehicle higher than necessary mations on the sill flange. Turn the jack can make the vehicle less stable.
- Page 134 7. Install the wheel nuts with the cone-shaped 10. Lower the jack to its fully closed position. end of the nut toward the wheel. Lightly 11. Place the deflated (flat) tire in the cargo tighten the wheel nuts. area. Do not stow the deflated tire in the spare tire stowage location.
Page 135: Road Tire Installation
Page 136: spare tire stowage, page 137: jump starting procedure, page 138: if your engine overheats, page 139: 2.4l engine - if equipped, page 140: towing a disabled vehicle, page 141: all-wheel drive (awd) models, page 142: enhanced accident response system (ears), page 143: scheduled servicing, page 144: maintenance plan.
- Page 145 Mileage or time passed (whichever comes first) Or Years: Or Kilometers: Additional Inspections Inspect the CV joints. Inspect front suspension, tie rod ends, and replace if necessary. Inspect the brake linings, parking brake function. Additional Maintenance Replace engine air filter. Replace air conditioning filter.
- Page 146 ** The spark plug change interval is mileage Heavy Duty Use Of The Vehicle based only, yearly intervals do not apply. Change engine oil at 4,000 miles (6,500 km) or 350 hours of engine run time if the vehicle is WARNING! operated in a dusty and off road environment or is operated predominately at idle or only very...
Page 147: Engine Compartment
Page 148: l engine, page 149: raising the vehicle.
- Page 150 Tire Sizing Chart EXAMPLE: Example Size Designation: P215/65R15XL 95H, 215/65R15 96H, LT235/85R16C, T145/80D18 103M, 31x10.5 R15 LT P = Passenger car tire size based on U.S. design standards, or "..blank.." = Passenger car tire based on European design standards, or LT = Light truck tire based on U.S.
- Page 151 EXAMPLE: Load Identification: Absence of the following load identification symbols on the sidewall of the tire indicates a Standard Load (SL) tire: • XL = Extra load (or reinforced) tire, or • LL = Light load tire or • C, D, E, F, G = Load range associated with the maximum load a tire can carry at a specified pressure Maximum Load –...
- Page 152 EXAMPLE: 01 = Number representing the year in which the tire was manufactured (two digits) • 01 means the year 2001 • Prior to July 2000, tire manufacturers were only required to have one number to represent the year in which the tire was manufactured. Example: 031 could represent the 3rd week of 1981 or 1991 Tire Terminology And Definitions Term...
- Page 153 This placard tells you important information Tire Loading And Tire Pressure about the: NOTE: 1. Number of people that can be carried in the The proper cold tire inflation pressure is listed vehicle. on the driver’s side B-Pillar or the rear edge of the driver's side door.
- Page 154 (4) The resulting figure equals the avail- To determine the maximum loading conditions Metric Example For Load Limit of your vehicle, locate the statement “The com- able amount of cargo and luggage load For example, if “XXX” amount equals 635 kg bined weight of occupants and cargo should capacity.
Page 156: Tires - General Information
- Page 157 three hours, or driven less than 1 mile (1.6 km) Tire Inflation Pressures Tire Pressures For High Speed Operation after sitting for a minimum of three hours. The The proper cold tire inflation pressure is listed The manufacturer advocates driving at safe cold tire inflation pressure must not exceed the on the driver's side B-Pillar or rear edge of the speeds and within posted speed limits.
- Page 158 Radial Ply Tires Run Flat Tires — If Equipped Tire Spinning Run Flat tires allow you the capability to drive When stuck in mud, sand, snow, or ice condi- WARNING! 50 miles (80 km) at 50 mph (80 km/h) after a tions, do not spin your vehicle's wheels above rapid loss of inflation pressure.
- Page 159 • Tire pressure - Improper cold tire inflation Keep dismounted tires in a cool, dry place with pressures can cause uneven wear patterns to as little exposure to light as possible. Protect develop across the tire tread. These abnormal tires from contact with oil, grease, and gasoline. wear patterns will reduce tread life, resulting Replacement Tires in the need for earlier tire replacement.
Page 160: Tire Types
Page 161: spare tires - if equipped.
- Page 162 Inflate collapsible tire only after the wheel is Compact Spare Tire — If Equipped WARNING! properly installed to the vehicle. Inflate the The compact spare is for temporary emergency collapsible tire using the electric air pump be- Compact and collapsible spares are for tem- use only.
Page 163: Wheel And Wheel Trim Care
Page 164: department of transportation uniform tire quality grades, page 165: traction grades, page 166: wheel and tire torque specifications, page 167: fluid capacities, page 168: fluids and lubricants, page 169: chassis.
- Page 170 EXTERIOR: • Fog Lights • Molded Splash Guards • Front Air Deflector • Hitch Receiver INTERIOR: • Cargo Tray • Slush Mats • Door Sill Guards • Premium Carpet Floor Mats • Katzkin Leather Interiors ELECTRONICS: • Park Assist • Mopar Web (Wi-Fi) •...
Page 171: Cybersecurity
Page 172: radio 4.3 & 4.3s.
- Page 173 Displaying The Time Audio Settings Balance/Fade • If the time is not currently displayed at the top • Push the SETTINGS button on the faceplate • Press the “Balance/Fade” button on the of the screen when in Radio mode, push the on the right side of the unit.
Page 174: Radio
- Page 175 • To access the Radio mode, push the RADIO Store Radio Presets Manually button on the upper left side of the faceplate. Your radio can store 12 total preset stations. They are shown at the top of your screen. To see Selecting Radio Stations all 12 stations, press the “All”...
Page 176: Media
- Page 177 • The iPod/CD/AUX controls are accessed by NOTE: pushing the PLAYER button on the faceplate Uconnect will usually automatically switch to to enter the Player main screen, then press the the appropriate mode when something is first “Source” button on the touchscreen and connected or inserted into the system.
Page 178: Uconnect 3/3 Nav With 8.4-Inch Display
- Page 179 • Press “+” or “–” next to Set Time Hours and Displaying The Time Equalizer Set Time Minutes to adjust the time. • If the time is not currently displayed on the • Press the “Equalizer” button on the touch- radio or player main page, press the “More”...
Page 180: Radio
Page 181: media, page 182: uconnect settings, page 183: steering wheel audio controls, page 184: sd card (3/3 nav only), page 185: operation of the remote, page 186: main navigation menu.
- Page 187 Acquiring Satellites Finding A Place By Spelling The Name Setting Or Changing Your Home Location • The GPS Satellite strength bars indicate the • From the Main Navigation Menu press “Where • Press the “Nav” button on the touchscreen in strength of your satellite reception.
Page 188: Following Your Route
Page 189: siriusxm travel link (3 nav only), page 190: uconnect phone.
- Page 191 Start Pairing Procedure On Mobile Phone NOTE: Keep in mind that software updates – either on • Search for available devices on your Bluetooth your phone or Uconnect system – may interfere enabled mobile phone. This is usually within with the Bluetooth connection. If this happens, Settings or Options under “Bluetooth.”...
- Page 192 Phone Menu Screen — Radio 4.3 & 4.3S 1 — Redial Last Number 7 — Manage Paired Phones 2 — Phone Signal 8 — Conference Call 3 — Current Phone 9 — Direct Dial 4 — Phone Battery Level 10 — Recent Call List 5 —...
- Page 193 Phone Menu Screen — Uconnect 3/3 NAV 1 — Favorite Phonebook Entries 8 — Manage Paired Phones 2 — Phone Battery Level 9 — SMS (text messaging) 3 — Current Phone 10 — Direct Dial 4 — Phone Signal 11 — Recent Call List 5 —...
Page 194: Making A Phone Call
Page 195: voice text reply, page 196: uconnect voice command (3/3 nav only).
- Page 197 • Locating an address can be given as a one The following chart lists the navigation voice WARNING! commands that may be available. shot entry. For example, after saying “Find Address” and the system is ready, you can say Any voice commanded system should be Navigation Voice Commands: the entire address in one command, used only in safe driving conditions following...
Page 198: If You Need Assistance
Page 199: customer assistance for the hearing or speech impaired (tdd/tty), page 200: reporting safety defects, page 201: index.
- Page 202 Compact Spare Tire ... . .160 Towing ....138 Flexible Fuel Vehicles Engine .....145 Contract, Service .
- Page 203 Headlights iPod/USB/MP3 Control ..174, 179, 181 Air Bag ....60, 82, 109 Automatic ....27 Bluetooth Streaming Audio .
- Page 204 Loading Vehicle Octane Rating, Gasoline (Fuel) ..166 Inverter ....54 Tires ....151 Oil, Engine .
- Page 205 Panic Alarm ....10 Lap/Shoulder Belt Untwisting ..77 Spark Plugs ....166 Replacement Bulbs .
- Page 206 Tires ... .110, 154, 159, 162 Tire Safety Information... .147 Vehicle Storage ....41 Aging (Life Of Tires) .
- Page 211 D O D G E . C O M ( U . S . ) D R I V I N G A N D The driver’s pri ma ry r es p on si b ili ty i s th e safe opera ti on of th e ve h icl e.
- Page 212 Dodge brand vehicle. Simply download the app, select your make and model and enjoy the ride. To get this app, go...
Rename the bookmark
Delete bookmark, delete from my manuals, upload manual.
Dodge Journey Key Fob Battery Replacement Guide How to change the battery in the key fob remote control of a first generation 2009 to 2014 Dodge Journey SUV.
Copyright 2024 � PaulsTravelPictures.com All Rights Reserved �
Privacy Policy About Paul & Author Contact Info
Shopping Cart:
- Aftermarket
- Mercedes-Benz
- Free Shipping on all orders. No minimum purchases*
- Compare ( 0 )
Customer Login
If you are already registered, please log in.
Create your account and enjoy a new shopping experience.
We're here for you!
don't pay full price
Take 10% off your entire order, *discount applied in cart*.
*Minimum order value $55. Maximum order value $250. Not valid with any other offer, promo, or discount. Not valid for professional equipment, software, or tokens. Ends October 16, 2020.
Select Your Vehicle
- Shop By Car Make
Dodge Journey OEM 4 Button Key Fob

have questions?
Guaranteed Fitment
Always the correct part
In-House Experts
We know our products
Added Value
Mounting, Balancing
Wordwide Delivery
Free shipping on all orders
Write a Review

- Discount applied in cart
- Cannot be combined with other discounts or offers
- Discounts do not apply to professional programming and key cutting equipment
- Discount does not apply to key fobs with bulk pricing options
- Offer only valid for in stock products
Free Standard Shipping & Returns
Get it by Fri ,Nov 27 with Express Shipping

Frequently Bought Together

Total Price:
Please choose options for all selected products
- This Item: Dodge Journey OEM 4 Button Key Fob Your price: $38.34 Our price Dealer price: $119.99 (You save $81.65 )
Related Products

New Aftermarket Dodge Key Fob Replacement 4 Button w/ Remote Start M3N-40821302
- Description
This is a Factory OEM (Original Equipment Manufacturer) Dodge Journey 4 Button keyless entry remote, aka "key fob".
Genuine OEM electronics in a new aftermarket case with uncut key.
2011-2020 Dodge Journey
MUST BE PROGRAMMED BY A PROFESSIONAL
You need to know the only way to get a NEW OEM key fob is to go to a dealer or authorized reseller of OEM parts, and you will pay dealer prices if you do this and spend hundreds of dollars.
The key fob you are going to purchase from us is used or as we like to say "previously loved". We recycle OEM key fobs and put them through a rigorous refurbishing process so we can guarantee our products and offer them at a reasonable price along with saving the environment. Oh, and we are not robbing you of your hard earned dollars like the stealership does. So if you are good with all of this what are you waiting for? Make your life easier, order a key fob from us and save the world!
Customer Reviews
Posted by Robert Walters on Jan 13th 2023
Off lease car only one FOB
Posted by William Burke on Jun 23rd 2020
These guys are great..I bought a low mileage off lease Dodge Journey and only received one key fob. I'm convinced the factory stuff is better than after market and these folks filled the bill perfectly. I'm a happy customer.
Posted by Tammy Gaucher on Jun 11th 2020
Fob was cheaper than a dealership and took to a locksmith to program. Quick, easy and saved me money.
https://www.keylessentryremotefob.com/dodge-journey-oem-4-button-key-fob/?revpage=2
Add to Your Shopping Cart
We are the experts.
Unmatched, expert support for ANY keyless remote issue. We've got your back!
Stay In The Know
Sign up for Keyless Entry Remote's News, Sales, and Deals.
Programming Instructions
Remote & Transponder Key Programming Instructions for over 5,000 vehicles!

Ask An Experts
- Sport Betting
- Yearly calendar
- Latest results
- English Español French Italiano Nederlands
TheSports.org
All sports Site

Field hockey - Dinamo Elektrostal Moscow

Hockey Club Dinamo Elektrostal is a field hockey team from Russia, based in Moscow. The club was founded in 1994.
Dinamo Elektrostal Moscow - Results
2021/2022 2018/2019 2017/2018 2017 2015/2016 2013/2014 2011/2012 2007/2008
Men's Euro Hockey League - Final Round - 2021/2022
Dinamo elektrostal moscow - identity.
- Official name : Hockey Club Dinamo Elektrostal
- Country : Russia
- Location : Moscow
- Founded : 1994
- Wikipedia link : http://nl.wikipedia.org/wiki/Dinamo_Elektrostal
Dinamo Elektrostal Moscow - Titles, trophies and places of honor
- Best result : First Round in 2021/2022
- Best result : 1st
- 1 times first in 2010
- 1 times second in 2009
- 1 times third in 2017
Trains Moscow to Elektrostal: Times, Prices and Tickets
- Train Times
- Seasonality
- Accommodations
Moscow to Elektrostal by train
The journey from Moscow to Elektrostal by train is 32.44 mi and takes 2 hr 7 min. There are 71 connections per day, with the first departure at 12:15 AM and the last at 11:46 PM. It is possible to travel from Moscow to Elektrostal by train for as little as or as much as . The best price for this journey is .
Get from Moscow to Elektrostal with Virail
Virail's search tool will provide you with the options you need when you want to go from Moscow to Elektrostal. All you need to do is enter the dates of your planned journey, and let us take care of everything else. Our engine does the hard work, searching through thousands of routes offered by our trusted travel partners to show you options for traveling by train, bus, plane, or carpool. You can filter the results to suit your needs. There are a number of filtering options, including price, one-way or round trip, departure or arrival time, duration of journey, or number of connections. Soon you'll find the best choice for your journey. When you're ready, Virail will transfer you to the provider's website to complete the booking. No matter where you're going, get there with Virail.
How can I find the cheapest train tickets to get from Moscow to Elektrostal?
Prices will vary when you travel from Moscow to Elektrostal. On average, though, you'll pay about for a train ticket. You can find train tickets for prices as low as , but it may require some flexibility with your travel plans. If you're looking for a low price, you may need to prepare to spend more time in transit. You can also often find cheaper train tickets at particular times of day, or on certain days of the week. Of course, ticket prices often change during the year, too; expect to pay more in peak season. For the lowest prices, it's usually best to make your reservation in advance. Be careful, though, as many providers do not offer refunds or exchanges on their cheapest train tickets. Unfortunately, no price was found for your trip from Moscow to Elektrostal. Selecting a new departure or arrival city, without dramatically changing your itinerary could help you find price results. Prices will vary when you travel from Moscow to Elektrostal. On average, though, you'll pay about for a train ticket. If you're looking for a low price, you may need to prepare to spend more time in transit. You can also often find cheaper train tickets at particular times of day, or on certain days of the week. Of course, ticket prices often change during the year, too; expect to pay more in peak season. For the lowest prices, it's usually best to make your reservation in advance. Be careful, though, as many providers do not offer refunds or exchanges on their cheapest train tickets.
How long does it take to get from Moscow to Elektrostal by train?
The journey between Moscow and Elektrostal by train is approximately 32.44 mi. It will take you more or less 2 hr 7 min to complete this journey. This average figure does not take into account any delays that might arise on your route in exceptional circumstances. If you are planning to make a connection or operating on a tight schedule, give yourself plenty of time. The distance between Moscow and Elektrostal is around 32.44 mi. Depending on the exact route and provider you travel with, your journey time can vary. On average, this journey will take approximately 2 hr 7 min. However, the fastest routes between Moscow and Elektrostal take 1 hr 3 min. If a fast journey is a priority for you when traveling, look out for express services that may get you there faster. Some flexibility may be necessary when booking. Often, these services only leave at particular times of day - or even on certain days of the week. You may also find a faster journey by taking an indirect route and connecting in another station along the way.
How many journeys from Moscow to Elektrostal are there every day?
On average, there are 71 daily departures from Moscow to Elektrostal. However, there may be more or less on different days. Providers' timetables can change on certain days of the week or public holidays, and many also vary at particular times of year. Some providers change their schedules during the summer season, for example. At very busy times, there may be up to departures each day. The providers that travel along this route include , and each operates according to their own specific schedules. As a traveler, you may prefer a direct journey, or you may not mind making changes and connections. If you have heavy suitcases, a direct journey could be best; otherwise, you might be able to save money and enjoy more flexibility by making a change along the way. Every day, there are an average of 18 departures from Moscow which travel directly to Elektrostal. There are 53 journeys with one change or more. Unfortunately, no connection was found for your trip from Moscow to Elektrostal. Selecting a new departure or arrival city, without dramatically changing your itinerary could help you find connections.
Book in advance and save
If you're looking for the best deal for your trip from Moscow to Elektrostal, booking train tickets in advance is a great way to save money, but keep in mind that advance tickets are usually not available until 3 months before your travel date.
Stay flexible with your travel time and explore off-peak journeys
Planning your trips around off-peak travel times not only means that you'll be able to avoid the crowds, but can also end up saving you money. Being flexible with your schedule and considering alternative routes or times will significantly impact the amount of money you spend on getting from Moscow to Elektrostal.
Always check special offers
Checking on the latest deals can help save a lot of money, making it worth taking the time to browse and compare prices. So make sure you get the best deal on your ticket and take advantage of special fares for children, youth and seniors as well as discounts for groups.
Unlock the potential of slower trains or connecting trains
If you're planning a trip with some flexible time, why not opt for the scenic route? Taking slower trains or connecting trains that make more stops may save you money on your ticket – definitely worth considering if it fits in your schedule.
Best time to book cheap train tickets from Moscow to Elektrostal
The cheapest Moscow - Elektrostal train tickets can be found for as low as $35.01 if you’re lucky, or $54.00 on average. The most expensive ticket can cost as much as $77.49.
Find the best day to travel to Elektrostal by train
When travelling to Elektrostal by train, if you want to avoid crowds you can check how frequently our customers are travelling in the next 30-days using the graph below. On average, the peak hours to travel are between 6:30am and 9am in the morning, or between 4pm and 7pm in the evening. Please keep this in mind when travelling to your point of departure as you may need some extra time to arrive, particularly in big cities!
Moscow to Elektrostal CO2 Emissions by Train

Anything we can improve?
Frequently Asked Questions
Go local from moscow, trending routes, weekend getaways from moscow, international routes from moscow and nearby areas, other destinations from moscow, other popular routes.
IMAGES
VIDEO
COMMENTS
See how to replace the battery in your 2011 - 2020 #Dodge #Journey #key fob keyless entry remote.FCCID: M3N-40821302 - Order Here: https://bit.ly/2TSOc67BATT...
CR2032 Coin Battery 🪙 you need: https://amzn.to/3GkOJnNHow to replace the battery in this key fob for the Dodge Journey 2011, 2012, 2013, 2014, 2015, 2016, ...
A quick tutorial on how to change or replace the remote key fob battery for a 2011 - 2020 Dodge Journey. This Dodge Journey remote key fob uses a CR2032 rep...
Do. gently rubbing with a clean pencil eraser or cloth. replace batteries with the size and type. Do. specified by the device's manufacturer. Remove all used batteries from the device at the same time, then replace them with new batteries of the same size and type. store batteries in a cool, dry place at normal. Do.
Use the metal key or the screwdriver to pry out the old battery. Once you pop out the old battery, slide a new CR2032 battery and press it in place. Make sure the positive "+" is not facing you. It should be facing the keyfob casing. Align the key fob, remove the shell, and press the two halves together to close the remote.
Dodge Journey Info Manuals Manuals 2019 Manuals 2019 . 2019 Dodge Journey Owners Manual - Key. Introduction. How To Use This Manual. Getting To Know Your Vehicle. ... The emergency key allows for entry into the vehicle should the battery in the vehicle or the key fob become depleted. The emergency key is also for locking the glove compartment.
How to Replace the Dodge Journey "Teardrop" key Fob Battery (2009, 2010) Scroll down to see a full video tutorial or keep reading for a step-by-step guide on dodge journey key fob battery replacement. What you will need: 1x CR2032 battery; A flat-head screwdriver; Step 1 First, look at the bottom of the device.
Step 1: Slide the lever on the back of the key fob to release the emergency key. Remove it and set it aside. Step 2: Flip the fob upside down so the buttons are facing away from you and the round end is facing upwards. There, you'll see a tiny Phillips head screw, which you'll need to remove next. Step 3: Once the screw is out of place ...
View and Download Dodge JOURNEY 2019 user manual online. JOURNEY 2019 automobile pdf manual download. ... slide the me- KEYS chanical latch on the back of the key fob side- ways with your thumb and then pull the key out Key Fob with your other hand. ... In a collision, one person, no matter what their size. Page 78 1. Enter the vehicle and ...
See how to change the battery in your 2011 - 2019 #Dodge #Journey #key fob keyless entry remote. FCCID: M3N-40821302 - Order Here: https://bit.ly/2TSOc67 BATTERY SIZE: CR2032 - Order here: https://bit.ly/2NjkLEM
Price and other details may vary based on product size and color. (2 Pack) CR2032 2032 OEM Replacement Fobik Prox (Compatible with Jeep Dodge Chrysler Key fob Prox fits 2008-2022 Case Shell 300 Challenger Dart Durango Grand Caravan Journey RAM Cherokee Routan Town ... X AUTOHAUX 2pcs M3N40821302 Replacement Keyless Entry Remote Car Key Fob for ...
See how to replace the battery in your 2011 - 2019 #Dodge #Journey key fob keyless entry remote.FCC ID # M3N-40821302 - Order Here: https://bit.ly/2UmyY80...
Amazon.com: dodge journey key battery. ... M3N40821302 Keyless Entry Remote Key Fob for Dodge Journey for Dodge Durango for Dodge Dart 2011-2019 1 PCS 3 Buttons-SCITOO. 4.8 out of 5 stars. 5. $18.19 $ 18. 19. ... CR2450 2450 OEM Original Key Fob Battery for Dodge Ram 1500 Prox (Bundle with tool) Case Shell fits 1500 ONLY (Including Big Horn ...
The Dodge Journey battery size is 86 (model years 2009 to 2019). AutoPadre. Comparisons. Consumer Guides. Refinancing Guide Dash Cam Guide Tire Shopping ... 2019 Dodge Journey Battery Size. The recommended 2019 Dodge Journey battery size is 86 (Height: 9 1/16" x Width: 6 13/16" x Length: 8"). 2019 Dodge Journey Battery Size(s)
Re-Insert Metal Ignition Key: Key Fob Re-Assembled: Test New Key Fob Battery: Re-insert the metal ignition key in to its slot until it clicks securely in to place. Test the new key fob battery by standing next to your Journey and pressing the "Unlock" or "Lock" buttons.
Battery Size: CR2032 (sold separately) custom_label_0: Dodge custom_label_1: Journey custom_label_2: 2011-2020 custom_label_3: ... These guys are great..I bought a low mileage off lease Dodge Journey and only received one key fob. I'm convinced the factory stuff is better than after market and these folks filled the bill perfectly. I'm a happy ...
Equip cars, trucks & SUVs with 2019 Dodge Journey Battery from AutoZone. Get Yours Today! We have the best products at the right price. ... BCI Group Size: 86Terminal Type: SAE - Type ALength: 9.06inNegative Terminal Location: Top Right Front. Sponsored. Duralast Battery BCI Group Size 26 525 CCA 26-DL. Sponsored.
2032 Battery you need - https://amzn.to/3HEGeFAHere is a quick and simple video on how to replace the dead / weak 2032 battery in your Dodge key fob. You do ...
Steps for Replacing the Charger Key Fob Battery. After you get your CR2032 3-volt replacement battery, you can move through the following steps to get your remote working right once again. 1. Get the Metal Key out of the Way. You have to get the metal key out of the case before you can open it up and reach the battery.
Dinamo Elektrostal Moscow - Titles, trophies and places of honor. Men's Euro Hockey League since 2007/2008 (7 participations) . Best result : First Round in 2021/2022; EuroHockey Men's Club Trophy since 2008 . Best result : 1st
Elektrostal , lit: Electric and Сталь , lit: Steel) is a city in Moscow Oblast, Russia, located 58 kilometers east of Moscow. Population: 155,196 ; 146,294 ...
The journey from Moscow to Elektrostal by train is 32.44 mi and takes 2 hr 7 min. There are 71 connections per day, with the first departure at 12:15 AM and the last at 11:46 PM. It is possible to travel from Moscow to Elektrostal by train for as little as or as much as . The best price for this journey is . Journey Duration.
If the battery in your 2020 Dodge Journey's key fob stops working, it may need a new battery. Learn how to replace it here.Transcript[music playing]No batter...