- WordPress Hosting
- Domain Names
- Website Builder
- Create a Blog
- Professional Email
- Website Design Services
- Course Maker
- Enterprise Solutions
- WordPress Themes
- WordPress Plugins
- WordPress Patterns
- Google Apps
- WordPress.com Support
- WordPress News
- Website Building Tips
- Business Name Generator
- Discover New Posts
- Popular Tags
- Blog Search
- Daily Webinars
- Learn WordPress
- Plans & Pricing

Add a Site Icon
A site icon , also known as a favicon, is a unique icon representing your website. This guide will show you how to add a site icon to your site.
In this guide
Video Tutorial
Where site icons appear, site icon image guidelines, remove a site icon.
The site icon is displayed in several places including:
- Next to your site’s name in your WordPress.com dashboard .
- In your visitors’ browser tab.
- As the icon used when someone bookmarks your site in their browser.
- In search results.
- As a home screen app icon when saved to a browser or phone.
Here are several examples:
Add Your Site Icon
You can upload a site icon by following these steps:
- Starting from your dashboard , navigate to Settings → General .
- Click on “ View ” in the upper-right corner and ensure the “ Default view ” is selected:

If you do not see the “View” option in the upper-right corner, you can visit the “Site Identity” section directly by clicking this link will take you directly to where you can edit your site icon.
- Click on the “ Change ” button underneath “ Site Icon “:
- Note that you may need to click on Site Identity before being able to choose an image, depending on your theme.
- Choose an existing image.
- Upload a new image following these guidelines.
- After selecting an image, click the “ Continue ” button. You may then be given an option to crop the image to ensure it’s square. You can also skip the cropping step if you wish.
- Click the “ Done ” button when you’re happy with the icon, and your changes will be saved automatically.
The image file for your site icon should meet the following criteria:
- Aspect ratio: Upload a square image.
- Dimensions: At least 512 x 512 pixels.
- File type: PNG and SVG image file types are the most common. Any valid favicon format is supported.
Here are some actionable tips you can follow:
- Keep it simple. Remember, you don’t have a lot of space to play around with!
- Keep it recognizable. Try to encapsulate your brand in the small space you have to work with. If you’re used to using a logo that isn’t a tiny square, try to create something that evokes that logo rather than unnecessarily squeezing the whole original in.
- Use as little text or lettering as possible. Remember that the favicon is a small image. Even if your usual logo has your company name spelled out, keep it concise in your favicon.
- Think about color. Different web browsers (like Google Chrome, Safari, and Edge) use different color palettes. And, with the increasing popularity of dark mode , you’ll want to ensure your favicon looks great regardless of the user’s browser. Ensure the favicon looks good and stands out on white, gray, and black background colors.
You can remove a site icon you added by following these steps:
- Or, visit Site Identity directly (using this link) if the option to remove your Site Icon does not appear in Settings.
- Click on the “ Remove ” button underneath “ Site Icon ” and click ‘ OK ‘ to confirm.
Was this guide helpful for you?
Not quite what you're looking for? Get Help!
What can we do to make this guide more helpful?
Related Guides
Couldn’t find what you were looking for?
Your site, built for you
Sit back as our team of experts builds a site you'll fall in love with. From single page sites to full stores, they'll help you make it happen.

Upgrade and unlock features, tools, and expert help with a paid plan.
Join the forum
Connect and learn with the WordPress.com community.
Check our guides
Find and follow step-by-step guides for every WordPress.com question.
Questions? Contact our Happiness Engineers.
Self-hosted WordPress site? Find support here.
New to WordPress.com? Find your perfect-fit plan here.
Get the latest learning in your inbox:
Your information will be used in accordance with WordPress.com privacy policy .
WordPress.com
- WordPress Hosting
- Domain Names
- Website Builder
- Create a Blog
- Professional Email
- P2: WordPress for Teams
- Website Design Services
- Enterprise Solutions
- WordPress Themes
- WordPress Plugins
- WordPress Patterns
- Google Apps
- WordPress.com Support
- WordPress Forums
- WordPress News
- Website Building Tips
- Business Name Generator
- Logo Maker
- Discover New Posts
- Popular Tags
- Blog Search
- Daily Webinars
- Learn WordPress
- Developer Resources
- Terms of Service
- Privacy Policy
- Do Not Sell or Share My Personal Information
- Privacy Notice for California Users
Mobile Apps
- Download on the App Store
- Get it on Google Play
Social Media
- WordPress.com on Facebook
- WordPress.com on X (Twitter)
- WordPress.com on Instagram
- WordPress.com on YouTube
Stand for peace
Currently this site has a single message for our Russian friends: let’s stand together against the war in Ukraine!
If you are a SiteGround client looking to log into your Client Area, you can follow this link: https://login.siteground.com/login
Is your WordPress site slow? Get a free audit to uncover performance bottlenecks.
How to Add a WordPress Favicon to Your Site (3 Easy Options)

Favicons are most commonly known as the small icons that display next to website names in browser tabs. However, while that’s where they originated, your WordPress favicon is also used in other places such as browser bookmarks, iOS home screen buttons, and more.
As such, it’s an important part of your branding . When used correctly, your favicon or ‘site icon’ can help users easily identify your business. It can help with boosting brand recognition, and even enhance the site’s User Experience (UX).
In this article, we’ll discuss the benefits of using a favicon in a WordPress site. Then we’ll explain how to create one, and walk you through three easy options for adding it to your site.
Finally, we’ll wrap it up with some WordPress favicon tips and best practices. Let’s get started!
The Benefits of Using a WordPress Favicon
If you ever had too many tabs open at once (guilty!), you can likely appreciate the usefulness of a favicon. A favicon makes it easy for users to quickly identify your website when they have multiple tabs open in their browser:

Depending on the number of open tabs, your site’s title may not always be visible. Therefore, adding a favicon can help improve the UX for your visitors .
Beyond boosting brand recognition, using a WordPress favicon can also make your site appear more professional and credible. In turn, this can help increase customer trust.
In addition, if someone saves your website to the home screen of their mobile device, your favicon will appear as the icon. Using your brand logo or similar imagery can help make your site easier to recognize, and overall aid in creating a cohesive aesthetic.
How to Create a WordPress Favicon
If you already have a favicon you’re ready to use (most businesses use their logo or a variant of it), feel free to skip to the next section. Otherwise, let’s look at how to create your favicon picture.
In the past, you had to use a specific ICO file for your favicon. However, nowadays, all modern browsers support the use of ICO, PNG, and GIF files for your favicon. JPEG is widely supported as well (read: JPG vs JPEG ), but not in all Internet Explorer versions, which makes it less ideal for favicon use.
If you’re familiar with Photoshop, you can use it to manually create a favicon. However, it’s often easier to use a basic cloud-based tool to create your favicon icon set from an existing image.
RealFaviconGenerator (the cloud-based version of the plugin we’ll discuss later) is a great option because:
- It also creates app icons.
- It provides favicon icons in both PNG and ICO formats.
- You can customize your favicon after uploading your image.
- All you need to do is paste in the code that the plugin gives you.
Other useful favicon generators are:
- Favicon.cc , which lets you create a favicon from scratch or upload an existing image.
- Favicon Generator , which functions similarly to RealFaviconGenerator.
To use RealFaviconGenerator, start by uploading the image you want to use by clicking on Select your Favicon image :

On the next screen, you can configure specific details about your favicon set (if desired). When you’re finished, scroll to the bottom and click on Generate your Favicons and HTML cod e :

On the next page, click on Favicon package to download your favicon images:

Make sure to leave this page open if you plan to manually add the favicon to your site.
Tips for Creating a WordPress Favicon
There are a few design and formatting tips worth mentioning and reviewing before creating your favicon. Most importantly, the recommended size for favicons is 512×512 pixels.
While your WordPress favicon will be a perfect square, you can also use a rectangular image and crop it either before or after uploading it to WordPress . WordPress comes with a built-in cropping functionality for site icons if you add them via the Customizer (which we’ll walk you through shortly).
Also, it’s important to note that your favicon will display as a 16×16 px square. Therefore, you want to choose an image that will look good once it’s shrunk down to those dimensions. Although it will display at that size, it should still have a height and width of at least 512 px.
Finally, it’s a smart idea to review some of the Google Guidelines for creating and using favicons. This will help ensure that your icon displays optimally in search engines and browser tabs.
How to Add a WordPress Favicon to Your Website (3 Easy Options)
Once you have your favicon, you’re ready to add it to your WordPress site. Let’s take a look at three methods you can use to do that.
1. Using the WordPress Customizer to Upload Your Favicon
As of WordPress 4.3, all WordPress sites include a site icon feature that makes it easy to upload and crop an image to use as a favicon. For most users, this is the simplest and quickest method for adding a favicon icon to WordPress.
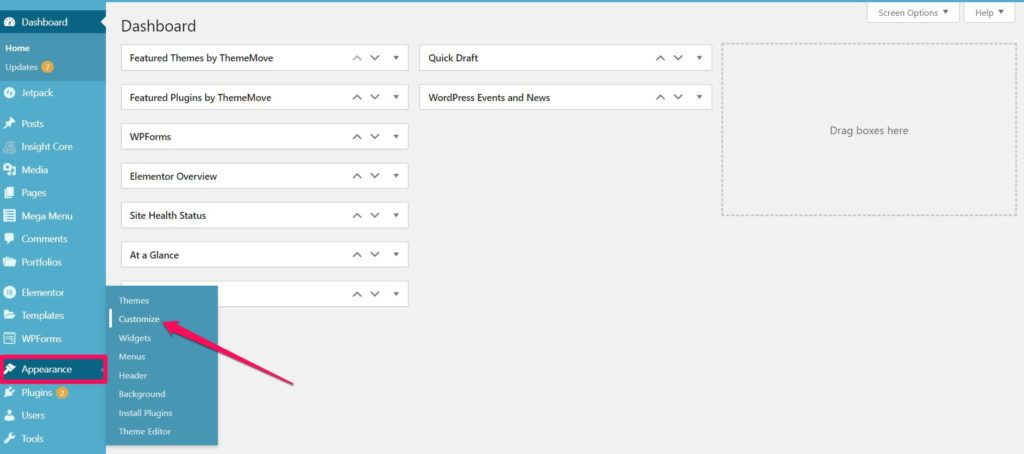
All you’ll need is an image that’s at least 512×512 pixels. WordPress will handle the rest of the process. To get started, go to Appearance → Customize in your WordPress dashboard:

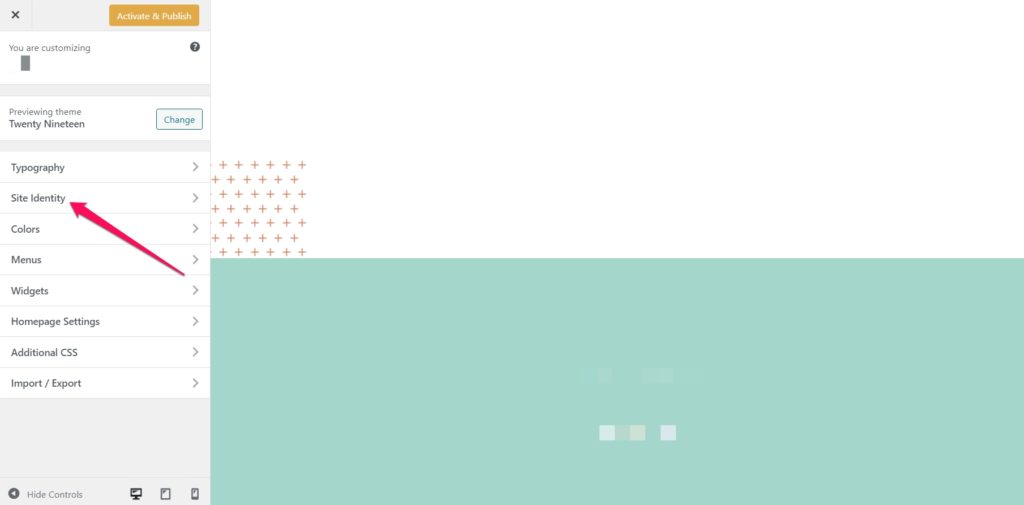
From there, navigate to the Site Identity tab:

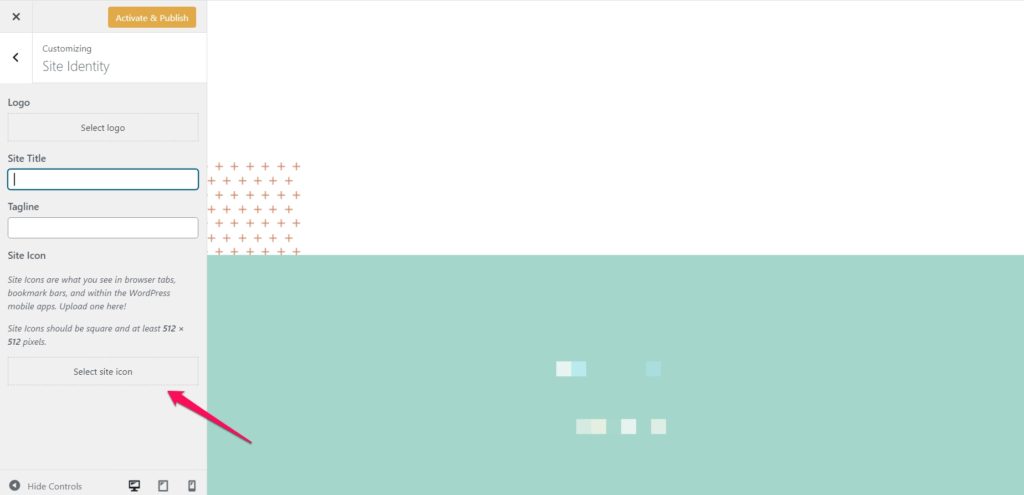
Next, look at the bottom for the Site Icon section, and click on the Select site icon button:
The normal WordPress Media Library interface will open. You can either choose an existing image in your Media Library or upload a new one. If you used RealFaviconGenerator to create your favicon, make sure the package you downloaded is unzipped.
Once you have an image you like, click on it and choose Select in the bottom-right corner:

If your image isn’t already a perfect square (e.g. 512×512 px), WordPress will give you a chance to crop it on the next screen.
Use the box to highlight the portion of the image that you want to use for your icon. You can see a preview of how your cropped image will look on the right side of the interface.
Once you’re happy with how things look, click on Crop Image to finalize your choice:

That’s it! All you need to do is select Save & Publish to make your favicon live. If you ever want to change your favicon in the future, you can come back to this interface.
2. Installing a Plugin to Add Your WordPress Favicon
If you’d prefer a plugin solution to the native WordPress site icon functionality, you can use a popular free plugin called Favicon by RealFaviconGenerator (the cloud-based tool we discussed earlier).
This plugin is just as simple to use as the native WordPress Customizer. However, it offers additional compatibility options for various devices and app icons. To use it, install and activate the free plugin via your WordPress dashboard :

Once you activate the plugin, go to Appearance → Favicon to create your favicon set. All you need to do is select or upload an image that’s at least 70×70 px (ideally 260×260 px):

After you select your image, click on Generate favicon . When you select that button, the plugin will take you outside your WordPress site to the RealFaviconGenerator website.
At the bottom of the site, scroll down to select Generate your Favicons and HTML code (see the previous section). While the tool works, Real Favicon Generator will send you back to your WordPress dashboard:

After that, your favicon will be set up and ready to go. You can view previews of how it will look on different devices in the plugin’s interface.
3. Manually Adding Your Favicon via FTP
If you’d prefer to do things manually, it’s possible to add a favicon to your WordPress site via File Transfer Protocol (FTP) or File Manager if your host uses cPanel .
If you go with this method, you’ll also need to create your own favicon image. You can do that by following the steps we outlined earlier in this post.
For this demonstration we’ll be using the package we created and downloaded from RealFaviconGenerator, the instructions apply even if you used a different tool to create your favicon.
To manually add a WordPress favicon to your website, you’ll need to:
- Access your site’s files, either via an FTP client or the File Manager in your hosting cPanel.
- Locate the root directory of your site and upload the contents of your favicon package ( favicons.zip )
The files should be in the same folder as your wp-admin and wp-content folders. Next, take the code RealFaviconGenerator provided you with earlier, and either:
- Use a plugin like Insert Headers and Footers to add it to your theme’s header.
- Paste it directly into the <head> section of your theme, by editing your theme’s header.php file .
Using the Insert Headers and Footers plugin is optimal because it ensures that you won’t lose your favicon if you change WordPress themes down the road.
To do so, install and activate Insert Headers and Footers. Then go to Settings → Insert Headers and Footers , and paste your code into the Scripts in Header section:

Make sure to save your changes. Then you’re all done!
Additional Tips for Using WordPress Favicons
If you want each site in your multisite network to have a unique favicon, the easiest way to achieve this is to use a favicon plugin like the one featured above. While it’s possible to edit your theme’s files to enable unique favicons for each network site, the process is significantly more complicated than using a plugin.
You might also consider using a Content Delivery Network (CDN) to serve your favicon images. The three methods we discussed in this post all store your favicon images on your server. However, you can optimize your site even further by using a CDN to serve those images.
When you install Cloudflare or a service like KeyCDN , visitors’ browsers will load your favicon from your CDN instead of your site’s server. If you are using a plugin like CDN Enabler , it should automatically rewrite your WordPress favicon URL to work with the above methods.
A WordPress favicon can help boost your brand recognition and improve the UX for your website’s visitors. Fortunately, you have multiple options to choose from that make adding one simple.
The three main methods you can use to add a WordPress favicon to your site are:
- Using the WordPress Customizer to upload a site icon.
- Installing a plugin, such as Favicon by RealFaviconGenerator.
- Manually adding a favicon via an FTP client or your File Manager.
Related Articles

WordPress Fonts: Everything You Need to Know

How to Change Fonts in WordPress (And Change Size, Color, Optimize)
How to Use WordPress Icon Fonts the Right Way (Better Performance)
6 Easy Steps to Add a Favicon to Your WordPress Website

Disclosure: This content is reader-supported, which means if you click on some of our links that we may earn a commission.
A favicon is the small icon beside your site’s name that appears on your browser tab or in Google search results. If you’re a new WordPress user and want to learn all about creating and adding a favicon to your WordPress site you’ve landed in the right place. It might seem like a daunting task at first, but once we walk you through the step-by-step process the end result will be a beautiful favicon that adds to the user experience of your website you can be proud of. Let’s dive right in.
Why Adding A Favicon To Your WordPress Website is Worth It
Though the name might sound a little funny, adding a favicon to your website is a great way to help your brand stand out and be memorable.
New and previous users can point your website out in search results faster and easier when there’s a favicon attached to your search engine results, browser bookmarks, or an open tab from your website.
Having one also helps with navigation by making it easier for anyone with lots of tabs open to locate your specific website. When users are navigating tabs or bookmarks and looking for your website, you don’t want to be the one in the bunch that’s stuck with the generic— and less visually appealing— icon WordPress puts in place in case you don’t upload a favicon.
In short, not having a recognizable favicon is a great way to get lost in the shuffle.
The Investment Needed to Add A Favicon To Your WordPress Website
Thankfully, creating and uploading a favicon can be done for free, and in a matter of a few minutes. You can either find an icon online to use as your favicon, or you can create one using Canva for free.
Don’t worry, you don’t have to be a design genius to create a favicon you can be proud of. To upload a great favicon that adds to your user experience, you’ll first have to design your favicon using favicon best practices, then upload it to WordPress either through its Customize feature or through a plugin. Let’s get into the details of it all.
6 Steps to Add A Favicon To Your WordPress Website
Before we begin, let’s start with ensuring you get reliable WordPress hosting, in case you haven’t already done so.
#1 – Sign Up For Reliable WordPress Hosting
If you’re starting a website with WordPress, you want to make sure you find a reliable web host at a good price point. If you’re already done that, you can skip this section and move on to the next step.
If you haven’t yet signed up for hosting, you’ll want to check out our list of the top WordPress hosting providers to make your best choice.
Want to know what our top choice was? Hostinger , because it comes with everything you need to get started, including a free domain name and automatic updates.
#2 – Create A Favicon With Canva
The very first step to uploading a distinguishable favicon is creating one that pairs well with your website’s branding. You might think “my website doesn’t really have any branding.” But that’s where we would beg to differ.
Every website has its own brand, even if you didn’t go out of your way to create one. If your website is a simple creation of simple pages and minimal to no colors, then that ends up being your brand. Choosing a favicon that matches your website’s visual brand will help you keep things cohesive, professional, and pleasing to the eye.
Now, how can you create a favicon for free? The simple answer is Canva. As a free design tool, Canva makes it ridiculously easy for you to create a favicon in a matter of minutes. And it’s easy too.
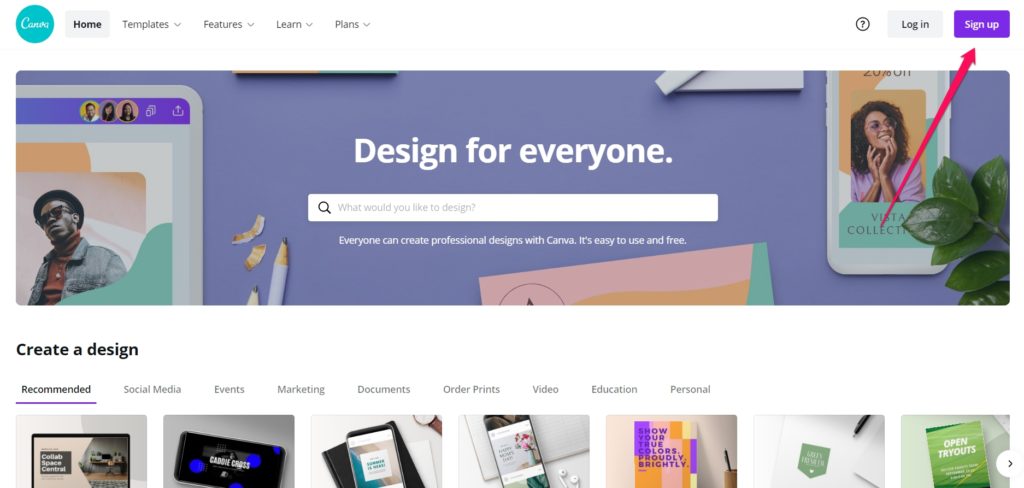
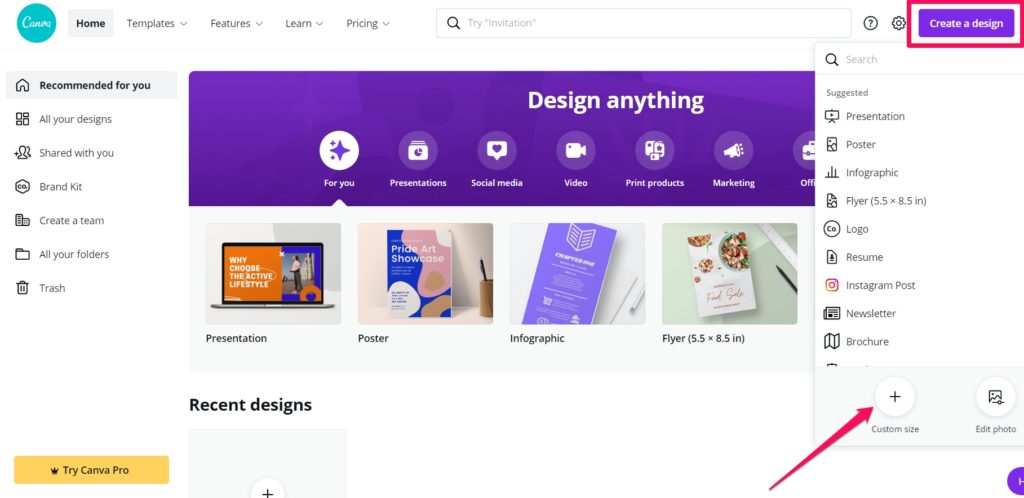
Once you visit the homepage, click on Sign Up. You’ll be able to sign up through Google, Facebook, or email. Once you’re signed up, navigate to your Canva homepage, and in the top right corner, click Create a design , then Custom size.
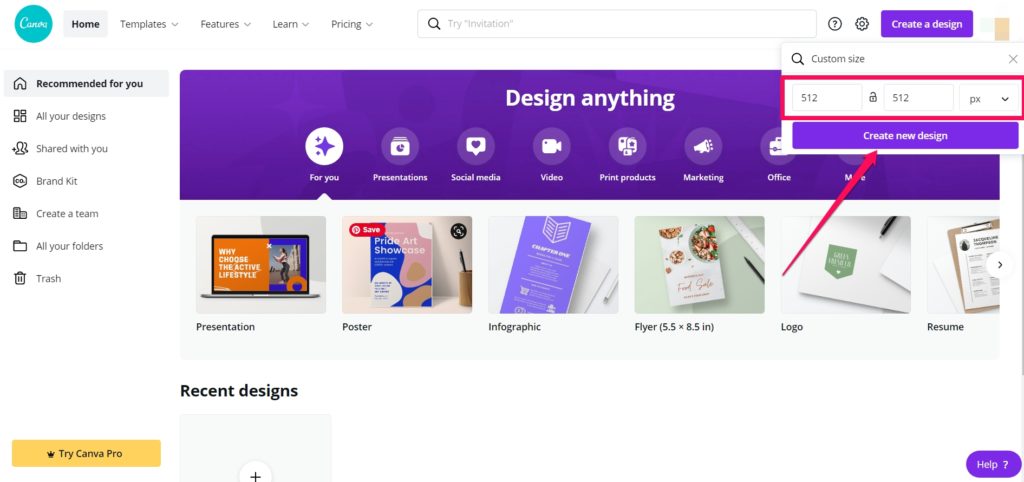
The recommended size for a WordPress favicon is 512 X 512 pixels. So enter those numbers in the height and width section and click Create new design. Make sure you create the template in pixels.
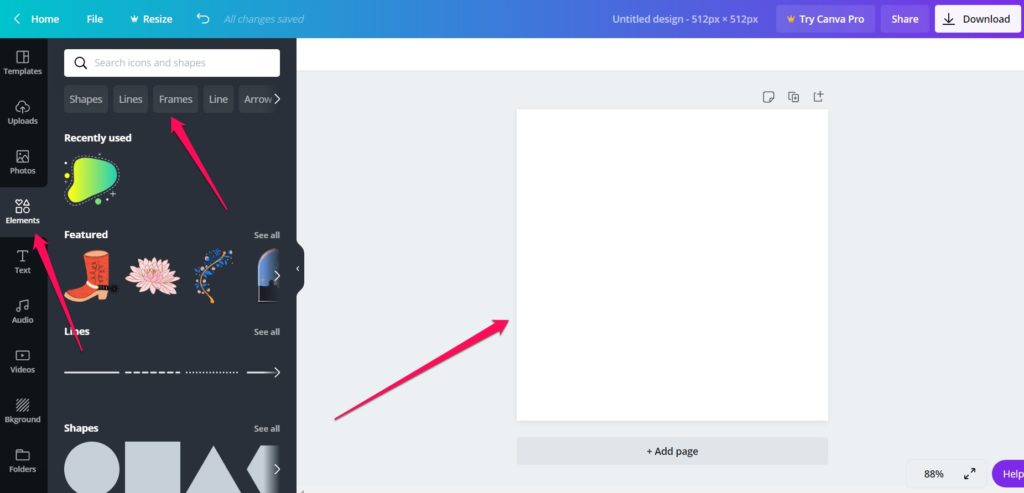
Here’s where it gets fun. What you want your favicon to look like is entirely up to you. You can make it any color or shape you want. Canva makes it easy to create a favicon with premade templates and Elements.
You can take your time designing a favicon that works for you. With Canva, you can start from scratch or use a premade shape or template and change the font, color, background, or size. For simplicity’s sake, we’re going to stick with using one of Canva’s premade templates and adding it to our board.
Once we’re happy with the results, we’re ready to save and download the file. Read on for favicon tips and best practices.
#3 – Favicon Tips And Best Practices
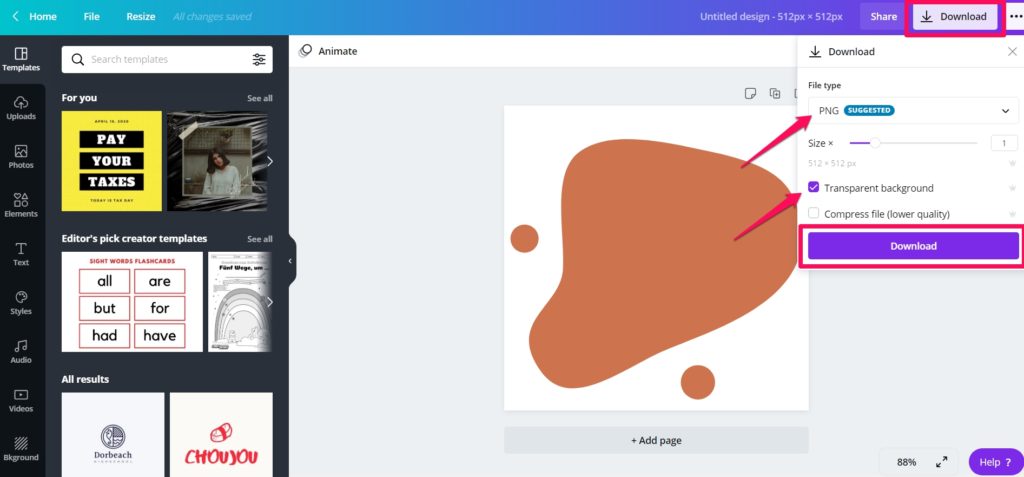
When you’re ready to download your favicon. Here are a few useful tips to keep in mind:
When you save your favicon, make sure it’s saved as a PNG. This will ensure the quality of your favicon image and enable you to save it with a transparent background.
File background
When you save your favicon, you want to ensure you wave it with a transparent background. This way, when you upload your favicon, and it’s anything other than a solid square, it won’t have weird white space behind it. This ends up looking amateurish and unprofessional. A transparent PNG background ensures there is no white space included in your final image.
Finally, you want to pay attention to your favicon’s size. The recommended favicon image size is 512px X 512px. Anything over or under these specifications and your favicon can end up looking weird, cut off, or not compatible for upload altogether.
With Canva, you can ensure you’re configuring all three once you’re ready to hit the download button in the top right corner.
Keep in mind that more advanced features like transparent background are only available to Canva Pro accounts. If you’re a new user you can sign up for a free 30-day Canva Pro account to take advantage of these advanced features.
#4 – Where To Find Free Favicon Icons
Say you don’t want to go through the trouble of creating a free favicon with Canva, what are your options?
The internet has plenty of places where you can find a favicon you like to use for free. Here are four great alternatives to designing one on Canva:
Favicons.io
Favicons.io is a great favicon generator tool that lets you automatically create a favicon with a few specifications. You can create a one-letter favicon, or create a favicon from an emoji. You can also change the favicon background color, font, and font size.
Once you’ve finalized your favicon, you’ll have to grab files and paste them directly into the root directory of your website. It’s extremely easy to use and pretty self-explanatory. You can have a favicon up and running in a matter of minutes.
Icons8 is yet another stellar favicon generator you can use for free. You can search for icon styles by category. The great thing about Icons8 is the wide range of favicon image styles. You can find plenty of stylized or flat favicon designs that’ll fit the look and feel of your site.
When you click on a favicon of your choice, you can change the overlay, background, color, or text, and then hit the download button. Then, all you’ll have to do is upload it to your WordPress site.
Notion.vip is a great place to find a wide variety of icons you can use as favicons. Once you land on the homepage, you can search icons by type, right-click the image and save, then upload it to your site’s customizer.
Flaticon.com
Flaticon claims to be the largest repository of icons with more than 4 million images in either PNG, SVG, EPS, PSD, and BASE 64 formats.
You can search for your perfect favicon by keyword or sift through currently trending icon packs. Keep in mind that not all icons are free. To gain access to premium icons you’ll have to pay a fee.
#5 – How To Easily Upload A Favicon To Your WordPress Website
You’ve either designed your favicon or you found one online you like. Now it’s time to upload it to your WordPress site.
Once you’re logged into your WordPress dashboard, you’ll want to navigate to Appearance then click Customize.
Once you’ve opened your Customize menu, navigate to Site Identity.
Once you’ve opened the Site Identity section, navigate near the bottom to the section labeled Site Icon and click to upload your newly designed favicon.
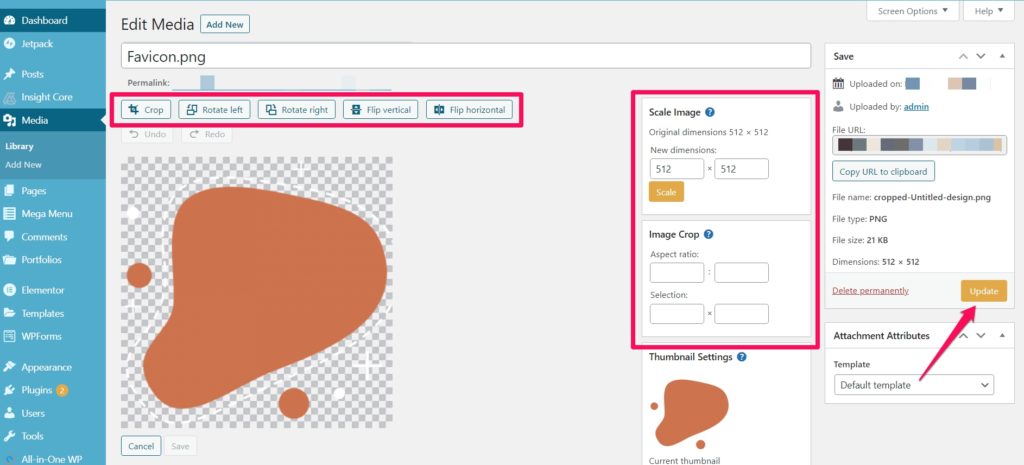
On WordPress, you can edit your image after you’ve uploaded it. Click on your uploaded image and press Edit Image.
From there, you’ll be able to either crop, rotate, flip, or scale your image to your liking. You can also rename your image and add alt text— which is recommended for SEO reasons. Your alt text can be as simple as the official name of your website, so Google knows how to classify your favicon.
Once you’ve made all your changes, make sure you click Update to save all your new changes.
In your Customize menu, be sure you click Activate & Publish to save your changes. Almost immediately, you’ll be able to see your new favicon in your navigation tab. For your favicon to show up in search engine results it’ll take a few days as Google crawls your site.
#6 – How To Upload A Favicon Using A Plugin
Maybe you prefer uploading your favicon using a plugin. Before you upload any plugin, make sure it’s been updated to be compatible with the latest WordPress update.
A great favicon upload plugin is the Favicon by RealFaviconGenerator. It allows you to have a little more control over how your favicon shows up on different devices and browsers.
If you don’t mind adding another plugin to your site, this can be a great way to upload and configure your WordPress favicon.
Once you’ve gone ahead and activated the plugin after you’ve installed it, from your dashboard navigate to Appearance then click Favicons.
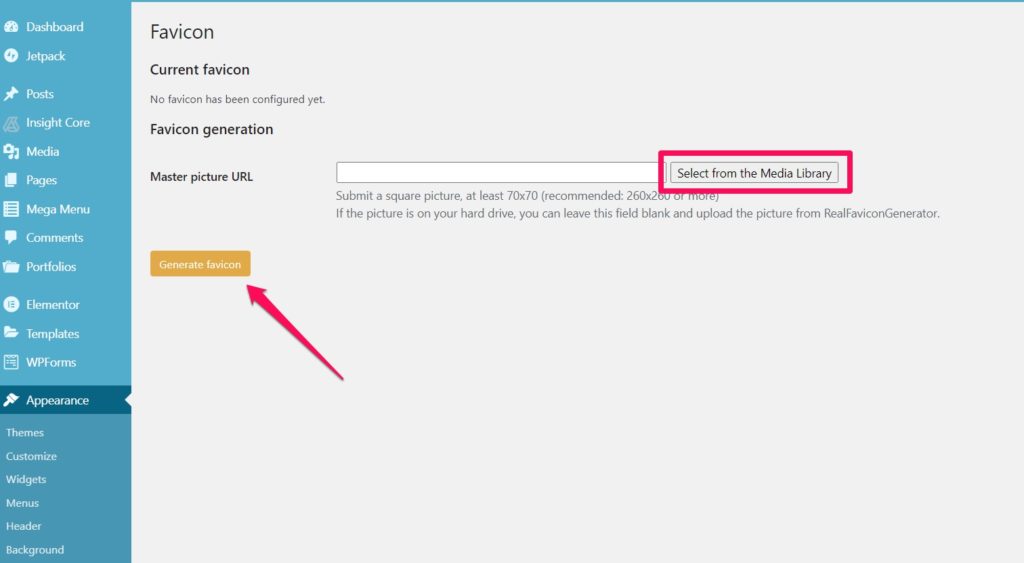
Once there, you can select and upload your favicon once you click Select From The Media Library.
The plugin recommends you submit a square picture of at least 70 X 70 pixels. The ideal size it recommends is 260 X 260.
Once you’ve uploaded your favicon from the media library and hit Generate Favicon , you’ll be taken to the favicon website to further configure your file.
You’ll be met with a set of options to ensure your favicon will look good in all types of browsers. Let’s take a look at each:
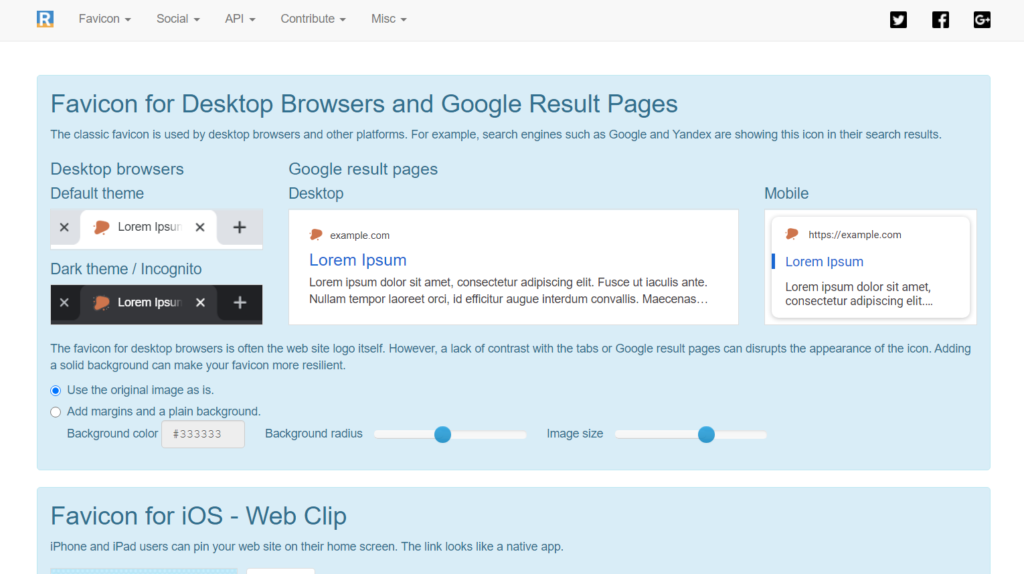
Favicon for Desktop Browsers and Google Results Pages
Here you can configure your favicon by adding margins and a plain background. You also get the option of choosing the exact background color you want your favicon to have.
In this instance, we ensured the favicon we uploaded had a transparent background, so we don’t want to add a color background.
Favicon for iOS – Web Clip
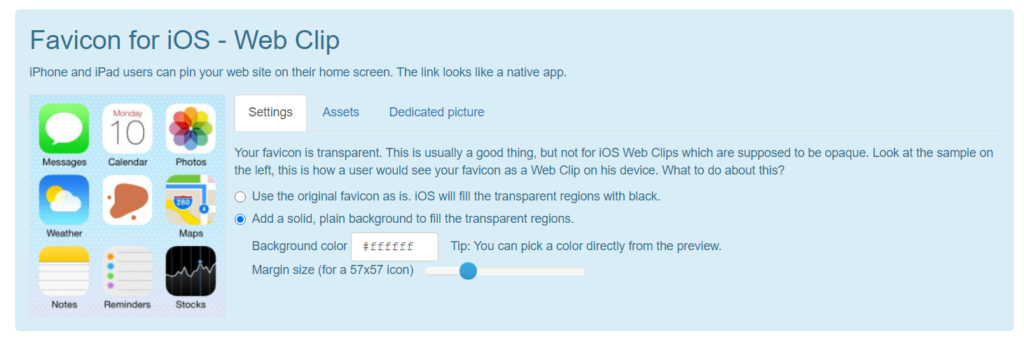
Have you ever wondered what your favicon would look like if iPhone or iPad users pinned your website to their home screen? It ends up looking like an app, so you want to make sure you configure your favicon to look great once it’s saved.
To do this, you can either add a solid, plain background with a color of your choice or use the original favicon as is. In this instance, we decided to add a white background to our transparent PNG image.
Favicon for Android Chrome
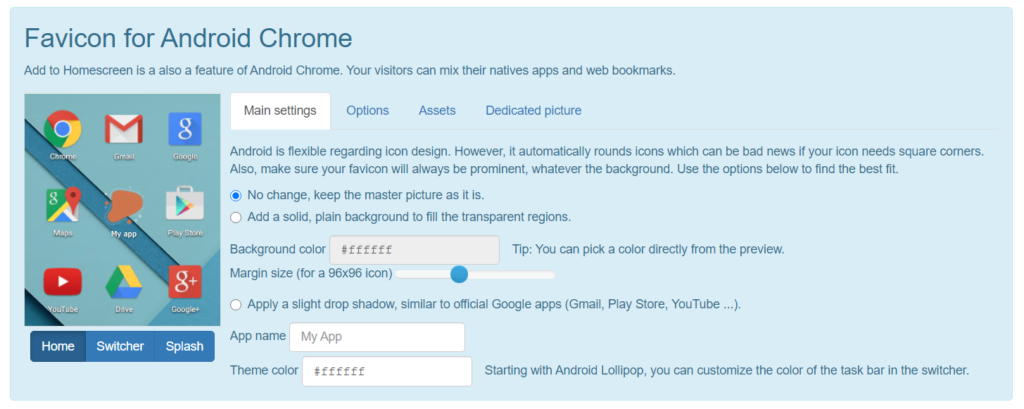
It’s a similar process for configuring your favicon for Android Chrome. You can configure your favicon to have a solid background with a color of your choosing, and you can also apply a slight drop shadow to imitate the look of Google apps.
Windows Metro
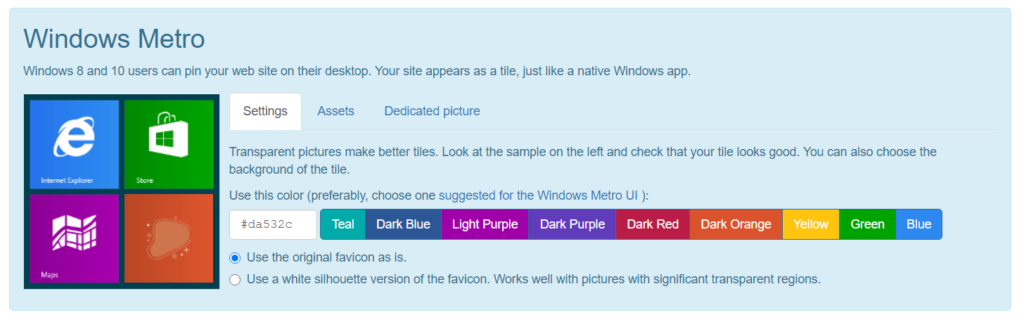
Your favicon will also look different in Windows Metro. Windows 8 and 10 users can also pin your website to their desktop, which will include your favicon image.
You can leave your favicon as is, or you can change the background color or use a white silhouette version of the favicon.
macOS Safari
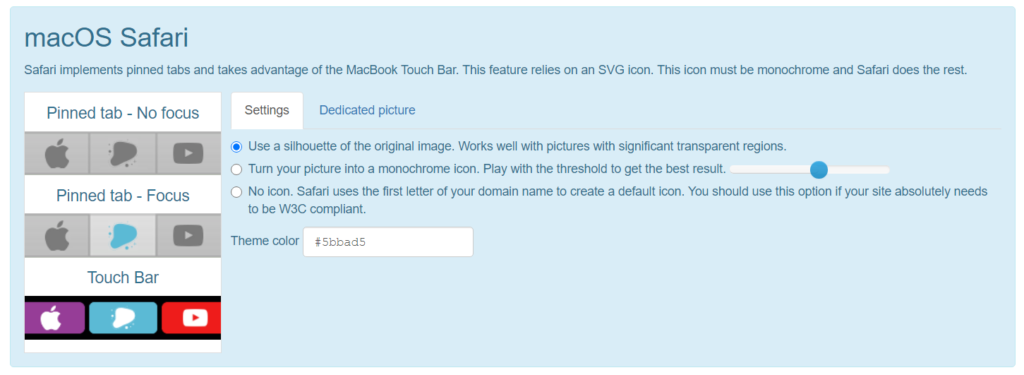
macOS relies on an SVG icon to generate a favicon for its MacBook Touch Bar feature. You can play around with the settings and either use the silhouette of your original image, turn your picture into a monochrome icon, or make Safari use the first letter of your domain name to create an icon. You can also change your theme color with your preferred hex code.
Favicon Generator Options
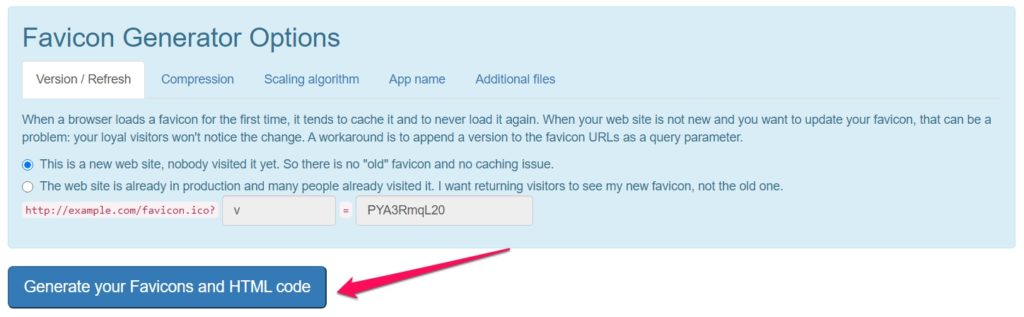
Finally, you can configure the plugin to override your old favicon if it’s been cached. Sometimes your cached favicon won’t update to your new changes. This feature allows you to ensure your favicon changes are all updated across the board.
Once you’ve configured the look of your favicon for every screen and browser, hit the Generate button. It’ll take it a minute to go back to your WordPress site, and you’ll be met with a success message. All done.
Adding a favicon to your website can add personality, strengthen your site’s brand, and help you stand out from the rest in bookmark bars and search engine results.
Thankfully, with this guide, adding a dynamic favicon that looks good in all instances is easy to do. Don’t forget to check out our blog for more WordPress insights.
We love writing about the best WordPress hosting deals out there, as well as ideas for your homepage design , and we love creating guides like this one , that will help you pick your site’s color palette.
Make your website better. Instantly.
Keep reading about website.
What Is WordPress Hosting (+ The Type You Should Use)
Website hosting, including WordPress website hosting, is one of the most important aspects of building and managing an online business. By simply choosing an inferior…
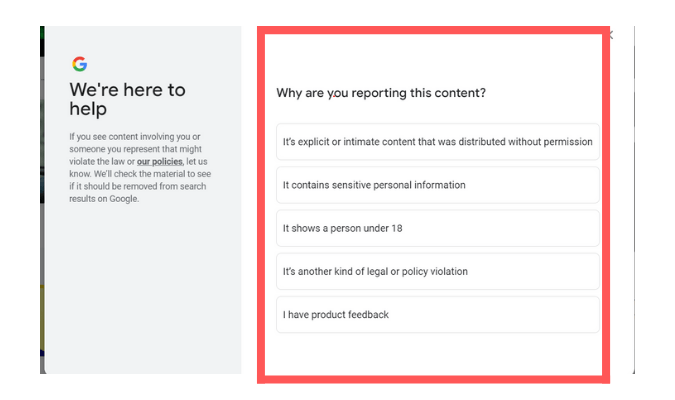
How to Remove Unwanted Search Results From Google
There are 5 simple ways to get rid of something outdated, remove personal information, or clear unwanted search results from Google. 5 Ways to Remove…

The Easiest Way to Remove Personal Information From Google
Type your name into Google and you’ll quickly realize how easily accessible your personal information is online. Stop the invasion of privacy and protect yourself…
Printful Review
Printful is a popular print-on-demand company that’s been helping entrepreneurs and businesses bring their designs to life since 2013. The company model is simple: customers…
Best Online Reputation Management
Your business’s reputation may be the last thing on your mind—but deep down you know it shouldn’t be. It’s tough to think about spending time…
Bluehost Review
Bluehost is one of the leaders in website hosting and powers more than two million sites worldwide. It’s also one of our top recommendations for…

The Best Web Hosting Services
We’ve talked about, researched, used, and reviewed hosting platforms here at Crazy Egg for years. Consider this set of web hosting provider reviews the culmination…

Best Cheap Web Hosting
If you’re starting your first website, you don’t need to drop a ton of money on premium web hosting, worry about website performance, or know…
Hostinger Review
Hostinger has come a long way since it first launched as a free web hosting service 15+ years ago. Today, it’s one of the most…
Netpeak Software Review
SEO seems to be getting increasingly complicated each year. There’s no shortage of small technical details that can go wrong and end up hurting your…
5 Easy Steps to Build a WordPress Website
Making a website was a time-consuming and expensive project. Business owners had to hire agencies that would charge a bomb to build a professional and…
Best Blogging Platforms
Blogging is an excellent way to drive traffic to your website, build authority, and express yourself. We’ve managed hundreds of blogs over the last decade….

Best VPS Hosting Services
We put ten VPS hosting plans through their paces and scored them in five core categories, so you can easily scan each provider to see…

Best Web Hosting for Small Businesses Compared
Through our work with helping small businesses enhance their online presence, we know the importance of finding a web hosting option that offers reliability and…

How to Get An SSL Certificate
Nothing screams “untrustworthy” more than a website labeled by web browsers as “Not Secure.” Getting rid of it requires an SSL certificate, which is a…
Over 300,000 websites use Crazy Egg to improve what's working, fix what isn't and test new ideas.

How to Add a Favicon and App Icons to WordPress
The icons displayed on browser tabs are known as favicons. They contribute to the identity and brand of a WordPress blog. App icons can help bridge the gap between web and mobile apps. You can add shortcuts to webpages on your homescreen in popular mobile browsers like Chrome and Safari. These shortcuts appear to be apps, but they are actually bookmarks. These shortcuts are represented by the app icons from your blog in mobile browsers.
Generating favicons and app icons
Many websites can generate favicons and app icons based on your logo. You can also make your own using Photoshop, though favicons require a Photoshop plugin. RealFaviconGenerator is my favourite favicon generator, but any favicon generator will suffice. The generator will generate a number of files, including favicon.ico, apple-touch-icon.png, manifest.json, and so on. You are not required to keep all of them. In fact, I recommend keeping only three of them for WordPress blogs. A generator generates favicons and app icons.
Choosing and displaying favicons
Common favicon file names are favicon.ico, favicon-16×16.png, and favicon-32×32.png. These files are generated by the most popular favicon generators. Browsers fetch these files to display them as favicons.
favicon-16×16.png isn’t needed.
The size of favicon.ico can vary, but it is typically 16px by 16px. As a result, favicon.ico and favicon-16×16.png are interchangeable. The only difference between the two is that favicon.ico is supported in older browsers, such as Internet Explorer 10 and earlier. Because favicon.ico is supported by all modern browsers, favicon-16×16.png is unnecessary.
favicon-32×32.png is recommended.
favicon-32×32.png is displayed for high resolution screens, such as Retina screens. If you don’t have a favicon-32×32.png, your favicon will probably look blurry on high resolution screens. Therefore, I recommend that all blogs have a favicon-32×32.png.
favicon.ico doesn’t need a link tag.
To load favicon.ico, many people use link tags. The link tags appear as follows: href=”/favicon.ico” type=”image/x-icon” link rel=”shortcut icon” href=”/favicon.ico” There are two common values for the rel attribute: “icon” and “shortcut icon.” In Internet Explorer, the “icon” does not work, and the “shortcut icon” is not valid HTML5. Neither option is preferable. If the link tag is missing, all popular browsers will look in your blog’s root directory for your favicon.ico. As a result, if you’re putting your favicon.ico in your root directory, it’s best to avoid using a link tag. A link tag is required in a number of situations. To support Internet Explorer, the “shortcut icon” is preferred in these cases. The following are the circumstances:
- You’re not placing your favicon.ico in the root directory.
- You’ve updated your favicon and want to bust the cache of your visitors. (In this case, you must change your favicon’s URL. E.g. href=”/favicon.ico?ver=2′′)
- You’re not using a.ico favicon.
Adding favicons to a WordPress blog
To add favicons to your WordPress blog, copy favicon.ico and favicon-32×32.png to the root directory. I.e., make sure http://yourdomain.com/favicon.ico is accessible. Next, copy this code into your functions.php:
add_action(‘wp_head’, function() {
echo ‘<link rel=”icon” sizes=”32×32″ href=”/favicon-32×32.png”>’;
Choosing and displaying app icons
App icons are a recent addition to browsers, so the code to add them is still changing. Different browsers use different ways to add app icons.
App icons in Safari
To add app icons in Safari, Apple recommends doing this:
<link rel=”apple-touch-icon” href=”apple-touch-icon-60×60.png”>
<link rel=”apple-touch-icon” sizes=”76×76″ href=”apple-touch-icon-76×76.png”>
<link rel=”apple-touch-icon” sizes=”120×120″ href=”apple-touch-icon-120×120.png”>
<link rel=”apple-touch-icon” sizes=”152×152″ href=”apple-touch-icon-152×152.png”>
Safari will automatically add visual effects such as rounded corners and shadows to your icon in IOS 6 and earlier. This is no longer the case in newer versions of Safari. Change “apple-touch-icon” to “apple-touch-icon-precomposed” to prevent older versions of Safari from adding visual effects. Because newer Safari versions will treat both tags the same way, I recommend using the -precomposed version to keep your app icon consistent across IOS versions. These are not the only sizes that Safari must support. Apple’s various devices come in a variety of sizes. If the device’s icon size is unavailable, Safari will resize the nearest icon to the required size. You can keep only the largest icon if all of your icons are the same (only resized). I recommend using this for Safari in conjunction with the “precomposed” tip:
<link rel=”apple-touch-icon-precomposed” sizes=”152×152″ href=”/apple-touch-icon-152×152.png”>
Note that if your icon has transparency, Safari will automatically fill it with black.
App icons in Chrome
To define app icons, newer versions of Chrome can use a manifest.xml file. This file can be generated by some favicon generators. There is, however, no need to use a manifest.xml file. If you have a lot of metadata, the manifest.xml file is used to reduce the size of your pages, but Chrome can also use a single link tag. Apple-touch-icon link tags can be read by Chrome, but they are deprecated. Google suggests using rel=”icon,” which is consistent with HTML5 specifications:
<link rel=”icon” sizes=”192×192″ href=”/icon-192×192.png”>
App icons in Internet Explorer and Edge
Windows 8.0 and 8.1 use a browserconfig.xml file. Some app icon generators can generate browserconfig.xml files. If you want to create it manually, Microsoft recommends making it like this:
<?xml version=”1.0″ encoding=”utf-8″?>
<browserconfig>
<msapplication>
<tile>
<square70x70logo src=”ms-icon-70×70.png”/>
<square150x150logo src=”ms-icon-150×150.png”/>
<wide310x150logo src=”ms-icon-310×150.png”/>
<square310x310logo src=”ms-icon-310×310.png”/>
<TileColor>#009900</TileColor>
</tile>
</msapplication>
</browserconfig>
You can add a meta tag that links to your browserconfig.xml. However, if you keep it in the root directory, Internet Explorer can automatically find it without the meta tag.
<meta name=”msapplication-config” content=”/browserconfig.xml”>
Adding app icons in WordPress
We combine the code for the 3 browsers and add them all to WordPress together. Other browsers can probably use Safari or Chrome’s code. To add app icons to your blog, add the following to your functions.php:
echo ‘<link rel=”icon” sizes=”192×192″ href=”/icon-192×192.png”>’;
echo ‘<link rel=”apple-touch-icon-precomposed” sizes=”152×152″ href=”/apple-touch-icon-152×152.png”>’;
You’ll also need to copy to your root directory an icon-192×192.png, an apple-touch-icon-152×152.png, a browserconfig.xml, and all the files referenced in your browserconfig.xml. Once you’re done, try adding your blog to your mobile device’s home screen to make sure it works!
Related Posts
11 best wordpress security plugins, what is wordpress, top 15 wordpress social login plugins, about the author.

Nohman Habib
I basically work in the CMS, like Joomla and WordPress and in framework like Laravel and have keen interest in developing mobile apps by utilizing hybrid technology. I also have experience working in AWS technology. In terms of CMS, I give Joomla the most value because I found it so much user freindly and my clients feel so much easy to manage their project in it.
Your email address will not be published. Required fields are marked *
Email Address: *
Save my name, email, and website in this browser for the next time I comment.
ABOUT CODINGACE
My name is Nohman Habib and I am a web developer with over 10 years of experience, programming in Joomla, Wordpress, WHMCS, vTiger and Hybrid Apps. My plan to start codingace.com is to share my experience and expertise with others. Here my basic area of focus is to post tutorials primarily on Joomla development, HTML5, CSS3 and PHP.
CEO: codingace.com
Request a Quote
Please complete all required fields!

How to Add a WordPress Favicon to Your Site (Step-by-Step)
- Last Updated: August 20, 2023
Adding a site icon, also known as a favicon, to your WordPress website is a simple way to make your site more visually appealing and recognizable.
In this guide, we will walk you through the steps to add a site icon to your WordPress site .
What is a Site Icon
A site icon is a unique icon that represents your website. It appears in various locations, such as your WordPress dashboard, visitors’ browser tabs, bookmarks, mobile search results, and as a home screen app icon when saved to a browser or phone.
By adding a site icon, you can enhance your site’s branding and improve user experience.
Steps to Add a Site Icon
To add a site icon to your WordPress site, follow these steps:

1. Go to Appearance / Customize : From your WordPress dashboard, navigate to the “ Appearance ” menu and select “ Customize .”

2. Use Site Identity : Look for the “Site Identity” section and click on the “Select site icon” button.
3. Choose an Image : Your Media Library will appear, allowing you to choose an existing image or upload a new one. Make sure to upload a square image that is at least 512 x 512 pixels in size. PNG and SVG file formats are commonly used for favicons.
4. Crop the Image (Optional) : If necessary, you may be given the option to crop the image to ensure it appears as a square. If your image is already square, you can skip this step.
5. Click Publish : Once you are satisfied with the icon, click the “Publish” button to save your changes. Your site icon will now be displayed across different platforms and devices.
Site Icon Image Guidelines
To ensure your site icon looks its best, keep the following guidelines in mind:
- Keep it simple : Due to limited space, aim for a clean and straightforward design.
- Make it recognizable : Try to capture the essence of your brand or logo in the small favicon space. Simplify your logo if needed.
- Minimize text or lettering : Remember that favicons are small, so avoid including extensive text. Keep it concise and focus on visual elements.
- Consider color : Different web browsers use diverse color palettes, so choose colors that look good on white, gray, and black backgrounds. Ensure your favicon remains visible and stands out, even in night mode.
Removing a Site Icon
If you decide to remove a custom site icon, follow these steps:
- Go to General → Settings : Access the “Settings” menu from your WordPress dashboard and select “General.”
- Click on the Remove Button : Look for the “Site Icon” section and click on the “Remove” button. This will remove the custom site icon from your WordPress site.
Adding a site icon to your WordPress site is a simple yet effective way to enhance its appearance and reinforce your brand identity. By following these steps and considering the image guidelines, you can create a favicon that represents your site effectively.

Andy Feliciotti
One response.
Thanks for this help <3
Leave a Reply Cancel reply
Your email address will not be published. Required fields are marked *
Save my name, email, and website in this browser for the next time I comment.
How to Underline Text in WordPress Block Editor (Step-by-Step)

How to Start a WordPress Blog in 2024: 6 Easy Steps

How to View Word Count in WordPress for Any Post/Page
Plugin Directory
SVG Favicon
Installation.
- Development
Description
NOW WITH DARK MODE! Safely add an SVG favicon to your site! Don’t limit your site favicon to the .ico/png/jpg formats! Upload cool vector art from your favorite vector app in seconds! Support is common for SVG favicons in modern browsers. Favicon meta generated by the customizer will not be over-written, giving older browsers a fallback in the event they lack support SVG favicons.
Before uploading your SVG favicon, make sure the aspect ratio is 1:1. For Safari, create a copy of your SVG and do the following:
- Drop it to a single color (preferably black)
- Merge art onto a single layer
- Place it on a transparent background
- viewBox attribute must be set to “0 0 16 16”
Uploading : Under the SVG Favicon tab, click the “Upload SVG Favicon” field and upload your SVG favicon
Manifest : After uploading your SVG favicon, you can fill out the corresponding manifest. This step is optional. If you already have your site manifest, leave “Use this site manifest” unchecked.
Safari : The upload process for a pinned tab icon is the same as above. Please note that pinned tab icons should be 100% black with a transparent background. The mask icon color will determine the color of the pinned tab icon.
Dark Mode (NEW) : Here is an example of how to enable dark mode in your svg favicon using the prefers-color-scheme media query:
- Artwork by Online Web Fonts – license
- Mithril – license
- SVG Sanitizer – license
- Tippy.js – license
- Spectrum – license
Screenshots

- Install SVG Favicon either via the WordPress.org plugin directory or by uploading the files to your server.
- Activate the plugin through the Plugins menu in WordPress.
- Go to the Appearance > SVG Favicon to upload your SVG favicon.
Can I use svg favicons?
Check SVG favicon browser Compatibility
Can I use dark mode in my svg favicon?
YES! Here is an example of how to enable dark mode in your svg favicon using the prefers-color-scheme media query:
Why can’t I see my svg favicon after updating?
If you are running a caching plugin for your WordPress installation, trying emptying the caches. If that doesn’t work, try emptying your browser cache and restarting.
Safari’s pinned icon cache stubborn, what can I do?
Try the following: 1. Unpin the tab for your site 2. Quit Safari 3. Remove the Template Icons folder in your Home > Library > Safari folder 4. Restart Safari 5. Refresh the page your testing (page with your mask-icon) 6. Re-pin the tab

Not compatible with PHP 8

SVG Favicon Works!

Didn’t work for me…

Great plugin that does what it says.
Contributors & developers.
“SVG Favicon” is open source software. The following people have contributed to this plugin.
“SVG Favicon” has been translated into 1 locale. Thank you to the translators for their contributions.
Translate “SVG Favicon” into your language.
Interested in development?
Browse the code , check out the SVN repository , or subscribe to the development log by RSS .
• Updated for WP 6.2
• Updated for WP 6.0
• Fixed typos and updated language file
• Now with dark mode support
• Initial Release.
- Version: 1.3
- Last updated: 7 months ago
- Active installations: 1,000+
- WordPress Version: 5.1 or higher
- Tested up to: 6.3.4
- PHP Version: 7.4.30 or higher
English (US) and Russian .
Translate into your language
- Tags: dark mode favicon favicon.ico SVG
- Advanced View
Contributors
Got something to say? Need help?
View support forum
Would you like to support the advancement of this plugin?
Donate to this plugin
Home » Web Tutorials » WordPress » How to Fix WordPress Favicon Not Showing in Browsers?
How to Fix WordPress Favicon Not Showing in Browsers?
Favicon is a small icon that shows in the browser’s title bar. Browsers use this icon to show the tab when you pin the webpage. Some search engines also show the favicon in search results thus making it a brandable icon for websites. Google is a good example that most of us can find the simple G icon indicates the Google Search website. However, there are many reasons your WordPress favicon may not be visible in browsers like Google Chrome. If you are struggling to fix the problem, here are some of the inputs that you can try.
WordPress Favicon in Browser
Below is how a favicon will show in Google Chrome desktop browser.

When you pin the tab , Chrome will use the favicon for that tab like below.

Chrome also shows the icon from the cache in the address bar when you try to open the site. Similarly, you can see the favicon or site icon in mobile Chrome app by viewing all open tabs.

Almost all browsers both in desktop and mobile also use the favicon as shortcut icons on the new tab page. Note that earlier Google Search was showing site’s favicon in the result page. However, Google removed favicon from the latest design of search results.
Fix WordPress Favicon Not Showing in Google Chrome
If you are not able to see the favicon of your site in Google Chrome or in any other browser, follow the below solutions to fix the issue.
1. Check WordPress Favicon Settings
WordPress allows you to add a favicon to your website. After login to your admin panel, navigate to “Appearance > Customize > Site Identity” section and upload your favicon image. Unlike standard favicon image sizes, WordPress site icon needs to be in 512 x 512 pixels.

You can upload a .PNG image for your site icon and after uploading the image check whether it displays correctly in the browser when you are in the admin panel. If it works properly, then open the published site to see if the image is showing in the title bar.
2. Remove Your Theme’s Favicon
Many commercial themes offer custom theme panel to upload logo and favicon. If you are already using WordPress default site icon feature, make sure to disable your theme’s settings for favicon. This will help to avoid overlapping of using the same function in different places which could potentially confuse the browser not showing the icon.
3. Use Favicon Plugin
The recommend favicon size to show in the browser’s title bar is 16 x 16 or 32 x 32 or 48 x 48 pixels. However, WordPress suggests using 512 x 512 pixels as WordPress uses the same icon as mobile app icon. Unfortunately, this larger image size can cause problem in properly showing your image. Since, you need different image sizes for different devices, you can try favicon plugins like RealFaviconGenerator .
- First, install and activate the plugin in your site.

- Go to “Settings > Favicon” menu and enable “Display update notifications” to receive information when there is a plugin update.

- Go to “Appearance > Favicon” section and select your favicon from the Media Library. If you don’t have the icon, leave “Master picture URL” as blank and click on the “Generate favicon” button.

- This will take you to the developer’s website where you can generate a favicon using different option. We recommend generating an icon with free favicon generator tool and upload use that as your master image.

- Scroll down to bottom and click on “Generate your favicon and HTML code” button.

- You will be automatically taken back to the admin panel and see the preview of your images in different platforms. You can also check your favicon instantly to see how it looks on the browser.

When you look at the source code of your site , the plugin will add lot of link meta tags for supporting different devices.

You can try this plugin to add 48 x 48 pixel favicon.ico file if the default WordPress site icon does not work on your site. In addition, the plugin will help you to generate icons for different devices like iOS and macOS Safari. The only thing is you need to keep the plugin active in order to continuously using favicon on your site.
Note: Unlike all other image request that you can see in browser’s developer console, you will not see favicon image request. Therefore, you have to see the page source and find the favicon image is linked in header meta tag.
4. Manually Uploading Favicon
If the default WordPress favicon option is not working and you also do not want to use plugin for any reasons, then you can try manually uploading your own favicon.
- Prepare your favicon image from free favicon generator tool . Make sure the image is in .ico or .gif or .png format with 16 x 16 pixels size.
- Login to your web server using FTP or use File Manager app in hosting panel and upload the favicon image in root directory of your WordPress installation. If you want to upload the image from Media Library in admin panel, make sure to use the correct file path.
- If you have any doubt, open the image file in browser. You should be able to access the image similar to any other images on your site.
- Now, go to “Appearance > Theme Editor” and find header.php file of your theme.
- Paste the below code in your header.php file along with other meta tags.
- It should look like below and remember to use the correct URL for your favicon image.

- Click on “Update File” button to save the change.
- If you do not want to edit theme’s file for this purpose, you can use plugins like Insert Headers and Footers and paste the above code in the header section area.
Now open your site and check the favicon is visible in the title bar.
5. Remove Default Hosting Favicon
One of the other problems with favicon is that many hosting companies like Bluehost and HostGator uses their own icons on some pages. For example, when you view the images or view source code, you will see HostGator and Bluehost icons instead of your site’s icon.

This does not happen with SiteGround and other hosting companies. What you can do is to check the root installation to see if there are any favicon available and replace it with your own icon. Otherwise, contact the hosting support to check if this can be resolved at all.
Another problem can occur is due to the favicon location. In our site, we use separate subdomain for keeping all media files . This could create problem if you do not provide correct image path in the meta link href value. Therefore, make sure to provide correct path and test your image is accessible in the location you have provided to avoid any issues.
6. Favicon in Mac Safari
Some browsers like Safari in macOS works differently. You can enable or disable favicon as per your need. Checkout our article on how to enable favicon in Safari and make sure you have enabled this setting if your browser offers this feature.
7. Clear Your Site and Browser Cache
If you are changing the icon or using different image with same file name, then make sure to clear your cache.
- Clear the cache on your site if you are using caching plugins like WP Rocket , W3 Total Cache , etc.
- Next, log out of your admin panel and press “Control + Shift + Delete” in Windows or “Command + Shift + Delete” in macOS. This will open clear browsing history popup. Select “Browsing history” and “Cached images and files” options and delete them.
- Now, open your site and check it shows correct favicon in the browser.

On mobile devices, you need to go to the settings or history section and clear your browsing data .
Final Words
Earlier favicon is used only by the browsers. However, the same meta link tag is used for different icons like apple-touch-icon for iOS. Therefore, it is a good idea to use all necessary icons on your site and test they are working in browser and other devices. The default WordPress site icon may not be sufficient in this case and you need to use your own meta tags or use a theme or plugin that offers this feature.
About Editorial Staff
Editorial Staff at WebNots are team of experts who love to build websites, find tech hacks and share the learning with community.
You also might be interested in

How to Fix WordPress Sitemap Errors in Google Search Console?
Google Search Console (GSC) is a free set of tools[...]

How to Add Push Notification in WordPress?
Earlier days, it was a difficult task to bring users[...]

Top 5 Search Extensions for Google Chrome
Google has the two powerful tools that help in getting[...]
DOWNLOAD EBOOKS
- SEO Guide for Beginners
- WordPress SEO PDF Guide
- Weebly SEO PDF Guide
- Alt Code Emoji Shortcuts PDF
- Free ALT Code Shortcuts PDF
- View All eBooks
TRENDING TECH ARTICLES
- 600+ Windows Alt Codes for Symbols
- Fix Chrome Resolving Host Problem
- Fix Slow Page Loading Issue in Google Chrome
- View Webpage Source CSS and HTML in Google Chrome
- Fix Safari Slow Loading Pages in macOS
- Fix Windows WiFi Connection Issue
- ROYGBIV or VIBGYOR Rainbow Color Codes
- Fix I’m Not A Robot reCAPTCHA Issue in Google Search
- Structure of HTTP Request and Response
POPULAR WEB TUTORIALS
- Move WordPress Localhost Site to Live Server
- Move Live WordPress Site to Localhost
- Move WordPress Media Folder to Subdomain
- Fix WooCommerce Ajax Loading Issue
- Create a Free Weebly Blog
- Edit Weebly Source Code HTML and CSS
- Add Scroll To Top Button in Weebly
- Add Table in Weebly Site
- How to Add Advanced Data Table Widget in Weebly?
- Up to $500 Free Google Ads Coupon Codes
FREE SEO TOOLS
- Webpage Source Code Viewer
- HTTP Header Checker
- What is My IP Address?
- Google Cache Checker
- Domain Age Checker Tool
- View All Free Web and SEO Tools
© 2024 · WebNots · All Rights Reserved.
Type and press Enter to search
How to Place a Favicon on Your WordPress Website

The favicon is the image that is displayed next to the web address in a browser. It’s also stored when someone chooses to bookmark the website. For many, these icons are used as part of their branding. It’s a miniature logo that can stand out just as pronounced as any advertisement.
It’s not difficult to install a WordPress favicon to give your site that sense of individuality. The hardest part is choosing what kind of a graphic you want the site to be remembered for.
Although these small images may not be as vastly important as other design ideas that can make or break the site , you may be amazed by how often these little icons affect visitor acquisition and retention.
Today, we’re going to show you how to add a WordPress favicon to your website. So, get your creative juices flowing and let’s get started choosing the right image for you.
Why Favicons Are Important
When it comes to branding, the logo of a business plays an important role for recognition. In the digital world, favicons have nearly the exact same function. For those who spend a lot of time at their computers, these tiny graphics are just as recognizable as a billboard for a company.
A favicon can also denote a sense of professionalism. From a visual standpoint, a site without a graphic can be unattractive and may turn visitors away. As silly as it may seem to some, think about how you feel if you visit a website without one of these tiny images.
Creating the Image
There are several ways you can create the perfect image for your icon. Many businesses will actually create smaller versions of their logos for the purpose of creating these tiny graphics. This helps keep consistency in the brand .
A few other ideas could include:
- Initials of names
- Basic representations of logos
- Single letters
- Simple symbols or shapes
One thing you need to keep in mind is that images that are shrunk to 16 pixels wide will not show a high degree of detail. It’s better to try and keep these graphics as simple as possible. Adjustments like drop shadows, embossing and outer glows are extremely difficult to see as a favicon.
Using Pixlr
Pixlr is a free image editor that functions much like Adobe Photoshop. You don’t need an account, and you can get started right away. To do this:
Step 1: Go to the Pixlr editor website .

Step 2: Click to “Create a New Image.”

Step 3: Select the size of graphic you want to use. It’s advisable to create this image 512 pixels high by 512 pixels wide. This creates a perfect square that WordPress can modify easily to shrink. Enter 512 in both the width and height areas and click, “OK.”

Step 4: This will give you a blank canvas to build anything you want as your favicon. For now, let’s just put in “GG” in caps by selecting the type tool.

Step 5: Once you start typing Pixlr will load up the text editor. Change the size of the font to 130. This is the highest the app will go, but we’re just using the text as an example anyway.

Step 6: Move the GG to the center of the canvas and click the “OK” button on the text editor.
Step 7: Go to “File” and click “Save” to store the image.

Step 8: Keep “My Computer” selected and change the name of the file to “favicon.” Click “OK.”

Step 9: This will open a new window to save your image. Put it somewhere that is easy to find.

Step 10: Go to your WordPress admin panel , click “Appearance” and then click “Customize.” This will load your theme’s settings of WordPress.

Step 11: Most themes will have a control built-in for “Site Identity.” It should be the first option in the customizer. Click on it.

Step 12: This will open a window where you can change your site title, tagline and add the favicon image. Click the “Select Image” button under the area for the site icon.

Step 13: This will open the media library of WordPress. You can either choose an image in the library or upload one. We are going to upload the GG graphic we made in Pixlr.

Step 14: Once the image is uploaded, select it to become the website icon.
Step 15: On the top left of the screen, there is a button for “Save & Publish.” No changes you make in the customizer will stay unless you click this button.

Step 16: Once you have saved, click the little “x” to the far left of the button to close customizer and return to WordPress.
In reality, any image can be used as a favicon. Even an image that is larger than 512 pixels. This is because WordPress has a built-in cropping tool.
Using Other Image Editors
You don’t need to use Pixlr if you have other editing software. The thing to keep in mind is the graphic is ideal at 512 pixels square. This helps WordPress adjust the size for various purposes.
Bookmarking a website is only one aspect of the favicon. The graphic needs to be able to scale in the event someone creates a desktop shortcut to the site. This is one of the reasons why you should stick with the 512-pixel shape in WordPress.
Using the larger image will also help it keep greater detail when it’s reduced in size. Of course, you don’t want something that has a lot of small features because they will be lost once the image is shrunk to 16 pixels for the icon.
Plugins of Interest for Making a WordPress Favicon
If your theme does not have a place for the favicon image or you would rather use some of the features of plugins, here are some that may be perfect for you. Some of these come with automatic installation and easy to use graphic editing abilities.
Favicon by RealFaviconGenerator

The Favicon by RealFaviconGenerator plugin is one of the most popular in WordPress. It allows users to create the favicon to be used in a myriad of situations other than the tiny icon in the browser. The plugin supports setting up the image for various operating systems while providing a checking system to make sure it’s set up correctly.
Favicon Rotator

If you want to add a bit of flare to your site, Favicon Rotator may be of some use. This plugin allows you to set more than one graphic as your site’s icon. If you use more than one image, the system will randomly select it every time someone visits the site. You can also set certain favicons to display according to mobile device operating system.
Multicons [ Multiple Favicons ]

Multicons is another plugin that can display certain icons depending on the operating system of the visitor. You can set a default icon for the website and then display a separate image for those using Apple-based devices, for example. If your business has separate services, such as a computer repair shop, this could be a fun addition for your visitors.
It’s often the small things that make the greatest impact when developing a website. Before you think that an icon depicting your business is unnecessary, consider what your company would be without the logo. Your website is an extension of the organization, and it needs to have the same level of professional appeal as any brick-and-mortar location.
What kinds of things do you have installed on your site that make it different from others? How often do you implement features with the sole purpose of engaging visitors?
Related Posts
How to install wordpress – the complete guide to wordpress installation, how to create a new category and move a post to a different category in wordpress, leave a comment cancel reply.
Your email address will not be published. Required fields are marked *
This site uses Akismet to reduce spam. Learn how your comment data is processed .
IMAGES
VIDEO
COMMENTS
Add Your Site Icon. You can upload a site icon by following these steps: Starting from your dashboard, navigate to Settings → General. Click on " View " in the upper-right corner and ensure the " Default view " is selected: If you do not see the option in the upper-right corner, you can visit the "Site Identity" section directly ...
Clearing all of my Safari Cache (clearing all of the history) Emptying all of the Cache; Deleting all of the files in the Safari Favicon Cache folder on my Mac; When I did two, and then initially launched Safari, the correct favicon briefly displayed in the tab bar before switching back to the other one. I am a little bit unsure of what to do here.
A favicon (short for "favorite icon") is an icon associated with a particular website or web page. ... Installing a Favicon in WordPress. ... As of this writing, most modern browsers-except for iOS Safari and Opera Mini-support the .ico format. Avoid 404 server errors - Virtually all modern browsers will request a favicon.ico, so it ...
Once in the Editor, look for the Patterns panel. Scroll down to the Header tab and click on the block pattern on the left. Click on the site logo block to Add a Site Logo. Then select your unique favicon from the Media Library or upload it. Hit Save, then Publish to apply the changes.
Select a master picture from the Media Library (optional) Once you hit the Generate Favicon button, you are redirected to RealFaviconGenerator, where you can design your favicon: adding a background to your iOS picture, using a saturated version of your master picture for Windows 8…. When you are done with the favicon editor, you are ...
Once you activate the plugin, go to Appearance → Favicon to create your favicon set. All you need to do is select or upload an image that's at least 70×70 px (ideally 260×260 px): The screen to add a favicon in WordPress using a plugin. After you select your image, click on Generate favicon.
Use the WordPress Customizer. As long as the WordPress theme you are using has this option, you can easily add Site Icons via the Customizer. Just go to Appearance > Customize in your site's dashboard, and then go to Site Identity > Site Icon. Upload a favicon image via your Theme Options Page.
Method 1: Adding a Favicon Using the WordPress Customizer. This is the easiest method to change a favicon in WordPress. All you need to do is upload your favicon image to the WordPress Customizer, and the rest will be taken care of for you. The first step is to access the WordPress Customizer.
Once you're signed up, navigate to your Canva homepage, and in the top right corner, click Create a design, then Custom size. The recommended size for a WordPress favicon is 512 X 512 pixels. So enter those numbers in the height and width section and click Create new design. Make sure you create the template in pixels.
Click 'Appearance'. Click 'Appearance' to get access to the site appearance settings. Click on 'Customize'. The 'Appearance' settings will expand, providing you with additional options. Click on 'Customize'. Click 'Site Identity' and add your favicon under 'Site Icon'. You can define your site name, tagline, logo ...
After deleting the plugin, deleting all caches, deleting the favicon folder in the finder, and using my old favicon in wordpress, it still stays the annoying blue square. I tried a different plugin and still the same. The plugin does not work properly for Safari Version 14.0.3 (16610.4.3.1.7). And after deleting the plugin it made it worse.
2 How to Add a Favicon to Your WordPress Website in 3 Ways. 3 #1 Adding a Favicon with the WordPress Customizer. 3.1 #2 Adding a Favicon Using a Plugin. 4 #3 Adding a Favicon Manually (WordPress 4.2 and Older) 5 Adding a Favicon Using Theme Options. 6 Main Takeaways.
Dynamic Favicons for WordPress. Typically, a single favicon is used across a whole domain. But there are times you wanna step it up with different favicons depending on context. A website might change the favicon to match the content being viewed. Or a site might allow users to personalize their theme colors, and those preferences are reflected ...
The only difference between the two is that favicon.ico is supported in older browsers, such as Internet Explorer 10 and earlier. Because favicon.ico is supported by all modern browsers, favicon-16×16.png is unnecessary. favicon-32×32.png is recommended. favicon-32×32.png is displayed for high resolution screens, such as Retina screens.
Steps to Add a Site Icon. To add a site icon to your WordPress site, follow these steps: 1. Go to Appearance / Customize: From your WordPress dashboard, navigate to the " Appearance " menu and select " Customize .". 2. Use Site Identity: Look for the "Site Identity" section and click on the "Select site icon" button. 3.
To find themes that accentuate favicon use, click the Appearance function in WordPress. Your list of themes will be the default screen. Click the "Add New" button at the top. Enter "favicon" in the search bar and look for a theme you like. This will show you a list of any theme that includes the word "favicon" in the description.
For Safari, create a copy of your SVG and do the following: Uploading: Under the SVG Favicon tab, click the "Upload SVG Favicon" field and upload your SVG favicon. Manifest: After uploading your SVG favicon, you can fill out the corresponding manifest. This step is optional. If you already have your site manifest, leave "Use this site ...
However, Google removed favicon from the latest design of search results. Fix WordPress Favicon Not Showing in Google Chrome. If you are not able to see the favicon of your site in Google Chrome or in any other browser, follow the below solutions to fix the issue. 1. Check WordPress Favicon Settings. WordPress allows you to add a favicon to ...
Step 6: Move the GG to the center of the canvas and click the "OK" button on the text editor. Step 7: Go to "File" and click "Save" to store the image. Step 8: Keep "My Computer" selected and change the name of the file to "favicon.". Click "OK.". Step 9: This will open a new window to save your image.
5. An easier solution in Chrome is to right click and select Inspect (or CTRL+SHIFT+I), then click and hold the refresh button. A menu will appear with the option to Refresh, Hard Reload, or Empty Cache and Hard Reload. Usually Hard Reload will do it, but if it's stubborn for some reason, Empty Cache and Hard Reload definitely will.