Free Shipping on $60+ orders. Get up to 3 free gifts & an extra 20% off with your order!
- International
- United States

Item added to your cart
Diy sewing travel kit: free pattern | madam sew, diy sewing travel kit: free pattern, sewing travel kit.
This is a FREE pattern + tutorial to make a pouch that you can use to store some basic sewing tools when you are away from home.
The tools and notions that you can find in premade travel sewing kits are often of very poor quality. As a sewer you have the tools and notions you need, but you might not have a practical little pouch. This case neatly organizes everything that you might need during your travels to repair your clothes or to sew on buttons. Let’s get to work!
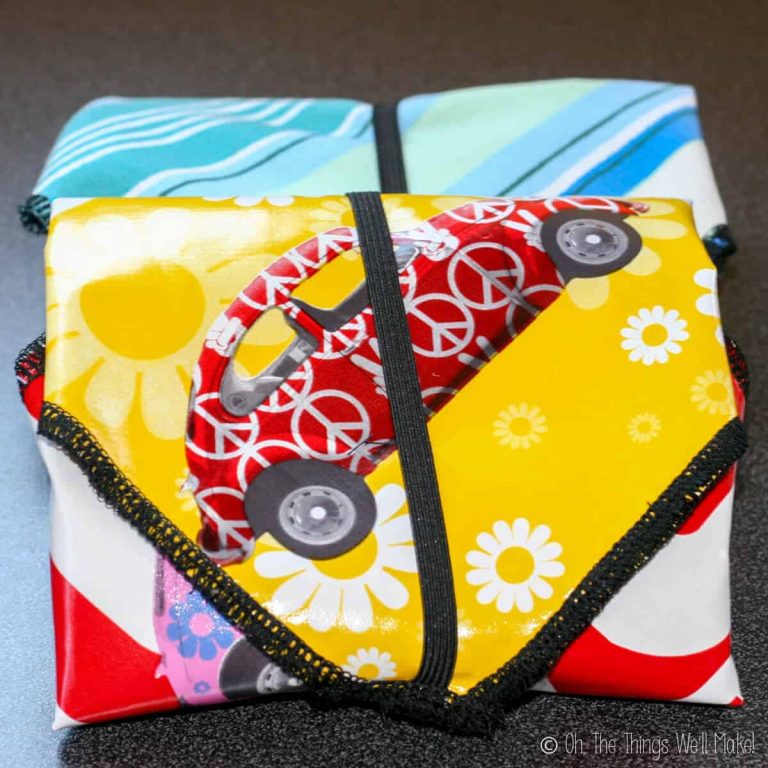
This travel pouch has:
- a zippered pocket for spare buttons, and spools or bobbins with sewing thread
- 3 slide-in pockets for scissors, seam ripper, a fabric marker, a seam gauge or tape ruler
- a felt base to hold needles, pins and safety pins.
This project is doable for everyone with basic sewing machine skills. You’ll learn how to insert a little zipper and attach bias tape.
The finished project dimensions are: overall 5 ½ х 9 ½ inch, folded 5 ½ х 4 inch
THE SUPPLIES
- a piece of fabric 27 x 6 inch (canvas or twill recommended),
- 32 inch bias tape (min. ¾ inch wide)
- 5 ½ x 3 inch piece of felt
- A regular zipper, minimum of 5 inch (you can easily trim a bigger zipper)
- 2 inch of corded elastic
- a small button
- 9 ½ x 5 ½ inch firm stabilizer
Your basic sewing tools: fabric scissors, a fabric marker, a sewing machine, sewing thread
THE PATTERN PIECES
Print the 3 PDF pages . Cut the 6 pattern pieces. Copy them on your fabric.
- Cut pattern pieces A-E out of your main fabrics, with the right side of your fabric facing up. Cut pattern piece D 2 times. I used a different fabric for pattern piece E, the pocket.
- Cut out pattern piece A also out of firm stabilizer or fusible wadding if you want to add a little volume.
- Cut pattern piece F out of felt.
1. Take piece E (pocket) and press down the top edge ⅜ inch. Then turn over another ⅜ inch, press and pin down. Next, stitch ¼ inch from your top folded edge.
2. Take piece E, pin and baste stitch it to piece D along the sides and the bottom at ¼ inch.
Baste stitching is a temporary stitching to hold 2 pieces together. Use a big stitch length. You don’t need to backstitch.
3. Take your temporary fabric marker and mark a line 2 inch in from the left side of your pocket piece. Then, mark another line 1 inch from that. Topstitch on these 2 lines.
4. Take piece F, pin and sew it right sides together to pieces D and E, as shown in the picture, use ¼ inch seam allowance.
5. Press the seam from Step 4 towards your main fabric.
6. Topstitch your seam from Step 4– topstitching should be ⅛ inch from the edge on the main fabric. You can use an edge joining foot for this, in order to keep a perfect ⅛ inch seam.
7. Take piece B and sew it right sides together to the left side of your zipper. Use a zipper foot to sew close to the zipper teeth.
8. Press the seam from Step 7 towards your fabric and topstitch it down, ⅛ inch from the zipper teeth, using a zipper foot.
9. Take piece C, pin and sew it right sides together to the right side of your zipper.
10. Press the seam from Step 9 towards your fabric and topstitch it down ⅛ inch from the edge.
Join our Sewing Club!
Save 10% on your first order
Be the first to know about our tutorials, weekly deals and so much more!
11. Take the zipper piece, pin and baste stitch them all the way around to the right side of the second D piece, using a ¼ inch seam allowance. Make sure the top and bottom edges of your zipper are closed shut as much as possible.
12. Take the fabric pieces B+C (Step 11) and pieces D+E (Step 6). Put them right sides together. Align the left edge and pin together (as shown in the 2nd picture). Sew together using a ¼ inch seam allowance.
13. Press your seam from Step 12 towards your zipper pocket.
14. Topstitch this seam ⅛ inch from the edge on the pocket.
15. Fuse the interfacing or wadding to piece A using a hot iron.
If you want to add quilting lines on piece A, do so now using your heat erasable marker . Quilt piece A to your stabilizer. Afterwards, iron out your quilting lines.
16. Depending on how close you stitched to the zipper teeth, and how wide and precisely you stitched your seams, the piece with the zipper might be longer than fabric piece A. Trim both pieces to the same size by cutting off a strip from the felt piece.
17. Take pieces B-F and stitch them wrong sides together with piece A. Sew all the way around with your stabilizer sandwiched in between at ¼ inch. Trim the edges, if necessary.
18. Take your corded elastic and stitch it down as shown in the photo. It should be placed in the center of the short side of piece A with the felt behind it.
19. Take your 32 inch long strip of bias tape. Pin your bias binding all around the edges of your pouch with the right sides together.
Make sure to fold over the first edge and then overlap a little extra from the opposite end on top of it so that there are no raw edges showing.
20. Fold the bias strip over the edge. Press down, pin and topstitch close to the edge of the bias tape, on the outside of the pouch. This will catch in the underneath of the bias tape. You can use your edge joining foot again for this. Be careful going around the curved edges at the corners as they will be a little tricky to get around.
21. Mark your button placement using your heat erasable marker. Sew on your button with a hand needle.
22. Something extra I added to this pattern: I noticed that my little stork scissors fell out easily, so I added a little elastic with a snap button to attach them.
23. Finally! Time to load up your travelling sewing kit with your supplies. What tools or notions do you think are indispensable when travelling?
I hope you will enjoy making this pouch and use it a lot! It’s also a lovely handmade gift for a friend. Who doesn’t need a sewing travel kit, right? You don’t need to go far to be in need of a little repair from time to time :-)
Happy Sewing!
An Sewing Blogger for MadamSew.com Follow us on Youtube , Instagram , Pinterest and Facebook
Download the PDF of the tutorial and the pattern pieces .

Leave a comment
Please note, comments need to be approved before they are published.
- Choosing a selection results in a full page refresh.
You are $40 away from free GIFT #1
Congratulations , you’ve unlocked all the free gifts!
Calculating..
Free Shipping on orders over $80

Pick your free gifts
Sewing Stiletto
Needle Sorting Pincushion
Quilt Hangers
Madam Sew Clip
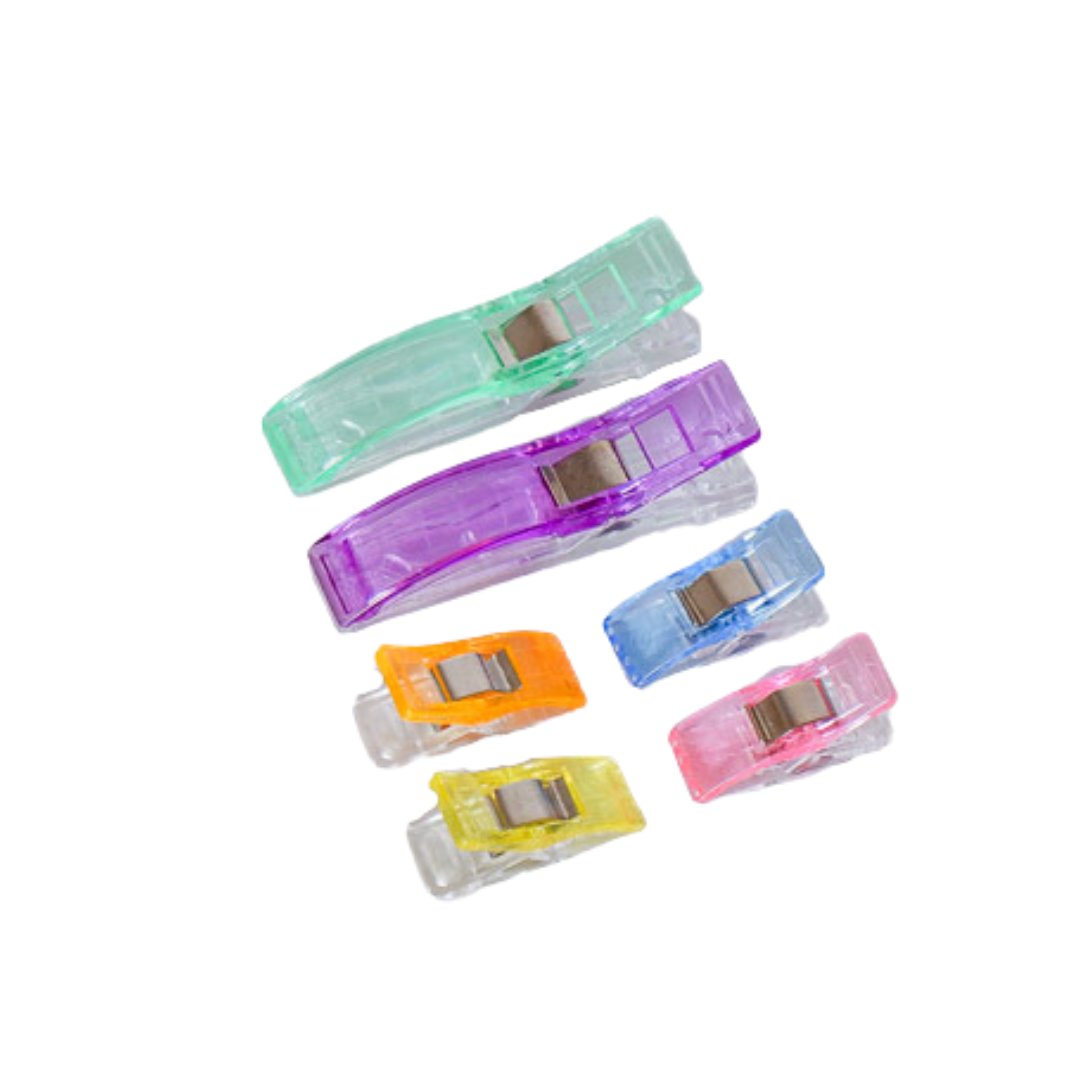
Clips 6 Set
Handy Ruler Grip

Discount Codes & Promotions calculated at checkout.
Plant 1 Tree with your order - 60-Day Money Back Guarantee
Grab a copy of our FREE Handbag eBook!

F REE HANDBAG EBOOK! Get your copy! >
How to Make a Travel Sewing Kit

How to Make a Travel Sewing Kit. I always travel with a sewing kit because you just never know when you are going to need it. The plastic ones always break and your sewing supplies end up all over your suitcase so I wanted to make one that was fabric and would protect my small sewing supplies. I love to sew travel projects and came across this pattern from allpeoplequilt.com and decided to give it a try. I wasn’t pleased with the instructions and thought a picture tutorial would make this travel sewing kit project easier.
As usual, I used remnants for this entire project but if you want something special head over to Fabric.com or Hobby Lobby to select the perfect fabric for you. This post contains affiliate links that if you click on them and make a purchase I may receive a small commission at no extra charge to you.
This is a beginner sewing project although it can be a little fidgety it does not require advanced skills. I would recommend a good quilting cotton for this project.
What you will Need:
- Travel Sewing Kit Pattern
- Remnants or 3 fat quarters in different coordinating colors
- 3″ square of felt
- 3″ square of cotton batting
- Embroidery Floss
Step 1: How to Make a Travel Sewing Kit
Cut out the pattern pieces and tape the two main pattern pieces together lining up the dots. You should have 1 long rounded pattern piece and a smaller rounded pattern piece. From the smaller pattern piece trace out and cut the shape for the needle patch. The original pattern included yoyos for decoration. I didn’t bother with them but if you would like to add them there is a round pattern piece for this purpose.
Step 2: How to Make a Travel Sewing Kit
Cut the travel sewing kit pattern as follows:
Outer Fabric:
- 1 of the main pattern A
- 3 of pattern B if you are doing the yoyos
Interior Fabric:
- 1 of main Pattern A
- 1 of Pattern C
Pocket Fabric:
- 1 — 1 1/2″ x 22″ for tie (I used my exterior fabric for this but you can choose any fabric you like.
- 3 — 3 1/4″ x 4 1/2″ rectangles
- 1 pattern D for the needle patch
Step 3: How to Make a Travel Sewing Kit
Press the 4 1/2″ side of the pocket rectangles down 1/2″. This will be the top of each pocket. Press the straight edge of the rounded pocket in the same fashion. Top stitch 1/4″ along each folded edge.

Step 4: How to Make a Travel Sewing Kit
Make the tie by pressing the strip in half lengthwise. Open up the strip and fold the edges toward the middle and press. Fold in half and top stitch along the length. Tie the ends in a knot and trim excess fabric.

Step 5: How to Make a Travel Sewing Kit
Using a Frixion heat erasable pen, mark the location for the pockets and the stitching lines from the pattern onto the interior pattern piece A. With right sides together, pin the bottom pocket to interior piece A. Stitch along the stitching line then fold the pocket over right side up and press. Do this for all three rectangular pockets.

Step 6: How to Make a Travel Sewing Kit
With right sides together pin the rounded pocket to the bottom of the interior Piece A. Using a 1/8th inch seam allowance, baste all of the pockets along the straight sides.
Step 7: How to Make a Travel Sewing Kit
Fold the tie in half and baste the fold to the right side of Interior piece A on the non pocket end.

Step 8: How to Make a Travel Sewing Kit
With right sides together place the Interior Piece A and the exterior Piece A together. Make sure that the tie is on the inside. It is good idea to push it into the top pocket so it doesn’t get caught in the seam allowance. Sew the two pieces together using a 1/4″ seam allowance and leaving a 2″ opening on one side.
Step 9: How to Make a Travel Sewing Kit
Turn the whole piece right sides out through the opening you left in the side.

Step 10: How to Make a Travel Sewing Kit
Layer to batting and the felt and hand sew the two pieces to the pocket end of Interior piece A making sure that you only sew through the top pf the pocket. This will be the needle patch.
Step 11: How to Make a Travel Sewing Kit
Hand sew the opening closed using ladder stitch. Add some sewing supplies and roll up and you have now finished your travel sewing kit.

If you would like more sewing and crafting projects sign up for our newsletter and receive your free ebook of 15 handbag patterns and tutorials.

SIGN UP TO RECEIVE THE LATEST FROM SEW VERY CRAFTY !
We don’t spam! Read our privacy policy for more info.
Check your inbox or spam folder to confirm your subscription.
Share this:
- Click to share on Facebook (Opens in new window)
- Click to share on Pinterest (Opens in new window)
- Click to share on Twitter (Opens in new window)
- Click to email a link to a friend (Opens in new window)
- Click to print (Opens in new window)

Hi, Welcome to Sew Very Crafty a place for beginner and intermediate sewists and crafters to learn and create. Here at SVC we create simple and fun projects that anyone with basic to intermediate skills can create and grow with. My name is Diana and I am a lifelong learner, sewing enthusiast, parent, spouse, lawyer, and die hard St. Louis Cardinals fan. I live in California with my husband. I love God and my country but am proud of my Irish heritage. I enjoy sharing my creativity and the things that I love with others.
Similar Posts

How to Make a Document Case

How to Sew a Flower Bowl

Learn to Sew a Cross Body Bag

How to Make a Shoe Bag

How to Sew a Bow Clutch

Clean Smelling Beeswax Candles
Looking forward to reading your thoughts on this project cancel reply.
This site uses Akismet to reduce spam. Learn how your comment data is processed .
Privacy Overview
- Skip to main content
- Skip to primary sidebar
7+ Really Useful Diy Travel Accessories to Sew
By Damjana Jakos • Updated on Apr 25, 2023
These free patterns will make your next trip so much easier!
Are you too, eager to get back to travel? Summer break is on my mind and I've been googling lovely getaway locations for our family (got a few planned actually) and now that's still plenty of time between now and then, I've pulled out my best travel patterns that I can revisit and sew.
I will admit that when I think of travel, I first think of what to sew for it. A fun travel sewing project will definitely put me in a summer travel mood! Here are more than 7 super useful items will definitely want to sew up before your next travel.
Also, these free travel sewing patterns will make your vacation easier : a storage bag, a free sleep mask pattern, tons of zipper pouches and jewelry storage bags, a backpack, a little sewing kit, a hat, a cable organizer, and more.

These patterns are super popular right now:
- This perfect tote pattern is free
- Never travel without this little diy cell phone purse !
- Keep your phone cords and charger in these diy drawstring bags
Diy Travel Accessories
Before you start your next traveling adventure, make yourself a few diy travel accessories you'll love. These just might quickly become the top priority on your list to sew!
I'm listing several super useful items you can sew for your next trip: a hat, a sleep mask, a makeup pouch, and a few practical diy travel storage items with free patterns and tutorials. They will all make your vacation or travel for the holidays so much cozier!
Diy Shoe Storage Bag

If you only have time to sew one item from this list, then choose this free shoe storage pouch pattern ! It's a brilliant solution to store anything and everything on your vacation: in addition to keeping your shoes away from your clothes, it will also home your other travel gear like electronics or cables, it can serve as a great first aid kit, and think how brilliant it would be to store individual types of apparel in separate pouches - never search for socks again! Head over to the shoe travel pouch tutorial and grab the pattern in 3 sizes for FREE !
Travel Jewelery Organizer

No more searching for your earrings and a matching necklace - and no more tangled mess! I made this cute jewelry pouch to organize my jewelry when traveling. And I thought you might use it too, so I made a pattern for it - tutorial HERE .
Sleep Mask - FREE PATTERN

Sew your own diy sleep mask using the free sewing pattern and make it easier to relax on any trip!
Eyeglasses Case Sewing Pattern

Never scratch your sunglasses again, with this cute and handy eyeglasses case to sew . This is a generously sized free pouch pattern for sunglasses with a wide opening (I call it easy-out pocket) - it will also fit larger sunglasses, and I can even use it as a phone pouch for my smartphone. Yay!
Small Jewelry Storage Pouch

Packing jewelry and want it to be totally safe - and in separate compartments? Use these mini pouches to store them separately, and put them into a larger pouch (see below). You'll always have a safe way to quickly store your earrings on the go - so practical! Grab the free pattern for the smallest pouch you'll ever make - and make them in matching prints with the next one:
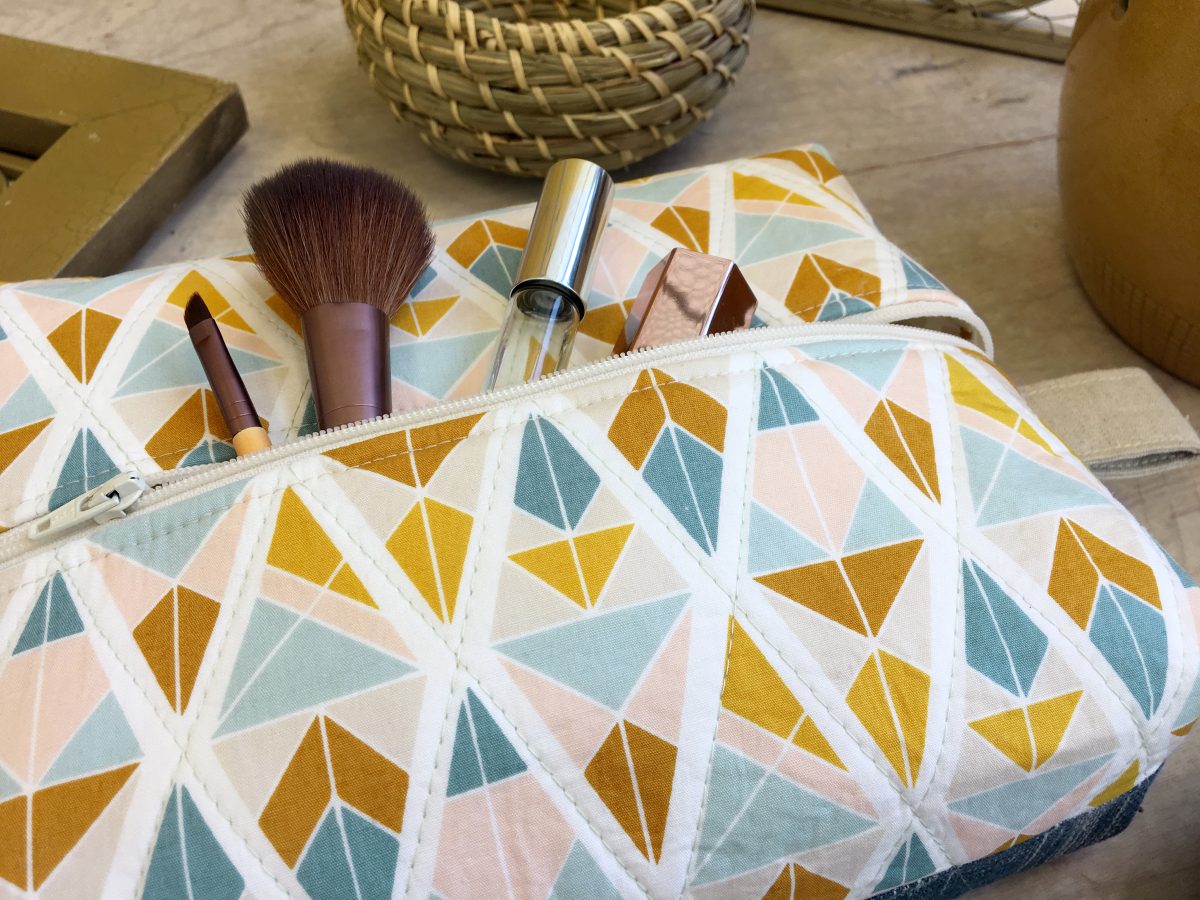
Convenient Travel Cosmetic Bag Tutorial

An easy travel cosmetic bag to hold all the makeup you need on vacation. It comes with a free template you can use to make a bag with 4 small interior slip pockets and a main compartment - an easy and simple design you can make fit any style.
Boxy Makeup Zipper Pouch - Free Pattern

Need something more 'boxy'? Here's how to sew the perfect small boxy zipper pouch you can use in a gazillion of things. Makeup too! - Free pattern in 2 sizes.
My best drawstring Backpack

Make a cute diy backpack using this free drawstring backpack pattern . Choose between two sizes and sew your perfect diy travel backpack!
Tiny Travel Sewing Case (Emergency Sewing Set!)

Clever, practical and tiny! This small diy sewing case is easy and quick to make, and always good to have as an emergency sewing kit. It will house your sewing needle and a few safety pins, and a spare button you might need on your next trip. Take a look at the free tutorial.
Even More Diy Travel Accessories
There are never enough practical diy ideas for travel. I'll be on the lookout for more, and will be adding them to this list. Make sure to follow along, and right now here's one more pouch you might like to have, for anything you can think of:
. This one at AppleGreen Cottage is easy to make and you can use it for just anything (even for storing your sleep mask, yes!).")
You can never have enough zipper pouches when you are traveling, on vacation, or at home. This one is easy to make and you can use it for just anything - makeup pouch, first-aid kit, USB key storage and a cable tidy, even for storing your sleep mask! It will keep it safely separated from the rest of your stuff. Get your free round-bottom zipper pouch pattern .
- also, try this bucket hat with 5 free sizes
- or make this huge messenger bag to tote a lot of things around.
Do you like these free travel sewing patterns and tutorials? Share them, tell your friends about them, or sign up for the AppleGreen Cottage newsletter to get all the new tutorials to your inbox.
Or save it to Pinterest for later:

WANT MORE FREE TUTORIALS AND GOODIES?
Get email updates and never miss out on new patterns, printables, and tutorials:
Or …check out the popular Aiden Cell Phone Purse in our shop. Guess what's on the back of this cool phone bag!
This pattern is just perfect for travel !

More Sewing Roundups

Reader Interactions
June 15, 2022 at 3:52 pm
I've made most of these patterns and I LOVE them! The shoe bag is FANTASTIC! I made 4 of them for a friend. She hung them up in her vacation closet to keep them up and away. I also made the eyeglass case, the cinch jewelry pouch and the boxed zipper pouch. I love AGC patterns. Thanks for making easy to follow patterns that turn out BEAUTIFUL every single time! You make me look good. 🙂
March 01, 2022 at 5:29 pm
Thank you so much for these lovely patterns.
Pamela Snyder
June 27, 2021 at 5:01 pm
Thank you for these wonderful patterns Damjana! We are RV shopping so I am about to begin making storage pieces for our dishes, glasses & so on..the fold down basket set is going to be perfect for sure. Do you have any other recommendations for RVer's out there?
August 26, 2020 at 11:50 am
Thanks! Some really lovely projects here for me to try. Really appreciate it!
August 26, 2020 at 12:00 pm
Ruth, you're welcome. I'd love to see what you sew up, tag me or add #applegreencottage if you post a photo anywhere! <3 Damjana
Josée Paquin
August 25, 2020 at 3:52 pm
Hello Thank you for the patterns.
Have a nice day Josée
August 25, 2020 at 10:15 pm
Josée hi, you're welcome. Enjoy!
August 25, 2020 at 3:16 pm
Thank you for the wonderful patterns!
August 25, 2020 at 10:17 pm
Jackie hi, means a lot, thank you! Happy sewing,
August 06, 2019 at 2:39 pm
I LOVE your ideas! Since I am a fairly new seamstress, they are perfect for me to start with!
August 06, 2019 at 2:58 pm
Happy to hear that <3 Happy sewing,
Sandra@Frogs-and-Faires
June 15, 2016 at 10:05 am
These are awesome ideas, Damjana! 🙂 Now in REALLY need to learn how to sew. 😛
Damjana at AppleGreen Cottage
July 02, 2016 at 7:26 pm
Haha, I think you do, Sandra! Have a great day!
Leave a Reply Cancel reply
Your email address will not be published. Required fields are marked *
Save my name, email, and website in this browser for the next time I comment.
DIY Tutorial Ideas!
DIY Tutorial Ideas Step-by-Step
- ALL TUTORIAL
- ALL RECIPES
- COSMETIC BAG
- How To Make A Travel Sewing Kit

For my tutorial, I am giving you alternate options for my really fun travel sewing kit tutorial . Click on the link for the full tutorial . I LOVE these kits! They are perfect for hand sewers and those of us that like embroidery but they are also a great gift for quilters (all those hand sewn bindings) or even someone headed off to college (everyone needs a mending kit at some point).

So, here is what you will need to cut instead!: 40 2"x2" squares for the interior panels: cut two (2) at 5 1/2" wide x 6 1/2" high and cut one (1) at 5 5/8"wide x 6 1/2" high for the pockets: cut one (1) at 5 1/2" wide and 4" high and one (1) at 3 1/2" wide x 6 1/2" high All of the other measurements will be the same as in my original tutorial ! After you have your 40 squares all cut out, you need to arrange them in the order that you want them sewn. The layout will be 4 rows of 10 squares each. You will have something that looks like this:

We are going to sew the squares together with a 1/4" seam allowance. If you have a 1/4" foot for your machine, this is the time to get it out!! I always mark my rows with a small # in the top corner of the first square of each row so that I don't have to worry about mixing up the rows. Once they are all pinned, I lay them out and check the layout one more time to make sure I don't want to move any around.

Then sew your squares into the 4 rows of 10 and press all of your seams. I press mine open but if you prefer to press them to the side go for it. :) Then pin your row one to row two, with right sides together, making sure to line up all of those seams as perfectly as possible.

Sew them together using a 1/4" seam. Repeat this step until all 4 rows are sewn together. Press all of your seams.

Yea!!! Patchwork complete!! Now just continue on with the tutorial , just remember that you will need to use the adjusted measurements for the inside panels and pocket pieces that I listed above. I have one more variation for you! :) Instead of turning under the top edge of the scissor case and stitching it, you can bind the top like this:

After you print out the scissor case pattern, you will need to cut off 3/8" from the top of the pattern. Use this adjusted pattern piece to cut out your scissor case. Then bind the top using the same method that I use in the tutorial to bind the pocket pieces. So simple but it gives it a different look. You will then have a really fun sewing kit to give to a lucky friend!!!

Post a Comment
- Blog Archives

- Applications
- Boxes-Caskets
- Card Holder
- Cosmetic Bag
- Denim Jeans
- Drawstring Bag
- For children
- Framed Coin Purse
- Glasses Case
- Gluten Free
- Hair Accessories
- Instant Pot
- Main Course
- New Year Christmas
- Pencil Case
- Pillows Cushions
- Quilt Block
- Rock the Tote
- Slow Cooker
Blog Archive
- ► April (1)
- ► February (7)
- ► January (9)
- ► December (3)
- ► October (9)
- ► September (22)
- ► August (7)
- ► June (27)
- ► May (27)
- ► April (32)
- ► March (2)
- ► February (20)
- ► December (26)
- ► November (65)
- ► October (23)
- ► September (28)
- ► July (8)
- ► June (30)
- ► May (5)
- ► February (17)
- ► January (19)
- ► October (15)
- ► September (4)
- Linen Sewing Basket Tutorial
- Star Pincushion Tutorial
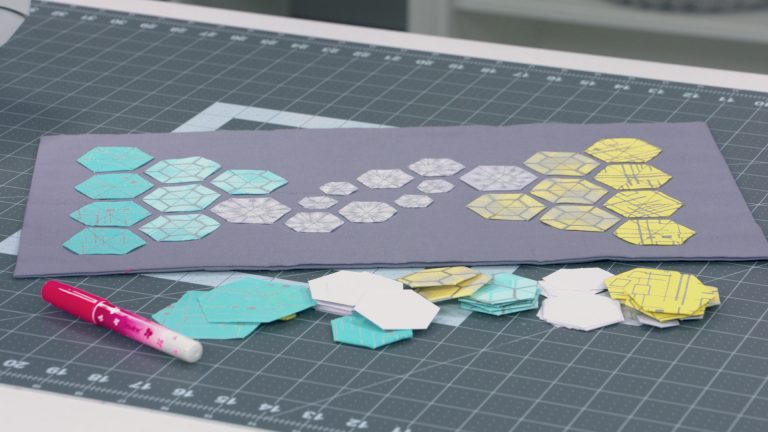
- Travel Sewing Kit Pattern & Tutorial
- Tutorial: How to Bind a Quilt
- Fussy Cut Zipper Pouch Tutorial
- Fabric Cuff Bracelet Tutorial
- Quilt Binding Tutorial
- Hexagon Zipper Pouch Tutorial
- Knitting needle holder or Pencil case Tutorial
- ► June (13)
- ► May (24)
- ► April (40)
- ► March (6)
- ► December (1)
- ► November (4)
- ► September (17)
- ► August (5)
- ► July (6)
- ► May (16)
- ► April (16)
- ► January (7)
- ► December (29)
- ► November (27)
- ► October (12)
- ► August (3)
- ► July (10)
- ► March (1)
- ► February (5)
- ► January (5)
- ► December (4)
- ► October (17)
- ► August (1)
- ► June (2)
- ► May (2)
- ► April (3)
- ► October (2)
- ► September (1)
- ► June (1)
- ► May (4)
- ► April (12)
- ► January (1)
- ► November (3)
- ► October (21)
- ► July (24)
- ► April (9)
- ► March (11)
- ► February (33)
- ► January (14)
- ► December (7)
- ► November (57)
- ► October (93)
- ► September (59)
- ► August (66)
- ► July (19)
- ► May (10)
- ► April (6)
- ► March (20)
- ► February (2)
- ► January (2)
- ► November (6)
- ► October (1)
- ► June (3)
- ► May (3)
- ► April (7)
- ► March (7)
- ► February (3)
- ► December (2)
- ► November (2)
- ► August (2)
- ► May (1)
- ► April (2)
- ► December (5)
- ► November (5)
- ► October (4)
- ► July (7)
- ► June (7)
- ► May (6)
- ► March (5)
- ► February (4)
- ► July (1)
- ► November (1)
- ► July (5)
Subscribe for Updates
- Home →
- Projects & Tutorials
- → DIY Travel Kit Out of a Washcloth – Roll Up Travel kit in 5 minutes

DIY Travel Kit Out of a Washcloth – Roll Up Travel kit in 5 minutes
Don’t you just hate it when you go on a vacation trip and you realize that you forgot to bring some of your toilet necessities with you? It happened way too many times to me, so I decided to do something about it. To somehow prevent it from happening.
That’s when I came up with an idea to sew a travel kit. That way, I can keep all the things I need on a trip ready to go at any time.

The best part about it is its simplicity. It sews up in a flash. And you don’t even have to buy any materials. You can just repurpose a washcloth instead. Which means that this DIY travel kit is also environmentally friendly.

If you like the idea and want one for yourself, take a look at this step by step washcloth travel kit tutorial I have prepared for you.
How to make a washcloth travel kit
Diy washcloth travel kit supplies.

When it comes to required materials for this project, you don’t need much.
A washcloth, a ribbon in a color of your choice, and two threads of different colors.
The tools you will be using are scissors or shears, pins, and a sewing machine, or a needle if you prefer sewing by hand.
How to sew a DIY travel kit out of washcloth
Step 1: add your creative touch to it.
Since the washcloth is already cut into a shape you can add just a bit of creativity and add a simple decoration. Team lazy decided to go the simplest way possible – stitch simple squares using a tight zig zag stitch. As you can see, I matched the pattern design with the shape of my pouch. If you prefer you can skip this step altogether.

STEP 2: Mark the pockets and the fold
Decide how much pockets you want your pouch to have, and how wide you want them. To do that fold the bottom of the washcloth up about 2/3 of the way and insert the items you want to carry in the roll up.

Pin them when you make your choice. I made three rows here, which means that my pouch will have four pockets.
Narrow pockets are better for items like toothbrushes, tweezers, or nail files because they hold them in place firmly. Wider ones are better for deodorants or toothpastes.

With this, the items in the pouch won’t be touching each other. And since the fabric absorbs moisture very well, it will remain hygienic and tidy.
STEP 3: Sew the pockets of the travel kit
Next thing you need to do is to sew the pockets and the ribbon. First deal with the pockets. Stitch them with a sewing machine or by hand if you wish. I recommend that you use a thread of different color than the one you used to make a pattern on the fold.

STEP 4: Sew the ribbon
Once you finish making the pockets, it’s time to sew the ribbon. Stitch it to the middle of the pouch, on the back. This will allow you to tie it up over the fold when you’ve packed everything you need. Nothing will fall out no matter how much your bags tumble around during the trip.

That’s it, your pouch is ready for the next adventure.

I hope you liked this DIY travel kit out of washcloth tutorial. Now you can make your own unique travel pouch. Let me know how it turned out in the comments.
RELATED PROJECTS:
- Soap pouch out of washcloth (VIDEO)
- How to make a hooded baby towel
- How to make a towel wrap
Related Posts
Stuffed dog sewing patterns – Stitch by Stitch, Bringing Furry Friends to Life
How to Finish Zipper Ends – Three Easy Methods [VIDEO]
How to Make Stylish Bow Headbands for Any Age! [from Babies to Adults]
DIY Easter Bunny Treat Bag (so cute!)
I enjoy easy, quick little sewing projects for hostess gifts , favours, etc. And really enjoyed your patterns . Thankyou! Cute website that you have!!!
Leave a reply:
Save my name, email, and website in this browser for the next time I comment.
You’re very creative! I enjoy watching your videos and searching your website. You have given me many, many ideas for home made gifts. I really enjoy making these lovely items and my family and friends love receiving unique and very practical and useful gifts! I always like to find a way to THANK special people in my life and you made that possible – they would never find my gift anywhere to buy at retail. THANK YOU VERY MUCH for posting and emailing me when you have a new cute thing to make!!
Love this idea!!! Great gift …
What a fun project – great stocking stuffer for the upcoming holidays!
What a clever idea, brilliant! Thanks for sharing at Handmade Monday.
Love it, Thank you so much for sharing your post at our Senior Salon Pit Stop. Pinned to Senior Salon Pit Stop InLinkz Linkup Shares board and tweeted @EsmeSalon #SeniorSalonPitStop
What a great idea! Thanks for sharing on Traffic Jam Weekend at LifeasaLEOWife.com! I think my readers would enjoy this tutorial, so we’d love to have you share on my two other link parties as well. Happiness is Homemade runs from Sundays thru Thursdays and You’re the Star Blog Hop runs month long with new features posted every Monday.
Niki ~ Life as a LEO Wife
this will be handy for my travels
Thanks for linking with #pocolo
This is a great project and so very useful. Thanks for sharing such a practical gift idea as well. #HomeMattersParty
What a handy little crafting project! Thanks for sharing with us. Pinned.
Leave a Reply:
A Spoonful of Sugar
Make. Bake. Create.
Travel Sewing Kit Pattern
February 25, 2018 By A Spoonful of Sugar - 9 Comments

I am so excited to share my latest pattern release with you. If you enjoy sewing small zakka projects, you will love creating these clever, triangular, Travel Sewing Kits . I had so much fun designing these mini travel sewing kits in the latest Tilda fabric range, Lemon Tree. They can be quickly constructed from your favourite fabric “scraps” and make ideal little gifts .

The Travel Sewing Kit is handy for quick repairs when travelling, or for crafting on the go! Featuring room to safely store pins, needles, safety pins, buttons, scissors, and more! Despite its petite size, it can hold all the essentials. The outside of the kit is constructed with strips of your favourite patchwork fabric, making it a fun scrap buster project. The interior includes felt panels to safely stow your sewing items. There is opportunity to customise your pouch with fabrics and trims. The kit cleverly folds into a triangle shape and is secured with press snaps or sew in studs.

This is a quick project that can be used as a t ravel sewing kit, an earbud holder, coin pouch, USB holder or jewellery holder. The Travel Sewing Kit would be the perfect gift for a traveller or friend who loves to sew. They are so handy to have on hand in your handbag in case of a wardrobe malfunction.

These little Travel Sewing Kits are so much fun to make – be warned you won’t be able to stop at one!
You can find the 12 page pdf pattern – complete with detailed instructions, templates, and photographs to guide you through the construction process – in our Etsy and Pattern Shop . It is available for immediate download.
If you make one, we would love to see it! Tag your social media posts with #travelsewingkit
Thanks to Two Green Zebras for providing the Tilda Lemon Tree fabric that was used in this project.

Never miss a post.
Get fresh new ideas delivered right to your inbox!
April 5, 2018 at 11:11 am
Super cute project!
April 25, 2018 at 12:49 am
Where did you get the tiny scissors?
May 28, 2018 at 3:16 pm
Great little pouch! Can these be made for sale?
October 14, 2018 at 4:19 am
I just downloaded this cute pattern from Craftsy. Thanks, but what are the tulips on top of the needles? Thanks,
November 1, 2018 at 1:55 pm
Hi Karen – the pins are Tulip Pins by Hiroshima needles http://en.tulip-japan.co.jp/hiroshima/ – I love their tulip design.
September 3, 2021 at 4:31 am
You can purchase these pins with the tulip heads already on them.
March 23, 2021 at 4:13 am
Where did you get the small scissors?
May 14, 2021 at 1:53 pm
I wonder weather the strips should be 1 3/4 inches by 9 inches as the three piece strip is not quite wide enough after being joined together with a 1/4 inch seam. Did I do something wrong? Annette
April 26, 2023 at 1:48 am
j’ai craqué, pratique et tellement mignon Véro
Leave a Reply Cancel reply
Your email address will not be published. Required fields are marked *
Save my name, email, and website in this browser for the next time I comment.
Popular Posts

Can't find time to sew? Get my TIME HACK GUIDE to sew more today!

31 Travel Sewing Projects

This post may contain affiliate links.
Get excited to vacation with these travel sewing projects. These are great beginner projects to organize in the car or airplane.
I love going on trips in the summertime and when my kids have breaks from school. We have so much fun playing, hiking, swimming, and biking wherever we go.
I’ve put a big list together of all the things you can sew for traveling at any time of the year. Some of these sewing projects are great for playing games, some are for organizing, and some are for sleeping. A lot of these have free PDF sewing patterns to help you make something to make travel better!

What is a PDF sewing pattern?
A PDF pattern is a sewing pattern designed on the computer and organized so that it can be printed on several letter or A4 size pieces of paper.
I love using PDF sewing patterns because if the pattern gets ruined or if my children or I changed sizes, I can always print it again. It’ll never be destroyed since I have a digital version!
How do you use a PDF sewing pattern?
Open the PDF on a computer and click print. When printing make sure that the scaling is set to 100% or no scaling so that the pattern prints at the correct size.
Once the pattern is printed it can be taped together to get the full size. Then the pattern can be cut for each pattern piece size or individual sizes can be traced so that the pattern can be used again and again. Learn how to use PDF sewing patterns .

Do you love to sew? Try one of these sewing projects:
- Beginner sewing projects
- Fat quarter sewing projects
- Scrap fabric sewing projects
- Eco-friendly sewing projects
- 30 minute sewing projects
Travel Sewing Projects

Sew a Clear Vinyl Zipper Pouch
Learn how to sew a clear vinyl zipper pouch with a free sewing pattern. This beginner sewing project is great for organizing! Get organized in an easy way with this fun clear vinyl zipper pouch.

DIY Tic Tac Toe Travel Game
Learn how to make tic tac toe travel game with felt and a drawstring bag. This beginner sewing project is a great for the car and airplane.

DIY Infinity Scarf with a Pocket
Learn how to make a DIY infinity scarf with a pocket perfect for giving. Use an invisible zipper for this sewing project for a hidden pocket!

Free Circle Drawstring Bag Pattern
Learn how to make a circle drawstring bag with a free sewing pattern. This beginner sewing project is great for organizing toys or makeup!

DIY Reusable Snack Pouches
It’s easy to bring snacks for kids (or yourself) with these DIY reusable snack pouches! Use waterproof fabric to make them easy to clean! I love being out and doing activities with my kids.

DIY Tote Bag with Fold Up Pocket
Learn how to make a DIY tote bag with a fold up pocket. With the reusable bag folded up in a pocket it's easy to store in a purse or car until needed.

Free Dice Bag Sewing Pattern
Learn how to make a drawstring bag with a free dice bag sewing pattern. Faux leather makes an easy sewing project and a great handmade gift.

How to Make a DIY Fabric Tray
Learn how to make a DIY fabric tray with fabric scraps for simple organizing. It’s a great beginner sewing project that makes an easy gift!

Free Cell Phone Bag Pattern
Learn how to make a cell phone bag with a free sewing pattern. This tiny crossbody bag is great for essentials and it’s a fun sewing project.

Free Beach Bag Sewing Pattern
Learn how to make a beach bag with a free sewing pattern. This bag sewing project is great to hold everything for the pool or the beach!

Easy DIY Pencil Pouch
Learn how to sew an easy DIY pencil pouch with scraps of fabric, a zipper, and a free sewing pattern. This is a great beginner sewing project!

How to Make a Tote With Leather Handles
Learn how to make a tote bag with leather handles. This beginner sewing project looks great and is perfect for carrying your essentials!

DIY Travel Toothbrush Roll Bag
Learn how to make a DIY toothbrush roll bag for traveling with a hand towel and a ribbon. Organize your hygiene items with this simple sewing project!

Small Circle Zipper Pouch Tutorial
Learn how to sew a small circle zipper pouch with a free sewing pattern. This easy sewing project can clip onto a bag or keys!

Ruffled Tote Bag Sewing Pattern
Make a ruffled tote bag with a beginner sewing pattern. This bag sewing project has ruffles or piping, and is great for combining fabrics.

How to Make DIY Reusable Cotton Rounds
Make use of all those organic cotton scraps of fabric by easily sewing or serging them into DIY reusable cotton rounds. They are great for removing make up!

How to Sew a Zipper Pouch
Learn how to sew a zipper pouch with a free sewing pattern. This easy sewing project is great for beginners and makes a great handmade gift!

How to Upcycle Jeans Into a Tote Bag
Learn how to upcycle jeans into a tote bag. This beginner sewing project is a quick and easy bag to sew, and it already has pockets!

Sew a Sunglasses Case with a Free Pattern
Learn how to sew a sunglasses case with a free sewing pattern! Keep your sunglasses case safe in your bag with a beginner sewing project!

Free Diaper Bag Pattern and Tutorial
Learn how to make a bag with lots of pockets for storage with this free diaper bag pattern and sewing tutorial. Use canvas for a durable bag!

How to Sew a Fabric Makeup Brush Holder
Are you thinking about summer travel plans and what to pack? You really don’t need a reason though to sew a fabric makeup brush holder, you can just make one for yourself to store your own brushes.
Noughts and Crosses Travel Game
Make a Tic Tac Toe game perfect for kids to play with while traveling!
How to Make Reusable Sandwich Wraps and Snack Envelopes
Ditch the plastic baggies and sew some reusable sandwich wraps and snack bags for traveling with sandwiches and other snacks. These are perfect for kid’s lunches.
Sewing a Rucksack: Free Backpack Pattern
We’re happy to share this free backpack pattern with you along with the step by step instructions for sewing a rucksack .
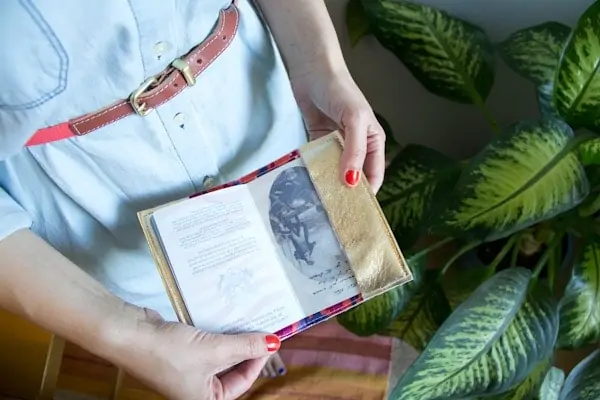
DIY Leather Passport Holder
Make a cute little fabric book to take care of your passport!
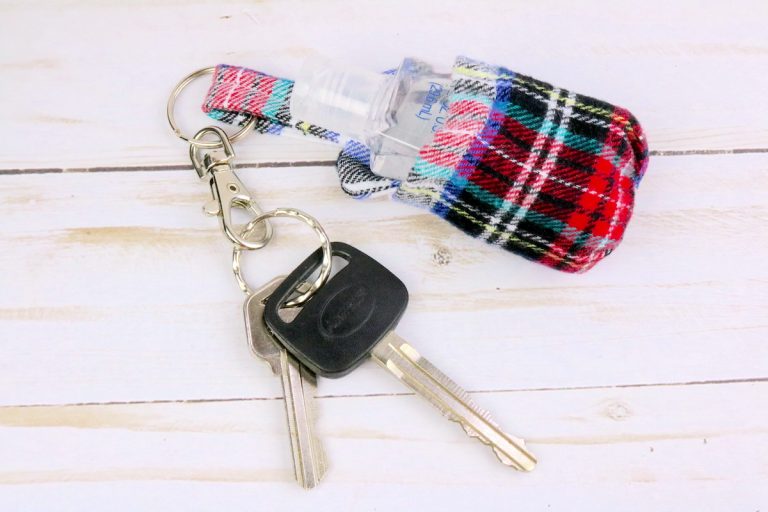
DIY Hand Sanitizer Holder Keychain
Having a bottle of hand sanitizer close by and ready to use is necessary today. With this DIY hand sanitizer holder keychain, you never have to fumble to find the bottle in your purse or backpack again!

How to Make a Travel Neck Pillow with Pattern
We show you How to Make a Travel Neck Pillow with Pattern! This will be great for traveling and you can make it premium for less than you could buy in store.
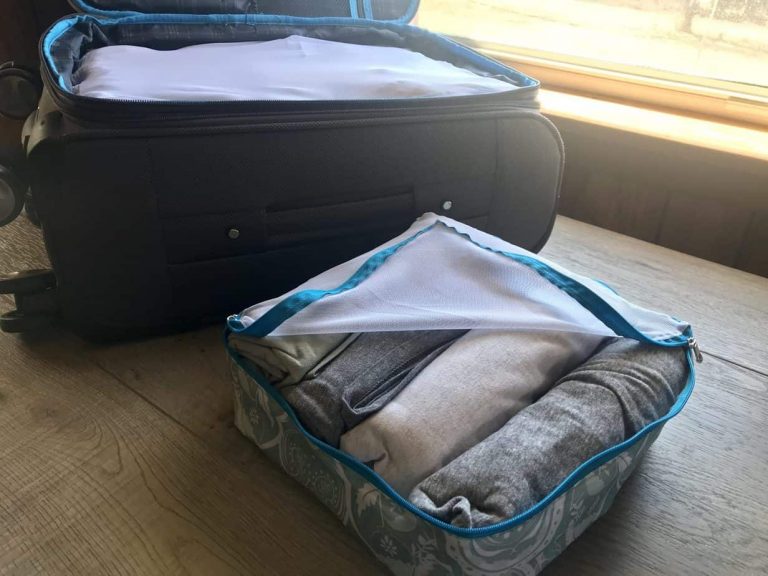
Packing Cubes Pattern with 3 Sizes
A packing cube is a zippered mesh bag used to organize clothes within luggage. Sew your own packing cubes in three sizes with this easy pattern and photo tutorial.
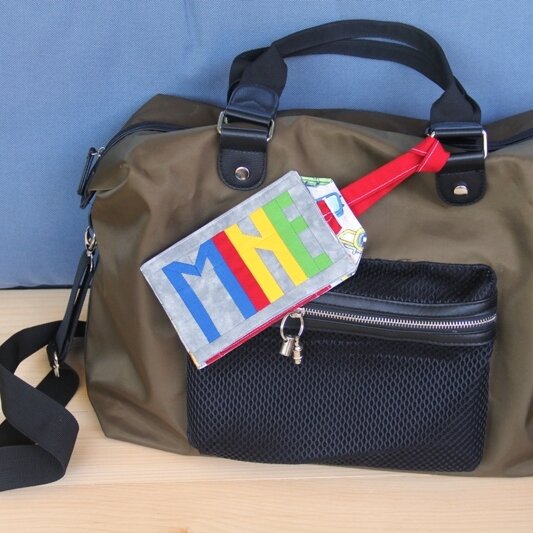
MINE Luggage Tag
Make a cute and unique luggage tag with this fun pattern!
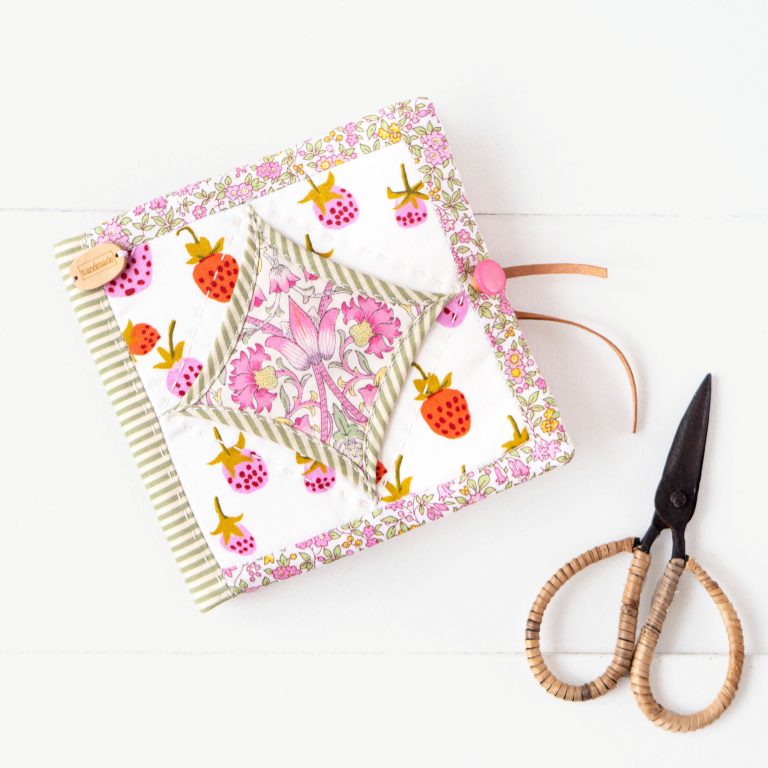
Traveller’s Sewing Book
A sewing kit to travel in style – even if it’s just from the sewing machine to the couch!
Tutorial: Kid Sized Travel Neck Pillow
Make a kid sized travel neck pillow to make car and airplane sleeping easier!

DIY Sleep Mask Pattern
The diy sleep mask pattern you’ll find here might turn out to be the BEST ever diy gift for anyone who can benefit from a quick, energizing nap or a full night’s sleep – and that’s pretty much everyone!
If you make something using this sewing project, I’d love to see! Please share it on social media with the hashtag #heatherhandmade and tag me!

I believe small sewing moments can create great joy. Find your own “ right ” way to sew. -Heather
Lady Light Travel
~ women's travel with a single carry on. tutorials, packing tips & techniques, clothing ideas, and more.

DIY Sewing Kit
01 Thursday Jun 2017
Posted by Lady Light Travel in Principles of Light Travel , Toiletries , Ultra-light techniques
≈ 14 Comments
sewing kit , travel , ultra light
I’m not a huge fan of commercial travel sewing kits. They are expensive, bulky, and never have the right color of thread for my clothes. I decided to make an itty bitty travel sewing kit that served my own needs. Now you can do it too!
DIY Travel Sewing Kit
Step 1 – collect materials.
This sewing kit uses common materials that you should have at home:
- A source of light cardboard – in this case I used a paper plate
- Various colors of thread found in your capsule wardrobe
- Safety pins
- Sewing needles
I didn’t include spare buttons in my sewing kit because I have already sewn them into my garments . That way the buttons are always available. I use the cutter on my dental floss as a substitute for scissors. It’s crude but it works.

For this sewing kit I chose colors that I wear in the summer; tan, coral, navy, chambray blue, and olive green
Step 2 – Draw the template on the cardboard
I drew a rectangle approximately 1 inch by 1-1/2 inches (1/2 cm by 1 cm) on my cardboard. I used 5 different colors in my sewing kit, so I spaced out 5 dots on the cardboard – one for each color.

Step 3 – Create points by adding in zig-zags
I added zig-zag lines to my template. The triangular shaped points will keep the thread in place when I wrap it around the cardboard.
Step 4 – Cut out template, add in notches

Step 5 – Add Thread
Wrap the thread around the cardboard. Secure the thread in the keeper notches.

Step 6 – Add in Hardware
I add in safety pins and sewing needles to finish my kit. I usually slide safety pins in one side. I slide sewing needles through the threads on the other side.

Step 7 – Finished!
I usually place my sewing kit into a pill size plastic bag. I also add in my eyeglass repair kit. Everything fits into a pocket of my toiletry kit.

The DIY Sewing Kit is much smaller and lighter than any commercial sewing kit. As a bonus, it has colors that you can actually use! The most important part of this kit is that it reduces the bulk and weight of a commonly carried item. It is just one more technique for travel with a personal item. Don’t leave your stuff at home to travel lightly – just cut bulk and weight!
Share this:
- Click to share on Twitter (Opens in new window)
- Click to share on Facebook (Opens in new window)
- Click to email a link to a friend (Opens in new window)
- Click to print (Opens in new window)
- Click to share on Pinterest (Opens in new window)
14 thoughts on “DIY Sewing Kit”
June 1, 2017 at 12:37 pm
Great idea! Thanks for sharing!
June 1, 2017 at 1:33 pm
This is the same as the free kit you get at hotels
June 1, 2017 at 1:38 pm
Many hotels don’t have the free kits. You certainly won’t find them at hostels or discount hotels. I don’t like to rely on something that may not be there.
Ive also found that the free kit doesn’t have the right colors. I don’t want to carry colors I can’t use.
June 1, 2017 at 6:48 pm
This is a great idea that I really should do… as well as sewing the spare button. Glad to see a new post!
June 2, 2017 at 12:09 am
I always make my own sewing kit, and I have used the plastic or heavy card cotton holder from free sewing kit giveaways. These days I often use a couple of plastic bobbins and wind on the relevant colours for that trip. I add the needles, pins, even a button, etc, and carry a small pair of scissors, which I can if I book through my luggage, something I always do from Australia as it’s free and so far, reliable. To hold it all, I made a tiny zippered wallet that is about half the size of my palm. Not quite as tiny as this one, but works well.
June 2, 2017 at 9:10 am
This works as well. My only concern is that the plastic bobbins and the case add extra weight to your kit. Many countries prohibit scissors in hand luggage, which is why I don’t carry them. They are, of course, superior to the dental floss cutter. >
June 2, 2017 at 9:34 am
I buy the super strong thread. I don’t use normal thread on vacation. I check the buttons on my travel clothes and double sew them if they appear wimpy. A shocking number are. I carry only Black, Royal and white. My three main travel colors. I carry the needles with extra large holes. Buttons never come off unless you are in a hurry so it’s good to try to reduce any frustration. The idea of the featured travel kit is good. It’s tiny and light weight … I have seldom had to use the sewing kit in all of my journeys … so less is more. (I did have an inner seam of my pants split which I stapled until I found a seamstress.) That made a good story! Happy Travels! Sylvia
June 2, 2017 at 10:58 am
I have rarely needed my sewing kit but when I did it was critical! I had some trim come off an hour before my cousins wedding. I was so glad a kit was available. >
June 19, 2017 at 6:31 pm
I’ve made a similar sewing kit but included a needle threader. My aging eyes just can’t thread a needle without one. Thank you for the great suggestions
August 11, 2020 at 11:54 am
Ok, I finally got around to do this in this time of Covid-19 since travel is not advised. I am getting around to doing other things that are travel related, too, like package a small amount of dry shampoo, refill my travel containers, etc. I appreciate the template for the thread and have had making one on my to do list since I first saw this several years ago. Now, I have done it. I used black, white, royal, charcoal and turquoise as those are my capsule wardrobe travel colors. I put in 1 button, but I do not wear button-up clothing as a rule so may never need it. Oh, and I put the sewing kit in a very small plastic bag that I use for transporting vitamins and meds so it is in a light-weight container.
August 11, 2020 at 2:47 pm
Good for you! I keep my kit in a small snack bag along with other repair items such as my eyeglass kit.
This quiet time is a good time to assess, repair, and improve our kit.
August 11, 2020 at 11:53 pm
A sewing kit is one thing I have only used twice in 20 years of traveling…. and I wonder if it’s even worth carrying. I have dropped down to one needle, white thread and black thread. I split the inseam of my pants on Paros and found a tailor to sew it up ….. That was in 2008. I was taking pictures in a church and stressed the seam…. Ugh … I was happy to find the seamstress.
Looking forward to traveling again.
Sylvia Travel Safe, Travel Light and Travel Happy….
August 12, 2020 at 12:00 am
I have only used it a couple of times. Once was an hour before my cousins wedding. I needed it right then!
August 12, 2020 at 1:28 pm
When your travel wardrobe is small, a sewing kit is one of those items that you really need when a rip or tear happens to an item of clothing. It is so small though that any weight it adds is negligible. I would rather be safe and have it than not. The two items that I would prefer not to travel without would be the sewing kit and medication for specific issues (tummy and migraine). I can make do with only 2 pair of undies, no makeup, or using my shampoo bar for my body but clothing that is gaping or an upset tummy or migraine are non-starters for me. I guess you can tell that I suffer from both of those maladies (migraines for 20 years and pepper and MSG allergies so my tummy gets attacked even when I am careful). Anyway, this sewing kit can be happily tucked away in my toiletry bag beside my tiny first aid kit and if I never need them, how fortunate I will be!
Leave a Comment Cancel reply

- Already have a WordPress.com account? Log in now.
- Subscribe Subscribed
- Copy shortlink
- Report this content
- View post in Reader
- Manage subscriptions
- Collapse this bar
Sew Your Own Travel Sewing Kit
- Description
Since traveling with a sewing machine isn’t always an option, learn how to sew a fun travel sewing kit from small scraps of felt. Ashley Hough shows you how to put it all together as well as personalize it with easy applique and labeled pages.
This travel sewing kit can be made from just a small amount of scrap felt. Ashley shows you what size of rectangle you will need to cut for the outer cover as well as for the pages. She then shows how to stitch the pages together and trim them in order to make all of the pages line up nicely. Once you decide how many pages are going to be in your book you can decide what to put on each page. Ashley chose pins, needles, thread and buttons for her book, though you can personalize it depending on who it is being made for.
Since this travel sewing kit is made from solid color pieces of felt it makes for a great background for an applique design. You can plan your own design or add an initial as Ashley demonstrates. She shows how it can be stitched in place with a straight stitch, blanket stitch or satin stitch. The same method you choose to use for the applique design on the front cover you can also use to secure the page labels. Ashley shows you how to sew your own page labels using just small pieces of felt and the pre-programmed alphabet on the sewing machine.
Once your travel sewing kit is complete you can insert and add all of the tools to it. Ashley shows how she inserted both the pins and needles into her book as well as demonstrates how she added the thread by wrapping it around a button to keep it from tangling up.
Explore videos by Ashley Hough
You may be interested in
Premium Membership
Unlock exclusive member content from our industry experts.
- 24/7 Access to Premium Sewing Videos, Projects, and Tips
- Step-by-Step Instructional Demos, Patterns, and Tutorials
- 50% Off Video Downloads Purchased in the National Sewing Circle Shop
- Access to Ask the Expert Program
- 2 Full-Length Video Downloads to Watch Offline
Gold Membership
Get everything included in Premium plus exclusive Gold Membership benefits.
- 8 Full-Length Video Downloads to Watch Offline
- 3 Full-Length Quilting Classes to Keep for Life
- 6 Printable Sewing Guides and Patterns
- Discounts on Purchase-to-Own Content in the National Quilters Circle Shop:
- Exclusive GOLD LIVE Streaming Events
Username or email *
Remember me
Lost your password?
Privacy Policy
Travel Sewing Kit
Be sure to have all of your sewing notions handy while on the go or being creative in your sewing room with this handy travel sewing kit.
The Travel Sewing Kit was sewn on a BERNINA 550 Quilters Edition featuring Fleet and Flourish fabric collection designed by Maureen Cracknell. Fabrics used within this tutorial can be picked up online or in your local store.

In the Travel Sewing Kit we showcase how to apply a zipper with tabs and how to sew with the walking foot.

Create a great gift for the people in your life that love to sew:
For more projects made with Fleet and Flourish fabrics check out our Fabric Project Catalog !
Download full instructions of the Travel Sewing Kit

Used Products

What you might also like

Two Extremely-Last-Minute Gifts You Can Make in a Hurry

Sewing Travel Kit made from a Clutch

Waterproof Travel Kit Bag

What’s In Your Sewing Kit: Tools

What’s In Your Sewing Kit: Presser Feet

Gifts from the Kitchen and Sewing Room

Travel-size Neck Pillow

Travel Shoe Bag Tutorial
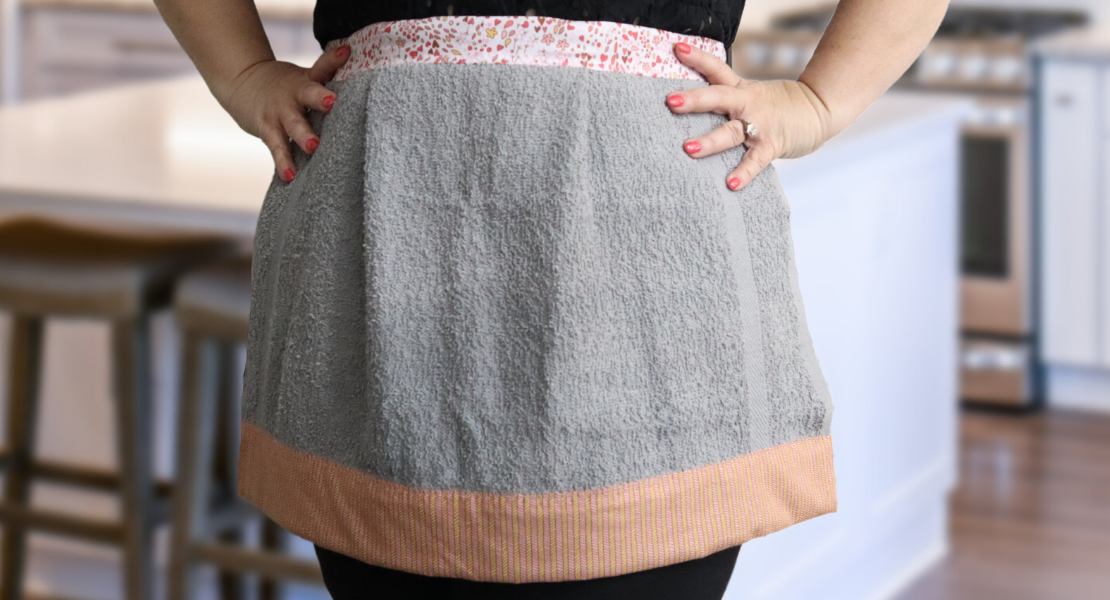
Easy Kitchen Towel Apron
Travel Projects to Stitch

Traveler’s Purse Tutorial

Embroidered Kitchen Towel
Boxy Travel Pouch Tutorial
Kitty Cat Costume Tutorial
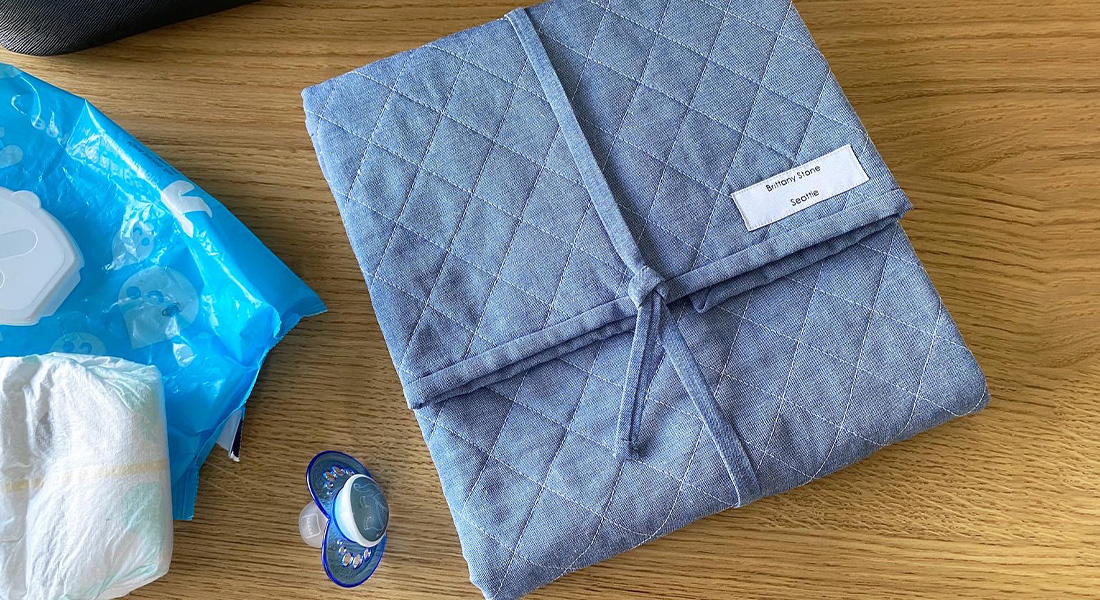
How to Make a Travel Changing Pad

Embroidered Kitchen Towels
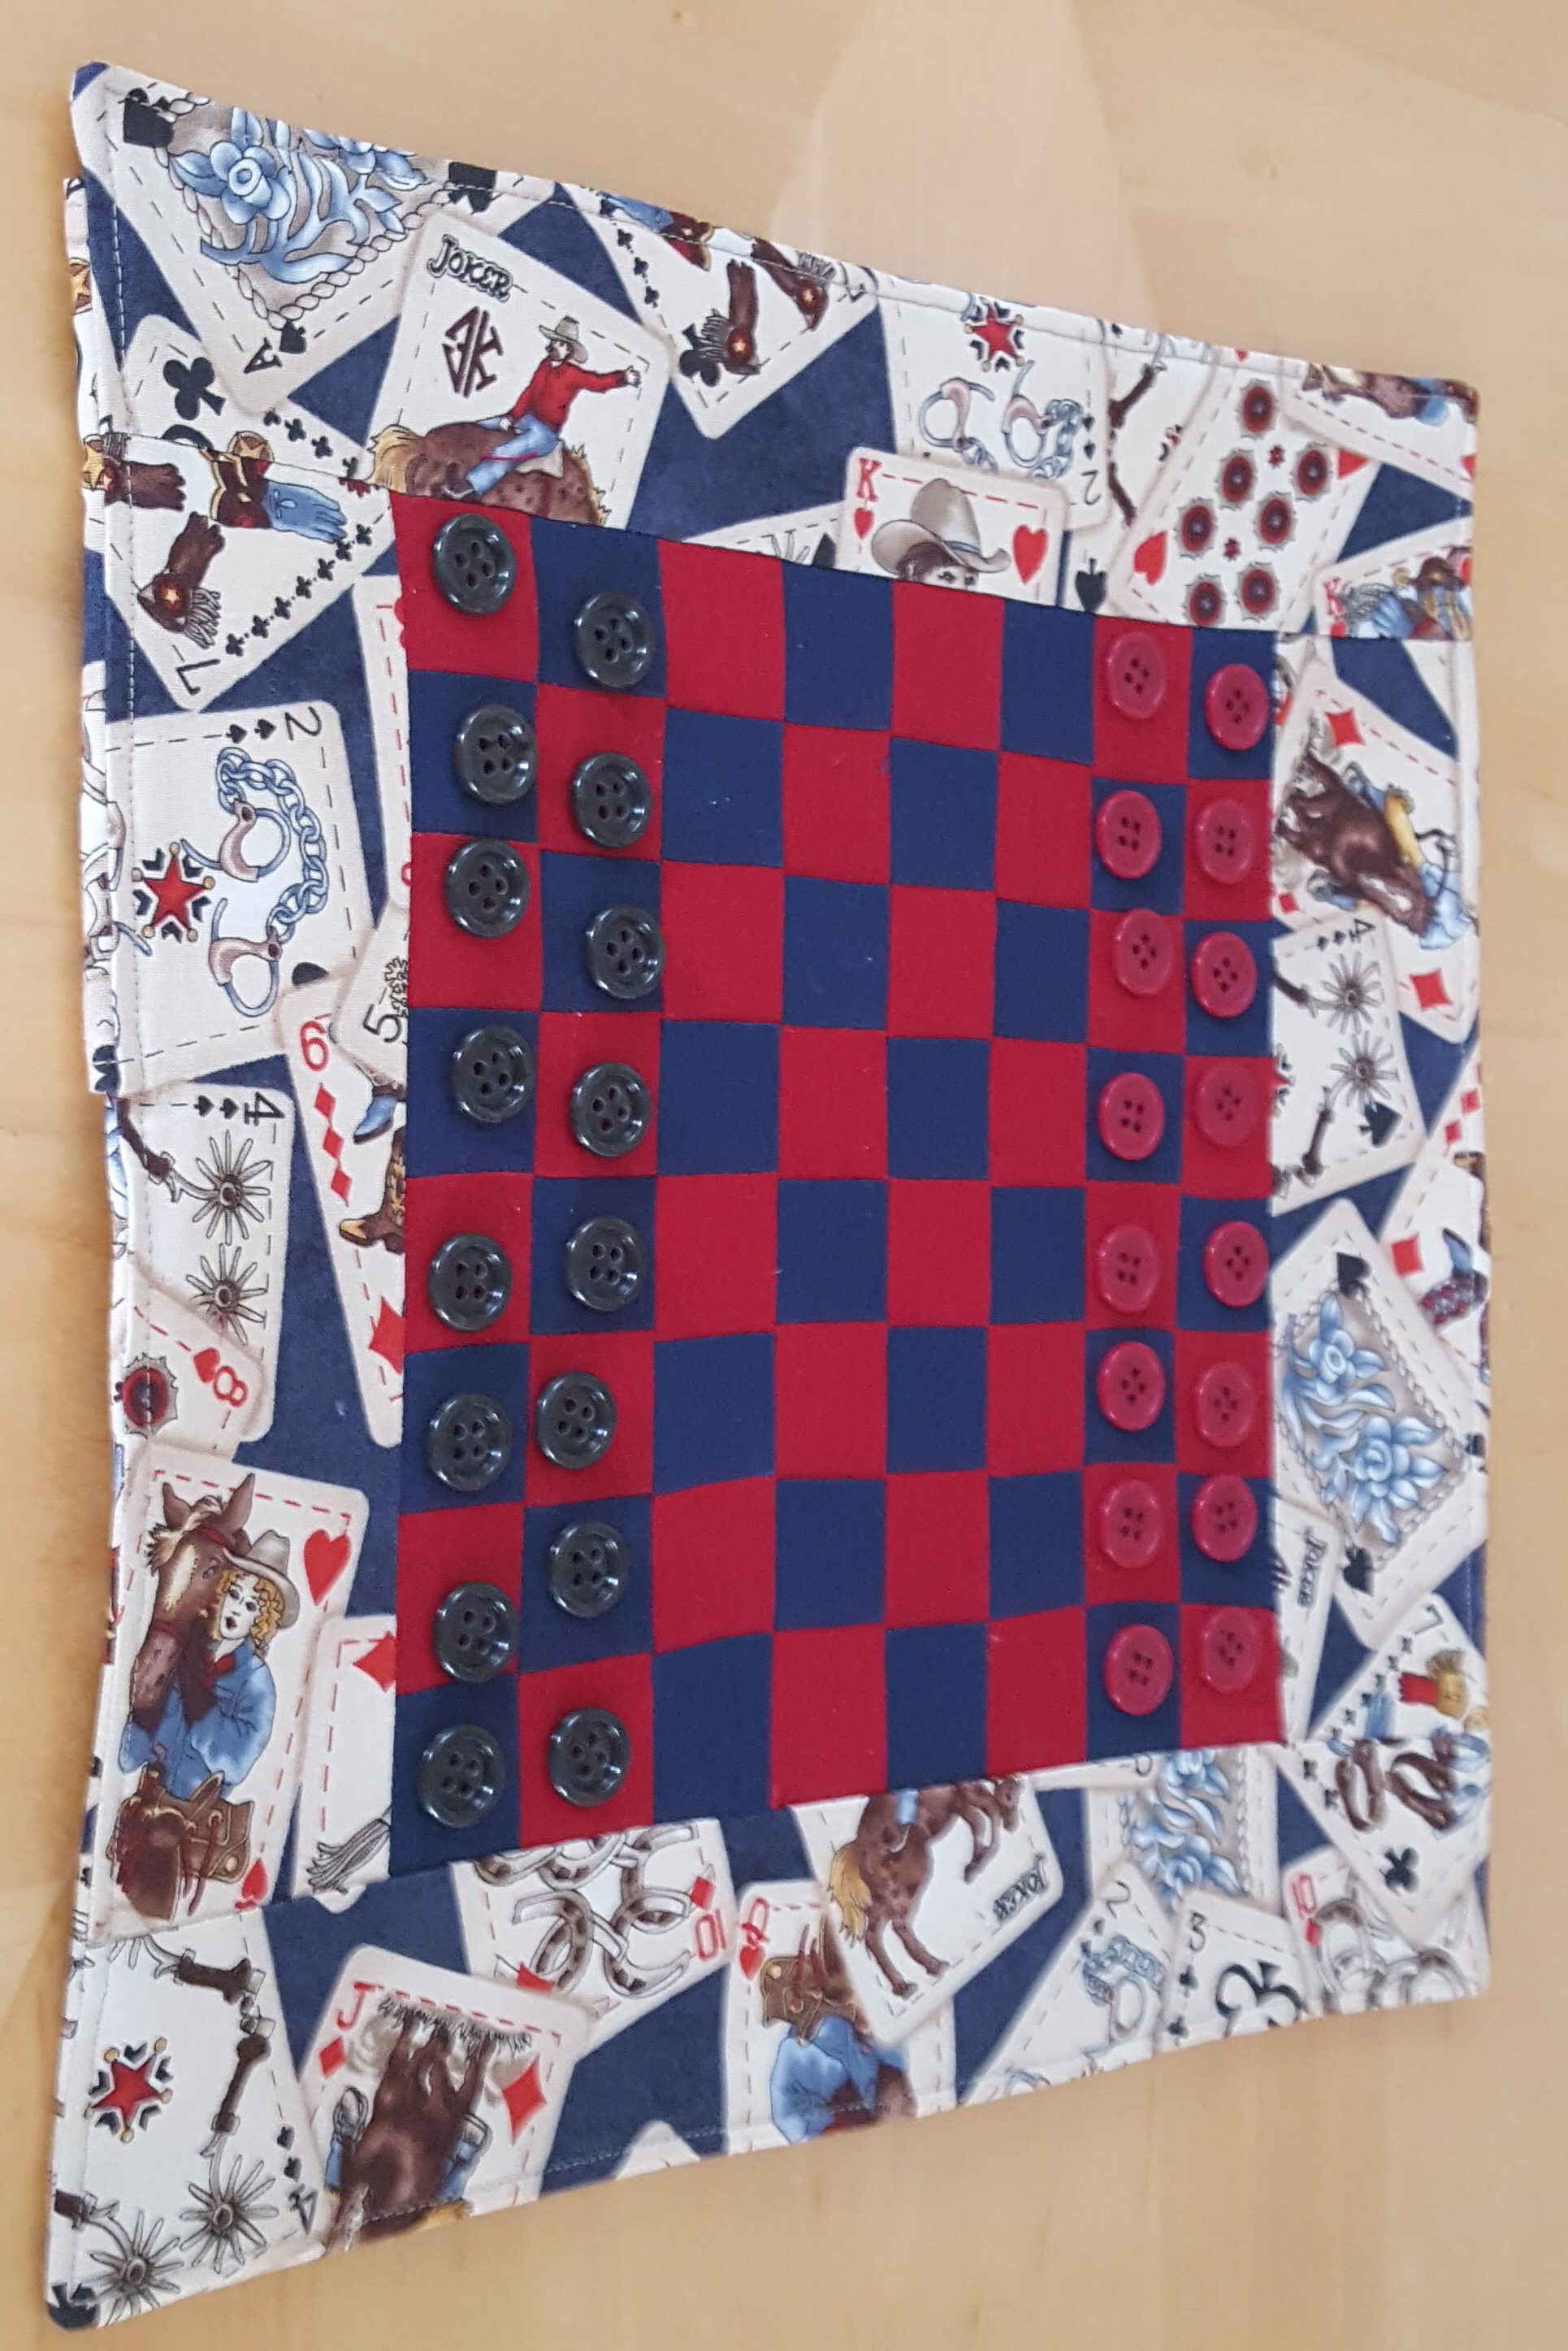
Mini Travel Checkerboard Game

DIY Roll-up Travel Jewelry Case

A Day in the Life of a Traveling Teacher

My Kitchen Potholder and Giveaway!
5 comments on “travel sewing kit”.
how do you print out the instructions and supplies for this bag
You can print the instructions and supplies by clicking on the link above- Download full instructions of the Travel Sewing Kit or by clicking on the link below
https://weallsew.com/wp-content/uploads/sites/4/2016/04/Travel-Sewing-Kit.pdf
I hope this helps! Enjoy making your traveling sewing kit!
What a great idea! These would make fantastic stocking stuffers for all of my friends and family!
(on a side note) If you read the comments here, I would LOVE to be able to have a way to SAVE projects from your site so I could come back to see a “queue” of projects I am interested in. Just an idea…
Thank you for the wonderful ideas!
The easiest way to save this project to look back at it later would be to bookmark it on your web page browser.
I love this project. I should have so many little sewing kits in my sewing room and car but I don’t. They are like are bags. I collect the patterns for some day. Happy Creating Sew Happy
Leave a Reply Cancel reply
You must be logged in to post a comment.

Recent Blog Posts
- How I Quilt It! with Amanda Murphy, Episode One
- Quilt Safari, Part Ten: Sewing the Quilt Blocks Together
- Easy Hack for Inserting Boning
- Machine Basting for Hand Quilting
- Quilt Safari, Part Nine: Sewing the Lion
Subscribe to our newsletter!
- February 2024
- January 2024
- December 2023
- November 2023
- Skip to main content
- Skip to secondary menu
- Skip to primary sidebar
- Skip to footer
Create Whimsy
Inspring makers and sharing their stories
Home » Sewing
How to Make a Travel Kit for English Paper Piecing

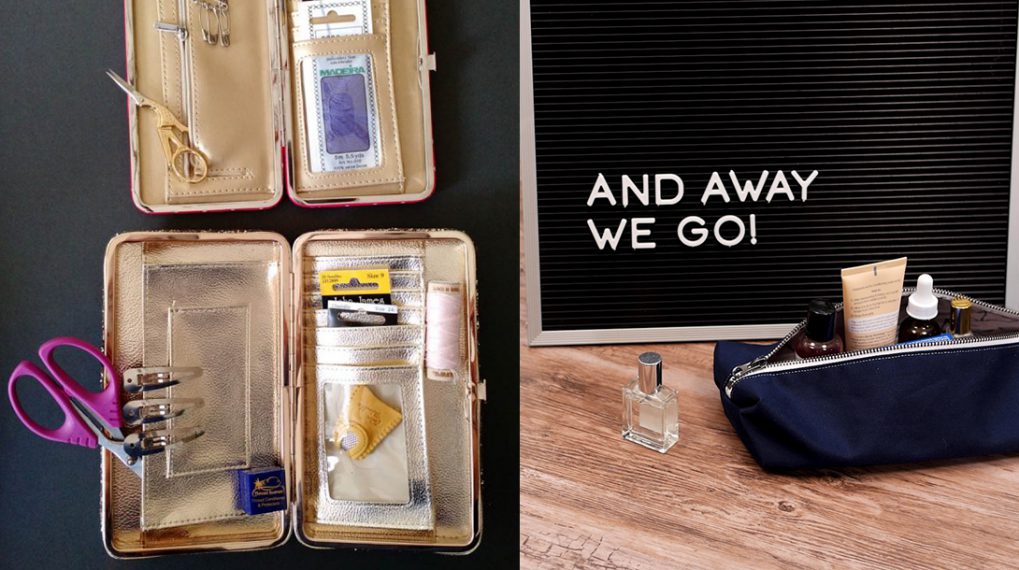
English Paper Piecing (EPP) Sewing KRAFT-TEX by Chardel Blaine
Kraft-Tex is a versatile heavy paper product that sews like fabric and acts like leather. It’s super sturdy, so is great for a project that will get a lot of use, like a travel kit for English paper piecing.
One of the joys of English Paper Piecing (EPP) is the technique’s portability. You can work on piecing a quilt almost anywhere – as long as you have your supplies nearby. And since you need just a few small items for English Paper Piecing Supplies , you don’t need a big, bulky tote bag. But to find just the right grab-and-go case for carrying my EPP projects when I’m on the move….
I wanted specific features in my travel case, but couldn’t find anything that had everything I wanted. So I designed this one! (The appliqué on the cover is optional, but it reminds me what I am likely to find inside.)
As an Amazon Associate I earn from qualifying purchases. Read more about our affiliate linking policy .
The travel case for English paper piecing has zipper pockets – 2 with vinyl windows and one removable bag that attaches to the center of the cover with Velcro. I can pull that one out to use separately. The back of each zipped window pocket is also the front of a slip pouch, both front and back, that is just the right size for a small cutting mat and a pattern or a notebook. The Velcro tab closure keeps it all together.
This is not a beginner project – there are many moving parts, and turning corners with zippers is not for the faint-hearted. Also Kraft-Tex is a non-woven material, so it doesn’t allow you to ease pieces to fit. Measure twice; cut once!
Here is a step-by-step guide to how I made my travel case for English paper piecing!

How to Make an EPP Travel Case with Kraft-Tex
Keep your English Paper Piecing Projects organized with a Kraft-Tex EPP Travel Case.
Everything you need for your project will be in one place to sewing at home or on the go.
- I Roll Kraft-Tex (I used Sapphire Hand-Dyed Kraft-Tex)
- 2 5 X 7 inch pieces craft vinyl
- 2 coordinating fat quarters - one for the main fabric and one for lining
- 18 X 18-inch batting
- 3 14-inch zippers
- 7 inches 3/4-inch wide Velcro hook and loop tape
- 1 3/4-inch Velcro hook and loop tape circle
- Optional appliqué
- Optional button
- Sewing machine and accessories
- Rotary cutter and mat
- Rotary cutting rulers
- Hera marker
- Iron and pressing surface
- Wonder Clips
- Hand sewing needle
Instructions

Recommended Products
As an Amazon Associate and member of other affiliate programs, I earn from qualifying purchases.

Did you make this project?
Please share a photo on Instagram and tag us @createwhimsy. We'd love to see your creations!
Browse through more projects with Kraft-Tex on Create Whimsy.

Share this article >>
- About Create Whimsy
- Work with Us
- Privacy Policy
- Terms & Conditions
- Destinations
Spotlight Stories
Marketing for Makers / Biz Tips

- Company Profile
- Company Policy
- Mission and Vision
- Certificates
- Aluminium Windows
- Aluminium Doors
- Aluminium Sliding Elements
- Aluminium Curtain Walls
- Aluminium Skylight Elements
- Aluminium Frames for Safety and Security
- Aluminium Conservatories
- Metal Panel Sheet Claddings
- Aluminium Entrance Frames
- Glass Structures
- Complementary Items
- Lightweight Steel Structures
- Human Resources OPEN
First successful projects, then lasting relationships!
As it has been in the past 40 years, Mimsa believe in providing competitive prices without compromising their principles of quality. We have managed to create lasting relationships based on honesty and cooperation while adding new customers each year.
Nothing is more important for us than Customer satisfaction!
Mimsa prioritizes customer satisfaction in the services they provide, and strives to understand the customers’ requests thoroughly in order to fulfil their needs and expectations. According to Mimsa Aluminium, every single customer should always be provided with the quality and services above expectations.
Every single completed project is the beginning of a lasting relationship for us.
Mimsa executes every project with experience and knowledge, while continuously improving itself and its high-quality production. Therefore, Mimsa never regards a project as a completed business. Every single project is a successful representation of lasting relationships. Thus, Mimsa pay great attention to post-sale support and keep on supplying uninterrupted support to their customers after completion.
It is very important for us that every single project we execute creates value to our workers, community and environment!
Aiming to create value for the community, environment and humankind in each project. Mimsa perceive that the occupational training of its employees and the new entrants to the workforce gets these individuals well equipped for the industry and community, and so does whatever needed without second thoughts.
km travel chesterfield 2024 brochure prices
This is our KM Travel Tour Operators page, we have listed the full address of KM Travel as well as phone numbers and websites. KM Travel is in Chesterfield, KM Travel may offer holiday tours, sightseeing tours, and general city tours in Chesterfield.
If you have used KM Travel before be sure to leave your own comment or rating on the city tour or holiday tour that you went on so other poeple wishing to use this company can read fair and honest reviews before the book there holiday with KM Travel. Please remember that KM Travel may offer much more that just UK holiday tours, UK Coach Tours and city tours so remember to contact the travel agents company using the details below to find out more information.
Latest KM Travel Reviews

- Transportation (Chesterfield)
- KM Travel Chesterfield
Chesterfield, United Kingdom
Related places.
- Get directions
- Photos page
QR code, vCard

Activate map
Business hours
Reviews of km travel chesterfield.
- Things to Do
- Restaurants
- Holiday Rentals
- Travel Stories
- Add a Place
- Travel Forum
- Travellers' Choice
- Help Centre
Lovely holiday - KM British & European Coach Holiday
- Europe
- United Kingdom (UK)
- England
- Yorkshire
- South Yorkshire
- Barnsley
- Barnsley - Things to Do
- KM British & European Coach Holiday
Brilliant holiday to Torquay, tinsel & turkey 20 th November to Belgrave Sands hotel. The hotel was... read more
Thanks to all at KM TRAVEL especially our driver courier Matt who made the trip more enjoyable and... read more
Trains Moscow to Elektrostal: Times, Prices and Tickets
- Train Times
- Seasonality
- Accommodations
Moscow to Elektrostal by train
The journey from Moscow to Elektrostal by train is 32.44 mi and takes 2 hr 7 min. There are 71 connections per day, with the first departure at 12:15 AM and the last at 11:46 PM. It is possible to travel from Moscow to Elektrostal by train for as little as or as much as . The best price for this journey is .
Get from Moscow to Elektrostal with Virail
Virail's search tool will provide you with the options you need when you want to go from Moscow to Elektrostal. All you need to do is enter the dates of your planned journey, and let us take care of everything else. Our engine does the hard work, searching through thousands of routes offered by our trusted travel partners to show you options for traveling by train, bus, plane, or carpool. You can filter the results to suit your needs. There are a number of filtering options, including price, one-way or round trip, departure or arrival time, duration of journey, or number of connections. Soon you'll find the best choice for your journey. When you're ready, Virail will transfer you to the provider's website to complete the booking. No matter where you're going, get there with Virail.
How can I find the cheapest train tickets to get from Moscow to Elektrostal?
Prices will vary when you travel from Moscow to Elektrostal. On average, though, you'll pay about for a train ticket. You can find train tickets for prices as low as , but it may require some flexibility with your travel plans. If you're looking for a low price, you may need to prepare to spend more time in transit. You can also often find cheaper train tickets at particular times of day, or on certain days of the week. Of course, ticket prices often change during the year, too; expect to pay more in peak season. For the lowest prices, it's usually best to make your reservation in advance. Be careful, though, as many providers do not offer refunds or exchanges on their cheapest train tickets. Unfortunately, no price was found for your trip from Moscow to Elektrostal. Selecting a new departure or arrival city, without dramatically changing your itinerary could help you find price results. Prices will vary when you travel from Moscow to Elektrostal. On average, though, you'll pay about for a train ticket. If you're looking for a low price, you may need to prepare to spend more time in transit. You can also often find cheaper train tickets at particular times of day, or on certain days of the week. Of course, ticket prices often change during the year, too; expect to pay more in peak season. For the lowest prices, it's usually best to make your reservation in advance. Be careful, though, as many providers do not offer refunds or exchanges on their cheapest train tickets.
How long does it take to get from Moscow to Elektrostal by train?
The journey between Moscow and Elektrostal by train is approximately 32.44 mi. It will take you more or less 2 hr 7 min to complete this journey. This average figure does not take into account any delays that might arise on your route in exceptional circumstances. If you are planning to make a connection or operating on a tight schedule, give yourself plenty of time. The distance between Moscow and Elektrostal is around 32.44 mi. Depending on the exact route and provider you travel with, your journey time can vary. On average, this journey will take approximately 2 hr 7 min. However, the fastest routes between Moscow and Elektrostal take 1 hr 3 min. If a fast journey is a priority for you when traveling, look out for express services that may get you there faster. Some flexibility may be necessary when booking. Often, these services only leave at particular times of day - or even on certain days of the week. You may also find a faster journey by taking an indirect route and connecting in another station along the way.
How many journeys from Moscow to Elektrostal are there every day?
On average, there are 71 daily departures from Moscow to Elektrostal. However, there may be more or less on different days. Providers' timetables can change on certain days of the week or public holidays, and many also vary at particular times of year. Some providers change their schedules during the summer season, for example. At very busy times, there may be up to departures each day. The providers that travel along this route include , and each operates according to their own specific schedules. As a traveler, you may prefer a direct journey, or you may not mind making changes and connections. If you have heavy suitcases, a direct journey could be best; otherwise, you might be able to save money and enjoy more flexibility by making a change along the way. Every day, there are an average of 18 departures from Moscow which travel directly to Elektrostal. There are 53 journeys with one change or more. Unfortunately, no connection was found for your trip from Moscow to Elektrostal. Selecting a new departure or arrival city, without dramatically changing your itinerary could help you find connections.
Book in advance and save
If you're looking for the best deal for your trip from Moscow to Elektrostal, booking train tickets in advance is a great way to save money, but keep in mind that advance tickets are usually not available until 3 months before your travel date.
Stay flexible with your travel time and explore off-peak journeys
Planning your trips around off-peak travel times not only means that you'll be able to avoid the crowds, but can also end up saving you money. Being flexible with your schedule and considering alternative routes or times will significantly impact the amount of money you spend on getting from Moscow to Elektrostal.
Always check special offers
Checking on the latest deals can help save a lot of money, making it worth taking the time to browse and compare prices. So make sure you get the best deal on your ticket and take advantage of special fares for children, youth and seniors as well as discounts for groups.
Unlock the potential of slower trains or connecting trains
If you're planning a trip with some flexible time, why not opt for the scenic route? Taking slower trains or connecting trains that make more stops may save you money on your ticket – definitely worth considering if it fits in your schedule.
Best time to book cheap train tickets from Moscow to Elektrostal
The cheapest Moscow - Elektrostal train tickets can be found for as low as $35.01 if you’re lucky, or $54.00 on average. The most expensive ticket can cost as much as $77.49.
Find the best day to travel to Elektrostal by train
When travelling to Elektrostal by train, if you want to avoid crowds you can check how frequently our customers are travelling in the next 30-days using the graph below. On average, the peak hours to travel are between 6:30am and 9am in the morning, or between 4pm and 7pm in the evening. Please keep this in mind when travelling to your point of departure as you may need some extra time to arrive, particularly in big cities!
Moscow to Elektrostal CO2 Emissions by Train

Anything we can improve?
Frequently Asked Questions
Go local from moscow, trending routes, weekend getaways from moscow, international routes from moscow and nearby areas, other destinations from moscow, other popular routes.
Na Ulitse Yalagina 13B Apartments

Trending Questions
Property policies, frequently asked questions, how much does it cost to stay at na ulitse yalagina 13b apartments, what are the check-in and check-out times at na ulitse yalagina 13b apartments, does na ulitse yalagina 13b apartments provide airport transfer services, what amenities and services does na ulitse yalagina 13b apartments have, does na ulitse yalagina 13b apartments have a swimming pool, does na ulitse yalagina 13b apartments have fitness amenities, does na ulitse yalagina 13b apartments provide wi-fi, does na ulitse yalagina 13b apartments have non-smoking rooms, does na ulitse yalagina 13b apartments have a restaurant, is parking available at na ulitse yalagina 13b apartments, popular hotels, popular attractions, explore more.
Expedia Rewards is now One Key™
Elektrostal, visit elektrostal, check elektrostal hotel availability, popular places to visit.
- Electrostal History and Art Museum
You can spend time exploring the galleries in Electrostal History and Art Museum in Elektrostal. Take in the museums while you're in the area.
- Cities near Elektrostal

- Places of interest
- Yuri Gagarin Cosmonaut Training Center
- Peter the Great Military Academy
- Central Museum of the Air Forces at Monino
- History of Russian Scarfs and Shawls Museum
- Balashikha Arena
- Balashikha Museum of History and Local Lore
- Bykovo Manor
- Pekhorka Park
- Ramenskii History and Art Museum
- Malenky Puppet Theater
- Drama Theatre BOOM
- Likino Dulevo Museum of Local Lore
- Noginsk Museum and Exhibition Center
- Pavlovsky Posad Museum of Art and History
- Saturn Stadium
- Fairy Tale Children's Model Puppet Theater
- Fifth House Gallery
- Church of Vladimir
- Malakhovka Museum of History and Culture
- Orekhovo Zuevsky City Exhibition Hall
Destinations in May
Destinations in 2024.
Please note prices are based on two persons sharing a twin/double room. Single room supplements may apply, please call check single availability/price.
Comments are closed.
- Destinations
- Hotel Information
- Private hire
- Special offers / Late availability
- Travel Insurance
- Employment Opportunities

NEW CHRISTMAS TOUR 2024 - Bournemouth - Norfolk Royale Hotel - BROCHURE ADDITION . 2024 EUROPEAN HOLIDAYS - Early release - ITALY - Lake Garda / Alassio Click here to download our 2024 Brochure All Our Holidays Include In The Price: Free Door to Door Taxi ( Subject to Area ) ~ Luxury Coach Travel ~ Reserved Coach Seats . Personally Selected ...
www.kmchesterfield.co.uk
KM Travel of Barnsley, South Yorkshire. Request a brochure by: Calling: 01226 245564 email: [email protected] . download: click here to download the 2024 Tour Brochure.
KM Travel is in Chesterfield, KM Travel may offer holiday tours, sightseeing tours, and general city tours in Chesterfield. If you have used KM Travel before be sure to leave your own comment or rating on the city tour or holiday tour that you went on so other poeple wishing to use this company can read fair and honest reviews before the book ...
What people are saying. " HOLIDAY TO BLACKPOOL ". Oct 2023. Thanks to all at KM TRAVEL especially our driver courier Matt who made the trip more enjoyable and a credit to the co... " Lovely place enjoyed it clean need a bit of investment there ". Aug 2022. Stayed at ilfracombe Devon 14 to 20 Aug the coach was lovely our driver Tony was ...
Reviews, contact details and business hours of KM Travel Chesterfield at 27 Stephenson Place, Chesterfield, Derbyshire. Check out nearby places on a map. Write a review. Log in. ... 21:03 Tuesday, 23 April 2024: Business hours. Monday: 9:00 am - 4:30 pm: Tuesday: 9:00 am - 4:30 pm: Wednesday: 9:00 am - 4:30 pm: Thursday: 9:00 am - 4:30 ...
KM Travel of Barnsley, South Yorkshire. Tel: (01226) 245564 [email protected] . Home. Booking Guide Request Brochure Customer Information Contact Us. ... Our 2024 British Coach Holiday Brochure is now available to download and available shortly from our Market Street office in paper form.
5. £339. Nil. Please note prices are based on two persons sharing a twin/double room. Single room supplements may apply, please call check single availability/price. Price Includes: * Luxury Coach Travel * Local Departure Points. * En-suite bedrooms * Excursions. * Half Board Accommodation.
Page List. (Click on the page required to be linked with that page in the brochure) Page 1 - Front cover. Page 2 - Introduction. Page 3 - Contact information. Customer information. Page 4 - How to make a booking. Holiday index January to June. Page 5 - Holiday index June to December.
Our 2024 UK Brochure is OUT NOW! Order yours today. 01246 474747 Opening Times Brochures . Menu (current) Home Holidays Day Trips ... A-Line Travel 15 Soresby Street Chesterfield S40 1JW 01246 474747 [email protected] . A-Line Travel, Company number 13060548
Lovely holiday. Review of KM British & European Coach Holiday. Reviewed 9 December 2023. Just back from a T&T break at Exmouth. The hotel and food were brilliant, and the driver James was the best. However we had a bad start after waiting nearly one and a half hours in cold and rain at Ilkeston for the coach. I know there was traffic problems ...
Geeveetravelchesterfield, Chesterfield. 1,657 likes · 24 talking about this · 29 were here. DOOR TO DOOR COACH HOLIDAYS DAY TRIPS AND PRIVATE HIRE
Thankyou received our brochure in the post , I see you have new for 2024 Kynren weekend , we went last year and its the most amazing show I've seen well worth going recommended to everybody. 22w. Robert Lindley. Can I have a brochure please 9 monsal crescent Barnsley S71 3PY. 15w.
KM Travel of Barnsley, South Yorkshire. Tel: (01226) 245564 [email protected] . Home. Booking Guide Request Brochure Customer Information Contact Us. Skip to content. Request a brochure by: Calling: 01226 245564 . email: [email protected] download: ... Please note prices are based on two persons sharing a twin/double room ...
Central Air Force Museum The Central Air Force Museum, housed at Monino Airfield, 40 km east of Moscow, Russia, is one of the world's largest aviation museums, and the largest for Russian aircraft. 173 aircraft and 127 aircraft engines are on display, and the museum also features collections of weapons, instruments, uniforms (including captured U2 pilot Gary Powers' uniform), other Cold War ...
The journey from Moscow to Elektrostal by train is 32.44 mi and takes 2 hr 7 min. There are 71 connections per day, with the first departure at 12:15 AM and the last at 11:46 PM. It is possible to travel from Moscow to Elektrostal by train for as little as or as much as . The best price for this journey is . Journey Duration.
KM Travel of Barnsley, South Yorkshire. Tel: (01226) 245564 [email protected] . ... we guarantee excellent customer service and affordable prices. ... Winter/Spring 2024. Blackpool 2024 Potters Resorts 2024. Our booking office is located at: 52, ...
2022 Brochure . Page List ... All Our Holidays Include In The Price: Free Door to Door Taxi ( Subject to Area ) ~ Luxury Coach Travel ~ Reserved Coach Seats . Personally Selected Hotels ~ En-suite Bedrooms ~ Free Varied Excursions . Telephone: 01246 -556617 ...
Prices at Na Ulitse Yalagina 13B Apartments are subject to change according to dates, hotel policy, and other factors. To view prices, please search for the dates you wish to stay at the hotel. What are the check-in and check-out times at Na Ulitse Yalagina 13B Apartments? The check-in time is after 14:00 and the check-out time is before 12:00.
Cities near Elektrostal. Places of interest. Pavlovskiy Posad Noginsk. Travel guide resource for your visit to Elektrostal. Discover the best of Elektrostal so you can plan your trip right.
IMAGES
VIDEO
COMMENTS
This is a FREE pattern + tutorial to make a pouch that you can use to store some basic sewing tools when you are away from home.Find the pattern and all the ...
DIY Sewing Travel Kit: Free Pattern | Madam Sew September 28, 2020 An Kesenne. DIY Sewing Travel Kit: Free Pattern SEWING TRAVEL KIT This is a FREE pattern + tutorial to make a pouch that you can use to store some basic sewing tools when you are away from home. The tools and notions that you can find in premade travel sewing kits are often of ...
Sterilite shoe box - this one has a little fancier lid and closure system. Rubbermaid shoe box - flip lid. The lid is attached to the box. Great for never loosing it, but could get in your way. Here's a quick list of what I have currently in my sewing kit: Thread. Needles. Scissors. Hexagon templates.
Step 1: How to Make a Travel Sewing Kit. Cut out the pattern pieces and tape the two main pattern pieces together lining up the dots. You should have 1 long rounded pattern piece and a smaller rounded pattern piece. From the smaller pattern piece trace out and cut the shape for the needle patch. The original pattern included yoyos for decoration.
A fun travel sewing project will definitely put me in a summer travel mood! Here are more than 7 super useful items will definitely want to sew up before your next travel. Also, these free travel sewing patterns will make your vacation easier: a storage bag, a free sleep mask pattern, tons of zipper pouches and jewelry storage bags, a backpack ...
Then sew your squares into the 4 rows of 10 and press all of your seams. I press mine open but if you prefer to press them to the side go for it. :) Then pin your row one to row two, with right sides together, making sure to line up all of those seams as perfectly as possible. Sew them together using a 1/4" seam.
hi there!here's a quick tutorial on how to make a super easy sewing kit for travelling. You can customise the pockets and size as it may suit you. enjoy!!SOC...
STEP 3: Sew the pockets of the travel kit. Next thing you need to do is to sew the pockets and the ribbon. First deal with the pockets. Stitch them with a sewing machine or by hand if you wish. I recommend that you use a thread of different color than the one you used to make a pattern on the fold.
The kit cleverly folds into a triangle shape and is secured with press snaps or sew in studs. This is a quick project that can be used as a travel sewing kit, an earbud holder, coin pouch, USB holder or jewellery holder. The Travel Sewing Kit would be the perfect gift for a traveller or friend who loves to sew.
Get excited to vacation with these travel sewing projects. These are great beginner projects to organize in the car or airplane. I love going on trips in the summertime and when my kids have breaks from school. We have so much fun playing, hiking, swimming, and biking wherever we go. I've put a big list together of all the things you can sew ...
For those long airplane rides, or trips away from home, I keep this little kit ready for when I want to do a little sewing. Its small, TSA-friendly, and easy...
The DIY Sewing Kit is much smaller and lighter than any commercial sewing kit. As a bonus, it has colors that you can actually use! The most important part of this kit is that it reduces the bulk and weight of a commonly carried item. It is just one more technique for travel with a personal item. Don't leave your stuff at home to travel ...
Ashley shows how she inserted both the pins and needles into her book as well as demonstrates how she added the thread by wrapping it around a button to keep it from tangling up. Sew Your Own Travel Sewing Kit Join National Sewing Circle to continue watching for $9.00 per month / $92.00 per year. Learn how to sew a fun travel sewing kit from ...
In the Travel Sewing Kit we showcase how to apply a zipper with tabs and how to sew with the walking foot. Create a great gift for the people in your life that love to sew: For more projects made with Fleet and Flourish fabrics check out our Fabric Project Catalog! Download full instructions of the Travel Sewing Kit. Difficulty level.
This no-sew DIY emergency sewing kit is made from a traveling soap container. It fits all you could need to feel safe on your cross-country escapades, like folding scissors, thread, measuring tape, a seam ripper, ribbon, and even a felt scrap to hold pins, safety pins, and sewing needles! Project Type Make a Project.
Finger press. Make 2 "window" units. Wrong sides together, press each 14 1/2-inch strip of main pocket fabric lengthwise. Right sides together, stitch each end of a zipper to the ends of the pressed fabric strip. Make mirror image pieces (so the right and left zipper pouches will both open from the same side).
Lisa shows you how to make a quick DYI sewing kit, perfect for your next SewJourn! Customize it to your most-used colors and notions. Videographer/Assistant...
Welcome to the 628DirtRooster website where you can find video links to Randy McCaffrey's (AKA DirtRooster) YouTube videos, community support and other resources for the Hobby Beekeepers and the official 628DirtRooster online store where you can find 628DirtRooster hats and shirts, local Mississippi honey and whole lot more!
Mission and Vision. Mission. First successful projects, then lasting relationships! As it has been in the past 40 years, Mimsa believe in providing competitive prices without compromising their principles of quality. We have managed to create lasting relationships based on honesty and cooperation while adding new customers each year.
Elektrostal is a city in Moscow Oblast, Russia, located 58 kilometers east of Moscow. Elektrostal has about 158,000 residents. Mapcarta, the open map.
DIY Travel Sewing Kit┃CUTE sewing project #HandyMum🎵Music provided by BGM President🎵Track : A Medieval Tale - https://youtu.be/5xN4G2dh2KEDear beloved aud...
A-Line Travel 15 Soresby Street Chesterfield S40 1JW 01246 474747 [email protected]. A-Line Travel, Company number 13060548... Lovely holiday. Review of KM British & European Coach Holiday. Reviewed 9 December 2023. Just back from a T&T break at Exmouth. The hotel and food were brilliant, and the driver James was the best.
If you're looking for a quick and easy project idea for sewing a homemade traveling toiletry kit, take a look at this DIY sewing project. You can make your o...