Dodge Journey: Start The Engine With Dead Key Fob
Key fobs are beneficial as they allow you to lock and unlock your Dodge Journey with the click of a button. However, if the battery goes dead, how do you start your vehicle? No worries, we got you covered. Follow these steps below to enter and start your Dodge Journey with a dead key fob.

2020 Models
2011 – 2019 models.
- Turn the fob over to reveal the latch located at the TOP BACK of the fob.
- Use the key to UNLOCK the vehicle door.
- Place the key fob on the START button, PUSH in, and press the BRAKE to start the vehicle.
*Although the battery in the fob is dead, the vehicle will, in fact, recognize the fob.
- The fob battery is low or dead if the engine does not start when pushing the button.
- Place the nose side of the Fob (opposite end from the emergency key) against the Start/Stop button.
- Push the Start/Stop button.
**NOTE : If you are unable to enter and start the vehicle with the dead key fob on the first try, REPEAT the steps. If you are still unsuccessful, contact the dealership for assistance or consult your vehicle user’s manual.
Related posts:
Leave a comment cancel reply.

Home » Troubleshooting » Dodge Journey key fob not working – causes and how to fix it
Dodge Journey key fob not working – causes and how to fix it
The remote keyless system in Dodge Journey allows the driver to conveniently lock and unlock the vehicle with the press of a button. When the key fob stops working, it quickly becomes an inconvenience to manually lock and unlock the vehicle. In some cases it can even leave you stranded if the vehicle can’t detect the key and won’t let you start the engine.

The most common cause of key fob not working in Dodge Journey is dead battery. But the remote key can also stop working due to worn buttons, poor battery contact, water damage, defective key fob, receiver module issues, signal interference, dead 12 volt battery, and unpaired key requiring reprogramming.
1. Dead battery in key fob
Dead battery is the leading cause of key fob not working in Journey. Usually there are signs of weakening battery before it gives up. If the remote was working previously, but the range of the remote was gradually decreasing until it ceased to function, this indicates that the battery was wearing out.

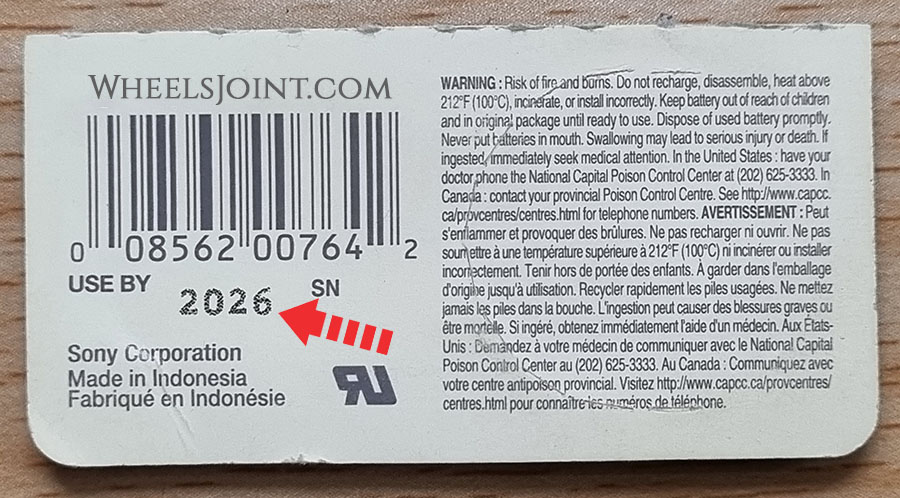
Replace the battery
If the button cell battery in the key fob of Journey is replaced incorrectly or a battery is unsuitable, it can damage the vehicle key. Only replace drained batteries with new batteries in the same voltage, size, and specification. Make sure the battery is facing in the right direction when inserting it.
Recommended video
Key fob not working after replacing the battery
When purchasing a new battery for the key fob of your Journey, keep in mind that the battery may be sitting on the shelf for a long time. Therefore after replacement it may not work, or may not last that long. Try purchasing the battery from a store where stock moves fast. If you still can’t get the key fob to work after verifying that the battery is healthy, your key fob issues may not be due to bad battery.
Starting the engine with dead key fob battery
If your Journey has push button start/stop feature, your vehicle may not start due to weak key fob battery and a ‘key not detected’ alert message may be displayed in the instrument cluster. Don’t worry, you can still start your vehicle, the immobilizer is controlled by a passive transponder. Passive means, among other things, that the transponder in the key does not need its own power source.

Touch the start/stop button with your key fob and then start the engine. If it doesn’t work, then look in the owners manual for exact location of key fob placement, as it may vary depending on model.
Use spare key: You can try starting your Journey with its second key. It will also rule out any other problem with the first key, for example, water damage.
How long does the key fob battery last?
Depending on how often you use the key fob or remote control of your Journey, the battery should last between two and four years. This is assuming the new battery you installed is healthy and its use by date is many years away.
2. Poor battery connection
The battery inside the key fob of Journey has metal retaining clips that hold the battery in position and completes the circuit. If the clips don’t have any tension, it can cause contact issues and the remote may not receive any power. Make sure the battery is firmly placed and does not move around when you shake the remote. Also make sure all the battery contacts are corrosion and dust free.
3. Water damage
If your Dodge Journey key fob has taken a bath in the soapy water of the washing machine after you forgot to take it out of your pants pocket, water damage is very likely.
Water resistant, not waterproof
Your Journey key has rubber seals which prevents the water from getting to the electronic chip inside. A splash of water or brief exposure to light rain should be fine, but exposure to excessive amount of water like submerging the key in the pool can cause the water to penetrate the seals and damage the chip. Submerging the key in ocean water at the beach can be much more damaging to key fob electronics due to highly conductive nature of salt water.
But my key fob survived water exposure?
If your Journey key fob survived a wash cycle, or a deep bath in the ocean or pool water, it doesn’t make the key fob waterproof, it means you got lucky. Exposure to excessive water increases the risk of water damage, so you shouldn’t make this a habit.
What to do in case of water damage?
If your Journey key fob stopping working after exposure to clean tap water or rain, immediately remove the battery and clean the electronic component with paper towel and let it dry fully before putting back the battery. In case of exposure to salt water, or soapy or dirty water, it is recommended to clean the chip with isopropyl alcohol or electronic cleaner. If the key fob still doesn’t work after cleaning and drying, the chip is probably fried and you will have to buy a new key.
4. Dead 12 volt battery
The remote keyless system and the central locking system in Journey require the 12 volt battery to be in healthy state to function properly. If the 12 volt battery is dead or if the electric current has been interrupted due to corrosion on the battery terminals or the ground connection, all on-board electronics will stop working.
In this case, you will have to manually unlock the door of your Journey with physical key. Also, the electrical accessories (e.g. headlights, fan, and infotainment system) will not function or may function poorly, and the engine will not start. Check the 12v battery and its connections.
5. Signal interference
Journey remote control signal can be disrupted by objects, poor weather conditions or transmitters on the same frequency band close to the vehicle. The remote key may work when you’re near the vehicle, but may not work from a distance. In case of severe interference, the remote may not work at all.

Interference signals can be caused not only by neighboring radio masts and towers, but also by unprofessionally installed satellite systems. A large part of the radio interference is caused by defects and aging effects in electrical devices and radio systems, which lead to unwanted emissions, radiation and repercussions on power and communication networks. Your Journey key fob should start working again when you leave the area of interference.
6. Reprogramming required
In rare cases, the remote key of Journey may stop working due to pairing issues. The key can be reprogrammed with an OBDII scanner. You may also be able to program a key by following a few steps, an original key is typically required for successful pairing. The instructions should be mentioned in the owners manual. If you fail to do it yourself, you may have to visit an authorized dealer for reprogramming of the key.
7. Defective key fob
If your Journey key fob stopped working after you dropped it on the floor, you may have damaged the internal chip. Or, if your key fob just stopped working one day out of the blue, in rare cases this could indicate a faulty key fob – assuming you have tried everything to fix the issue e.g. battery replacement, reprogramming and the spare key fob works.
8. Faulty receiver module
Dodge Journey has a remote keyless system receiver that receives radio frequency signals from the key fob. If none of your key fobs work, and and you can’t reprogram the keys, it is possible the receiver module has developed a fault.
You may have to perform further diagnostics to identify the faulty. The keyless entry antenna could be damaged, or the module is just not communicating with other modules on the vehicle. In these cases an OBDII scan tool can be used to verify if the commands are being transmitted and acted on by the security module.
9. Electronic immobilizer fault
The immobilizer is an anti-theft security system that prevents the engine from being started and the vehicle from being moved with an unauthorized vehicle key. A fault in the immobilizer system can prevent your Journey from being started. You may also see a warning light with key symbol or key not detected message in the instrument cluster.
For vehicles with an ignition lock
There is a chip in the vehicle key. The chip automatically deactivates the immobilizer if a valid vehicle key is inserted into the ignition lock. The electronic immobilizer is activated automatically when the vehicle key is removed from the ignition lock.
For vehicles with a starter button
There is a chip in the vehicle key. It is used to automatically deactivate the electronic immobilizer when there is a valid remote control vehicle key in the vehicle interior. The electronic immobilizer is automatically activated as soon as there is no valid vehicle key in the vehicle.
The engine can only be started with a genuine vehicle key that is coded correctly. You can obtain coded vehicle keys from an authorized Dodge dealer.
Reset the system
If the key fob is not working due to a glitch in the keyless entry system, it may be possible to restore the functionality by resetting the keyless entry system in your Journey.
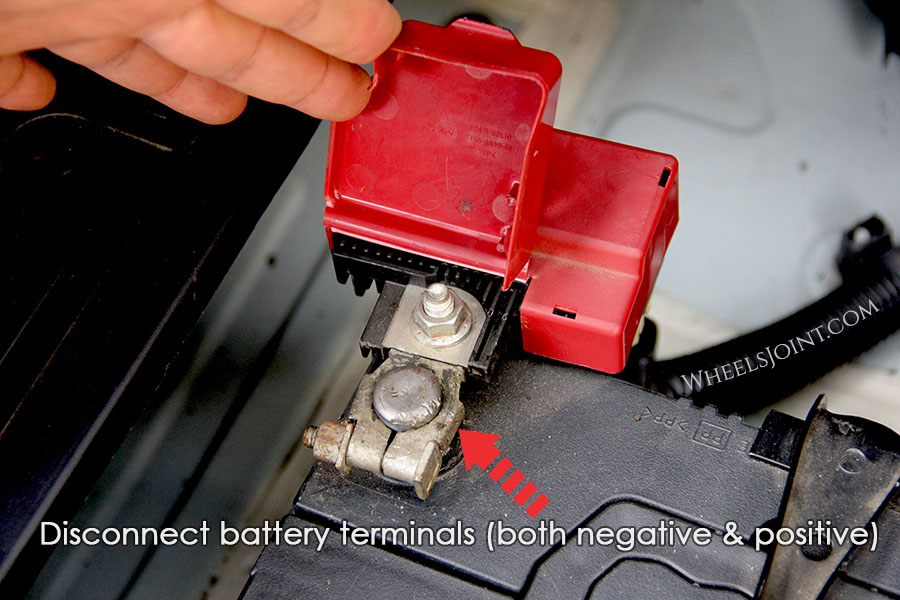
There isn’t any button or option to reset the keyless entry system in Journey, but you can reboot all the on-board computers by disconnecting the 12 volt battery for a few minutes. Remove the cable from the negative terminal of the battery first, then from the positive terminal. With the battery disconnected, press the horn button a few times and turn on the headlights to drain out all the residual electricity from the system. After about 15 minutes, reconnect the battery in reverse order: positive cable first, then negative cable.
Use OBD2 scanner for diagnosis
Since Dodge Journey is equipped with on-board diagnostics (OBD), a fault diagnosis can provide initial indications of where the malfunction is located. This method will be especially useful when diagnosing a faulty remote keyless system receiver module.
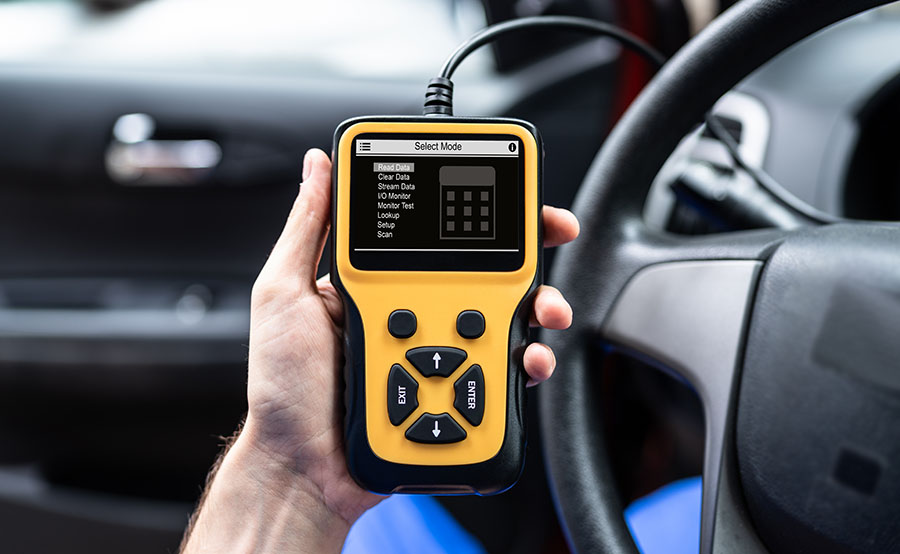
To begin troubleshooting, you must first connect the diagnostic tool to your Journey. The OBDII connector is usually located under the dashboard. With the tool connected, turn on the ignition. Most diagnostic devices then ask for some information about the vehicle. It is important that you enter this 100% correctly, otherwise the result of the search may be inaccurate. In addition to the vehicle make, model, and engine type, you usually also have to type in the Vehicle Identification Number (VIN). Since some OBD codes are manufacturer-specific, the scanner will be able to give you more accurate information if you enter more details about your Journey.
Conclusion:
There are many reasons why your Dodge Journey key fob is not working. When looking for the reason, you should start with the most obvious cause that is easy to diagnose: dead battery, which you can replace in a few minutes.

- Chrysler Sebring AC blowing hot air – causes and how to fix it
- Toyota Harrier won’t start – causes and how to fix it
- Cadillac CT6 AC smells bad – causes and diagnosis
- Buick Encore key fob won’t lock or unlock the doors
- Nissan Armada won’t start – causes and how to fix it
- Ford Everest AC not cooling – causes and diagnosis
- Chevy Silverado 1500 bad ignition coils symptoms, causes, and diagnosis
- Lexus RX AC blower motor not working – causes and diagnosis
- Honda Pilot heater not working – causes and diagnosis
- Nissan Maxima heater not working – causes and diagnosis
- VW Atlas Cross Sport Apple CarPlay not working – causes and how to fix it
- VW Transporter bad alternator symptoms, how to check voltage
- Dodge Viper steering wheel controls not working – causes and how to fix it
- VW Touran AC blowing hot air – causes and how to fix it
- Renault Kadjar AC not blowing hard enough – weak airflow causes
- Mercury Grand Marquis bad gas mileage causes and how to improve it
- Renault Kadjar AC smells bad – causes and diagnosis
- Chrysler Sebring bad O2 sensor symptoms, causes, and diagnosis
- Kia Carnival pulls to the left when driving
- Renault Scenic AC blower motor not working – causes and diagnosis

Dodge Journey Key Not Detected: Causes & Fixes

The “Key Not Detected” on your Dodge Journey is a warning sign often associated with issues with the key fob. It will normally pop up when the driver attempts to switch on the vehicle, and the computer system cannot pick up a signal from the key fob.
The warning message will come if any factor disrupts the communication between the key fob and the ECM. Once the push-start button is pressed and the key’s signal is not detected, the vehicle will not come, and the error will come up. Many factors could stop the vehicle from picking up signals from the key fob. These factors include dead key battery, damaged receiver module, dead car battery, and more.
We will examine what a “Key Not Detected” means in a Dodge Journey. Also, explore the causes of this issue and how it could be fixed.
Meaning of Dodge Journey Key Not Detected
A Dodge Journey “Key Not Detected” is a warning message showing that the vehicle cannot communicate with the key fob, especially when you try to start the car.
What is a key fob? If you are unfamiliar with the term, it is a device that opens and unlocks the vehicle. Its most important function is its ability to start the car through the push-to-start function.
The Push-to-start function in the Dodge Journey uses low-frequency communication. Once the start button is pressed, the engine computer picks up a signal from the key fob, which should be in the car at the time.
Once the computer picks up the signal, the ECM sends power to the engine for ignition.
Sometimes, the computer system does not pick up any signal from the key fob. Check the key fob and ensure it is in the vehicle; if it is, there is an issue with the device.
Without the ECM picking up signals from the key fob, the engine will not start.
Causes of Dodge Journey Key Not Detected
Many factors could cause a “Key Not Detected” warning message on your Dodge Journey dashboard. In most cases, it is an issue with the key fob. However, other issues could be responsible for the warning message, like damaged receiver modules.
Below are some of the major causes of “key Not Detected.”
Dead key fob battery
A major cause of the warning message “key Not Detected” is a dead battery. The Key fob uses a small button-like battery that powers it; unfortunately, it is not designed to last forever.
The key fob battery will weaken and must be replaced at a certain point. You will notice the need to change the battery when the range of the key reduces. Now, you must draw closer to the car to open or close the door or press the button multiple times.
You could also get a notification of the low battery on the dashboard of your Dodge Journey.
Receiver module issues or interference
Another cause of the “key Not Detected” warning message is when the receiver module is not working as it should.
What is the receiver module? A device inside the vehicle receives signals from the key fob. It then sends signals to other components depending on whether to open or lock the door or trunk and start the engine.
Sometimes, the signal from the key fob may be interfered with by other radio waves that do not allow the module to pick up the right signals. In other cases, the module might be damaged and unable to pick up any frequency.
Water damage to the key fob
If you expose your key fob to water, it could cause serious damage. You need to understand that the key is an electrical device, and it is not designed to be waterproof and will get damaged if exposed to a certain amount of water.
Dead vehicle battery
A dead Dodge Journey battery will stop the receiver module from picking up the key fob signal. The module receives power from the battery to function. Once there is no power flowing to the module, it will not work.
Until the battery is charged, you cannot access and switch on the vehicle using the keyfob.
Worn-out key fob
The key fob will get worn out after long usage due to exposure to dirt, moisture, and other working conditions.
You will notice that the key fob is worn when the buttons are harder to press, and it takes longer for the vehicle to respond to the key’s command.
Also, the battery contact may become worn out, loose, or corroded due to oxidation, vibration, and other factors. This will have the same effect as having a dead battery.
How to fix Dodge Journey Key Not Detected
Once you realize the Dodge Journey “Key Not Detected” warning message, you need first to figure out what the cause of the problem is. You can do this by inspecting all the vehicle components that could be the source of the issue.
Below are ways to fix a Dodge Journey “Key Not Detected.”
Replace the key fob battery
When the battery of your Dodge Journey key fob is dead, you need to replace it immediately. To do this, follow the steps below.
- Find the small notch at the side of the key fob and insert a screwdriver or any other tool that can fit in.
- Slowly pry open the case and separate it into two.
- Find buttons like batteries and take note of how they were placed.
- Insert the new batteries the same way the old ones were placed.
- Snap the separated key fob back together and test the key.
Replace key fob
In case of water damage or extreme wear conditions, you may need a new key fob compatible with your vehicle. You can get this in an authorized Dodge dealership.
Charge or replace car battery
If you are faced with a dead battery car battery, the easy fix is to charge the battery. Sometimes, the issue might not be a dead battery; it could be that the terminals are corroded. In this case, you may need to have them clean. Make a baking soda and water mixture, using the mixture and a rag to clean the battery.
Fix module issue
To fix the receiver module, you need first to locate it. The module is under that dashboard, just behind the glove box. Once located, check the connections, wiring antenna, and other components.
Go ahead and replace damaged parts of the module if you can. A professional should do issues like software malfunction.
Final Thought!
If you are faced with a “Key Not Detected”, it is important that you have the issue solved fast before the key fob becomes completely nonfunctional. Fortunately, problems with the key fob can easily be fixed, and you may not require professional help. Also, it will not cost much to have the issue fixed, even if you have to replace the key.

I'm Edmond Davis, an automotive expert with years of experience in vehicle repair, performance, and safety. I graduated from the University of Michigan with a degree in Automotive Engineering and have worked with major companies like Ford, GM, and Chrysler. I'm a trusted source of information for anyone looking to learn more about cars or improve their driving experience.
View all posts
Related Posts

Dodge Ram 1500 Mass Air Flow Sensor Location: Find It Easily

Dodge Ram Ground Strap Locations: Easy Guide to Find Them

Dodge Ram Volume Knob Not Working: Quick Troubleshooting Guide

3 Causes of Dodge Ram Shift Solenoid Problems

7 Causes of Dodge Charger Screen Not Turning On

3 Causes of Dodge Ram Wheel Speed Sensor Problems

Dodge Ram 1500 Fuel Filter Location: A Handy Guide

Dodge Ram 1500 Starter Solenoid Location: Quick Guide

Dodge Ram 1500 Front Parking Sensor Malfunction: Quick Fix Guide

5 Common Dodge Ram 1500 PCM Problems

9 Common Dodge Ram Air Conditioning Problems & How to Fix

Dodge Ram Throttle Position Sensor Reset: Quick Guide

5 Causes of Exhaust System Services Required See Dealer
Service Engine Emissions System 25 Derate: Causes & Fixes

© 2024 Daily Car Tips
- Remember me Not recommended on shared computers
Forgot your password?
- Alarms, Keyless Entry, Key Fobs, Locks & Remote Start
Key Fobs detected but not locking or unlocking
By bvanhooser September 3, 2022 in Alarms, Keyless Entry, Key Fobs, Locks & Remote Start
- Reply to this topic
- Start new topic
Recommended Posts
We have two journeys, one a 2012 and the other 2018. Two key fobs for each. Today all the key fobs stopped allowing us to lock, unlock, remote start, or panic. Both journeys still detect the key for passive entry and starting. I've replaced batteries, but that didn't fix it. Kind of at a loss as to why this happened. Any thoughts?
Link to comment
Share on other sites.
are you sure you put the batteries in correctly? so you are saying both journeys fob wont work? have no idea on that one
Yes batteries are in correctly.
and it happened the same time for both of your journeys fobs not to work?
- 6 months later...
Hi bvanhooser, I have just ran into the same issue on my 2015 journey... The 2 Key fobs are decteted and still start vehicle and proximity unlock/lock at the door handle, but no buttons function! Just out of the blue, worked fine untill I tried just now. Fobs were not dropped or damaged, literally worked hours ago.
Batteries in both fobs putting out 3V, no issues with fobs previously. Checked all doors, closed and lock/unlock properly. Starts normaly, car battery is plenty good.
Did you ever solve this problem? Any help much appreciated!
as most one time posters they never reported back on their solution to the problem, i would assume their problem would be different then yours. have you checked out youtube for any solutions?sounds like your journey is not rec the signals from your fobs,,,did you put in new batteries or just checked them for their strength i would replace them first before doing anything else. please report back on whatever you find to be the problem for others

Problem never really was resolved. Key fobs still don't work at home sometimes, but they do occasionally work when out and about. No real rhyme or reason to when they work. My wife's key fob will actually work sometimes and mine won't, and we're both at the car. Wish I had an answer for you...
44 minutes ago, bvanhooser said: Problem never really was resolved. Key fobs still don't work at home sometimes, but they do occasionally work when out and about. No real rhyme or reason to when they work. My wife's key fob will actually work sometimes and mine won't, and we're both at the car. Wish I had an answer for you...
ALL 4 quit working for both? Well lets say ONE FOB works "sometimes.
I don't have so new a year as an 2018, but I do know that if you have a Check Engine Light on when in use, the computer will NOT allow remote start to function till the fault is fixed.
Is this the only fault with both cars? Does the FOB lock/unlock the doors of both cars?
Your messaging is rather vague, we need specific as to which car and what is not working.
8. Faulty receiver module
Dodge Journey has a remote keyless system receiver that receives radio frequency signals from the key fob. If none of your key fobs work, and and you can’t reprogram the keys, it is possible the receiver module has developed a fault.
You may have to perform further diagnostics to identify the faulty. The keyless entry antenna could be damaged, or the module is just not communicating with other modules on the vehicle. In these cases an OBDII scan tool can be used to verify if the commands are being transmitted and acted on by the security module...................................
Reset the system
If the key fob is not working due to a glitch in the keyless entry system, it may be possible to restore the functionality by resetting the keyless entry system in your Journey.
There isn’t any button or option to reset the keyless entry system in Journey, but you can reboot all the on-board computers by disconnecting the 12 volt battery for a few minutes. Remove the cable from the negative terminal of the battery first, then from the positive terminal. With the battery disconnected, press the horn button a few times and turn on the headlights to drain out all the residual electricity from the system. After about 15 minutes, reconnect the battery in reverse order: positive cable first, then negative cable.
Oops, my post notifications were going to spam... Thanks for the replies guys! I also found a few recommendations to try rebooting the computers but was not looking forward to digging out the damn battery. I ended up just trying to clean all contacts in the fobs with rubbing alcohol and putting and it still didn't work. Waited a few hours after I made the post and pushed the lock button from my kitchen and it worked! No idea what the glitch was but it's never happened again, everything has worked as it should since.
Sorry I can't provide a fix or any help to anyone else with this issue, I honestly didn't do anything to fix it.
2 hours ago, DJDiggler said: Oops, my post notifications were going to spam... Thanks for the replies guys! I also found a few recommendations to try rebooting the computers but was not looking forward to digging out the damn battery. I ended up just trying to clean all contacts in the fobs with rubbing alcohol and putting and it still didn't work. Waited a few hours after I made the post and pushed the lock button from my kitchen and it worked! No idea what the glitch was but it's never happened again, everything has worked as it should since. Sorry I can't provide a fix or any help to anyone else with this issue, I honestly didn't do anything to fix it.
you dont have to disconnect at the battery just use the upper power jump spots located on the drivers side
- 1 month later...
On 3/22/2023 at 3:43 PM, bvanhooser said: Problem never really was resolved. Key fobs still don't work at home sometimes, but they do occasionally work when out and about. No real rhyme or reason to when they work. My wife's key fob will actually work sometimes and mine won't, and we're both at the car. Wish I had an answer for you...
This may sound strange but has been known to boost key fob signals by placing the key fob against your temple then push the button.
Join the conversation
You can post now and register later. If you have an account, sign in now to post with your account. Note: Your post will require moderator approval before it will be visible.

× Pasted as rich text. Paste as plain text instead
Only 75 emoji are allowed.
× Your link has been automatically embedded. Display as a link instead
× Your previous content has been restored. Clear editor
× You cannot paste images directly. Upload or insert images from URL.
- Insert image from URL
- Submit Reply
- Existing user? Sign In
More Forum Apps
- Online Users
- Leaderboard
|| Forum Activity ||
- All Activity
- Create New...
- Dodge Manuals
- Journey 2018
- User manual
Dodge Journey 2018 User Manual
- Owner's manual (519 pages)
- Quick reference manual (11 pages)
- page of 220 Go / 220
Table of Contents
- Ignition Switch
- Remote Start — if Equipped
- General Information
- Manual Folding Second Row Seat
- Stadium Tip 'N Slide (Easy Entry/Exit Seat Seven Passenger Models
- Manual Folding Third Row Seats
- Supplemental Active Head Restraints (AHR Front Seats
- Rear Head Restraint Adjustment
- Steering Wheel
- High Beam/Low Beam Select Switch
- Turn Signals
- Rear Window Wiper/Washer
- Climate Controls
- Climate Control Functions
- Operating Tips
- Opening Sunroof
- Anti Pinch Protect Feature
- Before You Begin Programming Homelink
- Programming Homelink to a Miscellaneous Device
- Internal Equipment
- Power Inverter — if Equipped
- Specifications
Advertisement
Quick Links
- 1 General Information
- 2 Specifications
- Download this manual
Related Manuals for Dodge Journey 2018

Summary of Contents for Dodge Journey 2018
- Page 1 2018 J O U R N E Y USER GUIDE...
- Page 2 I M P O R T A N T G et wa rr an ty and o the r i nfo r ma ti o n o n l i n e – y o u c a n re v i e w a n d p r i n t o r d o w n l o a d a c o p y o f t h e O wn e r ’s M anu al , Na vig at i on /U c on nec t manu a ls a nd t h e l i mi te d w a rra n t i e s p ro v i d e d b y F CA US L L C f o r y o u r v e h i c l e b y v i s i t i ng ww w.mo pa r.
- Page 3 Congratulations on selecting your new FCA US This User Guide has been prepared to help you quickly become acquainted with the important LLC vehicle. Be assured that it represents pre- features of your vehicle. It contains most things cision workmanship, distinctive styling, and you will need to operate and maintain the ve- high quality.
- Page 4 HOW TO USE THIS MANUAL WARNINGS AND CAUTIONS with steering wheel on the right side, the posi- tion or construction of some controls is not While reading this User Guide you will find a Essential Information exactly mirror-like with respect to the figure. series of WARNINGS to be followed to prevent To identify the chapter with the information Each time direction instructions (left/right or...
- Page 5 GRAPHICAL TABLE OF CONTENTS GETTING TO KNOW YOUR VEHICLE GETTING TO KNOW YOUR INSTRUMENT PANEL SAFETY STARTING AND OPERATING IN CASE OF EMERGENCY SERVICING AND MAINTENANCE TECHNICAL SPECIFICATIONS MULTIMEDIA CUSTOMER ASSISTANCE INDEX...
- Page 7 GRAPHICAL TABLE OF CONTENTS GRAPHICAL TABLE OF CONTENTS INSTRUMENT PANEL ....6 INTERIOR..... .7...
- Page 8 INSTRUMENT PANEL Instrument Panel 1 — Air Vents 4 — Windshield Wiper Lever (Behind Steering Wheel) 2 — Multifunction Lever (Behind Steering Wheel) 5 — Radio 3 — Instrument Cluster 6 — Steering Wheel...
- Page 9 INTERIOR Interior 1 — Door Locks/Window Switches 4 — Switch Panel 2 — Seats 5 — Climate Controls 3 — Gear Selector 6 — Glove Compartment...
- Page 11 GETTING TO KNOW YOUR VEHICLE GETTING TO KNOW YOUR VEHICLE KEYS ..... . .11 HEAD RESTRAINTS ....22 INTERIOR LIGHTS .
- Page 12 UNIVERSAL GARAGE DOOR OPENER Programming HomeLink To A Garage Door General Information ....49 Opener..... .48 (HOMELINK) .
Page 13: Keys
Page 14: ignition switch.
- Page 15 The Keyless Push Button Ignition has four op- erating positions, three of which are labeled and • Driving position. will illuminate when in position. The three posi- • All the electrical devices are available. tions are OFF, ACC, and ON/RUN. The fourth position is START.
Page 16: Remote Start — If Equipped
Page 17: general information, page 18: doors.
- Page 19 To Unlock From The Driver's Side: NOTE: Preventing Inadvertent Locking Of Passive Entry If “Unlock All Doors 1st Press” is programmed Key Fob In Vehicle: With a valid Passive Entry key fob within 5 ft all doors will unlock when you grab hold of the To minimize the possibility of unintentionally (1.5 m) of the driver's door handle, grab the driver’s front door handle.
- Page 20 To Enter The Liftgate: To Lock The Vehicle’s Doors: With a valid Passive Entry key fob within 5 ft With one of the vehicle’s Passive Entry key fobs (1.5 m) of the liftgate, push the button under- within 5 ft (1.5 m) of the driver or passenger neath the left side of the accent bar, which is front door handle, push the door handle lock located on the liftgate below the glass, to lock or...
Page 21: Seats
Page 22: manual folding second row seat, page 23: stadium tip 'n slide (easy entry/exit seat seven passenger models, page 24: manual folding third row seats, page 25: supplemental active head restraints (ahr front seats.
- Page 26 For comfort, the Active Head Restraints can be • In the event of deployment of an Active Head Restraint, refer to “Occupant Restraints/ tilted forward and backward. To tilt the head Supplemental Active Head Restraints (AHR)/ restraint closer to the back of your head, pull Resetting Active Head Restraints (AHR)”...
Page 27: Rear Head Restraint Adjustment
Page 28: steering wheel, page 29: mirrors, page 30: high beam/low beam select switch, page 31: turn signals.
- Page 32 NOTE: Intermittent Wiper System If you activate the washer while the wiper con- trol is in the delay range, the wipers will operate The wipers will automatically return to the Use the intermittent wiper system when in low-speed for two or three wipe cycles after “park”...
Page 33: Rear Window Wiper/Washer
Page 34: climate controls.
- Page 35 Automatic Climate Controls Descriptions Icon Description MAX A/C Button Press and release to change the current setting, the indicator illuminates when MAX A/C is on. Performing this function again will cause the MAX A/C operation to switch into manual mode and the MAX A/C indicator will turn off. A/C Button Press and release to change the current setting.
- Page 36 Icon Description Rear Defrost Button The Rear Defrost Control button turns on the rear window defroster and the heated outside mirrors (if equipped). An indicator will illuminate when the rear window defroster is on. The rear window defroster automatically turns off after ten minutes. Rear Climate Control Button Rear Climate Press and release this button to access the rear climate controls.
- Page 37 Icon Description Faceplate Knob Blower Control Blower Control is used to regulate the amount of air forced through the climate system. There are seven blower speeds avail- able. The speeds can be selected using either the blower control knob on the faceplate or the buttons on the touchscreen. •...
- Page 38 Icon Description Floor Mode Floor Mode Air comes from the floor outlets. A slight amount of air is directed through the defrost and side window demister outlets. Mix Mode Mix Mode Air is directed through the floor, defrost, and side window demister outlets. This setting works best in cold or snowy conditions that re- quire extra heat to the windshield.
- Page 39 Controlling The Rear Climate Controls From CAUTION! The Front ATC Panel Failure to follow these cautions can cause The rear ATC system has floor air outlets at the damage to the heating elements: rear right side of the 3rd Row seats and over- •...
- Page 40 Icon Description Front Climate Button/Done Press and release this button to change the display on the Uconnect radio back to the Front Climate Controls. Done Rear Passenger Temperature Up and Down Buttons Provides the rear passengers with independent temperature control. Push the up arrow button on the touchscreen to increase the temperature.
- Page 41 Icon Description Panel Mode Panel Mode Press this button on the touchscreen to change the air distribution mode to Panel Mode. In Panel Mode, air comes from the outlets in the instrument panel. Each of these outlets can be individually adjusted to direct the flow of air. The air vanes of the center outlets and outboard outlets can be moved up and down or side to side to regulate airflow direction.
- Page 42 Rear Automatic Temperature Control (ATC) • To return to Front screen, press the "REAR" Once the desired temperature is displayed, the button again, or it will revert to the Front — If Equipped ATC System will automatically achieve and screen after six seconds. maintain that comfort level.
- Page 43 Icon Description Rear Mode Control Push this button on the Rear Climate Hard Controls to change the air distribution mode for the rear passengers to one of the fol- lowing: Panel Mode Panel Mode Air comes from the outlets in the headliner. Each of these outlets can be individually adjusted to direct the flow of air. Moving the air vanes of the outlets to one side will shut off the airflow.
Page 44: Climate Control Functions
- Page 45 adjusted to desired user settings. Pressing other Defrost mode to improve window clearing opera- NOTE: settings will cause the MAX A/C operation to tion. Recirculation will be disabled automati- • It is not necessary to move the temperature switch to the selected setting and MAX A/C to cally if this mode is selected.
Page 46: Operating Tips
Page 47: opening sunroof, page 48: anti pinch protect feature, page 49: before you begin programming homelink, page 50: opener, page 51: programming homelink to a miscellaneous device, page 52: internal equipment.
- Page 53 A third fused 12 Volt power outlet is located on CAUTION! the back of the center console. This power outlet has power available when the ignition is • Do not exceed the maximum power of in the LOCK, ON or ACC position. 160 Watts (13 Amps) at 12 Volts.
- Page 54 Power Outlet Fuses 1 — F103 20 Amp Yellow — Power Outlet Console Bin & Power Outlet Console Rear 2 — F102 20 Amp Yellow — Cigar Lighter Instrument Panel & Power Outlet Left Rear Cargo Area...
Page 55: Power Inverter — If Equipped
- Page 56 inverter button OFF and ON. To avoid overload- 2. Press the “Outlet” button on the touch- WARNING! ing the circuit, check the power ratings on screen (located on the Uconnect display) to • Close the lid when not in use. electrical devices prior to using the inverter.
- Page 57 GETTING TO KNOW YOUR INSTRUMENT PANEL GETTING TO KNOW YOUR INSTRUMENT PANEL INSTRUMENT CLUSTER DISPLAY ..56 Yellow Warning Lights ... . .60 ONBOARD DIAGNOSTIC SYSTEM —...
- Page 58 INSTRUMENT CLUSTER DISPLAY Instrument Cluster Display Location And Controls Your vehicle may be equipped with an instru- The instrument cluster display features a driver- ment cluster display, which offers useful infor- mation to the driver. With the ignition in the interactive display that is located in the instru- STOP/OFF mode, opening/closing of a door will ment cluster.
- Page 59 • Right Arrow Button — Air Bag Warning Light malfunction or that a problem with the Brake Booster has been detected by the Anti-Lock Push and release the right arrow button for This light will turn on for four to eight seconds as Brake System (ABS) / Electronic Stability Con- access to main menus or submenus.
- Page 60 NOTE: engine off immediately and call for service. WARNING! Refer to “If Your Engine Overheats” in “In Case This light shows only that the parking brake is Of Emergency” for further information. applied. It does not show the degree of brake Driving a vehicle with the red brake light on is application.
- Page 61 — Electronic Throttle Control (ETC) — Electric Power Steering Fail Warn- CAUTION! ing Light Warning Light Continuous driving with the Transmission This light will turn on when there's a fault with This light informs you of a problem with the Temperature Warning Light illuminated will the EPS (Electric Power Steering).
- Page 62 — Liftgate Open Warning Light When the engine is running, the MIL may flash — Electronic Stability Control (ESC) to alert serious conditions that could lead to Warning Light — If Equipped This indicator will turn when the liftgate is open. immediate loss of power or severe catalytic The “ESC Indicator Light”...
- Page 63 — Electronic Stability Control (ESC) Off tire failure. Under-inflation also reduces fuel CAUTION! Warning Light — If Equipped efficiency and tire tread life, and may affect the the vehicle, avoiding sharp braking and steer- vehicle’s handling and stopping ability. This light indicates the Electronic Stability Con- ing.
- Page 64 telltale after replacing one or more tires or — Anti-Lock Brake (ABS) Warning — Low Washer Fluid Warning Light — wheels on your vehicle to ensure that the re- Light If Equipped placement or alternate tires and wheels allow This light monitors the Anti-Lock Brake System This indicator will illuminate when the wind- the TPMS to continue to function properly.
- Page 65 ONBOARD DIAGNOSTIC SYSTEM — • Check for an inoperative outside light bulb if CAUTION! either indicator flashes at a rapid rate. OBD II • Prolonged driving with the MIL on could — Cruise Control SET Indicator Light Your vehicle is equipped with a sophisticated cause further damage to the emission con- This light will turn on when the speed control is Onboard Diagnostic system called OBD II.
- Page 66 For further information, refer to “Cybersecurity” WARNING! in “Multimedia”. • ONLY an authorized service technician should connect equipment to the OBD II connection port in order to diagnose or service your vehicle. • If unauthorized equipment is connected to the OBD II connection port, such as a driver-behavior tracking device, it may: •...
- Page 67 SAFETY SAFETY AUXILIARY DRIVING SYSTEMS ..66 Supplemental Restraint Systems (SRS) . . .80 Exhaust Gas ....105 Child Restraints.
- Page 68 AUXILIARY DRIVING SYSTEMS The TPMS will warn the driver of a low tire must increase the tire pressure to the recom- pressure if the tire pressure falls below the mended cold placard pressure in order for the Tire Pressure Monitoring System (TPMS) low-pressure warning limit for any reason, in- “Tire Pressure Monitoring Telltale Light”...
- Page 69 cause the tire pressure to rise to approximately inflation has not reached the level to trigger CAUTION! 28 psi (193 kPa), but the “Tire Pressure Monitor- illumination of the “Tire Pressure Monitoring ter using an aftermarket tire sealant it is ing Telltale Light”...
- Page 70 Tire Pressure Monitoring Low Pressure Should this occur, you should stop as soon as "SERVICE TPM SYSTEM" message for a mini- Warnings possible and inflate the tires with low pressure mum of five seconds and then display dashes (- (those in a different color in the instrument -) in place of the pressure value to indicate cluster display graphic) to the vehicle’s recom- which sensor is not being received.
- Page 71 NOTE: instrument cluster will display a "SERVICE (TPM) Sensors. Then, drive the vehicle for TPM SYSTEM" message for a minimum of five 20 minutes above 15 mph (24 km/h). The • The compact spare tire does not have a tire seconds and then display dashes (- -) in place TPMS will chime, the "TPM Telltale Light"...
- Page 72 OCCUPANT RESTRAINT SYSTEMS General Information 1. Children 12 years old and under should always ride buckled up in a vehicle with a The following regulatory statement applies to all Some of the most important safety features in rear seat. radio frequency (RF) devices equipped in this your vehicle are the restraint systems: vehicle: 2.
- Page 73 7. The driver and front passenger seats should Seat Belt Systems Initial Indication be moved back as far as practical to allow If the driver is unbuckled when the ignition Buckle up even though you are an excellent the front air bags room to inflate. switch is first in the START or ON/RUN position, driver, even on short trips.
- Page 74 will remain on until the seat belts are buckled. BeltAlert can be activated or deactivated by WARNING! The BeltAlert warning sequence may repeat your authorized dealer. FCA US LLC does not based on vehicle speed until the driver and recommend deactivating BeltAlert. •...
- Page 75 WARNING! WARNING! WARNING! also provided at their seating position to • A twisted seat belt may not protect you der so that your strongest bones will take minimize the risk of severe injury or death properly. In a collision, it could even cut the force in a collision.
- Page 76 Lap/Shoulder Belt Operating Instructions seat). Grasp the latch plate and pull out the Lap/Shoulder Belt Untwisting Procedure seat belt. Slide the latch plate up the web- Use the following procedure to untwist a twisted bing as far as necessary to allow the seat belt lap/shoulder belt.
- Page 77 NOTE: Seat Belt Extender The adjustable upper shoulder belt anchorage is If a seat belt is not long enough to fit properly, equipped with an Easy Up feature. This feature even when the webbing is fully extended and allows the shoulder belt anchorage to be ad- the adjustable upper shoulder belt anchorage (if justed in the upward position without pushing or equipped) is in its lowest position, your autho-...
- Page 78 Seat Belts And Pregnant Women Seat Belt Pretensioner WARNING! The front seat belt system is equipped with • ONLY use a Seat Belt Extender if it is pretensioning devices that are designed to re- physically required in order to properly fit move slack from the seat belt in the event of a the original seat belt system.
- Page 79 Energy Management Feature — If Equipped essary to comfortably wrap around the occu- pant’s mid-section. Slide the latch plate into the The front seat belt system is equipped and the buckle until you hear a "click." second row outboard seat belt system may be In Automatic Locking Mode, the shoulder belt is equipped with an Energy Management feature automatically pre-locked.
- Page 80 How To Engage The Automatic Locking Mode (AHR) to deploy. If a rear impact requires de- WARNING! ployment, both the driver and front passenger 1. Buckle the combination lap and shoulder • Failure to replace the seat belt assembly seat AHRs will be deployed. belt.
- Page 81 Active Head Restraint (AHR) Components: NOTE: WARNING! For more information on properly adjusting and positioning the head restraint, refer to “Supple- • All occupants, including the driver, should mental Active Head Restraints” in “Getting To not operate a vehicle or sit in a vehicle’s Know Your Vehicle.”...
- Page 82 have deployed. The head restraint must be reset connecting wiring associated with the electrical position. If the ignition switch is in the OFF into the original position to best protect the Air Bag System Components. Your vehicle may position or in the ACC position, the air bag occupant for all types of collisions.
- Page 83 • The Air Bag Warning Light does not come on WARNING! during the four to eight seconds when the ignition switch is first in the ON/RUN position. Ignoring the Air Bag Warning Light in your instrument panel could mean you won’t have •...
- Page 84 Occupant Restraint Controller (ORC), which WARNING! WARNING! may receive information from the front impact could cause harm if the vehicle is in a sensors (if equipped) or other system compo- • Being too close to the steering wheel or collision severe enough to cause the air nents.
- Page 85 duce substantial vehicle damage — for ex- Knee Impact Bolsters Supplemental Side Air Bags ample, some pole collisions, truck underrides, The Knee Impact Bolsters help protect the Supplemental Seat-Mounted Side Air Bags and angle offset collisions. knees of the driver and front passenger, and (SABs) position the front occupants for improved inter- On the other hand, depending on the type and...
- Page 86 The SABs may help to reduce the risk of occu- occupants if they are not seated properly, or if pant injury during certain side impacts, in ad- items are positioned in the area where the SAB dition to the injury reduction potential provided inflates.
- Page 87 belted and seated properly, or if items are posi- Side Impacts Side Air Bags are a supplement to the seat belt tioned in the area where the SABICs inflate. restraint system. Side Air Bags deploy in less The Side Air Bags are designed to activate in Children are at an even greater risk of injury time than it takes to blink your eyes.
- Page 88 the severity and type of collision. Vehicle dam- • Steering Wheel and Column WARNING! age by itself is not a good indicator of whether or • Instrument Panel not Side Air Bags should have deployed. • Side Air Bags need room to inflate. Do not •...
- Page 89 • The air bag material may sometimes cause • Flash hazard lights as long as the battery has WARNING! power or until the hazard light button is abrasions and/or skin reddening to the occu- pressed. The hazard lights can be deactivated pants as the air bags deploy and unfold.
- Page 90 Maintaining Your Air Bag System • How far (if at all) the driver was depressing the WARNING! accelerator and/or brake pedal; and, loosening/tightening of seat attachment WARNING! • How fast the vehicle was traveling. bolts), take the vehicle to your authorized These data can help provide a better under- dealer.
- Page 91 Child Restraints NOTE: WARNING! • For additional information, refer Everyone in your vehicle needs to be buckled up In a collision, an unrestrained child can be- www.safercar.gov/parents/index.htm or call: at all times, including babies and children. come a projectile inside the vehicle. The 1–888–327–4236 Every state in the United States, and every force required to hold even an infant on your...
- Page 92 Summary Of Recommendations For Restraining Children In Vehicles Child Size, Height, Weight Or Age Recommended Type Of Child Restraint Children who are two years old or younger and Either an Infant Carrier or a Convertible Child Re- Infants and Toddlers who have not reached the height or weight limits straint, facing rearward in the rear seat of the ve- of their child restraint...
- Page 93 Older Children And Child Restraints WARNING! WARNING! Children who are two years old or who have Do not install a rear-facing car seat using a • Improper installation can lead to failure of outgrown their rear-facing convertible child seat rear support leg in this vehicle. The floor of an infant or child restraint.
- Page 94 Integrated Child Booster Seat — If NOTE: Equipped The second row bench with Integrated Child Booster Seat must remain in the full rear The Integrated Child Booster Seat is located in position during use. each outboard second-row passenger seat. 2. Pull the release loop forward to release the latch and seat cushion.
- Page 95 7. Once the seat belt is long enough to fit 4. Is the lap part of the belt as low as possible, WARNING! properly, insert the latch plate into the touching the child’s thighs and not the • The vehicle cannot be driven away from buckle until you hear a “click.”...
- Page 96 Recommendations For Attaching Child Restraints Restraint Type Combined Weight of the Use Any Attachment Method Shown With An “X” Below Child + Child Restraint LATCH – Lower Anchors Seat Belt Only LATCH – Lower Anchors Seat Belt + Top Tether Only + Top Tether Anchor Anchor...
- Page 97 Lower Anchors And Tethers For CHildren without using the vehicle’s seat belts. Some LATCH Positions For Installing Child Re- (LATCH) Restraint System straints In This Vehicle seating positions may have a top tether anchor- age but no lower anchorages. In these seating positions, the seat belt must be used with the top tether anchorage to install the child re- straint.
- Page 98 Frequently Asked Questions About Installing Child Restraints With LATCH Use the LATCH anchorage system until the com- What is the weight limit (child’s weight + weight bined weight of the child and the child restraint is of the child restraint) for using the LATCH anchor- 65 lbs (29.5 kg) 65 lbs (29.5 kg).
- Page 99 Locating The LATCH Anchorages Locating The Upper Tether Anchorages facing child restraints will also be equipped with a tether strap. The tether strap will have a hook at the end to attach to the top tether anchorage The lower anchorages are round bars that are There are tether strap anchorages behind each and a way to tighten the strap after it is attached found at the rear of the seat cushion where it...
- Page 100 You can install up to two child seats using the Options for installing two child seats using the WARNING! LATCH system at the same time. If you are LATCH anchorages in this vehicle: center seating position (2). Do not install a installing three child restraints, you must use 1.
- Page 101 To Install A LATCH-Compatible Child Re- 4. If the child restraint has a tether strap, con- buckled seat belt interferes with the child re- nect it to the top tether anchorage. See the straint straint installation, instead of buckling it behind section “Installing Child Restraints Using the child restraint, route the seat belt through If the selected seating position has a Switchable...
- Page 102 Installing Child Restraints Using The Ve- The seat belts in the passenger seating posi- Lap/Shoulder Belt Systems For Installing Child Restraints In This Vehicle hicle Seat Belt tions are equipped with either a Switchable Automatic Locking Retractor (ALR) or a cinch- Child restraint systems are designed to be se- ing latch plate or both.
- Page 103 Frequently Asked Questions About Installing Child Restraints With Seat Belts What is the weight limit (child’s weight + weight Always use the tether anchor when using the seat of the child restraint) for using the Tether Anchor belt to install a forward facing child restraint, up Weight limit of the Child Restraint with the seat belt to attach a forward facing child to the recommended weight limit of the child re-...
- Page 104 5. To lock the seat belt, pull down on the 9. Test that the child restraint is installed you may need to recline the seat and / or shoulder part of the belt until you have tightly by pulling back and forth on the child raise the head restraint to get a better fit.
- Page 105 6. Test that the child restraint is installed Installing Child Restraints Using The Top tether anchorage. You may need to move the tightly by pulling back and forth on the child Tether Anchorage seat forward to provide better access to the seat at the belt path.
- Page 106 possible, route the tether strap under the WARNING! head restraint and between the two posts. If • If your vehicle is equipped with a split rear not possible, lower the head restraint and seat, make sure the tether strap does not pass the tether strap around the outboard slip into the opening between the seat- side of the head restraint.
- Page 107 SAFETY TIPS Exhaust Gas Whenever a change is noticed in the sound of the exhaust system, when exhaust fumes can be detected inside the vehicle, or when the under- WARNING! Transporting Passengers side or rear of the vehicle is damaged, have a Exhaust gases can injure or kill.
- Page 108 damaged (i.e., bent retractor, torn webbing, Floor Mat Safety Information WARNING! etc.). If there is any question regarding seat belt Always use floor mats designed to fit your ve- • ALWAYS REMOVE THE EXISTING FLOOR or retractor condition, replace the seat belt. hicle.
- Page 109 Inspect sidewalls for cuts, cracks, and bulges. WARNING! WARNING! Check the wheel nuts for tightness. Check the • ALWAYS make sure objects cannot fall or ence with the accelerator, brake, or clutch tires (including spare) for proper cold inflation slide into the driver’s side floor area when pedals then re-install the floor mats.
- Page 111 STARTING AND OPERATING STARTING AND OPERATING ENGINE BREAK-IN RECOMMENDATIONS — GASO- To Resume Speed ....112 Materials Added To Fuel ..115 LINE ENGINE.
- Page 112 ENGINE BREAK-IN CAUTION! RECOMMENDATIONS — GASOLINE Never use Non-Detergent Oil or Straight Min- ENGINE eral Oil in the engine or damage may result. A long break-in period is not required for the NOTE: engine and drivetrain (transmission and axle) in A new engine may consume some oil during its your vehicle.
- Page 113 NOTE: To Set A Desired Speed U.S. Speed (mph) In order to ensure proper operation, the Speed • Pushing the RES (+) button once will result in Turn the Speed Control on. When the vehicle Control System has been designed to shut down a 1 mph increase in set speed.
- Page 114 strument Panel” in the Owner’s Manual at To Accelerate For Passing To Resume Speed www.mopar.com/en-us/care/owners-manual.html Press the accelerator as you would normally. To resume a previously set speed, push the RES (U.S. Residents) or www.owners.mopar.ca (Ca- When the pedal is released, the vehicle will (+) button and release.
- Page 115 NOTE: • As the vehicle moves closer to the obstacle, When the vehicle is shifted out of REVERSE, the instrument cluster display will show fewer ParkSense will retain the last system state (en- the rear camera mode is exited and the last arcs and the sound tone will change from abled or disabled) from the last ignition cycle selected touchscreen appears again.
- Page 116 NOTE: Different colored zones indicate the distance to The ParkView Rear Back Up Camera has program- the rear of the vehicle. mable modes of operation that may be selected The following table shows the approximate dis- through the Uconnect System. Refer to “Uconnect tances for each zone: Settings”...
- Page 117 REFUELING THE VEHICLE Loose Fuel Filler Cap Message CAUTION! If the vehicle diagnostic system determines that The gas cap is located behind the fuel filler door • Damage to the fuel system or emissions the fuel filler cap is loose, improperly installed, on the left side of the vehicle.
- Page 118 tergent gasoline recommended. Visit Indiscriminate use of fuel system cleaning agents should be avoided. Many of these mate- www.toptiergas.com for a list of TOP TIER De- rials intended for gum and varnish removal may tergent Gasoline Retailers. contain active solvents or similar ingredients. These can harm fuel system gasket and dia- phragm materials.
- Page 119 NOTE: • * For All Wheel Drive (AWD) models carrying five to seven persons and luggage will exceed • The trailer tongue weight must be considered the rear Gross Axle Weight Rating (GAWR) and as part of the combined weight of occupants therefore should not be attempted.
- Page 120 CAUTION! CAUTION! • DO NOT flat tow this vehicle. Damage to Towing this vehicle with ANY of its wheels on the drivetrain will result. If this vehicle the ground can cause severe transmission requires towing, make sure the drive and/or power transfer unit damage. Damage wheels are OFF the ground.
- Page 121 IN CASE OF EMERGENCY IN CASE OF EMERGENCY JACKING AND TIRE CHANGING..120 FUSES ..... .128 GEAR SELECTOR OVERRIDE .
- Page 122 JACKING AND TIRE CHANGING Jack Location Spare Tire Removal NOTE: The jack and jack-handle are stowed under- WARNING! On seven-passenger models, fold the third-row neath a cover in the rear storage bin in the cargo passenger seats flat. This will provide more area.
- Page 123 NOTE: 3. Pull the spare tire out from underneath the vehicle and raise it upright so the tire's tread Assemble components 2 and 3 by seating is on the ground. the small ball at the end of component 4. Tilt the retainer at the end of the winch cable 2 in the small hole at the end of compo- and remove it from the center of the wheel.
- Page 124 Jacking Instructions WARNING! CAUTION! • If working on or near a roadway, be ex- WARNING! Do not attempt to raise the vehicle by jacking tremely careful of motor traffic. on locations other than those indicated in the • To assure that spare tires, flat or inflated, Carefully follow these tire changing warnings Jacking Instructions for this vehicle.
- Page 125 3. Place the jack in the notches underneath the WARNING! lift area that is closest to the flat tire. Center the jack saddle between the drain flute for- Raising the vehicle higher than necessary mations on the sill flange. Turn the jack can make the vehicle less stable.
- Page 126 NOTE: star pattern until each nut has been tight- CAUTION! ened twice. For the correct lug nut torque, • For vehicles so equipped, do not attempt refer to “Torque Specifications” in “Techni- Be sure to mount the spare tire with the valve to install a center cap or wheel cover on cal Specifications”.
- Page 127 Road Tire Installation Vehicles Without Wheel Covers WARNING! 1. Mount the road tire on the axle. Vehicles Equipped With Wheel Covers To avoid the risk of forcing the vehicle off the 2. Install the remaining lug nuts with the cone 1.
- Page 128 5. After 25 miles (40 km), check the lug nut 1. Place the spare tire near to the winch cable. 3. Fit the assembled jack-handle over the winch drive nut. Rotate the jack-handle as- torque with a torque wrench to ensure that Hold the spare upright so that the tire's tread sembly clockwise to raise the spare tire into all lug nuts are properly seated against the...
- Page 129 Exterior Bulbs Bulb Number Low Beam Headlamp 9006 High Beam Headlamp 9005 Front Park/Turn Signal 3757AK Side Marker Lamp Front Fog Lamp PSX24W or 2504 Center High Mounted Stop Lamp (CHMSL) LED (Serviced at authorized dealer) License Lamp Exterior Bulbs – Rear (LED Version) Bulb Number Rear Tail/Stop Lamp LED (Serviced at authorized dealer)
- Page 130 FUSES WARNING! WARNING! • If the replaced fuse blows again, contact Do not place a fuse inside a circuit breaker WARNING! an authorized dealer. cavity or vice versa. Failure to use proper • If a general protection fuse for safety sys- fuses may result in serious personal injury, •...
- Page 131 Cavity Cartridge Fuse Mini-Fuse Description F112 – 10 Amp Red Spare F114 – 20 Amp Yellow Rear HVAC Blower/Motor F115 – 20 Amp Yellow Rear Wiper Motor F116 30 Amp Pink – Rear Defroster (EBL) F117 – 10 Amp Red Heated Mirrors F118 –...
- Page 132 Underhood Fuses (Power Distribution Center) The power distribution center is located in the engine compartment. Cavity Cartridge Fuse Mini-Fuse Description F101 60 Amp Yellow – Interior Power Distribution Center Rail F102 60 Amp Yellow – Interior Power Distribution Center Rail F103 60 Amp Yellow –...
- Page 133 Cavity Cartridge Fuse Mini-Fuse Description F156 – 10 Amp Red Brake/Electronic Stability Control Module F157 – 10 Amp Red Power Transfer Unit Module – If Equipped F158 – 10 Amp Red Active Hood Module – If Equipped F159 – 10 Amp Red Spare F160 –...
- Page 134 Cavity Cartridge Fuse Mini-Fuse Description F179 – 10 Amp Red Battery Sensor F181 100 Amp Blue – Electrohydraulic Steering (EHPS) – If Equipped F182 50 Amp Red – Cabin Heater #3 – If Equipped F184 30 Amp Pink – Front Wiper Motor JUMP STARTING CAUTION! battery, starter motor, alternator or electrical...
- Page 135 4. If using another vehicle to jump start the Connecting The Jumper Cables WARNING! battery, park the vehicle within the jumper 1. Connect the positive (+) end of the jumper cable’s reach, set the parking brake and • Take care to avoid the radiator cooling fan cable to the remote positive (+) post of the make sure the ignition is OFF.
- Page 136 5. Start the engine in the vehicle that has the If frequent jump starting is required to start your NOTE: booster battery, let the engine idle a few vehicle, you should have the battery and charg- There are steps that you can take to slow down minutes, and then start the engine in the ing system inspected at your authorized dealer.
- Page 137 NOTE: 6. Move the gear selector to the NEUTRAL CAUTION! position. The maximum vehicle speed is reduced to 48 mph (77 km/h), you may reduce vehicle Driving with a hot cooling system could dam- 7. The vehicle may then be started in speed further as needed.
- Page 138 CAUTION! WARNING! CAUTION! Racing the engine or spinning the wheels Fast spinning tires can be dangerous. Forces • When “rocking” a stuck vehicle by shifting may lead to transmission overheating and generated by excessive wheel speeds may between DRIVE and REVERSE, do not spin failure.
- Page 139 TOWING A DISABLED VEHICLE This section describes procedures for towing a disabled vehicle using a commercial towing service. Towing Condition Wheel OFF The Ground FWD MODELS AWD MODELS IF transmission is operable: Flat Tow NONE • Transmission in NEUTRAL NOT ALLOWED •...
- Page 140 ENHANCED ACCIDENT RESPONSE All-Wheel Drive (AWD) Models • The transmission must be in NEUTRAL. • The towing distance must not exceed SYSTEM (EARS) The manufacturer requires towing with all four 15 miles (24 km). wheels OFF the ground. Acceptable methods This vehicle is equipped with an Enhanced are to tow the vehicle on a flatbed, or with one •...
- Page 141 SERVICING AND MAINTENANCE SERVICING AND MAINTENANCE SCHEDULED SERVICING ... . .140 RAISING THE VEHICLE....146 Wheel And Wheel Trim Care ..160 Maintenance Plan .
- Page 142 SCHEDULED SERVICING Your authorized dealer will reset the oil change Severe Duty All Models indicator message after completing the sched- Change engine oil at 4,000 miles (6,500 km) or Your vehicle is equipped with an automatic oil uled oil change. If a scheduled oil change is 350 hours of engine run time if the vehicle is change indicator system.
- Page 143 Maintenance Plan Required Maintenance Intervals. Refer to the maintenance plan on the following page for the required maintenance intervals. At Every Oil Change Interval As Indicated By Oil Change Indicator System: • Change oil and filter. • Rotate the tires. Rotate at the first sign of irregular wear, even if it occurs before the oil indicator system turns on. •...
- Page 144 Mileage or time passed (whichever comes first) Or Years: Or Kilometers: Additional Inspections Inspect the CV joints. Inspect front suspension, tie rod ends, and replace if necessary. Inspect the brake linings, parking brake function. Additional Maintenance Replace engine air filter. Replace air conditioning filter.
- Page 145 ** The spark plug change interval is mileage Heavy Duty Use Of The Vehicle based only, yearly intervals do not apply. Change engine oil at 4,000 miles (6,500 km) or 350 hours of engine run time if the vehicle is WARNING! operated in a dusty and off road environment or is operated predominately at idle or only very...
- Page 146 ENGINE COMPARTMENT 2.4L Engine 1 — Engine Coolant Reservoir 7 — Power Distribution Center (Fuses) 2 — Power Steering Fluid Reservoir 8 — Air Cleaner Filter 3 — Engine Oil Fill 9 — Automatic Transmission Dipstick (4–Speed Only – If Equipped) 4 —...
- Page 147 3.6L Engine 1 — Engine Coolant Reservoir Pressure Cap 7 — Power Distribution Center (Fuses) 2 — Power Steering Fluid Reservoir 8 — Air Cleaner Filter 3 — Oil Filter Access 9 — Washer Fluid Reservoir 4 — Brake Fluid Reservoir 10 —...
- Page 148 RAISING THE VEHICLE Tire Markings • European — Metric tire sizing is based on European design standards. Tires designed to In the case where it is necessary to raise the this standard have the tire size molded into vehicle, go to an authorized dealer or service the sidewall beginning with the section width.
- Page 149 Tire Sizing Chart EXAMPLE: Example Size Designation: P215/65R15XL 95H, 215/65R15 96H, LT235/85R16C, T145/80D18 103M, 31x10.5 R15 LT P = Passenger car tire size based on U.S. design standards, or "..blank.." = Passenger car tire based on European design standards, or LT = Light truck tire based on U.S.
- Page 150 EXAMPLE: Load Identification: Absence of the following load identification symbols on the sidewall of the tire indicates a Standard Load (SL) tire: • XL = Extra load (or reinforced) tire, or • LL = Light load tire or • C, D, E, F, G = Load range associated with the maximum load a tire can carry at a specified pressure Maximum Load –...
- Page 151 EXAMPLE: 01 = Number representing the year in which the tire was manufactured (two digits) • 01 means the year 2001 • Prior to July 2000, tire manufacturers were only required to have one number to represent the year in which the tire was manufactured. Example: 031 could represent the 3rd week of 1981 or 1991 Tire Terminology And Definitions Term...
- Page 152 Tire Loading And Tire Pressure Tire And Loading Information Placard NOTE: The proper cold tire inflation pressure is listed on the driver’s side B-Pillar or the rear edge of the driver's side door. Check the inflation pressure of each tire, includ- ing the spare tire (if equipped), at least monthly and inflate to the recommended pressure for your vehicle.
- Page 153 conditions, tire size, and cold tire inflation pres- (2) Determine the combined weight of (6) If your vehicle will be towing a trailer, sures specified on the Tire and Loading Infor- load from your trailer will be transferred the driver and passengers that will be mation placard in “Vehicle Loading”...
- Page 154 • For the following example, the combined weight of occupants and cargo should never exceed 865 lbs (392 kg).
- Page 155 Safety NOTE: WARNING! • Unequal tire pressures from side to side may WARNING! Overloading of your tires is dangerous. Over- cause erratic and unpredictable steering re- loading can cause tire failure, affect vehicle sponse. • Improperly inflated tires are dangerous handling, and increase your stopping dis- and can cause collisions.
- Page 156 At least once a month: Check tire pressures more often if subject to a hicle loading may be required for high-speed vehicle operation. Refer to your authorized tire wide range of outdoor temperatures, as tire • Check and adjust tire pressure with a good dealer or original equipment vehicle dealer for pressures vary with temperature changes.
- Page 157 Tire Repair Run Flat tire reaches the run flat mode it has WARNING! limited driving capabilities and needs to be If your tire becomes damaged, it may be re- (48 km/h) for more than 30 seconds continu- replaced immediately. A Run Flat tire is not paired if it meets the following criteria: ously when you are stuck, and do not let repairable.
- Page 158 tread wear indicators, the tire should be re- It is recommended to replace the two front tires WARNING! placed. Refer to “Replacement Tires” in this or two rear tires as a pair. Replacing just one tire control and have a collision resulting in seri- section for further information.
- Page 159 tires. All season tires can be identified by the WARNING! WARNING! M+S, M&S, M/S or MS designation on the tire or death. Use only the tire and wheel sizes sidewall. Use all season tires only in sets of four; Do not use Summer tires in snow/ice condi- with load ratings approved for your vehicle.
- Page 160 above 75 mph (120 km/h) refer to original on the sidewall of the tire. Compact spare tire CAUTION! descriptions begin with the letter “T” or “S” pre- equipment or an authorized tire dealer for rec- ceding the size designation. Example: T145/ ommended safe operating speeds, loading and Because of the reduced ground clearance, 80D18 103M.
- Page 161 Do not install a wheel cover or attempt to mount not the same as your original equipment tire, WARNING! a conventional tire on the collapsible spare replace (or repair) the original equipment tire spare. Failure to do so could result in spare wheel, since the wheel is designed specifically and reinstall on the vehicle at the first opportu- tire failure and loss of vehicle control.
- Page 162 WARNING! CAUTION! CAUTION! and Loading Information Placard located on Avoid products or automatic car washes that Do not use scouring pads, steel wool, a the driver’s side B-Pillar or the rear edge of use acidic solutions or strong alkaline addi- bristle brush, metal polishes or oven cleaner.
- Page 163 Dark Vapor Chrome, Black Satin Chrome, or Low All passenger vehicle tires must conform pavement, as measured under con- Gloss Clear Coat Wheels to Federal safety requirements in addi- trolled conditions on specified govern- tion to these grades. ment test surfaces of asphalt and con- CAUTION! crete.
- Page 164 ture can lead to sudden tire failure. The grade C corresponds to a level of perfor- mance, which all passenger vehicle tires must meet under the Federal Motor Ve- hicle Safety Standard No. 109. Grades B and A represent higher levels of perfor- mance on the laboratory test wheel, than the minimum required by law.
- Page 165 TECHNICAL SPECIFICATIONS TECHNICAL SPECIFICATIONS WHEEL AND TIRE TORQUE SPECIFICATIONS . .164 FLUID CAPACITIES ....165 Chassis.....167 Torque Specifications .
Page 166: Specifications
- Page 167 FLUID CAPACITIES U.S. Metric Fuel (Approximate) Front Wheel Drive (FWD) Models 20.5 Gallons 77.6 Liters All-Wheel Drive Models 21.1 Gallons 79.8 Liters Engine Oil With Filter 2.4L Engine (SAE 5W-20, API Certified) 4.5 Quarts 4.26 Liters 3.6L Engine (SAE 5W-20, API Certified) 6 Quarts 5.6 Liters Cooling System*...
- Page 168 FLUIDS AND LUBRICANTS Engine Component Fluid, Lubricant, or Genuine Part We recommend you use Mopar Antifreeze/Coolant 10 Year/150,000 Mile Engine Coolant Formula OAT (Organic Additive Technology). We recommend you use API Certified SAE 5W-20 Engine Oil, meeting the Engine Oil requirements of FCA Material Standard MS-6395 such as Mopar, Pennzoil, and Shell Helix.
- Page 169 Chassis Component Fluid, Lubricant, or Genuine Part Use only ATF+4 Automatic Transmission Fluid. Failure to use ATF+4 fluid may affect the function or performance of your Automatic Transmission transmission. We recommend Mopar ATF+4 fluid. Power Transfer Unit (PTU) We recommend you use Mopar Gear Lubricant 75W-90. Rear Drive Assembly (RDA) We recommend you use Mopar Gear Lubricant 75W-90.
- Page 170 MOPAR ACCESSORIES • In choosing Authentic Accessories you gain • For the full line of Authentic Dodge Accesso- far more than expressive style, premium pro- ries by Mopar, visit your local dealership or Authentic Accessories By Mopar tection, or extreme entertainment, you also online at mopar.com for U.S.
- Page 171 ELECTRONICS: • Park Assist • Mopar Web (Wi-Fi) • Electronic Vehicle Tracking System CARRIERS: • Hitch-Mount Bike Carrier • Roof Mount Bike Carrier • Roof Box Cargo Carrier • Roof Mount Ski and Snowboard Carrier • Roof Mount Water Sports Carrier •...
- Page 173 MULTIMEDIA MULTIMEDIA CYBERSECURITY ....172 USB Port ....186 Making A Phone Call .
- Page 174 CYBERSECURITY Your vehicle may be equipped with certain se- prove the usability and performance of your curity features to reduce the risk of unauthor- systems or to reduce the potential risk of unau- Your vehicle may be a connected vehicle and ized and unlawful access to vehicle systems and thorized and unlawful access to your vehicle may be equipped with both wired and wireless...
- Page 175 NOTE: Privacy of any wireless and wired communica- WARNING! tions cannot be assured. Third parties may un- • FCA or your dealer may contact you directly lawfully intercept information and private com- • It is not possible to know or to predict all of regarding software updates.
- Page 176 RADIO 4.3 & 4.3S Radio 4.3 & 4.3S At A Glance Radio 4.3 & 4.3S 1 — Radio: AM/FM/SIRIUS Satellite Radio (If Equipped) 2 — Status Bar 3 — Settings: Clock, Display, etc. 4 — Screen OFF/ON 5 — MORE: Uconnect Phone, Compass, Etc. 6 —...
- Page 177 Displaying The Time • The Audio Menu shows the following options Speed Adjust Volume for you to customize your audio settings: • Press the “Speed Adjust Volume” button on • If the time is not currently displayed at the top –...
- Page 178 Radio 4.3 & 4.3S Radio 4.3 & 4.3S 1 — Radio Station Presets 5 — Audio Settings 2 — View All Presets 6 — Direct Tune Radio Station 3 — Seek Up 7 — Radio Band 4 — Channel/Station Information 8 —...
- Page 179 • To access the Radio mode, push the RADIO Direct Tune Store Radio Presets Manually button on the upper left side of the faceplate. • Tune directly to a radio station by pressing the Your radio can store 12 total preset stations. “Tune”...
- Page 180 Media 4.3 & 4.3S Radio 4.3 & 4.3S 1 — Music Source 2 — More: Audio Settings And Shuffle 3 — Current Track Information 4 — Play/Pause 5 — Source: Disc, iPod, AUX Or Bluetooth 6 — Browse Music By: Folder, Artist, Playlist, Song, Album Or Genre...
- Page 181 • The iPod/CD/AUX controls are accessed by NOTE: pushing the PLAYER button on the faceplate Uconnect will usually automatically switch to to enter the Player main screen, then press the the appropriate mode when something is first “Source” button on the touchscreen and connected or inserted into the system.
- Page 182 UCONNECT 3/3 NAV WITH 8.4–INCH DISPLAY Uconnect 3/3 NAV At A Glance Radio 3 NAV 1 — Status Bar 6 — Climate Control Button 2 — Small Navigation Map (Uconnect 3 NAV) 7 — Controls Button 3 — More Settings Button 8 —...
- Page 183 Displaying The Time • If these features are not available, uncheck • Press the “+” or “ –” buttons on the touch- the “Sync” with GPS box. screen, or by pressing and dragging over the • If the time is not currently displayed on the level bar for each of the equalizer bands.
- Page 184 Radio 3/3 NAV Radio 3/3NAV 1 — Radio Station Presets 5 — Seek Down Button 2 — Toggle Presets 1–6 and 7–12 6 — Direct Tune To A Radio Station 3 — Radio Band Buttons 7 — Seek Up Button 4 —...
- Page 185 • To access the Radio mode, push the “Radio” • Press and hold either “Seek arrow” button on all 12 stations, press the “arrow” button on the the touchscreen for more than two seconds to button on the touchscreen at the lower left of touchscreen at the top right of the screen to bypass stations without stopping.
- Page 186 Media Models 3/3NAV Models 3/3NAV 1 — Music Source: Disc, iPod, SD Card, AUX Or Bluetooth 2 — Repeat Track 3 — Shuffle Music Tracks 4 — Music Track Information 5 — Songs In Queue 6 — Browse Music By: Folder, Artist, Playlist, Song, Album Or Genre...
- Page 187 UCONNECT SETTINGS • The iPod/USB, CD, Audio Jack, SD Card or • On the Uconnect 3/3 NAV radio, press the Bluetooth source is accessed by pressing the “More” button on the bottom of the touch- • The Radio 4.3/4.3 S and Uconnect 3/3 NAV “Player”...
- Page 188 STEERING WHEEL AUDIO Left Switch • The functions of the portable device are con- trolled using the device buttons. The volume CONTROLS • Push the switch up or down to search for the may be controlled using the radio or portable next listenable station.
- Page 189 VIDEO ENTERTAINMENT SYSTEM NOTE: SD Card (3/3 NAV Only) • When connecting your iPod device for the first (VES) • Play songs stored on an SD card inserted into time, the system may take several minutes to the SD card slot, located on the radio face- read your music, depending on the number of plate.
- Page 190 Operation Of The Remote Auxiliary Audio/Video Input Jacks Navigation Overview • The Aux jacks are located on the rear of the The remote control operates similarly to any Uconnect 3/3 NAV With 8.4–inch Display Radio center console. DVD remote you have used before and allows integrates Garmin’s consumer-friendly naviga- the rear seat passengers to change stations, tion into your vehicle.
- Page 191 Main Navigation Menu Main Navigation Menu Touchscreen 1 — Where To? Button 4 — Tools Button 2 — View Map Button 5 — Detour Button 3 — Settings Button 6 — Stop Button...
- Page 192 Acquiring Satellites Finding A Place By Spelling The Name Setting Or Changing Your Home Location • The GPS Satellite strength bars indicate the • From the Main Navigation Menu press • Press the “Nav” button on the touchscreen in strength of your satellite reception. “Where to?”...
- Page 193 Main Navigation Menu Main Navigation Menu Touchscreen 1 — Where To? Button 4 — Tools Button 2 — View Map Button 5 — Detour Button 3 — Settings Button 6 — Stop Button...
- Page 194 Acquiring Satellites Finding A Place By Spelling The Name • You may enter your address directly, use your current location as your home address, or • The GPS Satellite strength bars indicate the • From the Main Navigation Menu press choose from recently found locations.
- Page 195 Following Your Route Following Your Route 1 — Distance To Next Turn 6 — Press And Drag Map 2 — Current Location 7 — Your Location On The Map 3 — Zoom In Button 8 — Estimated Time Of Arrival 4 —...
- Page 196 • Your route is marked with a magenta line on NOTE: the map. If you depart from the original route, If the route you are currently taking is the only your route is recalculated. A speed limit icon reasonable option, the device might not calcu- could appear as you travel on major roadways.
- Page 197 UCONNECT PHONE NOTE: The Uconnect Phone requires a mobile phone Uconnect Phone (Bluetooth Hands Free equipped with the Bluetooth Hands-Free Pro- file, Version 1.0 or higher. For Uconnect cus- Calling) tomer support: U.S. residents visit • If the Uconnect Phone Button exists on UconnectPhone.com or call 1-877-855-8400.
- Page 198 • Uconnect Phone will display an “In progress” • If your phone asks you to accept a connection request from Uconnect, select “Yes.” If avail- screen while the system is connecting. able, check the box telling it not to ask again – Start Pairing Procedure On Mobile Phone that way your phone will automatically con- nect each time you start the vehicle.
- Page 199 Phone Menu Screen — Models 4.3 & 4.3S 1 — Redial Last Number 7 — Manage Paired Phones 2 — Phone Signal 8 — Conference Call 3 — Current Phone 9 — Direct Dial 4 — Phone Battery Level 10 — Recent Call List 5 —...
- Page 200 Phone Menu Screen — Models 3/3 NAV 1 — Favorite Phonebook Entries 8 — Manage Paired Phones 2 — Phone Battery Level 9 — SMS (text messaging) 3 — Current Phone 10 — Direct Dial 4 — Phone Signal 11 — Recent Call List 5 —...
- Page 201 Making A Phone Call Mute (Or Unmute) Microphone During Call • Favorite phonebook entries can be saved as Favorites for quicker access. Favorites are • During a call, press the “mute” button on the To begin a phone call using Uconnect Voice shown at the top of your main phone screen.
- Page 202 NOTE: 2. This device must accept any interference WARNING! To access help, press the Uconnect Phone received, including interference that may button on the steering wheel and say "help." cause undesired operation. • Any voice commanded system should be Press the display or push either used only in safe driving conditions follow- NOTE: button and say "cancel"...
- Page 203 you. If you ever wish to interrupt the system Common Voice Commands (Examples) SiriusXM Travel Link “Show fuel prices” while it lists options, press the Voice Com- “Show movie listings” Switch Modes “FM” mand button , listen for the BEEP, and “Show current “Satellite”...
- Page 204 Common Navigation Voice Commands • When the Voice Command system is ready to Navigation Voice Commands: be given a command, the green indicator is “Find Nearest Transit” • To access the navigation voice commands, visible in the right corner of the touchscreen. “Find Nearest Lodg- press the Uconnect Voice Command ing”...
- Page 205 WARNING! Any voice commanded system should be used only in safe driving conditions following applicable laws regarding phone use. Your attention should be focused on safely oper- ating the vehicle. Failure to do so may result in a collision causing you and others to be severely injured or killed.
- Page 207 CUSTOMER ASSISTANCE CUSTOMER ASSISTANCE IF YOU NEED ASSISTANCE ...206 Customer Assistance For The Hearing Or In The 50 United States And Washington, Speech Impaired (TDD/TTY)..206 D.C.
- Page 208 IF YOU NEED ASSISTANCE Any communication to the manufacturer's cus- In Mexico Contact tomer center should include the following infor- Av. Prolongacion Paseo de la Reforma, 1240 The manufacturer and its authorized dealer are mation: vitally interested in your satisfaction. We want Sante Fe C.P.
- Page 209 a TDD or a conventional teletypewriter (TTY) in The manufacturer will not stand behind any WARNING! the United States, can communicate with the service contract that is not the manufacturer's chemicals known to the State of California to manufacturer by dialing 1-800-380-CHRY. service contract.
- Page 210 Hotline toll Warranty Booklet. United States customers free 1-888-327-4236 may visit the Dodge Contact Us page at (TTY: 1-800-424-9153); or go to http:// www.dodge.com scroll to the bottom of the www.safercar.gov ; or write to: Administrator, page and select the “Contact Us” link, then select the “Owner’s Manual and Glove Com-...
- Page 211 INDEX Accessories ....168 Arming System (Security Alarm) ..15 Chart, Tire Sizing ....147 Mopar .
- Page 212 Customer Programmable Features ..185 Jump Starting ....132 Fog Lights ....28 Oil .
- Page 213 HomeLink (Garage Door Opener) ..47 Hood ....46 Service ....126 Hood Prop.
- Page 214 New Vehicle Break-In Period ..110 Sunroof ....44 Reporting Safety Defects ..207 Power Steering Fluid .
- Page 215 Front Seat ... .71, 72, 74 Sirius Travel Link ....194 Tire And Loading Information Placard . . .150 Inspection .
- Page 216 Towing .....116 Underhood Fuses ....130 Washers, Windshield ...29, 30 Disabled Vehicle .
- Page 219 Thi s gui de has been pr epar ed t o hel p y ou get qui ckl y acquai nt ed wi t h y our new Dodge br and vehi cl e and t o pr ovi de D R I V I N G A N D A L C O H O L a conveni ent r ef er ence sour ce f or com m on quest i ons.
- Page 220 © 20 17 F CA US LLC . ALL RI G HTS R ESERVED. DODGE I S A REGI STER ED TRADEMAR K O F FCA US LLC .
This manual is also suitable for:
Rename the bookmark, delete bookmark, delete from my manuals, upload manual.
How to Start Dodge Journey With Manual Key: Unlock the Secrets
If you are a Dodge Journey owner, you may wonder how to start your vehicle using the manual key. While most vehicles nowadays come with keyless entry and push-button start systems, it’s always good to know how to start your car using the manual key in case of emergencies or if the battery in your key fob dies.
Step-by-Step Guide
Starting your Dodge Journey with a manual key is a relatively simple process. Follow these steps:
- Locate the key lock cylinder on the driver’s side door handle. It typically has a small key icon or a keyhole symbol.
- Insert your manual key into the keyhole and turn it clockwise to unlock the door.
- Once the door is unlocked, open it and slide into the driver’s seat.
- Insert the manual key into the ignition switch.
- Turn the key clockwise to start the engine. You may need to apply slight pressure while turning the key.
That’s it! Your Dodge Journey should now start using the manual key.
Troubleshooting Tips
If you are having trouble starting your Dodge Journey with the manual key, here are a few troubleshooting tips:
Benefits of Starting Your Vehicle with a Manual Key
While keyless entry and push-button start systems offer convenience, there are a few benefits to starting your vehicle with a manual key:
- Reliability: Manual keys don’t rely on batteries or sophisticated electronic systems, so you can always count on them to start your vehicle.
- Emergency Preparedness: In case of a dead battery in your key fob or a malfunctioning keyless entry system, knowing how to start your vehicle with a manual key can be invaluable.
- Simple and Straightforward: Using a manual key to start your vehicle is a straightforward process that doesn’t require any technical knowledge or expertise.
Next time you find yourself in a situation where you need to start your Dodge Journey with a manual key, you’ll be well-prepared and confident in your ability to get your vehicle up and running.
Frequently Asked Questions For How To Start Dodge Journey With Manual Key: Unlock The Secrets
How do i start dodge journey with a manual key.
To start a Dodge Journey with a manual key, insert the key into the ignition cylinder and turn it clockwise.
Where Is The Ignition Cylinder Located In Dodge Journey?
The ignition cylinder in a Dodge Journey is generally located on the right side of the steering column.
Can I Start Dodge Journey Without A Key Fob?
Yes, you can start a Dodge Journey without a key fob by using the manual key that comes with the vehicle.
What Should I Do If My Dodge Journey’s Manual Key Doesn’t Turn?
If your Dodge Journey’s manual key doesn’t turn, try wiggling the steering wheel back and forth while turning the key.
Related posts:
- How to Start Toyota Camry With Manual Key: Unlock Hidden Potential
- How to Start Honda Civic With Manual Key: Easy Steps for Quick Ignition
- Unlock the Mystery: Where is the Key Hole in a Dodge Journey?
- How to Easily Unlock Dodge Journey With Key Inside
Leave a Comment Cancel reply
Save my name, email, and website in this browser for the next time I comment.
Dodge Journey: Key Stuck in Ignition → Diagnosis

There are a few easy to fix reasons why your Dodge Journey’s key might get stuck in the ignition. It’s often easy to unstick the key. Whatever you do, don’t start trying to rip it out of the ignition. That can cause bigger problems.
This article is written with the assumption that your key is stuck right now and that you are looking to get it out.

There might be several factors contributing to your key getting stuck, including the ignition lock itself, a worn-out key, or even a misaligned transmission.
By diagnosing the root cause, you can determine the most effective way to address the issue and prevent it from recurring. In addition, knowing when to call a professional for assistance will save you time and effort, ensuring your vehicle remains secure and functional.
Key Takeaways
- Understand the common reasons behind a stuck key in your Dodge Journey’s ignition
- Learn practical solutions and preventive measures to avoid this issue in the future
- Know when to seek professional help for a stuck key to ensure your vehicle’s security
Causes of a Stuck Key

One common cause of a stuck key in the Dodge Journey is the key wearing out over time.
The teeth on the key may become worn, causing the key to lose its proper alignment inside the ignition cylinder. Also, the key can bend, which will cause it to bind in the cylinder.
Excessive usage or rough handling can weaken the key, increasing the likelihood of it getting stuck. Inspect your key for signs of wear and consider replacing it if necessary.
Damaged Ignition Cylinder
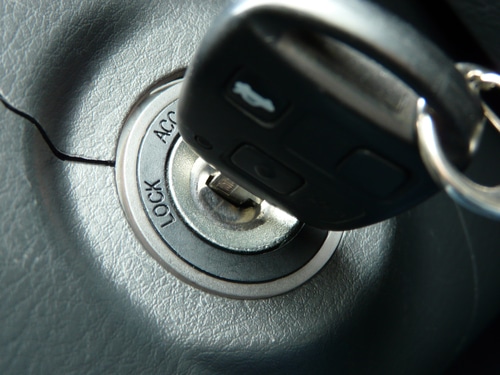
Another possible cause is a damaged ignition cylinder. The ignition cylinder is a component that facilitates the engagement and disengagement of the vehicle’s engine.
If your Journey’s key is difficult to insert or remove, or if you struggle to turn the key, it may be a sign that the ignition cylinder is damaged. In such cases, seek the assistance of a professional mechanic to diagnose and repair the issue.
Steering Wheel Lock
Lastly, the steering wheel lock is a safety feature designed to prevent the vehicle from being moved without the key.
When the steering wheel is locked, it might apply pressure on the ignition cylinder, making it difficult to release the key. If you encounter this issue, try gently turning the steering wheel from side to side while attempting to remove the key.
This process should ease the tension on the ignition cylinder and allow the key to be released.
Solutions to Remove a Stuck Key
Jiggling the key.
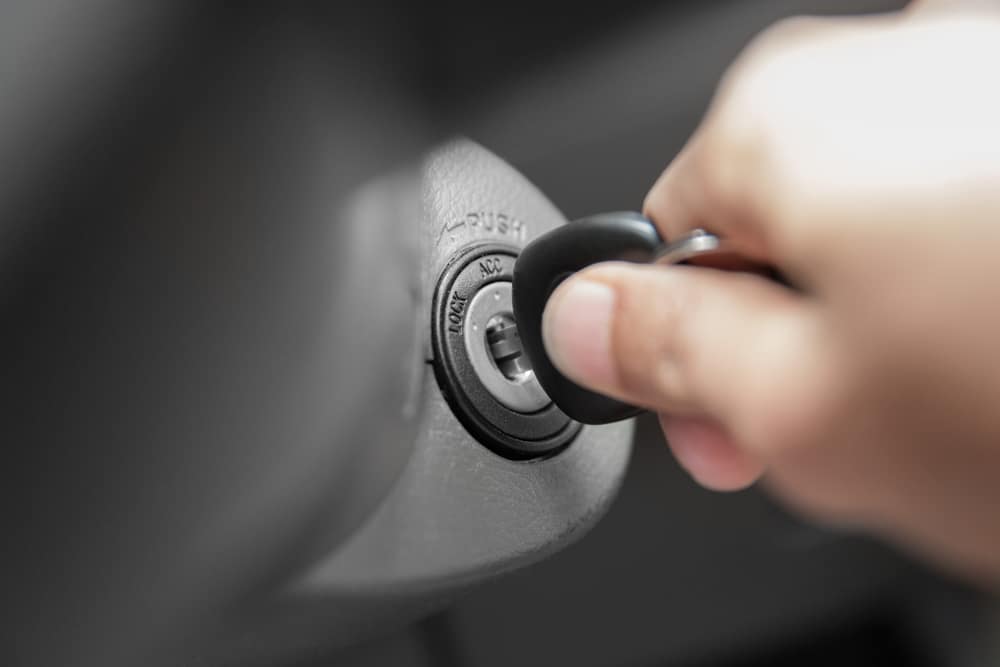
Sometimes, a simple solution to a stuck key is gently jiggling it. Apply slight pressure to the key while carefully moving it back and forth in the ignition. Be cautious not to forcefully twist or bend the key, as this can cause it to break.
Adjusting the Steering Wheel
Your Dodge Journey may be equipped with a steering lock system. In some cases, a misaligned steering wheel can bind the ignition switch, causing the key to be stuck. Follow these steps to unlock your steering wheel:
- Apply light pressure to the key : While keeping light pressure on the key in the ignition (as if you’re trying to turn it), simultaneously…
- Move the steering wheel : Gently turn the steering wheel left and right until you find a point where it unlocks and frees the key.
It may require a few attempts, but this process can often solve the issue with the stuck key.
Key Extraction Tools
If the previous methods don’t work, you may need to resort to using key extraction tools. These specialized tools are designed to safely remove a key without causing damage to your ignition. Some popular key extraction tools include:
- Broken key extractors : These tools are specifically designed to grip and remove broken or stuck keys. They usually have a narrow, hooked tip that can be inserted alongside the key, allowing you to pull it out.
- Pliers : While not specifically designed for this purpose, needle-nose pliers can sometimes be used to grip and carefully remove a stuck key. Be cautious not to apply too much force, as it could cause further damage to the ignition.
Seek the help of a professional locksmith if you’re unfamiliar with using key extraction tools.
Preventive Measures
To avoid your Dodge Journey key getting stuck in the ignition, taking certain preventive measures is important. In this section, we will discuss the following sub-sections: Regular Key Inspection, Proper Key Usage, and Lubrication.
Regular Key Inspection
Inspect your key regularly to detect any signs of wear, bending, or other deformities. If you notice any issues, it’s time to replace the key. Using a damaged key can lead to it becoming stuck in the ignition, or, in worst-case scenarios, breaking off inside the ignition.
Proper Key Usage
To prevent your key from getting stuck, be gentle while inserting and turning the key in the ignition. Avoid applying excessive force when turning the key, as this can cause damage to the ignition cylinder and lead to issues such as the key getting stuck.
Furthermore, be mindful of any debris or foreign objects in the keyhole. If you notice anything obstructing the keyhole, carefully remove the obstruction before inserting your key.
Lubrication
Lubricating the ignition lock cylinder can help keep the key from getting stuck. It is recommended to use a graphite-based lubricant designed specifically for locks.
Apply a small amount of lubricant to your key, insert it into the ignition lock cylinder, and turn it a few times to ensure even distribution. This will help maintain the smooth operation of the ignition system and prevent the key from getting stuck.
Remember to apply the lubricant sparingly and avoid using oil-based or sticky lubricants, as they can attract dirt and cause more issues in the long run.
When to Call a Professional
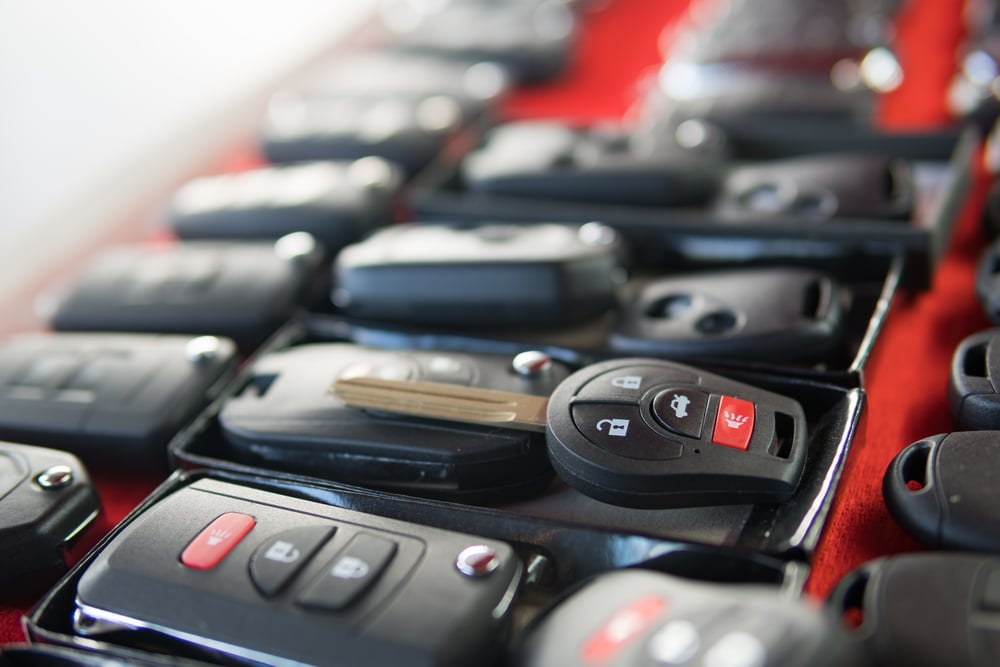
In some cases, when your Dodge Journey key is stuck in the ignition, it can be resolved with simple troubleshooting. However, there are situations where professional assistance might be necessary. Here are a few scenarios when you should consider calling a professional:
- Worn-out key: If your key is no longer effectively engaging the ignition lock, it might be time to replace it. A professional locksmith can create a new key that fits properly, ensuring smooth operation in the future.
- Faulty ignition lock cylinder: If the issue persists despite having a new or well-maintained key, the problem might lie within the ignition lock cylinder. A skilled locksmith or mechanic can assess the situation and determine if the cylinder needs to be replaced.
- Damaged or misaligned steering column: If the steering column or related components have been damaged or misaligned, this can make it difficult to remove the key. In this case, an experienced mechanic would be best suited to diagnose and address the issue.
- Electrical issues: Modern cars, including the Dodge Journey, have complex electrical systems that could contribute to the problem. If you suspect an electrical issue, such as a malfunctioning key interlock solenoid, it’s best to consult a qualified technician. They can perform necessary diagnostics and repairs to get your vehicle back in working order.
In any of these instances, it’s essential to prioritize safety and avoid attempting repairs beyond your expertise. Hiring a professional can save you time, effort, and potential further damage to your vehicle.
Frequently Asked Questions
How can i remove a stuck key from the ignition in my dodge journey.
First, try to gently turn the steering wheel left and right while attempting to turn the key, as the steering lock might be engaged. If this doesn’t work, ensure that the gear selector is in the Park position. Sometimes, jiggling the key while turning the steering wheel can help as well.
What are the reasons for a key not coming out of the ignition?
Some common reasons for a key getting stuck include a locked steering wheel, the gear selector not being in Park, a worn-out key, a problem with the release button, a bad ignition lock, or a low battery.
How can I fix a key stuck in the ACC position?
Ensure your vehicle is in Park and try turning the key while applying pressure on the brake pedal. If the key remains stuck, try disconnecting the battery for a few minutes and reconnecting it. This might reset the system and allow the key to return to the off position.
What should I do if my key won’t turn in the ignition switch?
First, make sure your vehicle is in Park and that the steering wheel is not locked. If the key still doesn’t turn, try using a spare key, as the original might be worn-out or bent. If the problem persists, you might need to consult a mechanic or replace the ignition switch.
Donetsk and Luhansk: What you should know about the ‘republics’
Who has followed Russia in recognising the controversial, Moscow-backed statelets in Ukraine? And what is life like there?

Kyiv, Ukraine – Moscow-backed separatists have controlled the southeastern Ukrainian regions of Donetsk and Luhansk, known collectively as Donbas, for almost eight years.
But Russian President Vladimir Putin recognised them only on Monday, paving the way for the official presence of Russian troops in the rebel-controlled areas that occupy about a third of Donetsk and Luhansk.
Keep reading
Why russia recognised separatist-held regions in east ukraine, syria backs russian recognition of east ukraine breakaway regions, stocks slide, oil jumps as russia orders troops to ukraine region, ukraine crisis: asia braces for economic fallout.
So far, only Cuba, Venezuela, Nicaragua and Syria have joined Putin in recognising Donetsk and Luhansk – along with breakaway Georgian provinces of South Ossetia and Abkhazia. They all did so also on Monday.
The central question is whether Russia would recognise them in their current borders. Should it decide to help the rebels “restore” their statelets to the original borders, it may spell a large-scale war between Moscow and Kyiv.
At the moment, Russia will recognise “the borders, where the leadership of the DNR and the LNR are executing their authority,” Deputy Foreign Minister Andrey Rudenko told the Interfax News Agency on Tuesday.
But the foreign ministry also said on Tuesday that the issue of the borders is yet to be resolved.
While Ukraine and the West try to avoid war, other questions loom.
What are the roots of the region’s separatism? What has kept these areas alive since 2014? And what is their future?

Neo-Stalinism
A 13.5 metre-tall statue of Soviet founder Vladimir Lenin still dominates the main square in Donetsk, the capital of the eponymous breakaway region in southeastern Ukraine.
And the constitution adopted by Lenin’s successor, Josef Stalin, has been restored by the Moscow-backed separatist leaders of Donetsk and neighbouring Luhansk after they broke away from the central government in 2014.
This constitution prescribes the death penalty for a number of crimes, making the separatist “People’s Republics” – and authoritarian Belarus nearby – Europe’s only homes to capital punishment.
After almost eight years of existence, the “republics” are understood to have evolved into totalitarian, North Korea-like statelets.
It is near impossible for foreigners to enter the areas. Ukrainians can only visit if they have relatives in Donetsk and Luhansk, and would have to cross into Russia first, which takes about 30 hours and costs $100 – a journey that also involves bribing officials at times. Residents need a Soviet-era residency registration.
In the statelets, secret police and “loyal” residents monitor every word, phone call and text message.
Dissidents or businessmen who refuse to “donate” their assets to the “needs of the People’s Republic” have been thrown in “cellars”, or dozens of makeshift concentration camps, without trial.
“It looks like the 1930s in the Soviet Union, a classic gulag,” Stanislav Aseyev, a publicist who was kidnapped in 2017 in Donetsk and was sentenced by a separatist “court” to 15 years in jail for “espionage”, told Al Jazeera.
For almost two years, he was incarcerated and tortured in these “cellars” until separatists swapped him and dozens of other prisoners in 2017.
Thousands of others were tortured and abused in the “cellars”, according to rights groups and witnesses. The grave human rights abuses make Donetsk and Luhansk far worse than today’s Russia, an international human rights advocate said.
“The cellars where prisoners are held in Donetsk, and the widespread use of torture, are among the most obvious human rights issues,” said Ivar Dale, a senior policy adviser with the Norwegian Helsinki Committee, a human rights watchdog group.
But there are much wider problems such as civil and political rights, he said.
“You could say that the political repression in Russia is doubly felt in Donetsk and Luhansk and other areas effectively under control of the Putin regime,” Dale told Al Jazeera.
Rust-belt ruins
These tendencies have gone hand in hand with economic degradation.
The living standards are “many times, if not dozens of times worse than in pre-war 2013”, said Aseyev, 32, who now lives in Kyiv and has published a novel about the events in Donetsk.
This regress looks even more staggering considering Donetsk’s and Luhansk’s not-so-ancient history. The cities were founded by two Brits.

Englishman Charles Gascoigne built a metal factory in what is now Luhansk in 1795, shortly after czarist Russia annexed Crimea and eastern Ukraine from the Crimean Khanate, a mostly-Muslim vassal of Ottoman Turkey.
Decades later, in 1869, Welshman John Hughes started a steel plant and a coal mine in what is now Donetsk, and the city was named after him – Hughesovka or Yuzovka – until the Soviet era.
The birth and rapid growth of both cities followed the czarist government’s drive to develop the immense coal and iron ore deposits of what is now eastern Ukraine.
Communist Moscow further spurred the region’s development, and tens of thousands of ethnic Russians settled there, making urban areas almost exclusively Russian-speaking.
Coal and mines grew deeper next to hillocks made of spent ore, and foundries, chemical and power plants dotted the region.
The political heyday of Donetsk began in 2010, when its native Viktor Yanukovych became Ukraine’s president – and brought cohorts of his cronies to Kyiv.
They tried to wrestle control of Ukraine’s politics and economy – but triggered months-long protests that began in November 2013 and ended in February 2014, when the Ukrainian parliament voted to remove Yanukovych from office.
The protests are known in Ukraine as the Revolution of Dignity – but Russian President Vladimir Putin still calls them a “coup”.
‘Russian spring’
In the czarist era, the region was known as Novorossiya – or New Russia – and the Kremlin would use the name in 2014 as it proclaimed the “Russian Spring” or “liberation” of Russian-speaking regions in eastern and southern Ukraine.
But pro-Russian rallies and uprisings in Kharkiv, Ukraine’s second-largest city, and Odesa, its largest seaport on the Black Sea, failed.
However, thousands of Russian volunteers flocked to Donetsk and Luhansk to aid separatist militias – while many locals were ecstatic about the “Russian Spring”.
“Putin will come and restore order here,” one of their supporters, a rotund minibus driver named Valerii, told this reporter in April 2014 in Donetsk.
But four months later, after the separatists tried to confiscate his minibus, he locked his apartment, loaded the bus with his most valuable belongings, and left for Kyiv.

‘Price tag’
Even though Ukraine barred any economic ties to the separatist regions, they still exist – and even involve top politicians.
Pro-Western President Petro Poroshenko, who came to power after the Revolution of Dignity, admitted that he channeled government funds worth tens of millions of dollars in exchange for Donetsk coal in the winter of 2014-2015 because otherwise “half of Ukraine could have frozen”.
But Russia still had to bankroll the separatist provinces spending billions of dollars a year.
So, what are Moscow’s economic goals in Donbas?
“Very simple – to lower the price tag of maintaining the occupied territories,” Aleksey Kusch, a Kyiv-based analyst, told Al Jazeera.
To achieve that, Russia may want to remove the middlemen who pocketed the lion’s share of profits from the export of coal and steel and the delivery of humanitarian aid that was immediately resold on the black market.
“They kept up to 70 percent of the profits,” Kushch said.
IMAGES
VIDEO
COMMENTS
2020 Models. Turn the fob over to reveal the latch located at the TOP BACK of the fob. Slide the latch to the side, then REMOVE the key. Use the key to UNLOCK the vehicle door. Place the key fob on the START button, PUSH in, and press the BRAKE to start the vehicle. *Although the battery in the fob is dead, the vehicle will, in fact, recognize ...
The Dodge Journey key f... A video tutorial on how to unlock and open a 2011 - 2020 Dodge Journey that has a dead battery or remote key fob that is no working. The Dodge Journey key f...
But the remote key can also stop working due to worn buttons, poor battery contact, water damage, defective key fob, receiver module issues, signal interference, dead 12 volt battery, and unpaired key requiring reprogramming. 1. Dead battery in key fob. Dead battery is the leading cause of key fob not working in Journey.
The "Key Not Detected" on your Dodge Journey is a warning sign often associated with issues with the key fob. It will normally pop up when the driver attempts ... Dodge Ram 1500 Fuel Filter Location: A Handy Guide. Dodge Ram 1500 Starter Solenoid Location: Quick Guide. Dodge Ram 1500 Front Parking Sensor Malfunction: Quick Fix Guide ...
Pre-2011 Dodge Journey Models. If you own a Dodge Journey model manufactured before 2011, you will find the external key hole on the driver's side front door handle. It is a traditional key hole and is conveniently placed for easy access. To unlock or lock the vehicle, simply insert your key and turn it clockwise or counterclockwise accordingly.
If the key fob is not working due to a glitch in the keyless entry system, it may be possible to restore the functionality by resetting the keyless entry system in your Journey. There isn't any button or option to reset the keyless entry system in Journey, but you can reboot all the on-board computers by disconnecting the 12 volt battery for ...
View and Download Dodge JOURNEY 2019 user manual online. JOURNEY 2019 automobile pdf manual download. ... To remove the emergency key, slide the me- KEYS chanical latch on the back of the key fob side- ways with your thumb and then pull the key out Key Fob with your other hand. ... The rear window wiper/washer control is located If the vehicle ...
Need help? We will connect you with an independent locksmith near you 24/7: 833-216-4646Have you lost your Dodge Journey key? Do you need a replacement? Or d...
The Remote Keyless Entry (RKE) key fob and an emer-gency key, which stores in the rear of the key fob. The emergency key allows for entry into the vehicle should the battery in the vehicle or the key fob go dead. The emergency key is also for locking the glove compartment. You can keep the emergency key with you when valet parking.
View and Download Dodge Journey 2018 user manual online. Journey 2018 automobile pdf manual download. ... KEYS To remove the emergency key, slide the me- chanical latch on the back of the key fob side- Key Fob ways with your thumb and then pull the key out with your other hand. ... Push the washer knob, located on the end of the The rear window ...
See how to replace the battery in your 2011 - 2020 #Dodge #Journey #key fob keyless entry remote.FCCID: M3N-40821302 - Order Here: https://bit.ly/2TSOc67BATT...
Step 2: Turn the Ignition On. You should still be able to get your Journey to start by placing the key fob as close to the button as you can while pushing it. Use the keyfob itself to push the start button. Even with a dead battery, the antennae in the ignition module should still pick up the transponder. If you would like a demonstration ...
having to push the key fob lock or unlock buttons, as well as starting and stopping the vehicle with the push of a button. To Unlock From The Driver Or Passenger Side With a valid Keyless Enter-N-Go key fob located outside the vehicle and within 5 ft (1.5 m) of the driver or passenger side door handle, grab either
1. Dead Battery. The most common reason a key fob isn't working is that the battery has died and needs to be replaced . Some vehicles will display a warning message that the key fob battery is about to die. Depending on your Dodge Journey's model year, it may or may not warn you. To replace your Journey's key fob battery, you'll have to ...
Follow these steps: Locate the key lock cylinder on the driver's side door handle. It typically has a small key icon or a keyhole symbol. Insert your manual key into the keyhole and turn it clockwise to unlock the door. Once the door is unlocked, open it and slide into the driver's seat. Insert the manual key into the ignition switch.
One common cause of a stuck key in the Dodge Journey is the key wearing out over time. The teeth on the key may become worn, causing the key to lose its proper alignment inside the ignition cylinder. Also, the key can bend, which will cause it to bind in the cylinder. Excessive usage or rough handling can weaken the key, increasing the ...
/ We're is ignition key hole located.location of ignition. We're is ignition key hole located.location of ignition. Report; Follow; Asked by GuruG39C8 Sep 02, 2020 at 06:02 AM about the 2011 Dodge Journey Crew AWD. Question type: General. 1 Answer. ... 2017 Dodge Journey Key Fob 3 Answers.
Location: Eastern Ukraine, Ukraine, Eastern Europe, Europe; View on OpenStreetMap; Latitude of center. 49.2725° or 49° 16' 21" north. Longitude of center. 38.915° or 38° 54' 54" east. Population. 2,100,000. Elevation. 59 metres (194 feet) OpenStreetMap ID. node 683681613. OpenStreetMap Feature. place=state. GeoNames ID.
2018-2020 Dodge Journey proximity programming! Both locations are highlighted via the photo, and Tips & Hints vehicle selection screen, and included in MyKey...
Ukrainians can only visit if they have relatives in Donetsk and Luhansk, and would have to cross into Russia first, which takes about 30 hours and costs $100 - a journey that also involves ...
Type: City with 415,000 residents. Description: city and administrative center of Luhansk Oblast, Ukraine. Categories: city of regional significance of Ukraine, city in Ukraine and locality. Location: Luhansk Raion, Luhansk Oblast, Eastern Ukraine, Ukraine, Eastern Europe, Europe. View on OpenStreetMap. Latitude. 48.5717° or 48° 34' 18 ...
DODGE JOURNEY KEYLESS ENTRY ANTENNA LOCATION PASSIVE ENTRY. FIAT FREEMONTIn this video we will show you how to remove or replace keyless entry antenna on Do...
Location: Sievierodonetsk Raion, Luhansk Oblast, Eastern Ukraine, Ukraine, Eastern Europe, Europe; View on OpenStreetMap; Latitude. 49.04632° or 49° 2' 47" north. Longitude. 38.21785° or 38° 13' 4" east. Population. 20,100. ... Every day is a journey, and the journey itself is home.