- Skip to primary navigation
- Skip to main content
- Skip to primary sidebar
- SEWING TUTORIALS
- FREE SEWING PATTERNS
- CROCHET TUTORIALS
- FREE CROCHET PATTERNS
- OTHER CRAFTS

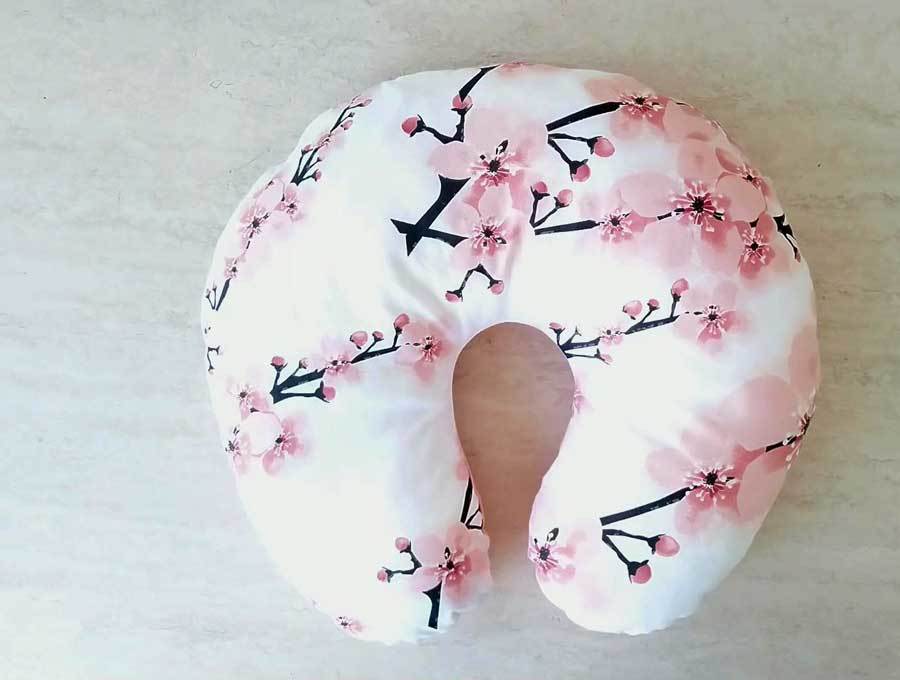
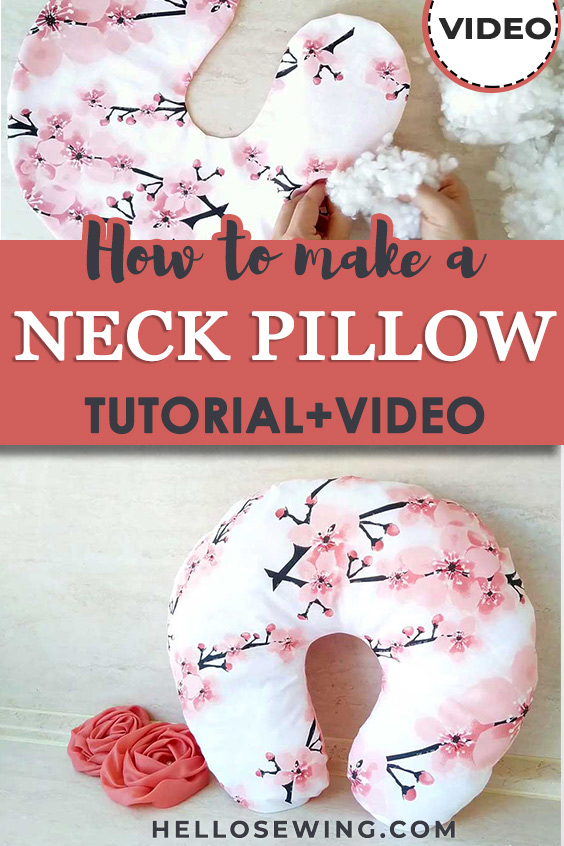
DIY Travel Pillow {Neck Pillow} - Free Pattern
Modified: Mar 1, 2023 by Treasurie
Are you planning a plane trip or long car ride? Make yourself a soft, comfortable DIY travel pillow to make your journey enjoyable and memorable. These neck pillows can be made in under 30 minutes and are a great beginner sewing project. DIY travel pillows are great to give for gifts and can be made in colorful fabrics that coordinate with luggage.

DIY Travel Pillow - Supplies
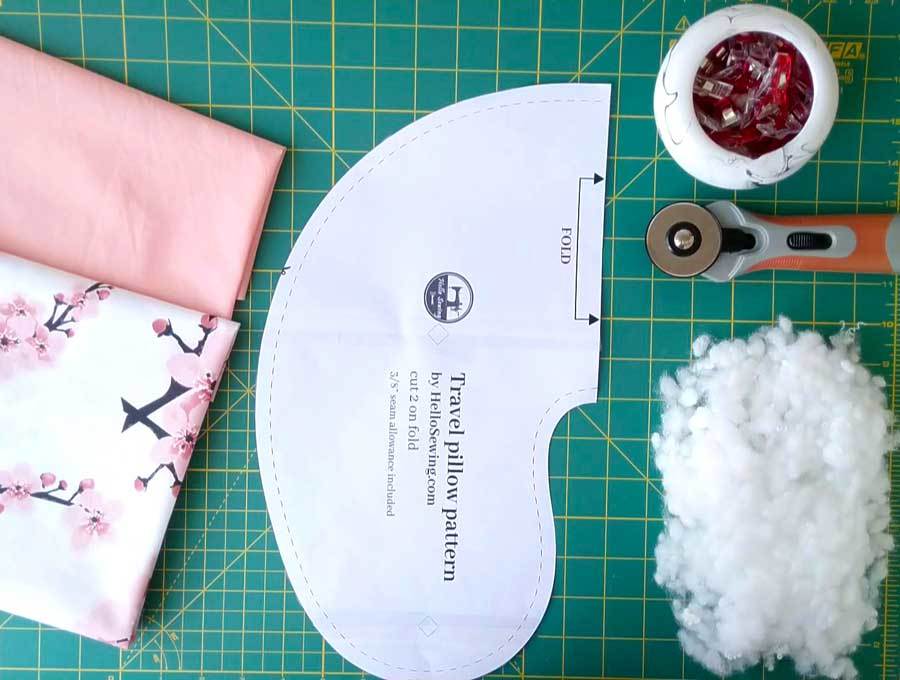
- FABRIC - ½ yard (0.45m) of cotton fabric - Choose a soft fabric that will breathe and not make you sweat. I used a soft quilting cotton. Since this will be next to your face, make sure you prewash the fabric before you start sewing. This will eliminate shrinkage and remove any chemicals the manufacturer may have added.
- STUFFING - Polyester stuffing is best. This is the kind you use for stuffed toys.
- SEWING MACHINE
- NEEDLE - Hand needle and thread
- PATTERN - Your DIY travel pillow pattern. Download the free pattern . (Link will open in a new window). Just trim the boxes and stick the 2 pages together.
>> Download the free pattern
Table of Contents

DIY Travel Pillow - The Video
Hooray! There is a video to go with this tutorial. Like all my videos, it is just a few minutes long, so grab a piece of chocolate and relax for a short while. Don't forget to subscribe to my YouTube channel for more weekly videos.
>> PRESS PLAY BELOW
DIY Travel Pillow - Instructions
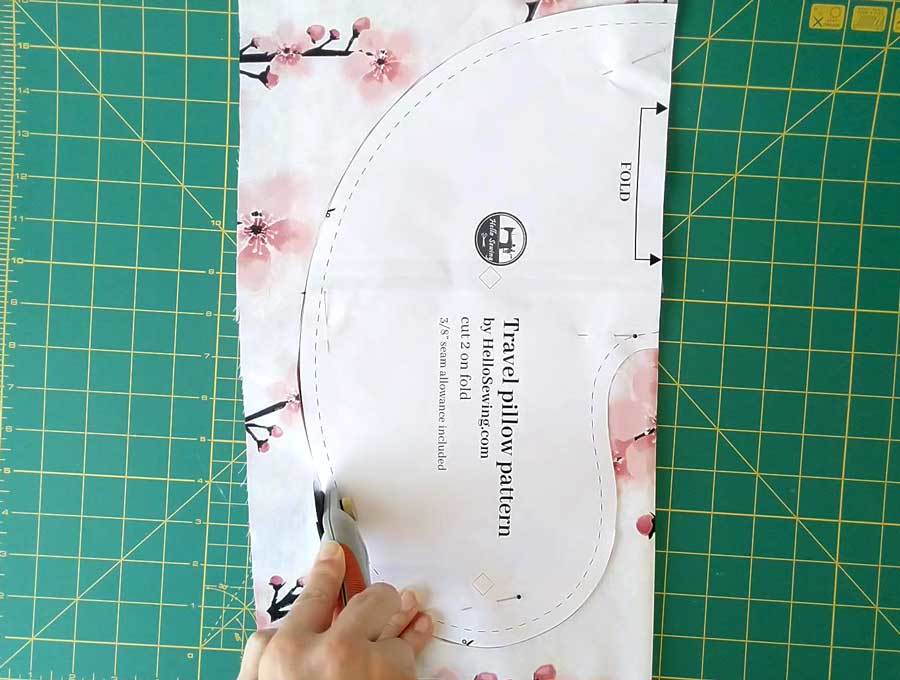
Step 1 - cut fabric.
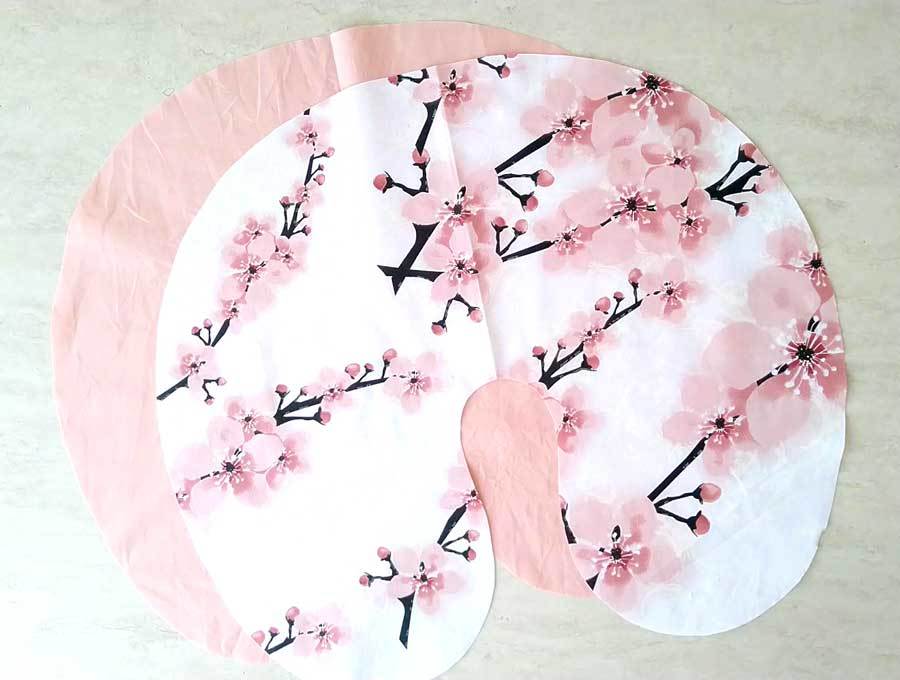
Place your pattern on the fold of your fabric and cut 2 pieces. One will be for the front and the other for the back. If you have larger scrap pieces use one color for the front and another for the back
Step 2 - Stitch
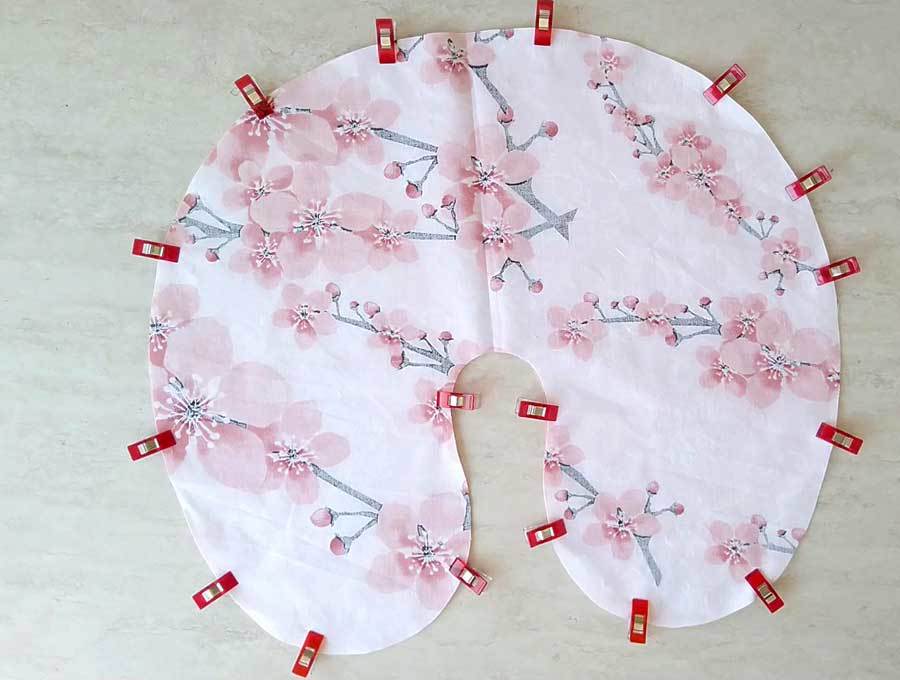
Put the fabric pieces with right sides together and stitch all the way around, leaving a 1 ½ inch (4cm) gap on the outside as shown. Use smaller straight stitches. I recommend using a 2.0 length. If you are new to sewing curves then read my article >> Sewing Curves

Step 3 - Clip and Turn
Clip the curves, leaving the gap unclipped. Turn your DIY travel pillow to the right side through the gap.
Further Reading: Sewing Clipping

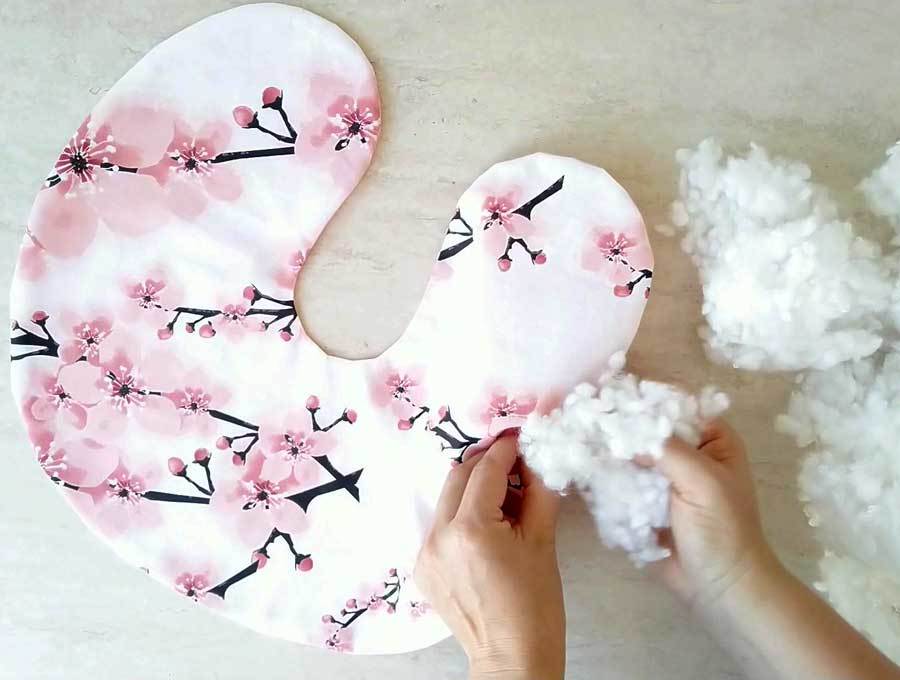
Step 4 - Stuffing
Give your pillow a good press and start stuffing. I made mine fairly hard but you can stuff it as much or little as you find comfortable. Keep in mind, the stuffing will squash down once you put your head on it.
Step 5 - Stitch Gap
Close the gap with an invisible ladder stitch . This stitch goes through the fold and if you use a matching color thread, it will almost be unnoticeable.
Further Reading: How to Sew an Invisible Stitch

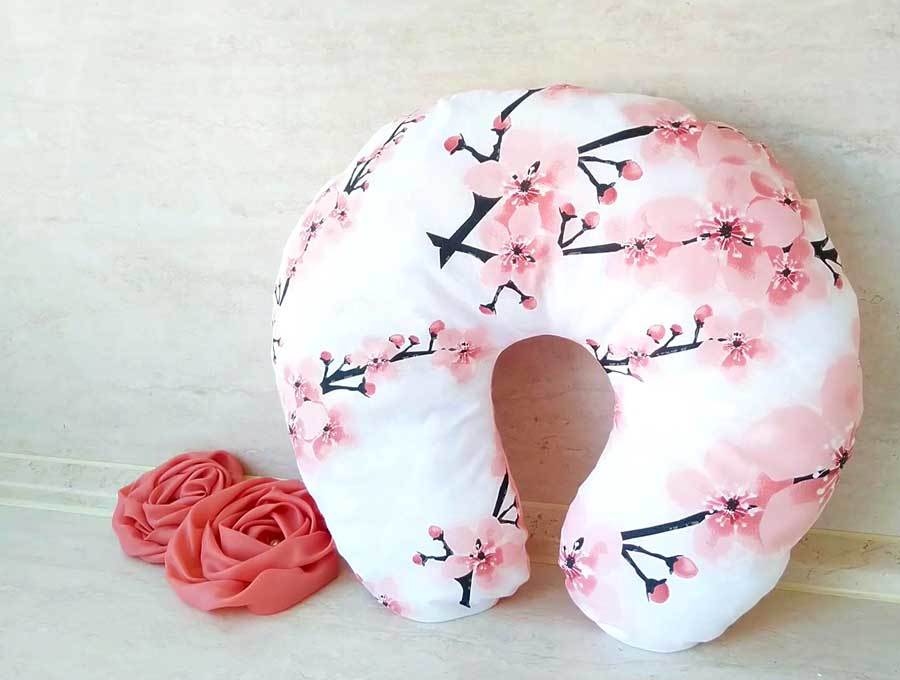
DIY Travel Pillow - In Conclusion
Your DIY travel pillow is all ready for a trip! I hope you are going somewhere exciting and have an amazing time.

More Pillow Tutorials
If you enjoyed this DIY travel pillow tutorial, you might like to sew some more pillows and cushions. Transform your house with some bright fabrics.
- Pillowcase Pattern
- How to Make A Pillowcase (with border)
- How to Make a Cushion Cover – Envelope Style
- Make a Cushion Cover with Piping
- Zippered Cushion Cover
- DIY Neck Pillow
- DIY Star Pillow
- Pom Pom Pillows
- Patchwork Cushion
- Reading Pillow Pattern
- Pillow Patterns
- DIY Christmas Pillows

DIY Travel Pillow
- Sewing Basics Sewing machine, needle, thread, scissors
- Fabric ½ yard (0.45m)
- Polyester Stuffing
Instructions

More Free Sewing Patterns & Tutorials

Reader Interactions
April 05, 2024 at 6:42 pm
Thank you for this pattern. I use a pillow this shape as my bed pillow. It fits my short neck and small person shoulders best. My ear is not crushed nor does my face get pillow wrinkles. It just cradles my head. It is filled with polyester fiberfil that doesn't clump, ever. It was purchased, and having a pattern without having to create my own is so nice. I'll be filling the new one with polyester fiberfil that doesn't clump as well. Perhaps I'll pack it slightly firmer than current to see if the slight tweak will be even better.
November 20, 2023 at 2:04 am
Thank you for this pattern! I used a zipper so I can stuff it with a few clothing items to 'carry on' the plane so I could have them easily accessible.
March 12, 2023 at 11:27 pm
Hi Beth, the gap works anywhere. I did it on the side as the seam is a little straighter so easier to close up at the end. Thanks for reading.
March 07, 2023 at 5:02 pm
I'm in the process of making a neck pillow using your pattern. Thanks for the excellent instructions. I have a question. Is there any reason not to make the closure spot at the back of the pattern instead of on the side? I'm thinking that it might be easier to stuff from the back as well as easier sewing it closed since it seems like the curve is a bit flatter at the back. Your thoughts? Again thanks for making the pattern available and for the detailed instructions.
February 03, 2023 at 6:43 pm
I just made this pillow - ultra easy! The stuffing was the biggest portion of the half hour duration! Lol! Thank-you for the pattern! Ooh! And I put a fabric loop on the back part so I can hook it on the tv tray latch on the plane 😉 or on a carabiner for on my carry on.
Violet Raven
December 29, 2022 at 7:35 pm
I made this for my grandma for Christmas, and she absolutely loved it!!
March 01, 2021 at 3:16 am
You can print the pattern and scale it down on your printer. Try 80% reduction.
February 12, 2021 at 8:32 am
Thank you for this pattern and tutorial! Do you think you'll have a pattern for child size anytime soon?
December 20, 2020 at 3:41 am
Hi Beverly, there is a link in the article above for the printable pdf. Thanks for reading.
Beverly Comley
December 18, 2020 at 9:41 pm
how do i get your pattern
September 14, 2020 at 9:44 pm
It is 3/8 inch (1cm) or the dotted line on the pattern
Stacey jeansonne
September 14, 2020 at 9:41 pm
Could you please tell me the seam allowance? Thank you
August 16, 2020 at 10:19 pm
I used fabric of dogs in sweaters, very cute!
August 16, 2020 at 10:17 pm
This is very cute! I am planning to make them for my family as Christmas presents. However, thick thread will work much better than thin.
November 14, 2019 at 7:59 pm
I'm sure they will love that you made it for them.
November 14, 2019 at 3:02 pm
My grandchildren often travel to visit us. I wanted to give them a personalized DIY gift to welcome them. I hope they will enjoy the pillows on the trip back. Thank you for the pattern and the video..
November 04, 2019 at 7:26 pm
Hi Diana, I appreciate the suggestion. I'll look into that.
November 03, 2019 at 11:00 pm
I’m not able to print this from my phone. If you could add a print button it would greatly appreciated.
nanawhatsnanamakingcom
June 13, 2019 at 2:06 pm
Thank you so much for sharing this. It is awesome which is why I featured it in my 10 awesome travel accessories post which you can check out here https://whatsnanamaking.com/travel-accessories-to-sew/ Beautiful fabric BTW
Leave a Reply
Your email address will not be published. Required fields are marked *
- Home →
- Projects & Tutorials
- → DIY Travel Pillow | Neck Pillow Pattern + VIDEO Tutorial

DIY Travel Pillow | Neck Pillow Pattern + VIDEO Tutorial
Traveling can get very uncomfortable at times, especially if you’re traveling by car or worse, bus. But if you have the right equipment for the trip, you can make it as comfortable as possible. What kind of equipment am I talking about? Neck pillows.
A well-made neck pillow can make a big difference during long trips during which you have no other options but so sit put.
Since I don’t really like those you can get in the stores, I came up with a cute and very comfortable DIY travel pillow design. It’s easy to make and it requires very little time. And I’m about to show you precisely how to make a travel pillow yourself. It makes a great gift and can be made in colorful fabrics to coordinate with your luggage or your fabric luggage tags !
Below you will find my step by step written tutorial with VIDEO instructions for all the visual learners.
We occasionally link to goods offered by vendors to help the reader find relevant products. Some of the links may be affiliate meaning we earn a small commission if an item is purchased.
Table of Contents
- 1 How to Make a Travel Pillow
- 2 Supplies and tools
- 3.1 DIY Neck Pillow VIDEO TUTORIAL
- 3.2 INSTRUCTIONS:
- 3.3 STEP 1: Prepare the pattern
- 3.4 STEP 2: Cut the fabric
- 3.5 STEP 3: Pin
- 3.6 STEP 4: Sew
- 3.7 STEP 5: Turn inside out and press
- 3.8 STEP 6: Fill the pillow with the stuffing
- 3.9 STEP 7: Finish the DIY travel pillow
- 4 NECK PILLOW STUFFING OPTIONS:
How to Make a Travel Pillow
You don’t need all that much for this project, it’s likely that you even already have all of the essentials in your sewing supplies. First up you will need to download the free neck pillow pattern below – it’s a U-shaped design that is very comfortable.
Supplies and tools
- fabric – 1/2 yard cotton fabric (or 2 x 1/4 yard if you are using two fabrics)
- stuffing – polyester stuffing works best
- matching thread thread
- scissors (or rotary cutter and a cutting mat )
- pins or clips
- sewing machine ( these machines are great for pillows and home decor, or you can even hand sew this)
- iron and ironing board
- sewing clips or pins
DOWNLOAD : FREE Travel pillow pattern (PDF file)
Notes : You can use a variety of materials for the stuffing – I’ll cover the options at the bottom of this tutorial if you’re not sure what to use. use what you consider to be the most comfortable option.
Once you prepare all that, you can start making the travel pillow.
How To Sew a Travel pillow
Watch the diy travel pillow video first and then follow the written step by step instructions below. Please enjoy and don’t forget to Like and SUBSCRIBE over on YouTube to be kept up to date with new videos as they come out.
DIY Neck Pillow VIDEO TUTORIAL
INSTRUCTIONS:
Step 1: prepare the pattern.
Print out the travel neck pillow pattern you downloaded and cut it out. Make sure you print it as 100% (no scaling) on either a US letter or A4 paper. Cut it out and tape it together
If you don’t have a printer or you can’t use the downloadable pattern for some other reason, you can draw it yourself on a piece of paper.
Just draw one half of the usual travel pillow shape. Similar to a bean. Then cut it out.
STEP 2: Cut the fabric
Fold the fabric in half and align the edges. Then put the travel pillow sewing pattern on the fold, pin it and cut through both layers according to the pattern. The seam allowance is already included.
Do this two times, as you need two identical pieces of fabric – one for the front and one for the back. If you have larger scrap pieces – this is a great project to use couple of them!
STEP 3: Pin
Unfold both pieces of fabric and set them on top of each other, right sides facing each other. Align the edges and pin everything in place. Leave an opening for turning.
STEP 4: Sew
Stitch all around the edges using a 3/8 inch seam allowance. Leave a gap of about two inches unstitched so that you can turn the DIY neck pillow inside out.
Use your scissors to notch all around the pillow, snipping small triangles out of the seam allowance about one inch apart from each other. This will allow the pillow to form properly along the curves. Don’t notch the gap.
STEP 5: Turn inside out and press
Turn the whole pillow inside out through the opening you left unstitched earlier. Tuck the seam allowance of the opening inside and press it. Press the entire thing flat with an iron using a lot of steam.

STEP 6: Fill the pillow with the stuffing
Take the polyester stuffing you have prepared and fill the neck pillow with it. You can put as much stuffing as you wish, it’s your choice. If you like your pillows to be fluffier then put a bit more, just don’t overdo it so that it doesn’t become too hard.
STEP 7: Finish the DIY travel pillow
Once you have finished stuffing the neck pillow, all that’s left to do is to close up the opening on it. Take your needle and a thread and close the opening shut with a ladder stitch.
Psst… do you like the gorgeous roses in the image above. Here’s how to make them
NECK PILLOW STUFFING OPTIONS:
As I mentioned earlier, you can use whichever stuffing you prefer, but if you’re not sure, here are a few suggestions and their characteristics.

No products found.
- Option 5: Feathers
Light and soft, very comfortable, and it can be shaped easily. It tends to flatten often and it can get pretty hot during use.

I hope you liked this neck pillow tutorial and that you found it useful and interesting. Let us know what you think about it by sharing your thoughts with everyone in the comment section below. If you have some suggestions for improvement, do tell, your feedback is very appreciated!
Now go ahead and make a few of these DIY travel pillows for yourself and your loved ones, they’ll be grateful for sure!
Do you like this? Pin for later:
Wanna be friends? Click HERE and follow me on Pinterest
- DIY Luggage Tags
- DIY Sleep Mask
- Breathable face mask tutorial
- DIY Kimono from a scarf
OTHER PILLOWS THAT MAKE GREAT GIFTS:
- How to make a pillowcase
- Book pillow tutorial
- DIY phone pillow
- dog bone neck pillow pattern
- 1.8K shares
Related Posts
17+ DIY Denim Quilt Ideas [Great for Upcycling Old Jeans]
15+ Fox Plush Patterns – Fox Stuffed Animal Patterns
11+ Lap Quilt Patterns
12+ Dragon Plush Patterns [FREE]
such a great idea! thank you for tutorial – it makes me think I can try to sew my own travel pillow 🙂
Leave a reply:
Save my name, email, and website in this browser for the next time I comment.
Sure you can. It’s such an easy so, and the travel pillow is so comfortable
It turned out awesome, and thanks so much for sharing the great tutorial.
Thank you for your kind comment, Chas. I love it!
What a great tutorial, thanks for sharing with us at Handmade Monday
Thank you, Julie. It’s a pleasure to share my projects with you!
Thank you for sharing your post at this week’s #TrafficJamWeekend Linky Party.
Have a wonderful weekend!
Thank you for dropping by!
Thank you for the instructions. We need to get neck pillows for our next trip and this will let us personalize them.
Looking forward to travel is such a great treat…and then the memories are so sweet. Share photos of your creations with us! I love seeing items made with my patterns
This is fantastic! Absolutely cannot wait to be able to travel again! Maybe the time at home will give me time to make some of these as Christmas gifts! Thank you for linky up at Oh My Heartsie Girl’s Wonderful Wednesdays, I’m co-hosting at My Crafty Zoo!
Oh, how I miss traveling! These make wonderful gifts everyone would love to receive
Such a great tutorial and pattern, thank you for sharing on OMHGWW it will be featured this week. Please stop by and share again!
Have a great week!
I will. Thank you so much for the feature and hosting this wonderful party
I like your choice of fabric. It turned out so pretty. The tutorial is very detailed and easy to follow. Thanks for sharing. #HomeMattersParty
Thank you so much for the kind words, Donna. I love it!
So many times I have wanted one of these! I can quilt, but making 3D items is always more of s struggle. I think I can manage this though. Look for your neck pillow to be featured in this week’s Creative Compulsions.
Michelle https://mybijoulifeonline.com
It’s actually very easy, I’m sure you can manage it! Thanks for the feature, I’ll stop by this week
My daughter and I recently traveled on airplane and I was wishing I had a travel pillow. This will be on my to-do list for our next cross-country excursion!
It’s a must have travel item for me! So comfy
I love the pattern. I use the micro-beads and use them in a separate pillow then the decorative outer shell I put a 1/2 inch loop in the seam. I attach a carabiner to that. When I am not using it after a flight I can attach it to a loop or strap before I leave the plane and don’t loose me favorite pillow. Just a thought worth mentioning.
Great idea, Judi, thanks for sharing. This sounds like a handy feature
this is amazing but here are the some best travel pillows for tall person that support your neck and head than that any other pillow
These are custom made pillows so that can be made to fit any person tall or short
That’s really very nice. Thanks.
Great project. I will be making one of these soon. Could I use scraps of fabric with the Polyester fill?
If you do yarn crafts, put a zipper on the back and leave a small gap at the bottom of each “arm”. Put 1 skein in each arm, threading the end through the gaps. Put an extra skin or 2 to fill it for comfort and now you can knit or crochet easily.
That is clever! Thanks for the tip, Susan!
Lately I have seen notices that say we use this type of pillow wrong. The opening goes in the back. This is so the pillow supports our head when we fall asleep and the head nods forward. Always something new to learn.
Yes, isn’t it funny how we are taught to do something and we are doing it this way for years when suddenly you realize you are doing it all wrong
Leave a Reply:
Sewing Skills for Fun & Business
- Pattern Making
- Sewing Tutorials
- Free Patterns
DIY travel neck pillow for adults and kids
In this post, I am going to show you how to make a travel neck pillow by yourself. This DIY tutorial comes with a pattern in toddler/kids and adult sizes that you can get for free as a “Thank you!” gift if you choose to become a subscriber to my email list.
The kid’s size pattern fits nicely up to a 10-year-old. For older kids, use the adult version of the pattern.
To download the travel neck pillow pattern, scroll down to the end of this post.
Travel neck pillow video tutorial
DIY Travel Neck Pillow
I had two reasons to make this pillow myself. First, I didn’t like the support our store-bought pillow provided. Of course, I could search for a more supportive one, but I also really wanted it to match the car seat cover I made a while ago.

Here is how to make it yourself:
What you are going to need to make a travel pillow (image 1)
- the pattern ;
- 12 inches/30 cm of non-stretch fabric for the kids’ version and 20 inches/50 cm for the adult one ;
- pins, scissors, a sewing machine ;
- polyfill or other stuffing material;
- hand needle and a matching thread .
Steps to follow when making the travel neck pillow
Use the pattern to cut two details of the travel pillow.
The idea to make a travel neck pillow came later, so I didn’t have enough fabric left to use.
That’s why I’ve joined some scrap pieces together to get the shape of the pillow. If you are using the pattern and enough fabric, you are going to end up with two whole and even details that look much prettier than mine (image 2).
Put them face sides together and pin them if you like. Sew all around the pillow except the narrow part on the inside. We are going to use it as a hole through which to turn the pillow inside out later.
Leaving the hole at this place, it would be a bit harder to hand stitch later, but it’s the least visible place so that’s where I am going to make it. If you prefer, you can leave the opening elsewhere to make it easier for you to hand stitch later.
Sew it with ⅜ of an inch or 1 cm seam allowance (image 3).
Use a straight stitch and anchor the seam at the beginning and the end.
Turn the pillow inside out by pushing it through the hole we left (image 4).
You might want to iron at this point, but the filling is going to pull the seams anyway so I am going to skip this step.

Stuff the pillow with poly-fil or other stuffing material
Here is how the travel pillow looks now (image 5). Now I am going to start stuffing the fill-in (image 6). How much you are going to stuff the pillow depends on your preferences.
I am using my thumbs to push the stuffing all the way in and I am careful to use the same amount of fill in all parts of the pillow (image 7).

Close the opening we left in the middle of the pillow
Once I am done, I need to close the hole in the middle (image 8). I am going to do that with the invisible hand stitch or the so-called ladder stitch. Here is how to do it.
Start at one side and insert the needle a bit in on one side and then on the other side so the seam allowance gets pushed inside and both sides get joined together (image 9).
This pillow is nicely stuffed, so I don’t pull the sides together right from the first stitches. I make a couple of them and then pull them together so that the thread doesn’t break under the pressure. I am going to go all the way up until I close the hole.
Then, I am going to go backward. Going back is not strictly necessary, but in my case, the fabric tends to unravel, so I am going to secure it.
To finish the stitch, instead of making a knot I am going to stick the needle inside the pillow. Then, take it out on the other side, cut the remaining thread and the end of it would disappear into the inside of the pillow (image 10).

To download the pattern, click on the button below. The adult and toddler/kids versions of the travel neck pillow pattern are provided in separate PDF files.
Like what you read here? Support my site
If you want to help me continue delivering similar content, please consider buying me a coffee to keep it going. It helps me focus and have more time to prepare these tutorials and develop my lessons.
I can devote more time and do everything involved to make this happen and share what I’ve learned about sewing and pattern-making with you.
I would appreciate it.
More sewing tutorials:
- How to make a car seat cover for a baby/toddler
- DIY Cape Tutorials – Make Your Own Halloween Costume
- DIY Organza String Bags
- Embellish Your Wardrobe: Create a Classic Box-Pleated Skirt
- Sewing with elastic thread – make a shirred dress
SIGN UP FOR SEWING FOR A LIVING NEWSLETTER
If you like what you read here, join our mailing list so we can send you our new sewing tutorials, pattern-making lessons, patterns, and some occasional offers that we think might interest you!
We will protect and use your data following our Privacy policy .
You may unsubscribe at any time by clicking the link in the emails we send.
Leave a comment Cancel reply
Your email address will not be published. Required fields are marked *
Save my name, email, and website in this browser for the next time I comment.
DIY Adult Travel Neck Pillow (with washable cover)

Adult-sized neck pillows
Recently, I’ve been making neck pillows. Several of us like pillows if we want to sleep during long drives (not the driver, of course), but usually we just use a rolled up jacket or whatever else we happen to be able to get our hands on at that moment (I’ve been known to use everything from window curtains to piling my hair under my head!). It occurred to me one day that if I made a real neck pillow, I’d be able to always have the right amount of “stuff” under my head (without using two jackets) and that would be a really nice thing! So since I was making one for myself, I started making them as gifts…for mother’s day…for father’s day… and if a recent trip was any indication, I’d say they went over pretty well! Since the van is a dirty place (and so are we after a week or more on the road), I decided to make a washable cover for the pillow. It may not look quite as pretty (it can turn out a little floppy), but, hey, at least I can wash it easily!
What You’ll Need to Make Your Own Neck Pillow

Some of the materials
Neck Pillow Pattern . (Many thanks to Dani for this – so as not to infringe on her copyright, I’ll just link to her pattern here . Click the image, the scroll to find the pattern . Or, click here to be taken directly to the pattern image .) Sadly, the pattern is no longer online. You can find the pattern on Pinterest here . You can also download the pattern and print it (below) – it should work with 8.5″x11″ or A4 paper. I don’t promise it’s perfect, but you should be able to figure it out…
About 1 yd. fabric; I like quilting cotton, but almost anything would work (I even used a piece of an old bed sheet at one point when I was pressed for time and materials – and it worked great!).
About 1 ¼ yd. soft fabric. I’ve used fleece and flannel with equally good results. Make sure it’s washable, though, or your washable cover won’t be very washable 🙂
Stuffing. I used Polyester Fiberfill, available at most craft shops. Since I was using partial bags, I don’t know exactly how much I used, but it was a lot. Plan on having at least a 12oz. bag on hand.
Closures. I used hook-and-eye fasteners, but you could use almost anything washable that will hold the two sides closed. I try to stay away from Velcro, though; let’s just say I’ve had my hair caught in the stuff way too many times! On my own pillow, I didn’t use closures at all…but that makes it look even less professional.
Matching thread
Sewing Machine
Sewing supplies (scissors, pins, hand needle, ruler or measuring tape)
Step 1: Laying out and Cutting Out the Pillow

The cut neck pillow pieces, pinned
Start by laying out the pattern on the cloth. The easiest way to do this is to fold the cloth in half (like in the store), right sides together; then pin the pattern on the fold. Cut a second pattern on the fold, as well.
***Note*** I found the pillow to be a little lacking in height, so I added about a half inch around the pattern on all sides except the side on the fold. This seemed to work great for a fatter neck pillow! ***Update*** After using the pillows, I’d say the original pattern is the best size for most situations. So, think twice before making it bigger 🙂
Step 2: Pinning and Sewing the Pillow

Sewing the pieces together
Pin the pieces you cut out, right sides together. They should be exact replicas of each other; if not, do your best to line them up as closely as possible and it should be ok.
Use the sewing machine to sew around all sides of the neck pillow, leaving about 4” open for stuffing the pillow. I used a ¼” to ½” seam allowance, depending on how strong I felt the fabric was.
Step 3: Turning the Pillow

The sewn and clipped neck pillow. The pins (purple and white) mark the area I left unsewn for stuffing and turning. I wouldn’t have wanted it any smaller!
Take the stitched pillow and clip the curves. “Clipping” is just snipping little triangles out of the seam allowances (don’t go through the seam!) in the curving areas (the tighter the curve, the more “clips” you’ll want to make). This will ensure that the seams lie flat and neat after you stuff it.
Then turn the pillow right side out. I found the easiest way to do this was to stick my hand right up inside the pillow and pull it right side out.
Step 4: Stuffing the Pillow

The neck pillow, stuffed and ready for the opening to be stitched shut
After the pillow has been turned right side you, stuff the neck pillow by taking small handfuls of the polyester fiberfill and sticking your entire hand through the opening, then pushing the fiberfill down to the very bottom of the pillow. Repeat until the entire pillow is very firmly stuffed (unless you like a less-firmly stuffed pillow).
Turn in the seam allowance of the stuffing opening and pin. This may be tricky if the pillow is well-stuffed! Hand-stitch the opening closed.

The opening, stitched closed. I’m almost embarrassed to admit I stitched it, but since I did, there it is. The good thing is that it will be hidden under the washable cover!
Congratulations! The pillow is finished! Now for the washable cover…
Step 5: Cut the Cover Pieces

The neck pillow cover, traced onto the flannel fabric (if you can see the pencil marks!)

The cut neck pillow cover
Cut the cover pieces exactly as for the neck pillow, EXCEPT make the pieces a generous ½-3/4” larger on all sides (except where the piece meets the fold – the straight edge) than the original pillow (the smaller the excess, the less floppy the cover will be, but it will also be much harder to stuff the pillow inside the cover!) I used the same pattern piece, and marked the extra with a pencil on the cloth…I know, not professional, but it does work if you’re too lazy to make another pattern piece 🙂
Step 6: Pin & Sew the Cover Pieces

The pieces, ready to be stitched
Pin the cover pieces, right sides together, matching all edges (especially the curves). Use the sewing machine to stitch around the entire outside (at ½” seam allowance) except for about 6-8”, which you’ll want to leave open for inserting / removing the pillow.
Step 7: Turn the Cover Right Side Out
Clip the curves (less so than for the pillow – keep the clips well away from the stitching) and turn the cover right side out. Take a thin object, such as a short ruler or pencil with broken lead, and run this along the inside of the pillow along seam lines. This should help the cover with the final “turning out”, so the seams are flat and finished-looking. Iron if the seams simply will not turn right side out and look good.
Step 8: Finishing the Cover

Hemming the opening
Turn the open edges under ¼” and then under ¼” again. Press. Essentially, you’re going to hem the opening so it doesn’t fray. Pin, then sew by hand or on the sewing machine (I used the sewing machine).

Stuffing the pillow into the cover. I made this particular cover a little big, so it’s extra floppy. I fixed that in the directions, though.
Stuff the pillow into the cover via the opening with the now-hemmed edges. Then position your closures to best close the opening while not being in the way for the sleeper / get caught in your hair / etc. Attach the closures – if you’re sewing, either use extra caution not to catch the pillow, or remove the pillow before sewing.

Almost done!
To wash, simply unhook the closures, pull the pillow out of the cover, and toss the cover in the laundry (laundering via the cloth’s specifications, of course!)

The stitched closures
Congratulations! Your neck pillow with its washable cover are finished!!!
This Week’s Featured Product!
If you’d rather buy a neck pillow, this one has multiple colors to choose from!
More Related Posts:

- ← Willowwood Arboretum: One of the Nice Kind of Arboretums!
- Holzwarth Historic Site – Worth a Summer Stop! →
4 thoughts on “ DIY Adult Travel Neck Pillow (with washable cover) ”
These are great! I’d love to make one for myself, since I have a hard time finding a neck pillow that is tall and narrow enough for my neck. How tall would you say your pillow are (original and/or altered pattern)? I need to figure out how much to adjust it. Thanks!
Hi froghazel, the normal pattern turns out to be about 4.5 in. tall when all was said and done if I stuffed it very firmly. I gave the larger pattern away as a gift – but it was a little taller, maybe closer to 5 or 5.5 in. If I didn’t stuff as firmly, it’s more like 3 in. Hope that helps!
Pingback: The Best of Anne's Travels in 2015 - Anne's Travels
Pingback: Top 10 Pages on Anne’s Travels in 2014 - Anne's Travels
Get Hiking Guides & Other Outdoor Fun!
Subscribe to View Junkie Adventure Report and get exclusive outdoor and hiking-related content.
I agree to receive newsletters & updates from Anne's Travels and accept the data privacy statement.
We use Sendinblue as our marketing platform. By Clicking below to submit this form, you acknowledge that the information you provided will be transferred to Sendinblue for processing in accordance with their terms of use

IMAGES
VIDEO
COMMENTS
Make yourself a soft, comfortable DIY travel pillow. This DIY neck pillow can be made in under 30 minutes & is a great beginner sewing project. Free pattern.
It's been modified to insert a zipper, and then it can be used to fill it with some lightweight travel clothes for that emergency when the airlines lose your luggage. Here's a link to her...
How to Make a Travel Pillow. You don’t need all that much for this project, it’s likely that you even already have all of the essentials in your sewing supplies. First up you will need to download the free neck pillow pattern below – it’s a U-shaped design that is very comfortable.
The following video will show you how to make a travel pillow in a very short amount of time. Just download the neck pillow pattern and follow this neck pillow tutorial and you’ll...
In this post, I am going to show you how to make a travel neck pillow by yourself. This DIY tutorial comes with a pattern in toddler/kids and adult sizes that you can get for free as a “Thank you!” gift if you choose to become a subscriber to my email list.
Since the van is a dirty place (and so are we after a week or more on the road), I decided to make a washable cover for the pillow. It may not look quite as pretty (it can turn out a little floppy), but, hey, at least I can wash it easily! What You’ll Need to Make Your Own Neck Pillow
Whether traveling by plane, train, or car this Travel Neck Pillow with pattern tutorial is going to make your next trip so much more comfortable! Make one for each of the kids as well so they can nap in style and comfort.
Here is a DIY tutorial on how to make a travel pillow. It comes with a PDF pattern in toddler and adult sizes. For the accompanying written instructions and ...