How-To Geek
How to translate web pages in safari on mac.
Have you landed on a French or Spanish website? Translate it to English with the press of a button!
Often find yourself on websites with text in a foreign language? If you use Safari, there's no need to go to Google Translate. You can translate web pages between seven languages right in Safari on a Mac.
Starting with Safari 14.0, Apple included a translation feature directly in the browser. As of this writing, the feature is in beta, but fully functional. If your Mac is running the latest version of macOS Mojave, Catalina, Big Sur , or newer, you can access the translation feature.
The translation functionality works between the following languages: English, Spanish, Italian, Chinese, French, German, Russian, and Brazilian Portuguese.
By default, you can translate any of the above languages to English. You can also add more languages to the mix (we'll talk more about that below).
To get started, open a web page in one of the supported languages. Safari will automatically recognize that language, and you'll see "Translation Available" in the URL bar, along with a Translation button; click it.
If this is the first time you've used the feature, a pop-up will appear. Click "Enable Translation" to turn on the feature.
In the translation menu, select "Translate to English."
The text on the page will instantly convert to English, as shown in the image below. The Translation button will also turn blue.
To disable the Translation feature and return to the original language, click the Translation button again, and then select "View Original."
As we mentioned above, you can also translate to languages other than English. To do so, click the Translation button, and then select "Preferred Languages."
This opens the "Language & Region" menu in System Preferences. Here, click the plus sign (+) to add a new preferred language. You can add multiple languages here while continuing to use English as the default language across your Mac.
In the pop-up, select the languages you want to add, and then click "Add."
System Preferences will ask if you want to make this your default language. Choose the previous default language if you want it to remain the status quo.
Now that you've added a new preferred language, you'll see the translation button even when you visit web pages that are in English.
The translation process for a preferred language is the same: click the Translation button in the URL bar, and then select "Translate to [the language you selected]."
Again, you can view the original at any time by simply clicking "View Original" in the Translation menu.
If you're traveling to a new country, you can also use the built-in Translate app on your iPhone or iPad to quickly translate speech between multiple languages.
Related: How to Use the Apple Translate App on iPhone


Tips & Tricks
Troubleshooting, how to use translate webpages in safari for mac.

Ever ended up on a webpage in a different language and wished you could translate it instantly? With the latest versions of Safari for Mac, you can use a native translation feature to convert a webpage from a foreign language to your native tongue. This is fantastic for many obvious reasons, particularly if you want to read international news from an original source rather than a regurgitated spin version from a US outlet.
Safari’s built-in language translation feature is for modern versions of Safari and macOS, so as long as you’re running Safari 14 or newer in macOS Big Sur or newer, you’ll be good to go. If you’re on an earlier version of MacOS, then you may find use in Google Chrome or Microsoft Edge, which also have native language translation features available, or you could use an iPhone or iPad if they’re running modern system software, as Safari for iOS and iPadOS have the translation capability too.
Want to try out the new translation feature to translate webpages in Safari on the Mac? Then read on!
How to Translate Webpage Language in Safari for Mac
Assuming your Mac is running a modern version of macOS and Safari, here’s how you can translate webpages:
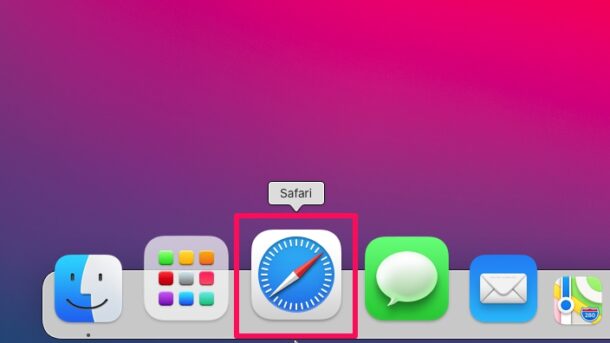
There you go. Now you’ve learned how to take advantage of the new built-in translator in Safari on your Mac.
Current supported languages for translation are English, Spanish, Simplified Chinese, French, German, Russian, and Brazilian Portuguese.
If you’re unable to find the native translator in Safari and you’re running Safari 14 or later on macOS 11 or later, it’s probably because you’re living in an unsupported region or trying to use an unsupported language. This new feature is currently limited to users living in the United States, UK, and Canada, but will expand as time goes on. If you’re too impatient to wait, you can change your Mac’s region to either of these countries and then access the translator.
Do you use an iPhone or iPad as your primary mobile device? If you’ve updated your device to iOS 14/iPadOS 14 or later, you will be pleased to know that you can translate webpages in Safari for iPhone and iPad in a similar manner as detailed here .
We hope you were able to access Safari’s built-in translator and convert foreign webpages to English without any issues. What are your overall thoughts on this addition to Safari? Let us know your experiences, thoughts, and tips in the comments!
Enjoy this tip? Subscribe to our newsletter!
Get more of our great Apple tips, tricks, and important news delivered to your inbox with the OSXDaily newsletter.
You have successfully joined our subscriber list.
Related articles:
- How to Translate Webpages in Safari on iPhone & iPad
- How to Translate Webpages in Safari on iPhone & iPad with Microsoft Translator
- How to Translate Text on iPhone & iPad
- How to Translate Webpages on iPhone & iPad with Chrome
14 Comments
» Comments RSS Feed
I live in the Netherlands. Using iMac 10.15.7, Safari 14.0.3. I did not get the translate icon. In iMac preferences, in Language and Region I changed Country to US and in UK, after restart neither produced a translate icon. I tried iPhone 11, iOS 14.4.2, tried Safari using same website, No translation icon….
What is wrong?
Translate is available for English, Spanish, Simplified Chinese, French, German, Russian, and Brazilian Portuguese. The Mac must be running macOS 11 or newer to have this capability.
On the iPhone and iPad, the translate feature is tucked behind the webpage options accessible in the URL bar.
For Mac users running prior versions of MacOS, Chrome offers a similar webpage translation feature.
Conversely, I’m using Safari 14.03 on a Mac in France and I have got the translate icon.
I am using Safari 14.0.3 on MacBook Pro 10.14.6 in the UK and I do not get the translate icon showing when using a foreign language site.
I also have an iPad not showing there either.
The translation feature is only available in macOS Big Sur or later for Mac, and iOS 14 / iPadOS 14 or later on iPhone and iPad. There was a typo by the original author which mentioned Safari 14 as the prerequisite rather than macOS 11, that has been fixed.
Hope that helps, sorry about the confusion!
This very necessary link provides an error:
https://osxdaily.com/?p=108867
Please fix and resend an email to subscribers.
I’ve been trying this with 14.0.3 on Catalina, but like Jeff, I do not get the translate icon on a foreign website.
I’ve been trying all afternoon with this tip, safari 14 latest Catalina. No translate icon ever appears; it almost feels like it hasn’t been switched on. Any thoughts?
I am running Safari 14.0.3 on a MacMini with MacOS 10.15.7. It does not have the translate icon. I am also running Safari 14.0.3 on a MacBookPro with MacOS 11..2.1. It has the translate icon. When I first tried to post this reply, the osxdaily.com website reported this to be a duplicate reply.
This is in macOS 11 or newer only, it’s a Big Sur feature not a Safari 14 feature
I am using Safari 14.03 on a Mac running 10.15.7 in the US and I do not get the translate icon when I go to a foreign language site. Could this be a OS 11 only feature?
I have 2 macintosh computers. The first is a MacMini running 10.15.7 with Safari 14.0.3 and it does not have the translate icon. The second is a MacBookPro running 11.2.1 with Safari 14.0.3. It has the translate icon. Both computers were checked using the http://www.lemonde.fr website.
I have the same problem as Jeff, using the same Safari and latest Catalina. Almost feels like translate isn’t switched on.
Any thoughts?
Same here. Catalina with Safari 14.03. Texas is in the US, though some might disagree.
Leave a Reply
Name (required)
Mail (will not be published) (required)
Subscribe to OSXDaily
- - How to Use ChatGPT for Mac Right Now, Bypassing the Waitlist
- - How to Search Google Without AI Rubbish & Clutter
- - How to Install & Run Windows 11 in VMware Fusion Pro on Mac
- - How to AirPlay from Chrome & Edge Browsers on Mac to Sonos or HomePod
- - How to Disable Microsoft Defender SmartScreen in Edge
- - iOS 17.5.1 & iPadOS 17.5.1 Update Released to Fix Reappearing Deleted Photos Bug
- - MacOS Ventura 13.6.7 & macOS Monterey 12.7.5 Updates Available
- - iOS 16.7.8 & iPadOS 16.7.8 Updates for Older iPhones & iPads Available
- - iOS 17.5 & iPadOS 17.5 Updates Released with Bug Fixes
- - MacOS Sonoma 14.5 Update Released with Security Fixes
iPhone / iPad
- - 3 Great Photo App Tips for iPhone, iPad, & Mac That You May Have Overlooked
- - How to Find Your Phone Number on iPhone
- - Play Apple Music in Retro Mac OS X Fashion with QuickTune
- - How to Factory Reset Mac (MacOS Sonoma & Ventura)
- - How to Fix the Apple Watch Squiggly Line Screen
- - What Does the Number Badge Mean on Microsoft Edge Icon?
- - How to Hide iPhone Keyboard When It’s Covering Buttons & Won’t Go Away
- - What’s a PXM File & How Do You Open It?

About OSXDaily | Contact Us | Privacy Policy | Sitemap
This website is unrelated to Apple Inc
All trademarks and copyrights on this website are property of their respective owners.
© 2024 OS X Daily. All Rights Reserved. Reproduction without explicit permission is prohibited.
- Accessories
- Meet the team
- Advertise with us

Whether you’re learning a new language or frequently visit sites that display in another dialect, you can translate a web page in Safari on Mac. Without a third-party tool, you can take advantage of Safari’s built-in translation feature. Read along to find out how.
How to translate a web page language in Safari on Mac
How to translate a portion of a web page on mac, how to change your languages translation settings on mac, how to help apple improve safari translations.
- If you visit another web page of the same site in the same tab, that page will be automatically translated as well. Safari will stop translating automatically if the page is not in the same original language or on a different domain.
Safari makes it simple to translate almost any web page in its entirety.
Maybe it’s not an entire web page you want to translate but a certain part. It might be a sentence or a paragraph. You can do this using Live Text and then take advantage of the additional options you have.
- Select the text you want to translate by dragging your cursor through it to highlight it.
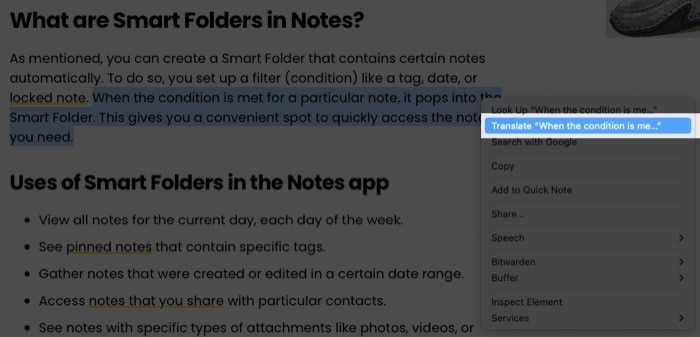
You can decide the availability of languages when you use Safari’s translation feature . Here’s how.
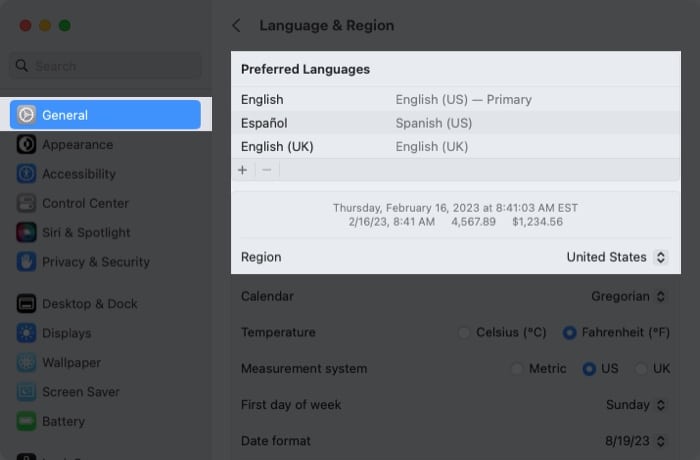
- At the top of the window, you’ll see Preferred Languages listing those you have available for translation.
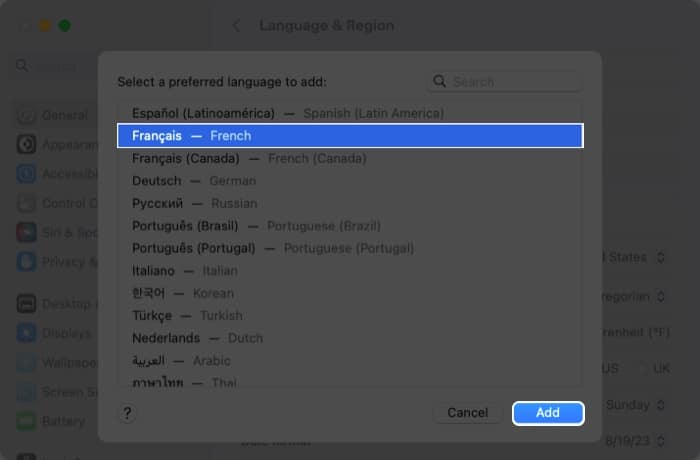
- You’ll see a message asking if you want to change your primary language to the one you want to add. Choose the option you want, and you’ll then see the new language displayed in your Preferred Languages list.
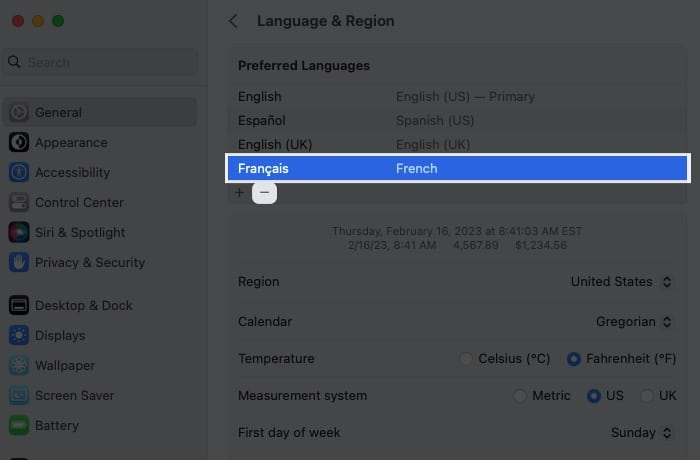
- When you finish, close the System Settings. You should then see your updated languages available when you select the Translate icon in Safari.
If you translate a page and believe the translation may be inaccurate, you can let Apple know. This helps Apple improve translations moving forward.

- You’ll see a message pop-up letting you know that Apple will store and use the web page address contents to improve translations. Pick Report to send the information to Apple.
Don’t let language barriers stop you!
With the built-in translation feature in Safari on Mac, you don’t have to use a third-party translator or bypass a potentially great web page because it’s in a different language.
Have you used translation in Safari on Mac yet? What are your thoughts on the feature? Let us know!
- 35+ Safari tips and tricks for iPhone
- Safari vs. Chrome: Which browser is better for iPhone and Mac?
- How to hide IP address in Safari on iPhone, iPad, and Mac
Sandy relishes crafting how-tos, listicles, and explainers, empowering others to unlock the full potential of their Apple devices. She joined iGeeksBlog in 2023, and her decade-long experience in tech writing shines through, starting with Apple products in 2015 and further enriched by collaborations with prestigious publications like Lifewire, How-To Geek, Digital Trends, iDownloadBlog, MakeUseOf, groovyPost, and AppleToolbox.
View all posts
🗣️ Our site is supported by our readers like you. When you purchase through our links, we earn a small commission. Read Disclaimer .
LEAVE A REPLY Cancel reply
Save my name, email, and website in this browser for the next time I comment.
Related Articles
How to fix hey siri not working on iphone (ios 17 updated), why are pictures not downloading in imessage and how to fix it, how to block websites on iphone and ipad in ios 17, how to unlink facebook and instagram (2024 guide).
How To Translate Web Pages In Safari

The international nature of the internet is one of the best things about it. You can visit web pages and find information from countries all across the world, but this also means it's likely you'll stumble across sites that are written in different languages. It can be a major hassle to translate web pages using third-party software or other means, especially if you don't visit websites outside of your native language very often.
Fortunately, many modern web browsers possess the ability to translate web pages natively, so you can still read the content in your preferred language. Apple has included a translation feature in its Safari browser, so you can easily translate pages on Mac, as well as the iPhone and iPad. This article covers the translation process on each respective Apple device, as well as how to navigate any hurdles you may encounter.
How to translate web pages in Safari on Mac
To translate a web page in Safari on Mac computers, you need to be using Monterey 12 or Big Sur 11.0 . Also, the page needs to be compatible with the translation feature. Here's how to find out whether you can translate the web page in Safari and how to do it (via Apple ).
1. If Safari can translate the web page, you'll see the "Translate" icon appear in the Smart Search bar at the top of the browser.
2. Click on the "Translate" button.
3. Select the preferred language you want the page translated into.
4. If prompted, select "Enable Translation."
5. To change it back, select the Translate icon again and click on "View Original."
If you don't see the language you want to translate the page into, try this:
Go to Apple menu > System Preferences.
Select "Language & Region."
Select "General."
Click on "Add" to add a language to your list of preferred languages.
After you add a language, go back to the web page and look at the Translate list again to see if your preferred language has appeared.
How to translate web pages in Safari on iPhone and iPad
The ability to translate web pages is available on devices running iOS 14 or later. You'll also need to be on a web page that is compatible with this feature. Here's how to translate pages in Safari on iPhone or iPad devices with iOS 14 or newer.
If the web page can be translated, you'll see the "Translate" icon flash for a second in the search/address bar at the top.
2. To translate the page, tap on the website options icon, which looks like the letter "A."
3. Tap on "Translate to [Preferred language]."
4. Tap "Enable Translation" if it appears.
5. The page will be translated. To go back to the original language, tap on the website options icon and select "View Original."
If the language offered isn't what you want the web page translated into, you'll have to change your preferred language order in your iPhone settings. Here's how:
Go to the Settings app.
Go to "General" > "Language & Region."
3. Under "Preferred Language Order," either move a language to the top or select "Add Language," choose one, and set it as your top preferred language.
4. Your iPhone will restart to make the change.
Be careful when making this change, as it will change supported apps and websites to your first preferred language.
How to translate web pages in Safari on older versions of iOS
You're not out of luck if you're an iPhone owner using an earlier iOS version than 14. You can also easily translate Safari web pages with the workaround of using an app, such as Microsoft Translator. This app comes with a Safari extension as well, making it a great choice for translation. Here's how to use Microsoft Translator on a Safari webpage (via Microsoft ).
1. On Safari, go to the web page you need translated.
2. Select the text you want to be translated by tapping and holding it, and then moving the selection bars on the text.
3. Now tap on the "Share" button that appears in black above the text or the icon at the bottom middle of the Safari menu.
4. Scroll down and tap on the "Translate" button, which appears if you have Microsoft Translator downloaded.
5. Choose the source language and the target language to get your translation.
6. Tap "Done" to close the translator.
This can also be good to use on websites that normally don't provide the translation option, even in iOS 14 or above.
Can Safari automatically translate web pages?
When you first visit a web page on Safari in a foreign language, it will detect if it can be translated to a different language based on what you have set in your Preferred Languages settings. From there, you'll need to choose to translate it using the instructions above. However, you won't need to do this for every page on the site. Safari will also translate pages on the same domain you originally translated from.
If you go to a website of a different language or visit a different domain, Safari will then end the automatic translation. Also, if you close the site and then come back to it, it will no longer be translated (via Apple ). So, you'll need to choose to translate web pages yourself every time you visit a website in a foreign language. From there, though, pages within the same domain will be translated automatically.
- Apple Watch
- Accessories
- Digital Magazine – Subscribe
- Digital Magazine – Info
- Smart Answers
- 11th-gen iPad
- New AirPods
- Best Mac antivirus
- Best Mac VPN
When you purchase through links in our articles, we may earn a small commission. This doesn't affect our editorial independence .
How to translate webpages on Mac, iPhone and iPad

If you are planning a holiday, working with colleagues or clients in different countries, or if you are just wanting to research something that happens to be in a different language, then you may be wondering if it is possible to translate a webpage into English or another language so you can read them.
The really good news is that this will soon become a simple process as Apple’s iOS 14 and macOS Big Sur will include a new feature that will make translations easier than ever.
How Translations will work in iOS 14 & macOS Big Sur
Once iOS 14 and macOS Big Sur arrive this autumn it will be possible to translate an entire webpage from or to the following languages: English, Spanish, Simplified Chinese, French, German, Russian, or Brazilian Portuguese. The new webpage translation feature will initially be in Beta, even once the operating systems are out of beta.
To find out how to use Siri and the new Apple Translate app on the iPhone read: How to translate text and speech on iPhone.
How Safari Translations will work in iOS 14
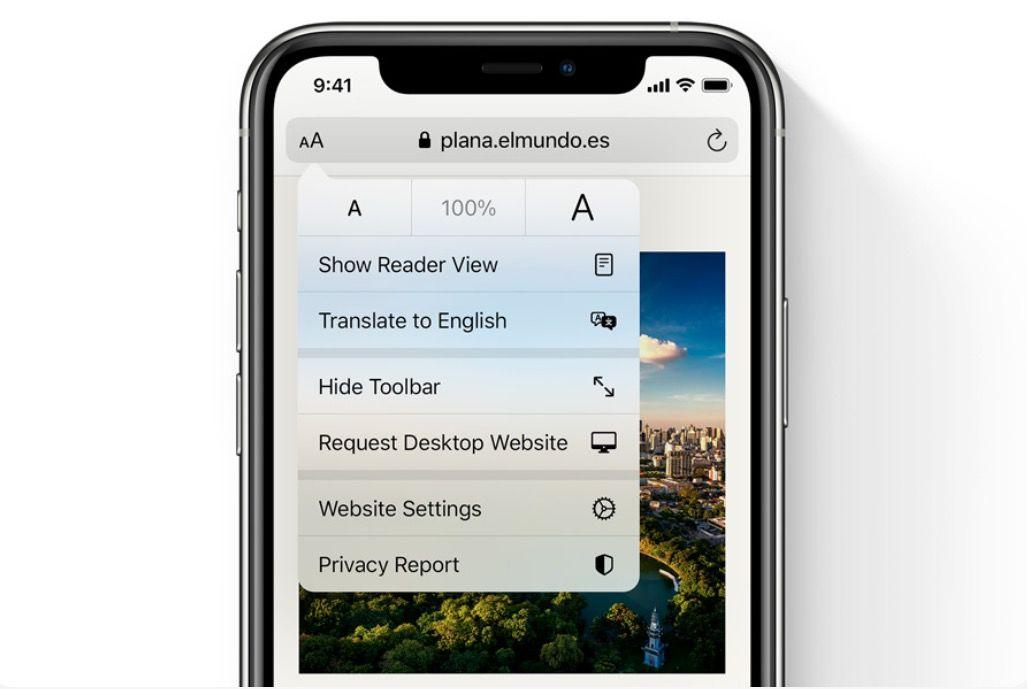
- This will bring up some additional options compared to iOS 13, including a new Translate to English option (This will default to your device’s language).
- Tap Enable Translation if required.
- If you want to return to the original, tap on Translate (which will have replaced the aA button).
- Tap View Original.
Read more about the features in iOS 14 here.
How Safari Translations will work in macOS Big Sur
Apple hasn’t revealed exactly how the Translation feature will work in Safari on the Mac as yet. However, we expect that it will be performed in a similar fashion to the iPhone and iPad.
Read more about the new features in macOS Big Sur here .
How to translate webpages now
Right now there are a few options if you want to translate webpages on the iPhone, iPad or Mac. These include using the Microsoft Translator app, Google Chrome on iPhone, iPad and Mac, or using the Google Translate website. We’ll cover each below.
Using Microsoft Translator
One way to easily translate webpages is to use the free Microsoft Translator app on your iPhone or iPad. There is no Microsoft Translator app for the Mac.
Here’s how to use Microsoft Translator app:
- Download the Microsoft Translator app here.
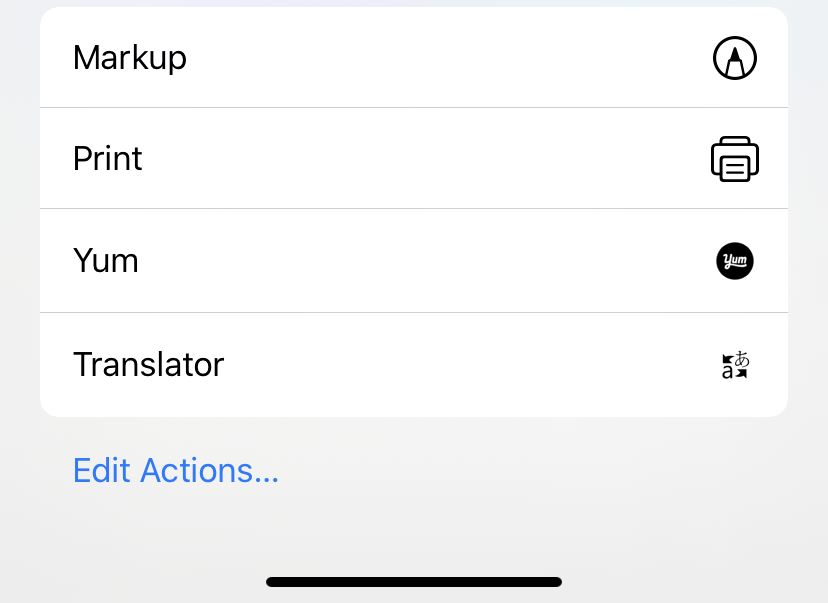
- Open the webpage you want to translate in Safari and tap on the Share button at the bottom.
Using Google Chrome on iOS
You can also use Chrome to automatically translate webpages.
Chrome for iOS includes a built-in translator.
- Download the Google Chrome app for iOS here (it’s free)
- Open Chrome on your iPhone or iPad.
- Go to the page you want to translate.

- Tap on English (assuming that’s your default language).
- The page will translate into your language. If you want to see the original then just tap on the other language shown.
Sometimes we found that the translation option wasn’t immediately visible, this may be due to a delay while the translation takes place or it may just need to be triggered by scrolling around on the page a bit.
Using Google Chrome on a Mac
You can also translate webpages using Chrome on the Mac.
- Open Chrome on your Mac. (You can download it here )
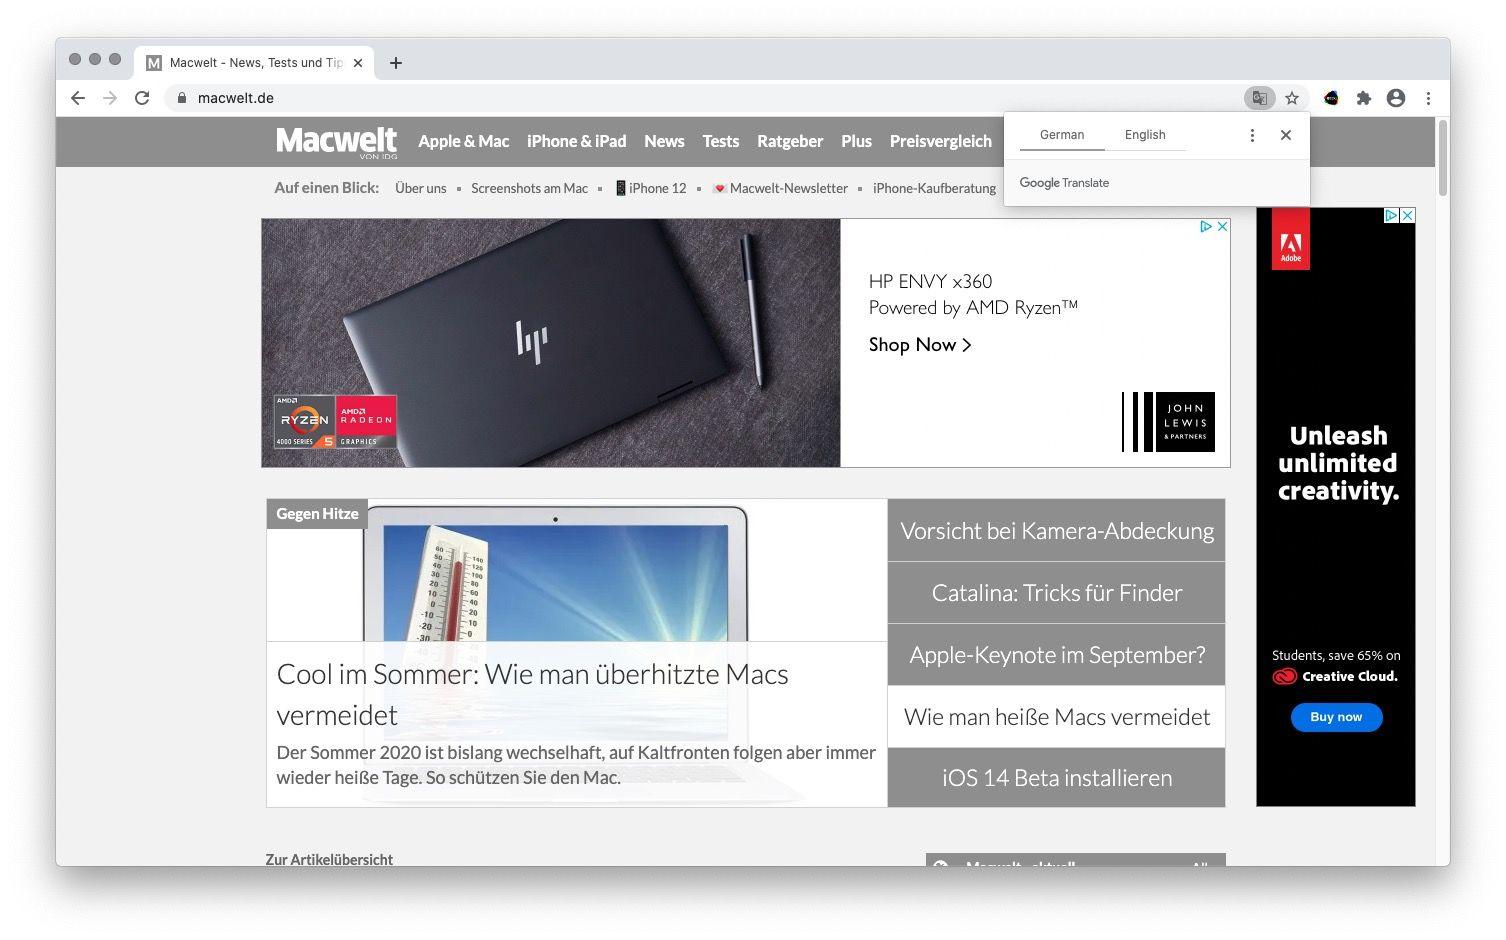
- You will see two language options: your own language and the one the page is written in. Choose your language.
Using Google Translate on a Mac
If you would rather not use Chrome, you can just use the Google Translate webpage to translate entire webpages.
- Go to the Google Translate webpage.

- Now choose the language you wish to translate it into.
Once you are viewing the page in the translated language any links you click on within the page will be automatically translated for you. This is particularly useful if you want to translate entire websites.
Another language related feature coming in iOS 14 is the new Translate app. You can learn how to use that here: How to use Apple Translate .
Author: Karen Haslam , Managing Editor

Karen has worked on both sides of the Apple divide, clocking up a number of years at Apple's PR agency prior to joining Macworld more than two decades ago. Karen's career highlights include interviewing Apple's Steve Wozniak and discussing Steve Jobs’ legacy on the BBC. Having edited the U.K. print and online editions of Macworld for many years, more recently her focus has been on SEO and evergreen content as well product recommendations and buying advice on Macworld.com.
Recent stories by Karen Haslam:
- Best VPN for iPhone: Unlock content with these recommended services
- How to edit a PDF on iPhone
- WWDC 2024: Everything you need to know
- Press Releases
- Industry News
- Product Spotlight
- Fresh from Apple
- Video Production
- Installation Videos
- Explainer Videos
- Testing Lab
- Networking & Security
- Special OWC Deals
- The Other World
- Powered by OWC
- Space & Beyond
- Random Thoughts & Topics
- OWC Unplugged
- Article Archives
- Make a Suggestion
Send us a Topic or Tip
Have a suggestion for the blog? Perhaps a topic you'd like us to write about? If so, we'd love to hear from you! Fancy yourself a writer and have a tech tip, handy computer trick, or "how to" to share? Let us know what you'd like to contribute!
How to Use the Built-In Translator in macOS Big Sur’s Safari
With macOS Big Sur, you can translate entire web pages in Safari. When you encounter a compatible page, just click the translation icon (see in the graphic below) in the address field to translate into English, Spanish, Chinese, French, German, Russian, or Brazilian Portuguese in real-time.
Here’s how to translate web pages in Safari:
- In the Safari app on your Mac, go to the webpage you want to translate.
- Move the pointer over the Translate button in the URL file (it looks like toward balloons with an “A” in one) to see if a translation is available. If the webpage can be translated, the Smart Search field displays Translation Available.
- Click the Translate icon, then choose a language.
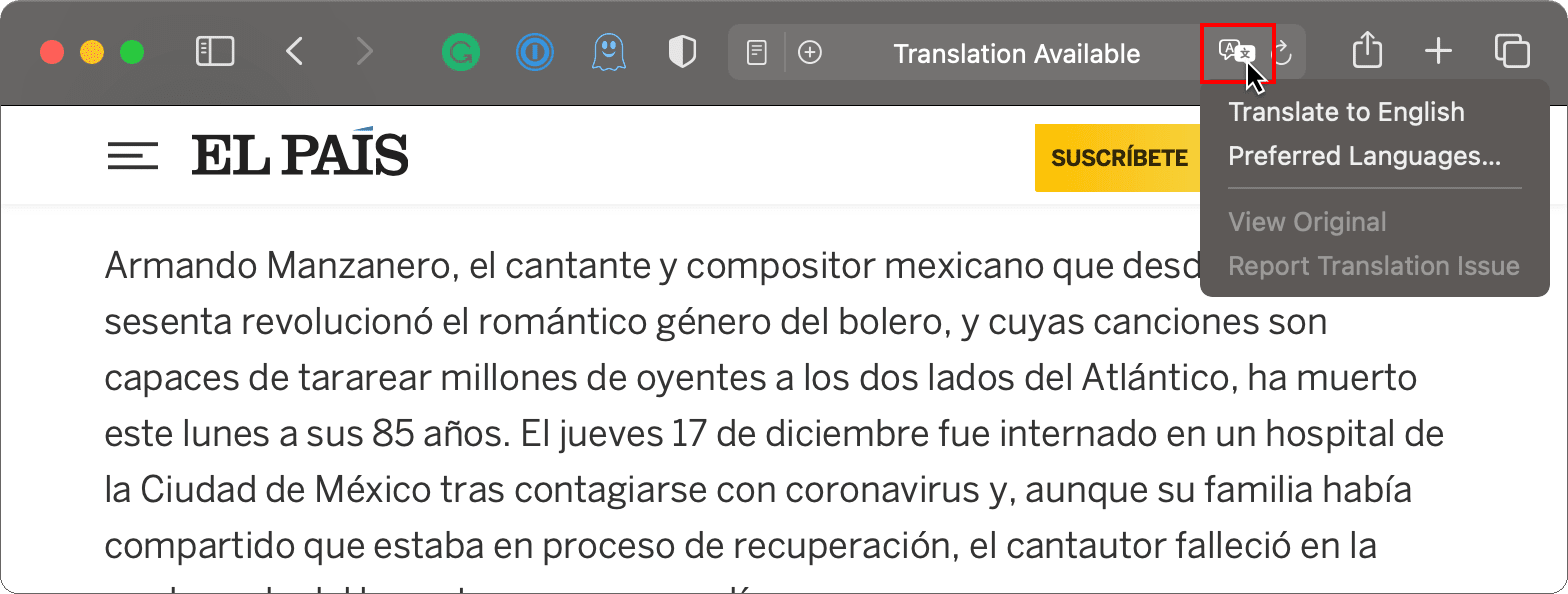
Preferred Languages
If you want to translate a page into a language other than English, go to the Apple menu and click System Preferences > Language & Region.
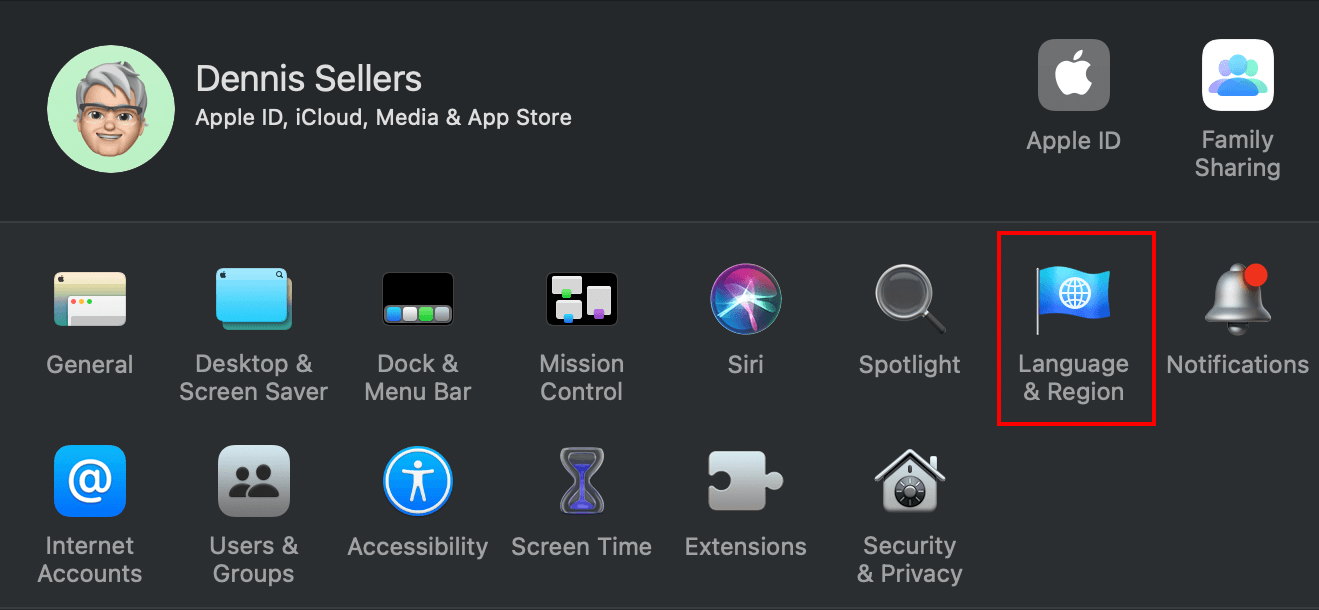
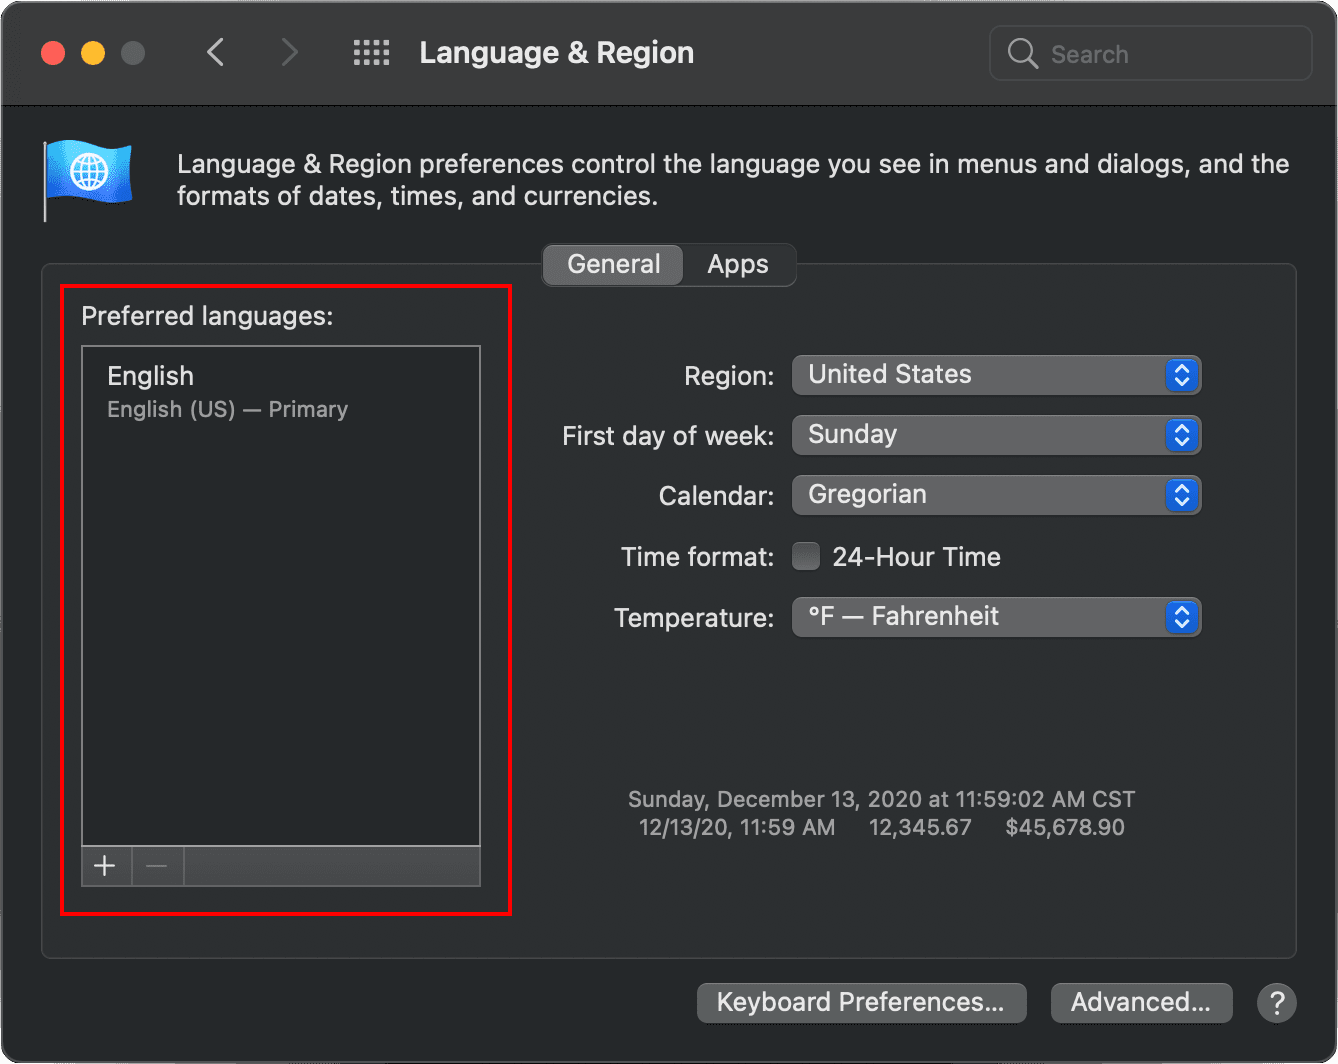
You’ll see the default preferred language on the left side of the window. To change it, click the “+” button at the bottom of the screen.
By the way, if the translate icon doesn’t show up, click the View option in the web browser’s menu bar and click Translate .
Related Links
- Friday Five: Amazing Things You Can Do with Google Chrome Browser on a Mac
- Converse with the World: The iOS 14 Translate App
- In the Vault: How to Encrypt Files On Your Mac
- iOS App Review: Word Lens
- Translating Apple’s New High Sierra & APFS Compatibility Document
Other Topics You Might Like:
Leave a Reply Cancel reply
Save my name, email, and website in this browser for the next time I comment.
Notify me of follow-up comments by email.
Notify me of new posts by email.
You Might Also Like

Apple Unveils New iPad Pro, Its Thinnest Product Ever with “World’s Most Advanced” OLED Display

M4 is Here: Apple’s Latest Chip Adds Dedicated Display Engine

Apple Adds External Drive Editing, Multicam Production in Final Cut Pro for iPad 2
How To Share Passwords With Others in macOS Sonoma Using iCloud Keychain
Email Address

- Brand Assets

8 Galaxy Way Woodstock, IL 60098 1-800-275-4576 +1-815-338-8685 (Int)
All Rights Reserved, Copyright 2020, OWC – Since 1988 | Terms of Use | Privacy Policy
We use cookies to provide you with a full shopping experience, including personalized content, and to help us improve your experience. To learn more, click here .
By continuing to use our site, you accept our use of Cookies, Privacy Policy and Terms of Use .
How to translate a page in Safari on iPhone, iPad, and Mac
Learn how to use Apple’s built-in translation tool to translate web pages in Safari on iPhone, iPad, and Mac if you come across a website that’s in a language you can’t read or understand.

Supported devices and languages
You can use Apple’s native web page translation feature inside Safari on an iPhone, iPad, and Mac running iOS 14, iPadOS 14, or macOS Big Sur and later to translate into the following languages :
- Chinese (Simplified)
- Chinese (Traditional)
- Portuguese (Brazil)
This method requires no third-party app download or Siri shortcut installation.
How to translate a web page in Safari
On iphone or ipad.
- Visit the website you want to translate in Safari.
- Tap AA from the address bar and choose Translate to English or a language you see there.
- The first time you do this, Apple will ask your permission to process your request. Tap Enable Translation .
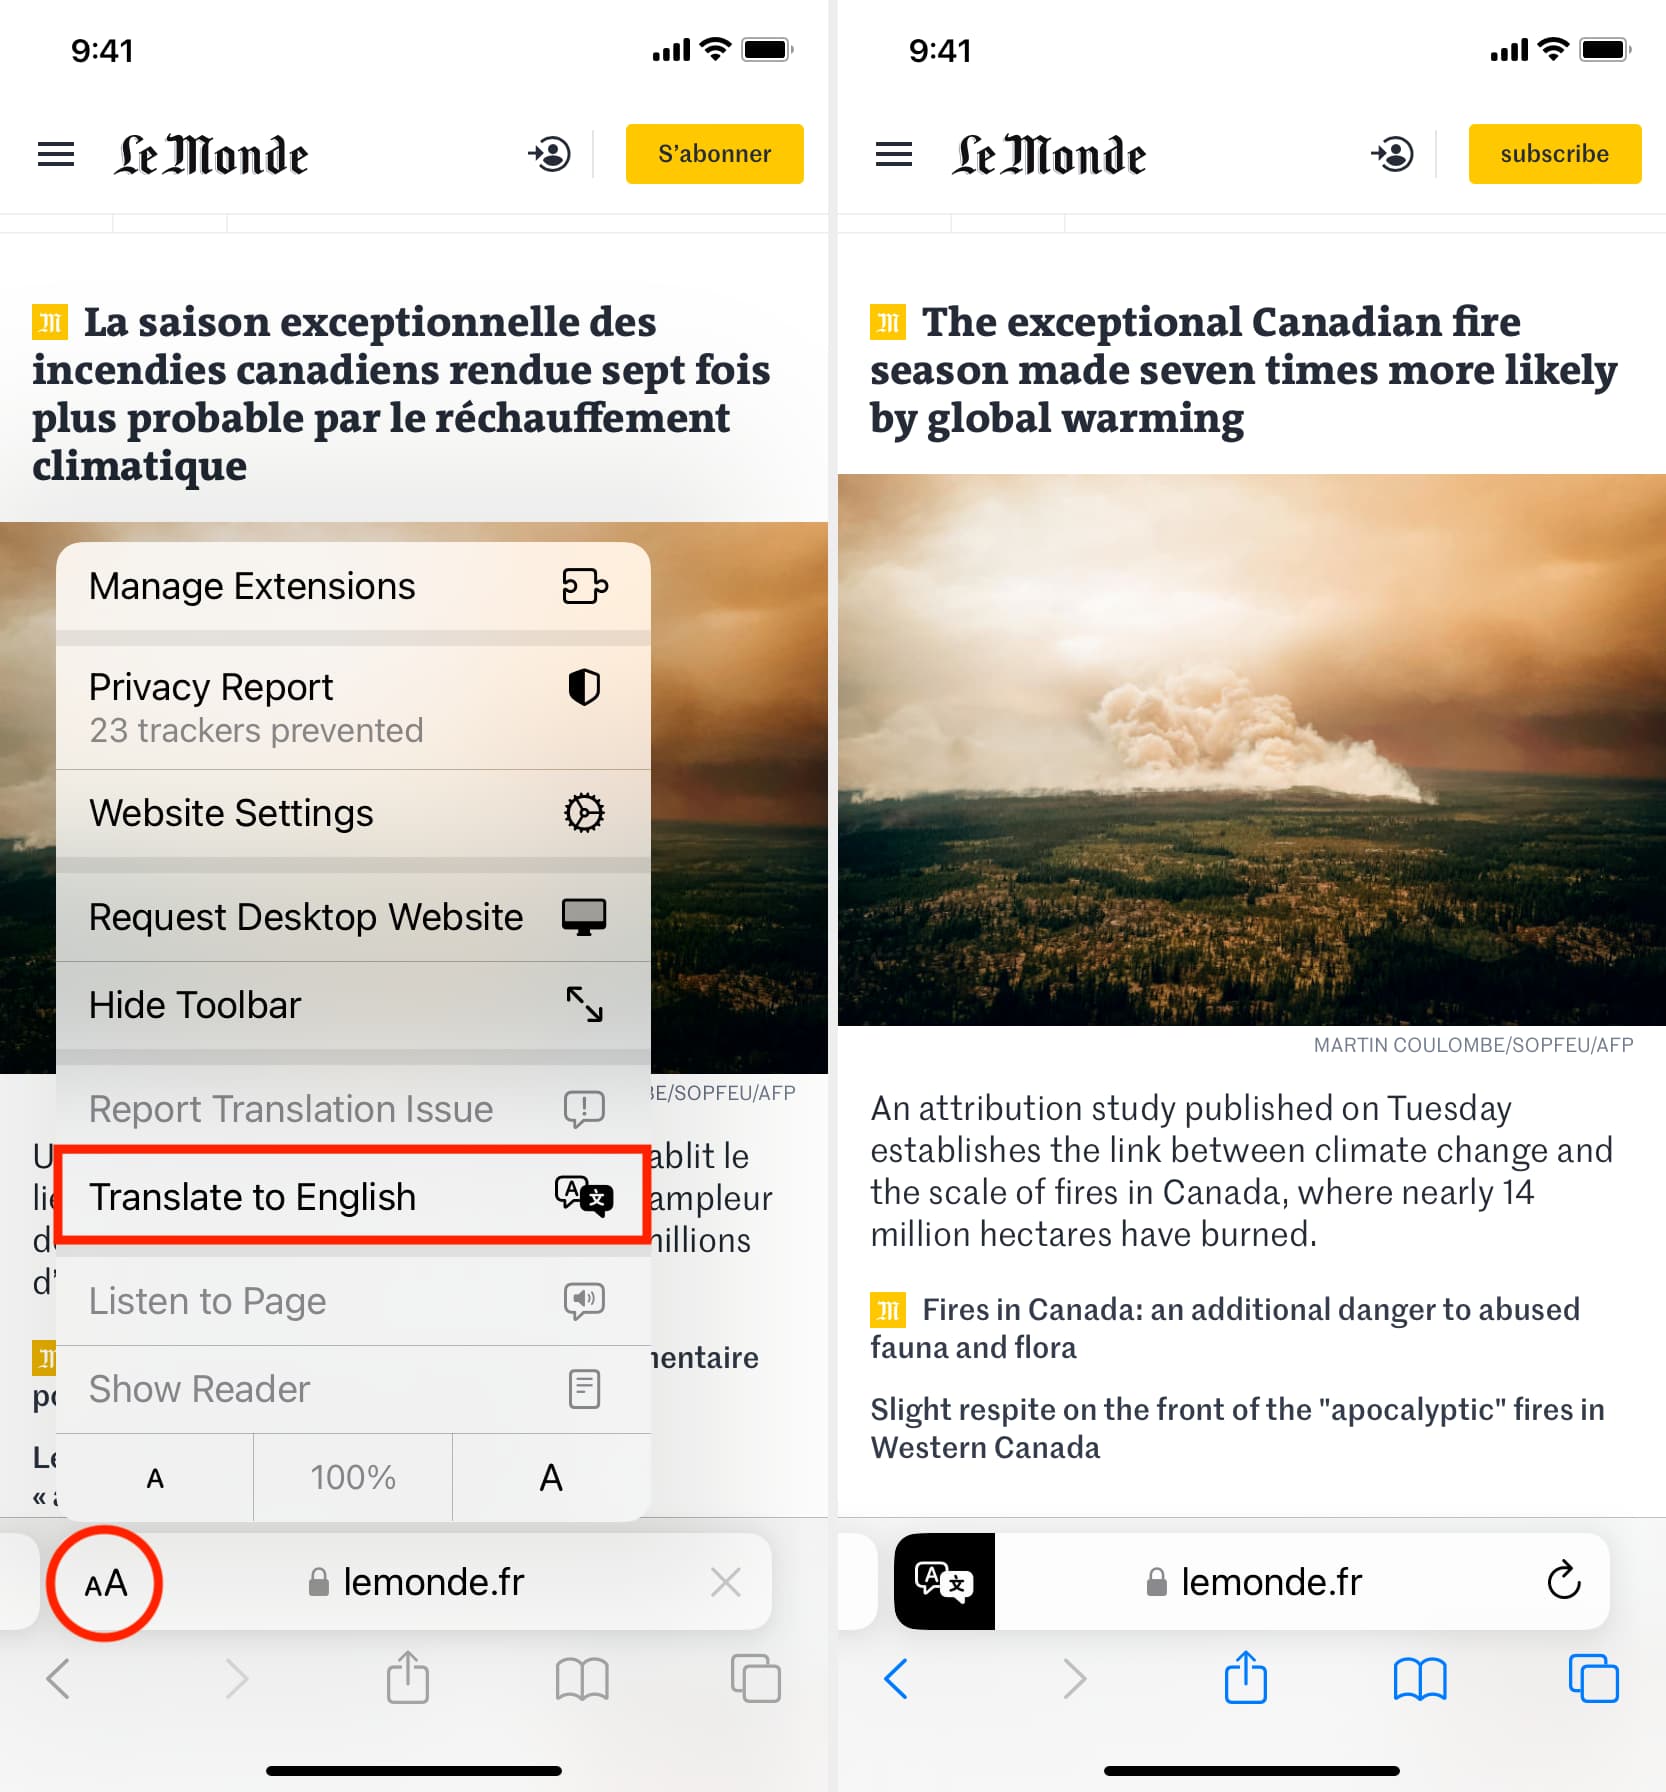
- View the website in Safari.
- Click the translate icon , and choose Translate to English or a language visible here.
- Click Enable Translation if this is the first time you’re using this service.

Using Apple’s web page translation
- Automatic translation: After translating one web page on a website, if you tap another link on that same site (domain) in the same original language, Safari should automatically translate it to your chosen language so you don’t have to follow the translation steps again and again while reading that website.
- View Original: After you follow the above steps, you can tap the AA button on iOS or the translate icon on Mac and choose View Original to get back to the original language of that web page.
- Inform Apple of issues: If you think the translation provided by Apple in Safari is incorrect, inappropriate, or broken, use the Report Translation Issue button, pick an appropriate reason, and hit Report to submit your feedback.

Add more language to Safari translation
Apple says that “ the availability of translations and the number of languages that can be translated may vary by country or region .”
With that in mind, you can have more options for Safari translation by adding that language to your system’s language settings.
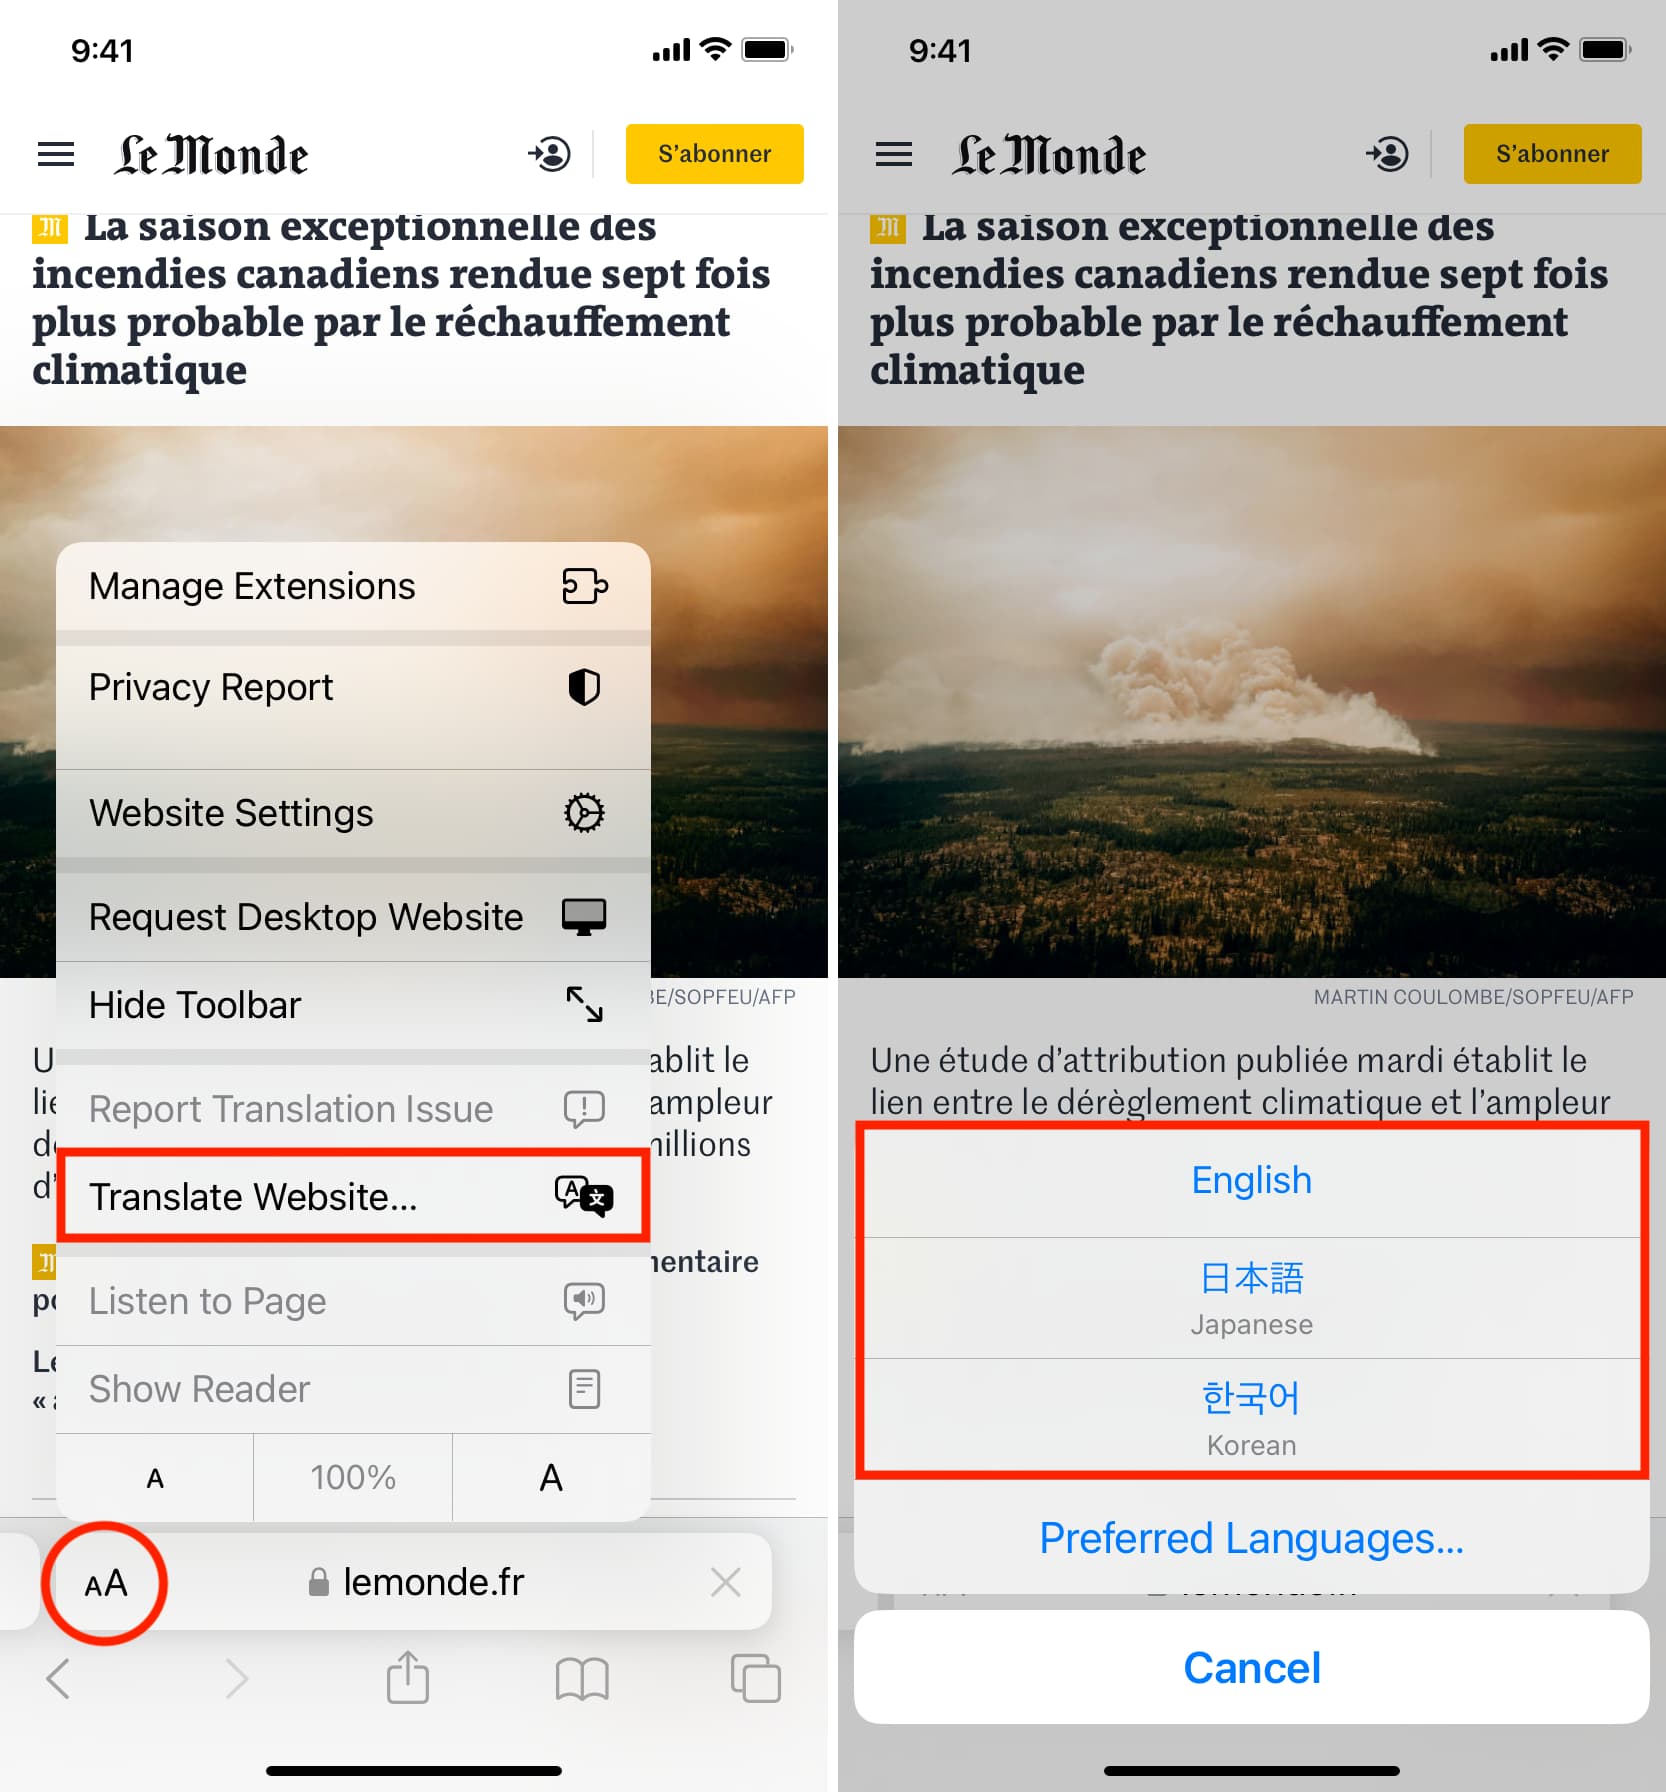
Go to Settings > General > Language & Region > Add Language and select a language . Now, you can choose to set this new language as your primary system language for all menus, settings, and everything. However, if you only need to use it for translation, tap Use English (or your current system language). This will add the new language to your iPhone but still keep English as the primary system language.
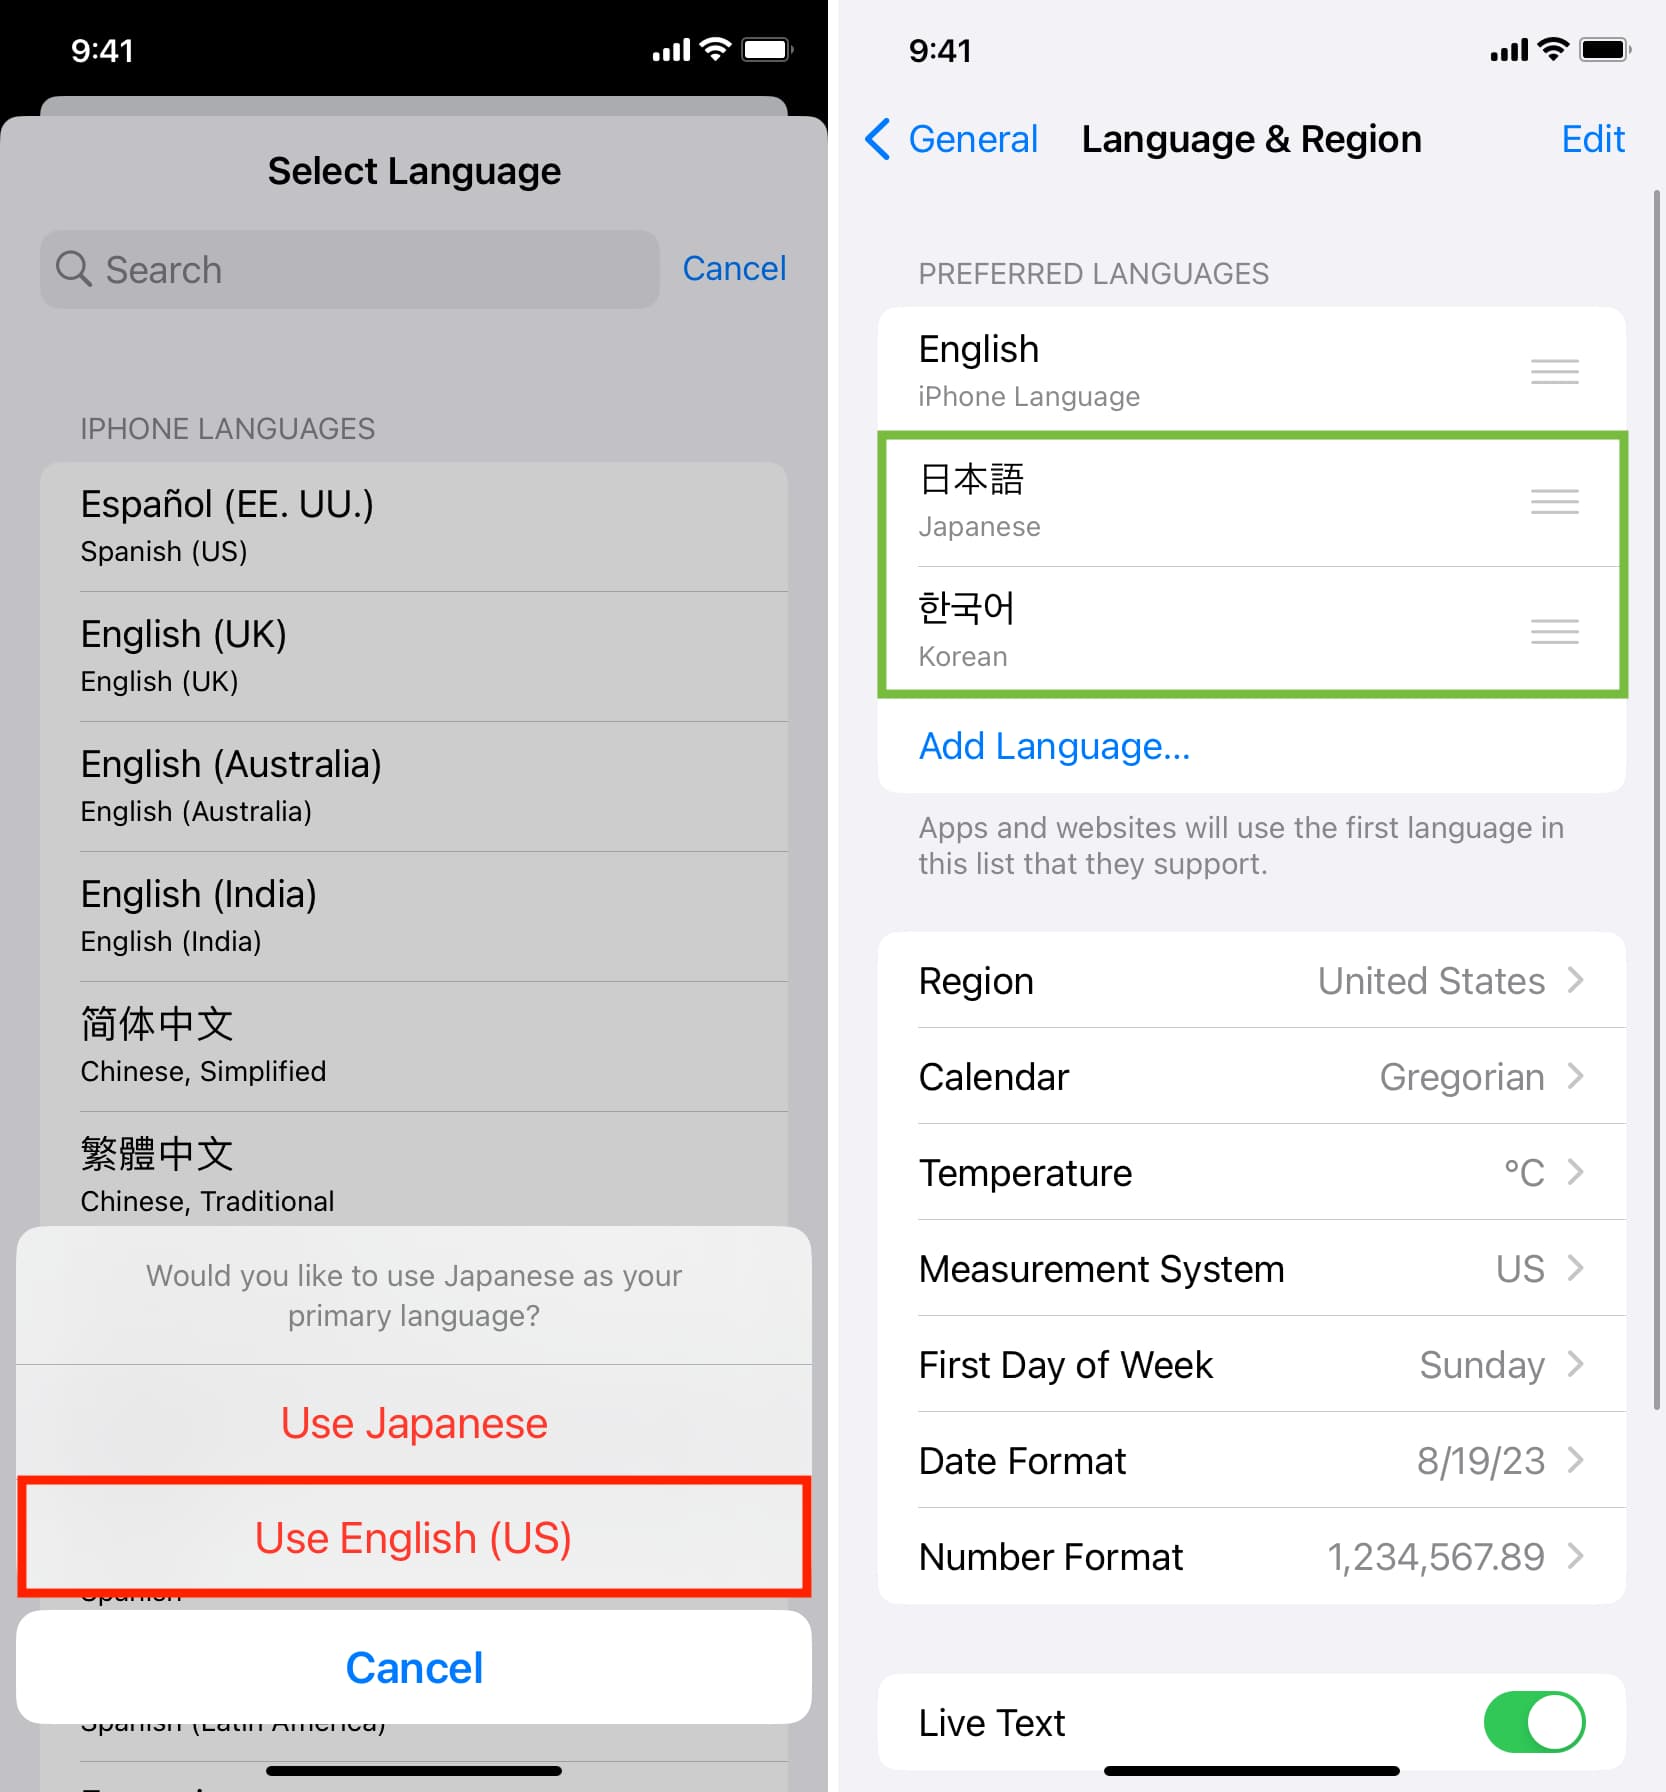
Now go to Safari, and it should automatically refresh your open web pages. After that, follow the above steps, and you will see Translate Website instead of Translate to English. Tap Translate Website and pick a language .
Click the translate icon in the Safari address bar and choose Preferred Languages . You can also reach this setting screen by going to System Settings > General > Language & Region . Now, click the plus button (+) under the Preferred Languages heading, choose your language, and click Add . Like the iPhone, you can use the new language as your system language or continue to use English. After this, if you’re prompted to add this new language to your Mac’s keyboard, you can hit Cancel .
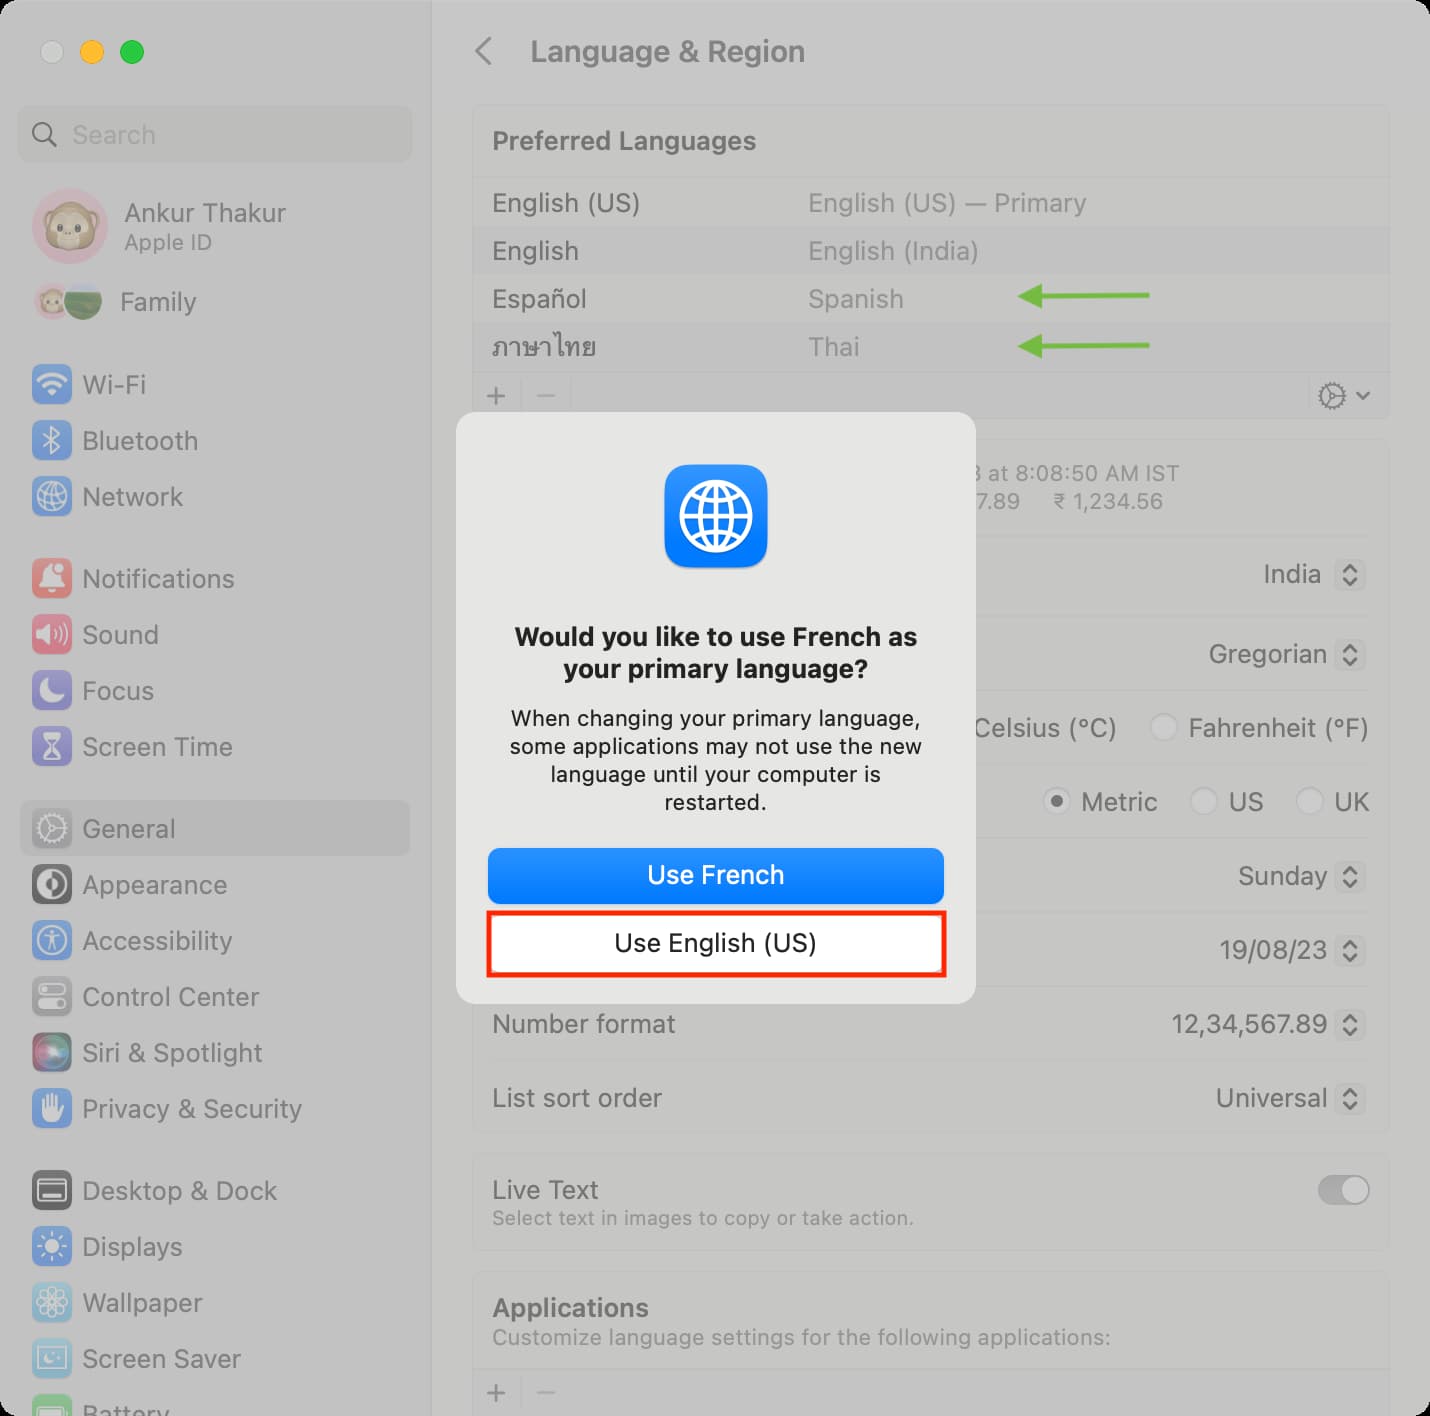
Next, visit Safari, and you should see the option to Translate to the newly added language .

Restart your device if you don’t see the language for translation in Safari even after adding it by following the above steps.
On the same note:
- How to translate words, sentences, and text found in images in Safari, Notes, Photos, and other apps
- How to set up and use multilingual typing on iPhone
- How to download languages in the Translate app to your iPhone or iPad for offline translation
Voice speed
Text translation, source text, translation results, document translation, drag and drop.

Website translation
Enter a URL
Image translation
How to quickly translate web pages in Safari on iOS and iPadOS
Easily translate web pages in Safari for iPhone and iPad.
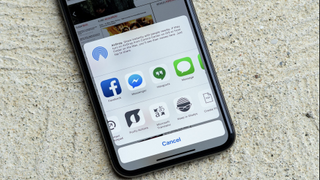
- How to translate web pages in Safari in iOS 16 and iPadOS 16
How to activate the Microsoft Translator extension in Safari
How to translate a web page on iphone with microsoft translator.
If you're running iOS 14 or later, Safari now comes with a translation feature baked into the browser, making it easier than ever to translate a web page on iPhone and iPad.
Once enabled, text is translated in-line on the webpage that you're viewing. It's a handy tool if you want to read websites that are written in different languages, and it's available right in the address bar in Safari.
With this in mind, here's how you can translate web pages in Safari on iPhone and iPad.
How to translate a web page on iPhone in iOS 16 and iPadOS 16
In iOS 15 and later, the ability to translate a web page's language to your native language is now a built-in part of Safari. As such, you no longer need a third-party app to translate. Here's how to use built-in language translation in Safari in iOS 14, iOS 15, and later.
- Tap the action button on the left side of the address bar while visiting a site that you need to translate. The button looks like two A's next to each other.
- Tap Translate to [Your Device Language] .

- Tap Enable Translation if prompted.
Your page will then be translated into the primary language that you've set on your device. If you want to revert back to the page's original language, take the following steps.
- Tap the translate button in the Safari address bar. It takes the place of the standard action button on the left side of the address bar.
- Tap View Original .

The page will revert to its original language.
If you're running a version of iOS 13 or earlier on your device, then a third-party app with a translation extension is what you'll want to use. Microsoft's Translator extension is an excellent tool for the task, as it translates the web page in place when activated.
Master your iPhone in minutes
iMore offers spot-on advice and guidance from our team of experts, with decades of Apple device experience to lean on. Learn more with iMore!

Microsoft Translator
Microsoft Translator is a great third-party solution for translating web pages, and its translations take place in-line on the web, rather than taking you to another, translated version of the page like some other apps.
Once you've got it downloaded, you can set up the action extension for translation web pages.
- Open Safari on your iPhone or iPad.
- While viewing a web page, tap the share button .
- Scroll to the left on the bottom row of icons.

- Tap the More button.
- Turn the switch next to Microsoft Translator to the green 'on' position.
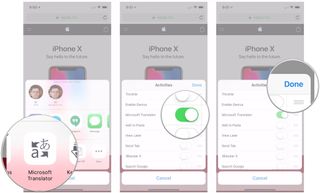
Now that you have the app installed, you can use it in Safari from the share menu.
- Head to the web page that you want to translate.
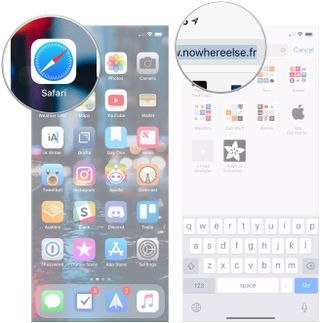
- Tap the share button at the bottom of the display.
- Tap the Microsoft Translator button. The extension will then translate the entire page for you.

Looking to upgrade your iPhone? Make sure you're getting the best price by checking in with our guides. We've got you covered for iPhone 14 deals and the larger model's iPhone 14 Plus deals . If you're looking for a fancy upgrade, complete with the Dynamic Island feature, then the iPhone 14 Pro deals , and iPhone 14 Pro Max deals can help cut down those monthly fees and help maximize your trade-in options.
In the market for a new iPad? Check out the best iPad deals guide. Happy translating!
Updated September 2022: Added information instructions for the translation feature in iOS 14, iOS 15, iPadOS 14, and iPadOS 15.
Joseph Keller is the former Editor in Chief of iMore. An Apple user for almost 20 years, he spends his time learning the ins and outs of iOS and macOS, always finding ways of getting the most out of his iPhone, iPad, Apple Watch, and Mac.
- Nicolette Roux Contributor
Apple's AI announcements won't be "nearly as impressive" as OpenAI & Google's, but there's still big stuff coming at WWDC
Google shows off new Gemini conversational AI capabilities as it becomes increasingly clear how far Apple's Siri has fallen
Apple announces the best album of all time, and everyone is saying the same thing
Most Popular
- 2 Have you forgotten about your iPhone 15 Pro's Action button? Give this "Super" shortcut a try
- 3 Figures reveal the surprisingly long life of old iPads— 67% of owners keep or pass on their old devices
- 4 iPhone 16 Pro Max camera leak points to two brand new 48MP sensors, including all-new Ultra Wide
- 5 Early Qualcomm Snapdragon X Elite benchmarks lag behind Apple's M3 equivalent and can't get near its brand-new M4
- a. Send us an email
- b. Anonymous form
- Buyer's Guide
- Upcoming Products
- Tips / Contact Us
- Podcast Instagram Facebook Twitter Mastodon YouTube Notifications RSS Newsletter
Translate Webpages in Safari on iPhone and iPad
On iPhone and iPad , Apple includes a Translate app that can translate several different languages in real-time, and Safari has integrated translation capabilities, too.
At the time of writing, supported languages include English, Spanish, French, Italian, German, Russian, Portuguese, Japanese, Chinese, Korean, Ukrainian, Polish, Arabic, Dutch, Indonesian, Thai, Turkish, and Vietnamese.
How Translate a Webpage in Safari


Add More Language Options to Safari Webpage Translation
You can translate web content into additional languages if you add them to your preferred languages list. The following steps show you how it's done.
- Launch the Settings app on your iPhone and iPad.
- Tap General -> Language & Region .
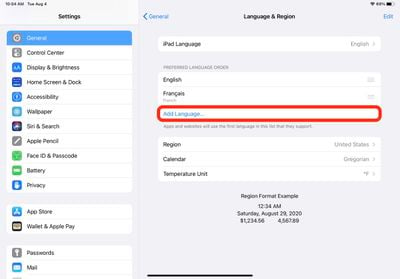
- Select a language from the list.
- Tap your preferred language to keep the current language that the system is using, thereby confirming this selection as an additional Webpage Translation language option.
After following the above steps, the next time you visit a compatible webpage in another language you'll see your selected languages available as additional translation options.
Get weekly top MacRumors stories in your inbox.
Popular Stories

iPhone SE 4 With Face ID Said to Be Priced Below $500

Apple Releases iOS 17.5.1 With Fix for Reappearing Photos Bug

5 Biggest Changes Rumored for iPhone 16 Pro Max

Microsoft Says New Surface Pro is Faster Than 15" M3 MacBook Air

iPhone 16 Lineup Rumored to Come in These Two New Colors
Next article.

Our comprehensive guide highlighting every major new addition in iOS 17, plus how-tos that walk you through using the new features.

Apple News+ improvements, cross-platform tracker alerts, website app downloads for the EU, and more.

Get the most out your iPhone 15 with our complete guide to all the new features.
A deep dive into new features in macOS Sonoma, big and small.

Apple's annual Worldwide Developers Conference will kick off with a keynote on June 10.

Expected to see new AI-focused features and more. Preview coming at WWDC in June with public release in September.

AI-focused improvements, new features for Calculator and Notes, and more.

Action button expands to all models, new Capture button, camera improvements, and more.
Other Stories

1 day ago by Tim Hardwick

2 days ago by Tim Hardwick

3 days ago by Tim Hardwick

1 week ago by Tim Hardwick

Immersive Translate - Translate Web & PDF
Description.
Mac keyboard shortcuts
By pressing certain key combinations, you can do things that normally need a mouse, trackpad, or other input device.
Using keyboard shortcuts
Common shorcuts like cut, copy, paste
Sleep, log out, and shut down shortcuts
Finder and system shortcuts, document shortcuts, accessibility shortcuts, other shortcuts.
To use a keyboard shortcut, press and hold one or more modifier keys and then press the last key of the shortcut. For example, to use Command-C (copy), press and hold the Command key, then the C key, then release both keys. Mac menus and keyboards often use symbols for certain keys , including modifier keys:
Command (or Cmd) ⌘
Option (or Alt) ⌥
Control (or Ctrl) ⌃
Caps Lock ⇪
On keyboards made for Windows PCs, use the Alt key instead of Option, and the Ctrl key or Windows logo key instead of Command.
Cut, copy, paste, and other common shortcuts
Command-X : Cut the selected item and copy it to the Clipboard.
Command-C : Copy the selected item to the Clipboard. This also works for files in the Finder.
Command-V : Paste the contents of the Clipboard into the current document or app. This also works for files in the Finder.
Command-Z : Undo the previous command. You can then press Shift-Command-Z to Redo, reversing the undo command. In some apps, you can undo and redo multiple commands.
Command-A : Select All items.
Command-F : Find items in a document or open a Find window.
Command-G : Find Again: Find the next occurrence of the item previously found. To find the previous occurrence, press Shift-Command-G.
Command-H : Hide the windows of the front app. To view the front app but hide all other apps, press Option-Command-H.
Command-M : Minimize the front window to the Dock. To minimize all windows of the front app, press Option-Command-M.
Command-O: Open the selected item, or open a dialog to select a file to open.
Command-P : Print the current document.
Command-S : Save the current document.
Command-T : Open a new tab.
Command-W : Close the front window. To close all windows of the app, press Option-Command-W.
Option-Command-Esc : Force quit an app.
Command–Space bar : Show or hide the Spotlight search field. To perform a Spotlight search from a Finder window, press Command–Option–Space bar. (If you use multiple input sources to type in different languages, these shortcuts change input sources instead of showing Spotlight. Learn how to change a conflicting keyboard shortcut .)
Control–Command–Space bar : Show the Character Viewer, from which you can choose emoji and other symbols .
Control-Command-F : Use the app in full screen, if supported by the app.
Space bar : Use Quick Look to preview the selected item.
Command-Tab : Switch to the next most recently used app among your open apps.
Command–Grave accent (`): Switch between the windows of the app you're using. (The character on the second key varies by keyboard. It's generally the key above the Tab key and to the left of the number 1.)
Shift-Command-5 : In macOS Mojave or later , take a screenshot or make a screen recording. Or use Shift-Command-3 or Shift-Command-4 for screenshots. Learn more about screenshots .
Shift-Command-N: Create a new folder in the Finder.
Command-Comma (,) : Open preferences for the front app.
You might need to press and hold some of these shortcuts for slightly longer than other shortcuts. This helps you to avoid using them unintentionally.
Power button : Press to turn on your Mac or wake it from sleep. Press and hold for 1.5 seconds to put your Mac to sleep.* Continue holding to force your Mac to turn off.
Control–Command–Power button :* Force your Mac to restart, without prompting to save any open and unsaved documents.
Control-Command-Q : Immediately lock your screen.
Shift-Command-Q : Log out of your macOS user account. You will be asked to confirm. To log out immediately without confirming, press Option-Shift-Command-Q.
* Does not apply to the Touch ID sensor .
Command-D : Duplicate the selected files.
Command-E : Eject the selected disk or volume.
Command-F : Start a Spotlight search in the Finder window.
Command-I : Show the Get Info window for a selected file.
Command-R : (1) When an alias is selected in the Finder: show the original file for the selected alias. (2) In some apps, such as Calendar or Safari, refresh or reload the page. (3) In Software Update, check for software updates again.
Shift-Command-C : Open the Computer window.
Shift-Command-D : Open the desktop folder.
Shift-Command-F : Open the Recents window, showing all of the files you viewed or changed recently.
Shift-Command-G : Open a Go to Folder window.
Shift-Command-H : Open the Home folder of the current macOS user account.
Shift-Command-I : Open iCloud Drive.
Shift-Command-K : Open the Network window.
Option-Command-L : Open the Downloads folder.
Shift-Command-N: Create a new folder.
Shift-Command-O : Open the Documents folder.
Shift-Command-P : Show or hide the Preview pane in Finder windows.
Shift-Command-R : Open the AirDrop window.
Shift-Command-T : Show or hide the tab bar in Finder windows.
Control-Shift-Command-T : Add selected Finder item to the Dock (OS X Mavericks or later)
Shift-Command-U : Open the Utilities folder.
Option-Command-D : Show or hide the Dock.
Control-Command-T : Add the selected item to the sidebar (OS X Mavericks or later).
Option-Command-P : Hide or show the path bar in Finder windows.
Option-Command-S : Hide or show the Sidebar in Finder windows.
Command–Slash (/) : Hide or show the status bar in Finder windows.
Command-J : Show View Options.
Command-K : Open the Connect to Server window.
Control-Command-A : Make an alias of the selected item.
Command-N : Open a new Finder window.
Option-Command-N : Create a new Smart Folder.
Command-T : Show or hide the tab bar when a single tab is open in the current Finder window.
Option-Command-T : Show or hide the toolbar when a single tab is open in the current Finder window.
Option-Command-V : Move the files in the Clipboard from their original location to the current location.
Command-Y : Use Quick Look to preview the selected files.
Option-Command-Y : View a Quick Look slideshow of the selected files.
Command-1 : View the items in the Finder window as icons.
Command-2 : View the items in a Finder window as a list.
Command-3 : View the items in a Finder window in columns.
Command-4 : View the items in a Finder window in a gallery.
Command–Left Bracket ([) : Go to the previous folder.
Command–Right Bracket (]) : Go to the next folder.
Command–Up Arrow : Open the folder that contains the current folder.
Command–Control–Up Arrow : Open the folder that contains the current folder in a new window.
Command–Down Arrow : Open the selected item.
Right Arrow : Open the selected folder. This works only when in list view.
Left Arrow : Close the selected folder. This works only when in list view.
Command-Delete : Move the selected item to the Trash.
Shift-Command-Delete : Empty the Trash.
Option-Shift-Command-Delete : Empty the Trash without confirmation dialog.
Command–Brightness Down : Turn video mirroring on or off when your Mac is connected to more than one display.
Option–Brightness Up : Open Displays preferences. This works with either Brightness key.
Control–Brightness Up or Control–Brightness Down : Change the brightness of your external display, if supported by your display.
Option–Shift–Brightness Up or Option–Shift–Brightness Down : Adjust the display brightness in smaller steps. Add the Control key to this shortcut to make the adjustment on your external display, if supported by your display.
Option–Mission Control : Open Mission Control preferences.
Command–Mission Control : Show the desktop.
Control–Down Arrow : Show all windows of the front app.
Option–Volume Up : Open Sound preferences. This works with any of the volume keys.
Option–Shift–Volume Up or Option–Shift–Volume Down : Adjust the sound volume in smaller steps.
Option–Keyboard Brightness Up : Open Keyboard preferences. This works with either Keyboard Brightness key.
Option–Shift–Keyboard Brightness Up or Option–Shift–Keyboard Brightness Down : Adjust the keyboard brightness in smaller steps.
Option key while double-clicking : Open the item in a separate window, then close the original window.
Command key while double-clicking : Open a folder in a separate tab or window.
Command key while dragging to another volume : Move the dragged item to the other volume, instead of copying it.
Option key while dragging : Copy the dragged item. The pointer changes while you drag the item.
Option-Command while dragging : Make an alias of the dragged item. The pointer changes while you drag the item.
Option-click a disclosure triangle : Open all folders within the selected folder. This works only when in list view.
Command-click a window title : See the folders that contain the current folder.
Learn how to use Command or Shift to select multiple items in the Finder .
Click the Go menu in the Finder menu bar to see shortcuts for opening many commonly used folders, such as Applications, Documents, Downloads, Utilities, and iCloud Drive.
The behavior of these shortcuts may vary with the app you're using.
Command-B : Boldface the selected text, or turn boldfacing on or off.
Command-I : Italicize the selected text, or turn italics on or off.
Command-K : Add a web link.
Command-U : Underline the selected text, or turn underlining on or off.
Command-T : Show or hide the Fonts window.
Command-D : Select the Desktop folder from within an Open dialog or Save dialog.
Control-Command-D : Show or hide the definition of the selected word.
Shift-Command-Colon (:) : Display the Spelling and Grammar window.
Command-Semicolon (;) : Find misspelled words in the document.
Option-Delete : Delete the word to the left of the insertion point.
Control-H : Delete the character to the left of the insertion point. Or use Delete.
Control-D : Delete the character to the right of the insertion point. Or use Fn-Delete.
Fn-Delete : Forward delete on keyboards that don't have a Forward Delete key. Or use Control-D.
Control-K : Delete the text between the insertion point and the end of the line or paragraph.
Fn–Up Arrow : Page Up: Scroll up one page.
Fn–Down Arrow : Page Down: Scroll down one page.
Fn–Left Arrow: Home: Scroll to the beginning of a document.
Fn–Right Arrow : End: Scroll to the end of a document.
Command–Up Arrow : Move the insertion point to the beginning of the document.
Command–Down Arrow : Move the insertion point to the end of the document.
Command–Left Arrow : Move the insertion point to the beginning of the current line.
Command–Right Arrow : Move the insertion point to the end of the current line.
Option–Left Arrow : Move the insertion point to the beginning of the previous word.
Option–Right Arrow : Move the insertion point to the end of the next word.
Shift–Command–Up Arrow : Select the text between the insertion point and the beginning of the document.
Shift–Command–Down Arrow : Select the text between the insertion point and the end of the document.
Shift–Command–Left Arrow : Select the text between the insertion point and the beginning of the current line.
Shift–Command–Right Arrow : Select the text between the insertion point and the end of the current line.
Shift–Up Arrow : Extend text selection to the nearest character at the same horizontal location on the line above.
Shift–Down Arrow : Extend text selection to the nearest character at the same horizontal location on the line below.
Shift–Left Arrow : Extend text selection one character to the left.
Shift–Right Arrow : Extend text selection one character to the right.
Option–Shift–Up Arrow : Extend text selection to the beginning of the current paragraph, then to the beginning of the following paragraph if pressed again.
Option–Shift–Down Arrow : Extend text selection to the end of the current paragraph, then to the end of the following paragraph if pressed again.
Option–Shift–Left Arrow : Extend text selection to the beginning of the current word, then to the beginning of the following word if pressed again.
Option–Shift–Right Arrow : Extend text selection to the end of the current word, then to the end of the following word if pressed again.
Control-A : Move to the beginning of the line or paragraph.
Control-E : Move to the end of a line or paragraph.
Control-F : Move one character forward.
Control-B : Move one character backward.
Control-L : Center the cursor or selection in the visible area.
Control-P : Move up one line.
Control-N : Move down one line.
Control-O : Insert a new line after the insertion point.
Control-T : Swap the character behind the insertion point with the character in front of the insertion point.
Command–Left Curly Bracket ({) : Left align.
Command–Right Curly Bracket (}) : Right align.
Shift–Command–Vertical bar (|) : Center align.
Option-Command-F : Go to the search field.
Option-Command-T : Show or hide a toolbar in the app.
Option-Command-C : Copy Style: Copy the formatting settings of the selected item to the Clipboard.
Option-Command-V : Paste Style: Apply the copied style to the selected item.
Option-Shift-Command-V : Paste and Match Style: Apply the style of the surrounding content to the item pasted within that content.
Option-Command-I : Show or hide the inspector window.
Shift-Command-P : Page setup: Display a window for selecting document settings.
Shift-Command-S : Display the Save As dialog, or duplicate the current document.
Shift–Command–Minus sign (-) : Decrease the size of the selected item.
Shift–Command–Plus sign (+) : Increase the size of the selected item. Command–Equal sign (=) performs the same function.
Shift–Command–Question mark (?) : Open the Help menu.
To use these vision shortcuts, first choose Apple menu > System Settings (or System Preferences), then click Keyboard. Click Keyboard Shortcuts, select Accessibility on the left, then select “Invert colors” and "Contrast" on the right.
Control-Option-Command-8 : Invert colors.
Control-Option-Command-Comma (,) and Control-Option-Command-Period (.) : Reduce contrast and increase contrast.
Use these shortcuts to change keyboard focus. To use some of these shortcuts, first choose Apple menu > System Settings (or System Preferences), then click Keyboard. Click Keyboard Shortcuts, select Keyboard on the left, then select the shortcut's setting on the right.
Control-F2 or Fn-Control-F2: Move focus to the menu bar. You can then use the arrow keys to navigate the menu, press Return to open a selected menu or choose a selected menu item, or type the menu item's name to jump to that item in the selected menu.
Control-F3 or Fn-Control-F3 : Move focus to the Dock.
Control-F4 or Fn-Control-F4 : Move focus to the active window or next window.
Control-F5 or Fn-Control-F5 : Move focus to the window toolbar.
Control-F6 or Fn-Control-F6: Move focus to the floating window.
Control-Shift-F6 : Move focus to the previous panel.
Control-F7 or Fn-Control-F7 : Change the way Tab moves focus—between navigation of all controls on the screen, or only text boxes and lists.
Control-F8 or Fn-Control-F8 : Move focus to the status menu in the menu bar
Command–Grave accent (`) : Activate the next open window in the front app.
Shift–Command–Grave accent (`) : Activate the previous open window in the front app
Option–Command–Grave accent (`) : Move the focus to the window drawer.
Tab and Shift-Tab : Move to next control, move to previous control.
Control-Tab : Move to the next control when a text field is selected.
Control-Shift-Tab : Move to the previous grouping of controls.
Arrow keys : Move to the adjacent item in a list, tab group, or menu, or move sliders and adjusters (Up Arrow to increase values, Down Arrow to decrease values)
Control–Arrow keys : Move to a control adjacent to the text field.
Other accessibility shortcuts:
Option-Command-F5 or triple-press Touch ID : Show the Accessibility Shortcuts panel .
VoiceOver commands
Zoom in or out
Use Mouse Keys to control the pointer with your keyboard
If you're using VoiceOver, you might need to make VoiceOver ignore the next key press before you can use some of the shortcuts in this article.
Safari shortcuts
Spotlight shortcuts
Mail shortcuts
Photos shortcuts
Disk Utility shortcuts
Preview shortcuts
Apple Music shortcuts
Startup shortcuts
For more shortcuts, check the shortcut abbreviations shown in the menus of your apps. Every app can have its own shortcuts, and shortcuts that work in one app might not work in another.
Use emoji and symbols
Create your own shortcuts and resolve conflicts between shortcuts
Change the behavior of the function keys or modifier keys
Use a spoken command for a keyboard shortcut
Explore Apple Support Community
Find what’s been asked and answered by Apple customers.
- Meta Quest 4
- Google Pixel 9
- Google Pixel 8a
- Apple Vision Pro 2
- Nintendo Switch 2
- Samsung Galaxy Ring
- Yellowstone Season 6
- Recall an Email in Outlook
- Stranger Things Season 5
Real-time video translation comes to Microsoft Edge

Following up on the massive Copilot+ announcements from yesterday, Microsoft’s AI toolset keeps getting bigger and bigger. As part of its annual Microsoft Build develop conference, Microsoft has announced an update to Edge that grants it the power to translate videos to different languages in real time.
Microsoft affirms that the upcoming AI feature will translate videos on the browser to multiple languages using subtitles and/or dubbing in real time. Microsoft has not said if the option will be set by default or where the user can go to turn this feature on or off, but it could be somewhere in Settings .
To begin, the sites where the feature will be available are Reuters, YouTube, Bloomberg, CNBC News, Coursera, and more. We’ll have to wait and see what other sites fall into the “more” category and if other video platforms, such as Dailymotion or Vimeo, are added to the list.
The list of available languages for the new feature would’ve been better if it had been longer. Still, for now, Microsoft says that the confirmed options are English to Hindi, German, Russian, Italian, and Spanish — and, of course, Spanish to English. So far, several languages, such as Portuguese, Arabic, French, Korean, Japanese, and more, are missing from the list, but hopefully they will be added soon.
Plans exist to add more languages to the list as the feature begins its rollout. Whether this is a feature that can run on the neural processing units (NPUs) in the new Copilot+ PCs is unclear, though the feature appears to be available for all PCs.
Editors' Recommendations
- A ‘healthy’ PC means using Bing, according to Microsoft
- 5 web browsers you should use instead of Google Chrome or Edge
- Microsoft Edge is slowly becoming the go-to browser for PC gamers
- Microsoft Bing and Edge are getting a big DALL-E 3 upgrade
- Huge leak reveals Microsoft’s new laptops coming next week

Microsoft makes it easy to change the default browser in Windows 11. That's important if you require special features specific to one of the many web browsers that are available on a PC. Unfortunately, it's not as simple to be rid of Edge entirely.
Microsoft Edge will still load to open some other file types. When opening a link from Windows Settings or other system components, the webpage will load in Edge. That's now about to change, however, according to a recent Windows blog post.
Microsoft has announced a host of updates that will soon be available for its Edge browser, including the Microsoft 365 Copilot feature and Sidebar app support for developers.
The company is showcasing the new features during its annual Build developer conference, which is currently taking place from May 23 through May 25.
Many desktop browsers continue to compete for users, and in April 2023, Apple Safari overtook Microsoft Edge in global market share, according to data collected by StatCounter.
Though the browsers' market share was still neck-and-neck, Safari's April figures come in at 11.89%, while Edge closed the month at 10.95%. Even so, both browsers continue to lag behind Google Chrome, which maintains its number one spot with in excess of 60%, as pointed out by MSpoweruser.
How to Use Inspect Element in Chrome, Safari, & Firefox
Published: May 20, 2024
When I started my coding journey, I couldn’t always pinpoint what made a web page great — all of the code underneath that craft a well-designed experience. So, I would use the inspect element on my browser to peel back the curtain. Here, I could see how pages were coded so I could understand how to recreate elements for my own projects.

The inspect element feature lets us view and even modify any website’s front end. This simple trick can help you understand how websites work and even help you build your own.
In this post, I’ll discuss what it means to “inspect” page elements and how to do so on three common web browsers. If you’re in a pinch, jump ahead to what you’re looking for.
Table of Contents
How to Inspect Elements in Chrome
How to inspect elements in safari, how to inspect elements in firefox, get a closer look with inspect, what does “inspect element” mean.
Inspect element is a feature of modern web browsers that enables anyone to view and edit a website’s source code, including its HTML, CSS, JavaScript, and media files. When the source code is modified with the inspect tool, the changes are shown live inside the browser window.
Inspect is a web professional’s scout team. Developers, designers, and marketers frequently use it to peek inside any website (including their own) to preview content and style changes, fix bugs, or learn how a particular website is built. For instance, if I find an intriguing interface on a competing website, the inspect element lets me see the HTML and CSS that make it up.
I also think of my browser’s inspect feature as a “sandbox” of sorts. I can play around with a web page as much as I want by changing content, colors, fonts, layouts, etc. When finished, I just refresh the page to revert everything to normal.
Inspect doesn’t change the website itself — only how it appears in your browser. You can then experiment without worry!
Inspect is also an incredibly valuable tool for those learning web development. Instead of viewing plain source code, I can use the inspect element to interact with the page and see how each line of code maps to an element or style.
By better understanding what constitutes the typical web page, I can communicate effectively with developers in the case of an error or if I want to make a change.
Inspect may be a “developer tool,” but you don’t need to write any code or install any additional software to use it. You can do everything I’ve described right inside your browser. Let’s learn how.
How to Inspect Elements
To inspect elements, you have to right-click any part of a web page and click Inspect > Inspect Element. Alternatively, you can press Command+Option+i on your Mac or F12 on your PC to do the same.
Every modern web browser has a native tool for inspecting elements. It can be accessed in any browser, but some browsers like Chrome and Safari have slight differences. Let’s discuss how to use the inspect tool in three desktop web browsers: Google Chrome, Apple’s Safari, and Mozilla Firefox.
Chrome comes with a handy developer tool that allows you to inspect individual elements. This allows you to see the code behind a web page and even edit it on your own browser. (Note that the changes are only visible to you, not to anyone else across the web.)
Here's how to get started.

Free Guide: 25 HTML & CSS Coding Hacks
Tangible tips and coding templates from experts to help you code better and faster.
- Coding to Convention
- Being Browser-Friendly
- Minimizing Bugs
- Optimizing Performance
You're all set!
Click this link to access this resource at any time.
1. Launch Chrome and navigate to the page you want to inspect.
To use the element inspector in Google Chrome, I first navigate to any web page. In these examples, I’ll be using HubSpot.com .
2. Open up the Inspect panel.
Once I arrive at my desired page, I have several ways to open Chrome's Inspect tool.
- Option 1 : I can right-click any part of the page and choose Inspect . Right-clicking a specific page element will open that element in the inspector view.
- Option 2 : In the top menu bar, I can select View > Developer > Developer Tools .
- Option 3: I can click the three-dot icon in the top right corner of the browser window. From there, I can choose More Tools > Developer Tools . Then, I can click the Inspect tab in the popup.
- Option 4 : I can use the shortcut control-shift-C on Windows or command-option-C on macOS.
3. Change the location of the inspect panel.
To better view the code, I can change the position of the inspector window.
The Chrome Developer Tools panel will open at the bottom of the browser window, but sometimes it opens in a separate window altogether.
If I want to change the location of the panel, I can click the three-dots icon in the top right corner of the panel (next to the X icon), and then choose my preferred dock position.
Pro tip: Choosing Dock to right makes it easier to view the rendered page and its source:

Along the top of the inspect panel, I see tabs for Elements , Console , Sources , etc. These are all tools I can use to assess a page’s contents and performance. However, everything I need to inspect is under the Elements tab.
4. Look at the source HTML code of the page.
The biggest area of the panel will contain the source HTML of the current page. I always spend some time exploring this region. Hovering the cursor over the piece of code highlights the corresponding element on the page.
Blue indicates the contents of an element, green corresponds to padding, and areas in orange are margins.
Pro tip: If you’re a beginner and want to learn more about the different elements you’re inspecting, check out this HTML guide for beginners.
5. Select a specific element to inspect.
Rather than trying to read through the code to find an element, I can also do the opposite. I can locate a piece of code by hovering over the page element itself. To do this, I click the Element select icon in the top left corner of the panel.

8. Edit the page's CSS code.
Moving down the Chrome inspect panel, I see the Styles tab. This shows me what CSS styling has been applied to the selected element. I can click on lines of code to rewrite them, or I can activate/deactivate certain declarations by checking/unchecking the boxes next to them. I’ll do this for my <h1> element’s font-weight property:
9. View the page's mobile version.
Finally, let’s cover one more feature of Chrome’s inspect feature: mobile view. When building a site, designers need to consider how its pages appear on desktop, mobile, and tablet screens alike.
Fortunately, Chrome lets me preview the same web page in multiple screen resolutions. Start by clicking the Toggle device icon in the top left corner of the panel:

Now, when I click a page element, the Web Inspector reveals the corresponding source code.
7. Edit, add, or delete page elements.
Like Chrome’s inspector, Safari lets me modify, add, and remove page elements. To edit the page, I can right-click an HTML element in the inspect panel. I can then choose an option from the Edit menu.
Web Inspector will prompt me for a new text input and then display my changes in real time:

If I want to delete a page element, I just select some code and delete it. Or, I can right-click and choose Toggle Visibility to hide an element without deleting it.
8. Activate or deactivate the page's CSS code.
To the right, I have the Styles column, where I can change or activate/deactivate CSS declarations for any element, like so:
When testing content and style changes, I want to see the effect on mobile screens as well as desktops. I’ll cover that next.
Pro tip: When seeking inspiration from other web pages, I always take advantage of the Styles tab in my browser’s developer tools to tailor the CSS according to how I envision it on my own page. Try it out. This allows you to refine and adapt design elements to suit your specific preference before moving forward with coding it in your own workspace.
Safari’s Responsive Design Mode allows me to preview a website across common devices.
To view the page in a mobile viewport, I choose Develop → Enter Responsive Design Mode . In this mode, I can use the same inspector tools on pages formatted for Apple devices or set the dimensions myself:

What I like: Safari’s responsive design tab not only lets you test your web page’s responsiveness on devices, but you can also test its behavior across different browsers. Serving as a one-stop-shop for testing responsiveness, the Safari dev tools are a huge time saver.
Firefox is another great option for inspecting a web page in either macOS, Windows, or Linux. Here’s how to get started.
1. Open Firefox's inspect element tool.
To open the Firefox Inspector, I have several options:
- Option 1: I can right-click any part of the page and choose Inspect Element . Right-clicking a specific page element will open that element in the inspector view.
- Option 2: I can select Tools → Browser Tools → Web Developer Tools from the top menu bar.
- Option 3: I can use the shortcut control-shift-I or press f12 in Windows or command-option-I in macOS.
Next, I go to the web page I’d like to inspect. I’ll be using HubSpot.com again.
3. Change the location of the inspector panel.
The Firefox inspector appears along the bottom of the window by default. To change its position, I can select the three-dots icon in the top right corner of the inspector, then choose an alternative display option.

4. Look at the HTML code of the page.
Firefox’s inspector panel is comparable in features to Chrome’s and Safari’s. The HTML source code indicates the corresponding page element with color codes — content is blue, padding is purple, and margins are yellow:
I can also find code by selecting elements on the page. To enter selection mode, I click the cursor icon in the top left corner:

I can then click any page element to reveal its source code in the inspect panel.
6. Modify or delete page elements.
To modify or delete a page element, I select its code in the inspector. Then, I can either double-click to change the text, right-click and choose Edit as HTML, or click Plus Button next to the “Search HTML” bar to add code. Or I can simply delete the code and see the resulting changes on the page.

7. Toggle the page's CSS styles.
To toggle the CSS styling of an element, I use the Filter Styles region at the bottom of the inspect panel. There, I can uncheck the box next to a CSS declaration to deactivate it (or write in new code myself):
8. View the page's mobile version.
Finally, Firefox’s tools also come with a mobile preview option. To use it, I can click the Responsive Design Mode icon in the top right corner of the panel:

Responsive Design Mode lets me choose from several preset screen resolutions or set my own. I can also toggle connection speed and device pixel ratio:

What I like: As a software developer, it is very important that I make web pages that can be easily used by anyone. Firefox’s accessibility tab in its inspector tool allows me to check if my nodes accessibility tree is missing any important properties. I can verify color contrasts too.
The quickest way to access this feature is by right clicking on the page → choose Inspect → select the two arrows next to debugger → select Accessibility .
Once you learn the basics of your browser’s inspect tool, you might realize just how much information about your favorite websites is publicly available. With a few clicks, you can explore how exactly web pages are built, what styles they use, how they optimize for search engines, how they format on mobile screens, and a lot more.
Editor's note: This article was originally published in December 2020 and has been updated for comprehensiveness.

Don't forget to share this post!
Related articles.

The Beginner's Guide to Website Development

Are .io Domains Good? Why Tech Startups Love .io Domains

15 Backend Project Ideas for Your Developer Portfolio

37 Backend Interview Questions and Answers: The Ultimate Guide 2022
![translate webpage safari macbook How to Build & Run an Effective Website With a Small Team or Budget [Startup Tips]](https://blog.hubspot.com/hubfs/website-on-a-budget.jpg)
How to Build & Run an Effective Website With a Small Team or Budget [Startup Tips]

How to Code a Website for Free in 6 Easy Steps

How Long Does it Take to Build a Website?

Flush DNS: What It Is & How to Easily Clear DNS Cache
![translate webpage safari macbook How to Make a Website With User Accounts and Profiles [With WordPress, Wix, and More]](https://blog.hubspot.com/hubfs/how-to-create-user-accounts-and-profiles.jpeg)
How to Make a Website With User Accounts and Profiles [With WordPress, Wix, and More]

Wildcard SSL Certificates: What They Are & How They Work
CMS Hub is flexible for marketers, powerful for developers, and gives customers a personalized, secure experience

IMAGES
VIDEO
COMMENTS
In the Safari app on your Mac, go to the webpage you want to translate. If the webpage can be translated, the Smart Search field displays the Translate button . Click the Translate button , then choose a language. If you think the translation might need improvement, click the Translate button , then choose Report Translation Issue.
Safari will automatically recognize that language, and you'll see "Translation Available" in the URL bar, along with a Translation button; click it. If this is the first time you've used the feature, a pop-up will appear. Click "Enable Translation" to turn on the feature. In the translation menu, select "Translate to English."
Translate a web page. In the Safari app on your Mac, go to the web page you want to translate. If the web page can be translated, the Smart Search field displays the Translate button . Click the Translate button , then choose a language. If you think the translation might need improvement, click the Translate button , then choose Report ...
Click on "Enable Translation" to continue. The page will now be translated into English. If you want to access the original page for any reason, click on the translate icon and choose "View Original". If you want to translate the page to a different language, click on "Preferred Languages". This will take you to the "Language ...
Click "Translate to _________" which will be your default language for your Mac. Click the icon again to revert the webpage to the original language. There's also a button (Preferred ...
Do one of the following to open the language settings: Open your System Settings, go to General, and pick Language & Region. Select the Translate icon in the Safari address bar and pick Preferred Languages. At the top of the window, you'll see Preferred Languages listing those you have available for translation.
If the webpage was not viewed in Private Browsing mode, then Safari also sends the webpage's address to Apple. Apple stores the address for up to 5 years to improve Apple's products, services, and technologies. Since Apple does not store the contents of webpages you translate, only publicly accessible webpages are used to improve Apple's products, services, and technologies.
If the webpage was not viewed in Private Browsing mode, then Safari will also send the webpage's address to Apple. Apple will store the address for up to 5 years to improve Apple's products, services, and technologies. Since Apple does not store the contents of webpages you translate, only publicly accessible webpages will be used to improve Apple's products, services, and technologies.
If the web page was not viewed in Private Browsing mode, then Safari will also send the web page's address to Apple. Apple will store the address for up to five years to improve Apple's products, services and technologies. Since Apple does not store the contents of web pages you translate, only publicly accessible web pages will be used to improve Apple's products, services and technologies.
1. On Safari, go to the web page you need translated. 2. Select the text you want to be translated by tapping and holding it, and then moving the selection bars on the text. 3. Now tap on the ...
Here's how to use Microsoft Translator app: Download the Microsoft Translator app here. Open the webpage you want to translate in Safari and tap on the Share button at the bottom. Scroll down ...
In the Safari app on your Mac, go to the webpage you want to translate. Move the pointer over the Translate button in the URL file (it looks like toward balloons with an "A" in one) to see if a translation is available. If the webpage can be translated, the Smart Search field displays Translation Available. Click the Translate icon, then ...
On Mac. Click the translate icon in the Safari address bar and choose Preferred Languages.You can also reach this setting screen by going to System Settings > General > Language & Region.Now, click the plus button (+) under the Preferred Languages heading, choose your language, and click Add.Like the iPhone, you can use the new language as your system language or continue to use English.
Translate. Google's service, offered free of charge, instantly translates words, phrases, and web pages between English and over 100 other languages.
In this video, I'll show you how to translate web pages in Safari version 14 or later in MAC OS 11 (Big Sur).
Here's how to use built-in language translation in Safari in iOS 14, iOS 15, and later. Tap the action button on the left side of the address bar while visiting a site that you need to translate. The button looks like two A's next to each other. Tap Translate to [Your Device Language]. (Image credit: iMore)
On iPhone and iPad, Apple includes a Translate app that can translate several different languages in real-time, and Safari has integrated translation capabilities, too.. Thanks to its webpage ...
В приложении Safari на Mac перейдите на веб-страницу, которую хотите перевести. Если веб-страница может быть переведена, в поле смарт-поиска отображается кнопка перевода . Нажмите кнопку перевода , затем выберите язык.
Indeed, a few tests show that DeepL Translator offers better translations than Google Translate when it comes to Dutch to English and vice versa. RTL Z. Netherlands. In the first test - from English into Italian - it proved to be very accurate, especially good at grasping the meaning of the sentence, rather than being derailed by a literal ...
Yandex Translate is a free online translation tool that allows you to translate text, documents, and images in over 90 languages. In addition to translation, Yandex Translate also offers a comprehensive dictionary with meanings, synonyms, and examples of usage for words and phrases.
In the Safari app on your Mac, go to the webpage you want to translate.. If the web page can be translated, the Smart Search field displays the Translate button .. Click the Translate button , then choose a language.. If you think the translation might need improvement, click the Translate button , then choose Report Translation Issue. The translation is sent to Apple for review.
The Website Translation Extension with Explosive Word of Mouth Across the Web [Immersive Translate] ⭐⭐⭐⭐⭐ The Functional Features Are as Follows: Translate Website - Offers bilingual website translate by smartly identifying the main content area of web pages, thus reducing the "intrusiveness" on the original webpage.
Finder and system shortcuts. Command-D: Duplicate the selected files.. Command-E: Eject the selected disk or volume.. Command-F: Start a Spotlight search in the Finder window.. Command-I: Show the Get Info window for a selected file.. Command-R: (1) When an alias is selected in the Finder: show the original file for the selected alias.(2) In some apps, such as Calendar or Safari, refresh or ...
Many desktop browsers continue to compete for users, and in April 2023, Apple Safari overtook Microsoft Edge in global market share, according to data collected by StatCounter.
3. Open up Web Inspector. There are three ways to open Web Inspector in Safari: Option 1: I can right-click any part of the page and choose Inspect Element. Right-clicking a specific page element will open that element in the inspector view. Option 2: I can choose Develop → Show Web Inspector from the top menu bar.