Account Options
- How to Use Points for Free Flights
- The Best Carry-On Luggage
- The Ultimate Guide to Traveling Like a Pro
- My Favorite Travel Credit Cards
- lake louise
- new orleans
- new york city
- palm springs
- packing lists
- product reviews
- How to Use Vitamin C Serum
- Easy Step-by-Step Skincare Routine
- Drunk Elephant: Best & Worst Products
- Fitness & Wellness
- How I Edit My Photos for Instagram
- Furniture My Interior Designer Loves
- Best Strapless Bras
- blogging & business
- Amazon Finds
- Hotel Lobby Candle
- Shop My Faves
- Promo Codes and Discounts
- Shop My Instagram

How To Use Google Maps Trip Planner
With so many different travel apps and websites available, it’s now easier than ever to keep yourself organized while planning a trip. One of my favorite tools to use, regardless of where I’m going, is Google Maps Trip Planner.
If you’re the type of person that gets easily overwhelmed when putting together an itinerary , you’ll want to follow this step-by-step guide which details exactly how I use it. Google Maps Trip Planner is not only a highly-visual way to get your bearings of an area, but it’s extremely useful for figuring out where you can realistically travel to during the duration of your trip.
It’s a fantastic way to use Google Maps for multiple stops in a single itinerary , and also comes in handy if you’ve received a TON of recommendations from friends, because you can add destination after destination, and then refer back to the map as you’re out and about exploring.
For example: if you’re visiting NYC and find yourself in Soho looking for a cute cocktail spot , rather than endlessly scrolling through Yelp or TripAdvisor, you’ll be able to pull out your trip planner to see if you’re near places that your friends have recommended! It’s also a particularly handy tool to use when creating a road trip itinerary.
Here’s the step-by-step outline that we’ll go over:
- Create a new Google map for your destination.
- Choose categories for your map.
- Start adding your locations and ideas.
- Customize and color-code your map.
- Decide which activities to group together.
- Plan your day-by-day itinerary.
- Download the Google Maps app on your phone.
- Share your map with friends.
This will all make more sense once I walk you through everything with screengrabs.
Whether you’re thinking about a girlfriends getaway or a honeymoon , Google Maps Trip Planner will be a game changer for you. Take my word for it! Here’s a step-by-step guide to using Google Maps to coordinate your next getaway — with a completely flawless travel plan.
How to Use Google Maps Trip Planner
1. make a new google map..
To get started, you’ll need to create a new Google Map by visiting this link .
It will take you to the main maps page, which you’ve likely seen before. (Make sure you’re logged into a Google account, and if you don’t already have one, you can sign up for free here .)
Once you’re signed in, simply click on the three bars icon in the top left corner and select “Your Places” from the menu.

Next, you’ll want to click on “Maps” in the far right corner of the menu.
You won’t see anything listed yet, unless you’ve created a map previously.
Click “Create Map” (which is at the bottom of the menu.)

After that, you’ll be directed to an untitled map that you’ll want to name and add a description to.
Do this by clicking on “Untitled Map” and a text box will appear and allow you to fill out this information. Remember to be as specific as possible so you stay organized throughout the entire planning process.

2. Categorize Your Map.
Create a list of all the things you want to spend your time doing on your trip. Here are the categories I typically use:
- Restaurants & Bars
- Cities & Towns (this is good if you’re road-tripping or visiting multiple destinations during a single trip)
- Hotels (I’d only use this category if you’re staying in more than one)
- Activities (beaches, hikes, Instagram spots, etc)
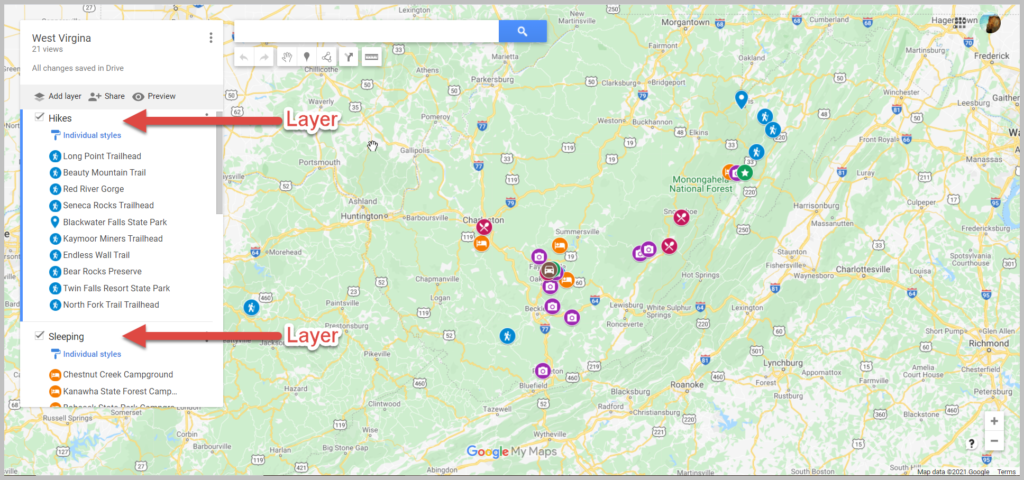
Now that you have your category ideas solidified, you’ll create a “layer” for each one by clicking on the “Add Layer” button on the left hand-side of your screen.
Be sure to name each individual layer by clicking on “Untitled Layer” text box, just like you did when you first named your map. I named my first layer “Hotels” as an example.

More: How I Use Points & Miles to Travel for Free
3. Add Your Ideas to the Google Map.
If you’re planning a trip to a destination you’ve been thinking about visiting for a while, it’s likely that you already have some things on your bucket list, whether it be from friends, bloggers, travel sites, or Instagram.
This is your chance to put those thoughts in one organized space and see which ones you’ll be able to make time for. (Shameless plug: I have guides for Tokyo , Maui , New York City , Thailand , Mykonos , Santorini , Positano , Miami , St Barths , and more. Feel free to use them for inspiration should you be heading to any of these locations!)
To add an idea you have for your trip, click on the layer (the category) that you want to add a location marker to.
For example, I added this hotel to my map by checking the box on my “Hotels” layer and then typing the hotel name into the search bar. When the place you’re searching for pops up on the menu, click “Add to Map” and you’ll see that a marker is placed on the map. You’ll also notice that the name of the location is added underneath the layer description on the left side of the screen.
- If you accidentally put a location into the wrong layer: not to worry. You can easily drag the location and drop it into the correct category.
- If the place you’re searching for doesn’t auto-populate: it’s probably because Google hasn’t made a location for it yet. But don’t fret! You can just as easily add that spot to your map by typing the address into the search bar and writing the location name manually.

Need some trip inspiration? Check out my travel guides, go-to airport looks, and carry-on essentials here.
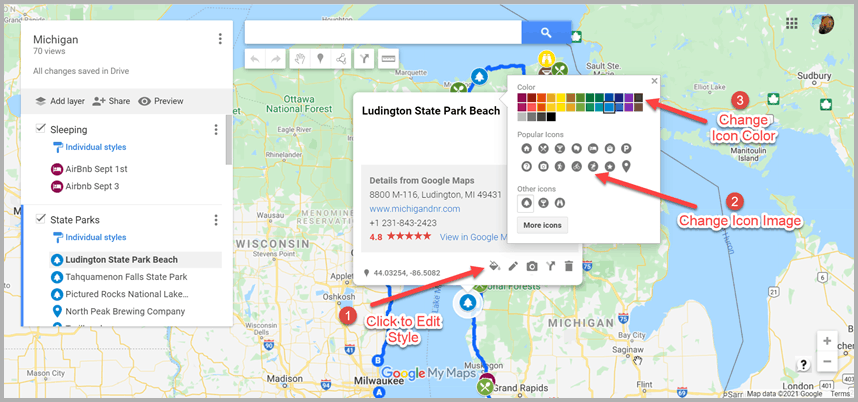
4. Customize Your Map.
One of the best ways to keep things visually organized is by color-coding your markers by their category.
To do this, click on the paint bucket that’s located at the bottom of the location marker’s pop-up window.
You can also add additional notes about a location (i.e. “LindsaySilb’s favorite bar; order their signature Bloody Mary) or write down other ideas that you have for that place by clicking on the pencil icon directly next to the paint bucket.
To remove an idea from your trip, just click the trash can icon that’s on the same panel.

There are a number of ways to use color coding:
- For example, you could mark all the restaurants that were on your “Must Visit” list in red, the ones you’d like to go to in yellow, and the ones you would stop by if you have the time in green. This will help you make sure that you get everything checked off of your “must-see” and “must-do” list first.
- For example, pricier sit-down restaurants can be marked in blue, while casual “grab and go” places could be labeled in green.
- You might have just one layer named “Activities” but instead of color coding all those places green, for example, you could mark the museums in purple, mark parks in blue, and stores in gray.
Pro tip: Even if you don’t want to color code everything, I recommend changing the default color from blue to something brighter, like red or yellow. In my experience, the blue location markers can be a bit hard to find on the map.
When you’re done organizing your categories, hit the save button and you’ll notice that they all show up underneath their accompanying layer.
Each location should be saved along with its phone number, address, and website information. This is super helpful because if you decide you want to make a reservation at a restaurant or purchase tickets to a theater show, you have all the tools you need to get there in one space.
5. Decide Which Activities to Group Together.
At this stage, you’ll be able to see a zoomed-out version of the map, with all of your points of interest plotted.
This might help you make decisions about which neighborhood to stay in, which hotel to book (if you’ve been debating between a few), which restaurants you can walk to, or which activities should be grouped together.
It’s nice to see your entire itinerary on a map and use a process of elimination approach to determine which pitstops make the most sense on which days. Seeing things on a map also makes it easier to keep track of the amount of time you’ll need to dedicate to get from place to place.

6. Plan Your Day-by-Day Itinerary.
I like to create a Google Doc that has a little outline of each day of the trip. I also use the doc as the place to store hotel confirmation numbers, car rental info, and flight info.
If you’re planning on driving when you get to your destination, you can easily pull up directions to your first stop by clicking on the arrow icon on the bottom of the pop-up’s panel.
This will automatically create a new layer on the left side of your screen with the location’s name on it. You’ll need to type in your starting location, like the airport, in the text box above it that’s labeled “A” and then click on the icon with the three dots to get step-by-step driving directions.

7. Download Google Maps on Your Phone & Log In.
Finally, to make the map you created accessible on your phone while you’re traveling, you’ll need to have Google Maps downloaded if you don’t already.
Then, be sure to sign in with the same Google account that you used to first create the map. Once you’re signed in, go to “Your Places,” and scroll to the last tab on the right called “Maps.”
8. Share Your Map with Friends and Travel Buddies.
One of the best parts about using Google Maps Trip Planner is being able to share the map. If you’re traveling with a group, sharing the map ahead of time will ensure that everyone is on the same page about where things are located.
And better yet, after you’ve returned from your trip, you now have a full list of everything that you can share with friends who are headed to that location.
To share the map on desktop, simply open the map like you’ve done previously. You’ll notice the “share” button directly underneath the title of your map. Click it, and you’ll have the option to share via Twitter, Facebook, or email.
To share the map on mobile, open the Google Maps app, then click the three bars > your places > maps. Select your preferred map, then select “View Map Legend,” and finally click share. You’ll be able to share your map via text, airdrop, Facebook, Twitter, email etc.
If you’re feeling particularly generous, I recommend going back into the map and adding notes about places that you went, what to order there, places that were worth skipping, etc. Your friends will thank you for it!
The verdict? This tool is a travel game changer .
Rather than sifting through an endless number of routes on Google Maps each time you want to go somewhere, using this process will help you streamline all of your travels. You can put together so many trip itineraries by using Google Maps Trip Planner, and it honestly offers the perfect way to plan a road trip.
Are there other apps or hacks that you use to plan trips? I’d love to hear about them. Drop your suggestions in the comments below.
Pin this post for later:

You Also Might Like

8 Travel Apps I Use to Jetset Like a Boss

The 13 Best Hotels in Miami

34 Travel Essentials for Women: What I Like to Bring on Every Trip
10 comments.

I do that all the time Lindsay! Since 2009, believe it or not! I always add a google maps to my travel posts so that people can follow exactly what I did. It’s so helpful!

This is the best thing ever! I love Google maps for making places I want to go but they were always just on my”normal” map and it really bothered me that I couldn’t colour code. I won’t be doing any work today I’m the office, just rearranging my whole maps! Thank you for this amazing tip & detailed guide!

Lindsay Silberman
yay!! So happy you found it helpful!

I had no idea about this, wow!!!! Incredible. Thank you, Lindsay 🙂

I love this and the Visit a City app, which figures out the grouping for you!

This was a great write up explaining the how to… only thing missing is multiple people cannot edit the map.

Actually, multiple people can edit: Just share your map with editor rights

How can you share the map with editor rights? I’m trying to do this right now, and I can’t quite figure it out! Thank you!!

How do you view all maps at once ?

love this tutorial!! thank you
Leave a Reply Cancel Reply
Save my name, email, and website in this browser for the next time I comment.
How to Apply Fake Nails Like a Nail Artist (in 15 Minutes or Less)
Here's exactly how to pack jewelry for travel.
How to use Google Maps as a trip planner and make a full itinerary
- You can use Google Maps as a trip planner through the "Places" and "My Maps" features.
- Both the Google Maps website and app let you save locations to lists, which you can then get immediate directions to.
- When getting directions, you can look up reviews and add multiple stops to your route.
Google Maps has become an essential part of any road trip. After all, it's a GPS, business directory, and reviews platform all-in-one.
But if you spend some time with it, you can integrate Google Maps even more seamlessly into your next vacation. Google Maps has a variety of features you can use to plan your trip and save any interesting spots you find on the way.
Here's how to make Google Maps your trip planner, using the Places feature, My Maps, and more.
How to use Google Maps as a trip planner
Use the 'places' feature to save points of interest.
Let's say you're traveling, and happen to stumble upon the cutest coffee shop you've ever seen. You want to visit, but don't have time right now — what's the best way to remember it?
Google Maps' Places feature can help you out. Both the Google Maps website and app let you save any location on the map to a list, which you can then easily find later.
1. Open Google Maps and click, tap, or search for the location that you want to save.
2. Find the Save icon , which has the icon of a bookmark. You'll find it right under the location's name, but you might need to swipe to find it in the mobile app.
3. Pick where you want to save the location to. You've got three lists to start with — Favorites , Starred places , and Want to go — but you can make a new one by tapping New list .
4. Once you've saved the location, you can find it again by opening the list. In the mobile app, tap Saved at the bottom of the screen; on the website, click the three stacked lines in the top-left and then Your places .
Tap on a location in your list to have the map jump straight to it.
Look at Google Reviews to find the best shops
Nearly every point of interest on Google Maps has a section for user reviews. Similar to sites like Yelp, these reviews can be a great way to see which stops are must-sees and which you can pass.
To check out reviews:
1. Open Google Maps and find the location that you're interested in.
2. At the top of its information page should be a star rating and a number, showing how many people have left reviews.
3. Scroll down until you hit the Reviews section, and you'll find reviews from other users who've visited the location. They'll include a star rating, a date, and occasionally a picture.
If you're interested in leaving a review of your own, check out our article on how to write Google reviews .
Make a custom My Maps page to share your road trip plan
Only available on a computer as of this month , Google's My Maps program lets you make a custom map or plot out a route with as many waypoints as you like, and then save and share it with others.
1. Head to the My Maps homepage and click Create a New Map .
2. You'll be given a world map. In the menu in the top-left, click the Untitled map name to give your map a name.
3. Use the search bar at the top of the page to find any location, then click Add to map to save it. You can add as many points of interest as you like.
4. You can also save multiple separate lists of locations to the same map; just click Add layer in the top-left menu.
5. To save directions between multiple locations, click the Add directions icon that looks like a curved arrow. It'll add a new layer that you can use to plot a path.
6. When you're done, click Share or Preview in the top-left window.
Add multiple stops to one trip
Driving from one city to another is simple. But if you want to make stops along the way — lunch, the beach, a mall — things get complicated.
Luckily, you don't need to start a new Google Maps route for every stop. You can create one navigation route that includes every stop from the start, giving you a clear way to see how long it'll all take.
1. Open the Google Maps app and start navigating to another location.
2. On the screen that lets you pick your starting and ending location, tap the three dot icon .
3. Select Add stop .
4. A third waypoint — labeled "B" — will appear. Tap it to choose your second destination, or drag it to reorder the waypoints.
On a computer
1. On the Google Maps app website, find a location and start getting directions to it.
2. Underneath the menu that lets you pick your starting and ending location, click Add destination .
3. A new field will appear. Enter your third waypoint.
4. Once you pick a new waypoint, you'll be able to click Add destination again and pick another one, as well as reorder them.
You can add up to nine destinations on both the website and mobile app.
On February 28, Axel Springer, Business Insider's parent company, joined 31 other media groups and filed a $2.3 billion suit against Google in Dutch court, alleging losses suffered due to the company's advertising practices.
- Main content
How to Use Google Maps to Plan Your Next Road Trip (Step-By-Step Tutorial With Examples)
Post summary: A comprehensive guide on how to use Google Maps to plan a road trip itinerary and why Google Maps is the best tool/app for planning a trip. Includes a road trip planning tutorial!
Author’s Note: This post was originally published in 2020 and was updated in April 2023 for accuracy and comprehensiveness.
So, you want to plan a road trip. But, where do you start? Better yet: How do you start?
I’m often asked about my trip planning process. Where to go, what to do, and how exactly to fit everything into a cohesive itinerary that, well, makes sense .
Planning a road trip can be hard. But, with the right tools and resources, it doesn’t have to be. I’ve already put together a list of my most trusted travel booking resources , and the best apps for road trips , but now I want to talk about one of my favorite road trip planning tools: Google Maps.
Google Maps is like a trip planning goldmine, and it’s always my very first step in organizing my itinerary whenever I take a trip.
Google Maps is one of the best tools for planning a cohesive and successful road trip, because it allows you to create a highly customizable, visual representation of your trip (shoutout to all my fellow visual learners out there). And its FREE!
Basically, if you’re planning a road trip, knowing how to customize Google Maps is going to make your life so much easier.
So if you’re wondering how to get started, then you’ve come to the right place. I’m breaking the entire process down into an easy to follow step-by-step tutorial on exactly how to use Google MyMaps to plan your next road trip. So, lets get started!
GOOGLE MAPS TRAVEL PLANNING OVERVIEW
Here’s exactly what we cover in this guide:
- Create a new Google Map for your trip.
- Add location pins to your map
- Customize and color code your location pins.
- Create Google Map layers to plan your day-to-day itinerary.
- Add driving directions to your map.
- Download your custom Google Map to your phone.
- Share your map with friends.
- Calculate gas milage for your road trip.
Scroll down for a super detailed step-by-step guide to planning your own travel itinerary for free using Google Maps or skip ahead with the table of contents.
Table of Contents
Need some road trip inspiration? Visit my most popular travel guides:
Las Vegas to Sedona Road Trip (3 Jam-Packed Itineraries to See it All in Less Time)
5-Day British Columbia Road Trip Itinerary
1-Day Yoho National Park Road Trip Itinerary
The Perfect 2-week Costa Rica Itinerary
. Don’t forget to grab my FREE Travel Expense Planner Download below to help you plan your next trip . Use it to easily and automatically calculate how much money you’ll spend on gas, flights, accommodation, food + more
WHY GOOGLE MAPS IS THE BEST TRAVEL PLANNING TOOL FOR YOUR NEXT TRIP
Google Maps is the best tool for planning your next trip , whether you’re just using it for adventure inspiration, to share ideas with your friends, or creating a detailed step-by-step road trip itinerary. Here’s why!
IT CREATES A VISUAL REPRESENTATION OF YOUR ROAD TRIP
If you’re a visual learner, Google Maps is going to be your best friend. But even if you’re not a visual learning, using Google Maps to plan your trip is still going to be incredibly helpful.
Planning your trip with Google Maps is the fastest way to familiarize yourself with the layout of an area. It allows you to wrap your head around how large an area is and where everything is in relation to each other, which, in my opinion, is the best way to start planning any trip.
Here’s an example of the Google Map I created for our 4-day road trip in Iceland.
Click here to access the interactive map.

GOOGLE MY MAPS HELPS YOU FIGURE OUT WHERE TO SPEND YOUR TIME
Have you ever had a list of places you wanted to see, only to find out that they’re super far away from each other?
Pinning your locations to your custom Google Map will show you where your stops are. This will help you figure out where to spend your time and plan accordingly.
Are your pins clustered in one place? If so, then you might want to allocate more time to that area. Or maybe your pins are spread out all over the map? If this is the case, then it might be best to prepare yourself for a lot of driving or focus on a smaller area instead.
YOUR GOOGLE MAP IS HIGHLY CUSTOMIZABLE
Whether you’re touring NYC, road tripping cross country, or backpacking to Beaver Falls in the Grand Canyon , you can create a highly customizable Google Map to help plan your adventure.
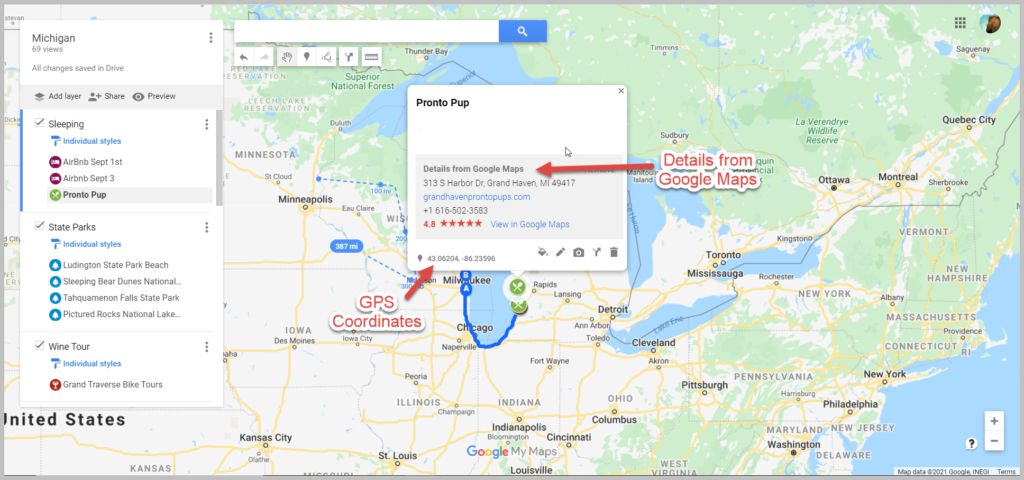
Handy features like customizable locations, adding multiple stops, pinning by GPS coordinates, organizing by categories, and overlaying direction layers, all make it incredibly easy to customize your Google Map to plan your travel itinerary.
Need to remember entrance fees, operating hours, or best places to see? You can even add notes to your location pins so you don’t forget important details!
IT HELPS YOU NAVIGATE AND PLAN YOUR ROUTE
Quickly learn how to navigate between stops by adding directions between multiple locations to your map.
This is an incredibly useful tool for figuring out the best routes to take, roads to avoid, and to plan for drive time. You can even choose between walking, biking, or public transportation directions. This is especially helpful for choosing the best entrance to Yellowstone National Park , taking the scenic route on an Ecuador road trip , or mapping out the best Hudson Valley wineries .
IT’S EASY TO COLLABORATE AND SHARE YOUR TRIP
Traveling with friends? Google Maps makes it super easy to collaborate by allowing you to share your map with your travel partners. You can even give them editing access so that everyone can add their must-do’s to the map.
YOUR MAP IS EASY TO SHARE BETWEEN DEVICES
You’ll have to create your Google Map on desktop. But, luckily, you can seamlessly share your custom map straight to your iPhone or Android using the Google Maps App!
Sharing your custom map to your phone makes it super convenient to access your itinerary on the go. You can even set up your map for offline use if you’re traveling without cell phone service.
HOW TO CREATE A CUSTOM MAP IN GOOGLE MAPS: A STEP-BY-STEP GUIDE
1. create a new google map, login to google drive on your desktop.
Before you start planning your road trip using Google Maps, make sure you’re signed into your Google Drive.
- Visit www.google.com/maps from your desktop and log in .
- If you don’t have a Google Drive account, create one now.
CREATE A NEW GOOGLE MAP
To create a new map, select “Saved” in the sidebar on the left > “Maps”. You can also click on the menu (the three lines) in the upper left corner > “Saved” > “Maps”.
For now, your list is probably empty. But as you create more maps, this is where they’ll be stored.
Begin creating your first custom map by selecting “CREATE MAP”

This opens a new blank map. Start by giving your map a title and a description.
Once you’ve named your map, you’re ready to start pinning stops! Keep reading to learn about adding and customizing location pins.
2. ADD LOCATIONS TO YOUR GOOGLE MAP
This is where you start adding the places you want to go!
HOW TO ADD LOCATION PINS
Add multiple stops to your Google map by pinning their locations. There are a few different ways to add location pins to your Google Map :

- Add a pin using coordinates if you can’t find the exact location in the search bar drop down list. You may have to use this method for extremely specific or remote locations, such as a backcountry campsite or an unmarked trailhead. Simply type the location’s latitude and longitude coordinates into the search bar. .
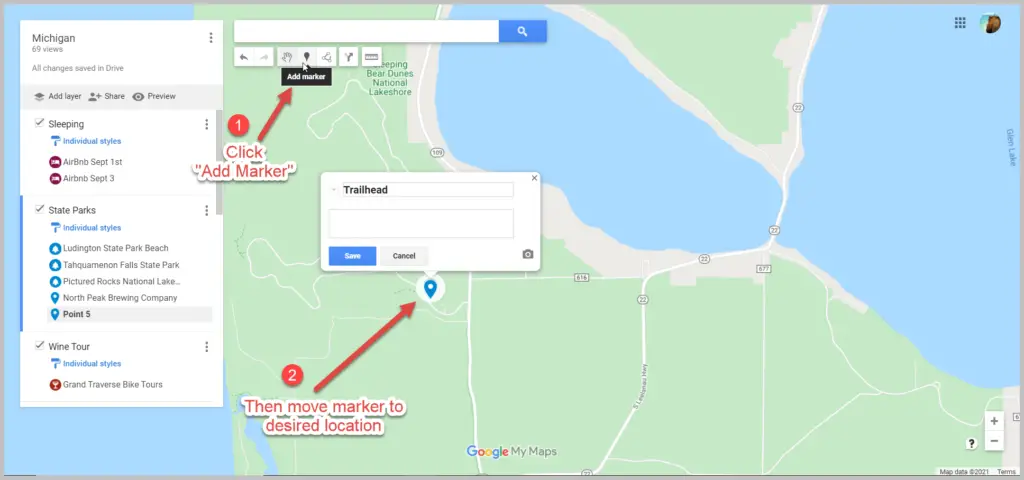
- To pin a general area, click on the “Add Marker” button below the map search bar . You’ll be able to drop a blank pin by clicking anywhere on the map. A box will appear asking you to add a title and description
NOTE: You’re allowed to pin 10 location pins per layer. Continue reading to learn how to use layers to add more than 10 location pins to your map.
3. CUSTOMIZING LOCATION PINS
Once you save your pins to the map, they’ll be blue by default. However, you can customize a pin by changing the color, icon style, description, and title . You can even add pictures or videos if you’re feeling extra fancy.
To change the color and style , begin by clicking on your location pin (either in the list to the left or directly on the map) > “Style” (the little paint can) in the lower right hand corner of the text box. Click “More Icons” to view more options.

To change the location title , click”Edit” (the pencil icon) in the text box. You can also add notes in the “Notes” box. Use the notes box to add more details about finding trail heads, hiking logistics, packing reminders etc. I also like to use it to keep track of specific places to see within a general location, such as a National Park.
To add media (i.e. photos or videos) , click “Add Image or Video” (the camera icon) in the text box. I found this especially helpful on my first Iceland road trip to remember which waterfall was which, since they all sound the same (if you’ve been there, you know what I mean!). You can also add your own photos and videos if you want to create a map to share with others.
To delete a pin , click on it and then click on the trash can icon. .

. 4. CREATING MAP LAYERS TO PLAN YOUR TRIP IN GOOGLE MAPS
What are google map layers.
Google Map layers are a really useful tool for organizing your road trip itinerary. But, what exactly is a layer? A layer in Google Maps is, by definition, a way to contain arbitrary geospatial data.
Okay, English please ?
In other words, each layer can be used to display different types of information on your map. You can dedicate different layers to different types of places like restaurants, cafe’s, hotels, hiking trails, etc. Or you can dedicate layers to different days of your trip. Or you can stick to one layer. Its up to you.
Here’s an example of how I broke up my Iceland itinerary, using a different layer for each day of our road trip:

HOW TO ADD LAYERS
When you create your map, you’re automatically using one layer (“Untitled Layer”). This is the layer that your location pins are added to by default, unless you add additional layers. You can add up to 10 location pins per layer, and 10 layers per map.
To add a new layer to your Google Map , simply click “Add Layer”. This creates a new “Untitled Layer”, which you can rename accordingly. To rename layers, click on the title name or click the 3 dots next to the title > “Rename Layer”.
To move a pin between layers , click on the location pin in the list, then drag and drop it into the desired layer.
Choose which layers to display by turning individual layers “on” and “off”. You can do this by checking/unchecking the box next to the layer’s name.
To delete a layer , click the 3 dots next to the layer’s title > “Delete this layer” > “Delete”.

. TIPS FOR USING LAYERS TO PLAN YOUR ITINERARY IN GOOGLE MAPS
When planning my road trip itineraries, I usually give each day its own layer (unless the trip is longer than 10 days, in which case then I’ll combine days or make another map). Then I color code all of my pins by day.
For example, all of my stops (i.e. location pins) on day 1 (layer 1) would be orange, all of my stops on day 2 (layer 2) would be red, and all of my stops on day 3 (layer 3) would be blue. Organizing pins and layers this way makes it a lot easier to visualize your day-to-day itinerary on the map.
That’s just what works for me, so obviously you don’t have to do it that way. You can organize your pins and layers in any way that makes sense to you.
WHEN TO MAKE SEPARATE MAPS
Personally, I prefer to make a single map for my road trip itineraries whenever possible. But that won’t work for everything or for everyone.
Sometimes maps can get confusing if you have a lot of stops to make. Other times you’ll find that you need more than 10 layers or directions between more locations than Google Maps allows.
To solve these problems, you may opt to create several maps. Perhaps you’ll find it easier to create a separate map for each day of your road trip, or create one map dedicated just to a certain type of location or activity.
For example, we created two separate maps for our road trip through New Zealand. One map for the North Island and one map for the South Island.
5. ADDING DIRECTIONS TO YOUR GOOGLE MAP
. What good would a Google Maps itinerary be if you couldn’t get driving directions?
To add driving directions to your Google Map , click on “Add Directions” (the arrow icon) under the search bar. A new layer will appear (you cannot add directions without it adding a new layer).

Click on “Add Directions” simply by clicking on a pinned location on the map. It will populate in point “A” . Click on a second location on the map, which will populate in point “B” . The route will show up as a blue line on the map.
The original directions will only give you the option to add points “A” and “B”. To add more destinations, click on “Add destinations”. You can add up to 10 destinations.
NOTE: This may seem obvious, but I’ll say it anyway: When you connect locations, make sure to do it in the order that makes sense. Don’t just add directions between two random locations. Make sure to do it in order!

To choose between driving, walking, or bicycle directions , click on the Directions button in the layer (the blue car icon). Then click on the appropriate mode of transportation.
VIEW STEP-BY-STEP DIRECTIONS
To view step-by-step directions, click the three dots to the right of the little of the directions layer > click “Step-by-step directions”.

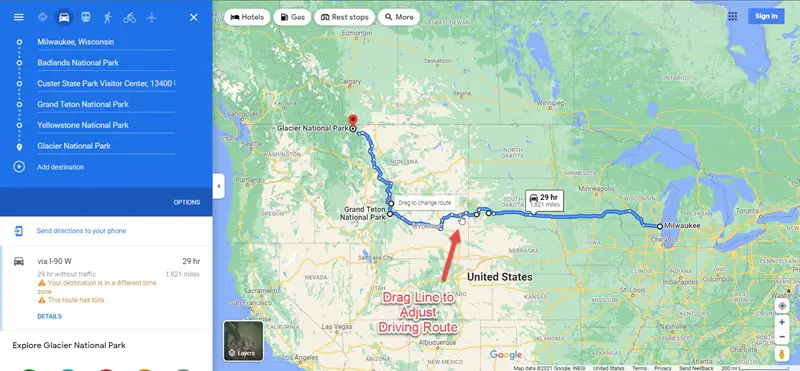
ADJUSTING YOUR ROUTE
Google maps will automatically calculate the shortest route between locations. But you can easily change the route if you prefer to take a different one (i.e. to take the more scenic route, avoid tolls/highways, etc.).
To adjust the route between two points , hover your cursor anywhere along the blue line. Your cursor will change from a hand to an arrow over a white dot. A dialogue box will say “Drag to change route”. Click and drag the white dot to the desired road or highway on the map.

. 6. HOW TO ACCESS CUSTOM GOOGLE MAPS ON YOUR PHONE
. There are two ways to access your custom Google Maps on your phone. You can (1) reference your map through the Google Maps app or (2) export the entire map for offline access using Maps.me . Which method you use depends on your personal preference.
Steps are the same for iPhone and Android.
1. To view your maps in the Google Maps app:
- You will need to download Google Maps, if you haven’t done it already
- Sign into the same Google Drive account you used to create the map
- Click on the search bar > “…More” > scroll to the right and click “Maps”
- Select your custom map

How to view your custom Google Map on your phone using the Google Maps app .
Essential tips for using the Google Maps app:
- Accessing step-by-step directions: When you open your map in the Google Maps app, your directions layer will be visible, but you won’t be able to click on it and get the step-by-step directions. . Instead, navigate to the individual location pins on the map. Click the pin and the directions instruction will populate in the search bar. Click on the search bar and then hit “Search”. This will exit your custom map and open up the regular Google Maps navigation screen. .
- Accessing your map offline: You can’t. There is currently no way to access your custom map offline in the Google Maps app. Which is obviously not ideal if you’re traveling without cell phone service or wifi. . You can download an area for use offline by clicking on your photo (the circle in the upper right corner) > “Offline maps” > “select your own map”. However, when you do this, the map will be blank and you’ll have to repin/save all of your pins. You can repin/save locations by searching for the location > “save” > and then either add to an existing list or create a new list.
2. To export your custom map to Maps.me:
This method is quite a workaround, but (unlike the Google Maps app) it allows you to access your custom map offline without having to repin anything.
On your desktop:
- Open your map on desktop
- Click the 3 dots next to the map title > select “Export to KML” > check the box next to “Export to .KML file instead of .KMZ”.
- Make this file accessible through your phone by uploading it to Dropbox, Google Drive, email, or any other file sharing app.
On your phone:
- Download the Maps.me app
- Search for the city, state, or country your map is based in and then download
- Go to your photo sharing app and open your .KML file with Maps.me
- You’ll be directed to your custom map in Maps.me
Tips for using Maps.me
If you download your map in Maps.me, you’ll be able to use it offline. However, the major drawback is that you will only be able to access step-by-step directions from your current location. So, even though your directions layers will populate on your map, you’ll only be able to view the drive times and not the actual directions, unless one of those points is your current location.
That being said, I am not a Maps.me expert. So, if you have an update or workaround for this issue, please reach out and let me know :)
7. CREATE A SHARED GOOGLE MAP
You might want to share your map if you’re planning a trip with someone else, collaborating on an itinerary, or sharing your map on a website.
To share your Google Map , open the map > click “share” in the gray bar above the layers. Make sure the slider for “Anyone with this link can view” is set to blue. Then copy the link and send it to friends!
To embed your map on a website , check that your sharing sliders are set to “Anyone with this link can view” and “Let others search for and find this map on the internet”. Next, click the menu (the three dots) next to the map title > then click “Embed on my site”. Copy the HTML and paste it in the source code for your page.
8. BONUS: CALCULATE GAS MILEAGE
. Download my customizable Travel Expense Planner below for free . Use it to easily and automatically calculate how much money you’ll spend on gas, using your custom Google Map!
And there you have it! All the tips, tricks, and general instructions on how to use Google Maps as a road trip planning tool . As always, if you have any questions or have anything to add, leave a comment below. I love to hear from you!
Happy adventuring!
Did you find this Google Maps road trip planning tutorial helpful? Don’t forget to pin it for later!

Hi, I’m Jackie! I’m a travel photographer and content creator based near the Adirondack Mountains of Upstate New York. I’m also a millennial who works full-time, yet I still find ways to travel frequently without breaking the bank, because traveling is what makes me feel most alive. Now I help fellow travelers who also work 9-5 and are looking for ways to travel more with limited PTO.
Related Posts

15 Useful Apps to Download Before Your Next Road Trip (for Free!)

All You Need to Know About Renting a Car in Belize | Cost, Tips, FAQs – Updated Guide 2023

19 Important Things to Know About Ecuador Before You Go
27 comments.
[…] Krawiecki, J. (n.d.). How To Plan Your Road Trip With Google Maps. The Adventure Atlas. Retrieved from How To Plan Your Road Trip With Google Maps (Tutorial With Examples) | The Adventures Atlas […]
[…] that an SUV or an RV is better suited for the whole family. Once you’ve secured your vehicle, map out your route, research the stops that you want to make, and make a list of the things that you’ll need to […]
[…] You won’t have service once you get there though, so I suggest downloading offline Google Maps of the area before you go. To learn how to download offline Google Maps, visit my blog post on How To Plan Your Road Trip Using Google Maps […]
[…] How to Plan Your Road Trip Using Google Maps […]
[…] How to Plan Your Trip Using Google Maps […]

All I needed when I googled “how to plan a trip in google maps” was to be pointed in the right direction of where to look for the feature. This went WAY beyond what I could have ever asked for and helped SO MUCH! Thank you, thank you, thank you!

Hi Nicole – I’m SO glad to hear you found this post helpful!
[…] How to plan a road trip using Google Maps […]

Hello Jackie, and thanks for the very informative article! It was well written and I used Google Maps on my last trip to the Baja in Mexico. One other tool I used was the free trip planner from Geovea https://geovea.com/trip_plan/new_trip to create and share my trip, and estimate my trip budget. You can also take your itinerary with you on your phone for navigation. I really appreciate all of the great travel guides and already planning my next trip :-)

Thank you for sharing all of this valuable information! I see how to view the turn-by-turn directions, but is there a way to start the route so you can follow it while driving? Thanks!!
[…] How to Plan Your Road Trip using Google Maps […]

This literally just changed my life! Thank you for sharing how to use google maps to plan a road trip. I will use this all the time now!
Hey there – so happy to hear you found this post useful!
[…] Planning a Costa Rica road trip? Read: How To Plan Your Road Trip With Google Maps (Tutorial With Examples) […]
[…] a large geographical area you need to give your trip a bit of structure. You can start by using Google Maps to plot and plan your journey so you can make a note of all the destinations you are interested in. You can then agree on a few […]
[…] Read next: How To Plan Your Road Trip With Google Maps (Tutorial With Examples) […]

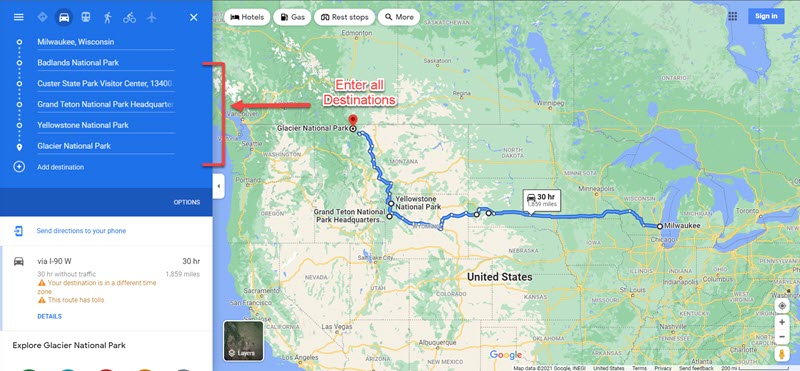
said no driving directions from point a to point b, so i couldn’t get started. E.G. Badland SD to Mt Rushmore to Custer Nat. Park, I need a little more direction, i’m not to good with comp. thanks
Hey Billy – Sometimes Google Maps won’t recognize directions to very general areas because it wants you to use something more specific. This most often happens with National Parks and wilderness areas. In those cases, Google Maps will generally present you with a list of specific locations you can choose from, such as the park’s ranger stations, visitors centers, etc. However, in your situation, I was able to pull up directions using “Badlands National Park”, “Mount Rushmore National Memorial”, and “Custer National Forest”. Hope that helps!
[…] necessary than you suppose to sleep, bathe and plan for slower days. A very good rule of thumb is to plan in rest time each three days. That method, you possibly can push your self however forestall exhaustion in your […]
[…] essential than you assume to sleep, bathe and plan for slower days. An excellent rule of thumb is to plan in rest time each three days. That means, you possibly can push your self however stop exhaustion in your […]

I’ve been a user of paper maps, since before the Internet, or color TV for that matter. For an up coming trip, basically Texas to FL, and back, I decided to make better use of Google Maps. A google search brought me to this page. Super helpful, and the pins per layer note answered a long standing confusion of mine. Thank you. I do have one question. Is there a way to to add waypoints based on distance or travel time? For example, this is going to be a two day trip. I want to find the halfway point (easily)? Or in the case of a longer trip, I want to drive X miles or Y hours? I know I can trial and error it, but what if I want the half-way point? What’s the easiest way to find it? Or where will I be in 8 hours of driving? Thank so much! Cheers, Eric
Hey Eric – thanks so much for your comment! Unfortunately, I don’t know of an easy way to calculate your half way point or location after x amount of hours. I typically eyeball it, which might be the only way to find your answer

Thanks very much, it is really helpful

This was most helpful for creating a personal map. I tried it and created a practice map on my laptop; named it and accessed it exactly like your instructions indicate. The part that has me puzzled is the accessing it from your phone. I have used Google maps on my phone for a long time and believe I am signed in using the same account. The Google Maps app on the phone identifies me (the right end if the search bar has my initial and shows the account when tapped.) When I tap the search bar I get to the … More but that is it. All I then see is the opportunity to set my Home and Work Locations but no listing of My Maps.
On the laptop going to the Menu (bars at left side of Search) allows access to Lists, Labeled, Visited, and Maps. (Maps is the one, as you indicate, to get to your personal Maps.) On my phone the only thing that seems to be available is the Labeled option. What am I missing to get to the Maps? I feel like there must be a switch somewhere to have the Maps come through … but I can’t seem to find it! Hoping you or someone can point me in the right direction. Thank you.

Without creating a custom map, is there a way to display a route in Google Maps and show attractions at the same time?

You’ve written a terrific guide and I’m learning a lot more about Google maps. Is there some way to print this guide or download a printable copy? Thanks.
Leave A Comment Cancel reply
Save my name, email, and website in this browser for the next time I comment.
WANT TO SAVE MONEY TRAVELING?
Check out the travel resources →
Check out my list of reliable budget-friendly travel resources that are guaranteed to save you the most money, without compromising your experience.
This error message is only visible to WordPress admins Error: There is no connected account for the user 17841400792270379.
Get in touch
Contact Portfolio Let’s work together
Explore the blog
Destinations Guides and itineraries Travel planning tips
Let’s connect
Never miss an adventure, privacy policy | terms of service | disclaimer | by zazen designs.
Back to top
How To Plan A Trip With Google Maps: 7 Easy Steps
This page may contain affiliate links which earn us a commission at no extra cost to you to support the site. Thank you!
Wondering how to plan a trip with Google Maps? Below, we’ll show you how we plan all our trips on Google Maps – get ready for every Google Maps hack you’ll ever need!
There is a lot that goes into planning the perfect trip. What are you going to do? Where will you stay? How are you going to plan your days? How long do you even need to see everything? It’s overwhelming!
I love travel planning. As you can see on this website, I kind of made my career out of it. Because I want to make the most out of my trips (and write the best possible guides about the destinations I visit), I take travel planning pretty seriously.
There is so much research that goes into it, and I couldn’t do it without my favourite travel planning tool: Google Maps. In this guide, I’m sharing how I use Google Maps as a trip planner, along with some handy hacks to help you on your next adventure. Let’s take a look!
Add Directions
Embed your map on your site, 3. it is easy to plan your driving miles/time.

7 Steps to Plan a Trip With Google Maps
Here is how to use Google Maps trip planner:
1. Create a Map
To create a map on Google, you do need a Google account. Once signed up/logged in, go to this page .
Click on “ Saved” >> “My Maps “, which will take you to your maps. If you have created any maps in the past, you will also find them here. As you can see in the screenshots below, I’ve already created quite a few!
Alternatively, you can go to this page , where you see and access your maps in an instant.

To create a new map, click on “ Create Map ”. This will open a new tab with an empty map.

By clicking on “ Untitled Map ”, you can give your map a name and a description. And ta-da! You’re ready for some travel planning on Google Maps. Time to create the perfect itinerary .

2. Add Locations
Now it’s time to start brainstorming. What do you want to do and see on your trip? There are so many ways to find the best places to visit.
For starters, you can find things to do by reading travel guides, blog posts , and itineraries from other travel bloggers. It’s also a good idea to go through Instagram hashtags and location tags. And, of course, good old printed travel guides (by Lonely Planet and Rough Guides, for example) are always a good shout too.
You don’t have to worry about how to plan out your days in detail. For now, you simply want to get an idea of what you want to do on your trip.
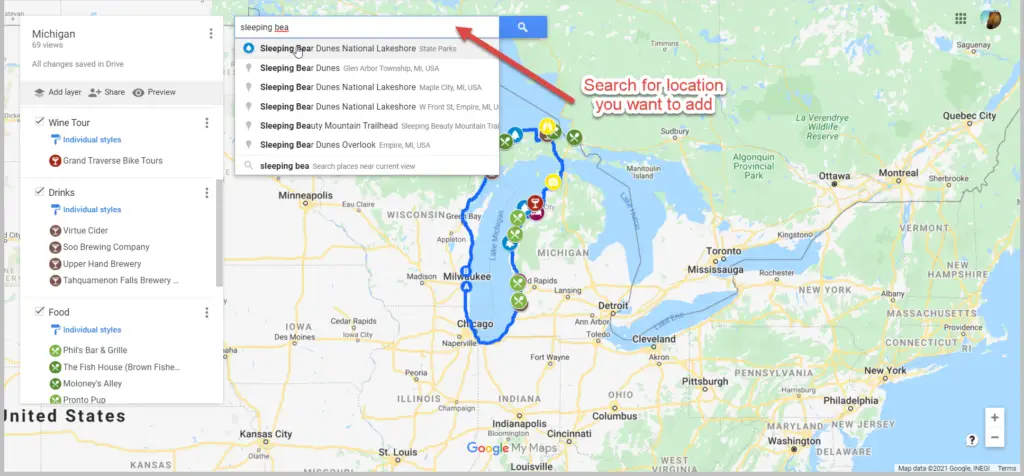
Whenever you find something that seems interesting, you can add these to your map by typing the location into the search bar. This can be the name of the location or the address, or you can use the coordinates. Usually, you’ll see a drop-down menu with suggestions as you type.

By pressing enter or selecting one of the options, Google Maps will take you to the location. Here, you can add these locations to your maps. Simply click on “ Add to map ”. Afterwards, you’ll see it appear on the Untitled Layer .

Alternatively, you can use the “ Add Market ” tool (shown in the screenshot below) to add a marker on the map. You can use this when a location isn’t on the map but you don’t have the coordinates, for example.

Before adding all your locations, make sure to read step 3. We explain how to customize your pins on Google Maps, making it much easier to plan your daily itineraries later on.

Planning a road trip on Google Maps? Start by adding the places you want to see/visit. Later on (see step 5), you can add directions to help you find the fastest routes. You can create on Google Maps for the overall road trip, and make another map for daily itineraries of your road trip.
3. Customise Your Categories (Icons and Colours)
The customisation options are another reason why planning trips on Google Maps is one of the best travel planning tools out there. By using colours, icons, pictures and notes, your map will be even easier to navigate.
These options let you break down your locations into categories, such as things to do, photography spots, restaurants, cafes, hotels, shops, etc.
You can change the colour of your pin and add an icon under the “ Style ” option – it looks like a paint bucket. There are hundreds of different icons to choose from.
At this stage, it’s best to stick to changing the icons for now. I normally change the colours to divide the days on my itineraries. Obviously, you can completely style this the way you want.

You can also change the colour and icon of your pins in the side menu.

When clicking on the “ Edit ” icon, you can change the title and add a description for your location. This can be handy to help yourself remember any specifics about this place, such as good photography spots, opening times and whether you need to book a ticket in advance or not.

You can add an image or video to your pins, too. And lastly, you can delete the pin by clicking on the trash icon.

4. Create Layers
Now you’ve added all the things you want to do and given them some icons, it’s time to take a look at the layers. You can add a layer by clicking the “Add layer” option in the sidebar. This automatically creates a brand new untitled layer on your map.

You can rename and delete the layers by clicking on the three dots next to the name of the layer.

You can make layers invisible by unchecking the box next to the name of your layer.

To move points of interest from one layer to another, you can simply drag them over with your mouse.
Layers are an easy way to categorize and organise the locations on your map. There are multiple ways to do this, and you can choose a way that works best for your trip. For example, you can create one layer for restaurant options in Tokyo, one for sightseeing in Tokyo, one for hotels in Tokyo , etc.
When I’m planning a big trip, I like to use layers to break down my individual days or cities. This way, I can quickly see what I’m doing every day while I’m travelling. To make it even clearer, I change the colours of all my pins to match the different layers.
5. Plan Your Itinerary (with Directions)
After following these steps, we should have a good overview of all the things we want to do and see during our trip. This will make it much easier to break down the trip into days.
For the Tokyo itinerary I’ve been planning as part of this Google Maps tutorial, I’m going to spread it out over two days.
I created two layers to match my time in Tokyo in Google Maps.

Because I can see where all my hotspots are located, I can see which activities and sights I want to pair together. This way, I can efficiently plan what I want to see each day. You can even make squares to group things together with the “ Line Drawing ” tool.
For example, it makes sense to group these pins together per day – this will save me a ton of time travelling from one place to the other.

Always check whether these things actually work together, though. Sometimes, a ton of restaurants are located near each other, but there’s no point in planning to visit four restaurants on the same day.
Sometimes, there are museums that take way too long to visit alongside other sights or you can combine certain parts of the city in one day.
Take a look at your itinerary and plan it accordingly. As mentioned before, I like to use the colour tool to add the same colour per day to make it even easier to spot. My Google Map itinerary turned out like this:

If you’re planning a road trip on Google Maps or want directions for walking from one point to another, you can use the direction tools. Click on one of the locations and select “ Directions to here ”.

This will create a new layer on your map. From here, you can add different locations to create a route. You can select points of interest on your map to easily add them to your route. Click on “ Add Destination ” to add more stops.
You can also change whether you want directions by car, bike, or on foot by clicking on the car icon. This opens up a small window with a car, bike and pedestrian. Changing the mode of transport will automatically change the directions to find the best route for you.
This tool allows you to create road trip itineraries or city walks with just a few clicks. I find this especially handy to plan a road trip with Google Maps, as it allows me to estimate the driving time and the amount of money I’ll have to spend on petrol.

By clicking on the three dots next to the name of this direction layer, you can click on “ Step-by-step directions ”. This will give you detailed directions, distances, and an estimation of how long it’ll take for you to get there. Super handy!

6. Book Your Hotels
Now you know exactly what your daily plans are for our trip, it makes it much easier to pick the perfect location for your accommodation . Since you know what parts of the city you’ll be visiting, you can pick a spot that’s near these locations. This will save you so much time (and money), as you won’t have to travel too far to go to start your daily itinerary.
I usually book hotels on Booking.com . The website’s map feature makes it perfect for choosing the location. Because I have my itinerary ready on Google Maps, I know exactly what area of the city I prefer to stay in.
Once you’ve booked your accommodation, you can add the location to your map too.
7. Share Your Trip & Access it on Your Phone
Once you’ve finished your map, you can share it with your travel buddies and download it onto your phone. Here is how to do it.
Access Your Map on Your Phone
To view the map on your phone (with an internet connection), simply download the Google Maps app. Log into your account and click on the “ Saved ” button at the bottom.
Then scroll down and click on “ Maps ”. This will take you to all the maps you created. Click on the map you want to access, and all your saved spots will appear.

Share Your Map
To share your map with your travel company or friends, click on the “ Share ” button. Make sure to enable link sharing , which will allow you to copy the shareable link. You can share this link with friends, who can then access your map and download it themselves.

If you’ve read any of my itineraries or travel guides , you have probably noticed some Google Maps. As I always use these maps for my own trips, I try to include them in my articles for you to use. If you want to embed your map onto your site, click on the three dots >> “Embed on site” .

This will give you a code that you can include on any site for an interactive map to appear.
Why Use Google Maps for Trip Planning?
Google Maps is one the best travel tools because it’s so easy to use for both planning your trip and using it during your trip. We use it for planning city trip itineraries and road trip routes, plus it allows us to save our favourite locations and hotspots.
Whenever we come across a location on social media that we’d like to check out, we add it to a bigger map so we can organise it into smaller itineraries when we’re ready to visit.
Here are some of the main reasons to use Google Maps:
1. It Allows You to Access Your Maps Anywhere
You can access Google Maps anywhere you want. After creating a map on your desktop, you can open it on your phone or tablet. Plus, you can download it so you can access it without being connected to the internet. This is especially handy when you’re abroad and internet access isn’t a given.
2. It Makes it Easy to Find the Best Hotel Location
Using Google Maps to plan my city breaks gives me insight on the perfect location for my accommodation. Because I have a visual representation of all the things I plan to do during my holiday, I know exactly what the best hotel spot is. I compare the map from Booking.com and my own map, and ta-da!
When planning road trip routes on Google Maps, you can easily estimate the time it takes to drive from one place to the next. You can use this to properly budget your trip in terms of petrol cost, too. And when on the road, you can use the directions from your own map while driving.
Conclusion: Using Google Maps Trip Planner
That concludes my tutorial on how to plan a trip with Google Maps. I hope this has shown you all the amazing features this tool offers and how easy it is to use when planning a road trip or city break.
Ever since I started using it, I’ve never looked back. It has saved me so much time and always takes away a ton of travel planning stress. I hope it can do the same for you!
Nele (Nay-la) graduated from Manchester Metropolitan University with an English and Creative Writing Degree and has lived in the UK for nearly 10 years. She has had an interest in Japan and its culture for as long as she can remember. Since her first trip in 2018 surpassed all expectations, she has continued to return to Japan to explore more of all it has got to offer. You can read her full story here .
10 thoughts on “How To Plan A Trip With Google Maps: 7 Easy Steps”
WOW!! I had no idea this resource existed. Your detailed steps and screenshots make it easy for me to take the plunge and start using this tool. Thank you.
Thank you so much for the lovely comment, Anne! So glad the post was able to teach you a few things – it’s such a great tool to use for planning trips!
Hi, Thank you for sharing this interesting feature. I was looking for a hard copy of a plan for my travel in Malaysia.
Great guide, exactly what I was looking for, Great work, Thank you!
- Pingback: Blogs To Read This September - Bournemouth Girl
This was very helpful. Thank you 🙂
Amazing tutorial! I am so glad you came up in Google search just as I was looking for this kind of resource. And best of all its free and a tool that I am so used to. How did I not know this before about G Maps?!
So glad to hear the tutorial was helpful! It’s been such a useful tool in my travels, hopefully you can use it on your next trip too!
Very detailed explanation and very well explained too. Thanks for making this blog…
Great post! I recently planned a trip to a nearby city using Google Maps, and it was incredibly helpful in navigating unfamiliar roads and finding the best routes. I especially appreciated the feature that allowed me to save my route and share it with friends. Will definitely be using this method for future trips!
Leave a Comment Cancel reply
This site uses Akismet to reduce spam. Learn how your comment data is processed .
Must-Read Articles

50+ Best Things To Do In Japan

Is The Japan Rail Pass Worth it?

The Perfect Three Week Japan Itinerary
Japan Travel Tips Group

The Japan Travel Newsletter
Sign up to get inspired! Receive insider tips, special discounts and more to plan your perfect Japan trip.
You have successfully joined our subscriber list.
japan travel Blog
Tokyo Kyoto Osaka Hiroshima Hakone Kobe Nikko Nara Kyushu All Japan Content
Plan Your Trip
Best Things To Do Japan Rail Pass 2 Week Itinerary 3 Week Itinerary Accommodation Japanese Phrases
About The Navigatio Work With Us
How to Plan a Trip in Google Maps: Your Ultimate Guide
Planning a trip can be a daunting task, but Google Maps makes it easy. With a few simple steps, you can map out your entire journey, from start to finish. You’ll be able to see the best routes, estimated travel times, and even add in stops along the way. Whether you’re going on a road trip or just trying to navigate a new city, Google Maps has you covered.
Step by Step Tutorial on How to Plan a Trip in Google Maps
Before we dive into the steps, let’s talk about what we’re aiming to achieve here. Planning a trip in Google Maps allows you to create a custom route with multiple stops, get directions, and even share your plan with friends. Let’s get started!
Step 1: Open Google Maps and click on the ‘Directions’ button
This step involves opening the Google Maps app or website and clicking on the ‘Directions’ feature.
Once you’ve opened Google Maps, you’ll find the ‘Directions’ button either on the top left corner if you’re on a computer, or on the bottom right if you’re using the mobile app. Clicking on this will take you to the route planning feature.
Step 2: Enter your starting point and destination
Type in the address or name of the place where you’re starting from and where you’re headed.
If you’re not sure of the exact address, don’t worry! Google Maps can work with landmarks, business names, and even general areas. Just make sure to double-check that the locations it selects are the ones you intended.
Step 3: Add additional stops to your route
Click on ‘Add stop’ to include any additional destinations you plan to visit along the way.
You can add multiple stops by clicking on ‘Add stop’ again. This is great for road trips or when running errands. Google Maps will automatically reorder the stops for the most efficient route, but you can manually adjust them if needed.
Step 4: Choose your mode of transportation
Select whether you’re driving, walking, biking, or using public transportation to get accurate directions.
Each mode of transport will give you different route options and travel times. For example, choosing ‘Walking’ avoids roads without sidewalks, and ‘Public transportation’ provides schedules for buses and trains.
Step 5: Review and adjust your route
Take a look at the suggested routes, and click on them to see step-by-step directions. Make any necessary adjustments to suit your preferences.
Sometimes Google Maps will offer several route options. You can choose the one that appeals to you based on factors like travel time, distance, or avoiding toll roads.
After completing these steps, you’ll have a detailed plan for your trip. You can start navigating immediately or save the directions for later. Google Maps will provide turn-by-turn guidance, so you can focus on enjoying the journey.
Tips for Planning a Trip in Google Maps
- Always check traffic conditions before you leave; Google Maps can show you real-time traffic updates.
- Use the ‘Leave at’ or ‘Arrive by’ feature to plan your departure or arrival time around traffic.
- If you’re planning to stop for food or gas, use the ‘Search along route’ feature to find the best spots.
- Remember to download offline maps if you’re traveling to an area with poor internet connectivity.
- Share your trip with friends or family right from Google Maps so they can follow your journey.
Frequently Asked Questions
How do i save a trip in google maps.
To save a trip, click on the three dots next to the ‘Directions’ button and select ‘Add to Your Places’ or ‘Send directions to your phone.’
Can I change the order of my stops in Google Maps?
Yes, you can click and drag the stops in the list to rearrange them manually.
Does Google Maps account for traffic?
Google Maps uses real-time traffic data to give you the most accurate ETA and can reroute you if there’s heavy traffic ahead.
Can I use Google Maps for planning a trip with multiple days?
While Google Maps doesn’t specifically have a multi-day trip planner, you can still plan each day’s route separately and save them.
How do I share my Google Maps trip plan with others?
Click on the ‘Share’ button, and you can send the link via email, text, or social media.
- Open Google Maps and click ‘Directions.’
- Enter your starting point and destination.
- Add additional stops.
- Choose your mode of transportation.
- Review and adjust your route.
That’s all there is to it! Planning a trip in Google Maps is a breeze once you know the steps. Whether you’re planning a cross-country adventure or a simple outing in your city, Google Maps is an invaluable tool that can help you make the most of your travels. With features like real-time traffic updates, the ability to add multiple stops, and the option to save and share your plans, Google Maps takes the stress out of trip planning. So next time you’re gearing up for a journey, remember to let Google Maps be your guide. Happy travels!

Kermit Matthews is a freelance writer based in Philadelphia, Pennsylvania with more than a decade of experience writing technology guides. He has a Bachelor’s and Master’s degree in Computer Science and has spent much of his professional career in IT management.
He specializes in writing content about iPhones, Android devices, Microsoft Office, and many other popular applications and devices.
Read his full bio here .
Share this:
- Click to share on Twitter (Opens in new window)
- Click to share on Facebook (Opens in new window)
- Click to email a link to a friend (Opens in new window)
- Click to share on LinkedIn (Opens in new window)
- Click to share on Reddit (Opens in new window)
- Click to share on Pinterest (Opens in new window)
- Click to share on Tumblr (Opens in new window)
Related posts:
- How to Add More Stops on Google Maps: A Step-by-Step Guide
- How to Plan a Trip on Google Maps: A Step-by-Step Guide
- How to Make Your Own Route on Google Maps – iPhone Guide
- How to Map Out a Route on Google Maps: A Step-by-Step Guide
- How to Map a Route on Google Maps: A Step-by-Step Guide
- How to Plan Route on Google Maps: A Step-by-Step Guide
- How to Stop Google Maps from Changing Route: Tips and Tricks
- How to Change Routes on Google Maps: A Step-by-Step Guide
- How to Create Itinerary in Google Maps: Step-by-Step Guide
- How to create a walking route on Google Maps: A step-by-step guide
- How to Make Google Maps the Default Navigation App on iPhone
- How to Map a Run on Google Maps: A Step-by-Step Guide
- How to Find Alternate Routes on Google Maps: A Step-by-Step Guide
- How to Avoid Highways on Google Maps: A Step-by-Step Guide
- How to Use Google Maps on Tesla: A Step-by-Step Guide
- How to See Toll Prices on Google Maps: A Step-by-Step Guide
- How to Make Google Maps Default on iPhone: A Step-by-Step Guide
- How to Avoid Tolls on Google Maps: A Step-by-Step Guide
- How to Find Halfway Point on Google Maps: A Step-by-Step Guide
- iOS 17: How to Install Google Maps on Your iPhone
How to Plan a Road Trip with Google Maps: A Step-by-Step Tutorial
This post may include affiliate links. As an Amazon Associate, I (The Winding Road Tripper) earn from qualifying purchases. Read more .
This post was originally published on August 8, 2021, and updated on February 16, 2023.
Ready to start planning your road trip using the power of Google Maps?
Then you’ve come to the right place.
Google has two amazing tools to help you plan your road trip: Google Maps and Google My Maps.
Google Maps is a great tool for plotting out your route, while Google My Maps is an amazing tool for road trip planning and organization.
In this post, I’ll teach you how and when to use each of these powerful free tools.
Let’s start by looking at Google Maps since it’s the simpler of the two.
But if you are looking for how to use Google My Maps, then click here .
How to Use Google Maps to Plot Your Road Trip Route
Google Maps is a great tool if you want to plot out your road trip route.
We use it as a starting point for all of our road trip planning to get a sense of how long our trip will be or what we can accomplish in the time we have.
Step 1: Open Google Maps
Start by opening up Google Maps on your desktop or phone.
When trip planning, we like to use our desktop computers to make use of the bigger screen.

Step 2: Plot Your Road Trip Route
To start plotting your road trip route, click on directions.

Then enter your starting point and your first destination.

Continue to add stops to your road trip by clicking on the (+) to add destinations.

Stop when you have all your road trip stops added to your map. Google Maps allows you to add up to 10 points to your map. If you want to add more, then Google My Maps is the tool for you.
Step 3: Reorder Road Trips Stops
If you want to play around with your route and reorder your stops, Google Maps makes it easy to do so.
On the left, where your stops are listed, you can drag and drop the stops to reorder them.

Step 4: Move the Driving Route
Google Maps will choose the fastest route between your road trip stops. But sometimes, there may be a scenic route you want to take.
You can easily move your driving route as desired by dragging and dropping your route.
Step 5: Send the Driving Route to Your Phone
Once you plan your road trip, you can send the directions to your phone for easy access during your trip. Directions can be sent via text message or email.
Note: You will have to have a Google Account to send directions to your phone.

Google Maps is a great starting point for planning a road trip.
But if you want to harness the power of Google and use it to plan your road trip and as a resource throughout your trip, Google My Maps is the choice for you.
Google My Maps: The Best Road Trip Planning Tool
Planning a road trip can be a daunting task. It’s hard to know where to start, and all the research can feel overwhelming. But that is where the ultimate road trip planning tool, Google My Maps, comes to the rescue.
Google My Maps is a very similar tool to traditional Google Maps, but it’s much more powerful and customizable.
In this section, we’ll start with detailed information on the features of Google My Maps. And then, we’ll get into exactly how we use Google My Maps to plan each one of our road trips.
Using this tool will help you seamlessly organize and plan your road trip.
Once we tried it, we never looked back.
Let’s start by giving you a little introduction to Google My Maps.
What is Google My Maps?
Google My Maps utilizes all of the data in Google Maps to allow you to create your very own custom map for your road trip. It’s a way for you to create a map containing the places important to you .
Once you create your map, you can access all of the personalized information you’ve added, so you never miss a beat while on the road.
Why is Google My Maps the Ultimate Road Trip Planning Tool?
Google My Maps is our favorite tool for planning a road trip. Here is why:
- It Helps You Visualize Your Trip Plotting all of your points of interest on a map helps see how your road trip may take shape. At the start of road trip planning, we typically have no idea what route we may take until we see all of the things we want to do on a map. And this is where Google My Maps can help.
- It Helps Organize Your Research When planning a road trip, you are likely gathering information from many sources, including websites, tourist bureaus, and recommendations from friends and family. Google My Maps can help you organize all of your research so you can more easily plan your road trip itinerary.
- It Consolidates Your Entire Itinerary Using Google My Maps allows you to have all of your road trip information in one place. There will be no need for a separate spreadsheet with your day-to-day itinerary or to bring your travel books with you.
What Are the Limitations of Google My Maps?
- Google My Maps Can Not Be Used Offline You will need access to wifi or cellular data to use your map on your road trip. But don’t let that stop you from using it to plan your road trip. There are ways to download your map to other apps for offline use, which I’ll take you through in the tutorial.
- You Can Only Add 2,000 Locations to Your Map Likely, you will not need over 2,000 locations when planning your road trip. And if you do, you can make separate maps, possibly divided by days or weeks, to get around this limitation.
- You Can Only Add 10 Layers to Your Map Layers are ways to categorize your location points. When using Google My Maps, you can only have ten layers per map.
- Planned Routes Can Not Be Accessed for Driving Directions on Google Maps When planning your trip, you may add a direction layer on your map to display the route you plan to take. Unfortunately, you can not use those directions to give you turn-by-turn navigation on your road trip. You’ll have to use Google Maps or click on a destination point on your custom Google My Map to bring up directions. I go through this in detail here .
How to Use Google My Maps to Plan a Road Trip
Now that you know why Google My Maps is the best road trip planning tool, let’s dive into the nuts and bolts of Google My Maps.
We’ll start with an in-depth overview and then show you exactly how we use Google My Maps to plan our road trips. Use the screenshots I’ve provided to help guide you through all of the steps.
Overview of Google My Maps
If you want to know how we use Google My Maps to plan our road trips, then feel free to skip down to the step-by-step guide for planning a road trip here .
But if you want to learn the ins and out of Google My Maps, this is where to start.
You can start from the beginning or jump to the section you want to learn more about by clicking on the links below.
Here is what we will cover to familiarize you with how Google My Maps works so you can start road trip planning like a boss.
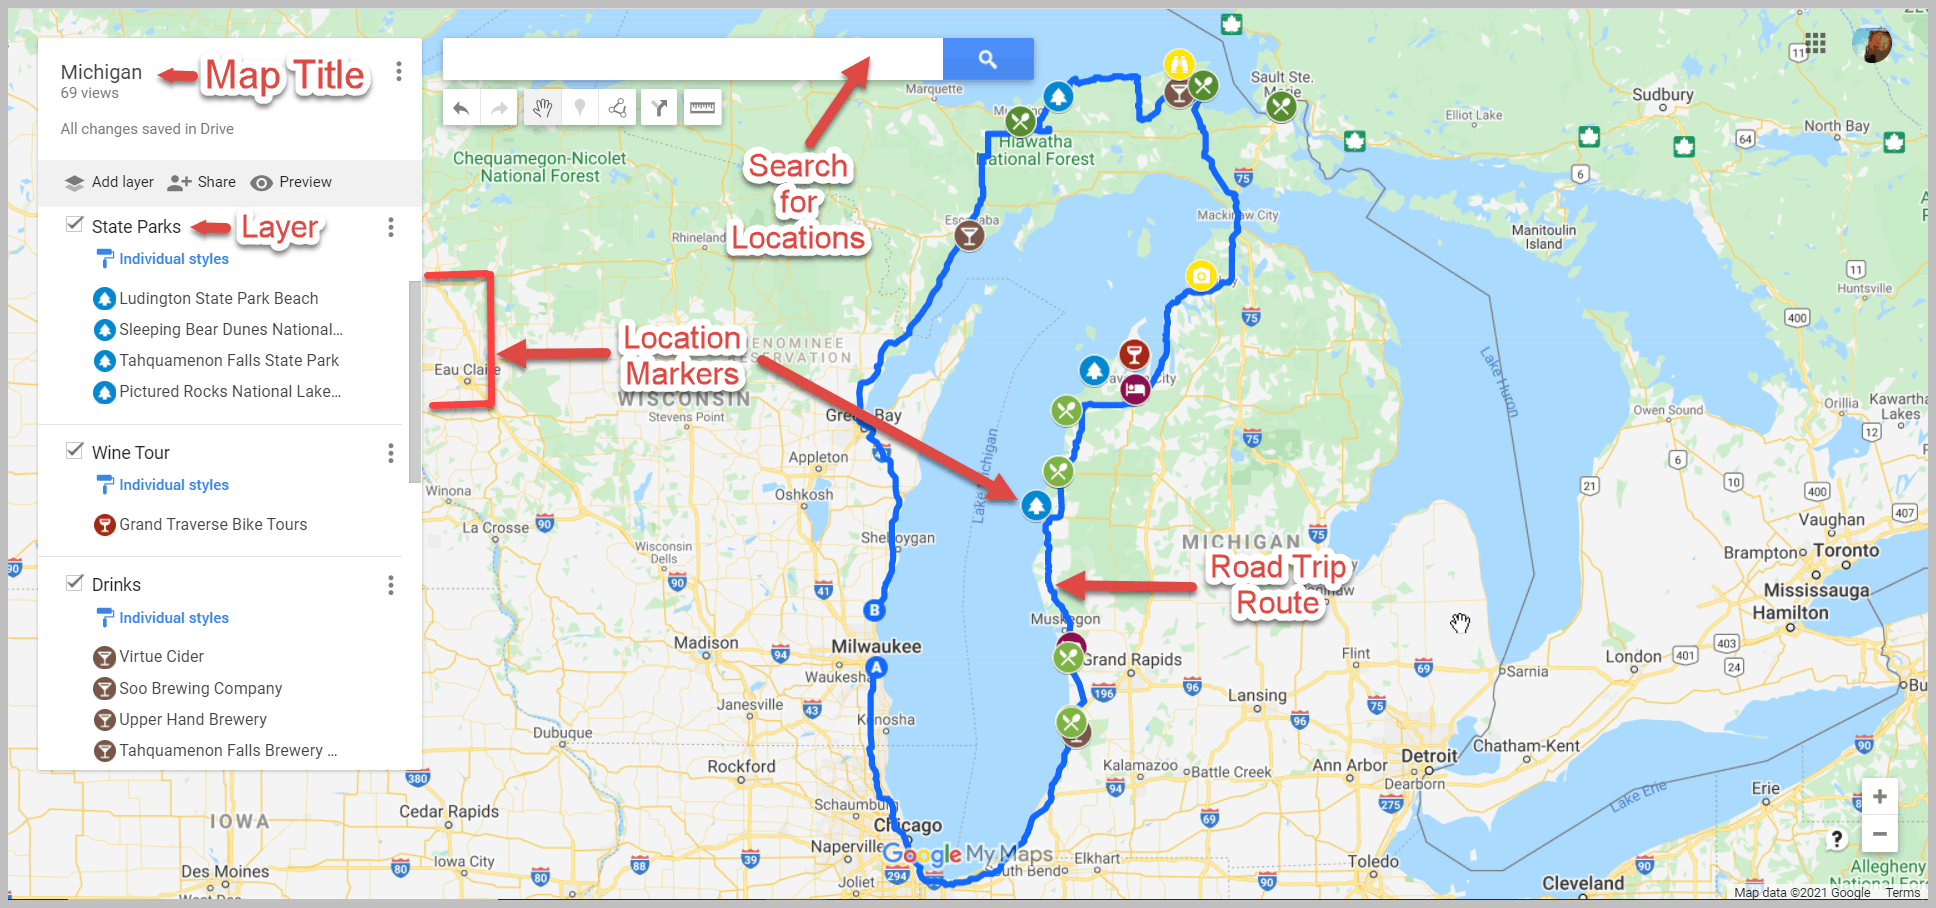
Google My Maps Layout
- Markers/Locations
Google My Maps allows you to add locations and driving directions to your map while allowing you to organize them as you wish.
To get started, let’s get familiar with the layout of Google My Maps.
I suggest creating your first Google My Map and playing around with the functions of the map to help you get familiar with them.
Note: You must either create a Google Account or sign in to your Google account to start using Google My Maps .
Location Markers
Location markers are points that you add to a map. They can be things like restaurants, hotels, sights-to-see, bathroom stops, etc.
Find things to do along your route with our Favorite Tools to Find Things to Do Along Your Road Trip Route .
Each point you add to a map will include any information that Google already has for that point.
These include things like:
- GPS coordinates
- Website address
- Phone Number
Three Ways to Add Markers to Your Google My Map
You can add markers to your road trip map in three ways:
- Using the search function
- Selecting a Point already on Google Maps to add to your own map
- Add a point manually
Let’s look at how to do all three.
Search Function
You can find a marker by typing in the name, address, or GPS coordinates into the search bar.
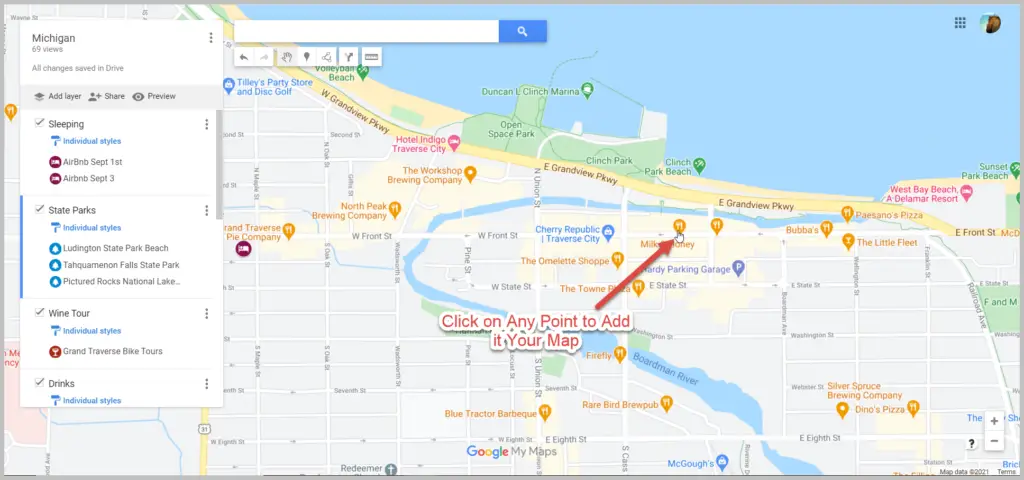
Adding a Marker That is Already on Google Maps
Google Maps already has many markers in its database. When you zoom into an area, many points of interest will start to show up. If any of these markers look appealing to you, you can add them to your own map by clicking on them.
Adding a Marker Manually
You may need to add markers manually when you can not find them via the search function and don’t have the location’s GPS coordinates.
For example, sometimes, I struggle to find the exact location of a trailhead via the search bar. In these cases, I find the location of the trailhead via a different resource and plot it on the map myself.
Color Code and Change the Icons of Your Markers
To keep your map organized, you’ll want to customize and color-code your icons to help you group locations together.
Luckily, Google lets you fully customize your markers.
Map layers are a great way to organize your maps.
But before we dive into adding layers, let’s talk about map layers.
What are Map Layers?
A map layer is a set of markers that are layered on top of an existing map. You can see your different layers on the left-hand side of your map.
When you add a marker to a map, Google My Maps will add it to a layer. You can then use these layers to organize your map.
The added marker will appear on the selected layer. If you want to move a marker to a different layer, click and drag that marker to the desired layer.
For example, I made a map of Wisconsin Campgrounds to help me find campgrounds nearby during our road trips.
I have chosen to use separate layers for different types of campgrounds; National Forests, State Parks, and County Parks.
The benefit of using separate layers versus adding all of the campgrounds to a single layer is that I can check and uncheck specific layers depending on what information I want to see on my map.
If I don’t want to see the State Parks on my map, I can uncheck “Wisconsin State Parks,” and they will not be plotted on my map until I recheck the box.
How to Add Layers
Within Google My Maps, you can have up to 10 layers on a single map.
To add layers, click on “add layer” on the left-hand side of your map just below the map title and description.

Google My Maps then adds an “untitled layer” to your map.
To change the title, click on “Untitled layer,” and it will give you the option to rename the layer.
The current layer selected will have a solid vertical blue bar on the left side of the layer panel. Any new markers created will be added to the selected layer.

You can use Google My Maps to plot your driving route. Unfortunately, you can’t use these routes for navigation in Google Maps. This is one of the downfalls of Google My Maps.
But that is not to say that adding driving directions to your Google road trip map isn’t helpful. Adding driving directions helps you visualize your route so you can better understand where you are going while on your road trip. It also will help you figure out how long you can drive in one day .
Here’s how to add and use Directions on your Google Map:
Start by clicking on the direction icon located below the search bar.

You will then continue to add stops along your route to get a visual of your driving route.

Google Maps will default to the quickest route when creating your driving route. The quickest driving route will likely be the main highways and not always the most scenic. Therefore, there may be times you want to deviate from the quickest route and take a more scenic route.
Fortunately, you can adjust your route by dragging it to where you want it to go.
Start by clicking on the route, and a small circle will appear.

Then drag this route to where you want the route to go.
How to Plan a Road Trip with Google My Maps – A Step-by-Step Tutorial
Now that we know the ins and outs of Google My Maps let’s learn how to use it to create your very own customized road trip map.
- Create a New Google Map
- Add Layers for Different Types of Locations
- Add Locations to Your Map
- Plan Your Road Trip Route
Step 1: Create a New Google Map
You will need to sign in to your Google Account or create a new account to create your own Google My Map.
Once you’re logged into Google, follow this link to bring you to Google Maps .
Click on the hamburger ( 𝄘 ) in the top left-hand corner of Google Maps.
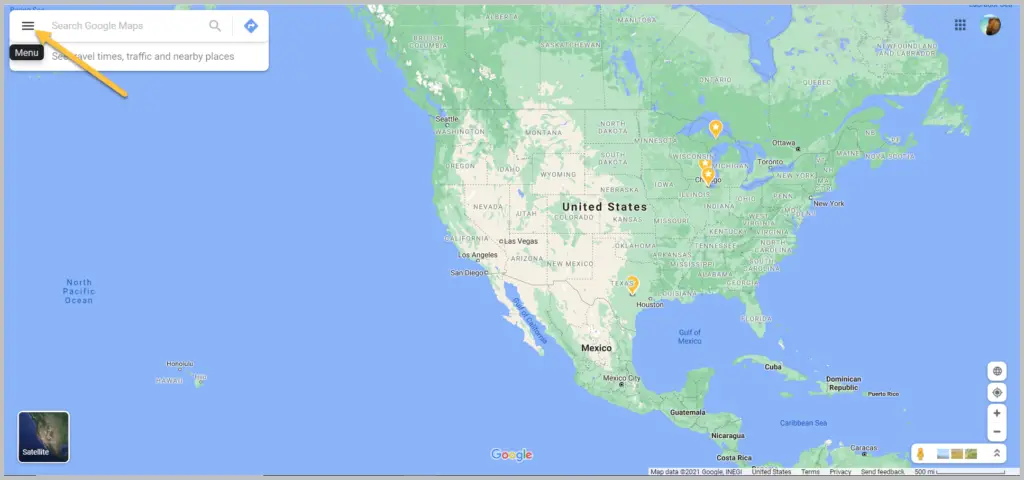
Click on “Your Places”.
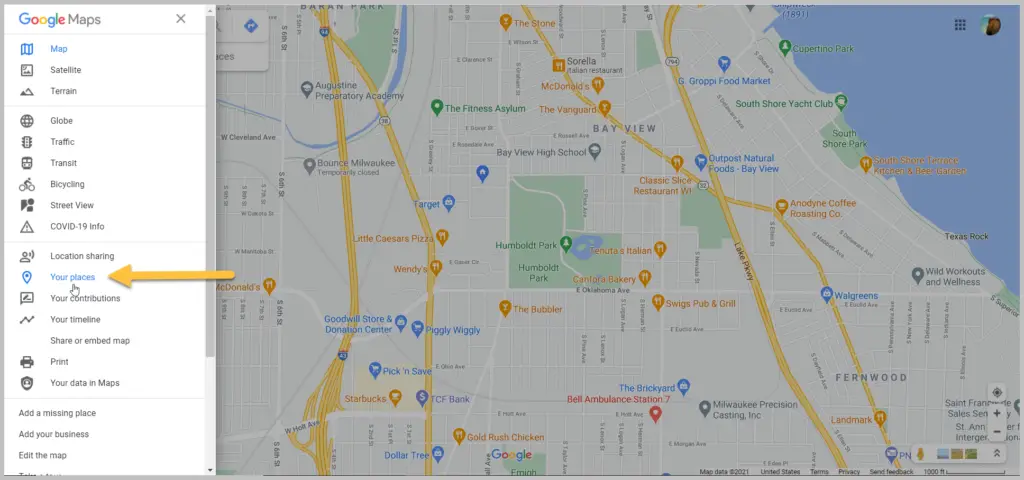
This brings up any saved information you’ve stored in Google maps, like your favorites
Now it’s time to bring up your very first map.
Click on Maps on the top left →, then click “create map” on the bottom left.
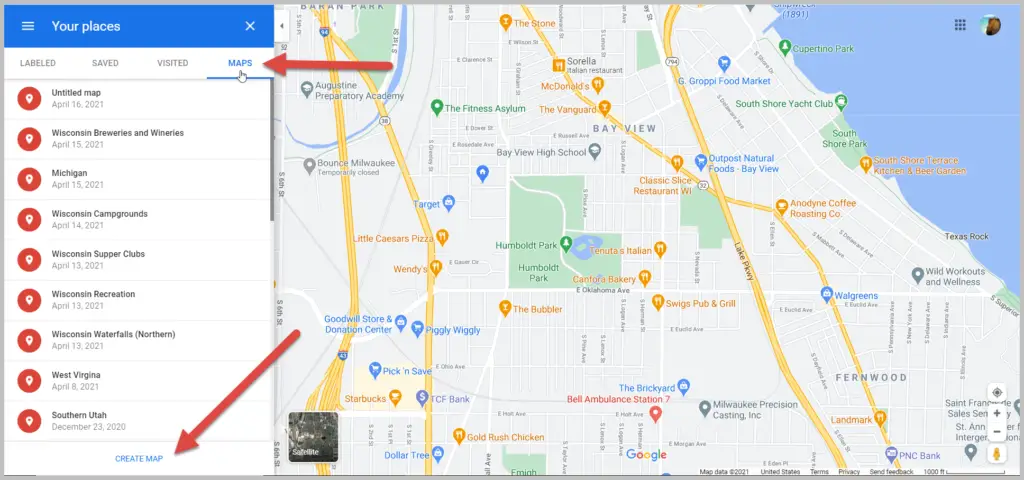
You now have your blank map!
Give your map a title, and get ready to create your first custom road trip map.
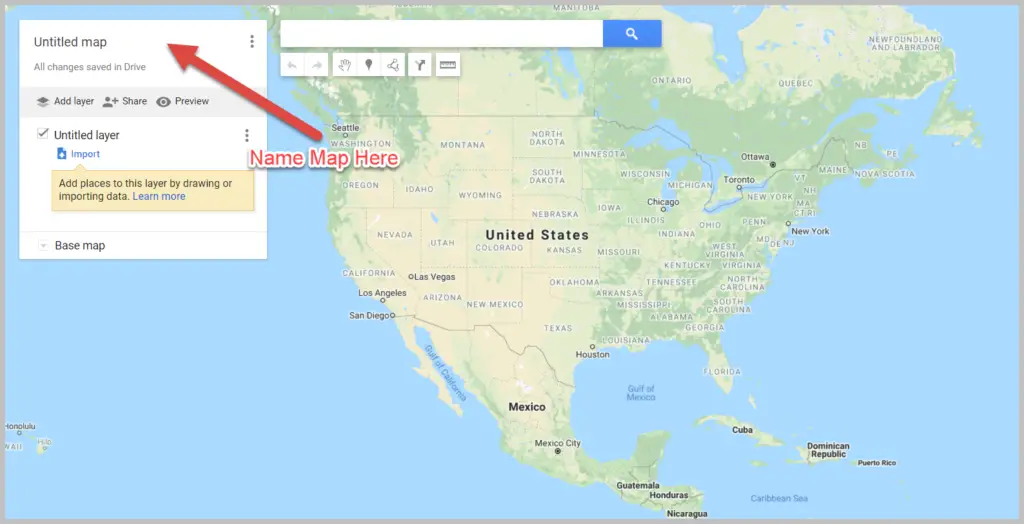
Step 2: Create Layers for Different Types of Markers
I like to start trip planning by creating different layers for the types of markers I plan to add to my map.
The layers I typically use are: – Places to Sleep – Places to Eat – Places to Drink – Things to Do
You can always add layers while you plan. But I find it easier to stay organized if I start with some layers on my map before adding locations.
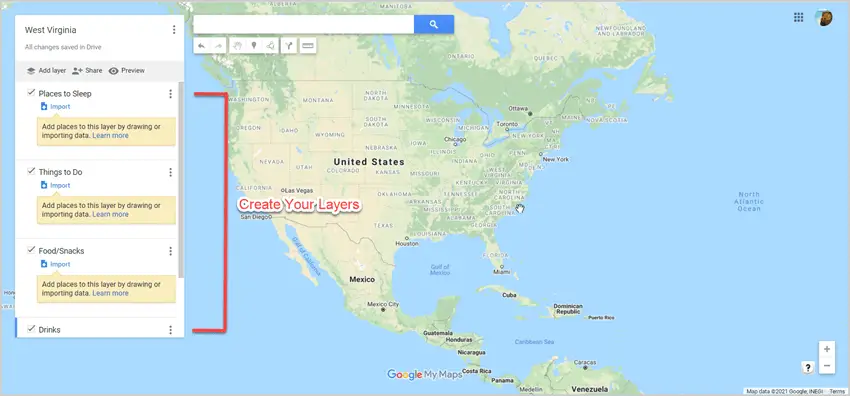
Step 3. Add Markers to Your Map
This is the best part of planning your road trip with Google My Maps.
Whether you are in your brainstorming stage of travel prep or you already know where you want to go, this step is where your trip starts to come together.
To start, you’ll research your destinations to find markers to add to your map.
I like to use the following resources for trip research:
- Google: Search for things to do, places to eat, places to stay, etc., in the areas you plan to visit or pass through
- Visitor Centers: Find tourism information online or request info from your destinations’ tourism bureaus to be mailed to you
- Travel books: We like to get ours from the library
- Facebook groups: Join a Facebook Group for the area you are traveling to. They are filled with tons of suggestions on the best things to do in the area.
When you find a location you want to make note of, add it to your map.
Do this by entering it into the search bar.
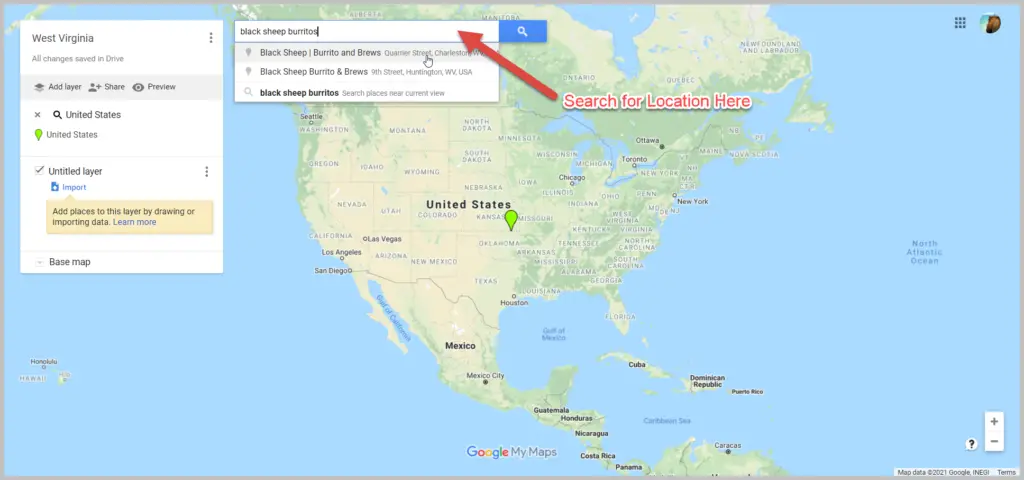
The great thing about Google Maps is that it pulls up all of the information on a location that Google has. If available, you can find the exact address, reviews, and website address.
If the location looks good, you can then add it as a marker to your map by clicking “add to map”.
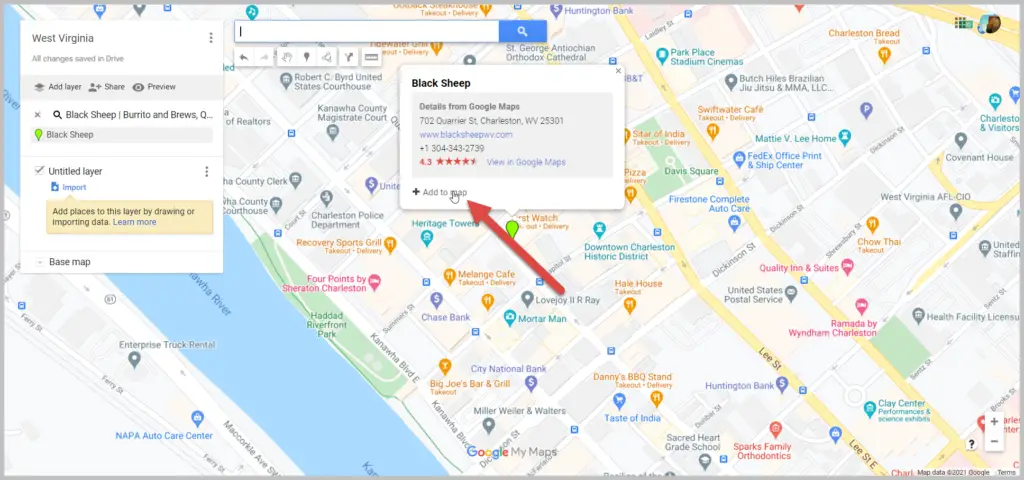
Once added to your map, you can customize your marker by changing your icon’s color and/or shape by clicking on the paint bucket icon labeled “style”.
I like picking a specific color and icon for each marker category. For example, my “restaurants” may all be blue with a fork and spoon icon, while my “sights to see” will be yellow with a binocular icon.

One of my favorite features of Google My Maps is that I can add my own info to the marker. Typically, this info comes from the research I’ve done on the location. If I found a blog post recommending a specific restaurant, I’ll add that to the marker, so I have that info at my fingertips when we are on the road.
Add any info you want to your marker and click save.

Your marker will now be added to your map.
You can see your marker in two places: one on the map and the other in the layer it was added to in the layers menu on the left-hand side of the screen.
Continue to add locations until your map starts to take shape.
Here is an example of a map we made for a West Virginia Road Trip .

Step 4: Determine Your Route / Itinerary
Now that you have location markers on your map, you can determine your route and day-to-day itinerary.
Take a look at where all your location markers are situated and start planning your route.
Start by creating a directions layer on your map.
Once you have your directions layer, rename it, and begin plotting your route.
First, you will need to enter your starting point. This can be done by either entering an address manually or clicking on a marker on your map.
Continue to add stops until your route is complete.
Here is an example of what our Lake Michigan Circle Tour Road Trip looked like.

Google Maps will default to the quickest route from two points. If you want to go a different route than the one suggested, you can drag the route to force it to go a different way than it was originally displayed.
You now have your own customizable Google Map for your road trip.
We use these maps for both planning our trip and for reference during our trip.
Now let’s look at how to use your awesome map during your trip.
How to View Your Google My Map on Your Phone
Now that you have your map customized, you’ll likely want to be able to view it on your phone.
You will first need to download the Google Maps app from your phone’s app store.
Once you have the Google Map app, here is how you access your map:
- Click on “Saved” on the lower toolbar on your phone
- Click on “Maps” on the lower right
- Select your customized map
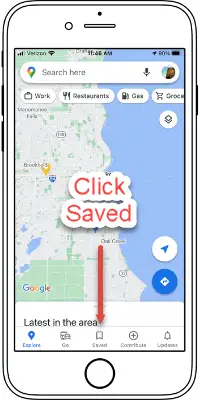
Now you can view your location markers and all the customized information you added to your map.
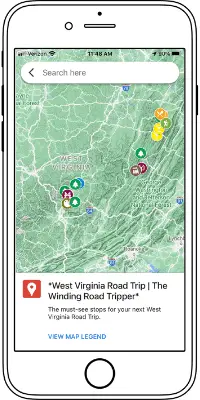
Click on your marker to bring up basic information. For the more detailed information you added, swipe up.
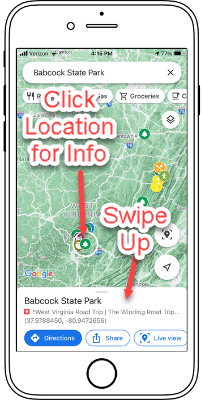
How to Use Your Google Map to Get Directions During Your Road Trip
Unfortunately, you can’t use the turn-by-turn directions you may have added to your map for actual driving instructions for your trip.
But not all is lost; you can still get directions to the next stop by using your customized map and Google Maps.
To do this, click on the location you want directions to and click on directions.
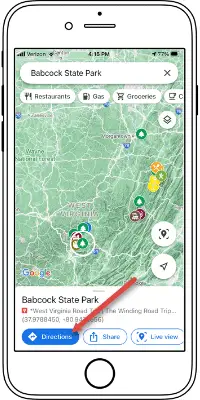
This will launch your Google Map app and allow you to get turn-by-turn directions to your next stop.
How to Export Your Map for Offline Access
Google My Maps works great when you have cell phone service on your trip. Unfortunately, you will not always have service, and you can’t download your Google My Map for offline use like you can in Google Maps.
Thankfully, there are ways to export your map for use offline.
To do this, we use Gaia GPS .
Let’s walk you through downloading your Google My Map for importing into Gaia GPS, an offline mapping app.
On your computer, click on the ( ⋮ ) in the top left corner by the map’s name. Then click on Export to KML/KMZ.
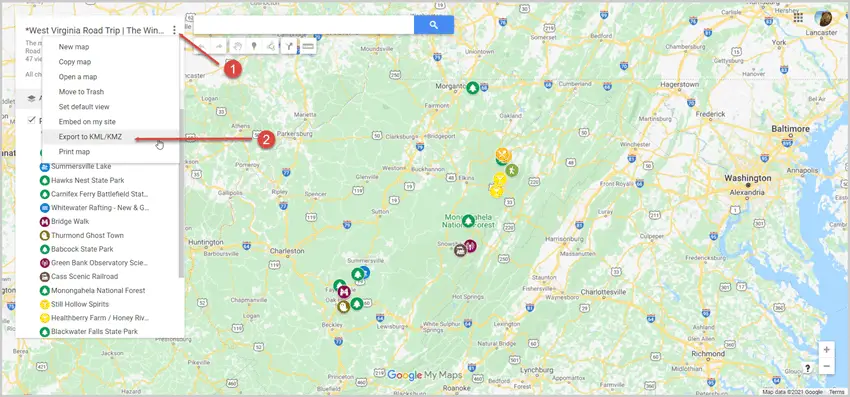
A pop-up will appear. Keep the default of “entire map” and click “download”.
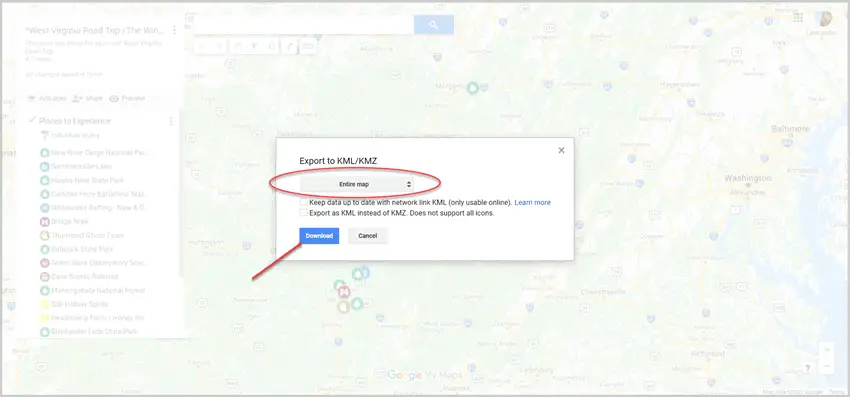
Now you can import this map into Gaia GPS.
Start by creating a Gaia GPS account .
Once logged in, click “Import Data” and select the .KMZ file you downloaded from Google My Maps.
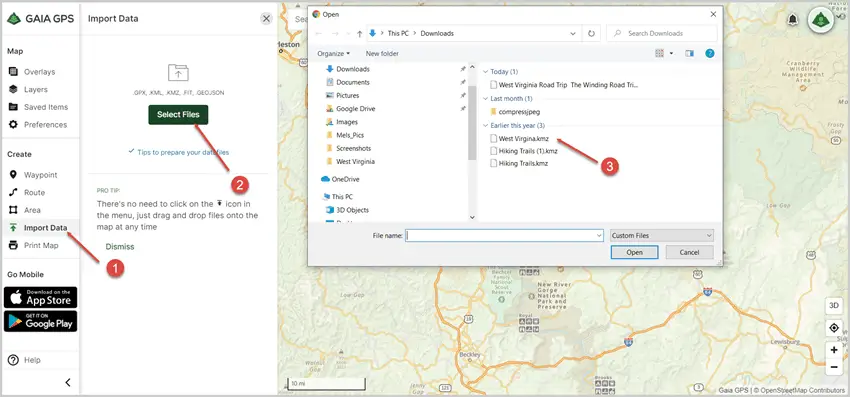
Your locations will now populate in your Gaia GPS map. Make sure to click “save” .
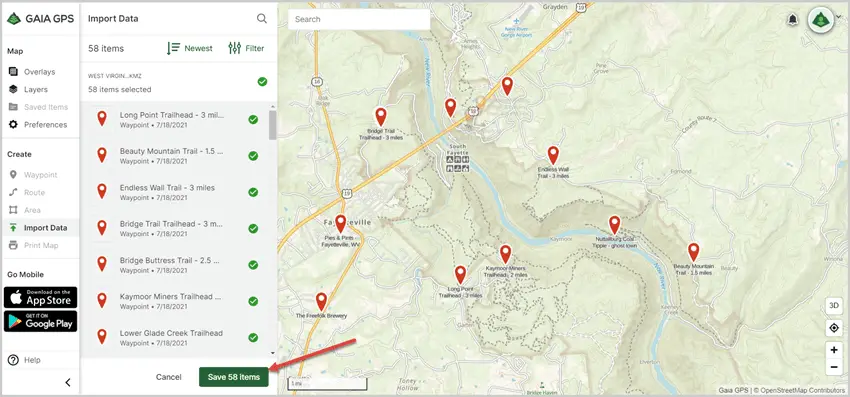
You can now access your map locations offline on your phone via Gaia GPS.
To do this, download the Gaia GPS App on your phone and log in.
Once logged in, you will see a notification that you have a saved location available.
Click on the Saved folder
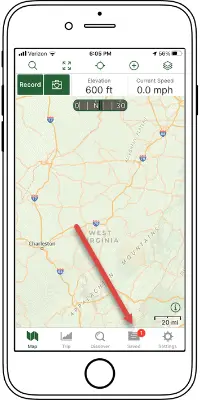
You can now see all your locations on your Google My Map. Including the details, you added.
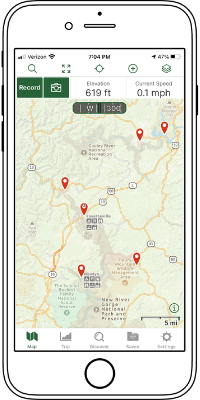
More Road Trip Tips: Road Trip Hacks for a Stress-free Trip Road Trip Activities for a Long Car Ride Road Trip Meal and Snack Ideas Money-Saving Tips for Your Next Road Trip How to Budget for a Road Trip

HOW TO USE GOOGLE MAPS TRIP PLANNER IN 7 STEPS

Google Maps Trip Planner allows you to create detailed travel plans while simplifying those confusing things related to travel planning.
Planning a trip often seems like trying to put together a million-piece puzzle. It is understandable that a trip to a place that we’ve only ever seen through a laptop screen can be confusing.
But it won’t be that way when you start planning a trip on google maps.
Most of the confusion related to travel planning is because we have no sense of orientation for that place or destination that we’re about to visit. All we have is a bunch of ideas – places we want to go and see, hotels we like, activities, but we have no idea where those things are located.
Creating a trip plan on google maps puts everything into perspective because it gives you a visualization of those things on a map.
When you have those ideas clearly pointed out on an organized google maps travel plan, it will be easier to choose the area you want to stay (and eliminate the surprise of booking a hotel in the middle of nowhere) , group together certain activities in a practical way and you can also plan a route in google maps for your daily itinerary.
Basically, planning a trip on google maps will make travel planning a whole lot easier. And best of all, it’s free and pretty simple to use.
Before we start, you may want to save the URL link to this post in case you need it for future reference.
Ok then let’s get right to it.
If you want to know something specific about creating a travel plan in google maps you can skip straight to what you want in the table of contents below.

1. CREATE A NEW GOOGLE MAP
2. add all your ideas to google maps, 3. changing the pins colors and icons, 4. categories a google maps travel plan, 5. access you google maps travel plan on mobile, 6. use maps offline, 7. share map with friends.
Do this if you’re soon going on vacation or planning a trip.
Before you go on vacation make sure to purchase travel insurance. I know, most times it seems like a waste of money. But the thing is, you don’t know you need it until you do so it’s good to minimize those risks that you could face while traveling. Keep in mind, that medical bills or hospitalization can cost 1000’s of $$. And
CLICK HERE FOR A FULL RUNDOWN ON TRAVEL INSURANCE STARTING AT JUST $1.50
In this guide, we are laying out a step-by-step guide to create a travel plan using google maps on desktop (laptop). Although it is possible to create a map on your smartphone, the options are limited. But don’t worry, the map created on your desktop will be synced to all your devices, even mobile phones and tablets.
If you already have a Google account (Gmail), go onto your search engine (Google, or whatever you usually use) and type in google maps. Or you can click here to get started.
You will need a google account so that your maps will be saved and also so the maps that you create can be accessed from all your devices like mobile phones and tablets.
If you don’t have a Google account click on this link to create one. Don’t worry it’s free and only takes about 5 minutes. Once you’ve created an account you follow the same steps from above.
Make sure that you’re logged in before you start creating a new google maps trip plan. If you’re logged in there should be a round icon with your initials on it in the top right corner of the screen. If there isn’t you’ll see a sign-in button.
After signing in, first go to the hamburger icon near the search bar on the map. It’s in the top left corner. And then click on your places, the first option in the drop-down menu.

In the menu click on MAPS , the last option on the right. This is where all the maps that you create are saved. So, if this is the first time that you’re creating a google map, this section should be empty.
At the bottom of the current menu, click on CREATE MAP .
Ok then, great the map has now been created.
All you need to do now is to give your new google maps a title and a description. If you only have one map, you barely need a title let alone a description. But as you create more maps, those titles and descriptions will help you easily find the map you’re looking for rather than searching through a bunch of unorganized maps.
In the menu in the top left corner of the screen, Click on Untitled Map . And in the text box that pops up, give your map a title. Think of giving specific names to your maps. For instance, if you’re making a map of New York, instead of just writing a title “New York”, write “New York Trip – October 2021”. And write a description, like places I have to visit, or the best hotels, restaurants, activities, for example.

Not everyone follows the same steps to create their personal travel plan on google maps. For example, our favorite way is to start off by putting all our ideas on the map.
We start off by making a list of places that we want to go, activities that we want to do, hotels and restaurants we like, and anything else that comes to mind that we could possibly consider while in that destination.
Because you can visualize Adding all our ideas onto a map offers a visualization of that destination and puts everything into perspective. For instance, if certain activities are too far away we can determine
For instance, we can easily understand if an activity is too far away or maybe choose a hotel that is centrally located in the middle of the things that we want to do.
Seeing all those places on a map will help you understand what you can realistically do within your trip duration. For instance, you will be able to determine if certain activities are too far away. Or if a hotel you like is in the middle of nowhere.
Adding all those ideas to the map is straightforward.
Step. 1. Go to the search box in the middle of the screen and type in the name of the place. You can search for anything you want, like hotels, restaurants, beaches, waterfalls, parks. Basically, on google maps you’ll find almost every place you look for. If that place doesn’t come up in the search, you’ll need to type in the street address.
Step. 2. Once you’ve found the place you want, a green will come on the map in the location of that place. And a small description box will be next to it.
Step. 3. To save that place to the map, click +add to map in the description box.
Repeat these 3 steps for all those places that you want to add on you new Google Map travel plan.

TIP: if only the green pin comes on the map, click on the green pin. When you click on the pin the description box will come up and you can add that place to the map.
Too many ideas but not much time? When we plan short trips, sometimes we book tours or at least we book a tour if they’re any good. Tours save us time because they combine the must visit spots in the destination we visit. And surprisingly, some tours have cost us less than if we did everything by ourselves.
Whenever we are considering a tour in a popular destination, we always make sure to book with a reputable company and also to book in advance. Because you know, the good things easily run out. Below are links of 2 companies that we personally use.
PRE BOOK & GET THE LATEST DEALS WITH VIATOR HERE
OR PREBOOK WITH KLOOK FOR THE BEST DEALS ON TOURS & TICKETS IN ASIA
At this point, we have a good idea of where all those places – like activities, tourist spots, hotels, restaurants – are located. And by default, all the pins will be in blue color.
But having a load of identical pins isn’t a great way to visualize a google maps travel itinerary.
So now, what we need to do is to give meaning to each pin by color coding and/or changing the pins into icons.
Color coding the pins or changing them into different icons will make your google map a lot more visually understandable.
For example, what we do is color code each place into different categories. For example, if we have beaches we make yellow pins, for hikes we use brown pins, for restaurants red pins, and so on.
And we also customize the icons. Don’t worry, both color and icons are pretty straightforward.
How to color code pins in google maps
Step 1. Click on the pin that you want to change the color. A description box will open up.
Step 2. Next click on the style, the icon resembling a tipping paint bucket. The first icon at the bottom of the description box.

Step 3. A small window with color samples will open. Choose a color that will help you easily identify that specific place.
How to change pins to specific icons
Changing those identical pins into icons that actually mean something will further help you visualize what those places are on your google maps trip planner.
For instance, if you have a beach add a palm tree or an umbrella. If you have a restaurant, add a knife and fork icon.
Color coding and icons work simultaneously. So don’t worry, you don’t need to choose either the icon OR the color.
To change icons follow steps 1 and 2 from above. When the window with color samples opens, there will also be a number of icons to choose from. However, you can further expand that icon window by clicking on more icons.
TIP: alternatively you can change color or icons of pins when you’re adding your ideas to the map. After you click +add to map
Adding layers in google maps trip planner is a key feature because it allows you to categories your trip itinerary into different sections.
Creating different layers is a way of grouping together certain things on the map. Because although you may have defined all the pins with specific colors, the map still doesn’t have much organization. It’s like having a bunch of pins with not much value.
The way in which you group together the pins will depend entirely on your choice and also on what is the purpose of the google maps that you’re creating. We’ll give a few ideas on how you could categories all those pins.
We group together our pins in 3 ways, depending on what makes the most sense for that specific travel plan.
If we want an easy to follow travel itinerary, we group together pins in days. So if a number of things can be done in a day, we group those together and call that a day plan.
Or, when we go to countries made up of loads islands like Indonesia or the Philippines, we categories all the pins by islands.
Or, we create a different layer for each different type of place that we want to visit. For instance, we make categories for hotels, restaurants, malls, historical places, activities, etc.
How to add layers on a google maps travel plan
Step 1. In the menu, in the top left corner, click on add layer. You can add up to 10 different layers.

Step 2. Categorize each layer with a title. Click on Untitled layer . A text box will open up and here you can write the title for that layer. If you don’t see the text box, click again until it comes on the screen.

Step 3. All the places that you had previously added to the map will be in the first layer. Once you’ve created different layers, all you need to do is to click on the place you want to move and drag it into the layer/category that you want.
Make sure the box next to each layer is ticked. If next to the layer title there is no tick, it means that layer is closed and you won’t be able to see the things in that layer when use the map on your mobile phone.
Now that you’ve created your Google Maps travel plan you will need to be able to access that plan easily with your mobile phone.
To access your plan on mobile phone go to google maps (make sure you go to google maps and not maps go) and click on saved at the bottom of your screen.
In the next window scroll all the way down and click on maps on the bottom right side of the screen. This is where the maps you create are saved.
Now choose the map you and click on it.
Now you can access your google maps travel plan when offline. And also use google maps to get directions even if you don’t have a connection.
So from now on it won’t really matter if you’re connected to the internet or not. You can easily find google maps travel plans and get directions even in remote places with unreliable wifi service.
You’ll need to plan these things ahead because the only way to access your maps or get directions is to download what you need in advance.
I will explain exactly how to download google maps for directions and how to download your google maps trip planner.
Accessing Google Maps travel plan offline
- Download Google Earth App on your mobile phone.
- Go to your google maps travel plan on desktop and click on the 3 dots next to the title.
- In the pop up box click export to KML/KMZ. In the next pop up leave the boxes unchecked and click download.
- Send a downloaded copy to yourself by email.
- Now, on your phone go to that email, click on the file and open it with Google earth.

And follow these steps to use Google directional maps offline
- On your mobile phone, open the google maps app. Be sure the app is Google Maps and not “Google Maps Go”.If you haven’t got the app on your mobile phone you can download it here.
- In the top right corner of your mobile screen you will see a round icon. Click on the icon to access your account and go to offline maps.
- On the next page click “select your map”. This will open the page where you download your map. By default, the area of the map will be of your location. However, you can scroll to find whichever part of the world you want to download.
Keep in mind that for google to work offline you need to download the map over a connection. By default, maps will only download over wifi connections. If you want to include mobile data for downloads head to the settings wheel on the “select your own map” page and go to download preferences.
Whether you are planning a trip with google maps or not you should always share your travel plan with someone you trust.
Especially if you’re traveling solo, someone should always know what your plans are. At least, if something happens in those places you’re going to visit someone will know where you are.
Besides safety reasons, you can also share your google maps and let friends or your travel buddies contribute and give their own input on things they want to do.
Follow the steps below to share your google maps travel plan:
- To share from desktop go to the map you want to share and under the main title click on the share button. In the pop up window click the button next to “anyone with this link can view”. Copy the link and share it either by email or message.
- To share on mobile open google maps mobile app, click saved at the bottom of the screen. In the next window scroll all the way down and click on maps. Open the map you want to share and click on “view map legend”. Click the share option and choose how and to who you want to share that google maps travel plan.
Sharing your map will give your loved ones some peace of mind. At least, if they don’t hear from you they will know where you were at that time.
Using google maps to create detailed travel plans takes out a lot of the unnecessary stress of travel planning. It also makes a travel plan organized and easy to understand because of the visual aspect of planning a trip on a map.
So I hope this article gives you a better understanding of how to plan a trip with google maps. But if you have any other ideas or alternate ideas on certain things we mentioned please let us know in the comments below. There is no better way to improve than to get ideas from other travelers.
Our love for travel started off in South East Asia and continues to attract us each year. If you want you can read a bunch of interesting articles about beaches, waterfalls, food, itineraries by clicking the link below.
CLICK HERE TO READ A BUNCH OF INTERESTING ARTICLES!!
Do you want to know useful travel tips without even searching?
Subscribe to our email list to receive tips and detailed itineraries for amazing places around the world that will spark your travel inspiration.
Your Name (required)
Your Email (required)
Follow Us On Pinterest .
2 thoughts on “HOW TO USE GOOGLE MAPS TRIP PLANNER IN 7 STEPS”
The articles you write help me a lot and I like the topic
I like this. I posted this on my LinkedIn and my followers enjoyed it! Keep up the good work. 🙂
Leave a Comment Cancel reply
Save my name, email, and website in this browser for the next time I comment.
——— ABOUT US ———

We're Jackie and James, now in our late 30's, we've been traveling on and off for 5 years now. After living our entire lives on a tiny island named Malta, we set off to explore Asia on a budget while writing detailed guides about awesome destinations. We hope our travels help you realize that traveling doesn't have to cost a fortune.
——— SEARCH THE BLOG ———
Recommended

Travel Packing Methods – X6 Packing Organization Tips
Read More->

HOW TO PLAN A TRIP – 10 STEP TRAVEL PLANNER GUIDE

TRAVEL SAFETY – 27 TIPS TO STAY SAFE WHEN TRAVELING

CHOOSING THE BEST LONG TERM TRAVEL INSURANCE POLICY IN 2021

CHOOSING A HOLIDAY DESTINATION – 7 STEPS TO FIND THE BEST VACATION SPOT
How to Use Google My Maps to Plan a Trip (Ultimate Guide)

Note: Some of the links in this post may be affiliate links. This means if you click on the link and purchase the item, I will receive a commission at no additional cost to you. More details are here .
I love a good map. I’ve got maps hanging on my walls. I go to the bookstore to read maps. Whenever I navigate my way home using only a map, I feel like I must have some innate bushcraft skills. And if you’ve read my posts about traveling in Maine , you’re probably sick of me talking about the DeLorme Atlas by now.
But while reading paper maps will always inspire a sense of get-up-and-go adventure for me, I’m not totally opposed to using tech for planning my trips and navigating on the ground.
And one of my favorite techy solutions? A secret little trip planner called Google My Maps, buried inside of everyone’s favorite map tool.
Google My Maps lets you create shareable custom maps with multiple layers, plus location pins with icons and notes. It’s a great way to brainstorm travel plans or create a trip itinerary from a desktop. And since the map can be viewed in the Google Maps app, you can use it to navigate on the go.
To give you an example of what this post will show you how to do, here’s one of the custom Google Maps I’ve created for a trip.
Keep reading for an overview of how to use Google My Maps to plan a trip, plus a video tutorial of how to set it up—all updated in 2023. I’ll also share answers to commonly asked questions and some lesser known tips to help you get the most out of this tool.
A quick note: Creating a custom map in Google My Maps is distinct from Google Lists of saved places. Check out our Google My Maps vs Lists comparison to see all the differences and our full guide to using Google Maps Lists .
8 Top Google My Maps Features
(AKA Why It’s Awesome)
Google My Maps allows you to see your trip itinerary.
This is so helpful, especially if you’re a visual person or enjoy using maps. But even if you’re not, it’s still really useful to see where everything is in relation to each other as you plan your trip, vacation, or holiday because it helps you be realistic about your plans.
It connects with other Google apps.
Setting aside my (ahem, very rational) fear that they may take over the world soon, I love all things Google. My Maps stores a copy of the map in whatever Google Drive account you’re using. (Am I the only one who has six of these?) So if you like to create Google Docs or folders to store trip planning information, documents, photos, or itineraries, it’s nice to have your map easily accessible in the same folder.
You get additional location information since it’s part of Google Maps.
If a location is on Google, you can see their website, phone number, address, reviews, and website when you add it to your custom map. (Note that you can’t see this information when clicking on your saved pin from the Google Maps app, but you can from desktop.)
You can add your own extra notes and photos.
Customize your map even more by adding notes, photos, or videos. Use the notes during planning to add website, hours, or tips. If I hear about the location from a particular website, I usually add that link and what was noted in the article about the location (e.g., it’s a great sunset spot, which dish on the menu is recommended) so I can reference it later.
You can view your route by creating a layer with directions.
When I traveled to Burlington, Vermont, I wanted to see the length of the bike trail on the map, so I used the directions feature to show the whole route. (Check out the Burlington travel guide for an example of the travel map I created that includes the bike path route.) And while I haven’t done this yet, you could also use Google My Maps to plan a road trip itinerary for a longer adventure.
Caveat: As I’ll discuss later, you can’t use directions layers to get turn-by-turn directions (but I mention an alternative below). For this reason, I only use these layers to visualize my route.
It’s highly customizable.
Don’t mind me while I swoon over the color coding and organization options over here. Use custom icons, layers, and colors so it’s easy to see what things are at a glance. For example, you can give different locations individual styles: a coffee cup icon for cafes, a bed icon for hotels, and a swimming icon for beaches. You can also use layers in many different ways, such as one layer for each day of your trip or one layer for each category (like dining, lodging, and things to do).
In-depth planning on your computer. Easy, on-the-go access from your phone.
While you can’t edit the maps from the Google Maps app on iPhone or Android, you (and anyone you’ve shared them with) can view them. You can click on icons and see your notes, as well as navigate to those locations.
Note that there used to be a dedicated My Maps app on Android, but this has been deprecated.
It’s easy to share it with a friend or with the world.
If you’re planning a trip with other people, it’s easy to share the map with others . And if it’s something you want to make available to everyone (like I do on my travel guide posts), just change the privacy setting and share the link or embed it on a website.
3 Ways to Use Google My Maps
Brainstorm and store ideas for future “maybe” trips.
I often come across a really interesting hotel, restaurant, or fun thing to do in destinations I want to travel to in the future, and I want to make sure I don’t forget about them. I have so many bookmarks in so many places (Pinterest, Facebook, Instagram), but Google My Maps is the place I’ve started storing ideas for future trips.
Plan your trip itinerary.
Want to use Google Maps for route planning? When you’re ready to plan an upcoming trip, plot it out visually by using Google My Maps to create your itinerary. If you like structured itineraries, you can easily create a detailed day-to-day plan.
Or, you can use a looser itinerary structure like we usually do by adding all the places you might like to go.
For example, on a day trip to NYC, we added tons of places to eat on the map (thank you, Tiktok). As we were walking around doing other activities and started to get hungry, we were able to easily see which saved restaurants were closest to us.
Navigate on the go.
Whether you’re using your map loosely for ideas or for a structured itinerary, you can pull it up on your phone anytime and get directions to your next location.
Not sure what you want to do today, or want to see what the closest restaurant from your list is for dinner? Pop into your custom map to jog your memory from the notes you made or to get directions to your next location.
Recommended: Need an organized backpack to take on the road? Check out my favorite luggage for camping, road trips, and flying: the Cotopaxi Nazca 24L and Allpa 35L !
How to Use Google My Maps to Plan a Trip
How to create a new custom map.
Go to Google My Maps from your desktop browser . Check the Google icon in the top right corner to make sure you’re using the Google account you want to. Click “Create A New Map” and a window will open with a blank map. To give your map a name and description , click the map name (“Untitled Map”).

You can also change the color and style of the base map if desired. At the bottom of the layer panel on the left, click the arrow next to “Base Map.” You’ll get a window with nine options, including terrain, light political (a very light version of the standard Google Maps), satellite, and some different colored versions. Note that changing the base map style on desktop won’t change anything when viewing on mobile in Google Maps.
How to Add and Edit Layers
When you create a new map, the first layer will already be created, so you’ll probably want to rename it. To give your first layer a title , click directly on the title name like you did with the map name, or click the 3 dots next to “Untitled Layer” and then click “Rename Layer.” Clicking these 3 dots next to a layer title is also how you can delete a layer if you add one accidentally or change your mind. In this example, I’m changing my first layer to “dining” and will add all restaurants to this layer.
You can use layers any way you want to, or simply stick to one layer if you don’t need multiple. To add new layers , simply click “Add Layer” in the gray section below the map title and description.
To move a pin between layers , click the pin on the layer and hold down the mouse, and then drag it to the desired layer.

How to Add Location Pins
There are various ways to add location pins to a layer. First, make sure the correct layer is chosen by clicking anywhere in the white area on the layer. You’ll see which layer is selected by looking for the blue bar on the left of the layer.
- In the map search bar, type either a place name or an address. Click “Add to Map” to add a pin for this location . This is how I add most pins.
- If you don’t need an exact location or don’t have an address , you can click the pin marker button below the map search bar (“Add Marker”). It will turn your mouse into a T and you can click anywhere on the map to add a blank pin. You’ll immediately be prompted to add the pin title and description.
- If you’re dealing with very remote locations (or you just like geeky map stuff), you can also use latitude and longitude coordinates in the search bar.
To delete a pin , simply click on it and click the trash icon.

A few tips and best practices for adding pins:
- If the place you’re searching for does not have a listing on Google, you’ll have to use an address. One thing to note is that sometimes Google Maps listings aren’t correct or don’t take you to the right place, so you may want to double check the location if you’re not using a street address to add the pin (especially if it’s a small business without a website).
- I have also found that hiking trail heads are frequently on Google Maps, but they’re not always correct in terms of navigating there by car. I usually add them to my map to get a basic idea of where they are while planning, but I use a paper map or atlas to find them while traveling.
How to Customize Location Pins
To change the title and add notes to your listing, click on the pin on the map, and then click the pencil icon (“Edit”).
To change the color and icon of the pin , click the paint bucket icon (from the pin itself or directly in the layer). Click “More Icons” to view all the icon options. You can color code by type of activity, by layer, or any way that makes sense to you.
To add photos or videos to a pin , click on the pin on the map, and then click the camera icon (“Add Image or Video”). This is another way to make your map interactive, especially after you’ve visited a location and want to share it with others.

How to Add A Directions Layer
I find that directions layers are helpful for showing the route of a walking tour, bike path, or road trip you want to take, but I don’t find them useful for directions while traveling since I can simply use the maps app to navigate.
I use directions layers whenever I want to show an entire route on a map , rather than a specific location. Think of this as the 2024 version of mapping out a trip with AAA paper maps and a highlighter (if you’re old enough to remember).
Click the arrow icon underneath the search bar, which will create a new directions layer. On the legend, click “Driving” if you want to change this to walking or biking directions. Add a location name or address to Points A and B in the legend. If you find that the pins are not exactly where they should be, you can drag the points on the map.
Continue adding points by clicking “Add Destination” on the map. You can either type the information into the legend or hover your mouse to a spot on the map and double click it. (This is especially useful if you’re tracing a route on something like a bike path or hiking trail that won’t have an address.)
Rearrange the order by dragging the items around in the legend. Just like altering directions on Google Maps navigation, you can click on part of the route and drag it to a different road if you want to change part of the route after it is complete.
If you need to access the directions so you can see the distance of your route or the time it will take, click the three dots on the layer and click “Step-by-Step Directions.” Note that you can’t actually use this to get turn-by-turn directions in Google Maps.

How to Share A Google My Map
There are several options for sharing your Google Maps trip plan.
Open up your map, then click the share button in the gray bar above your layers. To allow others to view your map (which includes embedding on your website), click “change” under the section “Who has access.” For embedding, you will need to make this setting public.
Otherwise, if you want to allow others to edit your map, add their email address in the “invite people” section.

How to View Your Custom Map in Google Maps (iPhone or Android)
Open Google Maps and go to the Saved icon at the bottom. Scroll to the bottom of this screen and click “Maps.” Choose the My Map you want to view. The layers with your custom icons will now be visible on your Google Map. You can click on any pin to view your details (such as description or photos), as well as to navigate there.
To close a map, click on a pin and then click “View Map Legend.” There, you can click the Close icon.
From the Map Legend, you can also toggle layers on and off, and then backing out to the main map (don’t click Close—just the back arrow or back button).
How to Navigate with a Custom My Map (iPhone or Android)
To navigate to one of your pins, open your map, find the pin for where you want to go, click it, and then click “directions.” When you do this, you won’t see your custom map anymore but will be looking at the regular navigation of Google Maps.
You can’t use a My Maps “directions layer” for navigation. If you’re looking for that functionality, I recommend just creating a route in Google Maps and sending it to your phone (or sharing with others). See here for more details.
How to Import Locations from Google Sheets, CSV, or Excel
Importing locations to a My Maps layer can be helpful in a few scenarios:
- You have a significant amount of locations to add to your layer
- Your data is already in the form of a spreadsheet
- You want additional fields included besides the default Name and Description
- You want to create groupings of pins (for example, a list of 50 restaurants could have a column for “Cuisine,” which will give you the option to group and style the pins by cuisine)
The process is simple, and you can import a variety of file types, including CSV, Excel (XLSX), or directly from Google Sheets. There are also special file formats that import map data from other programs, but this section is focused on spreadsheet-type files that you create and format.
Create a spreadsheet with the desired column headers. At a minimum, you need place names and either addresses or latitude-longitude information .
If you want to group your pins by some type of categorization, you should include that as a column. Other columns you could include: website, phone number, description, or notes. While Google Sheets allows you to include photos in a cell, Google My Maps will not import photos in this way (it will include the column as a field, but will be blank).
Once your spreadsheet file is ready, click “Import” on a blank layer (if your map already has layers, you will need to add a new layer to see this option). If uploading a CSV or XLSX, do this from the Upload tab. If using a Google Sheet, click the Google Drive tab and choose your file.
Choose which column has location data (address or latitude-longitude) and click “Continue.” Choose the location name column next and click “Finish.”
To change the icons individually, click “Uniform Style” next to the paintbrush on your layer. Under “Group Places By,” choose “Individual Styles.”
To change styles by a category column (such as Cuisine), click the link next to the paintbrush and choose to group places by the desired column. You can then give each category its own color or icon.
You can manually add new pins to this layer, and they will include all the fields you imported from the spreadsheet columns.
You can also add more items to your spreadsheet, and import this new data. Click the three dots on your layer. Under “Reimport and Merge,” click “Add More Items” and choose your file. It will add the new rows to your layer.
How to Import a Route from Google Maps Timeline History (KML) or GPS Data From a Fitness App (GPX)
Google My Maps can import routes and locations you’ve already traveled to via special file types that are very easy to download from certain apps. This could be useful if you want to share a walking, biking, or driving route that you’ve taken without having to recreate it on a directions layer.
Note that this only works as well as the GPS satellites were able to track your location while you were traveling.
If there are a lot of clouds, dense forest, buildings, or anything else blocking the GPS signal, your tracked route will be much less precise. I’ve noticed that Google Maps sometimes has my route showing somewhere I couldn’t have walked or driven.
If you have your location history turned on in Google Maps, you can download a KML file from a trip, which will include the route traveled and location pins for any stops. Sometimes it misses a location name or adds a pin in the wrong place, but overall it’s pretty good.
Go to your Google Maps Timeline and locate the day you want to export. Click on it, and you should now see your route highlighted along with any stops you made. Now click the gear icon on the bottom of your map, and click “Export this day to KML.” Go to your My Map and on a new layer, click “Import.” Choose the KML file you just downloaded. You can now edit each portion as needed—changing the color and thickness of the route line, changing the location icons, as well as adjusting the route where desired.
If you have other apps that track your location, such as fitness apps, you may be able to download a GPX file that shows the route you took. The instructions for doing this will vary from app to app, but I was able to easily find it in Samsung Health by looking at the detail of a particular workout/walk and clicking the three dots to download a GPX. The import process to Google My Maps is the same as above.
With both methods, you can make adjustments to points/stops along the way or even add more pins. With the Google Maps KML file, you can also adjust your route by moving the small white dots.
Google My Maps Tutorial
Here’s a walk through video to show you how to use Google Maps to plan a trip, along with several of my own Google My Maps itinerary examples. Coming soon: a 2024 update!
Google My Maps Examples
Here are a few more examples of My Maps I’ve created for sharing recommendations, trip ideas, and actual vacation planning.

Google My Maps FAQs and Tips
As great as Google My Maps is for planning a trip, there are some limitations to using it. Lots of questions have also come up about more specific uses and ways to use its features. Thanks to all the readers who have asked or shared tips in the comments as I’m always looking to make this a more robust guide. I’ve organized the questions and tips here since it makes it easier than scrolling through the comments.
How many layers can you add to a map?
Google My Maps limits you to 10 layers. If you are planning a longer road trip and want to create a layer for each day, this limitation may prove frustrating.
Here are a couple of workaround ideas: You can create 2 maps, and have the entire master route as 1 layer on each (showing the very basic route for all 12 days—say from city to city) as a reference. Then build individual layers for each day. As a second option, you could add multiple days to 1 layer and change the titles to start with the day they correspond to (so it would be “1 – Name of Place” instead of just “Name of Place.”) However, this option may not be ideal since you can’t see the titles until you click when you’re on the phone.
How many location pins can you add to each layer?
You can add up to 2,000 pins per layer, and the entire map cannot exceed 10,000 lines, shapes, or places total. I haven’t tested the limits, and it’s possible adding this amount of items could slow things down. My guess is that most travelers wouldn’t need anything so large, but it is possible according to Google .
Are custom Google My Maps available offline?
No, but keep reading for a workaround and alternative.
One of the biggest complaints about Google My Maps is that you can’t download your custom map and pins to use offline, unlike the rest of Google Maps.
However, I have been able to use it in areas with spotty reception. I pulled the map up when I did have reception, and I left it running in the background. It would stay loaded in the app and I was able to pull it up to look at it later when I was out of reception. I’m not sure I would rely on this as a surefire workaround, but it can work in a pinch.
Another alternative, especially if you’ll be traveling in another country where you’ll be completely offline, is to use Google Maps Lists, which can be edited from desktop or your phone but don’t offer the option for separate layers, unique icons, or adding photos.
Is there an app for Google My Maps?
There is no separate Google My Maps app, but you can view your maps within Google Maps. Just make sure you’re signed into the same account, and all your maps will sync.
(There used to be a dedicated My Maps app on Android, but this was deprecated in 2021.)
Can you create or edit maps from your phone?
No, the maps cannot be edited from the Google Maps app. Google My Maps can only be created or edited from the desktop version of the site. This is another huge advantage Google Lists has over Google My Maps because Lists allow you to add new places or entire lists from any device—iPhone, Android, tablet, laptop, or desktop.
Is there a bridge height filter?
No. For RVers and others who need to plan ahead for height limitations, there is no bridge height filter available in Google Maps. Since I haven’t had to use this feature myself, I am not confident in an alternative to recommend. However, from a bit of digging around, there are some apps and GPS units for truckers that may be a good place to start looking if you have an oversize vehicle.
What is the difference between Google Maps Lists and Google My Maps?
They both allow you to create custom maps with pins, but there are some key differences, such as offline access, layer capabilities, customizable pins, and creating/editing within the app. Check out the details on how Google My Maps compares to Lists (including a features comparison table).
How many stops can you add on a directions layer?
You can only add 10 stops per directions layer. This is also the maximum number of stops you can add for navigation in Google Maps. As some readers have pointed out, this can be limiting when you want to use this feature for a long road trip.
Can you use the directions layers on your phone for navigation purposes?
No, you cannot create a directions layer and then access those turn-by-turn directions for navigation in the Google Maps app.
So…are directions layers totally useless? What’s the point of having a Driving Directions layer in My Maps?
Personally, I still like to use these layers, but only to show a route for my very visual brain, rather than to actually create custom directions.
Can you send a custom created route (layer) to someone else so that the other person will take that specific driving route on google maps?
No, you can’t do this from My Maps, but there’s a workaround I can suggest.
Forget My Maps, and use Google Maps from desktop or mobile to plot a route. You can add up to 10 stops, and then you will be able to share your custom directions.
From desktop, there’s an extra step in first sending the directions to your phone. If you’ve created the directions in the mobile app or once you have them pulled up there, you can share them with anyone by clicking the 3 dots next to your list of locations (sharing must be done before clicking “Start”—if you’re already in the navigation, you need to back out of it to share). When you share, it will list all the steps as well as send a link for the other person to open the directions in Google Maps directly.
An important caveat to sharing custom routes: Google Maps will reroute the directions as it normally does according to current traffic at the time of driving, so this method cannot be relied upon if you’ve mapped a specific route for bridge clearances. As a workaround, you can add “stops” on the desired interstate (zoom in and add this literally on the road itself so navigation doesn’t try to take you off an exit), which will force Google Maps to take the driver that way. This is what I do when driving south from Connecticut to PA because Google Maps always wants me to take its beloved George Washington Bridge and I always don’t want to. I add a stop to force my route across the Tappan Zee Bridge. However, I’m not sure I would rely on this workaround as a sole method for RVs or truckers.
Can you see how much time the directions will take?
Yes, on desktop you can view the details if you want to know the distance or how long a route will take. To view distance and time for a directions layer, click the 3 dots on the laye, then click Step-by-Step Directions.
Of course, this doesn’t really help when you want to get this information on your phone or use the directions for navigation. As mentioned elsewhere, the “directions” layer functions best as a way to visualize a route. If you need turn-by-turn directions, see the steps mentioned above to save and send directions in Google Maps.
This post was originally published on July 27, 2017 and has been updated in May 2023.

Travel Photographer | FAA Certified Drone Pilot
Naomi is the coffee-loving, crazy-about-Latin-America writer and photographer behind everything here. She's guided by curiosity and a belief that every place has a story to tell–whether it’s through the intricate details of nature, history that has shaped a culture, or the people who call a place home. Learn More
How-To Geek
How to plan a road trip with multiple destinations in google maps.
Map out multiple destinations in Google Maps on the web or in the app.
Quick Links
Add multiple stops using the website, add multiple stops using the mobile app.
Whether you're planning a day out on the town, or want to orchestrate the perfect road trip across the country, Google Maps allows you to add up to nine stops, excluding your starting point, when you make directions from both the website and the Maps app. Here's how you do it.
First, open up your browser and head on over to Google Maps. Click the "Directions" button to the right of the search bar.
By default, Maps will use your device's location for the starting point. If you want this to be a different location, enter it now.
Next, enter the location of your first destination into the field provided, and then hit Enter. Alternatively, you can click any location on the map to get the same results.
Make sure you have either the driving or walking option selected, as Maps only lets you make multiple destinations with these two travel modes.
To add another destination, all you have to do is click either the "+" or the space below your first destination, and then start typing a new location. You can repeat this to add up to nine total stops. If you have more stops than is allowed, you may need to make another map from where you left off.
If at any point you decide you want to change up the order of your destinations, just drag any location up or down on the list using the circles on the left.
And once you've created your map in your web browser, you can click the "Send directions to your phone" link to send it to your mobile device by email or text message. Assuming you've got the Google Maps app installed, you can open it right up.
If you want to optimize your travel, you can also turn a multi-stop Google Maps trip into a round-trip .
Related: How to Find Public Restrooms Near You with Google Maps
You can use the Google Apps mobile app (free for iPhone , iPad , and Android ) to create a map with multiple destinations in much the same way.
Related: How to Download Google Maps Data for Offline Navigation on Android or iPhone
Fire up the Google Maps app on your mobile device, and then tap the blue "Go" button on the bottom right of your screen.
By default, Maps uses your device's location for the starting point. If you want this to be a different location, enter it now.
Start typing in your first destination or tap a location on the map below to start your journey.
Next, open the menu (the three dots at the top right), and then tap the "Add Stop" command.
Enter the location of your next stop, or tap anywhere on the map to add the next destination.
To change the order of your destinations, just drag any of the locations up or down the list using the "Hamburger" (three stacked lines) on the left.
When you've added all the stops to your trip, go ahead and tap "Done" so you can start your journey.
Related: How to View and Delete Your Google Maps History on Android and iPhone
7 Maps and Lens features to use on your next trip
Apr 03, 2023
[[read-time]] min read

Organizing the perfect vacation is one of the most stressful parts of traveling, but it can be easy (and even fun!) with the right tools. From planning your trip to exploring on the ground — here are some of the best ways you can use Google Maps and Lens to hack your summer travel.
Scope out places before you visit with immersive view
When you’re researching places to go, immersive view in Google Maps can help you make a more informed decision. Not only can you see a photorealistic view of an area, but you’ll also be able to get helpful information — like what the weather will be like at different times of day or when a spot gets most crowded. Indoor views even help you understand the vibe of a restaurant or cafe so you can choose the place that’s right for you.
Immersive view is live in London, Los Angeles, New York, San Francisco and Tokyo and it’ll launch in Amsterdam, Dublin, Florence, and Venice in the coming months.
Stay organized with the Recents tab on desktop Google Maps
To make trip planning easier, we’ll automatically organize places you’ve searched for on Maps by city with the new Recents tab on desktop. Found your favorite places? Share them with your travel buddy or save them to a new list. The Recents tab launches on desktop globally starting next week.
The Recents tab on desktop Google Maps makes it easy to stay organized while trip planning, and share your favorite places with friends and family.
Identify landmarks, artwork, plants, animals, and more with Lens
Once you’ve reached your destination, it’s time to start exploring with Lens as your tour guide. Use Lens in the Google app ( Android and iOS ) to search with your camera and answer questions like “who built that statue” or “what’s this pretty flower?”. When in doubt, Lens can figure it out.
Discover local cuisine with multisearch in Lens
With multisearch in Lens, you can combine words and images to find what you’re looking for in a whole new way – including information from the millions of local businesses on Google. Perhaps you saw a photo of a delicious looking pastry online, but don’t know what it’s called. Just take a screenshot, open it with Lens in the Google app, add the words “near me” to your search, and you’ll find nearby restaurants that serve what you’re looking for. Multisearch near me is now beginning to roll out globally.
Multisearch near me makes it easy to find local cuisine
Navigate with AR using Live View on Maps — indoors and out
In a new city, it can be hard to know which way to walk. With Live View in Maps, you’ll see AR arrows that point you exactly where you need to go. You can even use Live View indoors to navigate places like airports, helping you easily find your baggage claim or car rental. And when you’re out, search with Live View lets you find things around you — like ATMs, restaurants, parks and transit stations - and see helpful information like when they’re open and how highly they’re rated.
Search with Live View can help you find your way around cities like New York, London, Los Angeles, New York, Paris, San Francisco and Tokyo plus Barcelona, Dublin and Madrid in the coming months.
Explore on wheels with bike and scooter share information on Maps
Sometimes, there’s nothing like zooming through a new city — and bike and scooter share information on Maps can make this a breeze. Just select your destination, tap on directions, and scroll to the cycling option. You'll see nearby bikes and scooters, battery levels for electric options, and even if there’s a docking station for when you’re done.
Bike and scooter information is available on Google Maps in more than 500 cities globally like Berlin, New York, and São Paulo on both Android and iOS.
Ready to make travel plans now that you’ve got expert tips in your back pocket? Check out new ways we’re improving your travel experience on Search. We’ll be there every step of the way — all you have to do is book and explore!
Related stories

8 new accessibility updates across Lookout, Google Maps and more

5 AI-powered tools to help you get outside more

Find more sustainable ways to get around, with new Maps and Search updates

New ways to power up your electric vehicle adventures with Google Maps

3 Maps updates to make summer travel a breeze

6 ways to travel smarter this summer using Google tools
Let’s stay in touch. Get the latest news from Google in your inbox.
How to use Google My Maps to plan your trip
How to set up, share and use Google’s customized map view

- Quick steps
Tools and requirements
- How to use Google My Maps
Whether you’re planning a holiday or a day trip, having the ability to plan your trip with more granularity is a real boon, so it’s worth learning how to use Google My Maps to help you get organized.
Google Maps is undoubtedly one of the best wayfinding software available, but there are some features Google likes to split off into separate services.
One such example is the ability to customize your maps, which is currently housed under Google My Maps , allowing you to plan custom routes, set multiple markers, and add details like notes, colored labels, and more.
For example, the map above shows a map of some of the most popular destinations in Paris, with added detail in the form of summaries and different layers for different types of locations.
Below, we’ve included instructions on how to do a basic set-up, as well as some optional steps to really make your map sing.
Steps for how to use Google My Maps
- Head to Google My Maps and log in to your Google account
- Create and name a new map
- Input or import your destinations
- Customize tags, labels, and imagery
- Google account
- Desktop browser
Step by step guide for how to use Google My Maps
1. head to google my maps and create a map.

First, open Google My Maps and sign in to your Google account. In the top left hand corner of the screen, you’ll see a button titled “Create a new pin". Click this , then name your map by clicking the map title field in the index on the left side of the screen.
2. Add pins for your destinations

Next, you'll want to add pins for the destinations on your map. You can do this either by using the search bar as you would on the standard Google Maps, or by pressing the pin logo, which will change your mouse into a crosshair and allow you to manually place your destination.
3. Label and describe the destinations

A box will appear, in which you can type your own label for the location (or use whatever comes up in the text box search, if you used that method), add a short description or any notes, and even add media to the location.
This media can either be uploaded from your device, from a URL, from your Google Drive, from Google Image search results, or from YouTube.
4. (Optional) Add lines or directions

If you're traveling by foot, car or by bike, you can press the three circles connected by dots below the search bar (pictured above) to draw lines or directions between your destinations . You can choose to type the destinations directly into the index on the left side of the page or simply click on existing pins to connect them .
5. (Optional) Customize your map

There are lots of ways to make your map bright, colorful, and detailed.
By clicking the paint can icon on a pin or in the index bar next to the pin's name in the index, you can change the pin color or icon.
By clicking the dropdown menu titled 'Base map' at the bottom of the index, you can change the topography of your map.
You can also separate your pins out into layers by clicking 'add layer', allowing you to check or uncheck the visibility of given layers and separate destinations by any filter you might need; what day of the trip you'll be visiting, what kind of location they are, etc.
6. (Optional) Share and/or publish your map

When your map is ready, you can either share it with your families or travel buddies, or you can publish it online for your blog, social media, or project.
Clicking share will bring up a window with the sharing options, allowing you to toggle your map's visibility, searchability, and if your details are attached to the map, as well as its share link and an option to share on drive.
To see what it will look like to non-collaborators, click the preview button.
Get daily insight, inspiration and deals in your inbox
Sign up for breaking news, reviews, opinion, top tech deals, and more.
Josephine Watson ( @JosieWatson ) is TechRadar's Managing Editor - Lifestyle. Josephine has previously written on a variety of topics, from pop culture to gaming and even the energy industry, joining TechRadar to support general site management. She is a smart home nerd, as well as an advocate for internet safety and education, and has also made a point of using her position to fight for progression in the treatment of diversity and inclusion, mental health, and neurodiversity in corporate settings. Generally, you'll find her watching Disney movies, playing on her Switch, or showing people pictures of her cats, Mr. Smith and Heady.
Watch this: Marvel's first trailer for its immersive Apple Vision Pro app just landed
5 ways that Android 15 on Pixel is going to be way more customizable for users
Dell Technologies World 2024 — all the latest news and updates live as it happened
Most Popular
- 2 Apple TV Plus' next big comedy from Ted Lasso's co-creator sounds absolutely wild – and it's out in August
- 3 Fujifilm's most affordable medium-format camera gets a whopping $1,000 reduction
- 4 The best Memorial Day deal is already live: save $1,300 on Samsung's S95C OLED TV
- 5 Shop the 19 best tech deals from Amazon's massive Memorial Day sale
- 2 F1 Manager 24 preview - Create A Team is an absolute game changer
- 3 Apple TV Plus' next big comedy from Ted Lasso's co-creator sounds absolutely wild – and it's out in August
- 4 Have the new Apple Pencil Pro for your iPad Pro or Air? Start with these apps to try out the new skills
- 5 Chrome report reveals which extension could be slowing down your browser the most
- PRO Courses Guides New Tech Help Pro Expert Videos About wikiHow Pro Upgrade Sign In
- EDIT Edit this Article
- EXPLORE Tech Help Pro About Us Random Article Quizzes Request a New Article Community Dashboard This Or That Game Popular Categories Arts and Entertainment Artwork Books Movies Computers and Electronics Computers Phone Skills Technology Hacks Health Men's Health Mental Health Women's Health Relationships Dating Love Relationship Issues Hobbies and Crafts Crafts Drawing Games Education & Communication Communication Skills Personal Development Studying Personal Care and Style Fashion Hair Care Personal Hygiene Youth Personal Care School Stuff Dating All Categories Arts and Entertainment Finance and Business Home and Garden Relationship Quizzes Cars & Other Vehicles Food and Entertaining Personal Care and Style Sports and Fitness Computers and Electronics Health Pets and Animals Travel Education & Communication Hobbies and Crafts Philosophy and Religion Work World Family Life Holidays and Traditions Relationships Youth
- Browse Articles
- Learn Something New
- Quizzes Hot
- This Or That Game
- Train Your Brain
- Explore More
- Support wikiHow
- About wikiHow
- Log in / Sign up
- Computers and Electronics
- Website Application Instructions
- Google Applications
- Google Maps
How to Plan a Route with Google Maps
Last Updated: August 10, 2022
On a Browser
On the mobile app.
wikiHow is a “wiki,” similar to Wikipedia, which means that many of our articles are co-written by multiple authors. To create this article, volunteer authors worked to edit and improve it over time. This article has been viewed 110,861 times. Learn more...
Google Maps can be useful to navigate through a new location or place. You can also use it to find the best route or route alternatives, and plan your trip accordingly. You can get turn by turn directions, and different routes depending on your method of transportation. You will also be able to tell how long it will take you to get to your destination.

- A list of possible results will drop down. Click your selection, and the map will automatically expand to show you the routes from this starting location to your destination.

- Repeat this step for all the other stops you will make in the same trip.

- For driving—If you’re driving, click the car icon on the toolbar. This is generally the default route.
- For transit—If you are commuting via bus, train, subway, or other public transit, click the train icon on the toolbar. The routes on the map will slightly change to accommodate all public transit routes.
- For walking—If you’re walking, click the pedestrian icon on the toolbar. The routes on the map will slightly change to accommodate walking routes.
- For cycling—If you’re biking or cycling, click the cycling icon on the toolbar. The routes on the map will slightly change to accommodate safe biking routes.

- Metro—You can identify metro or subway stops by the blue “M” icon on the map.
- Hotel/motel—You can identify hotel and motels by the brown bed icon on the map.
- Coffeehouse—You can identify coffeehouse locations by the orange coffee cup icon on the map.
- Restaurant—You can identify restaurant or fast-food locations by the orange spoon-and-fork icon on the map.
- Bank—You can identify bank locations by the blue dollar icon on the map.
- Shopping center—You can identify shopping center or store locations by the blue handbag icon on the map.
- Market. You can identify grocery or market locations by the blue shopping cart icon on the map.
- Church—You can identify church locations by the brown church icon on the map.
- Park—You can identify park locations by the green tree icon on the map.
- Hospital—You can identify hospital locations by the red “H” icon on the map.
- School—You can identify school locations by the brown hat icon on the map.
- Library—You can identify library locations by the brown book icon on the map.

- A list of possible results will drop down. Tap your selection, and you will be shown the best transportation method and route from your starting location to your destination, with the total distance and time. Most of the time this will be via car or rail, since these are the faster options.

- Driving—If you’re driving, tap the car icon on the toolbar.
- Transit—If you commuting via bus, train, subway, or other public transit, tap the train icon on the toolbar.
- Walking—If you’re walking, tap the pedestrian icon on the toolbar.

- Hotel/motel—You can identify hotel and motel locations by the brown bed icon on the map.
- Restaurant—You can identify restaurant or fast-food locations by the orange spoon and fork icon on the map.
- Shopping center—You can identify shopping center or store locations by the blue hand bag icon on the map.
- Market—You can identify grocery or market locations by the blue shopping cart icon on the map.
- Hospital—You can identify hospital locations by the red H icon on the map.
Community Q&A
You Might Also Like

About This Article
- Send fan mail to authors
Is this article up to date?

Featured Articles

Trending Articles

Watch Articles

- Terms of Use
- Privacy Policy
- Do Not Sell or Share My Info
- Not Selling Info
Keep up with tech in just 5 minutes a week!

5 Google Maps Tips You Need To Know When Planning Your Next Trip
W hether a brief weekend escape or an extensive expedition across continents, planning a trip can be a daunting task. The challenge of selecting the ideal destinations, navigating through unfamiliar territories, and ensuring that you experience all the essential sights without overlooking anything, can quickly become overwhelming for any traveler. This is where online maps come into play, and one prominent tool that almost everyone has used at some point is Google Maps.
Google Maps goes beyond basic directions . It offers a suite of features designed to make trip planning not just easier, but also more enjoyable. You can map out itineraries, discover new attractions, get insights into local restaurants and services, and even find electric vehicle charging stations . The platform's real-time updates, user reviews, and detailed information on points of interest can help you make informed decisions while exploring new destinations. Moreover, its customization features allow you to create personalized maps that cater specifically to your travel plans, which are also shareable. Here are five essential Google Maps tips that every traveler should know. These tips will not only help you streamline your trip-planning process but also ensure that your travels are as smooth and enjoyable as possible.
Read more: 12 Smart Gadgets You Didn't Know Existed
Utilizing Offline Maps
When you're heading out on a trip, one thing you definitely don't want to worry about is losing access to your maps when your signal drops. That's where offline maps come in handy. Google Maps allows you to download maps for offline use, ensuring you never get lost even when you're off the grid.
Downloading maps for offline use is a straightforward process. Follow these steps:
- Open the Google Maps app on your smartphone or tablet.
- Tap on your profile icon in the top-right corner.
- Choose Offline maps.
- Tap Select your own map in the following window.
- Drag the map window to your desired area.
- Select Download.
Depending on the size of the area you're downloading and your internet connection speed, this process may take a few moments.
Once the download is complete, you'll be able to access the map even without an internet connection. Offline maps are not only convenient, but they can also save you time and frustration. Imagine hiking in a remote area and losing your cell signal — having the offline map ensures you can still navigate your way back to your starting point without any hassle. This is also one of the many secret Google Maps features that can come in handy.
Customizing Your Route With Multiple Stops
We all have days packed with errands or sightseeing, where we just wish we could plan the routes efficiently. Google Maps allows you to do that by customizing your route with multiple stops. It's a nifty feature that can save you time and make your trips more organized.
Follow these steps:
- Open Google Maps on your device and enter your final destination.
- Click on the three buttons next to your starting point and select Add stop.
- You can add multiple stops by repeating this step.
- Rearrange stops by dragging the three lines next to each destination.
Now, Google Maps will calculate the most efficient route for you, taking into account all your stops along the way. This is perfect for those days when you have several places to visit or errands to run, but you want to make sure you're not zigzagging all over town. It can also save you time and fuel. Plus, it's a great way to ensure you don't forget any important stops along the way.
When customizing your route with multiple stops on Google Maps, keep in mind to arrange your stops in a logical order to minimize backtracking and optimize efficiency. Additionally, consider traffic conditions and estimated travel times between each stop to plan your schedule accordingly. Lastly, ensure that all stops are accurately inputted to avoid any confusion or missed destinations along the way.
Taking Advantage Of Live Traffic Updates
This feature provides real-time information about traffic conditions, allowing you to avoid packed routes and save valuable time.
As you navigate with Google Maps, the app constantly monitors traffic conditions along your route. If there is heavy traffic, accidents, or road closures ahead, Google Maps will highlight the problematic area on the map using yellow or red markers.
To enable live traffic updates, open the Google Maps app and enter your destination. Once your route is set, Google Maps will display real-time traffic information along the way, including any incidents or slowdowns. You can then choose to follow the suggested route or explore alternative options based on the traffic conditions.
When using live traffic updates on Google Maps, keep in mind to regularly check for updates throughout your journey to stay informed about changing road conditions. You can also report problems on the road yourself on Google Maps . Lastly, be flexible with your travel plans and prepared to follow alternative routes suggested by Google Maps to avoid congestion and minimize travel time.
By taking advantage of live traffic updates, you can make informed decisions about your route and avoid getting stuck in gridlock. Whether you're commuting to work or heading out on a road trip, this feature can help you reach your destination more efficiently.
Exploring Nearby Attractions And Restaurants
When you're in a new area, or even just exploring your own neighborhood, Google Maps can be a great tool for discovering nearby attractions and restaurants.
To start exploring:
- Open Google Maps and zoom in on the area of your interest. You should see several options below the search bar, including Restaurants, Gas, Coffee, Shopping, ATMs, and more.
- Click on the option you want to explore. For instance, if you are looking for places to eat nearby, select Restaurants to see a list of dining options in the area. Each restaurant will be marked with its location on the map, along with details such as the establishment's name, its rating, and sometimes photos or reviews.
- Refine your search further by applying filters for rating and distance.
- After selecting a restaurant that catches your interest, click on it to view more detailed information, including its address, hours of operation, contact details, and directions on how to get there.
Google Maps also allows you to call the restaurant directly from the app if you wish to make a reservation or inquire about menu items.
You can explore all these categories by swiping right on the options pane below the search bar. To view the full list, click on the More button (three dots) at the very end.
Create A Custom Map To Share With Friends And Family
You can also easily create a custom map and share it with whoever you want on Google Maps. It's a great way to collaborate on travel plans, recommend must-visit places, or simply share your favorite local hangouts.
- Open Google Maps on your computer and sign into your Google account.
- Click on the menu icon and choose Saved > Maps > Open My Maps.
- Start a new map by clicking the Create A New Map button.
- Give your map a title and a description that encapsulates the essence of your adventure or theme. This could be anything from "Family Road Trip to Yellowstone" to "Best Coffee Shops in New York City."
- Populate your map with markers. Click on the marker icon, then click on the location on the map you wish to mark. For each marker, you can add a detailed description, upload photos, and even include links for more information.
- Additionally, Google My Maps allows you to draw paths and shapes, perfect for outlining routes or highlighting areas of interest.
- Once your map is ready, click on the Share button. Here, you'll be prompted to set the map's privacy settings. You can choose to make it public, share it with specific people, or keep it private with a link.
- Finally, invite your friends via email or simply send them the link.
Read the original article on SlashGear .

Android Police
How to use google gemini to plan your vacation.
Use Gemini for a stress-free trip-planning experience
Planning a vacation can be as overwhelming as it is exciting, given everything you need to do, from booking flights and accommodations to finding activities that match your interests. To simplify this process, take advantage of Gemini's (formerly known as Google Bard) new set of capabilities. The best part is that you can access the platform through your laptop or Chromebook or use it while you're on the go using your flagship or budget Android phone or iPhone.
How does Gemini make traveling easier?
Gemini, an artificial intelligence platform similar to ChatGPT, is now integrated with various Google services, like Gmail, Google Maps, and Google Flights. Here's how to best use Gemini's capabilities to make trip planning easier.
Check the weather
Gemini's integration with Google Search allows the tool to provide you with real-time information. You can check the weather conditions at your destination and pack appropriately.
Ask for a suggested packing list based on the weather
Not sure what to wear this time of year or want to blend in with the locals? If you're traveling to a new destination and are unfamiliar with the dressing norms of the locals, ask Gemini to generate a list of outfit ideas and other accessories you should pack.
Look up real-time flights for your preferred dates
While you're at it, you can quickly look up flights to your destination and back. This simplifies the process of searching for flights and comparing the prices and durations.
Get a list of hotels for your stay
If you're unsure where to stay during your trip, ask Gemini to create a list of hotels in the area. Gemini's suggestions include names and photos of several hotels, along with each hotel's star rating, a brief description of what you can expect, and the price per night. Use this as a starting point to compare your options and make an informed decision.
Ask for suggested activities in the area
You can ask Gemini to suggest activities you might enjoy during your stay. Gemini tailors its recommendations to your preferences, if any, and suggests events that align with your travel dates.
Request a list of relevant YouTube videos about the destination
If you're traveling to an unfamiliar place and want to know more about things to do in the area, local customs, and not-so-popular attractions, ask Gemini to curate a list of relevant YouTube videos about the destination.
Look up currency conversion rates
If you're traveling abroad, budgeting before you leave is crucial. Gemini can make estimating your expenses and how much money to bring along with you easier by providing real-time currency conversion rates and listing potential expenses you might incur while traveling.
Check out local dining options
Want to enjoy the local fare while you're traveling? Gemini can help you discover the best dining options in the area. You can even specify the type of cuisine you'd like to try to get more relevant results.
Get directions to places
When you have a tentative idea of the places you'd like to visit, Gemini can help you plan your vacation better by giving directions to various places. This can help you map out the most efficient route for your outings and maximize your vacation days.
Here's how to prompt Gemini, according to Google
Be sure to double-check gemini's responses.
Gemini is a powerful AI tool that generates fairly accurate results due to its integration with other Google services. Still, it's best to verify the information it provides, particularly regarding things like local customs, potential expenses, and health advisories.
Make the switch to Gemini
While Gemini has limitations compared to Google Assistant, and you should wait to switch from the latter , using the AI platform with Assistant can make travel planning easier and more straightforward.
- Travel recommendations
- The taste of travel
- Tips & tricks
- Travel experiences

How to plan a road trip, from cross-country journeys to weekend getaways

Driving is embedded into American culture, which is why road-tripping is so popular across the U.S. Whether you're looking to visit cities for history and culture or national parks for access to the great outdoors, a road trip can take you there. If you're not sure where to start, here's how to plan a road trip.
In this post
How do you plan a road trip for beginners?
When is the best time to start planning a road trip, how many days should you plan for a road trip, how to determine the best itinerary to take, how to choose when to take a road trip, how to plan a road trip on a budget, what is an appropriate/realistic driving time for each section of the trip, what are the best road trip tools/apps to use, what are the essentials to buy and pack, what are the main steps in the road trip planning process.

If you've never planned a road trip before, there are a few things you'll want to discuss with your travel companions before you start crafting a turn-by-turn itinerary. Start with where you want to go. We're talking big picture, like a region or a state, not every single stop along the way (we'll offer tips for how to plan a road trip with stops later on). Then think about how long you want to go for. And finally, consider your budget. Once you nail down those three things, you can start looking at the details.

The earlier the better! Planning a road trip can take quite a bit of time and effort, so allowing yourself at least a few weeks to put together a full itinerary is a good idea. You'll also want to leave enough time between planning and departure to get your car checked out by a mechanic. No one wants to break down on the road!
And if you're renting a car instead of driving your own, you'll want to book your rental car in advance to ensure there's inventory (say, the right type of rental car available).
The duration of your road trip is entirely up to you. The two important things to consider are where you want to go and what you want to do along the way. If you're looking for recommendations for how to plan a cross-country road trip, give yourself at least two weeks if you want to make a few sightseeing stops. If you want to take the trip at a more leisurely pace and spend more time sightseeing than driving, four weeks is more reasonable. Regional road trips, however, can be as short as a few days. Or you could really take your time and stretch them out over a week or more.

Choosing a road trip itinerary largely depends on your personal preferences, but in all cases, you should start by thinking about where you want to go, considering who you'll be traveling with. If you're planning a family road trip , that might take you to different destinations than if you were traveling with a group of friends or by yourself.
Once you have your general destination in mind, whether that's a region or a state or a full cross-country journey, you'll want to start selecting points of interest within that region. Plot these points on a map, then connect the dots! This is a good starting point for route planning, but now comes the laborious part: checking drive times between those points. It'll take a bit of finagling to create an itinerary that works in your favor.
As you're planning your road trip itinerary, you'll also need to consider your overnight locations. Some remote destinations might not have accommodations at all , and more popular accommodations may book up months in advance.
You should always consider seasonality for road trips. When you pick a destination, look at the typical weather for each season. In general, it's usually wise to avoid snowy destinations in the winter (some roads close seasonally) and extremely hot destinations in the summer (extreme heat can affect your car).
You can do a road trip on any budget, but no road trip will be free. You always need to consider the cost of gas and food. One way to save money, however, is on accommodations. Hotels are often more expensive than campsites, but campsites frequently book up in advance, particularly in the summer.

If you have more than one driver, you could take shifts and have a longer driving time each day. But an individual driver should typically not drive more than six to eight hours in one day. More experienced drivers, however, might have a higher limit of say, 10 to 12 hours. Drowsy driving is extremely dangerous, though, so make sure the drivers are well rested before each segment, and take breaks every 2 hours.
Every road tripper has their preference of apps, but these are tried-and-true favorites.
- Google Maps
- Roadtrippers
- Triptik by AAA
- iOverlander
- Atlas Obscura
Here's a quick and easy packing list for a road trip.
- First aid kit
- Tire pressure gauge
- Jumper cables
- Ice scraper (if traveling during winter)
- Portable phone charger
- Paper towels or toilet paper
- Bottled water

2 months before departure: Start looking at the points of interest you want to visit, consider the duration of your road trip, and determine your budget
1 month before departure: Get your car checked out or rent the relevant car for your itinerary and book your accommodations
2 weeks before departure: Buy the essential items
1 week before departure: Do a “test” pack to ensure everything fits in your car, or in your luggages if you are planning a road trip abroad
A road trip is an ideal way to see a destination, but it takes some careful planning to ensure you have a safe and enjoyable trip. While planning is important, always leave spare time in your itinerary. You never know what you might discover along the way!
About the author

Explore more articles

California consumers have the right to opt out of the sale * of their personal information. For more information on how we securely process personal information, please see our Privacy Policy .
Do not sell my info ON
* The definition of "sale" under the California Consumer Privacy Act is applicable only to California consumers.

- Rivers and Lakes
- Severe Weather
- Fire Weather
- Long Range Forecasts
- Climate Prediction
- Space Weather
- Past Weather
- Heating/Cooling Days
- Monthly Temperatures
- Astronomical Data
- Beach Hazards
- Air Quality
- Safe Boating
- Rip Currents
- Thunderstorms
- Sun (Ultraviolet Radiation)
- Safety Campaigns
- Winter Weather
- Wireless Emergency Alerts
- Weather-Ready Nation
- Cooperative Observers
- Daily Briefing
- Damage/Fatality/Injury Statistics
- Forecast Models
- GIS Data Portal
- NOAA Weather Radio
- Publications
- SKYWARN Storm Spotters
- TsunamiReady
- Service Change Notices
- Be A Force of Nature
- NWS Education Home
- Pubs/Brochures/Booklets
- NWS Media Contacts
NWS All NOAA
- Organization
- Strategic Plan
- Commitment to Diversity
- For NWS Employees
- International
- National Centers
- Social Media
Privacy Policy
National Weather Service
National Headquarters
National Forecast Maps
National forecast chart.
High Resolution Version | Previous Days Weather Maps Animated Forecast Maps | Alaska Maps | Pacific Islands Map Ocean Maps | Legend | About These Maps

National Temperature
Alaska | Hawaii | Guam | Puerto Rico/Virgin Islands More from the National Digital Forecast Database
Short Range Forecasts
Short range forecast products depicting pressure patterns, circulation centers and fronts, and types and extent of precipitation.
12 Hour | 24 Hour | 36 Hour | 48 Hour
Medium Range Forecasts
Medium range forecast products depicting pressure patterns and circulation centers and fronts
Day 3 | Day 4 | Day 5 | Day 6
Precipitation Amounts
Quantitative precipitation forecasts.
Day 1 | Day 2 | Day 3
Surface Analysis
Highs, lows, fronts, troughs, outflow boundaries, squall lines, drylines for much of North America, the Western Atlantic and Eastern Pacific oceans, and the Gulf of Mexico.
Standard Size | High Resolution
Temperature
Maximum daytime or minimum overnight temperature in degrees Fahrenheit.

Predominant Weather
Expected weather (precipitating or non-precipitating) valid at the indicated hour. The weather element includes type, probability, and intensity information.

Wind Speed and Direction
Sustained wind speed (in knots) and expected wind direction (using 36 points of a compass) forecasts.

Chance of Precipitation
Likelihood, expressed as a percent, of a measurable precipitation event (1/100th of an inch).

Precipitation Amount
Total amount of expected liquid precipitation.

Expected amount of opaque clouds (in percent) covering the sky.

Alaska Graphical Forecasts
Graphical forecasts from the National Digital Forecast Database for Alaska.

Hawaii Graphical Forecasts
Graphical forecasts from the National Digital Forecast Database for Hawaii.

Puerto Rico Graphical Forecasts
Graphical forecasts from the National Digital Forecast Database for Puerto Rico and Virgin Islands.
ACTIVE ALERTS Warnings By State Excessive Rainfall Winter Weather Forecasts River Flooding Latest Warnings Thunderstorm/Tornado Outlook Hurricanes Fire Weather Outlooks UV Alerts Drought Space Weather NOAA Weather Radio NWS CAP Feeds
PAST WEATHER Climate Monitoring Past Weather Monthly Temps Records Astronomical Data Certified Weather Data
CURRENT CONDITIONS Radar Climate Monitoring River Levels Observed Precipitation Surface Weather Upper Air Marine and Buoy Reports Snow Cover Satellite Space Weather International Observations
FORECAST Local Forecast International Forecasts Severe Weather Current Outlook Maps Drought Fire Weather Fronts/Precipitation Maps Current Graphical Forecast Maps Rivers Marine Offshore and High Seas Hurricanes Aviation Weather Climatic Outlook
INFORMATION CENTER Space Weather Daily Briefing Marine Climate Fire Weather Aviation Forecast Models Water GIS Cooperative Observers Storm Spotters Tsunami Warning System National Water Center International Weather
WEATHER SAFETY NOAA Weather Radio StormReady Heat Lightning Hurricanes Thunderstorms Tornadoes Rip Currents Floods Tsunamis TsunamiReady Winter Weather Ultra Violet Radiation Air Quality Damage/Fatality/Injury Statistics Red Cross Federal Emergency Management Agency (FEMA) Brochures Safe Boating
NEWS Newsroom Events Pubs/Brochures/Booklets
EDUCATION NWS Education Home Be A Force of Nature NOAA Education Resources Glossary JetStream NWS Training Portal NOAA Library For Students, Parents and Teachers Brochures
ABOUT Organization NWS Transformation Strategic Plan For NWS Employees International National Centers Products and Services Careers Glossary Contact Us Social Media
US Dept of Commerce National Oceanic and Atmospheric Administration National Weather Service 1325 East West Highway Silver Spring, MD 20910 Comments? Questions? Please Contact Us.
- Help Center
- Google Maps
- Privacy Policy
- Terms of Service
- Submit feedback
Plan your commute or trip
Find traffic & transit info.
You can use Google Maps to find all of your frequent trips quickly, in one tap. You’ll get information about your ETA, traffic reports and accidents along the way.
Tip : To show the map, tap anywhere on the map or drag the tabs back down.
Change the way that you commute
- Search for your destination in the search bar at the top.
- At the bottom, tap on 'Directions'.
- At the top, select your transportation mode.
- Select your preferred route.
You can pin your trip and find it back in the Go tab next time you need it.
Turn off your regular routes
If your Location History is on, we might show you directions for your regular routes. If you don't want the routes that you take regularly to be associated with your Google Account, you can turn off your Location History.
Note: Your regular routes are only visible to you.
- Scroll to 'Location settings'.
- Tap Location is on .
- At the top, turn off Location History.
Check traffic now & later
To reach your destination as quickly as possible, check typical traffic before you drive. You can avoid the busiest times of day.
- Search for a destination or tap a place on the map.
- At the bottom, tap Directions .
- The current traffic on your route
- Typical traffic by the hour and any slowdowns on the way
Change the mode of transportation for part of your trip
Tip: Only available on mobile and in some locations.
You can combine different modes of transportation, like driving, ride-sharing or bicycling, with transit on the same trip.
Once you’ve selected your route and can view the directions, you may be able to change how you travel for part of your trip. The rest of the route, like transit departure times and total journey time, will be updated when you change the mode of transportation.
Was this helpful?
Need more help, try these next steps:.
More From Forbes
Inside google’s process to creating newly-announced maps accessibility features.
- Share to Facebook
- Share to Twitter
- Share to Linkedin
Google has added support for "more detailed walking instructions" to Maps.
In attempting to do my duty disseminating as much Global Accessibility Awareness Day news as I could as a one-man newsroom last week, I reported on Google having a whale of a week announcing numerous accessibility-minded updates at its annual shindig known as the Google I/O developer conference. Amongst the items the Mountain View-based company hyped were enhancements to the ever-popular Google Maps.
According to Google, users will be able to access what it described as “more detailed walking instructions” while navigating to places. With Google Lens and its screen-reading capability, people will be able to hear the name and categories of places around them—Google used ATMs and restaurants as examples—and know how far away they are from getting there. In addition, Google has included support for detailed voice guidance which it said will “[provide] audio prompts letting you know when you’re heading in the right direction, crossing a busy intersection, or being rerouted if you’ve gone the wrong way.” Elsewhere for Maps, Google said the app features accessibility information for “more than 50 million places” thanks in large part to the crowdsourced data from business owners and Maps users. The details are denoted with a ♿ icon and highlights areas such as parking, seating, and restrooms. There also exist filters to help search places that are wheelchair accessible as well. Finally, for those with hearing disabilities, Google Maps now supports Auracast ; assuming community leaders and business owners mark their listing(s), Maps will surface venues compatible with Auracast. If so marked, Google noted places such as gyms, places of worship, and theaters can “broadcast enhanced or assistive audio to visitors with Auracast-enabled Bluetooth hearing aids, earbuds and headphones.”
In an effort to dive deeper on Google’s improvements to Maps, earlier this week I connected with Sasha Blair-Goldensohn, who works as Google’s accessibility and disability inclusion features lead for Maps, explained to me in a brief interview conducted via email the aforementioned accessibility features “draw inspiration from the joys and challenges of everyday life with a disability.” These lived experiences, he said, come from a multitude of people including Google employees and others living in or adjacent to the disability community.
According to Goldensohn, this collective feedback from the community has but one goal: to make Google Maps “just as helpful for disabled folks as anyone else” such that disabled people are able to “explore, navigate, enjoy, and contribute to the communities where we live and travel.”
“Features like Lens in Maps and detailed voice guidance provide Blind and low-vision users with information sighted people might take for granted, [such as] the distance to an upcoming turn or the words written on a sign,” Goldensohn said of prioritizing accessibility. “Making these features available worldwide, in all supported languages, is critical because people with disabilities live everywhere and we go everywhere.”
Matt Damon Movie Dud Falls Off Netflix Top 10 Global Chart After 1 Week
How could a ukrainian drone weighing just a few pounds blow up a 46-ton russian tank the warhead is the answer, nyt strands hints spangram and answers for wednesday may 22.
Goldensohn added it’s important to remember accessibility features, from Google or other companies, are extremely useful situationally. To wit, a person may have an injury and thus is temporarily disabled. He cited an example of knowing whether a restaurant, for instance, having steps or being accessible to wheelchair users may prove helpful to parents pushing strollers and/or travelers lugging rollable suitcases. Likewise, the advent of detailed walking directions helps people during times when it isn’t prudent to look down at one’s phone. It’s hard to look at your phone when your hands are full with groceries, Goldensohn said.
Goldensohn reemphasized the notion that Google’s accessibility features, in Maps and otherwise, are developed and heavy influenced by Googlers—the colloquial term for Google workers—with disabilities. This is important context, he said, because the company strives to “ensure we’re building features that are helpful for this community.” Goldensohn made note of how Maps’ new accessibility information feature was built in this fashion, saying local guides in the communities have contributed “more than [a] billion global accessibility updates” to the app since 2017.

- Editorial Standards
- Reprints & Permissions
Join The Conversation
One Community. Many Voices. Create a free account to share your thoughts.
Forbes Community Guidelines
Our community is about connecting people through open and thoughtful conversations. We want our readers to share their views and exchange ideas and facts in a safe space.
In order to do so, please follow the posting rules in our site's Terms of Service. We've summarized some of those key rules below. Simply put, keep it civil.
Your post will be rejected if we notice that it seems to contain:
- False or intentionally out-of-context or misleading information
- Insults, profanity, incoherent, obscene or inflammatory language or threats of any kind
- Attacks on the identity of other commenters or the article's author
- Content that otherwise violates our site's terms.
User accounts will be blocked if we notice or believe that users are engaged in:
- Continuous attempts to re-post comments that have been previously moderated/rejected
- Racist, sexist, homophobic or other discriminatory comments
- Attempts or tactics that put the site security at risk
- Actions that otherwise violate our site's terms.
So, how can you be a power user?
- Stay on topic and share your insights
- Feel free to be clear and thoughtful to get your point across
- ‘Like’ or ‘Dislike’ to show your point of view.
- Protect your community.
- Use the report tool to alert us when someone breaks the rules.
Thanks for reading our community guidelines. Please read the full list of posting rules found in our site's Terms of Service.
IMAGES
VIDEO
COMMENTS
Trip Planner is a Google My Maps project that helps you plan your trips and share them with others. You can customize your map with markers, routes, photos, and descriptions of your destinations ...
Find local businesses, view maps and get driving directions in Google Maps.
2. Create a new map through the home screen. At the top left of the "My Maps" home screen, you'll see a red box with the text "+Create a New Map.". Click on it to be redirected to a map screen. [3] 3. Give your map a descriptive name. To keep yourself organized, give your map a name to remind you what it contains.
Next, you'll want to click on "Maps" in the far right corner of the menu. You won't see anything listed yet, unless you've created a map previously. Click "Create Map" (which is at the bottom of the menu.) After that, you'll be directed to an untitled map that you'll want to name and add a description to.
Planning a trip with Google can help you save time and hassle, whether you're looking for flights, hotels, or things to do. Learn how Google's new features and improved navigation can help you find the best deals, create personalized itineraries, and explore your destination with ease.
1. Head to the My Maps homepage and click Create a New Map. Any map you create will appear on this page. Google; William Antonelli/Insider. 2. You'll be given a world map. In the menu in the top ...
Post summary: A comprehensive guide on how to use Google Maps to plan a road trip itinerary and why Google Maps is the best tool/app for planning a trip.Includes a road trip planning tutorial! Author's Note: This post was originally published in 2020 and was updated in April 2023 for accuracy and comprehensiveness.
7 Steps to Plan a Trip With Google Maps. Here is how to use Google Maps trip planner: 1. Create a Map. To create a map on Google, you do need a Google account. Once signed up/logged in, go to this page. Click on " Saved" >> "My Maps ", which will take you to your maps. If you have created any maps in the past, you will also find them here.
Step 3: Add additional stops to your route. Click on 'Add stop' to include any additional destinations you plan to visit along the way. You can add multiple stops by clicking on 'Add stop' again. This is great for road trips or when running errands. Google Maps will automatically reorder the stops for the most efficient route, but you ...
Step 2: Plot Your Road Trip Route. To start plotting your road trip route, click on directions. Then enter your starting point and your first destination. Continue to add stops to your road trip by clicking on the (+) to add destinations. Stop when you have all your road trip stops added to your map.
Step 1: Make a New Google Map. The first step to create a trip in Google Maps is to visit the Google Maps home page. Click on the hamburger menu icon in the top left-hand corner. Select "Your Places" from the dropdown menu. Select "Maps" in the far right-hand corner menu.
Accessing Google Maps travel plan offline. Download Google Earth App on your mobile phone. Go to your google maps travel plan on desktop and click on the 3 dots next to the title. In the pop up box click export to KML/KMZ. In the next pop up leave the boxes unchecked and click download.
Check the Google icon in the top right corner to make sure you're using the Google account you want to. Click "Create A New Map" and a window will open with a blank map. To give your map a name and description, click the map name ("Untitled Map"). You can also change the color and style of the base map if desired.
First, open up your browser and head on over to Google Maps. Click the "Directions" button to the right of the search bar. By default, Maps will use your device's location for the starting point. If you want this to be a different location, enter it now. Next, enter the location of your first destination into the field provided, and then hit Enter.
The Recents tab on desktop Google Maps makes it easy to stay organized while trip planning, and share your favorite places with friends and family. Identify landmarks, artwork, plants, animals, and more with Lens. Once you've reached your destination, it's time to start exploring with Lens as your tour guide.
1. Head to Google My Maps and create a map. First, open Google My Maps and sign in to your Google account. In the top left hand corner of the screen, you'll see a button titled "Create a new ...
Plan your route. Use the provided directions to plan your trip. Each step clearly indicates the direction you have to take, on which street you should be on, and the distance you have to travel. If your trip is long, you can incorporate the necessary stops, such as gas stations, hotels or motels, and restaurants, in your route.
Downloading maps for offline use is a straightforward process. Follow these steps: Open the Google Maps app on your smartphone or tablet. Tap on your profile icon in the top-right corner. Choose ...
On your computer, open Google Maps. Make sure you're signed in. On the left, choose an option: Get directions to relevant places: Click a place in the list. You'll get places based on your Gmail, Calendar and recent travel history. Get directions to saved places: If you saved your work or home address in your Google Account, click Home or Work.
Get directions to places. When you have a tentative idea of the places you'd like to visit, Gemini can help you plan your vacation better by giving directions to various places. This can help you ...
1 month before departure: Get your car checked out or rent the relevant car for your itinerary and book your accommodations. 2 weeks before departure: Buy the essential items. 1 week before departure: Do a "test" pack to ensure everything fits in your car, or in your luggages if you are planning a road trip abroad.
National Weather Maps. Surface Analysis. Highs, lows, fronts, troughs, outflow boundaries, squall lines, drylines for much of North America, the Western Atlantic and Eastern Pacific oceans, and the Gulf of Mexico.
On your Android phone or tablet, open the Google Maps app . At the bottom, tap Go . Search for your destination in the search bar at the top. At the bottom, tap on 'Directions'. At the top, select your transportation mode. Select your preferred route. At the bottom, tap Pin . You can pin your trip and find it back in the Go tab next time you ...
Elsewhere for Maps, Google said the app features accessibility information for "more than 50 million places" thanks in large part to the crowdsourced data from business owners and Maps users ...