
How to Shoot Night Photography with the Olympus Trip 35 by Tom Box
- Learn to Shoot Film: Tips & Tutorials
- January 25, 2019

Written by Tom Box

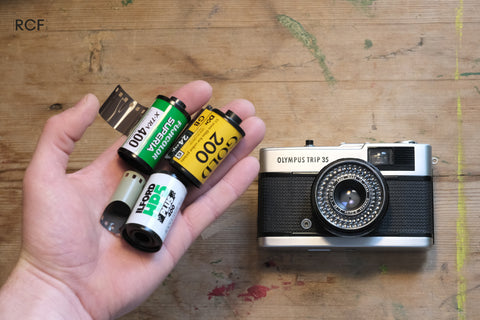
I would imagine most, if not all, of the people reading this have heard of the Olympus Trip 35
Over 10,000,000 units of the camera were sold during it’s lifetime, and the solid build, simple operation, and wide availability have made the Trip a hugely popular option for the modern film crowd.
I’m not going to review the camera, as this has been done dozens of times across the internet, but instead explain how to use the Trip outside of its limits, specifically with low light and night photography.
Find the Olympus Trip 35 at KEH Camera or on eBay .

Hacking the Olympus Trip 35 to Work in Low Light
The Olympus Trip 35 uses a selenium light meter to adjust aperture and shutter speed automatically, locking the shutter release if there is insufficient light which would result in underexposure.
However, the Trip also has a flash sync mode, whereby the aperture is manually selected and the shutter is set to it’s slower speed of 1/40th of a second.
This is, of course, designed to be used with a flash, but the manual aperture settings coupled with modern high speed films means you can also use the flash setting to successfully shoot the Trip at night. Don’t let that little red flag stop you…
Load a roll of 400 or 800 speed film, set the ASA to 400 and the aperture to it’s widest setting of 2.8, and you’re ready to go. That’s all there is to it.
If the scene is too bright for the set aperture of 2.8, don’t worry, the Trip’s meter is still active in flash mode and will stop down the aperture to prevent overexposure.
Related: Five Tips for Shooting Film at Night

Working With the Shutter Speed and Aperture Limitations
Now, 1/40th at f/2.8 really doesn’t seem slow or wide enough to shoot at night, even with 800 speed film. But I’ve found that I get excellent results if there are enough bright lights in the scene.
I used to shoot SLRs at night on aperture priority, lens wide open to f/1.4, and, even pointing at a shop window, I’d be struggling to hand hold the camera’s chosen 1/15th or 1/8th shutter speed.
The thing is, most auto-exposure cameras will be metering for the whole scene, taking into account the vast expanse of black just as much as any light sources.
More often than not, auto-exposure for a scene like a shop window at night would result in a blown out light source and mucky shadows, and not look at all how you remember seeing the scene with your own eyes.
Have you ever tried to take a photo of a sunset with your phone camera and it’s blown out the colors and tried to expose for the foreground? Every time.

What to Expect While Shooting the Olympus Trip 35 at Night
I won’t lie and tell you that using the Olympus Trip ( find on eBay ) at night will always produce perfect results. (It works best in an urban area with lots of artificial light.) But I do believe that shooting film at night can be as simple as setting the exposure once and getting on with taking photos.
An underexposed photo is better than a 2 second long exposure of motion blur!
Any grainy shadows can be clipped in using Photoshop or another image editing program to bring true black back into the shot and increase contrast.
That and slightly boosting the mid tones is pretty much the only editing I need to do to my Night Trip photos.

Related: Olympus Stylus Epic Point & Shoot Film Camera Review
The Olympus Trip 35 is a quintessential point-and-shoot camera, and that doesn’t have to stop when the sun goes down.
Try it yourself with some 400 or 800 speed film and see if you agree that night photography doesn’t always require tripods and fast lenses…
All of the photos in this post were taken on a trip to Japan, using Fuji Superia Premium 400 speed film and my Trip 35 set up as I’ve described. Developed and scanned at home.
I also double exposed a roll of CineStill 800T in the Trip. Photos below.

On a tangent…
It’s always worth checking over a ‘dead’ Olympus Trip 35 because it’s quite likely the meter is fine, and the problem is with gummed up aperture blades or other internal gubbins.
On two occasions, I’ve acquired a Trip which refuses to raise the red flag, suggesting the meter is dead, only to remove the top plate (held on by 3 easily accessible screws) and see that the meter needle is moving fine.
The problem both times lay in the sliding plates that determine aperture and shutter speed. A quick clean with naptha and it was working perfectly.
I’ve had a similar experience with an Olympus Pen EES-2 (basically the half frame Trip 35) which merely had sticky aperture blades. Half an hour of disassembly and cleaning and it’s working beautifully.
Thank you so much, Tom! Tom is a regular contributor here at Shoot It With Film, and you can check out his other articles here , like an intro to pinhole film photography and how to use prisms for creative effect . You can also check out Tom’s work on his website and Instagram .
Leave your questions about shooting the Olympus Trip 35 at night below in the comments, and you can pick one up for yourself at KEH Camera or on eBay !

Related Posts:

Blog Comments
Noor Hashem
January 1, 2020 at 7:38 pm
Can i use a 200 speed film or does it have to be 400 or 800?
July 27, 2020 at 5:54 am
Hi Tom, Can you use the Fuji Superia Premium 400 speed film also during the day or you would recommend it only for night shots?
Many thanks! Px
shootitwithfilm
July 27, 2020 at 2:48 pm
Thanks for your comment, Pilar! Fuji Superia 400 is a great film to use during the day. You can check out this post for examples of what it looks like during the day: https://shootitwithfilm.com/how-to-shoot-fujifilm-superia-400/
January 22, 2021 at 8:21 am
How did you do the double exposure on the Cinestill 800T’s pics ?
January 25, 2021 at 2:22 pm
The double exposures were totally random, done by shooting a full roll, rewinding it almost to the end and then shooting over it again. – Tom
April 12, 2022 at 7:59 pm
Hi, I´m planning to use a Fuji 500T for night concert shots in my Olympus trip. Do I have to detail this to the photography laboratory? Any recomendation?
April 12, 2022 at 11:14 pm
Hi Morena! If you want it developed and scanned normally, you don’t need to let the lab know any special information. You’ll only want to let the lab know if you want the film pushed in development or if you want the film scanned a specific way (such as having it scanned for highlights to bring out the nighttime atmosphere of the images). And while you don’t have to let the lab know any special info, if you feel like it was a tricky shooting situation, you can always reach out to the lab and ask their advice for developing and scanning.
September 10, 2022 at 4:07 pm
I just purchased this camera and the red shutter flag appears over my view finder whenever it is set to automatic. I have not yet tested with film yet but my run through seems to work okay when the apture is set to any other setting (2.8-end). What does this mean? That my internal light source is dead? And if so what does this mean when shooting? Shall I just set it to sunny 16 (as a rule of thumb) but how will this look in low light?
Leave a Comment Cancel Comment
Shoot it with film on instagram.


How To Use The Olympus Trip
April 28, 2023 By Cameras By Max
The Olympus Trip is a super popular camera among beginners to film, so here is our guide on how to use this awesome little camera, and some tips on how to get the most out of your Olympus Trip.

What is the Olympus Trip?
The Olympus Trip 35 was introduced in 1967, and discontinued in 1984, which is considered a long production run for a 35mm film camera. Over ten million Olympus Trip cameras were sold in this time.
Many people wrongly call the Olympus Trip a rangefinder camera, however we would classify it more as a point and shoot with zone focusing.
What features does the Olympus Trip have?
The Olympus Trip is really easy to use, and has some cool features that set it apart from other point and shoot 35mm film cameras.
- Zuiko coated 40mm f/2.8 lens : this lens is sharp, and the wide aperture makes it versatile in a lot of situations.
- Automatic settings : the Olympus Trip has two shutter speeds and aperture from f/2.8 to f/22.
- No batteries needed : the Olympus Trip is powered by the selenium meter around the lens. This is also what receives light and tells the camera which aperture is needed.
- Red flag feature : when the camera does not have enough light to take a photograph, a red flag appears in the viewfinder.
- Zone focusing : the Olympus Trip has four focus settings depending on how far away your subject is from the camera.
What are the different parts of the Olympus Trip?
The top plate.
The Olympus Trip top plate is very simple. The camera features are easy to find, making it an ideal camera for beginners. Below is a labelled diagram of the camera.

On the left of the top plate is the rewind knob (more on that later). In the middle is the flash hotshoe, used for mounting hotshoe flashes to the camera. The shutter button is the small black button on the top. On some models of Olympus Trip, this button can be silver. The small panel on the right is the shot counter that displays the number of shots you have taken.
The Olympus Trip lens holds most of the key settings for the camera , such as the ASA, focus, and aperture.

The ASA dial is set to match the roll of film that you put in the camera. For example, if you are using Portra 400, the ASA setting is set to 400.
The focus settings are simple, and known as zone focusing. There are four zones to choose from. We go through them in more depth later on in this article.
The aperture settings are only used if you are using flash. Otherwise, the camera is set to "A", which allows the camera to choose the aperture and shutter speed automatically.
The Bottom Plate
There is only one function on the bottom plate of the Olympus Trip 35: the rewind button. (And the tripod mount, technically.)

The rewind button is pressed when you are ready to start rewinding your film.
How To Load Film In The Olympus Trip
Loading film takes some practice, but it is really easy when you get to grips with it.
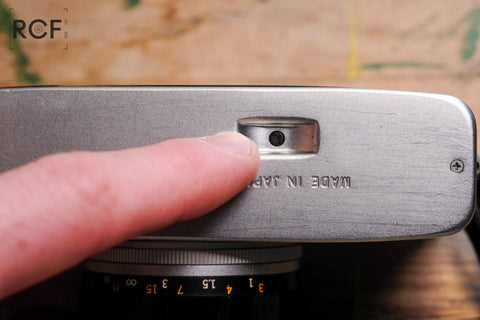
To load a roll of film in the Olympus Trip, first you have to open the back of the camera. To open the back of the camera, pull down this small silver tab, shown below.

Once you have the back of the camera open, you can load your roll of film. To load the roll of film, pull the rewind knob up. The roll of film goes in with the top of the canister (the part that sticks out) at the bottom of the camera. See the image below.

When the canister is in, as shown above, you can pull the film leader across the camera to reach the other side.

The rewind knob being put back down will lock the canister in place as you pull the film across. In order to lock the film onto the film spool in the camera, it has to go partly into one of the slots, and the notches at the bottom of the spool have to go through the sprockets on the film (the holes).

In order to be able to advance the film across the camera, you have to fire the shutter . You can do this by pointing it at a bright light or by setting the aperture setting to one of the numbers.
I recommend firing the shutter, and advancing the film (with the advance thumb wheel) twice before closing the back, so that you can make sure the film is definitely loaded correctly. As you get more confident, you can fire the shutter less times and therefore get more photos on your roll of film.
How To Take Photos With The Olympus Trip
Now you have loaded your roll of film, and closed the back of the camera, you are ready to start taking photos!
The first thing to check is that your ASA is set to the same speed as your roll of film. For example, Portra 400 is ASA 400. Or Kodak Gold is ASA 200.

When looking through the viewfinder, you will be able to see your frame lines, and the focus setting that the camera is set to. The viewfinder of the Olympus Trip does not show you where the focus is set, just which symbol you have the lens set to.

When the lens is set to "A", the camera will choose the shutter speed and aperture for you manually. If the image you are trying to take is too dark, the red flag will come up.
You can override this by setting it to one of the numbers instead, but be aware that these are intended for a flash to be used with it. By setting the Olympus Trip to a number on the lens, it reduces the shutter speed to 1/30 - that's one thirtieth of a second. So you will need to have a steady hand when doing so.
How does the film counter on the Olympus Trip work?
When you first load your roll of film, it may look as though the film counter is not moving. It takes two or three shots for the shot counter to move to the number one.
The back of the camera needs to be closed in order for the shot counter to start working.
The counter shows the amount of images you have taken, not how many you have left.

How do I focus the Olympus Trip 35?
The Olympus Trip focus settings are simple, but take some getting used to. There are four settings on the camera. The symbols for these are found on the black part of the lens, as shown earlier in the article.
The symbols are as follows:

The Olympus Trip has four focus settings . The viewfinder view does not change as you change the focus settings, so you need to know which setting is correct for how far away your subject is. Luckily, this is not hard.
The first setting has the symbol of one person. The first setting is used for close-up photographs , where the subject is less than 1 metre away.
The second setting is of two people, which is to be used for subjects from 1.5 to 3 metres away.
The third setting is a symbol of three people. This setting is used for subjects that are between 3 and 6 metres away.
The final setting is a symbol of a mountain, which is used for anything beyond 6 metres away.
If you ever forget these numbers, they are engraved on the underside of the lens (opposite to the symbols on the top).
How does the Olympus Trip 35 red flag feature work?
The purpose of this Olympus Trip feature is to stop you from taking a photograph that is not exposed enough and therefore will not be visible when developed.
When there is not enough light in your image, the red flag will pop up in the viewfinder. You will clearly be able to see it if you are looking through the viewfinder. It also blocks the shutter button from being pressed.

Can I use the Olympus Trip at night?
Yes, you can.
The easiest way to do this is to attach a flash to the top of the camera.
Attaching a flash to the top of the camera is easy and most flashes can be used on the Olympus Trip. It has a standard flash hotshoe on the top of the camera.
Here is an example of a flash that can be used on the Olympus Trip:
When using a flash on the Olympus Trip, there are different settings to use. These are the aperture numbers on the silver barrel of the lens closest to the camera.
The aperture you use needs to be read off of the meter table, which is usually displayed on the back of the flash unit.

You can read more about using the Olympus Trip at night here .
How To Rewind Your Film
Congratulations, you've finished your roll of film.
How can I tell if the roll of film is finished?
You will start to feel some resistance when trying to advance the camera. Do not force it, as you will snap part of the mechanism.
If you are using a 24 exposure roll of film, you will have reached the 24th shot. The shot counter should show the number 24, or near to that number. The same applies for a 36 exposure roll of film, as this will show the number 36. Sometimes you are lucky and get 37 or 38 shots out of a roll of film.
When the film will not advance any more, the film is finished.
How do I take the roll of film out?
On the bottom of the camera is your rewind button. Push this button in. It should stay in after you have pressed it once.
You can now use the rewind knob to rewind the film into the canister. Turn the knob clockwise.

Rewinding the film usually takes around thirty seconds of rewinding. You will feel when the film comes off of the spool at the end, because the rewind knob will have less resistance. Keep rewinding it until you feel certain that the film is back inside the canister.
You can now open the back and take the film out.

That's just about everything you need to know about the Olympus Trip 35 35mm film camera! We really recommend this camera for beginners, so we hope you have a great time using it and create some lovely images.
I think my Olympus Trip is broken; what should I do?
A lot of Olympus Trip 35mm film cameras have never been serviced in their lifetime. Because they are holiday cameras, a lot of them have sand in the mechanisms.
We highly recommend getting your Olympus Trip serviced if it hasn't been used in a while.
Maintained, these cameras can last many years, however when they have been left for decades, they can develop a few issues, such as stuck aperture blades, stuck shutter, non-functioning light meter, etc.
All of our Olympus Trip services and repairs are very affordable, so definitely consider sending it to us before deciding that it doesn't work, or putting it back in a drawer.
Shop our full range of Olympus Trips and accessories here:
Find out more about the olympus trip here:.

Featured Camera: The Olympus Trip 35

Can You Use the Olympus Trip At Night?
If you like what we do, but can't buy a camera from us, please consider buying us a cup of coffee! It helps us to keep these resources free, consistent, and accessible.
Still stuck on which film camera to buy?
Try our film camera quiz. All you have to do is answer a few questions, and then you will get a list of personalised camera recommendations.
Or send us a message on Instagram , send us an email , chat to us on our live website chat, or read some more of our blog posts!

Article written by: Max
Max is the owner of Cameras By Max. They work full-time repairing and refurbishing all the 35mm film cameras you see on the website. Their favourite camera (at the moment) is the Olympus XA, and their favourite city in the world is Edinburgh.
Take our quiz to find your perfect film camera.
Not sure which camera is best for you?
No more products available for purchase
Your cart is currently empty.
The Olympus Trip 35 Review: Everything You Need To Know
I’ve worked with many Olympus Trip 35s over the years and I’ve discovered the pros and cons of this brilliant little rangefinder camera!
The Olympus Trip 35 is so popular because it’s very easy to use, it has a great lens and it’s ideal for the novice photographer. Also, the Olympus Trip 35 is one of the only 35mm cameras powered by the sun, making it really handy to take on holiday with you. Since 1967 10 million units have been sold, which is a tremendous amount even today.
If you want to know how this camera compares to others, how much you should be paying, some of its common issues and much, much more then read on!
I’ve worked with a hell of a lot of Trip 35s over the last few years and I like them because they’re really simple. If there’s something wrong with a Trip 35 I usually know it pretty much instantly because they aren’t especially complicated.
I’ve sussed out all the common issues, what can be fixed easily and what spells the end for an individual Trip 35. Usually, it’s lens fungus or an unreactive aperture that means doom for this little camera.
After years of working with them, I took one to the south coast of England to do a full review and I was actually pleasantly surprised by it. As you’ll see throughout the article, there are actually some good pictures that came from this ancient camera.
Some shots were let down by the very real limitations of this camera but on the flipside, due to the brilliant 40mm Zuiko lens, when the exposure is correct, its shots are great.
There are a lot of pros and cons to this camera so it’s well worth reading up on it to figure out if it’s the right fit for you. I enjoyed shooting it more than I expected but it wouldn’t be a camera that I’d rely on regularly.
Olympus Trip 35 Specs
Format – 35mm
ISO – 25 – 400
Battery – Solar Powered Selenium Battery
Exposure – Automatic
Shutter Speeds – 40 – 200
Flash – Hot Shoe
A Brief History Of The Olympus Trip 35
Introduced in 1967 and rolling on until 1984, the Olympus Trip 35 was completely ahead of its time. Sporting a solar-powered light meter in the late 60’s was pretty special.
Of course, Olympus’ market audience was pretty obvious, being named ‘Trip’, it’s kind of spelt out for you. Strong, reliable, doesn’t need any batteries, anyone could use it, that pretty much ticks all the boxes when it comes to a holiday camera.
Incredibly, over 10 million Trips were sold (Up for debate) and of course, they’re still being bought and sold to this day.
How Does The Olympus Trip 35 Battery Work?
The Olympus Trip 35 is powered by the sun using a selenium light meter which is the ring around the lens. This powers the light meter and allows the camera to choose the shutter speed and aperture (depending on which settings you have on). This would have been very unusual in its time but the fact that it’s still reliable today is brilliant.
Is The Trip 35 Lens Good?
Yeah, the Olympus Trip 35 has a pretty good lens but I’ve got to say, there are quite a few drawbacks. The lens itself is a beautiful 40mm 2.8 Zuiko lens, it’s pretty high quality for a camera that feels like a point-and-shoot.
I’d say the main drawback is that the focus is zonal and you only have 4 options. You should be able to see above, there’s a picture of one person, then two, then a group and then a landscape symbol. These are your focus options and it’s basically, 1.5m, 2m 3m and 6m and beyond.
This does limit the camera quite a lot but you’ve got to forgive a 50-odd-year-old camera sometimes.
The focal length is interesting, 40mm is pretty unusual but it’s still just wide enough to take the kind of pictures you’d usually take when you go on your holidays. It’d probably be preferable to have a 35mm lens but beggars can’t be choosers.
The Olympus Trip 35 Compared To The Olympus OM10
It’s worth comparing the Olympus Trip 35 with the Olympus OM10 as they’re currently at similar prices.
The Olympus Trip 35 isn’t that similar to the Olympus OM10, the Olympus Trip 35 is a small point-and-shoot rangefinder and the OM10 is an SLR however, it’s good to see what the Olympus Trip 35 is like in comparison to another well-known camera.
The Olympus OM10 would provide much better shots as it has better quality lenses and more control however, the Olympus Trip is more convenient, more compact and easier to use.
How Much Is The Olympus Trip 35 Worth?
Currently, the Olympus Trip 35 is worth around $100-125 or £70-100. You can of course get the Trip 35 for less if you try bidding for it on eBay or search thrift stores and flea markets but it’s worth trying to make sure that your Trip 35 is all working correctly.
What Kind Of Photography Is The Olympus Trip 35 Best For?
The Olympus Trip 35 is unsurprisingly best for travel-type photography. This camera was made with travel in mind as it’s small, compact, strong, easy to use and doesn’t require any batteries. Otherwise, this is also a good camera for day-to-day use. Photographers like David Bailey championed the Olympus Trip 35 believing that it was an incredibly high-quality camera.
Although the Olympus trip 35 has a great lens it’s not necessarily overly accurate and it’s not easy to focus correctly so despite the fact that it has a 2.8 lens it doesn’t mean it’s very likely that you’ll be able to focus correctly close range and get the most out of that lens.
This is not necessarily ideal for more professional types of photography and is definitely better to be used in day-to-day life and travel photography.
Is The Olympus Trip 35 Fully Manual?
The Olympus Trip 35 has two settings, one is an automatic setting that chooses your aperture and shutter speed for you, it decides between a shutter speed of 40 and 200 and between apertures of 2.8 and 22.
Alternatively, you can decide the aperture and the shutter speed will be decided by the camera. All focusing is manual and all ISO needs to be changed manually.
How To Use The Olympus Trip 35
Olympus Trip 35 is a very simple camera to use once you get the hang of it, until then understanding its limitations can be slightly hard.
If your camera seems not to be working properly try to leave it in the sun for some time to effectively charge its battery.
To open the back of the camera there is a small lever on the bottom of the side of the camera which just needs to be pulled down until the back pops open.
To change the aperture just rotate the ring at the base of the lens, this ring will show numbers from 2.8 two 22. If you want to shoot in automatically then turn it all the way around until the red ‘A’.
To change the ISO you just need to rotate the ring on the outer edge of the lens until you are to the correct ISO.
In order to focus you need to rotate the black ring on the lens. The closest focus mode is portrait mode, then there is middle-range portrait row mode, next, there are people standing further away from you and finally, there is a full landscape mode.
To attach a flash you simply have to slide it into the hot shoe located on the top middle of the prism.
To shoot and wind on you just have to press the shooting button on the top of the camera and then wind the black winder on the back of the camera until you can’t wind it any further.
To rewind the film you must first press the black button on the bottom of the camera to release the film and then wind the silver winder on the top left of the camera all the way back until it feels loose.
Common Faults Of The Olympus Trip 35
As the Olympus Trip 35 is a very old camera it has a number of common faults, hopefully, I can shed some light on these and help you avoid them or potentially fix them.
Commonly the red flag of the Olympus trip 35 will stop working, the red flag usually shows you when the scene would be too under-exposed. The red flag would appear at the bottom of the viewfinder when you are looking through it and would usually stop you from taking a picture if it’s too dark.
Sometimes the lens won’t react correctly to light, this is a great thing to check because if this is happening then it’s not really something that you can stop and it will ruin your photos. If this is happening the only advice I can give is to put it in the sun for a bit to see if this charges your selenium battery.
It’s likely that the light seals have worn away unless you bought your camera from a reputable dealer. You will probably have to replace a small number of light seals just to ensure that you do not get light leaks, this is fairly easy and if you want to find out how to do it then go to this link .
Lastly, the lens may have fungus and if the fungus is internal and it’s not something that would be easy to fix it would be much simpler just to get another one.
Final Word On The Olympus Trip 35
This is a great camera for travel and is certainly a camera to consider using. Personally, it’s not my kind of camera, I prefer more control and this just doesn’t cut it for me!
For a camera of its age, it truly is fantastic, a solar-powered vintage wonder that can still produce some beautiful shots!
Leave a Reply Cancel reply
Your email address will not be published. Required fields are marked *
Save my name, email, and website in this browser for the next time I comment.
Hey! I've been shooting film for a very long time and throughout all of my 20's it's been my main format. In 2019 I started to buy and sell film cameras and I became a top rated seller on Etsy and eBay. I've built up a wealth of knowledge about different kinds of film cameras and their common issues.
Since I started photography I've produced a number of zines/prints and more recently made a book called 'So Far So Good'.
I started this website in late 2021 with hopes of helping out people who had been looking for similar information to me and so far, I'm really enjoying it.
Similar Posts
Is the olympus mju ii zoom 80 any good full review.
I’ve shot with a lot of Olympus Stylus Epic Zoom 80’s over the years and now I’ve got a lot of experience with this cult classic point-and-shoot camera. The Olympus Stylus Epic (MJU II) Zoom 80 is a great 35mm point-and-shoot camera that is extremely versatile with a good lens. Following the amazingly popular Olympus…
The Pentax K1000: Everything You Need To Know
I’ve shot with several Pentax K1000’s over the last few years and now I know the pros and cons of this tank-like camera. The Pentax K1000 is a robust classic SLR camera, simple and reliable, the K1000 is a joy. For a forty-year-old camera, this can still produce some beautiful shots. The K1000 is fully…
The Yashica T4 Review: Everything You Need To Know
I’ve been lucky enough to work with quite a few Yashica T3, T4 and T5s over the last few years and I’ve discovered the positives and the pitfalls of this unbelievably sharp point-and-shoot. I understand everything you want to know, how to use it, what film to use with it and the common issues that…
Is The Olympus MJU I That Good? Full Review & Guide
Over the past few years, I’ve shot with, tested and cleaned up hundreds of Olympus MJU I cameras and over that time I’ve really got to know this compact little camera. The Olympus MJU I (Or Infinity Stylus in the US) is a brilliant point-and-shoot camera with a 35mm 3.5 lens. With a weatherproof body,…
The Canon A-1 Review: Everything You Need To Know
Written – 03/08/2023 I’ve been shooting film for over 7 years and over that time I’ve used a bunch of Canon A-1s and discovered the ins and outs of this little SLR. The Canon A-1 is a classic SLR camera produced from 1978 to 1985 with shutter speeds ranging from 30 seconds to 1/1000th of…
Is the Olympus MJU II Really That good? Ultimate Guide
Over the last few years, I’ve tested a hell of a lot of Olympus MJU II’s and I’ve really got to grips with the real-life pros and cons of this cult classic camera. Along the way, I’ve discovered all of the reasons people love this camera and I’ve also got to grips with all of…
Item added to your cart

If you're the proud new owner of a vintage Olympus Trip 35 film camera, you're in for a treat! This classic piece of photographic history is perfect for capturing memories with a unique analog touch with ease. In this guide, I'll walk you through the step-by-step process of using your Olympus Trip 35, complete with images and important precautions to ensure you get it right every time.
Expand the relevant guide:
Collapsible content
Loading film into the olympus trip 35:.
Step 1: Choose your film
Select your preferred 35mm film roll, keeping in mind that the Olympus Trip 35 is compatible with ASA/ISO speeds ranging from 25 to 400.
Popular film brands include Kodak, Fujifilm, and Ilford. This post I wrote might be useful: Buying 35mm Film - A Complete Guide
Step 2: Set the film speed and set the camera to manual for film loading
Set the appropriate ASA/ISO speed for your film using the dial located on the front of the camera, near the lens.

Also turn the aperture ring to any manual f number against the red line so that it isn't set to 'A'. The shutter can now be released regardless of light conditions.
Step 3: Open the camera back
![[Image 2: The Olympus Trip 35's back lock tab]](https://cdn.shopify.com/s/files/1/0571/3212/2301/files/DSCF2797_480x480.jpg?v=1684491064 "olympus trip 35 auto setting")
Locate the back cover lock tab on the bottom of your Olympus Trip 35. Pull it down and the camera back should pop open.
Step 4: Insert the film cartridge
![[Image 3: Film cartridge being inserted into the camera]](https://cdn.shopify.com/s/files/1/0571/3212/2301/files/DSCF2798_480x480.jpg?v=1684491072 "olympus trip 35 auto setting")
Lift up the rewind knob and insert the film cartridge into the film chamber on the left side of the camera, making sure the tip of the film is pointing toward the take-up spool on the right side. Then push the rewind knob back down into the roll of film (sometimes needs a wiggle or slight rotation to go all the way back down).
Step 5: Engage the film leader into the take-up spool
![[Image 4: Film leader inserted into the take-up spool]](https://cdn.shopify.com/s/files/1/0571/3212/2301/files/DSCF2800_480x480.jpg?v=1684491080 "olympus trip 35 auto setting")
Pull the film across the camera and insert the tip securely through and into a slot on the take-up spool. Advance the film using the wind-on wheel.
Step 6: Align the film perforations
Ensure that the film perforations are aligned with the sprocket teeth on both sides of the film.
![[Image 4: Film leader inserted into the take-up spool]](https://cdn.shopify.com/s/files/1/0571/3212/2301/files/DSCF2801_480x480.jpg?v=1684491091 "olympus trip 35 auto setting")
This ensures the film will advance smoothly when winding.
Step 7: Close the camera back
Close the camera back tightly. The camera back should click shut, indicating it is securely closed.
![[Image 6: Closing the camera back]](https://cdn.shopify.com/s/files/1/0571/3212/2301/files/DSCF2803_480x480.jpg?v=1684491101 "olympus trip 35 auto setting")
IMPORTANT: Never open the camera back before fully rewinding the film, as this can expose your film to light and ruin your photos. Make sure to rewind the film completely after taking all 24 or 36 frames before unloading it.
Step 8: Advance film to '1'
Keep winding film and releasing the shutter until the film counter points to "1". This ensures the unexposed part of the film is ready for your first photo.

IMPORTANT: Watch the rewind knob when you wind the camera on ; it should start to rotate at the same time as you wind, indicating that the film has been taken up correctly - this is key, if this is not happening after a few shots then it probably means that the film has not been securely engaged by the take-up spool and the loading process will need to be repeated.

Step 9: Set the camera back to "Automatic" and get ready to shoot!
Turn the aperture ring until the 'A' mark is aligned with the red line in front of the viewfinder (click stop).

Your Olympus Trip 35 is now loaded with film and ready to capture amazing photos.

Taking Photos with the Olympus Trip 35:
How to take photos with the olympus trip 35:.
Step 1: Ensure the camera is wound on
This gets the shutter ready and primed to take a photo.
Step 2: Set subject zone focus distance on the lens
The Olympus Trip 35 has 4 settings which equate to focusing zone distances away from the camera (shown on the underside of the lens barrel):

- 🧍♀️Close focus ≈ 1 meter. This setting is used for focusing on anything ~1 meter away from the camera, be it close headshots or other close up details.
- 👥 Portrait ≈ 1.5 meters. Used for focusing on anything ~1.5 meters away from the camera, for example portraits or capturing wider details in the photo.
- 👯 Group ≈ 3 meters. Focusing on anything ~3 meters away from the camera, eg. full length body shots/group photos.
- 🌄 Scenery ≈ 5+ meters. Focusing on everything 5+ meters away from the camera, great for landscapes or subjects far away from the camera!

Step 3: Ensure aperture ring is set to 'A'
For 99% of situations in good light without a flash, it's best to leave the camera set to the red 'A'.

This lets the camera's solar powered meter set the exposure settings automatically and ensures a good exposure.
Step 4: Compose the photo using the viewfinder

Use the projected frame lines to see the area that will be captured in your photograph. There are hash marks to indicate the change in frame at close focus.
Step 5: Take photo by pressing shutter button

There should be a small click as the shutter fires - indicating a photo has been taken! 🙌 If instead a red flag appears in the viewfinder, this is a warning that there is not enough light in the scene for a proper exposure.

You can manually disable the red flag low light warning and take a photo anyway in low light by setting the aperture to '2.8'.
Towards the end of the roll it is important to not try to wind on the camera hard when you start feeling quite a lot of resistance or cannot wind on further - this signifies that the roll is finished, but if pushed too hard at this stage can result in the film snapping in the back of the camera.
Unloading Film from the Olympus Trip 35:
Step 1: Check the film counter
Once you've taken all the photos on your film roll (either 24 or 36 frames), check the film counter to ensure you've reached the end.
![[Image 10: Film counter indicating the last frame]](https://cdn.shopify.com/s/files/1/0571/3212/2301/files/DSCF2809_480x480.jpg?v=1684491137 "olympus trip 35 auto setting")
Towards the end of the roll it is important to not try to wind on the camera hard when you start feeling quite a lot of resistance - this signifies that the roll is finished and if pushed too hard can sometimes result in the film snapping in the back of the camera.
Step 2: Press rewind button in
Find the small black button on the base of the camera and push it in to disengage the film from the winding mechanism and allow the film to wind back into the film canister inside the camera.
Step 3: Rewind the film
Press the rewind button located on the bottom of your Olympus Trip 35. Then, turn the rewind knob clockwise to rewind the film back into the cartridge. Keep rewinding until you feel the tension release, indicating that the film has been fully rewound.
Step 4: Open the camera back
Following the same steps as when loading the film, locate the camera back lock tab on the bottom of your Olympus Trip 35. Pull it outwards to open the camera back.
Step 5: Remove the film cartridge
![[Image 13: Film cartridge being removed from the camera]](https://cdn.shopify.com/s/files/1/0571/3212/2301/files/DSCF2813_480x480.jpg?v=1684491173 "olympus trip 35 auto setting")
Pull up the rewind lever and lift the film cartridge out of the film chamber.
Step 6: Store and develop your film
![[Image 14: Film cartridge ready for storage or development]](https://cdn.shopify.com/s/files/1/0571/3212/2301/files/DSCF2814_480x480.jpg?v=1684491181 "olympus trip 35 auto setting")
Place the film cartridge in a light-tight container to protect it from light exposure. Take or send your film to a lab for development or develop it yourself using the appropriate chemicals and techniques.
Shop The Olympus Trip 35
Olympus trip 35 vintage 35mm film camera | tested & fully refurbished | 100 day guarantee, olympus trip 35 vintage 35mm film camera - forest slate green | tested & fully refurbished | 100 day guarantee, olympus trip 35 vintage 35mm film camera - burnt orange | tested & fully refurbished | 100 day guarantee, olympus trip 35 vintage 35mm film camera - golden yellow | tested & fully refurbished | 100 day guarantee, olympus trip 35 vintage 35mm film camera - teal green | tested & fully refurbished | 100 day guarantee, olympus trip 35 vintage 35mm film camera - royal blue | tested & fully refurbished | 100 day guarantee, olympus trip 35 vintage 35mm film camera - sand beige | tested & fully refurbished | 100 day guarantee, olympus trip 35 vintage 35mm film camera - lipstick pink | tested & fully refurbished | 100 day guarantee.
- Choosing a selection results in a full page refresh.
- Opens in a new window.
Daniel J. Schneider
Photographs, blog and reviews by a film photographer
Olympus Trip 35: Every bit as good as its reputation
I didn’t just stumble on the Olympus Trip 35. I knew all about its excellent reputation as a sharp, simple camera with a good pedigree.
I’m fairly certain I first heard of the Trip 35 on the the Film Photography Podcast some years back, when the hosts were going through a bit of an obsession with the little powerhouse.
It’s the 1960s equivalent of a point and shoot — much more than a box camera, but almost as hands-off as can be. Set the ISO and the focus range, and fire away.
I mentioned the Trip 35 back in February , and discussed a little about production numbers and dates, etc. The important parts are: black ones were only made for a couple years and tend to command much higher prices, especially in good shape — but they’re the same as the silver ones underneath the enamel.
Description

The Trip 35 is a small camera, just a little larger than the later Olympus 35RC , and fairly lightweight. It still feels good, though, in line with many other cameras of its era. Though it has some plastic in it, it is primarily a metal camera with all that vintage solidity.
Being a product of an era when high standards of quality seemed to apply across the board, it’s a whole lot better than one might expect today based on the quality gulf between high-end and low-end, which started to broaden noticeably in the 1970s and is now rather abyssal. The lens is exceptionally sharp, the auto-exposure system is at the top of its class, and the viewfinder is bright and accurate.
The lens is a 40mm f/2.8 D.Zuiko — a four-element design that bests a lot of the Trip 35’s direct competitors’ three-element lenses. While it’s not as fast as some of the f/1.9 and f/1.7 lenses in the pack, the sharpness is tough to beat.

The light meter uses a selenium photovoltaic cell, with a large light-gathering matrix surrounding the lens. The Trip 35 requires no batteries to operate, but if the meter dies, the camera will not function in auto mode.
The auto-exposure system features only two shutter speeds — 1/200 second and 1/40 second. In auto mode, it hunts through apertures at 1/200 in an attempt to make a proper exposure, and then slows down to 1/40 to continue the hunt if necessary. If a proper exposure isn’t possible at 1/40 second and f/2.8, a translucent red flag will pop up in the viewfinder. Otherwise, the exposure is made.
Looking through the viewfinder, you’ll notice a simple brightline frame with some parallax correction marks. It’s not huge, but it’s big enough, and it’s bright enough, too. Below the main viewfinder is a tiny prism that adds a view of the markings on the control rings on the lens barrel so you can see the aperture and focus.

On the lens barrel you can set the film speed (from ASA 25 to 400) by turning the 43.5 millimeter filter ring, and also the aperture for flash mode. The aperture ring has an “A” for auto mode, and the rest of the fixed aperture settings are meant to pair with the subject distance to match a flashgun’s guide number. When a manual aperture is selected, the shutter is locked at 1/40 second. The shutter can be permanently modified to stay at 1/200 , but this will limit the camera’s low-light abilities.
The third setting on the lens barrel is the expected one — focus. The Trip 35 uses zone focusing rather than a rangefinder. The four pictographs correspond to fairly standard distances: a little head and shoulders for 1 meter, two little heads and shoulders for 1.5 meters, two full-length people and a kid for 3 meters, and a mountain for infinity. In case you forget (or just prefer numbers to pictographs), the opposite side of the focus ring has distance markings. The pictograph is what gets shown in the viewfinder, though.
The shutter release button is threaded for a cable release. The rewind knob has a flip-out crank, and there is a frame counter on the right shoulder. The film advance is a thumbwheel on the back edge of the top cover behind the shutter release button.

Be sure to push in the take-up spool release button on the bottom cover before rewinding, and rewind before opening the film door with the small silver latch tab on the bottom left corner of the camera.
There is a standard tripod mount on the bottom, and the top features a hot shoe (and there’s a PC sync socket on the front cover, below and to the right of the lens).
And that’s about it — there just isn’t a lot of technical detail to the Trip 35, but there is elegance in simplicity.
With that, let me tell you what I like about it.
I didn’t expect to like the Trip 35 so much at first. I mean, hearing it talked about and seeing so many articles, I expected it to be just another 1960s-70s rangefinder-wannabe. Don’t misconstrue that to mean I expected it to be bad — but I didn’t expect it to set itself apart.

I think I was wrong. It’s not the best camera I’ve ever used, by any means, but its euphony of size, fit and finish, function, and image quality is really pretty special.
I’m not shy about my troubles with zone- and scale-focus cameras. I have terrible luck with them, mostly because I don’t remember to focus them before I press the shutter. I don’t know that I wouldn’t have better luck if I used them (or, more likely, one of them) more of the time, but in the limited experience I have with them, I just don’t remember more than half the time.
The Trip 35, though, solves that problem for me by showing me the focus setting clearly and brightly in the viewfinder. For me, this clears the biggest roadblock in the way for me to get good images with this class of camera. And for me, at least, it was by far the biggest roadblock.
Okay, okay — the images I’m attaching here aren’t so great — but they’re meant to check the thing out: to see lens distortions and aberration, focus across the breadth of the frame, and so on. And a lot of them also are taken as opportunities for me to test out the feel of the camera.

The film counter on mine was stuck at first. In fact, it was stuck all through my testing. I didn’t figure out how to unstick it until I was writing this. I’m not sure how I managed to miss the solution — I just opened the film door with the shutter uncocked and operated the advance, and the counter reset to the “S” (for Start). Everything else worked right from the start.
I found my Trip 35 at an antique mall, and while I paid below market for it, I didn’t get a thrift-store price. I’m okay with that. I’d been expecting one to turn up in a thrift store after all the talk, but not having actually seen one in five years of trawling thrift stores for photographica, I decided to go for it. Once I had it my hands, it pretty much wasn’t going back in the cabinet.
As stated above, it’s the much-less-common black version of the Trip 35. It’s not perfect — it has a few scuffs and signs of use on the enamel. But the lens is crystal clear and everything works as it should.

I found the size exceptionally right. It’s almost as small as a camera could be and still feel like it fills my hands adequately. The arrangement of the controls is good — really good. The film advance is smooth and fast. The shutter release has just the right amount of tension.
The shutter is quiet, too. Not silent — or even quite as silent as some others — but it’s impressively quiet. I can see why it’s prized for street photography. No batteries required, easy to zone focus, and, in decent light, no fiddling with exposure. It truly becomes point and shoot.
The results are great, too. Sharp from edge to edge, no noticeable distortions, and minimal chromatic aberration. My color tests were with expired film, but the results struck me as good. Contrast on the black and white shots, taken with Ilford Delta 100, was excellent.
If I had a complaint, it would be that the Trip 35’s aperture ring is narrow enough to be difficult to operate with my big sausage fingers. But it’s not really designed to be used without a flash attached, which is something I just don’t do very often.
One minor issue I had — and it was all me — was missing a ton of pictures because I didn’t check that it was loaded. With or without film, the Trip 35 happily clicks away. I think, at one point, I took about 40 pictures and started to wonder why I wasn’t out of film. Turning the rewind knob a bit, I realized there wasn’t any film in the camera, so I loaded it and spend some time retracing my steps to re-take what I could.
The only realistic avenues for improvement with the Trip 35 would be to give it fully manual controls, or a coupled rangefinder. Those deficiencies prevent me from rating the Trip 35 a perfect five stars, but don’t take that to mean you shouldn’t try one out if you have the chance — it’s a really great little camera.
Here are the rest of the test shots I feel like displaying:


- Olympus Manuals
- Digital Camera
Olympus TRIP 35 Manuals

Olympus TRIP 35 Instructions Manual (13 pages)
Table of contents.
- Setting the Camera to Manual System 2
- Loading the Film 3
- Engaging the Film End with the Take-Up Spool 3
- Before Closing the Rear Cover 4
- Checking the Film Counter 4
- ASA Film Speed Setting 5
- Setting the Camera to Auto System 5
- Composing the Picture and Releasing the Shutter 7
- Rewinding the Film 8
- Flash Photography 9
- The Olympus Pen Flash CL 10
- When Using Ordinary Flash Gun or Electronic Flash 10
- Technical Data 12
Advertisement

Olympus TRIP 35 Repair Instructions (17 pages)

Related Products
- Olympus Trip 500
- Olympus TRIP 505
- Olympus TRIP 600
- Olympus Tough TG-810
- Olympus Stylus Tough 8010
- Olympus Tough TG-820 iHS
- Olympus STYLUS U TOUGH-3000D
- Olympus u TOUGH-6000
- Olympus TG 850
- Olympus STYLUS TG-870
Olympus Categories
Upload manual
Olympus Trip 35: Perfect for Trips
A classic camera with legendary status, makes taking SLR quality photos a breeze and is the perfect camera for taking out, a real grab and go camera.

After sorting out my box of negatives, I found some from when I first started film photography and back then I shot with colour film, whereas now I’m purely black and white.
I picked this camera up on ebay after hearing many many good things on flickr and reading reviews here. I can’t remember how much I paid, but it wasnt much, around £7 I believe. My sister has recently bought one for a trip (that word is going to be used a lot in this review). She’s going on and cost her £18, I think this increase in price is due to the fact more people are realising just how good this camera is.
When my camera arrived, I did all the rudimentary checks you should do with a Trip 35 and that’s half depress the shutter to make sure the aperture blades are moving freely and make sure that the famous red flag rises in the viewfinder. When not enough light is available in “A” mode, simply do this by looking through the finder and cover the lens and press the shutter. The camera passed all the best and was ready to go.
Here are the specs for the Olympus Trip 35 you probably know them already:
Focus: Manual by scale, visible through viewfinder. Lens: 40mm f/2.8 Olympus D. Zuiko, 4 elements, three groups. Close Focus: 2.9’ (0.9m). Diaphragm: two bladed, diamond-shaped, stopping down to about f/22. Shutter: 1/40 or 1/200, automatically selected. No bulb setting. Meter: Selenium cell around lens. (automatically incorporates any filter factors.) Exposure: Program automatic (A) and fixed-aperture for flash. Note: if you chose a large aperture for flash and work in bright light, it stops down accordingly but keeps the shutter speed at 1/40. Film Speed: Third stops from ASA 25 – 400, except ASA 32. Filter Size: 43.5mm screw in. Flash: Hot shoe and PC terminal. Size: 4.912" W x 2.861" H x 2.269" D (124.77mm W x 72.67mm H x 57.62mm D). Weight: 13.77 oz. (390.5g).
Anyway, the following weekend me and my girlfriend and her friend went to Leeds, England. I took the Trip 35 with me, it fit nicely into one of my larger pockets due to the lens, and was easy to carry. I found the camera great to use on the street and hardly anyone notices it and if they do, they look intrigued. Here are some of the results from Leeds.

For my next roll, I decided to experiment a little. I used a roll of self redscaled film. It was iso 200 so I rated it at 50. Here are some results.

Overall, this camera is great and one everyone should own. Over 5 million were made so you will be able to pick one up, put any film init and it will perform fantastically. My two favourite things about it are the fact it doesn’t use batteries and well, it’s amazing zuiko lens. I believe the meter is accurate enough to use slide film and it is very consistent. Thanks for reading, keep shooting.
written by brandkow93 on 2012-05-17 #gear #street #review #colours #colour #olympus #olympus-trip-35 #david-bailey #sharp #redscaled
zorki , lizkoppert , spookydirt , joshuadleach , thepolaroid , foodeanz , alex34 , cloudishballon , chib3h , gengorou , concrete-monstaz , tomkiddo , wuxiong & neanderthalis .

Really wanted one of these for a while but told myself I couldn't buy any more cameras :/

I'm quite fond of this camera, i have never seen one with a lens cap!

@street_smile , I've got one with cap, recently brought from the auction: ic.pics.livejournal.com/romson/2316906/74569/original.jpg The logo has changed slightly since 1970, so possibly it's original cap.
More Interesting Articles
Tipster: film photo inspirations for summer.

The sun's out and so should our film cameras be! In this article we've listed a few fun, classic and experimental photo styles to give you inspiration for your summer shenanigans with the help of our creative community members.
Marce's Summer Adventures with the Sprocket Rocket

Busan-based film photographer Marce takes us back to summer and a trip filled with beautiful scenery and memorable moments, all captured using the Sprocket Rocket 35 mm Panoramic Camera.
Mahnoosh Niakan's Timeless Portraits with the LomoGraflok

Large format is often slow and clunky. It takes a lot of time and effort to get the perfect image. But with our LomoGraflok, the first instant back for 4x5 cameras, we have broken these barriers. Photographer Mahnoosh Niakan shares her incredible portraits taken with the LomoGraflok.
Bundle Up and Save!

On the look for a great deal? In need for the perfect gift? Not sure what film to get with your camera? Worry not and discover our budget friendly bundles including sweet discounts and freebies for many different products! Don´t miss a great deal and check them out now!
A Visual Trip with the LomoApparat by Angela Izzo

Both known for their world-distorting and experimental styles, LomoAmigo Angela Izzo and the LomoApparat make the perfect pair to take us to another reality. Check out Angela's latest shots!
Tipster: Night-time Adventures With the Fisheye No.2

With its 170° lens mixed with features such as multiple exposure, bulb mode, and flash, the Fisheye No.2 is perfect for nights out. Here we share some tips on how to get the best low light photos with your Fisheye No.2.
Enjoy Summer on Film with the LomoApparat Fluffy Omelet Special Edition

Thai artist Proei-Natchariya Laosrisin, also known as Fluffy Omelet, has designed a beach-themed new edition of our LomoApparat camera, perfect for capturing summer holidays on film. Check out the colorful camera and some photos taken by the artist!
Film Photography Day Deals are On!

In celebration of Film Photography Day there are tons of exclusive discounts and fab freebies available so shop now and enjoy sweet savings before it’s too late!
Available in our Shop
Isabelle Baldwin's Large Format Experimentation with the LomoGraflok 4×5 Instant Back

Arizona-based photographer Isabelle Baldwin has a love for environmentalism and analogue photography, so when we found out that she takes her large format camera on her adventures, we knew she'd be the perfect match for our LomoGraflok 4×5 Instant Back.
The Fisheye No.2 and Double Exposure – A Multilayer Adventure

Make a bold statement and break from the straight lines of a classic lens. And if that is not enough, switch the multiple exposure feature on for an extraordinary circular adventure.
Jonathan Mok on His First Impressions of the Diana F+ and Love of 120 Film

Jonathan Mok is a California-based photographer and creator with a knack for medium format photography. We knew the Diana F+ camera would be a perfect photographic companion for him!
Dreamy Bokeh With the New Petzval 55 MM F/1.7 Mkii

Jump outside of your comfort zone and take sensationally striking shots with the signature bokeh of the New Petzval 55 mm f/1.7 MKII! Available in Brass, Black Brass and Black Aluminium finish!
Get it in our Shop
Charm Within Everyday Life – Anna Starr Shoots With the Diana F+

Anna Starr has a passion for medium format experimental cameras, so we knew she’d be a perfect match for our endlessly creative Diana F+. In these photos she brings attention to the little things we might miss when going about our daily lives.
Your Lomography Holiday Gift Guide 2023

Let's take a look back at Lomography's 10 Golden Rules and find out which gifts are perfect for you and your loved ones! Film, instant cameras, art lenses, scanning kits, cute gadgets. . . you're sure to find something that suits you!
A Family Adventure With A Simple Use Reloadable Film Camera

What better way to spend some quality time with your family than to share what you love with them? For this photo series, I encouraged my mother to get back to her analogue roots and gave a roll of Lomography film and a Simple Use Reloadable Film Camera to document our time together.
Find Out More About


Olympus Trip 35 Review – Learning to be More Spontaneous – by Andrew Morang
5 May, 2018
Post Categories:
Share this post:
In the past, I always used manual cameras. I measured the light, set the exposure, and focussed myself. Even in a car, I like to be in control and only drive manual transmission, which is almost unheard of in the United States. The point-and-shoot craze of the 1990s completely passed by me. But now I have this funny little Olympus Trip 35, a “point-and-shoot.”
Why I bought it is a bit of a story. In preparation for a 2017 trip to Nepal, I sent my Leica IIIC off for repair. But in case it would not be ready in time, I bought three inexpensive compact 35s from the ‘Bay. A Minolta was dead on arrival, but a Yashica Electro 35CC and an Olympus Trip 35 were fully functional. However, the Leica was overhauled in time for Asia, so the Trip stayed home. But I was curious to see if the Trip 35 was as good as so many reviewers claim.

As you can see, the Olympus Trip 35 is a simple device. Film winding is via a wheel on the back. Exposure is automatic, controlled by a selenium meter that is coupled to the aperture and shutter. If the light is too low, a red flag pops up in the finder to tell you that the shutter button is locked. (If you buy one from the auction site, make sure the red flag feature works; that means the selenium cell is functioning.)

Limitations
This little Olympus Trip 35 has limitations:
- There are only two shutter speeds: 1/40 sec and 1/200 sec. The camera sets them for you based on the amount of light, but if you turn the aperture dial off “A” to one of the f-stops, the shutter is 1/40.
- The light meter, being a selenium cell, does not have low-light capacity. The selenium cell (behind the bubbly plastic) surrounds the lens. If you want a low-light camera, you need one with a battery-powered CDS or SBC cell.
- The viewfinder does not have a focus aide, so you need to estimate the distance. The lens has some symbols to help you, such as a mountain or a person. Really, it is not difficult, especially with the semi-wide 40mm lens.
- The filter size is a unique 43.5mm fine pitch. Why did Olympus do this, to sell their own unique size? Color filters are very hard to find, and they do not screw in easily. Maybe the assumption was that most casual users took color negative film and did not care about filters.
- For some unknown reason, hoods are unobtanium in the USA. I had to order one from a UK vendor, and it cost as much as the camera did.

The Trip 35 In Use
Regardless of these limitations, this Olympus Trip 35 is fun. With this little Trip 35, you can leave the focus at infinity (the mountain symbol), raise the camera to frame, and snap away. It is so simple, so liberating. I can take it with me on the bicycle, stop where I see something interesting, and snap a photograph. But I noticed I still support it in the same way as my bigger cameras: left hand cradling the lens and right hand holding the right side and index finger on the shutter button. Solid grip, no breathing, and careful press. So maybe I am really not spontaneous, but it is less of an effort than one of my “serious” cameras.

At low light, you can see the limitations of the Olympus Trip 35. Contrast is a bit low, and you should use a hood. And once the red flag pops up and locks the camera, your only option is to move the aperture control off “A” to 2.8 and hope the exposure will be adequate. Because I often take pictures in low-light conditions or in old buildings and factories, this little Trip 35 is rather restricting. Also, although there is no indication of when the selenium meter has set the lens wide open, the edges of the frame in dusk are a bit soft. I assume the lens is close to 2.8. It is certainly not as well corrected as a 35mm Summicron or 35mm Super-Takumar, but, of course, those are more sophisticated and expensive designs.

Despite some limitations, do not let me dissuade you from trying the little Olympus Trip 35. They are fun, inexpensive, and take good photographs. Thank you for reading, and thanks Hamish for letting me post these ramblings.
For more urban decay photography, please see: https://worldofdecay.blogspot.com
Find more similar content on 35mmc
Use the tags below to search for more posts on related topics:
Contribute to 35mmc for an ad-free experience.
There are two ways to contribute to 35mmc and experience it without the adverts:
Paid Subscription – £2.99 per month and you’ll never see an advert again! (Free 3-day trial).
Subscribe here.
Content contributor – become a part of the world’s biggest film and alternative photography community blog. All our Contributors have an ad-free experience for life.
Sign up here.
About The Author

Paul Graham on Olympus Trip 35 Review – Learning to be More Spontaneous – by Andrew Morang
Comment posted: 06/05/2018
Leave a Reply Cancel reply
Your email address will not be published. Required fields are marked *
Save my name, email, and website in this browser for the next time I comment.
Notify me of new posts by email.
Kodachromeguy replied:
Yes indeed, a step-up adapter is a possibility. I considered that, but there are two problems with the Trip 35. First, The genuine Olympus hood will not fit over the adapter ring, so then you need a screw-in hood that fits the filter that you finally adapt. Second: the viewfinder is partly obscured. Olympus used this size for several of their cameras, so once upon a time, there may have been more 43.5 filters available.

Philip Brooke on Olympus Trip 35 Review – Learning to be More Spontaneous – by Andrew Morang
Comment posted: 09/05/2018

Nigel Cliff on Olympus Trip 35 Review – Learning to be More Spontaneous – by Andrew Morang
Comment posted: 22/05/2018

Recommended reading : Down the Road on Olympus Trip 35 Review – Learning to be More Spontaneous – by Andrew Morang
Comment posted: 05/03/2020
Time to Meet Some of the Most Gorgeous Olympus Trip 35 Cameras Ever! – Photography on Olympus Trip 35 Review – Learning to be More Spontaneous – by Andrew Morang
Comment posted: 30/10/2020
Leave a Comment
Related Posts

17 May, 2024
By Molly Kate

15 May, 2024

By Ron Duda

13 April, 2024

Photography & Projects
Looking for some inspiration, or just want to flick through the project work and photos?

Reviews & Experiences
If you're looking for photography equipment and peripheral reviews, this is the place to start!

Theory & Reflections

Tutorials & Knowhow
If you want to learn or discover a new technique, build on your skills, or be inspired to have a go at a bit of DIY or camera modification, then you’re in the right place.
Contribute to 35mmc
Paid Subscription
£2.99 per month and you’ll never see an advert again! (Free 3-day trial).
Subscribe here
Content contributor
Become a part of the world’s biggest film and alternative photography community blog. All our Contributors have an ad-free experience for life.

Olympus Trip 35
The Olympus Trip 35 is a fully-automatic 35mm compact camera , manufactured by Olympus from 1967 [1] to 1984, during which time over ten million units were sold, [1] though this oft-quoted figure is likely to have included later plastic-bodied Olympus cameras with Trip branding, as the original Trip 35 had serial numbers going up to around 5,400,000. [2] The auto-exposure mechanism is effectively solar-powered by a selenium cell surrounding the lens, and consequently the camera runs without batteries. Until June 1978, the shutter button was silver-coloured metal. After that date, all Trips had a black plastic button.
- 1 Auto-exposure mechanism
- 3 Viewfinder
Auto-exposure mechanism
With the aperture ring set to "A", the camera operates as a program automatic with a working EV range of 8.32-17.4 at ASA 100. [3] Half-pressing the shutter-release button locks the exposure with both the aperture and shutter speed (of which there are only two, 1/40 and 1/200s) fixed by a delicate but accurate mechanism. As explained by one repair page ,
The combination of aperture and shutter speed that the exposure mechanism chooses depends on the amount of light available. The precise amount of light that triggers a change of the shutter speed is not documented in the user manual, but it is believed to be around EV 13. When brightness of EV 13 or more is detected, the Trip 35 will increase the shutter speed to 1/200 sec in preference to using a smaller aperture, and use a narrower aperture as light levels increase from there, presumably to avoid the diffraction effects that affect all 35mm cameras below f/11. [4] Below EV 13, it will use the 1/40 sec speed and widen the aperture for lower light levels. The camera will refuse to fire if there is not enough light, with a red plastic flag appearing simultaneously in the viewfinder. This mechanism makes it impossible to make the error of shooting with the lens cap in place.
When the aperture is set manually (primarily for flash photography), the shutter speed is set to 1/40th of a second. However, the meter is still active even in this "manual" mode. Setting the aperture manually merely sets the widest permissible aperture, and the auto-exposure mechanism may still choose to set a smaller aperture than this if it sees fit. [4]
Other than this, the camera offers no controls for setting exposure manually, though one can easily set exposure compensation by changing the film ASA dial to a higher or lower value.
The Trip 35 has a 40mm f/2.8 Zuiko non-interchangeable lens, with four elements in three groups. Ken Rockwell suspects this to be a front-element focusing Tessar . [5] This lens has a reputation for being extremely sharp, even in the corners; in Rockwell's tests, Costco-scanned Fuji ISO 400 print film loaded into this camera out-performed a Canon 17-40 f/4 L lens in the corners. [5]
The lens provides simple zone-focusing with 4 cute distance symbols marked on the top-left of the lens. These correspond to the real distance markings on the underside of the lens: 1 meter, 1.5 meters, 3 meters, and infinity. Filter ring is 43.5mm.
The viewfinder is an albada-type, with parallax markings for closer focusing. There is a second, very small window under this, nicknamed the "Judas window", which shows the current aperture setting and distance symbol which are on the lens barrel.
A small red flag will appear in the viewfinder if the auto-exposure mechanism decides there is not enough light and refuses to fire.
This camera's aperture blades (there are two blades) tend to be become sticky over time. Before purchasing an old Olympus Trip 35, ask the seller if the aperture is properly opening and closing at all values (f/2.8-f/22). This can be done by manually selecting each aperture value and half-pressing the shutter button. Otherwise, the lens unit would have to be disassembled and cleaned.
- ↑ 1.0 1.1 Olympus' history of EE-equipped cameras (archived)
- ↑ Serial numbers collected by the Olympus Trip Flickr group
- ↑ Specifications in the user-manual.
- ↑ 4.0 4.1 See the Trip 35 program graph , and the explanation in this thread .
- ↑ 5.0 5.1 http://www.kenrockwell.com/olympus/trip-35.htm
- Manual available from UCL
- Olympus Trip 35 group on Flickr
- A modification that allows a 1/200 shutter speed with manual aperture control
- Illustrated instructions for repairing a Trip 35
- Trip 35 in the Olympus Global History (archived)
- This is a trip at Classic Cameras by RaúlM.
- Lionel's Olympus Trip 35 page in French at 35mm-compact.com
- Olympus Trip 35 on www.collection-appareils.fr by Sylvain Halgand (in French)
- Flickr image
- Image by rick soloway
- Japanese 35mm viewfinder
- Image by Michele M. F.
- Image by Hans Jan Dürr
- Image by vincentnip
- Image by Ênio Resende
Navigation menu
Personal tools.
- View source
- View history
- List of Companies
- Community portal
- Recent changes
- Random page
- What links here
- Related changes
- Special pages
- Printable version
- Permanent link
- Page information
- This page was last edited on 7 November 2021, at 07:11.
- Text is available under GNU Free Documentation License 1.3 ; other licenses apply to photos.
- Privacy policy
- About Camera-wiki.org
- Disclaimers
Olympus Trip 35 Film Camera Review
A cult classic, an engineering marvel, and an excellent value for a modern film photographer.

Olympus Trip 35 is one of the most popular 35mm film cameras ever produced. It’s affordable, it’s easy to use, the lens is sharp, it needs no batteries, and it’s compact.
Trip 35 uses a scale focus system, which may seem daunting at first — but it’s not difficult, and the camera has unique aides to help you get the right distance — I’ll explain below.
I’ll also cover all the basics of operation (including the auto and manual modes), lens performance, and build quality of this excellent entry-level Olympus film camera .
A Cult-Classic, Engineering Marvel, an Excellent Value for a Modern Photog
Why is Olympus Trip 35 a favourite of so many photographers?
Olympus Trip 35 is not an expensive camera. It has decent specs, but it’s not the sharpest, fastest, or most compact camera. Yet, it’s loved by many photographers of all levels today.
Back when it was introduced — over 55 years ago — it was a huge hit. The camera was in production for 15 years, having sold between five and ten million units .
Trip 35 sold for $59.95 at launch in 1968, or $530 in today’s money. But you may still find a working copy for $50 in 2024!

But it’s not just the price that makes this camera good. Trip 35s are built very well with lots of metal components and an excellent glass lens. They are a pleasure to hold and use. They’re nearly pocketable and don’t require any advanced photographic know-how or a manual to get started: if you know how to load film , you can use this camera.
🤓 Trip 35’s automatic exposure system that chooses an aperture and shutter speed by converting light energy into mechanical force is of particular interest to film nerds like me. Though many fancy cameras from the era used selenium light meters for aperture or shutter-priority modes, Trip 35 combined both functions in a relatively simple and remarkably reliable design .

Olympus Trip 35 specs and features.
Trip 35 is a successor to Olympus PEN (namely, EES and EES-2) cameras’ excellent mechanical/optical design and portability.
My black paint brass Olympus Trip 35 version weighs 413g/14½oz , though some copies of this camera may weigh up to 20g lighter. The camera is nearly pocketable at 12×7×6cm (4 ½ ×2¾×2¼”), though it’s not the smallest .
Olympus Trip 35’s remarkably small (for the time) dimensions and ease of use are undoubtedly at the core of this camera’s name and ethos: a camera that’s easy to throw in a small bag or a pocket for a trip.
☝︎ Further reading: “ How to Travel With Film Through Airport Security .”
The leaf shutter on Olympus Trip 35 has two speeds: 1/40s and 1/200s. It can switch between the two automatically via the mechanical trap-needle system. In manual mode, Olympus Trip 35 only uses the 1/40s shutter speed. There are no Bulb and no self-timer modes.
The lens is a non-interchangeable Olympus D. Zuiko 40mm 𝒇2.8-22 (four elements in three groups). The closest focus distance is 1m/3ft. The lens uses an odd 43.5mm screw-in lens filter thread that can be adapted to the more common 40 or 46mm threads .
Fully automatic exposure (A) is controlled mechanically by converting ambient light energy via selenium cells (bubbles around the lens) into mechanical movements that modify the aperture and shutter speeds. The camera can be operated manually via the aperture ring around the lens, which will always trigger the shutter at 1/40s if not set to A. The exposure meter is operational between EV8 and EV17 ; it accepts films with ISO 25 — ISO 400 (which needs to be dialled in manually before shooting). No batteries needed.

The viewfinder features a mechanical “red flag” warning system for scenes with insufficient lighting (the camera will also prevent exposures in those conditions). It shows bright lines with parallax markings inside a small but bright window with 0.55x magnification. The eye relief isn’t great, but if you aren’t wearing glasses, you’ll notice a “ Judas window ” that overviews the camera’s shooting mode and distance settings.
Film advance is done with a thumb wheel; rewinding via the rewind knob is unlocked with a rewind button; the film cover opens with a small latch a the bottom-left when looking at the camera’s back.
Hot shoe and a PC socket are available for flash sync. Learn how to use flash with cameras like Trip 35 here .
Free Olympus Trip 35 manual download.
I’ve recently scanned the manual that my camera came with and converted it to a convenient PDF file that you can download for free here:
➜ Free Download : Olympus Trip 35 Instructions Manual (PDF)

This manual took some cropping and assembly as its pages aren’t standard (it’s folded like a map). I hope that this little bit of extra effort makes it easier to read on your screen. However, I’m not sure how well it will look in print.
You’ll be asked to sign up for a free account with Analog.Cafe. It comes with access to more downloadable guides, additional website features, and a monthly community newsletter.
Taking the first photo with Olympus Trip 35: loading film & setting focus.
Trip 35 is easy to load — the only tricky part is finding the latch to open the film door. ( If you’ve never loaded film in these types of cameras, check out this guide .)
Given that you’ve loaded your Trip 35 with film rated between ISO 25 and 400, you’ll need to set the ASA/ISO dial to match your film speed . In general, ISO 100-400 films do best with this camera (a higher-ISO film works best in subdued light, and lower-iso film provides finer grain).
For automatic exposures, the ring around the lens closest to the camera body should be set to “A.” But manual exposures are possible at the constant 1/40s shutter speed (can be metered as 1/30s) with the apertures selected via the same ring (i.e., any number other than the “A”). Learn how to shoot film cameras in manual mode here .

I appreciate the bright frame lines with parallax markings in the viewfinder . They make framing feel a little easier than on cameras with masks . Though I would prefer the self-illuminating kind.
The viewfinder window is fairly small. It’s usable with the glasses on; however, I had to use contacts to take advantage of the “Judas window” — a small secondary view below the main finder frame lines that shows the set distance icon and camera shooting mode/aperture.
Pointing the camera at things that are insufficiently lit for the film ISO/ASA set on the camera would raise a small translucent red plastic flag and block the shutter button. This would not happen when the camera is in manual mode (i.e. when an aperture value is selected instead of the “A”).
Olympus Trip 35’s shutter button provides medium-high resistance, it has a long travel distance, and it’s very well-balanced with the rest of the body for shake-free hand-held exposures . The leaf shutter is also shake-free (though it feels a little loud for what it is ).
Trip 35 uses a zone-focusing system. For a casual photographer, it works by turning the focus ring around the lens until it clicks to either a single-person icon 👤 for portraits, a two-person icon 👥 for group portraits, a red “group-snap” icon ⍒.⍒ , or the mountains icon 🏔️ for landscape photos.
Below the lens barrel, there are more precise focus markings in feet and metres. Learn how to zone-focus quickly and accurately here .

Olympus D. Zuiko 40mm 𝒇2.8 lens.
One of the most celebrated components of this camera is its lens. It’s very sharp in the middle , especially at 𝒇5.6-8 , with only minor swirl and softening in the corners.

The lens renders a medium-low amount of contrast on my copy, but the coating appears to work well, as I noticed no overwhelming or unexpected flaring in any of my photos.
Overall, I found D. Zuiko 𝒇2.8 well-corrected, suitable for reproducing fine detail on high-resolution films.
The 40mm focal length is common and well-suited for a non-interchangeable camera system. It translates to ~57° diagonal angle of view — very close to the 60° in our central vision . Essentially, this means easy framing for most situations.
The 40mm D. Zuiko may not be appropriate for interior/architecture photography, close-ups, telephoto, or certain landscape images.

Olympus Trip 35 portability and ease-of-use (ergonomics).
Even though Trip 35 isn’t the smallest or the lightest 35mm film camera , it’s reasonably portable for the type of lens it uses and a full metal body. All of its controls are perfectly positioned for quick, intuitive action. With a little practice, you can use this camera one-handedly.
I kept mine in wool jacket pockets and hoodies with no issues. Despite fitting will in hand, Trip 35 is noticeably hefty; my Peak Design wrist strap solved any danger of dropping this camera.
Olympus Trip 35 build quality & variations.
Trip 35 was a remarkably successful design; understandably, Olympus didn’t want to change it much while it continued to make record sales. All of the Olympus Trip 35s look nearly identical, with some known changes introduced in the 1970s that had little effect on appearance and no effect on performance (i.e. a plastic shutter button instead of the metal one).
The only significant divergence from the standard design was the black paint brass Trip 35 , which remained in production for just two years. This variation is much rarer than the silver aluminum bodies, but in Olympus’ world, this means that there are less than a hundred options available at any time, and they cost $50 extra.
If you plan to keep this camera for a while and are willing to spend a little more, the black version may be worth it (if you like the look of brassing). It has excellent build quality and an impressive appearance; every part fits perfectly, in line with what you’d expect from the much more expensive Olympus PEN half-frame SLRs .

But despite their clever design and quality assembly, Trip 35s can be prone to deterioration.
In my copy, the light meter over-exposes every brightly lit frame by 1-2 stops. It’s difficult to say if it’s the time taking a toll on the intricate cells or if it’s the imprecise nature of the selenium metering that’s preventing me from taking perfectly exposed images.
A clever photographer can always compensate by setting the film ASA/ISO higher in full sun or shooting Trip 35 manually. But if you’re looking to get a copy, you should verify that the camera is sold as fully functional . An online listing would say that in the title or the description.
Trip 35 mods, hacks, and repairs.
Repairing Trip 35s may cost as much or more than the value of the camera. The good news is that simple fixes (like cleaning oil of the shutter and aperture blades) aren’t difficult if you’ve got the right tools and know-how.
Another common issue with cameras this old is the light seals. The soft, spongy material tends to crumble over time, which in turn can create light leaks . I have a guide on fixing that quickly and cheaply here .
Being a mechanical camera with manual controls, Trip 35s can survive past the span of the selenium cells that power its fully automatic shooting mode. Some photographers may prefer to use the camera in the manual mode for more precise control over exposure. You may even modify yours to shoot with the faster 1/200s shutter speed for improved action snaps and reduced motion blur.
How much does Trip 35 cost, and where to find one.
Olympus Trip 35 film camera is a fantastic value in terms of fun, image quality, and build quality. Most copies of these cameras can be bought between $20-120 — depending on the condition. And a few bucks more can get you the rare-ish black paint version .
❤ By the way: Please consider making your Olympus Trip 35 purchase using this link so that this website may get a small percentage of that sale — at no extra charge for you — thanks!
About this article :
It can take five hours of work (or more) to write and proof a quality five-minute read with high-res illustrations. Below are the people who made this one possible. All content is reviewed, styled, and edited by Dmitri .

- Camera Reviews
- Lens Reviews
- The CCD Sensor
- Mobile Photography
- Half Frames
- MarketPlace
Search ImagingPixel for Images by Camera or Lens
Olympus trip 35 35mm zone-focus film camera.

T alk about the essence of 'iconic' 35mm compact cameras of yesteryears, cameras that help bring photography to the masses, cameras that are as equally functional as it is easy to use, cameras that are automatic but do not require a battery to operate, cameras with super sharp f/2.8 lenses, and the Olympus Trip 35 is always the one camera that will come to mind.
The Olympus Trip 35 , a fully automatic viewfinder camera, is a point-and-shoot 35mm compact model manufactured by Olympus. It was introduced to the market in 1967 as a compact, functional camera for holidays, went on to become very popular among the masses, and sales ended in 1984 after a prolonged production run, with over ten million units sold.

The camera is fitted with a coated non-interchangeable 40mm f/2.8 D. Zuiko lens, acknowledged as being very sharp and capable of capturing high-quality images, and operates as a programmed automatic with only two shutter speeds, at 1/40th sec or 1/200th sec. at apertures of between f/2.8 to f/22.
SCL Photography Guide: The Olympus Trip 35 Film Camera A fresh look at an old classic, to get you shooting your old Trip 35 or perhaps to interest you in investing in this great little film camera. Includes guide to buying, checking, loading and shooting with the camera. Bonus flash guide at the end. Thanks, Rob.
A low-light lock, with a red flag indicator, prevents you from taking under-exposed shots or trying it with the lens cap on.
Production Models
The design of the camera is simplicity itself. Early production units of the Trip 35 are manufactured with a silver shutter release button, with a film ISO speed rating from 25 to 200. Later production units, manufactured after 1978, come with a black plastic shutter release and a higher film ISO speed rating of 25 to 400. The Trip 35 is also available in black, which is much sought after by collectors.

The lens and lens mount are located centrally on the front of the camera, with a viewfinder window on the right front of the top plate, and a flash sync socket on the lower left of the lens mount.

On the top plate are the rewind crank, housed in a nice recessed on the left of the top plate, the accessory shoe (located slightly off-center), the shutter release button, and on the right, the frame counter.

The Trip 35 comes with a plain film back, with only the viewfinder eyepiece and film forward wind at the back of the top plate. The hinge-type film back is opened by pulling down on a latch lever lock located on the film chamber side of the film box.

The bottom plate carries the tripod socket and the rewind release button.

The film box is Olympus easy-load type, with the film chamber, shutter frame window, film guide sprocket, and a multi-slot takeup spool laid sequentially from left to right. Film loading is the normal 2-blank shot to forward the film to frame 1.
Year of Production
If you are interested in knowing when your camera was produced, you need to open the film compartment, remove the pressure plate on the back of the door by sliding it free from its locating pins, and look for the 3-character manufacturer's code on the back of the pressure plate.
- The 1st character or letter (in later models) signifies the assembly plant.
- The 2nd number represents the last digit of the year of assembly, e.g. 6 = 1976, 0 = 1980
- The 3rd number or letter represents the month of assembly, 1-9 for Jan-Sep, X, Y, and Z for Oct-Dec.
For example: If the code reads N2Y, then the production was in November 1972
Viewfinder Readout
The viewfinder is an albada-type bright frame, with frame lines and parallax markings for closer focusing.

There is a second, very small window under this, nicknamed the "Judas window", which shows the current aperture setting and distance symbol which are on the lens barrel.
A small red flag will appear in the viewfinder if the auto-exposure mechanism decides there is not enough light and refuses to fire.
Film ISO Speed
The camera will accept films with an ISO speed, for later models, of 25–400. Earlier models, from the first few years of production, had a maximum ISO speed of 200. A hot shoe and a Prontor-Compur sync connector provide for flash photography.
Zone Focusing
The Olympus Trip 35 focuses manually with a simple four-position zone-focus system, with distance settings displayed on the top scale in graphic form, and a bottom scale calibrated in both meters and feet. Focusing distances are 1 meter, 1.5 meters, 3 meters, and infinity.

Shutter Speeds
In Auto Mode, the shutter speed is set to 1/200th sec, and exposure is automatically controlled by aperture opening, whilst in manual or flash sync mode, the shutter is set to 1/40th sec, and a range of aperture openings from f2.8 to f22 can be selected for the shot.
Battery Not Included
The Olympus Trip 35 is built with a solar-powered selenium light meter, and it does not need any battery for it to run and operate. It is ideal for both the new user just getting into photography or the seasoned operator who wants slightly better control over the aperture setting and zone focusing mode. An accessory shoe and flash sync connector provide for flash photography.
Using The Camera
As with a fully automatic point-and-shoot camera, be it a film or digital, the Olympus Trip 35 is easy and fun to use.

Aside from the need for a roll of film to be loaded into the camera, be sure to set the correct film speed (ASA) setting, by turning the ASA ring in front of the lens barrel so that the ASA speed is displayed in the small opening.
Set the aperture or F-stop ring to 'A' for Auto, and off you go.
For the zone-focusing part of the equation, give it a go at estimating the distance of your subject, or turn the focal ring graphic icons to match the subject of your composition, be a portrait or head-shoulder shot, a three-quarter height shot, a group shop or just a view of the land, sea or urbanscape.
Early Images
A friendly shop assistant showed off his antics.

Do remember to check the zone focus setting as you go on with your shooting assignment. On bright and clear days the 40mm f/2.8 lens can be very forgiving and will stay sharp most of the time, but when things get a little dark and the automatic aperture falls to below f/5.6 you will tend to get blurred images if the zone focusing distance is not just right.
Olympus Trip 35 Instructions: Click here to download from www.buktus.org
Vintage Camera Marketplace by ImagingPixel

4 comments:
She is nice in black, too, but I like the silver/black better ;-)

Others may not agree with you, but I do believe that the current film camera enthusiasts are more inclined toward the silver/blacks... thanks
Hey thanks for the article. You state that in Auto mode the shutter speed is set at 1/200 and with flash it's 1/40. In fact both shutter speeds are available in auto and it switches at a point around EV 12.5 from f11 1/40 to f5.6 1/200, depending on the available light. It'll shoot down to EV 8.5: 1/40 2.8 and almost up to EV 17: 1/200 f22 in auto mode. The available combinations are 1/40 f2.8-f11 and 1/200 f5.6-f22 and it looks to actually select third-stops across this range, or thereabouts. This can be seen by the needle trap mechanism - there is an armature to determine the shutter speed by how far the armature raises when the shutter is depressed; this engages at one of two different cutout heights with the meter needle (along with a corresponding stepped scale for aperture), depending how far the needle is deflected by the coil/selenium cell circuit. It's an ingeniously simple mechanism - and worth noting that even in the daylight, on a dull overcast day, your shutter speeds can easily be low enough to blur if you don't make an effort to steady the camera.
Thanks for the followup, great!
Popular on ImagingPixel


- Today's posts
- Search forums
- Popular Content Most Replied Threads Most Liked Threads Most Viewed Threads Most Liked Posts
- Forum Rules
- Analog Workflow Forums (100% Analog/Traditional)
- Analog Equipment
- 35mm Cameras and Accessories
Olympus Trip 35 question
- Thread starter David Lyga
- Start date Sep 25, 2020
Latest Gallery

A Lamp Shop, Downtown DC
- TheFlyingCamera
- Jun 4, 2024

A Glen Echo Carousel, Horizontal, Fisheye

A Hotel Harrington Sign

A Inside Idling Bus

A Idling Bus
Recent classifieds.
- Started by B.S.Kumar
- Yesterday at 8:54 PM
- Started by dirkfletcher
- Yesterday at 7:58 PM
- Started by Manual Camera
- Yesterday at 2:38 PM
- Yesterday at 2:32 PM
- Yesterday at 8:18 AM
Forum statistics

- Sep 25, 2020
I am not placing this in the RF section because ... it is not a rangefinder camera! However, I do have a question. When this camera is set at f2.8. the aperture opens all the way.... EXCEPT if I put the camera right next to a bright light bulb. Then, the meter seems to slightly override my 'bad' choice by closing the aperture down a bit. in other words, the f2.8 is not a definitive, absolute choice that the photographer is allowed to make. The meter comes into play in order to cut down the 'incorrect' exposure. If I cover the selenium meter, the aperture opens up fully. I never experienced a camera like this: obtaining the correct exposure, at all costs, seems to be of primary importance here, and Olympus does not want full manual, even with only aperture, to be a component of its operation. Do I err here? This camera was intended to be a fully automatic model and, as far as I can understand, the aperture choices are solely for accommodating the guide numbers for flash, nothing else. Or ... is my camera faulty with letting the meter have the final say? - David Lyga

Donald Qualls
If, as I recall, that Trip works essentially the same as my Pen EES-2, the aperture settings are only for flash use, and setting manual aperture locks the shutter to something like 1/40. The automatic aperture uses what's called a "trap needle" meter system, where a pair of serrated jaws close on the needle of a meter movement that's invisible to the user. It's possible that the meter needle might be swinging so far that the needle trap is catching on it even when it's supposed to be ignored. Otherwise, there may be something slightly out of adjustment in your camera. BTW, thanks for mentioning this; it got me to look at my Pen and discover that the aperture is sticking again. Guess I'll have to look up the instructions, open it up, and clean it again. Pretty annoying -- every ten or fifteen years, you'd think this was delicate equipment or something.
Donald Qualls said: If, as I recall, that Trip works essentially the same as my Pen EES-2, the aperture settings are only for flash use, and setting manual aperture locks the shutter to something like 1/40. The automatic aperture uses what's called a "trap needle" meter system, where a pair of serrated jaws close on the needle of a meter movement that's invisible to the user. It's possible that the meter needle might be swinging so far that the needle trap is catching on it even when it's supposed to be ignored. Otherwise, there may be something slightly out of adjustment in your camera. BTW, thanks for mentioning this; it got me to look at my Pen and discover that the aperture is sticking again. Guess I'll have to look up the instructions, open it up, and clean it again. Pretty annoying -- every ten or fifteen years, you'd think this was delicate equipment or something. Click to expand...
That's exactly what I have with my Pen -- two aperture leaves, forming a square opening, and are at f/22 when at rest. Push the shutter release, and the leaves open until the meter needle stops them. There's a cross-over, IIRC when the auto aperture goes below f/8, where the shutter slows down instead of two stops of aperture. My Minolta 16 Mg has the same setup, except the setting is fully manual on a match-needle basis; you can actually hear the shutter pallet enable when you move the exposure dial past the cross-over. You don't get to hear it in the Trip or Pen because any time you manually set the aperture, you're locked at 1/40 for flash. You're supposed to use that only for guide number exposure with a fixed-power flash (would have been a bulb when these came out). If Maitani had designed an exposure limiter into that meter/shutter/aperture set, it would have greatly complicated the simple device. And how much difference will it really make if the meter limits you to only f/4 at 1/40 in full sun on a snow field (probably overexposing by seven stops or so), vs. f/2.8 at 1/40 (overexposed by a full 8 stops)? It's just a surprisingly simple mechanism that normally works very well, acting up at an edge case, giving unintended behavior in an extreme condition.
- Oct 8, 2020
How the Trip sets speeds: Among many other functions, there are two arms operated by the release slide. The rear arm has two wide steps beneath the meter needle, one for high speed and one for low. The other arm has -- lots of little steps, in two groups corresponding with the two steps of the first. Briefly, as the release slide is pressed down, it will allow these arms to rise up, the rear one trapping the meter needle. Depending on the position of the needle, it will halt the motion of the first arm on either the higher or lower step. The next arm will then rise, stopping when it's tiny steps reach the needle. How high this second arm rises will determine the aperture. On the underside of the upper portion if the shutter mechanism is an inertia retard. If the needle is "low", it will stop the rear arm on it's higher step, and the inertia retard will intercept the mechanism that opens and closes the shutter blades, briefly delaying their operation, delivering "slow" speed. If the needle is "high", it will stop the rear arm on it's lower step, allowing the arm to rise up further. In doing so, it will allow an arm on the back of the shutter mechanism to push the inertia retard away from the mechanism that operates the blades. As a result, the mechanism will allow the shutter to function unimpeded at it's fastest speed. Aperture function: On the back side of the aperture ring (the ring with the red "A" for auto and black manual aperture settings) is attached a cam that is designed to intercept the rear arm described above. When setting the aperture ring on the black settings, this cam should block this arm from rising, thereby preventing the camera from delivering it's faster shutter speed. BUT the cell and meter are not disabled -- the needle will still respond to light, and should the camera be used in adequately bright light, it may deliver an aperture one or more stops smaller than that set on the dial (down to about f5.6 or so by my eye in daylight conditions/high ASA), but will still only deliver the slower shutter speed. As noted on the dial, the black settings are "for Flash", under the assumption that the camera is being used in low light conditions. Why was the camera made without a mechanism to disable the meter when set on fixed apertures intended for use with flash? I can only imagine cost!
- Oct 9, 2020
crumbo said: How the Trip sets speeds: Among many other functions, there are two arms operated by the release slide. The rear arm has two wide steps beneath the meter needle, one for high speed and one for low. The other arm has -- lots of little steps, in two groups corresponding with the two steps of the first. Briefly, as the release slide is pressed down, it will allow these arms to rise up, the rear one trapping the meter needle. Depending on the position of the needle, it will halt the motion of the first arm on either the higher or lower step. The next arm will then rise, stopping when it's tiny steps reach the needle. How high this second arm rises will determine the aperture. On the underside of the upper portion if the shutter mechanism is an inertia retard. If the needle is "low", it will stop the rear arm on it's higher step, and the inertia retard will intercept the mechanism that opens and closes the shutter blades, briefly delaying their operation, delivering "slow" speed. If the needle is "high", it will stop the rear arm on it's lower step, allowing the arm to rise up further. In doing so, it will allow an arm on the back of the shutter mechanism to push the inertia retard away from the mechanism that operates the blades. As a result, the mechanism will allow the shutter to function unimpeded at it's fastest speed. Aperture function: On the back side of the aperture ring (the ring with the red "A" for auto and black manual aperture settings) is attached a cam that is designed to intercept the rear arm described above. When setting the aperture ring on the black settings, this cam should block this arm from rising, thereby preventing the camera from delivering it's faster shutter speed. BUT the cell and meter are not disabled -- the needle will still respond to light, and should the camera be used in adequately bright light, it may deliver an aperture one or more stops smaller than that set on the dial (down to about f5.6 or so by my eye in daylight conditions/high ASA), but will still only deliver the slower shutter speed. As noted on the dial, the black settings are "for Flash", under the assumption that the camera is being used in low light conditions. Why was the camera made without a mechanism to disable the meter when set on fixed apertures intended for use with flash? I can only imagine cost! Click to expand...
David Lyga said: Based upon my taking this camera apart (and soon selling it for $20) I must state that all you have said is not only true but masterfully written. I saw all those things and wondered how it all went together. Now I know. And one of the best points you mentioned was the fact that just because you manually set an aperture, that does NOT mean that that setting is strictly manual. Yes, if there is an abundance of light, the aperture will close down further, again to mitigate the potential of too much exposure with flash. It is an instrument meant for people who would rather not think too much. Its lens is spectacular. - David Lyga Click to expand...

- Oct 10, 2020
Interesting site for tinkerers who like to modify their Trip 35 ... http://s3.amazonaws.com/idarmethod/TopFolder/TripIndex.html An English friend and photographer did some remarkable stuff with his (not tinkered - but CLA'd) Trip 35's. https://www.flickr.com/photos/ajweller/albums/72157661904273834
Chan Tran said: Not think too much??? Didn't it actually made you think a lot before asking the question here. It drove you crazy as to why it does what it does. Click to expand...

- Oct 16, 2020
macfred said: Interesting site for tinkerers who like to modify their Trip 35 ... http://s3.amazonaws.com/idarmethod/TopFolder/TripIndex.html Click to expand...
- Oct 17, 2020
crumbo said: Cut this, bend that.... Having repaired countless 100's of these in my Olympus career, this is like fingernails on a chalkboard to me! Click to expand...

- Dec 6, 2020
Hi everybody, this would be my first entry here! Seeing some wise people in this thread while searching for solutions for my meter problem I thought I ask here =) I got my second Trip 35 along with some other worn cameras. First I thought the meter was all dead but with further investigation I found the meter somewhat works but it requires a lot of light to fire, like setting the ISO to 400 or 200 and point it at a bright sky. Anything with less light than that makes the red flag to pop. Looking at the meter needle under the top plate I can see it's moving when flashing a LED light on it, but only approx. 1/4 or 1/3 of the way. Never to the middle. Lowering the ISO setting makes the needle move even less. I can gently push the needle all the way to the left with a tweezer so it doesn't seem stuck. Also, the aperture blades seem snappy. For me it seems like the meter is working but is slow and tired... What are your thoughts? Are the selenium cells failing? Or could it still be a problem with the aperture blades?.
The Trip (like my Pen EE-S2 half frame) uses a "trap needle" metering system -- the aperture blades are coupled to a pair of blades that close on the meter needle. They should normally start fully closed (aperture will be a tiny square opening, visible through the lens because it's in front of the shutter) and open until the needle traps. If you don't see this happening from the front when you press the shutter release, the aperture blades need cleaning (this is a very common problem with Olympus cameras in this family). That, however, won't prevent the meter needle from moving. With a strong light and ISO set to minimum, it should be possible to see the meter needle approach full deflection. If that's not happening, it's likely your selenium cell is tired. The bad news is, new selenium cells are almost impossible to obtain, and if you got one you'd need to calibrate it in the camera by installing an oversize one and then covering larger and larger fractions of the cell until the meter gives correct exposure -- with a Trip that might require fully reassembling the camera multiple times as you adjust the cell's exposed area (though black tape over part of the exposure window should also work). The camera can be operated manually, by setting to flash mode and changing aperture with the ring, but that locks you to slow (= 1/40) shutter. There's a modification page that tells how to convert to "gravity controlled" shutter speed switching -- hold the camera with the viewfinder above the lens (either horizontally or vertically) for one shutter speed, and below the lens (upside down) for the other. Annoying, but it does work and allows manual control (choice of 1/200 or 1/40 plus all apertures) at the expense of permanently disabling automatic exposure.
Donald Qualls said: The Trip (like my Pen EE-S2 half frame) uses a "trap needle" metering system -- the aperture blades are coupled to a pair of blades that close on the meter needle. They should normally start fully closed (aperture will be a tiny square opening, visible through the lens because it's in front of the shutter) and open until the needle traps. If you don't see this happening from the front when you press the shutter release, the aperture blades need cleaning (this is a very common problem with Olympus cameras in this family). Click to expand...
Don't completely give up -- there was a fellow in Russia a while ago who was selling replacement sells (made for Kiev 3, 4, and 4M meters, IIRC), new old stock, and some have turned up in other places from time to time. I've also heard of people installing a silicon photocell with some extra bits to correct the voltage curve.
- Dec 7, 2020
As I see it, the gravity shutter speed mod is mainly aimed at automatic cameras that are rendered shelf-sitters by a bad selenium cell. I quite like the automatic operation of my Pen EES-2. bit of the meter cell were bad, and there was no practical way to replace the cell, I'd rather convert some kind of manual shutter speed control than be locked at 1/40 as soon as I assume manual aperture control.

- Apr 26, 2024
Hi gang, sorry to raise the dead! I’ve got a pen ees2 and have come across this thread based on my search. Essentially can see the aperture, when set to 2.8, seems to only open maybe 75% of the way sometimes. I was thinking fault but i can see that when set to iso 200 or below it is always wide open, but above it seems pot luck if it open all the way or not Am I right from this thread that this is almost an “override” where the camera is saying “hang on mate, I know you want manual but this will overexpose this pic” or is it a fault somewhere The fact is seems to be at higher iso make me *hope*’it’s the former
I recently came across this thread for the same reason (re: my Trip 35). Another way you could verify it is cover the light meter and observe the aperture and whether it opens fully or not.
radialMelt said: I recently came across this thread for the same reason (re: my Trip 35). Another way you could verify it is cover the light meter and observe the aperture and whether it opens fully or not. Click to expand...
- Apr 27, 2024
I have not tested all of the numerous Pen E half-frames, and there may be differences between each of them and the Trip 35 as well, but reading the manuals that I've seen, the f-stop ring is only for flash use, which fixed the shutter speed (usually 1/30) and the f-stop should be what you set it at -- assuming the camera is working correctly. Unlike in the non-flash mode where the shutter speed is adjusted according to the film speed, and the f-stop according to the ambient light, in flash mode, the shutter speed is fixed, and the aperture has to be fixed according to the GN of the flash. Otherwise the exposure could be WAY OFF.
There is a quirk in the Trip 35: If you set it to an f-stop and use it in bright light, the f-stop you get might be larger (smaller aperture) than what you set. But the shutterspeed will be fixed at about 1/40. If you want to use manual f-stops outdoors, either cover the selenium cell or set the ASA as low as it'll go.
Checking the Trip 35 manual indicates that it works like the other Pen E half-frames. In AUTO mode, the shutter speed is either 1/40 or 1/200 -- set by the film speed -- and the meter sets the f-stop according to the available light. When using a flash, the aperture is set manually (according to the GN of the flash and distance to the subject), and the shutter speed is set at 1/40. If your aperture is not what you've selected, I can only conclude that something is not working correctly. https://www.cameramanuals.org/olympus_pdf/olympus_trip_35.pdf
- This site uses cookies to help personalise content, tailor your experience and to keep you logged in if you register. By continuing to use this site, you are consenting to our use of cookies. Accept Learn more…
- 42mm Lenses
- Camera Reviews
- Film Cameras
- Japanese Cameras and Lenses
- Rangefinder Cameras
The Olympus 35 SP – Ansel Adams’ Point and Shoot?
Cory miller.
- August 16, 2019

Come with me on a loosely-historically-accurate trip, dear readers. The year was 1969. Yoshihisa Maitani’s maverick team of designers and engineers were up to their old tricks of changing the camera game forever. In April, Olympus released their newest creation, the Olympus 35 SP . Coming down from the Summer of Love in ’67 and heading straight for Woodstock in August, the little Olympus was groovy, baby; it even had fluorescent painted guide numbers and focus distance so you could read your flash settings under the black light of said psychedelic venues.
1969 wasn’t all about peace and love though; there were big things happening in the world (and on the moon). Neil and Buzz took the first steps on the lunar surface (Hasselblads in tow), Burt Reynolds was no doubt swooning over the newly-released Trans Am, The Beatles broke teeny boppers’ hearts the world over with their last public performance, both the Boeing 747 and Concorde jets made their first flights, and somewhere in the Sierras a sixty-seven-year-old Ansel Adams had an aching back…
What? Stay with me here, folks. The veritable O.G. of landscape photography was getting a little long in the tooth to be going on his vertical adventures up steep switchbacks with a full 8 x 10 kit in tow. By 1943 he’d gone mobile, capturing grand vistas from atop the rooftop perch of his woody station wagon. But suppose he felt game for a little altitude? What camera would afford him the use of his famous Zone System in a compact and back-saving weight? May I present Ansel Adams’ point and shoot, the Olympus 35 SP.
")
The 35 SP was preceded by the lesser-known 35 LE (auto only) and 35 LC (manual only) released in 1965 and 1967, respectively. Produced from 1969 to ’72 the 35 SP is without question the crown jewel of the lineup. It retailed for an original price of 24,800 yen ($229.67) or 88,367 yen ($818.37) adjusted for inflation. It was followed by the 35 SPn in 1972 which added a battery check light and some cosmetic changes and finally the 35 UC in 1973 which had even more cosmetic changes. All of these cameras share the same fantastic lens: the G. Zuiko 42mm f/1.7, which consists of 7 elements in 5 groups in a double-Gauss design. It has virtually no distortion and is sharp at all apertures, even the very useable f/1.7 maximum speed.
The cameras that followed like the Olympus RC and Olympus RD , although much smaller in size, did not come close to the 35 SP in terms of lens quality or features.
So what makes the 35 SP so great? Opening the manual, Olympus congratulates us on owning “the finest rangefinder 35mm camera available today” and promises if we read the instruction manual thoroughly and carefully, our efforts “will be amply rewarded.” Marketing hype aside, the 35 SP was (and remains even fifty years later) the only 35mm rangefinder with the combination of spot-metering, center-weighted metering, and spot metering in automatic exposure mode.
My copy was recently overhauled, and using it is pure haptic bliss. Focus is achieved with a lever on the side of the lens that moves with perfect fluidity through its short throw allowing focus from a near 0.85 meters (2.8 feet) through infinity. The 0.7 magnification viewfinder is bright and contrasty with a well-defined rectangular rangefinder patch in the center. This patch also serves as a representation for the spot meter reading area. At the top of the viewfinder, the meter needle swings along an E.V. scale from 3-17. In automatic mode, the meter needle moves continuously in response to changing light unless the exposure is locked by half-pressing the shutter button.
")
Shutter and aperture are selected via a trapped-needle mechanism similar to the venerable Olympus Trip 35. All this results in a long, but smooth range of motion for the shutter button as the meter needle is trapped by a plate, which then actuates a cam that determines how much the aperture opens. The automatic mode favors stopping down the lens in bright light and open apertures in low light. The minimum manual aperture is f/16, but the camera will stop down to f/22 in automatic mode if the meter reads E.V. 17 or higher. There is a distinct “shoulder” at the bottom of the shutter pull that lets one know precisely when the shutter will fire. The Seiko leaf shutter is certainly quieter than an SLR. The film advance is another tactile pleasure: it extends 30 degrees away from the back in its stand-off position and then whips through it’s short 120 degree throw to ready the next frame.
Cosmetically, the 35 SP is a very handsome camera. Its satin chrome finish, black leatherette, and minimalist design exemplifies the timeless look modern manufacturers still try to emulate today. The viewfinder window is framed a-la-M3 and the large front element of the lens, with its purple and brown hued coating, hints at the technical abilities that lie beneath. The top plate is a wonderfully simple affair with the film rewind crank, hot shoe, shutter release, and advance lever. The frame counter is easy to read and accented by a flash of orange from the familiar Olympus indicator arrow. The back of the camera contains only the eyepiece and spot meter button which conveniently falls below the right thumb. Finally in a welcome departure from Leica bottom loaders, the film back swings open and is actuated by a recessed tab on the bottom left corner of the camera.
Unfortunately, no camera is perfect including this child of the ’60s. The single greatest annoyance I experienced with this camera is the location of the strap lugs. The camera designers chose to place them at the top of the leatherette presumably to keep the chrome top cover uncluttered, but this results in a top-heavy center of gravity. The camera constantly tips backward, digging its top plate into my body. Because 95% of my shooting includes my dog on a leash, a wrist strap is not an option for me. I’m sure Ansel would have wanted his hands free when scaling granite monoliths too.
Another design flaw is the lack of a power switch. Consequently, the meter is always on. The CDs cell consumes more power with increasing light so the camera must be stored in its case or a bag when not in use. I was fortunate to find an original case for cheap, but they regularly sell for $50 or more on popular auction sites.
Another feature missing is a depth of field scale on the lens making this a less than ideal choice for street shooters. Although the focus throw is very short and focus is quick and easy, nothing is faster than zone focusing.
While the inclusion of a spot meter is perhaps this camera’s greatest asset, I do wish its view were a bit narrower. The area encompassed by the rangefinder patch represents a field of view of six degrees. Dedicated spot meters have a one-degree spot, which allow the user to more accurately meter a specific part of a scene. Another criticism of the meter is that the CDs cell is in a window lateral to the viewfinder instead of through the lens or within the filter ring. This means that if using filters, one must adjust the ISO to account for the filter factor.
")
[ Sample images shot on Kodak TMAX 400 and Portra 400 . TMAX shot at EI 400 and developed in XTOL 1+1. Portra also shot at EI 400. Scanned on a Pakon scanner with the exception of the included darkroom prints. ]
")
The big elephant in the room for cameras of this vintage is the battery issue: they were originally designed for the now banned PX625 mercury cell that seemed to last forever and emitted a steady 1.35 volts until it died. This creates problems for us today particularly when our aim is precision metering when practicing the Zone System. I recommend staying away from alkaline batteries as their voltage gradually and continually decline throughout their life. Silver Oxide cells maintain a much steadier 1.55 volts, but the resulting meter error is not linear; it increases with increasing light intensity. Wein Cells are zinc/air batteries that put out a correct 1.35 volts and are a good option, but tend to die more quickly than other battery types.
The cheapest option is to use 1.4 volt hearing aid batteries which are zinc/air and put out a steady voltage which is supposedly closer to 1.35 than 1.4, but they require a spacer of some type due to their smaller size. The MR-9 adaptor steps down the voltage of modern batteries to 1.35 volts and when combined with the steady output of silver oxide cells is perhaps the best, albeit most expensive option. As mentioned previously, my 35 SP had been overhauled and the meter tuned for modern batteries. When using standard silver oxide cells, the camera’s meter matches my Pentax Digital Spotmeter with surprising accuracy.
Zone System Metering
At this point, you may be wondering why I’m seemingly obsessed with spot meters or why my fictionalized version of Ansel Adams would have chosen the 35 SP as his compact companion. Simply put, spot meters open up the vast universe that is Zone System Metering.
And before your eyes simultaneously roll and glaze over, I promise the Zone System can be as simple or complicated as you want it to be. A working knowledge of this metering method can help you do something as simple as have your winter shots turn out with white snow instead of gray all the way to knowing how to tweak your processing to reign in or increase contrast. If you are interested in learning how to master this metering technique, check out my multi-part series surrounding the Zone System here.
We are incredibly fortunate to be living in what I consider to be the modern golden age of film photography. Whereas the casual photophile of yesteryear would have to shell out all his or her pennies to acquire a single camera, we are the beneficiaries of the magic of depreciation. The film geek of today is blessed with an enormous selection of professional level gear at rock bottom prices. We can buy multiple cameras to try with the confidence that we will not lose money on them when it comes time to sell.
This is a blessing and a curse. I firmly believe that each photographer must try many different types of cameras in order to arrive at the features best suited to their personal style and technique. This is the reason the question, “what is the best camera” is impossible to answer for another person. The downside is that a lot of us, myself included, have likely found ourselves focusing more on the gear itself than the actual taking of photographs. When we find ourselves in this predicament, it’s important to take stock of what we actually need or gain pleasure from using and let the other stuff go to someone else. Who knows, we might even turn a profit!
")
Throughout my own journey, I have discovered I am much more partial to SLRs for my own style of shooting. I like to be able to see my composition exactly including the depth of field. I also like to be able to see the actual field of view of my lens whether normal, wide, or telephoto.
I have never considered myself a rangefinder guy, but not for a lack of trying. I’ve owned three different Leica M bodies and sold them all. In addition to the reasons above, I’m a left-eye shooter so the whole focus with both eyes open and watch what is entering the frame thing never worked for me. I honestly never saw an advantage over a basic mechanical SLR for how I like to shoot.
But the 35 SP has changed my opinion of rangefinders. The lens performs incredibly well with edge-to-edge sharpness and no distortion. I find 42mm to be a very comfortable and useful focal length for normal shooting. I love that I can shoot fast in automatic mode or take my time in manual. The fact that the spot meter works in automatic mode is a game-changer and allows lightning fast metering for the highlights or shadows. The camera accomplishes all of this in a compact and lightweight package, and it looks great doing it.
While I still am prone to the binge and purge method of camera collecting, I think I’ll hang on to this one at least for a while. My Nikon’s still serve as everyday shooters and medium format is my choice for portraits and methodical landscapes, but the 35 SP fills a different niche. It’s an ideal choice for hiking or traveling when a balance of weight and performance is key.
The next time I’m in Yosemite, I’ll take it up the Mist Trail past Vernal and Nevada falls in a symbolic pilgrimage to old Ansel. I’ll stand on the Diving Board and look down at the valley floor some four thousand feet below my boots. I’ll slap on a red filter and shoot the Monolith like I’m sure thousands have in the interim between Ansel’s shutter squeeze and my own. Back on the ground, I’ll admire the real thing in the Ansel Adams Gallery and admire the little 35 SP, glad that it was much lighter than a glass plate camera. I bet my back will still hurt though.
Buy your own Olympus 35 SP on eBay
Buy one from our own f stop cameras.

Follow Casual Photophile on Youtube , Twitter , Facebook and Instagram
[ Some of the links in this article will direct users to our affiliates at B&H Photo , Amazon , and eBay . By purchasing anything using these links, Casual Photophile may receive a small commission at no additional charge to you. This helps Casual Photophile produce the content we produce. Many thanks for your support. ]
Share this post!
- Click to share on Facebook (Opens in new window)
- Click to share on Twitter (Opens in new window)
- Click to share on Reddit (Opens in new window)
- Click to share on Pinterest (Opens in new window)
- Click to share on Tumblr (Opens in new window)
- Click to email a link to a friend (Opens in new window)
- film camera

Cory Miller is a hospital pharmacist and film evangelist. He lives in central Ohio with his wife and photo assistant/chocolate lab. Photography serves as a stress relief and creative outlet combining his love for science and art. His current obsessions are making silver prints in the darkroom and exploring the zone system.
21 comments
Love the article! One question, where did you get your 35SP tuned and revised? Thank you!

Glad you enjoyed the article, Emilio! I got it from the fine folks at Blue Moon Camera. They also repair cameras if you have one in need of service

Great article, great photographs. It is a lovely thing to find a camera that’s an unexpected pleasure to shoot.
Coming from the other end, the SLR has never really appealed to me. Yet, it would be foolish of me to ignore the advantages over a rangefinder in certain situations. Fortunately, I stumbled upon another one of Maitani’s gems, the OM-1, which has been an absolute joy to use. So, it turns out you and I (and Ansel) have something in common.

Just started shooting with my dream camera an OM 2. I love it!
Hey Alex, thanks for the kind words! The OM-1 is a winner for sure. All of us here at the CP are big fans of Maitani’s work

Great article, thanks. Having been a Minolta fanboy since the early eighties I just recently started looking for a rangefinder. After looking at the 7SII I was less than convinced that it was the best choice. A couple of reviews on the 35SP later and I took the plunge into what is a fantastic little camera. I’ve only put a couple of rolls of Ektar 100 through so far but the results are amazing. It’s a great camera and that lens delivers outstanding images. I think these are still a bit of a hidden gem.

Thank you for posting this. I found it a really interesting article and the photos are good from this camera. I completely get the dog walking thing whilst trying to take photos since my dog is with me most of the time 🐶🐾

Thanks Natalie! Having a dog is a great way to get some exercise and make photography a part of your daily routine!

I tried the SP for a few weeks, it didn’t really do it for me. I think the build quality isn’t that great, on mine the spot meter button fell out and the rangefinder misaligned very easily. It’s a consumer model after all, you can’t expect pro build quality. But there is no denying that it takes nice photos, that lens is great.
The whole SLR vs. RF thing is something I struggle with too. I like SLRs for their versatility and robustness, but focusing is so much harder compared to a rangefinder patch. I feel like I spend most of my time with SLRs trying to align the split prism and even with great effort, half my shots come back unfocused. What’s crazy is, I’ve had people tell me the exact opposite of my experience, they sold their Leica M7 in favor of a compact SLR because they can’t live without a split prism, something that both baffles and infuriates me.

The same happen to me, the button fall off. I was wondering is i should cover the whole with tape ?

Bah… Noisy film advance,the noisiest shutter among all leaf-shutter rangefinders I’ve used, faint patch on all three copies I’ve had (most important attribute in a RF camera for me), no DOF scale, battery drains constantly unless in a bag (bye-bye candid street shots), need to adjust exposure when using a filter, silly full-auto mode (shutter-priority with aperture info in the viewfinder makes much more sense) and rather on the big side. The lens is really great, but you can get it on the much less hyped 35LC which is a much more straightforward camera to use, esp. since all three of my copies have a bright, contrasty RF patch. A Canonet GIII is a much better user camera than the SP in every respect with an equally competent lens, the spot meter feature in a rangefinder feels more like a marketing gimmick to me, or just one of Maitani’s exercises in pushing camera technology a bit further.
Thanks for sharing your experience, Christos. My copy doesn’t suffer from the issues you mentioned probably because it’s been serviced, but I do agree with you about the battery drain issue and lack of focus scale on the lens. For me, the spot meter is the greatest attribute of this camera and like I said in the article, everyone has different wants or needs from a camera.

An absolutely brilliant review of the 35SP – Much better than the one I posted on the internet back in 2002.
Wow, it is rare to find someone who is even aware of whether a camera has a trapped needle exposure mechanism. It does increase the amount of travel on the shutter release, but one should slowly press the release on any camera to avoid camera shake. – This is a superb fixed-lens rangefinder camera that still has one foot firmly planted in the late nineteen fifties and another in the sixties. – * EV light meter is reminiscent of the LV system in use by the end of the 1950’ies. * For a compact 35mm RF it is on the large side, typical of post 1959 fixed-lens RF cameras. * Yeah, I miss the zone focusing scale, which was typical of post 1965 fixed-lens RF cameras. – With regards to the big elephant, an MR-9 adapter for a 675 Silver Oxide cell is the best do-it-yourself option for a battery to power the meter. – Yes, the power is always on except for when the camera is cased. – If you don’t have an original case, a LowePro Z-30 camera pouch will do the trick. Even in total darkness the camera draws about a 20 micro amp current from the battery, because there will be a small bit leakage from CdS photocell, which acts as a variable resistor in what is very simple circuit comprised of 3 resistors and an old school galvanometer. – Most fixed-lens 35mm rangefinder cameras will completely shut off the meter, when the aperture is selected manually. The 35SP is one of two fixed-lens 35mm cameras that I’ve used that allow the use of the meter in the manual mode. The other was an older Minolta 7, with no S. On the Minolta 7 sliding the ASA selector all the past ISO 25 – would shutter the meter aperture, hence turn off the camera. – I rambled on too long. It’s a not camera for every photographer, but the lens along is worth the purchase price.
Hi Andrew – The other fixed lens compact that allows metered manual is the Konica S3/Revue SE 400. By sliding one of those plastic or wooden ‘hotshoe filler uppers’ that you can buy online the camera goes into flash mode and allows you to set aperture with the flash guide ring on the lens, there’s even an extra needle that pops up in the VF.
Thanks Olivia – it sounds like you tricked the camera to do a manual mode.

It’s quite easy to add a DoF scale. I used a blue plastic sticky tab, the sort you use for tabbing textbooks. You just need to look up a DoF table online and use a ruler to mark out lines on the sticky tab, and it fits perfectly on the lens barrel between the focus and aperture ring. Works great for me, don’t think I’ve ever had a shot out of focus with my 35 SPN.

The Olympus LE and LC indeed have 42mm F1.7 lenses, but they are “F-Zuiko” with 6 elements and not eh 7-element “G-Zuiko” of the SP.
Correction: The Olympus 35 LC was most definitely fitted with 42mm f/1.7 G. Zuiko lens. G. Zuiko signifies 7 elements. Take a peek at this link – https://flic.kr/p/24uV4M9

You are quite correct Andrew. Here is a page from the instruction book that shows quite categorically the lens on the LC has 7 elements. I have paid Mike Buktus $5.00 as a thank you for the book. SPECIFICATION Lens : G Zuiko F 1.7 f=42mm (7 elements in 5 groups) Shutter : Copal 1 to 1/500sec. and Bulb; built-in self timer; X contact synchronization Viewfinder : Bright frame viewfinder (magnification, 0.6) with correct exposure indication and fully automatic parallax correction. Loading : EL System (easy loading procedure) Film advancing : Lever type single stroke advancing; preliminary lead angle, 30″; advancing stroke angle, 128″; self-cocking; double exposure prevention Film counter : Exposures counting type ; self-resetting Film rewinding : Crank system ; rewind button setting type Focusing : Superimposed double image system ; single-lens geared rangefinder; direct advancing helicoid system; distance scale, 0.85 (2.7ft)-infinity Exposure adjustment: (cadmium sulphide), CdS/light meter; zero method Sensing cell: CdS type with mercury battery (1.3V) for power source Measuring range: EV3-17 Film speed scale: ASA 800, 400, 200, 160, l00, 80, 64, 40, 32, 25, 16, l0. Rear cover operation: Hinge type; “Magic” locking Accessory shoe: Cordless flash contact Size, weight: 138 (width) x 80.8 (height) x 69.5(depth)mm: 660gr
http://www.butkus.us
Thank you for your article on the Olympus – 35 SP. It was very informative. I live in Northern Ireland and was visiting my daughter in Oxford, England. I decided to bring my Pentax P30T that had a 50mm f/1.7 lens. I had never been in Oxford so did a walking tour based on places associated with C. S. Lewis. The results from the Pentax were very satisfying but I found the SLR to be bulky and not as handy to carry. I’ve always enjoyed 35mm rangefinder cameras and the Olympus was the camera I so wanted to own but the prices on eBay were so high. I deal with a company near Inverness and had kept looking on their website for a nice rangefinder camera at a sensible price. It took a while but an Olympus – 35 SP complete with case was being advertised at £99.00. I traded my Pentax for it and have it loaded with a roll of Kodak Ektar 100. I’m looking forward to some decent weather to get out to use it. It’s a perfect companion for my Kodak Retinette 1B.

As some have said in the comments, the SP is not for all. However, I think the LC would suit far more users. The lens is identical, the meter is a push button that doesn’t drain without use, the CdS sensor is around the lens – filters are compensated for and fingers don’t bork exposure readings. I found one in great condition for very little money a few years ago and was very happy with the results: https://www.flickr.com/photos/nickant44/albums/72157632652717685
Leave a Reply Cancel reply
New york city and the half-frame 35mm olympus pen d, olympus xa2 – point and shoot 35mm film camera review, the curse of the hasselblad xpan.

IMAGES
VIDEO
COMMENTS
Load a roll of 400 or 800 speed film, set the ASA to 400 and the aperture to it's widest setting of 2.8, and you're ready to go. That's all there is to it. If the scene is too bright for the set aperture of 2.8, don't worry, the Trip's meter is still active in flash mode and will stop down the aperture to prevent overexposure.
The Olympus Trip is really easy to use, and has some cool features that set it apart from other point and shoot 35mm film cameras. Zuiko coated 40mm f/2.8 lens: this lens is sharp, and the wide aperture makes it versatile in a lot of situations. Automatic settings: the Olympus Trip has two shutter speeds and aperture from f/2.8 to f/22.
First and foremost, the Trip 35 might just be the perfect camera for the casual photophile. Olympus built this camera to document the daily adventures of the everyman, and the Trip does this beautifully. And for experienced shooters, the Trip 35 can be a great way to break free of shooter's block, or inject our shooting with something fun and ...
The Olympus Trip 35 has two settings, one is an automatic setting that chooses your aperture and shutter speed for you, it decides between a shutter speed of 40 and 200 and between apertures of 2.8 and 22. Alternatively, you can decide the aperture and the shutter speed will be decided by the camera. All focusing is manual and all ISO needs to ...
1 Setting the Camera to Manual System. 2 Loading the Film. 3 Engaging the Film End with the Take-Up Spool. 4 Before Closing the Rear Cover. 5 Checking the Film Counter. 6 ASA Film Speed Setting. 7 Setting the Camera to Auto System. 8 Focusing. 9 Composing the Picture and Releasing the Shutter.
How to Take Photos with the Olympus Trip 35: Step 1: Ensure the camera is wound on. This gets the shutter ready and primed to take a photo. Step 2: Set subject zone focus distance on the lens. The Olympus Trip 35 has 4 settings which equate to focusing zone distances away from the camera (shown on the underside of the lens barrel):
This video is a complete walkthrough of the Olympus Trip 35 Camera. It covers everything you need to know about the camera including everything listed below:...
Today, I'll be reviewing the Olympus Trip 35. Its sharp lens, automatic settings, and small portable design makes this camera ideal for anyone looking to get...
With the camera set to 'A', based on the light hitting the meter it will choose the most appropriate aperture between f2.8 and f22. It will also choose either 1/40th or 1/200th for the shutter speed. If the amount of light isn't adequate for at very least 1/40th and f2.8 it will simply prevent the photo from being taken.
The sun made the colours gorgeously rich and saturated which along with the wonderfully sharp Zuiko lens helped capture that summer perfectly. The simplicity of this camera is a joy. Its automatic exposure means you only have to worry about choosing the correct distance setting, which frees you to concentrate more on composition and subject ...
Not quite a rangefinder, the Olympus Trip 35 is a compact 35mm camera with auto-exposure and a selenium-cell light meter. The black model was only made for two years, early in the production run. (Daniel J. Schneider) I didn't just stumble on the Olympus Trip 35. I knew all about its excellent reputation as a sharp, simple camera with a good ...
Olympus TRIP 35 Pdf User Manuals. View online or download Olympus TRIP 35 Repair Instructions, Instructions Manual. Sign In Upload. Manuals; Brands; ... Setting the Camera to Auto System. 5. Focusing. 6. Composing the Picture and Releasing the Shutter. 7. Rewinding the Film. 8. Flash Photography. 9.
Here are the specs for the Olympus Trip 35 you probably know them already: Focus: Manual by scale, visible through viewfinder. Lens: 40mm f/2.8 Olympus D. Zuiko, 4 elements, three groups. Close Focus: 2.9' (0.9m). Diaphragm: two bladed, diamond-shaped, stopping down to about f/22. Shutter: 1/40 or 1/200, automatically selected. No bulb setting.
This little Olympus Trip 35 has limitations: There are only two shutter speeds: 1/40 sec and 1/200 sec. The camera sets them for you based on the amount of light, but if you turn the aperture dial off "A" to one of the f-stops, the shutter is 1/40. The light meter, being a selenium cell, does not have low-light capacity.
Olympus Trip 35 ASA Settings. The Olympus Trip 35 has the following ASA setting options, 25, 40, 50, 64, 80, 100, 125, 160, 200, 250, 320, and 400. ... to get the best exposure for every condition. Alternatively, if the thinking is too difficult, then one may also set the camera to "Auto", and adopt the "point and shoot" style. This Article ...
The Olympus Trip 35 is a fully-automatic 35mm compact camera, manufactured by Olympus from 1967 to 1984, during which time over ten million units were sold, though this oft-quoted figure is likely to have included later plastic-bodied Olympus cameras with Trip branding, as the original Trip 35 had serial numbers going up to around 5,400,000. The auto-exposure mechanism is effectively solar ...
Updated on December 29, 2023. Olympus Trip 35 is one of the most popular 35mm film cameras ever produced — and for a good reason. Its battery-free light meter is reliable, the lens is surprisingly sharp, the body is nearly pocketable, and the price is right. This review is a deep dive into the world of this small, mighty camera.
The Olympus Trip 35, a fully automatic viewfinder camera, is a point-and-shoot 35mm compact model manufactured by Olympus. It was introduced to the market in 1967 as a compact, functional camera for holidays, went on to become very popular among the masses, and sales ended in 1984 after a prolonged production run, with over ten million units ...
Apr 27, 2024. #23. Checking the Trip 35 manual indicates that it works like the other Pen E half-frames. In AUTO mode, the shutter speed is either 1/40 or 1/200 -- set by the film speed -- and the meter sets the f-stop according to the available light.
The 35 SP was preceded by the lesser-known 35 LE (auto only) and 35 LC (manual only) released in 1965 and 1967, respectively. ... Shutter and aperture are selected via a trapped-needle mechanism similar to the venerable Olympus Trip 35. All this results in a long, but smooth range of motion for the shutter button as the meter needle is trapped ...
The Olympus Trip 35 uses four easy "Zone" settings for focusing a frame. This design feature saves much time having to focus the frame for sharpness. It means anyone from partially sighted to the blind could take sharply focused photographs. Head - 1 m
The Olympus Trip 35 has the following aperture settings on the ring, 2.8, 4, 5.6, 8, 11, 16, and 22, and these are also known as f-stop numbers. The aperture is one of the most important parts of a camera and usually used together with the focusing ring. Both of these settings determine how much of your photograph is in focus.
The Olympus Trip 35 sometimes requires cleaning and overhauling, and they are tricky to open if you do not know how. If your camera was jammed or the light meter was not working then you will need to open it to fix it. The following pages with illustrations might help with disassembly. Camera Repair Preparation.