How-To Geek
How to disable and edit safari’s autofill on macos and ios.
Safari's AutoFill will automatically complete information for contacts, passwords, credit cards and more.

Quick Links
Editing or disabling autofill on safari for macos, editing or disabling autofill on safari for ios.
Safari's AutoFill will automatically complete information for contacts, passwords, credit cards and more. Today we're going to discuss how to turn off or edit those AutoFill entries on macOS and iOS.
Whenever any form data is autofilled, Safari highlights them in yellow.
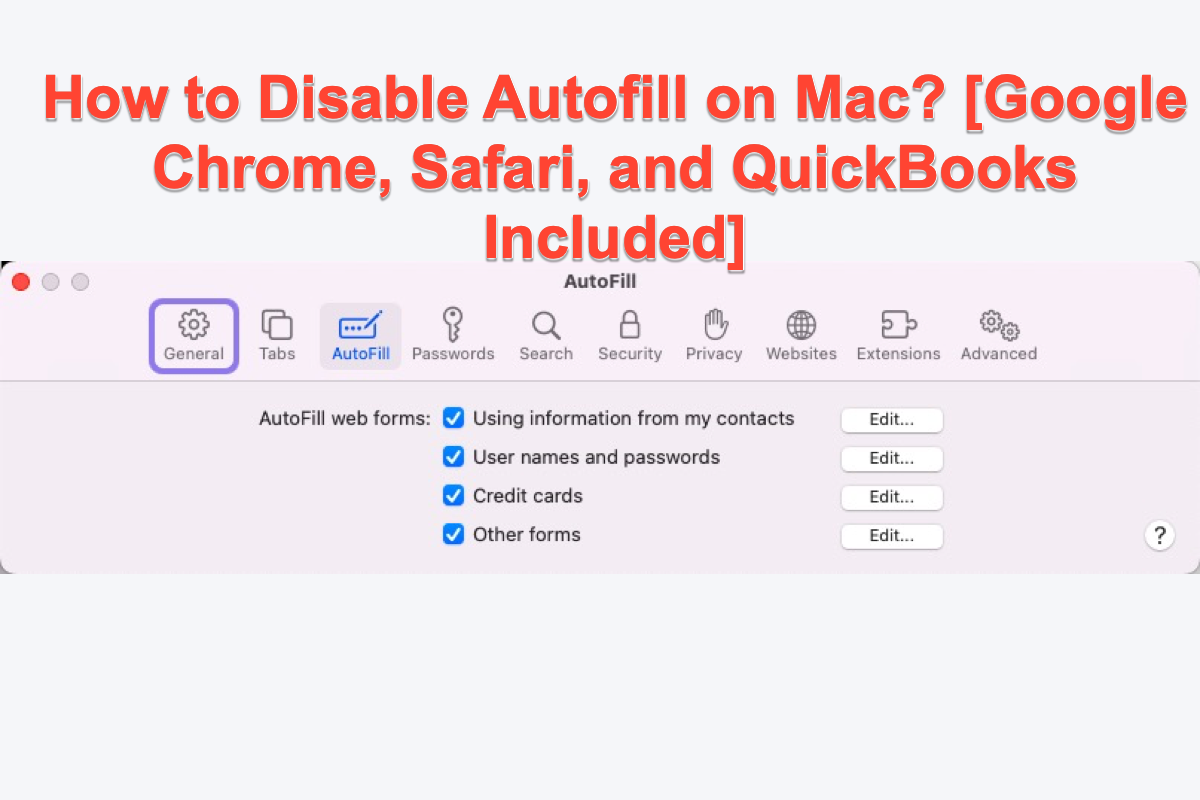
To turn off any or all AutoFill forms in Safari on macOS, first open Safari's preferences from the Safari menu or press Command+, on your keyboard.
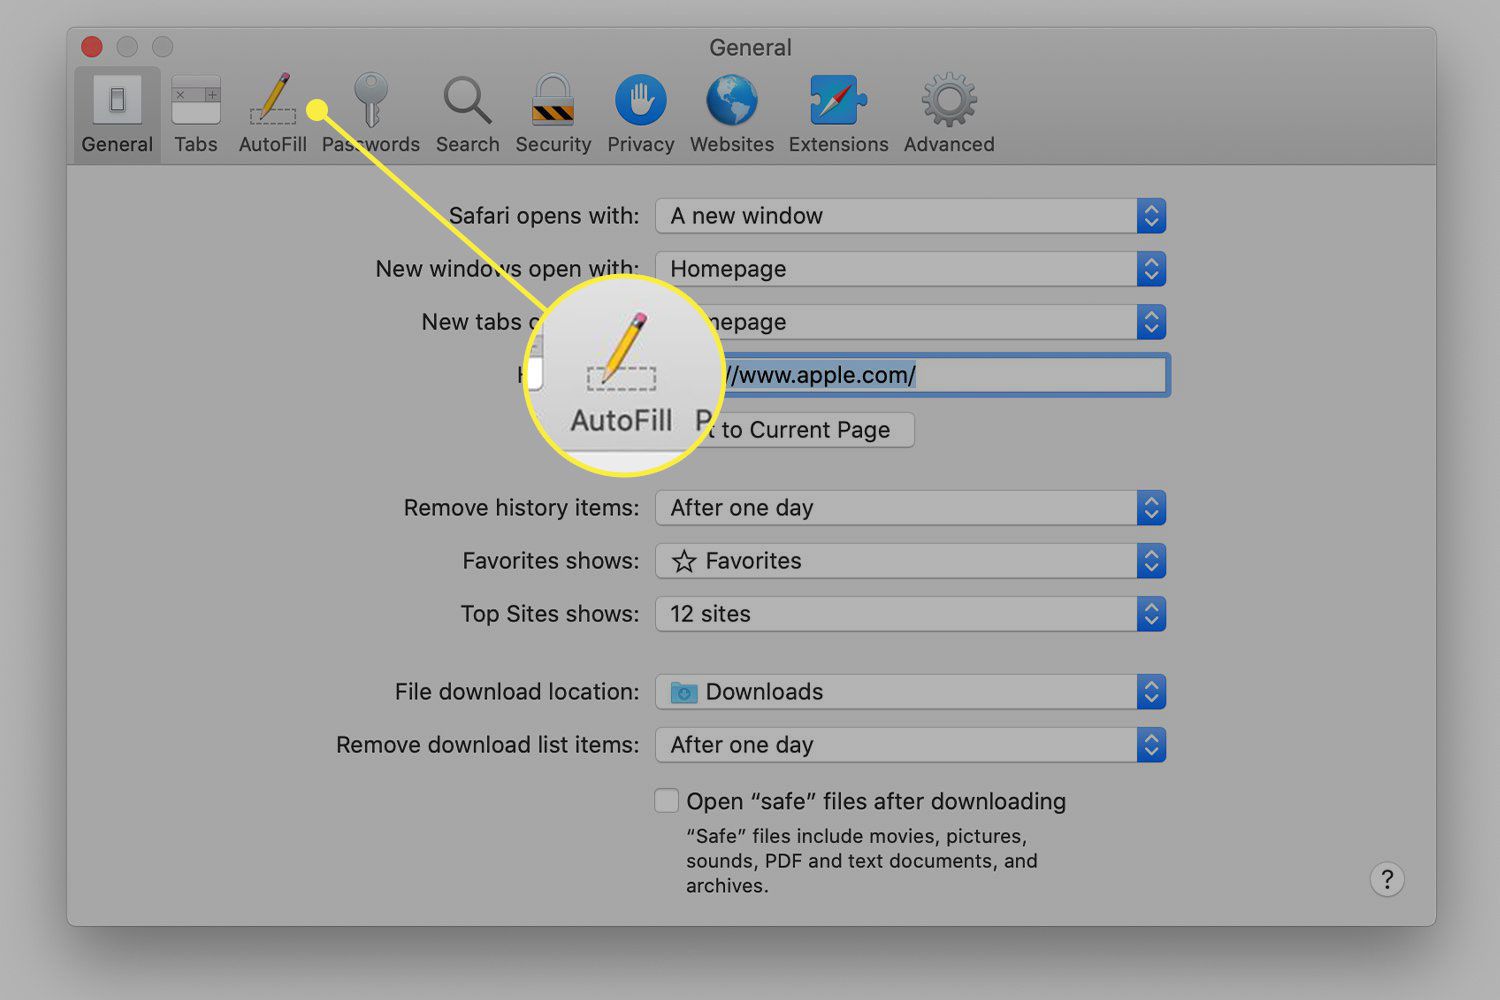
In Safari's preferences, click the AutoFill tab You'll see a list of the things Safari can autofill.
Uncheck any items you don't want Safari autofilling, or click "Edit" next to any of the four items to change the actual data Safari has saved. This includes:
- Using info from my contacts : When you start typing any personal information about you, or any other person in your Contacts, into a form (name, address, phone number, etc.), Safari will autofill the blanks.
- User names and passwords : Clicking "Edit" will simply switch to the Passwords tab, which will let you amend any of your login information contained therein.
- Credit cards : This will open a credit card dialog allowing you add or remove payment information. Double-click on an entry to update a credit card's information including the cardholder's name, card number, and expiration date. Before you can edit any sensitive data, you will have to enter your system password.
- Other forms : Click the other forms "Edit" button to edit or remove any or all form data you have saved for a particular website. This is particularly useful if you frequently visit a website with forms you need to fill in time after time with the same information.
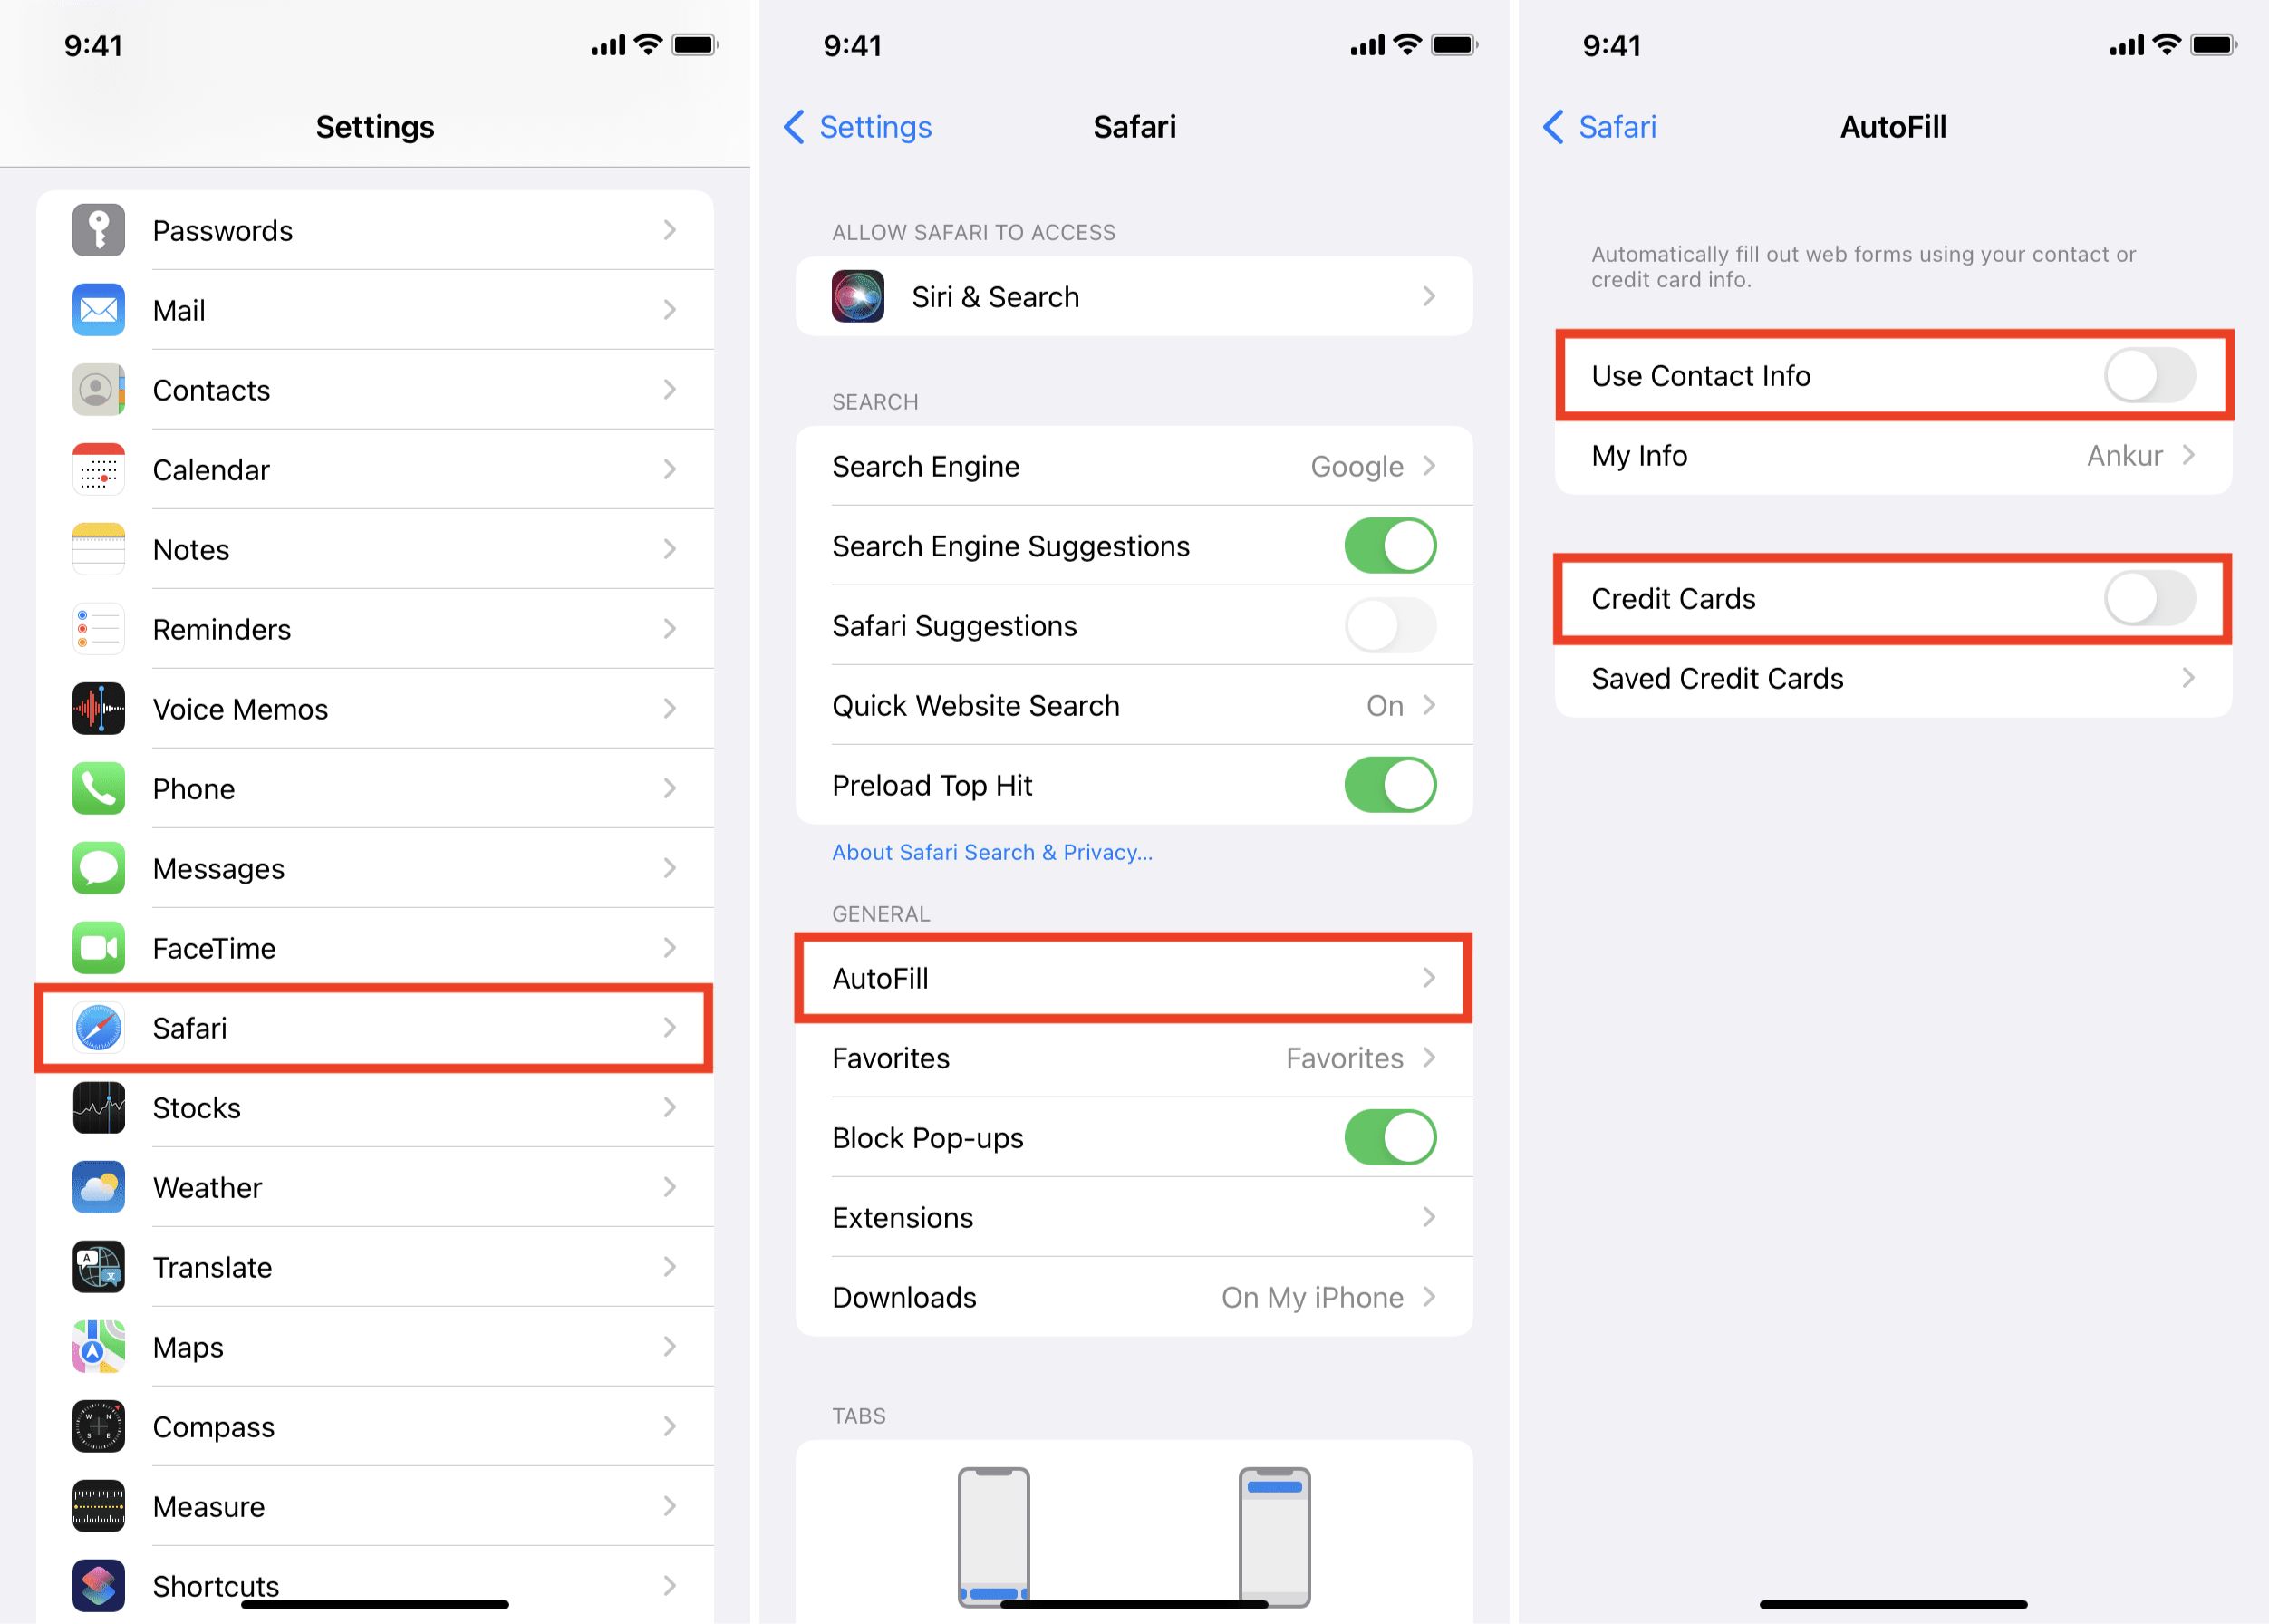
Safari on iOS can also fill in form data automatically. To access the AutoFill settings on iOS, open the Settings and tap "Safari".
Next, scroll down to the General options and tap "AutoFill".
In iOS, the options are slightly different than on macOS. You can still turn off your contact information, names and passwords, and credit cards, but there is no option for other forms.
The My Info option will let you choose another contact to use as your device's main contact, or again, you can edit your own contact information so it is up to date.
You can also view, add, remove, and edit any saved credit cards.
You may have noticed, in the previous screenshot, that there isn't any obvious way to edit saved login information. To fix any stored usernames and passwords, tap back to the Safari settings, and then tap "Passwords" right above the AutoFill settings.
Keep in mind that AutoFill will automatically populate any forms on your devices, regardless of who is using them. Thus, you should only lend your devices to people you trust, or simply turn off AutoFill if someone else is going to be using your Mac, iPhone, or iPad.
One final note: user login details and credit cards are stored in your iCloud Keychain ( unless they're not set up to sync to iCloud ), so when you add, delete, or edit either of these items on any one device connected to your iCloud account, the information will be populated to your other devices.
Related: How to Sync Contacts, Reminders, and More with iCloud
That's really all there is to it. Safari's AutoFill settings are simple enough to understand. Now, if you no longer want certain information to automatically populate forms, you can turn it off. Similarly, if the information is incorrect, you can fix it.
How to stop name, address, email, and payment autofill suggestions in Safari
To help you quickly fill a form or instantly check out, Safari can autofill your name, email, phone number, home address, and credit card information on a webpage. This sounds great. But at times, it can get annoying as these suggestions automatically pop up in other text fields or situations when you want to enter different details. Due to these or any other reason, if you don’t wish to see contact and payment autofill suggestions in Safari, here’s how to disable it on iPhone, iPad, and Mac.
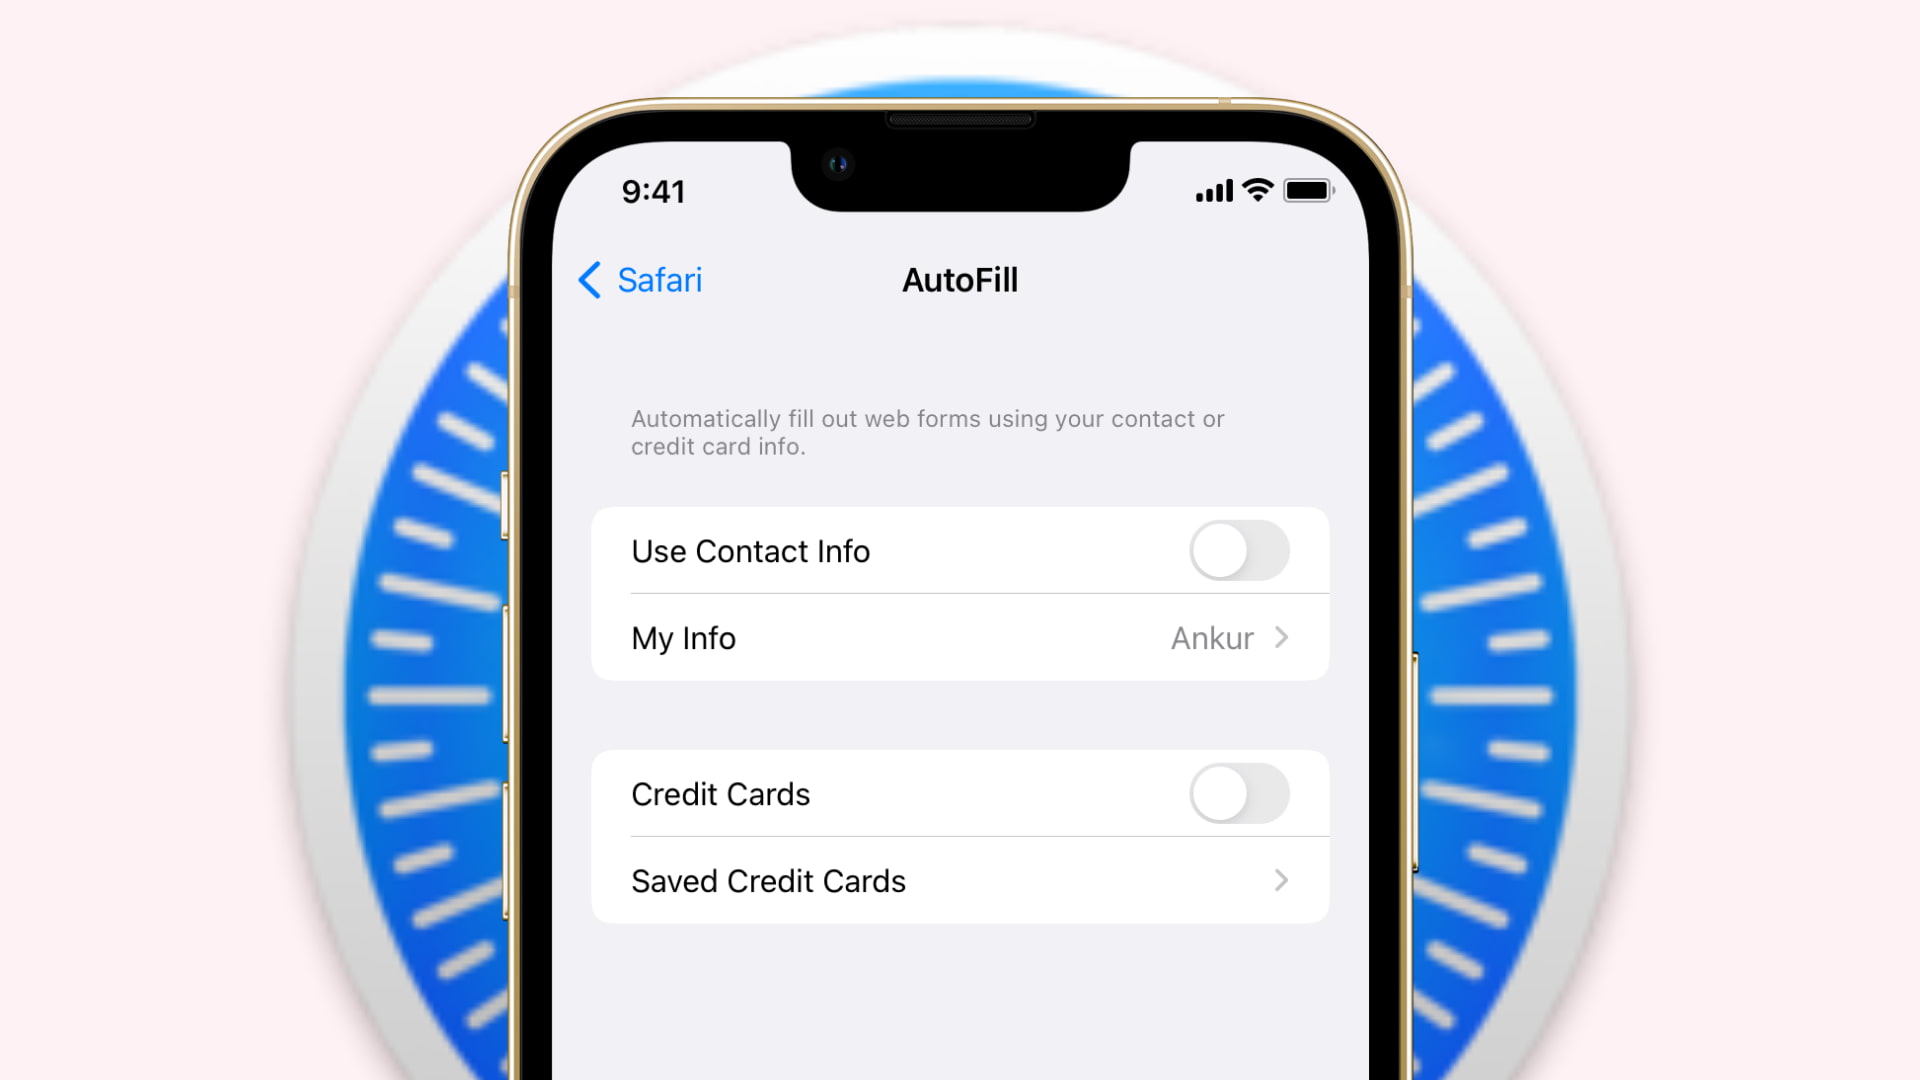
How to turn off Safari autofill on iPhone and iPad
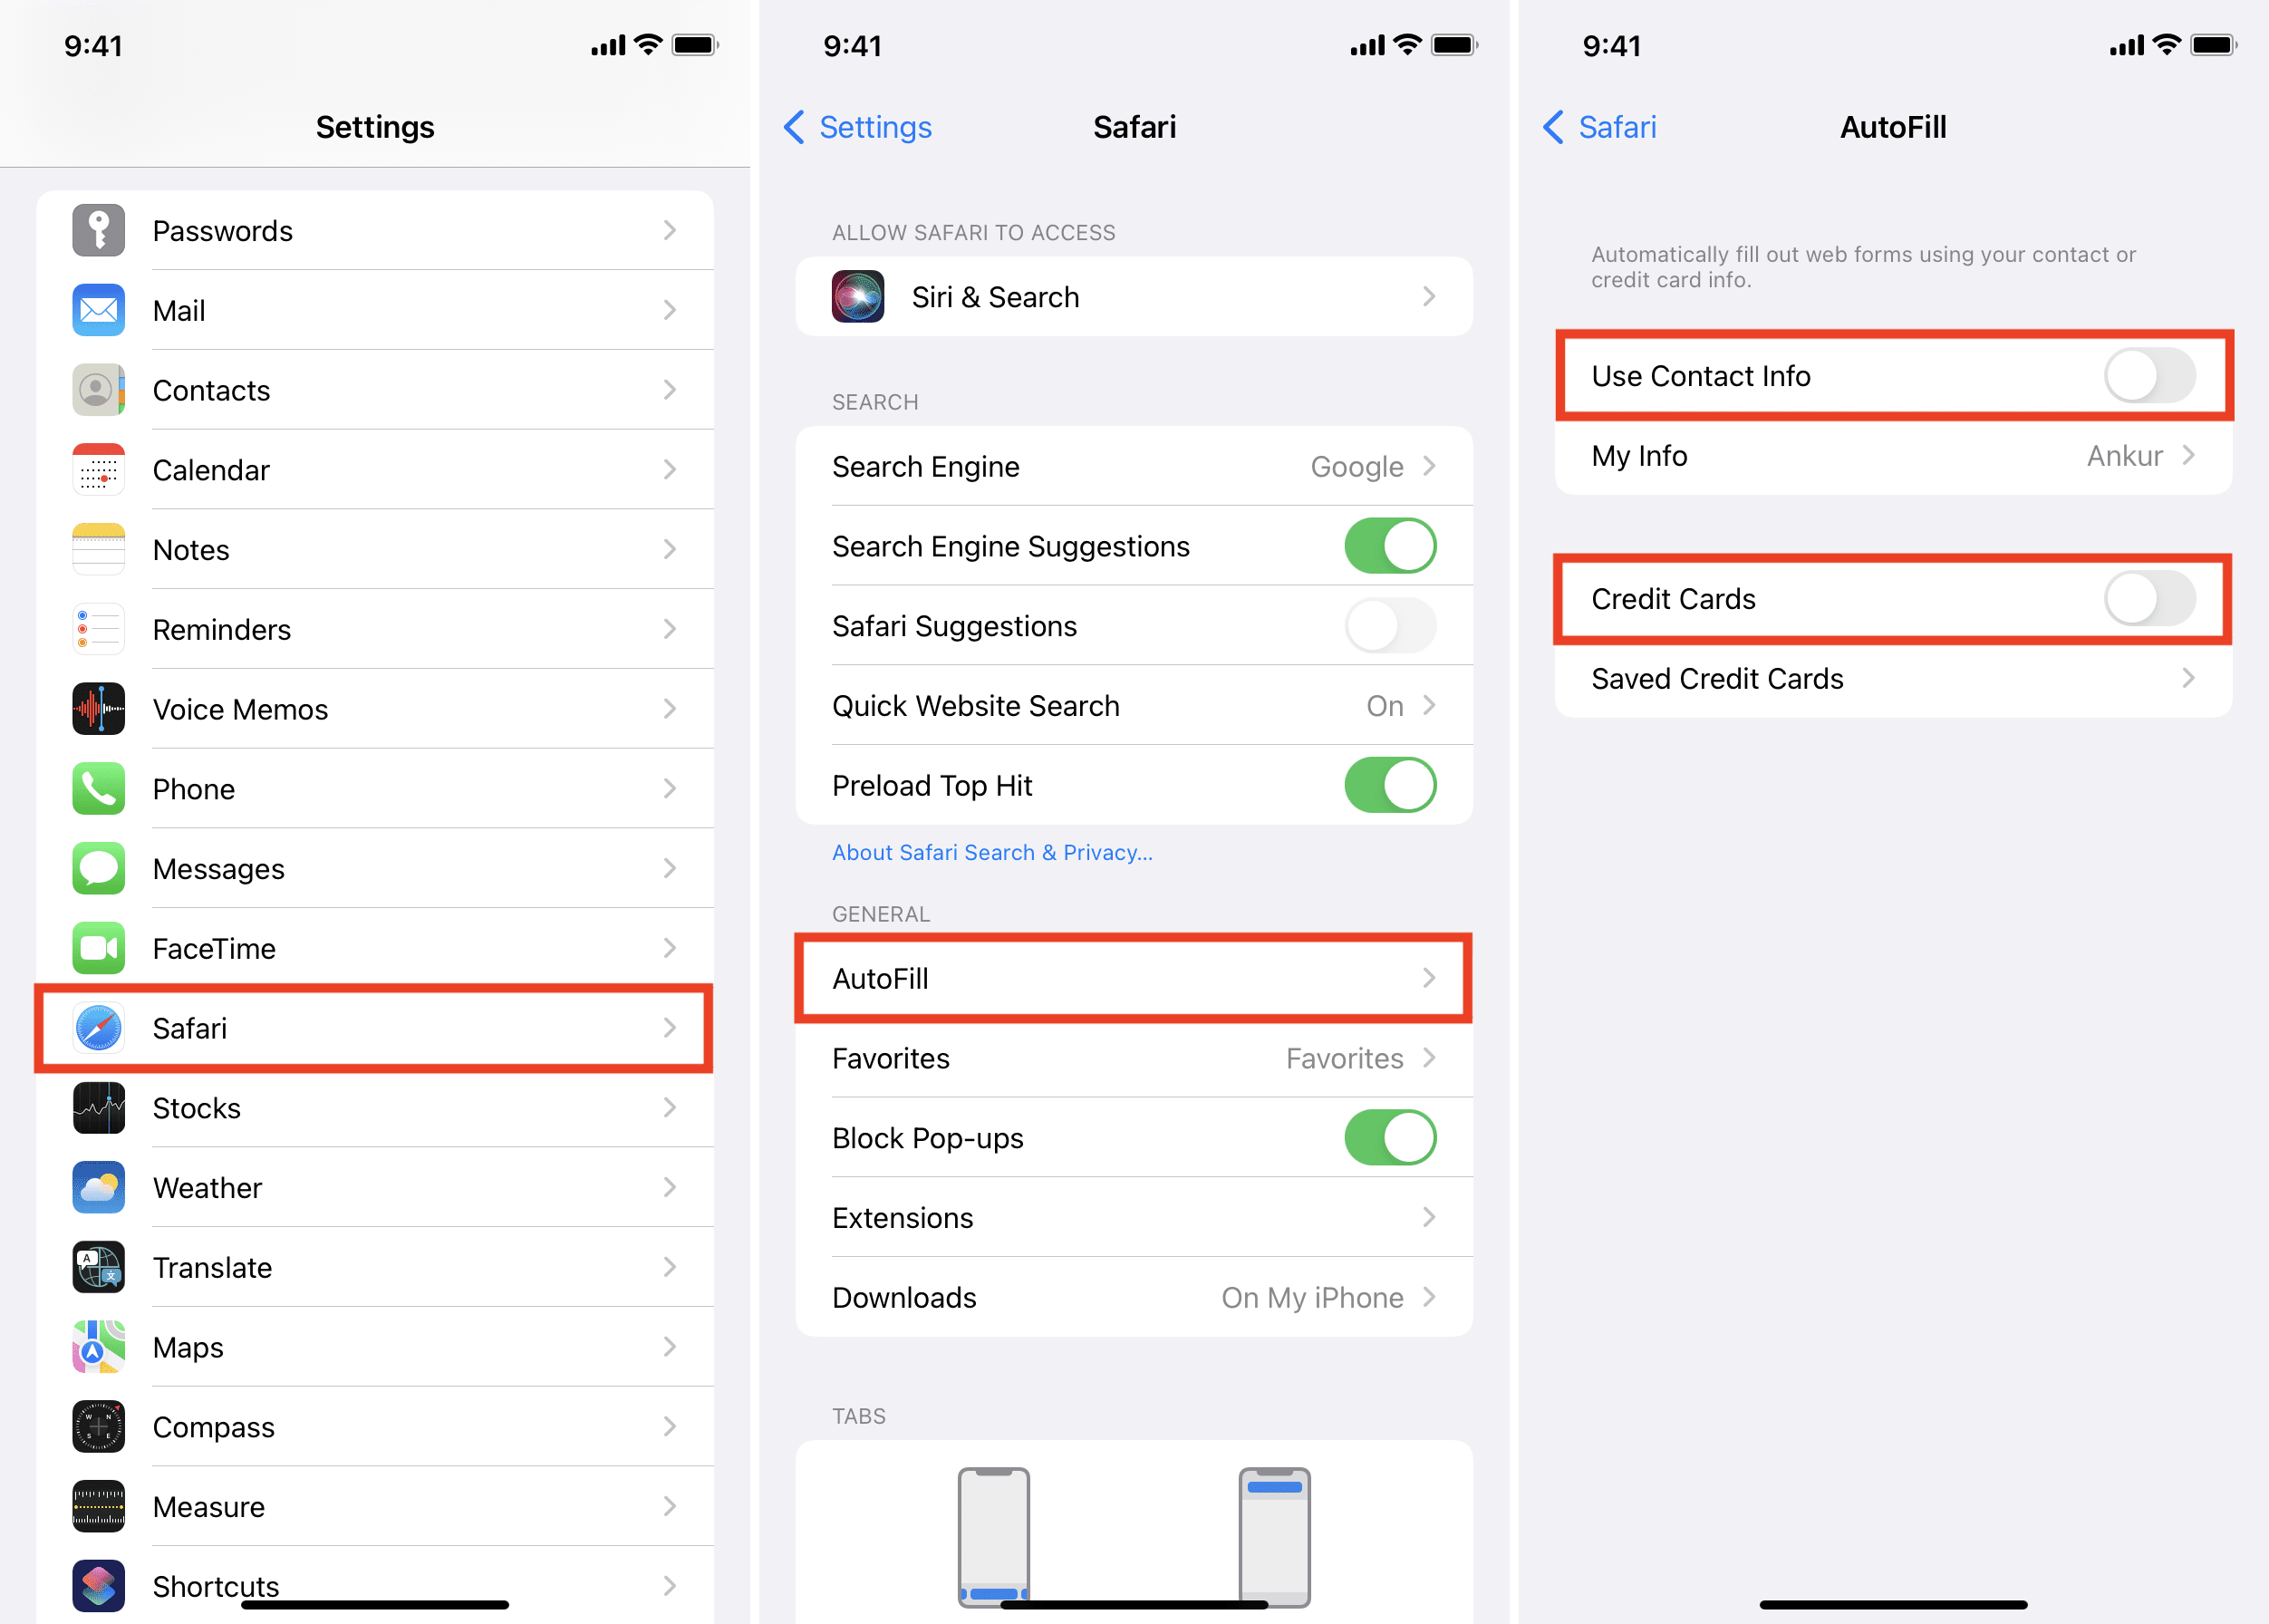
Using these steps, you can stop Safari from automatically filling in your contact and payment details on all websites:
- Open Settings and tap Safari .
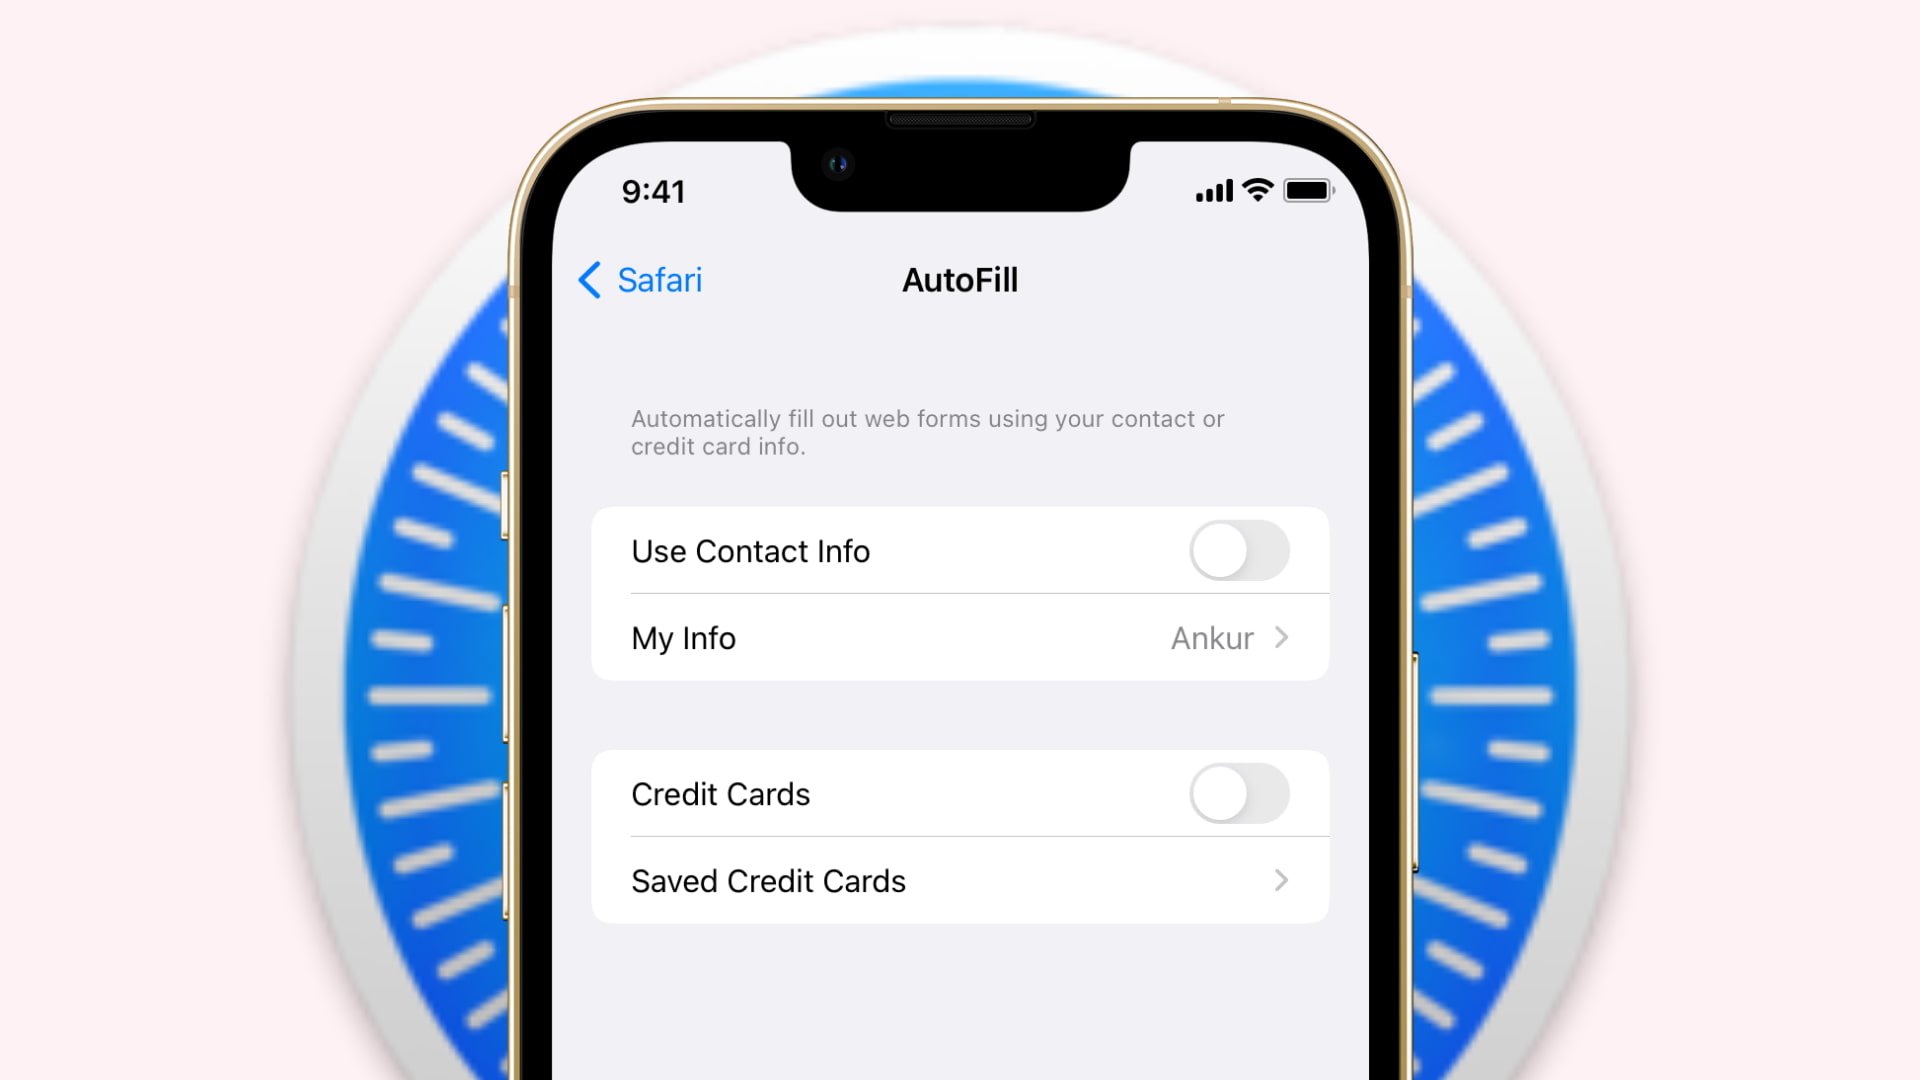
- Tap AutoFill .
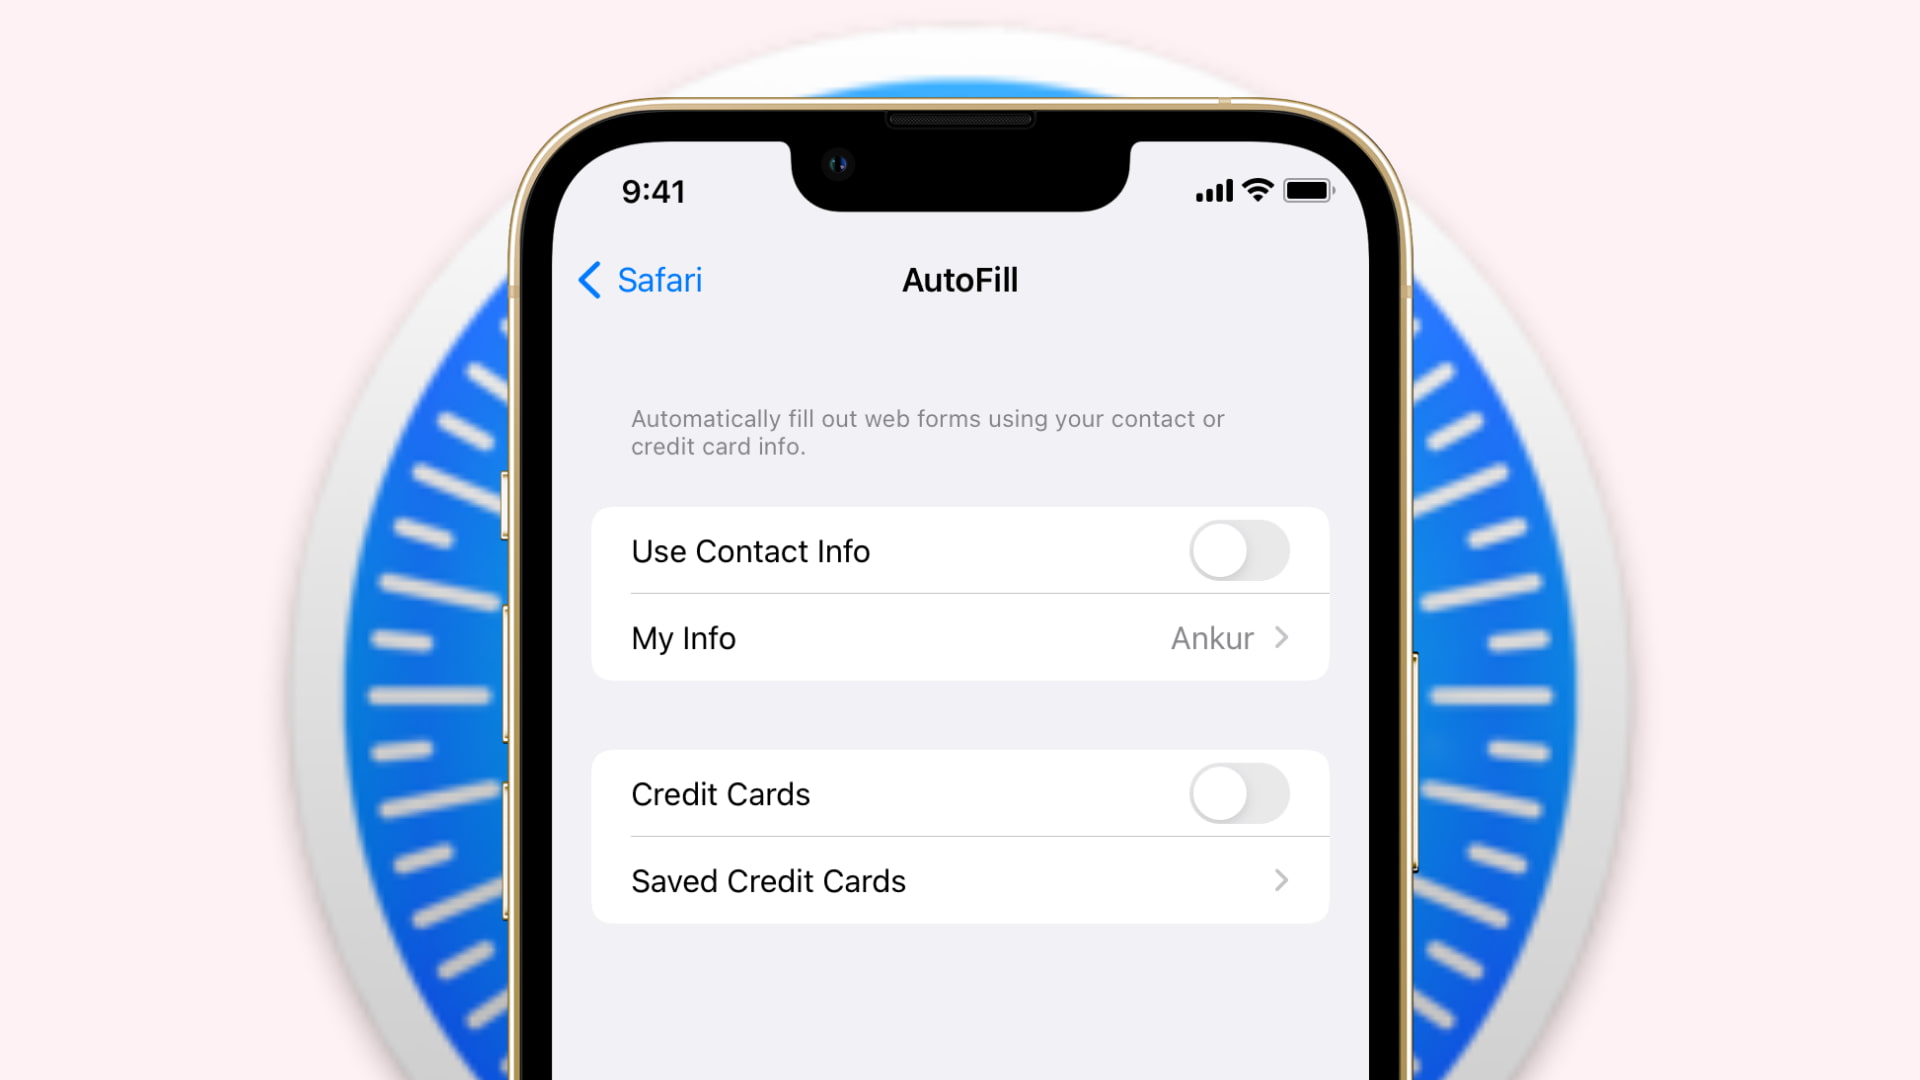
- Turn off Use Contact Info . This will now prevent Safari from auto-filling your name, email, phone number, address, etc.
- Turn off the switch for Credit Cards . Now, Safari won’t autofill your payment information on web pages.
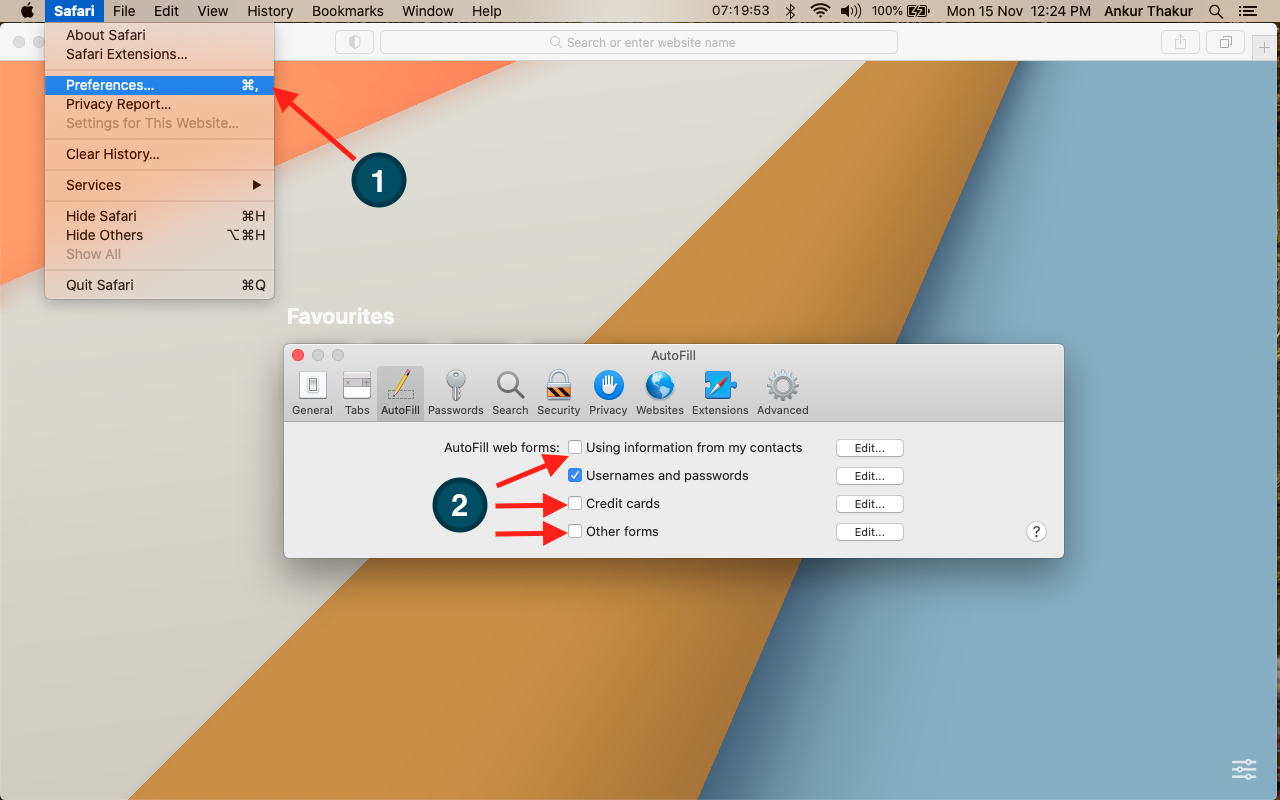
How to turn off autofill in Safari on Mac
Follow these steps to prevent Mac’s Safari from automatically filling in your name, email, address, phone number, and other details on all websites:
- Open Safari and click the word “ Safari ” next to the Apple icon.
- Click Preferences .
- Click AutoFill .
- Uncheck Using information from my contacts , Credit Cards , and Other forms .
If you ever decide to revert this change, follow the same steps to enable AutoFill. It’ll take effect immediately. In case it doesn’t, close the Safari app on iPhone or Mac and restart the device.
Check out next :
- How to safely install and use Safari extensions on iPhone
- How to set up and use the built-in 2FA code generator on iPhone and iPad
- Steps to stop Safari from matching your iPhone’s status bar to the website’s header color
How to Manage Safari Browser Autofill on Mac
The Safari browser’s Autofill feature is a time-saver for everyone from online shoppers to research enthusiasts. Yet, despite its conveniences, the feature comes with security implications that can’t be ignored.
This comprehensive guide delves into what Safari’s Autofill is, how to set it up, manage it, and what to be cautious about.
What is Safari Browser Autofill?
Autofill in Safari automatically completes forms for you using stored information. This feature is useful for several reasons:
- Speed : Filling out online forms becomes faster.
- Accuracy : It reduces the risk of typos.
- Convenience : It eliminates the need to remember or find stored information like addresses or card details.
Set Up Autofill on Safari
Getting Autofill set up on Safari is easy. Here’s how to do it:
Open Safari Settings
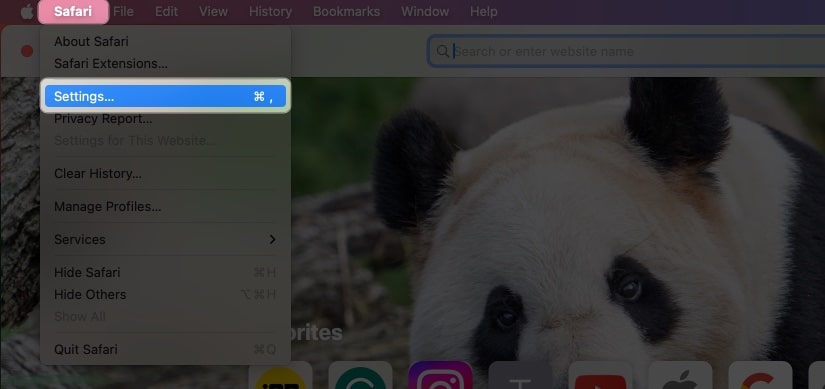
Open Safari and go to Safari > Settings or press Command + , .
Navigate to Autofill Settings
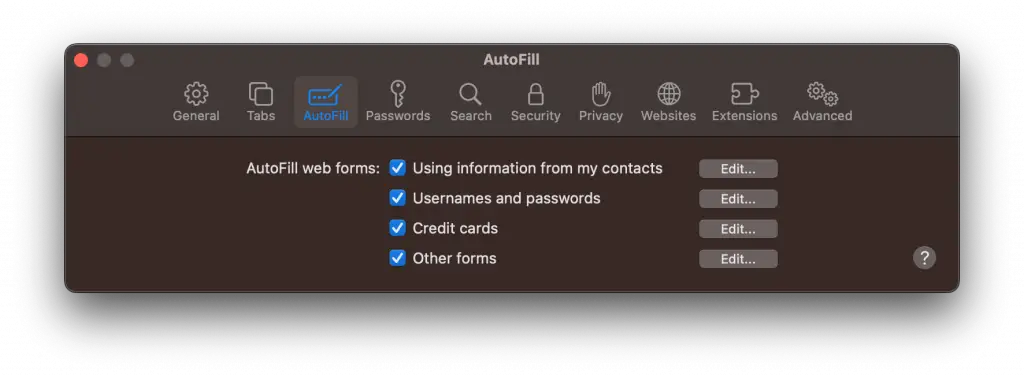
Click the “Autofill” tab to see options for what information Safari can automatically fill in for you.
Enable or Disable Categories
Here you’ll find options for Contact info, Credit cards, and Usernames & Passwords. You can check or uncheck these as per your preferences.
Manage Your Autofill Information
Edit stored information.
- Open the Autofill tab in Safari Settings.
- Click the “Edit” button beside each category.
- You can add, delete, or update the stored information.
Remove Specific Autofill Entries
- Right-click on a form field on a webpage and choose “Show Autofill Options” You can then remove specific entries.
Safety Concerns with Autofill
While Autofill is convenient, it does have some potential risks:
- Security : Sensitive information like passwords or credit card details could be exploited if someone gains access to your computer.
- Data Integrity : Outdated or incorrect Autofill entries could cause issues with transactions or sign-ups.
How to Disable Safari Browser Autofill
If you find the risks outweigh the benefits, you can disable Autofill. Go back to Safari > Settings > Autofill and uncheck the boxes for the information you no longer want to be automatically filled.
Safari’s Autofill feature offers a blend of convenience and efficiency, but it’s essential to manage it carefully to mitigate security risks.
Whether you’re an individual user or a professional dealing with sensitive data, understanding how to properly set up and manage Autofill can significantly enhance your browsing experience while keeping you safe online.
Professionally, I am a software developer. I am also a tech enthusiast and always curious about operating systems, softwares, internet and apps.
Similar Posts

How to Change Computer Name on Mac
When you set up your Mac for the first time, you’re asked to give it a name. This computer name, or hostname, helps identify your device on networks. Whether it’s the default name or a name you picked during the setup process, you may find yourself needing or wanting to change it down the line….
How to Enable Siri on Mac
Siri, Apple’s voice-activated virtual assistant, has been a staple feature on iPhones for years and is also available on Mac computers. Whether you’re looking to set reminders, find files, or even control smart home devices, Siri can make your life easier. In this guide, we’ll walk you through how to enable Siri on your Mac…

How to Create a New Text File on Mac
Creating a text file on a Mac is a simple task. Text files are versatile, lightweight, and easy to create or edit. They’re useful for storing notes, code snippets, or any plain text data. In this blog post, we will explore various ways to create a text file on your Mac using built-in applications. Create…

How to Create a Quick Note on Mac
In an era of ever-increasing data and digital interactions, effective and efficient information capture is vital. With a quick note, you can instantly jot down information, preventing any interruption to your workflow. In this blog post, we’ll provide an overview of creating a quick note and share tips for maximizing efficiency with this handy feature….
How to Remove Siri from Menu Bar on Mac
While Siri can be a convenient assistant for many macOS users, some people may find the Siri icon in the menu bar unnecessary or intrusive. If you’re looking to declutter your Mac’s menu bar or simply don’t use Siri, this guide will walk you through the process of removing Siri from the menu bar on…

How to Close All Tabs in Safari Browser on Mac
Navigating the web often results in accumulating a large number of open tabs in your browser, which can clutter your workspace and slow down your system. If you’re using Safari on a Mac, closing all tabs simultaneously can be a big timesaver and help you declutter. This blog post will guide you through various methods…
Leave a Reply Cancel reply

How to Use AutoFill in Safari on Mac
You can save time when filling out forms on Safari thanks to the excellent AutoFill feature. Here's everything you need to know.
If you’re like most people, you probably don’t remember the login to every online account you have, or recall most of your credit card information. You might have to refer to a saved note to remember your username and password, or have to pull out your credit card every time you need to use it to make a purchase online.
It can be tedious to have to enter that information repeatedly. Thankfully, a Safari feature called AutoFill makes saving and filling in information like login credentials or a credit card simple. We're going to show you how to use it.
What Is AutoFill?
AutoFill is a feature in Safari that allows you to automatically fill out web forms. The first time you fill out a form, AutoFill prompts you to save that information, which you can then re-use every time you fill out the same or similar form. This gets stored locally in Safari by default and in your iCloud Keychain (if you have that enabled.) We've explained the basics of using iCloud Keychain if you're not familiar.
When you are filling out fields in an online shopping cart, or you can’t remember your password to your Netflix account, AutoFill populates the fields with a click. It's incredibly useful in time-sensitive situations, such as when you need to order a ticket for a concert that will sell out quickly. No more time wasted having to enter your information manually.
What Information Can You Use With AutoFill?
AutoFill allows you to use multiple types of information. You can use information such as a username and password to an online account, credit card information, and it allows you to input information from your contacts. AutoFill also allows you to use other information that you may have entered on other forms. That way, when you revisit that website, you don’t have to try to remember the information.
How to Add a Username, Password, and Credit Card to Safari
Adding an account’s username and password through AutoFill is a straightforward process. To add a username and password:
- Open Safari on your Mac.
- Click on Safari in the Menu Bar , then click Preferences .
- Next, click on AutoFill .
- You will now see the multiple AutoFill Forms. Click Edit next to Usernames and passwords .
- Enter your Mac’s password or scan your fingerprint to proceed.
- Click the + symbol .
- You can now enter the website’s name, your username, and the password.
- Next, click Add Password .
If you would like to add a credit card through AutoFill, the process is similar to adding an account login. To add a credit card:
- In the AutoFill tab , click Edit next to Credit cards .
- Enter your password or scan your fingerprint to continue.
- Click Add .
- You can now fill in a description for the card that you want to add, the cardholder name, card number, and the expiration date.
- Once you have entered that information, click Done .
Now that you have added your login information or your credit card, you’re all set. Next time you go to the website to log in or need to enter your credit card, Safari will prompt you to automatically fill in the fields with that information when you click on the web form.
How to Remove or Change Saved AutoFill Information
There may be times when you would like to remove an account, or maybe you received a compromised password alert from Safari and would now like to update the password for AutoFill. Normally, it prompts you to save the new password automatically, but you can also do it manually. You can do this within the Passwords tab in Safari preferences.
- In Preferences , click Passwords .
- Select the website that is associated with your account.
- Click Edit .
- If you would like to update the information, simply remove the old login and enter the new information, then click Save .
- If you want to delete the login altogether, instead of hitting Save , click Delete Password .
- Click Delete Password again .
Can You Use AutoFill Across Apple Devices?
AutoFill information will be accessible on all of your Apple devices if you have iCloud Keychain enabled. You also need to be logged in to the same Apple ID. This means that if you try to sign in to an account on your iPhone that you saved on your Mac, Safari on your phone will automatically offer AutoFill's assistance. In addition to that, any updates or changes made through AutoFill will be saved and shared across your devices.
AutoFill Saves Time and Frustration
Having to enter crucial information repeatedly not only wastes time but is also inefficient. Trying to remember a login or entering a credit card when time is vital can be nerve-racking. Using a feature like AutoFill will remove hurdles when having to complete web forms, and you can use it across all of your Apple devices. It's one of the many handy features that Safari on Mac has to offer.
- Accessories
- Meet the team
- Advertise with us

AutoFill feature on Safari saves you time by streamlining your input in various fields. So, you don’t need to manually input your passwords each time you check in to your favorite websites. Interesting, right? In this guide, I’ll show you how to use Touch ID to autofill passwords in Safari on Mac.
How to save or remove username and password in Safari on Mac
How to use touch id to autofill passwords in safari, how to change autofill settings in safari on mac.
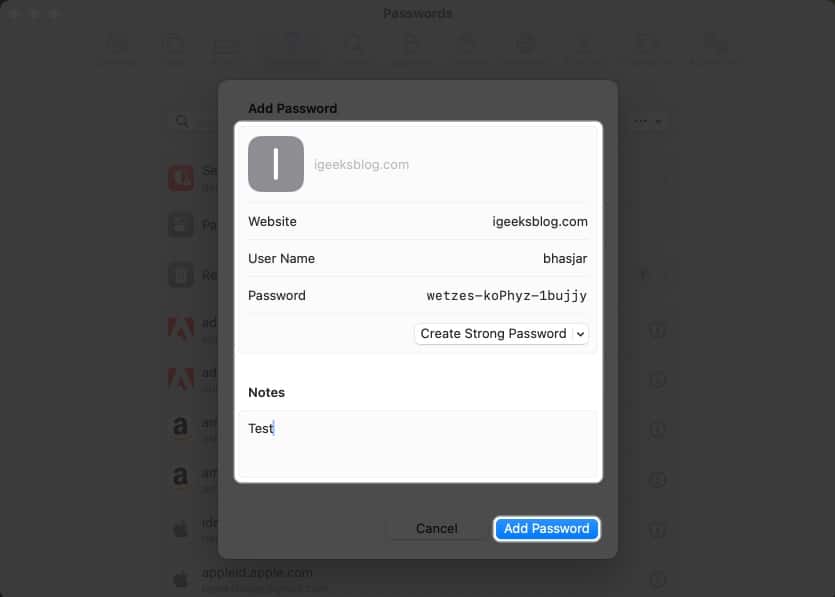
- Fill in the following details: Title , Website , Username, and Password . You can also add Notes if you want.
To remove the username and password in Safari on Mac, follow these steps:
- Open Safari → Go to the Sign in section of a website. I’m using Facebook for illustrations.

Voila! You’ve successfully avoided the hassle of typing your username and password.
You can autofill various information depending on the form you are filling. If you don’t want to save your private information or want to remove any saved details, you can change your Mac’s AutoFill settings.
- Go to Safari Settings.
- Head to AutoFill .
- Using information from my contacts: Enabling lets you fill in the basic information on any website using your Contact card. To update your information on the contact card, click the Edit button .
- Usernames and passwords: You may save your usernames and passwords on websites to access them later quickly. Saved passwords will be pre-filled in subsequent fields.
- Credit Cards: You can AutoFill your Credit Card details while purchasing on Safari. Furthermore, manage your saved credit cards by clicking the Edit button beside it.
- Other forms: This feature saves the data you enter in online forms and reuse it to fill out the same form fields quickly. To know websites that have saved AutoFill information, click the Edit button . From there, you can view or delete the saved information.
What to do if AutoFill is not showing the saved password on Mac?
Several things can prevent AutoFill from filling in a saved password on a website. Follow the instructions below to ensure your saved passwords are correctly auto-filled.
- Open Safari Settings .

- Go to Safari Settings → Select Passwords → Enter your Mac’s password .
- Locate the website’s password labeled never saved → Click the info icon .
- Select Delete Password → Confirm by selecting Delete Password .
- Afterward, click the Add button to save the website , username, and password .
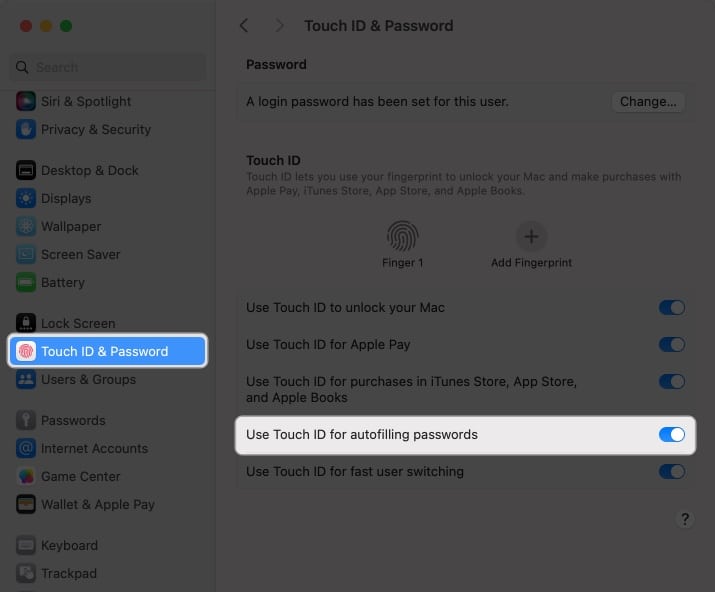
- Go to the Apple logo ( ) → Select System Settings .
Is AutoFill different from iCloud Keychain?
AutoFill is a handy feature that quickly fills in your saved usernames and passwords for websites and apps in Safari. It eliminates the need for manually entering login credentials every time.
However, Keychain is a password management tool that is a safe repository for all your login and other private information such as credit card details, Wi-Fi network passwords, etc. It uses robust encryption algorithms and a master password to encrypt sensitive data.
You can disable Touch ID for your Mac’s Safari AutoFill feature. To do so, go to Safari → Settings → AutoFill → uncheck Usernames and passwords .
Unfortunately, you cannot use the AutoFill feature outside the Safari browser on your Mac. However, Chrome offers its own password manager. Besides, you may use password manager apps that support Touch ID to AutoFill passwords across different apps and websites.
Wrapping up…
Using Touch ID on a Mac to automatically fill in passwords in Safari saves you time and increases your online security. So why not give it a shot and see how convenient it is for you. Do you use any third-party password manager on your Mac? Let me know in the comments below!
- How to use AutoFill Passwords on iPhone and iPad
- AutoFill Passwords not working on iPhone or iPad
- How to Change Default Password AutoFill App on iPhone
Bhaskar is a tech guru who turned wordsmith. Hiding his B.Tech degree in a closet, he ditched the corporate path to simplify tech for everyone. For the past 5 years, he's been dishing out how-tos, reviews, and sharp insights. But there's more! He's a witty interview champ and has been sharing his wisdom for 3 years. Furthermore, he has honed his editing skills for 1.5 years and is now delving into marketing to assist newcomers. When not jamming his fingers on those mechanical keyboards, you may find him on strings or engaging in sports. And by evening, his quotes will be appearing on your Instagram feeds.
View all posts
🗣️ Our site is supported by our readers like you. When you purchase through our links, we earn a small commission. Read Disclaimer .
LEAVE A REPLY Cancel reply
Save my name, email, and website in this browser for the next time I comment.
Related Articles
How to block text messages on iphone or ipad (ios 17 updated), how to play youtube videos in background on iphone or ipad (2024 guide), how to change your name on facebook (2024 guide), how to fix hey siri not working on iphone (ios 17 updated).
How to Disable Autofill Passwords in Safari on iPhone 13: A Step-by-Step Guide
To disable autofill passwords in Safari on an iPhone 13, you need to go into the settings app, select the ‘Passwords’ section, and turn off the ‘AutoFill Passwords’ option. It’s a simple process that will enhance your privacy and security.
Step by Step Tutorial on Disabling Autofill Passwords in Safari on iPhone 13
We’ve all been there, quickly tapping through websites and suddenly our password pops up, ready to be filled in with just a touch. While it’s convenient, it might not be the best for your security. Let’s go through the steps to disable this feature on your iPhone 13.
Step 1: Open Settings
First things first, open your Settings app. It’s the one with the gear icon.
When you open the Settings app, you’ll see a whole list of options, but for now, let’s focus on the task at hand.
Step 2: Scroll and Tap ‘Passwords’
Scroll down until you find ‘Passwords’, then give it a tap. It’s usually under the section with your Apple ID.
In the ‘Passwords’ section, you’ll find all sorts of password-related settings, but we’re looking for ‘AutoFill Passwords’.
Step 3: Toggle Off ‘AutoFill Passwords’
Find the ‘AutoFill Passwords’ option and toggle the switch to off. It should turn from green to gray.
Turning this off means that Safari won’t automatically fill in your passwords anymore, giving you more control over who has access to your accounts.
After completing these simple steps, Safari will no longer autofill your passwords. You’ll need to enter them manually each time you log in, which can be a tad inconvenient, but it’s a small price to pay for better security.
Tips on Managing Autofill Passwords in Safari on iPhone 13
- Always update your iPhone to the latest iOS version for enhanced security features.
- Consider using a password manager app for secure and convenient access to your passwords.
- Regularly review and delete any saved passwords that you no longer need or use.
- Enable two-factor authentication on your accounts for an extra layer of security.
- Be cautious of using autofill on public or shared devices, as it could potentially expose your passwords to others.
Frequently Asked Questions
What is autofill.
Autofill is a feature that automatically fills in your information, like passwords and addresses, in web forms.
Can I use Autofill with other browsers on iPhone 13?
Yes, you can use autofill with other browsers, but the steps to disable it might be different.
Is it safe to use Autofill for passwords?
It can be safe, but it’s also a potential security risk if your phone falls into the wrong hands.
How can I remember all my passwords without Autofill?
A password manager app can help you keep track of your passwords securely.
What are the benefits of disabling Autofill?
Disabling autofill can increase your security and privacy by preventing accidental exposure of your passwords.
- Open Settings
- Scroll and tap ‘Passwords’
- Toggle off ‘AutoFill Passwords’
Disabling autofill passwords in Safari on your iPhone 13 is a smart move to make sure your sensitive information stays secure. Sure, it might take an extra moment to type out your password each time, but isn’t that worth the peace of mind? Remember, in a world where data breaches are all too common, every little step you take to protect your digital life is important. Plus, it’s always a good idea to keep a close eye on your online security settings, updating passwords regularly, and staying informed about the best practices for keeping your information safe. Hasn’t this article made you think about your own security measures? What steps will you take to safeguard your digital footprint?

Matt Jacobs has been working as an IT consultant for small businesses since receiving his Master’s degree in 2003. While he still does some consulting work, his primary focus now is on creating technology support content for SupportYourTech.com.
His work can be found on many websites and focuses on topics such as Microsoft Office, Apple devices, Android devices, Photoshop, and more.
Share this:
- Click to share on Twitter (Opens in new window)
- Click to share on Facebook (Opens in new window)
Related Posts
- How to Add Autofill Password on iPhone
- How to Save Passwords on iPhone 11: A Step-by-Step Guide
- How to Turn Off Autofill in Excel 2010: A Step-by-Step Guide
- How to View Saved Passwords in Google Chrome: A Step-by-Step Guide
- How to Save Passwords on Chrome in Windows 11: A Step-by-Step Guide
- How to Find Passwords on iPhone 11: A Step-by-Step Guide
- How to Store Passwords in Safari on an iPhone 14: A Step-by-Step Guide
- How to Change the Router Password on Netgear N600: A Step-by-Step Guide
- How to Turn Off iCloud Keychain on an iPhone 12: A Step-by-Step Guide
- How to Change Email Password on iPhone 5: A Step-by-Step Guide
- How to View Safari History on iPhone
- How to Remove a Password in Excel 2013: Step-by-Step Guide
- How to Change the Password on Your iPad: A Step-by-Step Guide
- How to Change Password in Outlook 2013: A Step-by-Step Guide
- How to Remove Password Protection from a Document in Microsoft Word
- How to Remove a Password from an Excel 2010 Spreadsheet: Step-by-Step Guide
- Disabling Safari Extensions on iOS 17: A Step-by-Step Guide
- How Do I Find My WiFi Password? A Step-by-Step Guide
- iPhone 15: How to Clear Safari History in Just a Few Steps
- How to Change iPhone 14 Personal Hotspot Password
Get Our Free Newsletter
How-to guides and tech deals
You may opt out at any time. Read our Privacy Policy
How To Clear Autofill In Safari

- Software & Applications
- Browsers & Extensions
Introduction
Autofill is a nifty feature that saves time and effort by automatically filling in forms and login credentials on websites. It's like having a personal assistant who remembers your details and completes the tedious task of entering them for you. In Safari, Apple's web browser, Autofill is a built-in feature that can be incredibly convenient. However, there are times when you may want to clear or manage your Autofill data, whether for privacy reasons, to update outdated information, or simply to declutter your digital footprint.
In this article, we'll delve into the world of Autofill in Safari, exploring how it works, how to clear Autofill data, and how to manage Autofill settings. Whether you're a seasoned Safari user or a newcomer to the browser , understanding how to navigate and optimize this feature can greatly enhance your browsing experience. So, let's embark on this journey to uncover the ins and outs of Safari's Autofill and empower you to take control of your browsing data.
Understanding Autofill in Safari
Autofill in Safari is a time-saving feature designed to streamline the process of entering information on websites. It functions as a digital assistant, automatically populating fields with details such as names, addresses, phone numbers, email addresses, and even credit card information. This feature is particularly handy for frequent online shoppers, form fillers, and anyone who values efficiency in their browsing experience.
Safari's Autofill operates by storing the information you enter into web forms, allowing the browser to recognize and suggest the same or similar details when you encounter similar fields in the future. This can be especially convenient when filling out shipping addresses, billing information, or login credentials on various websites.
Additionally, Safari's Autofill feature extends beyond basic form data. It can also remember and suggest passwords for websites, making it easier to log in to your favorite online platforms without the hassle of typing out lengthy and complex passwords each time.
Furthermore, Safari's Autofill is integrated with iCloud Keychain, Apple's password management system. This means that the information stored in Safari's Autofill is securely synced across your Apple devices, ensuring a seamless browsing experience across your iPhone, iPad, and Mac.
Understanding how Autofill works in Safari is essential for maximizing its benefits while being mindful of potential privacy and security considerations. While Autofill can undoubtedly enhance convenience, it's crucial to be aware of the data being stored and take necessary steps to manage and clear it when needed.
By grasping the inner workings of Autofill in Safari, users can harness its capabilities to streamline their online activities while maintaining control over their personal information. This knowledge empowers users to make informed decisions about when and how to leverage this feature to suit their browsing preferences and security needs.
Clearing Autofill Data in Safari
Clearing Autofill data in Safari is a straightforward process that allows users to declutter and manage their stored information. Whether you want to remove outdated details, enhance privacy, or simply start afresh, Safari provides the tools to accomplish this task with ease.
To clear Autofill data in Safari on a Mac, follow these simple steps:
Open Safari Preferences : Launch Safari and click on "Safari" in the top menu bar. From the drop-down menu, select "Preferences."
Access Autofill Settings : In the Preferences window, navigate to the "Autofill" tab. Here, you'll find various options for managing Autofill data, including forms, user names and passwords, and credit cards.
Clear Specific Autofill Entries : To remove specific Autofill entries, click on the "Edit" button next to the respective category, such as "User names and passwords" or "Other forms." This allows you to view and selectively delete individual entries.
Clear All Autofill Data : If you prefer to clear all Autofill data at once, simply click on the "Edit" button next to the respective category and choose "Remove All" to wipe the slate clean.
Confirm the Deletion : Safari will prompt you to confirm the deletion of Autofill data. Once confirmed, the selected entries or all Autofill data will be permanently removed from Safari.
On an iOS device, such as an iPhone or iPad, the process of clearing Autofill data in Safari is equally straightforward:
Access Settings : Open the "Settings" app on your iOS device and scroll down to find "Safari."
Manage Autofill Data : Within the Safari settings, tap on "Autofill" to access the options for managing Autofill data.
Clear Specific Entries or All Data : Similar to the Mac version, you can choose to delete specific Autofill entries or clear all Autofill data entirely.
By regularly clearing Autofill data in Safari, users can maintain a tidy and up-to-date repository of stored information. This not only helps in safeguarding privacy but also ensures that Autofill suggestions remain relevant and accurate, enhancing the overall browsing experience.
Taking control of Autofill data empowers users to curate their digital footprint, aligning with their evolving needs and preferences. Whether it's tidying up outdated addresses, refreshing saved passwords, or simply decluttering form suggestions, the ability to clear Autofill data in Safari puts users in the driver's seat of their browsing environment.
Managing Autofill Settings in Safari
Managing Autofill settings in Safari provides users with the flexibility to customize their browsing experience and fine-tune the way Autofill operates. By delving into the settings, users can tailor Autofill to align with their preferences, enhance privacy, and ensure the accuracy of stored information.
In Safari, accessing the Autofill settings allows users to exert control over various aspects of this feature. Here's a detailed look at the key elements of managing Autofill settings in Safari:
Customizing Form Autofill
Safari enables users to customize the Autofill feature for web forms, such as those requiring personal information like names, addresses, and contact details. By navigating to Safari Preferences and selecting the Autofill tab, users can fine-tune the information Safari automatically populates in web forms. This customization empowers users to decide which details Safari should suggest, providing a personalized and efficient form-filling experience.
Managing User Names and Passwords
The management of user names and passwords is a crucial aspect of Autofill settings. Safari allows users to view and edit the stored login credentials for various websites. By accessing the Passwords tab within Safari Preferences, users can review, update, and remove saved passwords. This level of control ensures that users can maintain the security and accuracy of their stored login information, promoting a secure and seamless browsing experience.
Configuring Credit Card Autofill
For online shoppers, Safari's ability to Autofill credit card information can be a time-saving convenience. By navigating to the Autofill tab in Safari Preferences, users can manage and update their saved credit card details. This includes adding new cards, editing existing information, and removing outdated entries. This level of control over credit card Autofill ensures that users can keep their payment details up to date and accurate, enhancing the efficiency and security of online transactions.
Utilizing iCloud Keychain Integration
Safari's Autofill settings are seamlessly integrated with iCloud Keychain, Apple's password management system. This integration ensures that the Autofill data stored in Safari is securely synced across all Apple devices linked to the user's iCloud account. By managing Autofill settings, users can leverage the power of iCloud Keychain to maintain a consistent browsing experience across their Apple ecosystem, with synchronized Autofill data ensuring a seamless transition between devices.
By actively managing Autofill settings in Safari, users can harness the full potential of this feature while maintaining control over their browsing data. This level of customization empowers users to tailor their browsing experience to suit their individual needs, ensuring that Autofill operates in a manner that aligns with their privacy, security, and convenience preferences.
In conclusion, Safari's Autofill feature is a valuable tool that streamlines the process of entering information on websites, offering convenience and efficiency to users. By automatically populating forms, login credentials, and even credit card details, Autofill simplifies the browsing experience, saving time and effort.
Understanding how Autofill works in Safari is essential for users to make the most of this feature while being mindful of privacy and security considerations. The ability to clear Autofill data in Safari provides users with the means to manage and declutter their stored information, ensuring that Autofill suggestions remain relevant and accurate.
Furthermore, actively managing Autofill settings in Safari empowers users to customize their browsing experience, aligning with their individual preferences and security needs. By fine-tuning the information suggested by Autofill, managing login credentials, and updating credit card details, users can maintain control over their browsing data while enjoying the convenience of this feature.
Ultimately, Safari's Autofill feature, when utilized effectively and managed proactively, enhances the browsing experience, offering a seamless and personalized interaction with web forms and login processes. By staying informed about how to navigate and optimize Autofill in Safari, users can harness its capabilities while safeguarding their privacy and security.
In the ever-evolving digital landscape, where convenience and security are paramount, Safari's Autofill feature stands as a valuable asset, providing users with the tools to streamline their online activities while maintaining control over their personal information. With the knowledge and understanding gained from this exploration of Safari's Autofill, users are empowered to navigate the digital realm with confidence and efficiency.
Leave a Reply Cancel reply
Your email address will not be published. Required fields are marked *
Save my name, email, and website in this browser for the next time I comment.
- Crowdfunding
- Cryptocurrency
- Digital Banking
- Digital Payments
- Investments
- Console Gaming
- Mobile Gaming
- VR/AR Gaming
- Gadget Usage
- Gaming Tips
- Online Safety
- Software Tutorials
- Tech Setup & Troubleshooting
- Buyer’s Guides
- Comparative Analysis
- Gadget Reviews
- Service Reviews
- Software Reviews
- Mobile Devices
- PCs & Laptops
- Smart Home Gadgets
- Content Creation Tools
- Digital Photography
- Video & Music Streaming
- Online Security
- Online Services
- Web Hosting
- WiFi & Ethernet
- Browsers & Extensions
- Communication Platforms
- Operating Systems
- Productivity Tools
- AI & Machine Learning
- Cybersecurity
- Emerging Tech
- IoT & Smart Devices
- Virtual & Augmented Reality
- Latest News
- AI Developments
- Fintech Updates
- Gaming News
- New Product Launches
5 Ways to Improve IT Automation
- What is Building Information Modelling
Related Post
Sla network: benefits, advantages, satisfaction of both parties to the contract, what is minecraft coded in, how much hp does a diablo tuner add, what is halo-fi, what is halo lock iphone, related posts.
How Do I Clear Safari
How To Make Safari Remember Passwords

How To Stop Autofill In Safari
How To Delete Safari Autofill
How To Turn Off Safari Autofill
How To Make Safari Smaller
How To Save Passwords In Safari
How To View Stored Credit Cards In Safari
Recent stories.

What is Building Information Modelling?

How to Use Email Blasts Marketing To Take Control of Your Market

Learn To Convert Scanned Documents Into Editable Text With OCR

Top Mini Split Air Conditioner For Summer

Comfortable and Luxurious Family Life | Zero Gravity Massage Chair

Fintechs and Traditional Banks: Navigating the Future of Financial Services

AI Writing: How It’s Changing the Way We Create Content

- Privacy Overview
- Strictly Necessary Cookies
This website uses cookies so that we can provide you with the best user experience possible. Cookie information is stored in your browser and performs functions such as recognising you when you return to our website and helping our team to understand which sections of the website you find most interesting and useful.
Strictly Necessary Cookie should be enabled at all times so that we can save your preferences for cookie settings.
If you disable this cookie, we will not be able to save your preferences. This means that every time you visit this website you will need to enable or disable cookies again.
How to Change iPhone 13 Autofill Settings: A Step-by-Step Guide
Changing the autofill settings on your iPhone 13 is a breeze. It involves navigating to your iPhone’s Settings, selecting Safari, and then tapping on Autofill. From there, you can modify your saved information, add new data, or turn off the autofill feature entirely. By following these quick steps, you’ll have your autofill preferences updated in no time.
Step by Step Tutorial to Change iPhone 13 Autofill Settings
Before we dive into the nitty-gritty, remember that altering these settings will determine how your iPhone fills in forms on websites. Whether you want to update your personal information or you’re simply tired of your phone suggesting the wrong email address, these steps will lead you to autofill freedom.
Step 1: Open the Settings App
Open the Settings app on your iPhone 13.
The Settings app is your gateway to customizing your iPhone experience. It’s the one with the gear icon, typically found on your home screen. Once you’ve located and tapped on it, you’re ready for the next step.
Step 2: Tap on ‘Safari’
Scroll down and tap on ‘Safari’ in the Settings menu.
Safari is Apple’s native web browser, and it’s where your autofill settings live. You might have to scroll a bit to find it, but it’s in there among the other app settings.
Step 3: Select ‘Autofill’
Under the ‘General’ section in the Safari settings, tap on ‘Autofill’.
This option is all about making your web browsing experience faster and more convenient by automatically filling in forms with your personal information.
Step 4: Adjust Your Autofill Information
Here, you can turn autofill on or off, change saved information, or add new information.
If you want to stop your iPhone from autofilling forms, simply switch off the ‘Use Contact Info’ toggle. To update or add information, tap on ‘My Info’ and select the correct contact card.
Once you’ve made your changes, your iPhone will now follow your updated autofill preferences. This means the next time you’re filling out a form on Safari, it will either autofill with your updated info or not autofill at all, depending on your selections.
Tips for Changing iPhone 13 Autofill Settings
- Always double-check the information you add to autofill to ensure accuracy.
- Consider updating your autofill settings if your contact information changes.
- If you’re concerned about privacy, you can choose to disable autofill entirely.
- Remember that changes to autofill settings only apply to Safari, not other browsers you may use.
- You can also manage credit card information in the autofill settings if you frequently shop online.
Frequently Asked Questions
Can i use autofill for passwords on my iphone 13.
Yes, you can use autofill for passwords. Go to ‘Settings’ > ‘Passwords & Accounts’ to manage these options.
Will changing autofill settings affect all my devices?
If you use iCloud, changes to your autofill settings will sync across all devices signed in with the same Apple ID.
How do I add a new address to autofill?
In the Autofill settings, tap on ‘My Info’, then select ‘Add New Contact’ to input a new address.
Can I remove only specific information from autofill?
Yes, you can remove specific information by editing your contact card in the Contacts app.
Is it safe to save credit card information in autofill?
While convenient, storing credit card information does carry risks. Only save this info if you’re comfortable with it and make sure your device is secure.
- Open the Settings app.
- Tap on ‘Safari’.
- Select ‘Autofill’.
- Adjust your autofill information.
There you have it! You’ve just navigated through the process of changing your iPhone 13’s autofill settings. It’s a handy feature that can save you time and frustration when filling out forms on the web. However, it’s also crucial to manage this feature wisely to protect your personal information. Whether you’ve updated your contact info, added a new credit card, or decided to disable autofill altogether, your browsing experience will now better align with your preferences and needs. Don’t forget to review these settings periodically, especially after any significant life changes like a move or name change. Your iPhone is a powerful tool, and with the right adjustments, it becomes even more tailored to your life. Happy browsing, and may your forms be ever in your favor!

Matthew Burleigh has been writing tech tutorials since 2008. His writing has appeared on dozens of different websites and been read over 50 million times.
After receiving his Bachelor’s and Master’s degrees in Computer Science he spent several years working in IT management for small businesses. However, he now works full time writing content online and creating websites.
His main writing topics include iPhones, Microsoft Office, Google Apps, Android, and Photoshop, but he has also written about many other tech topics as well.
Read his full bio here.
Share this:
Related posts:.
- How to Delete Autofill Entry on iPhone: A Step-by-Step Guide
- 15 Ways to Fix Safari Not Working on iPhone in 2023
- Safari History iPhone: How to See It [2023 Guide]
- How to Use Autofill in Word: A Step-by-Step Guide
- How to Get Safari Back on iPhone 13
- 15 iPhone Settings You Might Want to Change
- How to Check iTunes Gift Card Balance on an iPhone
- How to Save Passwords on iPhone 11
- How to Clear AutoFill Data from Safari on the iPhone 5
- How to Add Person to Group Text iPhone Guide (6 Easy Steps)
- How to Delete Contacts on iPhone – 6 Simple Methods
- How to Make All Columns the Same Width in Excel 2013
- 3 iPhone Safari Tips You Might Not Know
- How to View Saved Passwords in Google Chrome (3 Methods)
- How to Use Vanilla Gift Card on Amazon: A Step-by-Step Guide
- How to Turn Off the Credit Card Autofill Option in Safari on an iPhone
- How to Disable Autofill Passwords in Safari on an iPhone 11
- How to Share a Contact Via Text Message on the iPhone
- How to Disable a Safari Extension on an iPhone 13
- How to Make Google Your Homepage in Safari on a Mac
How to Set Up AutoFill in Safari on iPhone
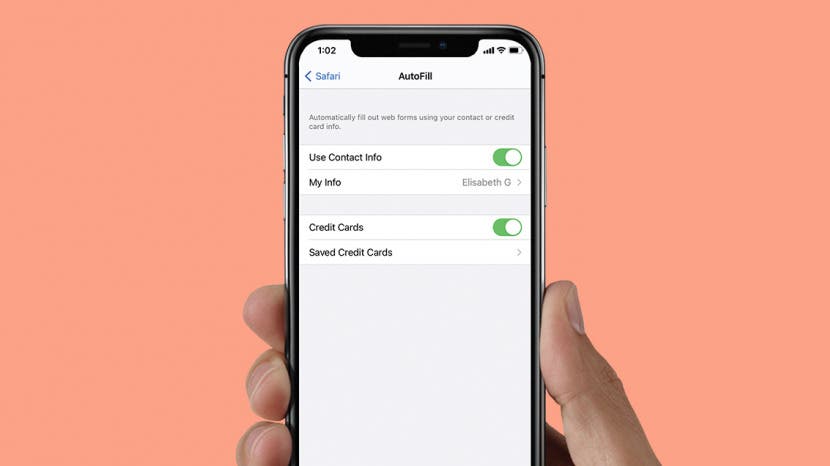
If you find yourself typing the same personal data and credit card information over and over again on your iPhone, it's time to set up Safari AutoFill. Setting up AutoFill in Safari on your iPhone saves you time and ensures the accuracy of the information you enter into forms online. We'll walk you through the Autofill setup process.
Related: How to Auto Fill Credit Card Information Using Your iPhone Camera
To set up Safari AutoFill on your iPhone:

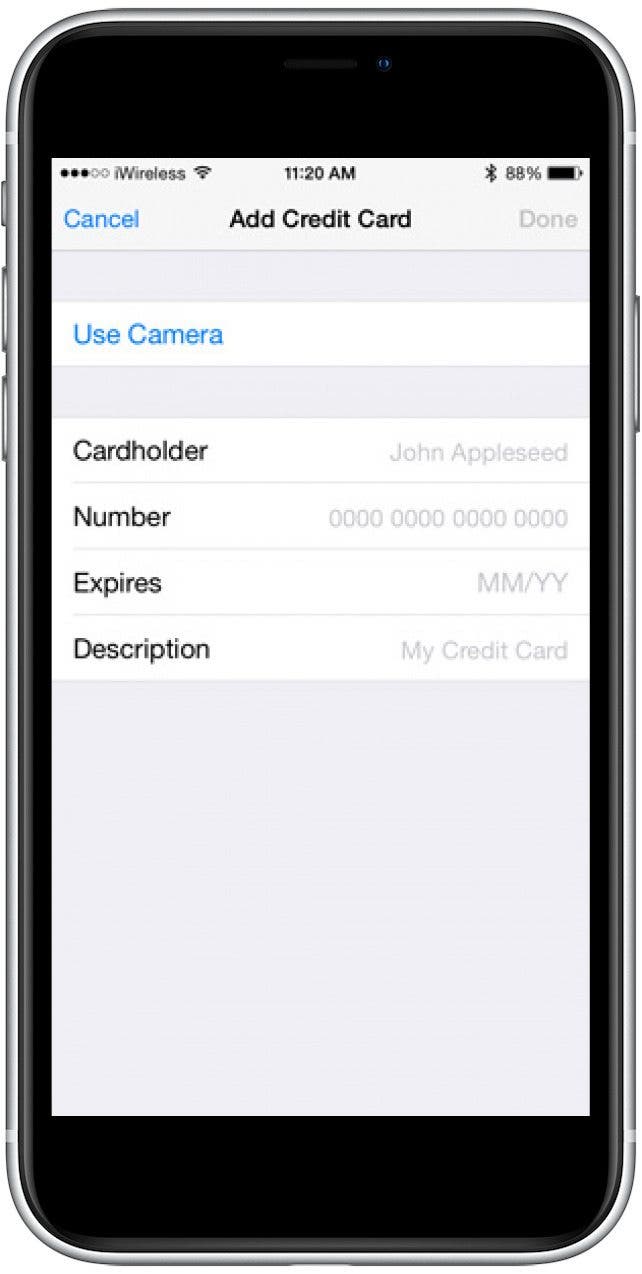
- To add a credit card in Safari AutoFill settings, select Saved Credit Cards .
- Enter your passcode, then tap Add Credit Card .
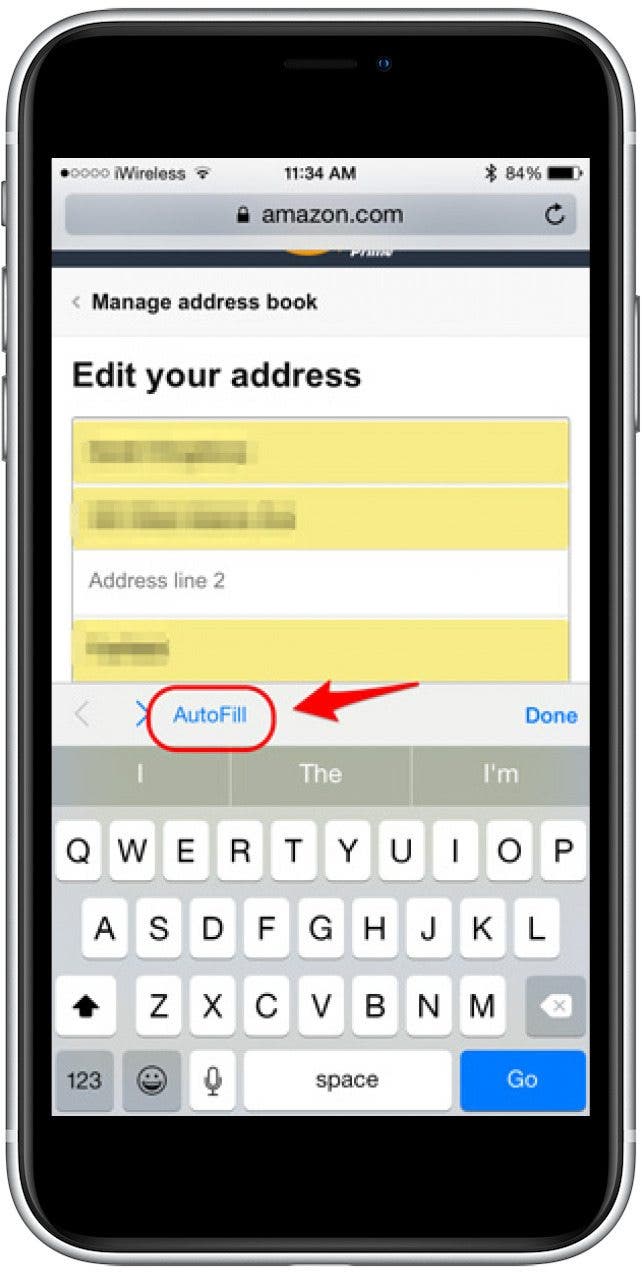
Once you have Use Contact Info and Credit Cards set up, you can fill in any web forms in Safari with your saved information by selecting AutoFill. To learn more about how to customize your Safari experience on your iPhone, sign up for our free Tip of the Day newsletter.
Author Details
Violet cooper.
Violet is a freelance lifestyle writer. She loves spending time with her husband, enjoys going on adventures, and is an Apple enthusiast.

Article Spotlight
New podcast episode: all about apple's latest ipad drop.

In the 211th episode, David and Donna cover all the new iPads that Apple announced at its online 'Let Loose' event on May 7. From the AI-focused M4 chip to a haptic touch-enhanced Apple Pencil Pro, listen in to find out if you should buy one of the new supercharged iPads!
Featured Products

Have you heard about the latest updates to iOS 17? Check out our iOS 17.5 Guide to discover all the new features Apple has added, including updates to Messages, Photos, and a brand new built-in app. iOS 17 was a massive update, and there are hundreds of new iPhone features to discover! The updated iOS 17.5 Guide is available exclusively to iPhone Life Insider subscribers. Get our updated iOS 17.5 Guide and check out all the latest software improvements!
Most Popular

How to Tell If Someone Blocked Your Number on iPhone
How to Record a Phone Call on an iPhone for Free
How to Tell If a Dead iPhone Is Charging

10 Best AI Apps for iPhone in 2024
How to Schedule a Text Message on iPhone
10 Simple Tips To Fix iPhone Battery Drain
How To Find My iPhone From Another iPhone

How To Put Two Pictures Together on iPhone
Can iPhones Get Viruses? How to Detect & Remove Malware (iOS 17)
iPhone Notes Disappeared? Recover the App & Lost Notes
How to Refresh AirTag Location Manually & More Often

How To Get an App Back on Your Home Screen
Featured articles, why is my iphone battery draining so fast 13 easy fixes.
Identify Mystery Numbers: How to Find No Caller ID on iPhone

Apple ID Not Active? Here’s the Fix!
How to Cast Apple TV to Chromecast for Easy Viewing

Fix Photos Not Uploading to iCloud Once & for All (iOS 17)
There Was an Error Connecting to the Apple ID Server: Fixed
CarPlay Not Working? 4 Ways to Fix Apple CarPlay Today
Check out our sponsors.

- Each email reveals new things you can do with your phone (and other devices) with easy-to-follow screenshots.
- Enter your email to get your first tip immediately!
How to edit autofill information on your iPhone, or disable the feature
- To edit autofill data on your iPhone , you'll need to go into your Settings app.
- Your iPhone stores and can automatically fill out forms that ask for email addresses, passwords, or credit card information.
- Autofill is useful, but if you've accidentally saved the wrong information, autofill will keep repeating that wrong information. This is when it's useful to edit autofill data.
- Visit Business Insider's homepage for more stories .
Chances are good that you use your iPhone's autofill feature so often that you take it for granted, barely noticing as your phone quickly loads in your passwords or credit card information.
But if you ever lose or cancel a credit card, or if you don't want personal data stored on your phone, or if you share your iPhone with others, then you may want to remove or at least customize the autofill feature. That way, you don't risk sharing too much sensitive information.
Check out the products mentioned in this article:
Iphone xs (from $999.99 at best buy), how to edit credit card data autofill on iphone.
1. Open the Settings app and scroll down to the Safari tab.
2. Tap Safari, then tap Autofill under the General subsection.
3. Toggle "Credit Cards" to the left (button will turn white) to prevent the phone from automatically using any of the cards on file, or tap "Saved Credit Cards" (and then enter your password) to manage your various cards on a case-by-case basis.
How to edit saved password autofill on iPhone
1. In the Settings app, swipe down and click on Passwords & Accounts.
2. On the next page, you can disable auto-filling passwords by switching "AutoFill Passwords" off, or you can edit password data on a site-by-site or app-by-app basis by tapping "Website & App Passwords."
3. In the Website & App Passwords menu, on an individual basis, you can also change the username and password you use to access each site on your that you have saved.
Read More: How to find all of your saved passwords on an iPhone, and edit or delete them
Related coverage from How To Do Everything: Tech :
How to add contacts to your iphone in 3 different ways, how to transfer all of your contacts from one iphone to another using icloud, 'why won't my iphone charge': how to diagnose and fix common iphone charging problems, how to backup your iphone to icloud, your computer, or an external hard drive.
Insider Inc. receives a commission when you buy through our links.
Watch: I'm a diehard iPhone user who switched to Android for a week — here's what I loved and hated about the Google Pixel 3 XL
- Main content
Home > News Tips
[Effective] How To Disable The Autofill Feature On Mac?
Updated on Friday, May 24, 2024

Approved by
English Français Deutsch やまと Español Português
How To Disable Autofill On A Mac? [Chrome, Safari, QuickBooks]
Mac is configured with an autofill feature that gathers your typing patterns, collects your input preferences, and then predicts and fills the rest of the content automatically when you type with one or more letters in opening an app in Spotlight Search , accessing a certain file or folder directory in Finder , fulfilling a password to log in an account, and so on.
This feature frees you from inputting all the content, saving you time and effort. You might think it is so considerate and intelligent that it always knows what you're going to type. Yet it brings troubles sometimes. The autofill feature is also considerate to other people who use your computer, which completes the unfinished word or fulfills the account information, causing data leaks.
The good news is that you can disable the autofill completion of apps on your Mac computer, including Google Chrome, Safari, and QuickBooks. Let's see them in detail!
How to disable Google Chrome autofill completion on Mac?
You can turn off the autofill completion of the installed Google Chrome with easy steps. On top of that, you can even clear its autofill data for the sake of data security. Here is how to do that:
Step 1: Launch Google Chrome on your Mac computer via Launchpad or Spotlight Search .
Step 2: Click the three dots at the top right of the Google Chrome screen.
Step 3: Select Settings for further actions.
Step 4: In the Settings tab, search " autofill " or click Autofill and password in the menu window.
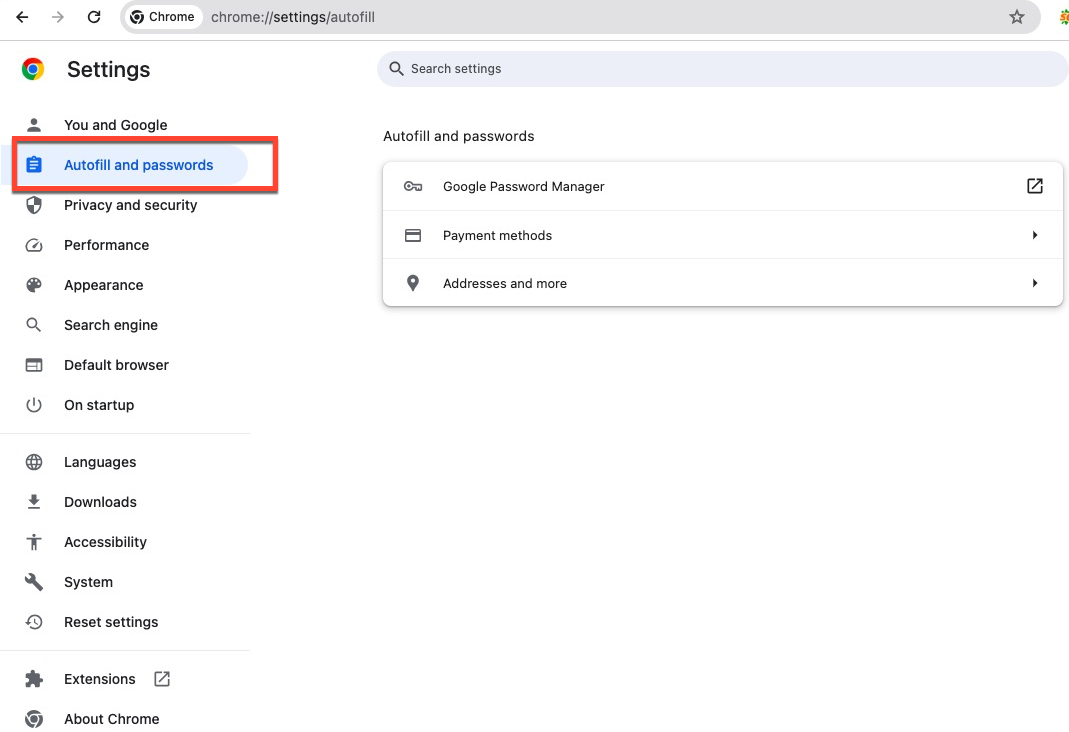
Step 5: Click each section to toggle off autofill for passwords, payment methods, addresses, and phone numbers.
You can also disable the autofill feature of the third-party extensions installed on Google Chrome:
- Click Extensions (puzzle piece icon) at the top right of the browser toolbar.
- Click Manage extensions .
- Toggle off any extensions that enabled autofill previously.
How to clear the autofill data in Google Chrome:
- Launch Google Chrome and click the three dots on the top right corner of its window.
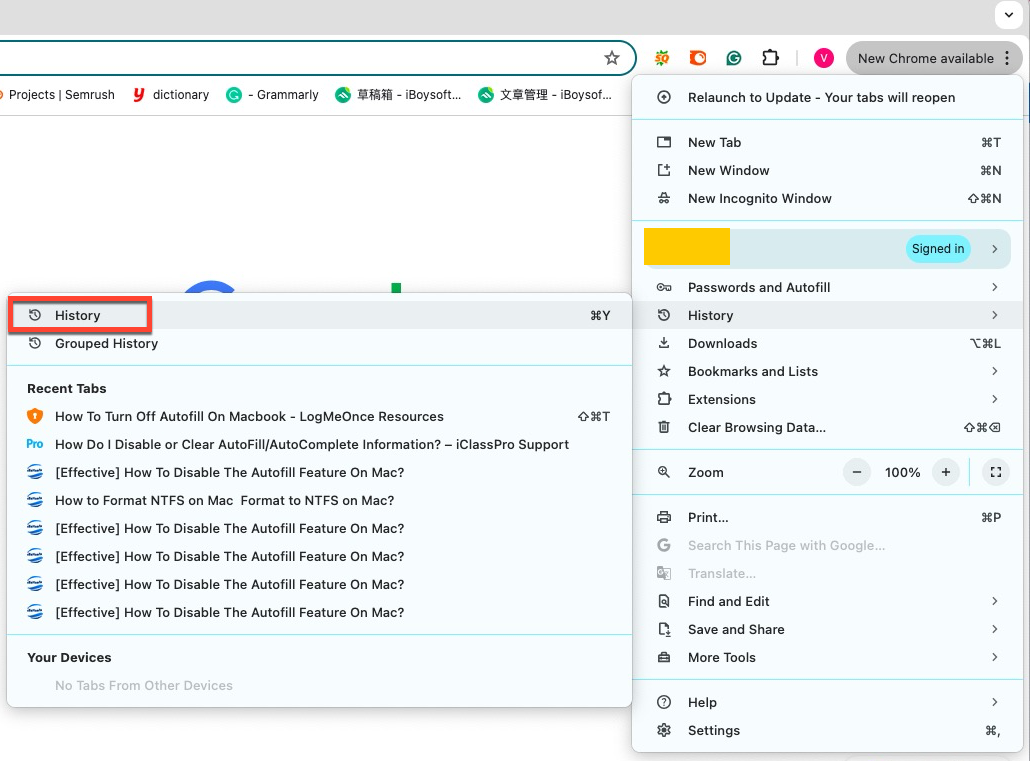
- Select Clear browsing data .
- Go to the Advanced tab to select All Time in the time range.
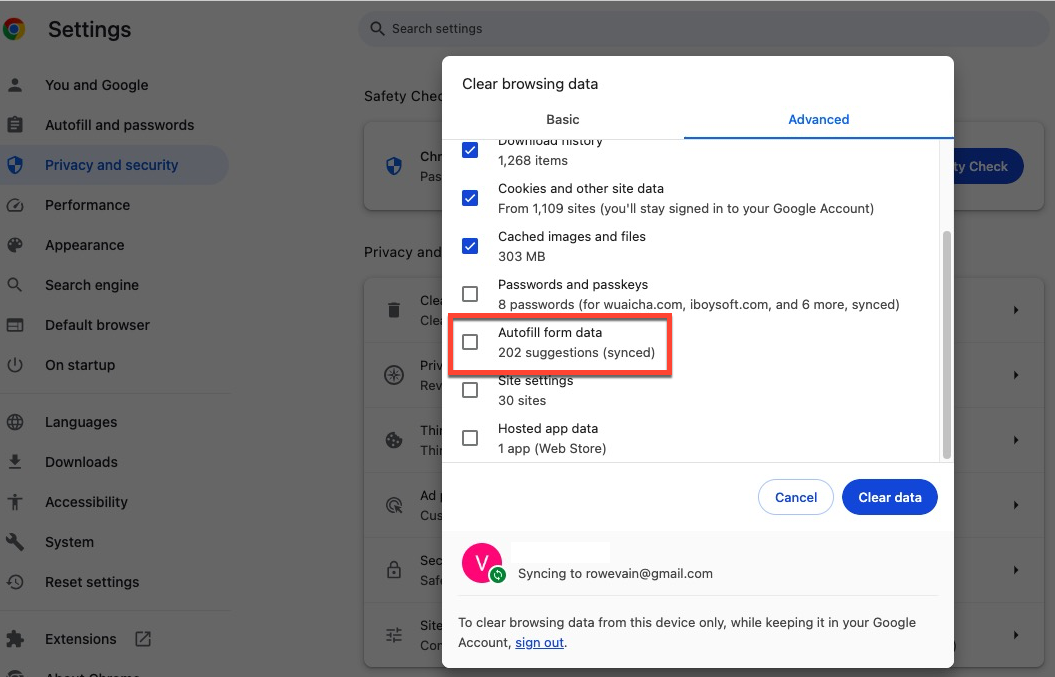
- Click Clean Data to confirm your actions. The clear time depends on how often you clear the browsing history. The more frequently you clear the browsing history, the less time the clearing process takes.
Be kindly to share this post to help more people if you find it helpful!
How to disable Safari autofill completion on Mac?
If you set Safari as the default browser on your Mac, you might want to know how to disable the autofill function on Safari instead. Just read the step-wise guides to finish this task with ease:
Step 1: Launch Safari and click Safari on the top left corner of the Mac desktop.
Step 2: Click Preferences from the dropdown menu and go to the Autofill tab.
Step 3: Uncheck User Names and Passwords . If you wish to prevent Safari from saving any other AutoFill web information, be sure to uncheck those options as well.

Step 4: Then the setting begins to work and the autofill action is turned off from this moment on!
How to clear the autofill data in Safari:
- Launch Safari and click Safari on the top left corner of the Mac desktop.
- Select Preferences for the following actions.
- Tap on the Autofill tab.
- Click Edit next to the User Names and Passwords .

- Click Done and you're all set!
How to disable QuickBooks autofill competition on Mac?
QuickBooks is a top accounting software that manages your cash flow, you must use it frequently to deal with your tax and other business. While the autofill feature might disturb you when you focus on inputting numbers or letters, prompting you to turn off the autofill feature.
How to turn off autofill in QuickBooks Online:
- Launch QuickBooks on your computer and go to Settings .
- Select Account and Settings then go to the Advanced tab.
- In the Automation section , select the pencil icon .
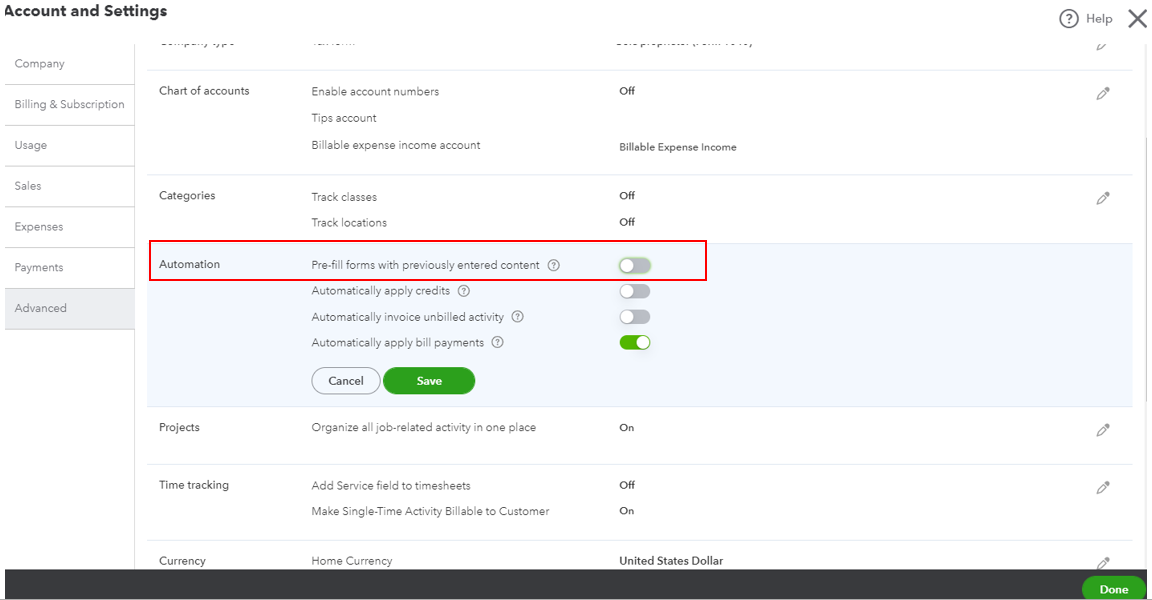
- Select Save and Done to confirm your actions.
How to disable autofill on QuickBooks Desktop:
Step 1: In QuickBooks Desktop , go to the Edit menu at the top left.
Step 2: Click Preferences in the drop-down.
Step 3: Select General at the left pane, then proceed to the My Preferences tab.
Step 4: In the Automatically Recall Information section, cancel the checkmark on the Automatically remember account or transaction information .
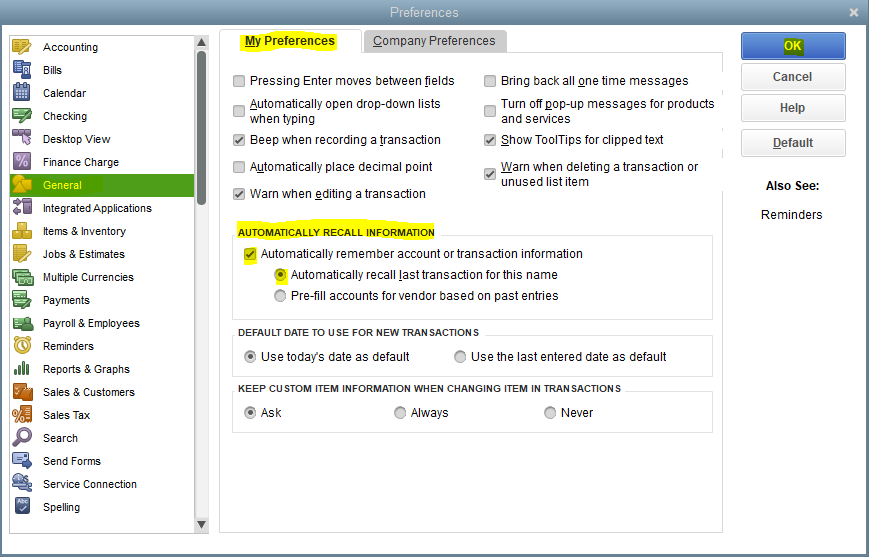
Step 6: Hit OK to complete

How To Fix QuickBooks Keeps Crashing On Mac? [Professional]
This post tells you how to fix QuickBooks Online and Desktop software that keeps crashing on your Mac computer. Moreover, some useful info about QuickBooks is also included in it.
The autofill feature is such a good point that allows you to enable and disable based on your preferences, and this post gives you detailed steps on how to disable it on different apps. If you're interested in it, do not hesitate to begin reading this post and turn off that feature!
Vain Rowe is a new technical editor at iBoysoft. She spares no effort to learn tech knowledge during the training and after training. She has shared dozens of articles across iBoysoft website and other websites, providing solutions and information about file restoration, disk cleanup, work efficiency, and data security.
Jessica Shee is a senior tech editor at iBoysoft. Throughout her 4 years of experience, Jessica has written many informative and instructional articles in data recovery, data security, and disk management to help a lot of readers secure their important documents and take the best advantage of their devices.
No. 308, 3/F, Unit 1, Building 6, No. 1700, Tianfu Avenue North, High-tech Zone
Copyright© 2024 iBoysoft ® . All Rights Reserved.

How To Manually Close All Safari Tabs On iPhone
A ny active online content consumer can attest that browser tab management can get a bit overwhelming sometimes. It's a bit easier to keep track of all your open webpages on a computer web browser because you can see at a glance how many links you have open and can close a few when the number is getting out of hand — when you can no longer read the title on the webpage tabs, that's usually a good sign for browser tab cleanup. On a mobile browser, though, you're more likely to forget about a link you clicked because you can only view one webpage at a time on your screen.
If you own an iPhone and use Safari for all your mobile browsing needs, you can check the status of your metaphoric webpage graveyard by launching the Safari app and tapping the Tabs view, signified by the two-square icon on the bottom navigation bar. If you haven't closed out a browser page in a while, the number of tabs you have open will likely be high. Unless you've rigged your iPhone to automatically close Safari tabs after a certain amount of time has passed, you might find yourself stressed out by the task of manually hitting "x" on several webpage tiles. If that's something you don't feel like doing, there may be another solution you can consider.
Read more: How To Speed Up The Internet Connection On Your Android Phone
Start Fresh And Purge All Your Open Safari Pages
In lieu of sifting through tons of webpages on Safari — most of which you've likely already read or are already irrelevant by now — to individually close them down, you can initiate the ultimate cleanup process and just remove everything you've got open in Safari. Here's how:
- Launch the Safari app.
- On the bottom navigation bar, long-press on the Tabs switcher icon to pull up the menu.
- Select "Close All [X] Tabs."
- Finalize the action by hitting "Close All [X] Tabs" again on the confirmation box.
If you have any Safari tab groups set up on your iPhone, you can also opt to only close all the pages filed in it by following the same instructions. After you launch the Safari app, tap the Tabs icon, swipe left or right on the tab group name carousel at the bottom of the screen, and tap on the group you want to clear. Long-press on Done hit "Close All [X] Tabs," and confirm the action. Executing these steps will only get rid of the tabs that have been added to it, leaving the other pages still open.
To rescue a recently closed tab, tap the Tabs switcher icon, long-press on the "+" symbol at the bottom of the page, and select from the list the webpage you'd like to view again. Alternatively, you can also tap Bookmarks (book icon) on the bottom navigation bar, hit the clock icon to open your Safari history, and find the link you want to re-open.
Read the original article on SlashGear

Vite 项目中如何去集成 Sass
样式方面我们首先是会想到要给项目进行默认样式的重置,此时我们应当去使用一个比较稳定的npm 包的样式重置代码:

找到对应的源码复制一份:
接着我们便是进行全局变量的配置,我们先试试直接在index.scss 文件中进行变量的定义,看看能不能在 vue 应用中进行使用:
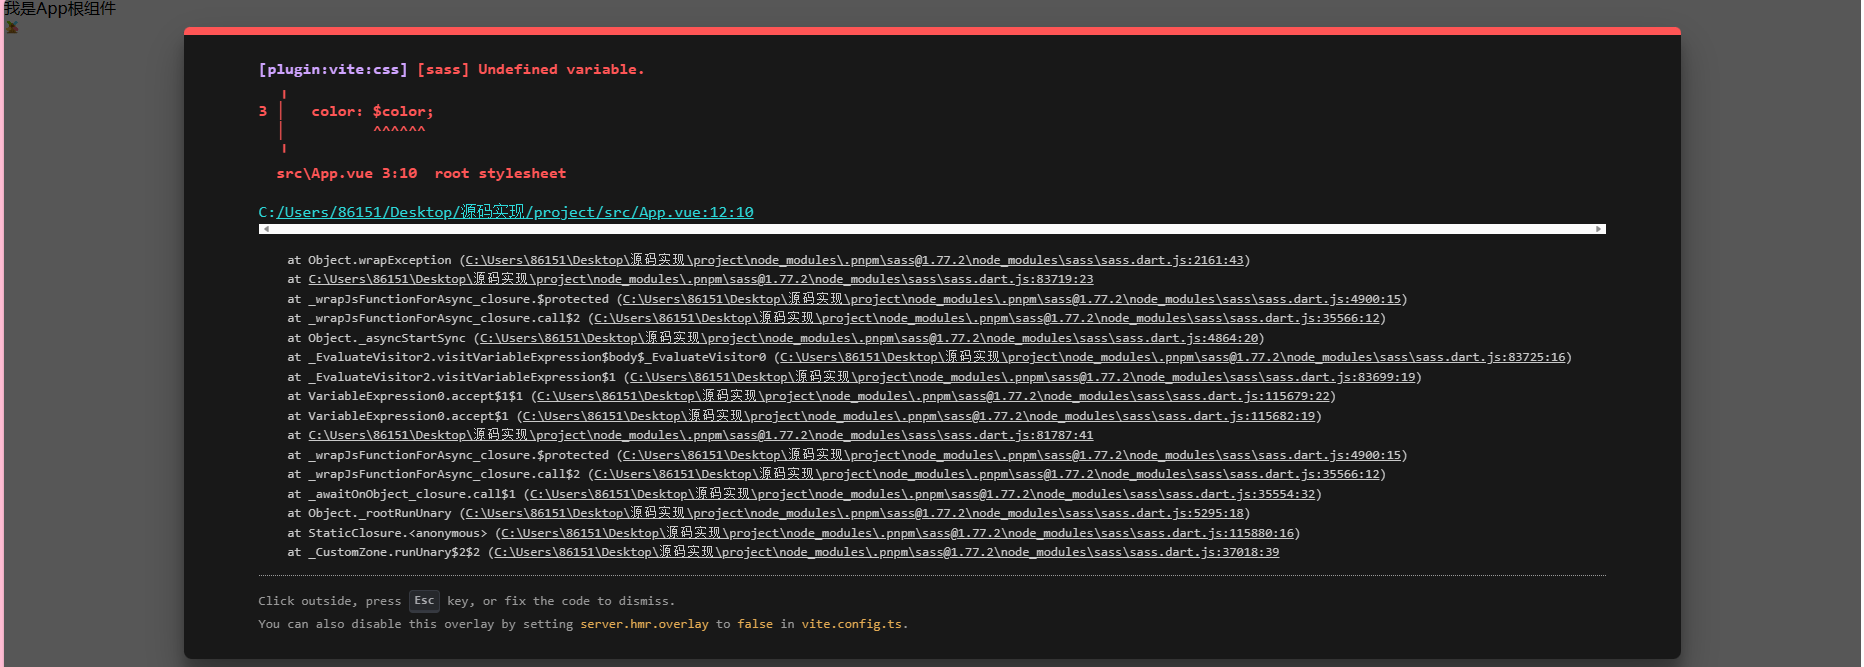
可是我们在 main.ts 中进行导入了呀,为毛就不行呢?通过查看文档:原来是需要这样来配置,如下就是集成 scss 全局变量的方法
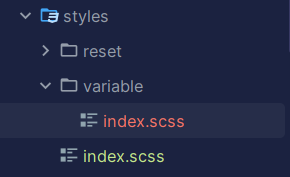
vite.config.ts
重新启动项目,现在就可以使用了:比如项目的主题色 宽高 层级… 都可以在这里定义了

当然还有很多的 scss 文件可以编写,一些混入 一些逻辑判断 一些封装都可以到这里进行集成
本文分享自 作者个人站点/博客 前往查看
如有侵权,请联系 [email protected] 删除。
本文参与 腾讯云自媒体分享计划 ,欢迎热爱写作的你一起参与!
Copyright © 2013 - 2024 Tencent Cloud. All Rights Reserved. 腾讯云 版权所有
深圳市腾讯计算机系统有限公司 ICP备案/许可证号: 粤B2-20090059 深公网安备号 44030502008569
腾讯云计算(北京)有限责任公司 京ICP证150476号 | 京ICP备11018762号 | 京公网安备号11010802020287
Copyright © 2013 - 2024 Tencent Cloud.
All Rights Reserved. 腾讯云 版权所有
iPhone User Guide
- iPhone models compatible with iOS 17
- R ' class='toc-item' data-ss-analytics-link-url='https://support.apple.com/guide/iphone/iphone-xr-iph017302841/ios' data-ajax-endpoint='https://support.apple.com/guide/iphone/iphone-xr-iph017302841/ios' data-ss-analytics-event="acs.link_click" href='https://support.apple.com/guide/iphone/iphone-xr-iph017302841/ios' id='toc-item-IPH017302841' data-tocid='IPH017302841' > iPhone X R
- S ' class='toc-item' data-ss-analytics-link-url='https://support.apple.com/guide/iphone/iphone-xs-iphc00446242/ios' data-ajax-endpoint='https://support.apple.com/guide/iphone/iphone-xs-iphc00446242/ios' data-ss-analytics-event="acs.link_click" href='https://support.apple.com/guide/iphone/iphone-xs-iphc00446242/ios' id='toc-item-IPHC00446242' data-tocid='IPHC00446242' > iPhone X S
- S Max' class='toc-item' data-ss-analytics-link-url='https://support.apple.com/guide/iphone/iphone-xs-max-iphcd2066870/ios' data-ajax-endpoint='https://support.apple.com/guide/iphone/iphone-xs-max-iphcd2066870/ios' data-ss-analytics-event="acs.link_click" href='https://support.apple.com/guide/iphone/iphone-xs-max-iphcd2066870/ios' id='toc-item-IPHCD2066870' data-tocid='IPHCD2066870' > iPhone X S Max
- iPhone 11 Pro
- iPhone 11 Pro Max
- iPhone SE (2nd generation)
- iPhone 12 mini
- iPhone 12 Pro
- iPhone 12 Pro Max
- iPhone 13 mini
- iPhone 13 Pro
- iPhone 13 Pro Max
- iPhone SE (3rd generation)
- iPhone 14 Plus
- iPhone 14 Pro
- iPhone 14 Pro Max
- iPhone 15 Plus
- iPhone 15 Pro
- iPhone 15 Pro Max
- Setup basics
- Make your iPhone your own
- Take great photos and videos
- Keep in touch with friends and family
- Share features with your family
- Use iPhone for your daily routines
- Expert advice from Apple Support
- What’s new in iOS 17
- Turn on and set up iPhone
- Wake, unlock, and lock
- Set up cellular service
- Use Dual SIM
- Connect to the internet
- Sign in with Apple ID
- Subscribe to iCloud+
- Find settings
- Set up mail, contacts, and calendar accounts
- Learn the meaning of the status icons
- Charge the battery
- Charge with cleaner energy sources
- Show the battery percentage
- Check battery health and usage
- Use Low Power Mode
- Read and bookmark the user guide
- Learn basic gestures
- Learn gestures for iPhone models with Face ID
- Adjust the volume
- Silence iPhone
- Find your apps in App Library
- Switch between open apps
- Quit and reopen an app
- Multitask with Picture in Picture
- Access features from the Lock Screen
- Use the Dynamic Island
- Perform quick actions
- Search on iPhone
- Get information about your iPhone
- View or change cellular data settings
- Travel with iPhone
- Change sounds and vibrations
- Use the Action button on iPhone 15 Pro and iPhone 15 Pro Max
- Create a custom Lock Screen
- Change the wallpaper
- Adjust the screen brightness and color balance
- Keep the iPhone display on longer
- Use StandBy
- Customize the text size and zoom setting
- Change the name of your iPhone
- Change the date and time
- Change the language and region
- Organize your apps in folders
- Add, edit, and remove widgets
- Move apps and widgets on the Home Screen
- Remove or delete apps
- Use and customize Control Center
- Change or lock the screen orientation
- View and respond to notifications
- Change notification settings
- Set up a Focus
- Allow or silence notifications for a Focus
- Turn a Focus on or off
- Stay focused while driving
- Customize sharing options
- Type with the onscreen keyboard
- Dictate text
- Select and edit text
- Use predictive text
- Use text replacements
- Add or change keyboards
- Add emoji and stickers
- Take a screenshot
- Take a screen recording
- Draw in documents
- Add text, shapes, signatures, and more
- Fill out forms and sign documents
- Use Live Text to interact with content in a photo or video
- Use Visual Look Up to identify objects in your photos and videos
- Lift a subject from the photo background
- Subscribe to Apple Arcade
- Play with friends in Game Center
- Connect a game controller
- Use App Clips
- Update apps
- View or cancel subscriptions
- Manage purchases, settings, and restrictions
- Install and manage fonts
- Buy books and audiobooks
- Annotate books
- Access books on other Apple devices
- Listen to audiobooks
- Set reading goals
- Organize books
- Create and edit events in Calendar
- Send invitations
- Reply to invitations
- Change how you view events
- Search for events
- Change calendar and event settings
- Schedule or display events in a different time zone
- Keep track of events
- Use multiple calendars
- Use the Holidays calendar
- Share iCloud calendars
- Camera basics
- Set up your shot
- Apply Photographic Styles
- Take Live Photos
- Take Burst mode shots
- Take a selfie
- Take panoramic photos
- Take macro photos and videos
- Take portraits
- Take Night mode photos
- Take Apple ProRAW photos
- Adjust the shutter volume
- Adjust HDR camera settings
- Record videos
- Record spatial videos for Apple Vision Pro
- Record ProRes videos
- Record videos in Cinematic mode
- Change video recording settings
- Save camera settings
- Customize the Main camera lens
- Change advanced camera settings
- View, share, and print photos
- Use Live Text
- Scan a QR code
- See the world clock
- Set an alarm
- Change the next wake up alarm
- Use the stopwatch
- Use multiple timers
- Add and use contact information
- Edit contacts
- Add your contact info
- Use NameDrop on iPhone to share your contact info
- Use other contact accounts
- Use Contacts from the Phone app
- Merge or hide duplicate contacts
- Export contacts
- Get started with FaceTime
- Make FaceTime calls
- Receive FaceTime calls
- Create a FaceTime link
- Take a Live Photo
- Turn on Live Captions in a FaceTime call
- Use other apps during a call
- Make a Group FaceTime call
- View participants in a grid
- Use SharePlay to watch, listen, and play together
- Share your screen in a FaceTime call
- Collaborate on a document in FaceTime
- Use video conferencing features
- Hand off a FaceTime call to another Apple device
- Change the FaceTime video settings
- Change the FaceTime audio settings
- Change your appearance
- Leave a call or switch to Messages
- Block unwanted callers
- Report a call as spam
- Connect external devices or servers
- Modify files, folders, and downloads
- Search for files and folders
- Organize files and folders
- Set up iCloud Drive
- Share files and folders in iCloud Drive
- Use an external storage device, a file server, or a cloud storage service
- Share your location
- Meet up with a friend
- Send your location via satellite
- Add or remove a friend
- Locate a friend
- Get notified when friends change their location
- Notify a friend when your location changes
- Turn off Find My
- Add your iPhone
- Add your iPhone Wallet with MagSafe
- Get notified if you leave a device behind
- Locate a device
- Mark a device as lost
- Erase a device
- Remove a device
- Add an AirTag
- Share an AirTag or other item in Find My on iPhone
- Add a third-party item
- Get notified if you leave an item behind
- Locate an item
- Mark an item as lost
- Remove an item
- Adjust map settings
- Get started with Fitness
- Track daily activity and change your move goal
- See your activity summary
- Sync a third-party workout app
- Change fitness notifications
- Share your activity
- Subscribe to Apple Fitness+
- Find Apple Fitness+ workouts and meditations
- Start an Apple Fitness+ workout or meditation
- Create a Custom Plan in Apple Fitness+
- Work out together using SharePlay
- Change what’s on the screen during an Apple Fitness+ workout or meditation
- Download an Apple Fitness+ workout or meditation
- Get started with Freeform
- Create a Freeform board
- Draw or handwrite
- Apply consistent styles
- Position items on a board
- Search Freeform boards
- Share and collaborate
- Delete and recover boards
- Get started with Health
- Fill out your Health Details
- Intro to Health data
- View your health data
- Share your health data
- View health data shared by others
- Download health records
- View health records
- Monitor your walking steadiness
- Log menstrual cycle information
- View menstrual cycle predictions and history
- Track your medications
- Learn more about your medications
- Log your state of mind
- Take a mental health assessment
- Set up a schedule for a Sleep Focus
- Turn off alarms and delete sleep schedules
- Add or change sleep schedules
- Turn Sleep Focus on or off
- Change your wind down period, sleep goal, and more
- View your sleep history
- Check your headphone levels
- Use audiogram data
- Register as an organ donor
- Back up your Health data
- Intro to Home
- Upgrade to the new Home architecture
- Set up accessories
- Control accessories
- Control your home using Siri
- Use Grid Forecast to plan your energy usage
- Set up HomePod
- Control your home remotely
- Create and use scenes
- Use automations
- Set up security cameras
- Use Face Recognition
- Unlock your door with a home key
- Configure a router
- Invite others to control accessories
- Add more homes
- Get music, movies, and TV shows
- Get ringtones
- Manage purchases and settings
- Get started with Journal
- Write in your journal
- Review your past journal entries
- Change Journal settings
- Magnify nearby objects
- Change settings
- Detect people around you
- Detect doors around you
- Receive image descriptions of your surroundings
- Read aloud text and labels around you
- Set up shortcuts for Detection Mode
- Add and remove email accounts
- Set up a custom email domain
- Check your email
- Unsend email with Undo Send
- Reply to and forward emails
- Save an email draft
- Add email attachments
- Download email attachments
- Annotate email attachments
- Set email notifications
- Search for email
- Organize email in mailboxes
- Flag or block emails
- Filter emails
- Use Hide My Email
- Use Mail Privacy Protection
- Change email settings
- Delete and recover emails
- Add a Mail widget to your Home Screen
- Print emails
- Get travel directions
- Select other route options
- Find stops along your route
- View a route overview or a list of turns
- Change settings for spoken directions
- Get driving directions
- Get directions to your parked car
- Set up electric vehicle routing
- Report traffic incidents
- Get cycling directions
- Get walking directions
- Get transit directions
- Delete recent directions
- Get traffic and weather info
- Estimate travel time and ETA
- Download offline maps
- Search for places
- Find nearby attractions, restaurants, and services
- Get information about places
- Mark places
- Share places
- Rate places
- Save favorite places
- Explore new places with Guides
- Organize places in My Guides
- Clear location history
- Look around places
- Take Flyover tours
- Find your Maps settings
- Measure dimensions
- View and save measurements
- Measure a person’s height
- Use the level
- Set up Messages
- About iMessage
- Send and reply to messages
- Unsend and edit messages
- Keep track of messages
- Forward and share messages
- Group conversations
- Watch, listen, or play together using SharePlay
- Collaborate on projects
- Use iMessage apps
- Take and edit photos or videos
- Share photos, links, and more
- Send stickers
- Request, send, and receive payments
- Send and receive audio messages
- Animate messages
- Send and save GIFs
- Turn read receipts on or off
- Change notifications
- Block, filter, and report messages
- Delete messages and attachments
- Recover deleted messages
- View albums, playlists, and more
- Show song credits and lyrics
- Queue up your music
- Listen to broadcast radio
- Subscribe to Apple Music
- Play music together in the car with iPhone
- Listen to lossless music
- Listen to Dolby Atmos music
- Apple Music Sing
- Find new music
- Add music and listen offline
- Get personalized recommendations
- Listen to radio
- Search for music
- Create playlists
- See what your friends are listening to
- Use Siri to play music
- Change the way music sounds
- Get started with News
- Use News widgets
- See news stories chosen just for you
- Read stories
- Follow your favorite teams with My Sports
- Listen to Apple News Today
- Subscribe to Apple News+
- Browse and read Apple News+ stories and issues
- Use Offline Mode to read downloaded News content
- Manually download Apple News+ issues
- Listen to audio stories
- Solve puzzles in Apple News
- Solve crossword and crossword mini puzzles
- Solve Quartiles puzzles
- Search for news stories
- Save stories in News for later
- Subscribe to individual news channels
- Get started with Notes
- Add or remove accounts
- Create and format notes
- Draw or write
- Add photos, videos, and more
- Scan text and documents
- Work with PDFs
- Create Quick Notes
- Search notes
- Organize in folders
- Organize with tags
- Use Smart Folders
- Export or print notes
- Change Notes settings
- Make a call
- View and delete the call history
- Answer or decline incoming calls
- While on a call
- Have a conference or three-way call on iPhone
- Set up voicemail
- Check voicemail
- Change voicemail greeting and settings
- Select ringtones and vibrations
- Make calls using Wi-Fi
- Set up call forwarding
- Set up call waiting
- Block or avoid unwanted calls
- View photos and videos
- Play videos and slideshows
- Delete or hide photos and videos
- Edit photos and videos
- Trim video length and adjust slow motion
- Edit Cinematic mode videos
- Edit Live Photos
- Edit portraits
- Use photo albums
- Edit, share, and organize albums
- Filter and sort photos and videos in albums
- Make stickers from your photos
- Duplicate and copy photos and videos
- Merge duplicate photos and videos
- Search for photos
- Identify people and pets
- Browse photos by location
- Share photos and videos
- Share long videos
- View photos and videos shared with you
- Watch memories
- Personalize your memories
- Manage memories and featured photos
- Use iCloud Photos
- Create shared albums
- Add and remove people in a shared album
- Add and delete photos and videos in a shared album
- Set up or join an iCloud Shared Photo Library
- Add content to an iCloud Shared Photo Library
- Use iCloud Shared Photo Library
- Import and export photos and videos
- Print photos
- Find podcasts
- Listen to podcasts
- Follow your favorite podcasts
- Use the Podcasts widget
- Organize your podcast library
- Download, save, or share podcasts
- Subscribe to podcasts
- Listen to subscriber-only content
- Change download settings
- Make a grocery list
- Add items to a list
- Edit and manage a list
- Search and organize lists
- Work with templates
- Use Smart Lists
- Print reminders
- Use the Reminders widget
- Change Reminders settings
- Browse the web
- Search for websites
- Customize your Safari settings
- Change the layout
- Use Safari profiles
- Open and close tabs
- Organize your tabs
- View your Safari tabs from another Apple device
- Share Tab Groups
- Use Siri to listen to a webpage
- Bookmark favorite webpages
- Save pages to a Reading List
- Find links shared with you
- Annotate and save a webpage as a PDF
- Automatically fill in forms
- Get extensions
- Hide ads and distractions
- Clear your cache and cookies
- Browse the web privately
- Use passkeys in Safari
- Check stocks
- Manage multiple watchlists
- Read business news
- Add earnings reports to your calendar
- Use a Stocks widget
- Translate text, voice, and conversations
- Translate text in apps
- Translate with the camera view
- Subscribe to Apple TV+, MLS Season Pass, or an Apple TV channel
- Add your TV provider
- Get shows, movies, and more
- Watch sports
- Watch Major League Soccer with MLS Season Pass
- Control playback
- Manage your library
- Change the settings
- Make a recording
- Play it back
- Edit or delete a recording
- Keep recordings up to date
- Organize recordings
- Search for or rename a recording
- Share a recording
- Duplicate a recording
- Keep cards and passes in Wallet
- Set up Apple Pay
- Use Apple Pay for contactless payments
- Use Apple Pay in apps and on the web
- Track your orders
- Use Apple Cash
- Use Apple Card
- Use Savings
- Pay for transit
- Access your home, hotel room, and vehicle
- Add identity cards
- Use COVID-19 vaccination cards
- Check your Apple Account balance
- Use Express Mode
- Organize your Wallet
- Remove cards or passes
- Check the weather
- Check the weather in other locations
- View weather maps
- Manage weather notifications
- Use Weather widgets
- Learn the weather icons
- Find out what Siri can do
- Tell Siri about yourself
- Have Siri announce calls and notifications
- Add Siri Shortcuts
- About Siri Suggestions
- Use Siri in your car
- Change Siri settings
- Contact emergency services
- Use Emergency SOS via satellite
- Request Roadside Assistance via satellite
- Set up and view your Medical ID
- Use Check In
- Manage Crash Detection
- Reset privacy and security settings in an emergency
- Set up Family Sharing
- Add Family Sharing members
- Remove Family Sharing members
- Share subscriptions
- Share purchases
- Share locations with family and locate lost devices
- Set up Apple Cash Family and Apple Card Family
- Set up parental controls
- Set up a child’s device
- Get started with Screen Time
- Protect your vision health with Screen Distance
- Set up Screen Time
- Set communication and safety limits and block inappropriate content
- Set up Screen Time for a family member
- Charging cable
- Power adapters
- MagSafe chargers and battery packs
- MagSafe cases and sleeves
- Qi-certified wireless chargers
- Use AirPods
- Use EarPods
- Apple Watch
- Wirelessly stream videos and photos to Apple TV or a smart TV
- Connect to a display with a cable
- HomePod and other wireless speakers
- Pair Magic Keyboard
- Enter characters with diacritical marks
- Switch between keyboards
- Use shortcuts
- Choose an alternative keyboard layout
- Change typing assistance options
- External storage devices
- Bluetooth accessories
- Share your internet connection
- Allow phone calls on your iPad and Mac
- Use iPhone as a webcam
- Hand off tasks between devices
- Cut, copy, and paste between iPhone and other devices
- Stream video or mirror the screen of your iPhone
- Start SharePlay instantly
- Use AirDrop to send items
- Connect iPhone and your computer with a cable
- Transfer files between devices
- Transfer files with email, messages, or AirDrop
- Transfer files or sync content with the Finder or iTunes
- Automatically keep files up to date with iCloud
- Intro to CarPlay
- Connect to CarPlay
- Use your vehicle’s built-in controls
- Get turn-by-turn directions
- Change the map view
- Make phone calls
- View your calendar
- Send and receive text messages
- Announce incoming text messages
- Play podcasts
- Play audiobooks
- Listen to news stories
- Control your home
- Use other apps with CarPlay
- Rearrange icons on CarPlay Home
- Change settings in CarPlay
- Get started with accessibility features
- Turn on accessibility features for setup
- Change Siri accessibility settings
- Open features with Accessibility Shortcut
- Change color and brightness
- Make text easier to read
- Reduce onscreen motion
- Customize per-app visual settings
- Hear what’s on the screen or typed
- Hear audio descriptions
- Turn on and practice VoiceOver
- Change your VoiceOver settings
- Use VoiceOver gestures
- Operate iPhone when VoiceOver is on
- Control VoiceOver using the rotor
- Use the onscreen keyboard
- Write with your finger
- Keep the screen off
- Use VoiceOver with an Apple external keyboard
- Use a braille display
- Type braille on the screen
- Customize gestures and keyboard shortcuts
- Use VoiceOver with a pointer device
- Use VoiceOver for images and videos
- Use VoiceOver in apps
- Use AssistiveTouch
- Adjust how iPhone responds to your touch
- Use Reachability
- Auto-answer calls
- Turn off vibration
- Change Face ID and attention settings
- Use Voice Control
- Adjust the side or Home button
- Use Apple TV Remote buttons
- Adjust pointer settings
- Adjust keyboard settings
- Control iPhone with an external keyboard
- Adjust AirPods settings
- Turn on Apple Watch Mirroring
- Control a nearby Apple device
- Intro to Switch Control
- Set up and turn on Switch Control
- Select items, perform actions, and more
- Control several devices with one switch
- Use hearing devices
- Use Live Listen
- Use sound recognition
- Set up and use RTT and TTY
- Flash the indicator light for notifications
- Adjust audio settings
- Play background sounds
- Display subtitles and captions
- Show transcriptions for Intercom messages
- Get live captions of spoken audio
- Type to speak
- Record a Personal Voice
- Lock iPhone to one app with Guided Access
- Use built-in privacy and security protections
- Set a passcode
- Set up Face ID
- Set up Touch ID
- Control access to information on the Lock Screen
- Keep your Apple ID secure
- Use passkeys to sign in to apps and websites
- Sign in with Apple
- Share passwords
- Automatically fill in strong passwords
- Change weak or compromised passwords
- View your passwords and related information
- Share passkeys and passwords securely with AirDrop
- Make your passkeys and passwords available on all your devices
- Automatically fill in verification codes
- Automatically fill in SMS passcodes
- Sign in with fewer CAPTCHA challenges
- Use two-factor authentication
- Use security keys
- Manage information sharing with Safety Check
- Control app tracking permissions
- Control the location information you share
- Control access to information in apps
- Control how Apple delivers advertising to you
- Control access to hardware features
- Create and manage Hide My Email addresses
- Protect your web browsing with iCloud Private Relay
- Use a private network address
- Use Advanced Data Protection
- Use Lockdown Mode
- Use Stolen Device Protection
- Receive warnings about sensitive content
- Use Contact Key Verification
- Turn iPhone on or off
- Force restart iPhone
- Back up iPhone
- Reset iPhone settings
- Restore all content from a backup
- Restore purchased and deleted items
- Sell, give away, or trade in your iPhone
- Erase iPhone
- Install or remove configuration profiles
- Important safety information
- Important handling information
- Find more resources for software and service
- FCC compliance statement
- ISED Canada compliance statement
- Ultra Wideband information
- Class 1 Laser information
- Apple and the environment
- Disposal and recycling information
- Unauthorized modification of iOS
Remove or delete apps from iPhone
You can easily remove or delete apps from your iPhone. If you change your mind, you can download the apps again later (if they’re still available in the App Store).
Do any of the following:
Remove an app from the Home Screen: Touch and hold the app on the Home Screen, tap Remove App, then tap Remove from Home Screen to keep it in App Library, or tap Delete App to delete it from iPhone.
Delete an app from App Library and Home Screen: Touch and hold the app in App Library, tap Delete App, then tap Delete. (See Find your apps in App Library .)
If you change your mind, you can redownload apps you’ve removed.
In addition to removing third-party apps from the Home Screen, you can remove the following built-in Apple apps that came with your iPhone:
Contacts (Contact information remains available through Phone, Messages, Mail, FaceTime, and other apps. To remove a contact, you must restore Contacts.)
FaceTime (In iOS 17.4 or later, if you remove the FaceTime app from your iPhone, or if you removed it in an earlier version of iOS before updating to iOS 17.4, you won’t be able to make or receive FaceTime calls or join SharePlay sessions on your iPhone unless you redownload the app . See Make FaceTime calls on iPhone .)
Find My (Removing this app doesn’t turn off location sharing or Find My for your device or items—it just removes the ability to view locations in the Find My app on that device.)
iTunes Store
Voice Memos
Wallet (Removing this app doesn’t delete cards and passes you stored in iCloud.)
Note: When you remove a built-in app from your Home Screen, you also remove any related user data and configuration files. Removing built-in apps from your Home Screen can also affect other system functionality.

IMAGES
VIDEO
COMMENTS
4. If you use <input> field without wrapping it in <form> tag, Safari 11+ or latest would show you auto-fill suggestion. So here is what you can do. Option 1: Make sure <input> elements are wrapped inside <form> element. Don't set value of name attribute to "username" or "login".
In the Safari app on your Mac, use AutoFill preferences to fill in contact information, user names and passwords, credit card information, and other forms on webpages. To change these preferences, choose Safari > Preferences, then click AutoFill. Complete forms with information from any contact card in Contacts.
To turn off any or all AutoFill forms in Safari on macOS, first open Safari's preferences from the Safari menu or press Command+, on your keyboard. In Safari's preferences, click the AutoFill tab You'll see a list of the things Safari can autofill. Uncheck any items you don't want Safari autofilling, or click "Edit" next to any of the four ...
In the Safari app on your Mac, use AutoFill settings to fill in contact information, usernames and passwords, credit card information and other forms on web pages. To change these settings, choose Safari > Settings, then click AutoFill. Open Safari for me. Option. Description. Using information from my contacts.
To change these preferences, choose Safari > Preferences, then click AutoFill. Complete forms with information from any contact card in Contacts. To view or edit information, click Edit. Securely save usernames and passwords you enter on web pages, then easily fill in the saved information when you revisit the same web pages. Click Edit to view ...
Follow these steps to prevent Mac's Safari from automatically filling in your name, email, address, phone number, and other details on all websites: Open Safari and click the word " Safari " next to the Apple icon. Click Preferences. Click AutoFill. Uncheck Using information from my contacts, Credit Cards, and Other forms.
Set Up Autofill on Safari. Getting Autofill set up on Safari is easy. Here's how to do it: Open Safari Settings. Open Safari and go to Safari > Settings or press Command + ,. Navigate to Autofill Settings. Click the "Autofill" tab to see options for what information Safari can automatically fill in for you.
Adding an account's username and password through AutoFill is a straightforward process. To add a username and password: Open Safari on your Mac.; Click on Safari in the Menu Bar, then click Preferences.; Next, click on AutoFill.; You will now see the multiple AutoFill Forms.
1. Open the Safari browser. 2. In the top toolbar, select "Safari" and then "Preferences." Click on Preferences under Safari. Devon Delfino/Business Insider. 3. Toggle over to the "Autofill ...
Open the Chrome app. Tap the 3 dots on the bottom-right of your screen. Scroll down a bit and select Clear browsing data. Adjust the Time Range at the top of the screen to say All Time. Make sure Autofill Data is checked off. Select Clear Browsing Data, then Clear Browsing Data again to confirm.
Open Safari → Click Safari on the menu bar → Select Settings. Select Preferences if you're running macOS Monterey or earlier. Select Passwords → Use your Touch ID or enter your Mac's password. Click the plus (+) icon. Fill in the following details: Title, Website, Username, and Password.
Step 3: Toggle Off 'AutoFill Passwords'. Find the 'AutoFill Passwords' option and toggle the switch to off. It should turn from green to gray. Turning this off means that Safari won't automatically fill in your passwords anymore, giving you more control over who has access to your accounts. After completing these simple steps, Safari ...
Clearing Autofill data in Safari is a straightforward process that allows users to declutter and manage their stored information. Whether you want to remove outdated details, enhance privacy, or simply start afresh, Safari provides the tools to accomplish this task with ease. To clear Autofill data in Safari on a Mac, follow these simple steps:
It's the one with the gear icon, typically found on your home screen. Once you've located and tapped on it, you're ready for the next step. Step 2: Tap on 'Safari' Scroll down and tap on 'Safari' in the Settings menu. Safari is Apple's native web browser, and it's where your autofill settings live.
In the Safari app on your Mac, start typing any name from your contacts to autofill their details. If a contact has more than one address, email, phone, or other contact info, you can choose from the home, work, or custom address you've already entered in their contact card (or use the Touch Bar ). If you don't want Safari to autofill ...
Open Settings. Scroll down and tap Safari. Scroll down and tap on AutoFill. Now toggle on Use Contact Info. The toggle will be green when the feature is enabled. If your name doesn't automatically appear next to My Info, tap My Info. Otherwise, skip to step eight. Select your name from Contacts. Make sure your information is filled in so that ...
How to edit credit card data autofill on iPhone. 1. Open the Settings app and scroll down to the Safari tab. 2. Tap Safari, then tap Autofill under the General subsection. Open "AutoFill" in your ...
Step 1: Launch Google Chrome on your Mac computer via Launchpad or Spotlight Search. Step 2: Click the three dots at the top right of the Google Chrome screen. Step 3: Select Settings for further actions. Step 4: In the Settings tab, search " autofill " or click Autofill and password in the menu window. Step 5: Click each section to toggle off ...
Set up AutoFill. You can save your personal information or credit card number on your iPhone to speed up filling in online forms and making purchases. Go to Settings > Safari > AutoFill. Do any of the following: Set up contact info: Turn on Use Contact Info, tap My Info, then choose your contact card. The contact information from that card is ...
4. Is there any way to disable or remove show/hide icon in Safari which appears when you start typing symbols into the input with "password" type? I could easely do it in IE/EDGE by adding to my CSS following rule: input[type=password]::-ms-reveal, input[type=password]::-ms-clear. {.
On the bottom navigation bar, long-press on the Tabs switcher icon to pull up the menu. Select "Close All [X] Tabs." Finalize the action by hitting "Close All [X] Tabs" again on the confirmation ...
In the Safari app on your Mac, choose Safari > Settings, click AutoFill, then make sure "User names and passwords" is selected. Make sure any information you want to autofill is saved in your My Card in Contacts. Safari can fill in only contact information that's in Contacts. For example, if a form requires your phone number but it isn ...
首先安装. 代码语言: javascript. 复制. pnpm add sass -D. 代码语言: javascript. 复制. pnpm add sass -loader -D. 样式方面我们首先是会想到要给项目进行默认样式的重置,此时我们应当去使用一个比较稳定的npm 包的样式重置代码:. 在这里插入图片描述.
Rearrange your Favorites: Drag them to different locations. Show only an icon for a webpage in the Favorites bar: Control-click a webpage's title, then deselect Show Title. Show only an icon for all webpages in the Favorites bar: Control-click between webpages in the Favorites bar, then select Show Icons Only. Edit the name of a favorite website or folder: Control-click the name you want to ...
Do any of the following: Remove an app from the Home Screen: Touch and hold the app on the Home Screen, tap Remove App, then tap Remove from Home Screen to keep it in App Library, or tap Delete App to delete it from iPhone. Delete an app from App Library and Home Screen: Touch and hold the app in App Library, tap Delete App, then tap Delete. (See Find your apps in App Library.)