- REALTOR® Store
- Real Estate Topics Open submenu Your resource for all things Real Estate. Including Legal, Agent & Broker, and Property Rights Issues.
- Membership Open submenu Whether you’re a new agent or an experienced broker you have access to a wide array of resources designed to help you succeed in today's market.
- Research & Statistics Open submenu Including home buying and selling, commercial, international, NAR member information, and technology. Use the data to improve your business through knowledge of the latest trends and statistics.
- Advocacy Open submenu NAR is widely considered one of the most effective advocacy organizations in the country.
- Education Open submenu NAR and its affiliated Institutes, Societies, and Councils offer a wide selection of real estate training options.
- News & Events Open submenu Stay current on industry issues with daily news from NAR. Network with other professionals, attend a seminar, and keep up with industry trends through events hosted by NAR.
- About NAR Open submenu America's largest trade association, representing 1.5 million+ members, including NAR's institutes, societies, and councils, involved in all aspects of the residential and commercial real estate industries.
- More Open submenu
- The Facts for REALTORS® Resources and updates on NAR’s settlement agreement related to broker commissions.
- Marketing Social Media Sales Tips & Techniques MLS & Online Listings View More
- Being a Real Estate Professional Starting Your Career Being a Broker Being an Agent View More
- Residential Real Estate Condominiums Smart Growth Vacation, Resort, & 2nd Homes FHA Programs View More Home Inspections
- Legal Arbitration & Dispute Resolution Fair Housing Copyright View More
- Commercial Real Estate Commercial research and other tools for practitioners to succeed in commercial real estate.
- Right Tools, Right Now
- All Membership Benefits
- NAR REALTOR Benefits® Bringing you savings and unique offers on products and services just for REALTORS®.
- Directories Complete listing of state and local associations, MLSs, members, and more.
- Dues Information & Payment
- Become a Member As a member, you are the voice for NAR – it is your association and it exists to help you succeed.
- Logos and Trademark Rules Only members of NAR can call themselves a REALTOR®. Learn how to properly use the logo and terms.
- Your Membership Account Review your membership preferences and Code of Ethics training status.
- Highlights & News Get the latest top line research, news, and popular reports.
- Housing Statistics National, regional, and metro-market level housing statistics where data is available.
- Research Reports Research on a wide range of topics of interest to real estate practitioners.
- Presentation Slides Access recent presentations from NAR economists and researchers.
- State & Metro Area Data Affordability, economic, and buyer & seller profile data for areas in which you live and work.
- Commercial Research Analysis of commercial market sectors and commercial-focused issues and trends.
- Statistical News Release Schedule
- Advocacy Issues & News
- Federal Advocacy From its building located steps away from the U.S. Capitol, NAR advocates for you.
- REALTORS® Political Action Committee (RPAC) Promoting the election of pro-REALTOR® candidates across the United States.
- State & Local Advocacy Resources to foster and harness the grassroots strength of the REALTOR® Party.
- REALTOR® Party A powerful alliance working to protect and promote homeownership and property investment.
- Get Involved Now more than ever, it is critical for REALTORS® across America to come together and speak with one voice.
- All Education & Professional Development
- All NAR & Affiliate Courses Continuing education and specialty knowledge can help boost your salary and client base.
- Code of Ethics Training Fulfill your COE training requirement with free courses for new and existing members.
- Continuing Education (CE) Meet the continuing education (CE) requirement in state(s) where you hold a license.
- Designations & Certifications Acknowledging experience and expertise in various real estate specialties, awarded by NAR and its affiliates.
- Library & Archives Offering research services and thousands of print and digital resources.
- Commitment to Excellence (C2EX) Empowers REALTORS® to evaluate, enhance and showcase their highest levels of professionalism.
- NAR Academy at Columbia College Academic opportunities for certificates, associates, bachelor’s, and master’s degrees.
- Latest News
- NAR Newsroom Official news releases from NAR.
- Blogs Commentary from NAR experts on technology, staging, placemaking, and real estate trends.
- Newsletters Stay informed on the most important real estate business news and business specialty updates.
- NAR NXT, The REALTOR® Experience
- REALTORS® Legislative Meetings
- AE Institute
- Leadership Week
- Sustainability Summit

REALTOR® Magazine
- Mission, Vision, and Diversity & Inclusion
- Code of Ethics
- Leadership & Staff National, state & local leadership, staff directories, leadership opportunities, and more.
- Committee & Liaisons
- History Founded as the National Association of Real Estate Exchanges in 1908.
- Affiliated Organizations
- Strategic Plan NAR’s operating values, long-term goals, and DEI strategic plan.
- Governing Documents Code of Ethics, NAR's Constitution & Bylaws, and model bylaws for state & local associations.
- Awards & Grants Member recognition and special funding, including the REALTORS® Relief Foundation.
- NAR's Consumer Outreach
- Top Directories Find a Member Browse All Directories Find an Office Find an Association NAR Group and Team Directory Committees and Directors
- By Role Broker Association Executive New Member Student Appraiser State & Local Volunteer Leader
- By Specialty Commercial Global Buyer's Rep Senior Market Short Sales & Foreclosures Land Green
- Multimedia Infographics Videos Quizzes
- Video Series First-Time Buyer Level Up Window to the Law Next Up: Commercial New AE Webinar & Video Series
- Podcasts Drive With NAR Real Estate Today The Advocacy Scoop Center for REALTOR® Development
- Programs Fair Housing Safety Leading with Diversity Good Neighbor NAR HR Solutions

- The Facts for REALTORS® Resources and updates on NAR’s settlement agreement related to broker commissions. Close
- Social Media
- Sales Tips & Techniques
- MLS & Online Listings
- Starting Your Career
- Being a Broker
- Being an Agent
- Condominiums
- Smart Growth
- Vacation, Resort, & 2nd Homes
- FHA Programs
- Home Inspections
- Arbitration & Dispute Resolution
- Fair Housing

- NAR REALTOR Benefits® Bringing you savings and unique offers on products and services just for REALTORS®. Close
- Directories Complete listing of state and local associations, MLSs, members, and more. Close
- Become a Member As a member, you are the voice for NAR – it is your association and it exists to help you succeed. Close
- Logos and Trademark Rules Only members of NAR can call themselves a REALTOR®. Learn how to properly use the logo and terms. Close
- Your Membership Account Review your membership preferences and Code of Ethics training status. Close

- Highlights & News Get the latest top line research, news, and popular reports. Close
- Housing Statistics National, regional, and metro-market level housing statistics where data is available. Close
- Research Reports Research on a wide range of topics of interest to real estate practitioners. Close
- Presentation Slides Access recent presentations from NAR economists and researchers. Close
- State & Metro Area Data Affordability, economic, and buyer & seller profile data for areas in which you live and work. Close
- Commercial Research Analysis of commercial market sectors and commercial-focused issues and trends. Close

- Federal Advocacy From its building located steps away from the U.S. Capitol, NAR advocates for you. Close
- REALTORS® Political Action Committee (RPAC) Promoting the election of pro-REALTOR® candidates across the United States. Close
- State & Local Advocacy Resources to foster and harness the grassroots strength of the REALTOR® Party. Close
- REALTOR® Party A powerful alliance working to protect and promote homeownership and property investment. Close
- Get Involved Now more than ever, it is critical for REALTORS® across America to come together and speak with one voice. Close

- All NAR & Affiliate Courses Continuing education and specialty knowledge can help boost your salary and client base. Close
- Code of Ethics Training Fulfill your COE training requirement with free courses for new and existing members. Close
- Continuing Education (CE) Meet the continuing education (CE) requirement in state(s) where you hold a license. Close
- Designations & Certifications Acknowledging experience and expertise in various real estate specialties, awarded by NAR and its affiliates. Close
- Library & Archives Offering research services and thousands of print and digital resources. Close
- Commitment to Excellence (C2EX) Empowers REALTORS® to evaluate, enhance and showcase their highest levels of professionalism. Close
- NAR Academy at Columbia College Academic opportunities for certificates, associates, bachelor’s, and master’s degrees. Close

- NAR Newsroom Official news releases from NAR. Close
- Blogs Commentary from NAR experts on technology, staging, placemaking, and real estate trends. Close
- Newsletters Stay informed on the most important real estate business news and business specialty updates. Close

- Leadership & Staff National, state & local leadership, staff directories, leadership opportunities, and more. Close
- History Founded as the National Association of Real Estate Exchanges in 1908. Close
- Strategic Plan NAR’s operating values, long-term goals, and DEI strategic plan. Close
- Governing Documents Code of Ethics, NAR's Constitution & Bylaws, and model bylaws for state & local associations. Close
- Awards & Grants Member recognition and special funding, including the REALTORS® Relief Foundation. Close

- Find a Member
- Browse All Directories
- Find an Office
- Find an Association
- NAR Group and Team Directory
- Committees and Directors
- Association Executive
- State & Local Volunteer Leader
- Buyer's Rep
- Senior Market
- Short Sales & Foreclosures
- Infographics
- First-Time Buyer
- Window to the Law
- Next Up: Commercial
- New AE Webinar & Video Series
- Drive With NAR
- Real Estate Today
- The Advocacy Scoop
- Center for REALTOR® Development
- Leading with Diversity
- Good Neighbor
- NAR HR Solutions
A Step-by-Step Guide to Creating a Virtual Home Tour

The COVID-19 economy has pumped up consumer demand for virtual home tours. These presentations, created using 360-degree and 3D tour technology, provide an immersive experience for viewing homes while limiting in-person contact.
Virtual tours give buyers a perspective on the home’s layout and flow that can’t be achieved with still photos, says consultant Jeff Turner of Santa Clarita, Calif. The tours help buyers weed out houses that are in their price range but that don’t fit their style, says Turner, a consultant to virtual-tour provider Immoviewer and entrepreneur in residence at Second Century Ventures and Reach , the National Association of REALTORS®’ strategic investment arm and award-winning technology accelerator. “Consumers are hungry for the opportunity to have a better online shopping experience, and to me, that’s the promise of 3D, 360-degree virtual tours.”
Data shows that virtual tours drive sales, says Amir Frank, a content manager at Matterport in Sunnyvale, Calif. Matterport studied MLS transaction data from the South, Southwest, Northwest, and Midwest from November 2016 to November 2019. The results showed listings with a 3D tour sold for up to 9% more and closed up to 31% faster than listings without them.
The cost and complexity of virtual tour technology have come down in recent years, making these tours more accessible for real estate professionals. To help you create exceptional virtual home tours, here’s a step-by-step guide to gathering equipment; preparing to shoot and edit the photos; uploading and editing the images; creating the tour from walkthrough to exit on an online platform; and publishing and marketing the tours.
Step 1: Choose Your Equipment and Platform
“We’re in the golden age of 360-degree cameras,” says Turner. “I’ve got within my grasp, right now, six different 360 cameras. All cost between $250 and $500. The cost shouldn’t be a barrier for anyone who’s doing any volume of home sales. I have a 3,400-square-foot house here in Southern California, and I can capture and turn this into a usable tour in less than 20 minutes.
“These are one-click tools,” he adds. “You don’t have to focus them. And the quality of these low-cost cameras has been improving over time dramatically.”
“To shoot a 2,000-square-foot home, it takes this [Ricoh Theta V] between five and 10 minutes,” agrees Peter Schravemade of Maroochydore, Queensland, in Australia, relationship manager for Box Brownie, a company that offers turnkey photo editing, virtual tours, and other services for real estate pros.
Besides its affordability and speed, says Schravemade, the Ricoh camera allows you to “bracket” to create the best possible images. Bracketing means taking the same photo multiple times, each with a different exposure, which helps ensure your tour includes exceptional interior and exterior views. He recommends shooting from three to five different exposures, then editing them together to create a bracketed image.
Matterport’s higher price results from its function as both a camera and a scanner, taking 360-degree tour photos, then creating a dollhouse-like floor plan. The floor plan is the major advantage, says Bill Lublin, CEO of Century 21 Advantage Gold in Philadelphia. Using the “dollhouse” format, viewers can go from room to room easily. However, it takes one to two hours to upload the Matterport tour, so it’s a slower process than what the Ricoh products offer.
Whatever 360-degree camera you use, you’ll also have to download a smartphone app or invest in a hosting platform for your tours. You’ll upload your photos to that platform for storing, editing, and sharing.
Step 2: Organize Photography, Lighting, and Camera Placement
Before you start shooting, open your photography app or hosting platform, and then place your 360-degree camera on your tripod. “I like to take photos exactly how I would move through a house,” says Turner, “starting with the exterior.” Take one photo from across the street and another in the front yard. Photograph both sides of the house if there’s room for your gear; then move around the house, and capture the backyard. When you’ve finished shooting the exterior, open the front door and photograph the entryway. Before taking interior shots, open doors and turn on all the lights. Open blinds and curtains, unless the view detracts from the image. “Then navigate through the house and take photos, as many as is necessary to allow people to flow through it.”
Inside, place the tripod in the center of each room with the camera set at eye height, above furniture and countertops. Then leave the room to take the photo using the smartphone app. You can take one photo per room, unless you’re bracketing your exposures or the size of the room requires more. Large rooms may need two or three images from different positions.
A Matterport camera requires a different workflow. The camera scans every corner of the room, creating a 3D dollhouse-like floor plan. Frank suggests starting at the lowest level and working your way up. Position the camera to take shots from the center of hallways and at each room’s entryway. Then put your Matterport camera in each corner of the room to create a feel for room size; the number of photos will assist the software as it forms the 3D dollhouse model.
Step 3: Upload the Tour
There are hundreds of 360-degree tour providers and hosting platforms, including Matterport, Ricoh360 Tours, Ogulo, Immoviewer, Box Brownie, Giraffe360, and EyeSpy360, says Schravemade. Many have apps that upload your photos as you take them. Editing tools on many of the platforms will stitch your images together for a seamless tour experience.
Costs vary by platform and complexity. Immoviewer has a subscription model that runs from $69 per month for five active tours to $159 per month for 20. Box Brownie uses a pay-as-you-go model in which a tour with up to 15 photos costs $16, one with 16 to 25 photos costs $24; options for image enhancement start at $1.60, and 360-degree virtual staging is priced at $64. The more complex Matterport tours fall in the $250 to $400 range.
Step 4: Create the Tour, From Walkthrough to Exit
Many editing programs, including Box Brownie and Immoviewer, will put your photos in the right sequence as they upload; as long as you take your photos in the order of the flow of the home’s floor plan, they’ll be properly arranged for the virtual tour.
If you’re using Matterport’s software, after you upload your photos, they’re processed into the 3D model in the correct order. You can then start adding “Matter Tags” and highlight reels, embedding videos and brochures, and labeling rooms and dimensions, says Frank.
If you have the editing skills to stitch the images together yourself, Schravemade recommends programs such as Adobe Lightroom and Photoshop, available as an online subscription for $9.99 per month as part of the Adobe Creative Cloud package. (A subscription to the full Adobe Creative Cloud costs $52 per month, but most users need only those two apps.)
With Immoviewer, “those tours are live the moment they’re uploaded. So if you’ve got a good [wireless] connection from the house and you use the app, the moment those images are uploaded, that virtual tour is live and ready to go,” Turner says.
Matterport’s detailed scanning and photography process can take a couple of hours to finish uploading. Once that upload completes, it then takes 24 to 48 hours to process. That’s when you’re able to start tagging and adding specs and points of interest. Box Brownie uses manual stitching for its photo editing process and has a 24-hour turnaround, says Schravemade.
Step 5: Publish and Market the Tour on Multiple Channels
Platforms such as realtor.com®, many MLSs, and social media are ideal places for publishing your virtual home tour. You can embed the tour link in email campaigns and text messages or drop it straight into Facebook, says Schravemade.
Once the images and 3D model have been created, Frank says, the Matterport system “automatically generates photos it thinks are usable in your marketing campaigns, as well as a few short teasers, which are great; you can easily download a GIF or MP4 [video] file and use it in your marketing campaigns.”
Make virtual home tours part of everything you can, whether it’s inexpensively with Immoviewer or Box Brownie or more fully immersive with detailed Matterport tours, Lublin advises. “People are more hesitant to enter properties now, but there’s a tremendous demand, and providing them the ability to see and choose to eliminate properties online is a powerful tool,” he says. “You always want to be seen as tech-forward. Now it’s easy to be tech-forward.”
Turner estimates 95% of listings still don’t have a true virtual tour, even amid the pandemic. “I wish [agents] wouldn’t be so hung up on perfect image quality, especially with a virtual tour,” he says. “Do one, get it up there, and give consumers this experience they’re looking for. A 360-degree camera is going to do a really good job of capturing an above-average image of the room.”

Mandy Ellis
Mandy Ellis is an Austin, Texas-based freelance writer focusing on real estate, food, travel, and health.
What You Need to Create 3D Home Tours
- Camera: $250–$3,500. Experts interviewed for this article recommended a range of options, including the Ricoh Theta V ($380); Insta360 One X ($456); Ricoh Theta Z1 ($1,000); and Matterport Pro2 ($3,400).
- Tripod or monopod: $25 to $50
- Extra battery: $30 to $40
- Battery charging station: $20 to $40
- App: Virtual-tour providers have apps that enable you to upload 3D photos to create tours.
On a Budget
For about $15, you can get a selfie stick, attach your smartphone to it, and walk through a listing, narrating as you go and pointing out features people might otherwise see more readily in an in-person tour. It’s not a true virtual tour, but it’s an economical way to create a tour to post to social media and aggregator sites.
Hear From the Experts
The National Association of REALTORS®’ recent three-part TechEdge series took a deep dive into virtual tours. The June 30 session, “The Virtual Agent,” was hosted by broker-owner Bill Lublin and featured Jeff Turner and Peter Schravemade. REALTORS® can purchase a recording of the session for $14.95 at nartechedge.com .
Related Content
10 tips for looking your best on video, 6 steps to running a virtual open house.
- Buyer Agent 101
- Listing Agent 101
- Getting Your License
- Open Houses
- Stats + Trends
- Realtor Safety
- Social Media
- Website Marketing
- Referral Marketing
- Property Marketing
- Branding + PR
- Marketing Companies
- Purchasing Leads
- Prospecting
- Paid Advertising
- Generate Listings
- Generate Buyer Leads
- Apps + Software
- Lead Gen Companies
- Website Builders
- Predictive Analytics
- Brokerage Tech
- Building a Brokerage
- Recruiting Agents
- Lead Generation
- Tech Reviews
- Write for Us
All products mentioned at The Close are in the best interest of real estate professionals. We are editorially independent and may earn commissions from partner links.

How to Make a Virtual Tour in 6 Easy Steps

Kaylee Strozyk is a freelance real estate contributor for The Close and Fit Small Business. Her real estate experience includes investing and flipping properties, and she also works closely with real estate agents and brokerages to grow their businesses through strategic online marketing and education. See full bio

- What Is a Virtual Tour in Real Estate?
- Choose the Right Type of Virtual Tour
- Gather the Right Equipment
- Plan Your Virtual Tour
- Take Your Virtual Tour Photo
- Use Software to Create Your Virtual Tour
- Promote the Virtual Tour
- Bringing It All Together
Seeing a virtual tour of a real estate listing always makes potential buyers’ eyes light up. It gives them a real-time sense of what the property feels like and the ability to move around the space, making listings more appealing. So, if you’re not adding virtual tours to your property listings, then what are you doing? Take advantage of this feature by reading my step-by-step guide on how to make a virtual tour and get more interested buyers in the (non) virtual door.
What Is a Virtual Tour in Real Estate?
Before getting into the nitty-gritty about how to make a virtual tour, you must understand what it is. A virtual tour is a combination of still images, 360-degree images, and video put together to create a simulation of a property. Viewers can click through each room within a property, getting as zoomed in or out as they want. They can spin in circles, go up and down stairs, and even look out the windows to see what their view would be if they purchased the property. Needless to say, it’s pretty awesome.
It shouldn’t replace listing photos but instead provide an additional way for viewers to engage with the property. For example, this virtual tour of a Zillow listing was created using images taken on a smartphone and the Zillow Home 3D app.

Since studies show that nearly 90% of prospective buyers prefer properties with virtual tours, the process is worth the effort for agents. Learning how to make a virtual tour online that gets the best results doesn’t have to be complex, but make sure you start with a clear understanding of each type.

Pro Tip : Keep in mind that virtual tours are entirely separate from virtual open houses, which are live events rather than an additional feature on a property listing. If you came here by mistake and are looking for virtual open houses, we’ve got you covered! Check out our Hosting a Virtual Open House: The Ultimate Guide article.
1. Choose the Right Type of Virtual Tour
Since there are multiple ways to make a virtual tour, start by choosing which type is best for your listings. Make sure to consider your budget, skill level, and interest in learning new equipment and software. For instance, if you’ve never had an interest in photography or videography, it may be better to choose basic equipment that attaches to your phone instead of investing in a top-of-the-line 360-degree camera.
The primary types of real estate virtual tours include:
- Video walk-through: Arguably the simplest type of virtual tour in real estate, this is a video of an agent walking through the property. Walk-throughs can be less than a minute or more than 10 minutes, with agents stopping to highlight or discuss certain features. These are best for agents who regularly use video marketing and can generate views on platforms like YouTube, Instagram, or TikTok.
- 360-degree or 3D virtual tour: These tours use specialized 360-degree photography to give buyers a highly realistic view of what the home feels like in person. They are typically interactive, allowing users to click on different spots in the house to see the view. This type of virtual tour is ideal to include in online listings, like Zillow, Realtor.com, and your realtor website.
- Virtual reality (VR): Virtual reality in real estate is a growing trend that allows prospective buyers to strap on a VR headset and “walk through” the home themselves. This feature is great to add to luxury listings for luxury or a tech-friendly audience.

2. Gather the Right Equipment
The right equipment is essential to creating a successful virtual tour. Many different types and options are available, so it’s important to compare them before making a purchase. The most budget-friendly options are generally phone attachments that allow you to take 360-degree without a separate camera. However, professional camera options are only a few hundred dollars, which could be ideal for agents focusing on high-quality photography and videography.
Some of the best equipment options for creating 360-degree virtual tours include:
3. Plan Your Virtual Tour
If you fail to plan, you plan to fail—and unless you plan to reshoot the tour a bunch of times and/or have a sloppy presentation, you better plan ahead. Virtual tours require even more precision than real estate photography to ensure that the images line up and give viewers the feeling of actually standing in the home. Consider where you want the tour to begin and the best way to take prospective buyers through the property.
A few of the best tips for preparing to make a virtual tour online include:
- Clean and stage the property: Technology can do a lot to promote a home, but the property must be in proper shape. Make sure the home is clean and physically staged, or use virtual staging software .
- Choose the right time of day to take photos: To enhance the quality of your photos, you’ll want to pick the time of day with the best natural light. This can vary for each property, but it is generally during the golden hour or just before sunset.
- Plan shots beforehand: Don’t go in blind. Have an idea of each room’s best features and plan what you want to highlight. Think about the viewer’s natural path through the house, from the front door to the backyard.
- Test shots: Try a few shots from different angles to see what works best before diving in.
- Level your tripod: Nothing is worse than a room that looks crooked or is not quite centered. You want to be sure you’re capturing the room exactly as it is.
4. Take Your Virtual Tour Photos
With the right tools and preparation, taking the photos for your virtual tour is a relatively simple process. The specific steps may vary depending on the exact camera and equipment you use, but generally, you should place your camera in the center of the room and let it capture the space. With phone attachments, make sure to take as many pictures as possible. This step gives your software plenty of data to create the most seamless and best-quality virtual tour.

5. Use Software to Create Your Virtual Tour
There are many different software options available for creating 360 virtual tours. The right choice depends on the type of equipment and the type of virtual tour you want to create.
A few of the most popular options include:
- Zillow 3D Home Tours: This free tool from Zillow allows users to upload images to the app from any supported iPhone®, Android smartphone, or 360-degree camera. It’s best for creating an interactive virtual walk-through.
- Asteroom: This software is built to create virtual tours with a phone attachment. Simply take your photos, and the software automatically generates an interactive 3D tour with a dollhouse view, floor plan with accurate room dimensions, and 2D stills—for just $59 per tour.
- Matterport: As the leading creator of 3D and 360-degree virtual tours, Matterport provides some of the best quality cameras and tour options. They offer a free plan option to test out their tour creator, and paid options range from $9.99 to $269 per month.
Although the specifics will vary, these software programs will make it easy to upload your panorama or 360-degree images, add room labels, enhance images, and generate floor plans or a dollhouse. As with any new software, there will likely be a learning curve. However, the process can become simple and repeatable by strategically choosing the best type of tour for your business, the right equipment, and the right software.

6. Promote the Virtual Tour
A virtual tour can be a powerful tool for attracting traffic and interest to your properties. However, you are responsible for ensuring that potential buyers actually see and interact with your tours—otherwise, what’s the point of making them? Make sure you promote your properties and tours on every platform you can access.
For example, a strong promotion strategy can include:
- Embed the tour on Zillow, Realtor.com, and other listing aggregators
- Share the tour on your real estate website
- Send an email to your list of previous clients and buyers
- Promote the tour on your social media platforms and even local Facebook groups
- Send a text that includes a link to the virtual tour to prospective leads and interested buyers
- Add a QR code to your real estate sign that directs visitors to a link to the tour
- Create short-form videos to share on TikTok and Instagram

Keep in mind that when you add a virtual tour to your Zillow listings, the platform automatically advertises it to its users. This automation will drive more clicks, engagement, and potential offers to your listings.
What do you need to create a virtual tour?
To start making virtual home tours, you only need a few key items. First, you’ll need the right equipment, ranging from a high-quality 360-degree phone attachment to a specialized 360-degree camera and tripod. You’ll also need the right software to create your virtual tour.
How do you make a 360-degree virtual tour?
The process of making a 360-degree virtual tour is simple. Get a 360-degree camera or phone attachment. Place the device in the middle of each room in the house to capture your images. Upload the images or video to a virtual tour software, and then promote your tour online to spread the word and get views.
How do I create a virtual tour on my iPhone?
The best way to create a real estate virtual tour with your smartphone is by purchasing a 360-degree camera attachment. However, some people also use the panorama feature and software like Lapentor to create virtual tours in less time.
Creating a 360-degree virtual tour allows buyers to look at a listing more immersively. This feature leads to more interest in your listings and more successful sales. Using the tools and tips in this guide, real estate agents can easily learn how to make a virtual tour that grows the bottom line of their business.
Have you ever done a virtual tour? Do you have some extra tips that we can add to our list? Let us know! We always want to expand our expertise and hear from fellow agents about what works for your business.

Kaylee Strozyk is a freelance real estate contributor for The Close and Fit Small Business. Her real estate experience includes investing and flipping properties, and she also works closely with real estate agents and brokerages to grow their businesses through strategic online marketing and education.
Add comment Cancel reply
Your email address will not be published. Required fields are marked *
Related articles
Real estate photography pricing, types & hiring tips guide.
Hiring a professional photographer will step up your real estate marketing and attract more potential buyers with awesome, top-notch listing photos.
How to Become a Leasing Agent for Real Estate in 7 Steps
In the real estate industry, leasing agents are crucial for connecting property owners with potential tenants.
10 Impactful Real Estate Open House Signs: Tips & Examples
When hosting and promoting an open house, nothing beats the classic real estate open house signs.
Success! You've been subscribed.
Help us get to know you better.
- Get a Real Estate License
- Real Estate Appraiser Exam Prep
- Real Estate Exam Prep
- Appraisal Professional Development Courses
- Continuing Education Courses
- Graduate Realtor® Institue (GRI)
- Real Estate Designations
- Mortgage Broker Courses
- Get a Real Estate Appraiser License
- Appraiser Continuing Education
- Appraiser Career and Salary Information
- Why Choose VanEd for Online Appraisal
- Appraisal Student Reviews and Testimonials
- About VanEd
- Accreditations & Course Approvals
- VanEd Cares - Working to End Homelessness
- VanEd Cares Scholarship Program
General VanEd Information
- Reviews & Testimonials
- Student Success Stories
- Veteran Discount 40% Off
- How It Works
- Why Choose VanEd?
- How to Navigate Your Student Dashboard
- General Questions
- Colorado FAQ
- Nebraska FAQ
- Oklahoma FAQ
- Partners & Affiliates
- Affiliate Program Details
- Affiliate Program Enrollment
- Contact VanEd
- Frequently Asked Questions (FAQ)
- The VanEd Real Estate Agent Blog
- Industry News
- Career Tips
- Course Updates
- Business Practices
- Real Estate Infographics
- VanEd Real Estate Agent Blog
How to Make a 360° (3D) Virtual Real Estate Tour with iPhone/Android
Published: march 25, 2020.

Method 1: Google Tour Creator
Method 2: zillow 3d home tours.
Technology is one of the most integral parts of nearly every type of business. For real estate agents, this is no different. Adapting and staying up-to-date with the newest technology trends is one of the most important things a real estate agent can do to remain competitive and set themselves apart. Real estate agents must adopt the newest trend to emerge , 360° virtual real estate tours.
What Is a 360 Virtual Real Estate Tour?
A virtual 360° real estate tour or a VR (virtual reality) tour is a simulation of existing real estate using a sequence of videos or still 360° photos. A virtual tour may also include additional multimedia elements such as audio, text, or graphic overlays.
In this post, we will take a look at creating 360 degree video for real estate listings.
What You'll Need to Get Started
Google & zillow account.
You will need a Google account with access to Google Tour Creator and a Zillow account to register for Zillow 3d Homes .
360° Camera for SmartPhone (Optional)
Follow these 6 steps to make your first 360° virtual real estate tour with Google Tour Creator.
Step 1: Take Your 360° Photos
Follow the directions on your smartphone camera attachment or take a panoramic photo with your iPhone or Android. You should end up with photos that look similar to the following:

You may also want to take standard photos of fixtures, lighting, or any other elements in the home or property that you want to show buyers and sellers. This will come in handy later when you want to add to or improve your VR tour.
Finally, organize your photos in an easy-to-locate folder on your desktop or laptop.
Step 2: Open Up Tour Creator and Create a New Tour
Login to your Google Account and open up Google VR Tour Creator and click on 'Get Started'. Next, click on "New Tour".
Once you have created your tour, you will be asked to name your tour and add a cover photo and a description. Name your tour with the address or property name that you will be showing, but don't be overly descriptive. The cover photo should be well-lit, inviting, and look professional. Remember, every photo going into your tour should be a representation of you and your business.

Step 3: Create Your First VR Scene
Once you have created your first tour and provided a name, description, and cover photo, you will be prompted to add your first scene. Next, click 'Upload' and locate the folder where you saved your 360° photos. Drag and drop the photo you would like to use for your first scene.

Once you have uploaded your image, you will have the ability to rotate it or position it how you would like. Click 'Add Scene' below your image and proceed.
Step 4: Edit Your Scene
Once you have finished creating your first scene, you will be able to edit and provide additional information about your 360° VR photo. Listed below are the items you will be able to modify.
- Title : E.g. Kitchen, Living Room, etc.
- Location : Address of the property)
- Description : A full description of the photo
- Starting View : Where in the image do you want your scene to start
- Credits : Provide attribution if someone else took the photo.

Step 5: Add Audio, Narration, and Points of Interest (Optional)
After creating your scenes, you can go back through and spice up your VR tour. In each scene, you have the option to add additional ambient audio, narration, and points of interest.
Narration is an excellent way to add a personal touch to your VR tour and can help provide essential information to your real estate clients. On your iPhone, open up your Voice Memos app or on Android download the Smart Recorder app. For each scene, create a short, but descriptive narration of what your viewers are looking at. Once you are finished, save your MP3 file, click the narration icon at the bottom of your scene, and upload your file.
Points of Interest
If you would like to highlight any fixtures, lighting, or additional elements in your scene, you may want to have a few 'points of interest'. To add a point of interest, first start by clicking 'Add Point of Interest' at the bottom of your scenes' information panel. You will have the ability to add narration or an image. Once you have added your point of interest, adjust where you would like to place it in the scene inside the preview area. This will allow your viewers to click on the point of interest as they progress through and learn more about that element in virtual reality.
Step 6: Save and Publish Your Tour
Once you have finished creating your scene, click 'Publish' at the top. You will be asked whether you want to make your scene private or public. After publishing your scene, click on the 'copy link' icon. You will now be able to share this link on Facebook , Twitter , or Google Expeditions . You can also paste this link in an email and share it directly with your clients!

Final Home Tour Using Google Tour Creator
You and your clients will be able to view this tour on their desktop, laptop, smartphone, tablet, or Google Cardboard .
Zillow 3D Home is a brand new app that allows iPhone users to create virtual real estate tours that can be shared privately or attached to a current Zillow listing. Users can create a free virtual real estate tour with an iPhone (7 or later) or with a 3D camera.
Zillow recommends using a Ricoh Theta V or a Ricoh Theta Z1 360-degree camera.
Optional 360-Degree Cameras
Follow these 7 steps to create your first Zillow 3D Home Tours real estate tour.
Step 1: Download the Zillow 3D Home Tours App
Download the Zillow 3D Home Tours App on your iPhone from the Apple App Store.
Step 2: Open the App, Login, and Tap "Start Capture"
Open the app and login using you iCloud account, Gmail account, or your Zillow account. Next, tap "Start Capture". Select "Use iPhone Camera".
Step 3: Select the Room You want to Capture
Once you have added your address, Zillow provides you with a variety of rooms and areas of your apartment or house to choose from, including:
- Dining room
- Living room
- Master bedroom
- Master bathroom
Once you have selected the first room you want to include, you are ready to capture your panorama.
Step 4: Capture Your Panorama
Hold your iPhone vertically in front of your chest. Slowly rotate to the right in a full circle while following the apps instructions. If you are going too quickly or the app failed to capture an area, you will be prompted to slow down or redo that part of the panorama.
Step 5: Review Your 360° Photos
Review your 360° photos of each room and retake and photos that are blurry or misaligned.
Step 6: Repeat Steps 3-5
Repeat steps 3-5 until you have taken a high-quality panorama photo of each room requested.
Step 7: Publish Your Virtual Tour
Login to your Zillow dashboard to edit, publish, and share your tour.

Visit How to Make a Virtual Tour for Real Estate with Zillow 3D Home Tours to learn more and improve the quality of your iPhone-created tours.
Improve Your Understanding of Real Estate Technology
Enroll in one of VanEd's real estate continuing education course and improve your understanding of industry-specific technology!
- The Ethics of Technology: Etiquette for the Age of Engage
- Technology Tools & Resources
- Technology and Taxation
Written and Published by: VanEd
Similar Posts
.jpg "how to create 3d house tour")
5 Tips for Taking Better Real Estate Listing Photos

10 Useful Time Management Tips for Real Estate Agents

Real Estate Exam Prep: What Topics Are On The Exam?

How to Become a REALTOR® In 2024
Search for a topic, blog categories, vaned socials, download your free real estate career ebook.

Subscribe to VanEd
Get early access to sales, helpful real estate tips, industry news, and course updates from VanEd - straight to your inbox.
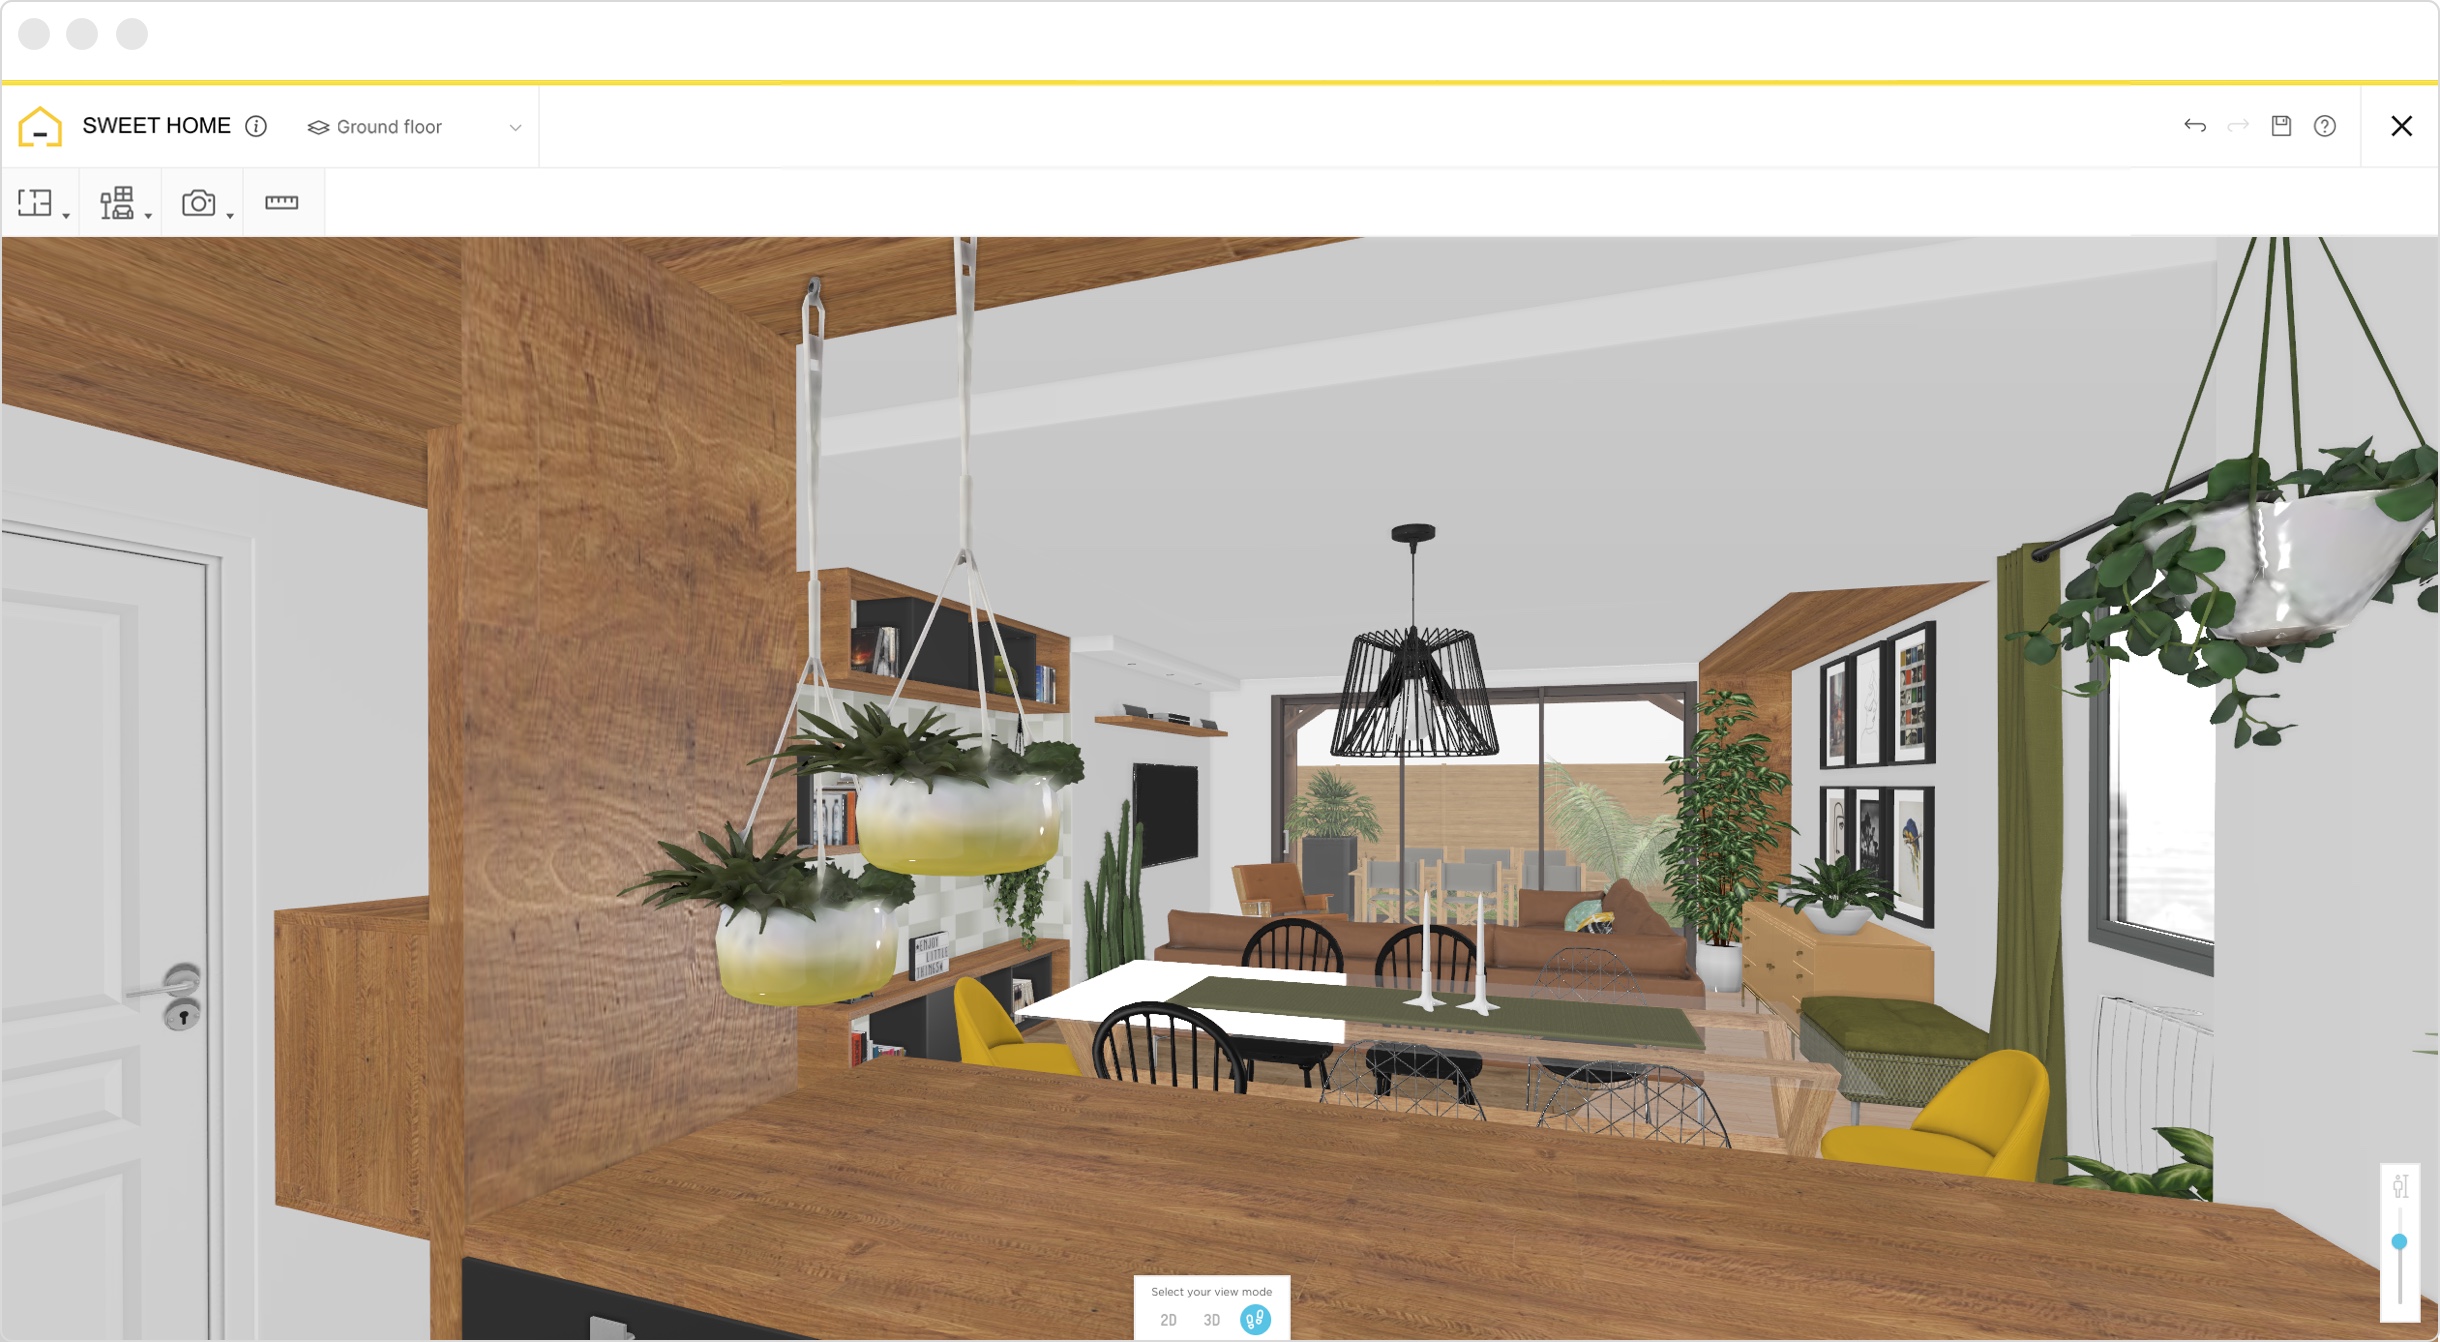
How to take a virtual tour of your 3D floor plan?

Take a 3D walkthrough of your floor plan
Choose the right furniture using AR technology
Use VR technology to design and visit your home
In details:
After drawing your dream home it’s time to view it from a real life perspective! Learn how to take a virtual tour of your 3D floor plan.
Tour your 3D floor plan as if in real life with HomeByMe’s first-person viewing mode. This viewing mode allows you to take a virtual walkthrough of your project and envisage yourself in your new space.
How to tour your 3D floor plan:
The first-person viewing mode allows you to take a virtual tour of your 3D floor plan. The 3D graphics move seamlessly as you move your avatar from room to room. Adjust the height of your avatar to view the floor plan as you would in real life. Click in a space to advance or change direction. Drag up or down to adjust the viewing angle of the room; to visualize the ceiling or floor of your 3D project.
The first-person viewing mode is an interactive way to view your design project . Use this perspective to project yourself into your new space and test the circulation of a property. Make adjustments to your project and view them immediately in the first-person viewing mode, due to HomeByMe’s 3D rendering technology. The virtual tour feature of HomeByMe’s 3D floor plans is loved by those planning personal home renovation projects .
Why use HomeByMe to draw and visualize your 3D floor plan?
If high-quality graphics, an intuitive interface and shareability are important factors when choosing a floor plan design software , then look no further.
HomeByMe’s 3D rendering technology enables you to immerse yourself in your project as if in real life. The simple and intuitive software allows you to move seamlessly through your 3D floor plan and drag to view different angles of your project, for a complete view of your space.
Switch between the 2D and 3D viewing modes to edit your project. Any changes you make will be immediately reflected in the first-person viewing mode.
Access the first-person viewing mode for free when creating your HomeByMe projects, which are available anytime via the HomeByMe website. Take a virtual tour of your 3D floor plan online via computer or mobile device and then share your final design.
Easily share your project with your friends and family, so they can take their own virtual tour of your property. Share your 3D floor plan via social networks and in the HomeByMe Inspiration page to gather feedback from the HomeByMe community. HomeByMe’s first-person viewing mode allows you to communicate your floor plan ideas with project associates and lets them immerse themselves in the new space before providing feedback.

Create a 360° image with HomeByMe in order to visualize your design from all angles. Using your computer, smartphone or tablet, you can zoom and rotate to see the room from a first-person perspective. 360° images are helpful when making design decisions, like choosing furniture, fixtures and finishes. Making a 360° image is easy: simply order it on the HomeByMe website, click to create a 360° image of your project and receive it by email. Once you’ve received your image, you can instantly share it online with friends and family.

Augmented Reality
HomeByMe offers the possibility to design your home with Augmented Reality . Furnishing your home is so much easier when you can visualize the furniture in its place before buying it. Using our specialized application, simply select a piece of furniture from HomeByMe’s product catalog, scan your room using your iPhone or iPad, and view the furniture as it would look in your home. If you need a second opinion, you can take a photo within the app and share it online with friends and family.
Virtual Reality
HomeByMe’s Virtual Reality (VR) experience takes your design process to the next level. Using a VR headset, such as the Oculus Rift or HTC Vive, you can truly immerse yourself in your project, both during the design phase and afterwards, as a virtual walkthrough. Visualise your project from every angle and decorate your home, by adding items from the catalogue, whilst virtually standing inside your home. All objects will appear life-size, allowing you to really experience your new interior and experiment with different designs, until you find one that suits your style.
Visit our Inspiration page for examples of 3D floor plans, which you can even duplicate to get started and then adjust to suit your design needs!
You may also like...

What is a floor plan? Everything to know about floor planning!

How to draw 3D floor plans?

How to Create and Furnish your 3D Floor Plan?

How to create 2D Floor Plan online?
Immerse yourself in your project to see how your design will appear in real life. Use advanced technology to view your floor plan from all angles.
Need a helping hand?
Give us your plan and our team will create your 3D project. Then you’ll only have the fun part left: decorate your house!
Create your floor plan now!
How To Create 3D Tours
3 Mins Read
January 31st, 2024

Nichole Samuel
Owner of Goddess Interiors based in the NYC, CT Tristate area. She has over 12 years in the home and design industry and specialize in new construction and virtual services.
Currently at
What Is a 3D Tour
The complete virtual tour of the house is called its 3D tour. Through aspects of design, décor, stylistic space and luxurious space, one can have a personalised feel of the entire space. Being provided with a real-time experience that is blended with very articulate perfections also adds on to the charm of the 3D Tours. It is one of the best tools when personalised furnishing is to be displayed or visualised.

Image credit: foodandspiritprofessional.com
Creating a 3D Tour
Buying A Camera
You will need to have a camera that can shoot 360-degree panoramic footage. The camera should be able to shoot both vertically and horizontally. A set of tripods and a camera will be best for capturing better pictures.
Features Of The Camera
Your camera should be able to function using a smartphone or a remote so that you can avoid human involvement in the capturing scenes: the more the feature, the more customised options.
Proper Positioning Of The Camera
The position of the camera is very important. You should place the camera in such a way that it can shoot the entire house including it corners. It should be placed in such a way that the largest part can be covered in a better way.
Recording The Moments
To create a 3D tour the most important thing is to capture the moments of the house rather than just its spaces. Once you have started recording, place the camera properly so that the shoot can be recorded properly at once. The pictures clicked should have liveliness in them to create a desire of wanting for the users.
Panoramic Shot
You need to step out of the house and record the outer spacing and the whole resident from outside to record a 360 degree evolve. It is very much mandatory to cover every corner of the house so that nothing is missed during the tour and a remarkable experience can be created for the viewers.
Cover All The Places
Move the camera in all the places of the house to cover the rest of the house. Take multiple shots of a single place to select the best shot at the last place. Covering all the places will help the viewers in clearing all their doubts relating to the design, spacing, and interior of the house.
Creating The Tour
You can use Make TV site for creating the 3D tour of the house. There are many other free and paid software that can be used for creating a visual tour. You can use it for free just by signing up. You will find an option of creating the new tour on the left side of the page. You will need to upload your photos captured under either cylindrical heading or spherical heading. After creating the tour, you will get a link that you can use to publish your tour.

You Might also like
3D Design, Modeling & Rendering
3D Visualization – Best 3D Visualization Software for Designing.

9 Different Types of 3D Modeling for Designers
February 3rd, 2024

Best Laptops for 3D Rendering and Modeling in 2024
September 8th, 2024

3D Modeling vs 3D Rendering
Join 50,000+ designers and teams.
Using Foyr Neo is as easy as 1, 2, 3. First, upload a floor plan or create one from scratch. Then drag and drop from over 60K 3D models to fill your rooms. Lastly, just set the shot and let the AI create stunning 4K renders for you in less than 10 minutes.
No Credit Card Or Download Required

Specially built for Interior Designers
Get started for free

- Residential
Video Render
Let’s Talk: [email protected]
- Goldman Sachs
- BOOK A CALL
- Book a Call
- Español ( Spanish )
- Français ( French )
- Deutsch ( German )
Interactive 3D Virtual Tours.
Photorealistic 3d Rendering To Provide An Immersive Experience.
Our interactive virtual tours help architects, designers, and real-estate developers to engage and excite potential investors or buyers — streamlining the outreach and fundraising process.
High Tech Virtual Tours.
- Increase sales through Visual Storytelling using the latest immerise technology.
- Present them an interactive virtual tour with the key information they need.
Your Solution for High-Tech Virtual Tours.
Drive sales..
Visual storytelling using the latest immersive technology builds enthusiasm, engagement, and interest among prospects.
Provide clarity.
Present all the key information about your project and your vision, making it easy for viewers to digest and understand.
Autopilot or Take Control.
Curate the experience with a fully guided virtual tour, or let the viewer take the controls and explore at their own pace.
Multilingual Support.
Ensure your project is presented and understood clearly with accurate subtitling or narration in as many languages as you need.
Easy to share.
A single link makes it simple to embed the tour on your website or to share via email or social media.
Make Your Virtual Tours INTERACTIVE with PlusReal.
PlusXR – Give viewers an instant feel for the surroundings, by highlighting points of interest around the project site and displaying walking and driving distances.
Dimensions.
PlusXR – Specify the exact footprint of your project development, as well as plotting dimensions, measurements, and other relevant spatial information.
Key Information.
Overlay key information about the scope of the project such as materials used, number of units, location of access points, or layout options.
Drone Photo.
Bring your project to life with hyper-realistic 360º photo implementation and drone photography to integrate your project into its surroundings.
Move Around Freely.
Get an instant feel for your surroundings. Highlight points of interest around the location, in relation to walking and driving distances.
Quality Meets Trust.
Our Range of Interactive Virtual Tours.
Choose the type that suits your project.
Industrial Virtual Tours. GO TO PAGE
Engage and excite prospects with a detailed and immersive experience of your industrial project, including accurate dimensional and spatial data.
Residential Virtual Tours. GO TO PAGE
Share your vision with investors and buyers by offering photorealistic tours of your residential project, featuring accurate lighting, layouts, and furnishings.
Commercial Virtual Tours. GO TO PAGE
Show off the commercial potential of your project, by allowing the viewer to experience each aspect of the planned design in hyper-realistic detail.
Interactive Workflow.
Our process is collaborative and iterative. We’ll check in with you at each key approval point, and when you’re happy to proceed, we’ll move to the next stage.
You’re in the driving seat — controlling the timeline and influencing each design decision.
Your documents serve as the foundation for our 3D rendering services.
View Our Latest Projects with +PlusReality.
Industrial virtual tour..
See why our clients trust us to provide highly engaging and realistic depictions of their industrial design projects which place the viewer at the center of their vision.
Specialized Interior Designes will create eye-cathing photorealistic renders. They’ll work closely to explore different arrangements, styles, furniture and choose the best ideas.
Residential Virtual Tour.
Discover how our residential virtual tours help real estate developers to engage with prospective buyers by immersing them visually in the design and space.
Commercial Virtual Tour.
View a selection of our commercially-focused work, and see the value in providing your potential buyers or investors with a highly realistic virtual tour.
Clients Say.
Trusted by global brands..
Brands like these trust Plus Render to deliver exceptional visualizations every time.
A 3D virtual tour and a 360 tour are both digital tools used to showcase a space, but there are some key differences between the two:
Immersiveness : A 3D virtual tour is generally more immersive than a 360 tour. In a 3D virtual tour, the viewer can move through the space and interact with objects, while in a 360 tour, the viewer can only look around in a fixed location.
Interactivity : A 3D virtual tour is more interactive than a 360 tour . In a 3D virtual tour, the viewer can click on objects, zoom in and out, and interact with hotspots to learn more about specific features in the space. In a 360 tour, the viewer can only look around and not interact with the environment.
Quality : A 3D virtual tour generally has higher-quality graphics than a 360 tour. This is because 3D virtual tours are created using specialized software for high-quality rendering of textures, lighting, and other features.
Cost : A 3D virtual tour is generally more expensive than a 360 tour. This is because creating a 3D virtual tour requires specialized equipment and software and a higher level of expertise.
Overall, both 3D virtual tours and 360 tours are useful tools for showcasing a space, but the choice between the two depends on the specific needs of the project and the desired outcome. 3D virtual tours are generally more immersive and interactive but more expensive to create, while 360 tours are less expensive but less immersive and interactive.
A 3D Virtual Tour is a simulation of a virtual environment which has been 3D modeled. This simulation is generated by a powerful software representing in great detail the project, providing an interactive, immersive experience.
There are two types of 3D Virtual Tours:
- 360º Virtual Tours are a set of combined 360-degree views. They allow customers to virtually visit each space in a static 360º view through your property, allowing them to discover more about what you have to offer.
- Virtual Reality Walkthrough: Viewers are immersed in a fully interactive 3D environment that provides a virtual representation of the building as a whole, including all the interiors, exteriors, and surroundings. The viewer can maneuver freely in this space, understanding the whole proposal on a much deeper level.
Additionally, its interactive interface can allow viewers to change elements/materials/furniture in real-time. Both 3D Virtual Tours can be easily shared with a link or QR code to any device. They are compatible with phones, tablets, computers, and off-the-shelf virtual reality glasses.
It’s both a differentiative marketing tool and a cost-effective design & construction tool. Developers and architects are well aware of the financial pressures that keeping up with the competition places on their businesses. Knowing how to make the most of technology might give you the edge you require. This highly immersive experience allows clients to engage and live the proposal, understanding it from a much deeper level.
On the other hand, analyzing the property before breaking ground prevents unnecessary waste of significant amounts of time and money. It even allows you to make changes in real-time, understanding the solar impact or the use of different materials.
Feel free to Contact Us to understand how it can help you.
Virtual tours are ideal for showing off a property in its entirety because of their immersive experience . They’re highly shareable. A potential customer has to scan a QR code or visit a specific URL, and they can see the property.Virtual tours are time savers. Imagine would-be clients already weeding themselves out and only working with interested customers? That’s the benefit of creating a virtual tour! Analyzing the property before breaking ground prevents unnecessary waste of significant amounts of time and money. It even allows you to make changes in real-time, understanding the solar impact or the use of different materials. Offering virtual tours makes you different. Most developers and architects will have 3D renderings at best, however many have yet to jump on the virtual tour bandwagon. Reduces the amount of back-and-forth between you and customers. The virtual tour gives a very detailed overview of the property, so you’ll have fewer questions to answer.
All our 3D virtual tours are initially based on 2D plans; then we subsequently produce a realistic 3D model. Then, depending on the Virtual Tour type, we can either generate 360º images or a Virtual Reality environment. Find more about what the 3D Modeling & Rendering process could entail by visiting the Workflow section on our Pricing page.
The price is determined based on the number of working hours spent on the Virtual Tour and its complexity. Nevertheless, we want to be as transparent as possible with our clients. The prices are closed and stated on the web to avoid surprises. We want our clients to be in control. You can potentially qualify to receive volume discounts, so be sure to look on our Pricing page or Contact Us for a project estimate.
Let’s Talk.
Don’t worry if you don’t already have a detailed project plan in place. We’ll collaborate with you and develop your idea together.
Big enough to deliver, small enough to care.
- [email protected]
- + 34 633 266 577
- Calle Mayor 10B, 48930 Bilbao, Spain
- plusrender.com
Virtual Tour
Image Render
Plus Render
© 2022-2024 +Render Architectural Solutions. All Rights Reserved.

If you are looking to use a premium feature such as privacy or custom logo, you will need to upgrade your account to PRO.
Scene Sound
Add sound to only this scene. Supported formats: .mp3, .wave, .aiff
Image Downloads
Image will open in a new window. Right click image to save.
360 Capture
Capture the current scene as a 360 image. Image will download automatically after a few seconds.
Mint 360 Image
Mint this 360 image as an VR NFT. minter.orbix360.com will open in new window.
Insert a flat image into this scene
Upload image:
Image Hotspot Options
Scale (percent), adjust position / rotation (or use arrow keys).
Change 360 Image
Select a new background image for this scene
Orb Rotation
Orb rotation behaviour, rotation speed, audio stream, organize scenes, rename and reorder your scenes.

Navigation Hotspots
Orb Privacy
Privacy settings, info hotspot.
Add a text hotspot to this scene
Hotspot Info Text
Maximum character count: 50
Upper Left Logo
This is a premium feature click here to upgrade Supported formats (png and jpg) size: 300x50
Custom nadir
This clickable element will place a logo at the bottom of your image. Supported formats (.png and .jpg) size: 800x800.
Create plugin
Element name:
Element properties
Element name:, custom properties.
Idaho Falls news, Rexburg news, Pocatello news, East Idaho news, Idaho news, education news, crime news, good news, business news, entertainment news, Feel Good Friday and more.

The house on King Road: A look at the Moscow home where four U of I students were killed
Sally Krutzig and Kevin Fixler, Idaho Statesman

( Idaho Statesman ) — At 1122 King Road in Moscow sits a gray six-bedroom, three-bathroom house that continues to be the source of significant national attention.
Known as a student rental, the home’s most recent tenants were a group of six University of Idaho undergraduates who signed a 12-month lease that began on June 5, according to the property management firm that oversees the home.
Three of the student renters would not live to see the end of their lease.
The tenants were Madison Mogen, Kaylee Goncalves, Xana Kernodle, Bethany Funke and Dylan Mortensen, as well as an unnamed sixth person on the lease.

RELATED | Who were the four students killed at the University of Idaho? A look into their lives
In the early morning hours of Sunday, Nov. 13, Mogen, Goncalves, Kernodle and Kernodle’s boyfriend, Ethan Chapin, were stabbed to death in the house. Police found two bodies on the second floor and two bodies on the third floor, but have not released which victims were discovered where.
Mortensen and Funke were on the first floor of the home and went unharmed. Police have said they were not involved in the killings.
Nearly six weeks have passed, and law enforcement still has not named a suspect in the quadruple homicide.
The Idaho Statesman used photos from rental listings and documents submitted by former owners to the city of Moscow to explore the layout of the King Road house. Depictions of the floors are approximations created by the Statesman based on that information.
Just north of the home is the university’s new Greek Row , where many fraternity and sorority activities take place. That proximity meant the area was particularly popular among those involved in U of I Greek life.
About 1,600 students are members of the school’s fraternities and sororities. That total represents 23% of the roughly 7,000 undergraduate students enrolled in fall 2022 at the Moscow campus, according to university spokespeople.
Goncalves was a member of the Alpha Phi sorority, while Mogen and Kernodle were members of Pi Beta Phi. Funke is a member of Pi Phi as well, and identified Mogen as her “big sister” in a letter she wrote that was read at a Dec. 2 memorial . Mortensen also appears in multiple photos reviewed by the Statesman, including with Funke, on the sorority’s Facebook page, wearing clothing with Pi Phi insignia.
Many renters in the area around King Road were overflow from the nearby fraternities and sororities, said Merida McClanahan, supervisor at Team Idaho Real Estate & Property Management.
“ we have a lot of university students as our tenants and we’ve got quite a few of the properties down there on King Road,” McClanahan told the Statesman in a phone interview. “It’s a tight-knit community. They’re on the back side of campus right across the street from Greek Row, and those kids cycle in and out.”
The listed owner of the King Road property didn’t return email and phone messages from the Statesman.

David Janssen, 32, a former U of I graduate student who said he’s a five-year tenant of an apartment complex adjacent to the rental home, confirmed that fraternity and sorority members appear to dominate the tightly packed neighborhood.
The surrounding Greek life environment contributed to what those familiar with the neighborhood, including Janssen, described in interviews with the Statesman as a loud party culture in the conjoined dead-end streets of King and Queen roads.
“This has always been a party place since I’ve lived here — always,” said Sean Hundley, 34, a nearly lifelong Moscow resident, and maintenance person for the adjacent apartment complex.
The tenants of the King Road house had received three noise complaints for loud music since August, according to a Statesman review of Moscow police reports. Two came on the same night in early September from separate neighbors in two single-family homes, each about a quarter-mile away, on the street located above the valley where the King Road house sits.
Goncalves received a warning from police for the first noise complaint in August. Mogen and Kernodle each received law enforcement warnings from the two complaints in September, according to the police reports.
In recently released Moscow police body-cam footage posted on YouTube , officers were shown trying to track down a resident of the home after the first of the September noise complaints.
“I guarantee you they’re associated with a sorority,” Moscow Police Sgt. Dustin Blaker said in the footage, to a male student who didn’t live at the home. “As many of them are living here, it’s an off-campus sorority house.”

The King Road home’s six bedrooms had at one time been rented as separate apartments, according to McClanahan, with the property management firm.
“Primarily for the last 12 years, it has been rented as one unit as a single-family home,” McClanahan said.
The house originally had two floors, but an owner requested to add the lowest floor in 2000, according to Moscow city permits. Built into a hillside, the house has one exterior door on each floor.
The home is 3,120 square feet, according to Zillow . The Latah County Assessor’s Office assessed its value at $343,848 in August.
The first floor

All of the tenants except the sixth unnamed person on the lease, who police said had moved out before the start of the school year, were home at the time of the Nov. 13 attack. The five housemates, along with Chapin, were all back at the King Road house by 1:56 a.m., police said. Call records made by Mogen and Goncalves indicated the attack happened sometime after they placed a phone call at 2:52 a.m., according to The New York Times.
The roommates on the first floor, Mortensen and Funke, likely were asleep until later that morning, according to police.
Attempts by the Statesman to reach Funke and Mortensen have been unsuccessful.
At 11:58 a.m., a 911 call was made from inside the house on one of the surviving roommates’ cellphones, according to police. The roommates summoned friends to the house because they believed one of the victims on the second floor had passed out and was not waking up. Multiple people spoke with the 911 dispatcher before officers arrived, police said.
Authorities have declined to release the 911 recording, citing an ongoing investigation.
On social media, many have expressed disbelief that Mortensen and Funke would not have woken up during the killings. However, former first-floor tenant Ryan Augusta told Fox News that he typically “heard nothing” from the second and third floors when he lived there in 2019. Reached by the Statesman, Augusta said he stood by his prior statement.
City records and photos from online rental listings indicate the first floor has two bedrooms that open into a shared hallway. The hallway also leads to a bathroom and a stairway that goes to the second floor.
A door between the bedrooms opens to the property’s driveway.
The second floor

The second floor of the home includes a living room, two bedrooms, a bathroom and a kitchen. This floor can be accessed from the outside through a sliding glass door between the porch and the kitchen.
This floor has two separate staircases, one that leads to the first floor and one to the third floor.
Kernodle lived on the second floor, her mother, Cara Northington, said in an interview this month with NewsNation . Chapin’s mother, Stacy Chapin, previously confirmed to the Statesman that her son spent the night at his girlfriend’s house.
The third floor

The third floor of the home includes a bathroom and two bedrooms — one of which has a balcony with a sliding glass door. This floor can be accessed only by the staircase from the second floor.
Goncalves’ father, Steve Goncalves, said his daughter and Mogen lived on the third floor, according to Fox News. He said he believes that the two women, close friends since childhood, both slept in Mogen’s room the night of the killings.
Two items — a pair of pink boots frequently worn by Mogen in social media photos and a decorative letter M— could be seen in the window of bedroom E following the homicides. Goncalves posted social media videos from bedroom F.
Goncalves had a dog named Murphy who was home at the time of the attack, police said. Officers found the dog in a room where the crimes were not committed, but do not know where he was at the time of the killings, according to a news release. Police found no evidence on the dog, they said.

SUBMIT A CORRECTION
IMAGES
VIDEO
COMMENTS
If you're creating a virtual tour with an iPhone, follow these nine steps. Download the Zillow 3D Home app to your iPhone®. Open the app and tap "Start capture". Choose the iPhone setting. Select the room type in the app. Capture the first panorama. Hold the iPhone vertically in front of your chest.
Step 5: Publish and Market the Tour on Multiple Channels. Platforms such as realtor.com®, many MLSs, and social media are ideal places for publishing your virtual home tour. You can embed the tour link in email campaigns and text messages or drop it straight into Facebook, says Schravemade. Once the images and 3D model have been created, Frank ...
Learn how to create a virtual home tour using the free Zillow 3D Home® app and the Ricoh Theta V or Z1 360-degree camera by following the nine simple steps i...
Start creating your stunning 3D house tours with CloudPano today and redefine how properties are presented to the world. Follow These Next Steps: #1 - Register for an upcoming webinar :**Free Webinar → "How To Start a Wildly Profitable Virtual Tour Business and Get High Ticket Clients To Come To You Without Hard Selling Or Buying a Large ...
Capture tours with a 360-degree camera. Save time creating your 3D Home tour with a Ricoh Theta and Insta360 camera. Learn how to set up your camera, capture panoramas, and upload and finish tours. Get started. For multifamily properties, use this guide.
Create your plan in 3D and find interior design and decorating ideas to furnish your home. Discover Homebyme! The first free online 3D service for designing your entire home. Create your project. 0 Bring your project to life. Create your plan. ... Take a virtual tour of your future home by creating realistic images of your project of your project.
The process of making a 360-degree virtual tour is simple. Get a 360-degree camera or phone attachment. Place the device in the middle of each room in the house to capture your images. Upload the images or video to a virtual tour software, and then promote your tour online to spread the word and get views.
Listings with 3D Home tours and interactive floor plans are made to be explored. With every room you capture, you help people understand the layout and imagine what it would be like to call it home. To create a 3D Home tour and an interactive floor plan, you'll need an iPhone 7 (or newer). You can also use compatible 360-degree cameras like ...
Plan Out Your Photos. 4. Clean and Stage the Home—or Consider Virtual Staging. 5. Test Out Your Equipment and Lighting. 6. Take Your Photos and Upload Them to Your Software. Benefits of Creating ...
📱 DOWNLOAD OUR APP!Want to easily shoot stunning real estate photos on your iPhone? Download the SnapSnapSnap app for free here: https://apps.apple.com/us/a...
Step 3: Create Your First VR Scene. Once you have created your first tour and provided a name, description, and cover photo, you will be prompted to add your first scene. Next, click 'Upload' and locate the folder where you saved your 360° photos. Drag and drop the photo you would like to use for your first scene.
Embark on self-guided virtual tours of museums, art galleries, caves, real estate properties, historical sites and more. Matterport's immersive digital twins provide a detailed, dimensionally-accurate view of sites from anywhere in the world in 3D. Explore featured spaces and collections across diverse categories - all curated by our experts ...
The first-person viewing mode allows you to take a virtual tour of your 3D floor plan. The 3D graphics move seamlessly as you move your avatar from room to room. Adjust the height of your avatar to view the floor plan as you would in real life. Click in a space to advance or change direction. Drag up or down to adjust the viewing angle of the ...
Create your digital twin. Use any compatible camera, from your phone to our flagship Pro3, to capture your space in 3D. Alternatively, have one of our Capture Services technicians do it for you. Choose a Capture Method. Choose your plan. Find a plan that fits your needs, budget, and objectives.
Digital Pro: The affordable all-in-one package for $299. Try Digital Pro, our all-in-one marketing solution that includes a 3D tour, 2D photography, floor plan, and a scroll-stopping promo video for just $299 (a $500 value). Order Now.
Set up your camera. Open the Zillow 3D Home app and sign in to your Zillow account. Tap Start capture and select Connect 360° Camera. Check that Wi-Fi on your Ricoh or Insta360 camera is switched on. Following the instructions in the app, use the QR code to pair your mobile device to the Ricoh or Insta360 camera.
The position of the camera is very important. You should place the camera in such a way that it can shoot the entire house including it corners. It should be placed in such a way that the largest part can be covered in a better way. Recording The Moments. To create a 3D tour the most important thing is to capture the moments of the house rather ...
A 3D virtual tour and a 360 tour are both digital tools used to showcase a space, but there are some key differences between the two:. Immersiveness: A 3D virtual tour is generally more immersive than a 360 tour.In a 3D virtual tour, the viewer can move through the space and interact with objects, while in a 360 tour, the viewer can only look around in a fixed location.
Embed size: 640 x 400800 x 4501200 x 675. Yearly - Monthly Premium Plans. If you are looking to use a premium feature such as privacy or custom logo, you will need to upgrade your account to PRO. Pro Features. Add Your Own Logos on Your Experiences. .
Visit the 3D & VR Tour of 1122 King Rd (updated) The tour was constructed using the available real estate (and other) photos. None of those photos features ceiling fans. This is a really, really, really good virtual tour. One thing that stuck out to me as a real estate professional is that the outlets were installed upside down. Quality flip work.
MOSCOW, Idaho — Law enforcement is using 3D imaging to illustrate the crime scene and layout of the home where four University of Idaho students were killed last year since the home was ...
Zillow 3D Home is a free mobile app that allows homeowners and real estate professionals to capture virtual tours of homes with the help of an iPhone or Android device and in combination with 360-degree cameras. These tours are published to a listing's home details page on Zillow, letting potential buyers and renters walk through the home's ...
The house originally had two floors, but an owner requested to add the lowest floor in 2000, according to Moscow city permits. Built into a hillside, the house has one exterior door on each floor.