

RV renovation – How to remodel a Camper on a Budget (Full Process)
By: Author Joy & Ken Kelley
Categories Farmhouse inspiration , Our Camper Trailer , RV feature , RV Inspiration

Ever since we posted the first picture of our remodel on social media, there have been so many requests asking to reveal how we did our RV renovation and the details that went into it, so finally here is everything that you should know to conquer a camper remodel!

So today we will be sharing a step-by-step post describing everything we considered and also the steps we took for our RV renovation. From the materials we used, the resources we checked, and some tips we picked along the way in our (one month) Camper remodel on a budget!
I’ve tried to cover as much as possible with this post, but if there’s anything in particular that you would like us to cover, just contact us! We are happy to share about all the things we learned in this process, the good and the bad and we will also cover a breakdown of the exact cost of this remodel in a future post!
(If you are curious about the source list of all the items in the camper, I have them linked at the bottom)

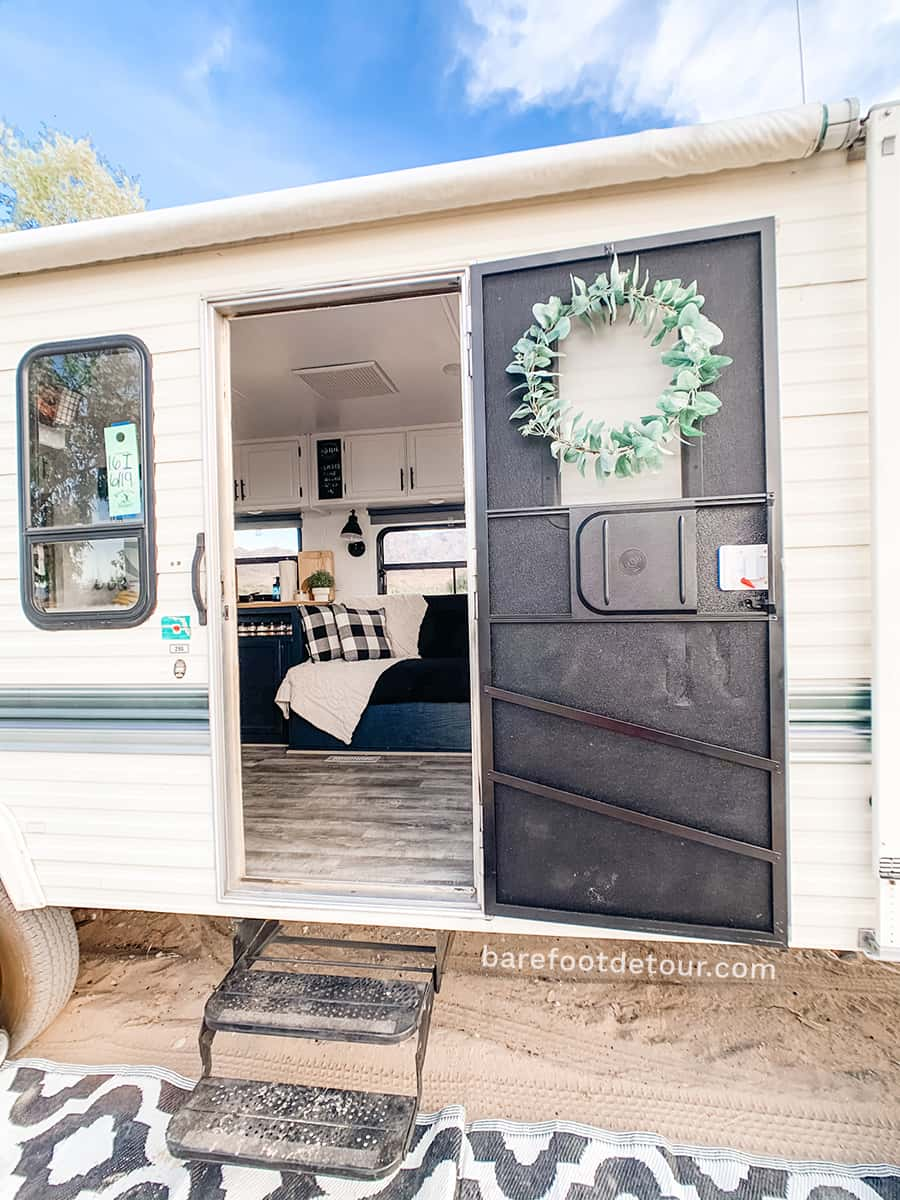
Now I want to share that in this post, we will be focusing on the interior RV renovation, we are still planning to paint and renovate the outside of our camper, but that is material for a whole different post! If you want to see a full tour of how it looked before, check this post .
I also want to mention that we did this renovation in the middle of 2018, so we have been using and camping on it for a while now. There are some things that we have changed along the way, so I will also cover that at the end of the post.
1 – Find an old camper
2 – plan the rv renovation, 3 – shop for the rv renovation, 4 – repair any damages, 5 – demo the inside of the rv, 6 – prep the different surfaces, 7 – add inner shelves or separations for organization, 8 – prime and paint, 9 – renovate countertop and table, 10 – add peel and stick backsplash, 11 – replace lights, 12 – redo flooring, 13 – add furniture, 14 – renovate the couch and dinette pillows, 15 – select mattresses and bedding, 16 select kitchen wares, 17 decorate and select different hanging methods, 18 – make it homey, 19 updates after two years of use, 20 – rv renovation resource list, wrapping thing up.
This post outlines the process that we followed in order to renovate our RV, and while my husband has experience in renovation while working with my father-in-law (he is a Licensed Contractor). We are no professionals at this. We just love sharing and hopefully helping others =]

I already shared how we came across our camper in the before blog post where I share what our plans were when we go it. We purchased it from a family friend for around $3,000 USA dollars, this is very cheap compared to what is normally available around us in California, so we jumped at the opportunity.
Here are some pictures of how our camper looked before, if you want to see a full tour of the before, check out this post .

If you are buying an RV from a complete stranger , we would recommend that you check the list we are adding below, because if any of those things are broken or not working correctly, it can set you down in your budget as repairs or replacements can cost a few hundred dollars.
- WATER DAMAGE : This is one of the most common issues in the RV world because the roofing on RV’s has to be re-touched (especially if the RV sets outside in direct sunlight) yearly or every a few years depending on the kind of roof sealer the RV has.Direct sun can wear the protective layer of the roof making it weak and allowing rain to cause many issues, from fully collapses roofs, to damage in interior walls and nasty mold inside and outside the walls. So if you find something with a little bit of water damage, it could be that you still have to replace a big portion of it.
- WORKING APPLIANCES : If you are buying something smaller than a pop-up or teardrop camper, you want to make sure that the included appliances like the stove, oven, microwave, and refrigerator are working properly.
- FUNCTIONAL WATER AND BATHROOM : Again, this only applies if the RV you are purchasing includes it, double-checking that the water tank, as well as the water systems inside the RV, are working is very important!
- AC and HEATING SYSTEMS : Depending on the season you purchase your RV, one of these might be overlooked, but it’s important to check both when you are purchasing to make sure that there’s no extra repair that you will need in order to use them.
- TIRES, BRAKES and TOW SYSTEM : These while super basic, could be items that you don’t pay too much attention when trying to assess the state of the interior, we had to replace the whole breaking systems in our camper, and we are so glad that we did look before taking our first long trip because not having enough braking power could have been not just a mistake but an accident waiting to happen.
- AWNING : I’ve seen many campers that have broken awnings, and while you can easily find replacements for the fabric for one or two hundred dollars, replacing the whole system can get super expensive, like almost a thousand of extra dollars depending on the size. So it’s definitely something you should check.
The main reason why we recommend you check all these things before purchasing is because those items will be expensive to replace or fix, so if you can get away with not having to invest money on the basic functionality of your RV, you will have more money to allocate to make it look AMAZING!
The planning phase of your RV renovation can seem like such a not important thing to focus on, but if you (like us) are working on a budget, planning your priorities and where you want to splurge is super important to keep the renovation (and yourself) organized and account for everything you will need to purchase.
There are so many steps I recommend in order to plan the “look” of your RV so that you achieve exactly what you have in mind, spending as little as possible.
- Define your decoration style : This is such an important step, because, in order to outline your remodel, you do need to know what style talks best to you. In my case, I love the mix of Industrial, Modern, and Farmhouse. So I focused on some items for each that really made me happy and decorated from there.
- What items in your style will you want to include : Even when two people like the same style, there are preferences that we have over the items that we like in each style, so it’s important for you to select what you want to include that is important to you, this could be bedding, a rug, decor pieces, wallpaper, etc.
- Select what items will be your “big ticket” items : After you have all the items that you wish to include, select when ones that are the most important to you. In my case, it was the peel and stick subway tile and the black kitchen sink . I wanted them so bad that I allocated a big portion of our budget to them and compromised on other items that I wanted but that ended up being not so high in my list, like the kitchen faucet and the bathroom sink and faucet.
- Find budget-friendly alternatives for expensive items : As I mentioned, I decided that items in my list were not as important, so I found very cheap alternatives for things like the kitchen and bathroom faucet and the bathroom sink. (I ended up paying $25 for the kitchen faucet by getting a 50% off coupon from Google Shopping, $4 for the bathroom faucet and $6 for the new bathroom sink from E-trailer during a sale) So if you wait for sales or use extra coupons, your cost can go down a ton!
- Make a list of all the basics you will need : From the outside in, when I first started to plan the remodel I overlooked the number of items we would need that are just basics, like tape and paper to cover while painting, sanding paper, and tools like drills and hammers that if you don’t already have, can add pretty quick to your budget. So make a list of basics, if you don’t have the tools, check to see if you can borrow or rent instead of buying.
- Make a list of all the decor and extra items you will need : I know that by now you get that I am a list-making lover. But when planning a complex project like an RV remodel, staying organized on the things you need to do and how much you will spend on it can help you stay on track of the budget and also of the task you need to get done. I made a list of everything we needed to buy, where we will buy it and how much it was, that way I could organize our shopping trips (shopping with 3 little ones is complicated enough as it is, am I right?) and stay in budget!
Of course, this is just how we did things, there is no right or wrong way to approach a project! If you don’t like list-making, that is totally ok =]

As I mentioned, during the planning phase of our remodel, I made a list of everything we had to purchase, separated it by place, and also by importance.
The basics that will get us started were at the top of the list, the decorating items and things like flooring were at the bottom because we would not get to that until pretty much all the painting was done.
As I shared in our 5 biggest lessons we learned while renovating our RV post, we live in the mountains so shopping is already a full-day thing for us because most stores are 45 minutes down the mountain.
We basically shopped in person only at Home Depot and Ikea, and everything else we purchased online at Amazon and a few things from Target .

I recommend that you double-check the return policy on anything that you purchase for the remodel because until you see it where it’s supposed to go (even after measuring) you might change your mind.
Working with small spaces is tricky, and sometimes you will find something that you like but that it’s not necessarily the best use of the space. So that’s when the decision of what’s more important to you will weigh in.
I also recommend getting an Amazon Prime account because you will receive your items so much faster!

Before anything can start, you have to fix any water damage or other damages that your RV might have, especially if they are interior damages.
If your damage is only in the exterior, make sure that your RV is protected against the weather while you wait to get to it, that way it will not get worse.
Once the damages are addressed and fixed, we can move to the FUN part! Well, at least that is my husband’s favorite part of any project! DEMO!
Depending on what you plan to do with the interior of your RV, at this stage you might need to take cabinets out, or like in our case, take all the doors of the cabinets out!

We decided against taking too much of the storage out, and instead, we only took the pieces that were outdated (TV stand and music system) and used the space in a very bad way.
By removing those cabinets we saved enough weight to replace with something different, we found a cabinet for the bottom at the idea that was the exact measurements we wanted and taller than the old one so we could take advantage of the storage.
We also took all of the countertops, the one in the kitchen, bathroom, the table in the dinette, and the counter in the nightstand of our bedroom.

In most RVs, you will find a mix of particle board cabinets, some solid wood pieces, and veneer coverings. Most walls are either painted boards or wallpaper.
And depending on how old your RV is you might find even more surfaces like glass and poly doors and other plastic panels.
Preparing each surface for an efficient and successful covering is not only the most time-consuming part of this whole process but also one of the most important!
If you read my post about the 5 lessons we learned while remodeling , you already know that prepping was something we didn’t invest too much time in the beginning, and we ended up working double because of this!

So, How do you prep and RV for paint?
The short answer is, it all depends on the kind of surfaces that you have and the condition of your walls and cabinets.
Most old RVs have either a mix of particleboard (fake wood) and real wood, wallpaper and some have peel-and-stick surfaces.
For all the real wood parts in our RV, we decided to use liquid sander since we didn’t want to have to sand like crazy, every single part of the cabinets of the RV.
As the name hints liquid sander it’s a liquid that helps remove all the “gloss” out of your surfaces, we used about 2 layers of that, and then we lightly sanded all the parts that were going to be exposed to a lot of wear just to be safe.
For all the particleboard parts, we sanded a layer off (lightly) so that the primer would have a better surface to adhere to. We used a hand-held orbital sander that made the process so much faster than doing it manually!.
The sanding part, while annoying is super important to not skip over because if your primer doesn’t adhere well, the paint will chip with any minor scuff.
We didn’t remove the wallpaper on our walls because it was in very good condition , so removing it would have been more work for pretty much the same result.
So we decided to plain on top of it instead.
If you need to remove your wallpaper , I’ve read good reviews about this wallpaper stripper and also this wallpaper streamer that uses only water, no chemicals.
Just to be safe I wiped our walls (with wallpaper on) with this TSP substitute , this way I knew the surface would be spotless and in the best condition, so our primer would adhere better.
For all plastic parts, I washed them with the same TPS substitute as I did the walls and used spray paint for plastic, taping around the edges.
Because we rolled the paint on the walls and ceiling, painting around the already painted plastic parts was super easy.
(Ken did try to spray the camper instead of rolling, but he didn’t like how the coverage looked, so we opted for rolling instead)

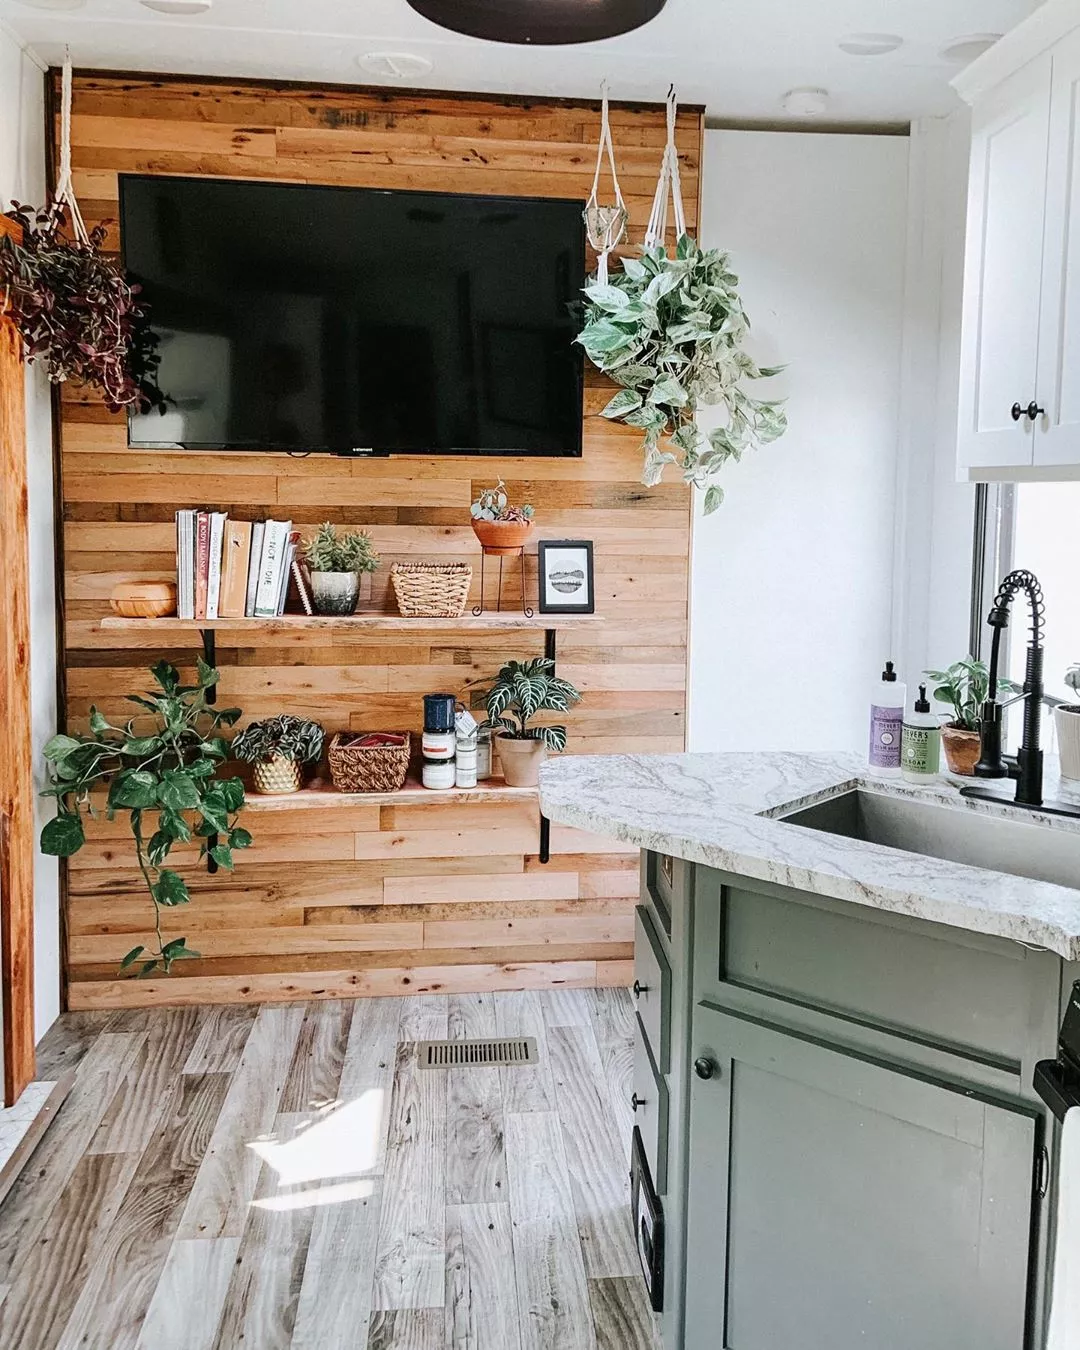
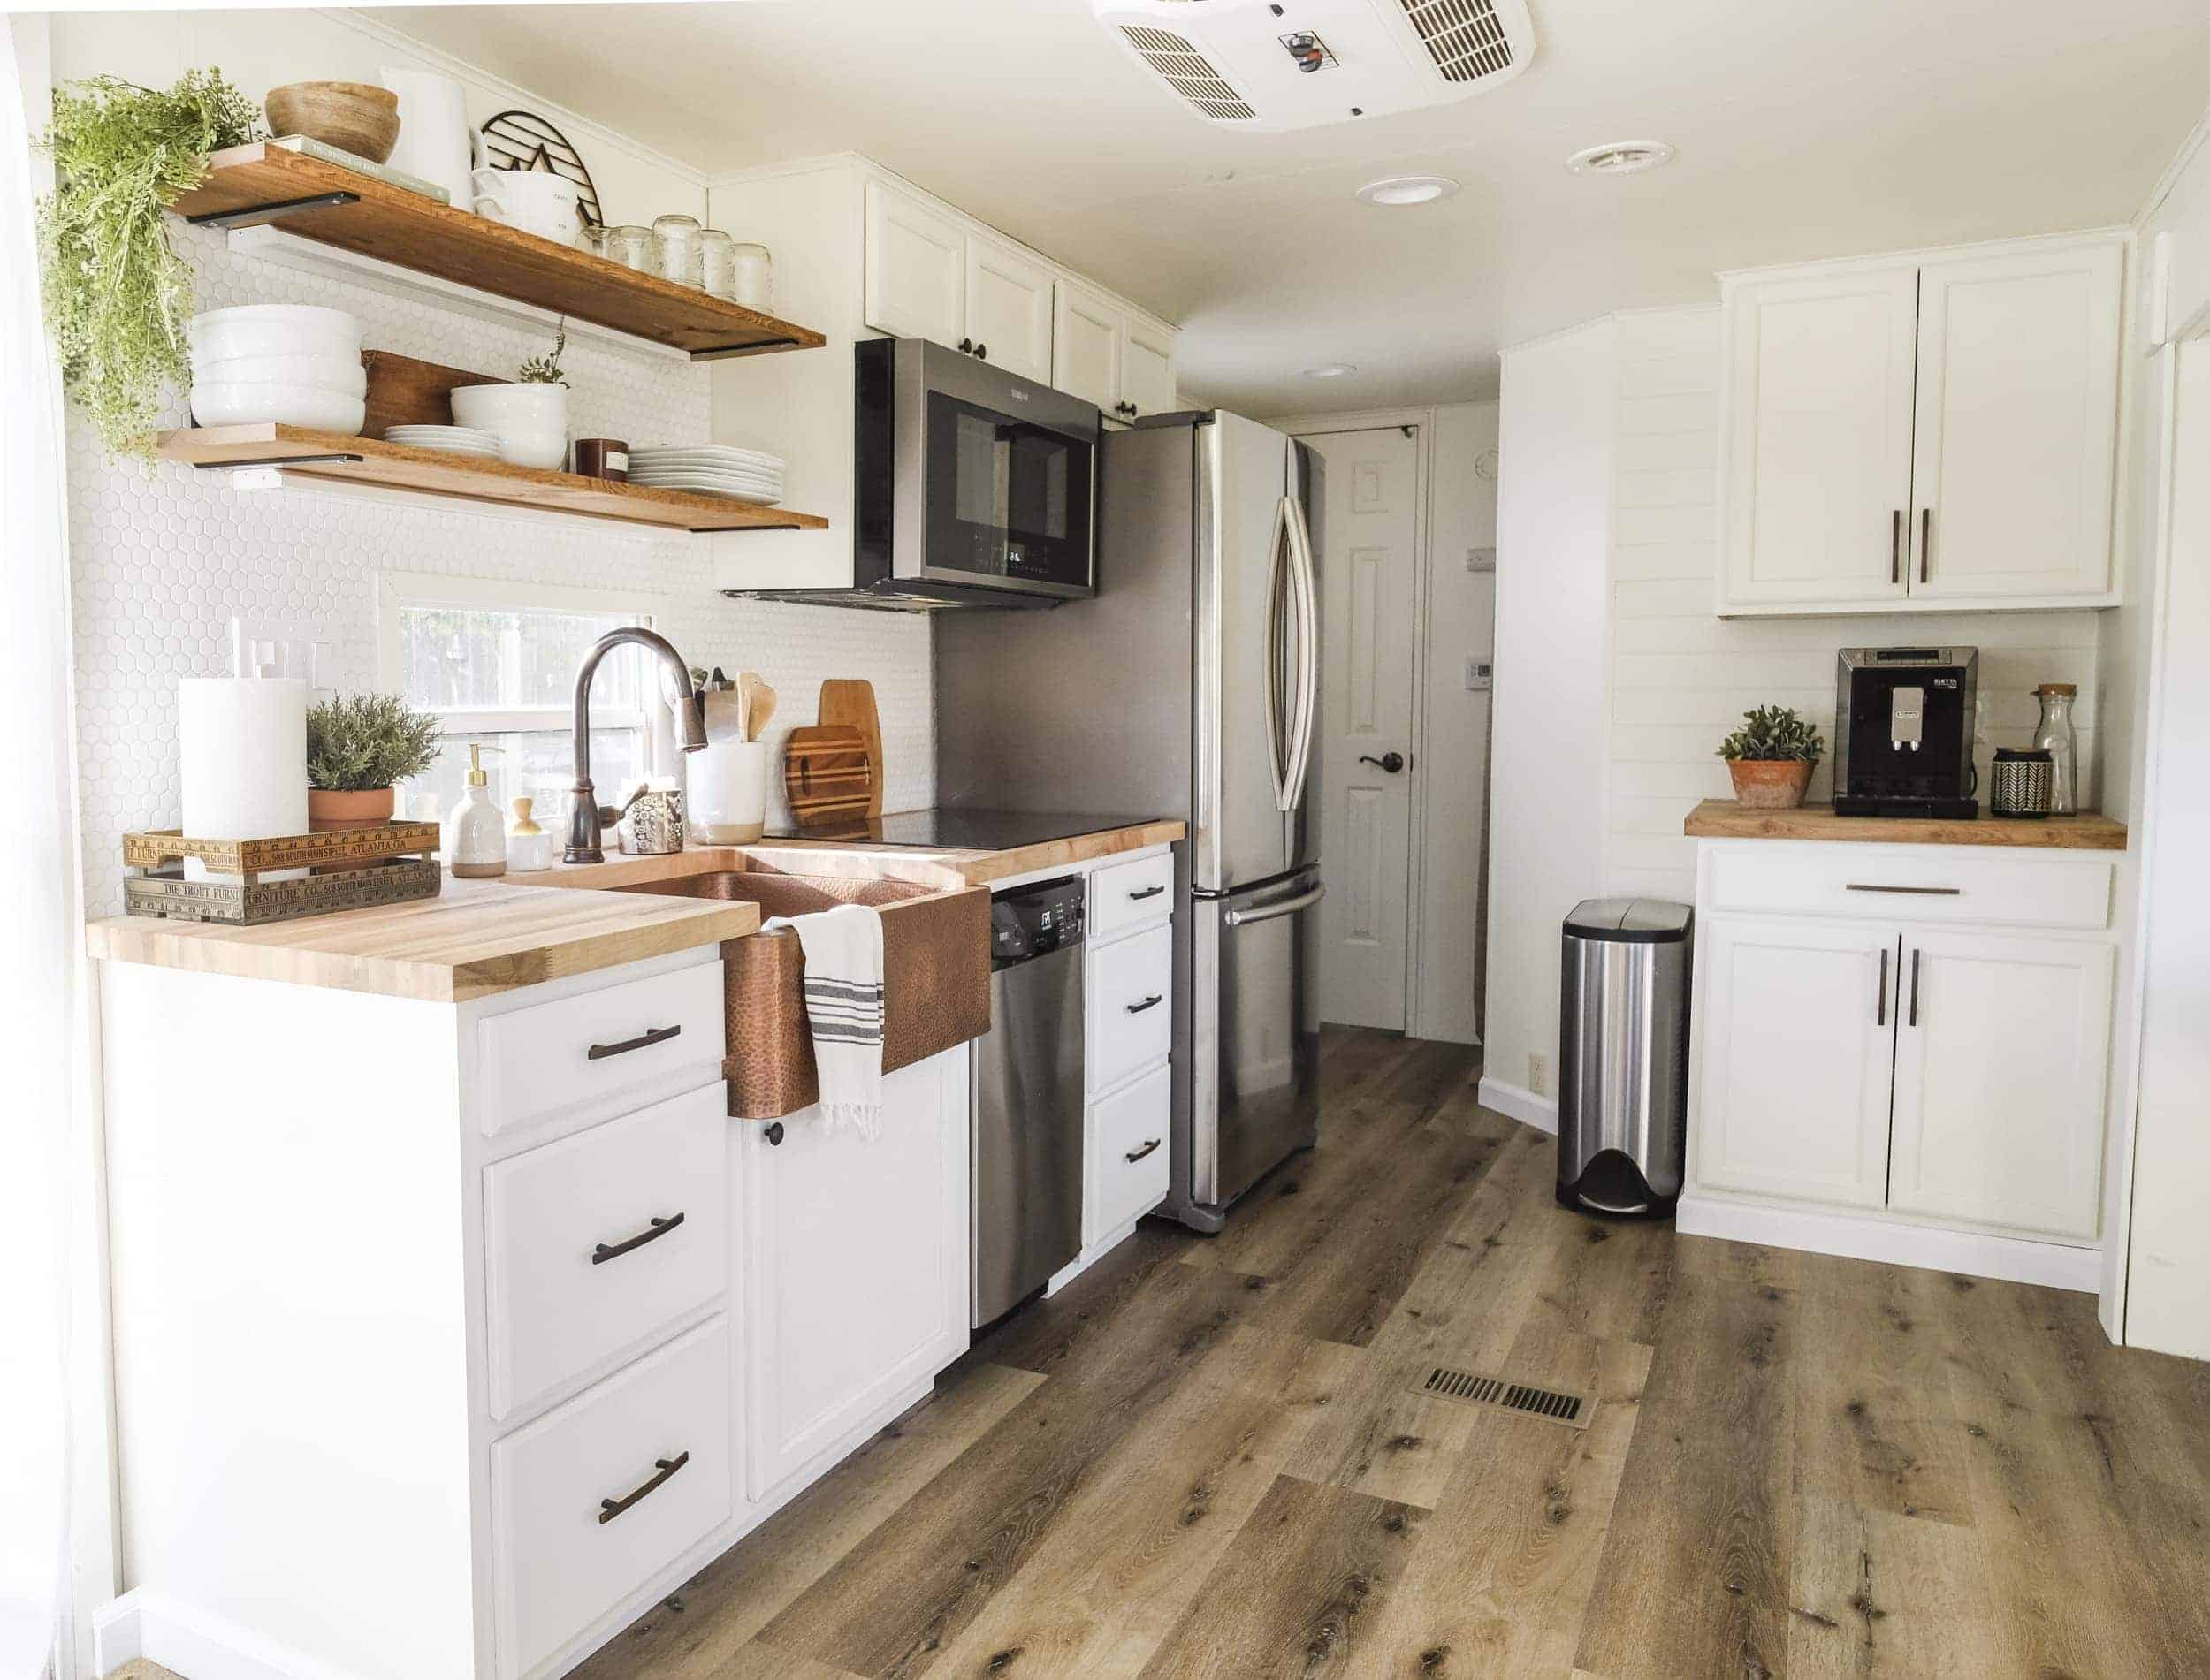
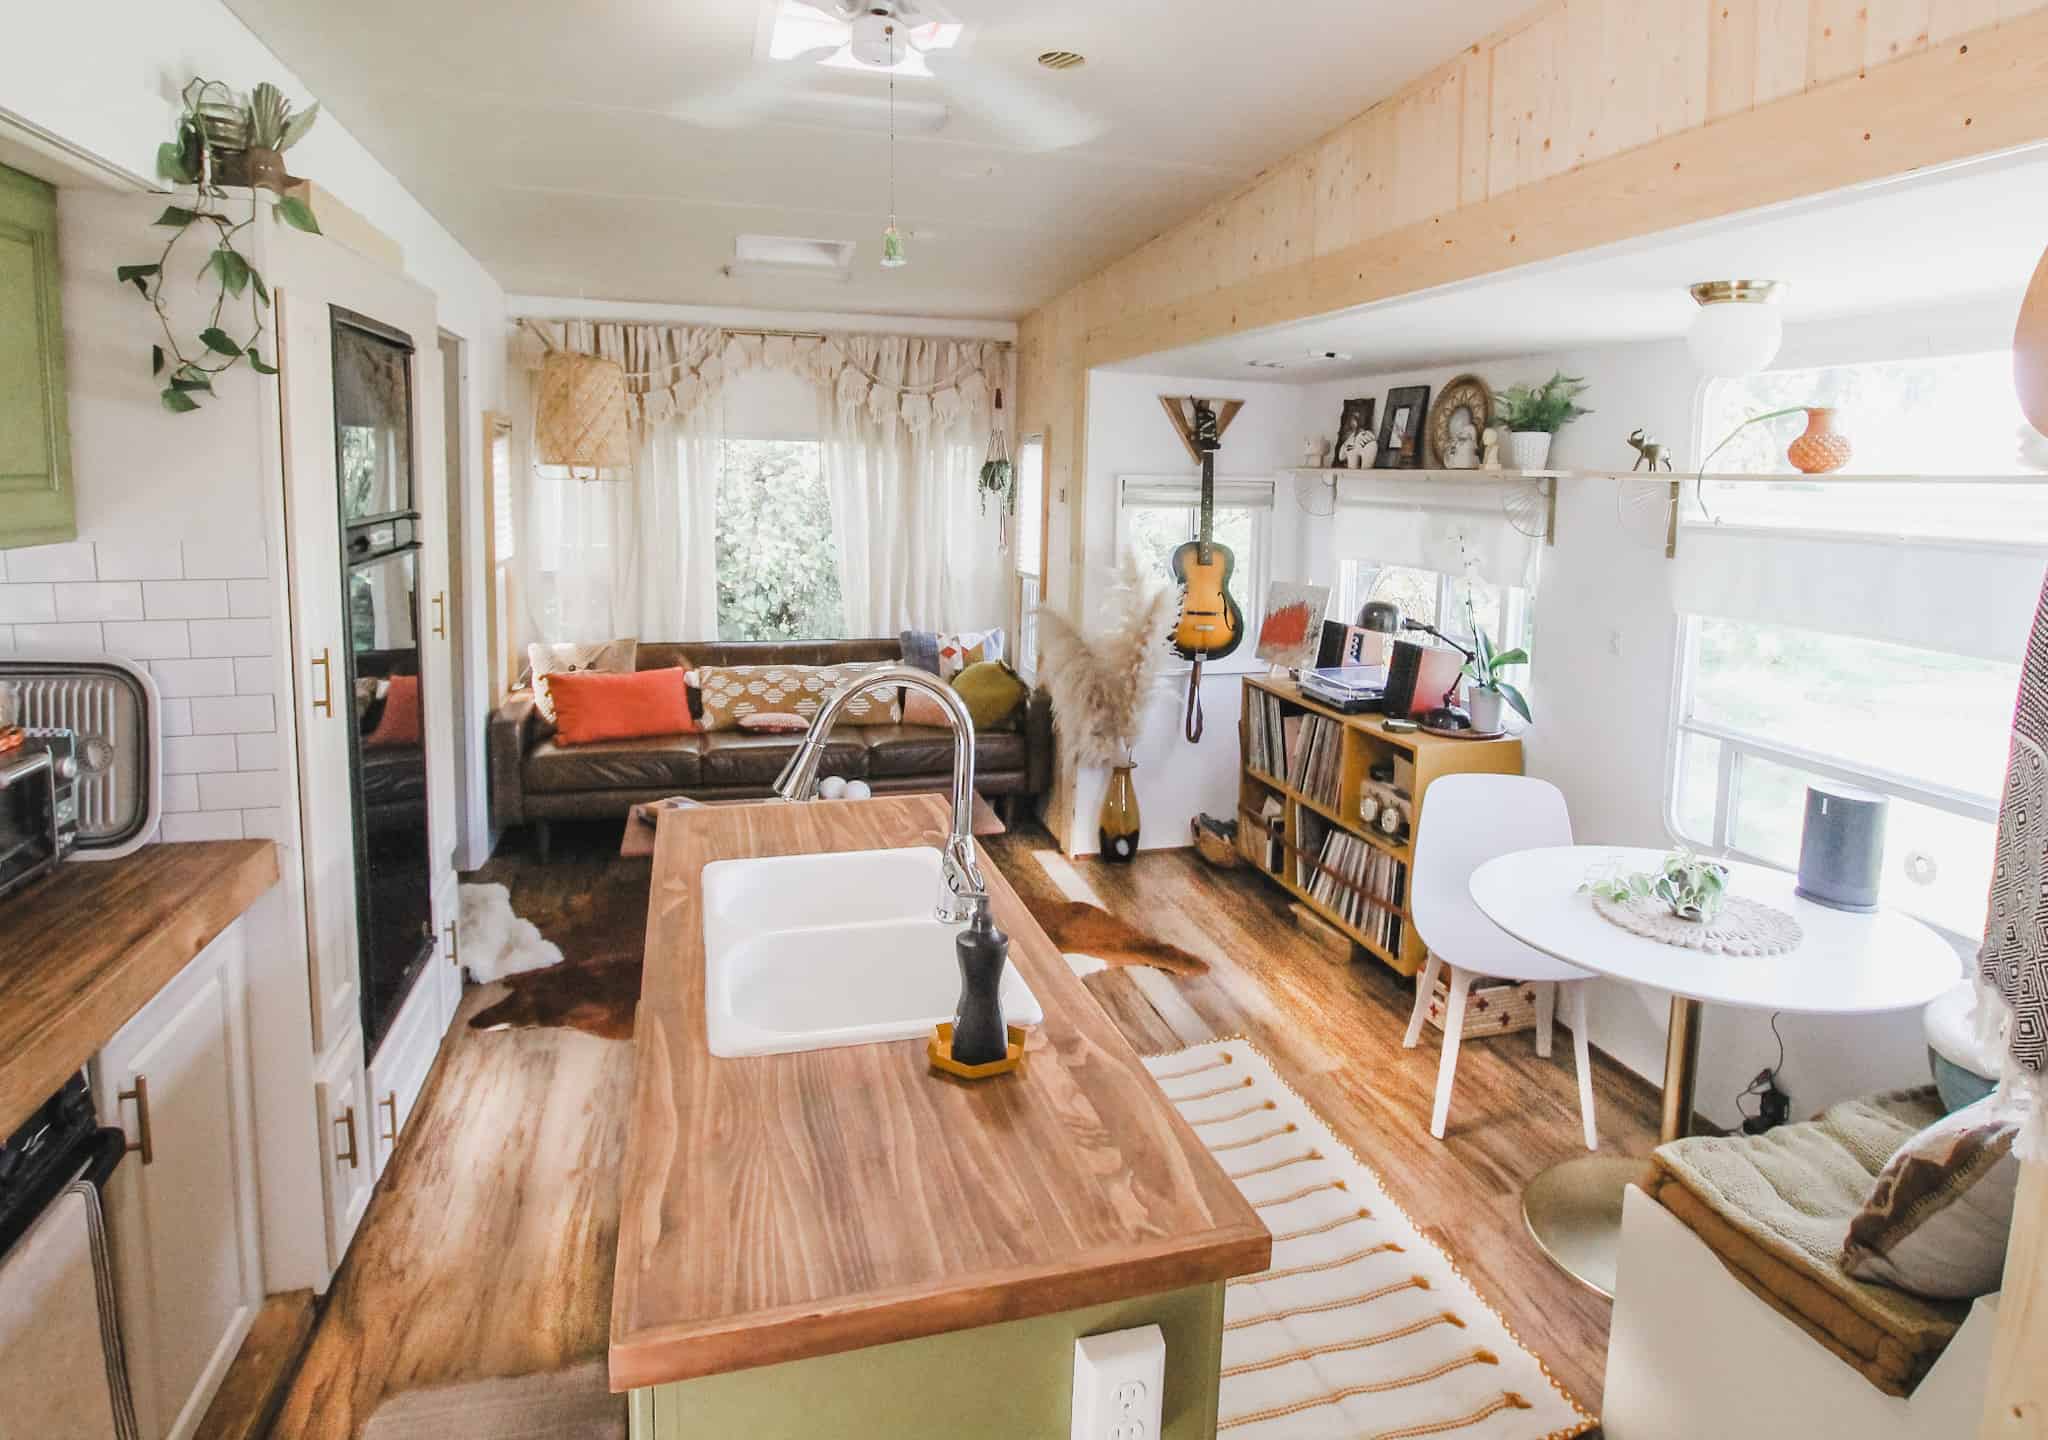
Since I purchased containers to organize the kitchen as much as possible, I asked Ken to build extra shelves inside two cabinets so that my basket containers could fit perfectly, this way I was using every single inch inside the cabinets and keeping everything labeled and organized.
We did this at this stage so that we could paint those cabinets and later add shelf liner along with all the other cabinets.

Below you can see the finished shelves, with liner and the boxes on top. I used black vinyl to cut oval and rectangle labels and used a Posca ink marker to write the labels (and the spice jars below my sink )
Below the left picture, you can see how I used these containers , and boxes from Ikea for above the sink. For the right picture you can see that I used 4 baskets from Target for the area above the couch, we left the last cabinet at full height for all the tall kitchen appliances.

Just as important as selecting your paint is to select the right kind of primer.
As I already mentioned if you plan to paint over different kinds of surfaces as we did: wallpaper, laminate, etc.
We definitely recommend you select a shellac primer ( Zinsser Bullseye is what we use) or good oil-based primer.
Water-based primers can moisten and sometimes lift off a porous substrate, and that can cause the paint to lift or crack.

And if you have any laminate (fake wood) you want to go with an oil-based paint that will “attach” better to the surface.
To Prime our walls and cabinets, we used the Rust-Oleum Zinsser Bullseye primer because we’ve had a great experience with it in the past, and it’s good for pretty much every surface we’ve worked with (it’s oil-based).
I could not recommend it enough and at Home Depot we got the best price for it, we rolled the walls and also sprayed the bathtub before using this tub refinishing kit .
In our camper, the only particleboard parts we had were mainly the cabinet structure, bathroom structure, and countertops but since we replaced all countertops, we only worked on the rest of the surfaces.
When we selected our colors, I knew we wanted two very contrasting colors. So when looking at swatches we decided on using BEHR Night club for everything that was dark and BEHR Silent White for everything light.

Probably one of the most common questions we get asked on Instagram is how did we refinish the countertop and didn’t break the bank in the process.
Because I wanted a very special sink (this one) we allocated most of the kitchen budget towards that and the peel and stick subway tile.
This left us without the kind of money we would need in order to get a “real” butcher block counter.
So we put our thinking caps on and thought about using something different for the same look. After some research in our favorite stores, we found the perfect solution, this Ikea tabletop used for desks.

The only problem was that our counter was longer than the tabletop.
So we decided to also change the table in our dinette, this way we could use the remainder of that cut to finish the countertop.
It worked so perfectly! The seam is behind our stovetop, so I placed a basket on the back to cover the seam.

I am so happy with the way that the counter looks, they have worked perfectly even without any treatment on the top.
We considered doing a layer of poly sealer but decided to try and see how it went without it.

Below is a top view of the table in our dinette, this one was super simple, Kenny just cut it to size and switched the mechanism from the old table.
Because this table was a little more narrow than the older table, in order to make the transformation to a bed work. Ken added pieces on each side of the dinette (the bottom part) so that the width would compensate for the missing 1 ½ inches from the desk. He also added a small piece of wood at the bottom of the edge he cut to add support and strength when used as a bed.
This way, it looks good, but it’s still functional in case we need to use the bed of the dinette.

As I’ve already shared, one of my priorities was to get the black sink and the peel and stick backsplash tiles. I did SO MUCH reading of all kinds of reviews in order to select the Smart Tiles, at the time there were not many options, but from what I read, they had some of the best reviews I found.
I selected the full white subway tile because I really liked the look, I kept going back and forth about either selecting the ones I did or the ones that have the gray “faux grout” and I was *this* close to going with that one =]
The instructions are super simple and it was pretty easy to install, you do want to make sure you have a clean surface and the necessary tools for the job.

You will need:
- Cutting surface – I used this self-healing cutting mat
- Metal ruler
- Box cutter or Xacto knife
- Small level
- Sharpie or a pencil
- Masking tape or painters tape
I like starting by making a reference line where the top of my first row should go, I used the level to mark and make sure it was straight. A note here would be to make sure that the RV is level because if the RV is not level, your line will not be straight.
You also want to start at the bottom-left side of the area you want to cover and work from there to the side and up.
I used some sheets of newspaper to create a cutting template for the windows since they have those tricky curves that you want to cut as clean and close as possible.
I also dry-fitted all my pieces with painter tape and peeled a bottom edge while still having the painters tape on the top, so this way they were perfectly positioned. Once about ½ an inch was stuck in the bottom, I removed the painters tape and proceeded to remove the backing of the rest of the piece, this made the process super easy, and I had no need to remove any pieces to re-adjust.

I was so excited to have enough of it leftover to also add a little piece of backsplash in the bathroom!

Peel and stick wallpaper
If you follow us on Instagram, you probably already know that I am a little obsessed with “faux wallpaper” I call it faux, because in order to save money I used shelve liner as wallpaper for all of our accent walls in the RV.
I basically used two different kinds, the shiplap one , and the gray chevron .
One “hack” that helped me make seamless lines when adding different sheets of the chevron shelve liner , was to cut the edge of the pattern in order to place it as close as possible to the edge without having crazy lines.
I’m sorry I am one of those people that little miss-alignments in patterns would just drive me bananas, and I will see it every time I enter the bathroom, so I wanted to try and make it look as seamless as possible.

I have to mention that this shelf liner has stood out the test of not only time but also, humidity and heat.
Something that the shiplap one didn’t!!! I’ll explain more about the issues we ran into at the bottom of the post, but what you should know is that I am not happy with the shiplap shelf liner. We store the RV in the high desert, so it gets super HOT and sadly the shiplap paper shrank with the fluctuation of temperature.
Don’t get me wrong, the cubbies that I have in my craft room (that I cover with this exact same one) are still holding beautifully! But there is not such an extreme fluctuation of temperature in our house, so it makes sense.
I did learn my lesson with that one though, and as I am going to go over at the end of the post, I recently ran into LoomWell , a company that carries wallpaper that is resistant to higher temperatures . So I plan to at some point upgrade to one of their patterns for some of the shiplap walls.

One thing I was so happy to find out when doing research on light fixtures was that you can use any kind you want for an RV , the only thing is that you need to use low voltage light bulbs , for our camper we used 12V light bulbs for the light fixtures that needed bulbs.
In the picture below you can see how it looked when we detached all the lights from under the cabinet , and ceiling.

I knew I wanted something brighter, more efficient, and less dangerous than those lights (I’ve read horror stories of burns with these bulbs!)
So I knew LED lights and bulbs were the way to go. So let’s discuss what we ended up doing for each area:
Couch area light
For the lights above the couch area , I fell in love with these set of scones below, they were in my price range and also in the modern farmhouse look I was after, you can check them out here .

The only downside of the set of scones is that they do not come with switches.
But that can be easily fixed with these little guys , just drill a hole on the side and connect them like you would any other switch.
(if you have done electrical work before, if you don’t know what you are doing, please ask for advice from a professional, don’t risk injuries!).
Bedroom light
For the light in our bedroom, we pretty much did the same thing, I made sure to select something that was more flush because we are both tall.
I settled for this ceiling light that had just the perfect industrial feel and accompanied it with this bulb , we also added a switch .

I was planning on using this remote control switch , but it made the bulb look too long (I think they are better suited for bulbs with lampshades that are not see-through, so I’m saving them for our brick and sticks house)
And this is how it looks in our bedroom:

Dinning light
For our dining room, I wanted something special but also budget efficient. So we decided to make our own light using the same bulbs we had for our bedroom , a shelving bracket , a vintage cage lampshade , and a pre-made lamp cord .
Since we wanted to make another for our house, we purchased everything in pairs, it was cheaper, but you can definitely buy everything in singles.
We already had a switch from the old light we had there, so we didn’t need another switch, but if you do, this is the one we used in all other lights that needed it.

All other lights
For every other light in the camper, we replaced the old lights with these small round LED lights , why?
- they are smaller.
- they save a ton of energy.
- and look SO MUCH BETTER.
- the light is so much brighter than the yellow low light that our old ones gave.
Let me show you a closer look:

I am so in love with them!
You turn them on and off by pushing in the circle in the middle, and after they are off, that little piece glows in the dark, so they are easy to find!
You can see our new LED lights in action in the picture below, they are in our ceiling and also under the cabinets, we replaced the ones in our bathroom, the boy’s bunk beds, and under the cabinet in our bedroom as well.
We used 16 of them to replace all the lights that we had left.

I also wanted to mention that since we purchased everything on Amazon using my Prime membership , I knew I had the option of returning if I didn’t like what I had ordered.
Because I wanted to be able to test options before buying in bulk to replace all the lights in the camper.
I purchased 4 different alternatives for the remaining lights.
That way I could see in person the kind of light they give and how they looked in the camper.
Once I was happy with the bulb size and the kind of light that gave (some are warmer than others, so if you want a cooler light, the best way to go is by testing)
I purchased the total of lights I needed to replace (and in the case of the bulbs, I purchased extras, so we could have them in hand in case one broke.)
Also, just a note: I mistakenly bought bulbs that were not 12V , and they pretty much died as soon as I tested them in the camper.
So make sure you read the details carefully! I, of course, could not return those, because it was my fault for not reading the details.
Ps. NOTE OF CAUTION – We are lucky to have my father-in-law that is a licensed building contractor nearby, and Ken has electrical experience as well. BUT if you are not sure, please don’t put yourself in danger when re-doing electrical work, and either consult an electrician or hire one instead.

If you are familiar with snap flooring, adding flooring to your RV would be the exact same process.
One thing that Ken was not happy about was that he didn’t account for the expanding of the flooring with the very high temperatures we experience where we store our RV, he added a little bit of room for expansion, but what he normally does at home.
If you are going to store your RV in an area that gets very hot, I would recommend you account for a more than average expansion of the floor.
We do want to see how this peel and stick flooring or this one behaves to see if that would be a better option for our next renovation.

I’ve seen that some people also use peel and stick floor tiles for RV renovations and while I want to give those a try as well, I will probably make a full post diving onto the possibilities of flooring for RVs.
We only added the corner white cabinet from Ikea, Ken bolted it to the wall to make sure that it would not move. We added it before adding the flooring, so the flooring goes to the edge of it and not under it. We don’t plan to switch it so it made sense to us.
If you are not 100% sure if you will put something in your RV permanently, make sure you only added it after you re-do the flooring.
Also, in the beginning, I wanted to fully replace the couch, and place a regular sleeper sofa there, but then we realized that our water tank was under there, so we decided not to mess with it and just make new covers.
In our case, we didn’t change as much as we wanted and did more cosmetic upgrades instead. So I have no experience changing too much furniture, but I did all the research when I considered switching the RV couch for an RV sofa bed and posted it here .

This is probably another of the most asked questions that we get. So I had to include it as a point and I will elaborate more on each one in a full post later.
I basically selected 2 different fabrics in order to make the new covers.
For the couch, I selected a long hair Minky fabric that was super fluffy, I love the idea of having that for the winter, so it was almost like having a blanket for the cover.
And for the dinette, I selected a great water-resistant fabric , so that I could wipe it down. Since we have 3 little (and very messy) boys, I needed something that I didn’t need to wash every two minutes.
I purchased my fabric from fabric.com but unfortunately, the exact same ones I purchased are no longer carried. But they are very similar to this grey waterproof one and this black minky .
To make the cover I basically placed the fabric inside out and pinned the corners, I sewed the edges and make sure that I have enough fabric for the edges to come all the way in so we can hook them using the hack I describe below.
Cover securing hack One hack I used to make sure the cover doesn’t move is to attach curtain hooks with wire to different parts in the bottom and back of the couch.

This way I could hook the cover (that is basically fabric with sewn sides) and make it stay in place even when transforming the couch into a bed and vice versa. The more hooks you have the more you can secure the cover.
And for added security, I also added 3 in the middle, those are a little tricky to hook because you will have to shove your hand in the middle until you see the fabric from the bottom, then hook them.
For me, it works better when I keep the couch semi-folded in order to hook the bottom and middle best, I hook the back once the couch is in an upright position.

Dinette couch covers
I used a fabric similar to this grey waterproof one, and I made covers by contouring the cushions with the fabric.
I used elastic around the edges to secure them but they ended up moving a little bit, so I added two extra pieces on each side so that I could tie them down and secure them better.

I did this for the big bottom ones and the small backsides I just made them using an envelope fold in the back since I made them with the fabric inside out, and super-tight, while they are a little tricky to pop out to wash, they stay without needed any extra ties.
We decided to get brand new mattresses and bedding for the bunk beds and also our bedroom.
Our bedroom mattress is a standard RV Queen so we just purchased this one . We love that it has cooling gel and honestly, we sleep better in that mattress than we do in our bricks and sticks house.
But if you are looking for different mattress sizes for RVs, we have two awesome recommendations for you:
They are 100% made in the USA and part of Brooklyn Bedding, specialized in RV mattresses and with 4 different options of comfort.
Bear offers RV mattresses that have a breathable Celliant Cover to help improve athletic performance, also 100% made in the USA.
Master bedding : Our sheets and comforter are from Ikea, and while they still have the inner comforter, I was not able to find the duvet cover online, and I have not seen it anymore at the store, but this one is very similar . I actually liked the pattern in the camper so much that I wanted something similar for our bed at home, but Ikea does not carry California King sizes, so I bought this one, and I am loving it!
I also added a hand-lettered pillow with back background, you can check my pillow collection here , you can change the background color to any color you want!

Bunk beds bedding : The duvet cover is the exact same one as the one we have in our master bedroom, from Ikea (they have different patterns per each side) but I found this one that is similar , and use it in our brick and stick home, along with the buffalo plaid one)

To finish up their bunk beds, I hung one of my favorite pieces of artwork, the “ Little one, you will move mountains ” and while this is a swaddle, I am working on adding it to my shop as prints and tapestry. And also these adorable log pillows .

We purchased everything for the kitchen of our camper, from plates, cups, and wine glasses, to pans and pots. Of course, we made sure to get as many things as we could out of melamine so that it would not be at risk of breaking when driving.
- Melamine dinnerware : We purchased a set very similar to this one from Target.
- Melamine cups and wine glasses : I love these cups and also these wine glasses , because mama needs her wine!

Behind stove storage : This basket , with these metal and plastic containers + these wooden handle utensils + this ikea knife block (without the base) and a couple of faux cactus .

We hung so many things in the camper, and while for some of them (very few) we Did use screws with anchors, for all others we selected options that would not hurt our walls like:
- Poster hanging strips
- 3M hooks (with metal hook)
- 3M hooks (full white)
- Heavy duty Velcro (for frames)
- Museum putty (for thing on top of the shelves or counters)

I used this wall grid panel (spay painted in white) and re-assemble long-ways, so it would fit the space better.
I added some decor and pictures that I sealed by running them through my Minc machine and some lamination pouches , this way I have the margin to hand them with clips without ruining them.

I think that the most important point of renovating an Rv, is to add all the details that will make YOU feel not only comfortable but as if you are in an extension of your house.
In our case, I really wanted to add details that were hand-drawn by me. So on top of the door, I added a vinyl piece that reads “ home sweet camper ❤ ” and the great part is that cutting it is a pretty easy process, and installing that one was super simple. Just make sure you have a big enough transferring tape with a grid, or cut the bottom to align with the door.
In our bedroom, I also added a vinyl decal that has a US map with an “ Our next adventure is… ” This one was a little more complicated because I had to cut and also apply it in pieces because the size I wanted was too big, but I added separations in the map between States so that it could be easier to cut separately.
If you have a cutting machine and would like to use the same files, you can find them on my Studio Website:
- Home sweet camper ❤
- Our next adventure is … USA map
- Exit with arrows

I also created a print for the entryway that reads “Together is my favorite place to be”, you can get a copy of that print in the Barefoot Detour Teespring store here.

After many, many stays in our camper, there are only a few things that we’ve updated that we plan to upgrade.
I wanted to address them here one by one so that I can explain myself better =] so the very first thing is:
Couch area sconses
While I loved the look of the first ones we had , the boys pulled them down a bunch of times because they were a little low, this made them sag a little. So we upgraded them to these ones that have two sets of adapters, one in the bottom and one in the top, unlike the other ones that only had one at the top. I love the new ones, and now they sit much higher, so my boys don’t even touch them (other than for turning on and off, of course)

Shiplap wallpaper
I have to make a note about this because I am going to change the wallpaper (shelve liner) I used for our accent walls. We store our camper in my husband’s family ranch in the high desert, so it gets HOT.

The shelf liner has shrunk because of this, and I was so sad! I did not know that this can happen with the heat, and I plan to switch to a temperature-safe wallpaper, like Loomwell . I have this dotted pattern and this one in the realm of possibilities.
Hanging solutions
While I still love all the solutions that we selected for the camper, there are some things that we have switched from 3M foam hangers to regular screws for the basket next to our bed since it holds somewhat heavy items, we decided to just secure it that way Kenny will not wake up with a basket in his head.

Couch cover
Since it’s summer I decided to switch the super hairy couch cover that I made in Minky fabric, for something that does not get as hot.
I picked this one and used the same hooks I set up for my DIY cover to make sure the cover fits nice and tight.
I like that it’s so easy to switch, so I might get another color so I can change the look every once in a while.

What to know where I purchased all the things we used in our remodel? You can shop my pictures on this page I set up or check my list below, I’ve tried to include as many things as possible =]
- Prep : Liquid sander + orbital sander + wash walls
- Primer : This oil-based primer rocks!
- Paint : We used BEHR Night club for everything that was dark and BEHR Silent White for everything light
- Flooring : We used one from Home Depot, but I am not too happy with how it expanded. We are planning on using this one or this one for our next restoration.
- Spray paint : We used spray paint for plastic and regular Rustoleum all material for the hinges.
- Shiplap wallpaper : I used this one , but it shrank a little with the hot temperatures in the summer 🙁
- Bathroom wallpaper : For our accent wall I used this shelve liner from Target
- Peel and stick Backsplash : we used Smart tile subway Tiles in full white
- Kitchen Countertop + Table : We used this desk from Ikea
- Black sink : This is one of my favorite kitchen items!
- Oil-bronzed pulls : These ones fit the holes of our old ones perfectly, but measure before you buy!
- Light fixtures : We recently upgraded our couch are sconces to these ones , I love that they have integrated switches, just make sure you add 12V light bulbs .
- LED ceiling lights : These are the ones we use all around our camper , they are amazing, bright, safe, and they look way better than the old ones.
- Roll-blinds blackouts : We purchased the blackout blinds from Ikea, but they no longer carry those exact same ones. We were lucky to find them when there were going to be discontinuing, so they were about 40% off. I did find other options like these ones , and these ones that are very similar .
- Mattresses : We recommend to check Bear RV mattresses and RV Mattress by Brooklyn bedding for the best RV mattresses available!
- Wall mesh organizer : I used this wall grid panel (spay painted in white) and re-assemble long-ways so it would fit the space better.
- Bed-side basket : I used this one and attached it with 3M strips first then upgraded to screws.
- Window greenery garland : I got it from Ikea, but it was a seasonal item, this one is super similar , just a little shorter.
- Always and forever pillow : Find it here and you can also check all my other designs here , choose any color background you want!
- Master bedding : Ours is from Ikea, but I have not seen it anymore, this one is very similar (I bought it for our bricks and stick home)
- Bunk beds bedding : They are the same ones from Ikea (they have different patterns per side) but I found this one that is similar , and use it in our brick and stick home, along with the buffalo plaid one)
- Log pillow s: I love these , they took a super long time to arrive, but they are adorable!
- CMK letters : These are the boy’s initials (they all have the same initials) I just purchased cardboard letters from a craft store and painted them with black spray paint and hung with poster strips .
- Smart TV : We have this 28″ smart TV , it was a perfect size! And we mounted it with this thing , but bolted it through the wall (I used the backs to hold blankets) + We changed the plug cable to this white one .
- Entrance mesh organizer : We purchased ours in the same section of Target, and since then has been discontinued, but I found a similar one here .
- Entrance white cabinet : We purchased a combination from Ikea, is this Billy box and this Oxberg door together with one of these pulls .
- Together is my favorite place to be print : I drew this and you can buy a copy in different sizes via Zazzle
- Behind stove storage : This basket , with these metal and plastic containers + these wooden handle utensils + this Ikea knife block (without the base), and a couple of faux cactus .
- Melamine cups and wine glasses : I love these cups and also these wine glasses because mama needs her wine!
- Kitchen rug : I love this one because it washes so well!
- Refrigerator notepad : List-maker gonna list notepad from my shop
- Copper mugs and hanger : We purchased these ones and love it to make mescal mules, we u sed this Ikea rod to hang them, I also found this one at Target that is super similar.
- Hoop succulent DIY : I used regular embroidery hoops , placed them on top of a silicone placemat , and hot glued small rocks for the bottom and faux succulents in the middle
- Triangular planter set : I got these ones and added a few faux succulents .
- Bathroom towel holder : I used this one .
- Shower curtain : I selected this Boho inspired one from Amazon.
- Outdoor rug : I love this black and white pattern .

I hope this post encourages you to renovate your RV or to just tackle a small area in your camper. We are all for small steps, so if you feel overwhelmed, just start with one area and move from there on =]
And share this with anyone that you think could use help with a remodel! Contact us if you have any questions! We love staying in touch =]
Want to save this post for later? Just pin any of the images below =]

Happy remodeling!

Merri jones
Tuesday 1st of August 2023
This is amazing! We have a very similar camper and are wanting to Reno for our family travels. Thank you so much for taking the time to share all of the info, advice, links, etc! That is so helpful and I appreciate all the time it will save me as a mom who otherwise might not be able to have the time to embark on what is usually a very overwhelming project like this. Thank you!!!
Ps did you happen to find any covers for the banquet cushions that were already complete and did not require sewing? I am trying to avoid the sewing but have not been able to find other covers. Thanks.
Tuesday 22nd of August 2023
Hi Merri! It makes me so happy that this post helped you! =]
I actually bought covers for our 5th wheel and while the fabric is not as good as the fabric I purchased for our dinette, it's a solid option if you would rather not sew them! I used covers and made sure to add clips to keep tight in the covers. Here are the links: - covers: https://amzn.to/3sshBHD - clips: https://amzn.to/3Z0YqkN
I hope this helps!
Sunday 4th of December 2022
Hiya! Do you remember where you got the black s-hook holding the towel on the wall in the bedroom? Thanks!
Friday 31st of March 2023
Hi Beth! I purchased them from Target in 2020, they were on the sale rack, and I could not find them on their website, I'm sorry!
Wednesday 31st of August 2022
Hi! Your renovation has been an inspiration for my hubby and I. We have the exact same trailer and finally took the plunge to update it. One issue we have run into is changing the lights by the sofa. I chose similar farmhouse style sconce lights and LED 12v Edison bulbs. They came with cords but my Hubby hardwired them in for a cleaner look. When we turn them on they lit up then "burned out" immediately? Are we missing something obvious in the install? My hubby is a mechanic and has wired a lot of different lighting etc. but not in the camper. Any thoughts?
Thursday 7th of July 2022
Your camper looks awesome!! Do you have the info on the ikea tables you bought??
Monday 22nd of August 2022
Hi Doris! The exact desk that we purchased is not available anymore, but they have one that is supposed to be the updated version: https://www.ikea.com/us/en/p/anfallare-tabletop-bamboo-00465141/ for the bathroom, we used their cheapest desk tabletop =] I hope that helps!
Wednesday 27th of April 2022
Hi! Your remodel is amazing! I love everything about it. We are looking to buy a camper soon and I love what you’ve been able to fit in yours. Can you share the length/size of your camper? Thank you!
Monday 2nd of May 2022
@Sam, Thank you so much! I'm so happy you like our renovation. Our camper is about 29 feet long =]
- Find a Location
How To Renovate an RV

Here are more dramatic RV renovations.
How to Find an RV to Renovate

Can’t wait to launch into an RV renovation project but need a canvas to showcase your creativity?
Camping World offers thousands of used RVs ready for your DIY dreams. Many of these are perfectly suited for your renovation project. Butt here are other benefits of buying a pre-owned RV , such as cheaper upfront costs and potentially lower insurance payments.
Shop Camping World’s selection of pre-owned RVs perfect for a DIY renovation.
Plus, Camping World’s Design Centers will make your renovation projects fun and easy. Bring the family to help you select new furniture, fixtures, appliances, and more. Our design experts will help you visualize how it’ll all tie together inside your RV.
How Much Does it Cost to Renovate an RV?

RV renovations come in all shapes and sizes, large and small. For example, using a wallboard kit to revive your RV’s interior walls can cost little more than $200, but larger DIY RV renovation projects can easily cost you thousands.
RVers that have completed renovation projects report spending anywhere from $2,000 to $7,000+. But it all depends on the size of your RV and the extent of the renovations undertaken.
Here are a few tips to help you cut costs for your RV renovation:
- Renovate in stages. Break up your project into 3-4 stages to spread out the work. I like to use Demo, Prep, Installation, and Finish for my stages, helping me visualize what the space will look like at the end of each stage and providing time to earn a few more paychecks before covering the costs of the next stage.
- Creatively source materials. When I redid the floors in my Fleetwood Bounder , I found a local couple with extra laminate RV flooring from a completed renovation project. I purchased it from them for substantially less than I would’ve paid at a retail store.
- Mark retail sales on your calendar. RV retail sites like Camping World often offer seasonal promotions. Mark them on your calendar so you can pick up renovation supplies, new appliances, and other RV accessories at a discount as you prep for your renovation project.
How Hard is it to Renovate an RV?

Like cost, renovation difficulty varies from project to project. It can be as easy as unscrewing old knobs and screwing in new square knobs to freshen up the look of your RV cabinetry. But it can be as difficult as you want to make it.
Flooring can be a tricky RV renovation project because many manufacturers build RVs from the frame up, meaning the flooring is installed in a singular sheet before base sets are installed on top of it.
A base set is the cabinetry and framework that creates rooms in your RV – bathrooms, bedrooms, kitchen, etc.
Removing worn RV furniture can also be challenging, as some manufacturers install certain items before the exterior walls are set into place. This means you may have to deconstruct a worn sofa instead of simply removing the bolts securing it to the floor and carrying it out your RV’s door.
Here are some of our favorite easy RV renovation projects:
- Upgrade the kitchen. Install a new backsplash and change your cabinet pulls for a revived look.
- Brighten the bedroom. Turn your bedroom from dark to light with a DIY wallboard kit .
- Advance your airflow. Keep your RV cool and maximize your A/C’s performance with this DIY RV airflow installation .
- DIY your dream dinette. Improve this oft-overlooked RV space with these RV dinette design ideas .
- Sanctify the shower. Bring comfort and relaxation to your RV shower with these upgrade ideas .
How to Plan an RV Renovation
There’s no substitute for experiencing what it’s like to live in an RV before starting a renovation.
Misty took this approach:
“I lived in it for a year and figured out what would be beneficial and make life easier. I put shelves in the closet where there was wasted space. Instead of huge open cabinets, I added dividers and shelves. I removed and installed a new dining table to make getting around easier. Then, I installed lights I liked, and now I’m ready to remove and replace the shower door.”
Others take a more systematic tact, like Barbara:
“We made a list of items we liked about our rig, items we didn’t like or wanted to change, and things we really wished we had. Then we drew up a floorplan detailing where things were and how they could change. Then started tearing out the old and putting in the new. We removed the entire kitchen and changed it to fit our needs – especially since I’m short and upper cabinets are nearly useless for me. We got rid of the oven because, in 11 years, we had only used it once. We removed the bathtub for the same reason. We altered the footprint of the bedroom to accommodate my 6’+ tall husband. Then we put in new floors, cabinets, countertops, etc. We started with a laminate floor we loved and built the coloring around it.”
How to Renovate an RV Interior
When renovating an entire RV interior, work from top to bottom, addressing items like installing a new roof vent fan or reviving worn cabinetry before progressing to upgrading furniture or installing new flooring.
Some RVers also start with their most pressing need, like Remedy:
“Our first travel trailer had no seating. So took out the queen bed and closets on each side. Built platforms for twins and put bolsters like a daybed. Used the closet doors for storage beneath beds. Mounted a TV on the wall. It has a cubby for an old tube TV, so now that’s extra storage. Also installed a small window unit since the original A/C was so loud.”
Keeping it simple is also a great idea if your RV just needs a modest upgrade, like Frances’:
“We removed the little jack-knife couch and replaced it with 2 rocker recliners. Much better! We like everything else just how it is!”
If you’re like Traveling 8 Pack , though, a little more effort can be worth it:
“We took out the U-shape dinette and original couch in the living room of our 2019 bunkhouse so we could put in a sleeper sofa, table, and benches. Then, we covered the window with pic on the side of the slide and ship-lapped wallpaper.”
Check out their finished product!

How to Renovate an RV Bedroom
A good laugh and a long sleep are the best cures in the doctor’s book. – Irish Proverb
Aside from full-timers, most of us plan RV trips for adventure, relaxation, or some combination of the two. Your RV’s bedroom must feel peaceful and comfortable if you want to avoid feeling just as tired or burnt out as you were prior to the trip.
It all starts with the bed, so read our tips on how to make your RV bed the most comfortable bed ever before you progress.
Beyond a comfortable bed, consider your RV entertainment system options , closet storage solutions , nightstand access, and anything else you enjoy in your residential bedroom.
Here are a few of our favorite RV bedroom renovations:
How to Renovate an RV Kitchen
Many campers spend most of their time in the kitchen and living room of their RV. If this space isn’t working for your RV lifestyle, it’s time for a makeover. Does your RV feel a bit too cave-like? Many older RVs featured darker cabinetry, so it makes sense to start here if you want to brighten up your space.
Genesis makes a complete cabinet revival kit that’s available in eight different colors. It provides a much more cost-effective alternative to ripping out and replacing cabinetry. Plus, it’s easy to apply and has enough peel-and-stick material to cover up to 150 square feet of cabinetry.
Check out Camping World’s complete selection of Genesis Cabinet Revive Kits.
Beyond cabinetry, there are more in-depth renovations like installing a new kitchen sink basin, upgrading your cooktop, and reviving worn kitchen countertops. DIY projects like these are a bit more intensive, and you’ll benefit from contacting a Camping World Design Center to help you plan and execute your renovation.
Find a design center near you.
Here are a few recent RV kitchen renovations that have caught our attention:

How to Renovate Sidewalls of an RV

Wallboard kits are arguably the easiest way to revive your RV’s interior sidewalls. They come with the supplies you need to complete the simple peel-and-stick application, and they’re available in multiple colors and modern designs.
They’re great for renovating older RVs with ominously dark wallpaper or eccentric patterns that have gone out of style. Genesis makes some of the best kits for RV interior wall renovation, and their kits can be used in your RV’s living room, slide-out, kitchen, bedroom, bathroom, and anywhere else you want to give the walls a facelift.
Shop the complete selection of Genesis RV renovation products at Camping World.
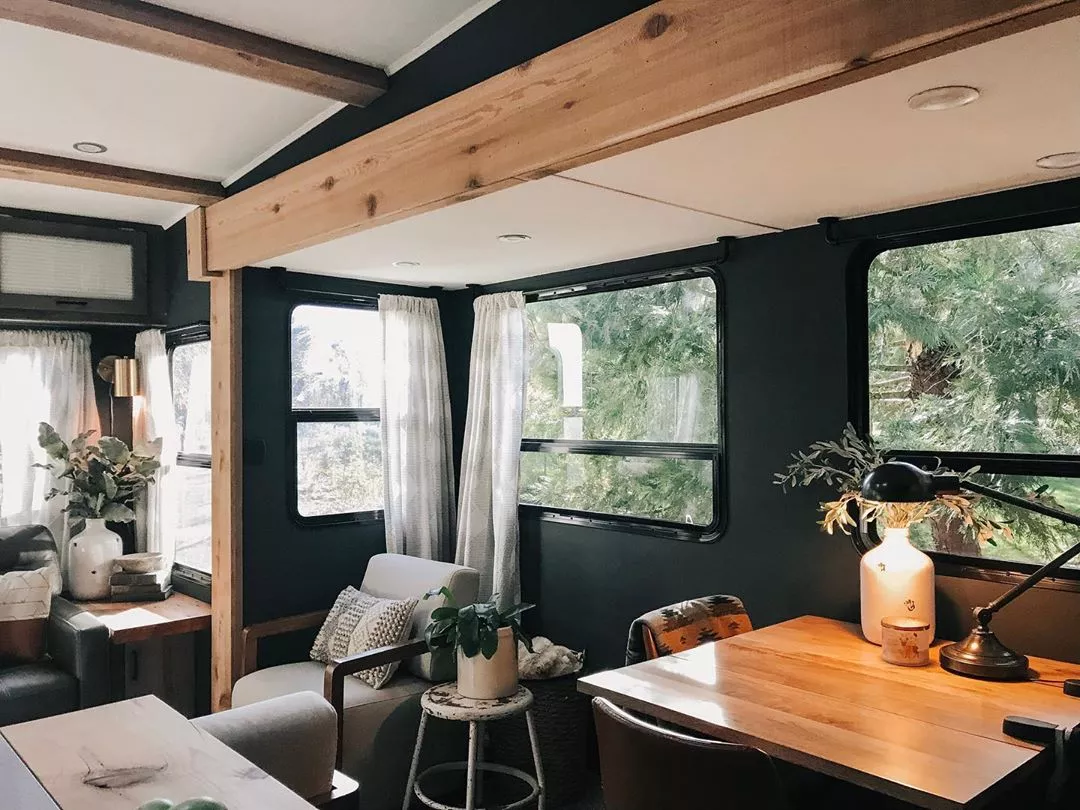
Sometimes, uplifting the sidewalls completely changes the feel of your RV’s interior. Just ask Charol:
“We did a makeover to our 18′ Starcraft camper. All the cabinets were dark brown, including the bathroom door, and the walls were beige. The video is how it looks now.”
How to Renovate an RV Bathroom
An RV bathroom renovation can be as simple as installing a more comfortable RV toilet. I’d rather not tell you how many times I’ve had to remove and replace one of these. It’s never pretty, but things get much easier (and cleaner) once completed.
You can also get creative to satisfy a unique need, like Leigh:
“I added a 2″ duct hose from the heater plenum under the tub and exited with a small vent to blow heat into the bathroom. I was my wife’s hero to give her some warmth should there be a nighttime need.”
Other, more attractive bathroom renovation ideas include:
- Upgrading your showerhead. Find a new showerhead for a more luxurious RV bathing experience.
- Redesigning the vanity. Employ the right storage caddies and organizers to design your ideal bathroom vanity.
- Installing hooks for hanging storage. Ensure everyone has a place for their bath towels with strategically-placed hooks and hangers .
- Replacing the shower curtain and bath mat. Brighten up the space with a matching shower curtain and bath mat set .
For more inspiration, here’s everything you need to upgrade your RV shower.
How to Sell a Renovated RV
Flipping an RV can be lucrative, but selling privately comes with baggage. We’ve detailed our recommendations for how to sell a used RV here , but the easiest path is to consign with Camping World.
Start by using the Good Sam RV valuator to get an instant quote.
Then, utilize the resources available at your local Camping World dealership for cleaning and photographing your RV, listing it on our nationwide marketplace, and providing 24/7 customer support to answer the questions of prospective buyers.
We’ll show your RV on our lot, negotiate financing through local or national banks, satisfy outstanding loans, handle the paperwork, and write you a check when the sale is final. You’ll be free to focus on other matters, like shopping for your next RV !
Learn more about consigning your RV with Camping World.
How to Rent Out Your Renovated RV
Once your RV renovation is complete, you don’t have to be the only one to enjoy the newly-renovated space. When you’re not using your RV, renting it out is a great way to earn extra cash and grow your rainy day fund for the next renovation or RV purchase.
It also gives curious folks the opportunity to experience RV life without taking the plunge of buying. You never know who you’ll inspire to hitch up and hit the open road after they enjoy their stay in your renovated RV.
With Good Sam RV Rentals, you can easily list your RV for rent in your region and earn up to $1,485 per week (depending on your RV make and model). The program only takes out 10% of your earnings as commission fees, and payouts for rental earnings can be initiated in as little as 24 hours.
When you rent through Good Sam RV Rentals, your RV is protected with 24/7 Roadside Assistance coverage and up to $1 million in rental protection coverage. Find out how to list your RV and start earning today.
Your RV renovation project has begun once you have the vision in your head. Here are a few more articles that we hope inspire your next DIY renovation:
- 50 Dramatic RV Renovations
- The #1 Thing to Remodel in Your RV, According to You
- Why You Should Upgrade Your RV’s Interior
Have you renovated an RV? Do you have any tips? Share your experience in the comments below.
Leave Your Comment Cancel Reply
Save my name, email, and website in this browser for the next time I comment.
Shop By RV Type

Your Adventure Awaits
Copyright © 2023 cwi, llc all rights reserved.
- RV Glossary |
- Privacy Policy |
- California Privacy Rights |
- Do Not Sell or Share My Personal Information |
- Targeted Advertising Opt Out |
- Terms of Use
Stunning Travel Trailer Remodels to Inspire Your Next Project
Is your travel trailer in need of a little TLC? Are you looking for inspiration with your very own travel trailer remodel? Maybe you're just starting to think about remodeling it, and you're not sure where to start. Either way, we've got you covered!
What you'll find...
One of the best things about RV remodeling is that it shows how even just a little effort can go a long way. Remodeling is also the most economical way to upgrade your RV.
In this blog post, we'll showcase some of the best and most stunning travel trailer remodels that will inspire your next project. These trailers have been completely transformed into beautiful homes-on-wheels, and there's no reason why you can't do the same.
So get inspired and get started on your own remodel today!
The Best and Most Inspiring Travel Trailer Remodel Ideas
Travel trailer remodel no.1 - rustic kitchen remodel.

Hello, fellow wanderers! I’m Alyssia. Since 2008, my husband and I have called an RV our home, journeying through life one mile at a time. Our nomadic lifestyle has led us to over 70 countries, each with their unique tales that have shaped our own.
I share our stories and insights right here, hoping to inspire and guide you in your own adventures. Expect tips on RV living, our favorite camping spots, breathtaking hiking trails, and the joys and challenges of an ever-changing view from our window. Alongside, you’ll also find practical advice on outdoorsy stuff, designed to equip you for any journey. Join us as we continue to explore the vast, beautiful world on wheels!

RV Remodel Tips, Ideas, & Cost for an RV Makeover
Get the 3-minute weekly newsletter keeping 5K+ designers in the loop.
Enter your Email to Sign up
Whether you want to revamp your RV or you just got a new one and want to make some changes, this article will help you do that. We just did an RV remodel process, and we must say that we're very impressed by the results.
In fact, our glee over our new home is what inspired this article, in which you'll learn how to do the full RV renovation yourself. We'll cover RV remodel tips, ideas, and the cost associated with the whole process.
Let's dive in.
What's On This Page?
RV Remodel Tips to Keep In Mind
Here are some RV remodel tips to keep in mind before you begin your activities.
1. Work Within A Budget

The best way to go about your DIY travel trailer remodel is to set a renovation budget and work within it. Think of your RV as a blank canvas. The higher your budget, the blanket your canvas because you'll have more to do.
Once you've set your budget, you'll know what to give priority to. For example, you may want to do a complete renovation but don't have money. In this case, it's best to focus on the parts that need the most attention.
On the other hand, you could choose to do a whole renovation but compromise on the quality of items you choose to use in the RV interior.
The point is that working with a budget will allow you to plan out your RV remodel better. Remember also to set aside some money for contingencies. 10% of your budget should do it. This will allow you to have a fund to back to in case some things are more expensive than you thought or if an emergency occurs.
2. Go With One Pattern
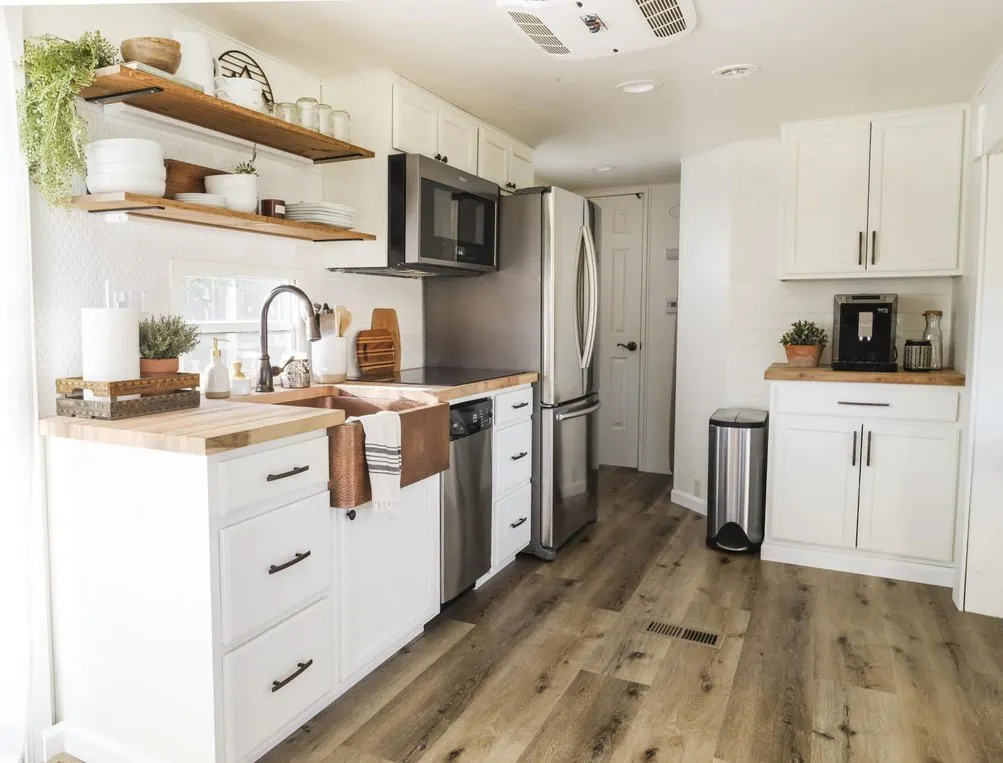
Image Source: joyfullygrowingblog.com
Having two or more patterns within your RV interior can make the place look busy, and the space look smaller. Therefore, stick to one pattern as you do your RV renovations. If you're unsure about which pattern to go with, you can test your taste on your accessories.
For example, get patterned pillows and blankets to test out the feel of the pattern you'd like before putting it on your walls.
The good thing about having patterns on your accessories instead of your walls or cabinets is that you can swap them out if you don't like them.
3. Form Follows Function
Image Source: cnbc.com
Form follows function means that the purpose of your space should be the cornerstone of your design. Therefore, in this case, your design ideas should fit into the fact that you're working with an RV. Don't introduce anything that would compromise the efficient running of your RV.
This also means working with elements that are suitable for an RV. For example, you can choose to use Azdel Composite, which is a good alternative to wood when it comes to RVs.
Azdel Composite is lighter than wood and does a great job of providing proper insulation. We recommend using this material in an RV because of its value. Azdel Composite is odor-resistant, mildew-resistant, quiet, and lightweight.
These qualities are perfect for an RV because it's a small space. The odor-resistance means that strong smells won't linger, which is great when moving into another season.
4. Follow the Rule of Three
Image Source: koa.com
The rule of three states that you should incorporate white, light, and bright into your RV design. Combining these three design elements makes your RV seem bigger and makes the small space feel brighter and more open.
For example, you can use white paint for the interior and blend this with a light gray palette for the rest of the RV.
Another way to ensure you get a bright space is to replace your cabinets with Plexiglass inserts. This makes the space look bigger and brighter without having to form more openings on the side of your RV.
5. Be Generous With the Primer
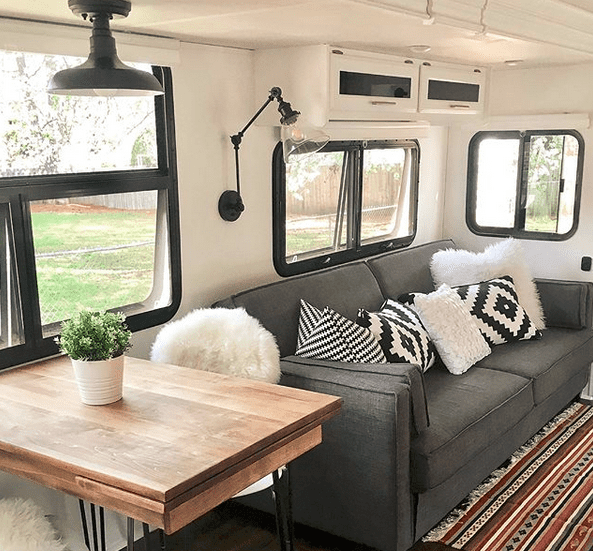
Image Source: ouradventurediary.com
You'll see the difference on your walls if you apply a primer first and then paint.
Although you may have heard of the trick of mixing your paint with your primer, it’s not enough to get great results for your RV renovation.
6. Use Current Trends
For the best experience in your RV, consider following current trends while designing your interior. This will keep you in touch with what’s happening in the world no matter where you travel to.
Another reason why keeping up with the trends is a good idea is that you get to increase your efficiency. As technology continues to evolve, doing everyday things gets easier, and you want to be able to enjoy this.
You might also enjoy the minimalistic feel that comes with more modern trends.
23 RV Remodel Ideas to Spice Up Your RV
Whether you want to upgrade a section of your RV or the entire vehicle, these remodel ideas come in handy.
1. New Windows
Image Source: extraspace.com
All-weather windows are the best for a travel trailer. This is because you'll be traveling to various places and want windows that will protect your inner space no matter the location.
Another thing to consider when getting new windows is window treatments. Window treatments protect your RV interior from the scorching sun. Examples of window treatments you can try include roller shades, window covers, aluminum blinds, and more.
Check out our guide on how to insulate windows for more inspiration.
2. Paint In and Out
Image Source: thehappyglamper.co
There’s nothing more refreshing than having new paint in your space. In fact, we recommend this idea if you’re not looking to do a complete renovation or you’re working with a tight budget.
However, remember to apply primer before applying the coat of paint. This applies regardless of whether you add the primer to your paint or not.
Consider going light on your interior to make the space seem open and bigger. To customize the space, you can also add some colors that reflect your personality. However, remember to go with the palette of the rest of the interior to ensure uniformity.
Here are some tips to follow when painting your RV:
- Sand the surfaces you want to paint using a fine grit sandpaper
- Use a pure water and vinegar solution to clean the surfaces after you sand them
- Putty any holes
- Apply a bonding primer
- Apply the paint
3. Replace Light Fixtures
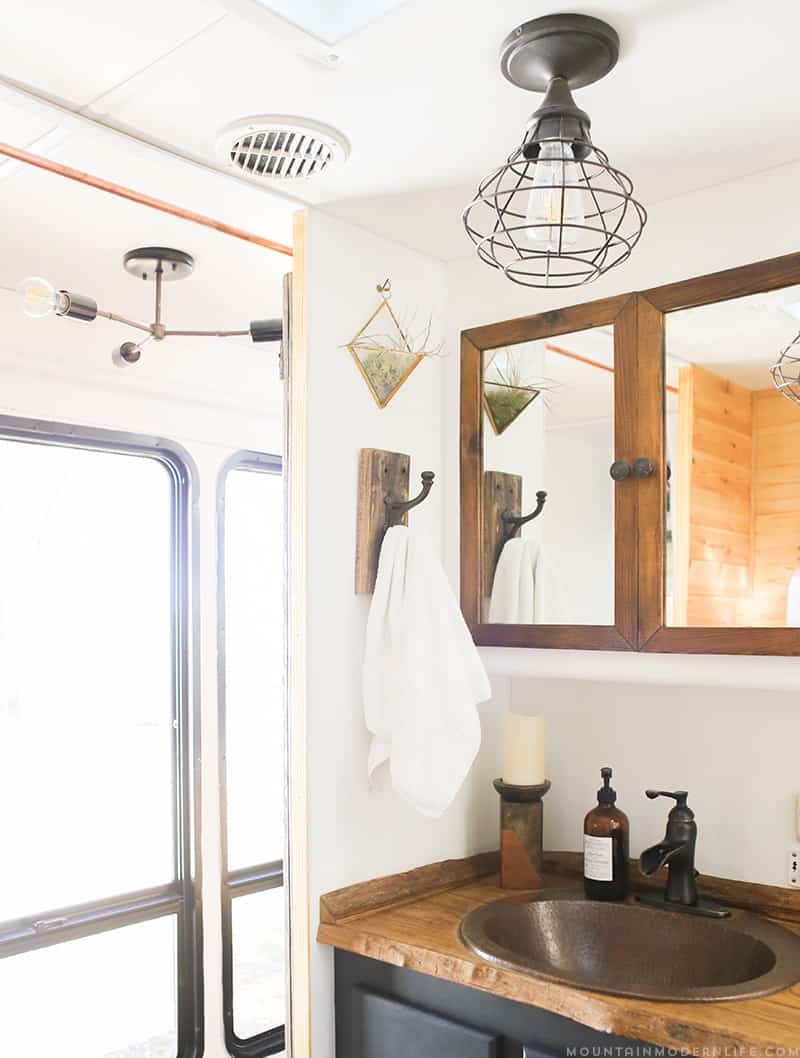
Image Source: mountainmodernlife.com
Swapping out light fixtures was one of the activities we enjoyed most when renovating our RV. You can use any light fixture you want in your RV if you use 12-volt bulbs. You can get RV-compatible 12-volt bulbs from Amazon if you're unsure which store to check.
4. Add A Backsplash
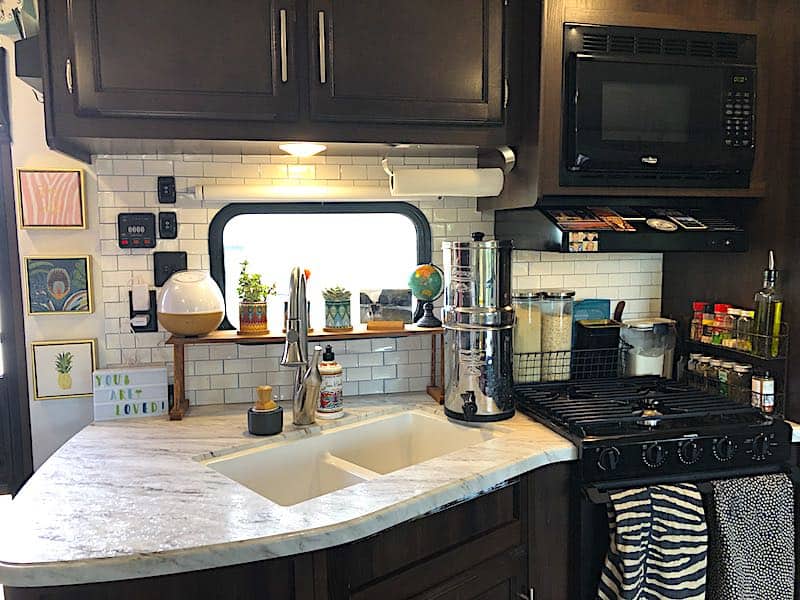
Image Source: rvinspiration.com
A backsplash is a cool way to spice up your space. You can put one in your kitchen and one in the bathroom.
Remember how we talked about following one pattern? This is one of the instances where this comes in.
We find it best to use the same (or almost similar) pattern for our kitchen and bathroom backsplash.
Some exciting and modern backsplash options you can go with include ceramic tiles and faux bricks. This is where your creativity, taste, and budget come into play.
You can also for a peel-and-stick backsplash if you want to keep things simple.
5. Replace the Flooring
Image Source: blog.goodsam.com
Here’s another way you can make your RV space look completely different. One of the most common materials used in RV flooring is linoleum. This material is lightweight, durable, anti-microbial, eco-friendly, and more.
Therefore, you can opt to go with linoleum again (if that’s what you had) in a different pattern or try other options like vinyl planks or even wood if you don’t mind the weight and maintenance.
Replacing the flooring of your RV is a good idea when you’re doing a complete interior renovation. This will allow you to match the floor with the rest of the interior decor.
You can also choose to go with affordable printed foam tiles if you don’t like the idea of wood, vinyl, or linoleum.
6. Update Your Fixtures and Faucets
Image Source: southernglamper.com
Here’s another renovation idea that will change your entire experience. Plus, it’s also a chance to update your plumbing if you’ve always wanted to.
Some fixtures you can change up include cabinet handles, doorknobs, and towel racks. In fact, if the current fixtures and faucets are still in perfect condition, you could store them safely and then swap them up again if you want to change things up.
The thing with an RV is that it’s not a very big space. Therefore, changing even the little things can make a huge difference, especially if you spend a lot of time there.
If you want a more modern or masculine feel, go with brushed black metal for your fixtures and faucets. On the other hand, if you want a more rustic feel, gold and copper accents should do the trick.
Remember to keep the pattern uniform for a more seamless feel. Therefore, if you go for brushed black steel, use it for all your fixtures and faucets.
7. Install Some Shelves
Shelves help to add storage room to your small and cozy space.
Consider adding some shelves to your living room where you can place books, photos, and more. It will help make the space more homey and personalized. You can also opt for floating shelves in your kitchen instead of RV cabinets for a more airy look.
8. Change Up the Curtains

Image Source: harvesthosts.com
Curtains hugely affect your space, and changing them is one of the easiest and most affordable ways you can remodel your RV interior.
New curtains can freshen up your space and change the entire atmosphere. For example, if you have light-colored curtains, you can replace them with dark-colored ones.
Curtains also play a role in insulating your camper trailer. They keep the sun out and also offer an added fabric layer of fabric to prevent warmth from escaping during those cold nights.
9. Add New Covers to Your Seats
Image Source: godownsize.com
You can either reupholster your seats again or add slipcovers that you can wash whenever you like. The new fabric will add new life to your RV and improve your experience.
10. Create An Accent Wall
An accent wall creates life in your space and works as a great conversation starter when you have a guest over. Instead of just painting the entire RV one color, consider creating an accent wall where you can put up some floating shelves and place your favorite photos and other accessories.
You can also choose to add some mirrors on this accent wall to make your RV interior seem bigger.
11. Add A Skylight
Image Source: tpatennis.com
12. New Kitchen Appliances and Cabinets
Renovating your kitchen is always fun. You can play around with so many things to create change and a new experience. Some appliances you can upgrade that will make your RV feel like home include the stovetop, refrigerator, dishwasher, and microwave.
With these appliances in place, you can easily make and store your meals and ingredients and save on money you’d have used for outdoor dining.
You could also consider going with energy-efficient appliances for a better experience. Once your kitchen is fully equipped, you’ll feel the difference it’ll bring to your RV experience.
When it comes to cabinets, you could either paint your current ones or install new ones. The choice depends on the state of your current cabinets, preference, and budget.
13. A Kitchen Island
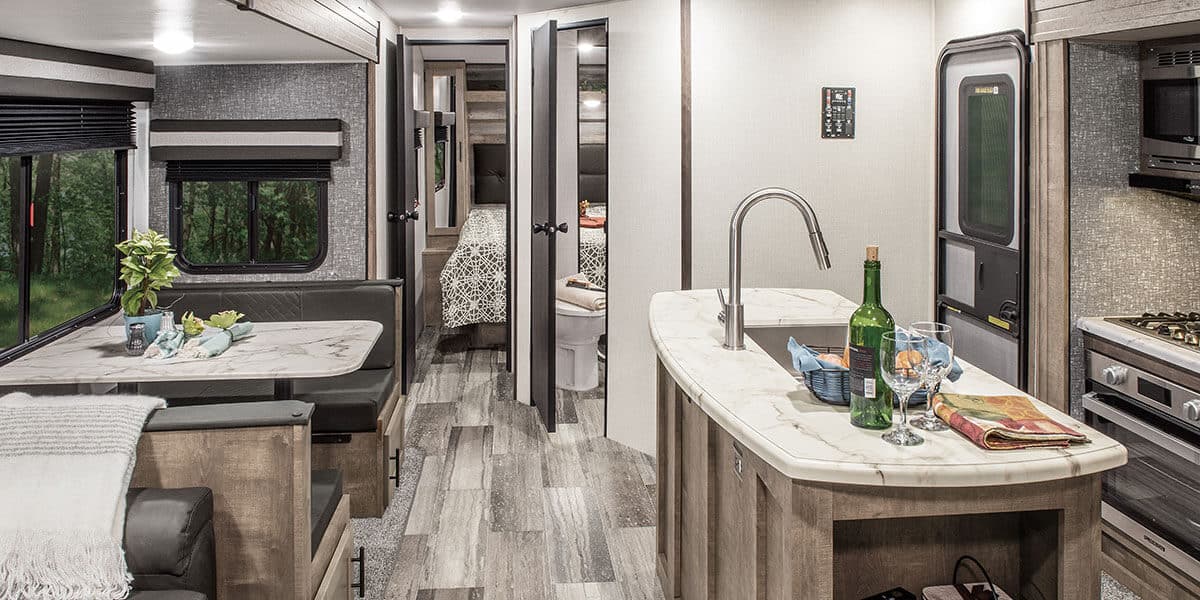
Image Source: kz-rv.com
A kitchen island can save you counter space, especially if you opt to move your sink there. It also spices up the look of your RV interior because it’s a unique feature.
You could also add more cabinet space to the kitchen island where you can store your dishes, utensils, silverware, and more.
14. Revamp the RV Exterior
Image Source: rvshare.com
The exterior of your RV needs some love too. Painting the exterior is a great way to remodel it. You could go for bright colors like gray or white. However, if you’re feeling adventurous, you could also go for some bold colors like blue or green.
Another way you can remodel your exterior is by replacing your old camper door with an upgraded RV door. You can either make the new door yourself or purchase a finished one.
15. Use Reclaimed Wood
Wood is one of the creative ways to spruce up your RV decor. For example, you could replace your floor with a wood plank vinyl floor or even a wooden one if you don’t mind going big.
Other places you can incorporate wood include kitchen cabinets and tables. This will give your mobile home a natural feel.
You can even do a teak shower floor if you don’t mind maintaining it. All in all, ensure that you have enough information on maintaining wood if you decide to go that route.
Here are some more ideas on using reclaimed wood to create treasure in your space.
16. Replace Your Countertops
When considering countertops, go for lightweight ones. Examples of these include plastic laminate, thin stainless steel, and plywood.
Another simple way to renovate your countertops includes using linoleum sheets on your kitchen counters. These are easy to do and can make the space feel new. Use this space to add some texture and color to your RV interior.
17. Add Solar Panels
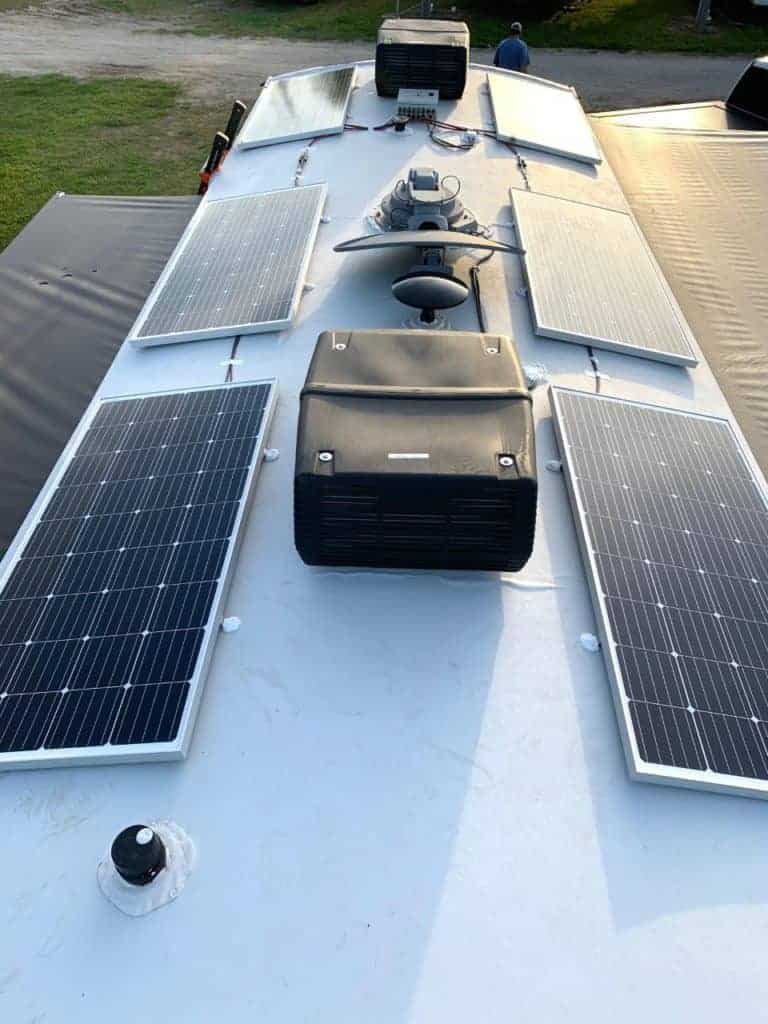
Image Source: battlebornbatteries.com
Using solar panels is a great way to be sustainable and extend the battery life of your RV. You can add solar panels to the roof of your RV after your consult a specialist.
Having energy from solar panels will also give your generator a break and can help increase its life span.
18. Get A New Toilet
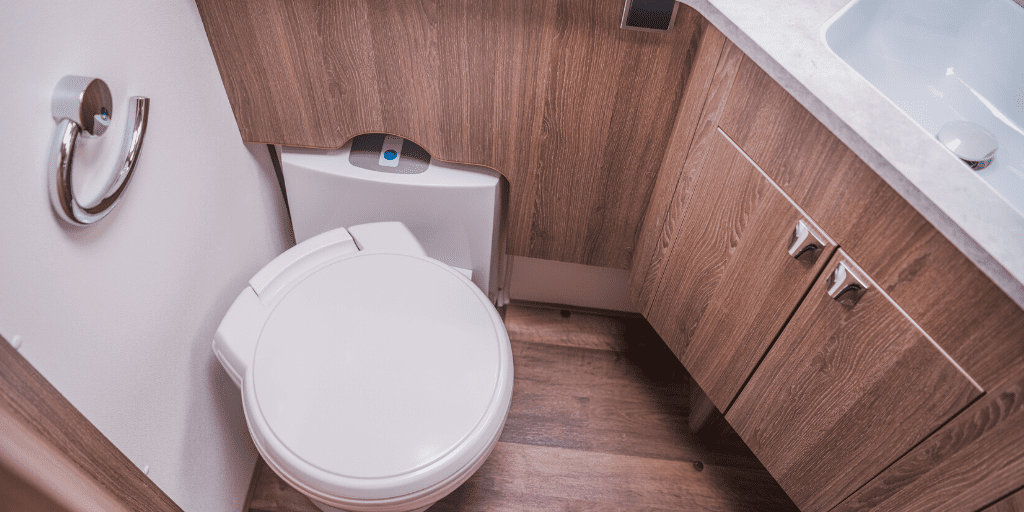
Image Source: michiganrvandcampgrounds.org
The best toilets for an RV are gravity flush toilets or even camping toilets.
A new toilet can also make a difference, especially when your current one is a bit old. Consider getting an eco-friendly one that will help you reduce your water usage.
19. Get Bunk Beds
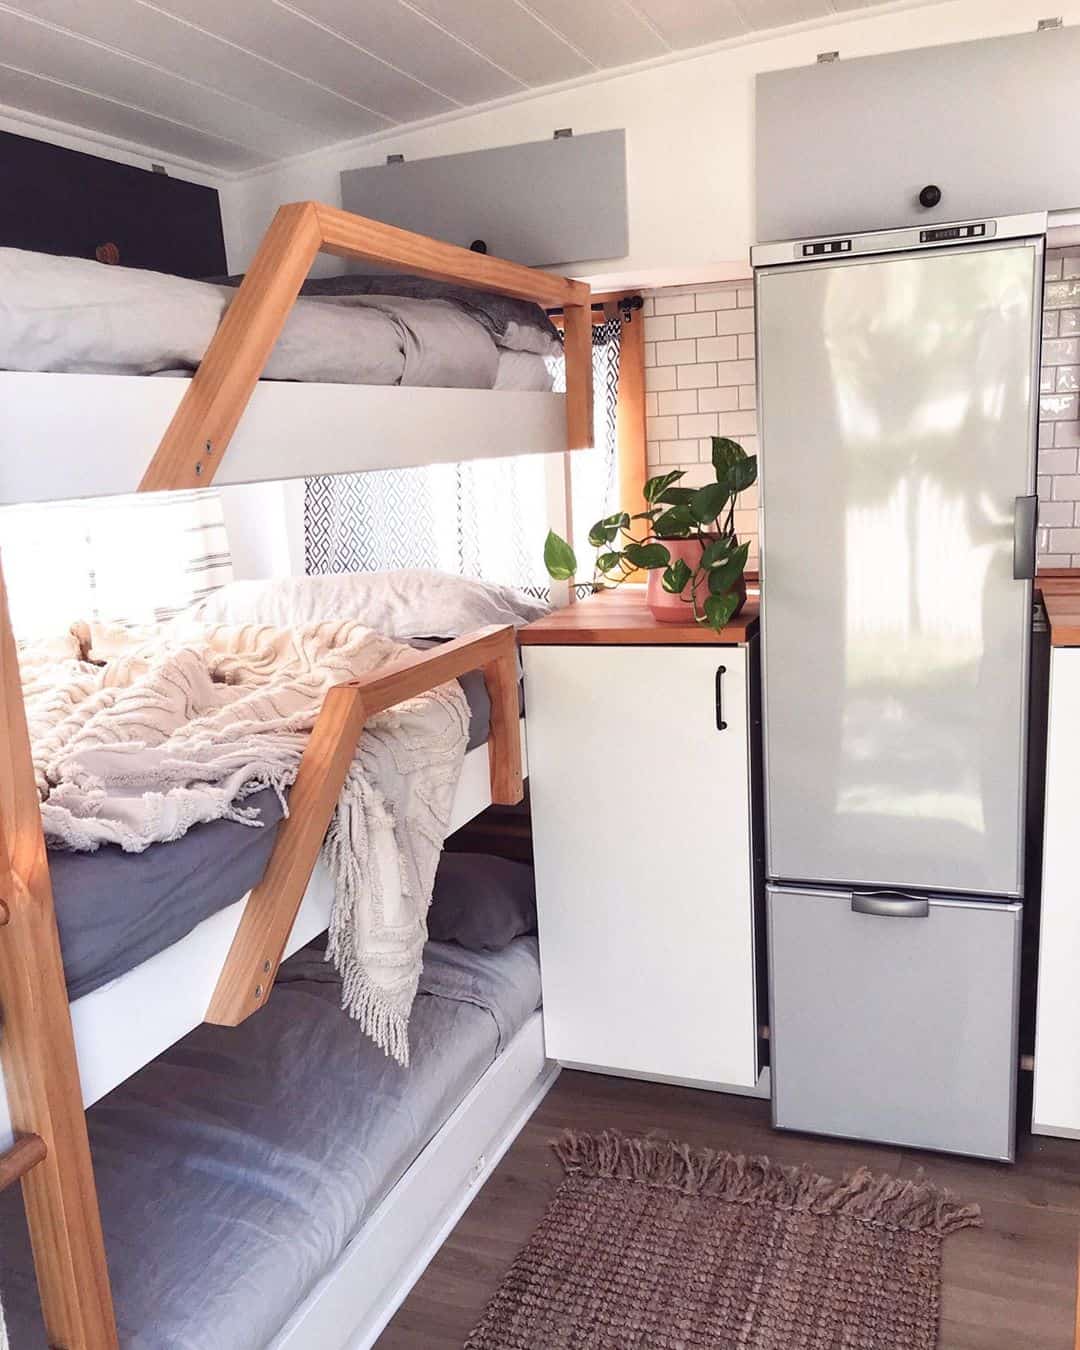
Image Source: rvobsession.com
Bunk beds are a superb way to save space in your RV. This is especially if you have kids with you. And the best part is that you can put storage containers under the bed.
For extra space, you could also have some hidden built-in drawers under the lower bunk.
20. Repurpose Your Bunk
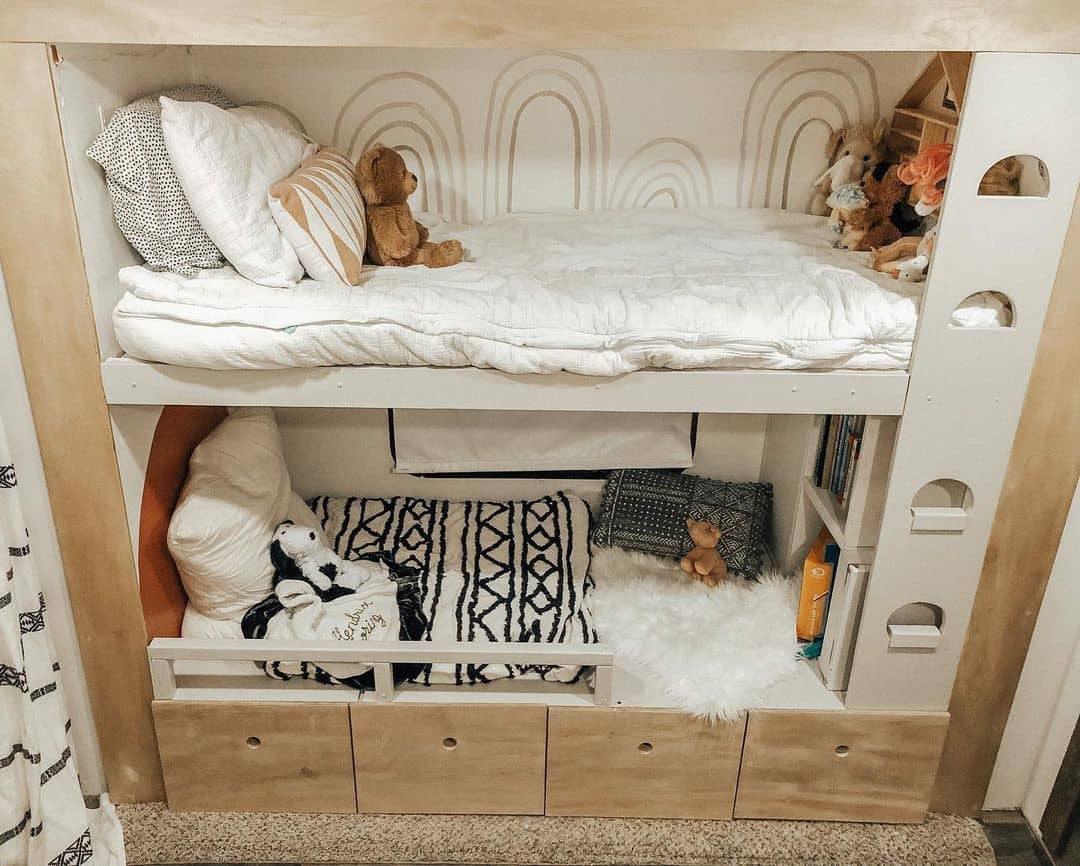
Image Source: tinyhousetalk.com
This revonation idea works great if you have a bunk bed that you’re no longer using. This could be because all your kids are grown up and have moved on.
If this is the case, consider adding storage containers to the top bunk or bottom bunk and railings to the side to avoid them from falling over while you’re moving.
You can use this storage space to store whatever you don’t need on a daily basis.
21. Do Some Thorough Cleaning
Image Source: rvbylife.com
This idea especially applies if you’ve just bought a used RV. The first thing to do, even before you look for what to replace, is to clean it thoroughly. This serves two main purposes.
One is to remove any prior dirt and energy from the previous owners, and two is to find out what needs fixing or replacing.
You’ll get to know your RV intimately while cleaning it and find ways to customize it to suit your needs. Remember to clean the storage spaces as well and get rid of anything the previous owners may have forgotten.
22. Consider A Loft Bed
Image Source: winnebago.com
A loft bed is quite similar to a bunk bed except without a lower bunk. This means that you can use the space under the loft bed as a storage space, desk, sitting area, and more.
Loft beds are great when you don’t have much space to play with in your RV or when you don’t have a designated bedroom.
Just remember to account for some small stairs or a ladder to help you get to the bed.
23. Upgrade the RV Bathroom Vanity
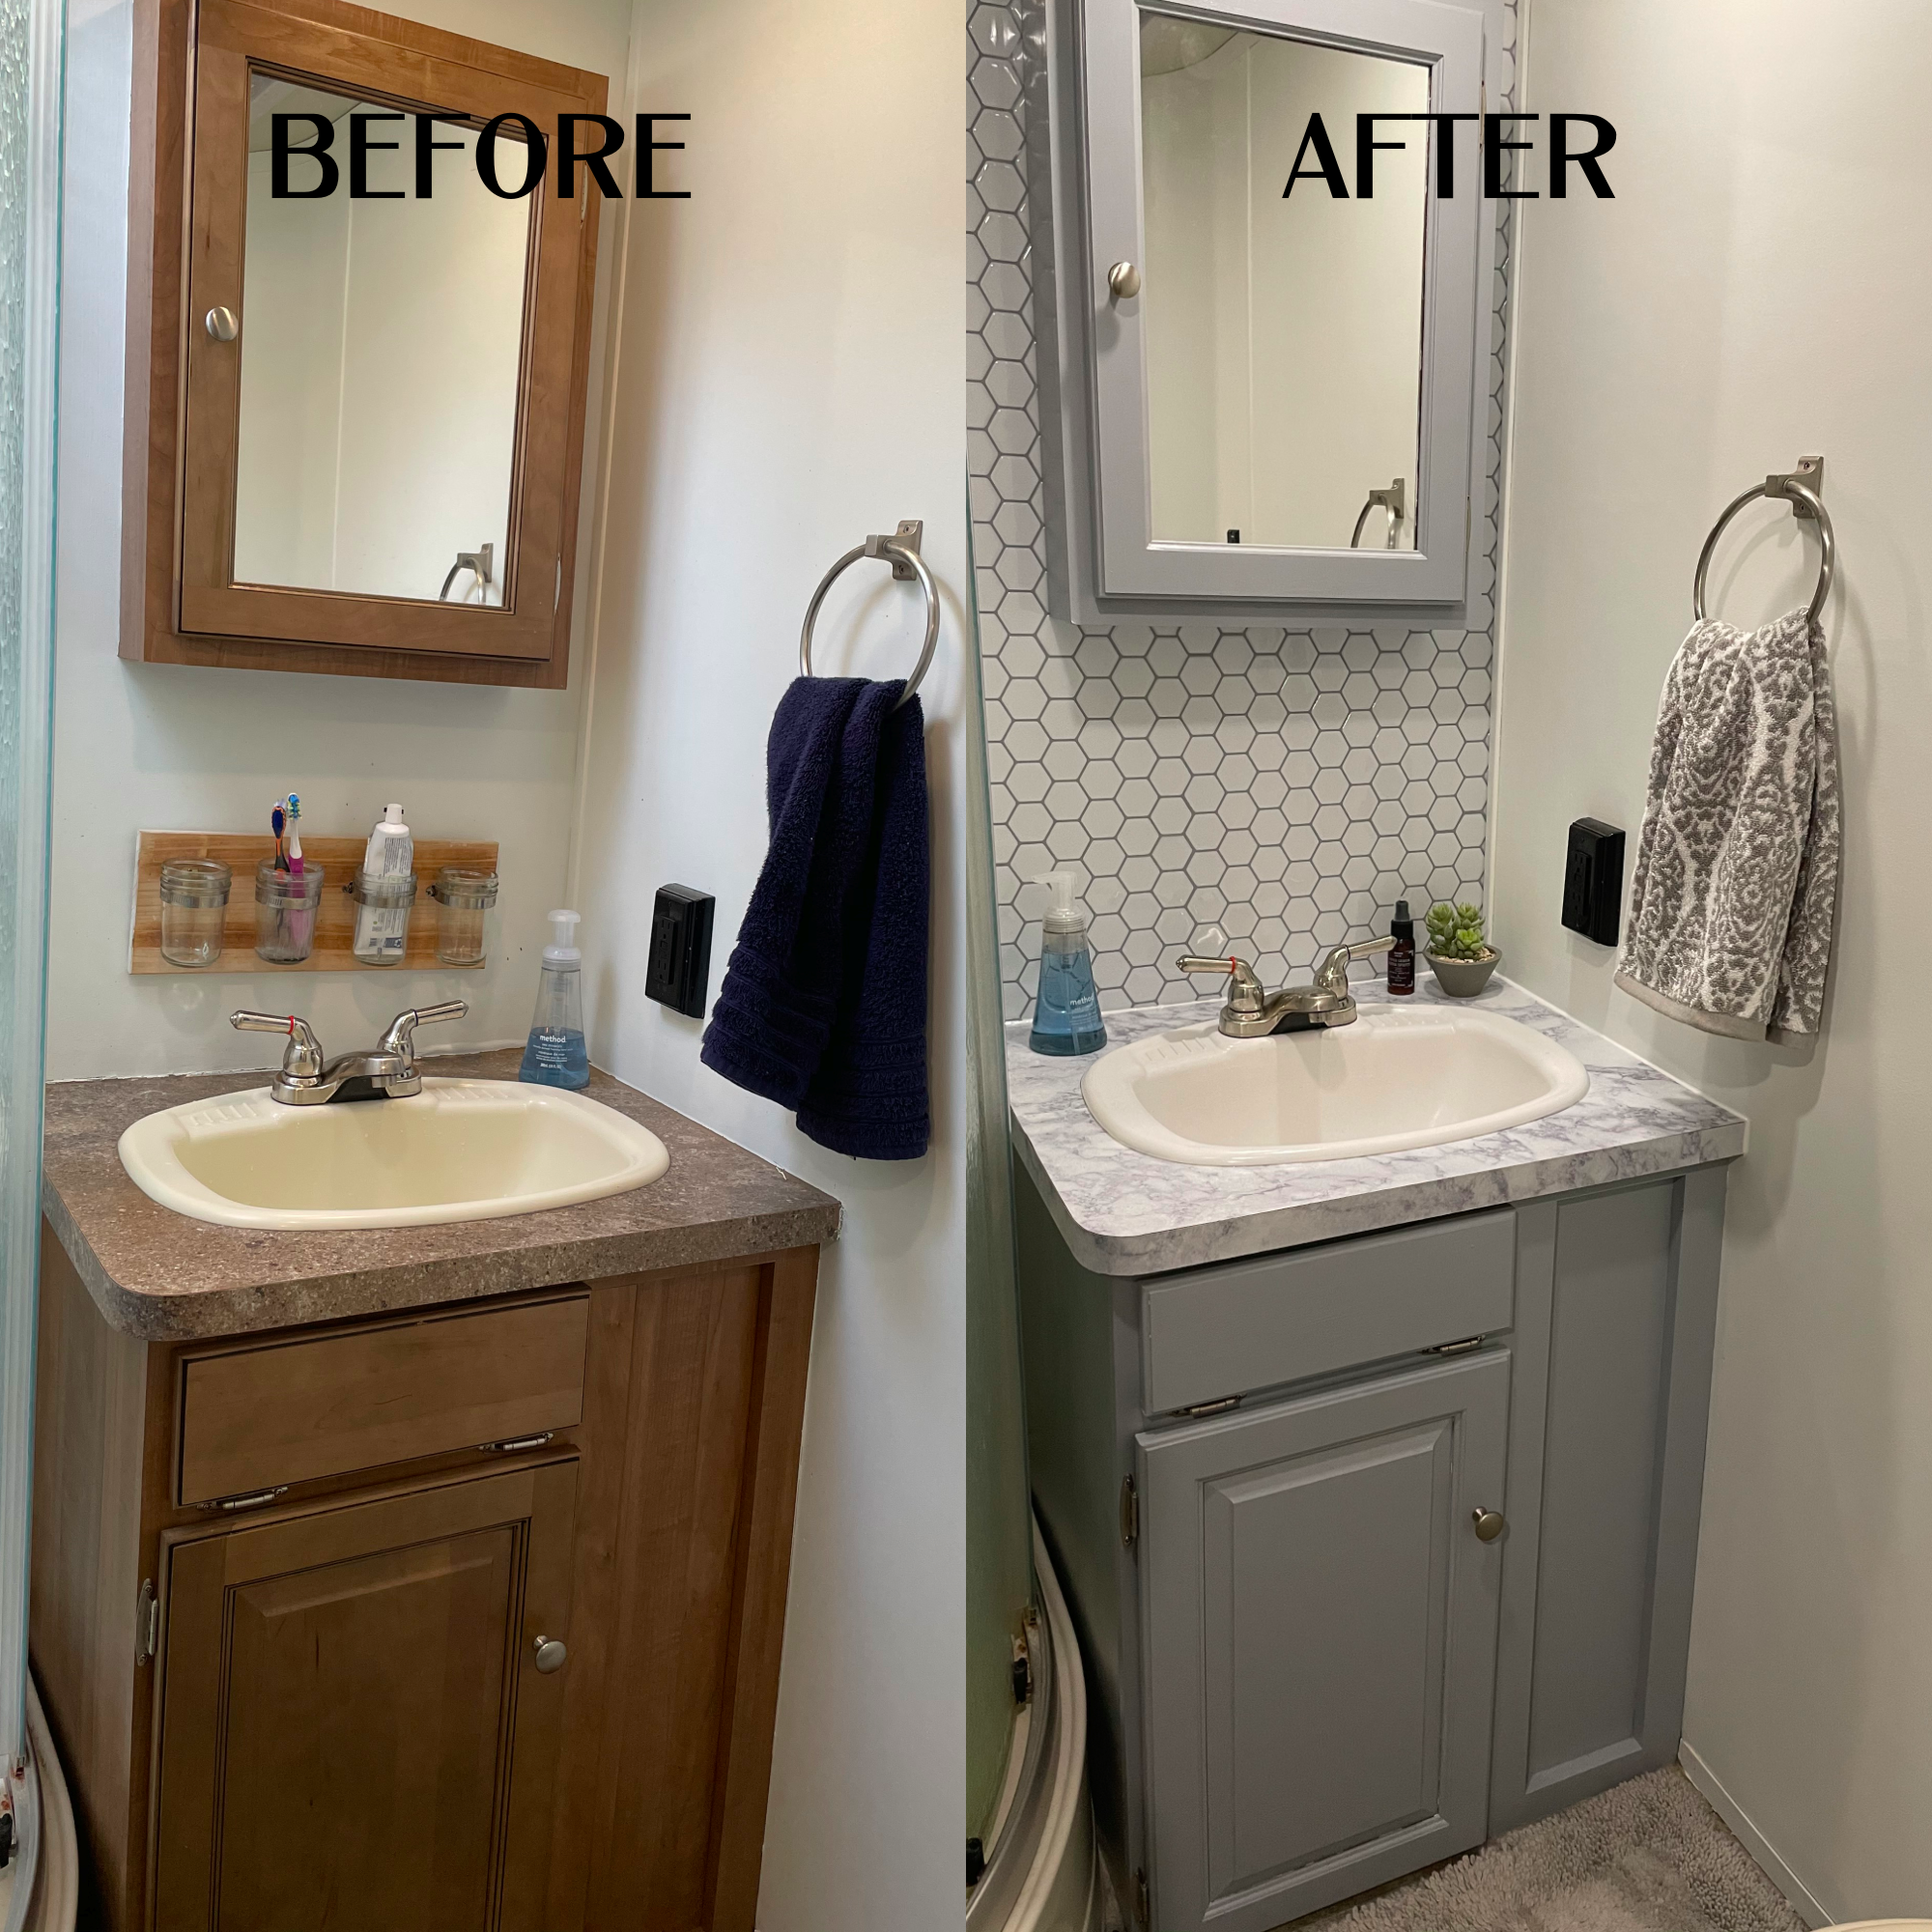
Image Source: sophieslifeontheroad.com
Here’s another fun upgrade.
Imagine waking up in the morning, washing your face, and preparing for the day in front of a beautiful bathroom vanity. It will make your whole day better.
When looking to upgrade your RV bathroom vanity, ensure that you’re using lightweight materials. For example, you could use acrylic, plastic, or light stainless steel sinks made for RVs.
Also, ensure that these sinks are compatible with your plumbing system before you purchase them. For the faucets, consider stainless steel or pebbled copper. You could also add a towel rack and a round mirror for an enhanced experience.
RV Remodel Cost

The cost of remodeling your RV will depend on the extent of damage, the things you want to change, your preferences, and more.
Setting a budget before you begin the work will serve you well because you'll know what to focus on.
On the other hand, you could first start by determining what you want to work on and then creating a budget based on that.
On average, renovating an RV ranges from a few hundred dollars to a couple of thousand dollars.
If you're just changing things for a more modern look without having to fix serious problems such as water damage, you should budget for about $1,000 or more.
The actual cost will depend on the materials you use, the condition of your RV, how much remodeling you want to do, whether it's DIY or you'll hire professionals, and so on.
We hope that this guide was helpful and that you can now plan and execute your own RV remodel without much hassle.
Remember to work with a budget and to leave some money for contingencies before you start your remodeling process. This will give you more control over the process and make it as seamless as possible.
Featured Image Source: heartlandrvs.com

About the author
Latest Post

What Are the Advantages of CNC Machine-Driven Tools?
The Best Markers for Plexiglass or Acrylic Sheets

Best Compound Miter Saw For Accurate Miters And Crosscuts

Top 5 Best Printers for Edible Images on Your Pastries
How to Get Started With Architectural Photography: 6 Steps

What Is a CNC Machine? An Overview of the Machine

What Is the Standard Kitchen Sink Size?

How To Mix and Match Pillows on a sofa With Simple Tips

Best Countertop Dishwasher for Kitchen & Office Spaces

What Does an Architect Do? Main Roles of Architects

Best Underlayment For Hardwood Floors To Prevent Damage
Some types of hardwood flooring will benefit from underlayment. There are various types of underlayment materials you can use. Hardwood floors ...

Best Underlayment for Peel and Stick Tiles Application
Peel and stick vinyl plank flooring requires an underlayment, which typically acts as a protective barrier between the flooring and ...

Best Underlayment for a Metal Roof for Homeowners
As a homeowner, I recommend investing in the best underlayment for a metal roof. In fact, a house with no ...
Part of The Indexsy Group, Registered in Canada DBA Archute
AMAZON Affiliate Disclosure
Archute.Com is A Participant in The Amazon Services LLC Associates Program. An Affiliate Advertising Program designed to Provide A Means for Sites to Earn Advertising Fees by Advertising And Linking to Amazon.Com
BROWSE CATEGORY
RV Remodel Before and After – Transforming a 20+ Year Old Camper
September 2, 2022 August 10, 2021 | Christopher Harvey

Last Updated on September 2, 2022 by Chris and Lindsay
If you are looking for ideas and inspiration for your RV remodel or renovation we’ve got some simple, budget-friendly and relatively easy-to-do-yourself projects that have turned a 1999 Class C motorhome into our home .
Whether you own a travel trailer, van, fifth wheel or skoolie we have loads of simple ways to make the most of your living space. And to make this better, we did our entire renovation on a tight budget and have lots of cost-saving tips.
Plus, did we say this was our first camper remodel? If we can do what we’re about to show you, then so can you!
In this post, we’ll share with you our RV remodel before and after and let you decide which projects you think will spruce up your tiny home on wheels. We’ll break down the basics for each project and link you to all of our project details.
Rates start at $50/half hour and consultation packages can be tailored to your wants and needs!
Contact us via email to arrange an initial consultation and discuss consultation packages available!
NOTE: Due to the nature of our travel schedule, we do not offer remodeling services outside of a consultation.
Our Total Camper Makeover
We call our project an RV remodel rather than an RV renovation because most of the work we did on our camper was to create something new from the existing setup. We see renovation as a way to restore or bring back a worn-out version to the original.
In our remodel we did strip our camper down to the bare walls and floors. So in our case, we’re going to show you what we did from the ground up.
RV Renovation at a Glance: Before and After
While Pinterest and Instagram are full of great snapshots of makeover projects and ideas, we found they can create a sense of panic and leave you feeling overwhelmed.
If you are like us, you probably look at those examples and think:
Sure, those people did a great job. But where do I begin and how can I do this RV renovation or trailer makeover if I do not have a lot of DIY experience or a large budget?
So we thought we should say up front that if this is how you feel, we were right there with you.
But we also want to share that what we learned – both in studying other RV renovations and in making some mistakes of our own along the way – gave us complete confidence to share with you that we think all of the projects we’re about to share with you are completely within your ability.
None require technical skill and all can be completed with basic tools, a mind for safety, and on a budget.
If you’re up for the challenge, we hope this post will give you more than enough inspiration and ideas to complete your tiny home renovation.
Whether you’re sprucing up a pop-up camper or travel trailer, completely renovating a vintage trailer, building out a van or giving new life to a fifth wheel – you can use our examples to guide you to taking on and completing the projects you choose to do with your camper makeover.
That said, sometimes you have to start with the end in mind and find ways to hold on to those images of what the camper will look like when it is done when you are in the middle of a challenging project.
So, here’s a peek at each of the rooms in our motorhome before and after. We’ll reveal a few of the key projects in each room.
But be sure to continue reading this post and click on any resources we provide you on how to complete the specific jobs that may be of interest to you!
Our RV Living Room Remodel

Key Features:
- Wall and cabinet paint
- Vinyl plank floors
- Custom-built sofa sleeper
- New vintage light fixtures
- Window curtains
- Dinette removed & Desk Installed
- Cube Box storage
- Entryway steps and floor mat
- Water dispenser storage
Our RV Kitchen Renovation

- Walls painted
- Peel and Stick Tile backsplash
- Butcher block countertop
- Residential sink and faucet
- Painted bottom cupboards teal
- Custom wall storage and decor
- Bamboo roll-down shade
- Bamboo stovetop cutting board
Our RV Bathroom Remodel

- Cedar shower rebuild
- Vessel sink and residential faucet
- Custom composting toilet
- Copper toilet paper holder
- Wood dowel towel holders
Our RV Bedroom Renovation

- Walls and closets painted
- Barn door design and painted teal
Laundry chute
- Dog bed & Shoe Storage
Our Top RV Makeover Ideas
Although we’re proud of all of the transformations in our camper remodel, these are the things we’ve done that have made the biggest difference in turning an outdated motorhome into a brand new home on wheels.
Paint Interior Walls and Cabinets
Nothing will have as stunning an impact on a camper remodel before and after then taking the time and effort to paint the interior walls and cabinet. Older RVs typically have bland wallpaper pressed against the walls throughout the interior.
Wood cupboards are typically brown, boring and bare and the general look and feel throughout the entire interior tend to feel outdated, weary and not modern.
By painting your camper walls and cabinets a bright color – such as the white and light grey that we used – you really open up the interior, make it more modern, and give yourself room to make other features of your camper interior really pop.
Be warned, committing to this task is easier said than done. Because we wanted a consistent look and feel throughout the entire camper interior, we knew that we were undertaking a huge endeavor.
Not only did it take significant time to remove cabinet doors and hardware – including struts, latches and handles – but also prepping the interior for paint took significant time.
We had to use plastic to cover areas we did not want to get paint on, such as windows, countertops and appliances. And we ran blue painter’s tape around all edges of ceilings, fixtures, switches and other areas we wanted to trim with paint very carefully.
Of course, in thinking about the mess we could make on the floor we were certain that we wanted to replace the existing carpet and vinyl sticker floor. So we did not worry so much about dripping paint on the floor as we were concerned about getting it on things like our refrigerator, light switches and window frames.
The painting itself took multiple steps. We used a liquid sander to prep the interior for paint. This involved rubbing two layers of liquid sander on each surface.
Then we primed with Kilz primer. In most cases, this was also two coats. We used a paint gun for the first round of priming.
But we quickly realized that we were making too much of a mess and decided to hand paint and roll the second coat of primer. This step included trimming all corners and other delicate areas of the interior.
Finally, we added the paint to each surface by hand using brushes and rollers. We painted the walls a very light grey and the cabinet doors white.
We switched out the handles on all of the cabinets from tarnished bronze to a simple modern black. This contrast in itself really made the cabinet doors pop throughout the camper.
Installing Vinyl Plank Flooring
If adding paint throughout the interior was the single most impactful project for our RV makeover, installing vinyl plank flooring was easily the second most complimentary.
Because we lightened up the interior of the camper using white and grey paint, we went with a darker grey vinyl plank flooring to create a contrast between the floors and walls.
These two jobs together completely transformed the camper. And if we had chosen not to do anything more in our camper remodel, the paint and flooring would have given new life and a much more modern feel to the camper interior.
First, we removed everything from the floor of the camper that was not permanently fixed where we liked it. This included the sofa and dinette – both of which we intended to replace during our rv makeover.
Then we ripped out the existing green carpet from the living room and bedroom. This was not as challenging as we thought – though we did have carpet on the stairs and around cabinets that was a bit tough to remove.
From there it was a matter of snapping the vinyl plank flooring pieces together, positioning them on the floor as desired and then cutting them accordingly.
While there were some tight spots in some places the difficulty of the job was overcome by the immediate satisfaction in the transformation of the entire interior.
Building a Rustic Cedar Shower
Of all of the DIY projects we didn’t consider when we first began our RV renovation, building a cedar shower was at the top (shortly behind that was building a composting toilet and a sofa sleeper!).
However, as we began working on the flooring in the bathroom it became clear that the shower was going to be an eyesore in what was becoming an otherwise amazing makeover.
The shower lining was yellow from age. And there was a weary and outdated brass-colored siding that held the shower stall glass in place.
While we had always intended to repaint the shower with a bright white epoxy resin to give the stall new life, we had not intended to tear the whole thing out and rebuild it from scratch!
But that is exactly what we did! And what a transformation!
This project took more time in planning, measuring and thinking through the design than it actually took to build. As each shower stall is different, we consulted several online resources for ideas and inspiration.
But there were no exact plans that matched the needs of our shower stall or the wants we had in creating a vintage, rustic look to the camper interior.
Essentially we tore out the old glass shower walls, leaving the existing pan and plumbing in place, and then used wood to frame out the new shower walls. Once we had framed the shower walls we added cedar planks throughout to give it that rustic look.
We then sealed the cracks and crevices and painted the cedar with a waterproof coating that would prevent the wood from holding water. To add the final touches we built a shower curtain rod out of copper pipe and fittings and installed a few wood dowel towel holders.
Where the shower and sink meet we left a cubby shelf to be able to store soap, toothbrushes and other toiletries items next to the sink.
Constructing a Custom Composting Toilet
We didn’t realize we had a leak with our existing standard-issue RV toilet until late in our camper remodel. And once we started shopping for replacement parts and entire toilets we realized we may want to invest the money in a composting toilet.
But composting toilets are expensive. So we did a little research and came up with our own idea of what we could build ourselves. This by far was one of our most creative DIY RV reno projects.
After removing the existing toilet we had to cap the black tank, for obvious reasons. Once this was done we looked at the open area around where the toilet was, approximately 30 inches wide by 24 inches deep.
This was a blank slate for us, with the only catch being that we wanted to divert our urine into our black tank rather than into a reusable container.
With that restraint in hand, and knowing that we wanted to have a side of the toilet where we could store sawdust, spray bottles and toilet paper we set about to design the composting toilet.
Essentially we built the toilet using 2×4 and 3/4″ plywood and the requisite plastic diverter and bucket. We used a hose to connect the diverter to the black tank and installed a standard toilet seat on top.
Finally, we added piano hinges to allow the entire top of the toilet to lift up for us to be able to access the trash bags inside.
Designing and Building a Sofa Sleeper
When we purchased our old motorhome with the idea of completing a DIY camper makeover we knew we wanted to remove the old pullout sofa and replace it with one that had a little more function. Additionally, the existing cushions looked terrible and were not an option once we added paint and flooring to the camper interior.
So we tore the sofa out before we painted and spent the next little while considering the various designs we could come up with to replace it.
Of concern was the fact that our furnace was located beneath the sofa and was clearly not going to go anywhere. While we don’t typically use our furnace often, there was no sense in throwing it out.
But it was going to make the sofa design more challenging. A second complicating factor is that there were existing wires bundled up behind the sofa as part of the RV power system .
We already knew that we wanted to add additional battery capacity to our battery bank . And this gave us the idea to move our batteries inside the camper and install our solar controller and inverter beside the battery bank beneath the sofa.
With these criteria decided it was a matter of finding various examples of slide-out sofa beds that were not too complicated to replicate.
Of course, with our design nothing was standard. We had to move wires and build around the furnace. But ultimately we created a box to hold our batteries, inverter and solar controller and made the bottom of the sofa high enough to clear this and the furnace.

We built the sofa with slats that would allow it to pull out into a bed if needed but also put hinges on it so we could lift it up to access the area underneath.
We also repurposed the existing cushions by removing the outdated lining and sewing new covers made out of bleached canvass for a rustic look.
Installing butcher block countertops and residential kitchen sink and faucet
A dream of ours has always been to have butcher block counters in our camper. But when we lived full time in our truck camper there was little space with which to work with a new counter and it would have been very complicated and wasteful to cut out the holes needed for appliances.
However, with more counter space in our motorhome, we knew the minute we first saw the kitchen that we wanted to replace the outdated countertop, sink and faucet with a more modern, yet rustic farmhouse-looking setup.

Because of the size of the existing counter, we ended up purchasing a huge slab of butcher block that we measured and cut to fit the existing space.
We stained it to a natural dark brown to create a beautiful contrast between the white and grey walls and the dark grey flooring. The last step was going to be to find a proper sink and faucet that would match the transformation taking place in the kitchen.
Standard RV sinks turn yellow with age and our kitchen sink and faucet were no exception. So taking those out was easy.
But finding a deeper and wider residential sink was a challenge. We didn’t want to have to remove the existing drawers or do substantial changes to the existing plumbing. So when we found a great sink option we went with it.

It took a little time to find the courage in ourselves to cut the sink and faucet holes in our new stained countertop. But once we made that commitment and the holes were cut the kitchen really came together to transform the interior.
We did find that this makeover to the RV kitchen caused the countertop to sit a little higher than previously. But there is no doubt that the job we did completely transformed this room in our motorhome and was worth the effort!
Installing butcher block countertops and vessel sink and faucet in bathroom
In a similar fashion to the renovations to our kitchen area, we decided to remodel the bathroom sink along with the same style.
Removing the old yellow sink and faucet was a joy. And after cutting and staining the kitchen counter it was much easier to install the bathroom counter.
We opted to go with a vessel sink that sits on top of the counter to add a more modern rustic look. Incidentally, this required less cutting as we only had to bore 2 holes in the countertop – one for the sink drain and one for the faucet hookups.
We also centered the sink so we didn’t have to do much work to the existing plumbing as well. This section of our bathroom, with the cedar-plank shower next to the sink, has quickly become our favorite part of our camper!
Other Great Budget-Friendly DIY RV Renovation Ideas
Although those are our top renovations that gave our camper a modern and brand new look and feel, these are some other budget-friendly DIY ideas for your camper remodel or RV renovation.
While your camper or travel trailer may not have all of the same space as ours, we think you’ll appreciate the inspiration these ideas will bring to help you turn your older camper into an amazing, modern and comfortable tiny home.
Custom Barn Door Decor

Some travel trailers, fifth wheels and motorhomes have curtains to separate rooms. Ours had a pocket door between the kitchen and bathroom and sliding farmhouse-style barn doors to close off the bedroom.
However, not only were these doors broken and off track. But also they were bland and boring in comparison with all of the other makeovers we completed.
So we took them down, added some creative designs using thin wood slats and repainted them to the look and feel we wanted.
Foldout Trash Can
OK, so this definitely isn’t necessary. But with two dogs that like to check out what’s in the trash can and not wanting to ruin the beauty of the rest of our RV reno, we decided that hiding the trash can in the kitchen was ideal.
For this, we simply converted a cabinet door from one that opened sideways to one that dropped open from the top with the hinge on the bottom. We installed a strut to help hold it in place when open and then screwed a small trash can into the door.
This incredibly simple project was an easy makeover and great use of space in our camper.

Dirty clothes always have a way of being in the way in a small camper. And with an outside storage bay projecting into our camper next to our bed we decided we’d make a simple modification to account for our dirty laundry.
From inside the bedroom, we cut a door in the storage bay and installed a hinge so the door would lift. Now we can simply grab the handle, lift the chute door and toss our dirty clothes into a hamper accessible from outside the camper!

Adding or changing curtains in your camper is a great way to tie the room together while also providing the privacy you desire and blocking the sunlight when you want to cool the camper down.
Many campers come with pleated-style blinds that are not only unpleasant to the eye but also difficult to use and easy to break.
We installed simple curtain rods and sewed fabric to be able to easily slide over the rods and serve their purpose in covering the windows.
SOFA Cushions
Because we removed our old sofa and built a new one we had to find cushions that fit our new sofa dimensions. For this, we repurposed our old cushions but then spruced them up with some handmade canvas covers.
Simply soak canvas drop cloths in a bucket of bleach and water to uniformly color the cloth. Then sew the cushion covers accordingly. We added throw pillows as accents to tie the sofa into the rest of the living room interior.
Cube box storage

The entryway to our camper is a busy place. As such, we knew we wanted storage that would custom solve issues we faced in the past. We wanted to store shoes, dog leashes and quick-grab items like keys and headlamps in a way that did not conflict with the look and feel of our camper renovation.
While we considered building our own shelving and we experimented with some cheaply made shelves, ultimately we decided to go with 4 cubes from IKEA that we could face and secure in whichever direction we wanted.
This way we were able to have 2 cubes face the door for our shoes, 2 cubes face the living room for dog toys and then we cut a piece of butcher block counter for the top where we have baskets to store the grab-and-go items.
Water dispenser stand
After the dinette and carpet were removed there was a corner of the living room that was bare and empty. Knowing how valuable storage space is in a camper or van we knew we couldn’t waste this space.
So we built a small stand to hold our drinking water where we could also store our dogs’ food bowls beneath. It was a simple custom job that added to the interior makeover.
Standing desk
Most people would use the cabover space as an additional sleeping area. After all, that is its intent. However, we were more concerned with having a productive use of the space than an extra bed.
So we decided to convert the sleeping area into a standing desk that pulls out from underneath our cabover storage area. It is simple and very practical for our needs.
Front Door Entrance

One last project we took on to complete the amazing transformation of our camper remodel was to makeover the front entrance to our tiny home. We inherited a doorway covered in the same green carpet we removed from the rest of the camper.
So it was immediately obvious that removing it would reveal all sorts of options beneath the carpet. We opted to add decorative vinyl stickers to the fronts of the steps, to paint the side wall white and to cut a standard welcome mat in half to fit on the bottom of the two steps.
This part of the RV reno restored a new modern look to the entrance making it very welcoming every time we open the door to our camper
Wrapping Up our RV Makeover
Our camper was probably a sight to see when it rolled off the dealer’s lot in 1999. While nobody could predict what would happen when the year turned, it is easy to look back on our motorhome and see that some things were destined to need to be changed.
When we began listing the things we wanted to accomplish in our RV makeover we couldn’t see all of the jobs and processes that it would take to reveal the new, second life of our full-time home on wheels.
But the further we wandered into the camper makeover the more we started to see the amazing potential a complete renovation would have on the camper.
We hope that this post has provided you with lots of great ideas and inspiration for how to makeover your RV while sticking to a budget or without having prior remodeling expertise.
We’d love to hear some positive feedback from you on what you like best about our camper makeover, answer any questions you have and, of course, hear how your RV renovation or makeover has gone! Leave us a comment or connect with us on social media to let us know!
NOT SURE WHERE TO BEGIN WITH YOUR RV REMODEL?
No worries! We can help you get started on your RV remodel! From offering counsel and assistance in picking out the best RV to remodel to walking you through some of the major and minor tasks you may want to complete, we offer RV remodeling consultation to suit your needs!
About Author

Christopher Harvey
Christopher Harvey is the co-founder and main copywriter for Called To Wander. His passion is to create content that engages and informs readers and helps them to pursue the Abundant Life on the Road. Aside from writing, he also edits videos for the YouTube channel. He has freelanced for a variety of publications and consults with different brands on SEO and content strategy.
See author's posts
Leave a Comment Cancel reply
Save my name, email, and website in this browser for the next time I comment.
This site uses Akismet to reduce spam. Learn how your comment data is processed .
- What’s Your Design Style? Take the Quiz!
- White Paint Colors (The ultimate guide!)
- Blanket Ladder Plans + Dimensions Worksheet
- Gift Guides
- Room Reveals
- Budget Decor
- Fall/Thanksgiving
- DIY Home Improvement
- RV Remodels
- Tools & Tips
- Paint Color Guides
- Painting Resources & Tips
- Condo Renovation
- Our Current RV
- Our First RV
- Our First House
- Shop My Products
- Shop Our First RV
- Loving Lately
- My Amazon Storefront
RV Remodel Ideas & Tips | Projects That Will Transform Your RV
RV remodel ideas and tips that will help make your RV renovation go smooth! Build your own affordable luxury RV using these easy DIY projects.
RVs are great for weekend camping trips, traveling across the country, or even full time living if you’re a little crazy like us.
We really wanted to try out RV life and tiny living, but brand new RVs, like large 5th wheels and motorhomes were so expensive! We wanted a RV that was customized to all of our specific needs, so we bought a used 2005 Damon Bayridge trailer to remodel.
After fulling gutting and renovating the camper, we lived in and loved our little RV for almost two years. Next, we ended up needing something newer and more roadworthy so we could travel the country!
We settled on upgrading to a 2017 Open Range Roamer, mid-bunk style 5th wheel. Before moving in (yup, you guessed it) we gutted it and did a full remodel!
These projects, and remodel ideas are what we learned along the way.
We’re excited to share our best RV remodel ideas and tips in this blog post! These ideas are the RV remodel projects that made the biggest impact.
1. Remove Window Valances & Blinds
Removing window valances and blinds is the quickest and easiest way to make a big impact in a RV.
I’m not quite sure why the RV industry is stuck in the 1980’s with their window valance patterns. It seems like every RV – new or old – has ugly window coverings. Even ultra expensive luxury trailers and motorhomes use ugly valances!
This RV project idea is an easy one! It can be accomplished in less than 5 minutes per window and only requires basic hand tools (or a power drill).
Each window valance in our RV was fastened to the wall using small Phillips head wood screws. We made quick work of removing them with our trusty DeWalt 20v drill (Amazon) . Removing the blinds was equally easy. They were also fastened to the wall with small Phillips head wood screws. After removing the two screw holding up each side, they pulled right off the wall easily.
Install Shades & Curtains
After you’ve removed the old window coverings and blinds, you can either upgrade to something that looks better, or simply leave the window bare.
In our RV remodel, we chose to add full length floor to ceiling curtains with decorative curtain rods as well as woven natural bamboo shades. This gives the trailer a classy, residential look and adds texture to the walls. In some areas of the RV, we installed basic cheap blackout roller shades – in plain white – for more of a minimalist look.
To install the woven natural bamboo shades, we used small Phillips head wood screws to fasten the shade brackets directly to the window frame. We were able to install the brackets in almost the exact spot as the blinds used to be, so the old holes were hidden perfectly.
The curtain rod needed to be installed near the ceiling of the trailer to achieve the full floor to ceiling look. After finding the wood studs in the wall ( using our favorite magnetic stud finder from Amazon ) we installed the curtain rod brackets using the screws that were included with the curtain rod kit.
If you only do one RV renovation project, upgrading the window treatments is a good choice. This project RV will make the biggest impact with the least amount of work.
To take your RV remodel a little bit further, painting is the next idea. Paint can make a huge impact in any space, especially in an RV.
My Related Articles: Why We Chose To Live In An RV (AGAIN!)
2. Paint Your Interior Walls
Painting the interior walls of an RV is not as quick or easy as upgrading window trims, but paint is cheap and makes big impact. Paint can make all the difference between a dark, dated looking RV, and a light bright modern vibe.
Prep work is the key to painting like a pro. If you don’t prep the walls properly, paint will not adhere. Using the right paint is equally important.
The following painting information is a condensed version of the full step-by-step tutorial I wrote called ‘How To Paint RV Walls. In the tutorial, I go into even more detail with tons of pictures.
How To Paint RV Interior Walls
Being meticulous with prep work is important for painting a RV interior successfully. The interior walls in recreational vehicles are usually made from thin plywood panels and have a special vinyl coating. The special covering is similar to wall paper.
Plywood RV wall panels come in 48″ widths, which means there is a seam between panels every 4 feet. To hide the seam, RV manufacturers use vinyl tape. The walls are not really meant to be painted which makes the job more difficult.
Before you get started on the painting project, make sure to take everything that you can out of the trailer. Remove all the furniture, and demo any unwanted cabinetry, as well as window valances and blinds.
Recommended Painting Supplies:
Start by using TSP Heavy Duty Cleaner to wash all the walls (Amazon) . TSP (Trisodium Phosphate) is a special degreaser that breaks down oil and grime. It’s designed specifically to clean surfaces in preparation for painting, and it works amazing!
Next, tape off all the doors and windows, as well as any other fixtures or cabinetry that you don’t want painted. Remove electrical cover plates, or cover them with tape. Painting the cabinetry the same color as the walls can simplify the process if you plan to paint the cabinets.
Tip: Sometimes it’s easier to temporarily remove light fixtures than it would be to tape them off.
Now that all the prep work is complete, it’s time for the fun part: painting! We recommend using an airless paint sprayer . Airless paint sprayers are fast, and make an even spray pattern. This saves a ton of time, and helps you make streak-free coats.
I was surprised at how cheap we were able to buy this Graco airless sprayer from the listing on Amazon. So far, it has worked extremely well for me, and we’ve used it for several projects. I recommend it to anyone with a painting project coming up.
We used Kilz Adhesion Bonding Primer (Amazon) which adheres to RV interior wall panels like super glue! RV wall panels are notoriously difficult to paint, so using the right primer is mandatory.
After one coat of primer, and two coats of Sherwin Williams Alabaster (SW 7008) white paint, the interior walls looked better than new ! If you need help choosing the perfect color of white paint, checkout this article I wrote: How To Choose The Best White Paint Color – The Ultimate Guide .
Sample, Sample, Samplize!
To pick the perfect color, you really need to test out paint to see how it will look in your space.
After learning about Samplize a few years ago, I love recommending their peel-and-stick vinyl paint samples . I use them for every single one of my projects!
They make testing paint color samples SO EASY , and it saves you the hassle of painting test splotches on your walls. Check out their peel-and-stick vinyl paint sample in the image below.
We ended up choosing to paint the entire interior of our RV with the white paint color – Alabaster by Sherwin-Willaims. In the image below, you can see the freshly painted interior of our gutted trailer.
3. Install New Flooring
New flooring a necessity in most camper remodel projects. RV’s usually come with cheap linoleum and thin carpet. The low quality flooring doesn’t always look good, even when its brand new. It also tends to wears out quickly.
If you’re remodeling a trailer ( especially if it’s at least a few years old ), the floors are probably in need of some DIY elbow grease.
Installing flooring in an RV is similar to the installation process for floors in a residential home. If you’re a capable DIYer with basic tools, you can handle this project!
The most intimidating part of RV flooring is dealing with pop-outs. Don’t let this scare you off! It’s less difficult than it seems.
Begin by removing baseboard trim and in-floor heat registers, then remove all the old flooring. RV’s typically have an OSB plywood subfloor which is similar to what you find in houses.
We chose to use engineered stone core vinyl click-lock plank flooring from Urban Floor . This flooring is extremely durable, 100% waterproof, affordable and easy to install.
To install click-lock plank style flooring, start on one side of a room and work your way systematically across, making sure to stagger the seams as you go. When you get to a pop-out, end the flooring as if that was the edge of the room. This leaves a small seam between the edge of the flooring and the pop-out.
Next, install flooring in the pop-out separately, as if it was its own room. When you’ve finished, there will be a small gap between the flooring of the main room and the pop-out. You can make the seam less noticeable by covering it with a rug when the pop-out is extended.
4. Add New Furniture
Out with the old, in with the new! Let’s be honest: a lot of RV furniture is ugly, and uncomfortable. Adding new furniture is another great RV remodeling idea. Getting rid of the old couches, recliners, and table will give you a clean slate to work with from a design perspective.
You can completely revamp the design style of your RV with remodel projects like paint, flooring, window coverings, and decor. Why not complete the cohesive redesign with new furniture that perfectly matches the new style you’re going for.
Whether it’s: modern, bo-ho, rustic, coastal, or cabin style, you can to curate furniture to perfectly match the new style.
Related: What’s Your Design Style? Take The Quiz!
Don’t limit your search to RV specific furniture pieces. Depending on the size of the trailer you’re working with, you should be able to fit full size residential furniture, at least in a few places.
Our two favorite furniture pieces in the RV are: Article Sven leather sofa (our full review here) and Article Hira Natural Wool Pouf (our full review here) . Can you tell we’re kind of obsessed with Article Furniture?
5. Build An Accent Wall
Accent walls add bold style to any room. We built a modern looking wood accent wall in the bedroom of our RV. Its natural wood colors add a pleasant contrast against the Sherwin-Williams Alabaster white walls.
The room is pretty small, so we designed the wood accent wall to double as a durable built in headboard wall for the bed!
We installed these vintage style industrial wall sconce light fixtures (Amazon) to add detail and functionality to the accent wall.
I wrote a full step-by-step tutorial detailing exactly How To Build A Modern Wood Accent Wall if you want to see the exact steps we used to build the accent wall.
6. Install New Light Fixtures
Installing new light fixtures in your RV is a great project to get started with, even if you aren’t committed to doing a full renovation.
Updating the light fixtures is a double bonus because not only will your trailer look better, but it can use less energy and improve your batteries performance!
Check out the YouTube video tutorial we made. It shows you exactly how to replace your RV light fixtures!
Get rid of your old bulky, ugly ceiling lights, and upgrade to these sleek, slim LED ceiling lights!
7. Hang Art or Decor on the walls
This RV renovation idea is simple, easy to accomplish, and makes such a big difference! Try hanging some simple art, a coat rack, or even shelves to beautify and personalize and customize your trailer.
Are you curious what is the best way to hang things in a RV? Check out our YouTube video that shows you exactly what to do!
8. Install Butcher Block Countertops In Your RV
Installing butcher block countertops is an easy, budget friendly remodel idea. It’s possible to install butcher block countertops in any RV, even if you don’t plan on doing a full gut job kitchen remodel.
The butcher block countertops were only a starting point for the kitchen remodel in our trailer; we went out with a completely new kitchen! We designed our RV to be full time living capable. To accomplish this, we opted to remove all the RV appliances and install new cabinetry as well as full-size residential appliances.
To learn more about butcher block countertops, check out the article I wrote – Everything You Need To Know About Butcher Block Countertops .
Appliances: 30″ Hammered Copper Farmhouse Sink (Home Depot) – Counter Depth French Door Refrigerator (Home Depot) – 18″ Dishwasher (Amazon) – 4 Burner Electric Induction Cooktop (Amazon) – Convection Oven / Microwave Combo (Home Depot)
These high quality appliances make kitchen highly functional and perfect for full time living. To learn more about the kitchen renovation in this trailer, including before and after pictures, check out the full RV Kitchen Makeover Reveal.
Our Related Articles: How To Install Soft Close Hinges In Any Cabinets
9. Add A Backsplash In the Kitchen
A kitchen remodel wouldn’t feel complete without a backsplash. This RV remodel idea is affordable, and adds some texture and complexity to the kitchen.
We installed a 1″ hex porcelain tile backsplash (Home Depot) using OMNIGrip premixed tile adhesive (Home Depot) . OMNIGrip is similar to thinset mortar, but it’s better for use in RV’s because of its flexibility and strength. To finish off this the backsplash project, we grouted between the tiles with premixed grout in the color Alabaster (Home Depot) to perfectly matches the walls.
Tip: for an easier & cheaper way to DIY your RV kitchen backsplash, consider using these peel and stick subway tile backsplash sheets from Amazon.
10. Remodel The Bathroom
Next up on the list of RV remodel ideas: bathroom remodel! A cramped bathroom with a tiny shower will make any RV feel uninviting.
Although the bathroom in our RV is small, we were able to make some significant upgrades. First, we installed a much more functional shower complete with exposed copper piping and mixer valves. We swapped out the cheap plastic shower insert for a 40″ fiberglass shower base (Amazon) and installed wall panels to complete the walk-in shower.
Next, we installed a new 18″ wide vanity (Amazon) with a cute copper vessel sink (Home Depot) to give the bathroom a finished look.
To learn more about this RV bathroom remodel, checkout the full bathroom remodel blog post I wrote .
11. Install A Tankless Water Heater
After upgrading to the fancy walk-in shower, it quickly became apparent that 5 minutes worth of hot water for showers wasn’t going to cut it! No one likes running out of hot water in the shower, and waiting for a water heater to recover is a pain.
We got to work brainstorming ideas and researching. A larger tanked water heater could have worked, but space was a major concern. There was not anywhere to fit a larger tank.
That’s when we decided to install a RV tankless propane water heater (Amazon) . The tankless water heater uses propane and 12v power so it can be used when boondocking, or when 120v shore power is not available.
12. Build A Coffee Bar
This RV remodel idea might not be for everyone, but all the coffee obsessed RVers will understand.
Check out the coffee bar we added to our RV kitchen! The coffee bar is installed where the pantry used to be. Between the upper and lower cabinets, it has roughly the same amount of storage as the old pantry, yet adds valuable counter space.
A Delonghi Eletta Cappuccino Machine (Amazon) is the star of the show! Yes, it’s expensive; but it saves us $5 every time we drink coffee at home instead of going to Starbucks!
I hope these RV remodel ideas have been helpful. Good luck on your RV renovation!
UP NEXT: Checkout all of our RV related posts here!
Do you plan on using any of these ideas? Do you have any other tips that we should know about? Please let us know in the comments below!
RV Remodeling Ideas & Photos
This post may contain affiliate links or mention our own products, please check out our disclosure policy .
RV Remodel: Turning Older Into Legendary
Published on May 25th, 2021 by Brian Newman
“By golly, these darn new-fangled RVs are making our Freya’s Chariot look bad.” If you find yourself saying this about your Classic Era (1971-1989) or Neo-Classic Era (1990-2007) travel trailer, there are some great ways you can upgrade your old RV to outshine those young whipper-snappers with a little RV remodel. While the manufacturers and vendors deal with the shortage of RV parts, we’ll show you some affordable ways to take advantage of in-stock items and outside industry materials to find solutions. You’ll also learn about the many creative ideas artisans around the country offer that you may not have thought of yet.
Legacy Era RVs
First of all, like any artist or interior designer, let’s start with the canvas your working with: that’s your RV. If you have a 1960s Shasta AirFlyte, older Airstream, a Coleman Pop-up, or original Winnebago Brave, these iconic RVs draw their own attention. Giving them a good once-over with exterior cleaning products will draw a crowd.
In this discussion, we’re talking about those motorhomes and travel trailers that are the forebears of today’s RVs. In many ways, your coach has features the Modern Era (2008-Present) doesn’t. Examples would be a 1991 Jayco Eagle travel trailer, a 1994 Cobra Sandpiper fifth wheel, or a 2000 Damon Escaper Ultra Sport Class A motorhome. Each one of these RVs has a story to tell. While you may not know its individual past, the Cobra and Damon are significant. Did you know that Forest River began in 1996 by using the assets of Cobra? On September 2, 2003, Thor Industries completed its buyout of Damon. The new daughter company became one of the root brands solidifying Thor Motor Coach.
DON’T MISS OUT ON CAMPER SMARTS UPDATES
Sign up for the newsletter today.
Please enter a valid email address.
An error occurred. Please try again later.
Thank you for subscribing to the Camper Smarts newsletter, keep your eye on your inbox for updates.
When you have a legacy RV remodel, you’re rolling with a piece of RV history . Not only are you representing the past, but you’re also reusing a built coach, which may already have some significant upgrades in it and has some life left. The average lifespan of an RV is 20 years, but with the proper TLC, your home on wheels can last so much longer. Over 70% of all Airstreams are still on the road today.
Why We Chose a Legacy Motorhome
Brian and Marianne Newman have lived the full-time RV life in their 2001 Fleetwood Pace Arrow since 2018. Brian is a second-generation RVer, and Marianne caught the RV bug from him. When the Newman’s toured the many motorcoaches to find their new home on wheels, they purposely chose a Neo-Classic Era over a Modern Era RV. The vital components like the chassis, engine, transmission, frame and other essentials were still in great shape. The RV had less than 50,000 miles on it, and the few repairs it needed were manageable. The empty-nesters decided they could use their money to upgrade the features they wanted instead of investing in a high price.
Their RV remodel plans include changing the living room furniture, new countertops, and upgrading to a 50-amp electric service to ultimately convert propane features to electric. One of the latest projects they completed was turning the old front TV cabinet into a memorial cabinet to have a space for their four-legged pack members that have crossed the rainbow bridge.
Don’t Be Afraid To “Ruin” the Value With an RV Remodel
One of the most significant advantages you have compared to the Modern Era RVs is that your coach has already gone through the depreciation value curve. New RV buyers will lose up to 30% of the value in the first year and continue downward 20%-30% each year after that. The average new RV purchaser will keep their coach for around 8 years. After that, they’ll sell it to upgrade, transition to a different RV category, or leave the lifestyle. If a new model year owner considers upgrading a feature, they have to think about how it will impact the resale value later. As a legacy RV owner, don’t be afraid to have fun upgrading and adding your personal touches to it. If you do plan on upgrading later on, from a dealer’s perspective, this may be the last ride for “Sweet Bessy,” so dress her up to the nines.
Whether your RV remodel upgrades work or not, you’re learning. The most successful RVers are those that know how to work on their units themselves. You can perform over 90% of the maintenance and repairs yourself. The conventional RV building methods (wood frames and corrugated aluminum) used many of the same tools you have in your hardware bay during the Classic and Neo-Classic Era. Go ahead and attach that locomotive cowcatcher to the front of your Class A motorhome (Marianne won’t let Brian add it to their Pace Arrow). Add creative exterior decals, create RV workspaces by hand, or do something simple like updating the couch cushions. Make your legacy RV yours.
RV Remodel: Outdoor Decor
Setting up an inviting outdoor space.
The best way to say “Howdy Neighbor” is to start with an inviting front porch. You could pick up a simple doormat to place it under your entry steps, but go for the gusto! There are plenty of RV outdoor rugs to choose from, whether you go to a big-box store, camping store, or online. If you don’t like what you see, make your own.
In the 1980s, this author’s RV outdoor rug was the faux grass used on miniature golf courses. It rolled up well and withstood the weather (although it was heavy). The best rugs allow water to flow through and maintain their integrity well. Bamboo outdoor carpets are durable, waterproof, and can handle the weight of outdoor furniture. You can find personalized RV doormats on Etsy to place under your entry steps to compliment whatever outdoor rug you use.
Accommodate Your Potential Guests
For your RV outdoor furniture, quality and quantity is everything. You don’t have to break the bank, but you want tables, chairs, and other pieces that look inviting but won’t fall apart after a couple of uses. Always have two empty chairs set up and available. Angle them a little toward the road. You’re telling people who walk by to take a moment to say hello. A closed-circle configuration says this is a “member’s-only” club.
Mood Lighting
When you really look at those built-in RV LED awning lights, what do they say? The LED lights light up the outdoor space, and there are color variations, but where’s the unique personality? Using RV hanging awning lights, or “twinkly lights” in the RV jargon, can be a stylistic solution to solve your outside lighting concerns for your RV remodel. You can go “old school” with pink flamingoes or gnomes to match your lawn versions. There is the various color-themed version to match the season, your RV, or your style. If you want to dress up for the evening, there are even crystal RV awning lights.
Camper Smarts Tip on Outdoor Furnishings: Most of us that live the RV lifestyle live by the friendly and trusting spirit of the RV Community. Some are still learning, so if there is something outside near and dear to your heart (or wallet), make sure you secure it before turning in for the night. As a good neighbor, make sure you keep an eye out for your neighbors too. RVers always look out for each other.
Everything and the Kitchen Sink
Your travel trailer’s outdoor kitchen consists of a side rail to hang your favorite barbecue or other propane cooking device. Adding one or two folding tables will give you enough counter space for additional RV cooking devices. If you can sacrifice a door-side exterior bay, you can build a sliding drawer with a built-in grill and sink connected to your RV’s LP and plumbing. Learn more about these and other DIY projects that are easier than you think for your RV remodel at Do-It-Yourself RV .
RV Remodel: Interior
A welcoming first impression.
When you bring your guests inside, you want it to be just as inviting. Check out some of the excellent RV remodel interior design accessories we recommend to help you finish your look. You’ll be amazed at what $10-$20 can do.
Give a Facelift to the Floor
More than likely, if your motorhome or travel trailer has a manufacturer date before 2007, you have carpet. If you want to keep it, renting a steam cleaner with a hose attachment can bring it back to that original color. You can also add some area rugs for problem spots. It covers the permanent stain and adds a dimension to your overall interior design. If it’s time to rip out the carpet, they’re doing great things with laminates today. Peel and stick wood planks are designed to look like wood but have vinyl durability. It comes pre-glued, so after you line things up, just peel off the adhesive paper and stick it down. You can use a carpenter knife to cut the slats to size. The same is true for the thousands of tile patterns. RV manufacturers use tongue and groove flooring seen in brick and stick homes. You can do this too, but it’s more involved with your time, money, and effort. The finished RV remodel flooring project has a distinctive look and can be worth the effort.
Getting New Furniture Without Buying New Pieces
The Classic Era was known for the farmhouse floral decor fabrics. The Neo-Classic had more modern styled floral, striped, and leather furniture. If you’re not ready to rip out and replace your furniture, there’s a lot you can still do with the cushions and covers. Custom RV cushion covers can change your dinette, sofa, and other seating. There are artisans around the country that let you choose the fabric you want and put them together. If the foam need replacement, a quick run to a hardware or craft store will solve that. You may have a memory foam mattress that has a firm bottom layer that’s still good enough for repurposing.
Elkhart, Indiana, the RV Capital of the World, is home to over 80% of the RV Industry. The region is home to a large Amish community that dates back well before the first recreational vehicle company hung its shingle. If you have the opportunity to visit a town center, their highly-prized handmade Amish quilts are worthy of any art museum wall.
Displaying one on your sofa not only upgrades your interior design, but the quilts can also keep you warm on cold nights. The stitching patterns and techniques are family traditions that date back many generations. You may even have the opportunity to meet the artisan too. Remember to respect their religious traditions about photography and video. No piece of furniture is complete without a decorative pillow. Whether it’s a solid color, complimentary pattern, or personalized decorative pillow that acts as your “welcome aboard” signpost, pillows can be the cozy cap to finish your interior design creation. Personalized prints come with any welcoming message or phrasing you want (including the subtle innuendos and double meanings similar to the movies of the 1930s).
Gaining “Silver and Gold” During an RV Remodel
Suppose you and your family were on that TV game show where families guess the top answer of people surveyed. The host asks the question, “What’s the biggest concern in RV kitchens?” How would you answer it? The number one “golden” answer is storage and the second “silver” is counter space. Classic and Neo-Classic Era motorhomes and travel trailers did pretty well with the counters, but storage was always a problem. Three-way refrigerators and 2-in-1 range ovens were dependent on propane. There are ways to drop the tank in an age of energy independence, so you’re free from LP. An RV remodel almost always involves the kitchen in some way.
If you want to install a solar panel system , check out our discussions on the topic. We always recommend consulting a professional and performing your research. It’s complicated, and you can get hurt if you make a mistake. The benefits of a solar system can be worth it with some RV lifestyle adjustments . For some simple kitchen solutions, getting a custom flush mount or butcher block sink covers to give you the meal prep space you need. If your RV doesn’t come with it, there are stove covers and flip-up counter additions you can install too. There are many portable kitchen islands for a significant amount of counter space for brick and stick homes that fit well in mid-size travel trailers or larger.
If you cut off your propane, you can change your stove to a flush electric range or conduction version. Many microwaves now have convection capabilities. Use the open oven space to add an apartment-sized dishwasher or cookware storage. When you changed the dinette cushions, you can also refinish the table or add a freestanding one. RV accessory companies may have a table that fits your dinette, so you can still use it for additional sleeping space. To finish it right, table runners add the right amount of color and protection to the table.
Don’t forget to use a tabletop computer mount for the ergonomic benefits for those who use the dinette as an RV office space. We also recommend sitting where you can’t see the TV or the best scenery outside the windows. It’s great to take a break, but a 10-minute breather shouldn’t turn into 10-hours. For RV storage solutions , you’ll find a plethora of gadgets and gizmos to organize your cabinets, closets, drawers, and shelves. Those that use small campers like teardrops and pop-ups find that tent gear works well. Larger RVs can find cookware that stacks together, foam organizers, or repurposing cloth shoe trees.
RV Remodel: Making the Bedroom a Luxury Suite
In the RV world, mattresses don’t stick to the 4 standard sizes you see in residential homes. You’ll find short queens, extra-large twins, and other variations . A good portion of bed companies cater to RV mattress sizes, so you can find the perfect one that fits best. If you choose memory foam, RVs aren’t as airtight as houses. Humidity and heat wear down their elasticity quicker. Choose a thick mattress, so you don’t feel the plywood base, and use a moisture-control barrier layer underneath it to lengthen the life.
To update your cabinetry’s look during an RV remodel, try a new set of hardware. RV handles and hinges are a lot less expensive than replacing doors or cabinets. When you go to the hardware store, take one of the handles and knobs with you to match up bolt hole lengths and have actual comparisons. When window day and nightshade wiring breaks, it’s frustrating trying to open the window. There are RV shade repair kits to restring them. You can also upgrade to the new zebra shades or try some great no-sew DIY shades and RV window covers.
From the Water Closet to the Powder Room
Dry bathrooms in RVs give you a lot of opportunities to update and upgrade. Smaller travel trailers still use plastic composite commodes, but porcelain RV toilets are always better if you can do it. Secured shelving, functional art, and new accent wallpaper can knock years off your coach’s look and enhance storage.
When you redo the bathroom sink, go porcelain or stainless steel. Add an LED light fixture and faux tile backsplash to manage your RV’s weight (natural tile can quickly eat up a significant portion of your cargo carrying capacity). Marianne’s looking forward to the shower redesign because she’s had her eye on that teak bench for years.
Chores Are a Bore, Make It Fun!
Why do people spend many hours of their leisure time in the garage fixing up old cars, making crafts, or working on various other hobbies? Because they enjoy the work, the accomplishment of a challenge, and seeing the results of what they did. Another definition for this: fun. Brian refers to his RV as a 35-foot hot rod. While it’ll get 0-60 mph by tomorrow, any maintenance, repair, or upgrade he completes on it feels like an accomplishment. Most of the time the work isn’t difficult. The hardest part is learning what to do and taking that step into the unknown.
Marianne’s experience is a little different. With her limited mobility due to her disability, having a smaller household space makes it easier to perform daily tasks to participate in the care of the motorhome. The RV hacks and other RV DIY solutions she learned about made full-time living better through the various social media and RV LIFE online forums within the RVing community. The point is, many of these projects are cheap and can be fun if you make it that way. The reward is seeing your unique vision coming together. You may have a whole laundry list of projects, but don’t overburden yourself by starting them all at once. Start small, complete it, and move to the next one when you’re ready. Create a plan (adjust for the unexpected), and stick to it.
While camping stores, online stores, and YouTube are great resources, don’t totally rely on the 21st century. You’ll find great RV remodel ideas online from our sister website Do-It-Yourself-RV, like 10 DIY Projects That Will Improve Your RV . Talk to your campfire friends at the campground too. Many veteran RVers have the skills to walk you through parts of the repair or maintenance process you’re having a hard time figuring out. They may even have the tool you need and let you borrow it instead of running out and altering your vacation budget.
As you travel, check out the antique or craft shows you pass by. In these uncertain times, the local businesses struggled to survive the economic shockwaves of the Global Pandemic. If you need a decorative or functional item, these local artisans and craftspeople may have a high-quality piece that feels more special than the item online. If your RV needs repair work beyond what you can do, many mobile RV repair technicians are highly qualified and come to you. They’ll work within your budget and timing. They’ll help you realize your vision for your RV because, more than likely, there’s an RV waiting at home for them.
Happy Trails!
About the Authors
After the first 50 miles in a rented Class A motorhome, Marianne caught the RV Bug Brian had as a legacy RVer. A few years later, the Newmans joined the full-time RV lifestyle in 2017. Together with their two working-class fur-babies, they explore the RV World together. Like John Madden, Brian hasn’t “worked” in years because he gets to write about his passion. You can read his feature articles on Camper Smarts and other RV LIFE Network Affiliates. Mari enjoys working alongside her husband occasionally but focuses on other ventures in social media.
Share this post:
Related posts:.

RV Safety: Navigating Tornado-Prone States and What to Do During a Tornado Warning

Safe Camping Near Alligators: Essential Tips and Destinations in the US

Becoming A Camp Host: Insights and Stories from Workampers
About the author:.

Brian Newman and his wife joined the full-time RV lifestyle in 2017. Brian has been a freelance writer since 2019 and has a diverse background that includes literature, religion, business, finance & investment, disability, recreational vehicles, and U.S. history.
4 thoughts on “RV Remodel: Turning Older Into Legendary”
On our trip down to Cali a couple of weeks ago we stopped at the Rest Area on 395/21 and saw a group of beautiful oldies. There was a lot of love with those units…
Our overall plan with our 2001 Pace Arrow exterior is to restore it to factory+. Instead of redoing the decals, I want to replace the design with paint. Add some clear coat to really make it shine
Some pics to illustrate the ideas being talked about might be nice.
We have our “entry” level 1990 Hawkins Motor Coach DP. We love it so much that we are restoring/remodeling the inside first. Now we just plan to keep it and enjoy life with it. Thanks for the great article and ideas!
Leave a Comment Cancel reply
Welcome please follow these guidelines:.
- Be kind and respectful.
- Keep comments relevant to the article.
- Avoid insults, threats, profanity, and offensive remarks.
- Refrain from discussing gun rights, politics, or religion.
- Do not post misleading information, personal details, or spam.
We may hide or remove comments at our discretion.
I have read and accepted the Comment Guidelines and Privacy Policy *
Follow Camper Smarts:
- Follow Us On Facebook
- Follow Us On Twitter
- Follow Our Pins

6 Quick & Easy Remodel Projects That Transformed Our RV Into a Home!

I think we need to start this post by saying neither one of us have an eye for design. Decorating is not one of our strong suits. But with a little bit of effort, we were able to transform our Forest River Rockwood fifth wheel into our home for little effort, time, and money.
When we first began shopping for an older, used camper, we were a little intimidated by the amount of work we felt it was going to take to update the inside . While there are a ton of DIY tutorials out there, we’ve had a few too many Pinterest fails to feel confident in our skills. So when we found a camper that already had white cabinets and nice flooring, we were thrilled.
Even though our fifth-wheel already had a lot of great features, you can see from the before photos that it still needed a little TLC. So with a few easy changes, we feel we truly turned our camper into a home. With our success despite our lack of renovation and interior decorating experience , we know that anyone can do these simple updates. Best part was that it only took us 1 week before we were on the road! We were so anxious to become full-timers that we didn’t want to wait the amount of time it would take to do a complete overhaul on an RV.
Here are 6 SMALL projects we did that made a HUGE difference.
Disclosure: Some of the links contained below are affiliate links. This means that if you make a purchase, we will receive a small commission (at no cost to you). Keep in mind that we won’t put anything on our site that we don’t personally use or know to be valuable!
1. New furniture
With old RVs come old furniture. While it depends on the amount of use and previous owner, most of the time you’ll find that the original furniture that comes with the RV is going to be stained, faded, and possibly even have tears. Oh and that hideous floral fabric on the sofa! No throw pillows, blankets, or sofa covers can fix that.
While the recliners weren’t awful, they were really heavy. Picking those big boys up and flipping them over on top of the sofa to strap down every time we traveled was just not attractive. Besides, we had better things to use our weight limit on (like all our favorite RV life gadgets and comforts from home that we discussed in our post with tips for packing an RV ).
With IKEA in almost every major city now days, it’s not hard to find space saving and lightweight furniture. We replaced the recliners in the back of the RV with Poang Chairs from IKEA and 100% love and recommend them. We love them because they are SUPER comfortable but very lightweight and fit perfectly in the back of the fifth-wheel. There are different color options (both cushion color and chair color) and the cushions are machine washable. The foot rests are optional but fit nicely behind the chair when you aren’t using them, so they are out of the way.
We also replaced the jack-knife sofa with a futon. We wanted the ability to still turn the sofa into a bed in case we have guests, but also wanted the comfort of a couch to watch TV from. We found this Kodiak futon lounger used on OfferUp and got it for a fraction of the price, but you can buy it brand new on Amazon. We like this futon because its much smaller than the average futon, but still very functional.
Since the armrests adjust, its great for lounging and watching TV, especially when your TV is not mounted directly across from the sofa and you have to turn your body to view it. We’ve hosted guests in our RV and they felt very comfortable sleeping on it as well.
It also allows for storage underneath . We have an under-the-bed storage tub underneath there, as well as our Shark vacuum. It comes in 25 different prints and colors so you’re sure to find one that matches your decor. We’ve been very happy with the purchase and would highly recommend a futon for your RV. Amazon has a huge selection of futons to choose from.
BEFORE:
Choosing multi functional furniture is a great way to give yourself extra space, as well as create extra storage! If you’re looking for more ideas for making the most of the small space in your RV, we highly recommend this book:
2. Removing floral wall paper border
That hideous floral pattern that was on the sofa that we ditched perfectly matched the wallpaper border that was right at eye level on every…single..wall! So obviously, that had to go too. This was the first thing we began ripping down once we got all the furniture out. We purchased Goo Gone and used this tutorial on YouTube .
Our wallpaper border didn’t pull off quite as easily as it did in the video. We learned that spraying the wallpaper and soaking it before pulling it off helped too. There were still spots that took a little more elbow grease too. We had to use a razor to cut the border around the windows as well. Overall, it wasn’t too difficult of a task and the Goo Gone helped tremendously.
3. Reupholstering some window valences and replacing others with curtains
Can you guess what fabric was on the valences above EVERY window in our fifth-wheel. Yep! The matching hideous floral pattern. Who ever thought that having a matching sofa, wallpaper, AND valences were a good idea? Who knows but we sure hated it.
Pulling the valences down was a piece of cake and just required unscrewing them from the walls and ceilings. We then purchased fabric and simply covered them by using a stable gun . Only took a few hours total! We chose to keep the valences in the main living area of the fifth-wheel instead of replacing them with curtains because we liked the blinds that came with the camper.
We did choose to replace the valences with black out curtains in the bedroom to add darkness for optimum sleeping conditions . It was tricky to find the length we needed so we hemmed them ourselves. But don’t worry if you don’t own a sewing machine…we don’t either. We used iron on adhesive hem tape and it worked great!
We cut the curtains to be the length we wanted while leaving about an inch extra to allow for space to hem.
Then we folded the fabric over the tape and pinned it in place.
Then we ironed over it, and viola! Easy, cheap, and quick solution!
The curtains definitely make the bedroom feel more cozy too.
I also used the iron on adhesive hem tape to recover throw pillows that came with the couch . Throw pillows can be pricey so this was a huge money saver ! You can even sometimes find fabric remnants on sale for a great price.
To read our easy, no-sew DIY pillow covers instructions , you can click here. Or pin it for later by clicking the image below:
4. Painting the kitchen table and chairs
We were really happy that our 5th-wheel had an actual kitchen table and chairs, rather than the bench dinette. To us, it feels more like home and less like a camper. But of course, like most older RVs, it was oak, which just didn’t work for us since everything else was white.
In the past, I’ve hated painting furniture because of the amount of steps involved (sanding and priming before you can even begin painting). So when we heard about Amy Howard’s chalk paint , we were thrilled. No sanding or priming needed!
We didn’t want the entire table white, so we chose to stain the top a darker wood color . We love how it turned out! We used the espresso satin color by Minwax .
Painting your RV interior white is probably the most drastic improvement you can make. It can have a huge impact on the overall look and feel, and of course, can make the space feel much cleaner and bright. We didn’t have to paint the cabinetry in our RV since they were already white. But this guide is an incredible resource:

5. Adding back splash to the kitchen
We were amazed by how much the back splash added to the overall look of the kitchen. Best part is that it only took us about an hour to put it up ! Would you believe us if we told you its not actually tile back splash but peel n’ stick sheets ?
Most people who see them in person have to touch them to believe it. There are lots of different colors and patterns to match any color scheme. We haven’t had any problems with it peeling off the wall yet, so we’ve been super happy with the look and quality .
AFTER:
6. adding wall and shelf decor.
This is a “no brainer”. But we often see people skip this step while decorating their RV, mainly because they aren’t sure how to keep it from falling off or down when traveling . Well, we’re still figuring that out but have had some decent luck with command strips and mounting putty .
And yes, sometimes we get tired of taking down decor on the shelves and putting it back up every time we travel. However, it really helps improve the overall feel of our home on wheels . We love having inspirational phrases or just anything that makes us smile when we look at it. You can decide how much or how little decor you want to add, but we really recommend it because it allows you to put your special touch into making your RV feel like home .
We love the farmhouse style look that many RV owners are using to decorate their tiny homes. If you want some amazing inspiration for how to decorate your RV, check out this 75 page e-book that contains 13 different DIY projects:

Wondering how much all this cost us?
Less than $500!
Yep, that’s right. We transformed our RV into our cozy, tiny home for less than $500 with the tips above!
Check out the entire gallery of photos of our 2005 Forest River Rockwood Fifth Wheel:
We love how much our fifth-wheel feels like home now with just a small amount of effort and without breaking the bank . If you’re like us and are too intimidated to do a complete overhaul on your RV, but want to make small changes that can transform it into your home, we know our tips will help .
Want more remodel tips?
Here’s an awesome RV remodel our friends did to their fifth-wheel!
Thanks for reading and be sure to check out our RV resources page .
Looking for more RV life tips and ideas?
Beddy’s: the best bedding for rvs: .
Product Review: Beddy’s
How much it costs to full-time RV:
How Much Does It Cost to Full-Time RV? (+ a FREE Download!)
Save money RVing:
Tips for Saving Money While Living Full-Time in an RV
Find the BEST and FREE spots to park your RV:
How to Find the Best (and FREE) Spots to Park Your RV
Five must-have products for RV life:
5 Items That Improved RV Life For Us!
Leave us your thoughts and questions in a comment below!
Save this for later by clicking the pin below.

Love this remodel! Our 5th-wheel has the identical layout and we’ve used your remodel as our inspiration. I do have a question about the bedroom and the pedestal bed. Did you consider removing the pedestal and rebuilding a frame for the mattress? We cannot find any information on what lies beneath that pedestal and if it’s worth trying to pull that out so we have some walk-around space. We’re wondering if it’s bare-bones framing under there and would require a ton of work to build a new floor and lower wall area. If you can shed some light on that … Read more »

Thank you for your kind words! Unfortunately we didnt consider doing what you mention so we dont really have any information to share. Best of luck with whatever you do!

Hi! Newbie here! We’re about to embark on the full-time RV lifestyle with a family of four: myself and the hubbs, our 2 children (12yo girl & 10yo boy), a 10lb kitty, and a 30+ lb Aussiedoodle 😳😬. We plan to do this for at least 2-3 years. We’re excited, but intimidated also. Your recap of cosmetic touches that make it feel more homey eases my nerves at least a bit. One question: how is having carpet under the dining table? We’re considering pulling our carpet from under the living and dining area furniture in the slides and adding vinyl … Read more »
Hi Brittany, thank you for writing us and congrats on your decision to embark on your full time RV journey! How exciting 🙂 I think carpet is always a personal choice… some people are really against it and others like the way it can make things feel “homey”. We never had a problem with the carpet and it was easy enough to vacuum to keep clean. My advise would be that if you want the vinyl flooring for the aesthetic and to make it easy to sweep/mop rather than needed a vacuum, then go for it. Many people have done … Read more »

can you remodel bathroom and have tub no shower????
I think it could be somewhat difficult, but dont see why not. Ive seen it done on other renovations before and actually just saw a brand new RV with a tub offering.

I love how this turned out! We will be remodeling our Cougar 5th wheel this summer and I can’t wait to share our updates! Thanks for all of the tips.. definitely saving for later ❣️ xoxox liz
Awesome! Best of luck with the Reno – it makes such a huge difference!

Can you tell me where you got your bedspread?
It was just a bed in a bag set that we picked up somewhere – believe it was TJ Maxx. Sorry not more help!

We’re looking at buying a 2000 RV. Bcuz RV walls are so thin, renovating a RV isn’t like a house. I want to change the dinette to a u-shaped and rip up the carpet to add vinel flooring. How do we find out about riping things out and whats behind it. (We haven’t talked the bathroom yet.)
Hi Kathleen,
Thank you for writing us and we wish you the best in your RV renovation. Unfortunately, we don’t really know how to answer your question as our updates were mostly cosmetic. I recommend that you check out https://rvinspiration.com/ – this site has TONS of information on RV renos.

I like your recommendation to paint the chairs to make the camper seem more like home. My wife and I have considered buying a fifth wheel for our summer vacations with the family. We also may consider buying a used one and then renovating it.

Much thanks to you for sharing background and thoughts!

I like the helpful info you supply for your articles. Best of luck with the following!

This is awesome, looks definitely homie and inviting!
Thanks we appreciate that so much!

How do you guys keep the furniture from falling over when you’re driving? I love the look but I can just imagine all the chairs falling over, etc.
We’d flip the chairs over and place them on top of the sofa. Then we’d strap them down to the RV so they wouldn’t go anywhere during travel. The original furniture worked the exact same way so there was already straps bolted into the floor that we were able to continue using with the new furniture. To protect the chairs and the sofa from getting damaged during transit, we cut some pool noodles to place on corners and areas where the chairs and couch made contact with each other – worked out great!

Wow. What a nice output and if your looking for some rv windows that is safe and durable we have some. Thanks for your posts had a interesting time reading this!

Thank you for sharing! We are trying to update our rv by doing little things also. I appreciate you sharing your faith. Every life has its detours.

Thanks Carol for your kind comment! Would love to hear about and see your updates on your RV – good luck!

I just finished one with a built in three person sauna and an 80” screen mini movie theater I’d love to share with people to see 😃

Where did you get the Huge United States ?
Hi Danna, we actually got the map at Walmart for around $10 bucks! It’s a wall sticker and I think we found it by the paint section.

I used extra strength velcro strips for pictures and clock. Never have had a problem with falling off.

Love this article – what a big bang for your buck! Such good ideas and beautiful results! Especially the painted furniture; I have contemplated painting our chairs and table but am holding off for now…planning to just reupholster the seats. I am amazed at how good your beige wallpaper looks in combination with all your other updates! The white cabinets make such a difference!

Did you happen to redo the shower/tub? The one we have is so SMALL every time my husband showers it sounds like he’s tearing the shower walls down!! He’s a broad shouldered, thick body guy and really has a hard time!! We would have room I think to enlarge if I could find a small tub and build a smaller sink cabinet! Any information you may have I’d be grateful for!!
Hello, unfortunately, no we didn’t do anything to the shower. Our shower is actually a pretty good size. I have a stocky build and it has never been a problem for us so we don’t know anything about redoing the shower/sink. Sorry we can’t be more helpful for you 🙁 Good luck!

Where can I find a 5th Wheel that’s in decent condition that’s not brand new and won’t cost a fortune? I’m wanting to do this as a tiny house. I want to find a piece of land and permanently set one up to live in more cheaply than owning my home.
RVTrader is a great resource. We found ours on Craigslist but that can be tough sometimes with how many scams there are now days. Check Facebook Marketplace too, I’ve seen a few posts on there. Good luck to you!!! Let us know when you find one!

I found mine on FB Marketplace, it took me 2 months but I finally got one. I’m just getting started on the remodel and I’ve taken your advice on both the chairs and the futon. The RV was filthy when I got it, and it scared me but I think with a professional carpet clean and upholstery clean on the dinette chairs and a good scrubbing I should be ok. I won’t be starting the painting until I’m actually already living in it, so that should be interesting. Thank you for your ideals though it’s given me inspiration and hope.

I went to a local used-car/used-rv dealer a few years ago and described what I was looking for. I was friendly and soon had the interest of both the owner and his daughter/office manager. I was straight up about what I was looking for, though it changed over the years–I wanted something inexpensive! This fall he had a few really nice ones–but he called me when he lowered the price on one he knew I liked–I got my 2005 PERFECTLY kept Jayco Jayflight 28.5 RL for 3000 bucks under the lowest NADA price. Networking is a great resource–my friends were … Read more »

After looking at the picture’s and reading your info I am so amazed at what you have done. Your new home is absolutely beautiful. I love all the colors and how you fixed it up. You two have done an awesome job. Now I’m going back up to snoop around some more. Thanks for sharing this. Be safe.
Thank you so much, that is so nice of you to say! We’ve been really happy with how it turned out, even if we wanted to cry at times while we were fixing it up! 🙂

Looks great! Just a note on replacing furniture with “real” furniture. If the placement is something in a slideout, you can cause future failures in the slideout if the weight of the new piece is significantly different from the old. They are made very specifically to align and operate based on original specs. Also, if a remodel is a motor home v.s. a tow behind camper, the ability to strap down all furniture when you are on the move is essential in case of an accident. Everything is a potential projectile that can cause serious injury to passengers or driver. … Read more »
Thanks Jules! You’re totally right, you need to think about being able to secure whatever furniture you choose to put in your rig! Luckily for us, the fifth wheel has a place where you strap down all of the furniture that worked perfectly with the new furniture!

You didn’t mention painting the cabinets, so I’m assuming you didn’t.
Ours came already white so no, we didn’t have to paint them. Which was a definite bonus!!

Where did you find the USA map that is over the bed?
Walmart! I think it’s still there too!

Did less than $500 include the furniture?
Yes $500 total. Like we said in the post, we got the futon used from an app called OfferUp. So that helped tremendously. A lot of the wall decor we already had too.

It’s so homey. Great job.
Thank you so much 🙂

So the floor was already like that? And the paint? Stellar! Great tips!
Yes! We got super lucky! Thanks dear!
- CALL 480-962-6789
- COLLISION REPAIR
- RV PAINTING
- RV GENERATOR REPAIR
- AQUA-HOT | PLUMBING
- TESTIMONIALS
RV INTERIOR RENOVATIONS
Why buy a new Coach when we can completely upgrade your existing Coach? From graphics and paint, collision and body repair, windshield replacement, to flooring and cabinets, we can do it all.

Restore the value of your RV with an interior remodel. Any project big or small.
From Old To New Again
RV interiors match the style of the times when they are new, but many options and upgrades happen every year. Before long, your interior can feel outdated. Buying a new RV is an expensive option to simply updating your RV interior with custom attributes to fit your RV’ing lifestyle.
Flooring, cabinetry, appliances, entertainment centers, lighting, and more. Come meet with one of our top designers and brainstorm ideas for your project today.

What Our Fans Say!
Rv renovators can help you to update and modernize your rv’s interior.
If you’ve owned your RV for a number of years or purchased an older model with a dated interior, you may feel it’s time for a change. After all, who wants to go on a long trip in an RV with an old and stale interior?
RV Renovators can transform just about any RV’s interior giving it a sleek and modern look that you and your family will love. An RV is a luxury item that is designed to let you travel in style. It’s a vehicle you should feel very at home in, and RV Renovators will ensure that you do.

RV Renovators Can Help You to Restore and Upgrade the Damaged Interior of an RV
Whether your RV has suffered water damage, fire damage, or any other type of damage to its interior, RV Renovators can help you to quickly have it looking even better than it did when it was new. Many people make the mistake of feeling that their RV is no longer going to be able to provide them the comfort it once did following extensive damage. But, when you have an experienced and skilled restoration expert ready to help you, this simply isn’t true. RV Renovators uses a team of experts that will ensure that once we are finished working on your RV, you will absolutely love it.
What Kinds of Services Does RV Renovators Offer?
While RV Renovators offers all manner of RV restoration, the work on the interior of an RV is particularly impressive. We can essentially take an old RV and restore the interior to factory showroom quality .
With more than 40 years of Rv interior experience, our interior staff will help design your Rv Interior with the style you desire. Rv interior services include;
- Cabinet repair or replacement
- Custom cabinet fabrication
- Cabinet refinishing
- Flooring replacement
- TV and audio updates
We can redo the carpet, wood flooring, cabinets, countertops, the shower, the toilet, sink, kitchen, and furniture. If it’s a part of the interior of an RV, we can remove it, repair it, or replace it.
Not only can we restore your RV to its former glory, but we’ll also work with you to make any customizations or modifications that you want to have done . Your RV is your home away from home and you should feel comfortable in it. If you hire RV Renovators to restore its interior, then you will definitely be comfortable in it.
Complete RV Cabinet Shop
RV Renovators is the only Rv Service center in the valley that has its own custom cabinet shop. We can repair and refinish the cabinets you have or create a custom cabinet design that is the desire of your heart.

RV Flooring Replacement
Let RV Renovators flooring department show and demonstrate the up-to-date flooring materials. If your desires are, carpet, vinyl, wood plank, plastic laminates or tile, the technicians can get the job done. If your RV is in need of an interior facelift, then RV Renovators is the perfect company for you.
Contact Us For RV Interior Remodeling
An RV is a wonderful luxury to own and can turn a road trip into a relaxing and rejuvenating experience. But if you really want to get the most out of your RV you need it to be in great condition. It’s very hard to relax and unwind in an RV with a worn out or damaged interior.
If the interior of your RV is in rough condition you may be thinking of selling it and buying a new RV. Before you do, contacting RV Renovators to see what we can do for you first is the smart move to make.
Why Should You Hire RV Renovators ?
Are there other RV renovation and restoration companies out there? Of course, there are. But, will any of them provide you the level of service, and expert workmanship that RV Renovators will? That’s highly doubtful. RV Renovators has been in business for a long time and we are a highly successful company. Companies do not stay in business as long as we have without being great at what we do. We make it a point to go above and beyond to help all of our clients. We don’t want you satisfied with the work we do for you; we want you to be thrilled with it.
RV Renovators is located in Mesa, Arizona and are happy to offer our expert services to anyone in the region. We are more than happy to take on any project, be it a minor repair, or a major restoration. No matter what type of work you need to have done, at RV Renovators we are confident that we’ll be able to help you. Now is the perfect time to have the interior of your RV restored. If you are ready to be able to enjoy your RV again the way you did when it was new, then call RV Renovators today.
Enter to Win Grand Design RV’s Summer of Free Camping Giveaway
- Author Posts
- Joined: Nov 2019
Grand Design RV is celebrating the launch of its new Lineage Class C motorhome with a special event in New York City. They are offering one winner an Ultimate Glamping Getaway Weekend and a summer of outdoor adventures. The winner and a guest will start their summer with a trip to New York City, including airfare and accommodations from June 21-23, 2024.
They will get VIP access to a glamping pop-up event in Bryant Park on June 22, celebrating the launch of the Lineage motorhome. The prize also includes reimbursement for campsite fees at any U.S. National or State Park from June 23 to September 2, 2024, a $1,500 spending stipend, and a gift basket with glamping amenities.
To enter, participants need to share their ultimate glamping summer plans by June 6, 2024. The winner will be randomly selected on June 7 and must be available for travel to New York City from June 21-23, 2024.
Go here to enter: https://www.granddesignrv.com/motorized
- You must be logged in to reply to this topic.
Don't have an account? Register now
3 Things You Need to Know about Grand Design’s 5-Year Frame Warranty
By Bish's RV
Written by Greg Long

Until recently, the standard frame warranty in the RV industry was three years. However, Grand Design rocked the RV world last week by introducing an unprecedented five-year frame warranty for all its products.
This huge warranty upgrade reflects Grand Design’s commitment to giving their customers peace of mind and confidence in Grand Design camper construction quality.
This article will cover the 3 things you need to know about Grand Design’s 5-year Warranty:
- Who is covered?
- What is the warranty?
- Grand Design stands by its construction quality
Who Does the 5-Year Frame Warranty Cover?
The 5-Year Frame Warranty covers all Grand Design products. Both Travel Trailers and 5th Wheels!
5-year Warranty Covers 2020 and Newer Campers
What’s most remarkable about this incredible warranty is that it isn’t just for future purchases—it includes all Grand Design RVs purchased as far back as 2020.
Grand Design is honoring this five-year warranty retroactively. This means anyone who purchased a new Grand Design in 2020—or any year thereafter—now benefits from the five-year frame warranty. The warranty is good for 5 years from the original purchase date.

This move showcases Grand Design’s dedication to its customers, ensuring they receive the full value and protection they deserve for their investment in a Grand Design RV.
With this groundbreaking initiative, Grand Design is raising the bar for warranties in the RV industry and reaffirming its position as a leader in quality and customer satisfaction.
What’s Included in Grand Design’s 5-Year Frame Warranty?
- ✅ Grand Design’s 5-year frame warranty covers defects in the Towable Frame Assembly, including main frame rails, outriggers, cross-members, and upper deck frame.
- ✅ The warranty extends to labor provided directly by Grand Design for covered defects.
- ✅ It applies to Model Year 2020 and newer vehicles and is retroactive from the date of retail purchase.
- ✅ The warranty only covers defects in materials or workmanship to the welded or huck-bolted frame assembly.
- ✅ Grand Design or its authorized agents will undertake repairs, provided the warranty terms are met.
What’s Not Included in the 5-Year Frame Warranty?
- ❌ Components attached in final stage production, such as axles, fifth-wheel pin box, and rear hitch assemblies
- ❌ Damage caused by neglect, misuse, or neglectful use of the RV
- ❌ Any damage or defects caused during transit or by extreme weather events
- ❌ Alterations or modifications not performed by Grand Design
- ❌ Damage caused by overloading or improper weight distribution
- ❌ Damage caused by aftermarket components or extreme road conditions
- ❌ Exterior paint or finish on the frame assembly, including corrosion or scratches
Grand Design’s 1-3-5 Warranty is the Best Complete Warranty in the RV Industry!
With the addition of Grand Design’s 5-year Frame warranty, they now offer the best complete warranty in the RV industry.

Grand Design 1-Year Limited Warranty
The limited warranty covers the entire RV, helping to protect against manufacturing defects and material failures under normal usage conditions.
Components covered under 1-year Limited Warranty:
- Appliances: Coverage includes kitchen appliances like the refrigerator, stove, and microwave, as well as other built-in appliances such as the air conditioning and heating units.
- Electrical Systems: This includes wiring, fuses, and electrical panels.
- Plumbing: Covers leaks and defects in the plumbing system, including pipes, sinks, showers, and toilets.
- Mechanical Systems: Including slide-out mechanisms, leveling jacks, and other mechanical components

Grand Design 3-Year Structural Warranty
The structural warranty protects the owner from any defects in the structural material.
Components covered under 3-year Structural Warranty:
- Sidewalls: Includes both the exterior and interior walls
- Roof: Covers the materials and craftsmanship of the roof assembly
- Floors: Includes the decking and sub-flooring that provide the foundation of the interior.
- Slide-outs: The mechanisms and structures that support slide-out sections of the RV

Grand Design 5-Year Frame Warranty
Components covered under 5-year frame warranty:.
- Main Frame Rails: The primary longitudinal supports of the RV’s chassis
- Outriggers: Lateral extensions from the main frame that help stabilize and evenly distribute weight across the chassis.
- Cross-members: Structural elements connecting the main frame rails, enhancing weight distribution and frame rigidity.
- Upper Deck Frame: Supports the upper level in multi-story RVs, maintaining integrity and handling upper-level load.

FYI: These 1-3-5 warranties protect you from damage or mistakes that happened while the product was being made.
These warranties do not cover damages from misuse, commercial use, or lack of maintenance.
Why Did Grand Design Change Its Frame Warranty?
While RVers are applauding Grand Design’s generous new 5-year frame warranty, many are asking what prompted Grand Design’s decision to make this big change.
The answer is a bit concerning. Grand Design fifth wheels, particularly Solitude and Momentum models, have been accused of having frame failure issues – a serious structural defect called frame flex.
For more information on Frame Flexing, read our article, “RV Frame Flex: What it is and how you can prevent it!”

Grand Design Stands By the Quality of Their Campers
Rumors and articles circulating online about Grand Design campers prompted a comprehensive review of Grand Design’s manufacturing processes and product quality.
Collaborating with its frame supplier, a third-party structural engineering firm, and industry experts, Grand Design has conducted rigorous testing to ensure that its products not only meet but exceed industry standards.
The results are in, and Grand Design is so confident in its frames’ stability that it has extended its frames’ warranties to 5 years. This bold move showcases Grand Design’s commitment to quality and customer satisfaction.
The 5-year frame warranty clearly indicates that Grand Design is devoted to superior craftsmanship and earning the trust of its customers.
Next Steps to Owning a Grand Design RV
If you’re looking for an RV with a long track record of quality construction and customer satisfaction, a Grand Design RV could be exactly what you’re searching for.
We have proudly sold Grand Design campers at Bish’s RV for over a decade. We can confirm their durable craftsmanship. Our team of RV outfitters is always on hand to share insights, answer questions, and help guide you in your decision-making process.
Finding the Perfect Grand Design RV for Your Camping Adventures
Take Advantage of Special Pricing
In appreciation of our customers, Bish’s RV is excited to announce a reduction in prices on all Grand Design RVs. There’s never been a better time to invest in a Grand Design RV.
Check Out Grand Design Pricing and Availability:

Speak With our Grand Design RV Experts
Our team at Bish’s RV is happy to assist you in finding the perfect Grand Design RV that suits your lifestyle and needs. Call or visit us today to discuss your options and learn more about the unique benefits of owning a Grand Design RV.

The More You Know, the Less You Pay
Stay informed and engaged with the RV community by joining forums, attending RV shows, or following industry news sources .
Subscribe to our blog to get RV news and education straight to your inbox:

Improve your Grand Design Knowledge
Which RV is Better: Grand Design Transcend Xplor or Jayco Jay Flight? Grand Design Imagine vs. Jayco Jay Feather: Which is the Best Travel Trailer?
Jayco vs. Grand Design: Which RV Brand is the Best?

Bish’s RV Content Manager
Amateur adventurer; professional dreamer. aka: The Bish-Blog-Guy

Today’s News
- Overland Expo West Opens in Ariz.; Dometic, GMC Partner May 17, 2024
- Meyer Dist. to Acquire Thibert’s Auto, Trailer, RV Divisions May 17, 2024
- Moix RV’s Brinkley-Exclusive Grand Opening Starts Today May 17, 2024
- NTP-STAG Opens New Distribution Center in Dallas, Texas May 17, 2024
- Outdoor Recreation Roundtable Hosts Inaugural Exec Forum May 17, 2024
- Trim‐Lok Midwest Touts New Manufacturing Facility in Video May 17, 2024
- Brown & Brown Supports RV Learning Center for Fran Roberts May 17, 2024
- 2024 Caravan Salon Returns to Düsseldorf on Aug. 30-Sept. 8 May 17, 2024
- RVibrake Enters RV Tech Institute’s Level 3 Training Program May 17, 2024
- RecPro Announces Partnership with ICON Trailer Locks May 17, 2024

- News Archives
- Digital Editions
- Top 50 Dealers Awards

- Today’s News
- Top 50 Dealer Awards
Living Vehicle Introduces All-Electric ‘CyberTrailer’

SANTA BARBARA, Calif. – As the Cybertruck-inspired frenzy continues, Living Vehicle , a California-based luxury RV specialist, unveiled the CyberTrailer. This trailblazing creation stands apart from traditional RVs, embodying the spirit of complete independence from constraining utility connections.

Innovation Unleashed: The CyberTrailer Experience
Echoing the distinctive, angular design of the Tesla truck, the CyberTrailer is crafted for adventurers who desire freedom from the constraints of conventional camping setups. Designed by Living Vehicle, this luxury camper is a testament to sustainability and self-sufficiency in their classic luxury unplugged lifestyle.
The Charging Station that Travels with You
The CyberTrailer is not just a luxury camper; it is a mobile charging station. This innovative feature allows the trailer to provide independent power for all its needs while also charging the tow vehicle when off-grid. Utilizing redundant power sources, including advanced solar panels and backup power generation systems, the CyberTrailer ensures a continuous and reliable power supply. This capability transforms off-grid adventures by offering complete energy independence and enhanced functionality, making it possible to venture further extending power and travel without charging stations.
Ultimate Off-Grid Independence
Setting the CyberTrailer apart from other RVs is its complete autonomy from utility connections. Operating entirely on solar power, this mobile haven is engineered to thrive away from overcrowded RV parks, campgrounds, and remote areas devoid of charging stations. Its state-of-the-art solar panels not only power the trailer but also support all onboard electrical systems, making it a true off-grid vessel. Capable of lasting weeks, even months off-grid, the Living Vehicle CyberTrailer is in a class of its own differentiating itself from anything else on the market.
Water Independence
The CyberTrailer is equipped with a proprietary water generation system that extracts moisture from the air, like technologies found in Living Vehicle’s renowned travel trailer models. This system, combined with advanced water and waste recycling processes, enables occupants to sustain themselves without any water hookups. These features collectively forge a path towards a future where travel is not just about moving between places but truly experiencing them without leaving a trace.
Versatile Towing and Enhanced Functionality
While ideally paired with electric vehicles like the Tesla Cybertruck, Ford F-150 Lightning, and Rivian R1T, the CyberTrailer is also compatible with conventional half-ton gas and diesel vehicles. High-power alternators installed in motor-based tow vehicles may provide a backup power source to the electrified trailer. This versatility ensures that the spirit of adventure is accessible to all, regardless of their vehicle’s fuel type.
Exciting Design Developments on the Horizon
As Living Vehicle continues toward production, more detailed specifications will be released, along with additional imagery of both the exterior and interior of the CyberTrailer. These updates will provide deeper insights into its capabilities and features.
Reserve Your Independence
Starting at $175,000 with deliveries commencing in 2025, the CyberTrailer offers a luxurious, independent mobile living solution. With 80% of the reservations already sold out, interested buyers are encouraged to secure their spot quickly. Secure your spot in this off-grid all-electric revolution with a fully refundable $100 deposit.
For further details or to reserve your CyberTrailer, please contact [email protected] or visit LivingVehicle.com/CyberTrailer.

© 2023 G&G Media Group LLC
Navigate Site
- Privacy & Policy

Assassin's Creed Shadows
Experience an epic historical action-adventure story set in feudal Japan!
Available November 15, 2024
BECOME A SHINOBI ASSASSIN AND A LEGENDARY SAMURAI
Experience an epic historical action-adventure story set in Feudal Japan! Become a lethal shinobi assassin and a powerful, legendary samurai as you explore a beautiful open world.
Trailers and gameplay
Game features.

Become a Shinobi and a Samurai
Become Naoe, a shinobi Assassin, and Yasuke, a legendary samurai, as you experience their riveting stories and master their complementary playstyles.

Enter the world of feudal Japan
Explore the captivating open world of feudal Japan, from spectacular castle towns and bustling ports to peaceful shrines and war-ravaged landscapes. Adventure through unpredictable weather, changing seasons, and reactive environments.

Information is your weapon
Build your own network of spies to be your eyes and ears across locations to hunt down your next target. Along the way, recruit new allies with unique abilities to help accomplish your missions.

Game details
Japan, 1579 — The country is on a brutal path toward unification driven by the iron will of daimyo Oda Nobunaga. Unrest grows as new coalitions appear and corruptive foreigners infiltrate the land. After the brutal invasion of the peaceful province of Iga, a young shinobi embarks on a journey to fulfill an impossible promise while a legendary samurai finds new purpose confronting the demons of his past.
In Assassin’s Creed Shadows, you will live the intertwined stories of Naoe, an adept shinobi Assassin from Iga Province, and Yasuke, the powerful African samurai of historical legend. Against the backdrop of the turbulent late Sengoku period, this remarkable duo will discover their common destiny as they usher in a new era for Japan.
From chaos to purpose, from darkness to light. A new Creed rises over Japan.
Additional information

Rating Pending
- May contain content inappropriate for children. Visit ESRB.org for rating information.
Ubisoft Québec
Open World Action/Adventure
Xbox Series X|S
Release date
November 15, 2024
Get the game

Standard Edition
Pre-order Assassin's Creed Shadows and receive the “Thrown to the Dogs” quest!
The Assassin's Creed Shadows Standard Edition includes:
Gold Edition
The Assassin’s Creed Shadows Gold Edition includes:
- Up to three days of early access to the game.
- The season pass including a bonus quest at launch and two upcoming expansions.
Ultimate Edition
The Assassin’s Creed Shadows Ultimate Edition includes:
- The Ultimate Pack containing the Sekiryu Character Pack, Hideout Pack, and five skill points, as well as the Red Dragon filter in Photo mode.

POWER YOUR DREAMS
Elevate your game.

Xbox Design Lab

Xbox Elite Wireless Controller Series 2 – Core (White)

Xbox Rechargeable Battery + USB-C
© 2024 Ubisoft Entertainment. All Rights Reserved. Assassin’s Creed, Ubisoft, and the Ubisoft logo are registered or unregistered trademarks of Ubisoft Entertainment in the US and/or other countries.
'Suicide Squad Isekai': Trailers, Characters, and Everything We Know So Far
Task Force X gets an anime makeover!
Quick Links
Does 'suicide squad isekai’ have a release date, watch the 'suicide squad isekai' trailers, does 'suicide squad isekai' have a voice cast, what is ‘suicide squad isekai’ about, what is isekai, who is making 'suicide squad isekai', where can you watch other adaptations of the 'suicide squad'.
Warner Bros. Japan and WIT Studio have announced their thrilling collaboration on an original anime series titled Suicide Squad Isekai . This exciting project is based on the beloved DC characters , taking the concept of the Suicide Squad into the realm of isekai. During their panel at Anime Expo, the companies unveiled a teaser that provides a tantalizing glimpse into what fans can anticipate from this unique isekai anime adaptation. Directed by Eri Osada , Suicide Squad Isekai promises to be an outrageous and exhilarating anime series that will captivate a global audience.
With plenty of previous adaptations, the Suicide Squad concept has already made its mark in various forms of media. Now, the upcoming Suicide Squad Isekai anime series offers an exciting new take on the beloved characters and their thrilling adventures. Here’s everything we know so far about Suicide Squad Isekai .
Editor's Note: This article was updated on May 13, 2024.
Suicide Squad Isekai
Harley Quinn, The Joker, and the Suicide Squad cause havoc in ISEKAI*, an all-new original anime series from Warner Bros. Japan and WIT Studio. *ISEKAI(異世界): Term for "another world" in Japanese.
There’s no news of its exact release date yet, but we do know that Suicide Squad Isekai will premiere sometime in 2024 . Be sure to keep an eye on this space for further updates.
DC released the announcement teaser for Suicide Squad Isekai on July 4, 2023. The less-than-1-minute clip gives off a very strong and colorful impression of what audiences can expect from the isekai anime adaptation of the Suicide Squad. With Harley Quinn and the Joker taking center stage, the clip shows the duo rampantly driving through the streets and getting into trouble as usual. Whether it's massive tanks or majestic dragons, there’s no such thing as too much in Suicide Squad Isekai .
On December 1, 2023, we finally got the official trailer for Suicide Squad Isekai . Featuring a blend of mad-cap urban action and fantasy brawling, the video teases the appearance of new and familiar Task Force X members, including King Shark, Peacemaker, and Clayface. Watch the trailer right here:
On Friday, May 10, 2024, we got yet another look at Suicide Squad Isekai .
We finally have the official Japanese voice cast of Suicide Squad Isekai . Here they are:
The Suicide Squad is one of the many long-running concepts that originated in DC Comics. Generally, it refers to a team of supervillains or antiheroes who are recruited by a government agency, typically Amanda Waller and the organization called A.R.G.U.S., to carry out dangerous and high-risk missions. These missions are often classified and involve combating powerful threats that conventional heroes may not be able to handle. The members of the Suicide Squad are usually individuals with extraordinary abilities or skills but have found themselves on the wrong side of the law. In exchange for reduced sentences or other incentives, they are given a chance to redeem themselves by undertaking these perilous missions. The team is typically comprised of iconic characters such as Harley Quinn, Deadshot, Captain Boomerang, and others, each with their unique personalities, powers, and motivations. They are implanted with micro-bombs, ensuring their compliance and eliminating any attempt to escape or betray the mission.
While we don't have specific plot details for Suicide Squad Isekai , by the very nature of the genre we can assume that the story will see Harley and the Joker transported to a magical realm. And in all probability, Amanda Waller will send the Suicide Squad to retrieve the Clown Prince of Crime and her star hitter from wherever they are, no matter the body count.
At its core, "isekai" directly translates to “otherworld” or “another world” , in which our beloved characters find themselves thrust into extraordinary and unfamiliar realms. They must quickly learn to navigate their way through mysterious dimensions, virtual landscapes, or enchanting fantasy settings, all while adapting to their newfound surroundings to survive. Popular isekai animes include The Rising of the Shield Hero , where the main character is summoned to another world to defend it from interdimensional monsters using only a shield. Another hit isekai anime is Sword Art Online , where a virtual reality MMORPG video game traps the players, forcing them to adapt to the game world and find a way home.
Isekai anime, the genre that transports protagonists from our mundane reality into captivating parallel worlds, is an exhilarating and immersive experience that captures the imagination of viewers. With its enchanting blend of fantasy, action, and often a sprinkle of comedy, brace yourself for a wild ride filled with unexpected twists and turns, as these characters may even undergo mind-boggling transformations, morphing into anything from dastardly villains to inanimate objects. With a multitude of thrilling tropes at play, "isekai" anime guarantees a thrilling and unpredictable adventure that will leave you on the edge of your seat!
Director Eri Osada is helming the project, together with Tappei Nagatsuki and Eiji Umehara as screenplay writers, Akira Amano working on the character design draft, Naoto Hosoda handling character design, and Kenichiro Suehiro composing the music. As Osada comments about the upcoming project :
“I am very happy to be working as a director on this all new anime series based an DC's Suicide Squad characters. I can't tell you which character yet, but the villain I wanted to have appears in this Suicide Squad ISEKAI, and I hope you will enjoy it too.”
Suicide Squad Isekai is animated by WIT Studio, whose previous works include Attack on Titan , Ranking of Kings , and Spy x Family . The anime series is produced by Warner Bros. Japan.
DC’s trouble-making Suicide Squad has had its fair share of adaptations over the years. The most recent ones, all of them available on Max, include the following:
Suicide Squad (2016): directed by David Ayer , the story revolves around a secret government agency led by Amanda Waller, also portrayed by Davis, that recruits a team of supervillains for a dangerous mission. The squad, composed of iconic characters such as Harley Quinn (Robbie), Deadshot ( Will Smith ), Captain Boomerang ( Jai Courtney ), and Enchantress ( Cara Delevingne ), is assembled to combat a supernatural threat endangering the city of Midway City. As they reluctantly band together, these criminals-turned-antiheroes must overcome their personal demons, forge uneasy alliances, and save the world from imminent destruction.
Watch on Max
The Suicide Squad (2021): directed by James Gunn , this standalone sequel/reboot to the 2016 film introduces a new team of supervillains assembled for a dangerous mission. The film follows Amanda Waller, played by Viola Davis , who recruits imprisoned criminals to join Task Force X, also known as the Suicide Squad. This time, the team is sent to the fictional island of Corto Maltese to destroy a secretive Nazi-era laboratory known as Jotunheim. Led by Colonel Rick Flag, played by Joel Kinnaman , the squad includes Harley Quinn ( Margot Robbie ), Bloodsport ( Idris Elba ), Peacemaker ( John Cena ), Ratcatcher 2 ( Daniela Melchior ), and many others. As they navigate treacherous jungles and encounter deadly adversaries, they uncover a sinister plot and must work together to complete their mission and survive.
Suicide Squad: Hell to Pay (2018) : directed by Sam Liu , this animated film revolves around the titular Task Force X, also known as the Suicide Squad, a group of incarcerated supervillains coerced into carrying out dangerous missions for the government. Led by Amanda Waller, voiced by Vanessa Williams , the squad embarks on a high-stakes mission to retrieve a powerful mystical object known as the "Get Out of Hell Free" card. As they navigate through a treacherous underworld, the squad members, including Deadshot ( Christian Slater ), Harley Quinn ( Tara Strong ), Bronze Tiger ( Billy Brown ), and Killer Frost ( Kristin Bauer van Straten ), must contend with ruthless adversaries, fellow mercenaries, and their own inner demons.
IMAGES
VIDEO
COMMENTS
Travel Trailer Remodel Cost and Money Saving Tips. Fortunately, remodeling travel trailers and motorhomes doesn't have to be an enormous expense. In fact, you can make a few small changes for as little as $20-$50 and get a fresher look. Want a full travel trailer remodel?
1 - Find an old camper. 2 - Plan the RV renovation. 3 - Shop for the RV renovation. 4 - Repair any damages. 5 - Demo the inside of the RV. 6 - Prep the different surfaces. 7 - Add inner shelves or separations for organization. 8 - Prime and Paint. 9 - Renovate countertop and table.
RV Renovators Give New Life to Motorhomes, Vans, and Trailers. Kraig Becker. May 10, 2022. RV renovators do amazing work, whether it's giving a vintage travel trailer a modern makeover or salvaging a motorhome that needs a little TLC. These talented and innovative artists can transform an RV interior into an elegant and comfortable living ...
Whether you want to tackle a renovation, decorate your RV to feel more homey, or organize all of your belongings, here are 99 ideas to transform your camper. Camper Remodel Ideas: Renovate. Let's start with minor renovations that make a big difference! These camper remodel ideas may require a few tools and some DIY-confidence! 1.
Photo by Camping World. RV renovations come in all shapes and sizes, large and small. For example, using a wallboard kit to revive your RV's interior walls can cost little more than $200, but larger DIY RV renovation projects can easily cost you thousands.. RVers that have completed renovation projects report spending anywhere from $2,000 to $7,000+.
RV Remodel Ideas No.1 - Black and White are a Perfect Duo. Source. Black and white: the undisputed champions of color combinations. No matter what era you live in, black and white is a timeless classic that never fails to look good. As seen in the picture, the kitchen and the surrounding area look so much more chic.
Travel Trailer Remodel No.1 - Rustic Kitchen Remodel. In the kitchen, the brown cabinets have been painted white, giving a fresh new look to the entire space. The walls and beige countertops have also been repainted to finish the classic yet elegant black and white theme. The old-fashioned marble floor has been replaced with black hardwood ...
Change out the sink, remove the countertop, and replace the mirror for a beautiful space. 12. Install New Kitchen Appliances. Photo Credit: Vieves RV Remodels. An RV remodel idea especially worth considering for travelers who spend months at a time traveling is upgrading the kitchen appliances.
Whether you want to update your RV kitchen, upgrade the bathroom, or replace the floors, these 21 RV remodel ideas can give your recreational vehicle the ultimate makeover! 1. Repaint Your RV Interior. A post shared by @instagram. Painting the inside of your RV a new color is an affordable RV makeover idea with endless options.
Our painted RV bathroom with a peel & stick tile backsplash. 9. Use peel & stick tiles in your RV remodel. Traditional tiles are usually too heavy for a camper, and can easily break as the camper moves. One great option is to use peel & stick vinyl tiles to cover old backsplash or create interest on your RV walls.
Add a Peel-and-Stick Backsplash. Peel-and-Stick backsplashes are one of the best budget-friendly RV remodel ideas for transforming your space. Whether you're looking for a new way to update your kitchen, bathroom, or other area, a peel-and-stick backsplash can help add a modern touch even with the smallest of budgets.
1. Work Within A Budget. The best way to go about your DIY travel trailer remodel is to set a renovation budget and work within it. Think of your RV as a blank canvas. The higher your budget, the blanket your canvas because you'll have more to do. Once you've set your budget, you'll know what to give priority to.
If you are looking for ideas and inspiration for your RV remodel or renovation we've got some simple, budget-friendly and relatively easy-to-do-yourself projects that have turned a 1999 Class C motorhome into our home. Whether you own a travel trailer, van, fifth wheel or skoolie we have loads of simple ways to make the most of your living space.
7 easy and affordable RV remodel tips: Paint, paint, paint. Remove the wallpaper border. Replace the furniture. Add a backsplash in the kitchen. Replace the valances with curtains. Update the countertops. Decorate. Rent out your remodel.
I gave our RV a stunning makeover on a budget. See the transformation from before to after in this video! Subscribe to my channel for more DIYs: http://you...
Step 4: Prime and Paint the Walls & Cabinets. The most important and most time-consuming step of your RV renovation is the painting! Start in the kitchen area. Remove all of the doors from the kitchen cabinets in your RV. Then prime all of the walls, the ceiling, the cabinets, and the cabinet doors.
These ideas are the RV remodel projects that made the biggest impact. 1. Remove Window Valances & Blinds. Removing window valances and blinds is the quickest and easiest way to make a big impact in a RV. I'm not quite sure why the RV industry is stuck in the 1980's with their window valance patterns.
Their RV remodel plans include changing the living room furniture, new countertops, and upgrading to a 50-amp electric service to ultimately convert propane features to electric. One of the latest projects they completed was turning the old front TV cabinet into a memorial cabinet to have a space for their four-legged pack members that have ...
4. Painting the kitchen table and chairs. We were really happy that our 5th-wheel had an actual kitchen table and chairs, rather than the bench dinette. To us, it feels more like home and less like a camper. But of course, like most older RVs, it was oak, which just didn't work for us since everything else was white.
While RV Renovators offers all manner of RV restoration, the work on the interior of an RV is particularly impressive. We can essentially take an old RV and restore the interior to factory showroom quality. With more than 40 years of Rv interior experience, our interior staff will help design your Rv Interior with the style you desire.
A high-quality roll of wallpaper can start around $25 to $50. A new coat of paint can make almost anything look better and newer. Depending on how much you paint and the size of your travel trailer, one can of paint may be more than enough. Expect to pay between $15 and $30 for a gallon of high-quality paint.
In this video I will show you how to remodeled the interior of our 20 year old camper trailer on a a budget. check out this camper trailer makeover. SHOP MY ...
Modern Travel Trailer Remodel. Sarah Lemp on August 14, 2017 (updated July 19, 2022) 4K+. This quick and easy trailer remodel was done in just a few weeks! We took a 2012 Salem Cruise that was in great shape, and made just a few, minor cosmetic improvements that made a huge difference. It's amazing what a can of paint will do!
A company called AC Future and its venerable Italian design partner Pininfarina sure think so. Joining the plethora of concept reveals at CES 2024, Future AC has set forth its Electric Transformer ...
Grand Design RV is celebrating the launch of its new Lineage Class C motorhome with a special event in New York City. They are offering one winner an Ultimate Glamping Getaway Weekend and a summer of outdoor adventures. The winner and a guest will start their summer with a trip to New York City, including airfare and accommodations from June 21 ...
Grand Design's 5-year frame warranty covers defects in the Towable Frame Assembly, including main frame rails, outriggers, cross-members, and upper deck frame. The warranty extends to labor provided directly by Grand Design for covered defects. It applies to Model Year 2020 and newer vehicles and is retroactive from the date of retail purchase.
SANTA BARBARA, Calif. - As the Cybertruck-inspired frenzy continues, Living Vehicle, a California-based luxury RV specialist, unveiled the CyberTrailer. This trailblazing creation stands apart from traditional RVs, embodying the spirit of complete independence from constraining utility connections. Innovation Unleashed: The CyberTrailer Experience Echoing the distinctive, angular design of ...
In Assassin's Creed Shadows, you will live the intertwined stories of Naoe, an adept shinobi Assassin from Iga Province, and Yasuke, the powerful African samurai of historical legend. Against the backdrop of the turbulent late Sengoku period, this remarkable duo will discover their common destiny as they usher in a new era for Japan.
Watch the 'Suicide Squad Isekai' Trailers DC released the announcement teaser for Suicide Squad Isekai on July 4, 2023. The less-than-1-minute clip gives off a very strong and colorful impression ...